Manage B2B and B2C collaboration in Foundry: Organizations, spaces, and security(在 Foundry 中管理 B2B 和 B2C 协作:组织、空间与安全)
As a Foundry user, you may need to collaborate with other organizations, including business partners, vendors, or customers, while maintaining strict security boundaries.
You likely fall into one of the two common scenarios below:
- Business to business (B2B): Providing products or services to other companies.
- Business to consumer (B2C): Serving individual customers or small businesses.
Foundry enables secure collaboration in both of these situations, allowing you to onboard external entities while enforcing robust access controls. This guide outlines best practices for configuring organizations, authentication flows, and security boundaries in Foundry.
Core concepts
Familiarize yourself with the following concepts to understand the collaboration approaches that will be covered later on. Additional information is available for each concept in the linked documentation.
Organizations
In Foundry, an organization is a core security concept, enforcing access controls and data segregation between different groups of users and sets of resources. Refer to the organization documentation for more information.
Multiple organizations are ideal for enforcing data security and segregation while enabling secure collaboration. With organizations, you can build an ecosystem of partners, vendors, or companies.
Key features:
- A user can only belong to one organization.
- A user can be a guest in additional organizations.
- Organizations can be created at any time.
- Organizations can be created without a dedicated space or ontology.
Note that the option to create a space or ontology is displayed when creating an organization, but these are distinct concepts that are not required to create an organization.
Spaces
A space, previously known as a namespace, is a high-level container of projects. Spaces enable collaboration between users centered around a common purpose, and can be shared across multiple organizations.
A space always has an associated ontology of the same name. For example, a space called “Company A” will have an associated ontology that is also called “Company A”. This ontology is “contained” in its associated space.
One or multiple organizations can have access to one or multiple spaces. For the purposes of this guide, we will refer to a space that is restricted to one organization as a “private space”, and a space that is accessible to a set of organizations as a “shared space”. There is no technical difference between these, except the number of organizations that each space is shared with.
An organization with access to a space gives project owners the option to share projects with members of that organization. An organization having access to a space does not mean that all members have access to all projects by default. Refer to the spaces documentation for more information.
Resources can be moved from one space to another if a user has sufficient permissions on the source and target spaces, and sufficient permissions on the organization(s) that are tagged on the source and target projects. Essentially, the created resources will be expanded to other organizations. This requires elevated permissions on the source organizations.
Note that some legacy Foundry environments may use different filesystems for each space, preventing resources from being moved, but this is not typically the case.
Key features:
- A space can be created at any time.
- A space always has its own ontology.
- At any given time, at least one organization should have access to a given space.
- Organizations can be added to spaces at any time.
- Organizations with access to a given project must always be a subset of the organizations that have access to that project's space. An organization can be removed from a space at any time, as long as it does not have access to any projects within the space.
Below is a sample organization that can access a space, which contains projects and resources.
A space that is shared with several organizations can include projects that are only available to a subset of those organizations. Review the multi-organization spaces documentation for more information.
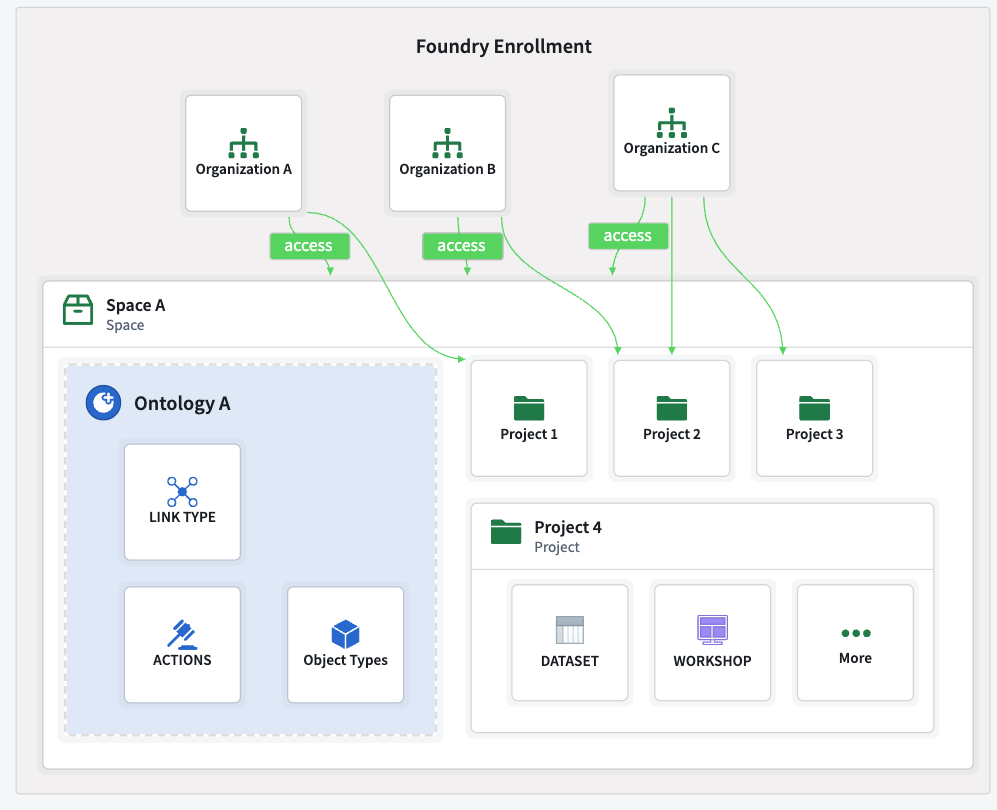
The following is an example of multiple organizations that can or cannot access a space. Within this space, a subset of those organizations can have access to a given project.
- Organizations A, B, and C can access space A, but organization D cannot. Any project contained in space A will not be accessible to organization D.
- Organizations B and C can access “Project 2” in space A, but only organization C can access “Project 3”.
Ontologies
An ontology groups resources such as object types, actions, links, groups, and interfaces. These serve as a shared source of truth for decision making and decision capture for all users across an organization. Refer to the ontology documentation for more information.
Ontologies cannot exist independently of a space. When a space is created, an ontology will be created as well. A space's permissions and organizations will be propagated to that space’s ontology. To learn more, refer to the ontology and spaces documentation.
Resources can be moved from one ontology to another ontology. Visit the ontology migration documentation for more details.
Key takeaways:
- Object types, actions, links, groups, and other ontology resources can only exist as part of an ontology.
- An ontology can only be created when a space is created.
- Organizations added to or removed from an ontology’s space are also added to or removed from the ontology.
- Resources can be migrated across ontologies.
Note that functions are not considered ontology resources.
Projects
Projects enforce stricter security boundaries than standard folders, and organize resources related to a specific purpose. For example, all data transformations and their outputs are contained within a project. A transformation cannot write to another project, although projects can consume resources from another project with the necessary permissions.
Project access should be managed at the project level for users and groups, minimizing the need for individual role assignments. Refer to the projects and roles documentation for more information.
Key takeaways:
- Projects serve for organizing resources while providing strict security boundaries.
- Projects always belongs to a space.
- Multiple organizations can have access to a given project, but only if those organizations have access to the space that the project belongs to.
Resource imports: Spaces, projects and ontologies
Resources in one project can be imported into and consumed by another project, for example as inputs for pipelines or analyses. Once a resource is imported, any user with the appropriate role, such as Viewer, can access it.
Resources can be imported across spaces, as long as a user has the necessary permissions to execute the import. For example, a dataset from space A can be imported into space B and used as a backing datasource in a space B ontology.

Use cases
Depending on your organizational requirements, you may need to structure your organizations, spaces and permissions according to different configurations.
Consider the questions below when building for B2B or B2C scenarios.
- Identity management: Are user identities managed externally through one or more identity providers, or internally, by Foundry?
- Customer onboarding: How many customers will be onboarded and how large is each customer? A customer may be a single user, a few users, or even thousands of users.
- Collaboration: Do users need to collaborate with each other?
- Data sharing: Should data be shared between customers?
- Usage separation: Should each customer's usage be kept separate, for example, for billing purposes?
- Platform access: Should users have access to Foundry platform features, for example, creating Workshop modules?
- Customization: Do applications need to be customized or tailored for each customer?
- Application interaction: Will customers primarily use applications built within the platform such as Workshop applications, or will external custom applications be built with tools such as the Ontology SDK (OSDK)?
Note that for the purposes of this guide, a customer can denote an individual or an entity such as a company, supplier, or buyer.
The answers to these questions will help you understand your organizational needs and the Foundry configurations that may be best suited to your use case. Review the sections below to learn more about common scenarios and how to structure spaces, organizations and permissions according to each. If you require additional information or have unique organizational needs, contact your Palantir representative.
A single organization
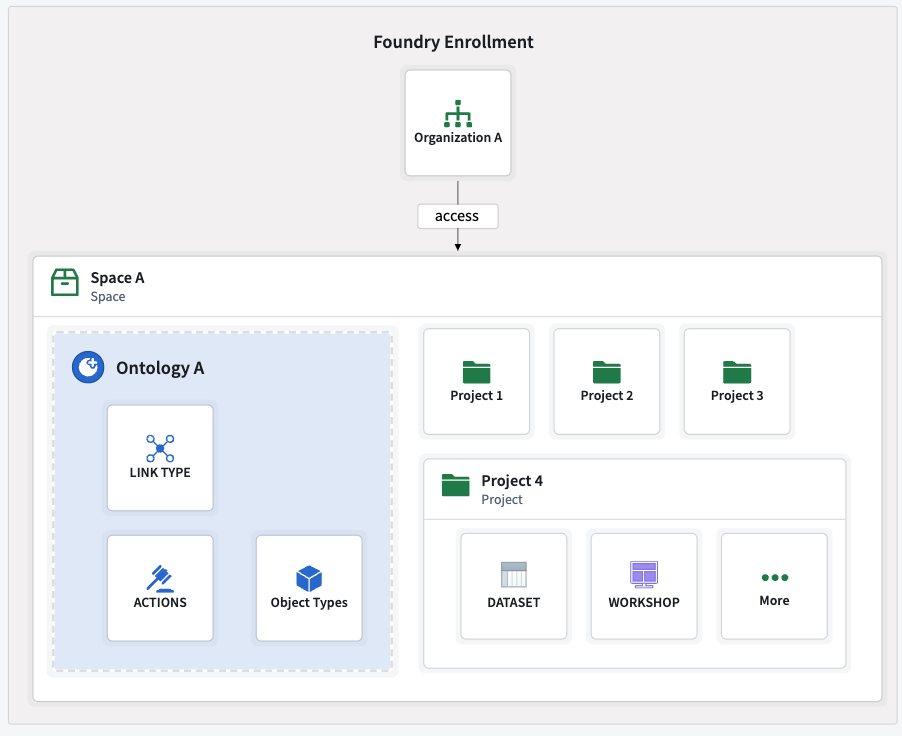
The most straightforward and common configuration only requires a single organization and a single space. All projects are created and managed in the same space, and project-level permissions can be refined using markings and roles that are assigned to users or groups.
Refer to the example below, where an organization has access to a single space that contains one ontology.
While streamlined and easy to maintain, this configuration may not be sufficient for secure collaboration with external entities. In that case, a configuration that uses multiple spaces and organizations is necessary to maintain strict security boundaries.
B2B: Onboard numerous customers with many users
The B2B configuration enables secure collaboration with external entities by using multiple spaces and organizations to maintain strict security boundaries while meeting your organizational needs. This configuration consists of a main internal organization, and additional separate organizations for your customers.
B2B organizations may have hundreds of customers, each with hundreds or even thousands of users. In such scenarios, it is possible to onboard customers at scale. If you have hundreds of customers, you can have hundreds of organizations on your Foundry instance. Note that there are limits to the number of customers and users, but these limits are typically sufficient to allow onboarding large customer bases with numerous users.
Below are different options for how customers can collaborate with you and with each other using combinations of shared and private spaces.
Option A: Private spaces
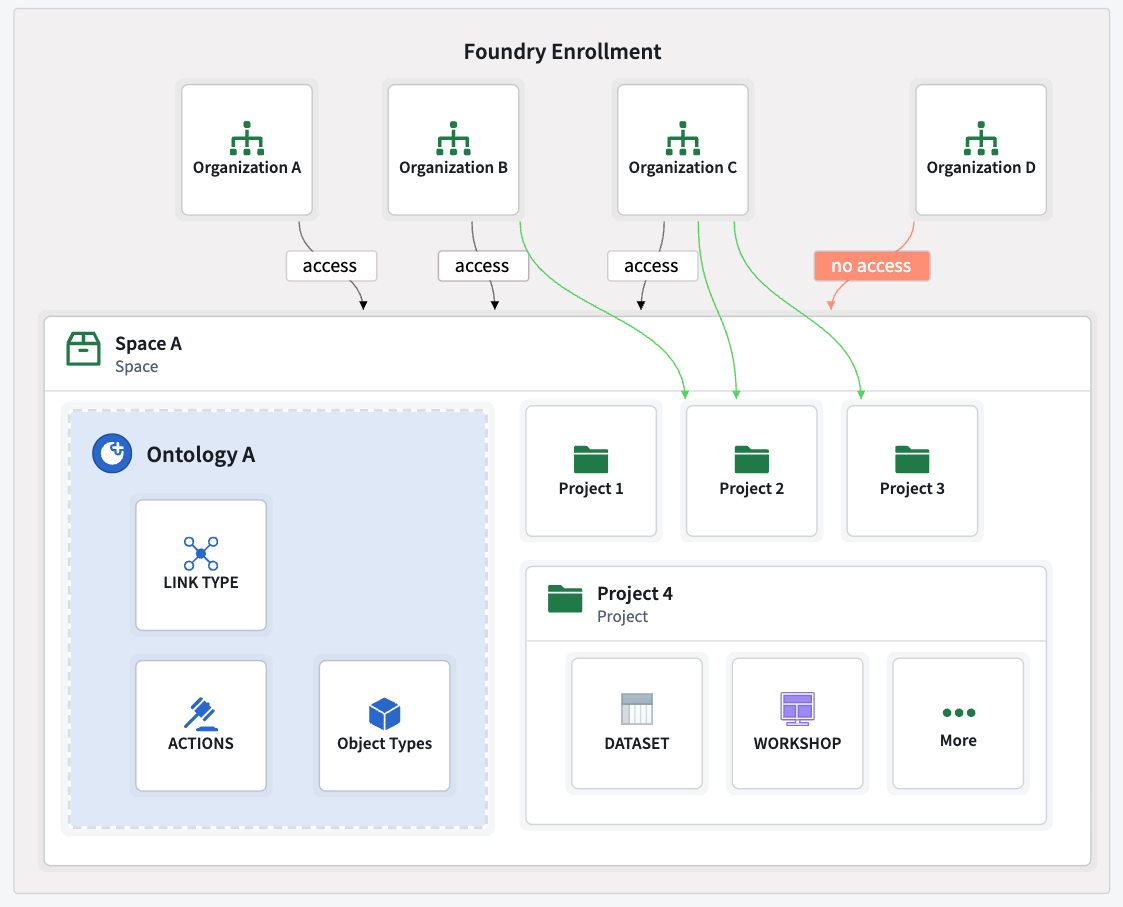
If no collaboration is required, each customer can have its own organization. Each organization can have its own space and ontology, with no resource sharing or collaboration configurations. Users from one organization can be added as guests to other organizations to work on resources there.
However, even if users belong to multiple organizations as guests, they cannot import resources between organizations. This is because organization markings on resources prevent imports into non-shared spaces.
In the example below, multiple organizations each have their own space and ontology.
By default, a user of one organization cannot see the existence of other organizations. This behavior can be configured in Control Panel. Refer to the cross-organization collaboration documentation for more information.
Below are the configuration options for cross-organization visibility and collaboration in Control Panel.
Option B: Shared spaces
A shared space and its ontology can be created to enable collaboration between organizations. A space can be made accessible to multiple organizations, allowing them to work together and access shared resources.
Access to a shared space does not automatically grant access to all of the space's projects. Each project can be restricted to specific organizations. Organizations can only access the projects in the spaces they have access to. For example, each application can be stored in one project, where only allowed organizations are granted access.
Below is an example of multiple organizations with access to a shared space and ontology.
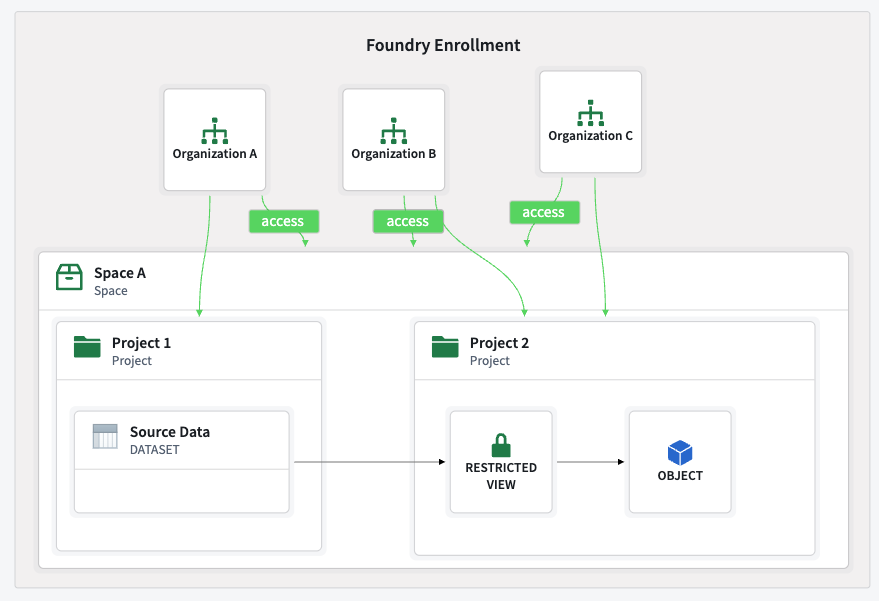
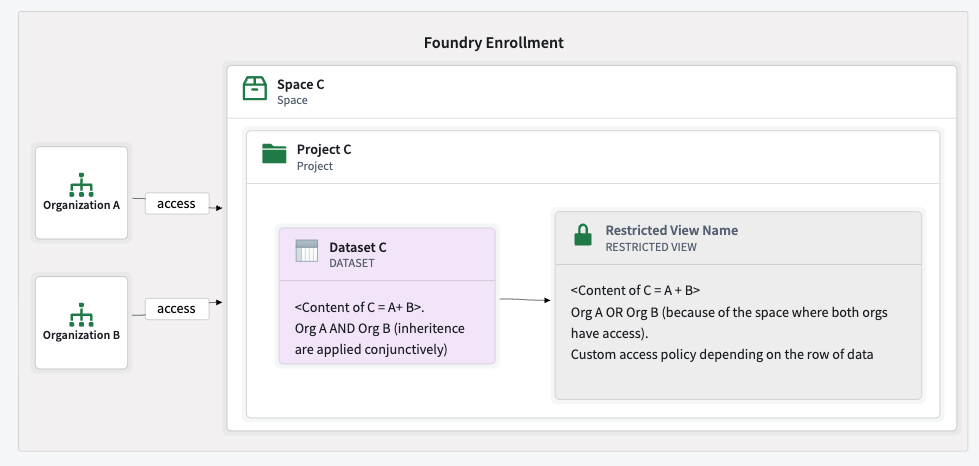
Interaction with restricted views
By combining a shared space with restricted views, you can enable multi-organization applications with row-level security, ensuring that each organization only accesses authorized data.
:::callout{theme="warning"}
This configuration's security is ensured by correctly configuring restricted views, project permissions, and cross-organization visibility. Administrators should take special care when defining permissions.
An example of valid setup is importing a dataset from a private space, creating a restricted view in a shared space, and creating ontology entities on top of this restricted view in the shared ontology.
:::
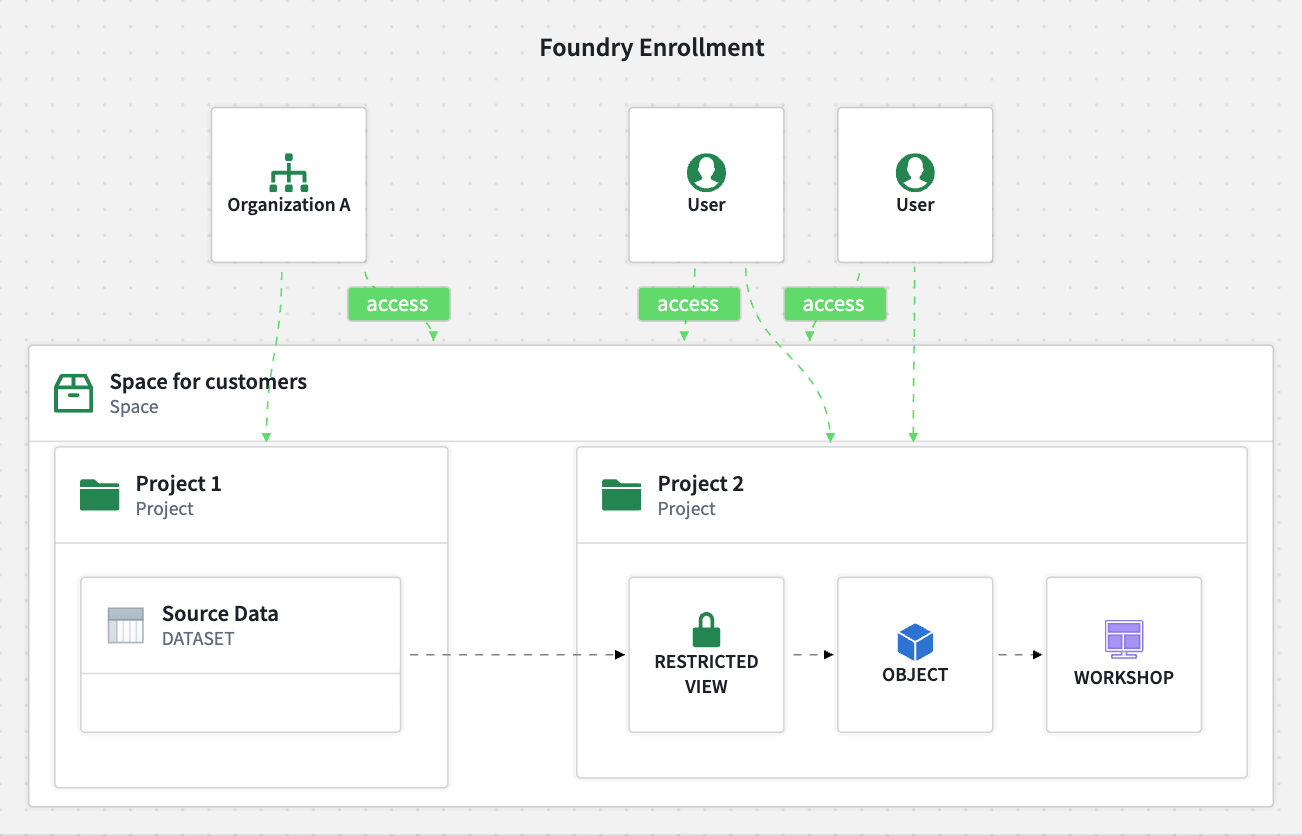
The example below demonstrates multiple organizations with access to a shared project (project 2) in a shared space. These organizations can only access the data as defined by the restricted view policies.
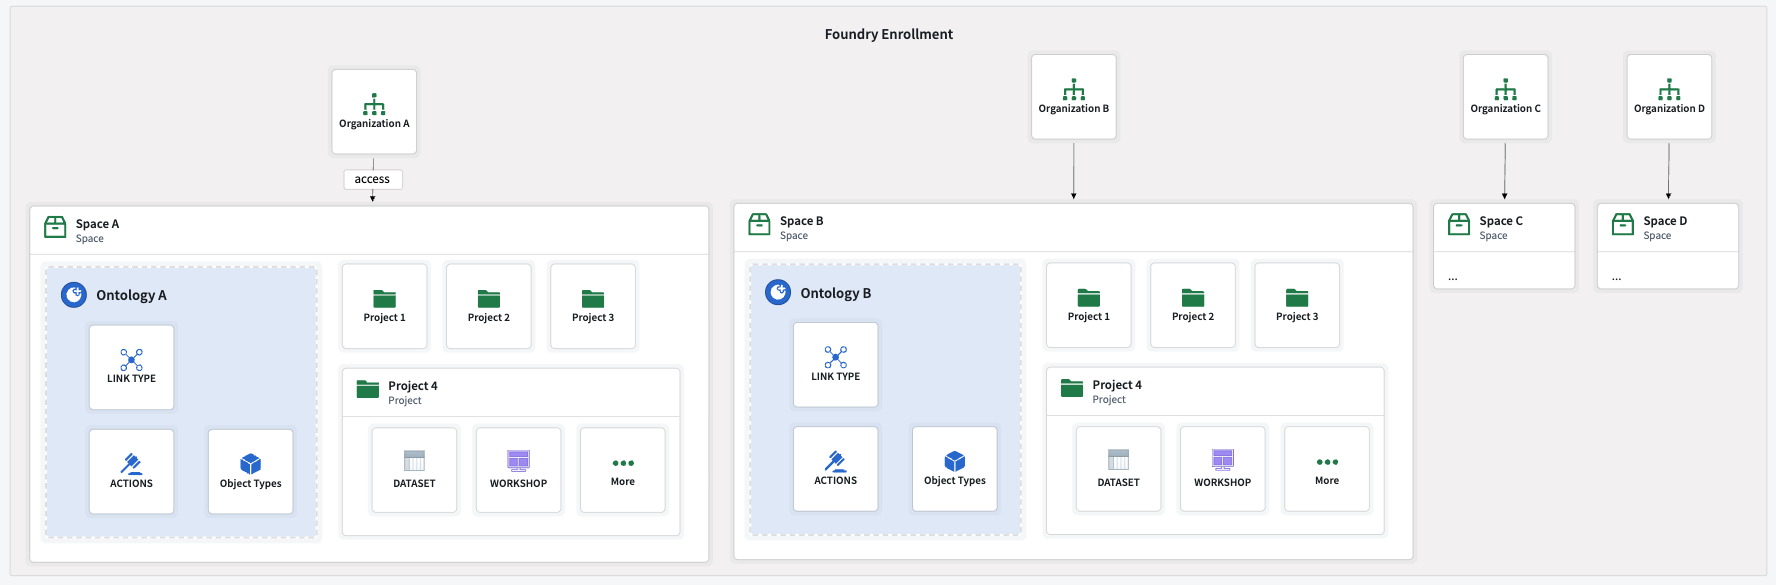
Option C: Private and shared spaces
As previously stated, a shared space and its ontology can be created to collaborate between organizations. However, each organization can also have its own space and ontology.
This approach is useful when shared resources and applications need to be accessible by all organization and organization-specific workflows or customizations are required.
Below are some examples of scenarios that benefit from private and shared spaces.
- Pooling resources such as ingest, compute, or public datasets (for example, weather data) in a shared space, while allowing each organization to use them differently in custom organization-specific applications.
- Hosting common applications in the shared collaboration namespace, while hosting custom applications in each organization's private namespace.
In the example below, organizations have their own space and ontology as well as access to a shared space and ontology.

Combine data from multiple organizations
Resources from multiple organizations can be brought into a shared space, allowing for cross-organization references and collaboration with data from different sources. However, when managing permissions, it is important to consider how resource markings. Markings control who can access a resource or its content, in addition to the standard project-access layer.
Below are the different types of markings:
- Organization markings: If an organization is attributed to a project, then the project will be marked with that organization's marking.
- Non-organization markings: Examples of non-organization markings are personally identifiable information (PII), or internal markings.
Both of these types of markings can be applied in different ways, with combinations of AND and OR to define access, but their default behavior differs. However, depending on the marking type and where in the platform it is applied, the way it is applied differs. Organization and non-organization markings may be applied with the OR condition, AND condition, or a more complex combination, depending on where and how the marking is applied.
Markings control who can access a resource or its content. Refer to the guidelines below for how disjunctive and conjunctive markings work.
- Disjunctive marking (
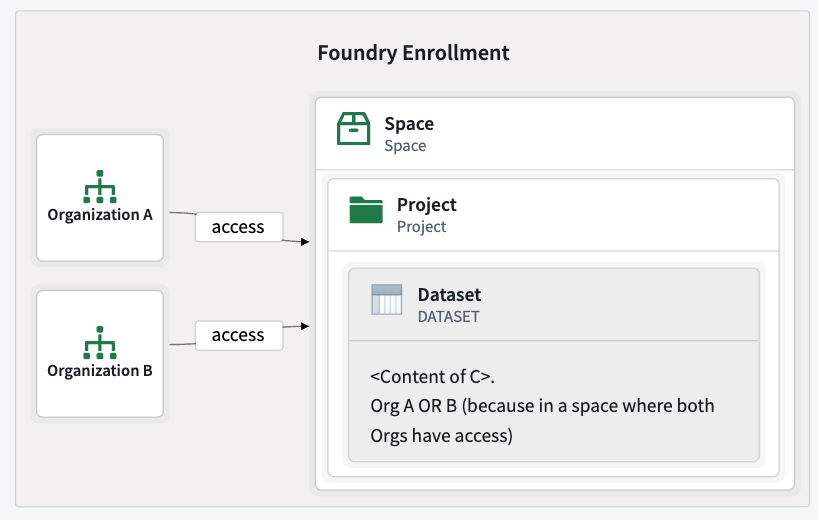
OR): Can be accessed by users who satisfy any of the required markings. - A resource automatically has the organization markings of its saved location. Organization markings are disjunctive, and can only be applied as disjunctive markings. For example, a user who is a member of organization A or organization B can access a resource in a space that can be accessed by organization A and organization B.
- Conjunctive marking (
AND): Can only be accessed by users who satisfy all of the required markings. - When resources are marked, they apply conjunctively. Non-organization markings can only be applied in this way from the platform UI. For example, if the
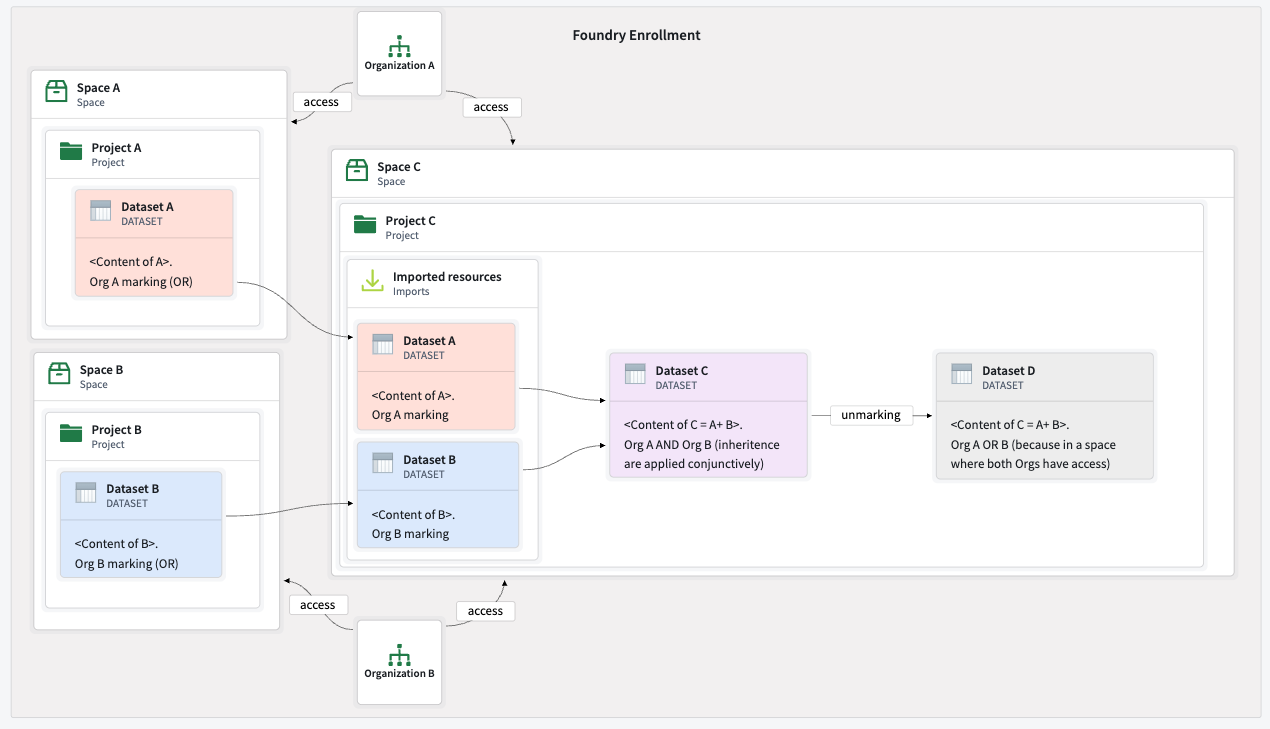
PIInon-organization marking has been applied to a resource, only users that have access to thePIImarking will be able to access this resource. - When data is combined from multiple upstream resources, their markings, including organization markings, apply conjunctively. For example, if dataset 1 is marked with [organization A
ORorganization B], and dataset 2 is marked with [organization AORorganization C], the downstream dataset will require a user to be a part of [organization AORorganization B]AND[organization AORorganization C] to access it. - Unmarking resources: Markings can be removed from resources or their content. To expand access to marked data, you must explicitly remove markings on a resource. This can be done with transforms or restricted views. For example, in a code repository, you can explicitly unmark a resource in a transform with the
stop_propagatingorstop_requiringmethods.
Refer to the removing inherited organizations documentation for more information.
Below are some practical implications:
- Default Behavior: Any resource created in a shared project with no upstream dependencies is marked with disjunctive organization markings. Users from any of the organizations on this project can access it. For example, if organizations A and B can access a project, this implies that any user of organizations A or B can access the project's content. A “Common application” has the disjunctive markings of organizations A
ORB, so any user of organizations A or B can access it.
- A dataset derived from organization A and organization B's data will require organization A
ANDorganization B because of its provenance. If this dataset is unmarked, it will require organization AORorganization B because of its location. - A resource created in a shared project with no upstream dependencies is marked with disjunctive markings, so users from organizations A or B can access it.
Refer to the shared space and ontology documentation for more information.
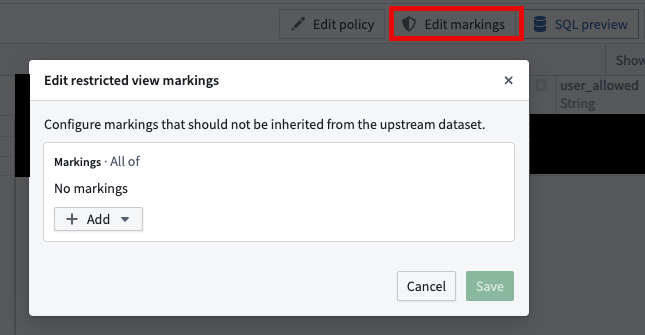
- Restricted views can also be used to unmark specific markings and add more granular rules for row-level access, depending on the restricted view's data and defined policies. For example,
if user_rid === content of this column, allow access to this row.
You can remove a marking for all of the restricted view content before applying row-level access policies.
B2C: One organization for all customers
In B2C scenarios with a very large number of organizations, for example thousands, a different approach may be required. For this guide, we will use the following configuration:
- A single organization: All external users are onboarded as members of a single organization.
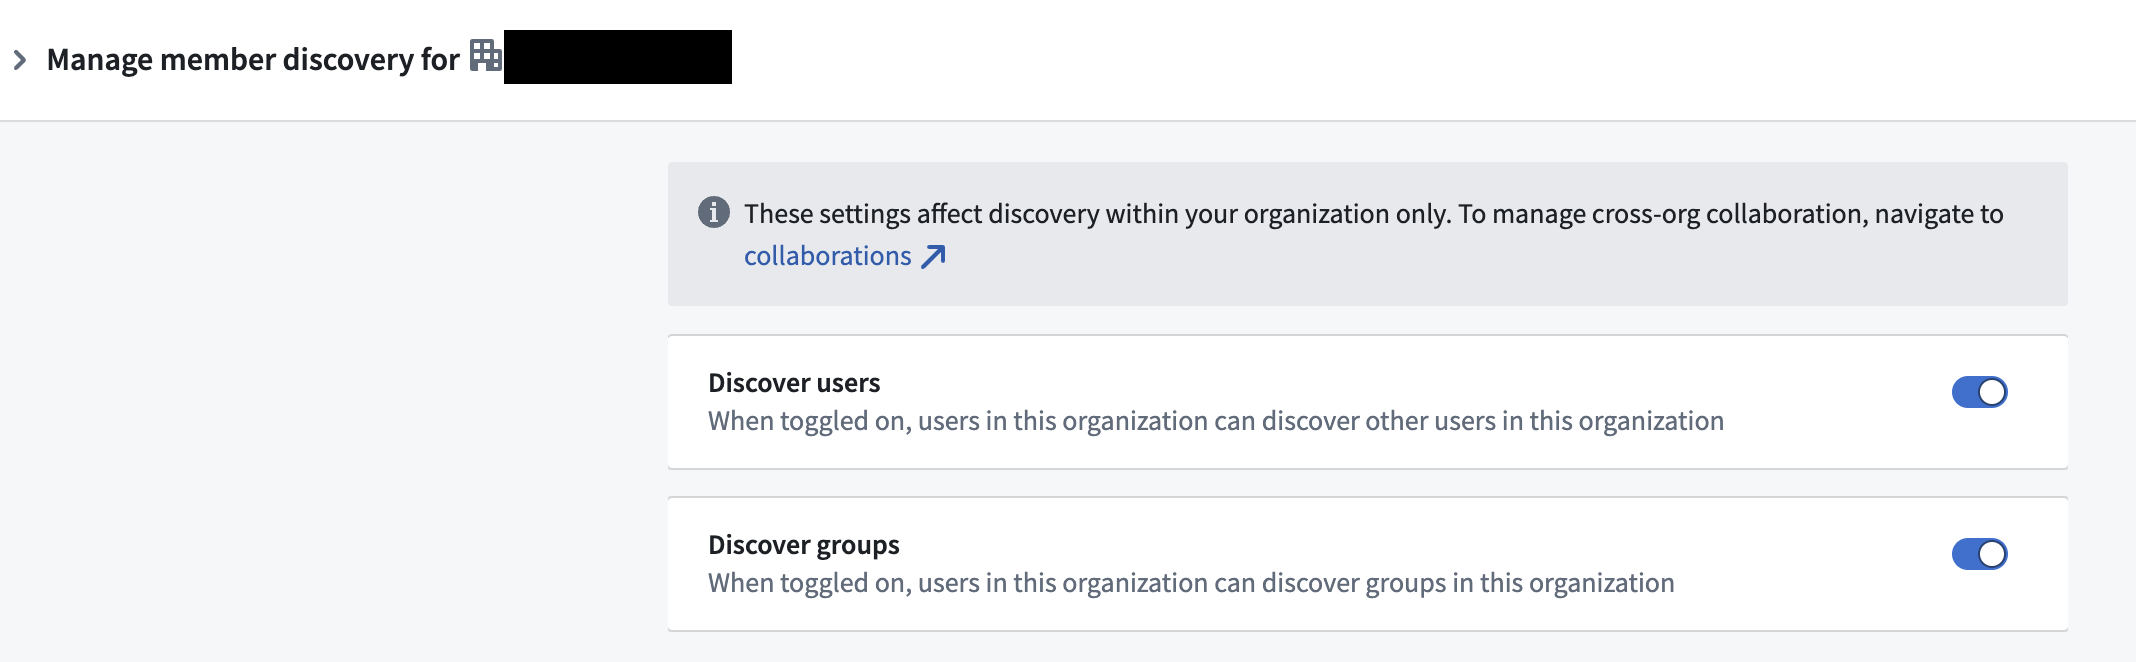
- User isolation: The organization is configured to disable user discoverability, so users cannot see or find each other. The same configuration should be applied to groups. Review how to configure user and group visibility.
Below is an example of a main internal organization and a separate organization for all users, with user discoverability disabled. Both organizations have access to a shared customer space and ontology.
You can allow or disallow users and groups from seeing each other within an organization in Control Panel.
Restricted views for row level permissions
A common requirement in B2C scenarios is to limit customer data access so that they can only view their own data or a specific subset of data. This can be implemented using restricted views.
Configuring a restricted view for a B2C use case closely mirrors the process for a B2B use case, but instead of isolating business data, it ensures customers cannot access each other’s data.
The example below demonstrates multiple customers using the same application, where each customer can only see their own objects instances. The restricted view policy defines which rows a user can access and hence which objects they can see.
Restricted view policies can be implemented in various ways. A common need is to allow users to only view only the objects they have created. This is implemented by configuring an action that creates a new object in an object type backed by a restricted view. The policy allows access to objects instances only if the user’s ID matches the user ID column in the object's property. When new objects are created, the user ID column is automatically populated with the current user’s ID, ensuring users can only access their own objects.
Authentication
In addition to creating organizations and spaces, users need a way to authenticate with an identity provider to access their accounts. For the purposes of this guide, terms like "business entity", "customer", and "third party" all refer to the same concept; an external organization that is being onboarded.
Strategy 1: Each organization brings its own identity provider
Each customer is onboarded as a unique organization and each customer’s identity provider (IDP) is integrated with Foundry. This method is best suited for scenarios with a low number of customers, or where each customer has a large user base and wants to manage their own groups and access control. Refer to the group external realms documentation for more details.
This approach requires multiple manual interventions. There is no automated process for collecting and configuring customers' identity provider. You will need to obtain the details of each customer's identity provider and follow the setup described in the SAML getting started and identity provider configuration documentation.
Strategy 2: You provide the identity provider as a passthrough
For each onboarded customer, the goal is to synchronize IDPs through identity or SSO federation. This is a common approach in SaaS B2B setups, where IDPs trust each other to enable seamless authentication. This method is especially useful when onboarding a high number of customer entities. In this case onboarding is more streamlined, since you control the IDP infrastructure. Most of the process can be scripted or fully automated using tools such as Okta or Auth0.
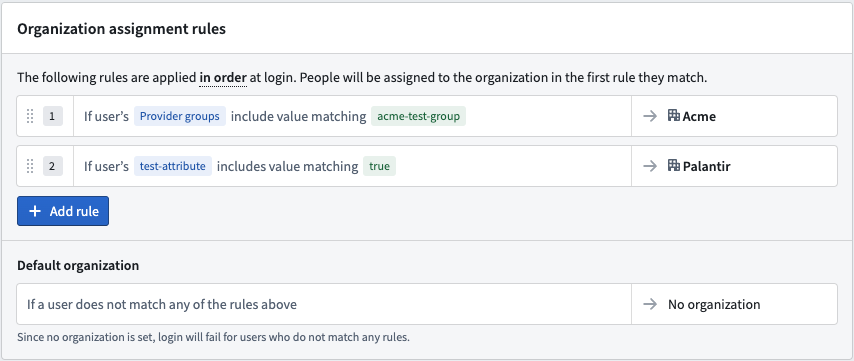
Each user must have an attribute indicating their associated organization. This attribute is passed to Foundry by the IDP to route users to the correct organization upon login. This allows support for restricted view workflows, ensuring that users only see permitted data by basing policies on users attributes.
:::callout{theme="warning"} You should always configure a default rule where users without an organization attribute should be assigned to a "No organization" group. This prevents accidental access to unintended data if the organization attribute is missing. :::
You can assign users to an organization depending on their user attributes in Control Panel. See user rules for more information.
Strategy 3: You provide the identity provider internally
In this approach, you provide and manage an IDP, and create user accounts directly in this IDP. This strategy is especially relevant for B2C scenarios.
Key advantages:
- You control the entire authentication flow.
- IDP integration with Foundry only needs to be set up once.
- You manage user account creation and authentication methods centrally.
Strategy 4: A mix of different approaches
You can combine multiple strategies to suit different customer needs.
- For large customers, integrate with their own IDP.
- For smaller customers, create users in the main IDP or use identity federation.
This flexible approach allows you to tailor onboarding and authentication workflows based on the size and requirements of each customer.
Distribution of products
A builder on Foundry can create resources such as datasets, pipelines, objects, and applications. These resources can then be packaged and deployed to other users. For example, resources can be deployed to other projects or spaces, or to the same or different organizations. This enables you to centrally develop applications and workflows, then distribute them to other businesses or organizations. This allows for release management from one development environment to an environment shared between organizations.
For more information, refer to the following resources:
- The Marketplace overview for deployment
- The Foundry DevOps overview for packaging
- The DevOps release management overview for release management
Resources packaged as a Marketplace product can be installed in a new project and space. Resources can be installed multiple times, potentially in different projects or organizations to allow organizations access to their own package installations. This is ideal for "build centrally, deploy to many" scenarios, with the flexibility to tweak workflows as needed after installation.
Considerations regarding the development environment:
- The resources to be packaged and the development environment should be located in a project that belongs to a single, dedicated development organization.
- Developers who package resources must have
Expandpermission on this organization, as they are expanding resource access to other organizations.
Considerations regarding Marketplace store placement:
- Place the Marketplace store in a project that is in a space that all target organizations can access. Consider creating a dedicated space for the store, and include all relevant organizations if you do not have such a space already.
- Ensure that all organizations can access the store’s project, even if none of the organization's users can access it.
With this product distribution setup, keep the following considerations in mind:
- Users that will be installing Marketplace products do not need additional permissions on organization markings.
- If permission issues arise, they will arise during packaging, not installation. This allows you to resolve issues early in the process.
Consider the diagram below, where organizations are structured as follows:
- A main internal organization with users has its own private space and ontology.
- A development organization has its own space and ontology, where users of the internal organization are guests.
- There is a shared space and ontology, where the Marketplace store lives.
- There are N organizations with their own space and ontology. Products are installed in these organizations by users that have access to the project that contains the Marketplace store. This project is in a shared space.

Refer to the store permissions guidance for more information.
Refer to the following sections for access strategies for product distribution.
Strategy 1: Self-service store for end-users
If you want users to install Marketplace products themselves, you must grant the relevant permissions to install from the store to a specific location.
- Users who need to self-service install a given product from a given store need to have the
marketplace:install-from-local-marketplacepermission on the project containing the store. This permission is usually granted to theViewerrole, assuming the role was not manually altered by the customer. - Users who need to self-service install a given product from a given store need to have
marketplace:install-inpermission on the target space and ontology to install the marketplace product in a particular place. This permission is usually granted toEditororOwnerroles, assuming they were not manually altered by the customer. - Grant additional permissions if needed by the product or installation, for example
Viewerpermissions on inputs, or linked products.
Refer to store permissions for more information.
This enables self-service installation following the previously described setup.
Strategy 2: Controlled installation by the main entity
If you prefer to control the installation process, such as for monetization, you should only grant platform administrators or designated internal developers access to the Marketplace store's project. This enables them to handle product installation for end-users and maintain control over the process.
Having your developers manage installations on behalf of your customers typically requires one of two approaches:
- Setting up a shared space where both the developer organization and customer organization have access, with all required input data made available in that shared space.
- Granting guest access for the customer organization to the developer, including sufficient permissions to access the necessary input data and install the product within the customer's private space.
中文翻译
在 Foundry 中管理 B2B 和 B2C 协作:组织、空间与安全
作为 Foundry 用户,您可能需要与其他组织(包括业务合作伙伴、供应商或客户)进行协作,同时保持严格的安全边界。
您很可能属于以下两种常见场景之一:
- 企业对企业(B2B): 向其他公司提供产品或服务。
- 企业对消费者(B2C): 服务个人客户或小型企业。
Foundry 在这两种情况下都能实现安全协作,允许您引入外部实体,同时实施强大的访问控制。本指南概述了在 Foundry 中配置组织、身份验证流程和安全边界的最佳实践。
核心概念
请熟悉以下概念,以便理解后续将介绍的协作方法。每个概念的更多信息可在链接文档中找到。
组织(Organization)
在 Foundry 中,组织是一个核心安全概念,用于在不同用户组和资源集之间实施访问控制和数据隔离。更多信息请参阅组织文档。
多个组织非常适合在实现安全协作的同时加强数据安全和隔离。通过组织,您可以构建一个由合作伙伴、供应商或公司组成的生态系统。
主要特点:
- 一个用户只能属于一个组织。
- 一个用户可以作为访客加入其他组织。
- 组织可以随时创建。
- 创建组织时无需专用空间或本体论(Ontology)。
请注意,创建组织时会显示创建空间或本体论的选项,但这些是不同的概念,并非创建组织的必要条件。
空间(Space)
空间(以前称为命名空间)是项目的高级容器。空间支持用户围绕共同目标进行协作,并且可以在多个组织之间共享。
一个空间始终有一个同名的关联本体论。例如,名为"公司 A"的空间将有一个同样名为"公司 A"的关联本体论。该本体论"包含"在其关联空间中。
一个或多个组织可以访问一个或多个空间。在本指南中,我们将仅限一个组织访问的空间称为"私有空间",将可供一组组织访问的空间称为"共享空间"。除了每个空间共享的组织数量不同外,两者在技术上没有区别。
拥有空间访问权限的组织使项目所有者能够选择与该组织的成员共享项目。组织拥有空间访问权限并不意味着所有成员默认拥有对所有项目的访问权限。更多信息请参阅空间文档。
如果用户对源空间和目标空间拥有足够权限,并且对源项目和目标项目上标记的组织拥有足够权限,则可以将资源从一个空间移动到另一个空间。本质上,创建的资源将扩展到其他组织。这需要对源组织拥有提升的权限。
请注意,某些旧版 Foundry 环境可能为每个空间使用不同的文件系统,从而阻止资源移动,但通常情况并非如此。
主要特点:
- 空间可以随时创建。
- 空间始终拥有自己的本体论。
- 在任何给定时间,至少应有一个组织有权访问给定空间。
- 组织可以随时添加到空间中。
- 有权访问给定项目的组织必须始终是该项目所在空间有权访问组织的子集。只要组织没有访问该空间内的任何项目,就可以随时将其从空间中移除。
以下是一个可以访问空间的示例组织,该空间包含项目和资源。
与多个组织共享的空间可以包含仅对其中部分组织可用的项目。更多信息请参阅多组织空间文档。
以下是多个组织可以或不能访问空间的示例。在此空间内,其中部分组织可以访问特定项目。
- 组织 A、B 和 C 可以访问空间 A,但组织 D 不能。空间 A 中包含的任何项目对组织 D 都不可访问。
- 组织 B 和 C 可以访问空间 A 中的"项目 2",但只有组织 C 可以访问"项目 3"。
本体论(Ontology)
本体论将对象类型(Object Type)、操作(Action)、链接(Link)、分组(Group)和接口(Interface)等资源分组。这些资源作为整个组织用户进行决策制定和决策捕获的共享事实来源。更多信息请参阅本体论文档。
本体论不能独立于空间存在。创建空间时,也会创建一个本体论。空间的权限和组织将传播到该空间的本体论。要了解更多信息,请参阅本体论与空间文档。
资源可以从一个本体论移动到另一个本体论。更多详情请访问本体论迁移文档。
关键要点:
- 对象类型、操作、链接、分组和其他本体论资源只能作为本体论的一部分存在。
- 本体论只能在创建空间时创建。
- 添加到本体论空间或从中移除的组织也会被添加到本体论或从中移除。
- 资源可以在本体论之间迁移。
请注意,函数(Function)不被视为本体论资源。
项目(Project)
项目比标准文件夹实施更严格的安全边界,并组织与特定目的相关的资源。例如,所有数据转换及其输出都包含在一个项目中。一个转换不能写入另一个项目,尽管项目可以在拥有必要权限的情况下使用另一个项目的资源。
项目访问应在项目级别为用户和组进行管理,从而最大限度地减少单独角色分配的需求。更多信息请参阅项目与角色文档。
关键要点:
- 项目用于组织资源,同时提供严格的安全边界。
- 项目始终属于一个空间。
- 多个组织可以访问特定项目,但前提是这些组织有权访问该项目所属的空间。
资源导入:空间、项目和本体论
一个项目中的资源可以被导入并由另一个项目使用,例如作为管道或分析的输入。一旦资源被导入,任何拥有适当角色(如查看者)的用户都可以访问它。
只要用户拥有执行导入的必要权限,资源就可以跨空间导入。例如,来自空间 A 的数据集可以导入到空间 B,并用作空间 B 本体论中的支持数据源。
使用场景
根据您的组织需求,您可能需要根据不同的配置来构建您的组织、空间和权限。
在构建 B2B 或 B2C 场景时,请考虑以下问题。
- 身份管理: 用户身份是通过一个或多个身份提供者(Identity Provider)在外部管理,还是由 Foundry 在内部管理?
- 客户引入: 将引入多少客户,每个客户的规模有多大?客户可能是一个用户、几个用户,甚至数千个用户。
- 协作: 用户之间是否需要相互协作?
- 数据共享: 是否应在客户之间共享数据?
- 使用分离: 是否应保持每个客户的使用分离,例如出于计费目的?
- 平台访问: 用户是否应有权访问 Foundry 平台功能,例如创建 Workshop 模块?
- 定制化: 是否需要为每个客户定制或调整应用程序?
- 应用程序交互: 客户将主要使用平台内构建的应用程序(如 Workshop 应用程序),还是将使用本体论 SDK(OSDK)等工具构建外部自定义应用程序?
请注意,在本指南中,客户可以指个人或实体,如公司、供应商或买家。
这些问题的答案将帮助您了解您的组织需求以及可能最适合您使用场景的 Foundry 配置。请阅读以下部分,了解常见场景以及如何根据每种场景构建空间、组织和权限。如果您需要更多信息或有独特的组织需求,请联系您的 Palantir 代表。
单一组织
最简单、最常见的配置只需要一个组织和一个空间。所有项目都在同一个空间中创建和管理,项目级权限可以使用分配给用户或组的标记(Marking)和角色(Role)进行细化。
请参考以下示例,其中一个组织有权访问包含一个本体论的单个空间。
虽然这种配置精简且易于维护,但对于与外部实体的安全协作可能不够。在这种情况下,需要使用多个空间和组织的配置来维持严格的安全边界。
B2B:引入拥有大量用户的众多客户
B2B 配置通过使用多个空间和组织来维持严格的安全边界,同时满足您的组织需求,从而实现与外部实体的安全协作。此配置包括一个主要的内部组织,以及为您的客户提供的额外独立组织。
B2B 组织可能有数百个客户,每个客户有数百甚至数千个用户。在这种情况下,可以大规模引入客户。如果您有数百个客户,您的 Foundry 实例上可以有数百个组织。请注意,客户和用户数量存在限制,但这些限制通常足以允许引入拥有大量用户的大型客户群。
以下是客户如何使用共享和私有空间的组合与您以及彼此进行协作的不同选项。
选项 A:私有空间(Private Space)
如果不需要协作,每个客户可以拥有自己的组织。每个组织可以拥有自己的空间和本体论,无需资源共享或协作配置。一个组织的用户可以以访客身份添加到其他组织,以便在那里处理资源。
然而,即使用户以访客身份属于多个组织,他们也不能在组织之间导入资源。这是因为资源上的组织标记阻止了导入到非共享空间。
在下面的示例中,多个组织各自拥有自己的空间和本体论。
默认情况下,一个组织的用户无法看到其他组织的存在。此行为可以在控制面板(Control Panel)中配置。更多信息请参阅跨组织协作文档。
以下是控制面板中跨组织可见性和协作的配置选项。
选项 B:共享空间(Shared Space)
可以创建一个共享空间及其本体论,以实现组织之间的协作。一个空间可以设置为对多个组织可访问,允许它们一起工作并访问共享资源。
对共享空间的访问不会自动授予对该空间所有项目的访问权限。每个项目可以限制为特定组织。组织只能访问它们有权访问的空间中的项目。例如,每个应用程序可以存储在一个项目中,只允许被授权的组织访问。
以下是多个组织访问共享空间和本体论的示例。
与受限视图(Restricted View)的交互
通过将共享空间与受限视图结合,您可以启用具有行级安全性的多组织应用程序,确保每个组织只访问授权数据。
:::callout{theme="warning"}
此配置的安全性通过正确配置受限视图、项目权限和跨组织可见性来保证。管理员在定义权限时应特别小心。
一个有效设置的示例是从私有空间导入数据集,在共享空间中创建受限视图,并在共享本体论中基于此受限视图创建本体论实体。
:::
下面的示例演示了多个组织访问共享空间中的共享项目(项目 2)。这些组织只能访问受限视图策略定义的数据。
选项 C:私有空间和共享空间
如前所述,可以创建一个共享空间及其本体论以在组织之间进行协作。然而,每个组织也可以拥有自己的空间和本体论。
当共享资源和应用程序需要被所有组织访问,并且需要特定于组织的工作流或定制时,这种方法非常有用。
以下是一些受益于私有空间和共享空间的场景示例。
- 在共享空间中汇集资源,如数据摄取、计算或公共数据集(例如天气数据),同时允许每个组织在自定义的特定于组织的应用程序中以不同方式使用它们。
- 在共享协作命名空间中托管通用应用程序,同时在每个组织的私有命名空间中托管自定义应用程序。
在下面的示例中,组织拥有自己的空间和本体论,并且还可以访问共享空间和本体论。
合并来自多个组织的数据
来自多个组织的资源可以引入共享空间,从而允许跨组织引用和与来自不同来源的数据进行协作。然而,在管理权限时,考虑资源标记的方式很重要。标记控制谁可以访问资源或其内容,这是在标准项目访问层之外的额外控制。
以下是不同类型的标记:
- 组织标记: 如果一个组织被归属于一个项目,那么该项目将被标记为该组织的标记。
- 非组织标记: 非组织标记的示例包括个人身份信息(PII)或内部标记。
这两种类型的标记可以以不同方式应用,使用AND和OR的组合来定义访问权限,但它们的默认行为不同。然而,根据标记类型以及它在平台中的应用位置,其应用方式有所不同。组织标记和非组织标记可以根据应用位置和方式,以OR条件、AND条件或更复杂的组合来应用。
标记控制谁可以访问资源或其内容。请参考以下关于析取标记和合取标记如何工作的指南。
- 析取标记(
OR): 可以由满足任意所需标记的用户访问。 - 资源自动具有其保存位置的组织标记。组织标记是析取的,并且只能作为析取标记应用。例如,属于组织 A 或组织 B 的用户可以访问位于可由组织 A 和组织 B 访问的空间中的资源。
- 合取标记(
AND): 只能由满足所有所需标记的用户访问。 - 当资源被标记时,它们以合取方式应用。非组织标记只能通过平台 UI 以这种方式应用。例如,如果
PII非组织标记已应用于资源,则只有有权访问PII标记的用户才能访问此资源。 - 当来自多个上游资源的数据被合并时,它们的标记(包括组织标记)以合取方式应用。例如,如果数据集 1 被标记为[组织 A
OR组织 B],而数据集 2 被标记为[组织 AOR组织 C],则下游数据集将要求用户属于[组织 AOR组织 B]AND[组织 AOR组织 C] 才能访问它。 - 取消标记资源: 可以从资源或其内容中移除标记。要扩展对标记数据的访问,您必须显式移除资源上的标记。这可以通过转换(Transform)或受限视图来实现。例如,在代码仓库中,您可以在转换中使用
stop_propagating或stop_requiring方法显式取消标记资源。
更多信息请参阅移除继承的组织文档。
以下是一些实际影响:
- 默认行为: 在共享项目中创建且没有上游依赖关系的任何资源都标记有析取组织标记。来自此项目上任何组织的用户都可以访问它。例如,如果组织 A 和 B 可以访问一个项目,这意味着组织 A 或 B 的任何用户都可以访问该项目的内容。"通用应用程序"具有组织 A
ORB 的析取标记,因此组织 A 或 B 的任何用户都可以访问它。
- 源自组织 A 和组织 B 数据的数据集将需要组织 A
AND组织 B,因为其来源。如果此数据集被取消标记,则由于其位置,它将需要组织 AOR组织 B。 - 在共享项目中创建且没有上游依赖关系的资源标记有析取标记,因此来自组织 A 或 B 的用户可以访问它。
更多信息请参阅共享空间和本体论文档。
- 受限视图也可用于取消标记特定标记,并根据受限视图的数据和定义的策略为行级访问添加更细粒度的规则。例如,
如果 user_rid 等于此列的内容,则允许访问此行。
在应用行级访问策略之前,您可以移除所有受限视图内容的标记。
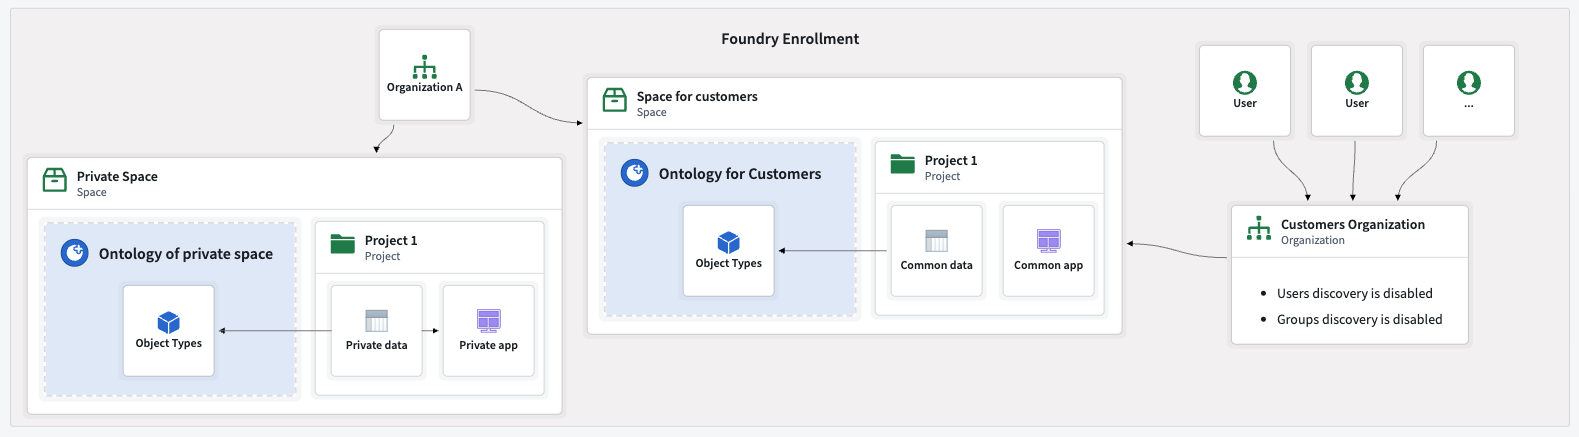
B2C:所有客户共用一个组织
在拥有大量组织(例如数千个)的 B2C 场景中,可能需要不同的方法。 在本指南中,我们将使用以下配置:
- 单一组织: 所有外部用户都作为单个组织的成员引入。
- 用户隔离: 组织配置为禁用用户可发现性,因此用户无法看到或找到彼此。应对组应用相同的配置。查看如何配置用户和组可见性。
以下是主要内部组织和所有用户的单独组织的示例,其中禁用了用户可发现性。两个组织都可以访问共享的客户空间和本体论。
您可以在控制面板中允许或禁止用户和组在组织内相互查看。
用于行级权限的受限视图
B2C 场景中的一个常见需求是限制客户数据访问,以便他们只能查看自己的数据或特定的数据子集。这可以使用受限视图来实现。
为 B2C 使用场景配置受限视图的过程与B2B 使用场景非常相似,但目的不是隔离业务数据,而是确保客户无法访问彼此的数据。
下面的示例演示了多个客户使用同一个应用程序,每个客户只能看到自己的对象实例。受限视图策略定义了用户可以访问哪些行,从而决定了他们可以看到哪些对象。
受限视图策略可以通过多种方式实现。一个常见需求是允许用户只查看他们自己创建的对象。这是通过配置一个操作来实现的,该操作在由受限视图支持的对象类型中创建一个新对象。该策略仅当用户的 ID 与对象属性中的用户 ID 列匹配时才允许访问对象实例。当创建新对象时,用户 ID 列会自动填充当前用户的 ID,从而确保用户只能访问自己的对象。
身份验证(Authentication)
除了创建组织和空间之外,用户还需要一种通过身份提供者进行身份验证的方式来访问他们的账户。在本指南中,"业务实体"、"客户"和"第三方"等术语都指代同一个概念:正在被引入的外部组织。
策略 1:每个组织自带身份提供者
每个客户作为一个独特的组织被引入,并且每个客户的身份提供者(IDP)与 Foundry 集成。此方法最适合客户数量较少,或者每个客户拥有大量用户并希望管理自己的组和访问控制的场景。更多详情请参阅组外部领域文档。
这种方法需要多次手动干预。没有自动化的流程来收集和配置客户的身份提供者。您需要获取每个客户身份提供者的详细信息,并按照SAML 入门和身份提供者配置文档中描述的设置进行操作。
策略 2:您提供身份提供者作为传递
对于每个引入的客户,目标是通过身份或 SSO 联合来同步 IDP。这是 SaaS B2B 设置中的常见方法,其中 IDP 相互信任以实现无缝身份验证。当引入大量客户实体时,此方法尤其有用。在这种情况下,引入更加简化,因为您控制着 IDP 基础设施。大部分过程可以使用 Okta 或 Auth0 等工具编写脚本或完全自动化。
每个用户必须有一个属性指示其关联的组织。此属性由 IDP 传递给 Foundry,以便在登录时将用户路由到正确的组织。这允许支持受限视图工作流,通过基于用户属性制定策略,确保用户只看到允许的数据。
:::callout{theme="warning"} 您应始终配置一条默认规则,将没有组织属性的用户分配到"无组织"组。这可以防止在组织属性缺失时意外访问非预期的数据。 :::
您可以根据用户在控制面板中的用户属性将用户分配到组织。更多信息请参阅用户规则。
策略 3:您在内部提供身份提供者
在这种方法中,您提供并管理一个 IDP,并直接在此 IDP 中创建用户账户。此策略特别适用于 B2C 场景。
主要优势:
- 您控制整个身份验证流程。
- 只需设置一次 IDP 与 Foundry 的集成。
- 您集中管理用户账户创建和身份验证方法。
策略 4:混合不同方法
您可以结合多种策略以满足不同客户的需求。
- 对于大型客户,与其自己的 IDP 集成。
- 对于小型客户,在主 IDP 中创建用户或使用身份联合。
这种灵活的方法允许您根据每个客户的规模和需求定制引入和身份验证工作流。
产品分发
Foundry 上的构建者可以创建数据集、管道、对象和应用程序等资源。然后可以将这些资源打包并部署给其他用户。例如,资源可以部署到其他项目或空间,或者部署到相同或不同的组织。这使您能够集中开发应用程序和工作流,然后将它们分发给其他企业或组织。这允许从一个开发环境到组织间共享环境的发布管理。
更多信息,请参考以下资源:
- 部署相关的市场(Marketplace)概述
- 打包相关的Foundry DevOps 概述
- 发布管理相关的DevOps 发布管理概述
打包为市场产品的资源可以安装到新的项目和空间中。资源可以多次安装,可能安装到不同的项目或组织中,以允许组织访问自己的包安装。这对于"集中构建,多处部署"的场景非常理想,并且可以在安装后根据需要灵活调整工作流。
关于开发环境的注意事项:
- 要打包的资源以及开发环境应位于属于单个专用开发组织的项目中。
- 打包资源的开发者必须对此组织拥有
扩展(Expand)权限,因为他们正在将资源访问权限扩展到其他组织。
关于市场商店放置的注意事项:
- 将市场商店放置在所有目标组织都可以访问的空间中的项目里。考虑为商店创建一个专用空间,如果您还没有这样的空间,请包含所有相关组织。
- 确保所有组织都可以访问商店的项目,即使没有该组织的用户可以访问它。
使用这种产品分发设置时,请牢记以下注意事项:
- 将要安装市场产品的用户不需要对组织标记拥有额外权限。
- 如果出现权限问题,它们将在打包期间出现,而不是在安装期间。这使您可以在流程早期解决问题。
考虑下面的图表,其中组织结构如下:
- 一个主要的内部组织,其用户拥有自己的私有空间和本体论。
- 一个开发组织,拥有自己的空间和本体论,内部组织的用户作为访客。
- 一个共享空间和本体论,市场商店位于其中。
- 有 N 个组织,每个组织拥有自己的空间和本体论。产品由有权访问包含市场商店的项目的用户安装到这些组织中。该项目位于共享空间中。
更多信息请参阅商店权限指南。
请参考以下关于产品分发的访问策略部分。
策略 1:面向最终用户的自助服务商店
如果您希望用户自行安装市场产品,您必须授予从商店安装到特定位置的相关权限。
- 需要从给定商店自助安装给定产品的用户,需要对包含商店的项目拥有
marketplace:install-from-local-marketplace权限。此权限通常授予查看者角色,假设该角色未被客户手动更改。 - 需要从给定商店自助安装给定产品的用户,需要对目标空间和本体论拥有
marketplace:install-in权限,以便将市场产品安装到特定位置。此权限通常授予编辑者或所有者角色,假设它们未被客户手动更改。 - 根据产品或安装的需要授予额外权限,例如对输入的
查看者权限,或链接产品的权限。
更多信息请参阅商店权限。
这允许按照先前描述的设置进行自助服务安装。
策略 2:由主要实体控制的安装
如果您希望控制安装过程,例如出于货币化目的,您应仅授予平台管理员或指定的内部开发者访问市场商店项目的权限。这使他们能够为最终用户处理产品安装,并保持对流程的控制。
让您的开发者代表客户管理安装通常需要以下两种方法之一:
- 设置一个共享空间,开发组织者和客户组织都可以访问,所有必需的输入数据都在该共享空间中提供。
- 授予开发者对客户组织的访客访问权限,包括足够的权限来访问必要的输入数据并将产品安装到客户的私有空间中。