Announcements(公告)
REMINDER: Sign up for the Foundry Newsletter to receive a summary of new products, features, and improvements across the platform directly to your inbox. For more information on how to subscribe, see the Foundry Newsletter and Product Feedback channels announcement.
Share your thoughts about these announcements in our Developer Community Forum ↗.
Introducing TypeScript Ontology SDK 2.0, now generally available
Date published: 2024-10-29
TypeScript Ontology SDK (OSDK) 2.0 is generally available the week of October 28th, offering a streamlined syntax to improve performance, enable more complex applications, and speed up the development process. By default, any new TypeScript applications created in Developer Console will now use the latest 2.0.x generator.
Migrate existing applications to TypeScript 2.0
The TypeScript OSDK 2.0 migration guide explains version differences, highlights relevant syntax and structure changes, and provides code examples to help you update applications built using legacy versions.
Though it is not currently mandatory to migrate legacy applications to use version 2.0 syntax, upcoming TypeScript OSDK 2.0 releases, including support for interfaces and media sets, will require migration.
Palantir will maintain support for legacy TypeScript applications for at least one year from the release of version 2.0.
To generate TypeScript OSDK 2.0 for an existing application, select the SDK versions menu in the left side panel of your application in Developer Console.

Generate TypeScript OSDK 2.0 for an existing legacy version application in Developer Console.
Get support
The Ontology SDK Developer Community ↗ provides a forum for Foundry users to ask and answer questions about the Ontology SDK's capability suite. If you are unable to find answers to your questions in the community forum or migration guide, contact Palantir Support for additional assistance.
Foundry Connector 2.0 for SAP Applications v2.32.0 (SP32) is now available
Date published: 2024-10-29
Version 2.32.0 (SP32) of the Foundry Connector 2.0 for SAP Applications add-on, used to connect Foundry to SAP systems, is now available for download from within the Palantir platform.
This latest release features bug fixes and minor enhancements, including:
- Improved database-level paging for SAP HANA (no materialization of paging key)
- Support for BALDAT table decompression
- Resolution of an issue with filters that contain empty spaces between values
We recommend sharing this notice with your organization's SAP Basis team.
For more information about downloading the latest add-on version, review our documentation.
Edit history tracking is now supported in Object Storage V2 [GA]
Date published: 2024-10-22
Object Storage V2 now supports tracking user edit history. To use this feature, enable the Track user edit history setting in Ontology Manager for object types, and to display user edit histories, update object views to include the Edit History widget.
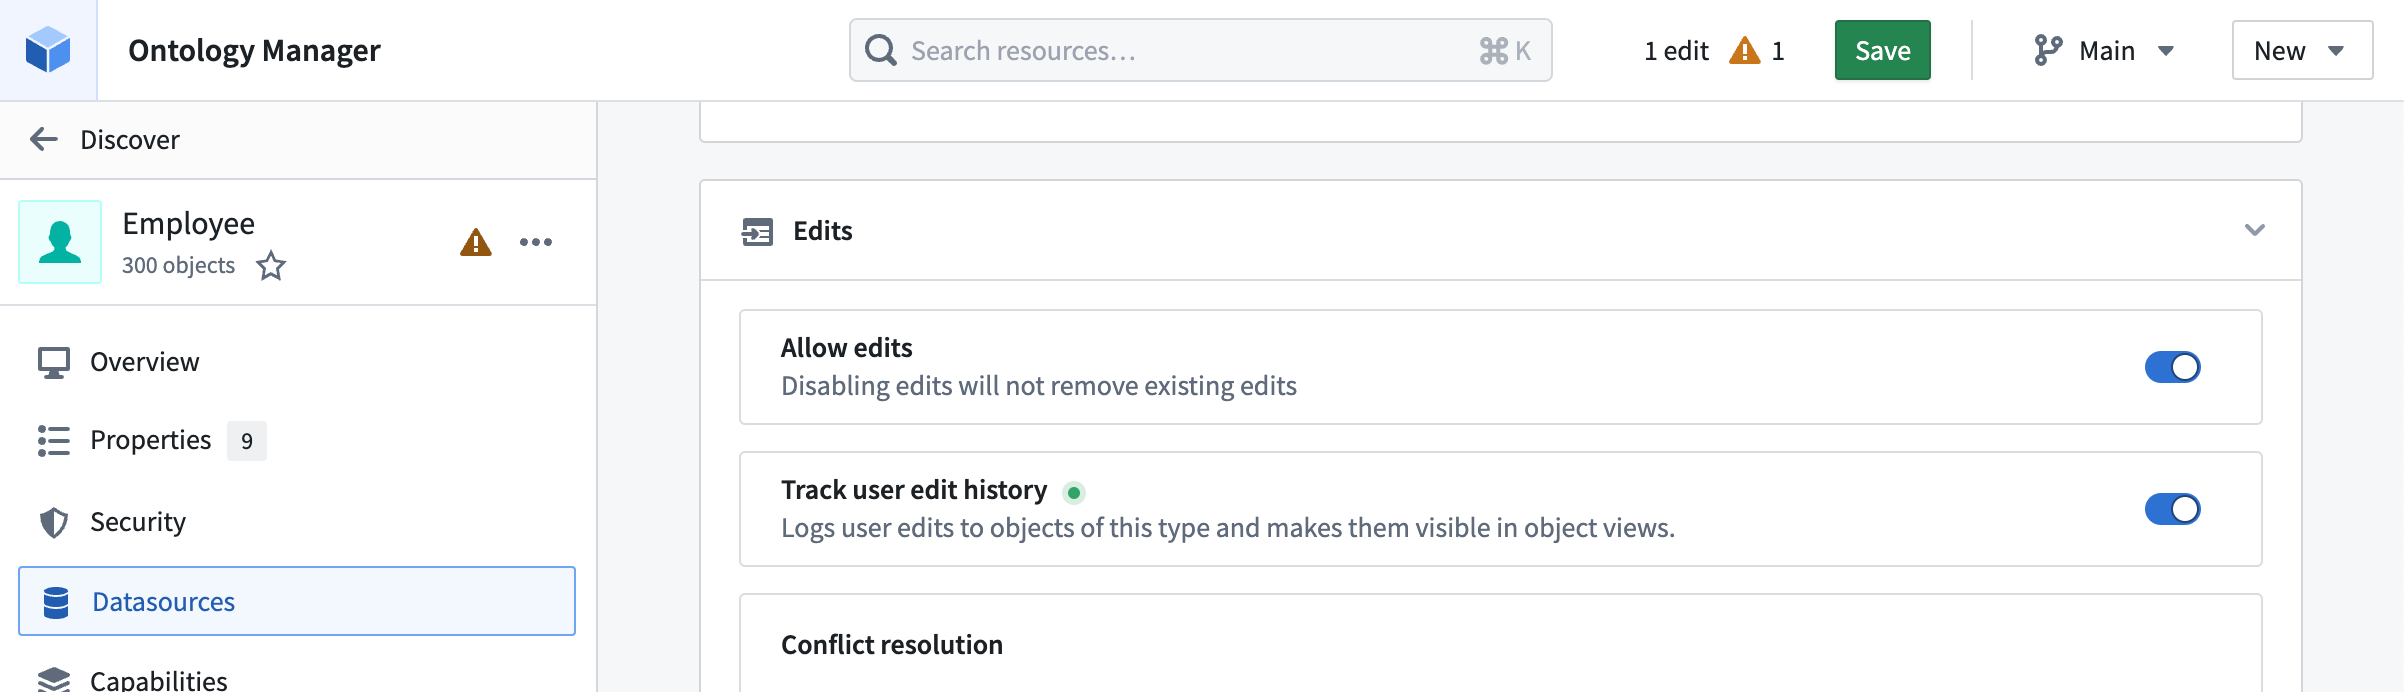
The Track user edit history setting within Ontology Manager.
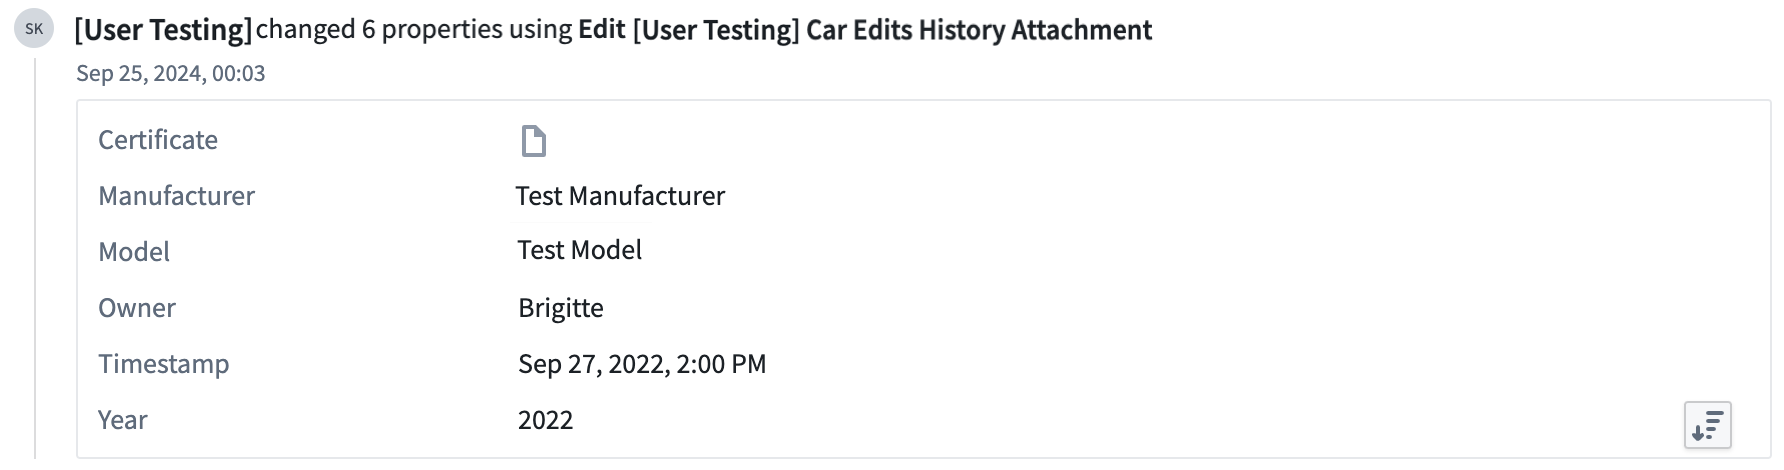
The Edit History workshop widget displays user edit history.
The edit history reflects changes made to objects after enabling the Track user edit history setting. Any changes made prior to the activation of this feature will not be tracked. Additionally, user edit history from Object Storage V1 will not be available after migrating to Object Storage V2.
Redesigned Control Panel and enhanced navigation features
Date published: 2024-10-15
We are excited to announce the latest updates to our Control Panel layout and its homepage, designed to enhance your user experience and streamline navigation. Read on for the latest features, navigation improvements, and visual and organizational enhancements.
Latest features
Favorite settings: You can now "favorite" your most frequented settings. Favorited settings will appear on the left sidebar for quick and easy access.
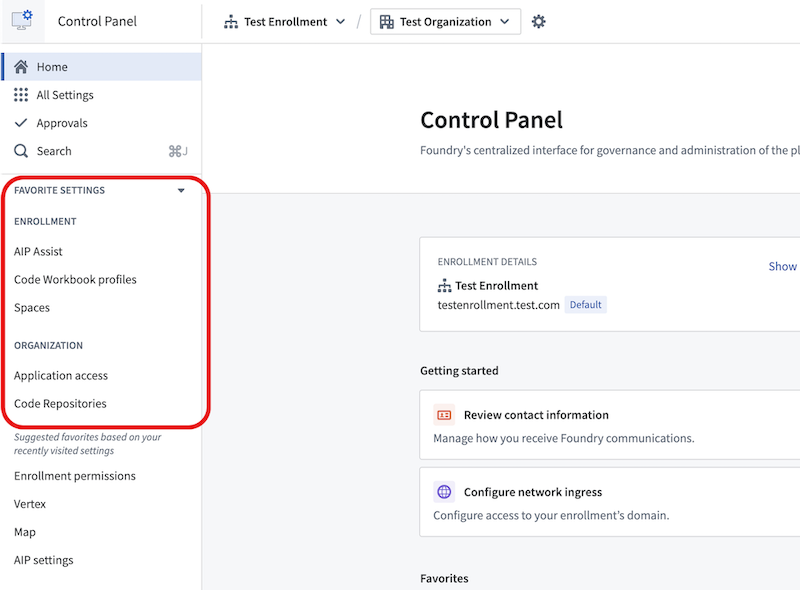
The Favorite Settings section in Control Panel.
Recently visited settings: Keep track of your recent activity with the new "recently visited" settings feature, allowing you to quickly return to settings you have accessed recently.

The recently visited settings section in Control Panel.
Improved navigation
Enhanced headers: The Organization and Enrollment selectors have been moved to the page header. This change simplifies navigation and makes it easier to switch between different sections.
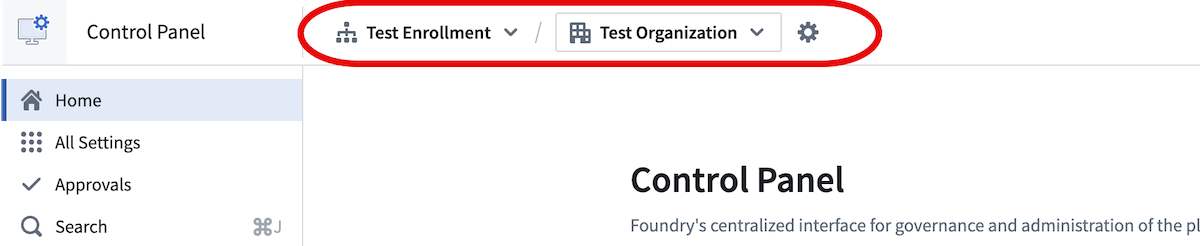
The enhanced header design, featuring the Organization and Enrollment dropdown selectors.
Contextual save Actions: When modifying settings, Actions will now display the context of the Action. For example, when saving to an enrollment, the Action will state "Save for [enrollment name]" as in the following screenshot. This ensures clarity and reduces the risk of errors.

An example of a contextual save Action for a "Test" Organization.
Visual and organizational enhancements
Streamlined look and feel: The overall look and feel of the Control Panel and homepage has been redesigned to provide a cleaner and more modern interface, improving usability and aesthetics.
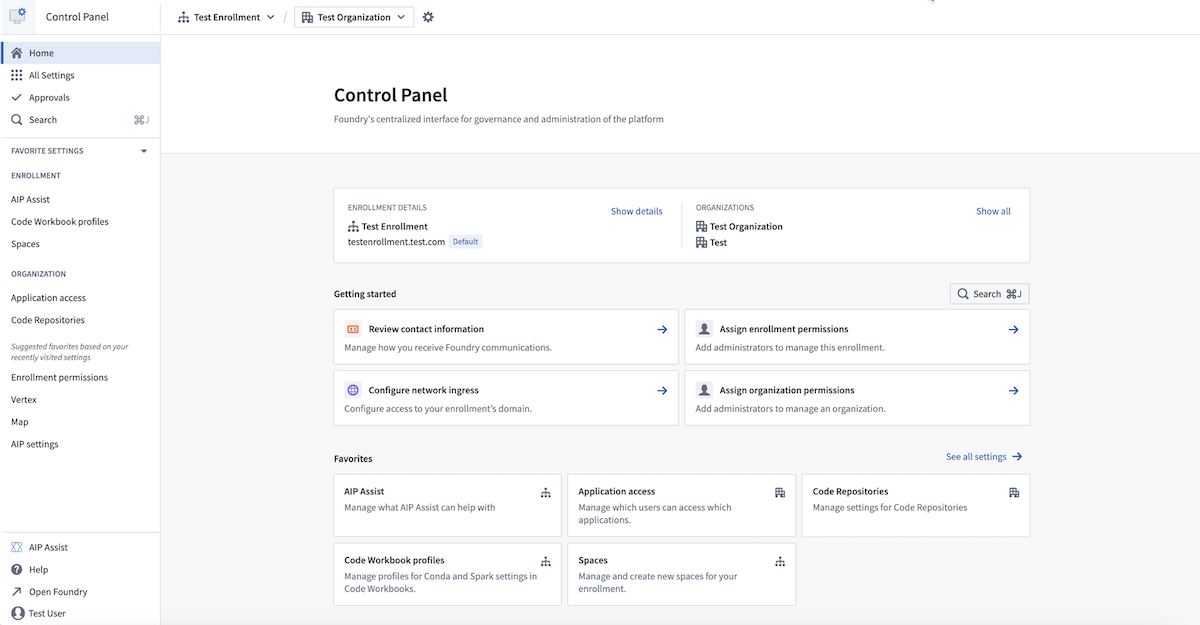
The newly updated and streamlined design of Control Panel.
Categorized settings and new All Settings page: Settings are now grouped into new, intuitive categories. You can view the full list of settings on the new All settings page, making it easier to find and manage your preferences.
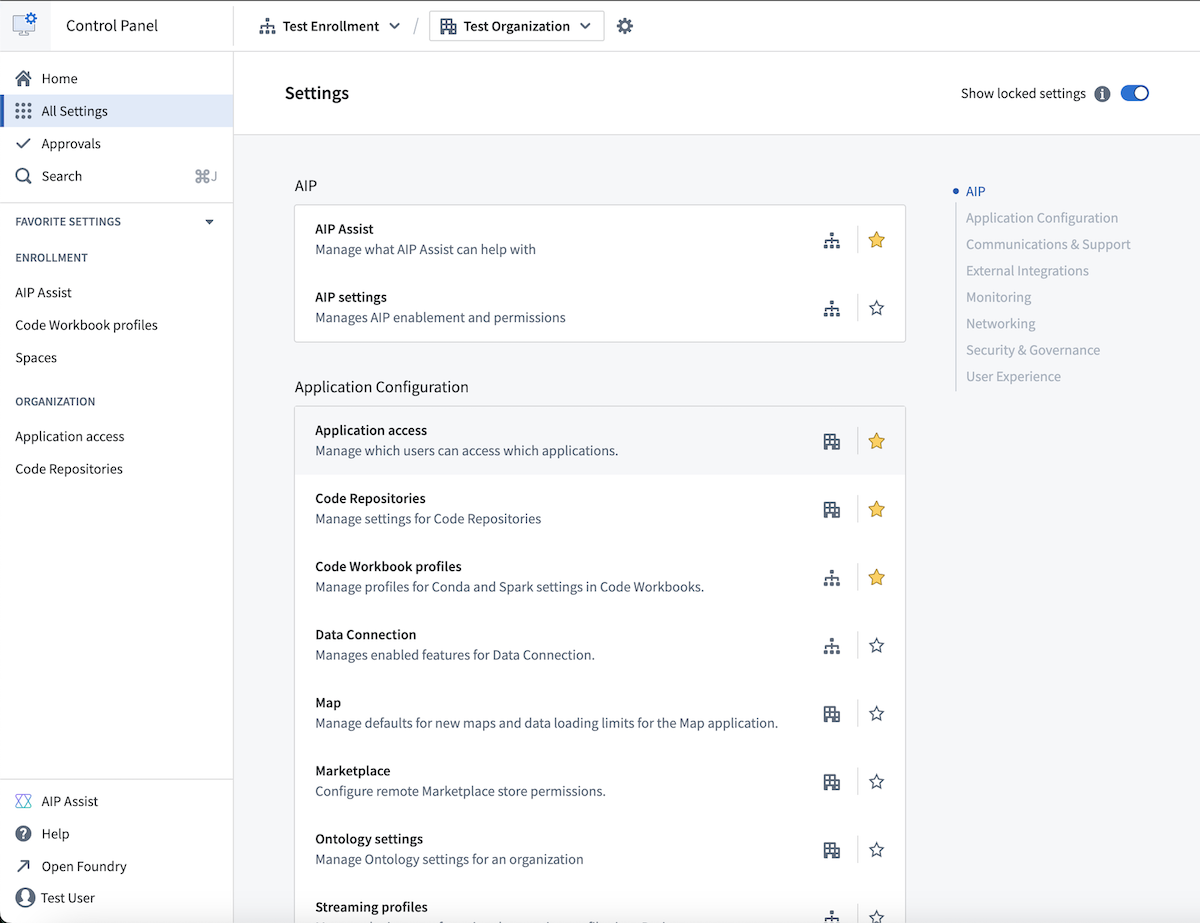
The new All Settings page, showing all available settings split into categories.
We believe these changes will significantly improve your experience using the Palantir platform.
For more information, review the Control Panel documentation.
Create custom LLM-powered Assistants with AIP Assist Agents [Beta]
Date published: 2024-10-10
We are excited to announce the beta release of custom-made LLM-powered assistants called "AIP Assist Agents". This feature allows users to create LLM-powered assistants that specialize only on custom content sources, with no coding experience required. This builds on the ability to register custom content sources with AIP Assist, which allows users to add Notepad documents or in-platform custom documentation to AIP Assist's knowledge base.
Custom source-backed AIP Assist Agents
It is important to note how this feature differs from existing AIP Assist support for custom content sources. Serving custom sources with AIP Assist makes content available as a resource when AIP Assist answers user queries, along with Palantir platform and developer documentation. Without AIP Assist Agents, custom sources can be configured to be available to AIP Assist's default mode.

The AIP Assist mode selector.
In contrast, AIP Assist Agents must first be selected from the AIP Assist mode selector, as shown below, and only use the provided custom sources to respond to user questions. As a result, AIP Assist Agents are hyper-focused and purpose-built, providing users with higher quality responses based solely on specialized content sources. This is a powerful new functionality for support teams, developer teams, and platform administrators.

The AIP Assist mode selector, showing a sample inventory management AIP Assist Agent.
Create custom LLM-powered assistants in just a few clicks
To get started with AIP Assist Agents, you must first register custom content sources from Notepad or in-platform custom documentation. After doing so, you can create an AIP Assist Agent in the Agent Studio application and give it access to your custom content sources.
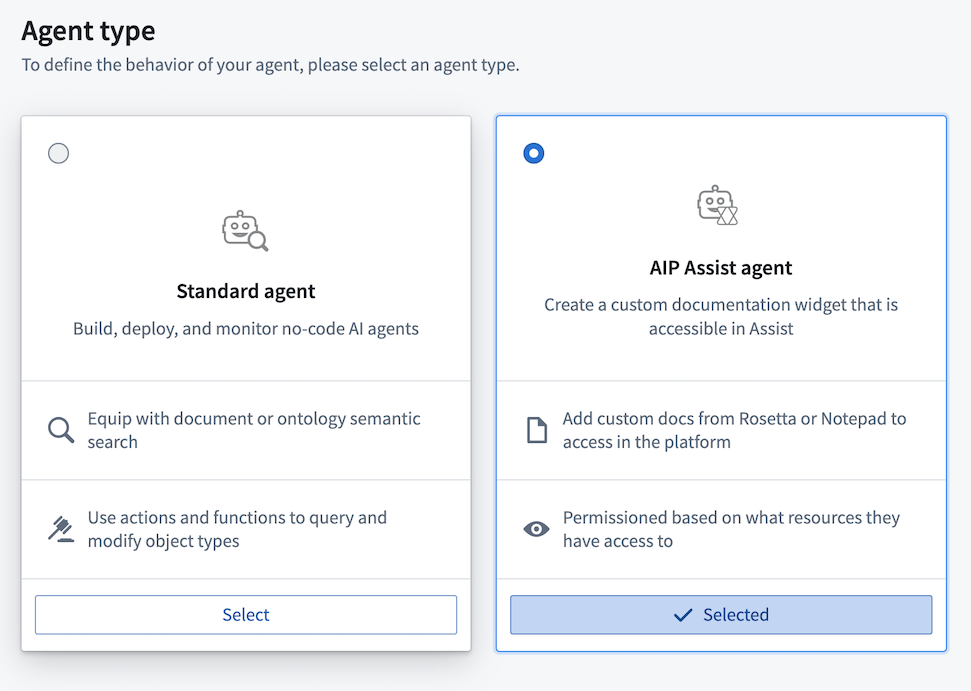
AIP Assist Agent creation in the Agent Studio application.
Once you have created an AIP Assist Agent and provided it with access to your custom content source, you are ready to start interacting with it in AIP Assist. Creating specialized LLM-powered assistants is now a streamlined, no-code process that you can leverage to fit your operational needs and increase application support for your users.
Note that these features are part of Palantir's AIP offering, and require your enrollment to have AIP enabled in Control Panel. AIP Assist Agents and Agent Studio may not be available on all enrollments at this time. Contact your Palantir representative to determine eligibility for your enrollment.
Learn more about AIP Assist custom sources and AIP Assist Agents.
Improved access to and usability of AIP in Quiver [Beta]
Date published: 2024-10-10
This feature is now generally available. Read the latest announcement.
Since July 2023, users have been able to leverage the power of AIP in Quiver to explore their data with ease by asking AIP to generate new or configure existing cards on their canvas via natural language prompts. Deploying the week of October 7th in beta on most AIP-enabled enrollments, Quiver's two primary large language model-driven capabilities - AIP Generate and AIP Configure - are now accessible beneath a card in addition to their existing availability in the top ribbon of Quiver's workspace and a selected card.
AIP Generate creates analysis from a user prompt to provide rapid insight on data available in the Ontology, offering another method for object set analysis in addition to capabilities native to Object Explorer and Contour. AIP Configure applies user prompts to update card configurations and tailor analytical outputs to a user's needs regardless of their familiarity with Quiver's visualization settings.
Quiver cards that can leverage AIP now display an AIP logo to their right in the card search bar.
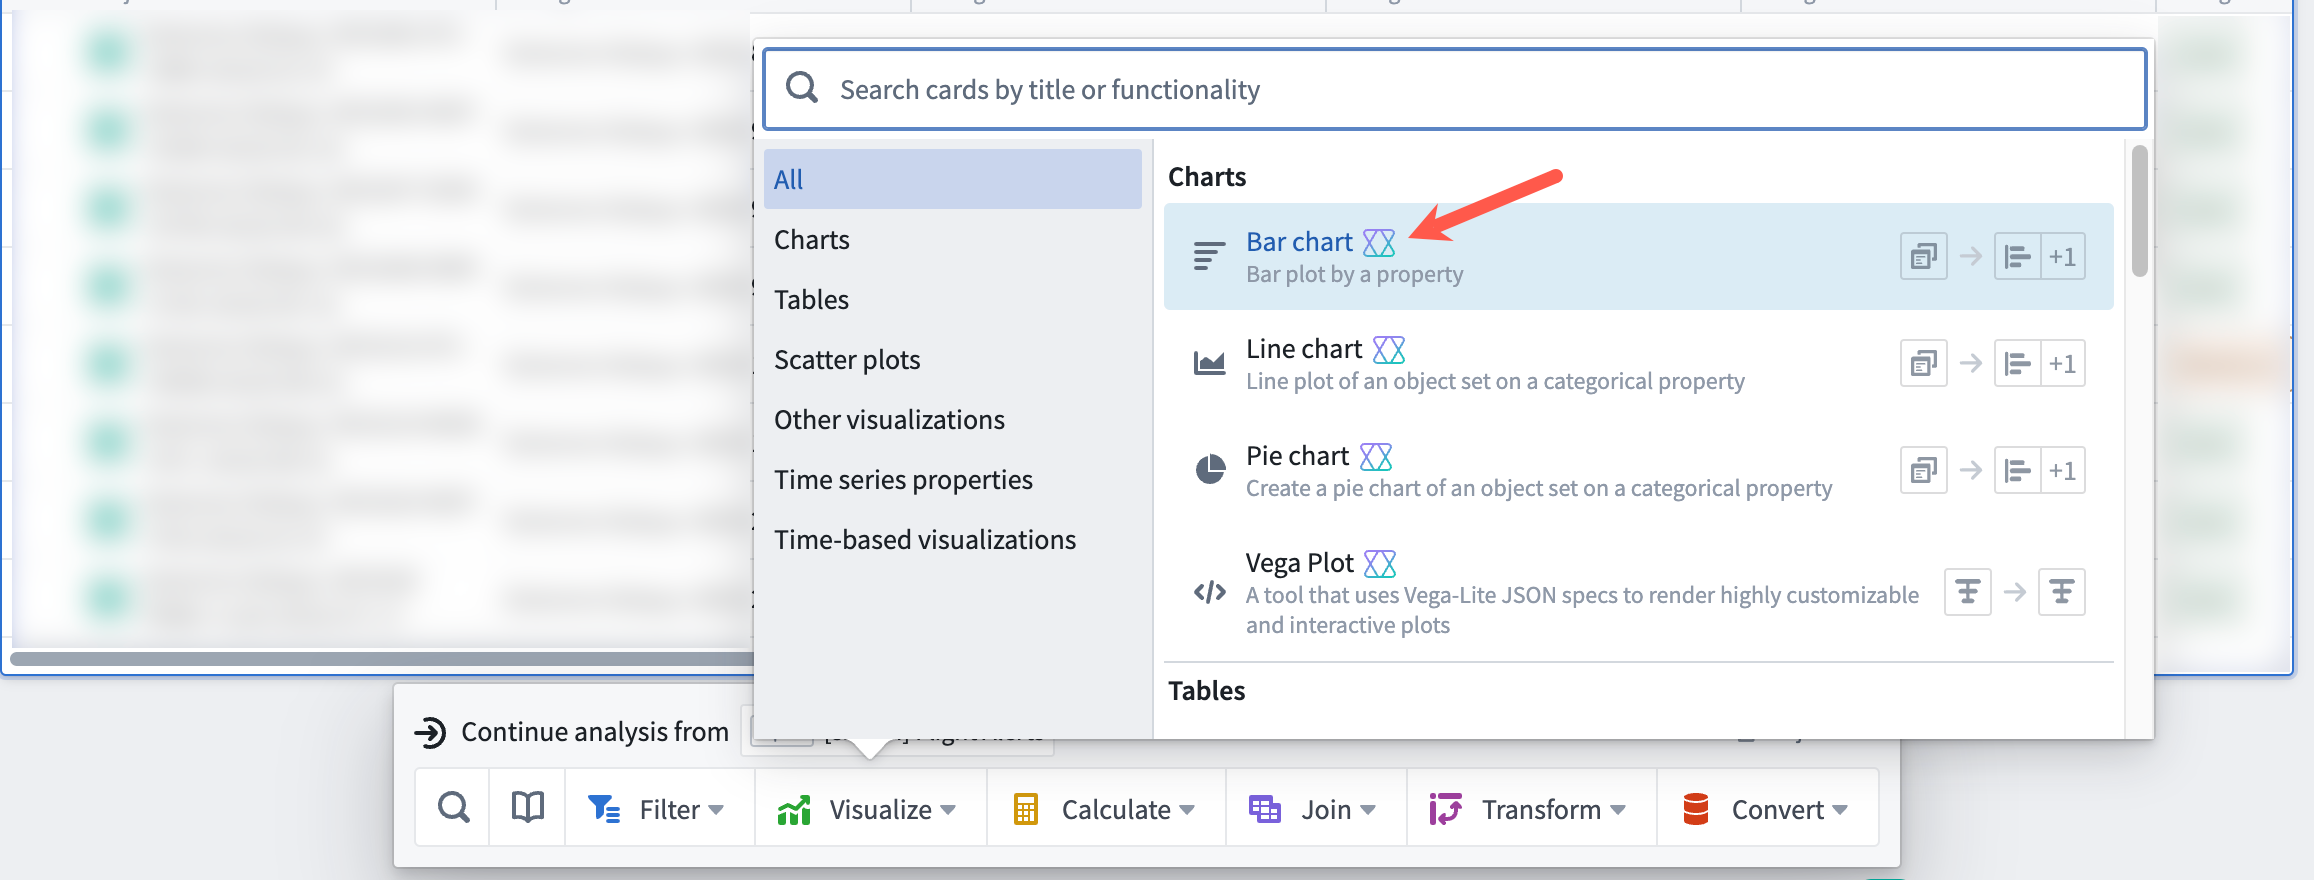
Quiver cards backed by AIP's analytical capabilities display an AIP logo to their right.
Access AIP Generate from a Quiver card
After you select an object set to analyze in Quiver, you will see an input field with an AIP logo beneath the card selection that instructs you to Enter a query to continue the exploration. When you select the input field, AIP Generate produces a list of suggested queries to support your analysis. Deploying the week of October 7th in beta on most AIP-enabled enrollments, Quiver's two primary large language model-driven capabilities - AIP Generate and AIP Configure - are now accessible beneath a card in addition to their existing availability in the top ribbon of Quiver's workspace and a selected card.
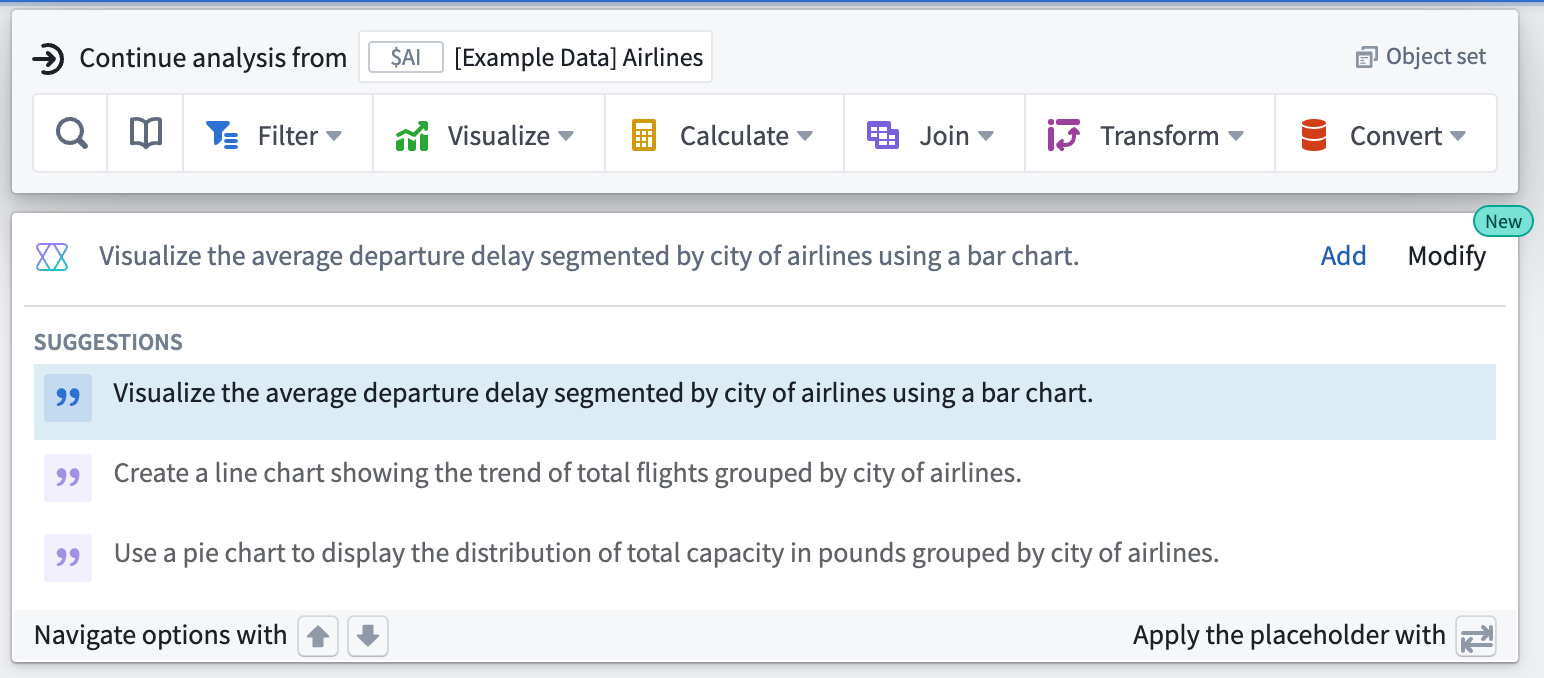
Users can access AIP Generate beneath a Quiver card to create a new analysis.
You can choose a suggested query or enter your own. After you select a suggested or enter your own query, AIP Generate produces potential next steps for the analysis, which you can refine by editing the query directly within the input bar where you wrote the original query. Next, select the result or press the Enter key to instruct AIP to add the card to the canvas and make all configurations on your behalf.
Access AIP Configure from a newly-created analysis
To configure an existing card, hover your cursor over the card and select the Modify button before entering your configuration prompt into the text field to the right of the AIP icon. Verify that AIP's suggestion answers your prompt before selecting the proposed modification.
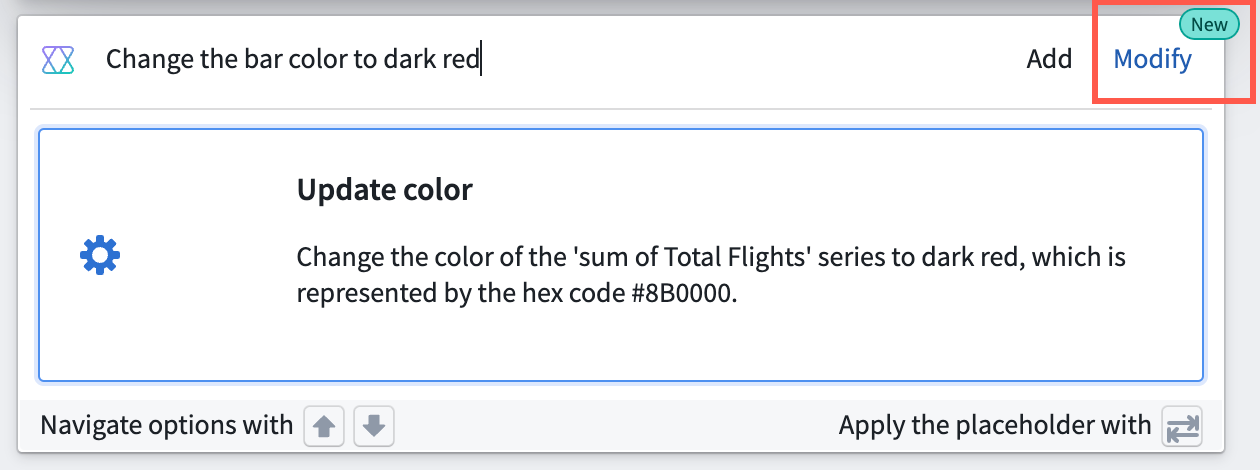
Users can access AIP Configure beneath an analysis card.
If you are unable to access these features in your enrollment, contact Palantir Support for enablement.
You can reference additional AIP Generate and AIP Configure details within Quiver's existing documentation.
Workshop Vega chart widget
Date published: 2024-10-10
Introducing Workshop's newest widget, Vega Chart. This widget offers advanced data visualization capabilities backed by the Vega-Lite ↗ grammar. Additionally, it provides additional flexibility over the Chart XY widget with its wider array of configuration options, and is the widget that should be used when you encounter limitations from use of the Chart XY widget.
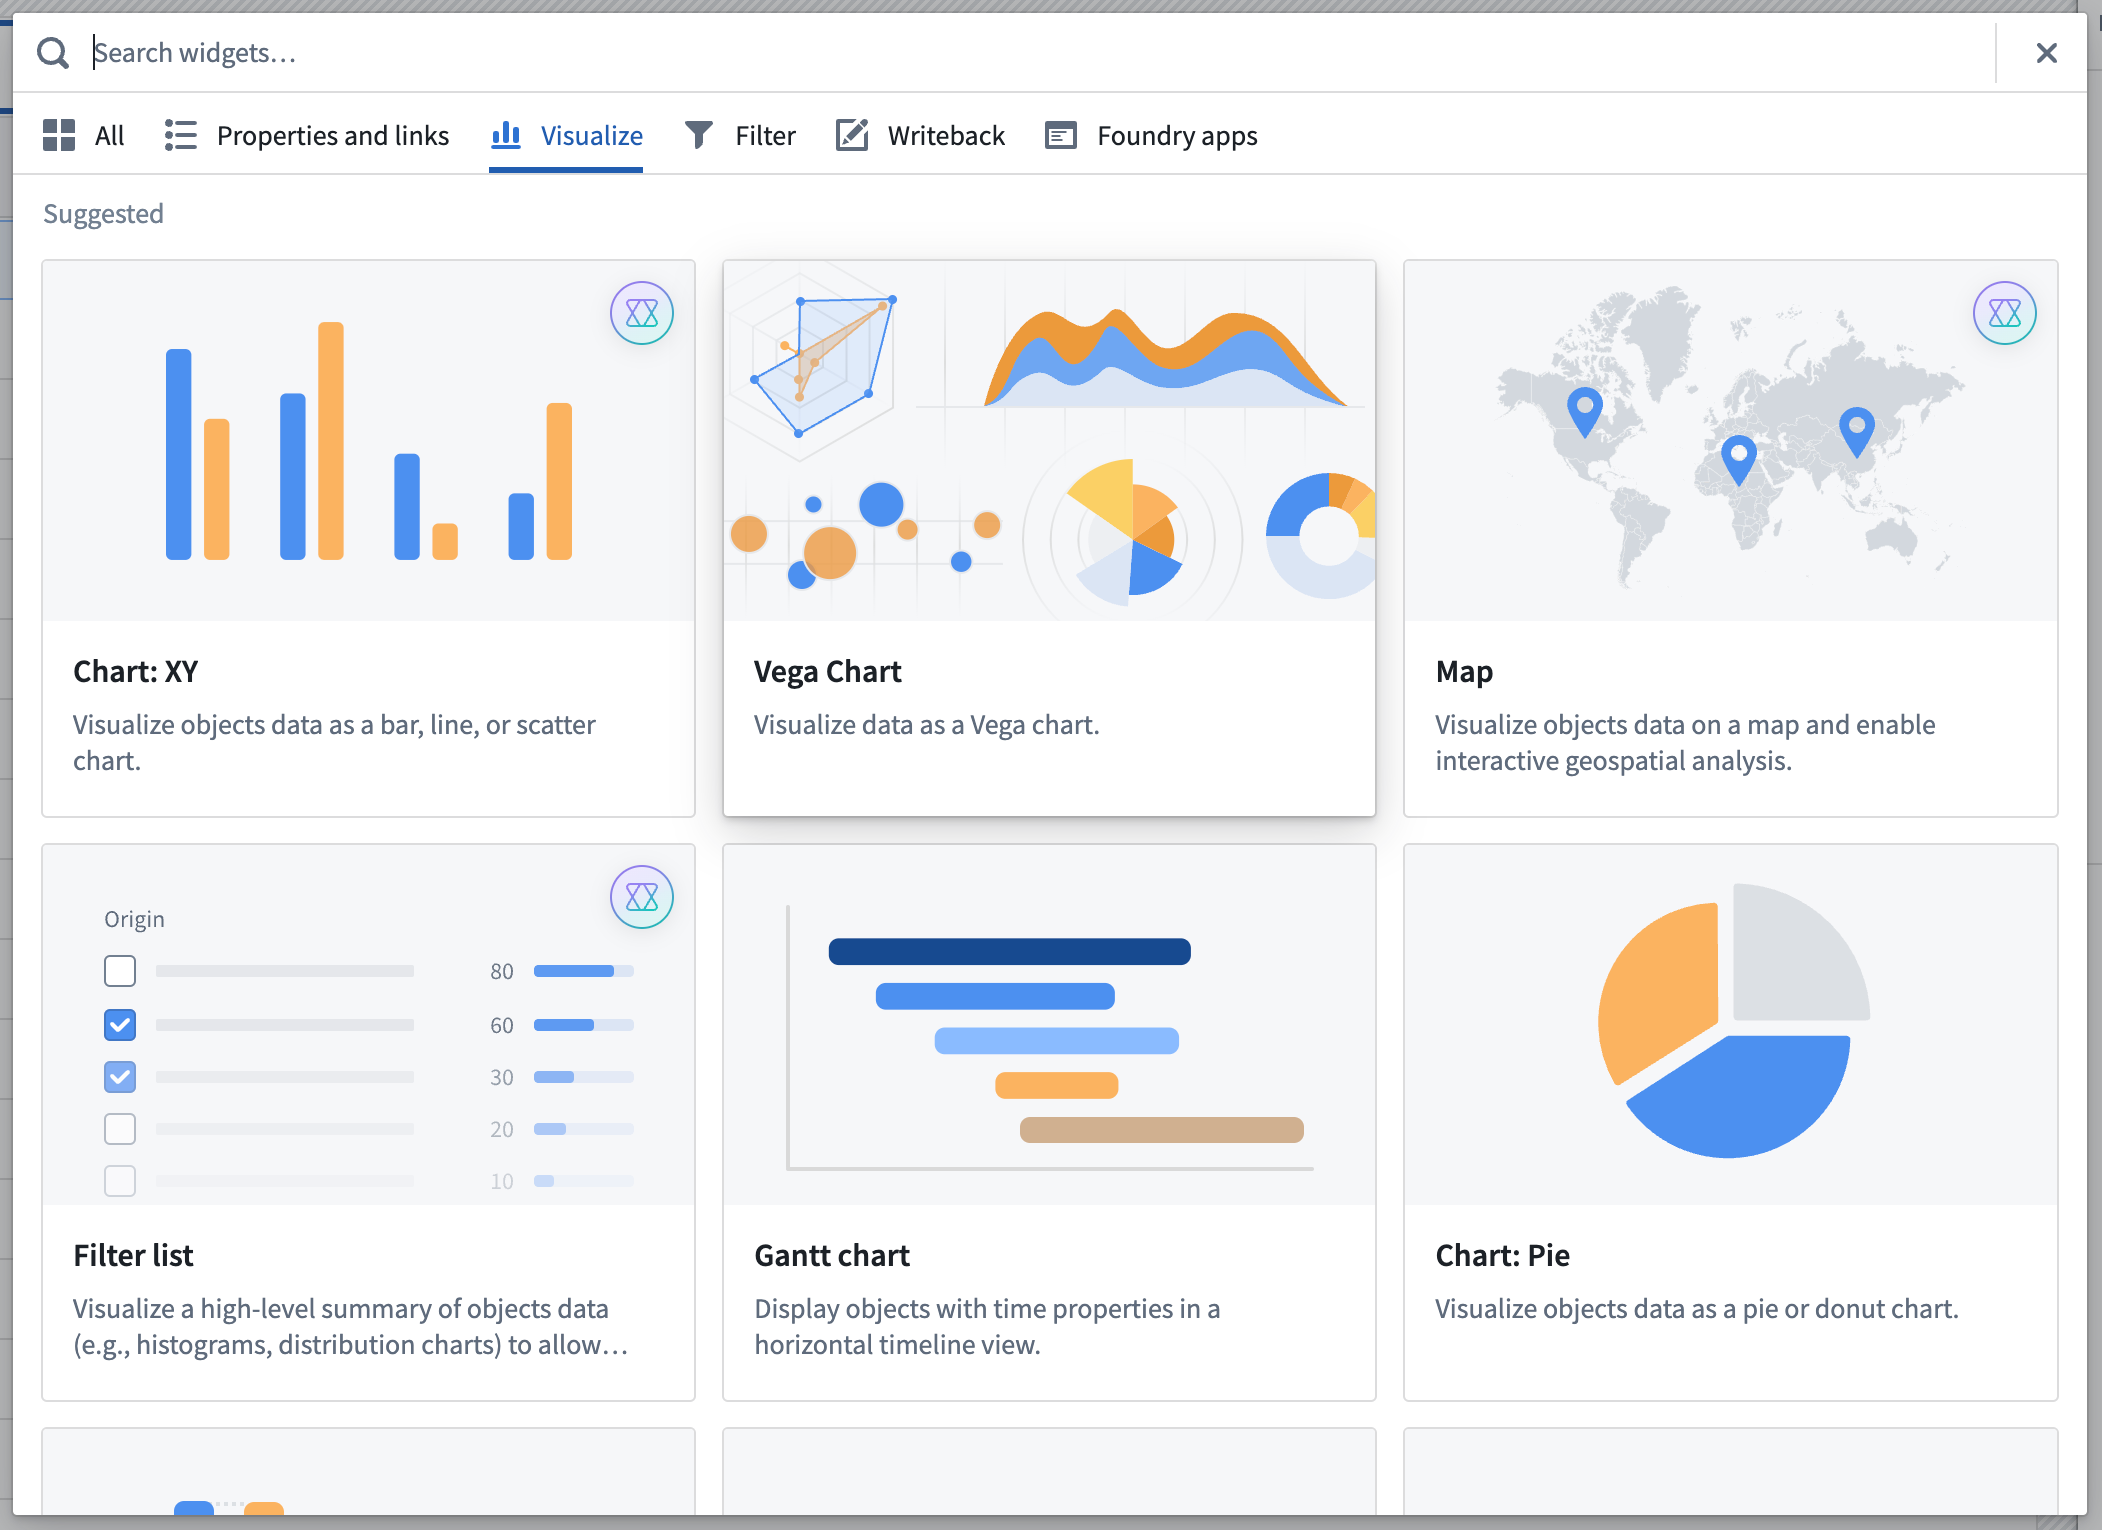 Select Vega Chart from the Workshop widget picker.
To get started, select Vega Chart from Workshop's widget picker, or read more about the widget in documentation.
Ontology SDK for Java development [GA]
Date published: 2024-10-08
Java support is generally available the week of October 7th in Ontology SDK and Developer Console. Java developers can now generate a Java library to easily interact with Ontology objects, links, actions, aggregations, and functions. Users can add the Java OSDK to existing Java services or create brand-new applications to enable seamless integrations with data on the Palantir platform.
The Ontology Software Development Kit (SDK) allows you to access the full power of the Ontology directly from your development environment. You can generate the Java OSDK with Developer Console, a portal for creating and managing applications using Palantir APIs. With the new support for Java OSDK, you can build Java-based programs, such as backend services that interact with the Ontology. These services will use confidential clients to authenticate to the Palantir platform and serve data based on the permissions granted to users.
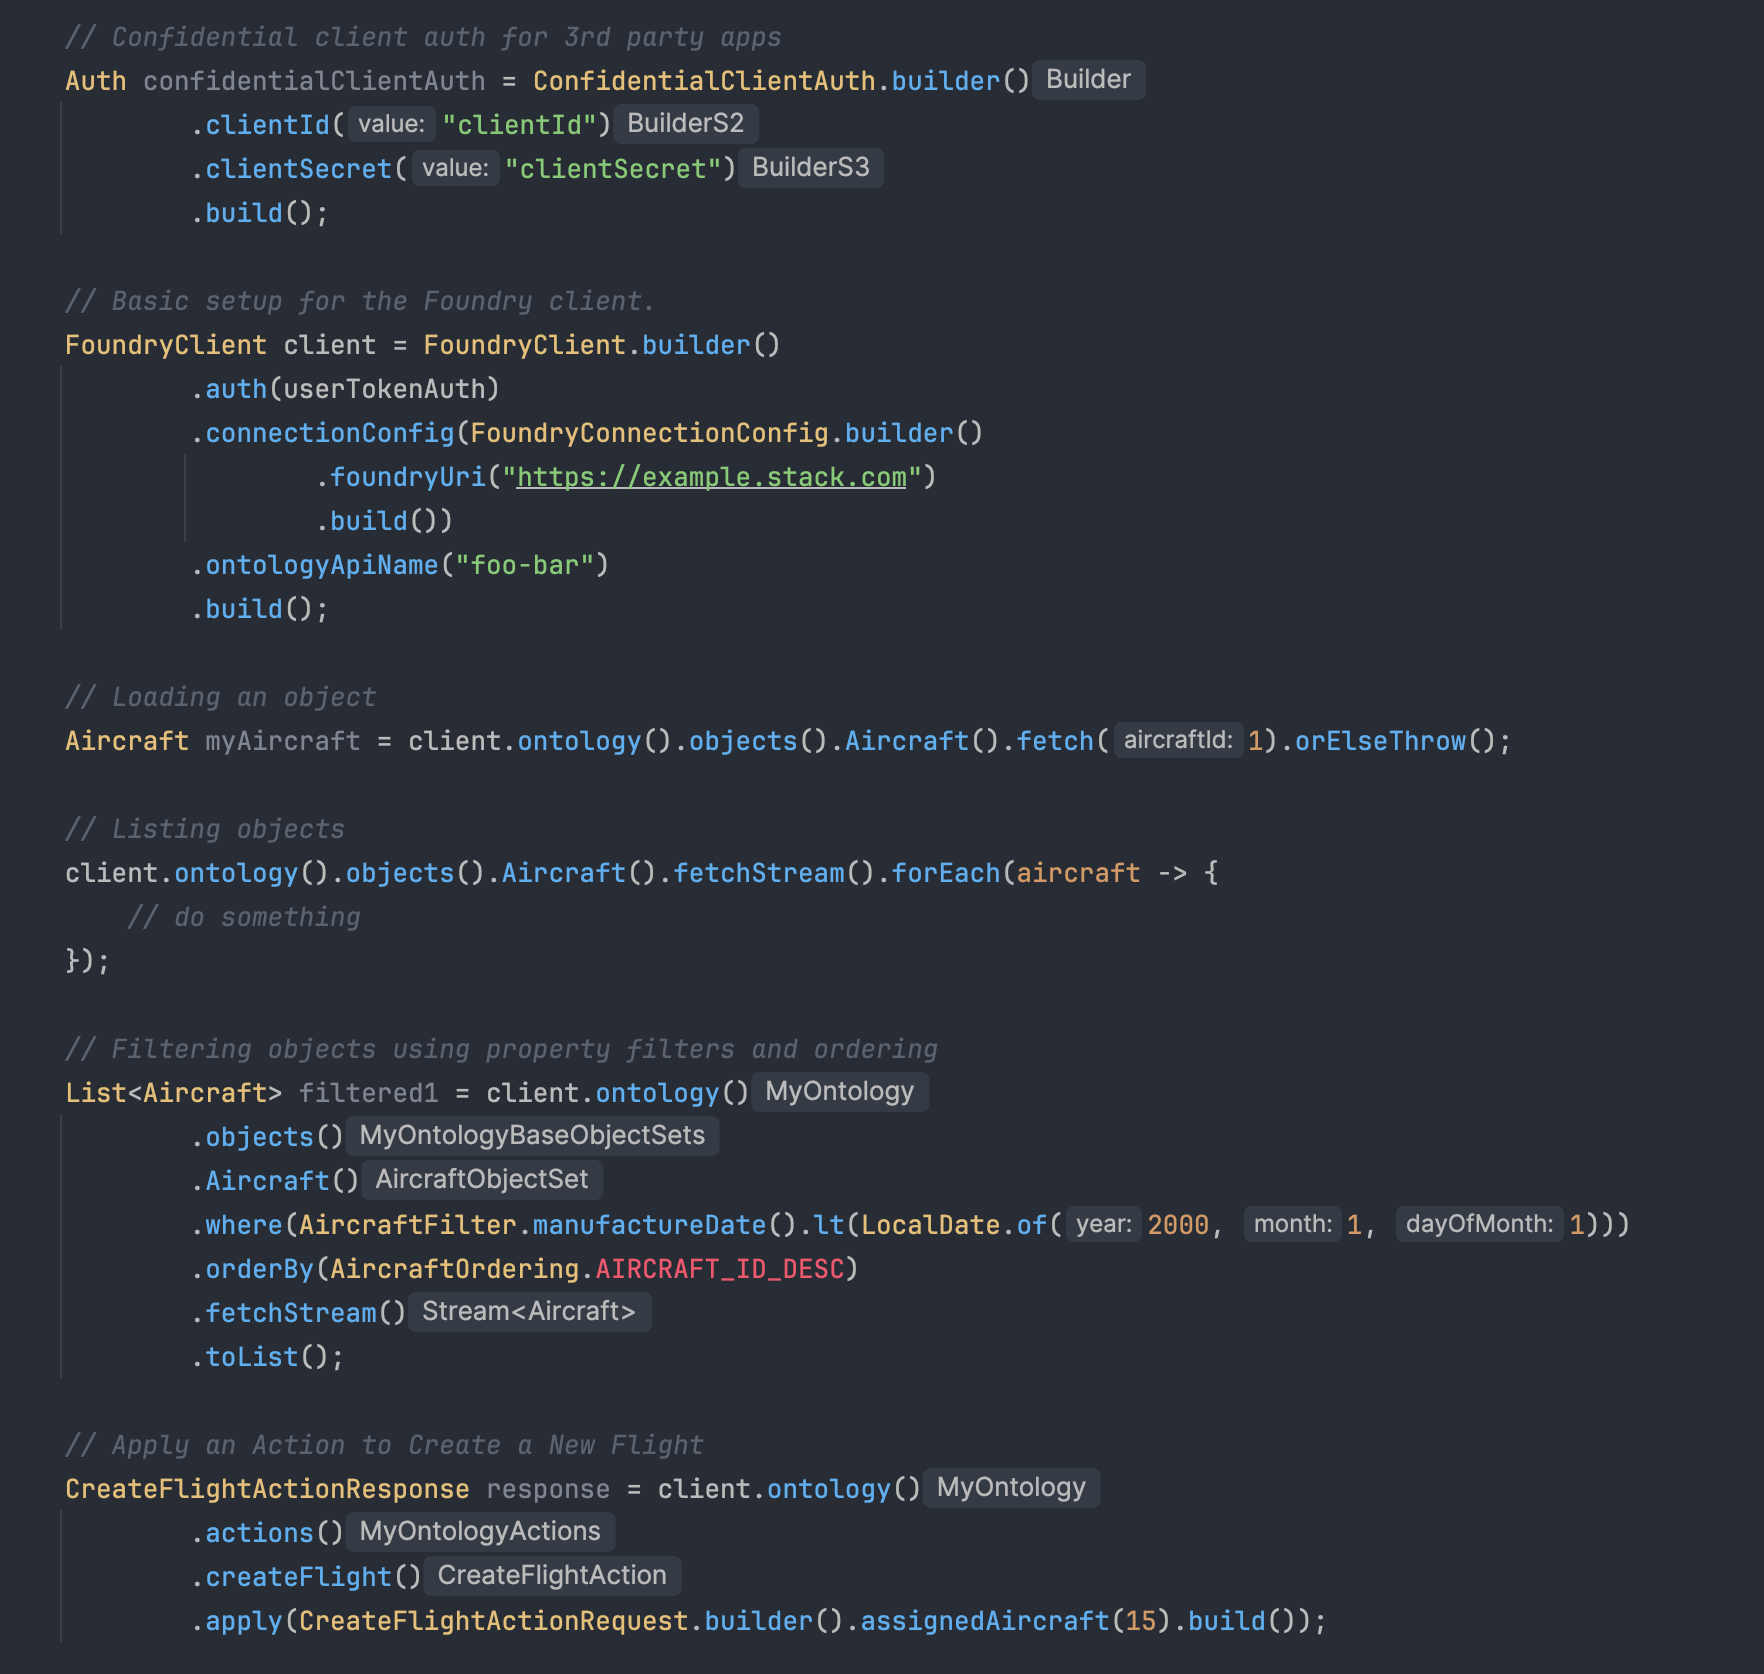
This is a code sample featuring some functionality of a generated Java OSDK for an Aircraft Ontology Object.
Get started with Java packages
Java support is included as an additional language in Developer Console, which also supports Typescript and Python development. Developers who want to use the Java OSDK can follow the documented steps to create a Developer Console application and generate a new version. The SDK Versions page now includes a maven tab that lists all generated Java packages.
Before you can generate a Java OSDK, you must set a Maven group ID under SDK Versions > Settings. Once generated, follow the instructions found in API documentation > Getting started to import your Java OSDK into your Java environments.
To bootstrap an application, you can follow the Bootstrap a New Ontology SDK (OSDK) Java Application Guide.

To generate an SDK, first select the SDK versions tab to view all generated SDKs, select Settings to set a Maven Group ID, then finalize with Generate new version to generate the Java OSDK.
How can I learn how to use it?
For an introduction into using the Java OSDK and some sample functionality, you can generate a Java OSDK Tutorial inside Developer Console. This will give you an overview on some functionality offered by the Java OSDK and how you can interact with the Ontology through a Java client.
First, generate an example Ontology SDK Tutorial app through the top tab in Developer Console.
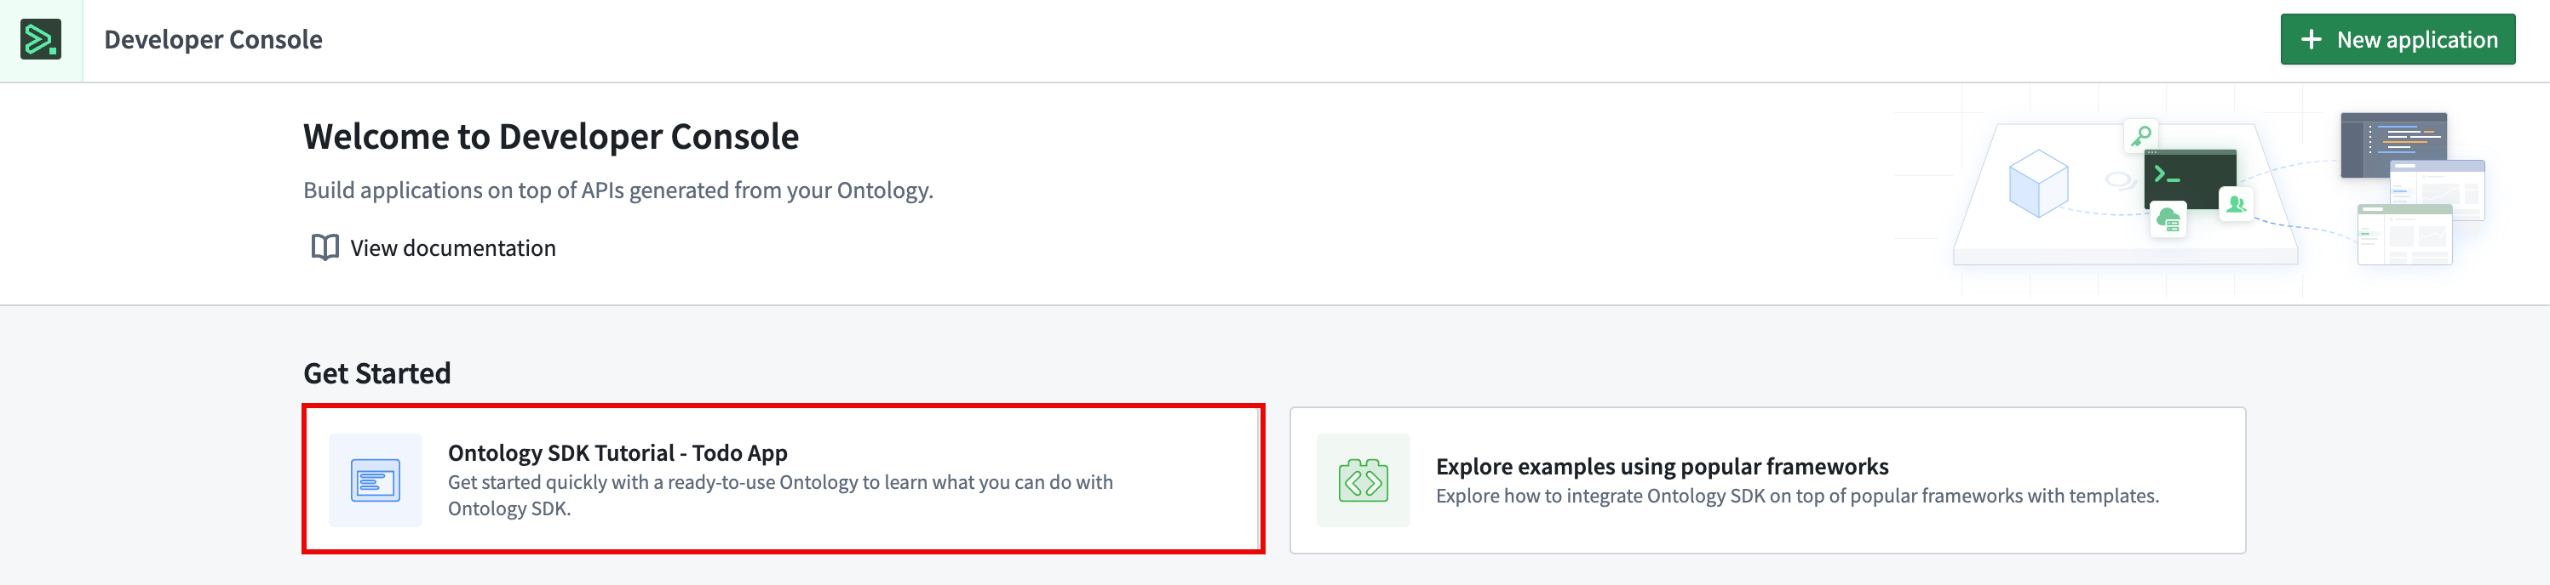
The Developer Console homepage where you can select to generate a tutorial through the Ontology SDK Tutorial - To-do App.
After generation, you will be brought to a series of lessons. Before being able to access the Java tutorial, you must set a Maven group ID under SDK Versions > Settings. Once generated, follow the instructions found in Lessons > 0: Getting Started to use the console to generate an example tutorial Java application and complete the tasks. From here, complete each lesson and its associated tasks. For a hint, reference a sample solution.
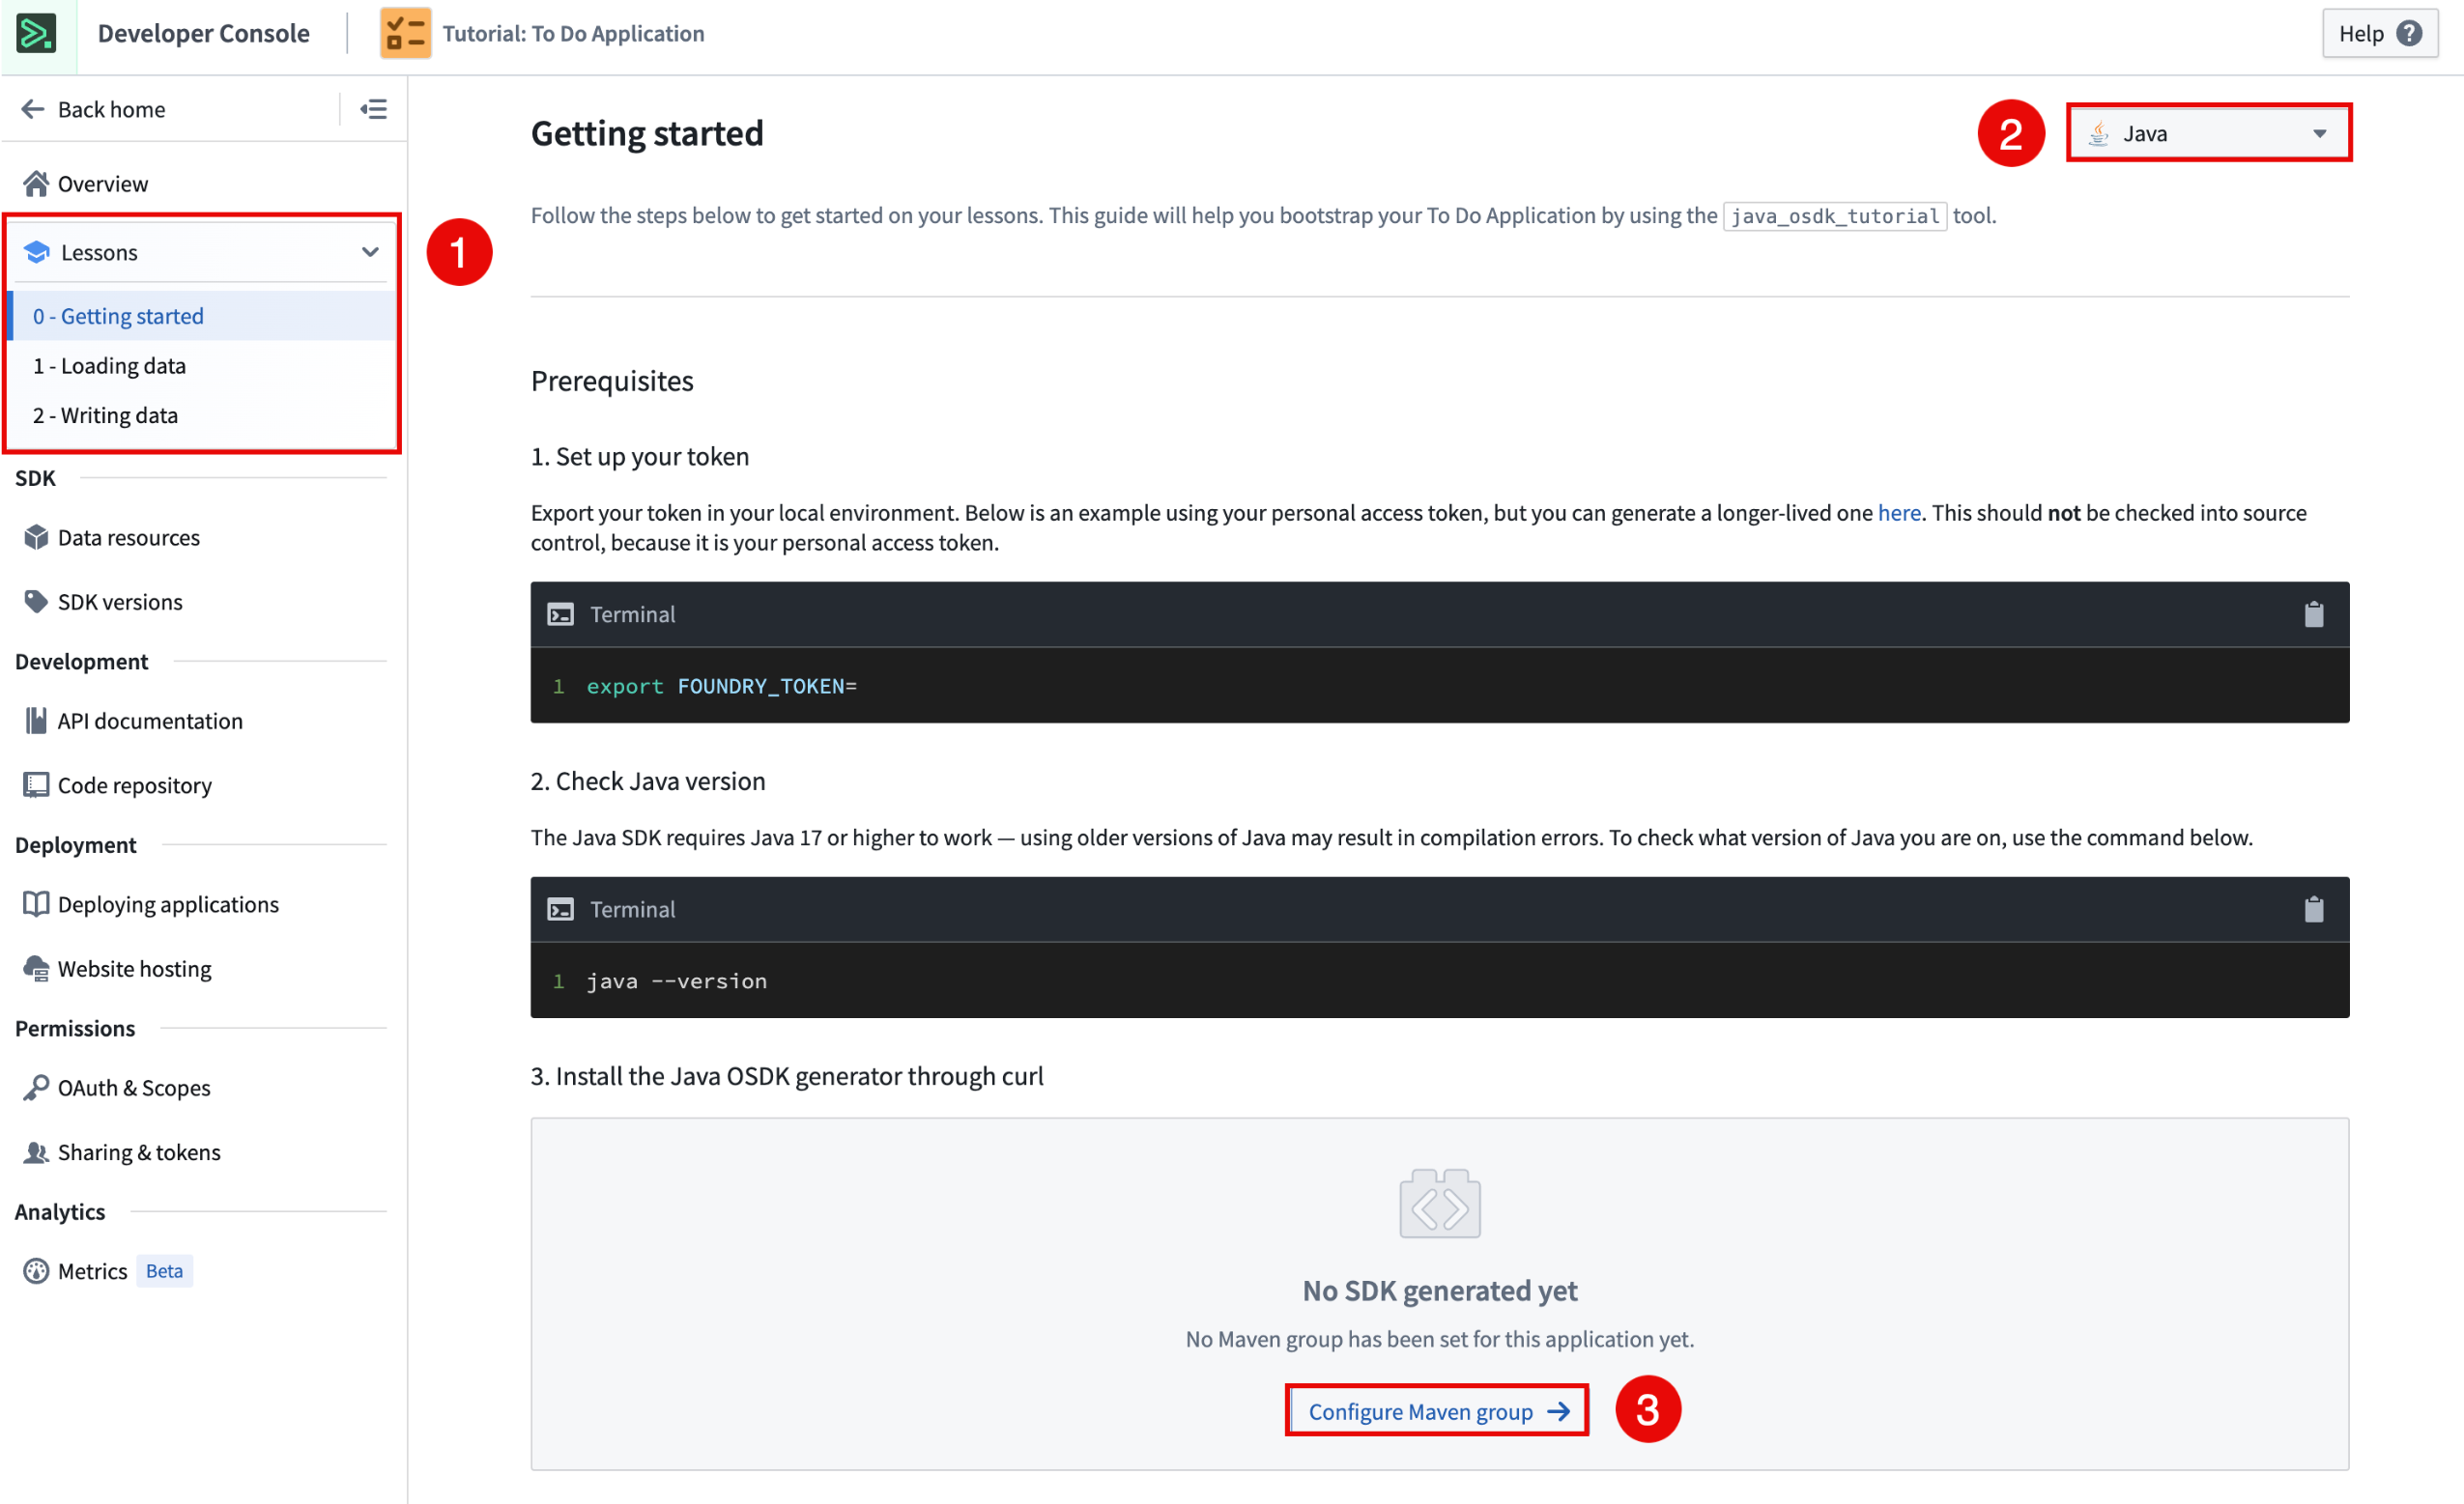
To create a Java Lesson using OSDK, select a lesson, select Java as the language, and lastly, configure a Maven group and generate the Java OSDK.
Need support?
Developer Console includes dynamically created API documentation for all languages supported by the Ontology SDK. Use the language dropdown menu to switch to Java-specific documentation.
In addition, public documentation for all Java OSDK functionality can be found in Palantir's public Java OSDK documentation.
We are always happy to interact with you through our Palantir Community Forum ↗. Submit feedback and any questions related to Ontology SDK or Developer Console using the #ontology-sdk tag.
What is next on the development roadmap?
We are working on adding more features to the Java OSDK including Interface casting, filtering and operations, a Compute Module template for Foundry Workflows, and more.
Introducing a simplified process for creating and managing code workspaces
Date published: 2024-10-08
A refined creation and management process for code workspaces is now generally available. This new process allows Code Workspaces users to manage new workspaces from a single code repository resource, rather than from two distinct resources that need to be individually configured and permissioned. During code workspace creation, users now only need to configure the backing code repository, and new code workspaces can be accessed by selecting the code repository from anywhere in the Palantir platform filesystem, removing confusion and streamlining access.
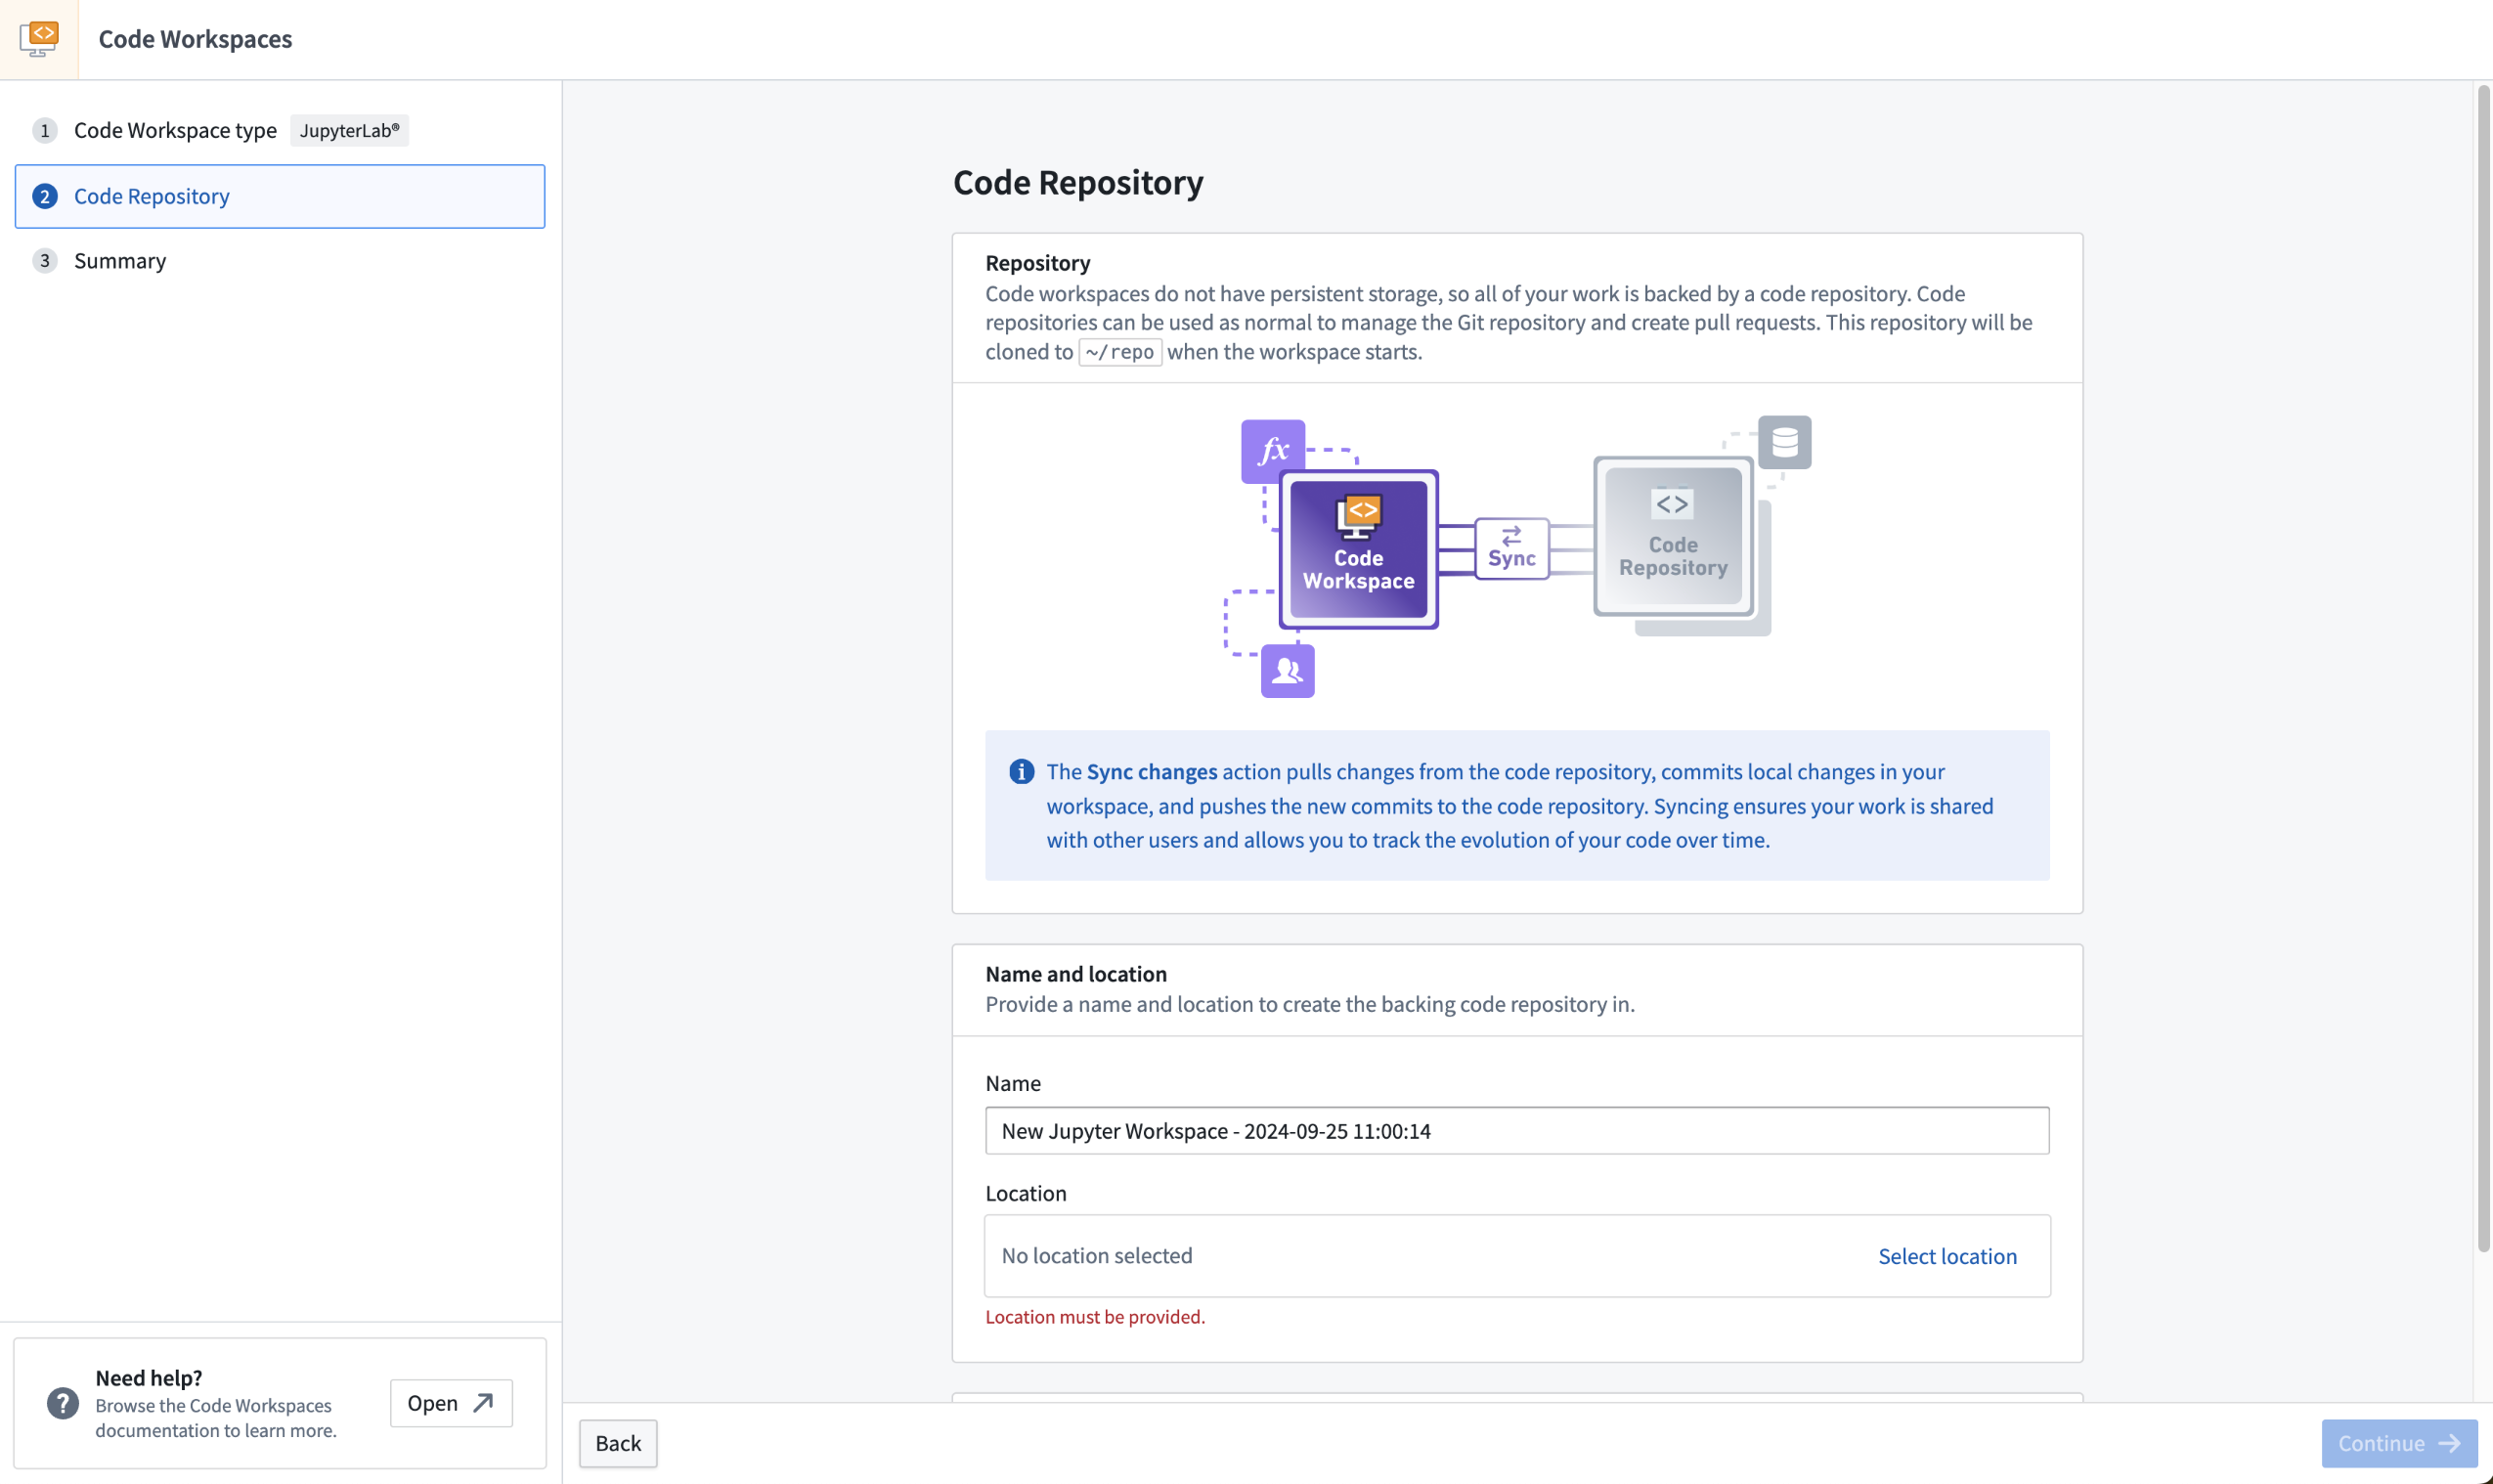
The new Code Workspaces UI, now only requiring configuration for the backing code repository.
Users can benefit from a decluttered user interface, and will no longer run into permissions issues with new code workspace resources. This feature applies to both RStudio® and JupyterLab® workspaces, but only affects code workspaces created after the week of September 30. These code workspaces will still have both a Code Workspaces and Code Repositories resource in the filesystem.
Learn more about creating new code workspaces.
RStudio® is a trademark of Posit™ and JupyterLab® is a trademark of NumFOCUS.
All third-party trademarks referenced remain the property of their respective owners. No affiliation or endorsement is implied.
Introducing model inputs in Code Workspaces
Date published: 2024-10-08
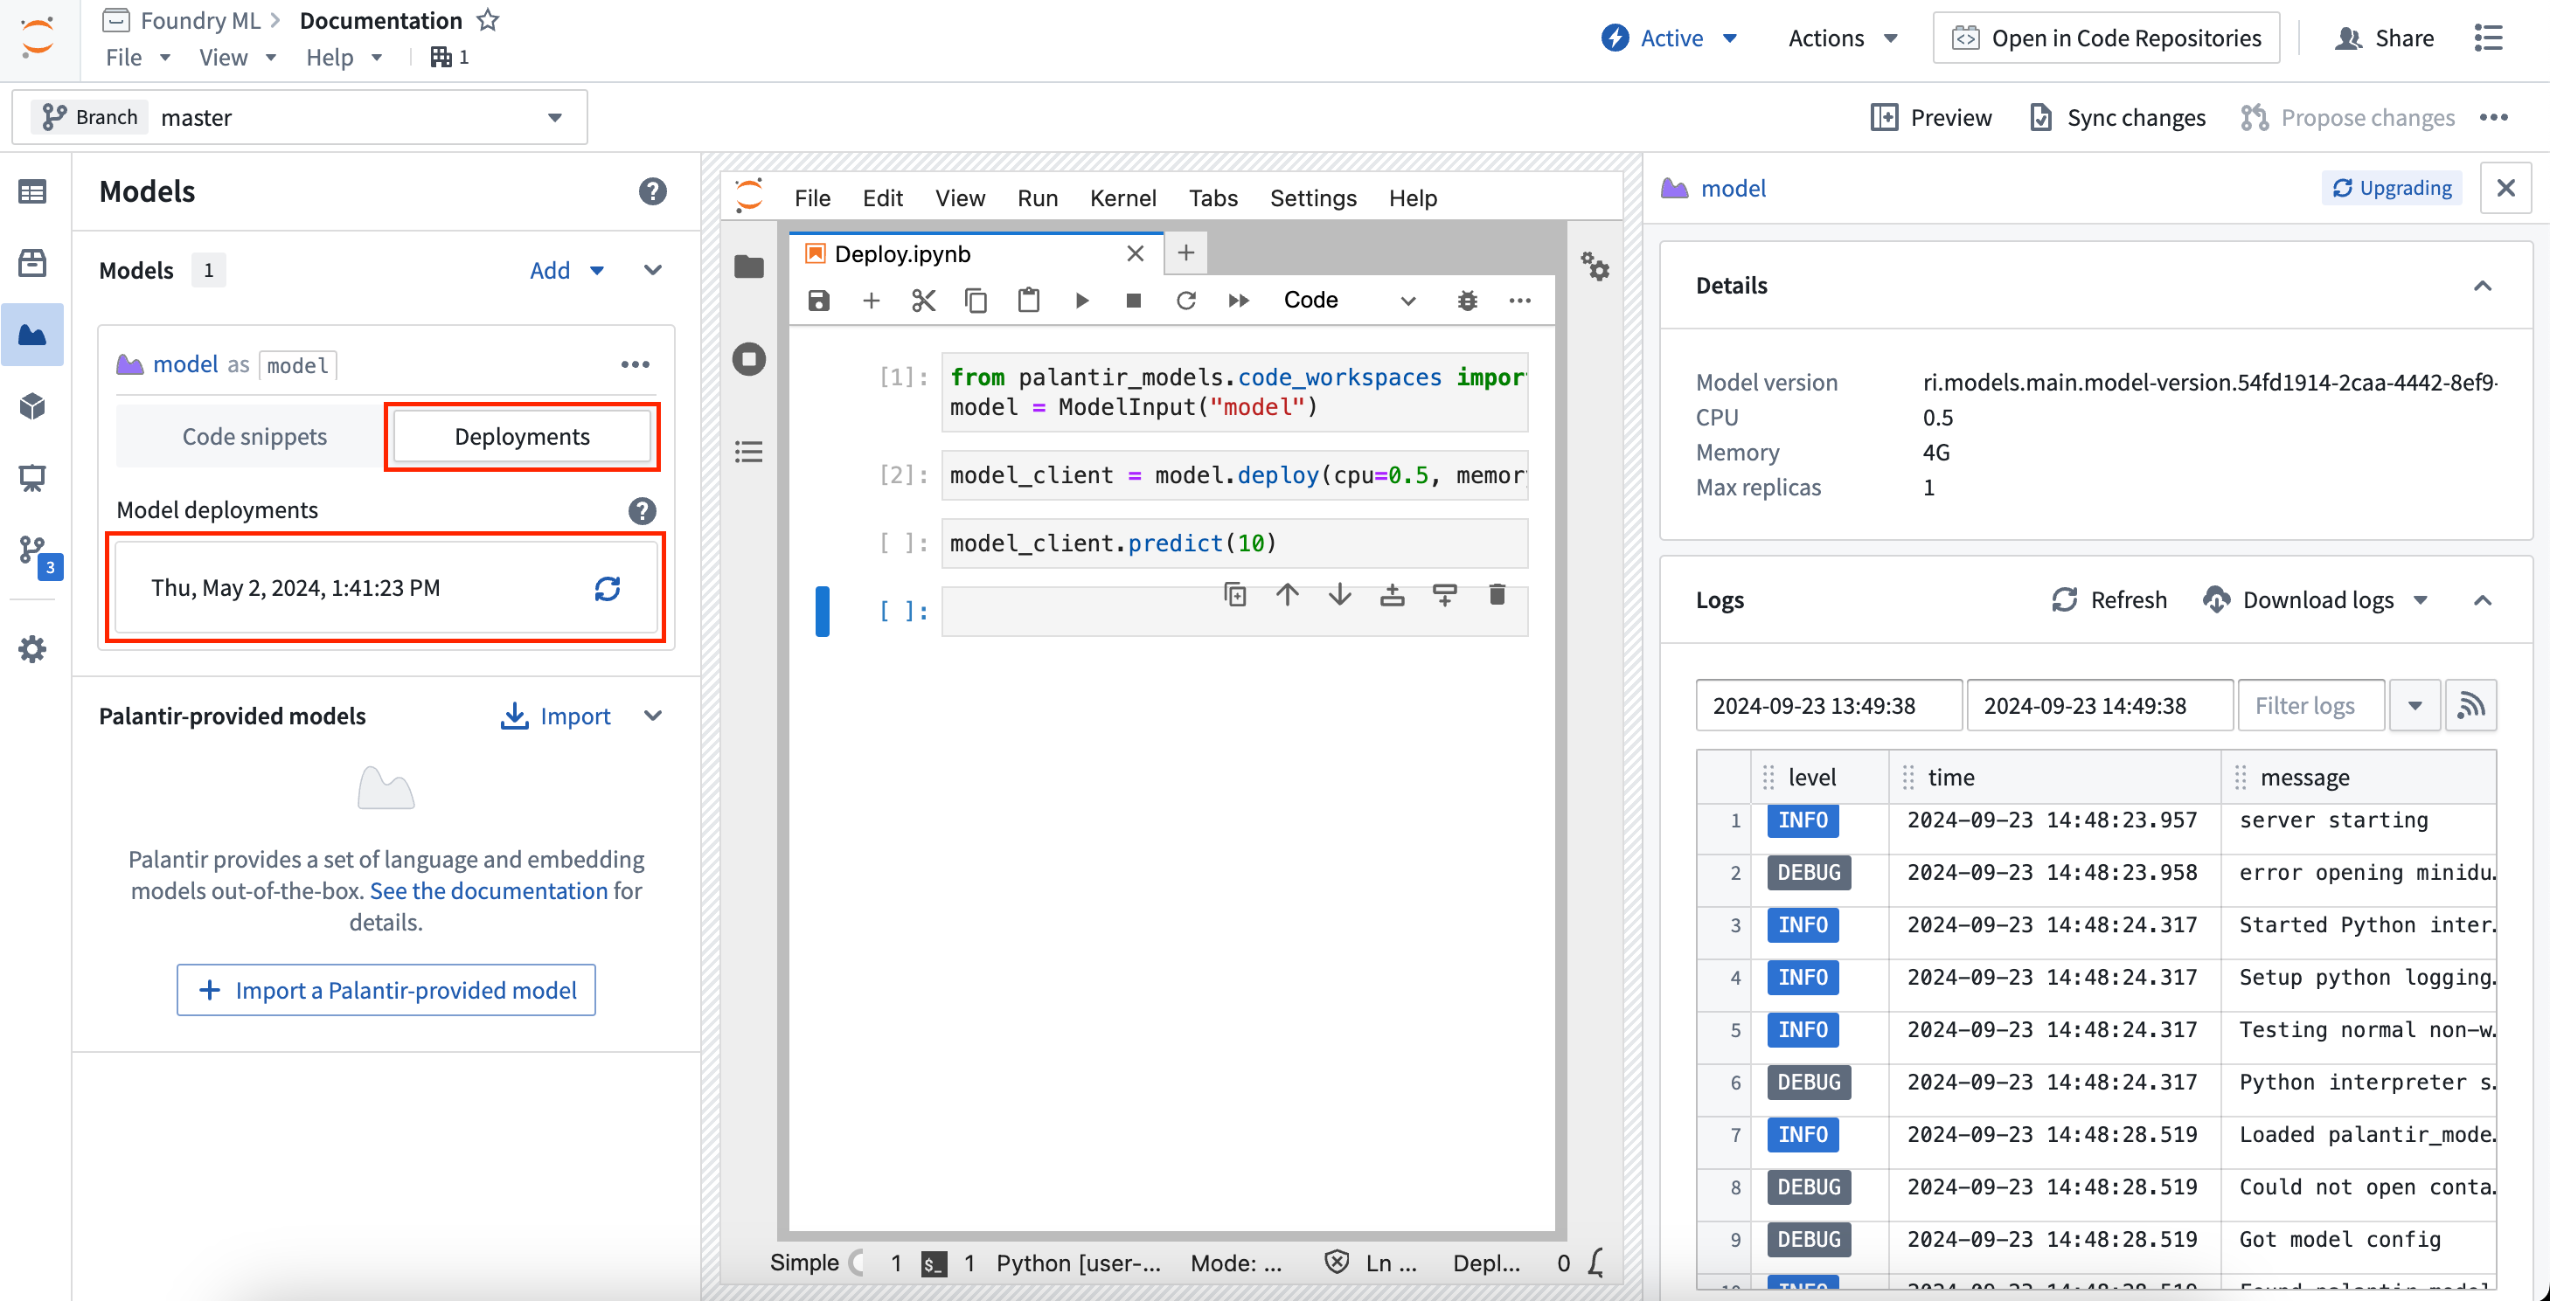
We are excited to introduce new modeling capabilities in Jupyter® Code Workspaces. Existing models can now be imported into Jupyter® notebooks, enabling a new series of interactive workflows in Code Workspaces, from fine-tuning existing models to integrating ML/AI capabilities into Code Workspaces dashboards.
Download models in Jupyter® Notebooks
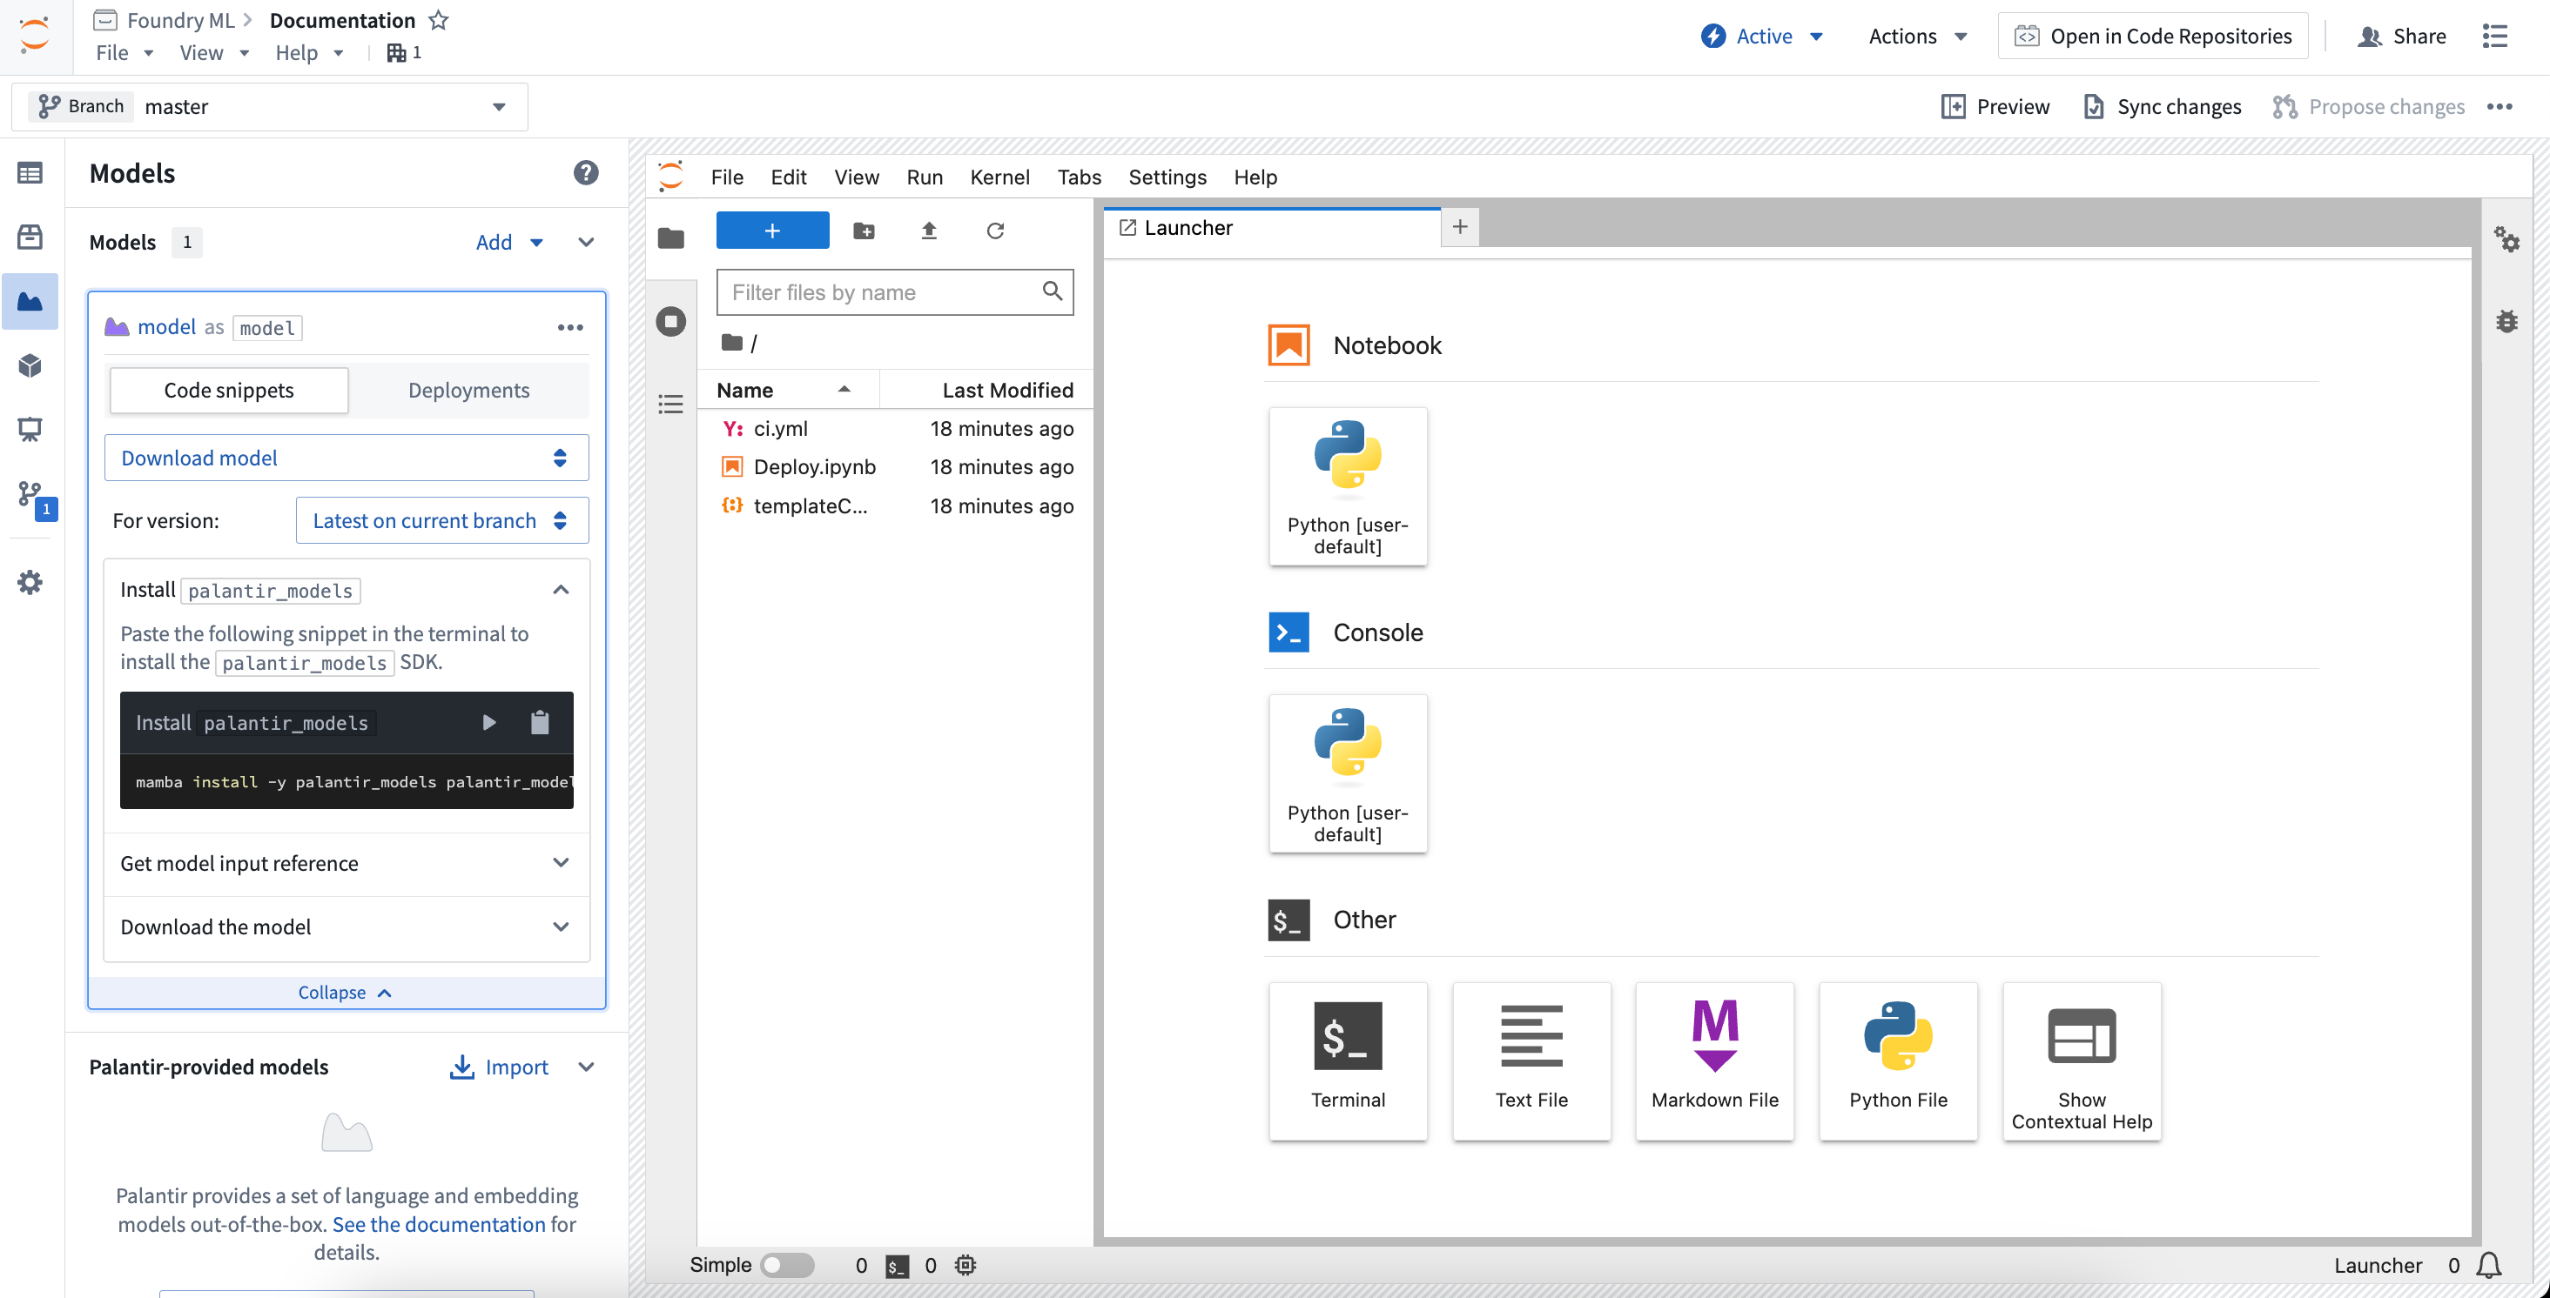
Maximize the utility of your models by downloading them directly into Code Workspaces. This new feature allows you to bring models produced in the Palantir platform into your notebook environment, giving you access to the serialized model weights. Ideal for fine-tuning, this functionality enables a deeper interaction with your models.
With the ability to deserialize models into actual Python objects, you can run inference on imported datasets seamlessly. The results of these inferences can then be written back to the Palantir platform for further use in downstream applications.
Deploy models for inference in Jupyter® Notebooks
Imported models can also be deployed for interactive inference within Code Workspaces. This opens up a range of new capabilities for model usage in the Palantir platform:
- Deployment verification: These deployments share the same infrastructure as model deployments. Easily publish and deploy a model for instant testing, all from the same notebook.
- Interactive Evaluations: Construct detailed evaluation notebooks to assess multiple models interactively, providing real-time feedback and enabling rapid iteration.
- AI/ML-Enhanced Dashboards: Integrate advanced AI/ML features into your dashboards, offering real-time predictions and analytics directly in your dashboards.
Review the documentation on using model inputs in Code Workspaces.
Share data insights with reports in RStudio® Code Workspaces
Date published: 2024-10-03
R Markdown Reports in Code Workspaces are now generally available, allowing RStudio® users to seamlessly generate, visualize, and share reports from R Markdown files. Reports are generated as a shareable webpage, enabling RStudio® users to distribute analyses and critical findings to colleagues and stakeholders. Generated reports can be configured to update when edits are made to the underlying R Markdown file, keeping involved parties informed on the latest changes.
A user-friendly option for delivering findings
Leverage user-friendly report creation by navigating to an R Markdown file and opening the Reports tab in the Applications sidebar of Code Workspaces.
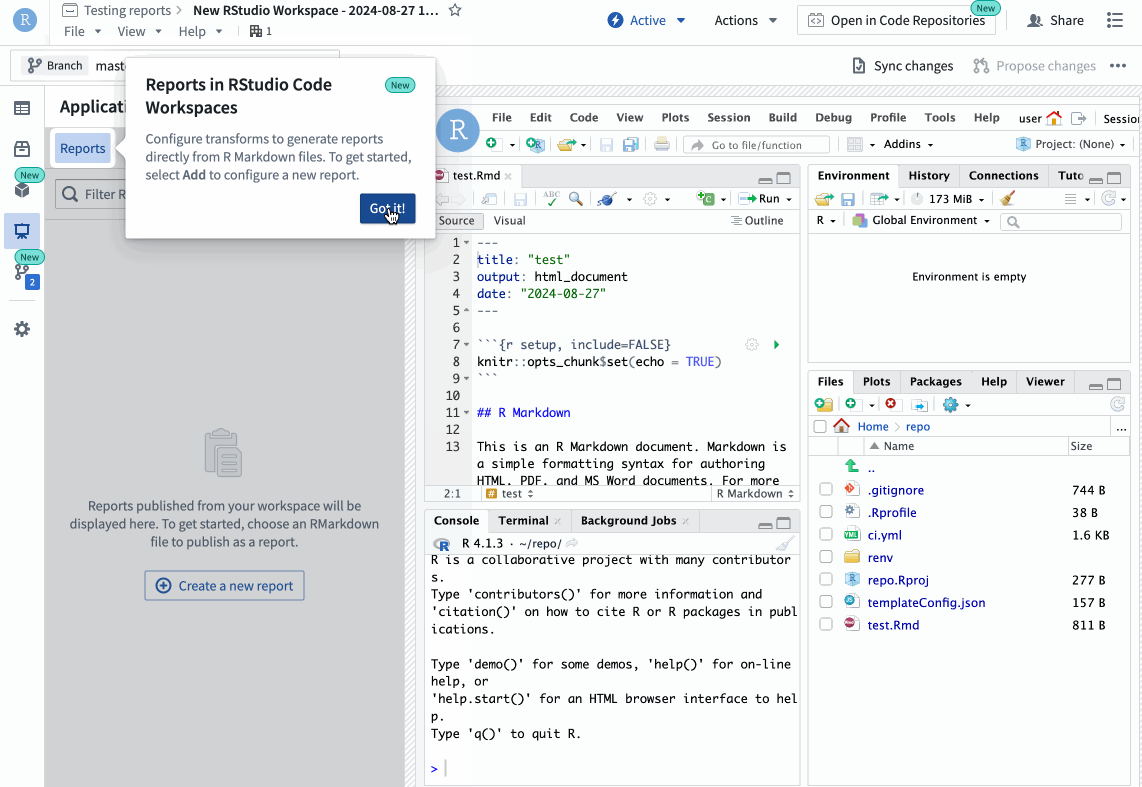
The Reports tab in the Applications sidebar showing the Create a new report option.
The Reports tab is your go-to place for viewing, editing, and creating reports. From here, you can select a report to open it in a new tab and share the report link to deliver insights and analyses.
Revisit and share historical reports
Additionally, it is possible to share past report versions and evaluate how reports change over time with built-in version history. This enables users to continuously update the underlying R Markdown file, while still being able to step back in time to showcase previous findings. The record of previous reports affords users peace of mind when making changes to the underlying file; if a previous report was particularly useful or impactful, you always have the ability to view or share it.

The version selector on a report card in the Reports tab.
The introduction of R Markdown reports in RStudio® Code Workspaces marks a significant improvement that streamlines the creation of shareable datasets. Dive into this new feature to create insightful, shareable reports built with customizable workflows that integrate seamlessly with the Palantir platform.
Learn more about R Markdown Reports in Code Workspaces.
RStudio® is a trademark of Posit™.
All third-party trademarks referenced remain the property of their respective owners. No affiliation or endorsement is implied.
Configure your support team in Control Panel
Date published: 2024-10-03
The configuration for support teams has moved from the Foundry Issues application to Control Panel in an effort to improve discoverability.
When a group has been registered as a support team, some status changes can be automated according to a set of rules. For example, when a reporter comments on an issue, the issue can automatically transition to “Waiting on Support” status for support team visibility.
This move to Control Panel also means that support teams are now configured at the enrollment-level rather than by Organization. As such, all Foundry issues assigned to support teams will now be affected by status automation regardless of the reporter's Organization, simplifying configuration in multi-Organization setups.

You can now configure your support teams in Control Panel.
Introducing "Platform Updates" for in-platform access to release notes and announcements [GA]
Date published: 2024-10-01
We are excited to announce the availability of product updates directly in-platform, advertising the latest features of the Palantir platform. Once a month, the application will be advertised on the left sidebar and upon opening it, you will have access in-platform to the latest product release notes and announcements. You can navigate freely to this feature via Notifications or under Support > Platform updates.
If you are interested in drilling down into a specific application, simply use the filter at the top right. The bar at the top allows you to switch between Announcements and Release notes. Furthermore, you can select an announcement individually to access the long version stored in our public documentation.

A screenshot of the "What's new in the Palantir platform" feature, enabling greater access to Announcements and Release notes.
As a reminder, if you would also like to receive these updates as emails directly to your inbox, sign up for our monthly newsletter.
Build interactive assistants with AIP Agent Studio [Beta]
Date published: 2024-10-01
Note: As of the week of April 27, 2026, AIP Agent Studio was renamed AIP Chatbot Studio. All existing features and functionalities remain unchanged.
AIP Agent Studio is a new, no-code tool that enables users to build and deploy interactive assistants, known as AIP Agents, equipped with enterprise-specific information and tools. AIP Agent Studio provides a natural language interface to leverage the Ontology, documents, and LLMs via AIP Agents that can take and update parameters (such as Ontology objects or text strings).
Available as a beta release, contact your Palantir representative to install on your enrollment.
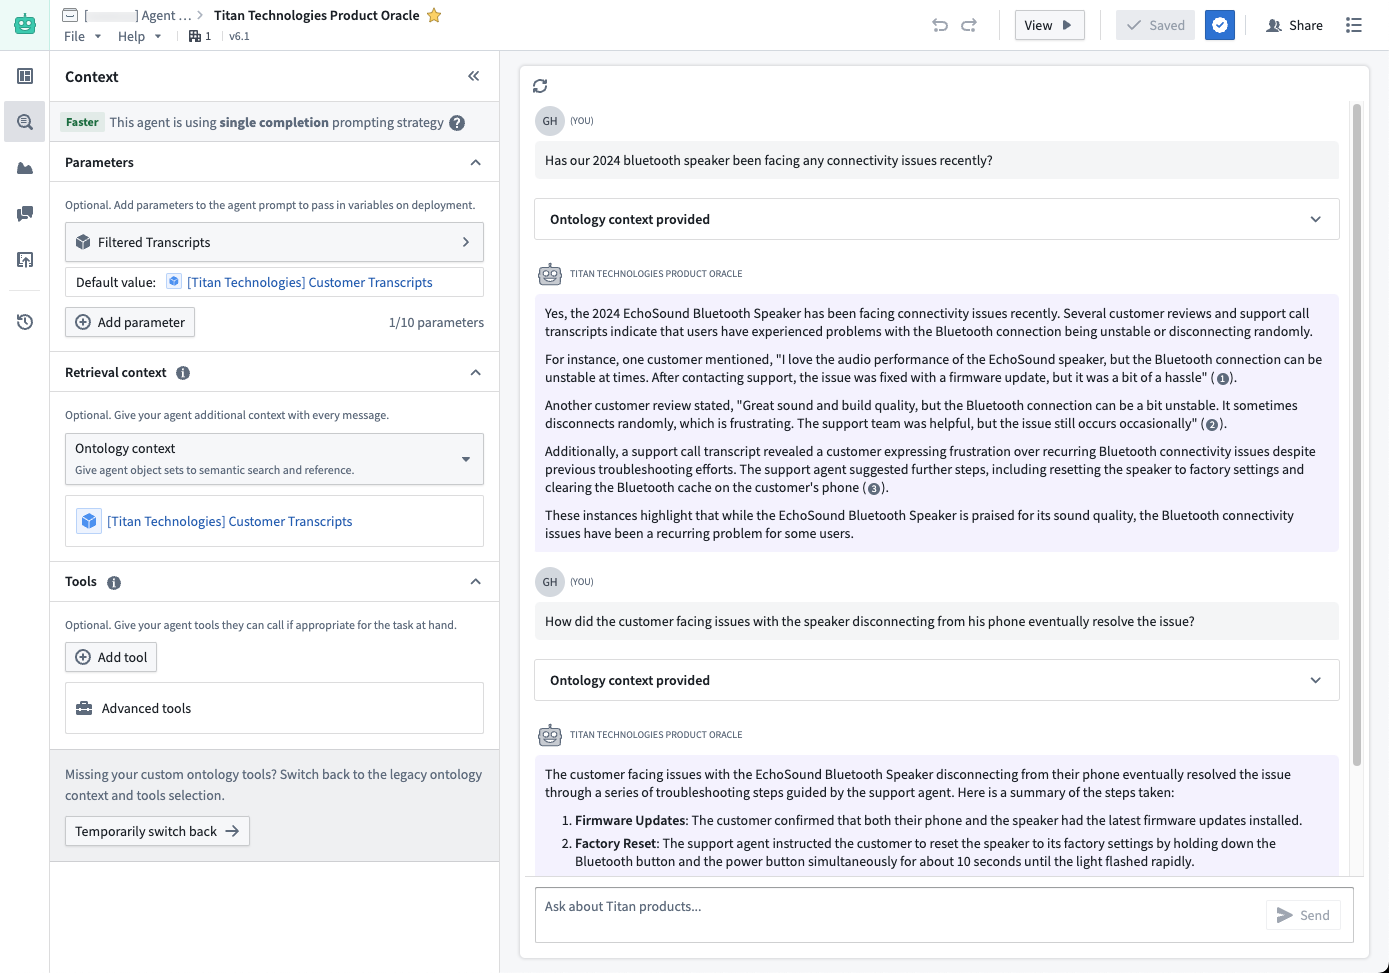
A LLM-powered AIP Agent that uses a parameter to take a filtered Ontology object set of customer support transcripts as context when answering user questions about current product issues.

The above AIP Agent can be deployed in a Workshop application with the agent parameters linked to variables.
Versatile agents designed for interactive assistance and effortless integration
AIP Agent Studio offers several compelling features:
- Customizable agents: Create and configure AIP Agents with specific prompts, parameters, and tools tailored to your enterprise needs.
- Interactive assistance: Deploy agents that can interact with users in a conversational manner to provide insights and perform tasks.
- Seamless integration: Leverage Ontology, documents, custom content sources, and LLMs to build powerful agents that can be deployed in Workshop, AIP Threads, and AIP Assist.
- Security: Built on the same rigorous security model that governs the rest of the Palantir platform, ensuring data integrity and access control.
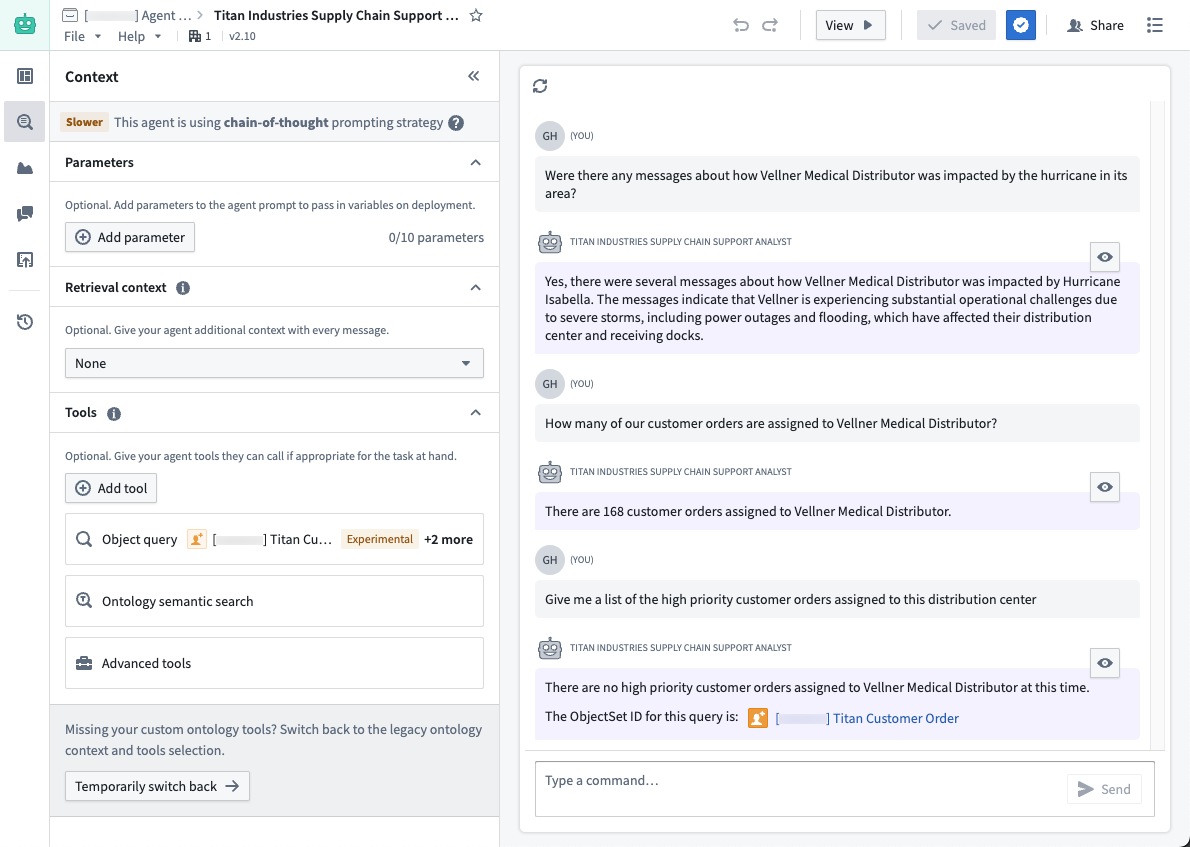
An AIP Agent with an Ontology semantic search tool and an Object query tool to find relevant information from supply chain communications and correlate that to specific orders.
When should you use AIP Agent Studio?
We recommend using AIP Agent Studio for:
- Grouped document retrieval-augmented generation (RAG) Agents: Ideal for analyzing large sets of documents or unstructured data. Whether dealing with procurement documents, environmental impact assessments, insurance claims, or shift handover logs, AIP Agents can provide context-aware responses and insights.
- Ontology context filtering: Useful for tasks requiring additional filtering based on the application context. For example, in drafting or brainstorming scenarios, agents can be used to adhere to specific style guidelines published by different stakeholders. This allows for consistent and personalized document generation, such as creating briefings tailored to specific higher-ups' preferences.
- Custom documentation assistance: By integrating with AIP Assist, AIP Agents can specialize in responding to queries based solely on custom content sources, making them invaluable for support teams, developer teams, and platform administrators. This functionality extends the power of AIP Agents to custom documentation.
- Routine prompting and templating: Perfect for scenarios requiring routine drafting or templating, such as coding assistance or generating domain-specific language (DSL) rules. Pre-prompting the agent with specific guidelines or templates can significantly enhance performance and consistency.
AIP Agent Studio is not suitable for tasks that require repetitive, well-defined processes. For such use cases, other tools like AIP Logic or AIP Automate may be more appropriate.
What’s next on the development roadmap?
We are actively developing AIP Agent Studio and will soon introduce support for deploying AIP Agents externally via the Ontology SDK (OSDK). Stay tuned for updates.
Learn more about AIP Agent Studio.
AIP Terminal will be deprecated October 2, replaced by AIP Agent Studio
Date published: 2024-10-01
Note: AIP Agent Studio has been renamed AIP Agent Studio as of April 27, 2026. All existing features and functionalities remain unchanged.
The AIP Terminal application is being replaced by AIP Agent Studio. To get started with AIP Agent Studio, review the relevant getting started guide. AIP Terminal app will be deleted on October 2, 2024. Any saved profiles made in AIP Terminal app will no longer be accessible. If you are actively using AIP Terminal or AIP Terminal profiles, migrate to AIP Agent Studio and manually transfer any important saved profiles over to agents in AIP Agent Studio. The AIP Agent widget will be unaffected.
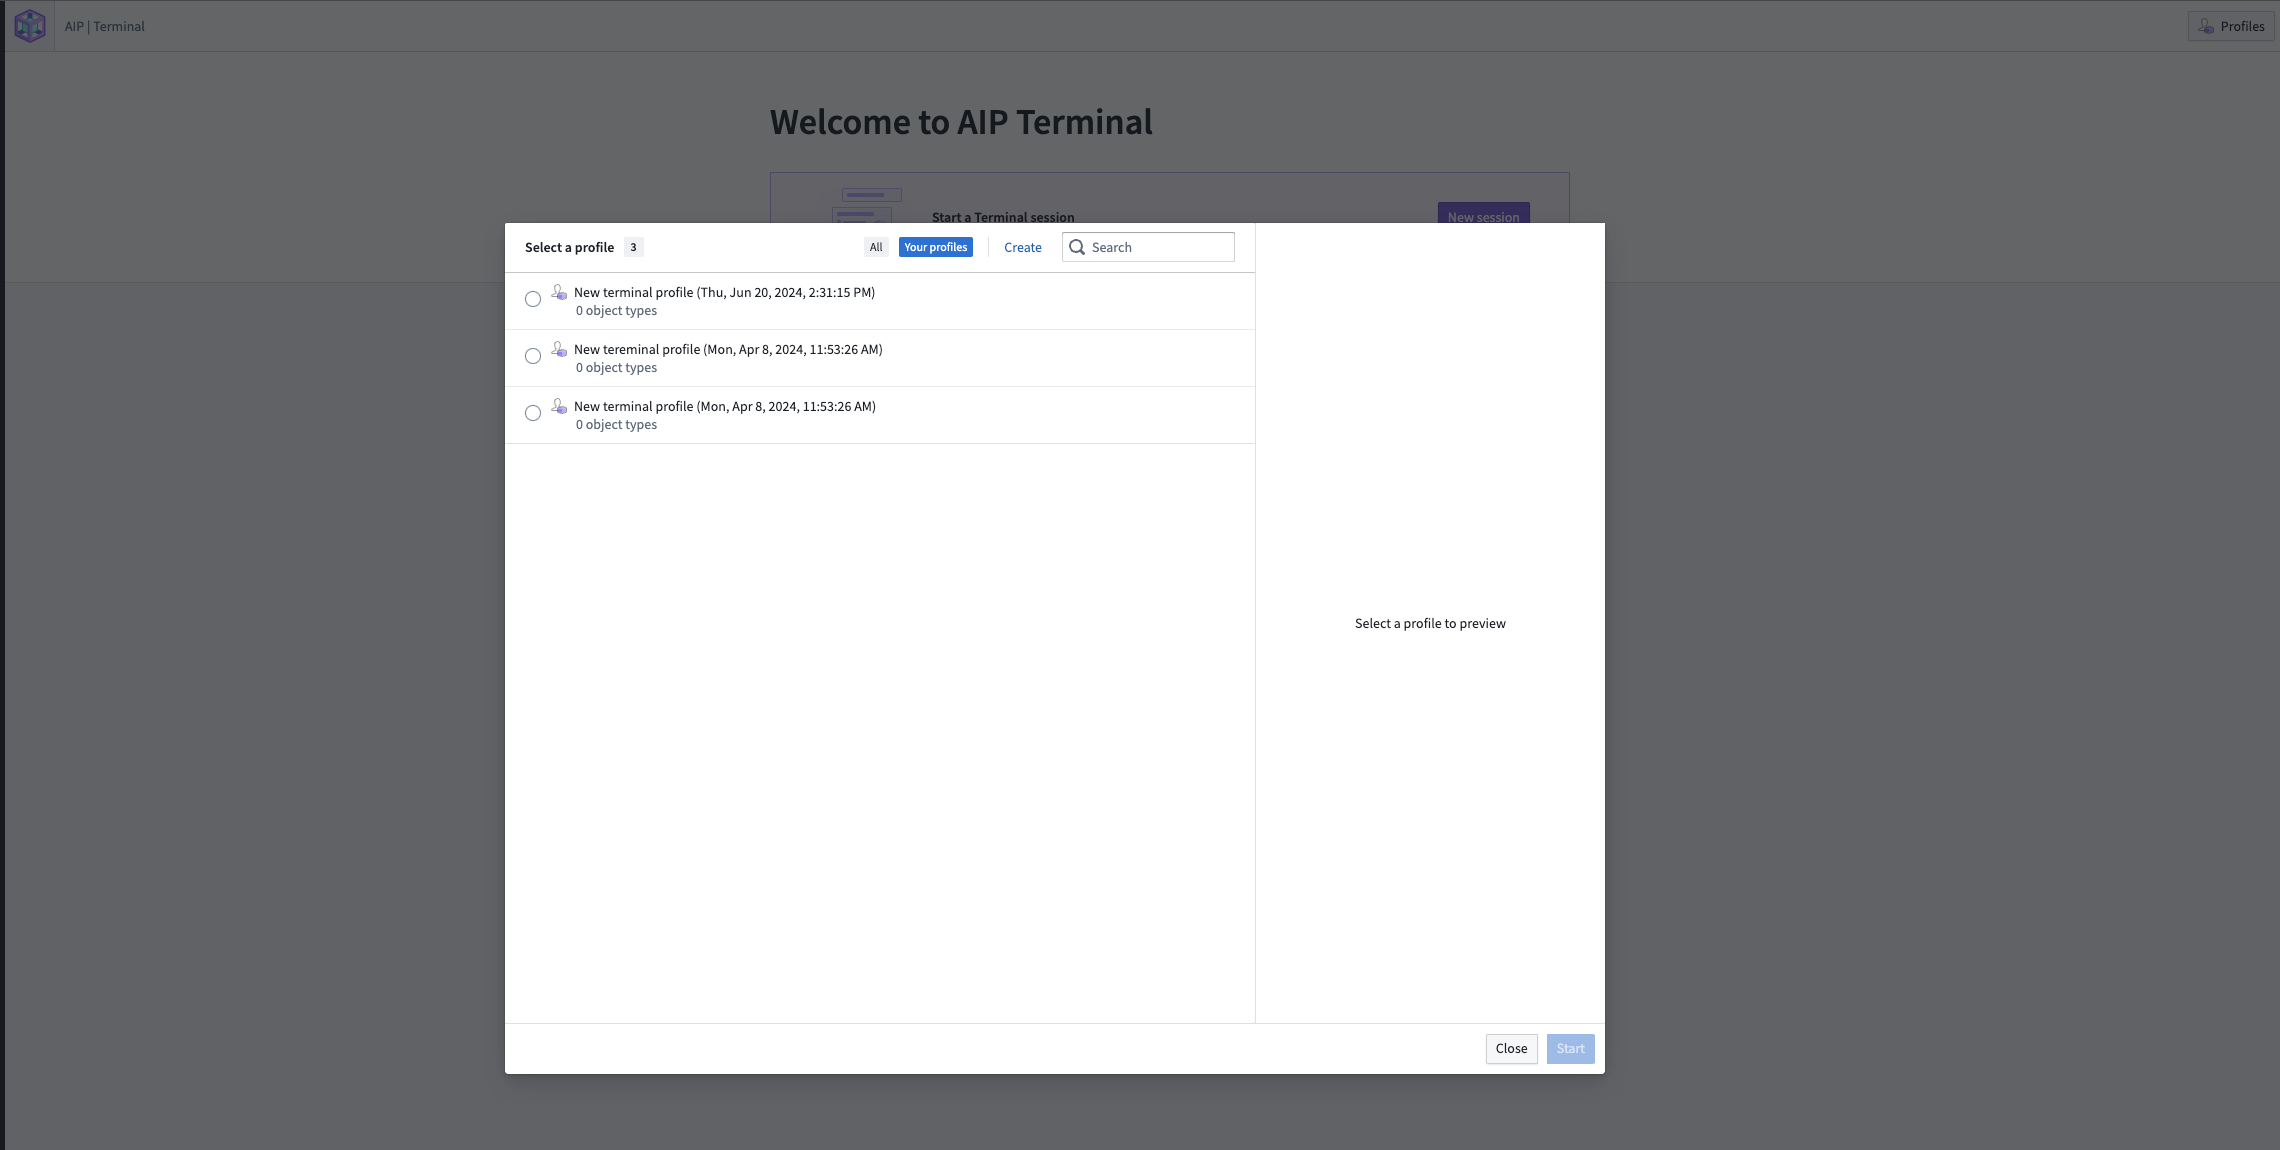
Deprecated AIP Terminal profiles will be deleted on October 2.
Store time series logic with derived series, now generally available [GA]
Date published: 2024-10-01
We are excited to announce the GA release of derived time series, available on all enrollments the week of October 7.
Prior to the release of this feature, the results of time series analyses performed in Quiver could not be used in workflows involving other Foundry applications. Now, you can derive a new series from raw sensor data and save it back to the Ontology, allowing for the use of the derived series in all Ontology-aware applications. Once in the Ontology, derived series behave as raw time series but are calculated on the fly. This eliminates the need to manage or store derived data or duplicate those calculations across the platform.

A generic outline of how an operation can be performed on raw data to generate derived series.
What's new with derived series?
In the previous beta version of derived series, you were required to manually save the derived time series to the Ontology through Pipeline Builder or Code Repositories. Now, you can conveniently save to the Ontology automatically using the Save derived series setting found in the Derived Series Options section of any supported time series card in Quiver.


The Save derived series option in a Quiver card, and the setting to save automatically to the Ontology in configuration options.
We also updated the derived series management experience with a feature-rich time series logic editor, shown below:
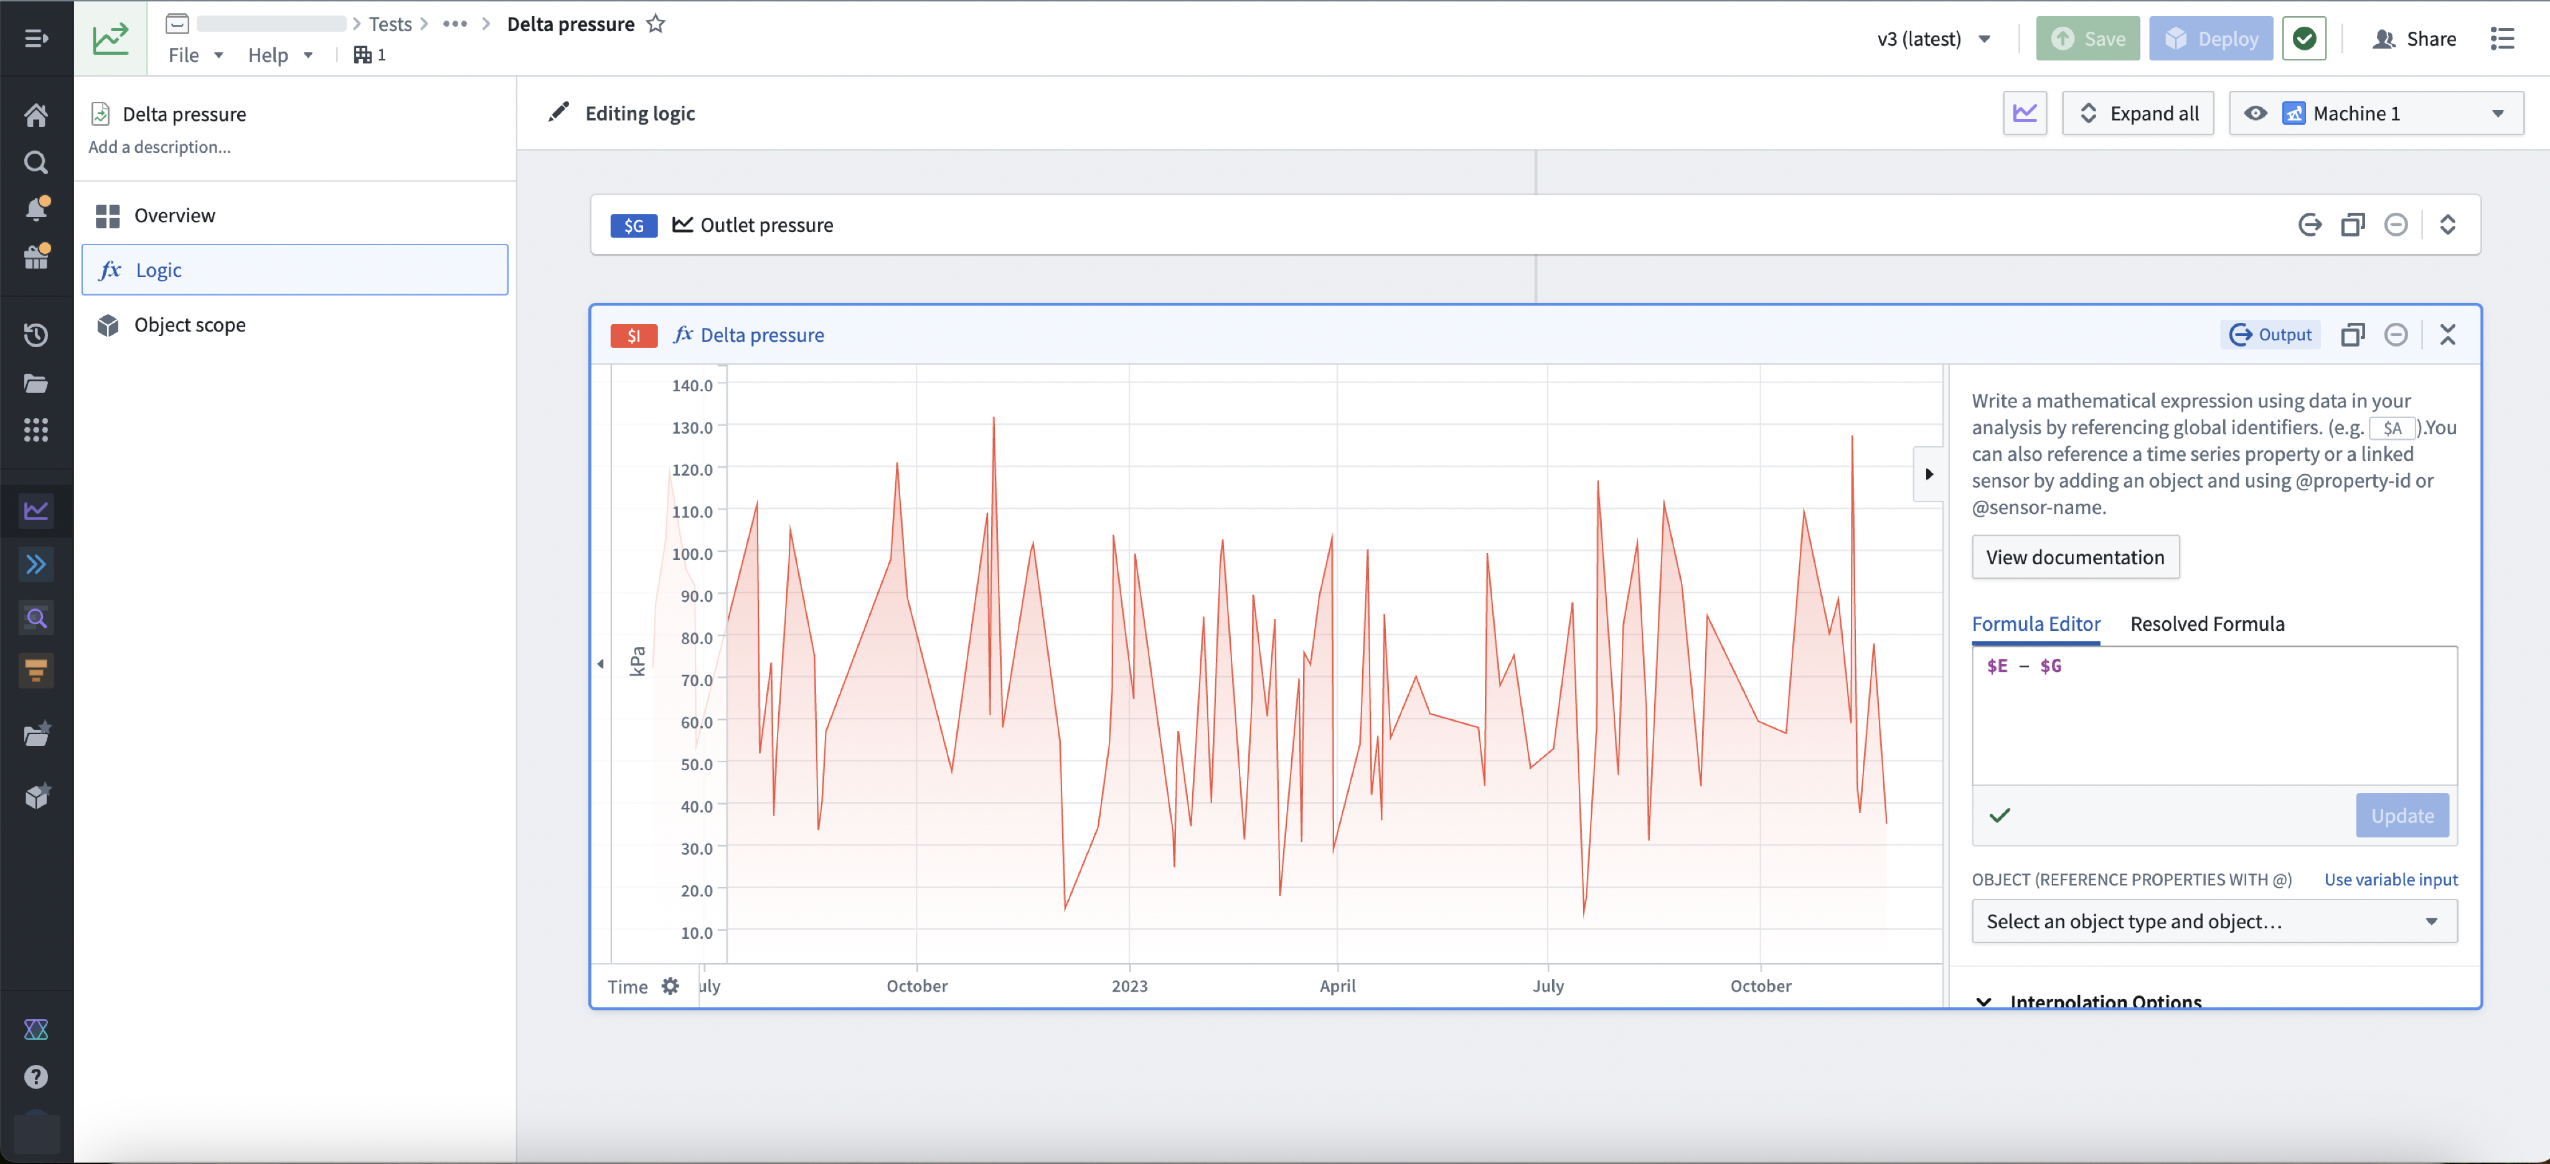
The updated time series logic editor for a Delta pressure derived series.
Finally, we now provide tooling for managing the derived series that have been saved into the Ontology:
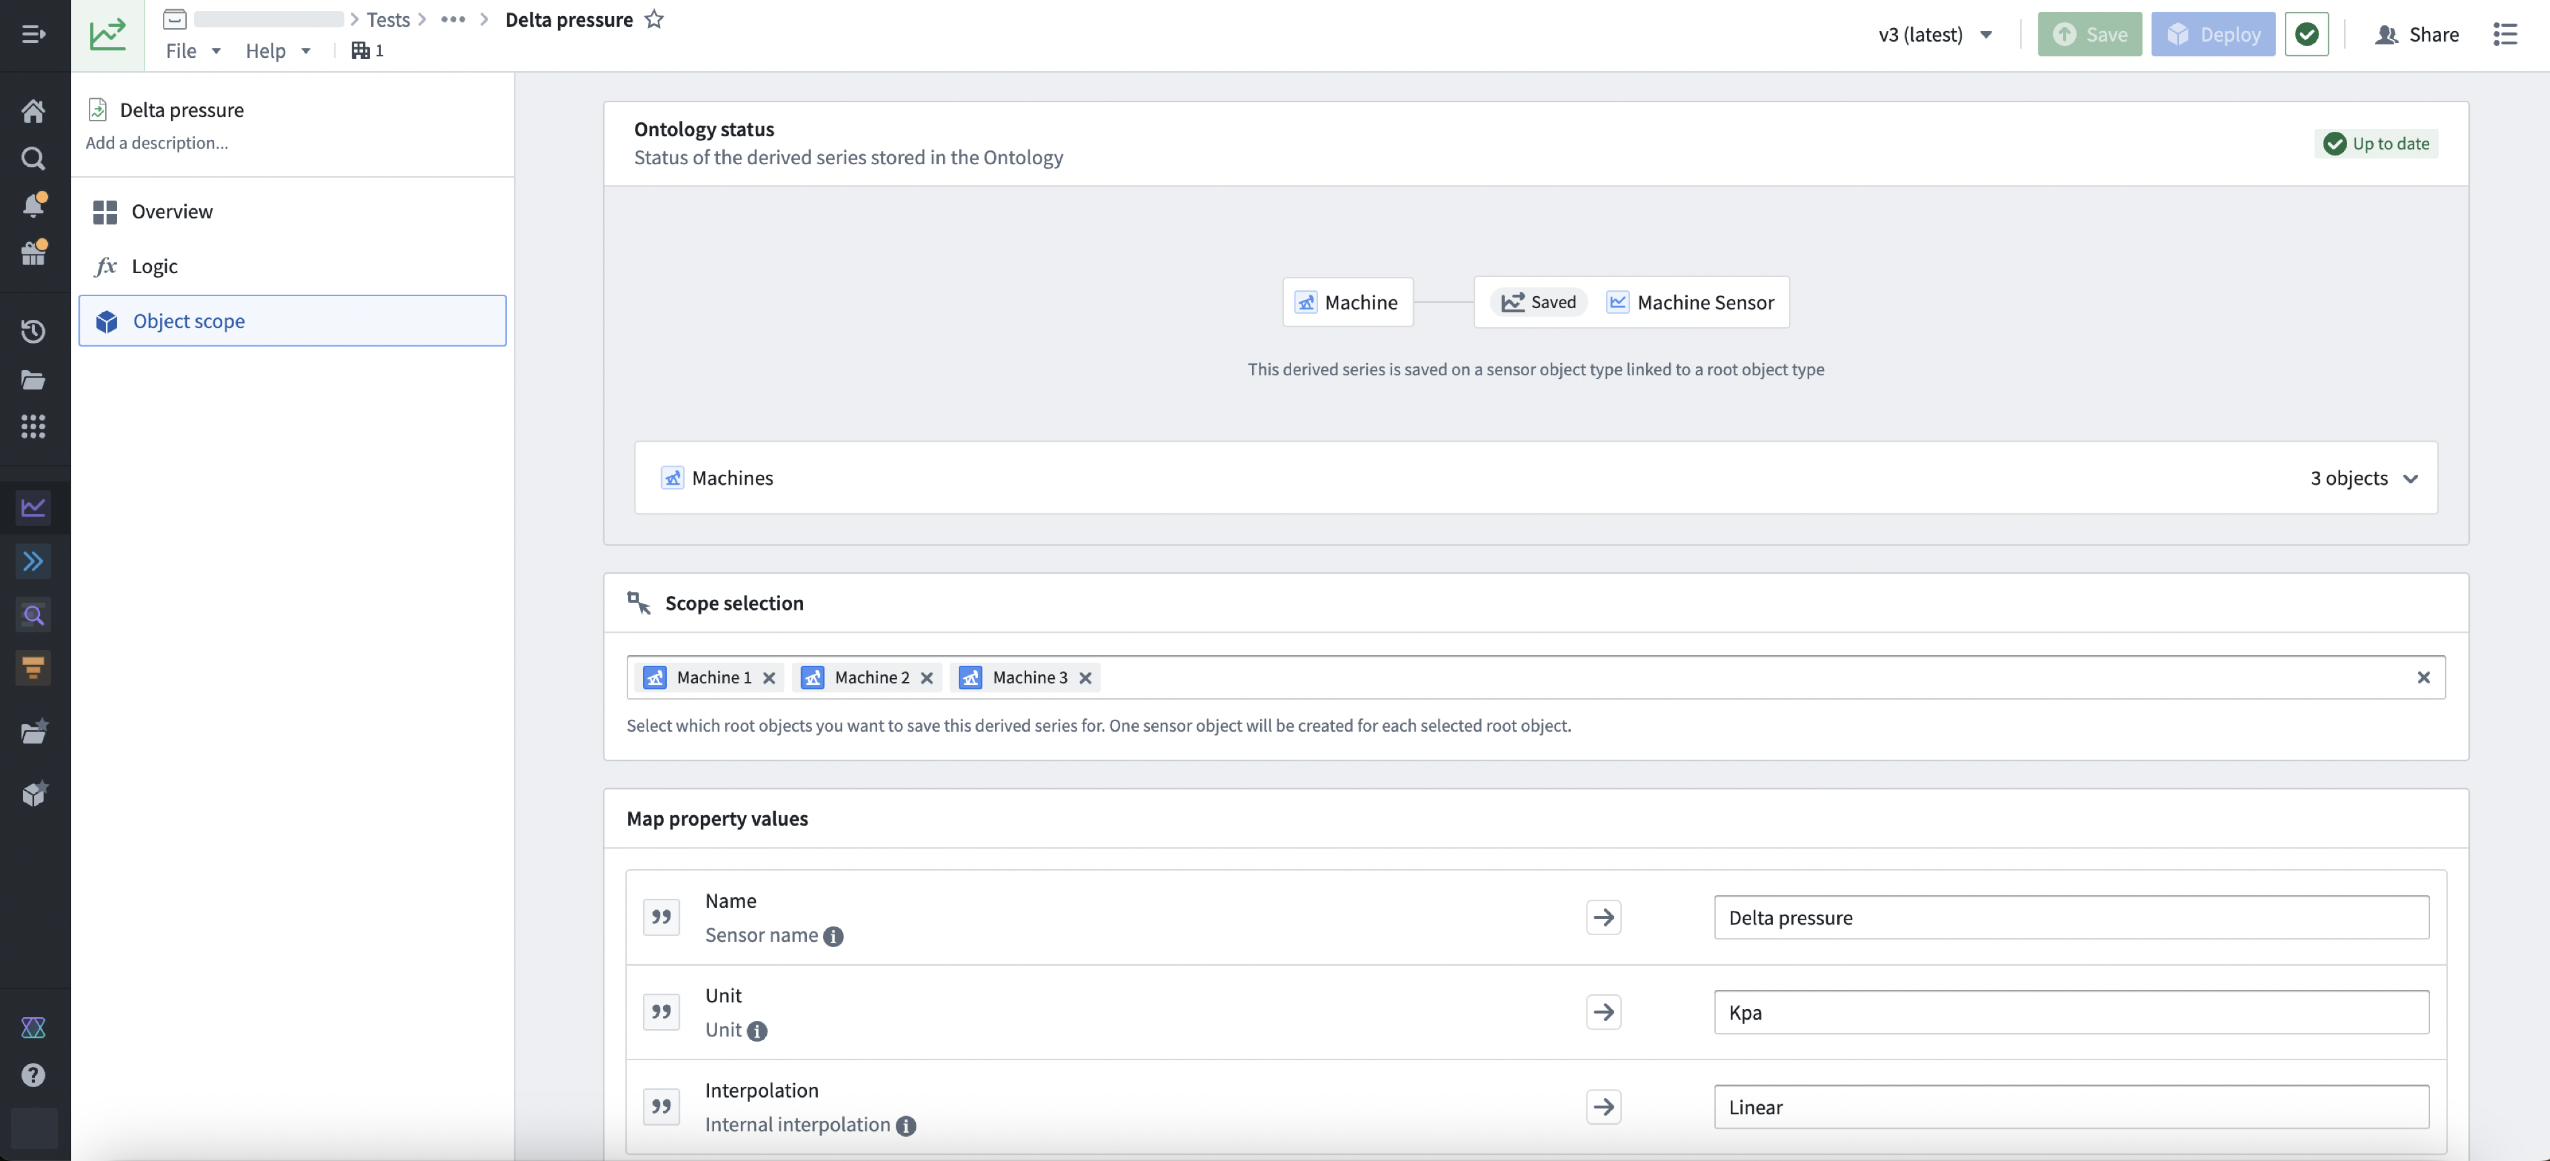
The new Ontology tab for configuring automatic Ontology saving to sensor object types.
Why use derived series?
Before derived series, there was a lack of user-friendly tooling for creating and managing derived series in the platform. Additionally, there was no intuitive way to use transformed time series across different Palantir applications without materializing the transformed data and manually adding the new series to the Ontology.
Now, users can derive new series in Quiver and save them to the Ontology for use in operational and analytical applications throughout Foundry. Users can also manage the logic and Ontology saving of derived series in a dedicated tool, with calculations only performed when a user requests the derived series.
Example use case
A current use case for derived series focuses on process optimization for waste water treatment plants, using data science to optimize energy and chemical consumption. With derived series as features to machine learning models, we can streamline the deployment of these models that use live-streamed time series data to inform operational safe water plant decisions at scale.
What is next for derived series?
Over the upcoming weeks, we will be adding the ability to select a filtered object scope for the root object to which the derived series will be linked.
Learn more about derived series in our documentation, including permissions requirements and how to set up automatic Ontology saving.
Use intake forms to eliminate access management information gaps [Beta]
Date published: 2024-10-01
This feature is now generally available. Read the latest announcement.
Platform administrators can now create authentication intake forms from Foundry's Control Panel to capture, review, and supplement user information not provided through existing identity provider integrations, such as those with SAML or OpenID Connect providers. Intake forms can be used to gather and enhance user data required for platform access management, particularly in instances where certain information may not be obtained from identity providers.
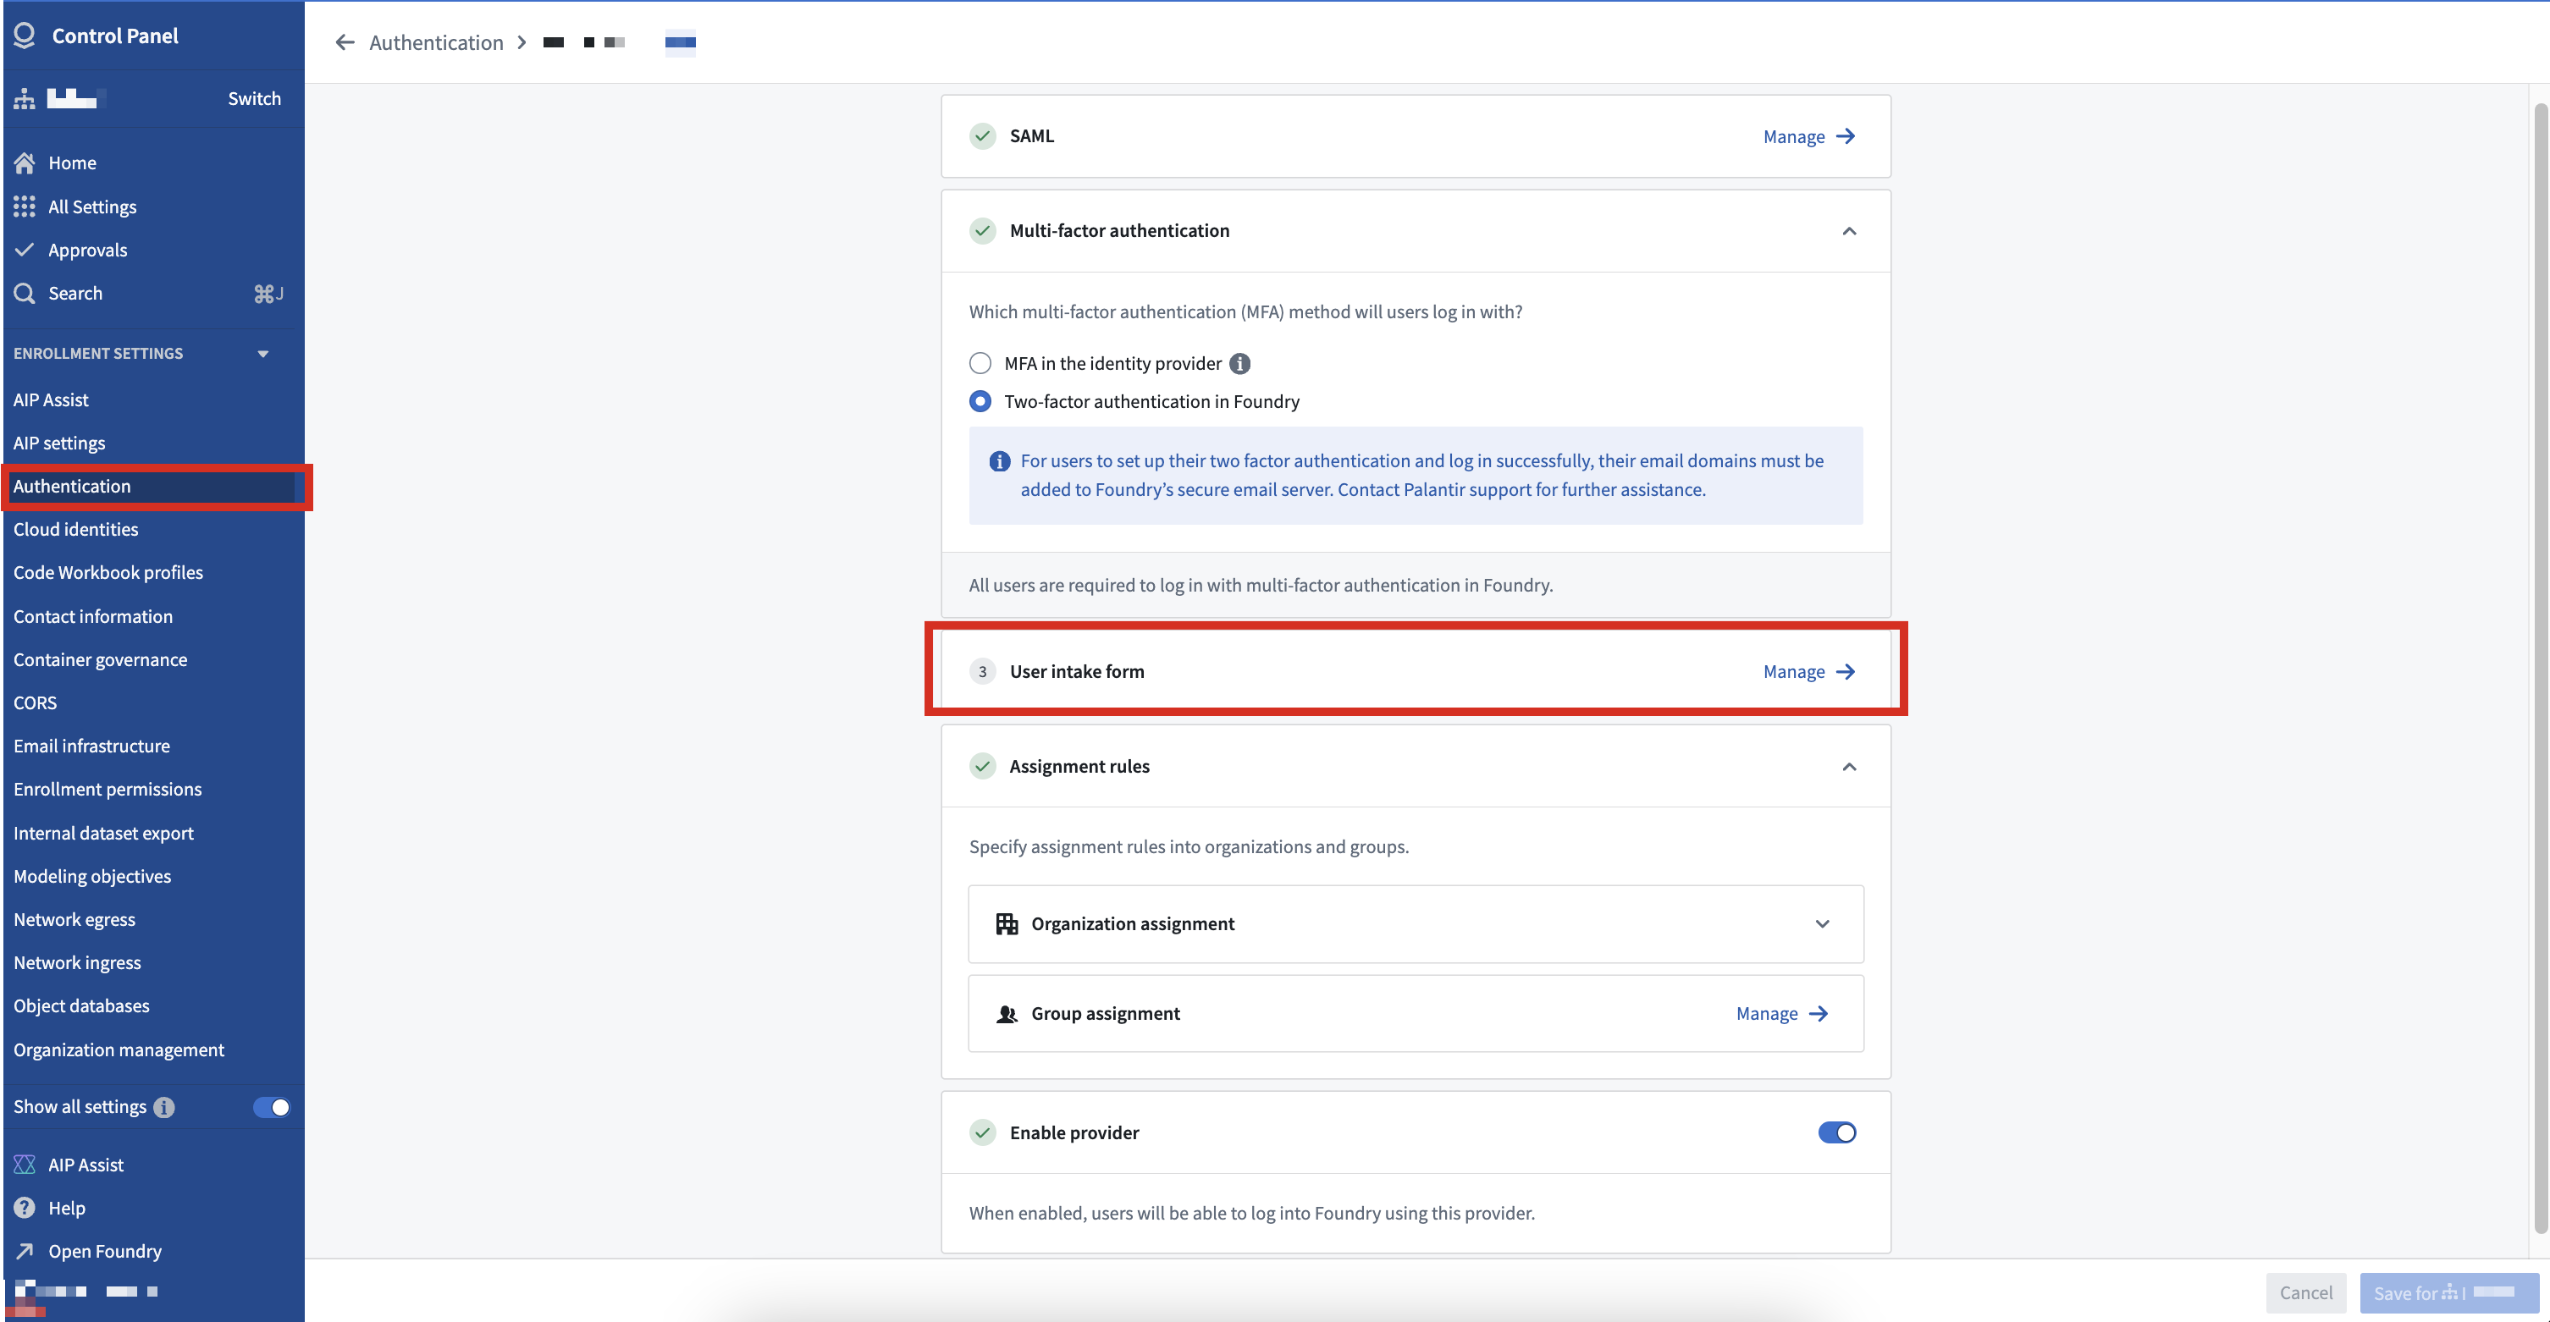
User intake forms created in the Control Panel supplement authentication information not inherited from an identity provider.
After a platform administrator publishes an intake form, users complete the form at the time of their first login and receive platform access upon approval. After submission, users can view their intake form's status and resubmit a new form, if necessary.
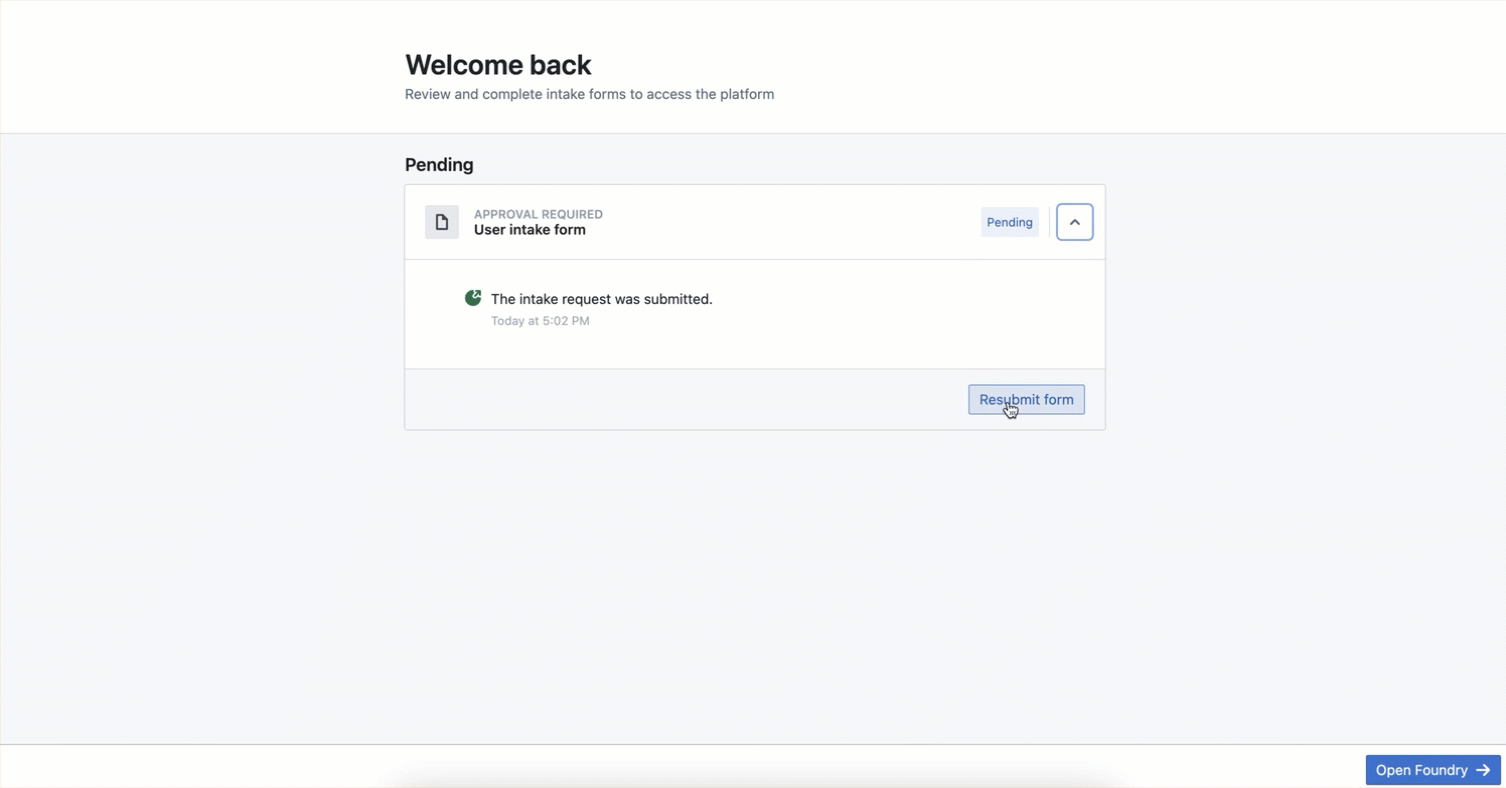
Users can view their intake form's review status or resubmit a new form to garner platform access.
During the beta period, contact Palantir Support to enable intake forms on your enrollment.
Palantir's platform authentication documentation offers additional detail about intake forms.
Introducing AIP Threads [Beta], your enterprise productivity tool
Date published: 2024-10-01
AIP Threads is a new general productivity tool for enterprise that enables users to accomplish a variety of tasks and ad-hoc analyses with the power of LLMs. No special configuration or technical expertise is required to interact with documents (for example, PDFs) and AIP Agents (interactive assistants equipped with enterprise-specific information and tools.) To begin working with AIP Threads, simply drag and drop your document into the interface, pick from previously uploaded documents that you have access to, or select an AIP Agent that you and your organization have created, and ask away.
AIP Threads is available as a beta release and can be accessed by contacting your Palantir representative to install on your enrollment.
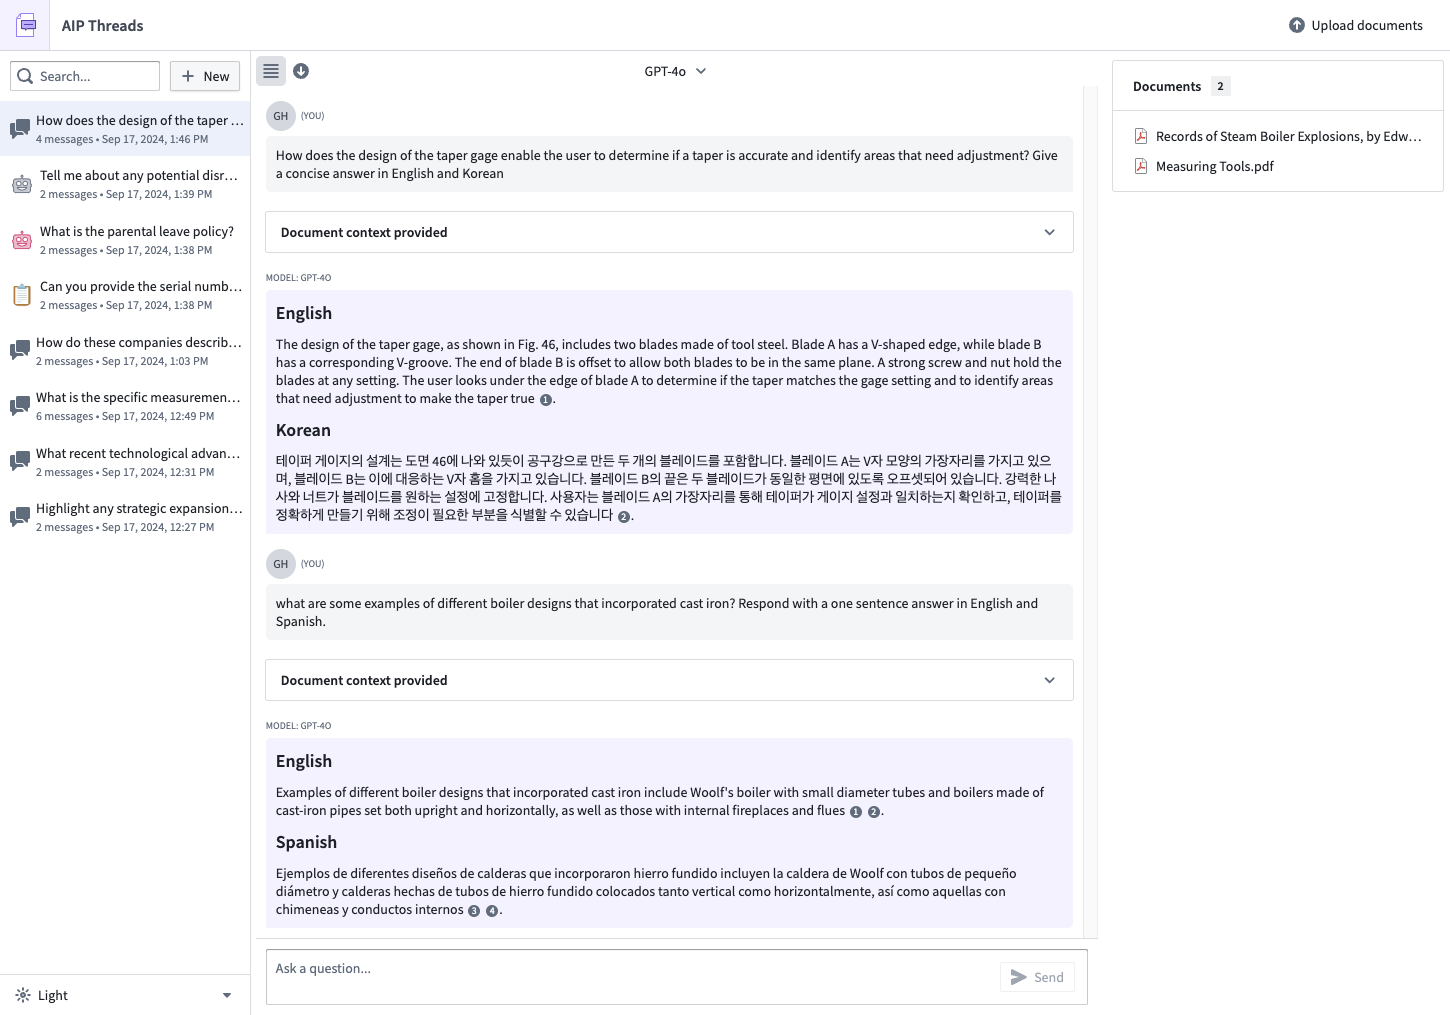
The AIP Threads interface showcasing interactions with documents and AIP Agents.
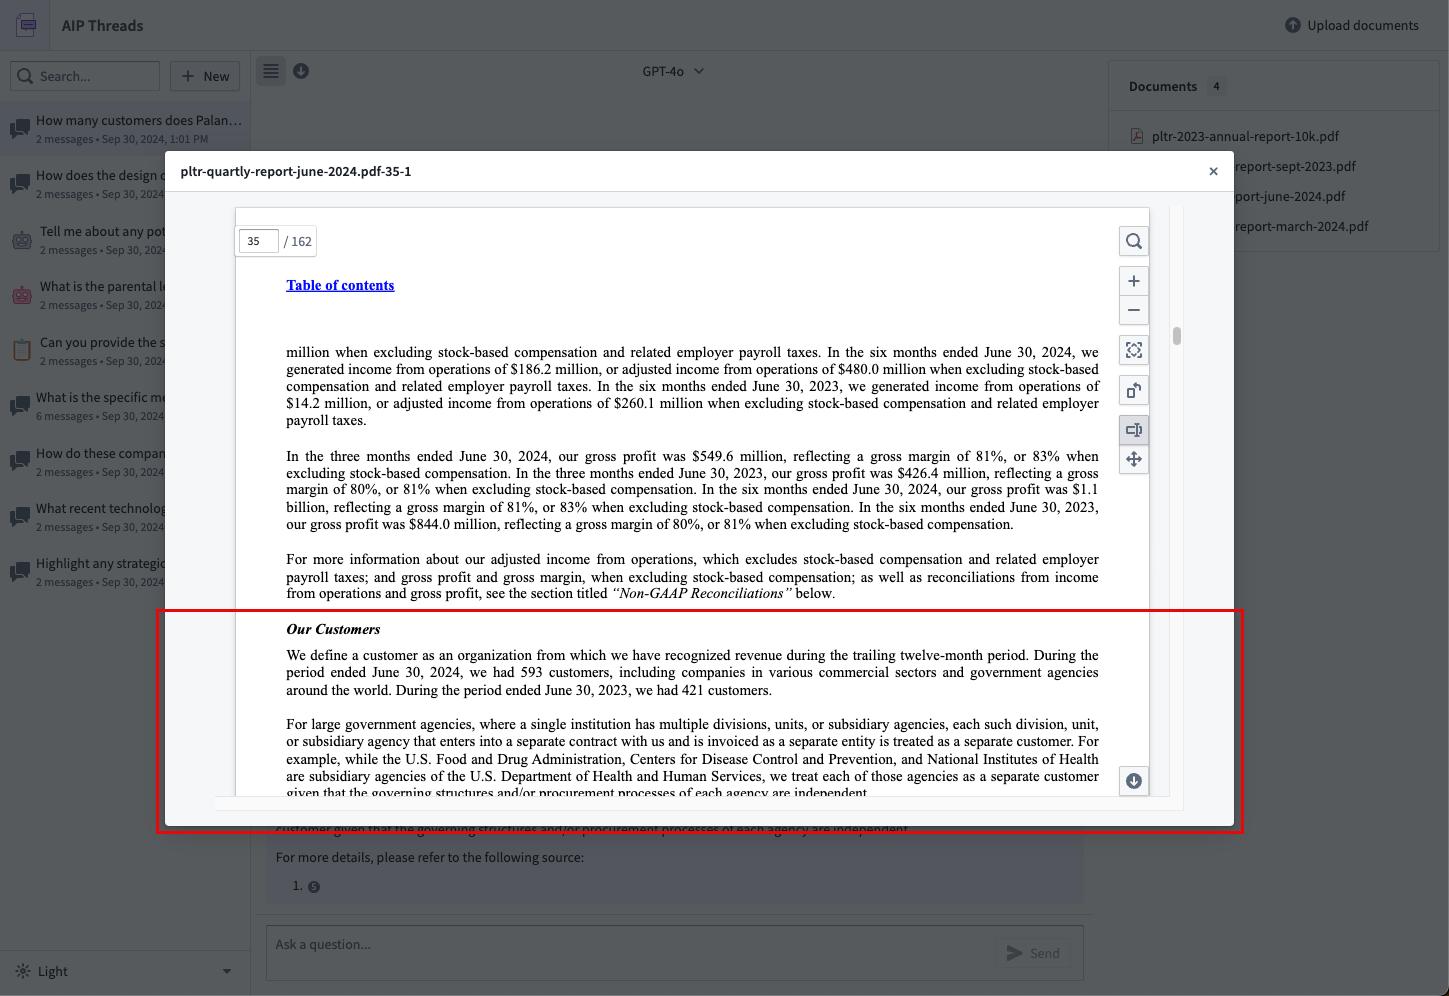
A PDF document citation shown in AIP Threads.
Perform rapid document analysis and obtain specialized assistance
AIP Threads is ideal for:
- Quick, ad-hoc document analysis: Extracting and summarizing key information from technical manuals, vendor contracts, intelligence reports, and more.
- Interactive assistance: Using AIP Agents for dynamic help and insights based on specific enterprise data.
- Iterative workflows: Performing iterative tasks that require detailed document analysis and interaction.
AIP Threads is not suitable for workflows requiring highly structured, repetitive tasks. For such cases, other tools like AIP Logic or AIP Automate may be more appropriate.
What’s next on the development roadmap?
We are actively developing AIP Threads and will soon add support for passing the full document text into the context window to further enhance its capabilities. Stay tuned for updates.
Additional highlights
Starting October 2024, the additional highlights section will no longer be in use and will be merged into release notes. From now on, review Palantir platform release notes for enhancements, bug fixes, and new features.
中文翻译
公告
提醒: 订阅 Foundry 新闻通讯(Newsletter),即可直接在收件箱中接收关于新功能、产品改进等平台更新的摘要。有关如何订阅的更多信息,请参阅 Foundry 新闻通讯与产品反馈渠道现已开放注册(正式发布)。
欢迎在我们的开发者社区论坛 ↗分享您对这些公告的看法。
隆重推出 TypeScript Ontology SDK 2.0,现已正式发布
发布日期:2024-10-29
TypeScript Ontology SDK (OSDK) 2.0 已于 10 月 28 日当周正式发布,提供简化的语法以提升性能、支持更复杂的应用程序并加快开发流程。默认情况下,在开发者控制台(Developer Console)中创建的任何新 TypeScript 应用程序都将使用最新的 2.0.x 生成器。
将现有应用程序迁移至 TypeScript 2.0
TypeScript OSDK 2.0 迁移指南解释了版本差异,突出了相关的语法和结构变更,并提供了代码示例,帮助您更新使用旧版本构建的应用程序。
虽然目前不强制要求将旧版应用程序迁移至使用 2.0 语法,但即将发布的 TypeScript OSDK 2.0 版本(包括对接口(Interfaces)和媒体集(Media Sets)的支持)将需要迁移。
Palantir 将在 2.0 版本发布后至少一年内继续为旧版 TypeScript 应用程序提供支持。
要为现有应用程序生成 TypeScript OSDK 2.0,请在开发者控制台(Developer Console)中应用程序的左侧面板选择 SDK 版本(SDK versions) 菜单。
在开发者控制台(Developer Console)中为现有旧版本应用程序生成 TypeScript OSDK 2.0。
获取支持
Ontology SDK 开发者社区 ↗为 Foundry 用户提供了一个论坛,用于提问和解答关于 Ontology SDK 功能套件的问题。如果您在社区论坛或迁移指南中找不到问题的答案,请联系 Palantir 支持以获取更多帮助。
Foundry Connector 2.0 for SAP Applications v2.32.0 (SP32) 现已可用
发布日期:2024-10-29
用于将 Foundry 连接到 SAP 系统的 Foundry Connector 2.0 for SAP Applications 插件 2.32.0 版本 (SP32) 现已可从 Palantir 平台内下载。
此最新版本包含错误修复和小的增强功能,包括:
- 改进了 SAP HANA 的数据库级分页(无需物化分页键)
- 支持 BALDAT 表解压缩
- 解决了包含值之间空格的过滤器问题
我们建议将此通知分享给您组织的 SAP Basis 团队。
有关下载最新插件版本的更多信息,请查阅我们的文档。
对象存储 V2 现支持编辑历史追踪 [正式发布]
发布日期:2024-10-22
对象存储 V2 (Object Storage V2) 现在支持追踪用户编辑历史。要使用此功能,请在 Ontology Manager 中为对象类型启用追踪用户编辑历史(Track user edit history)设置,并更新对象视图以包含编辑历史(Edit History)小组件来显示用户编辑历史。
Ontology Manager 中的 追踪用户编辑历史(Track user edit history) 设置。
Workshop 编辑历史(Edit History) 小组件显示用户编辑历史。
编辑历史反映的是在启用追踪用户编辑历史(Track user edit history) 设置后对对象所做的更改。在此功能激活之前所做的任何更改将不会被追踪。此外,迁移到对象存储 V2 (Object Storage V2) 后,来自对象存储 V1 (Object Storage V1) 的用户编辑历史将不可用。
重新设计的控制面板与增强的导航功能
发布日期:2024-10-15
我们很高兴地宣布控制面板(Control Panel)布局及其主页的最新更新,旨在提升您的用户体验并简化导航。请继续阅读以了解最新功能、导航改进以及视觉和组织方面的增强。
最新功能
收藏设置: 您现在可以将最常访问的设置“收藏”。收藏的设置将出现在左侧边栏,方便快速访问。
控制面板(Control Panel)中的 收藏设置(Favorite Settings) 部分。
最近访问的设置: 通过新的“最近访问”设置功能跟踪您的近期活动,让您能够快速返回到最近访问过的设置。
控制面板(Control Panel)中的“最近访问的设置”部分。
改进的导航
增强的页眉: 组织(Organization) 和 注册(Enrollment) 选择器已移至页面页眉。此更改简化了导航,使在不同部分之间切换更加容易。
增强的页眉设计,包含 组织(Organization) 和 注册(Enrollment) 下拉选择器。
上下文相关的保存操作: 修改设置时,操作(Actions)现在将显示操作的上下文。例如,保存到注册时,操作将显示“为 [注册名称] 保存”,如下面的屏幕截图所示。这确保了清晰度并降低了出错风险。
为“测试”组织保存的上下文相关操作(Action)示例。
视觉与组织增强
精简的外观: 控制面板(Control Panel)和主页的整体外观已重新设计,以提供更简洁、更现代的界面,提高可用性和美观性。
控制面板(Control Panel)全新更新和精简的设计。
分类设置与新的所有设置页面: 设置现在被分组到新的、直观的类别中。您可以在新的所有设置(All settings) 页面上查看设置的完整列表,从而更轻松地查找和管理您的偏好。
新的 所有设置(All Settings) 页面,显示所有可用设置并按类别划分。
我们相信这些更改将显著改善您使用 Palantir 平台的体验。
有关更多信息,请查阅控制面板文档。
使用 AIP Assist Agents 创建自定义 LLM 驱动的助手 [测试版]
发布日期:2024-10-10
我们很高兴地宣布推出名为“AIP Assist Agents”的自定义 LLM 驱动助手的测试版。此功能允许用户创建仅专注于自定义内容源的 LLM 驱动助手,无需编码经验。这建立在向 AIP Assist 注册自定义内容源的能力之上,允许用户将 Notepad 文档或平台内自定义文档添加到 AIP Assist 的知识库中。
基于自定义源的 AIP Assist Agents
需要注意的是,此功能与现有的 AIP Assist 对自定义内容源的支持有何不同。使用 AIP Assist 提供自定义源,使得在 AIP Assist 回答用户查询时,这些内容以及 Palantir 平台和开发者文档可作为资源使用。没有 AIP Assist Agents,自定义源可以配置为在 AIP Assist 的默认模式下可用。
AIP Assist 模式选择器。
相比之下,必须首先从 AIP Assist 模式选择器中选择 AIP Assist Agents(如下所示),并且它们仅使用提供的自定义源来回答用户问题。因此,AIP Assist Agents 是高度聚焦和专门构建的,仅基于专业化的内容源为用户提供更高质量的响应。对于支持团队、开发者团队和平台管理员来说,这是一个强大的新功能。
AIP Assist 模式选择器,显示一个示例库存管理 AIP Assist Agent。
只需点击几下即可创建自定义 LLM 驱动的助手
要开始使用 AIP Assist Agents,您必须首先从 Notepad 或平台内自定义文档注册自定义内容源。之后,您可以在 Agent Studio 应用程序中创建一个 AIP Assist Agent 并授予其访问您的自定义内容源的权限。
在 Agent Studio 应用程序中创建 AIP Assist Agent。
一旦您创建了 AIP Assist Agent 并授予其访问自定义内容源的权限,您就可以开始在 AIP Assist 中与其交互。创建专门的 LLM 驱动助手现在是一个简化的、无需编码的过程,您可以利用它来满足您的运营需求并增加对用户的应用支持。
请注意,这些功能是 Palantir AIP 产品的一部分,需要您的注册已在控制面板中启用 AIP。目前,AIP Assist Agents 和 Agent Studio 可能并非在所有注册中可用。请联系您的 Palantir 代表以确定您的注册是否符合条件。
了解更多关于 AIP Assist 自定义源 和 AIP Assist Agents 的信息。
改进了 Quiver 中 AIP 的访问和可用性 [测试版]
发布日期:2024-10-10
此功能现已正式发布。阅读最新公告。
自 2023 年 7 月以来,用户已经能够利用 Quiver 中 AIP 的强大功能,通过自然语言提示让 AIP 生成新的或配置画布上现有的卡片,从而轻松探索数据。Quiver 的两个主要大型语言模型驱动功能——AIP Generate 和 AIP Configure——除了在 Quiver 工作区顶部功能区以及选定卡片中可用外,现在也可以在卡片下方访问。此功能于 10 月 7 日当周在大多数启用 AIP 的注册中以测试版形式部署。
AIP Generate 根据用户提示创建分析,以快速洞察本体(Ontology)中可用的数据,除了 Object Explorer 和 Contour 本身的功能外,还提供了另一种对象集分析方法。AIP Configure 应用用户提示来更新卡片配置,并根据用户的需求定制分析输出,无论用户是否熟悉 Quiver 的可视化设置。
可以利用 AIP 的 Quiver 卡片现在在其右侧的卡片搜索栏中显示一个 AIP 标志。
由 AIP 分析能力支持的 Quiver 卡片在其右侧显示一个 AIP 标志。
从 Quiver 卡片访问 AIP Generate
在您选择要在 Quiver 中分析的对象集后,您将在卡片选择下方看到一个带有 AIP 标志 的输入字段,提示您 输入查询以继续探索。当您选择输入字段时,AIP Generate 会生成一个建议 查询 列表以支持您的分析。您可以选择一个建议的查询或输入您自己的查询。选择建议或输入您自己的查询后,AIP Generate 会生成分析的可能后续步骤,您可以通过直接在输入栏(您编写原始查询的地方)中编辑 查询 来优化这些步骤。接下来,选择结果或按 Enter 键指示 AIP 将卡片添加到画布并为您进行所有配置。
用户可以在 Quiver 卡片下方访问 AIP Generate 以创建新的分析。
从新创建的分析访问 AIP Configure
要配置现有卡片,请将光标悬停在卡片上并选择 修改(Modify) 按钮,然后在 AIP 图标右侧的文本字段中输入您的配置提示。在选择建议的修改之前,请验证 AIP 的建议是否回答了您的提示。
用户可以在分析卡片下方访问 AIP Configure。
如果您无法在您的注册中访问这些功能,请联系 Palantir 支持以启用。
您可以在 Quiver 的现有文档中参考 AIP Generate 和 AIP Configure 的更多详细信息。
Workshop Vega 图表小组件
发布日期:2024-10-10
隆重推出 Workshop 的最新小组件——Vega 图表(Vega Chart)。该小组件提供由 Vega-Lite ↗ 语法支持的高级数据可视化能力。此外,它通过更广泛的配置选项提供了比 图表 XY 小组件(Chart XY widget) 更高的灵活性,并且当您遇到使用图表 XY 小组件(Chart XY widget)的限制时,应使用此小组件。
从 Workshop 小组件选择器中选择 Vega 图表(Vega Chart)。
要开始使用,请从 Workshop 的小组件选择器中选择 Vega 图表(Vega Chart),或阅读文档中关于该小组件的更多信息。
用于 Java 开发的 Ontology SDK [正式发布]
发布日期:2024-10-08
Java 支持已于 10 月 7 日当周在 Ontology SDK 和开发者控制台(Developer Console) 中正式发布。Java 开发者现在可以生成一个 Java 库,以便轻松地与本体(Ontology)对象、链接、操作、聚合和函数进行交互。用户可以将 Java OSDK 添加到现有的 Java 服务中,或创建全新的应用程序,以实现与 Palantir 平台上数据的无缝集成。
本体软件开发工具包(Ontology Software Development Kit, SDK) 允许您直接从开发环境访问本体的全部功能。您可以使用开发者控制台(Developer Console)(一个用于创建和管理使用 Palantir API 的应用程序的门户)生成 Java OSDK。借助对 Java OSDK 的新支持,您可以构建基于 Java 的程序,例如与本体(Ontology)交互的后端服务。这些服务将使用机密客户端(confidential clients)向 Palantir 平台进行身份验证,并根据授予用户的权限提供数据。
这是一个代码示例,展示了为飞机本体对象(Aircraft Ontology Object)生成的 Java OSDK 的某些功能。
开始使用 Java 包
Java 支持作为开发者控制台(Developer Console)中的一种附加语言包含在内,该控制台还支持 Typescript 和 Python 开发。想要使用 Java OSDK 的开发者可以按照记录的步骤创建开发者控制台应用程序并生成新版本。SDK 版本(SDK Versions) 页面现在包含一个 maven 选项卡,列出了所有生成的 Java 包。
在生成 Java OSDK 之前,您必须在 SDK 版本 > 设置(SDK Versions > Settings) 下设置 Maven 组 ID。生成后,按照 API 文档 > 入门(API documentation > Getting started) 中的说明将您的 Java OSDK 导入到您的 Java 环境中。
要引导一个应用程序,您可以遵循引导新的 Ontology SDK (OSDK) Java 应用程序指南。
要生成 SDK,首先选择 SDK 版本选项卡以查看所有生成的 SDK,选择 设置(Settings) 以设置 Maven 组 ID,然后通过 生成新版本(Generate new version) 完成以生成 Java OSDK。
如何学习使用它?
要了解如何使用 Java OSDK 以及一些示例功能,您可以在开发者控制台(Developer Console)中生成一个 Java OSDK 教程。这将让您概览 Java OSDK 提供的某些功能,以及如何通过 Java 客户端(Java client) 与本体(Ontology)交互。
首先,通过开发者控制台(Developer Console)中的顶部选项卡生成一个示例 Ontology SDK 教程应用程序。
开发者控制台(Developer Console)主页,您可以在其中选择通过 Ontology SDK 教程 - 待办事项应用(Ontology SDK Tutorial - To-do App)生成教程。
生成后,您将进入一系列课程。在能够访问 Java 教程之前,您必须在 SDK 版本 > 设置(SDK Versions > Settings) 下设置 Maven 组 ID。生成后,按照 课程 > 0:入门(Lessons > 0: Getting Started) 中的说明使用控制台生成一个示例教程 Java 应用程序并完成任务。从这里开始,完成每个课程及其相关任务。如需提示,请参考示例解决方案。
要使用 OSDK 创建 Java 课程,请选择一个课程,选择 Java 作为语言,最后配置 Maven 组并生成 Java OSDK。
需要支持?
开发者控制台(Developer Console)包含为 Ontology SDK 支持的所有语言动态创建的 API 文档。使用语言下拉菜单切换到 Java 特定的文档。
此外,所有 Java OSDK 功能的公共文档都可以在 Palantir 的公共 Java OSDK 文档 中找到。
我们始终乐于通过我们的 Palantir 社区论坛 ↗ 与您互动。请使用 #ontology-sdk 标签提交与 Ontology SDK 或开发者控制台(Developer Console)相关的反馈和任何问题。
开发路线图上的下一步是什么?
我们正在努力为 Java OSDK 添加更多功能,包括接口转换(Interface casting)、过滤和操作、用于 Foundry 工作流的计算模块模板(Compute Module template)等等。
引入简化的代码工作区创建和管理流程
发布日期:2024-10-08
一个经过优化的代码工作区创建和管理流程现已正式发布。这个新流程允许代码工作区(Code Workspaces)用户从单个代码仓库资源管理新的工作区,而不是从两个需要单独配置和授权的不同资源进行管理。在代码工作区创建期间,用户现在只需要配置底层的代码仓库,并且可以通过在 Palantir 平台文件系统的任何位置选择代码仓库来访问新的代码工作区,从而消除了混淆并简化了访问。
新的代码工作区(Code Workspaces)用户界面,现在只需要配置底层代码仓库。
用户可以从更简洁的用户界面中受益,并且不会再遇到新代码工作区资源的权限问题。此功能适用于 RStudio® 和 JupyterLab® 工作区,但仅影响在 9 月 30 日当周之后创建的代码工作区。这些代码工作区在文件系统中仍然会同时拥有代码工作区(Code Workspaces)和代码仓库(Code Repositories)资源。
RStudio® 是 Posit™ 的商标,JupyterLab® 是 NumFOCUS 的商标。
所有引用的第三方商标均为其各自所有者的财产。不暗示任何隶属关系或认可。
在代码工作区中引入模型输入
发布日期:2024-10-08
我们很高兴地介绍 Jupyter® 代码工作区(Code Workspaces)中新的建模能力。现有模型现在可以导入到 Jupyter® 笔记本中,从而在代码工作区(Code Workspaces)中启用一系列新的交互式工作流,从微调现有模型到将机器学习/人工智能能力集成到代码工作区仪表板中。
在 Jupyter® 笔记本中下载模型
通过将模型直接下载到代码工作区(Code Workspaces)中,最大限度地发挥模型的效用。这个新功能允许您将在 Palantir 平台中生成的模型带入您的笔记本环境,使您能够访问序列化的模型权重。此功能非常适合微调,使您能够与模型进行更深入的交互。
凭借将模型反序列化为实际 Python 对象的能力,您可以无缝地对导入的数据集运行推理。然后,这些推理的结果可以写回 Palantir 平台,以便在下游应用程序中进一步使用。
部署模型以在 Jupyter® 笔记本中进行推理
导入的模型还可以部署到代码工作区(Code Workspaces)中进行交互式推理。这为在 Palantir 平台中使用模型开辟了一系列新的能力:
- 部署验证: 这些部署与模型部署共享相同的基础设施。轻松发布和部署模型以进行即时测试,所有这些都可以在同一个笔记本中完成。
- 交互式评估: 构建详细的评估笔记本以交互式地评估多个模型,提供实时反馈并支持快速迭代。
- 人工智能/机器学习增强的仪表板: 将先进的人工智能/机器学习功能集成到您的仪表板中,直接在您的仪表板中提供实时预测和分析。
查阅关于在代码工作区(Code Workspaces)中使用模型输入的文档。
在 RStudio® 代码工作区中通过报告共享数据洞察
发布日期:2024-10-03
代码工作区中的 R Markdown 报告现已正式发布,允许 RStudio® 用户从 R Markdown 文件无缝地生成、可视化和共享报告。报告生成为可共享的网页,使 RStudio® 用户能够将分析和关键发现分发给同事和利益相关者。生成的报告可以配置为在底层 R Markdown 文件发生编辑时更新,使相关方了解最新变化。
交付发现的用户友好选项
通过导航到 R Markdown 文件并打开代码工作区(Code Workspaces) 应用程序(Applications) 侧边栏中的 报告(Reports) 选项卡,利用用户友好的报告创建功能。
应用程序(Applications)侧边栏中的 报告(Reports) 选项卡,显示 创建新报告(Create a new report) 选项。
报告(Reports) 选项卡是您查看、编辑和创建报告的首选位置。在这里,您可以选择一个报告以在新选项卡中打开它,并共享报告链接以交付洞察和分析。
重新访问和共享历史报告
此外,还可以共享过去的报告版本,并通过内置的版本历史评估报告随时间的变化。这使得用户可以持续更新底层的 R Markdown 文件,同时仍然能够回溯以展示之前的发现。先前报告的记录让用户在更改底层文件时高枕无忧;如果之前的报告特别有用或影响深远,您始终可以查看或共享它。
报告(Reports)选项卡中报告卡片上的版本选择器。
在 RStudio® 代码工作区(Code Workspaces)中引入 R Markdown 报告标志着一项重大改进,它简化了可共享数据集的创建。深入探索这个新功能,创建具有洞察力的、可共享的报告,这些报告建立在可定制的、与 Palantir 平台无缝集成的工作流之上。
了解更多关于代码工作区中 R Markdown 报告的信息。
RStudio® 是 Posit™ 的商标。
所有引用的第三方商标均为其各自所有者的财产。不暗示任何隶属关系或认可。
在控制面板中配置您的支持团队
发布日期:2024-10-03
支持团队的配置已从 Foundry Issues 应用程序移至控制面板(Control Panel),以提高可发现性。
当一个群组被注册为支持团队时,某些状态更改可以根据一组规则自动进行。例如,当报告者对问题发表评论时,问题可以自动转换为“等待支持”状态,以便支持团队可见。
移至控制面板(Control Panel)也意味着支持团队现在是在注册级别而非组织级别进行配置。因此,分配给支持团队的所有 Foundry 问题现在都将受到状态自动化的影响,无论报告者属于哪个组织,从而简化了多组织设置中的配置。
您现在可以在控制面板(Control Panel)中配置您的支持团队。
引入“平台更新”以在平台内访问发布说明和公告 [正式发布]
发布日期:2024-10-01
我们很高兴地宣布,产品更新现在可以直接在平台内获取,宣传 Palantir 平台的最新功能。每月一次,该应用程序将在左侧边栏中做广告,打开后,您将能够在平台内访问最新的产品发布说明和公告。您可以通过 通知(Notifications) 或 支持(Support) > 平台更新(Platform updates) 自由导航到此功能。
如果您有兴趣深入了解特定应用程序,只需使用右上角的过滤器即可。顶部的栏允许您在 公告(Announcements) 和 发布说明(Release notes) 之间切换。此外,您可以选择单个公告以访问存储在公共文档中的完整版本。
“Palantir 平台新增功能”功能的屏幕截图,可更好地访问公告(Announcements)和发布说明(Release notes)。
提醒一下,如果您也希望以电子邮件形式直接将这些更新发送到您的收件箱,请注册我们的月度新闻通讯。
使用 AIP Agent Studio 构建交互式助手 [测试版]
发布日期:2024-10-01
注意: 自 2026 年 4 月 27 日当周起,AIP Agent Studio 已更名为 AIP Chatbot Studio。所有现有特性和功能保持不变。
AIP Agent Studio 是一个新的、无需编码的工具,使用户能够构建和部署配备企业特定信息和工具的交互式助手,称为 AIP Agents。AIP Agent Studio 提供了一个自然语言界面,通过 AIP Agents 利用本体(Ontology)、文档和 LLM,这些代理可以获取和更新参数(例如本体对象或文本字符串)。
作为测试版发布,请联系您的 Palantir 代表以在您的注册上安装。
一个 LLM 驱动的 AIP Agent,使用参数获取经过过滤的客户支持记录本体对象集,作为回答用户关于当前产品问题时的上下文。
上述 AIP Agent 可以部署在 Workshop 应用程序中,代理参数链接到变量。
为交互式协助和无缝集成而设计的多功能代理
AIP Agent Studio 提供几个引人注目的功能:
- 可定制的代理: 创建和配置具有特定提示、参数和工具的 AIP Agents,以满足您的企业需求。
- 交互式协助: 部署能够以对话方式与用户交互以提供洞察和执行任务的代理。
- 无缝集成: 利用本体(Ontology)、文档、自定义内容源和 LLM 构建强大的代理,这些代理可以部署在 Workshop、AIP Threads 和 AIP Assist 中。
- 安全性: 建立在与管理 Palantir 平台其余部分相同的严格安全模型之上,确保数据完整性和访问控制。
一个 AIP Agent,具有本体语义搜索工具和对象查询工具,用于从供应链通信中查找相关信息并将其关联到特定订单。
何时应该使用 AIP Agent Studio?
我们建议在以下场景使用 AIP Agent Studio:
- 分组文档检索增强生成 (RAG) 代理: 非常适合分析大量文档或非结构化数据。无论是处理采购文档、环境影响评估、保险索赔还是交接班日志,AIP Agents 都可以提供上下文感知的响应和洞察。
- 本体上下文过滤: 适用于需要根据应用程序上下文进行额外过滤的任务。例如,在起草或头脑风暴场景中,代理可用于遵守不同利益相关者发布的特定风格指南。这允许一致和个性化的文档生成,例如创建针对特定上级偏好的简报。
- 自定义文档协助: 通过与 AIP Assist 集成,AIP Agents 可以专门基于自定义内容源来响应查询,使其对支持团队、开发者团队和平台管理员来说非常宝贵。此功能将 AIP Agents 的强大功能扩展到自定义文档。
- 常规提示和模板化: 非常适合需要常规起草或模板化的场景,例如编码辅助或生成领域特定语言 (DSL) 规则。使用特定指南或模板预先提示代理可以显著提高性能和一致性。
AIP Agent Studio 不适合需要重复、明确定义流程的任务。对于此类用例,其他工具如 AIP Logic 或 AIP Automate 可能更合适。
开发路线图上的下一步是什么?
我们正在积极开发 AIP Agent Studio,并将很快引入通过 Ontology SDK (OSDK) 在外部部署 AIP Agents 的支持。敬请关注更新。
AIP Terminal 将于 10 月 2 日弃用,由 AIP Agent Studio 取代
发布日期:2024-10-01
注意: AIP Agent Studio 已于 2026 年 4 月 27 日更名为 AIP Agent Studio。所有现有特性和功能保持不变。
AIP Terminal 应用程序正在被 AIP Agent Studio 取代。要开始使用 AIP Agent Studio,请查阅相关的入门指南。 AIP Terminal 应用程序将于 2024 年 10 月 2 日被删除。在 AIP Terminal 应用程序中创建的任何已保存配置文件将不再可访问。如果您正在积极使用 AIP Terminal 或 AIP Terminal 配置文件,请迁移到 AIP Agent Studio 并手动将任何重要的已保存配置文件转移到 AIP Agent Studio 中的代理。AIP Agent 小组件将不受影响。
已弃用的 AIP Terminal 配置文件将于 10 月 2 日被删除。
使用派生序列存储时间序列逻辑,现已正式发布 [正式发布]
发布日期:2024-10-01
我们很高兴地宣布派生时间序列(derived time series) 的正式发布,该功能将于 10 月 7 日当周在所有注册中可用。
在此功能发布之前,在 Quiver 中执行的时间序列分析结果无法用于涉及其他 Foundry 应用程序的工作流。现在,您可以从原始传感器数据派生一个新的序列并将其保存回本体(Ontology),从而允许在所有支持本体的应用程序中使用派生序列。一旦进入本体,派生序列的行为就像原始时间序列,但它们是即时计算的。这消除了管理或存储派生数据或在平台中重复这些计算的需要。
<img src="./media/sts1.png" alt="对原始数据执行操作以生成派生序列的通用概述。" width="