Announcements(公告)
REMINDER: Sign up for the Foundry Newsletter to receive a summary of new products, features, and improvements across the platform directly to your inbox. For more information on how to subscribe, see the Foundry Newsletter and Product Feedback channels announcement.
Share your thoughts about these announcements in our Developer Community Forum ↗.
Leverage LLM-powered assistants in custom applications
Date published: 2024-12-19
Note: As of the week of April 27, 2026, AIP Agent Studio was renamed AIP Chatbot Studio. All existing features and functionalities remain unchanged.
AIP Agents can now be deployed to Ontology SDK (beta) and third-party applications using Palantir platform APIs. AIP Agents are interactive assistants built in Agent Studio that can be equipped with enterprise-specific information and tools. This feature simplifies integration and enhances the capabilities available to developers, underscoring our commitment to building a robust development ecosystem.
AIP Agents in third-party applications
AIP Agents can now be deployed to third-party applications using Palantir platform APIs, allowing developers to seamlessly integrate LLM-powered assistants and provide improved support to users. These platform APIs enable users to programmatically create, update, and list conversation sessions with AIP Agents, allowing for embedding within custom application contexts. For more information on using platform APIs and a full list of supported capabilities, refer to the API documentation.
AIP Agents in Ontology SDK applications [Beta]
AIP Agents can be used in Ontology SDK applications through Developer Console support for platform API and SDK resources. To use an AIP Agent in an Ontology SDK application, add the necessary Ontology resources and the Project containing your agent to the application's Platform SDK resources.
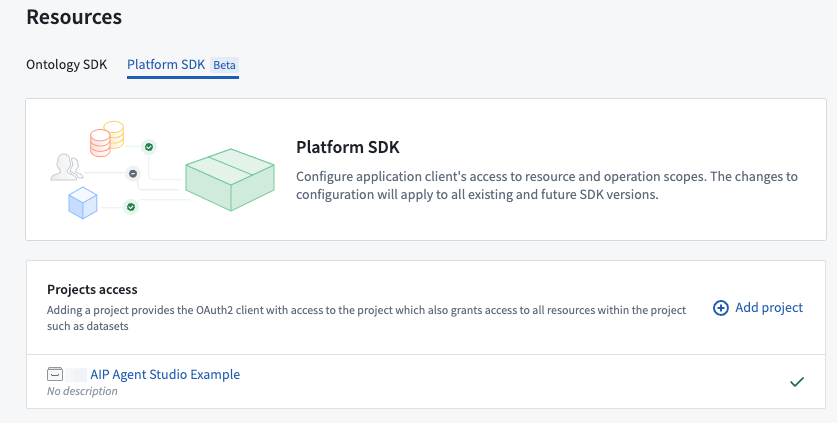
The option to add a Project for an AIP Agent in the Developer Console Platform SDK tab under Resources.**
Then, enable AIP Agents API operations for your application, which grants permission to read, create, and update AIP Agent interactions.
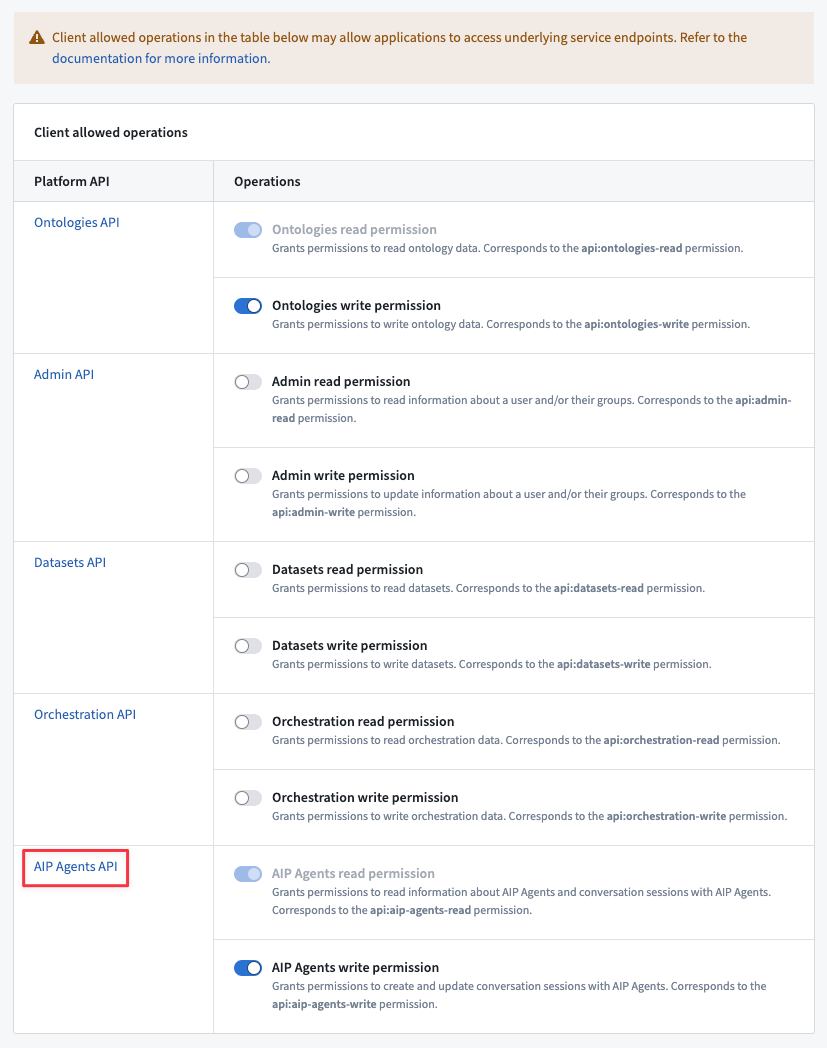
The option to enable the AIP Agents API operations in the Client allowed operations table in your Developer Console application.
Leverage these new platform APIs in Ontology SDK or third-party applications to provide targeted, real-time support with LLM-powered assistants. To get started with AIP Agents in custom applications, refer to the AIP Agent Studio and platform API documentation.
Semantic search KNN Join now available in Pipeline Builder
Date published: 2024-12-19
KNN Join is now available in Pipeline Builder across all enrollments. This powerful feature allows you to find the K-nearest rows from the right dataset for each row in the left dataset, making your data-merging tasks more efficient and accurate.
What is KNN Join?
KNN (K-Nearest Neighbors) is a method that helps you match and combine rows from two datasets based on their similarity. Imagine you have two lists of items, and you want to find the items in one list that are most similar to the items in the other list. KNN Join does this by comparing each item from one list with all the items in the other list and finding the closest matches.
To use the feature, select the Join board, then the KNN join for Join type. The following screenshot shows an example of a KNN join type selection:
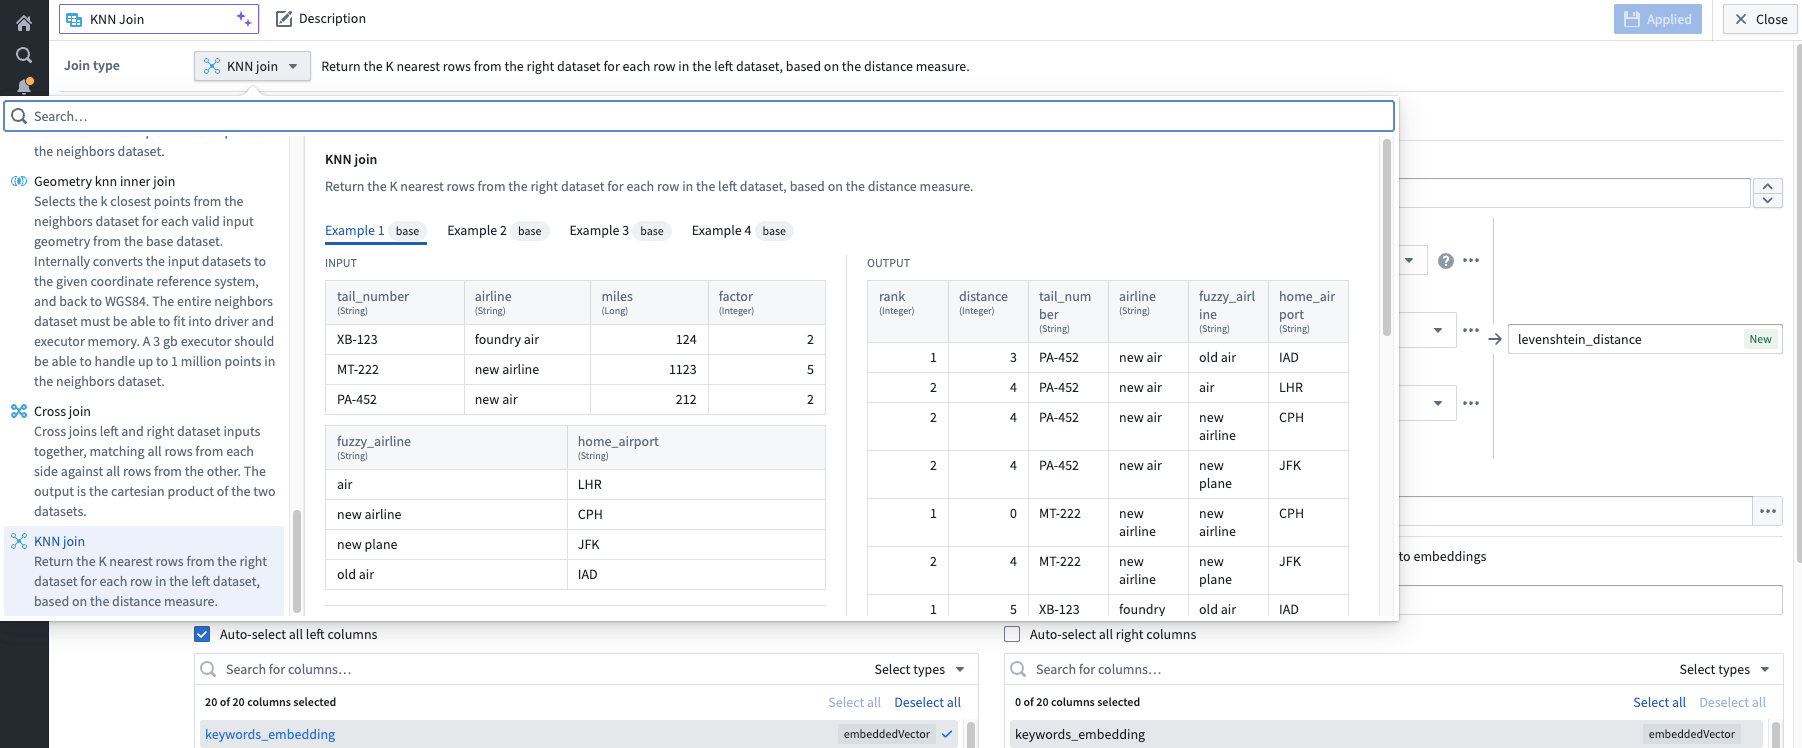
A screenshot of the KNN join selection, with an example.
Then, specify the parameters for the KNN join. The following example demonstrates an objective where for every movie on the left dataset, we want to find the three nearest movies based on the keywords of all movies.
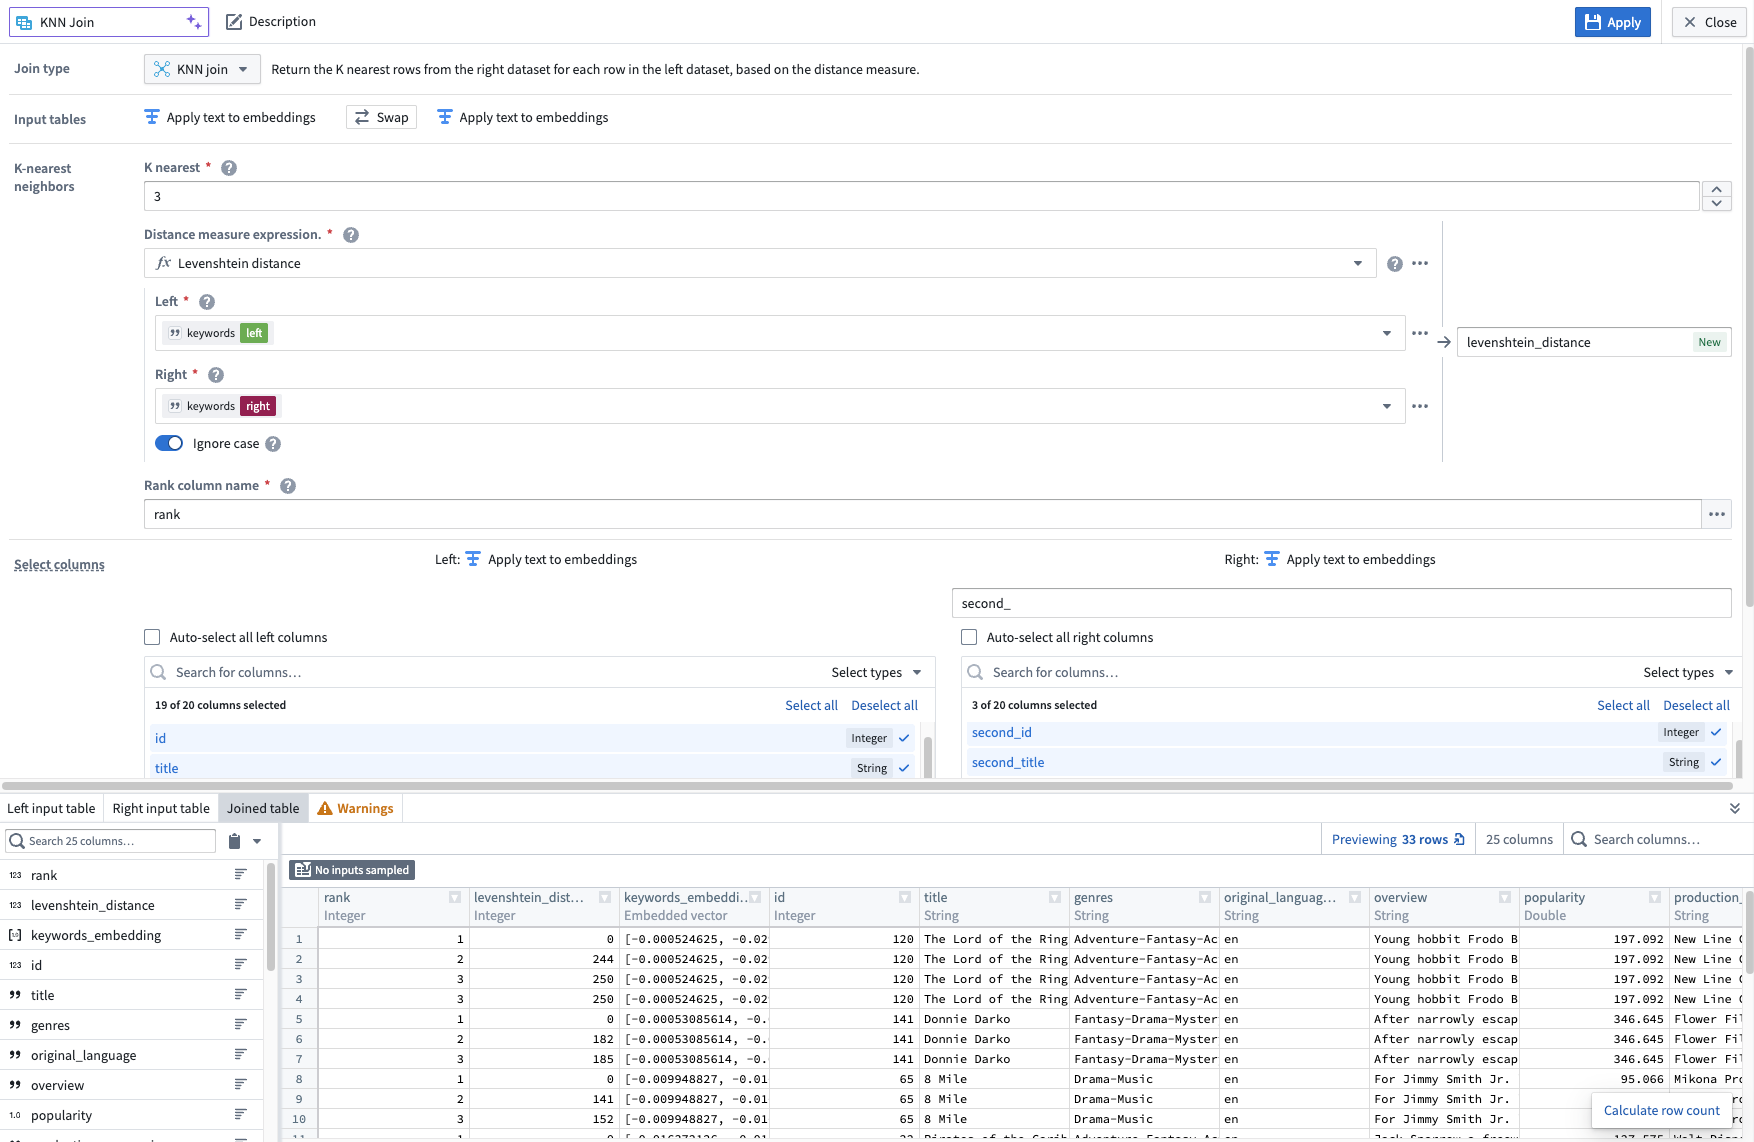
The KNN board configured to get the three closest movies based on the similarities of the keywords for each movie.
The KNN join feature was implemented to enhance your data processing capabilities.
For more information, visit our KNN join documentation.
Debug TypeScript Functions in Code Repositories during Live Preview [GA]
Date published: 2024-12-17
Code Repositories now enables you to debug and iterate on TypeScript Functions during Live Preview. This feature is generally available across Foundry enrollments the week of December 16.
To get started, create a TypeScript Function in Code Repositories and place a breakpoint by hovering your cursor over the line number where you want to begin the debugging process. Next, select the red circle that appears to Set a breakpoint.
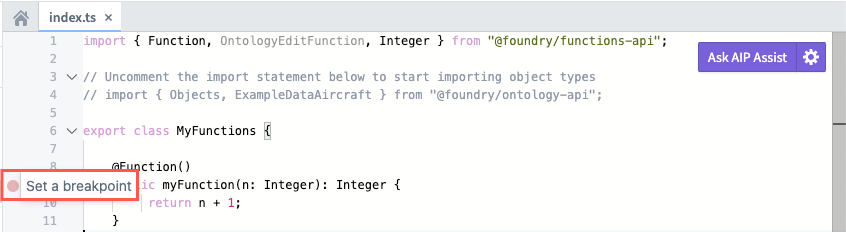
Set a breakpoint in your TypeScript Function to inform Code Repositories where the debugging process will begin.
Select Run and Debug within the Functions panel to start the debugging session.
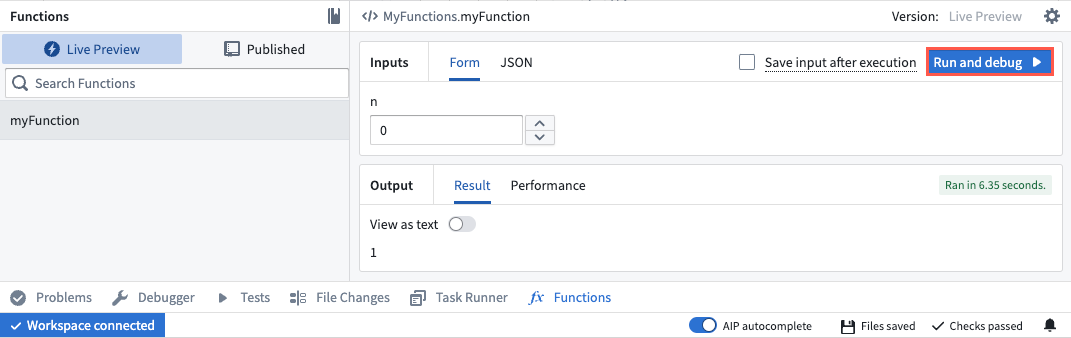
Select Run and debug to begin the debugging process and launch the Debugger interface.
Code Repositories will launch the Debugger interface, where you can step over, into, or out of individual Frames. To end the debugging session and return to your Function's Live Preview, select the red square icon in the left panel to Stop execution.
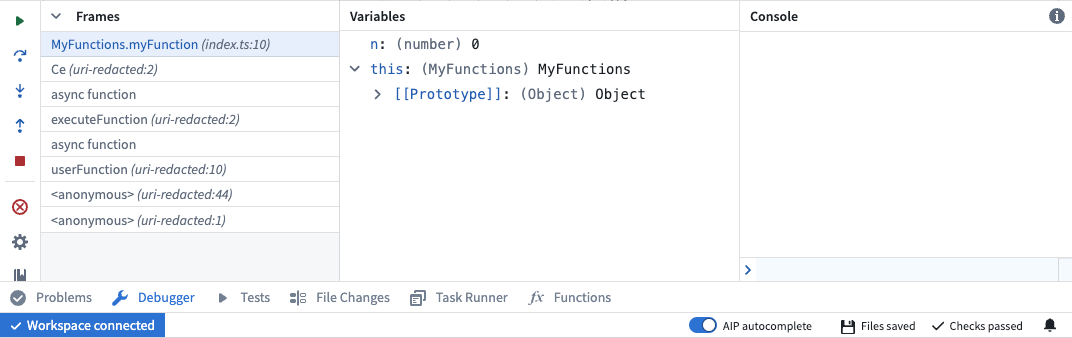
An in-progress debugging session within Code Repositories.
Review the Ontology building documentation to learn more about debugging TypeScript Functions.
Introducing time series alert automations [GA]
Date published: 2024-12-10
We are excited to share that you can now configure automations to send alerts, or "events", when time series data meets a certain specific criteria. With time series alerting, you can maintain awareness of critical workflows in your organization, such as learning when machine pressure exceeds a set limit or when production outputs fall below an expected result.
To get started with time series alerts, you will first identify periods of interest within time series data using the Time series search card in Quiver. Then, the logic behind the time series search is saved and replicated across objects of the same type using Automate. When your configured alerting automation runs, any newly identified time intervals are output as objects in a pre-configured alert object type.
The time series alerting feature will be generally available the week of December 16, 2024.
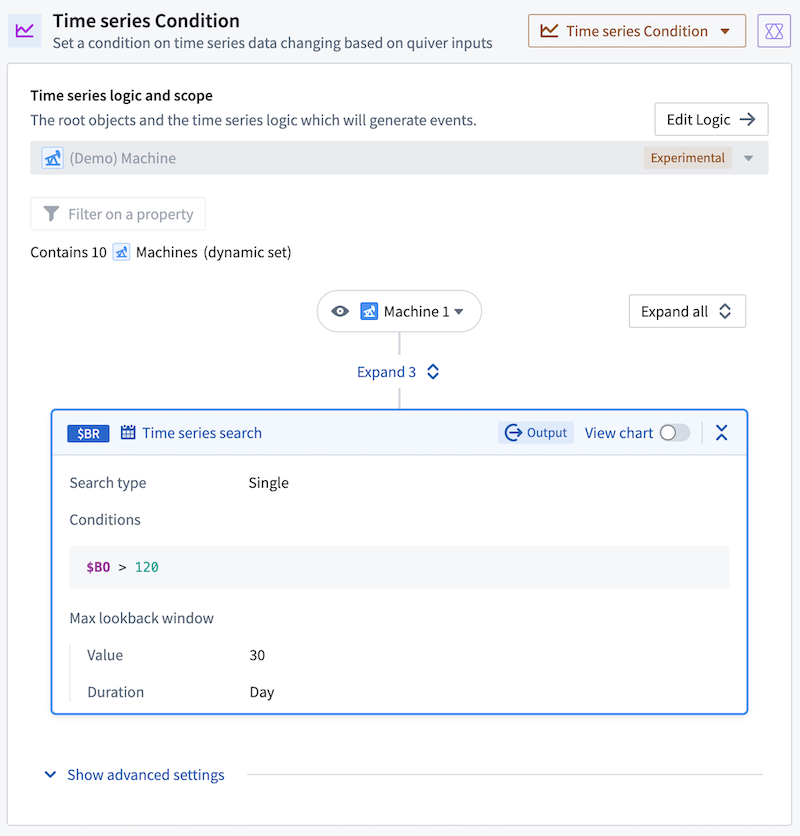
The time series condition logic in the Automate application.
Why should I use Quiver and Automate for time series alerting?
The first time your automation runs, it will check the entire time series for alerts. From then on, it will only check for new data. In other words, this product runs incrementally by default. This is different from both Foundry Rules and FoundryTS, which both check the entire time series for alerts every time they run. For this reason, using Quiver with Automate for time series alerting will be more performant and cheaper than those previous solutions.
What's next for time series alerting?
Time series alerting automations are not a real-time solution. Although search logic can be automated on time series backed by streams, the automations will not run directly on top of the streaming data but rather on top of the archive dataset. This incurs at least 10 minutes of additional latency since archive jobs run every 10 minutes. Our team will be focused on building a real-time alerting solution in the coming months.
Learn more about time series alerting automations in our documentation.
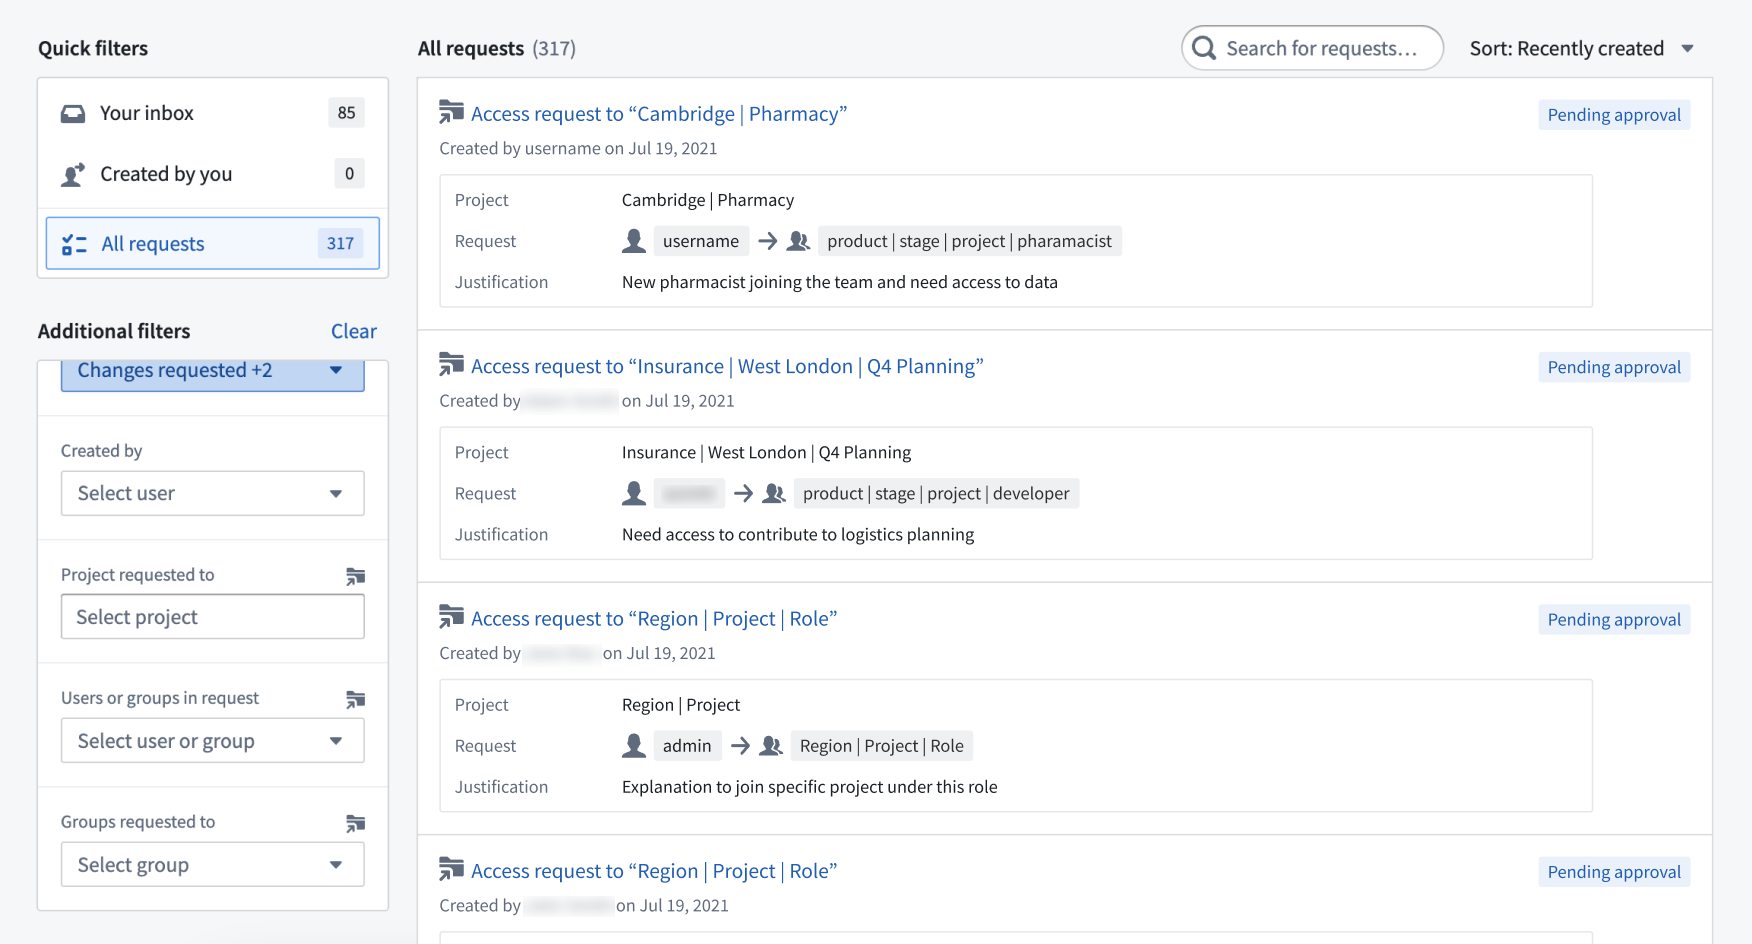
Access request workflow improvements are now available
Date published: 2024-12-10
Initiating access requests is easier than ever, with group attributes and descriptions now visible in the request workflow.
Additionally, access reviewers will benefit from enhanced search capabilities to identify tasks, more information at a glance without needing to open a request, and the ability to easily revert accidentally approved subtasks.
Key request workflow improvements
When Projects in the platform have many groups, it can be difficult to know which group is the appropriate one to select when requesting access. Some of the following new features allow you to configure a better request experience and gain more transparency into group details:
- Group descriptions, if set, now show up in the request flow below the name of the group.
- Attributes can now be configured for groups, allowing you to filter groups available for selection. For example, you can add a
Roleattribute to a group so you can filter down to groups with certain permissions. Read more about how to set group attributes in our documentation. - Email notifications are now automatically sent to request creators. These notifications are optional, and you can choose to opt out of them if desired.
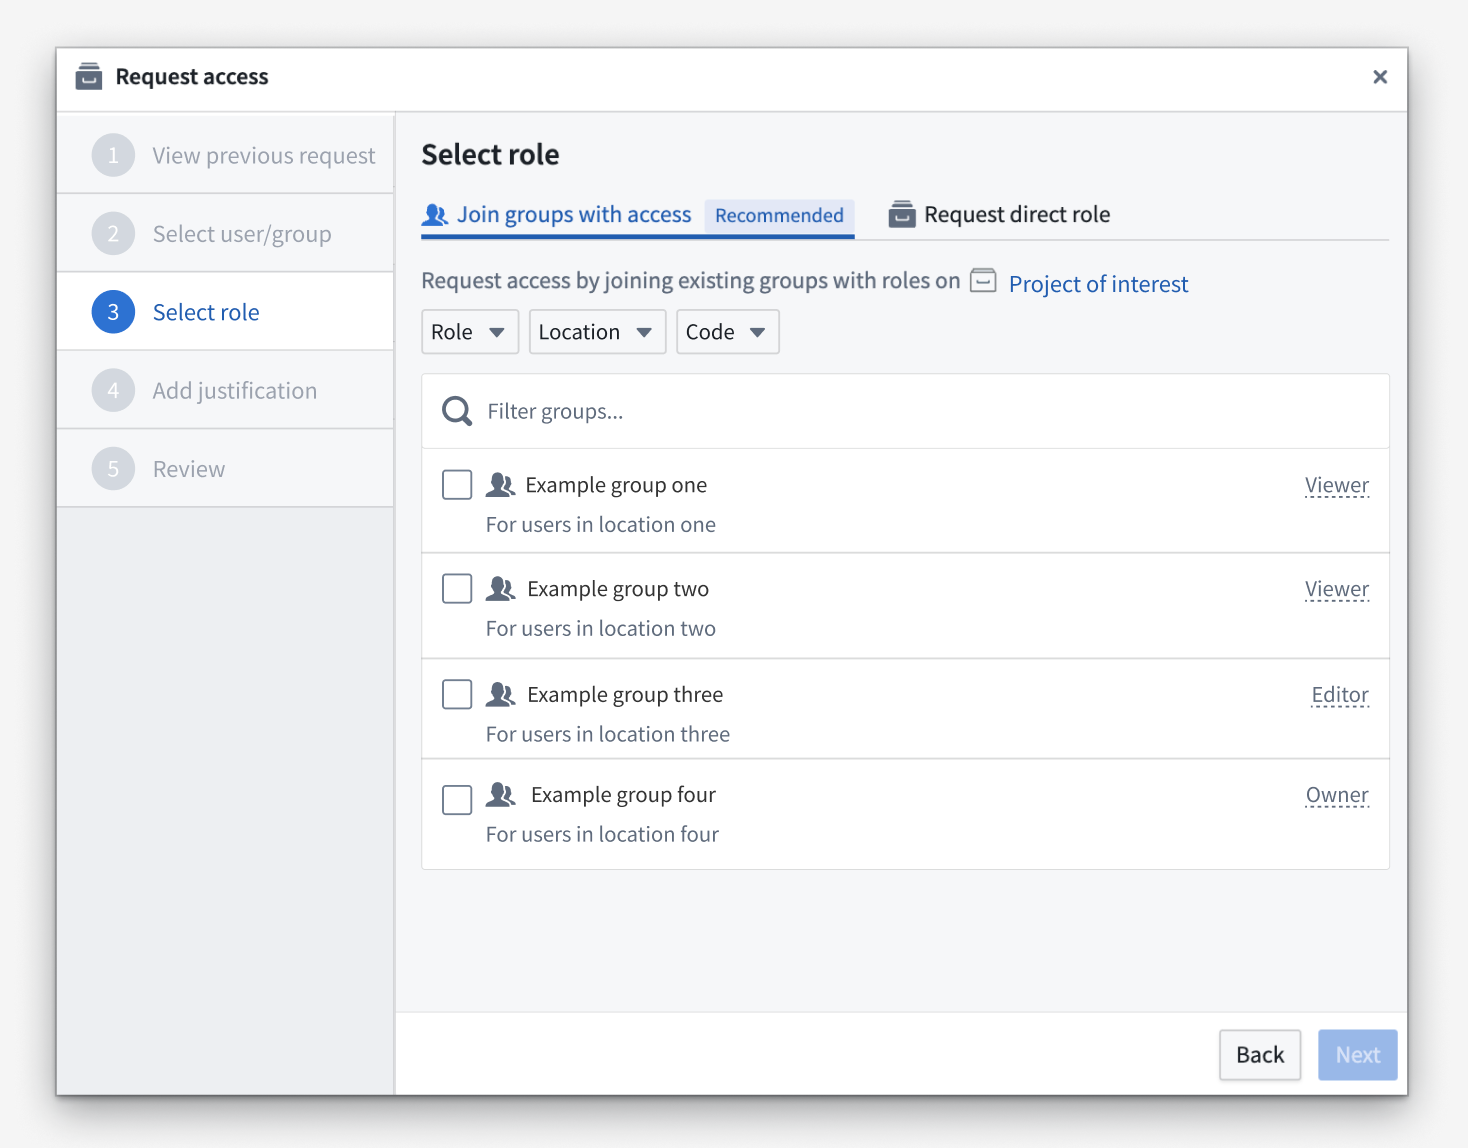
The improved Request access dialogue, featuring group descriptions and filtering support.
Key review workflow improvements
Access request reviewers now benefit from the following legibility and usability improvements that help to efficiently process requests:
-
Now, it is much easier to reverse mistakenly approved access requests. If you are a request approver, you can now use the new Revert option on each subtask.
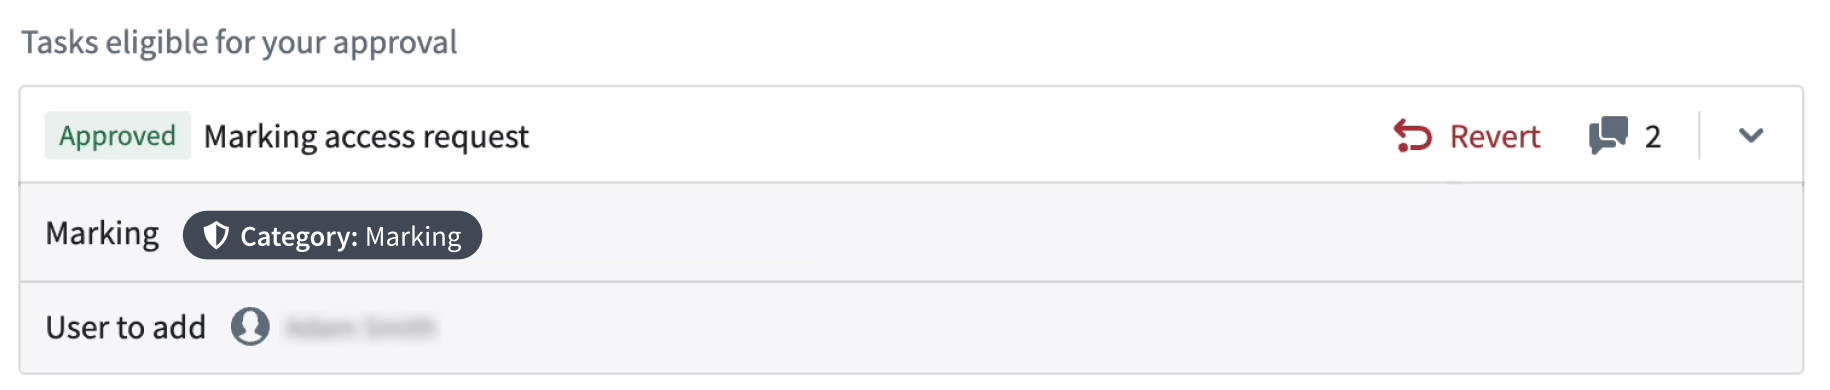
The Revert option available on an approved Marking access request. -
The inbox view of the Approvals application now allows reviewers to view a request preview and understand key details without having to open the request overview page.
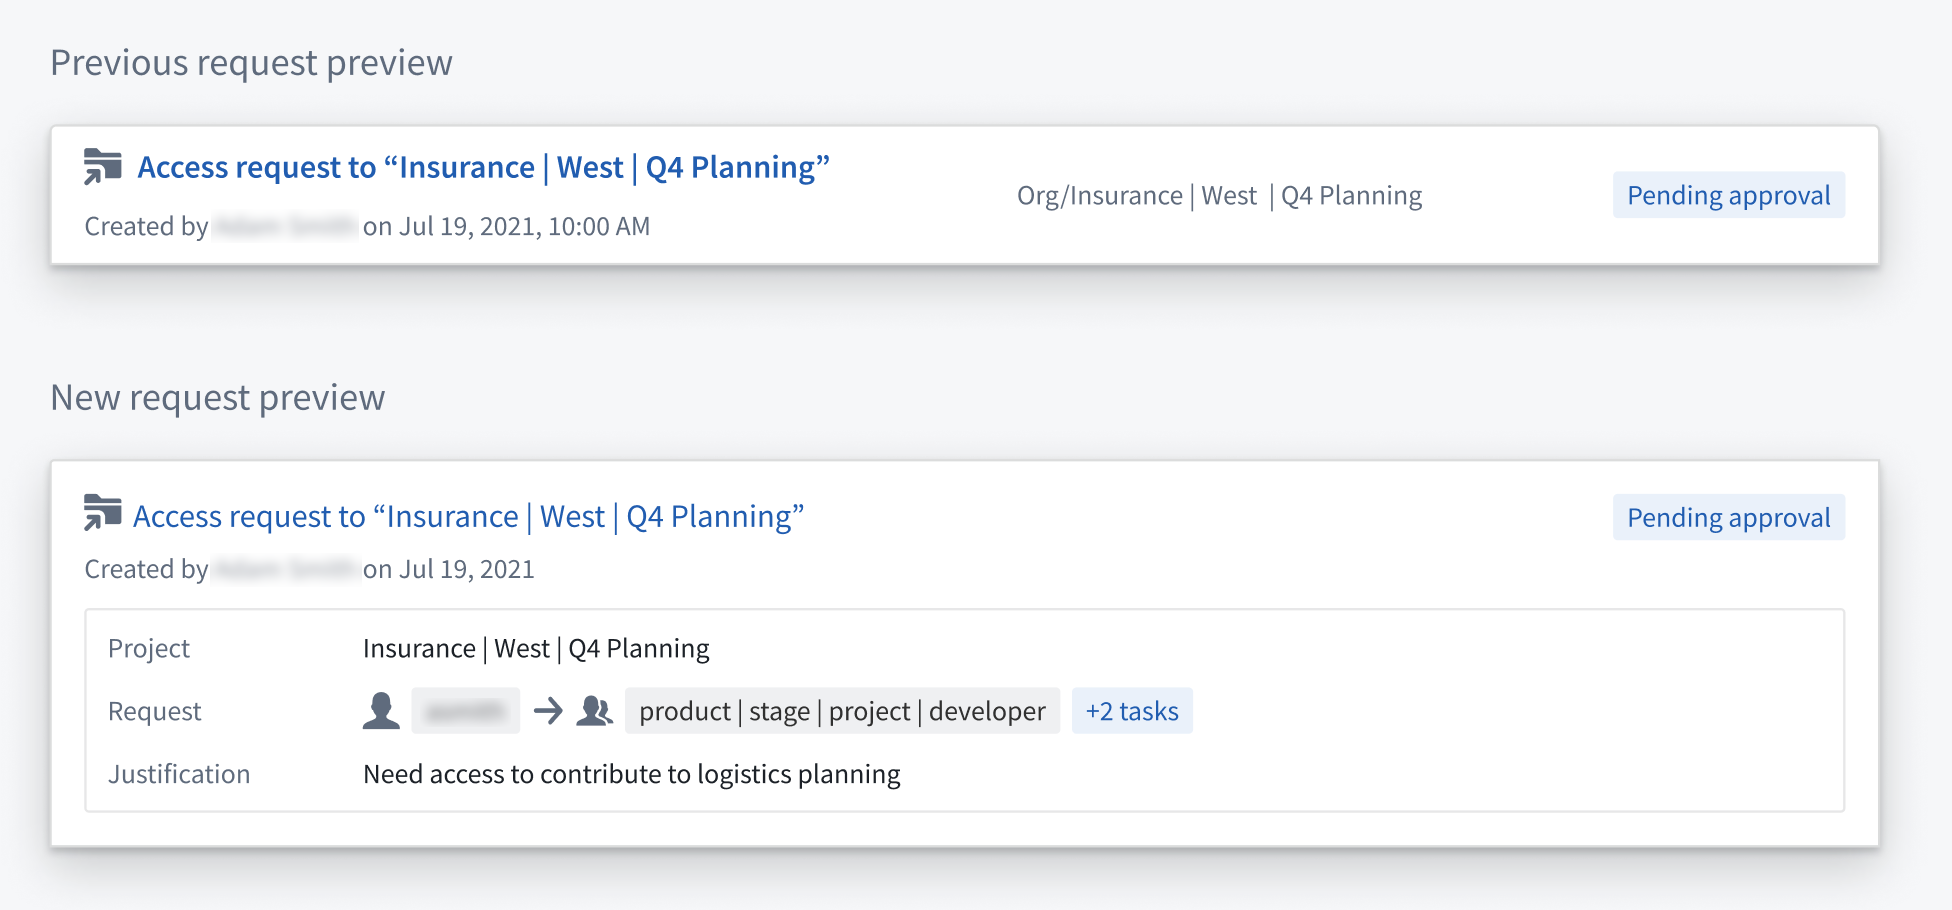
Two request previews for a previous and new access request. Details include the request creator, request date/time, justification, and related Project. -
Request reviews no longer need to navigate to platform settings to view a user's groups. Instead, reviewers can now view the groups referenced in the request along with the groups to which the requesting user belongs.
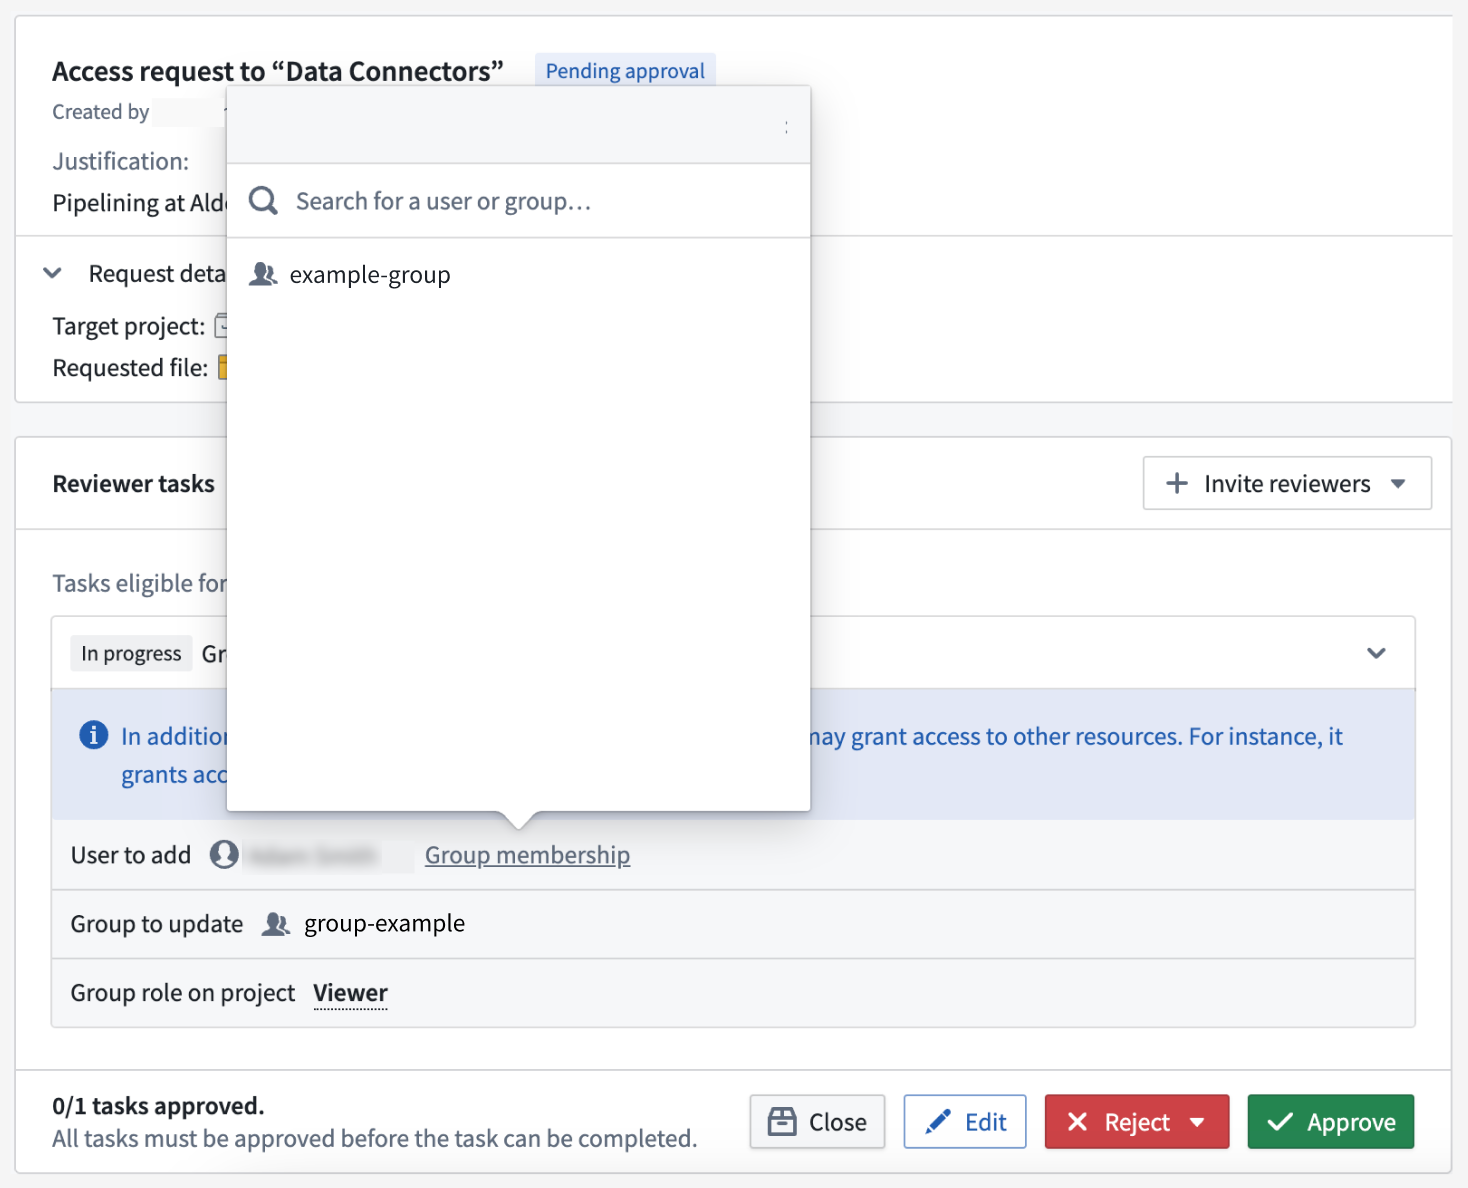
An open access request, with a pop-up window showing the user's current group membership. -
Previously, request reviewers were not allowed to work on requests that were previously actioned by another reviewer. Now, all eligible reviewers can override previous reviews, make edits, and approve a request.

The action buttons at the bottom of an access request, with options to Approve eligible tasks and Override and approve tasks.
Finally, several additional small improvements were made to the search and filter functionality:
-
You can now search by request title and requested groups.
-
Selected filters now persist within and between sessions.
-
Redundant statuses and quick filters were removed.
The updated view of the Approvals application overview page, with updated search and filter options and visibility.
Learn more about approvals and access requests.
Configure any driver property to a JDBC-backed source using Data Connection [GA]
Date published: 2024-12-12
You can connect Foundry to a variety of relational databases and data warehouses, such as Snowflake and Salesforce, through custom JDBC sources configured in the Data Connection application. Now generally available across Foundry enrollments, Data Connection's JDBC properties panel allows you to configure any property on an underlying Palantir-provided JDBC driver when you create and configure your driver's behavior.
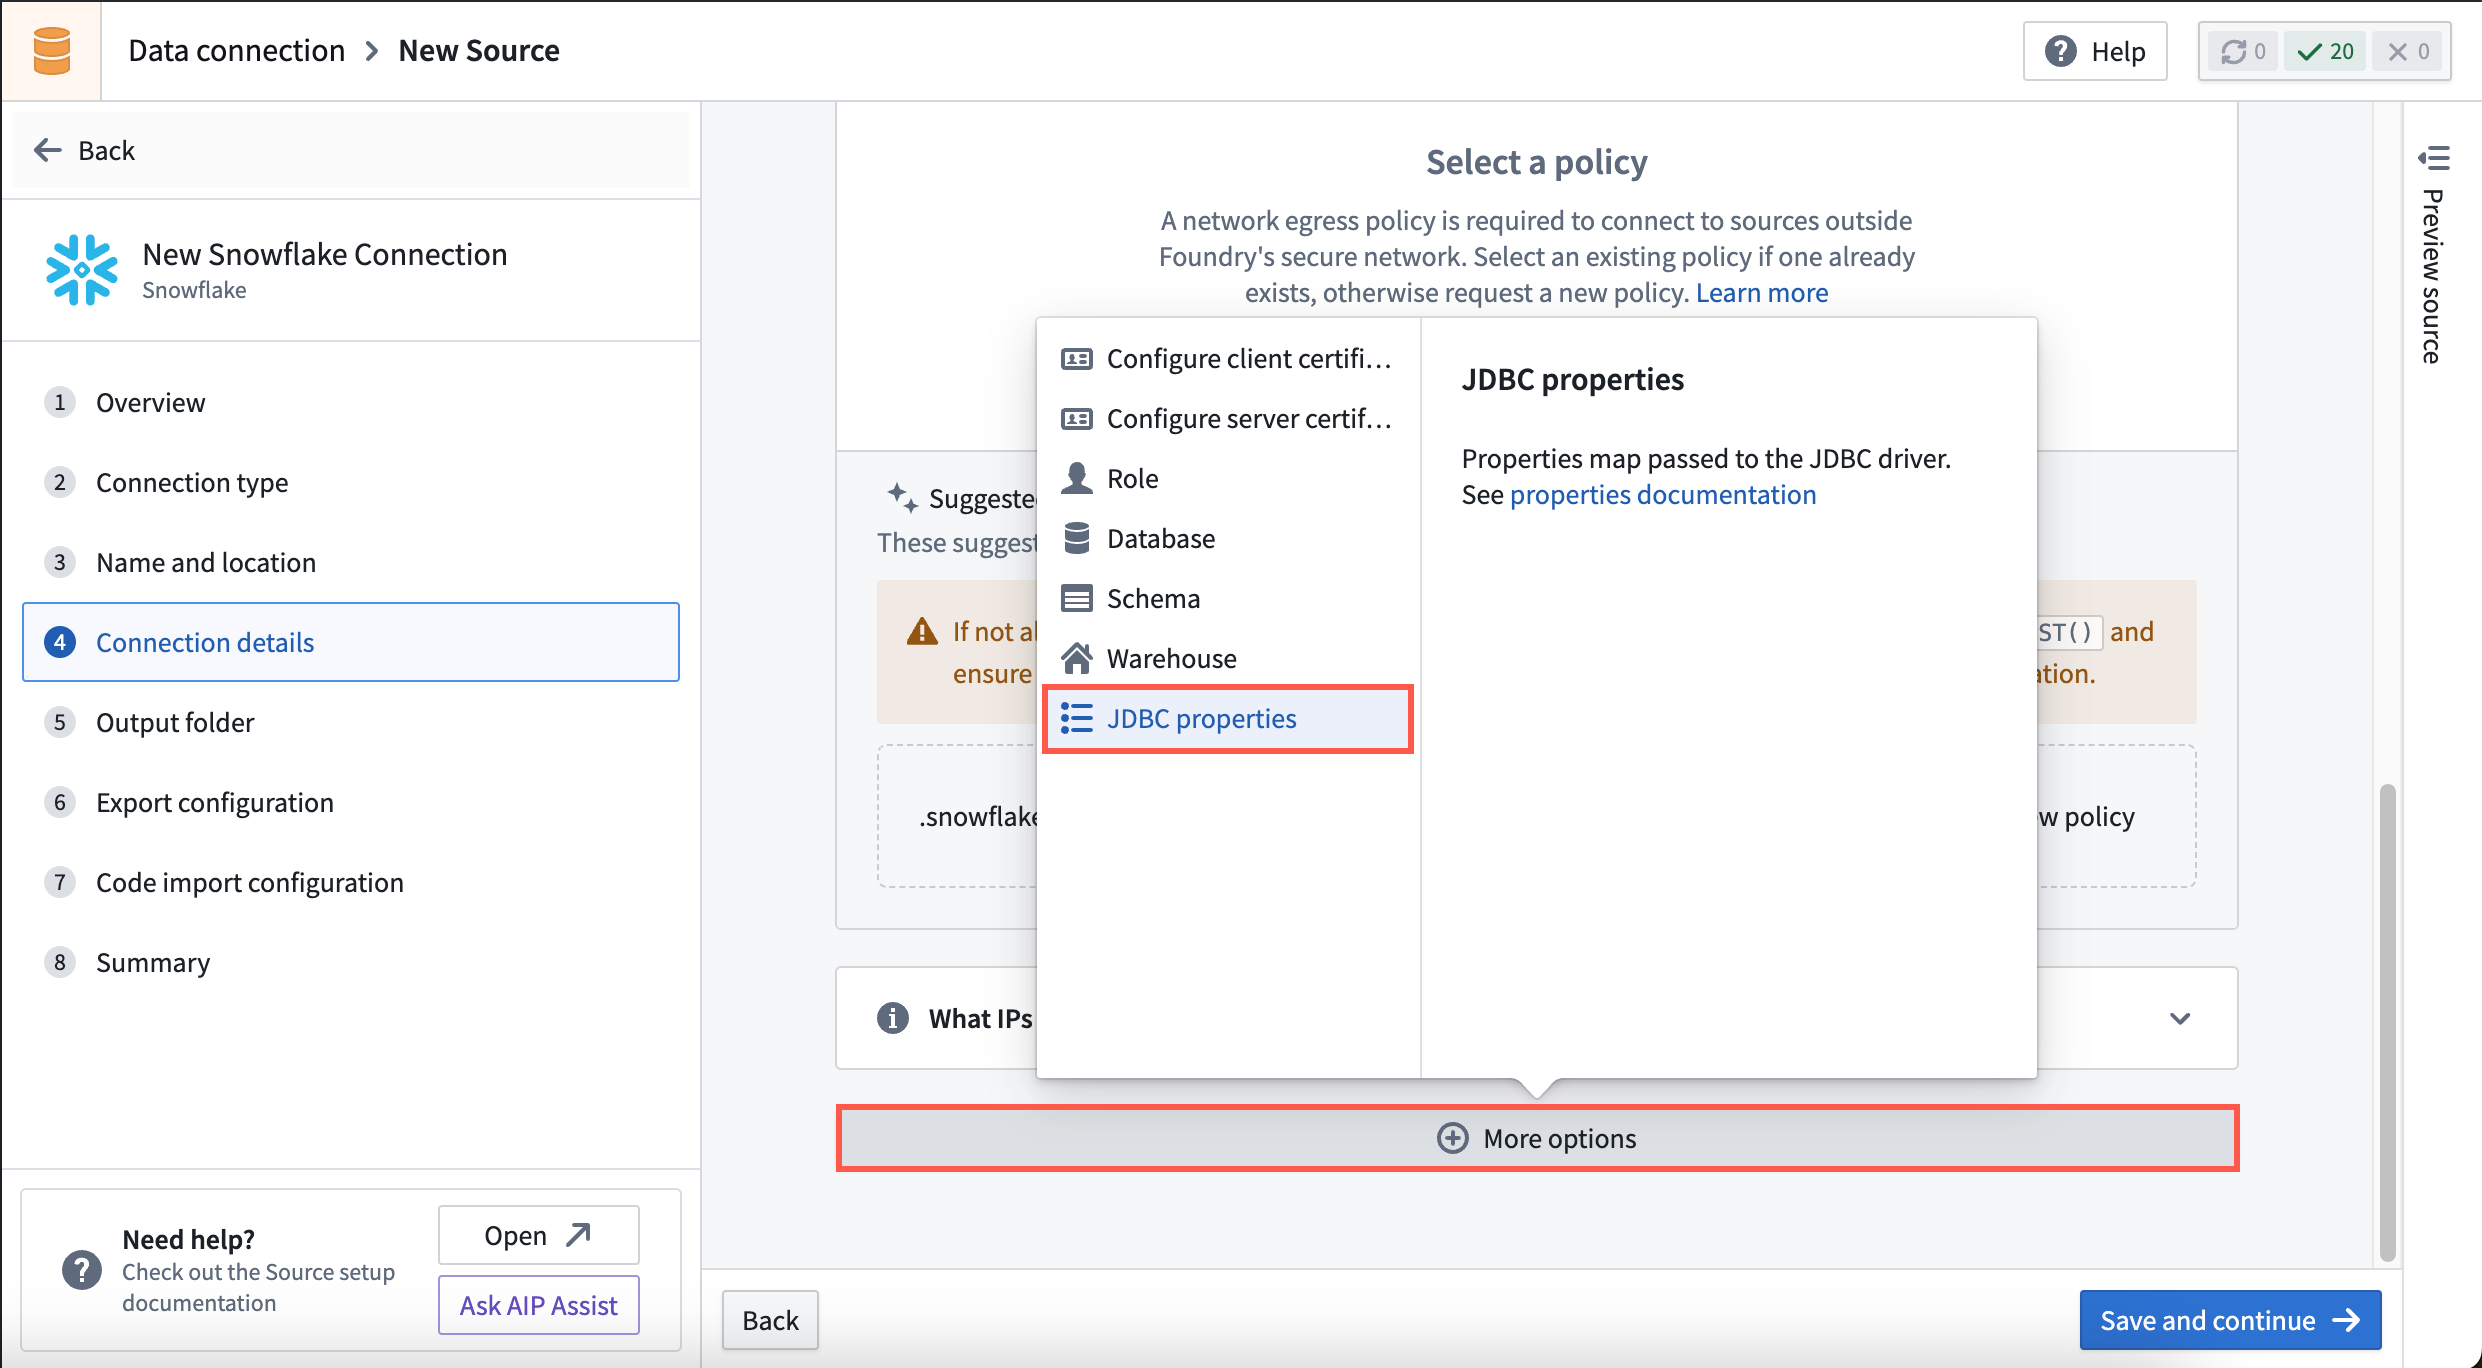
You can add driver properties to Palantir-provided JDBC sources when making connection configurations in Data Connection.
When creating a new source in Data Connection, you can create additional JDBC properties in the Connection details window by selecting More options to open the JDBC properties panel. Additionally, you can choose to encrypt select JDBC properties you provide to the driver by creating a New encrypted property.
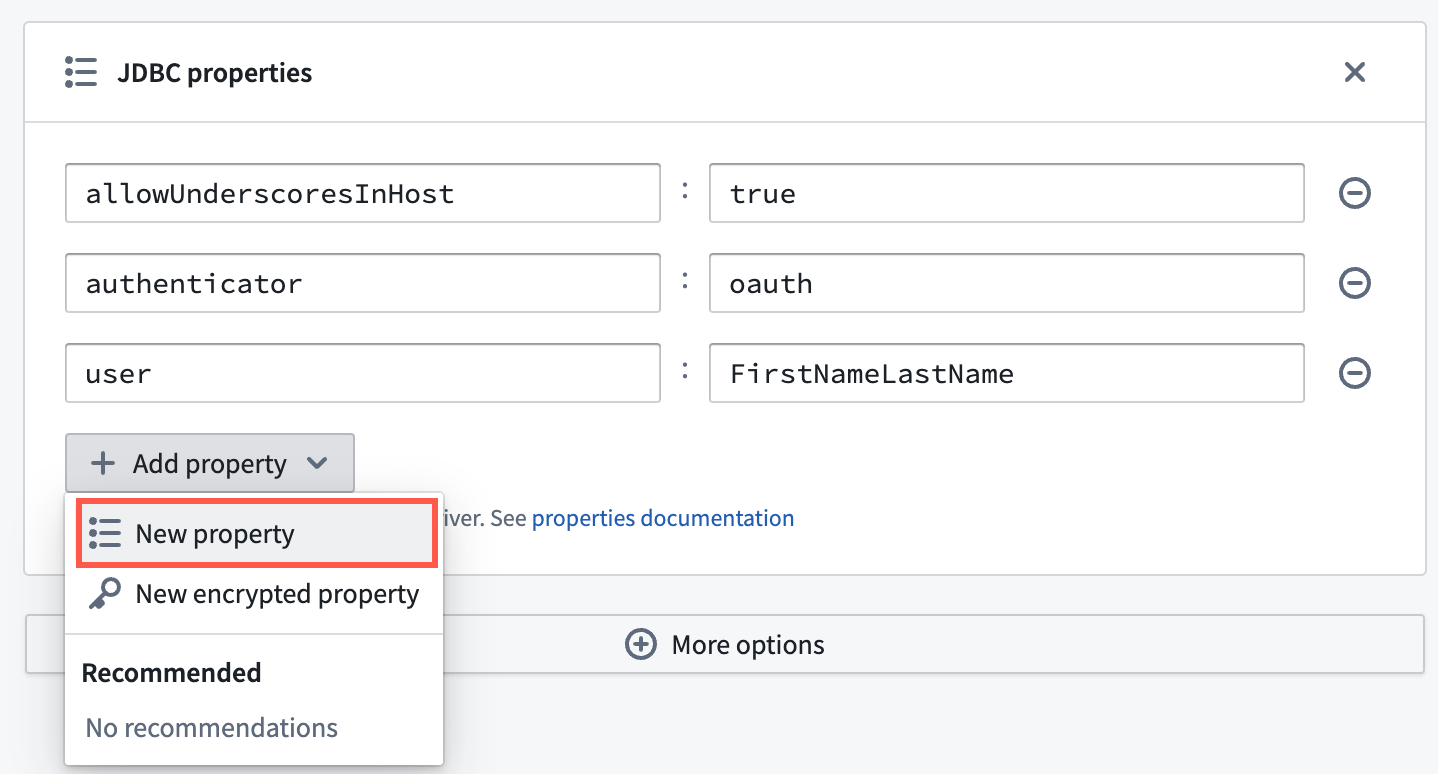
Data Connection enables you to create additional JDBC properties beyond those automatically fed to the driver.
You can reference Data Connection's documentation for a complete list of the available Palantir-provided drivers for JDBC sources.
Standardize Projects using Project templates [GA]
Date published: 2024-12-12
Project templates standardize the creation and configuration of projects within a space.
Governance frameworks can be supported through the configuration of platform security primitives like roles, groups, markings, and project constraints. These configurations can be encoded and mandated for all new Projects through Project templates, allowing organizations to set governance guardrails on created Projects.
Space owners can create, edit, and delete Project templates. Project templates can be administered in the Control Panel Spaces extension on a per-space level.
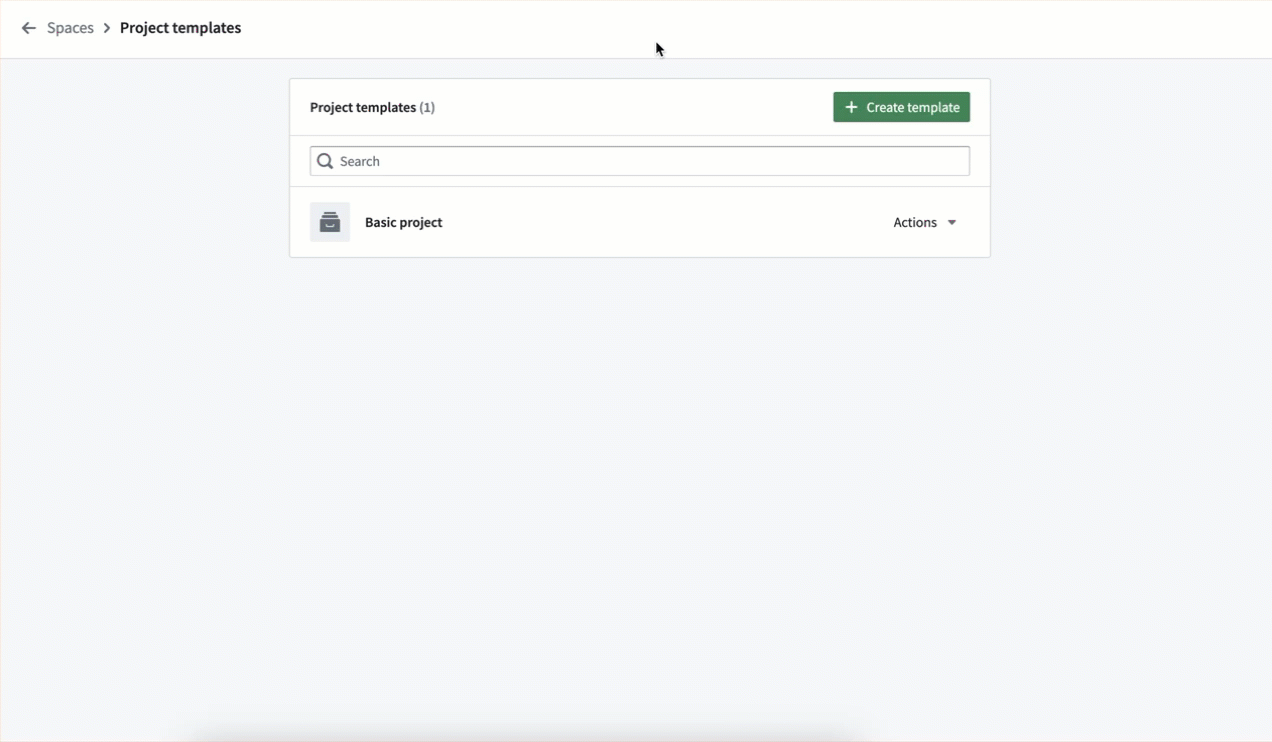
Set up a new project template using the Create project template wizard.
Learn more about managing Project templates on our documentation page.
Accelerate your use case building with Examples, now with the ability to bring your own data and build walkthroughs
Date published: 2024-12-12
Examples, a new in-platform component of Build with AIP, is a curated library of reference examples, tutorials, and building blocks designed to turbocharge your workflow building.
To access Examples, type "Examples" into the application search on the workspace navigation bar or via Support > Explore Examples. Additionally, you can explore application-specific examples directly from application splash pages.
Two new groundbreaking features for Examples are now available on all enrollments:
-
Bring your own data: You can now easily install complex workflows using your own data - just drag and drop from your desktop (or upload an existing resource in Foundry) on several of our most promising examples. Look for examples with the “bring your own data” tag to try this feature. This exciting feature allows you to easily install production-ready workflows.
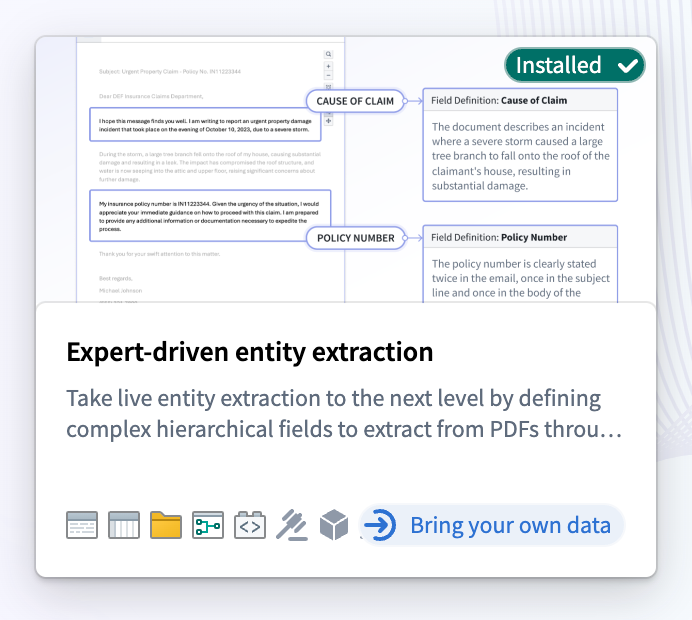
Look out for the "Bring your own data" tag on the example.
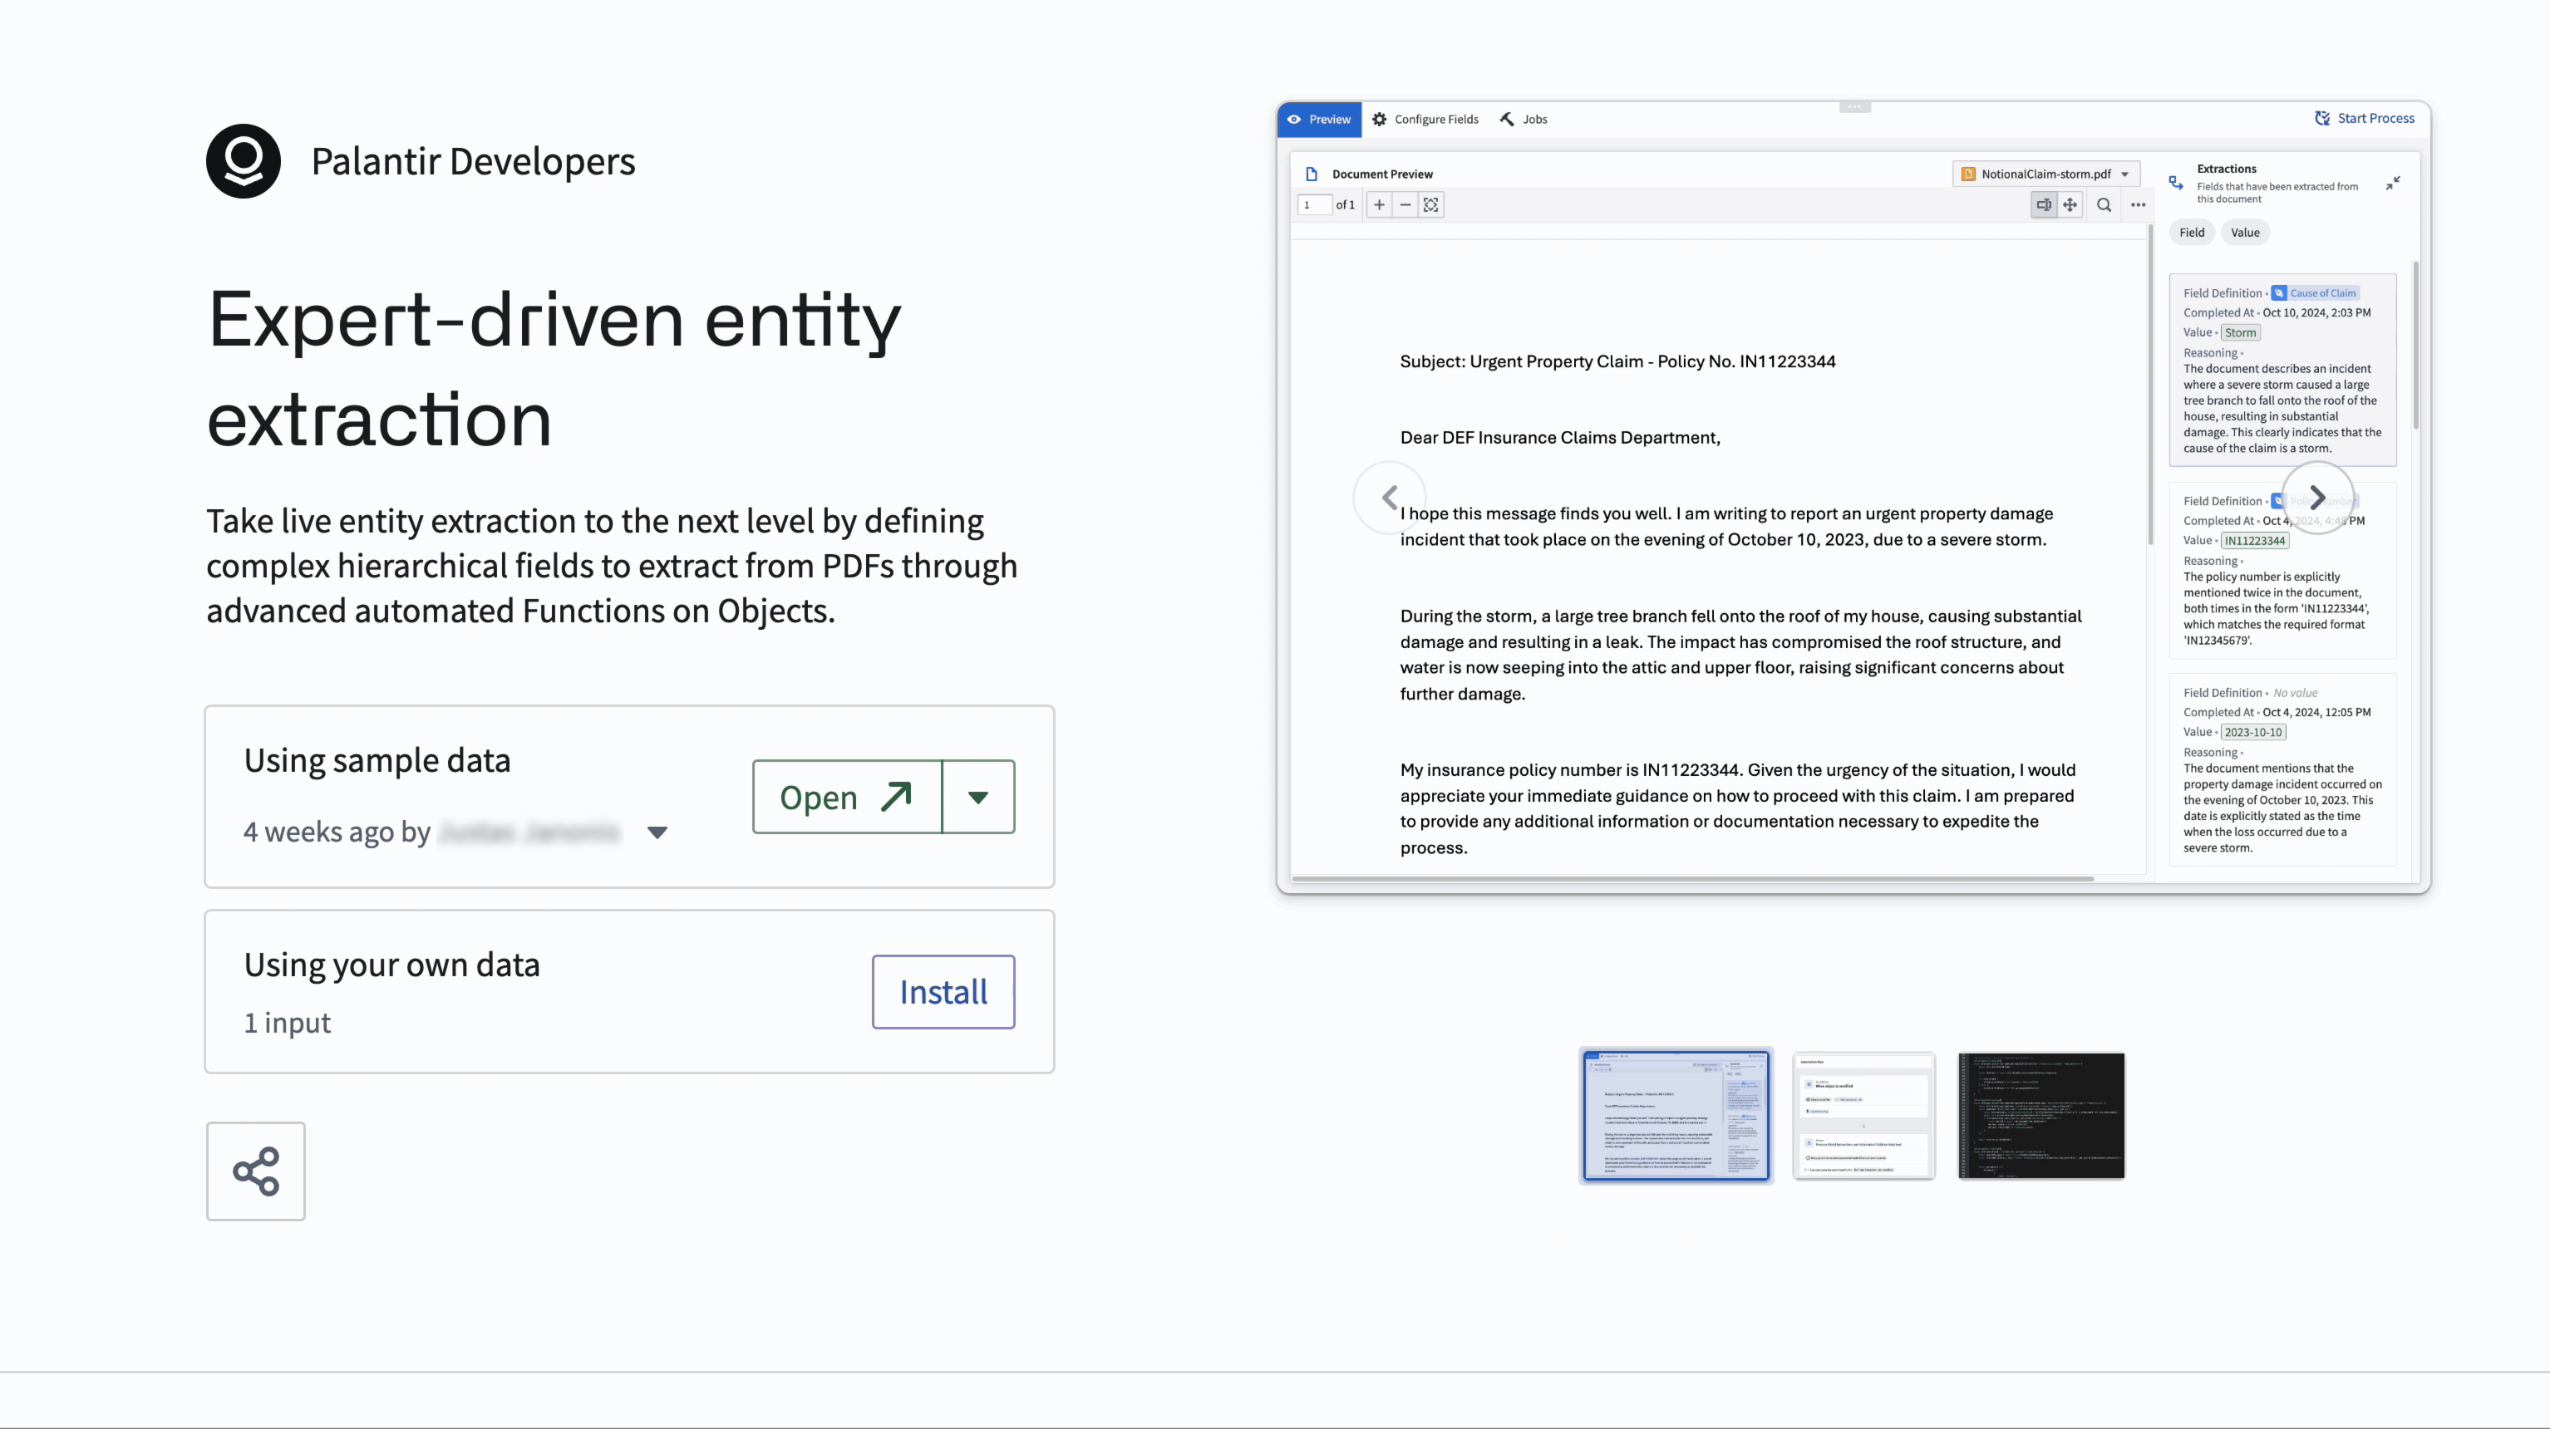
Now you can install an example with your own data to drive a production-ready workflow in minutes. -
Walkthroughs: Obtain a step by step walk through of exactly how a workflow was made. AIP Assist walkthroughs will automatically guide you from resource to resource to make it easier to comprehend your workflow.
Get step-by-step explanations of the resources in your example with the walkthrough feature in Examples.
Additionally, the Examples application covers installable examples for almost every part of Foundry, not just AIP. Explore specific reference examples for each Foundry application on the respective homepages of the application.
For more on Examples, visit our documentation.
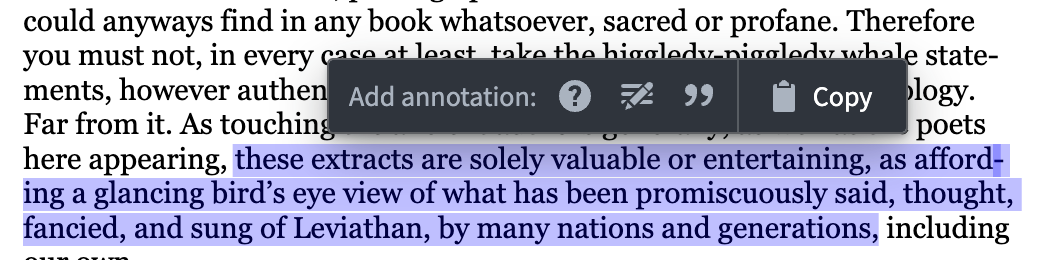
Create annotations on documents using Workshop's PDF Viewer widget
Date published: 2024-12-10
The PDF Viewer widget in Workshop now supports more complex document tagging workflows by enabling users to create, display, and interact with text and area annotations overlaid on PDF files.
Use PDF Viewer to display ontology objects as annotations with customizable colors and interactions.
You can configure document annotation display and interaction settings through the Annotation options menu of the PDF Viewer widget's Widget setup panel. If you want to display and customize existing annotations with features like custom color highlighting and events on selection, then you can add an annotation layer through the Display existing annotations menu.

You can configure annotation display and creation settings within Annotation* options.*
Additionally, you can use Create annotations (via Actions) to configure actions which run on new text or area annotations, enabling you to add a document annotation through the Add annotation: pop-up that appears when you highlight text or an area.
You can configure annotation actions which appear when you select a document's text or a specific area.
For more information on how to configure existing or create new annotations in Workshop, review PDF Viewer's documentation.
Announcing AIP rate limits control for Enrollment Admins at the Project level
Date published: 2024-12-10
Enrollment administrators can navigate to the AIP rate limits page in the Resource Management App to configure the maximum % of TPM (tokens per minute) and RPM (rate per minute) that all resources within a given Project could utilize at every given minute combined, per model.
This means that you have the flexibility to maximize LLM utilization for production use cases in case of ambitious use cases in AIP, and limit or disallow experimental projects from saturating the entire enrollment capacity.
By default, all Projects are given a specific limit to operate to. An admin can create additional Project limits, define which Projects are included in each one, and what percent of enrollment capacity can be used.
Read more in our new LLM Capacity Management documentation.
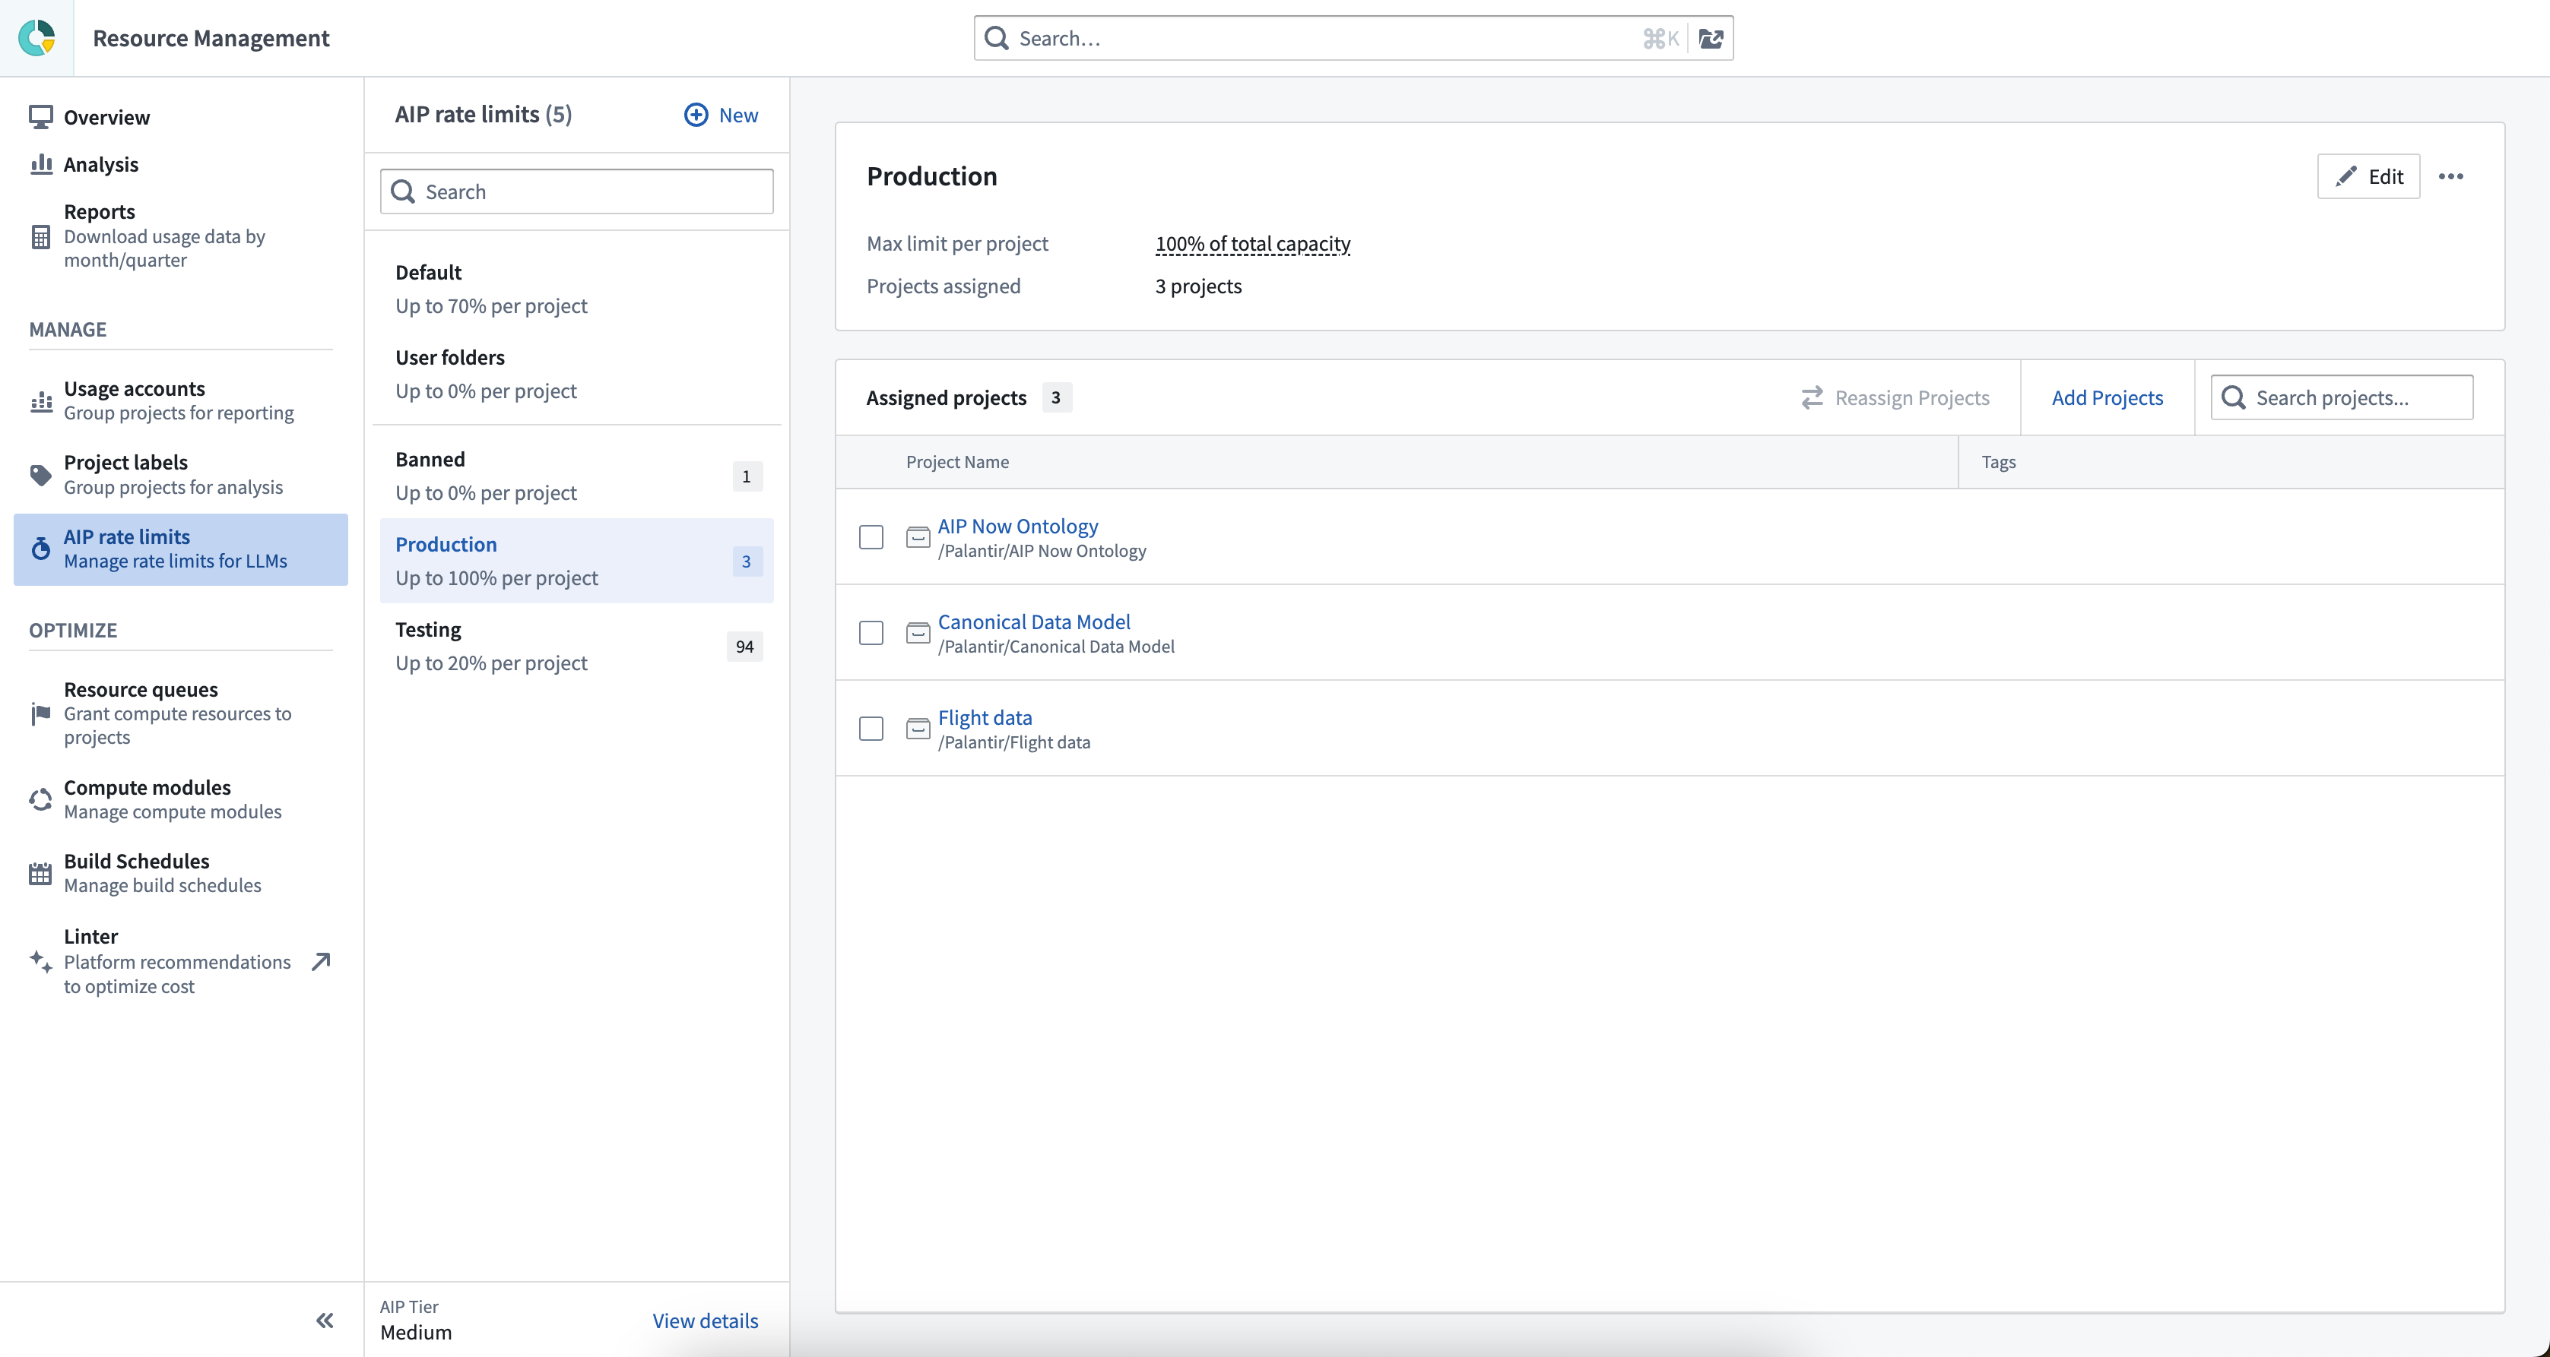
Navigate to Resource Management to the AIP rate limits page to add and manage Project limits.
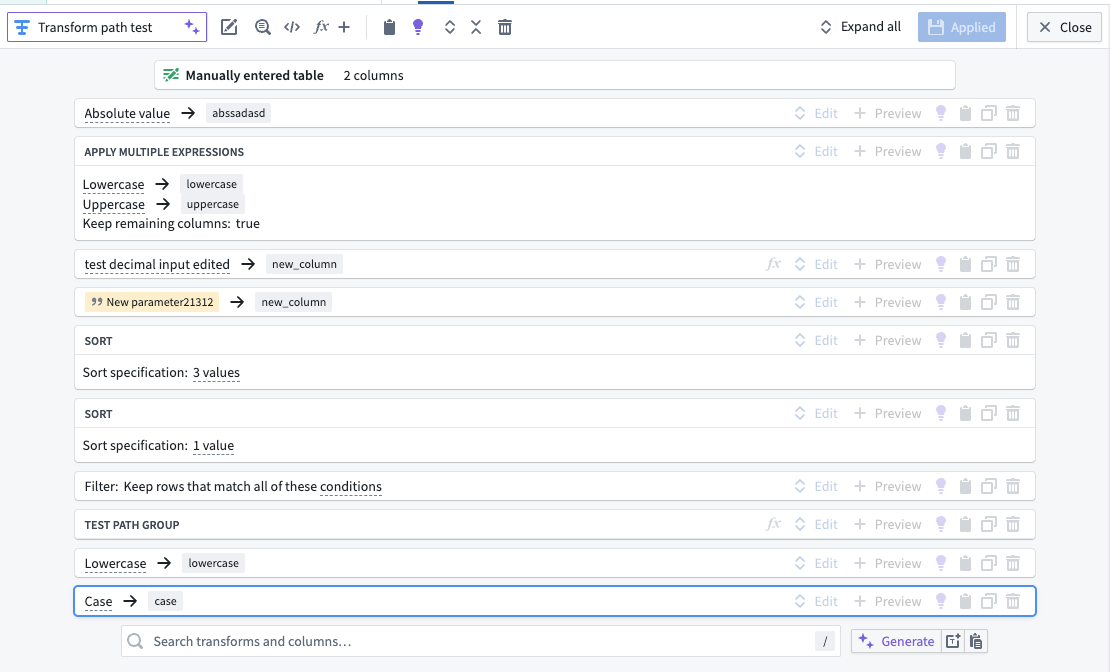
Pseudocode rendering now available in Pipeline Builder
Date published: 2024-12-10
Starting today, you can now use pseudocode transform rendering to help with your pipeline readability experience.
What is pseudocode?
Pseudocode is a simplified way of writing down the steps of an algorithm or process in plain language. It looks a bit like code but does not adhere to a specific programming language's syntax, making it easier to read and understand.
Pseudocode comes with the following benefits:
- Improved readability: You now have the option to display your transforms in a cleaner pseudocode format, making it easier to follow the logic for those who are familiar or prefer this logic representation.
- Automatic screen fitting: The pseudocode will automatically adjust to fit your screen, so you will not have to worry about endless scrolling.
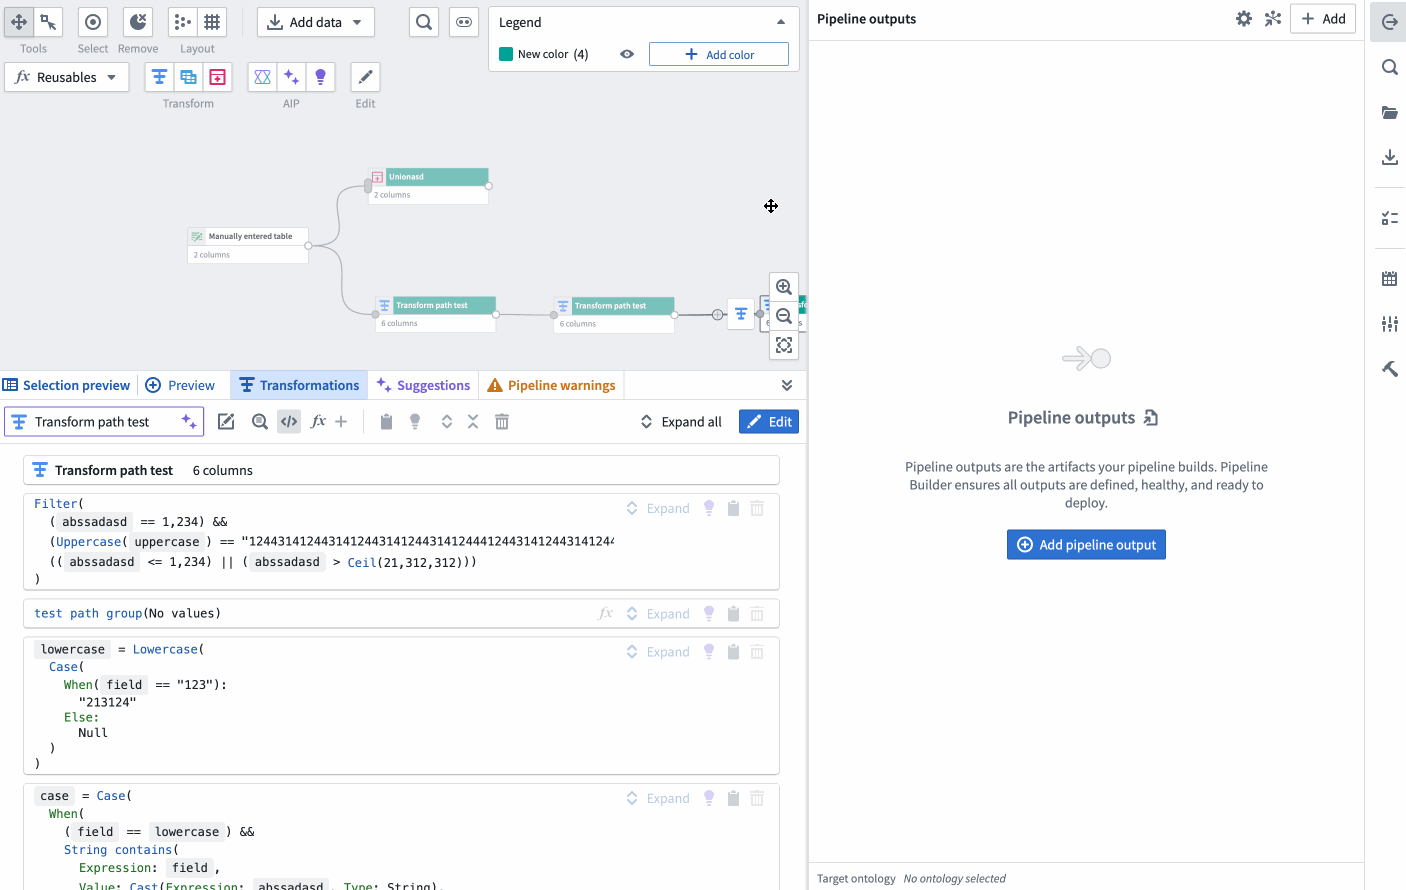
New pseudocode view option on the Pipeline Builder graph showcasing the automatic layout adjustment when the screen width is adjusted.
You can turn this preference on in Settings under User preferences or in any transform path using the \</> icon.

<img src="./media/pseudocode-transforms-path.png" alt="Toggle pseudocode style on for collapsed boards using the </> icon." width="400">
The below two images shows the two rendering options. The original format will show the current view of transforms in a collapsed format as follows:
This image shows the current view of transforms in a collapsed board rendering format. This format may be preferred by users who are accustomed to this layout and find it straightforward.
Conversely, the new pseudocode format will render like in the following image:
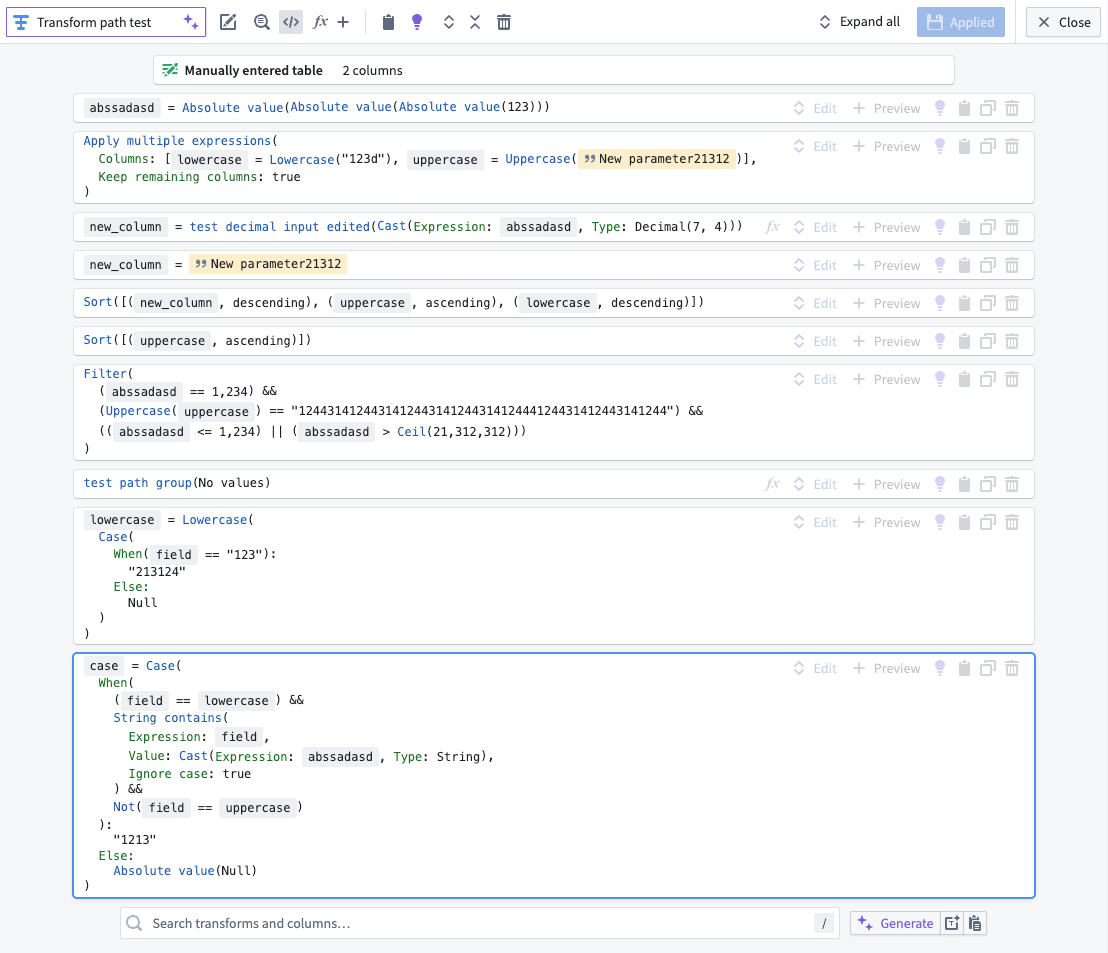
This image showcases the new pseudocode transform rendering. The transforms are now displayed in a clean, easy-to-read format, which can be particularly beneficial for users familiar with coding.
Note that enabling pesudocode does not provide a way to write code into Pipeline Builder and will not affect diff views, joins, unions, or LLM nodes. The aim of the functionality is to provide a more complete summary of what each transform is doing to allow for easier skimming and comprehension.
Review the documentation on Transform views.
LLM Capacity is now increased if both Direct OpenAI and Azure OpenAI are enabled
Date published: 2024-12-05
Starting today, if you have both the Azure OpenAI and Direct OpenAI model families enabled, your enrollment will have 2x the amount of TPM (tokens per minute) and RPM (requests per minute) capacity for GPT4o and GPT4o-Mini. Enabling Direct OpenAI also guarantees increased stability and early access to new models.
Be aware that Direct OpenAI currently lacks support for geo-restriction. As a result, only non-geo-restricted enrollments can take advantage of the enhanced capacity.
Enrollment Administrators can enable Direct OpenAI or other model families under the Model enablement tab within the AIP settings extension of Control Panel.
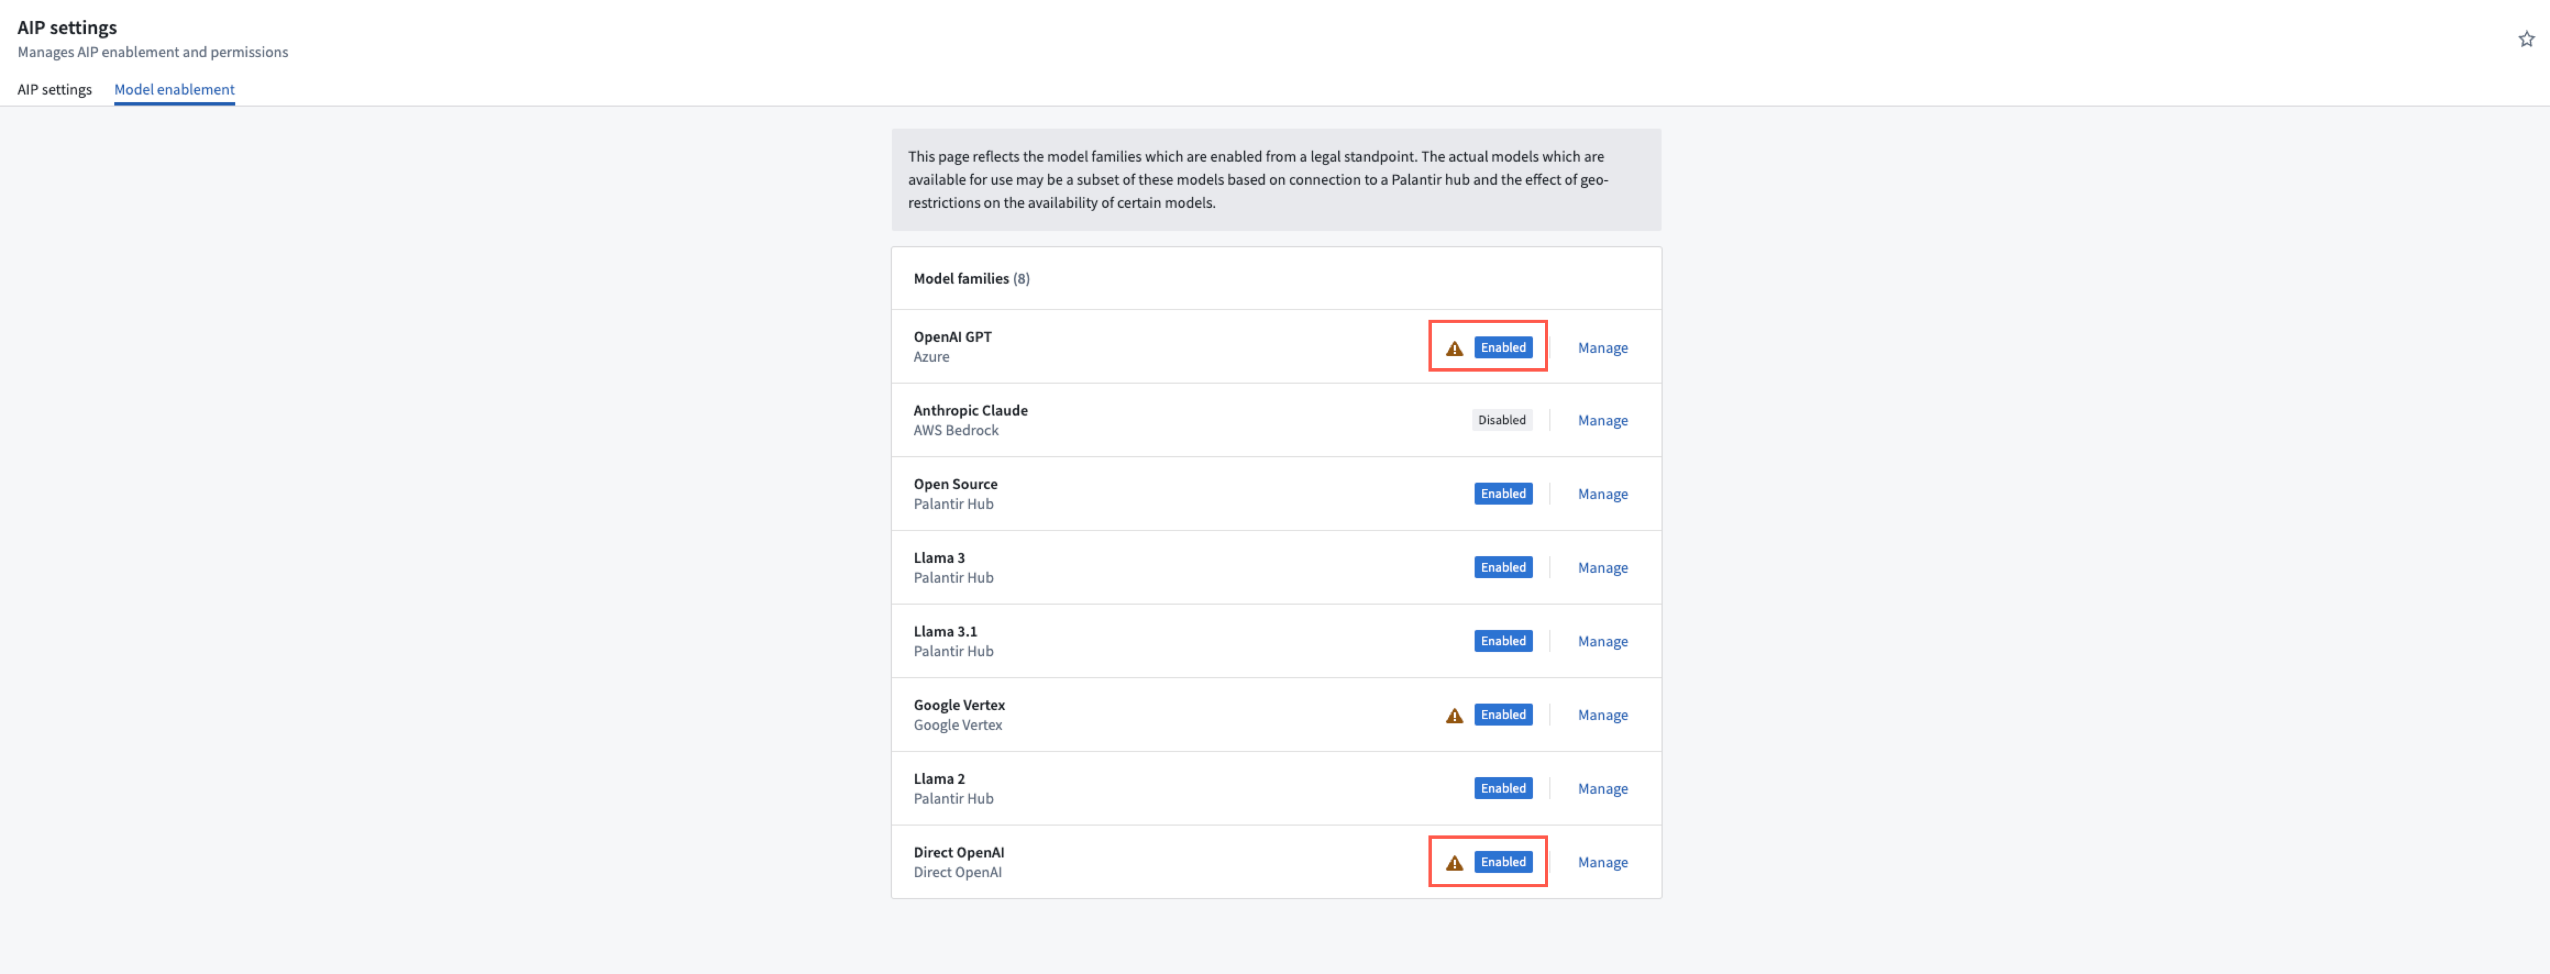
You can enable specific Model families from within Control Panel's *AIP settings*.
Create custom widgets that can interact and bidirectionally communicate with Workshop
Date published: 2024-12-05
Support for bidirectional iframe widgets in Workshop powered by iframing OSDK-built or external web applications is now available in Workshop, via use of a plugin ↗ that facilitates bidirectional communication with Workshop. Features of bidirectional communication include:
- Defining the configuration of fields and events for your custom widget to access and interact with
- Reading from Workshop variables from within your custom widget
- Writing to Workshop variables from within your custom widget
- Executing Workshop events from within your custom widget
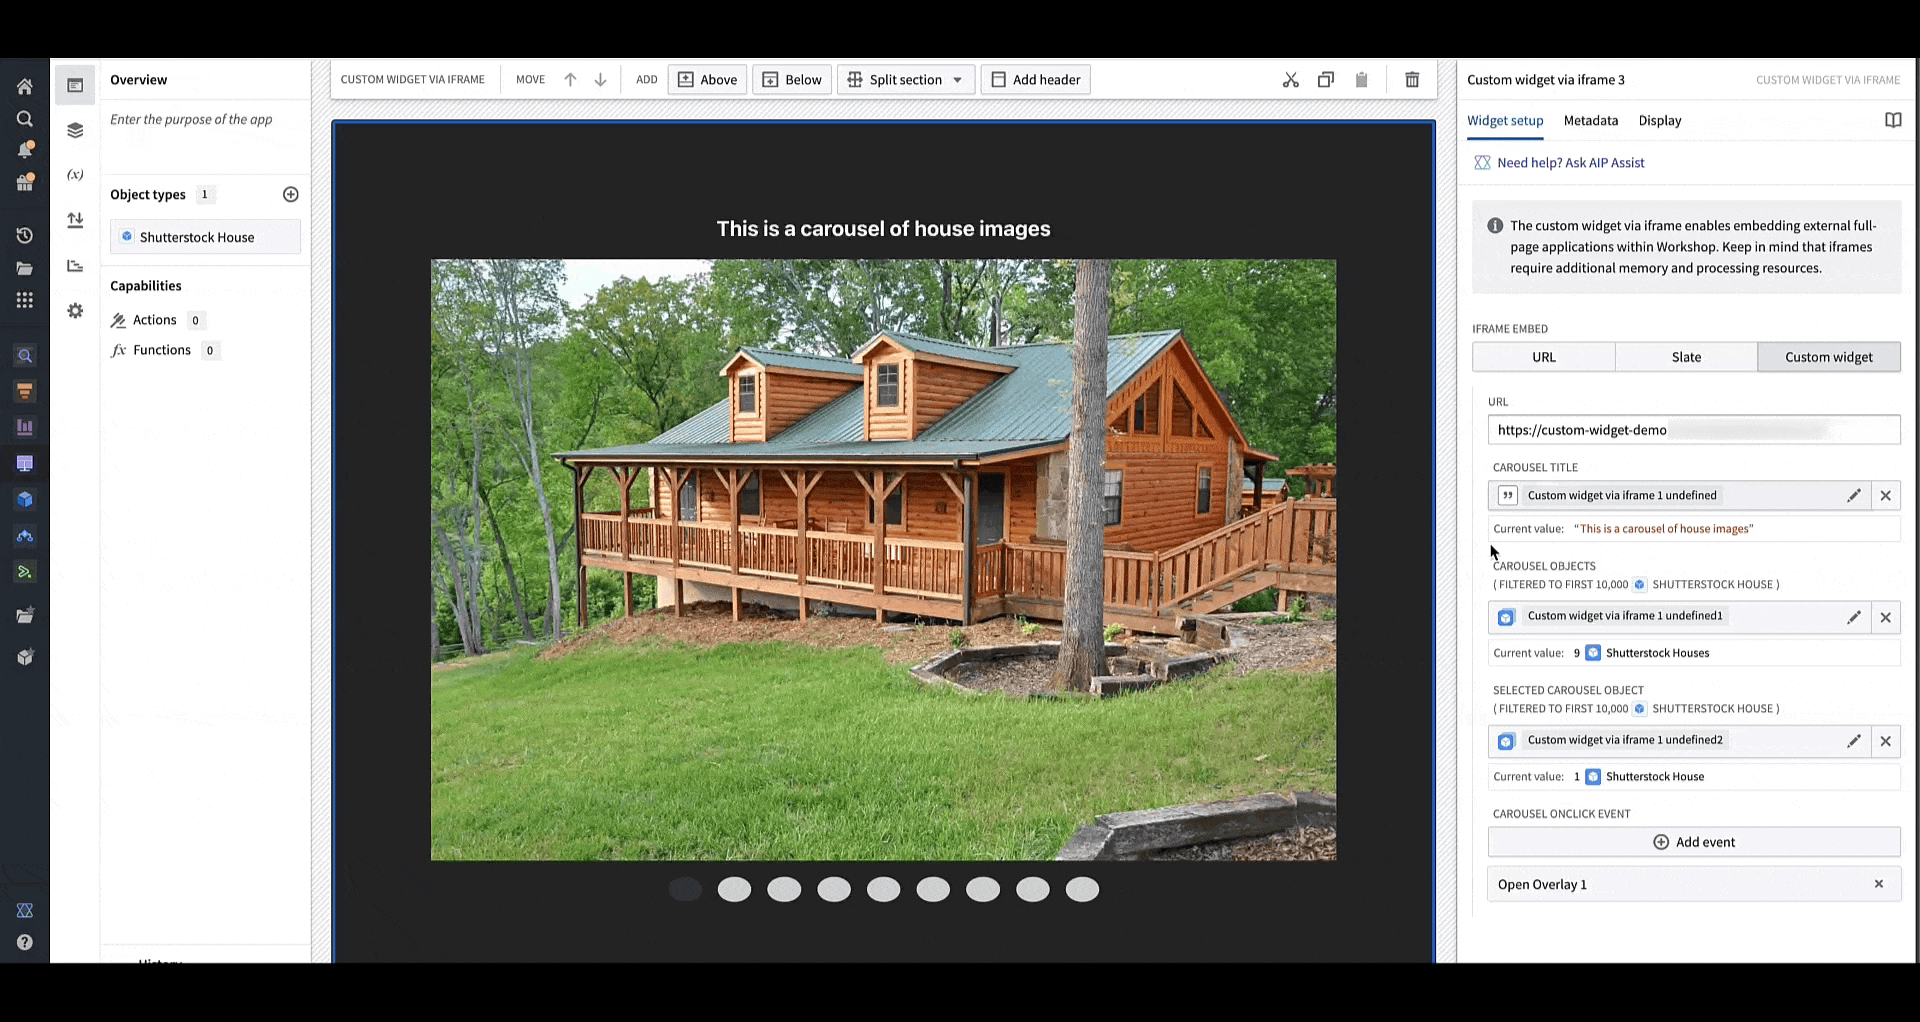
Define the configuration fields in terms of variables and events
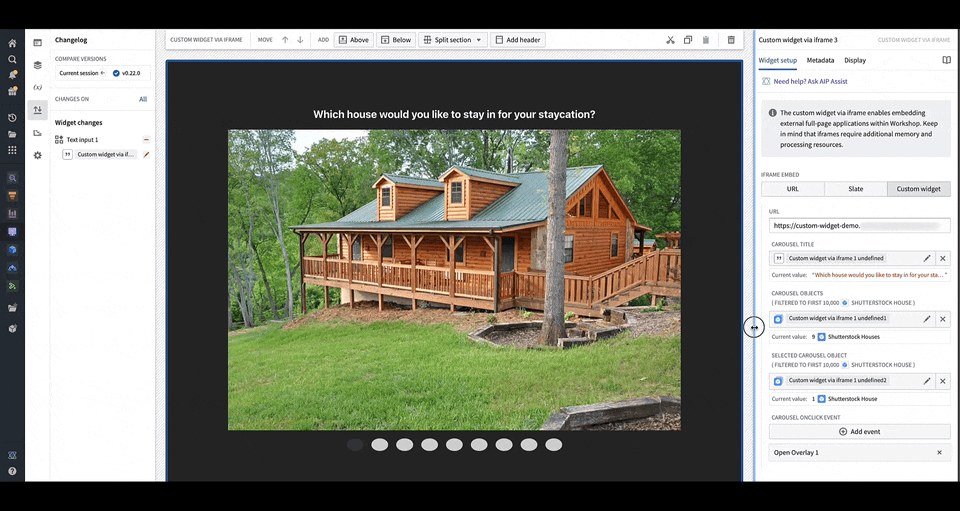
You can define the shape of your custom widget’s own configuration panel in terms of variables and events. Taking the example of a OSDK app with an image carousel of rental house objects, the variables and events are defined in a configuration that consists of a list of fields in correspondence, that are then rendered in Workshop with the associated labels.
You can load your application URL into Workshop, which will then load the list of fields corresponding to those in the application as the configuration options for the widget. In the animation above, the configuration options for a custom carousel application include a string field Carousel Title, an object set field Carousel Objects, an object set field Selected Carousel Object, and event field Carousel OnClick Event.
Read from Workshop variables
A custom app displayed in an iframe will continue to receive updates from Workshop variables at the moment of any change.
Changing the values of the configured variables in Workshop immediately alerts the sample OSDK app of the change to allow it to re-render, as shown in this animation where the title for the carousel app is being dynamically modified.
Write to Workshop variables
Custom apps can write to Workshop variables. Using the API provided in the plugin package ↗, use the IDs of the config variable fields that you defined in order to set variable values in Workshop. An example is shown in the code snippet below where for config field selectedCarouselObject, you can use the following methods in your iframed application to write to the Workshop variable populating selectedCarouselObject:
workshopContext.selectedCarouselObject.setLoadedValue(val: OntologyObject[] | undefined);
workshopContext.selectedCarouselObject.setLoading();
workshopContext.selectedCarouselObject.setReloading(val: OntologyObject[] | undefined);
workshopContext.selectedCarouselObject.setFailed(errorMessage: string);
When a user interacts with the OSDK or custom app, Workshop will update accordingly and render the appropriate components that use the variable value to reflect the new value. In the gif above, when the carousel is clicked through, the selected carousel object field in the configuration is updated with the object corresponding to the current slide of the carousel.
Execute Workshop event
Custom apps can execute Workshop events. Using the API provided in the plugin package ↗, use the IDs of the config event fields that you defined in order to execute an event in Workshop. In the example shown below where config field is carouselOnClickEvent, you can use the following method in your iframed application to execute the Workshop event(s) configured under field carouselOnClickEvent:
workshopContext.carouselOnClickEvent.executeEvent(mouseEvent?: React.MouseEvent);

You can configure events that will happen when it is triggered in the OSDK or custom app. In the animation above, a user clicking an image in the application's carousel opens an overlay containing more details on the object corresponding to the carousel slide that was clicked.
How to set up your custom widget
To get started, review the Iframe documentation for details on implementation. Then, we recommend you visit the NPM plugin documentation ↗ to configure the plugin with your React or OSDK app.
Once you have the plugin configured, continue to configure your widget via the steps provided on the Palantir documentation.
Improved access to and usability of AIP in Quiver [GA]
Date published: 2024-12-03
Access to AIP in Quiver is generally available the week of December 2.
Since July 2023, users have been able to leverage the power of AIP from their Quiver canvases to explore their data with ease by asking AIP to generate new or configure existing cards via natural language prompts. Quiver's two primary large language model-driven capabilities - AIP Generate and AIP Configure - are now accessible from most AIP-enabled Foundry enrollments beneath a card in addition to their existing availability in the top ribbon of Quiver's workspace and a selected card.
AIP Generate creates analysis from a user prompt to provide rapid insight on data available in the Ontology, offering another method for object set analysis in addition to capabilities native to Object Explorer and Contour. AIP Configure applies user prompts to update card configurations and tailor analytical outputs to a user's needs regardless of their familiarity with Quiver's visualization settings.
Quiver cards that can leverage AIP display an AIP logo to their right in the card search bar.
![]()
Quiver cards backed by AIP's analytical capabilities display an AIP logo to their right.
Access AIP Generate from a Quiver card
After you select an object set to analyze in Quiver, you will see an input field with an AIP logo beneath the card selection that instructs you to Enter a query to continue the exploration. Write an analytical action you would like to perform in the text input box, and AIP Generate will suggest options using a Palantir-provided large language model (LLM).

Users can access AIP Generate beneath a Quiver card to create a new analysis.
Select an option or press the Enter key to instruct AIP to add the card to the canvas and make all configurations on your behalf. You can also reconfigure your prompt in the text input box to produce alternative options.
If AIP believes your query requires multiple steps, it will highlight this as a + Follow Up. Hovering your cursor over the + Follow Up tag shows the next prompt which AIP will automatically apply.

AIP generates follow up actions if it believes your query requires multiple steps.
Once you select + Follow Up, AIP Generate enters Chain Of Thought mode, showing its previous steps along with suggested next actions. You can select Reset to enter your own prompt as a reconfiguration of AIP Generate's initial follow up.
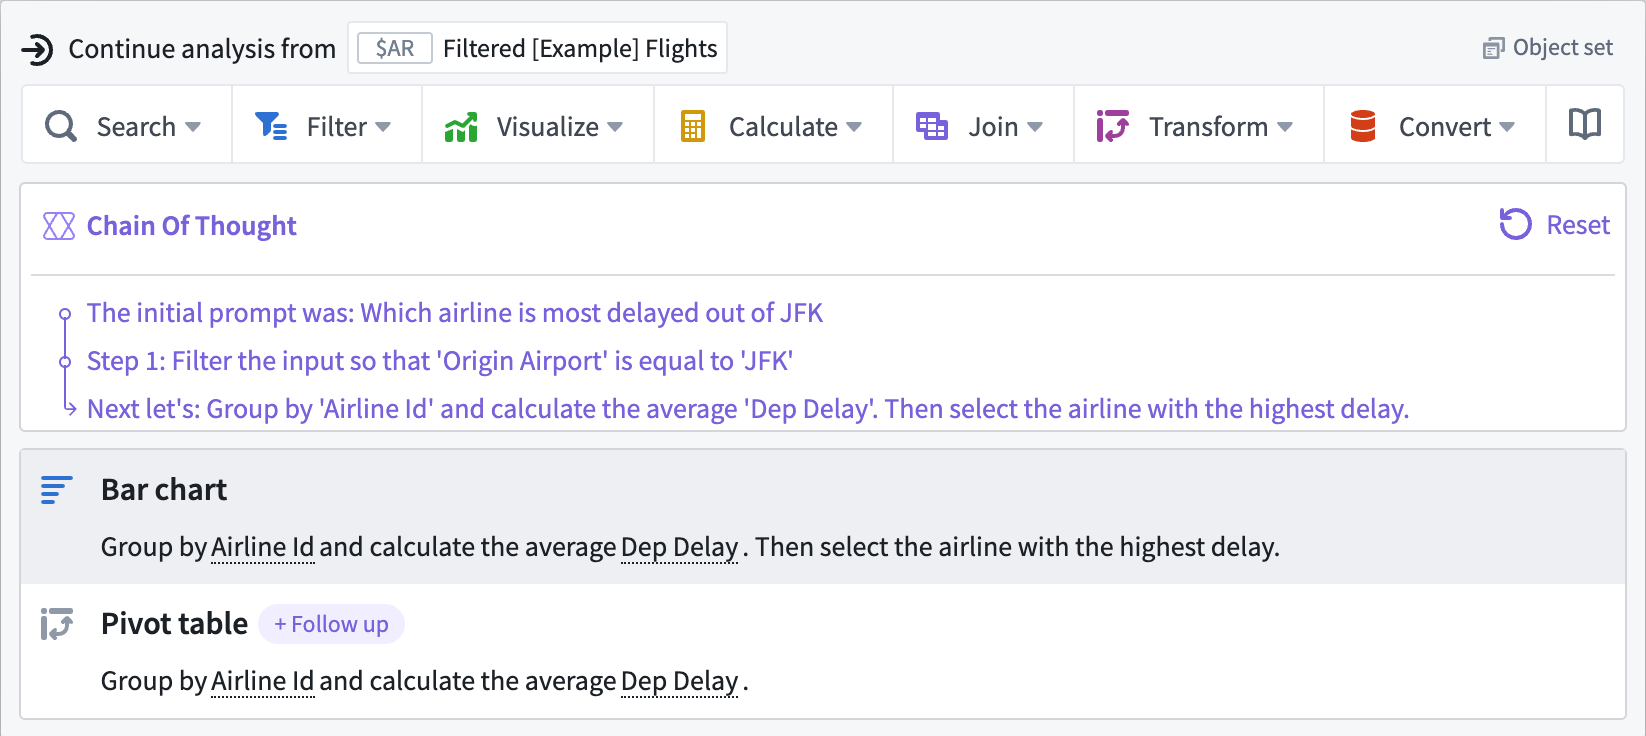
AIP Generate enters Chain Of Thought mode for multi-step queries.
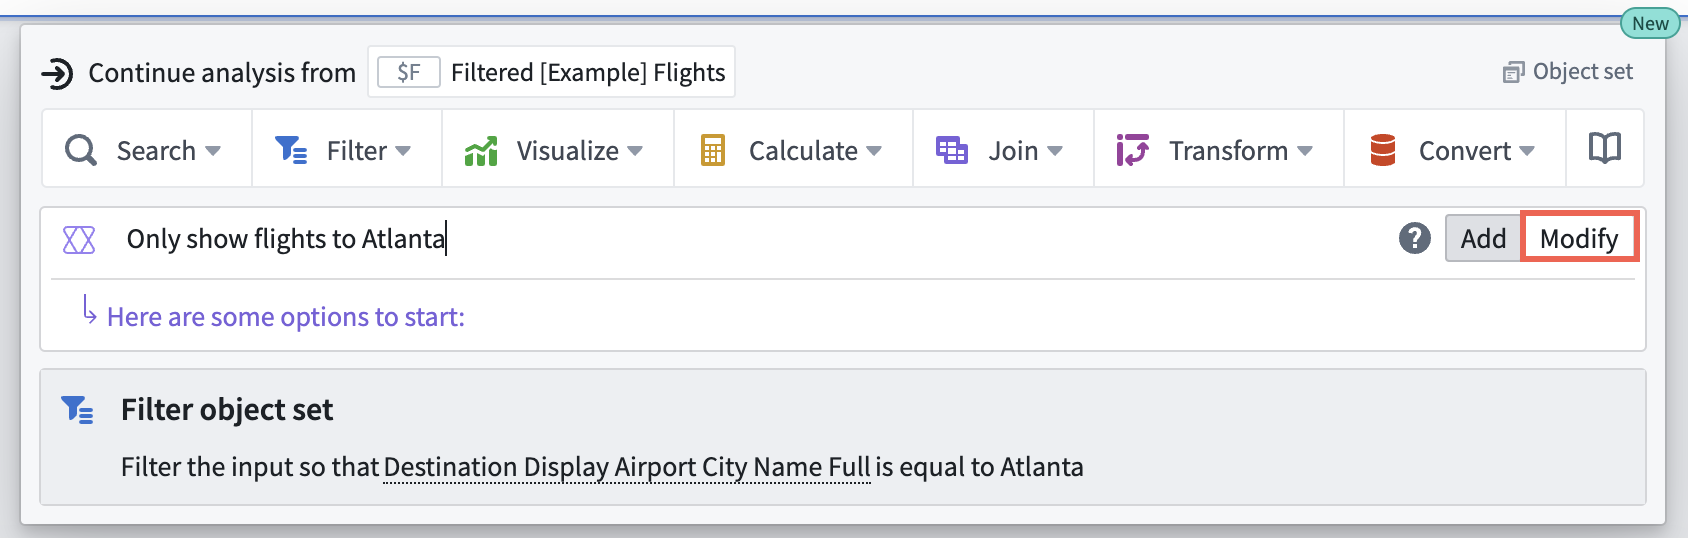
Access AIP Configure from a newly-created analysis
To configure an existing card, hover your cursor over the card and select the Modify button before entering your configuration prompt into the text field to the right of the AIP icon. Verify that AIP's suggestion answers your prompt before selecting the proposed modification.
Users can access AIP Configure beneath an analysis card.
AIP must be enabled on your Foundry enrollment to access these features in Quiver.
You can reference additional AIP Generate and AIP Configure details within Quiver's existing documentation.
Leverage custom LLM-powered assistants in Carbon workspaces
Date published: 2024-12-03
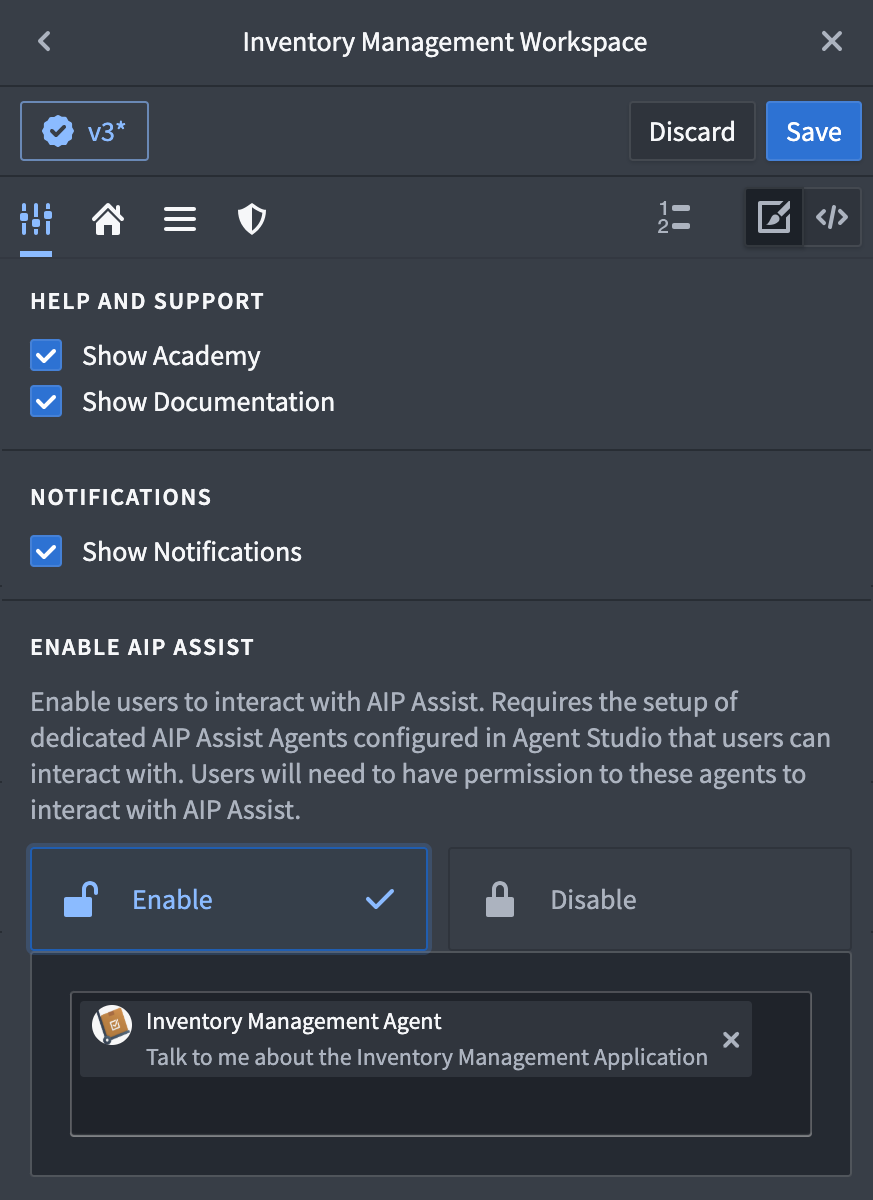
Starting the week of December 9, AIP Assist Agents will be generally available in Carbon workspaces. AIP Assist Agents are LLM-powered assistants that use custom sources as their only search context, allowing users to access immediate, interactive support tailored to their specific needs. Carbon workspace managers can now configure and deploy AIP Assist Agents in Agent Studio and make them available in Carbon workspaces, providing access to support in targeted, context relevant areas.
Carbon workspace managers can use this feature by navigating to workspace settings, enabling AIP Assist, and selecting one or more agents for end-users to access.
The Carbon workspace settings, now with the option to enable AIP Assist and select agents.
Each agent can provide expertise in different areas, allowing you the flexibility to customize support and offer expert interactive assistance when and where it is needed most.
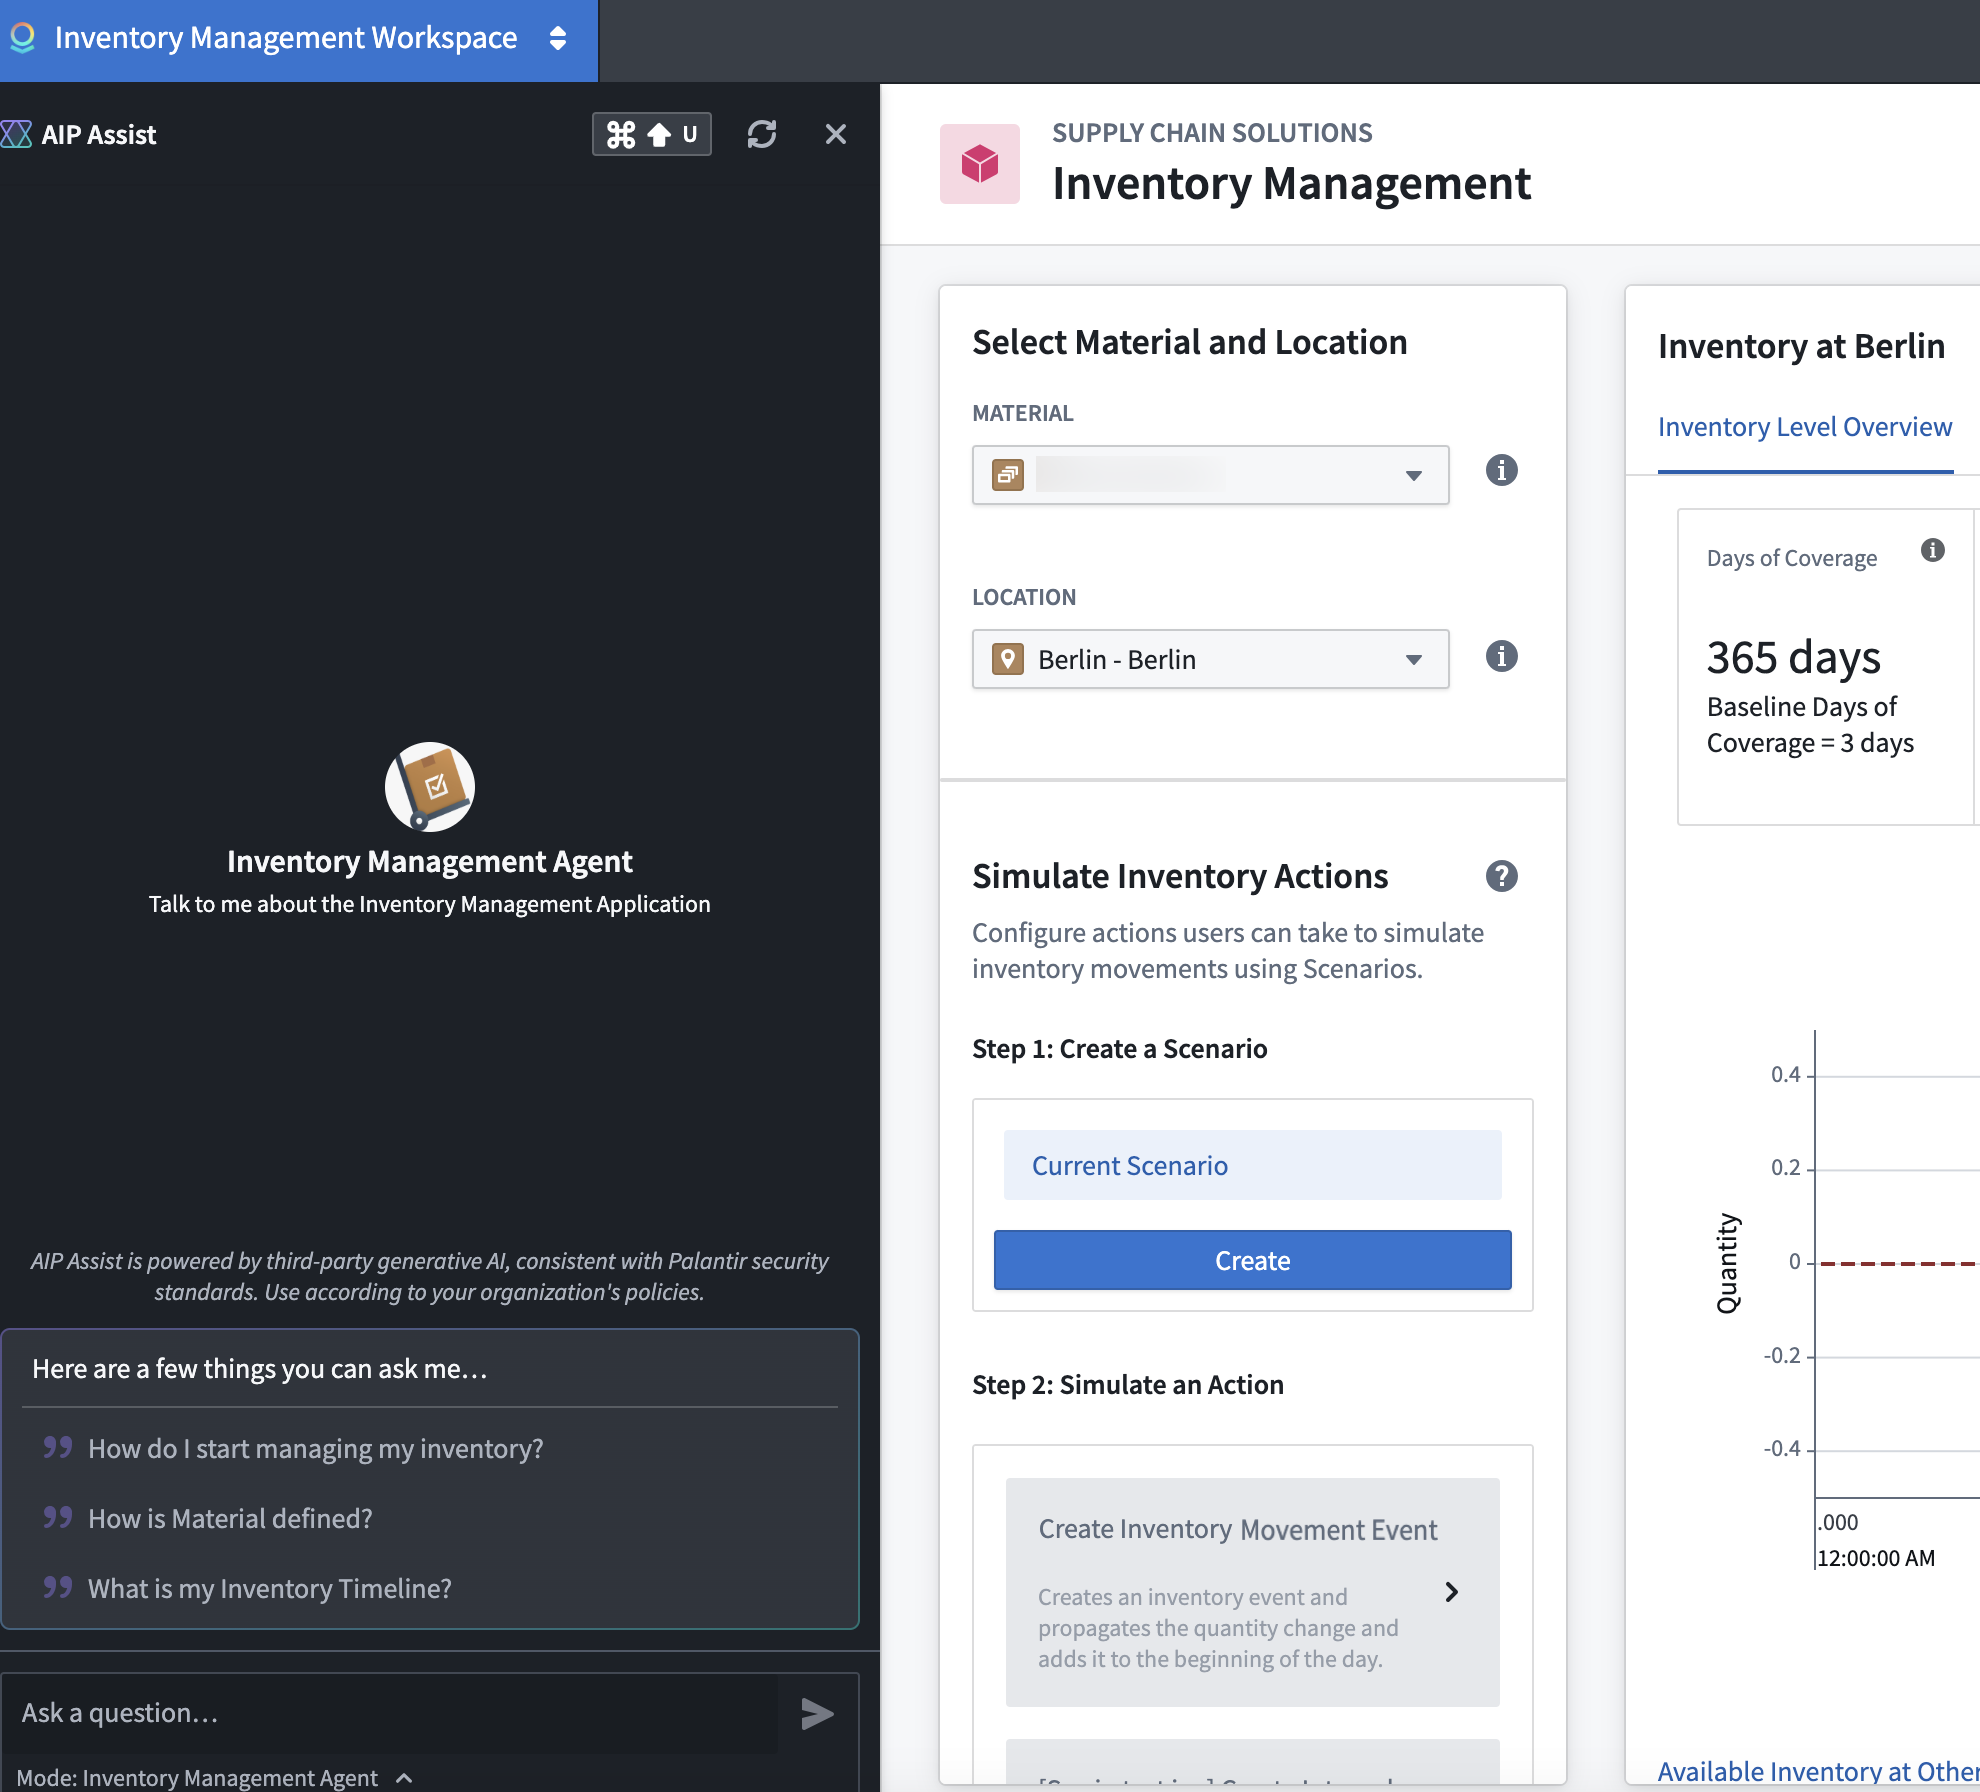
A sample Carbon workspace with suggested questions for an AIP Assist Agent.
Note that users require permissions to selected agents to access this feature.
Learn more about AIP Assist Agents and Carbon workspaces.
New Slack and webhook integrations for monitoring views
Date published: 2024-12-03
New integrations that allow users to receive monitoring view alerts through Slack and webhooks are now available, in addition to existing support for PagerDuty. This allows users to integrate monitoring views with Slack to receive alerts in specified channels, or with other external systems through webhooks. Users can now monitor their resources more effectively, ensuring prompt alerting through preferred channels and enabling seamless integration with existing workflows and tools.
Our new Slack integration allows users to select a Slack source from Data Connection, eliminating the need to manually enter authentication credentials or egress policies to configure Slack alerts for monitoring views.

The Slack integration configuration dialog, showing the selected Slack source, channels, and severity.
Users can create webhook integrations for monitoring views by selecting a webhook, choosing the message parameter on that webhook, and selecting a severity level.
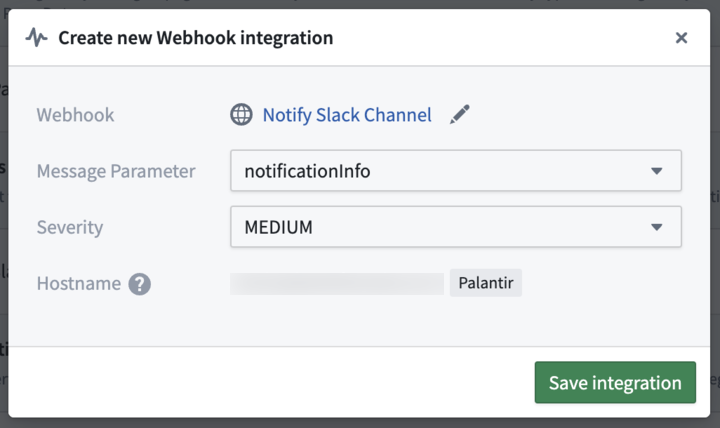
The webhook integration configuration dialog, showing the webhook, message parameter, and severity.
With these new integrations users can streamline their incident response processes and improve overall system reliability, with the flexibility to choose the notification channel that is most convenient and effective.
Note that all integrations are configured against a given severity level. Only alerts matching that severity will trigger associated integrations.
Learn more about configuring Slack, webhook and PagerDuty integrations.
Significant performance and accuracy boost for AIP Assist introduced
Date published: 2024-12-03
Following feedback from our first Developer Conference for technical leaders and builders held November 13-14, we are thrilled to share a series of significant improvements to AIP Assist that will enhance your experience and productivity.
Key updates implemented to boost AIP Assist's performance
- Reduced hallucinations and improved tool usage: AIP Assist now provides more accurate answers with fewer instances of irrelevant or incorrect information. You can expect clearer responses and better tool utilization when interacting with the assistant.
- More detailed and thorough responses: Enjoy more comprehensive answers to your queries. AIP Assist delivers in-depth information and explanations, ensuring you have the details you need.
- Improved documentation search functionality for Platform Assist and Developer Assist: Search capabilities have been enhanced for both Platform and Developer Assist modes. Finding the information you need is now faster and more accurate than ever before.
Improved knowledge of Platform API Documentation
AIP Assist will now provide in-depth explanations and examples directly from platform API reference documentation to help developers make the most of our features and APIs. You can expect more relevant and precise assistance in your development tasks.
Anthropic Claude 3.5 Sonnet enabled for Developer Assist
We are excited to announce that Claude 3.5 is now the preferred model for Developer Assist. This upgrade brings a significant increase in accuracy for code-related assistance. Whether you are coding, debugging, or exploring new programming concepts, Developer Assist is now more precise and helpful than ever.
Contact your Palantir administrator to enable Claude 3.5 where regionally available.
New information option with model and query understanding details
You can now see which model AIP Assist used and how it understood your query by using the information icon under each answer provided.
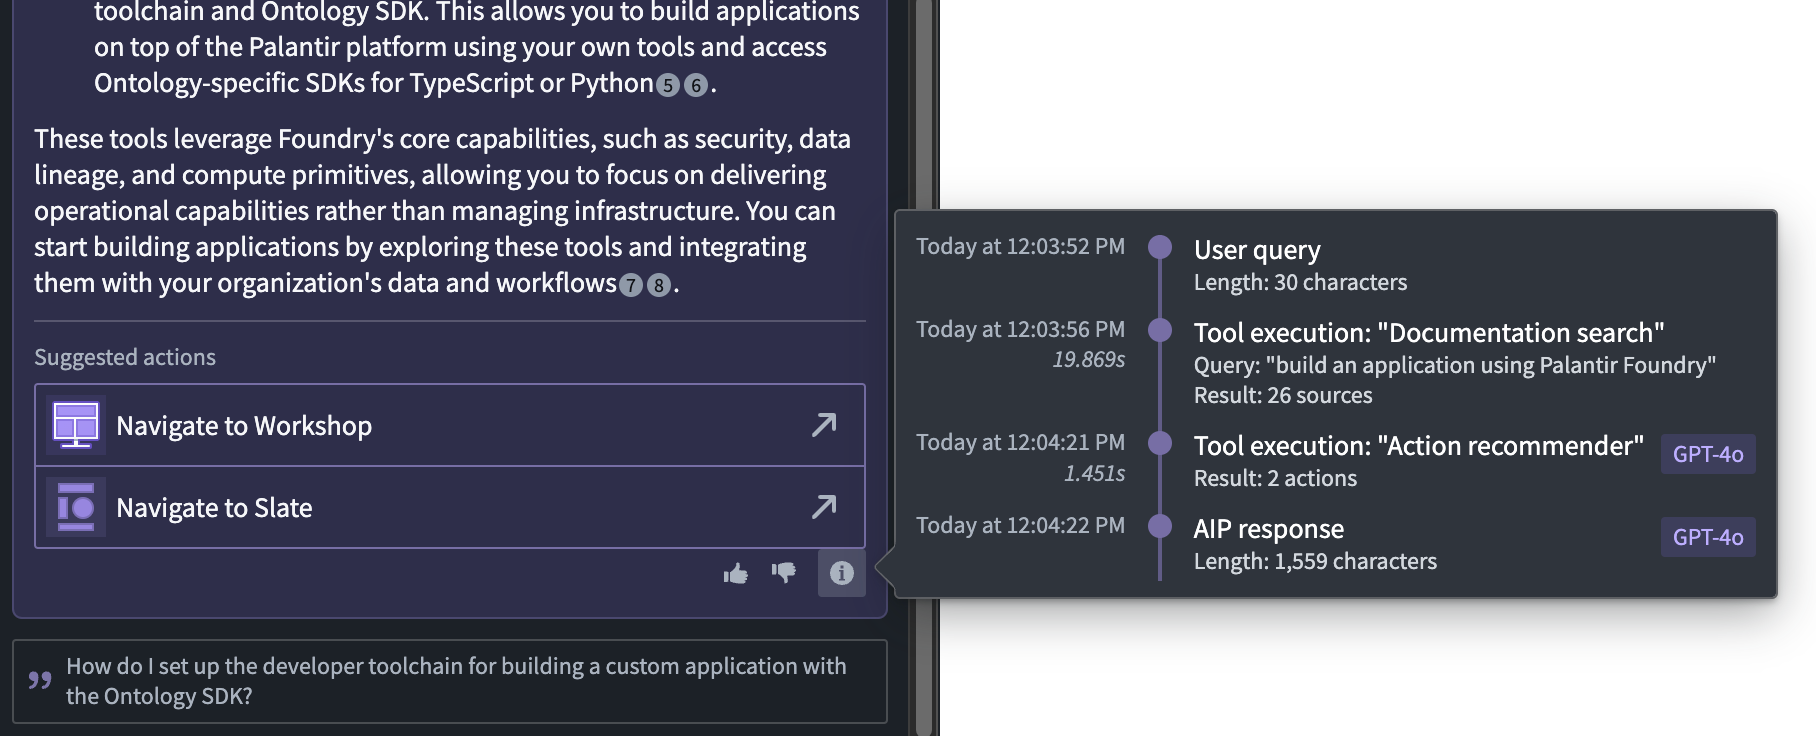
Open the context menu using the information icon to learn how AIP Assist provided your response.
Use Python Functions in Pipeline Builder [Beta]
Date published: 2024-12-03
Pipeline Builder now supports using Python Functions in your pipelines. This new feature allows you to seamlessly integrate custom Python logic, including powerful Python libraries, into your batch and streaming pipelines.
To get started, open the Python Functions template in Code Repositories and write your Python Function.
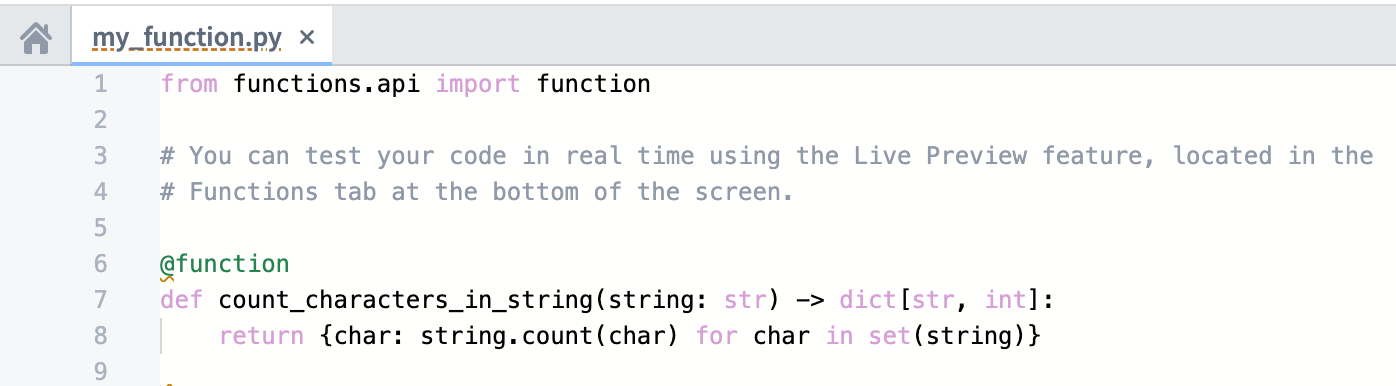
A Python Function created in Code Repositories.
Once you have tagged a release of your function, you can now import and use your Python function in Pipeline Builder.
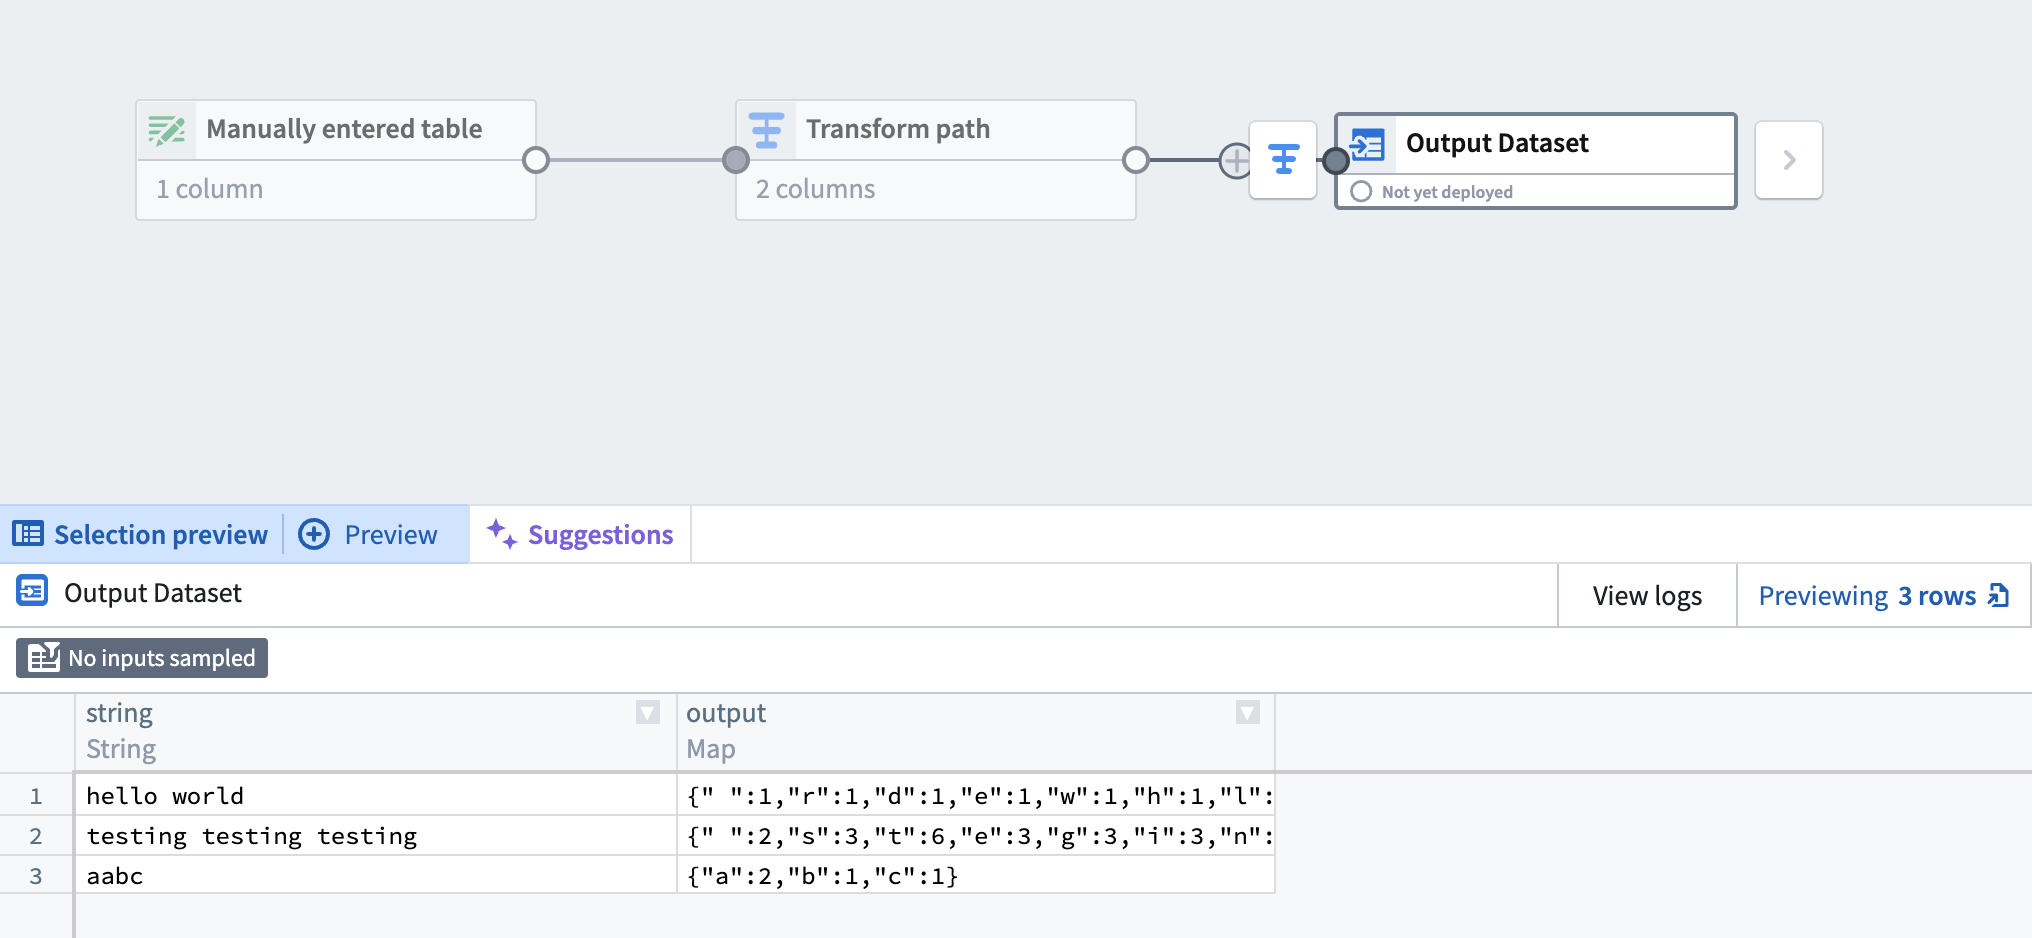
The output of applying a Python Function to a Manually Entered Table in Pipeline Builder preview.
For more information on how to use Python Functions in Pipeline Builder, review documentation on Use a Python function in Pipeline Builder.
Use the new Send feedback option on our documentation website to help us improve our content
Date published: 2024-12-03
You can now share your thoughts on our public documentation website ↗ through a new Send feedback option at the bottom of all pages of the documentation. We are eager to hear your suggestions, from topics you would like us to expand upon or clarify, to resources we can add to make our documentation and in conjunction, AIP Assist, more powerful in leveraging the Palantir platform.
Your insights are extremely valuable to us as we endeavor to make your experience with the Palantir platform as smooth and efficient as possible. We look forward to incorporating your feedback and updating our documentation to better support your success.
Note: You do not need to register to submit your feedback and your participation is voluntary. For more information on how Palantir processes personal information,_ review our privacy statement ↗.
You can find the Send feedback option at the bottom of all pages of the documentation.
Introducing serverless Python function support [Beta]
Date published: 2024-12-03
Serverless support for Python functions in Foundry is now entering beta. Like TypeScript, you will now be able to run Python functions with no additional setup once you have tagged and released a function repository. Python functions using the serverless backend will be available in Workshop, Actions, and any other place where TypeScript functions can currently be used. This new high-performance backend allows functions to be run with no setup or user-managed resources.
Serverless Python is now available in a beta state and being enabled on a rolling basis. You can verify whether the serverless option is enabled by navigating to your function in Ontology Manager as in the screenshot below.
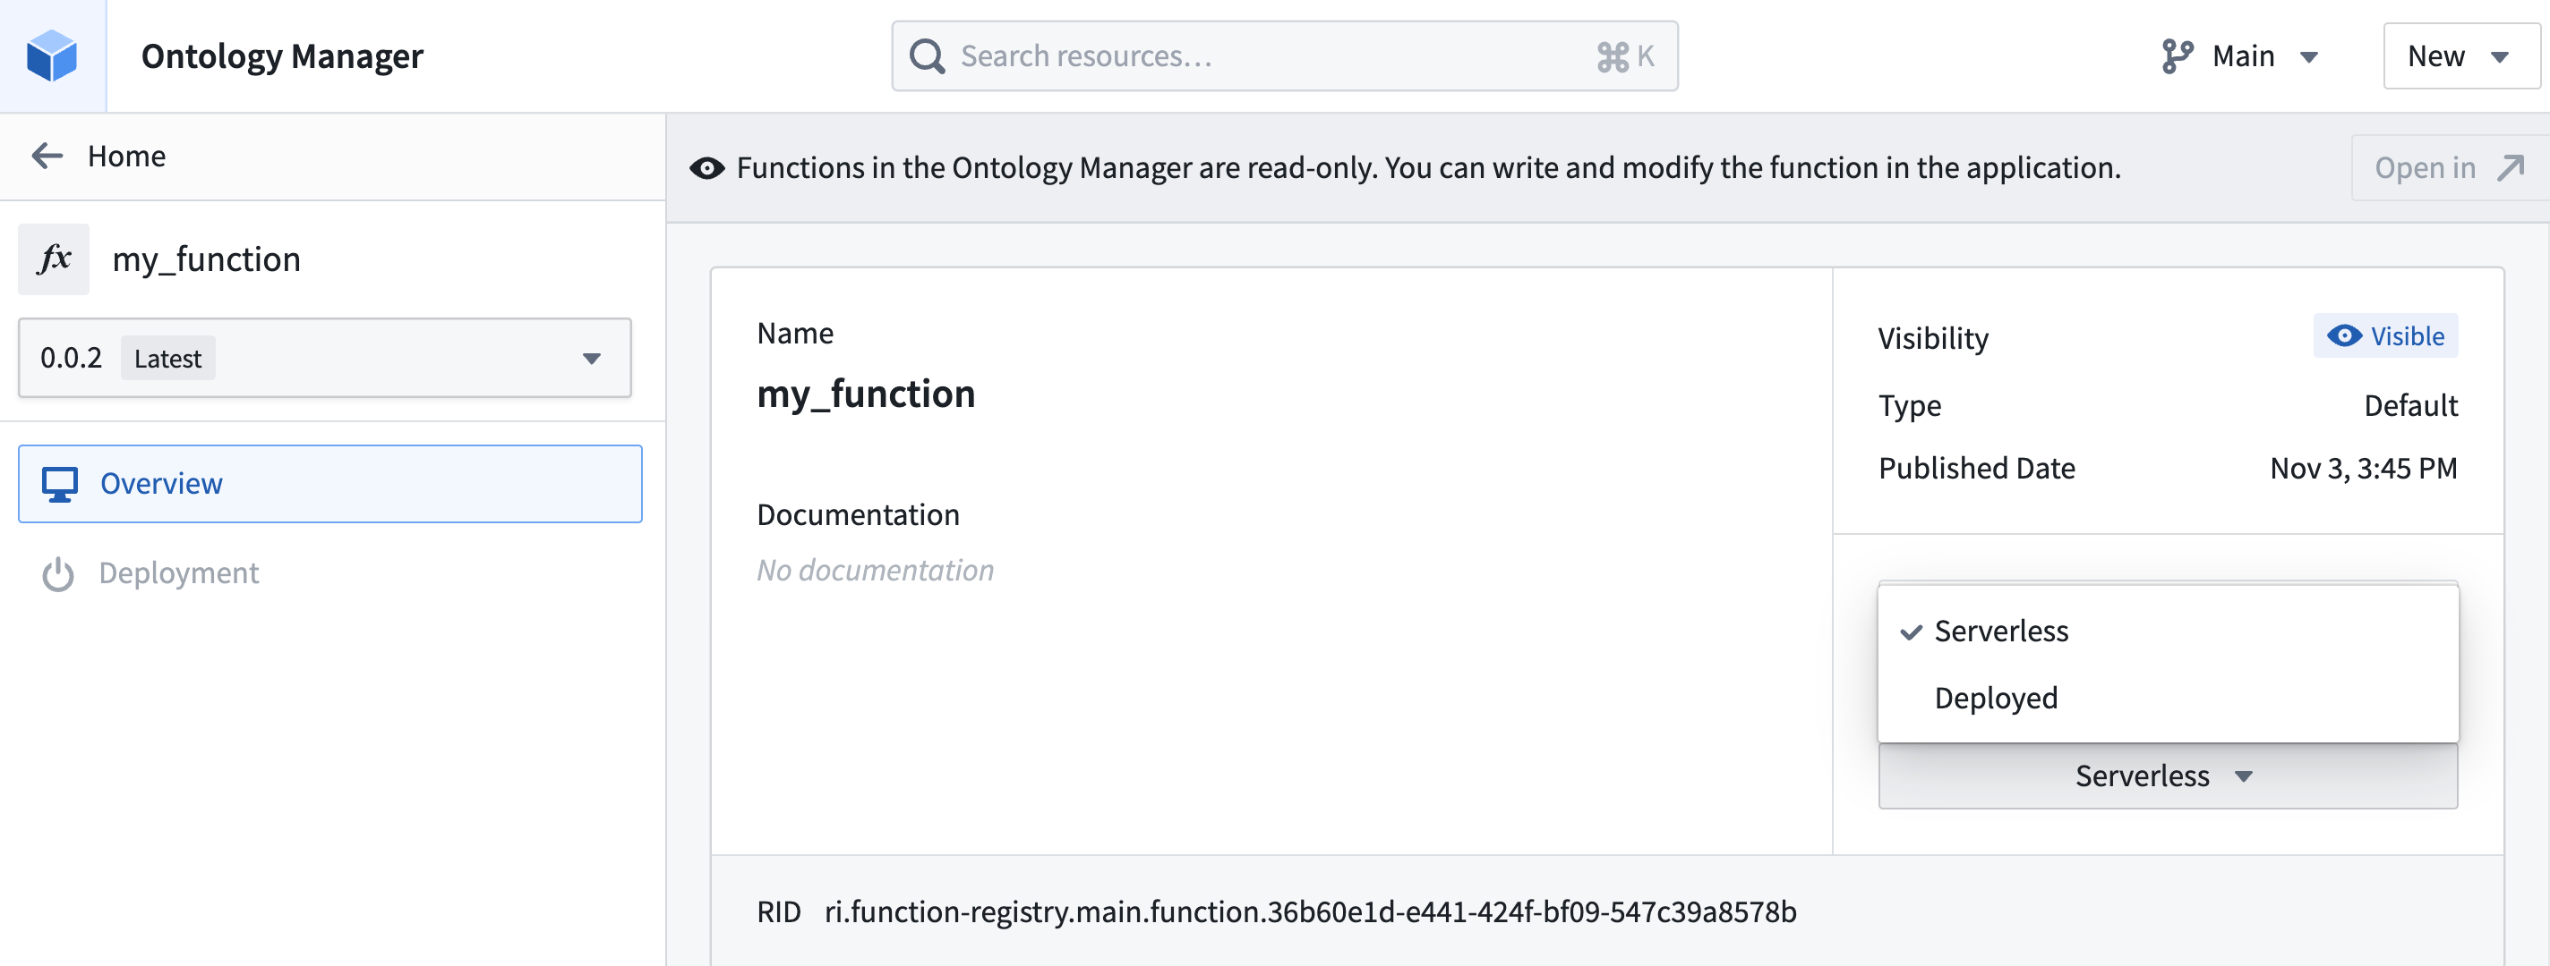
Select between serverless and deployed function support for your existing function in Ontology Manager.
If the serverless option is not available on your enrollment, contact Palantir Support for enablement.
Once enabled, all new function repositories will use the serverless backend by default after you have tagged and released. No other configuration or setup is necessary. You can learn more about Python functions in Palantir's Python documentation. You can also switch existing Python functions using the "deployed" backend to serverless within Ontology Manager.
We generally recommend serverless and it is the default where it has been activated. To help guide your consideration on which to use, review the guidance below.
Deployed functions have the following capabilities not available in serverless functions:
- Support for external sources.
- Possibility for local caching may be possible if the function is tolerant to restarts, given the long-lived nature of deployed functions.
Deployed functions have some limitations that do not apply to serverless execution:
- Different versions of a single function can be executed on demand, making upgrades safer. With deployed functions, you can only run a single function version at a time.
- Deployed functions incur costs as long as the deployment is running whereas serverless functions only incur costs when executed.
- Deployed functions require more upfront set up and long-term management as compared to serverless functions which have infrastructure that is managed automatically.
- The environment that a function executes in is created for each new execution, so there can be no inadvertent state shared between executions.
To understand the difference in capabilities in detail, review the following relevant documentation pages:
中文翻译
公告
提醒: 请注册 Foundry 新闻通讯,即可直接在收件箱中收到关于新产品、功能及平台改进的摘要。有关如何订阅的更多信息,请参阅 Foundry 新闻通讯与产品反馈渠道公告。
欢迎在我们的开发者社区论坛 ↗分享您对这些公告的看法。
在自定义应用中利用 LLM 驱动的助手
发布日期:2024-12-19
注意: 自 2026 年 4 月 27 日当周起,AIP Agent Studio 已更名为 AIP Chatbot Studio。所有现有功能保持不变。
AIP Agents 现在可以使用 Palantir 平台 API 部署到 Ontology SDK(测试版)和第三方应用中。AIP Agents 是在 Agent Studio 中构建的交互式助手,可配备企业特定信息和工具。此功能简化了集成,增强了开发人员可用的能力,彰显了我们构建强大开发生态系统的承诺。
第三方应用中的 AIP Agents
AIP Agents 现在可以使用 Palantir 平台 API 部署到第三方应用中,使开发人员能够无缝集成 LLM 驱动的助手,并为用户提供更好的支持。这些平台 API 允许用户以编程方式创建、更新和列出与 AIP Agents 的对话会话,从而能够嵌入到自定义应用上下文中。有关使用平台 API 的更多信息及支持功能的完整列表,请参阅 API 文档。
Ontology SDK 应用中的 AIP Agents [测试版]
AIP Agents 可通过开发者控制台对平台 API 和 SDK 资源的支持,在 Ontology SDK 应用中使用。要在 Ontology SDK 应用中使用 AIP Agent,请将必要的 Ontology 资源和包含您 Agent 的项目添加到应用的平台 SDK 资源中。
在开发者控制台 平台 SDK 选项卡的 资源 下,添加 AIP Agent 项目的选项。
然后,为您的应用启用 AIP Agents API 操作,这将授予读取、创建和更新 AIP Agent 交互的权限。
在开发者控制台应用的 客户端允许操作 表中,启用 AIP Agents API 操作的选项。
在 Ontology SDK 或第三方应用中利用这些新的平台 API,通过 LLM 驱动的助手提供有针对性的实时支持。要开始在自定义应用中使用 AIP Agents,请参阅 AIP Agent Studio 和平台 API 文档。
Pipeline Builder 中现已推出语义搜索 KNN Join
发布日期:2024-12-19
KNN Join 现已在所有环境中于 Pipeline Builder 中可用。此强大功能允许您为左侧数据集中的每一行找到右侧数据集中最近的 K 行,使您的数据合并任务更加高效和准确。
什么是 KNN Join?
KNN(K-最近邻) 是一种方法,可帮助您基于相似性匹配和合并两个数据集中的行。假设您有两个项目列表,并且希望找到一个列表中与另一个列表中最相似的项目。KNN Join 通过将一个列表中的每个项目与另一个列表中的所有项目进行比较,并找到最接近的匹配来实现这一点。
要使用此功能,请选择 Join 面板,然后在 Join type 中选择 KNN join。以下截图显示了 KNN join 类型选择的示例:
KNN join 选择的截图,附有示例。
然后,指定 KNN join 的参数。以下示例演示了一个目标:对于左侧数据集中的每部电影,我们希望基于所有电影的关键词找到三部最接近的电影。
KNN 面板配置为基于每部电影关键词的相似性获取三部最接近的电影。
KNN join 功能旨在增强您的数据处理能力。
有关更多信息,请访问我们的 KNN join 文档。
在实时预览中调试代码仓库中的 TypeScript Functions [正式发布]
发布日期:2024-12-17
代码仓库 现在允许您在实时预览期间调试和迭代 TypeScript Functions。此功能已于 12 月 16 日当周在 Foundry 环境中正式发布。
要开始使用,请在代码仓库中创建一个 TypeScript Function,然后将光标悬停在要开始调试的行号上,放置断点。接下来,选择出现的红色圆圈以 设置断点。
在 TypeScript Function 中设置断点,以告知代码仓库调试过程将从何处开始。
在 Functions 面板中选择 运行并调试 以启动调试会话。
选择 运行并调试 以开始调试过程并启动 调试器 界面。
代码仓库将启动 调试器 界面,您可以在其中单步执行、进入或跳出各个 帧。要结束调试会话并返回 Function 的实时预览,请选择左侧面板中的红色方形图标以 停止执行。
代码仓库中进行中的调试会话。
请查阅 Ontology 构建文档 以了解有关调试 TypeScript Functions 的更多信息。
引入时间序列警报自动化 [正式发布]
发布日期:2024-12-10
我们很高兴地宣布,您现在可以配置自动化,在时间序列数据满足特定条件时发送警报或“事件”。通过时间序列警报,您可以保持对组织中关键工作流的了解,例如了解机器压力何时超过设定限制,或生产输出何时低于预期结果。
要开始使用时间序列警报,您首先需要使用 Quiver 中的 时间序列搜索 卡片识别时间序列数据中的感兴趣时段。然后,时间序列搜索背后的逻辑会通过 Automate 保存并复制到相同类型的对象中。当您配置的警报自动化运行时,任何新识别的时间间隔都会作为预配置警报对象类型中的对象输出。
时间序列警报功能将于 2024 年 12 月 16 日当周正式发布。
Automate 应用中的时间序列条件逻辑。
为什么应该使用 Quiver 和 Automate 进行时间序列警报?
当您的自动化首次运行时,它将检查整个时间序列以查找警报。此后,它将仅检查新数据。换句话说,此产品默认以增量方式运行。这与 Foundry Rules 和 FoundryTS 不同,后两者每次运行时都会检查整个时间序列以查找警报。因此,使用 Quiver 和 Automate 进行时间序列警报将比以前的解决方案性能更高且成本更低。
时间序列警报的下一步是什么?
时间序列警报自动化并非实时解决方案。尽管搜索逻辑可以在由流支持的时间序列上自动化,但自动化不会直接在流数据上运行,而是在存档数据集上运行。由于存档作业每 10 分钟运行一次,这会导致至少 10 分钟的额外延迟。我们的团队将在未来几个月专注于构建实时警报解决方案。
访问请求工作流改进现已可用
发布日期:2024-12-10
发起访问请求比以往任何时候都更容易,现在请求工作流中可见组属性和描述。
此外,访问审核员将受益于增强的搜索功能以识别任务,无需打开请求即可一目了然地获取更多信息,以及轻松撤销意外批准的 subtask 的能力。
关键请求工作流改进
当平台中的项目有许多组时,可能很难知道在请求访问时应选择哪个组。以下一些新功能允许您配置更好的请求体验,并获得对组详细信息的更多透明度:
- 组描述(如果已设置)现在会显示在请求流程中组名称下方。
- 现在可以为组配置属性,允许您过滤可供选择的组。例如,您可以向组添加
Role属性,以便过滤到具有特定权限的组。在我们的文档中阅读有关如何设置组属性的更多信息。 - 现在会自动向请求创建者发送电子邮件通知。这些通知是可选的,您可以选择根据需要退出。
改进的 请求访问 对话框,包含组描述和过滤支持。
关键审核工作流改进
访问请求审核员现在受益于以下可读性和可用性改进,有助于高效处理请求:
-
现在,撤销错误批准的访问请求变得更加容易。如果您是请求审批人,您现在可以在每个 subtask 上使用新的 撤销 选项。
已批准的标记访问请求上可用的 撤销 选项。 -
Approvals 应用的收件箱视图现在允许审核员查看请求预览并了解关键详细信息,而无需打开请求概览页面。
先前和新的访问请求的两个请求预览。详细信息包括请求创建者、请求日期/时间、理由和相关项目。 -
请求审核员不再需要导航到平台设置来查看用户的组。相反,审核员现在可以查看请求中引用的组以及请求用户所属的组。
一个打开的访问请求,带有一个弹出窗口,显示用户当前的组成员身份。 -
以前,请求审核员不允许处理先前由其他审核员处理过的请求。现在,所有符合条件的审核员都可以覆盖先前的审核、进行编辑并批准请求。
访问请求底部的操作按钮,包含 批准符合条件的任务 和 覆盖并批准 任务的选项。
最后,对搜索和过滤功能进行了几项额外的小改进:
-
您现在可以按请求标题和请求的组进行搜索。
-
选定的过滤器现在在会话内和会话之间保持不变。
-
删除了冗余的状态和快速过滤器。
Approvals 应用概览页面的更新视图,包含更新的搜索和过滤选项及可见性。
使用 Data Connection 配置任何 JDBC 支持源的驱动程序属性 [正式发布]
发布日期:2024-12-12
您可以通过在 Data Connection 应用中配置的自定义 JDBC 源,将 Foundry 连接到各种关系数据库和数据仓库,例如 Snowflake 和 Salesforce。Data Connection 的 JDBC properties 面板现已正式在 Foundry 环境中可用,允许您在创建和配置驱动程序行为时,配置 Palantir 提供的 JDBC 驱动程序上的任何属性。
在 Data Connection 中进行连接配置时,您可以向 Palantir 提供的 JDBC 源添加驱动程序属性。
在 Data Connection 中创建新源时,您可以在 连接详细信息 窗口中通过选择 更多选项 打开 JDBC properties 面板来创建额外的 JDBC 属性。此外,您可以选择通过创建 新加密属性 来加密您提供给驱动程序的某些 JDBC 属性。
Data Connection 使您能够创建超出自动提供给驱动程序的 JDBC 属性之外的额外属性。
您可以参考 Data Connection 的文档,了解可用的 Palantir 提供的 JDBC 源驱动程序的完整列表。
使用项目模板标准化项目 [正式发布]
发布日期:2024-12-12
项目模板标准化了空间内项目的创建和配置。
可以通过配置平台安全原语(如角色、组、标记和项目约束)来支持治理框架。这些配置可以通过项目模板对所有新项目进行编码和强制要求,从而允许组织对创建的项目设置治理护栏。
空间所有者可以创建、编辑和删除项目模板。项目模板可以在每个空间级别的控制面板空间扩展中进行管理。
使用 创建项目模板 向导设置新的项目模板。
使用示例加速用例构建,现在支持自带数据和构建演练
发布日期:2024-12-12
示例是 Build with AIP 的一个新的平台内组件,是一个精选的参考示例、教程和构建块库,旨在加速您的工作流构建。
要访问示例,请在工作区导航栏的应用搜索中键入“示例”,或通过 支持 > 探索示例。此外,您可以直接从应用启动页面探索特定于应用的示例。
现在所有环境都提供了两个突破性的示例新功能:
-
自带数据: 您现在可以轻松安装复杂的工作流,使用您自己的数据 - 只需从桌面拖放(或上传 Foundry 中的现有资源)到我们最有前途的几个示例上。查找带有“自带数据”标签的示例以尝试此功能。这一激动人心的功能允许您轻松安装生产就绪的工作流。
留意示例上的“自带数据”标签。
现在,您可以使用自己的数据安装示例,在几分钟内驱动生产就绪的工作流。 -
演练: 获取关于工作流如何构建的逐步演练。AIP Assist 演练将自动引导您从一个资源到另一个资源,使您更容易理解工作流。
使用示例中的演练功能,获取示例中资源的分步说明。
此外,示例应用涵盖了 Foundry 几乎所有部分的可安装示例,而不仅仅是 AIP。在相应应用的主页上探索每个 Foundry 应用的特定参考示例。
使用 Workshop 的 PDF Viewer 小部件在文档上创建注释
发布日期:2024-12-10
Workshop 中的 PDF Viewer 小部件 现在支持更复杂的文档标记工作流,允许用户创建、显示和与覆盖在 PDF 文件上的文本和区域注释进行交互。
使用 PDF Viewer 将 ontology 对象显示为具有可自定义颜色和交互的注释。
您可以通过 PDF Viewer 小部件 小部件设置 面板中的 注释选项 菜单配置文档注释显示和交互设置。如果您希望显示和自定义现有注释,并具有自定义颜色高亮和选择事件等功能,则可以通过 显示现有注释 菜单添加注释层。
您可以在 注释选项 中配置注释显示和创建设置。
此外,您可以使用 创建注释(通过操作) 来配置在新文本或区域注释上运行的操作,使您能够通过高亮文本或区域时出现的 添加注释: 弹出窗口添加文档注释。
您可以配置注释操作,当您选择文档的文本或特定区域时会出现这些操作。
有关如何在 Workshop 中配置现有注释或创建新注释的更多信息,请查阅 PDF Viewer 的文档。
宣布面向 Enrollment 管理员的项目级 AIP 速率限制控制
发布日期:2024-12-10
Enrollment 管理员可以导航到资源管理应用中的 AIP 速率限制页面,配置给定项目内所有资源在每分钟内每个模型可以使用的最大 TPM(每分钟令牌数)和 RPM(每分钟请求数)百分比。
这意味着您具有灵活性,可以在 AIP 中为生产用例最大化 LLM 利用率,并限制或禁止实验性项目饱和整个 enrollment 容量。
默认情况下,所有项目都被赋予一个特定的操作限制。管理员可以创建额外的项目限制,定义每个限制中包含哪些项目,以及可以使用 enrollment 容量的百分比。
在我们的新 LLM 容量管理文档中阅读更多信息。
导航到资源管理中的 AIP 速率限制页面,以添加和管理项目限制。
Pipeline Builder 中现已提供伪代码渲染
发布日期:2024-12-10
从今天开始,您现在可以使用伪代码转换渲染来帮助改善管道的可读性体验。
什么是伪代码?
伪代码是一种用简单语言写下算法或过程步骤的简化方式。它看起来有点像代码,但不遵循特定编程语言的语法,使其更易于阅读和理解。
伪代码具有以下优点:
- 改进的可读性: 您现在可以选择以更清晰的伪代码格式显示转换,使熟悉或偏好这种逻辑表示的人更容易理解逻辑。
- 自动屏幕适配: 伪代码将自动调整以适合您的屏幕,因此您不必担心无休止的滚动。
Pipeline Builder 图上的新伪代码视图选项,展示了调整屏幕宽度时的自动布局调整。
您可以在 设置 下的 用户偏好 中,或使用任何转换路径中的 \</> 图标打开此偏好。
<img src="./media/pseudocode-transforms-path.png" alt="使用 </> 图标为折叠面板切换伪代码样式。" width="400">
以下两张图片显示了两种渲染选项。原始格式将以折叠格式显示转换的当前视图,如下所示:
此图片显示了当前在折叠面板渲染格式中的转换视图。习惯于这种布局并认为其直观的用户可能更喜欢此格式。
相反,新的伪代码格式将如下所示渲染:
此图片展示了新的伪代码转换渲染。转换现在以清晰、易于阅读的格式显示,这对于熟悉编码的用户尤其有益。
请注意,启用伪代码并不提供向 Pipeline Builder 编写代码的方式,也不会影响差异视图、连接、联合或 LLM 节点。此功能旨在提供每个转换正在做什么的更完整摘要,以便于快速浏览和理解。
查阅关于转换视图的文档。
如果同时启用 Direct OpenAI 和 Azure OpenAI,LLM 容量现已增加
发布日期:2024-12-05
从今天开始,如果您同时启用了 Azure OpenAI 和 Direct OpenAI 模型系列,您的 enrollment 将拥有 2倍 的 GPT4o 和 GPT4o-Mini 的 TPM(每分钟令牌数)和 RPM(每分钟请求数)容量。启用 Direct OpenAI 还保证了更高的稳定性和对新模型的早期访问。
请注意,Direct OpenAI 目前不支持地理限制。因此,只有非地理限制的 enrollment 才能利用增强的容量。
Enrollment 管理员可以在控制面板的 AIP 设置扩展中的模型启用选项卡下启用 Direct OpenAI 或其他模型系列。
您可以从 控制面板的 AIP 设置 中启用特定的模型系列。
创建可与 Workshop 交互并进行双向通信的自定义小部件
发布日期:2024-12-05
Workshop 中现在支持由 iframe 嵌入 OSDK 构建或外部 Web 应用驱动的双向 iframe 小部件,通过使用促进与 Workshop 双向通信的插件 ↗ 实现。双向通信的功能包括:
- 为您的自定义小部件定义字段和事件的配置,以便访问和交互
- 从您的自定义小部件内部读取 Workshop 变量
- 从您的自定义小部件内部写入 Workshop 变量
- 从您的自定义小部件内部执行 Workshop 事件
根据变量和事件定义配置字段
您可以根据变量和事件定义自定义小部件自身配置面板的形状。以包含出租房屋对象图像轮播的 OSDK 应用为例,变量和事件在配置中定义,该配置由一组对应的字段组成,然后在 Workshop 中与关联标签一起渲染。
您可以将应用 URL 加载到 Workshop 中,Workshop 随后将加载与应用中字段对应的字段列表,作为小部件的配置选项。在上面的动画中,自定义轮播应用的配置选项包括字符串字段 Carousel Title、对象集字段 Carousel Objects、对象集字段 Selected Carousel Object 和事件字段 Carousel OnClick Event。
从 Workshop 变量读取
在 iframe 中显示的自定义应用将在任何更改发生时持续接收来自 Workshop 变量的更新。
更改 Workshop 中配置变量的值会立即通知示例 OSDK 应用更改,以允许其重新渲染,如本动画所示,轮播应用的标题正在动态修改。
写入 Workshop 变量
自定义应用可以写入 Workshop 变量。使用插件包 ↗ 中提供的 API,使用您定义的配置变量字段的 ID 来设置 Workshop 中的变量值。以下代码片段显示了一个示例,其中对于配置字段 selectedCarouselObject,您可以在 iframe 嵌入的应用中使用以下方法写入填充 selectedCarouselObject 的 Workshop 变量:
workshopContext.selectedCarouselObject.setLoadedValue(val: OntologyObject[] | undefined);
workshopContext.selectedCarouselObject.setLoading();
workshopContext.selectedCarouselObject.setReloading(val: OntologyObject[] | undefined);
workshopContext.selectedCarouselObject.setFailed(errorMessage: string);
当用户与 OSDK 或自定义应用交互时,Workshop 将相应更新并渲染使用变量值的适当组件以反映新值。在上面的 gif 中,当轮播被点击时,配置中的选定轮播对象字段会更新为与轮播当前幻灯片对应的对象。
执行 Workshop 事件
自定义应用可以执行 Workshop 事件。使用插件包 ↗ 中提供的 API,使用您定义的配置事件字段的 ID 来执行 Workshop 中的事件。在下面的示例中,配置字段为 carouselOnClickEvent,您可以在 iframe 嵌入的应用中使用以下方法执行在字段 carouselOnClickEvent 下配置的 Workshop 事件:
workshopContext.carouselOnClickEvent.executeEvent(mouseEvent?: React.MouseEvent);
您可以配置在 OSDK 或自定义应用中触发时发生的事件。在上面的动画中,用户单击应用轮播中的图像会打开一个覆盖层,其中包含与所单击轮播幻灯片对应的对象的更多详细信息。
如何设置您的自定义小部件
要开始使用,请查阅 Iframe 文档 了解实现细节。然后,我们建议您访问 NPM 插件文档 ↗ 以使用您的 React 或 OSDK 应用配置插件。
配置好插件后,继续按照 Palantir 文档 中提供的步骤配置您的小部件。
改进了 Quiver 中 AIP 的访问和可用性 [正式发布]
发布日期:2024-12-03
Quiver 中 AIP 的访问已于 12 月 2 日当周正式发布。
自 2023 年 7 月以来,用户已经能够从他们的 Quiver 画布中利用 AIP 的强大功能,通过自然语言提示要求 AIP 生成新卡片或配置现有卡片,轻松探索数据。Quiver 的两个主要大型语言模型驱动功能——AIP Generate 和 AIP Configure——现在可以从大多数启用 AIP 的 Foundry enrollment 中的卡片下方访问,此外它们还可以在 Quiver 工作区的顶部功能区以及选定卡片中使用。
AIP Generate 根据用户提示创建分析,以快速洞察 Ontology 中可用的数据,除了 Object Explorer 和 Contour 的原生功能外,还提供了另一种对象集分析方法。AIP Configure 应用用户提示来更新卡片配置,并根据用户的需求定制分析输出,无论用户是否熟悉 Quiver 的可视化设置。
可以利用 AIP 的 Quiver 卡片在其卡片搜索栏右侧显示 AIP 徽标。
![]()
由 AIP 分析能力支持的 Quiver 卡片在其右侧显示 AIP 徽标。
从 Quiver 卡片访问 AIP Generate
在您选择要分析的对象集后,您将在卡片选择下方看到一个带有 AIP 徽标的输入字段,提示您输入查询以继续探索。在文本输入框中编写您想要执行的分析操作,AIP Generate 将使用 Palantir 提供的大型语言模型 (LLM) 建议选项。
用户可以在 Quiver 卡片下方访问 AIP Generate 以创建新的分析。
选择一个选项或按 Enter 键指示 AIP 将卡片添加到画布并为您进行所有配置。您还可以在文本输入框中重新配置提示以生成替代选项。
如果 AIP 认为您的查询需要多个步骤,它将突出显示为 + 后续操作。将光标悬停在 + 后续操作 标签上会显示 AIP 将自动应用的下一个提示。
如果 AIP 认为您的查询需要多个步骤,它会生成后续操作。
一旦您选择 + 后续操作,AIP Generate 将进入思维链模式,显示其先前的步骤以及建议的下一步操作。您可以选择 重置 以输入您自己的提示,作为对 AIP Generate 初始后续操作的重新配置。
AIP Generate 为多步骤查询进入思维链模式。
从新创建的分析访问 AIP Configure
要配置现有卡片,请将光标悬停在卡片上并选择 修改 按钮,然后在 AIP 图标右侧的文本字段中输入您的配置提示。在确认 AIP 的建议回答了您的提示后,选择建议的修改。
用户可以在分析卡片下方访问 AIP Configure。
必须在您的 Foundry enrollment 上启用 AIP 才能在 Quiver 中访问这些功能。
您可以在 Quiver 的现有文档中参考其他 AIP Generate 和 AIP Configure 详细信息。
在 Carbon 工作区中利用自定义 LLM 驱动的助手
发布日期:2024-12-03
从 12 月 9 日当周开始,AIP Assist Agents 将在 Carbon 工作区中正式发布。AIP Assist Agents 是 LLM 驱动的助手,使用自定义源作为其唯一的搜索