Announcements(公告)
REMINDER: Sign up for the Foundry Newsletter to receive a summary of new products, features, and improvements across the platform directly to your inbox. For more information on how to subscribe, see the Foundry Newsletter and Product Feedback channels announcement.
Share your thoughts about these announcements in our Developer Community Forum ↗.
Test your changes in Pipeline Builder, the Ontology, and Workshop with Foundry Branching
Date published: 2025-01-30
Foundry Branching is now available in a beta state. Review the updated announcement to learn more.
Grok-2 is now available in AIP
Date published: 2025-01-30
We are excited to announce that Grok-2 and Grok-2-vision are now generally available on AIP for all non-geographically-restricted and US-geo-restricted enrollments. These flagship models from xAI provide top industry performance and versatility, including sophisticated vision support.
Grok-2 and Grok-2 vision are available for all enrollments that have accepted our AIP contract addendum and enabled xAI LLM usage in Control Panel. If your enrollment does not currently include these features, ask an enrollment administrator to review the AIP enablement settings and documentation.
This LLM is available to use in all AIP features such as Logic and Automate, Pipeline Builder, Functions, Transforms and more.
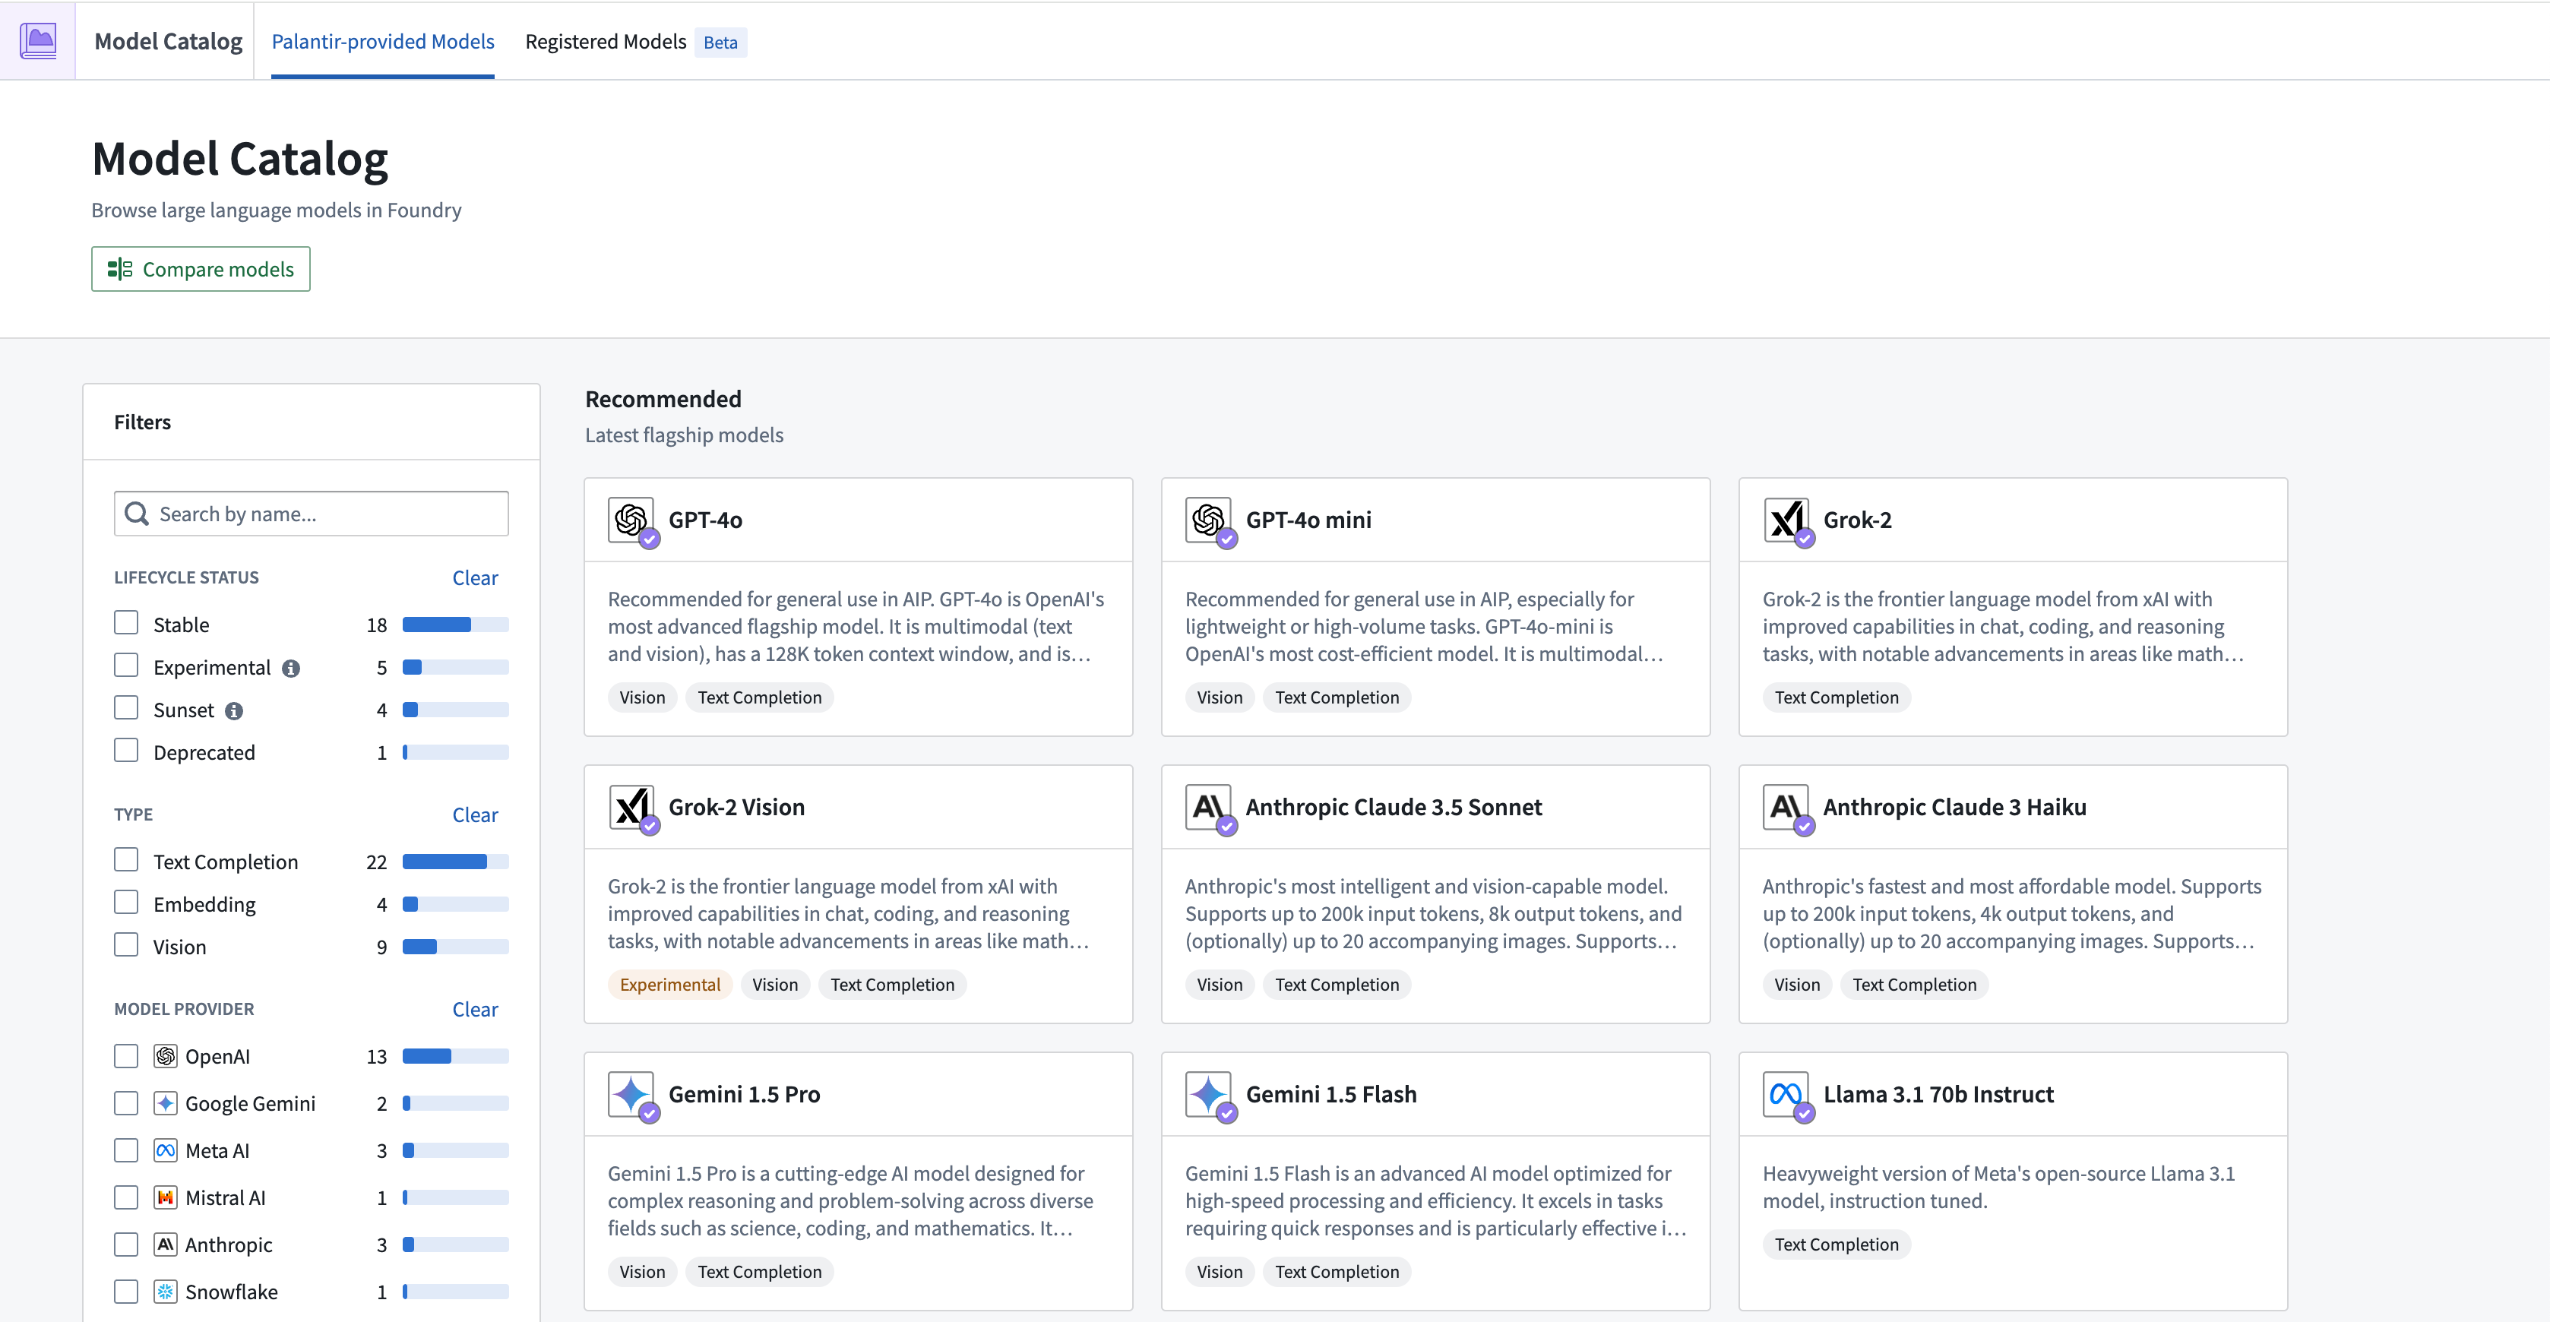
Grok-2 and Grok-2 vision available in Model Catalog.
Track and visualize model training progress with model experiments
Date published: 2025-01-28
We are excited to introduce model experiments, a Python API designed to track, visualize, and compare the results of model training attempts. The model development process is inherently iterative, and managing numerous training attempts can be challenging. To address this, model experiments offers an API for logging and visualizing model training metrics and hyperparameters, enabling users to gain a deeper understanding of the training process and make informed, data-driven decisions.
Integrate with existing model training code
Model experiments are available in Code Repositories and Jupyter® Code Workspaces without additional libraries or dependencies. With versions of the palantir_models API beyond 0.1482.0, bindings are introduced for experiment creation in Jupyter® Code Workspaces and Code Repositories, allowing users to leverage this feature in existing compatible workflows.
Visualize experiments
Once published, model experiments can be found under the Experiments tab of a model page. Multiple experiments can be selected and compared, providing insight into training iterations and fostering a data-driven approach to model development.
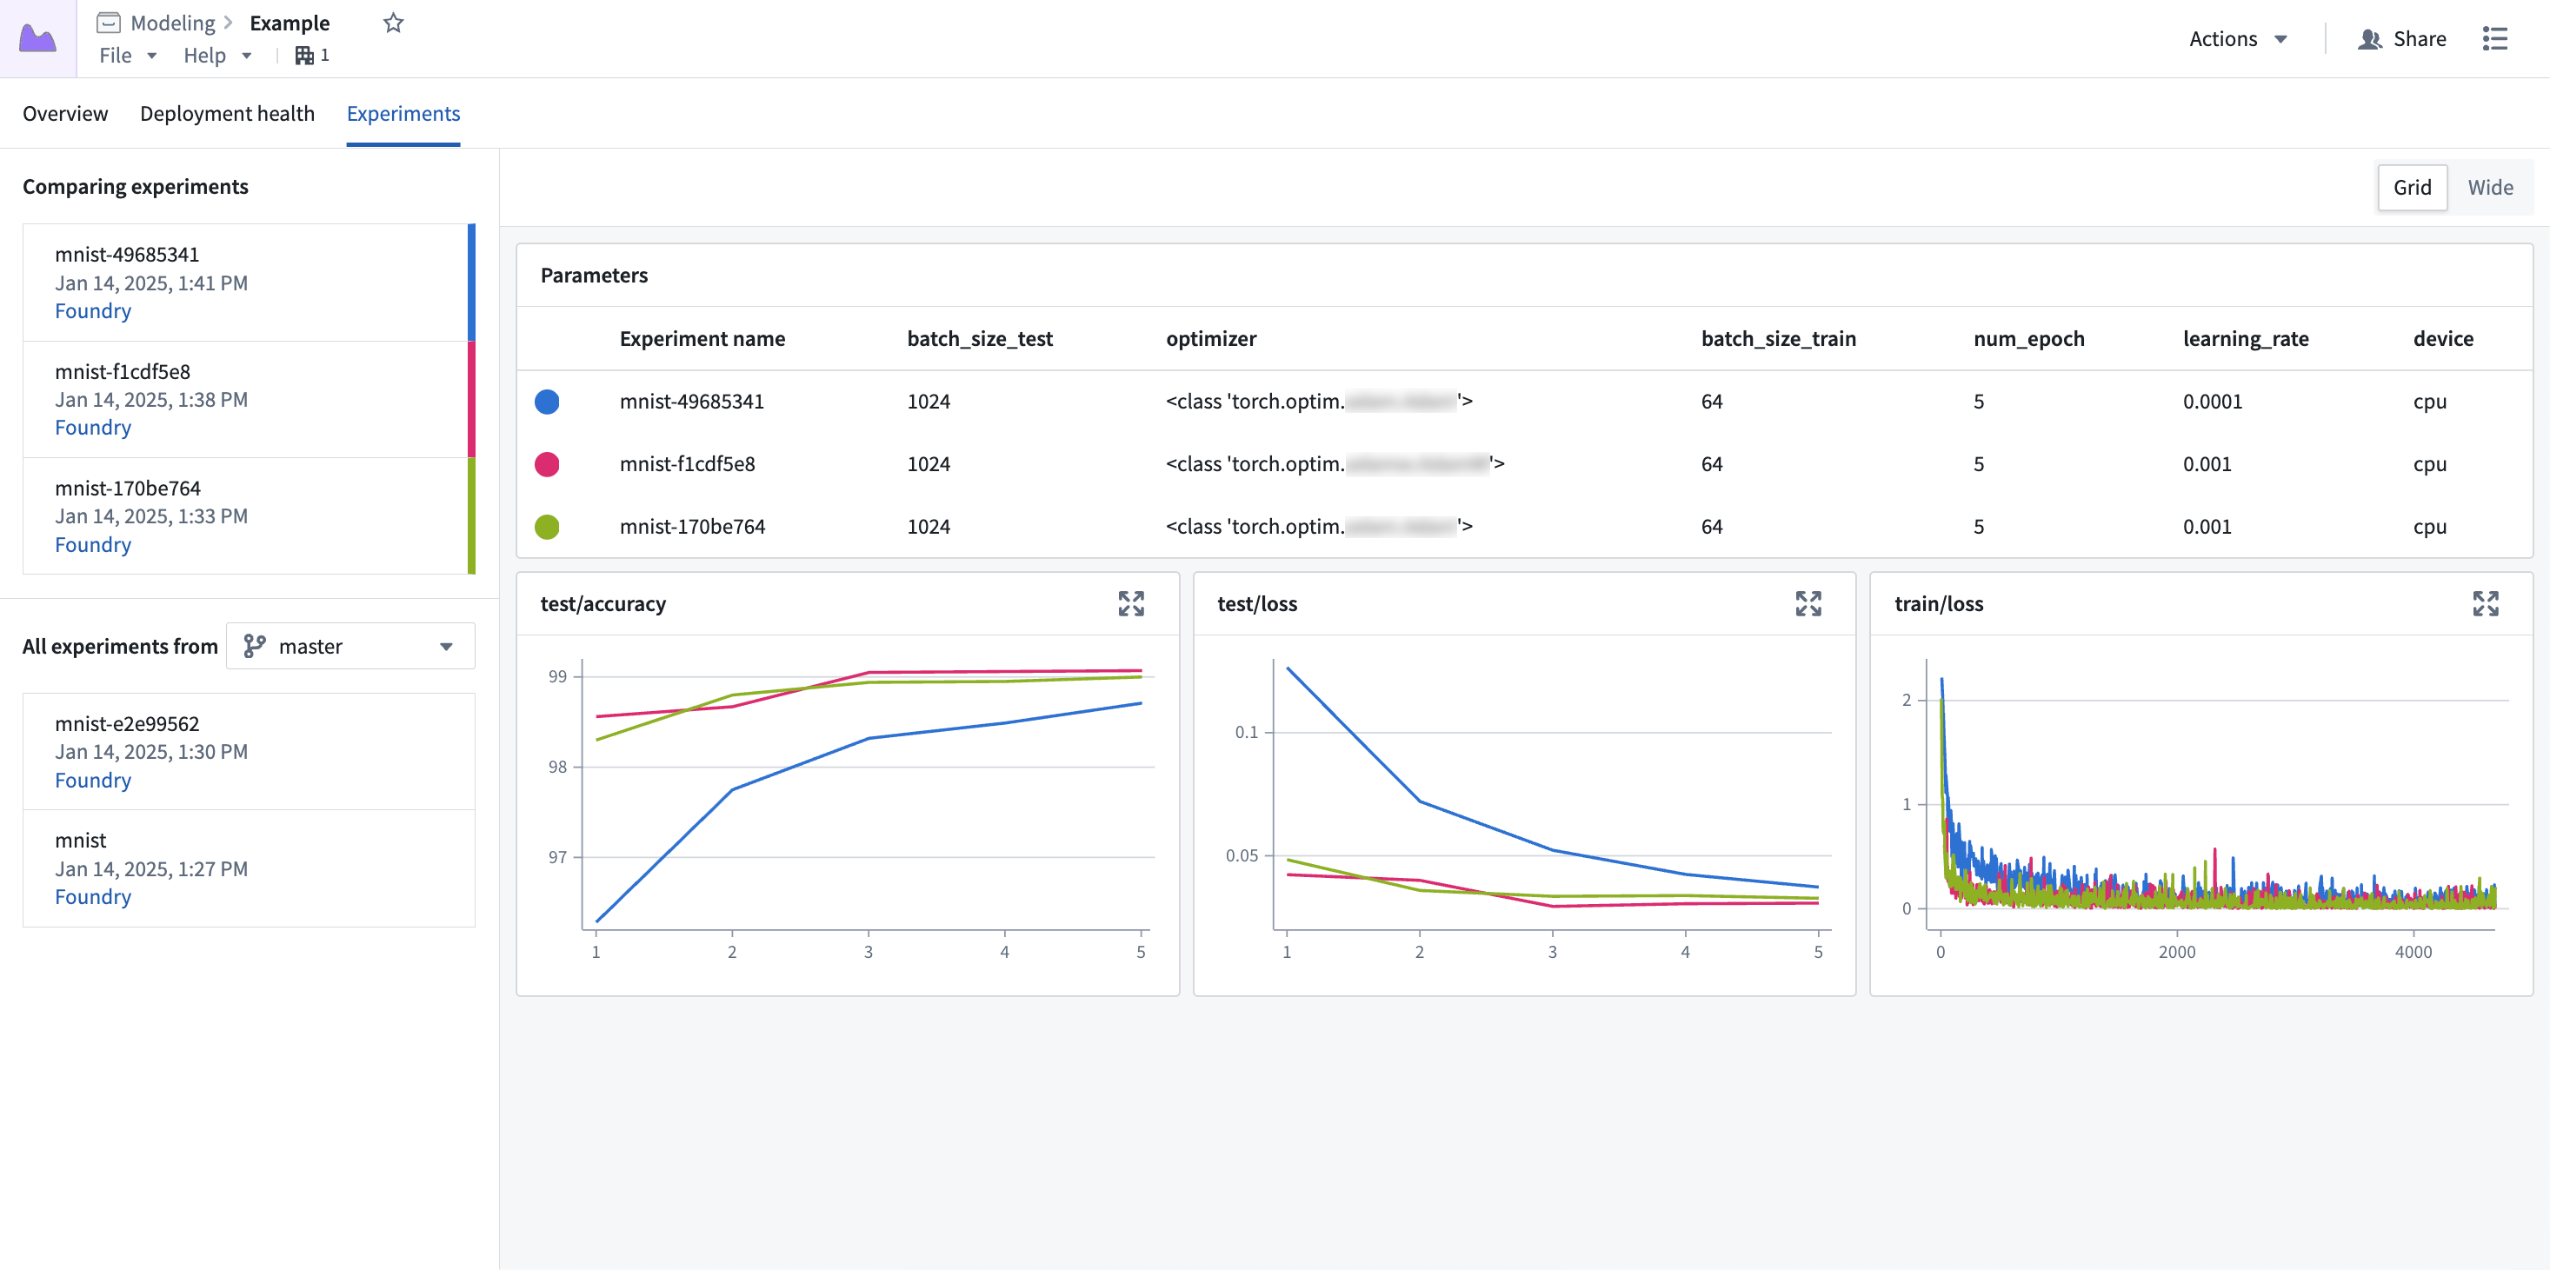
Three experiments are compared, with a Parameters table at the top, followed by line charts for each metric.
What's next?
We will continue to make additional enhancements to model experiments over the next few months, including:
- Expanding the list of supported types for hyperparameters and metrics.
- Better integration with open-source machine learning frameworks.
- Surfacing related experiments in model selection contexts in the Palantir platform.
Leverage this feature to seamlessly integrate tracking and visualization into your model training workflow. With model experiments, you can streamline experimentation and accelerate the journey from model conception to deployment, ultimately driving more effective and efficient machine learning development.
Explore the documentation to get started with model experiments.
PR preview is now available for React Ontology SDK applications
Date published: 2025-01-23
We are happy to announce that application builders can now access a PR preview when working on React applications with Ontology SDK (OSDK). A PR (pull request) preview provides a working version of your React application based on the code committed in your pull request. You can preview any proposed changes to your application before it is merged into your main branch and production state, making it easier for you to check for any undesirable outcomes and verify user-facing workflows before changes make their way to production. Previously, builders, designers, and other members of an application team would need to create a development environment to view changes. The PR preview feature removes this requirement, allowing for quicker verification of design and functionality changes and a more efficient, collaborative process.
How do I create a PR preview?
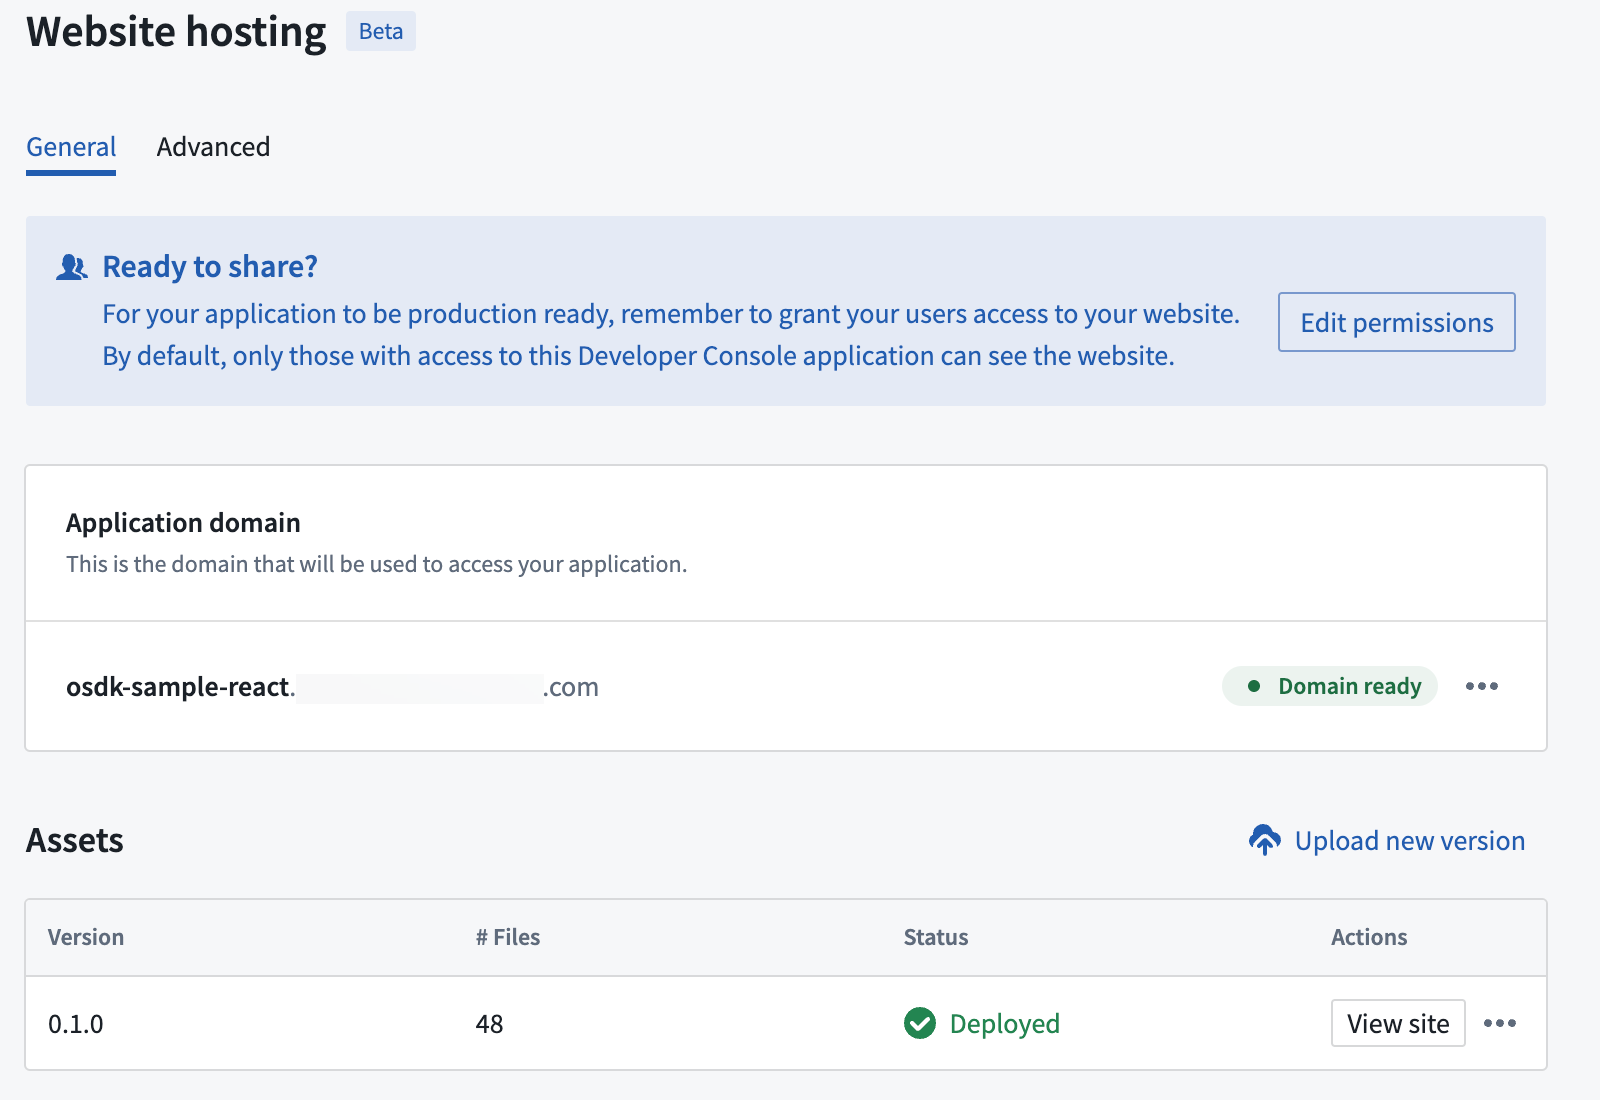
The PR preview feature is available for any OSDK React application that is hosted in a code repository using the Developer Console web hosting capability.
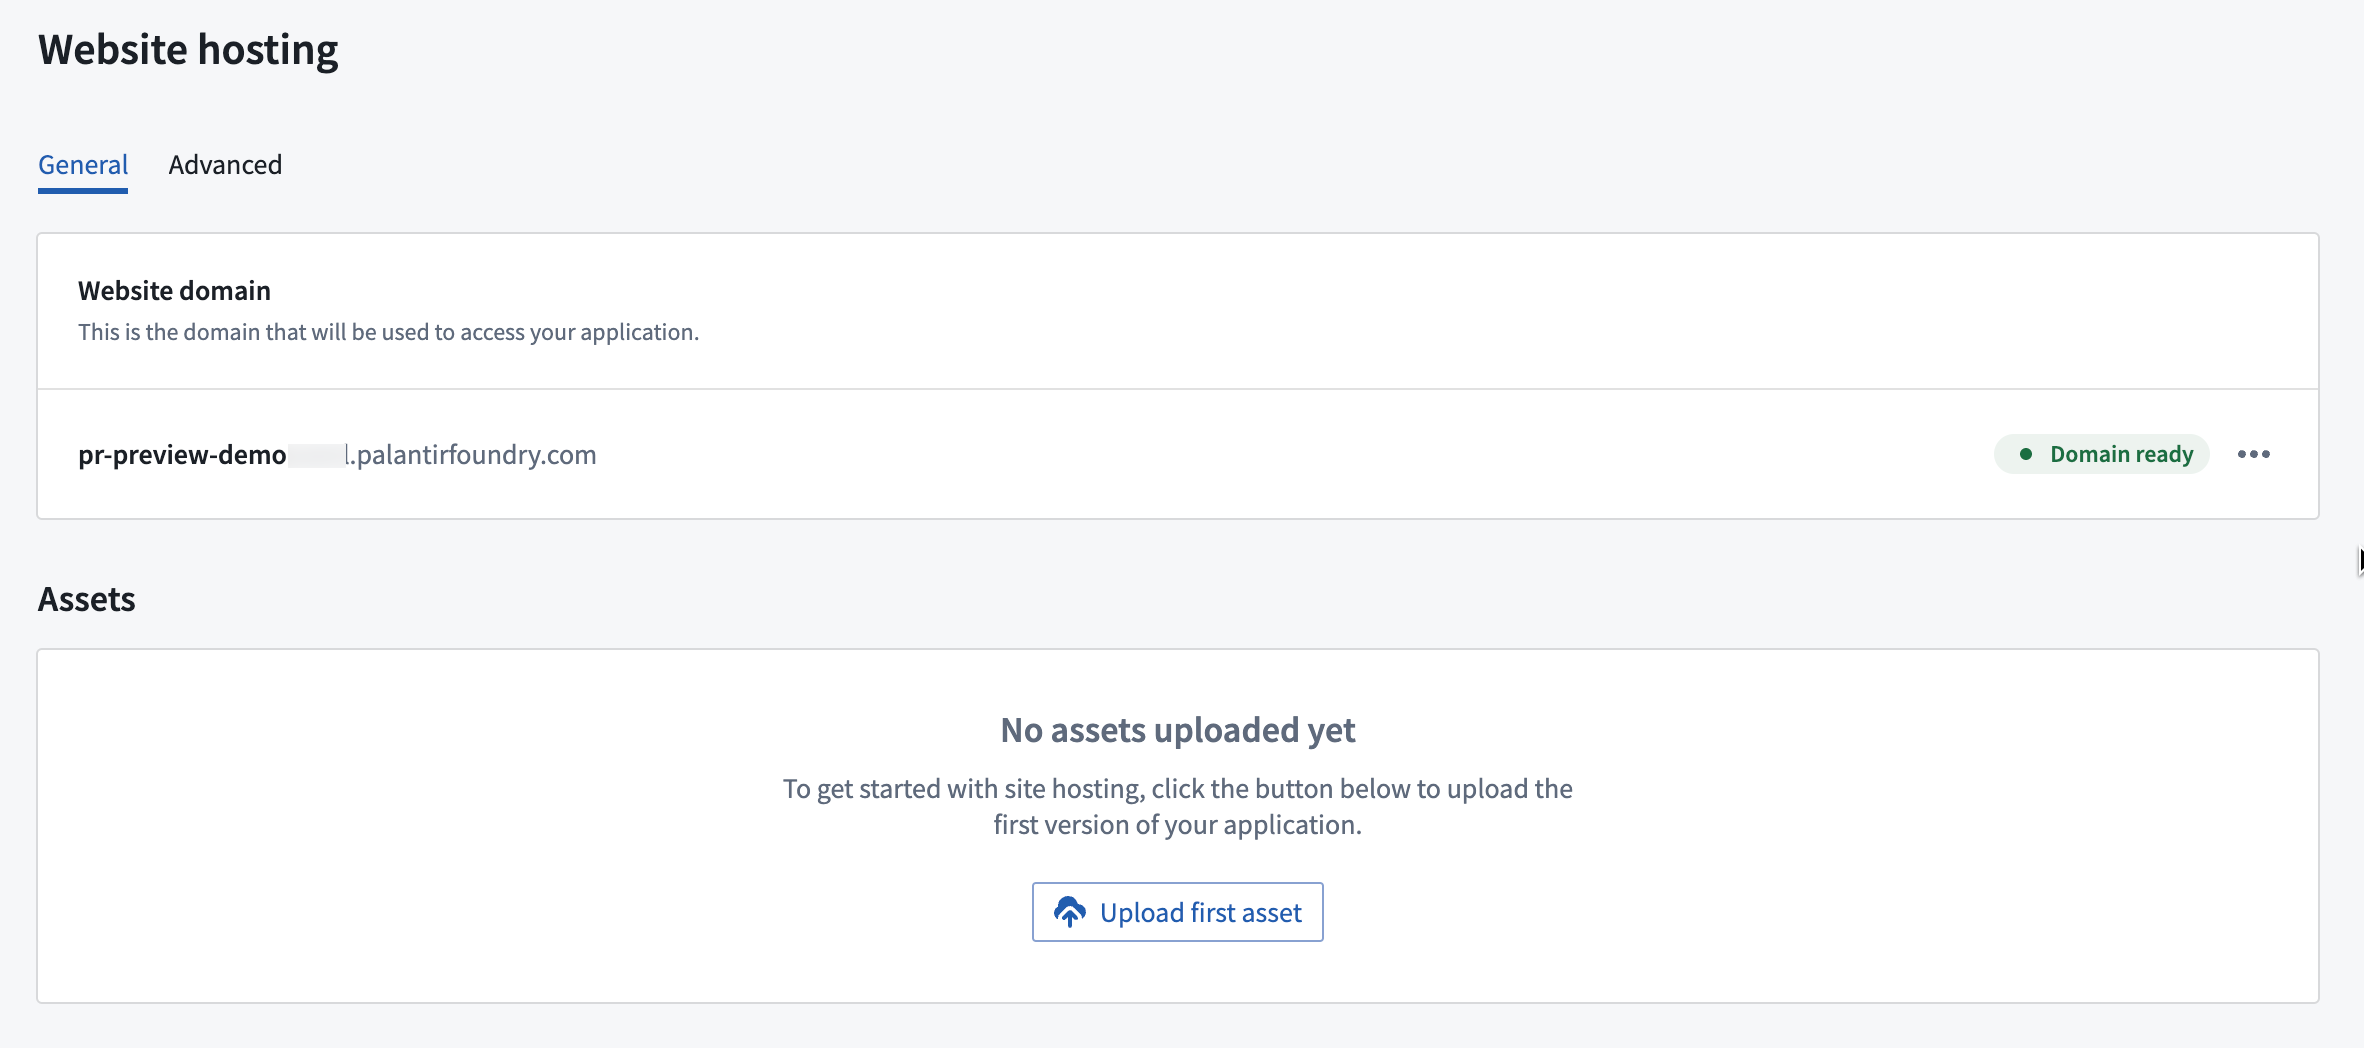
The website hosting configuration page in Developer Console.
- To get started, first build an application in Developer Console.
- Then, configure website hosting for that application.
- Choose to use a VS Code workspace to take advantage of the developer features available in the Palantir extension for Visual Studio Code. From either environment, you can create branches in your repository, implement code changes with commits, and push updates.
- Once you make a change and checks are complete, navigate to Code Repositories and create a pull request to merge your changes to the main branch.
- From the Version control tab at the top of the screen, choose Pull Requests.
- Select the pull request you would like to preview, then select Preview in the lower right corner to open a preview version of your React application.
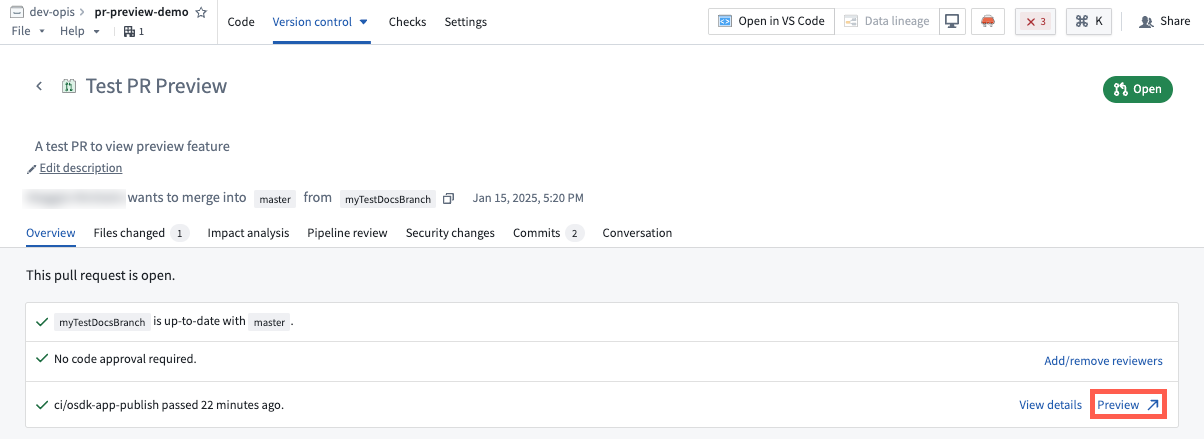
A pull request in Code Repositories with the option to view a preview of the changes.
You can also find a PR preview link for every commit on your branch by navigating to the Commits tab of the pull request. Note that PR previews are only available within seven days of the creation of the pull request. After seven days, the preview will expire.
Preview permissions
To access the PR preview feature for React applications, users must have proper permissions for the application from Developer Console. To manage these permissions, open your application in Developer Console, then navigate to Sharing in the left sidebar.
To make changes, create pull requests for the application code, and share PR preview with other users, you must have either Owner or Editor permissions. To share a PR Preview with a user without granting permissions to edit your application code or configurations, add them as a Viewer under Share hosted website.
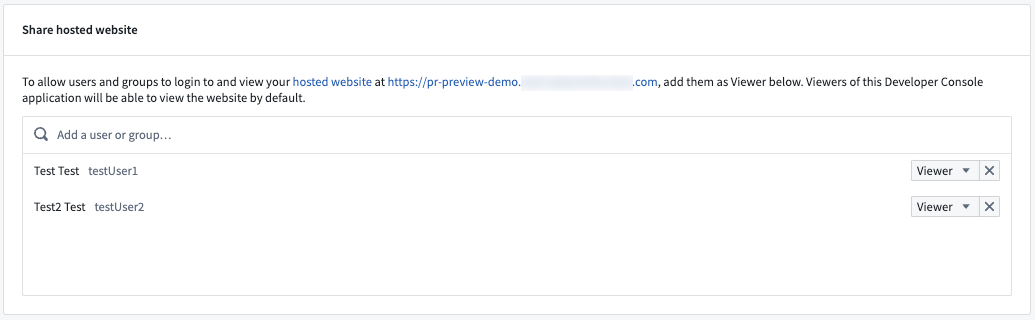
The permissions configuration page in Developer Console, with the option to grant users access to view PR previews.
What's next?
We look forward to building a version control interface directly in VS Code workspaces, removing the need to navigate to Code Repositories to generate PRs and obtain preview links.
We want to hear from you!
As we continue to work and improve the Palantir developer experience, we encourage you to leave feedback and comments in our community forum ↗.
The Send to AIP Assist event in Workshop now features an AIP Assist Agent selector
Date published: 2025-01-23
Starting the week of January 20, the Send to AIP Assist event in Workshop will allow users to select a default AIP Assist Agent to receive the event's prompt. This Workshop event is triggered on button selection, and opens the AIP Assist sidebar to send a configured prompt. To further customize the user experience, builders can now provide a default agent, an LLM-powered assistant that is equipped with enterprise-specific knowledge to answer queries about custom operational topics. AIP Assist Agents use custom content as their search context, and can be configured in Agent Studio [Beta].
Event configuration
A default AIP Assist Agent can be selected during event configuration, allowing builders to choose the appropriate agent for the given context. Agents can be given access to custom content, such as documentation about the application being used or other operational processes to provide targeted assistance at relevant times. Selecting an agent is optional, and users can also select a dedicated agent in the AIP Assist sidebar. By selecting a default agent, builders can be sure that the correct agent for the task has been chosen without relying on end-users for manual selection.

The agent selector in the Workshop event configuration panel.
Prompts sent in the event can be static text or dynamic variables, allowing builders to tailor the user experience as they see fit based on the prompt and the receiving agent. As an example, if a builder expects that users will have trouble with a specific workflow, they can add a button that will trigger the Send to AIP Assist event with a tooltip that explains the button's usage.
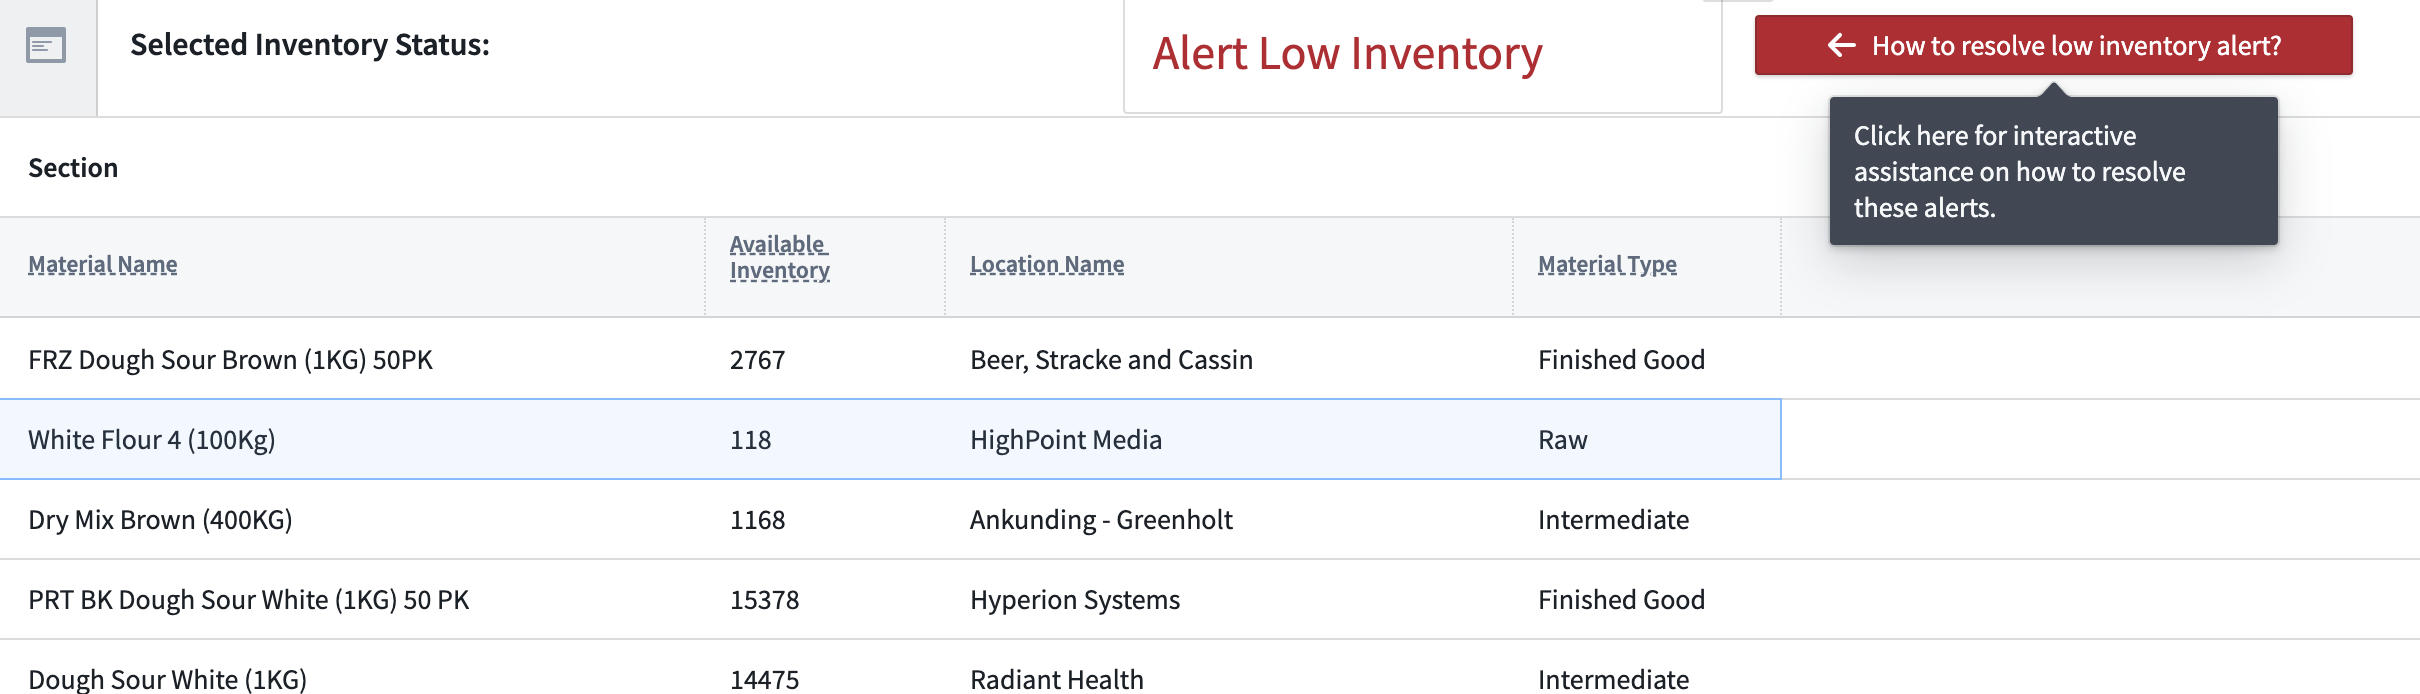
An example of a button that triggers the Send to AIP Assist event with an explanatory tooltip.
With this feature, builders can ensure that users have access to immediate interactive support in Workshop application workflows. Note than an AIP Assist Agent must first be configured and given access to custom content in Agent Studio.
Learn more about configuring the Send to AIP Assist event in Workshop.
Note: AIP feature availability is subject to change and may differ between customers.
Bulk upgrade function versions across Workshop applications in Workflow Lineage
Date published: 2025-01-21
We are thrilled to announce that you can now bulk upgrade function versions used in Workshop applications in Workflow Lineage. This new feature streamlines the often tedious process of manually updating individual function versions. Performing bulk upgrades on a single page ensures that all your functions are up-to-date across multiple Workshop applications with significantly less manual work.
Get started with ease
Getting started on upgrading your modules is simple:
- Select Workshop application nodes: Simply select the desired Workshop application nodes on the graph.
- Review upgradable functions: The bottom panel will display all functions, logics, and variables eligible for an upgrade.
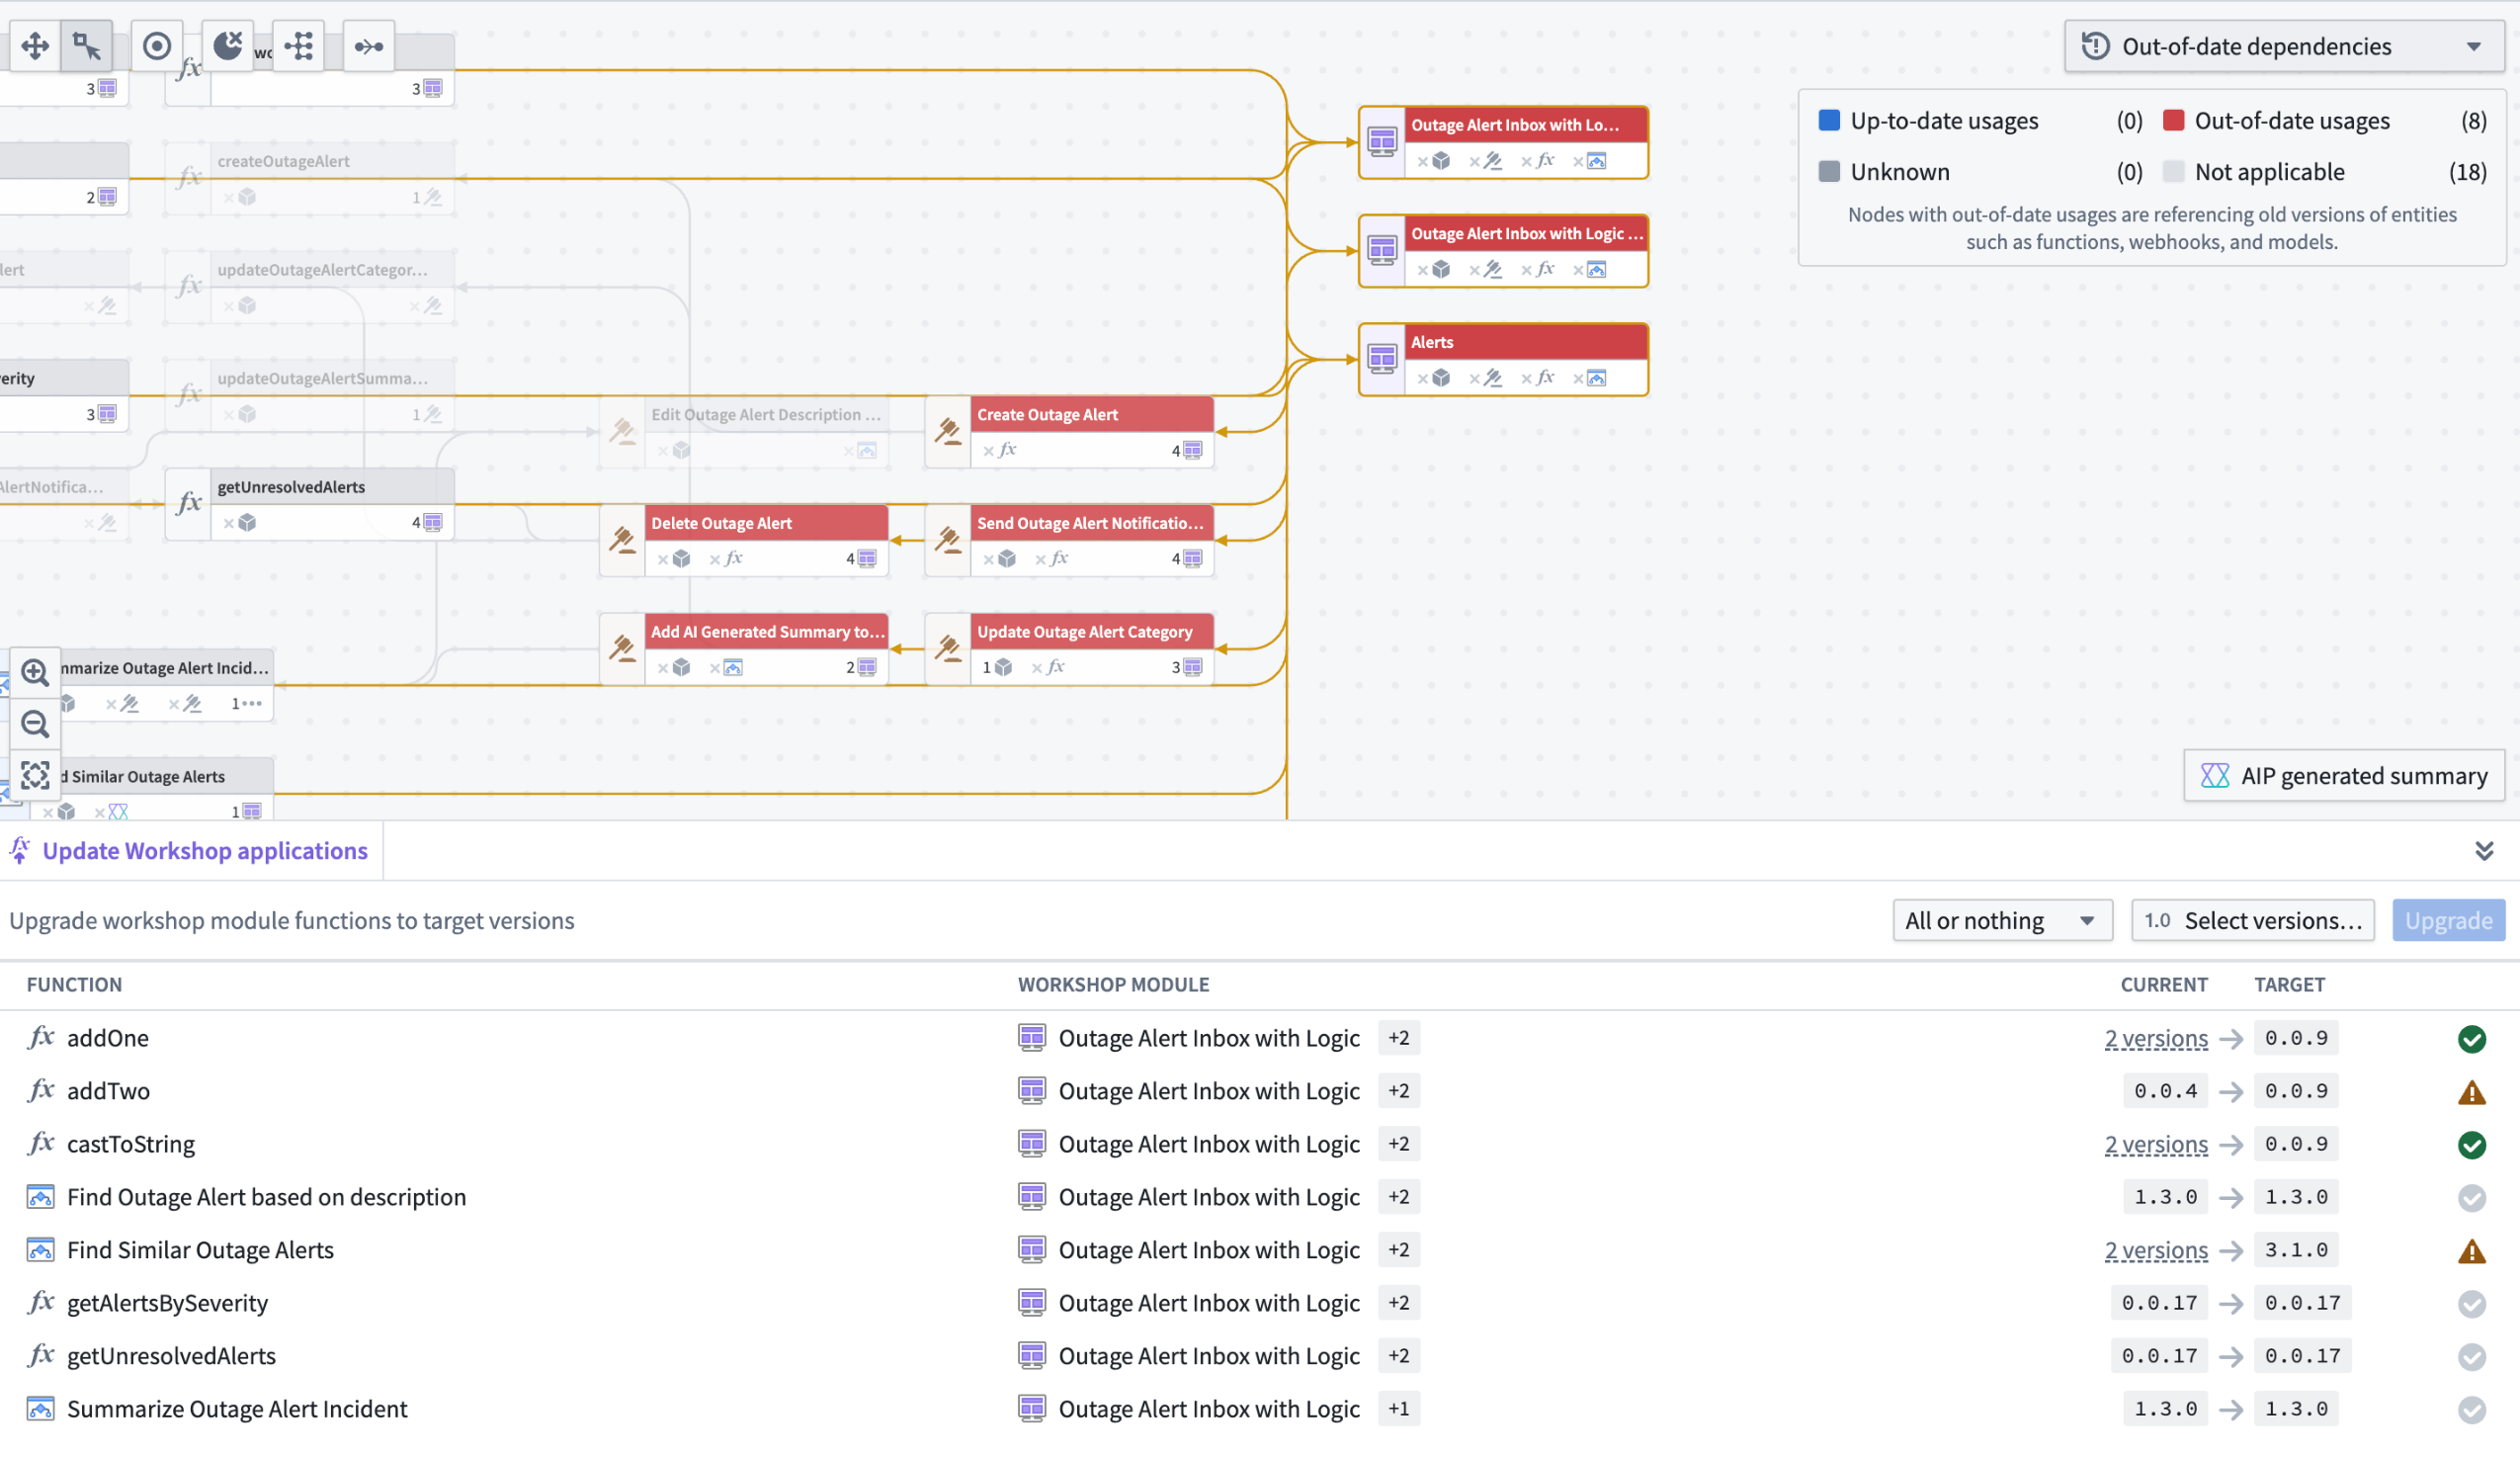
Select the relevant Workshop application nodes and review upgradable functions in one view within Workflow Lineage.
We support two types of upgrades:
- All or nothing: Upgrade functions only if all of them can upgrade without breaking changes, otherwise upgrade nothing.
- Partial: Upgrade only functions without breaking changes. Functions that would cause breaking changes will not be upgraded.
You can select the specific version you want the functions to upgrade to for both function repositories and sources like AIP Logic or Compute Modules. If nothing is specified, Workflow Lineage will default to the latest version.
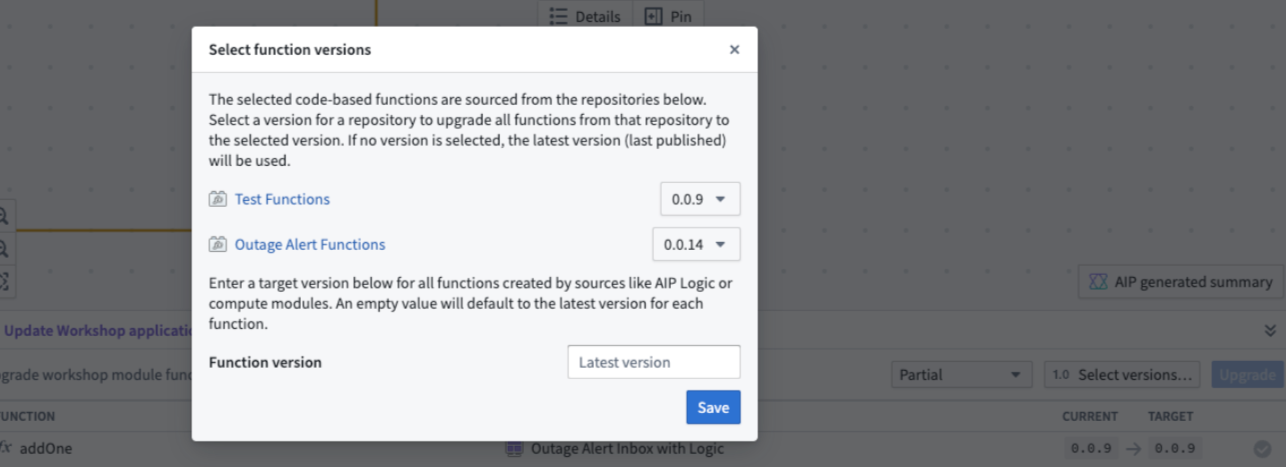
Specify the version to upgrade your functions to or have Workflow Lineage default to the latest version when upgrading.
After you upgrade your functions, you will see the list of Workshop applications that were successfully upgraded.

Workflow Lineage showing functions that have been successfully upgraded.
Learn more about how to bulk upgrade functions in Workshop applications.
Support for Google Gemini 1.5 Flash and Pro LLM models now available
Date published: 2025-01-21
Both Gemini 1.5 Flash and Gemini 1.5 Pro through Google Vertex AI is now generally available on all enrollments. To use the new Gemini models, the Gemini model family must be enabled through the AIP Settings Control Panel extension.
Gemini 1.5 delivers significant performance improvements, efficient training with Mixture-of-Experts (MoE) architecture, and a groundbreaking long context window, processing up to one million tokens for Gemini 1.5 Flash and two million tokens for Gemini 1.5 Pro. These models enable new possibilities in multi-modal processing and in-context learning, making AI applications more powerful and useful.
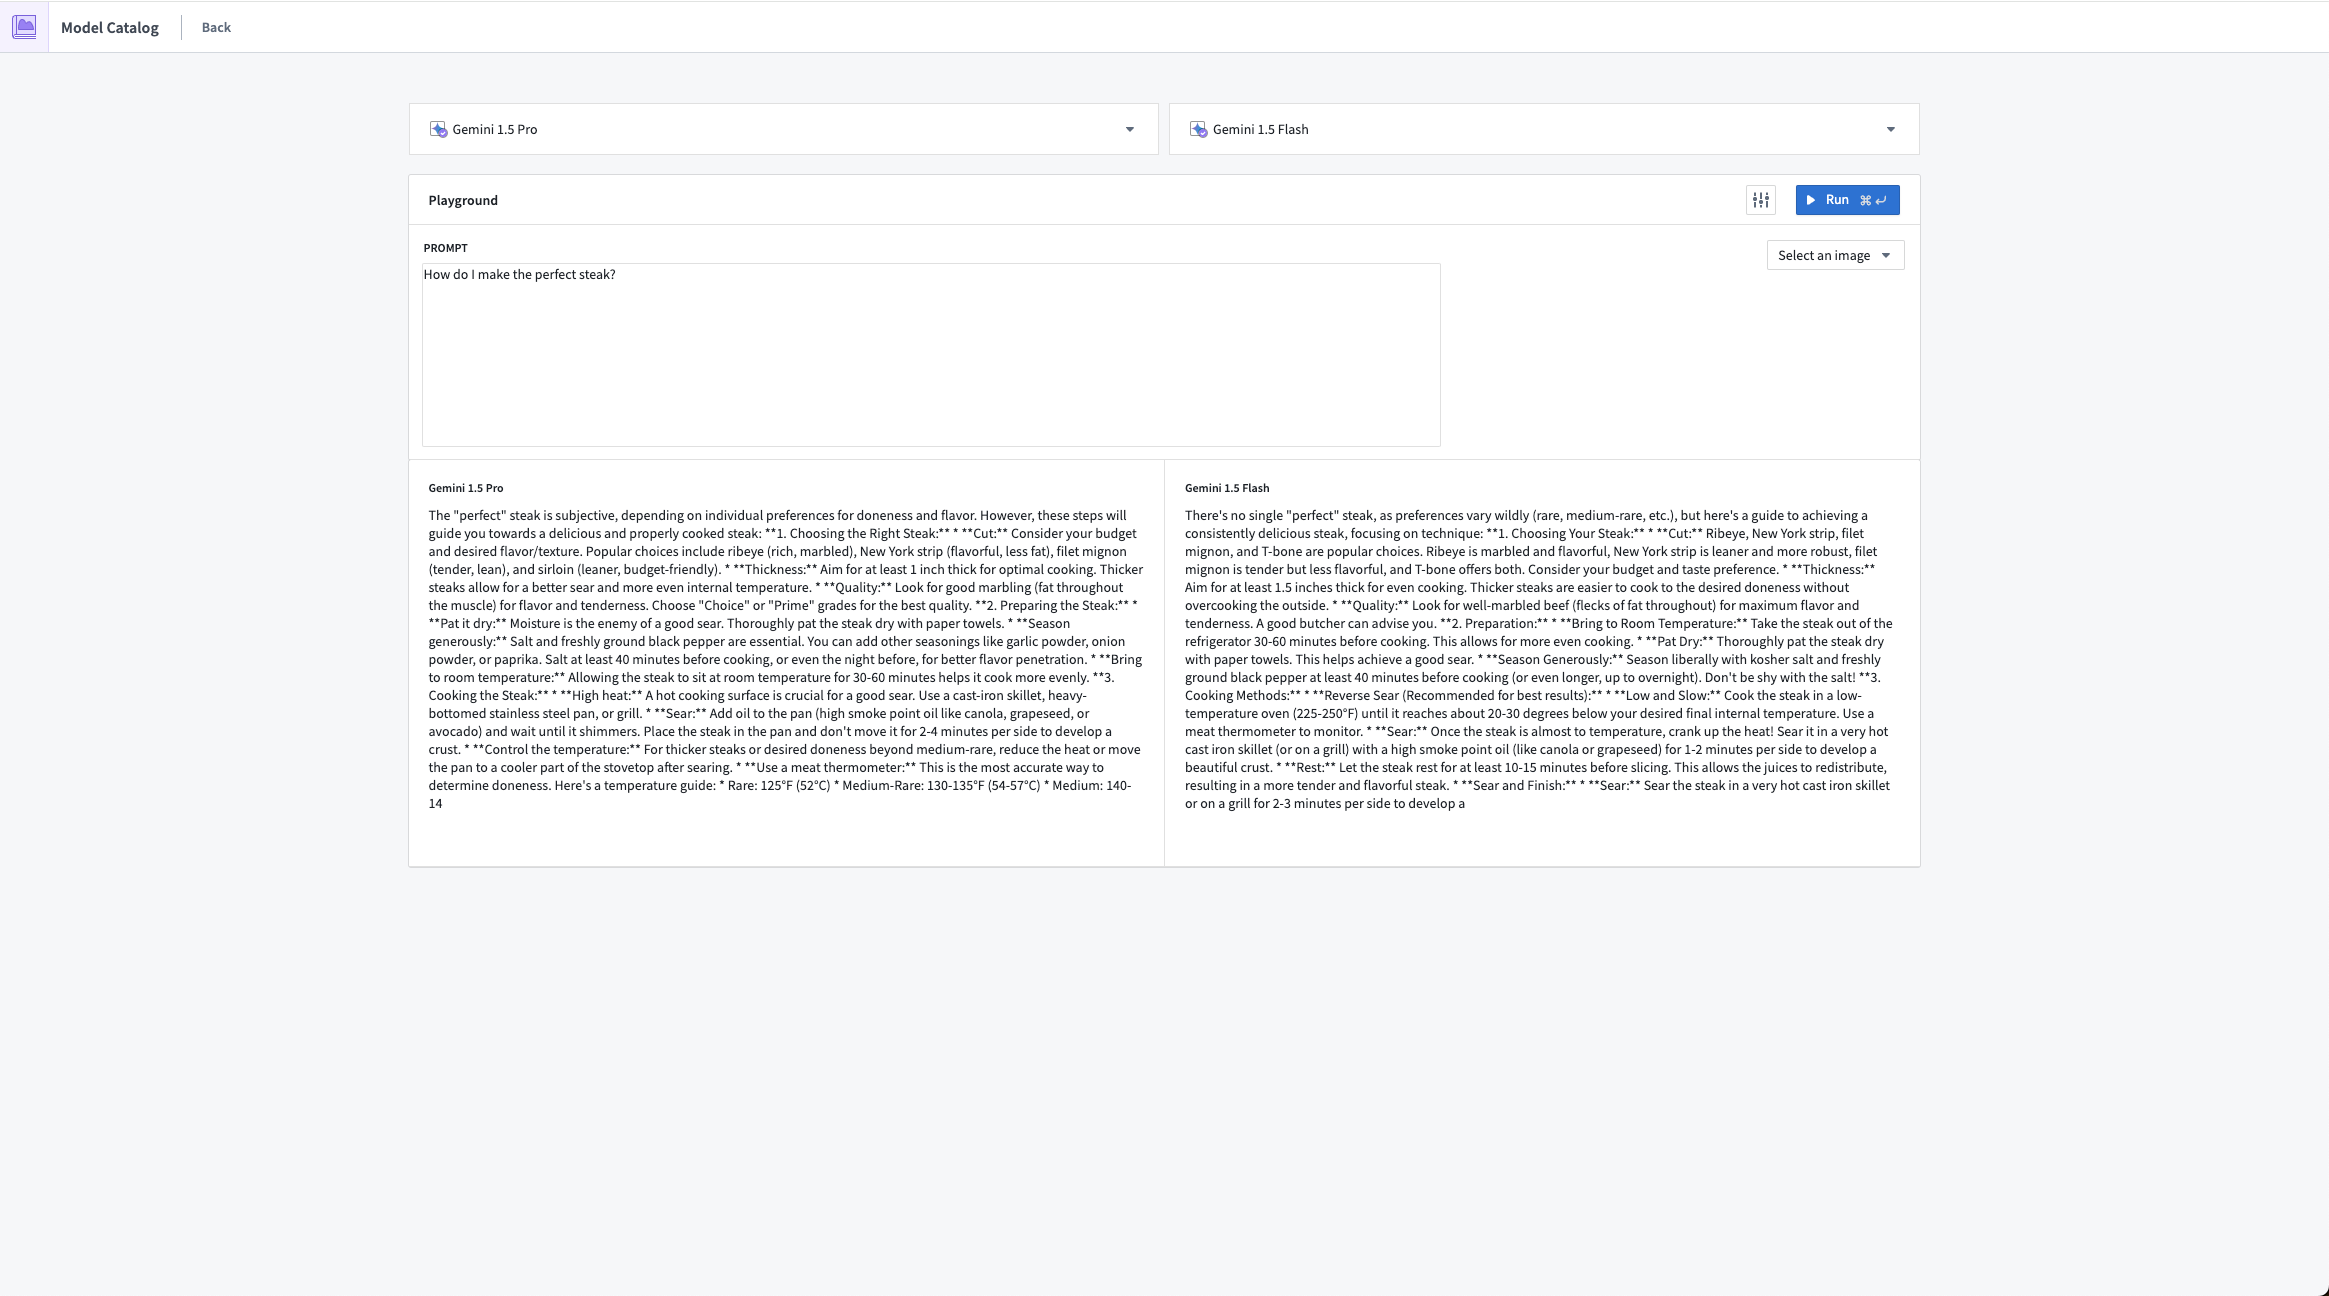
Google Gemini 1.5 Pro responding to a sample prompt in Model Catalog's Playground feature.
Review a list of LLMs supported in Palantir.
Code Repositories now offers inline code assistance and improved access to AIP Assist features
Date published: 2025-01-21
Starting the week of January 20, Code Repositories will offer inline code assistance and new ways to add attachments to AIP Assist as a beta feature. This update enables users to access AIP Assist features directly from the code editor, enhancing support for engineering efforts and minimizing the need for context switching. This improvement is due to the updated integration between AIP Assist and Code Repositories, which previously introduced context-aware attachments in beta. Context-aware attachments and other AIP Assist features are now more accessible, providing developers with flexible options that effortlessly integrate with existing workflows.
Inline code assistance from AIP Assist
Code Repositories now features inline code assistance [Beta] when a snippet of code is highlighted. The Explain, Find bugs, and Ask a question options are displayed above the selected code snippet, enabling users to access targeted help from AIP Assist directly from their code.

A highlighted code snippet and the available AIP Assist inline code assistance options.
This feature can be disabled by opening the Ask AIP Assist dropdown menu in the top right corner of the editor, then selecting Configure AIP Settings. In the AIP Features section, users can enable or disable the Show AIP Assist actions above selected code option and other AIP features to suit their needs.
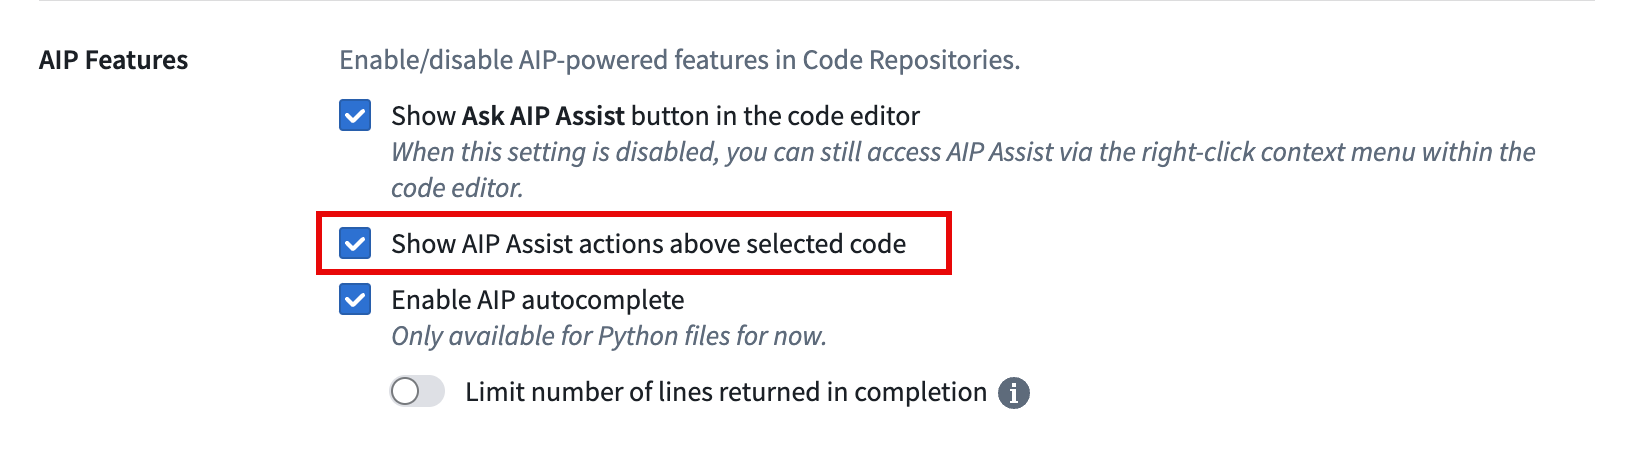
The Show AIP Assist actions above selected code option in Code Repositories AIP settings.
Users can also access these AIP Assist features from the Ask AIP Assist dropdown menu, or by right-clicking a highlighted code snippet and selecting one of the available AIP Assist options from the context menu.
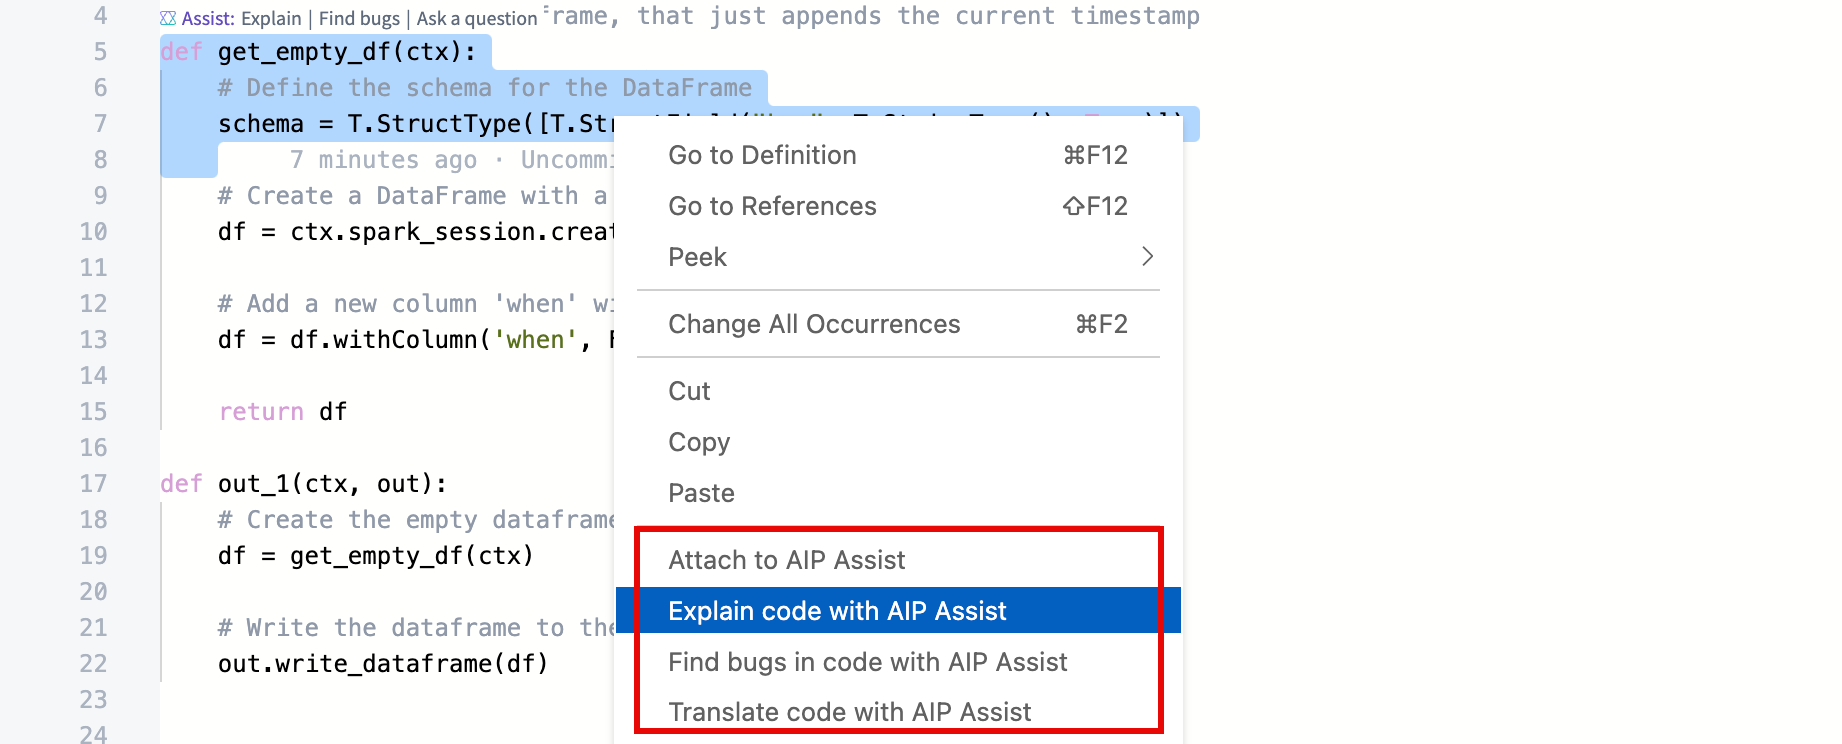
The AIP Assist options in the context menu of highlighted code.
New methods for adding context-aware attachments
Context-aware attachments allow users to attach code snippets, files, and repositories to conversations with AIP Assist. These attachments provide context that enriches AIP Assist knowledge and enables more accurate responses to code-specific questions. Previously, this feature was only accessible from the AIP Assist sidebar, but it can now be accessed from the redesigned Ask AIP Assist dropdown menu. This update allows developers to attach a highlighted snippet, the current file, or the entire repository to AIP Assist conversations directly from the code editor.

The Ask AIP Assist dropdown menu providing attachment options for AIP Assist conversations.
Code snippets can also be attached by highlighting the desired code, right-clicking, and selecting Attach to AIP Assist from the context menu. These options allow developers to choose the best fit for their workflows and integrate powerful AIP Assist features seamlessly.
Learn more about context-aware attachments and other AIP Assist application integrations.
Note: AIP feature availability is subject to change and may differ between customers.
Introducing custom website hosting in Developer Console for Developer Tier enrollments
Date published: 2025-01-16
We are excited to expand the availability of website hosting to Developer Tier enrollments. This powerful addition enables you to seamlessly build and deploy custom frontend applications, leveraging Foundry as your backend with the help of the Ontology SDK (OSDK).
To get started, navigate to Developer Console and create a client-facing application. See the documentation for an in-depth walkthrough:
Provision custom subdomains
Use Developer Console to provision a custom subdomain. Foundry will automatically provision the required infrastructure including DNS records and TLS certificates. Your application will be served from one of the following domains depending on your enrollment type:
- Enterprise tier enrollments:
{APPLICATION-NAME}.[YOUR-ENROLLMENT].palantirfoundry.com - Developer tier enrollments:
{APPLICATION-NAME}-[HASH].apps.[ZONE].palantirfoundry.com
The website hosting menu in Developer Console.
With this feature, Developer Tier enrollments can now take advantage of Foundry's development tooling and website management tools.
Kick-start development
Go from an empty slate to a deployed website in 10 minutes. Start with a custom repository template, develop inside a fully set up VS Code workspace, and manage your changes in Code Repositories.

The development environment in Foundry, with the VS Code IDE on the left and live preview of the application in development on the right.
Continuous deployment
Leverage robust version control tools provided by Code Repositories to review and safely deploy your website changes.
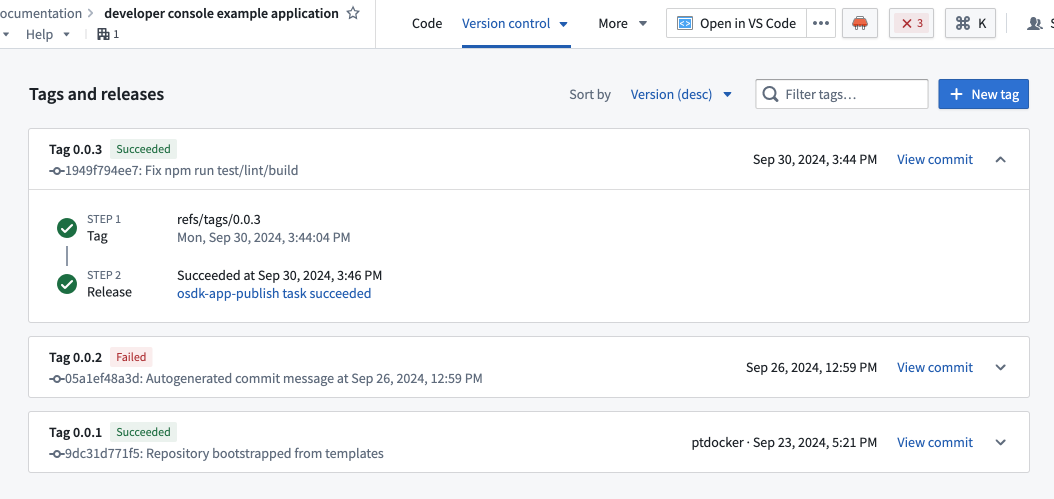
The version control page in Code Repositories.
Website management tools
Configure your website's content security policy, manage roll-back, and monitor usage metrics.
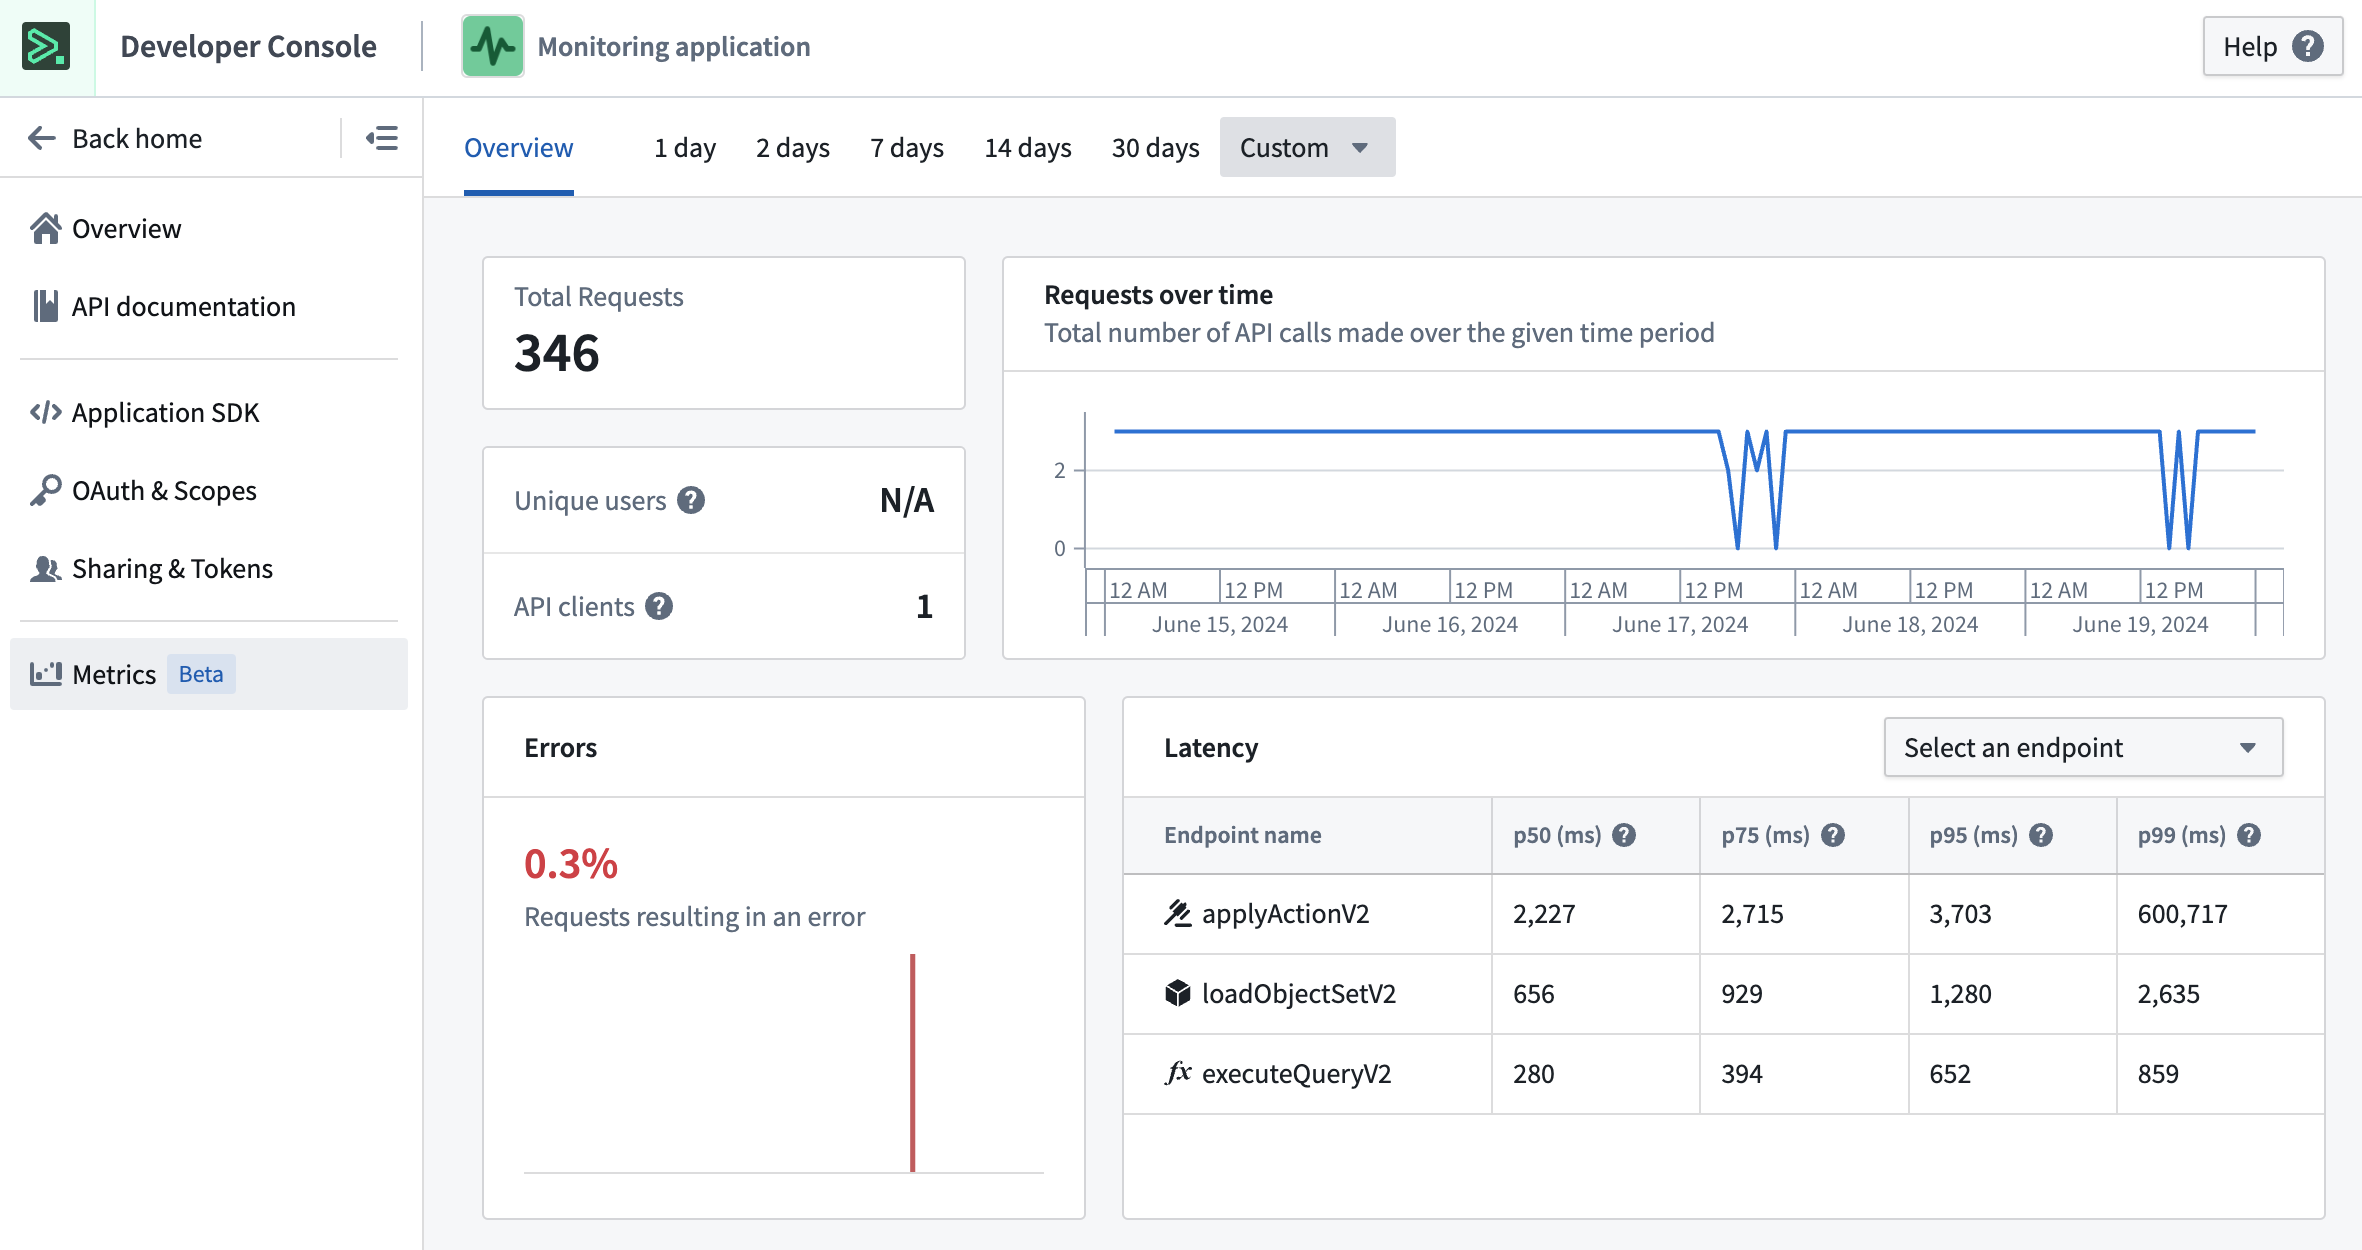
Developer Console provides tools to monitor your application's Foundry usage.
Introducing manual entry transform tables in Quiver
Date published: 2025-01-16
Generally available across enrollments the week of January 13, you can add manual entry transform tables as cards to your Quiver canvas, enabling you to create a transform table from scratch that contains up to 5,000 rows of data. Manual entry transform tables have an intuitive spreadsheet-like user interface and support five data types: string, number, Boolean, time, and time series.
As with Quiver's other transform tables, you can apply any of the transform operations available in the transform table search window to manual entry transform tables.
When should I use manual entry transform tables?
As an example use case, you can create a manual entry transform table to dynamically parameterize an analysis in conjunction with row and column selectors. The values in the table's selected rows can be used as dynamic parameters downstream, such as the figures for metric_b in the Time Series Chart on the Quiver canvas in the image below.
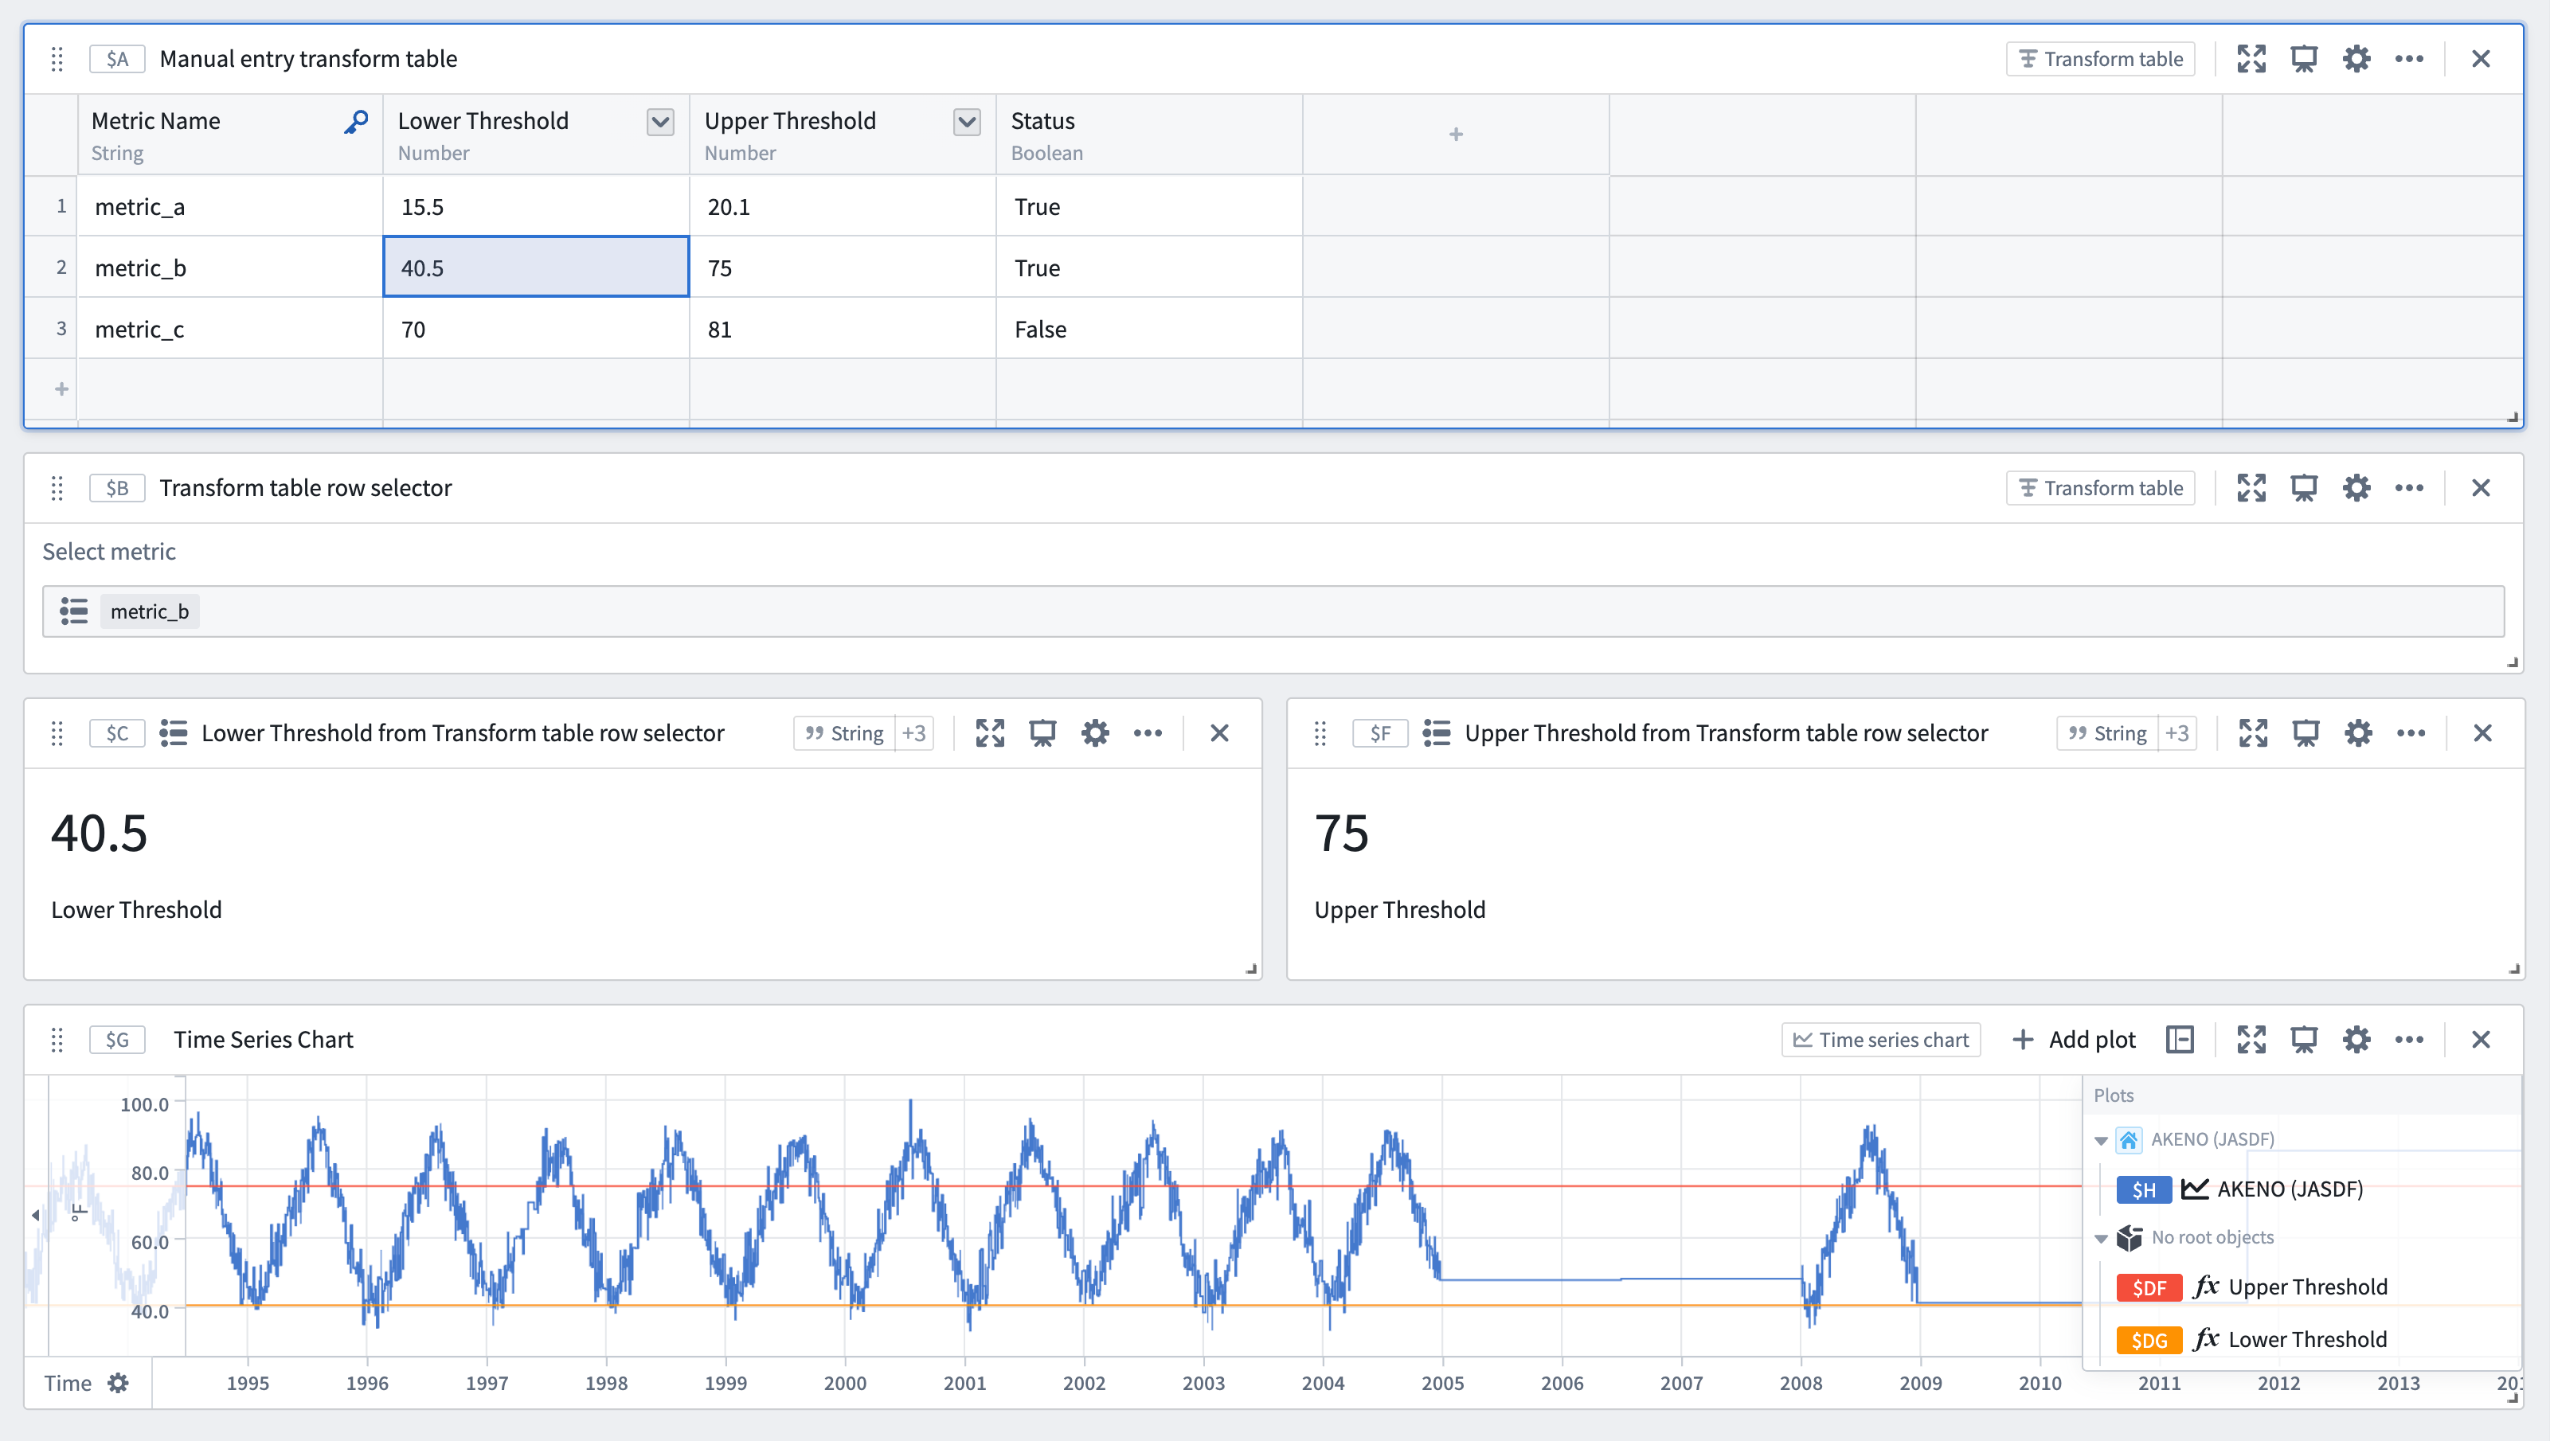
Use manual entry transform tables to parameterize an analysis in Quiver.
You can also use manual entry transform tables to ingest small sets of data from external sources to supplement an analysis and integrate with the Ontology. Additionally, manual entry transform tables enable the full range of Quiver's time series analysis operations for time series datasets containing up to 5,000 rows without the need to establish a time series sync.
To learn more about manual entry transform tables and the workflows they support, see Quiver's transform table documentation.
Benefit from granular control over Project resource queue assignments with the Resource Management application
Date published: 2025-01-16
Available today on all enrollments, you now have new options in the Resource Management application to give you more granular control over a Project's resource queue assignments. In the past, GPU-enabled Projects that were assigned to vGPU resource queues used their enrollment's default resource queue for vCPU workloads. Now, you can configure these types of Projects to use a specified vCPU resource queue. This means that Projects can be assigned to up to two different resource queues, a vCPU queue, and optionally, a vGPU resource queue, to give you more flexibility over your resources.
Additionally, you can now support critical workflows that require dedicated compute resources by making one existing branch per Project the "priority" branch for that Project. Workloads on a set priority branch benefit from the ability to use assigned resource queues, as opposed to other workloads which continue to use the resource queues assigned to the Project. Like Projects, each priority branch is assigned to a vCPU resource queue, and they can also optionally be assigned to a vGPU resource queue.
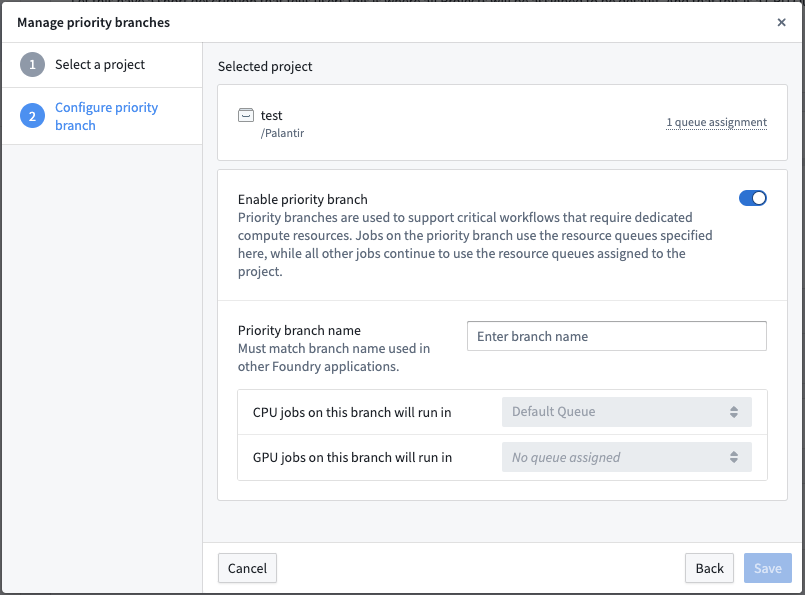
Enable priority branch and manage which vCPU and vGPU resource queues the priority branch uses.
You can now also view a Project's resource queue assignments in the platform filesystem sidebar. For example, the following screenshot demonstrates a Project with a priority branch namedproduction, with distinct vCPU and vGPU resource queue assignments between the priority branch and the Project itself.
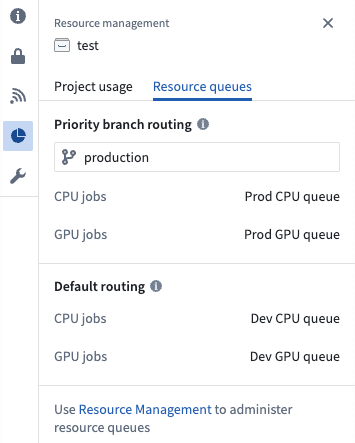
View a Project's resource queue information at a glance from the platform filesystem sidebar.
For more information, visit the priority branch documentation.
Use Python transforms in VS Code workspaces
Date published: 2025-01-14
We are excited to announce that you can now develop Python transforms in VS Code workspaces, allowing you to use the Visual Studio Code IDE to seamlessly develop your Python transforms with Palantir workflows. This beta feature is available to all users who have access to VS Code workspaces (also in beta).
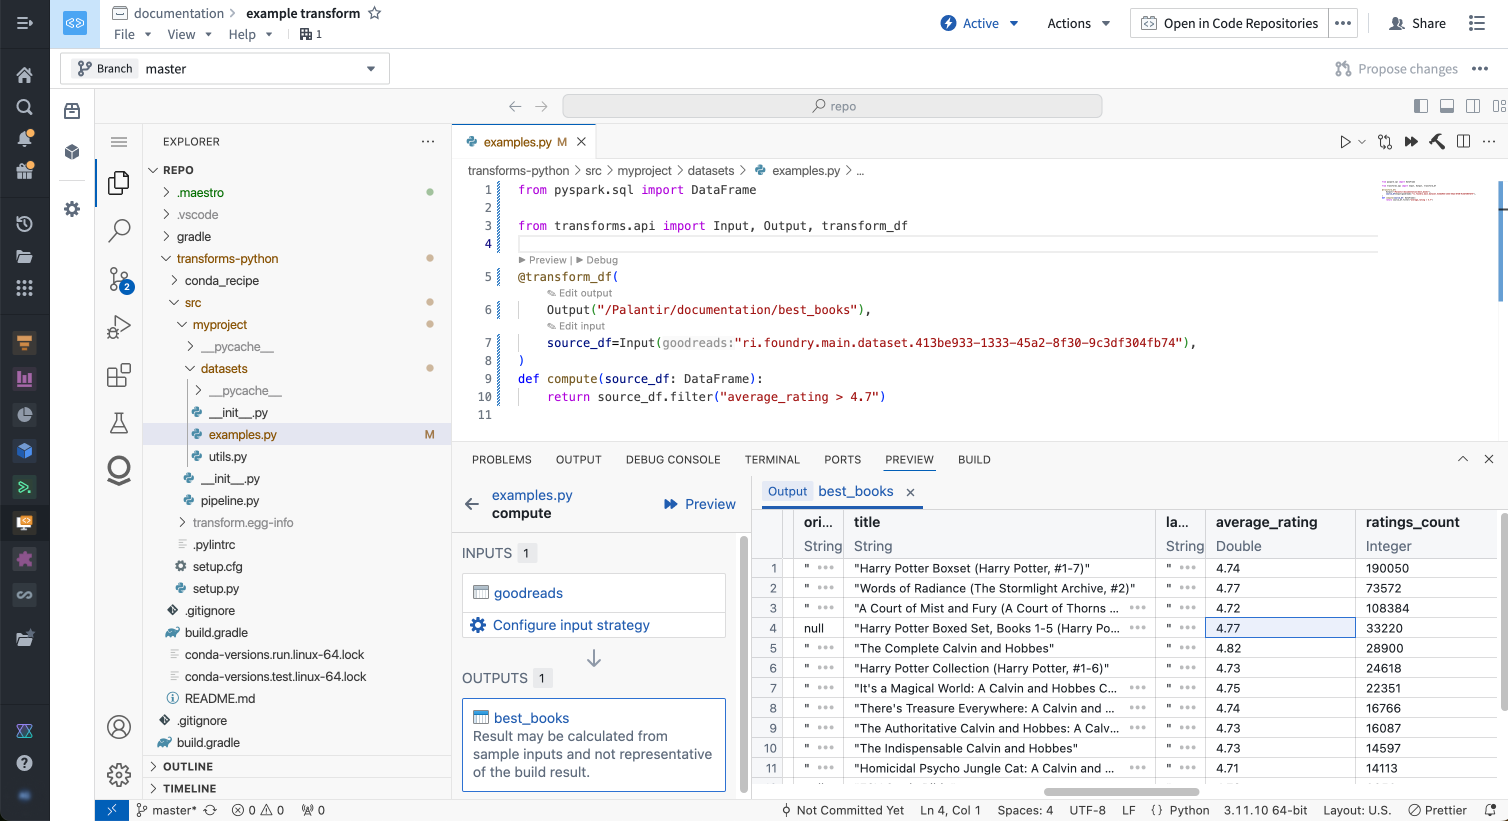
The VS Code workspace interface, featuring improved developer tools.
Why should I develop my Python transforms in VS Code?
Python transforms with VS Code workspaces unlock significant improvements to tooling and capabilities that meaningfully improve developer workflows. You can expect the following updates to your developer experience:
- Fully customizable IDE: Customize the VS Code workspace IDE to your preference, with themes, keybindings, interface layouts, and more.
- Palantir extension for Visual Studio Code: This extension bridges VS Code and Foundry, allowing you to perform and use Python transform operations (such as transforms preview, debugging, and the library panel) natively in VS Code.
- Full dataset (sample-less) preview: Rather than running a full build, you can run previews on the full dataset to get results.
- Performant language server: Benefit from fast autocomplete suggestions and linting.
- Transforms type hints: Use a transforms-aware linter that suggests correct transforms parameter types.
- Optimized environment setup: Use Palantir’s latest high-performance environment management tool to set up your Python environment quickly and efficiently.
- Terminal access: Use a powerful and efficient tool to run shell commands. For example, you can run a Python interactive shell or git CLI.
- Improved source control: Leverage VS Code’s built-in source control interface or the git CLI in the terminal for complex source control operations.
Get started
To start using Python transforms in VS Code workspaces, open your transforms repository in the Code Repositories application. From here, select Open in VS Code from the top right corner of the screen, which will take you to a VS Code workspace:
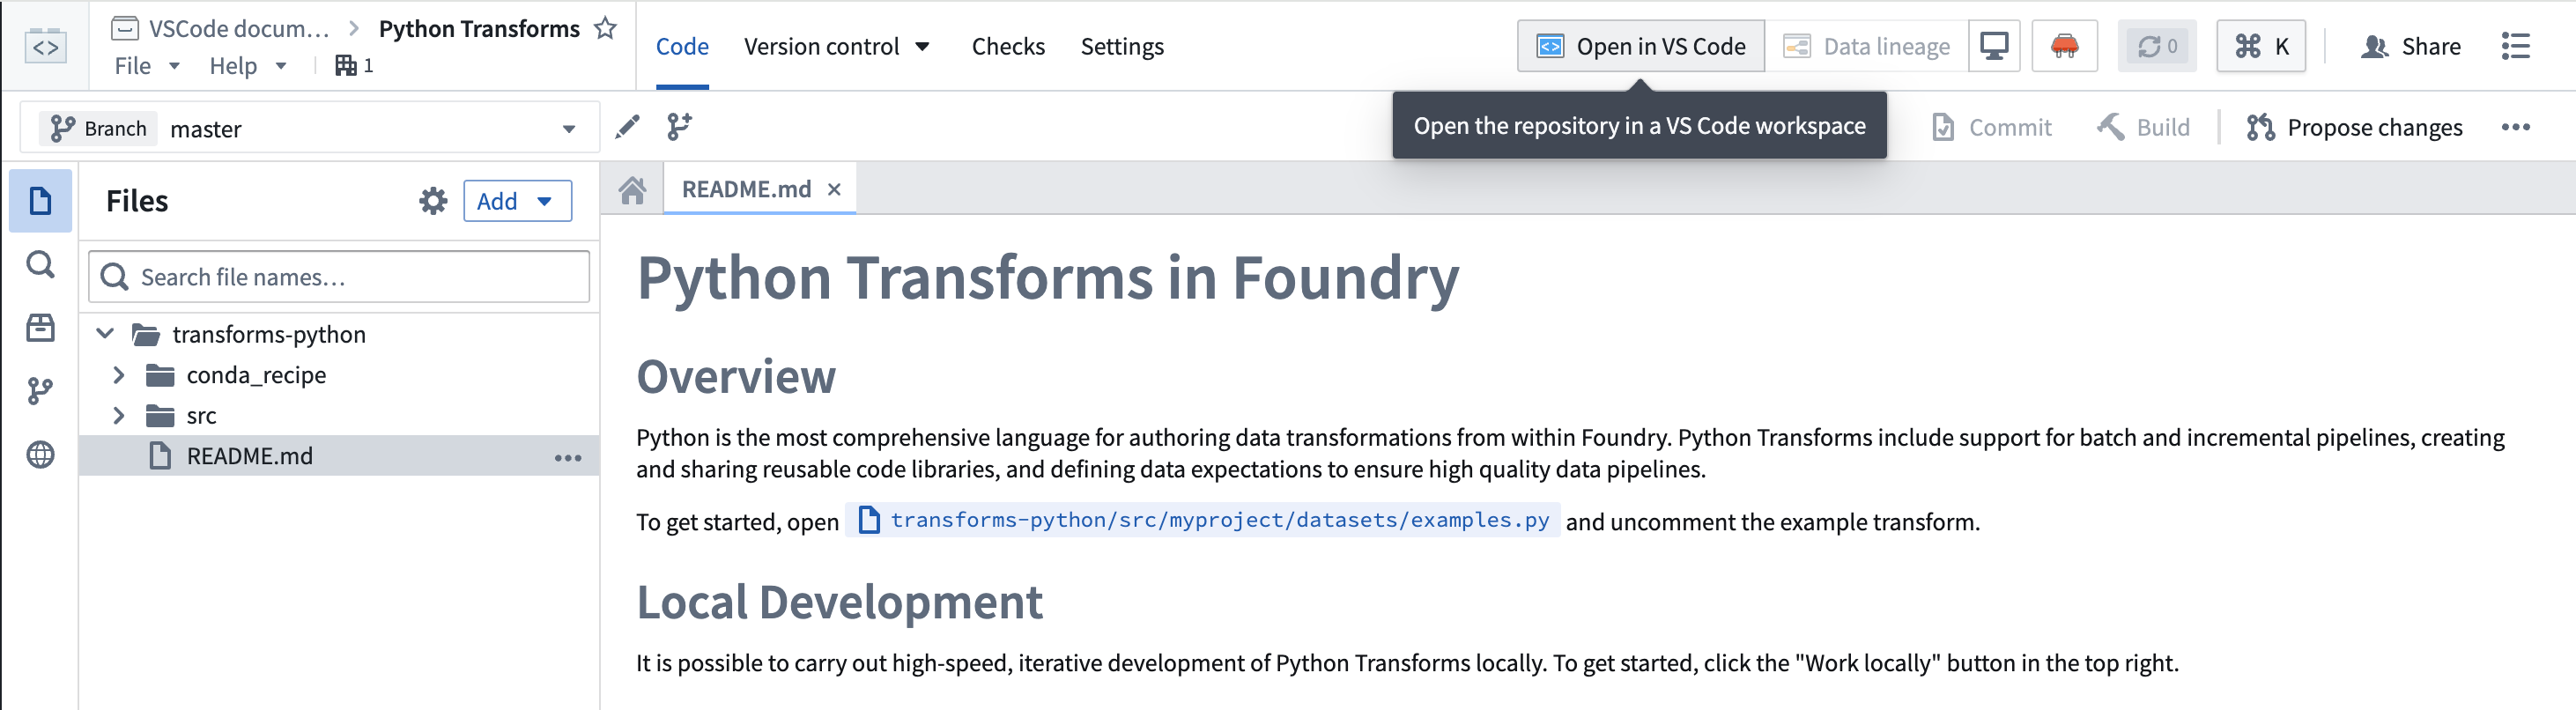
Open your Python transforms code repository in a VS Code workspace by selecting Open in VS Code.
:::callout{theme="warning"} VS Code workspaces are in a beta state and available by default in all Organizations where Code Workspaces is enabled. If you do not see the option to open your code repository in a VS Code workspace, contact Palantir Support to learn how to enable access. :::
Limitations
Python transforms in VS Code workspaces is a new feature; some transforms preview components are not yet supported. We are actively working to add support for all missing features. For more information, review our documentation.
中文翻译
公告
提醒: 订阅 Foundry 新闻通讯(Foundry Newsletter),即可直接在收件箱中收到平台新产品、功能及改进的摘要。有关订阅方式的更多信息,请参阅 Foundry 新闻通讯与产品反馈渠道公告。
欢迎在我们的开发者社区论坛 ↗ 分享您对这些公告的看法。
使用 Foundry 分支功能在 Pipeline Builder、本体和 Workshop 中测试变更
发布日期:2025-01-30
Foundry 分支功能(Foundry Branching) 现已进入测试阶段。查看更新后的公告以了解更多信息。
Grok-2 现已在 AIP 中可用
发布日期:2025-01-30
我们很高兴地宣布,Grok-2 和 Grok-2-vision 现已在 AIP 上对所有非地理限制和美国地理限制的注册用户全面开放。这些来自 xAI 的旗舰模型提供了顶级的行业性能和多功能性,包括先进的视觉支持。
Grok-2 和 Grok-2-vision 适用于所有已接受我们的 AIP 合同附录 并在控制面板中启用 xAI LLM 使用的注册用户。如果您的注册目前不包含这些功能,请让注册管理员查看 AIP 启用设置和文档。
此 LLM 可用于所有 AIP 功能,例如 Logic and Automate、Pipeline Builder、Functions、Transforms 等。
Grok-2 和 Grok-2-vision 在模型目录中可用。
使用模型实验跟踪和可视化模型训练进度
发布日期:2025-01-28
我们很高兴推出模型实验(model experiments),这是一个 Python API,旨在跟踪、可视化和比较模型训练尝试的结果。模型开发过程本质上是迭代的,管理大量的训练尝试可能具有挑战性。为了解决这个问题,模型实验提供了一个用于记录和可视化模型训练指标及超参数的 API,使用户能够更深入地了解训练过程,并做出基于数据的明智决策。
与现有模型训练代码集成
模型实验可在代码仓库(Code Repositories)和 Jupyter® 代码工作区(Jupyter® Code Workspaces)中使用,无需额外的库或依赖项。使用版本高于 0.1482.0 的 palantir_models API,引入了在 Jupyter® 代码工作区 和 代码仓库 中创建实验的绑定,允许用户在现有的兼容工作流程中利用此功能。
可视化实验
发布后,模型实验可以在模型页面的 实验(Experiments) 选项卡下找到。可以选择和比较多个实验,从而深入了解训练迭代过程,并促进基于数据的模型开发方法。
三个实验进行比较,顶部是 参数(Parameters) 表,随后是每个指标的折线图。
后续计划
我们将在未来几个月内继续对模型实验进行更多增强,包括:
- 扩展超参数和指标支持的类型列表。
- 更好地与开源机器学习框架集成。
- 在 Palantir 平台的模型选择上下文中显示相关实验。
利用此功能,将跟踪和可视化无缝集成到您的模型训练工作流程中。借助模型实验,您可以简化实验过程,加速从模型构思到部署的旅程,最终推动更有效、更高效的机器学习开发。
React Ontology SDK 应用程序现支持 PR 预览
发布日期:2025-01-23
我们很高兴地宣布,应用程序构建者现在可以在使用 Ontology SDK (OSDK) 的 React 应用程序 时访问 PR 预览(PR preview)。PR(拉取请求)预览提供了基于您拉取请求中提交代码的 React 应用程序的工作版本。您可以在更改合并到主分支和生产状态之前预览任何提议的更改,从而更容易检查任何不良结果,并在更改进入生产环境之前验证面向用户的工作流程。以前,构建者、设计师和应用程序团队的其他成员需要创建一个开发环境来查看更改。PR 预览功能消除了这一要求,允许更快地验证设计和功能更改,并实现更高效、更协作的流程。
如何创建 PR 预览?
PR 预览功能适用于任何托管在使用开发者控制台(Developer Console)网页托管功能的代码仓库中的 OSDK React 应用程序。
开发者控制台中的网站托管配置页面。
- 首先,在开发者控制台中构建一个应用程序。
- 然后,为该应用程序配置网站托管。
- 选择使用 VS Code 工作区 以利用 Visual Studio Code 的 Palantir 扩展中可用的开发者功能。从任一环境中,您都可以在仓库中创建分支、通过提交实现代码更改并推送更新。
- 一旦您做出更改并完成检查,请导航到代码仓库并创建一个拉取请求以将您的更改合并到主分支。
- 从屏幕顶部的 版本控制(Version control) 选项卡中,选择 拉取请求(Pull Requests)。
- 选择您要预览的拉取请求,然后选择右下角的 预览(Preview) 以打开您的 React 应用程序的预览版本。
代码仓库中的拉取请求,带有查看更改预览的选项。
您还可以通过导航到拉取请求的 提交(Commits) 选项卡,找到分支上每个提交的 PR 预览链接。请注意,PR 预览仅在拉取请求创建后的七天内可用。七天后,预览将过期。
预览权限
要访问 React 应用程序的 PR 预览功能,用户必须从开发者控制台拥有该应用程序的适当权限。要管理这些权限,请在开发者控制台中打开您的应用程序,然后导航到左侧边栏中的 共享(Sharing)。
要进行更改、为应用程序代码创建拉取请求以及与其他用户共享 PR 预览,您必须拥有 Owner 或 Editor 权限。要与用户共享 PR 预览而不授予编辑应用程序代码或配置的权限,请在 共享托管网站(Share hosted website) 下将他们添加为 Viewer。
开发者控制台中的权限配置页面,带有授予用户访问 PR 预览权限的选项。
后续计划
我们期待直接在 VS Code 工作区中构建版本控制界面,从而无需导航到代码仓库即可生成 PR 和获取预览链接。
期待您的反馈!
在我们继续努力改善 Palantir 开发者体验的同时,我们鼓励您在社区论坛 ↗ 中留下反馈和评论。
Workshop 中的“发送到 AIP Assist”事件现包含 AIP Assist Agent 选择器
发布日期:2025-01-23
从 1 月 20 日那周开始,Workshop 中的 Send to AIP Assist 事件将允许用户选择一个默认的 AIP Assist Agent 来接收事件的提示。此 Workshop 事件在按钮选择时触发,并打开 AIP Assist 侧边栏以发送配置好的提示。为了进一步定制用户体验,构建者现在可以提供一个默认的 Agent,这是一个由 LLM 驱动的助手,配备了企业特定的知识,用于回答关于自定义操作主题的查询。AIP Assist Agents 使用自定义内容作为其搜索上下文,并可以在 Agent Studio [测试版] 中进行配置。
事件配置
在事件配置期间可以选择一个默认的 AIP Assist Agent,允许构建者为给定的上下文选择合适的 Agent。Agent 可以被授予访问自定义内容的权限,例如有关正在使用的应用程序的文档或其他操作流程,以便在相关时间提供有针对性的帮助。选择 Agent 是可选的,用户也可以在 AIP Assist 侧边栏中选择一个专用的 Agent。通过选择默认 Agent,构建者可以确保已为任务选择了正确的 Agent,而无需依赖最终用户进行手动选择。
Workshop 事件配置面板中的 Agent 选择器。
事件中发送的提示可以是静态文本或动态变量,允许构建者根据提示和接收 Agent 自行定制用户体验。例如,如果构建者预计用户会在特定工作流程中遇到困难,他们可以添加一个按钮,该按钮将触发 Send to AIP Assist 事件,并附带一个解释按钮用途的工具提示。
一个触发 Send to AIP Assist 事件并带有解释性工具提示的按钮示例。
借助此功能,构建者可以确保用户在 Workshop 应用程序工作流程中能够获得即时交互式支持。请注意,必须先在 Agent Studio 中配置 AIP Assist Agent 并授予其访问自定义内容的权限。
了解有关在 Workshop 中配置“发送到 AIP Assist”事件的更多信息。
注意: AIP 功能的可用性可能会发生变化,并且可能因客户而异。
在工作流谱系中批量升级跨 Workshop 应用程序的函数版本
发布日期:2025-01-21
我们非常高兴地宣布,您现在可以在工作流谱系(Workflow Lineage)中批量升级 Workshop 应用程序中使用的函数版本。此新功能简化了手动更新单个函数版本这一通常繁琐的过程。在单个页面上执行批量升级可确保您的所有函数在多个 Workshop 应用程序中保持最新,同时显著减少手动工作量。
轻松上手
开始升级模块非常简单:
- 选择 Workshop 应用程序节点: 只需在图表上选择所需的 Workshop 应用程序节点。
- 查看可升级的函数: 底部面板将显示所有符合升级条件的函数、逻辑和变量。
在工作流谱系中选择相关的 Workshop 应用程序节点并在一个视图中查看可升级的函数。
我们支持两种类型的升级:
- 全部或全不: 仅当所有函数都可以在不引入破坏性更改的情况下升级时才升级,否则不升级任何函数。
- 部分: 仅升级不会引入破坏性更改的函数。会导致破坏性更改的函数将不会被升级。
对于函数仓库和诸如 AIP Logic 或 Compute Modules 等来源,您可以选择希望函数升级到的特定版本。如果未指定,工作流谱系将默认使用最新版本。
指定要将函数升级到的版本,或者让工作流谱系在升级时默认使用最新版本。
升级函数后,您将看到已成功升级的 Workshop 应用程序列表。
工作流谱系显示已成功升级的函数。
了解有关如何批量升级 Workshop 应用程序中函数的更多信息。
现已支持 Google Gemini 1.5 Flash 和 Pro LLM 模型
发布日期:2025-01-21
通过 Google Vertex AI 提供的 Gemini 1.5 Flash 和 Gemini 1.5 Pro 现已在所有注册用户中全面可用。要使用新的 Gemini 模型,必须通过 AIP 设置控制面板扩展启用 Gemini 模型系列。
Gemini 1.5 提供了显著的性能改进、基于混合专家(MoE)架构的高效训练,以及突破性的长上下文窗口,Gemini 1.5 Flash 可处理多达一百万个 token,Gemini 1.5 Pro 可处理多达两百万个 token。这些模型为多模态处理和上下文学习带来了新的可能性,使 AI 应用程序更加强大和有用。
Google Gemini 1.5 Pro 在模型目录的 Playground 功能中响应示例提示。
代码仓库现提供内联代码辅助并改进了对 AIP Assist 功能的访问
发布日期:2025-01-21
从 1 月 20 日那周开始,代码仓库(Code Repositories)将提供内联代码辅助(inline code assistance)以及向 AIP Assist 添加附件的新方式,作为测试版功能。此更新使用户能够直接从代码编辑器访问 AIP Assist 功能,增强对工程工作的支持,并最大限度地减少上下文切换的需求。这一改进得益于 AIP Assist 与代码仓库之间更新的集成,此前已在测试版中引入了上下文感知附件。上下文感知附件和其他 AIP Assist 功能现在更易于访问,为开发者提供了灵活的选择,可轻松与现有工作流程集成。
AIP Assist 的内联代码辅助
代码仓库现在在突出显示代码片段时提供内联代码辅助 [测试版]。解释(Explain)、查找错误(Find bugs) 和 提问(Ask a question) 选项显示在选定的代码片段上方,使用户能够直接从其代码中访问 AIP Assist 的针对性帮助。
突出显示的代码片段和可用的 AIP Assist 内联代码辅助选项。
可以通过打开编辑器右上角的 询问 AIP Assist(Ask AIP Assist) 下拉菜单,然后选择 配置 AIP 设置(Configure AIP Settings) 来禁用此功能。在 AIP 功能(AIP Features) 部分,用户可以根据需要启用或禁用 在选定代码上方显示 AIP Assist 操作(Show AIP Assist actions above selected code) 选项以及其他 AIP 功能。
代码仓库 AIP 设置中的 在选定代码上方显示 AIP Assist 操作 选项。
用户还可以从 询问 AIP Assist 下拉菜单访问这些 AIP Assist 功能,或者通过右键单击突出显示的代码片段并从上下文菜单中选择一个可用的 AIP Assist 选项。
突出显示代码的上下文菜单中的 AIP Assist 选项。
添加上下文感知附件的新方法
上下文感知附件允许用户将代码片段、文件和仓库附加到与 AIP Assist 的对话中。这些附件提供了上下文,丰富了 AIP Assist 的知识,并能够对特定代码问题做出更准确的响应。以前,此功能只能从 AIP Assist 侧边栏访问,但现在可以从重新设计的 询问 AIP Assist 下拉菜单中访问。此更新允许开发者直接从代码编辑器将突出显示的片段、当前文件或整个仓库附加到 AIP Assist 对话中。
询问 AIP Assist 下拉菜单为 AIP Assist 对话提供附件选项。
代码片段也可以通过突出显示所需代码、右键单击并从上下文菜单中选择 附加到 AIP Assist(Attach to AIP Assist) 来附加。这些选项允许开发者选择最适合其工作流程的方式,并无缝集成强大的 AIP Assist 功能。
了解有关上下文感知附件和其他 AIP Assist 应用程序集成的更多信息。
注意: AIP 功能的可用性可能会发生变化,并且可能因客户而异。
为开发者层级注册用户推出开发者控制台中的自定义网站托管功能
发布日期:2025-01-16
我们很高兴地宣布将网站托管功能扩展到开发者层级(Developer Tier)注册用户。这一强大的新增功能使您能够利用 Foundry 作为后端,借助 Ontology SDK (OSDK) 无缝构建和部署自定义前端应用程序。
要开始使用,请导航到开发者控制台(Developer Console)并创建一个面向客户端的应用程序。有关详细的分步指南,请参阅文档:
配置自定义子域名
使用开发者控制台配置自定义子域名。Foundry 将自动配置所需的基础设施,包括 DNS 记录和 TLS 证书。您的应用程序将根据您的注册类型从以下域名之一提供服务:
- 企业层级注册用户:
{APPLICATION-NAME}.[YOUR-ENROLLMENT].palantirfoundry.com - 开发者层级注册用户:
{APPLICATION-NAME}-[HASH].apps.[ZONE].palantirfoundry.com
开发者控制台中的网站托管菜单。
借助此功能,开发者层级注册用户现在可以利用 Foundry 的开发工具和网站管理工具。
快速启动开发
从空白状态到部署网站,只需 10 分钟。从自定义仓库模板开始,在完全设置好的 VS Code 工作区中进行开发,并在代码仓库中管理您的更改。
Foundry 中的开发环境,左侧是 VS Code IDE,右侧是正在开发的应用程序的实时预览。
持续部署
利用代码仓库提供的强大版本控制工具来审查并安全地部署您的网站更改。
代码仓库中的版本控制页面。
网站管理工具
配置您网站的内容安全策略,管理回滚,并监控使用指标。
开发者控制台提供工具来监控您的应用程序的 Foundry 使用情况。
在 Quiver 中引入手动输入转换表
发布日期:2025-01-16
自 1 月 13 日那周起,该功能在所有注册用户中全面可用,您可以将手动输入转换表(manual entry transform tables)作为卡片添加到您的 Quiver 画布中,从而能够从头创建一个包含多达 5,000 行数据的转换表(transform table)。手动输入转换表具有直观的类似电子表格的用户界面,并支持五种数据类型:字符串、数字、布尔值、时间和时间序列。
与 Quiver 的其他转换表一样,您可以将转换表搜索窗口中可用的任何转换操作(transform operations)应用于手动输入转换表。
何时应使用手动输入转换表?
作为一个示例用例,您可以创建一个手动输入转换表,结合行和列选择器来动态参数化分析。表中选定行的值可以在下游用作动态参数,例如下图中 Quiver 画布上 时间序列图表(Time Series Chart) 中的 metric_b 数值。
使用手动输入转换表在 Quiver 中参数化分析。
您还可以使用手动输入转换表从外部来源摄取少量数据集以补充分析,并与本体(Ontology)集成。此外,手动输入转换表支持 Quiver 的全部时间序列分析操作,适用于包含多达 5,000 行的时间序列数据集,而无需建立时间序列同步。
要了解有关手动输入转换表及其支持的工作流程的更多信息,请参阅 Quiver 的转换表文档。
通过资源管理应用程序对项目资源队列分配进行精细控制
发布日期:2025-01-16
此功能即日起在所有注册用户中可用,资源管理应用程序(Resource Management application)中新增了选项,让您能够更精细地控制项目的资源队列分配。过去,分配给 vGPU 资源队列的启用 GPU 的项目,其 vCPU 工作负载使用注册用户的默认资源队列。现在,您可以将这些类型的项目配置为使用指定的 vCPU 资源队列。这意味着项目最多可以分配到两个不同的资源队列:一个 vCPU 队列,以及可选的 vGPU 资源队列,从而为您的资源提供更大的灵活性。
此外,您现在可以通过将每个项目的一个现有分支设置为该项目的“优先级分支(priority branch)”,来支持需要专用计算资源的关键工作流程。在已设置的优先级分支上的工作负载能够使用分配的资源队列,而其他工作负载则继续使用分配给项目的资源队列。与项目一样,每个优先级分支都分配到一个 vCPU 资源队列,并且也可以选择分配到一个 vGPU 资源队列。
启用优先级分支并管理优先级分支使用的 vCPU 和 vGPU 资源队列。
您现在还可以在平台文件系统侧边栏中查看项目的资源队列分配。例如,以下截图展示了一个项目,其优先级分支名为 production,并且优先级分支与项目本身之间具有不同的 vCPU 和 vGPU 资源队列分配。
从平台文件系统侧边栏快速查看项目的资源队列信息。
在 VS Code 工作区中使用 Python 转换
发布日期:2025-01-14
我们很高兴地宣布,您现在可以在 VS Code 工作区(VS Code workspaces) 中开发 Python 转换(Python transforms),从而能够使用 Visual Studio Code IDE 与 Palantir 工作流程无缝地开发您的 Python 转换。此测试版功能对所有有权访问 VS Code 工作区(同样处于测试版)的用户开放。
VS Code 工作区界面,具有改进的开发者工具。
为什么要在 VS Code 中开发 Python 转换?
在 VS Code 工作区中使用 Python 转换可以显著改进工具和功能,从而有效改善开发者工作流程。您可以期待以下开发者体验更新:
- 完全可定制的 IDE: 根据您的偏好自定义 VS Code 工作区 IDE,包括主题、快捷键、界面布局等。
- Visual Studio Code 的 Palantir 扩展: 此扩展桥接了 VS Code 和 Foundry,允许您在 VS Code 中原生执行和使用 Python 转换操作(例如转换预览、调试和库面板)。
- 完整数据集(无样本)预览: 无需运行完整构建,即可对整个数据集运行预览以获取结果。
- 高性能语言服务器: 受益于快速的自动补全建议和代码检查。
- 转换类型提示: 使用能够感知转换的检查器,建议正确的转换参数类型。
- 优化的环境设置: 使用 Palantir 最新的高性能环境管理工具快速高效地设置您的 Python 环境。
- 终端访问: 使用强大高效的工具运行 shell 命令。例如,您可以运行 Python 交互式 shell 或 git CLI。
- 改进的源代码控制: 利用 VS Code 内置的源代码控制界面或终端中的 git CLI 进行复杂的源代码控制操作。
开始使用
要开始在 VS Code 工作区中使用 Python 转换,请在代码仓库(Code Repositories) 应用程序中打开您的转换仓库。然后,从屏幕右上角选择 在 VS Code 中打开(Open in VS Code),这将带您进入一个 VS Code 工作区:
通过选择 在 VS Code 中打开 在 VS Code 工作区中打开您的 Python 转换代码仓库。
:::callout{theme="warning"} VS Code 工作区处于测试阶段,默认在所有启用了代码工作区(Code Workspaces)的组织中可用。如果您没有看到在 VS Code 工作区中打开代码仓库的选项,请联系 Palantir 支持以了解如何启用访问权限。 :::
限制
VS Code 工作区中的 Python 转换是一项新功能;某些转换预览组件尚不支持。我们正在积极努力增加对所有缺失功能的支持。有关更多信息,请查看我们的文档。