Announcements(公告)
REMINDER: Sign up for the Foundry Newsletter to receive a summary of new products, features, and improvements across the platform directly to your inbox. For more information on how to subscribe, see the Foundry Newsletter and Product Feedback channels announcement.
Share your thoughts about these announcements in our Developer Community Forum ↗.
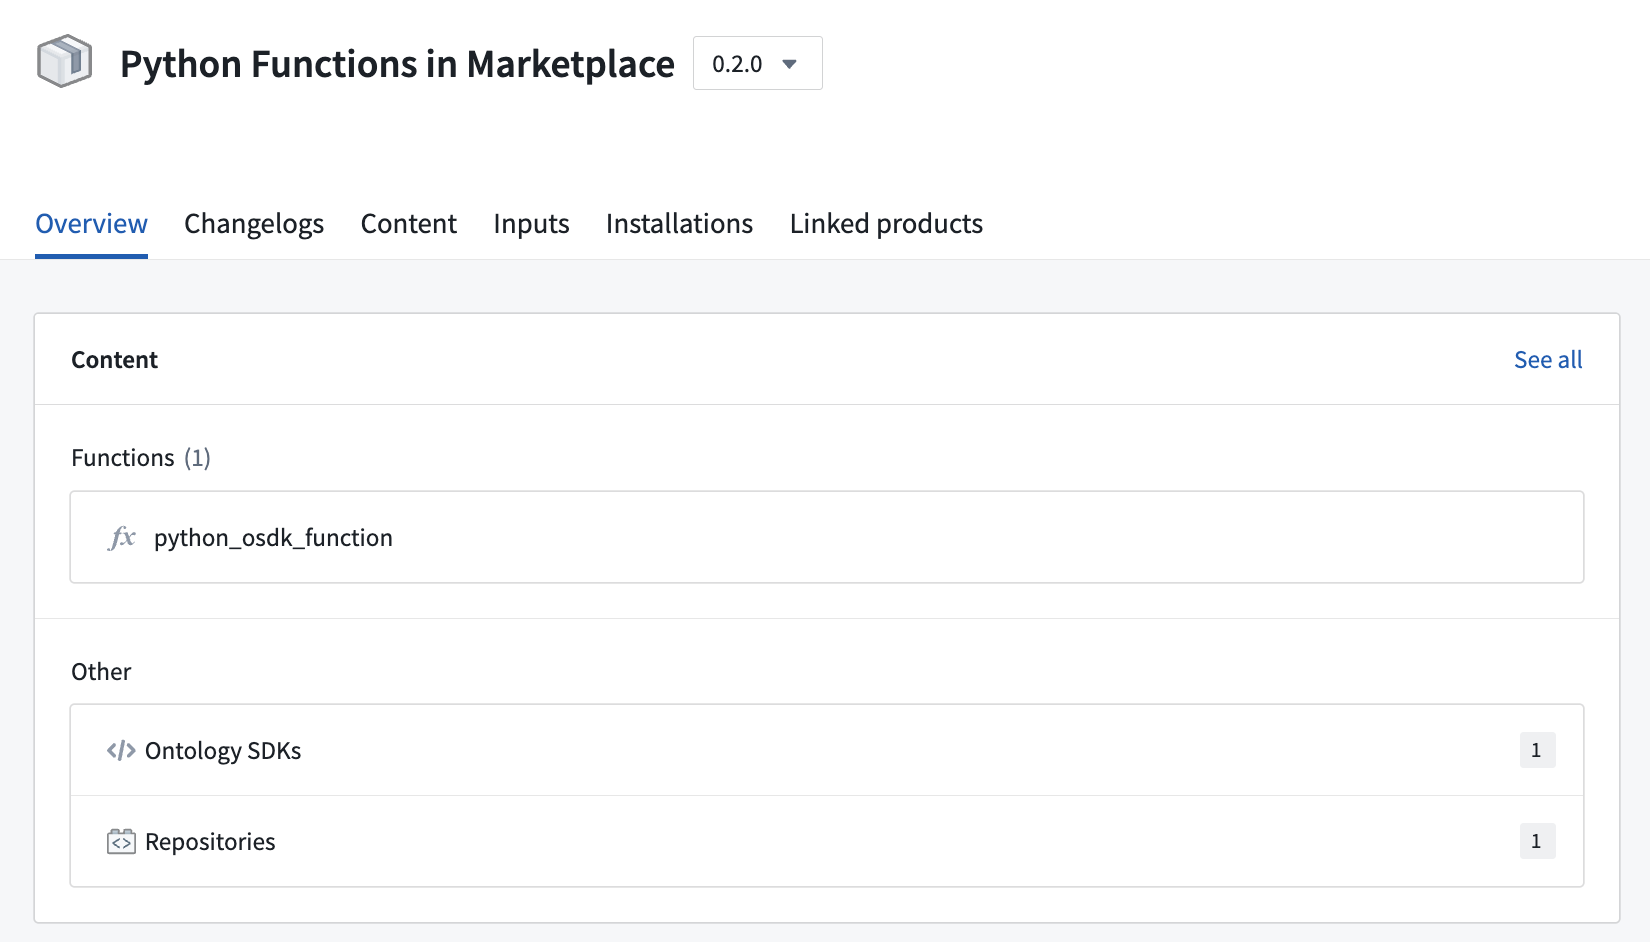
Python and TypeScript v2 Functions with OSDKs are now compatible with Marketplace
Date published: 2025-07-31
Python and TypeScript v2 Functions that use OSDKs can now be included as content in Marketplace products.
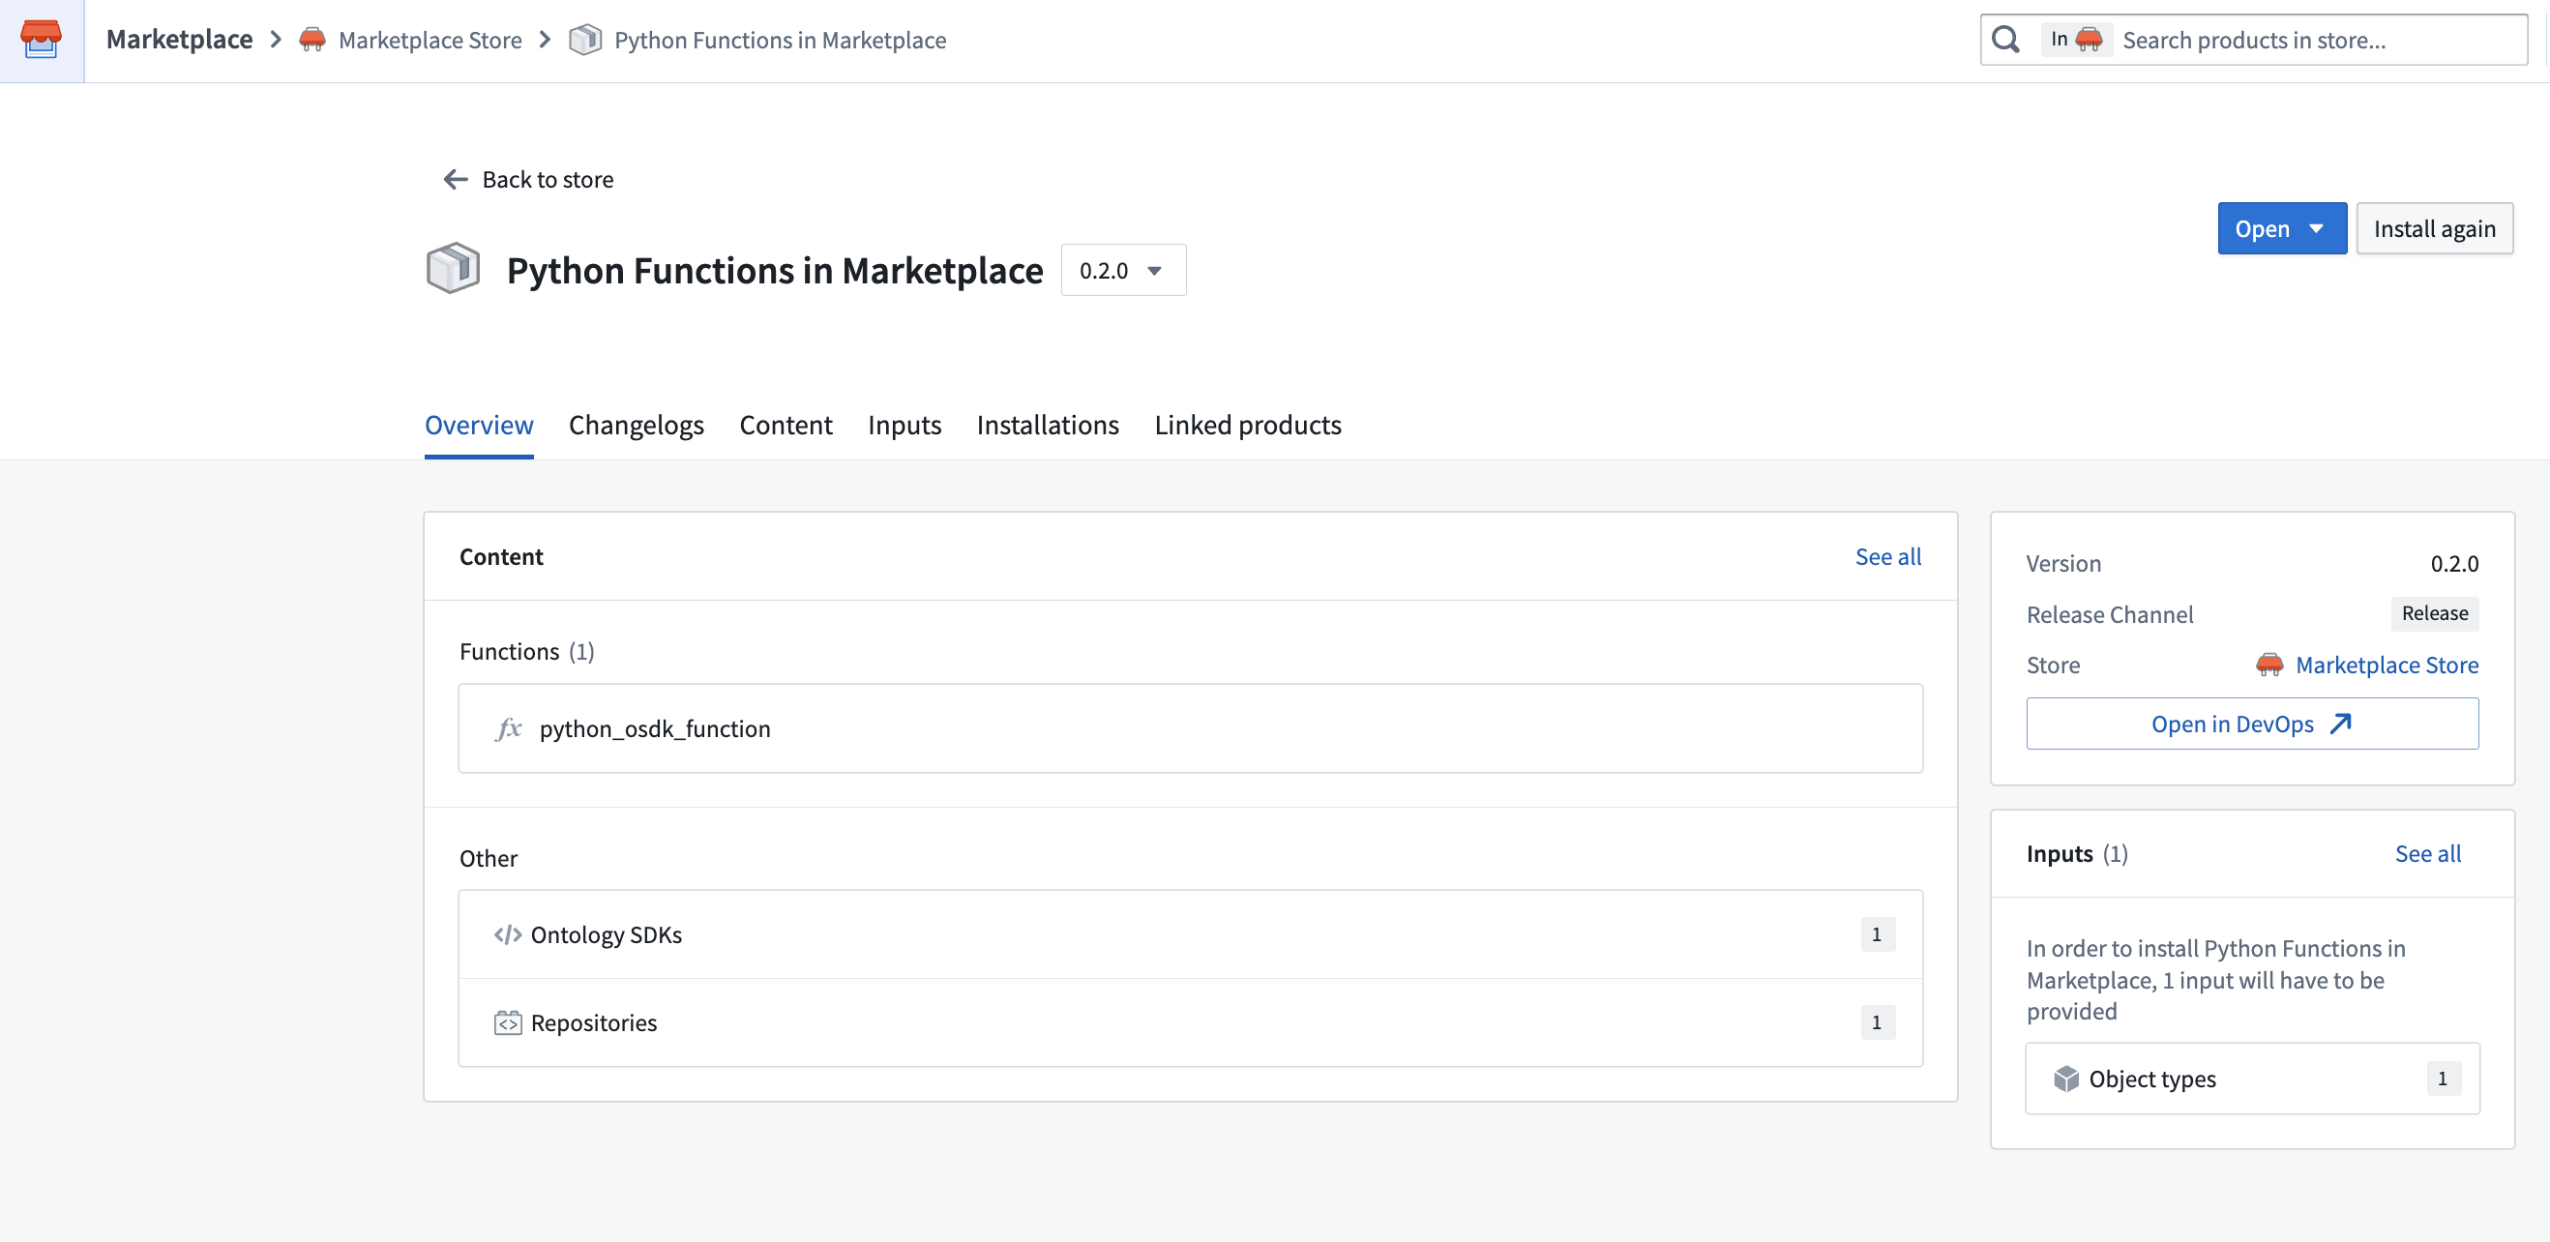
Packaging a Python function that uses an OSDK in a Marketplace product.
When you add a function that uses an OSDK to a Marketplace product, that function’s OSDKs will be automatically added for you. Additionally, all ontology entities used in your OSDK will be added as inputs. When you install your Marketplace product, you can reconfigure each of the entities used by your OSDK to instead reference entities in the ontology where it is being installed.
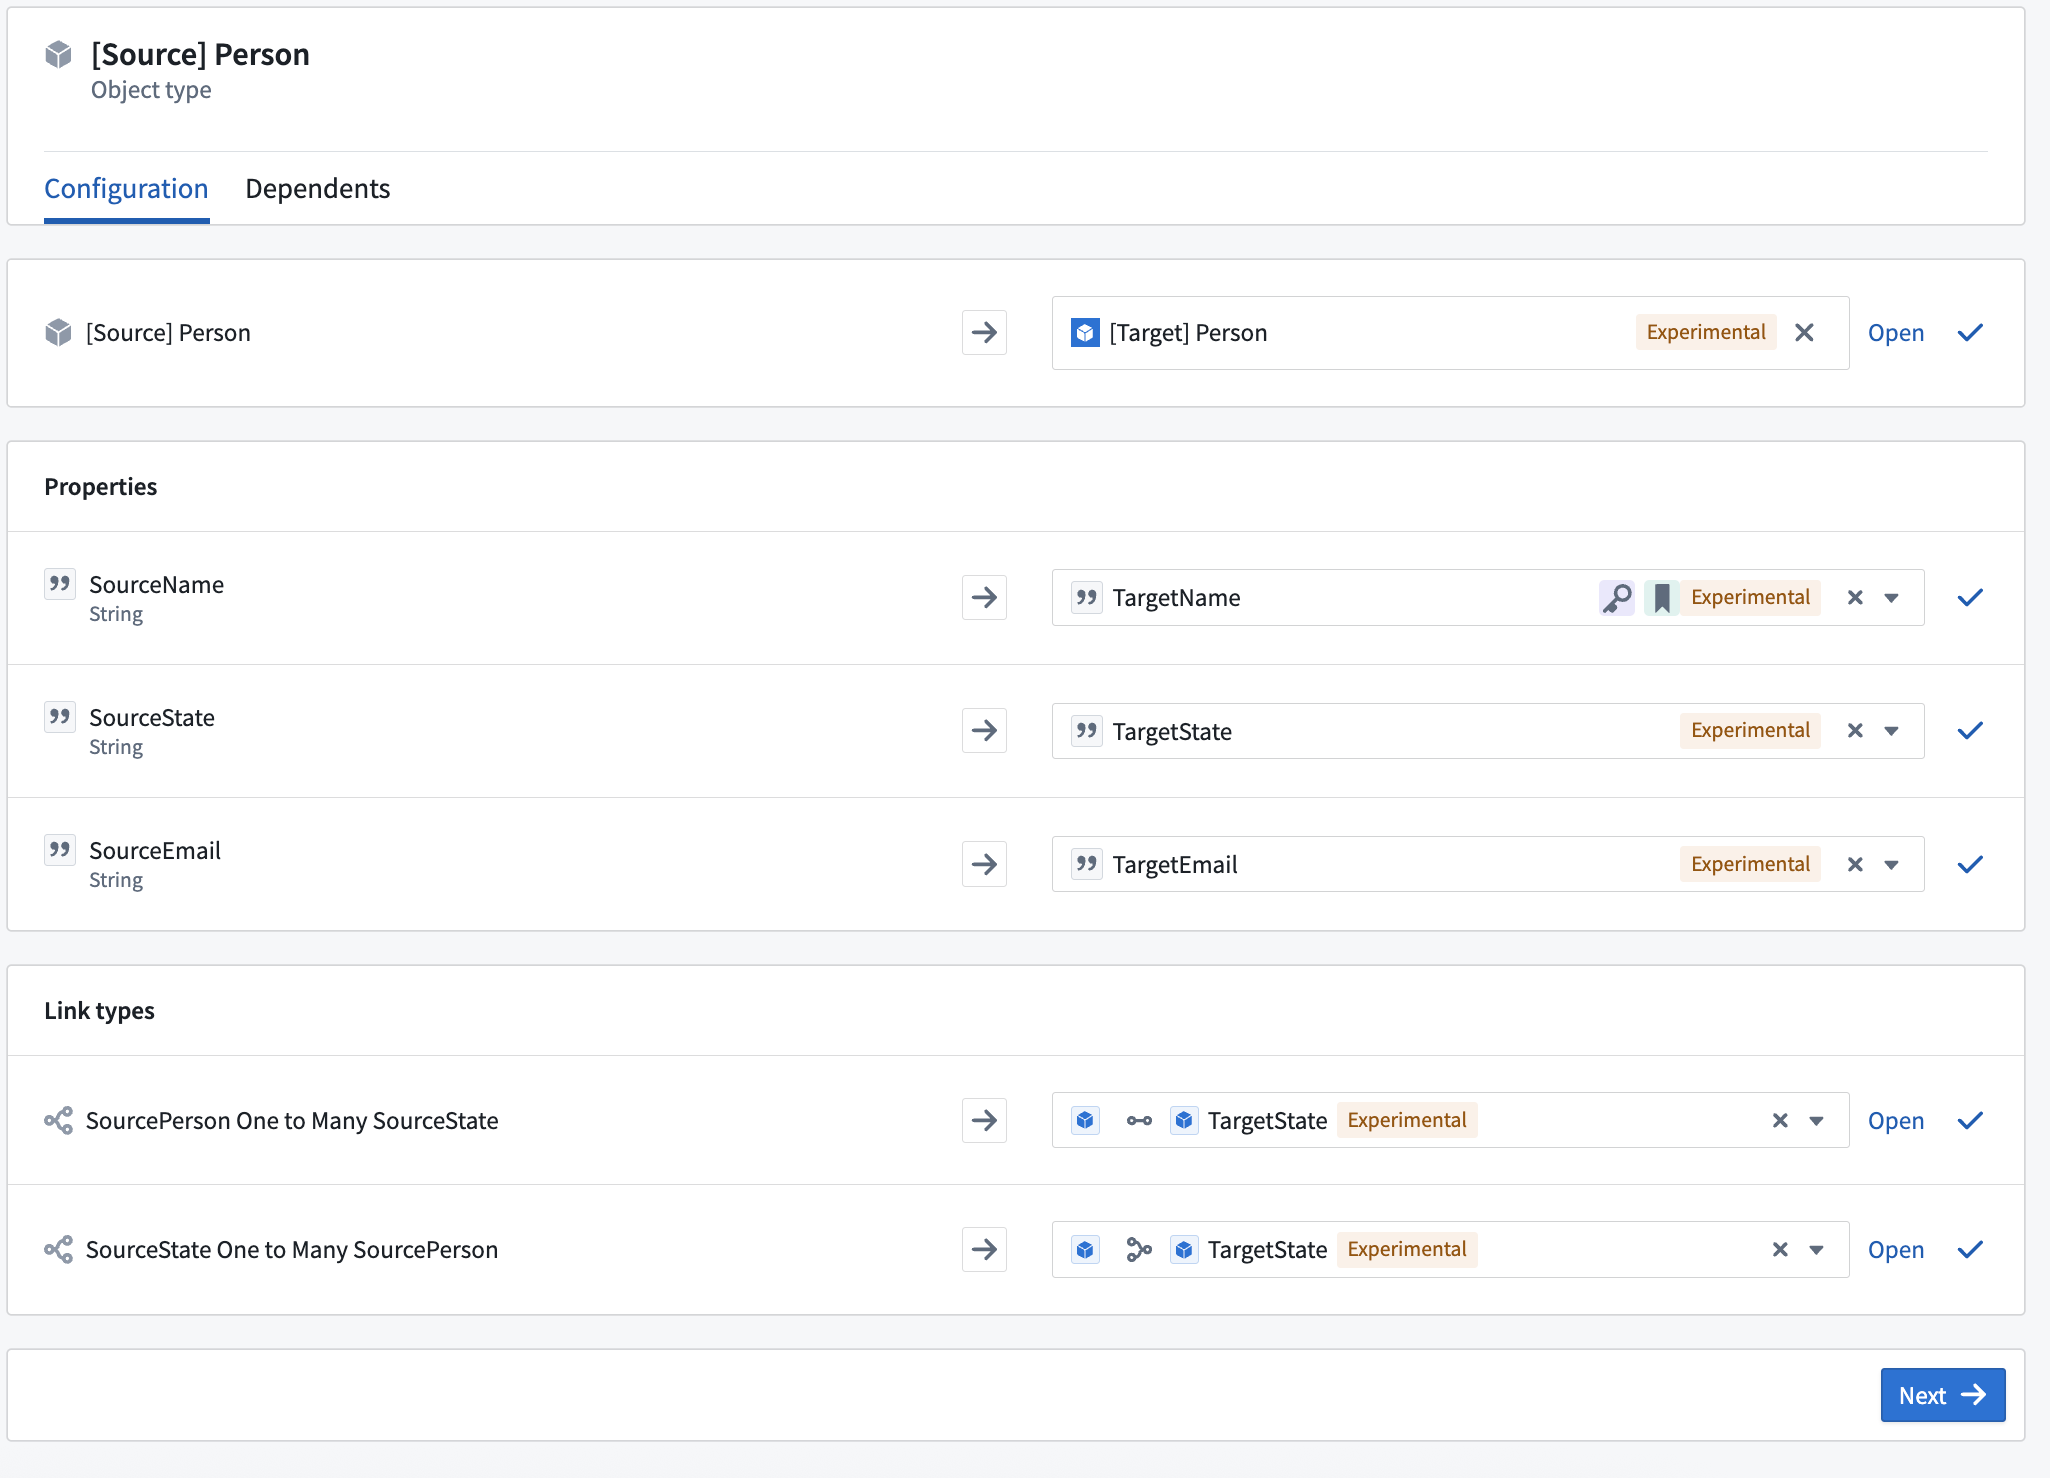
Reconfiguring an object used by an OSDK when installing a Marketplace product containing a Python function.
New configuration options for deployed Python functions and consolidated settings
Date published: 2025-07-31
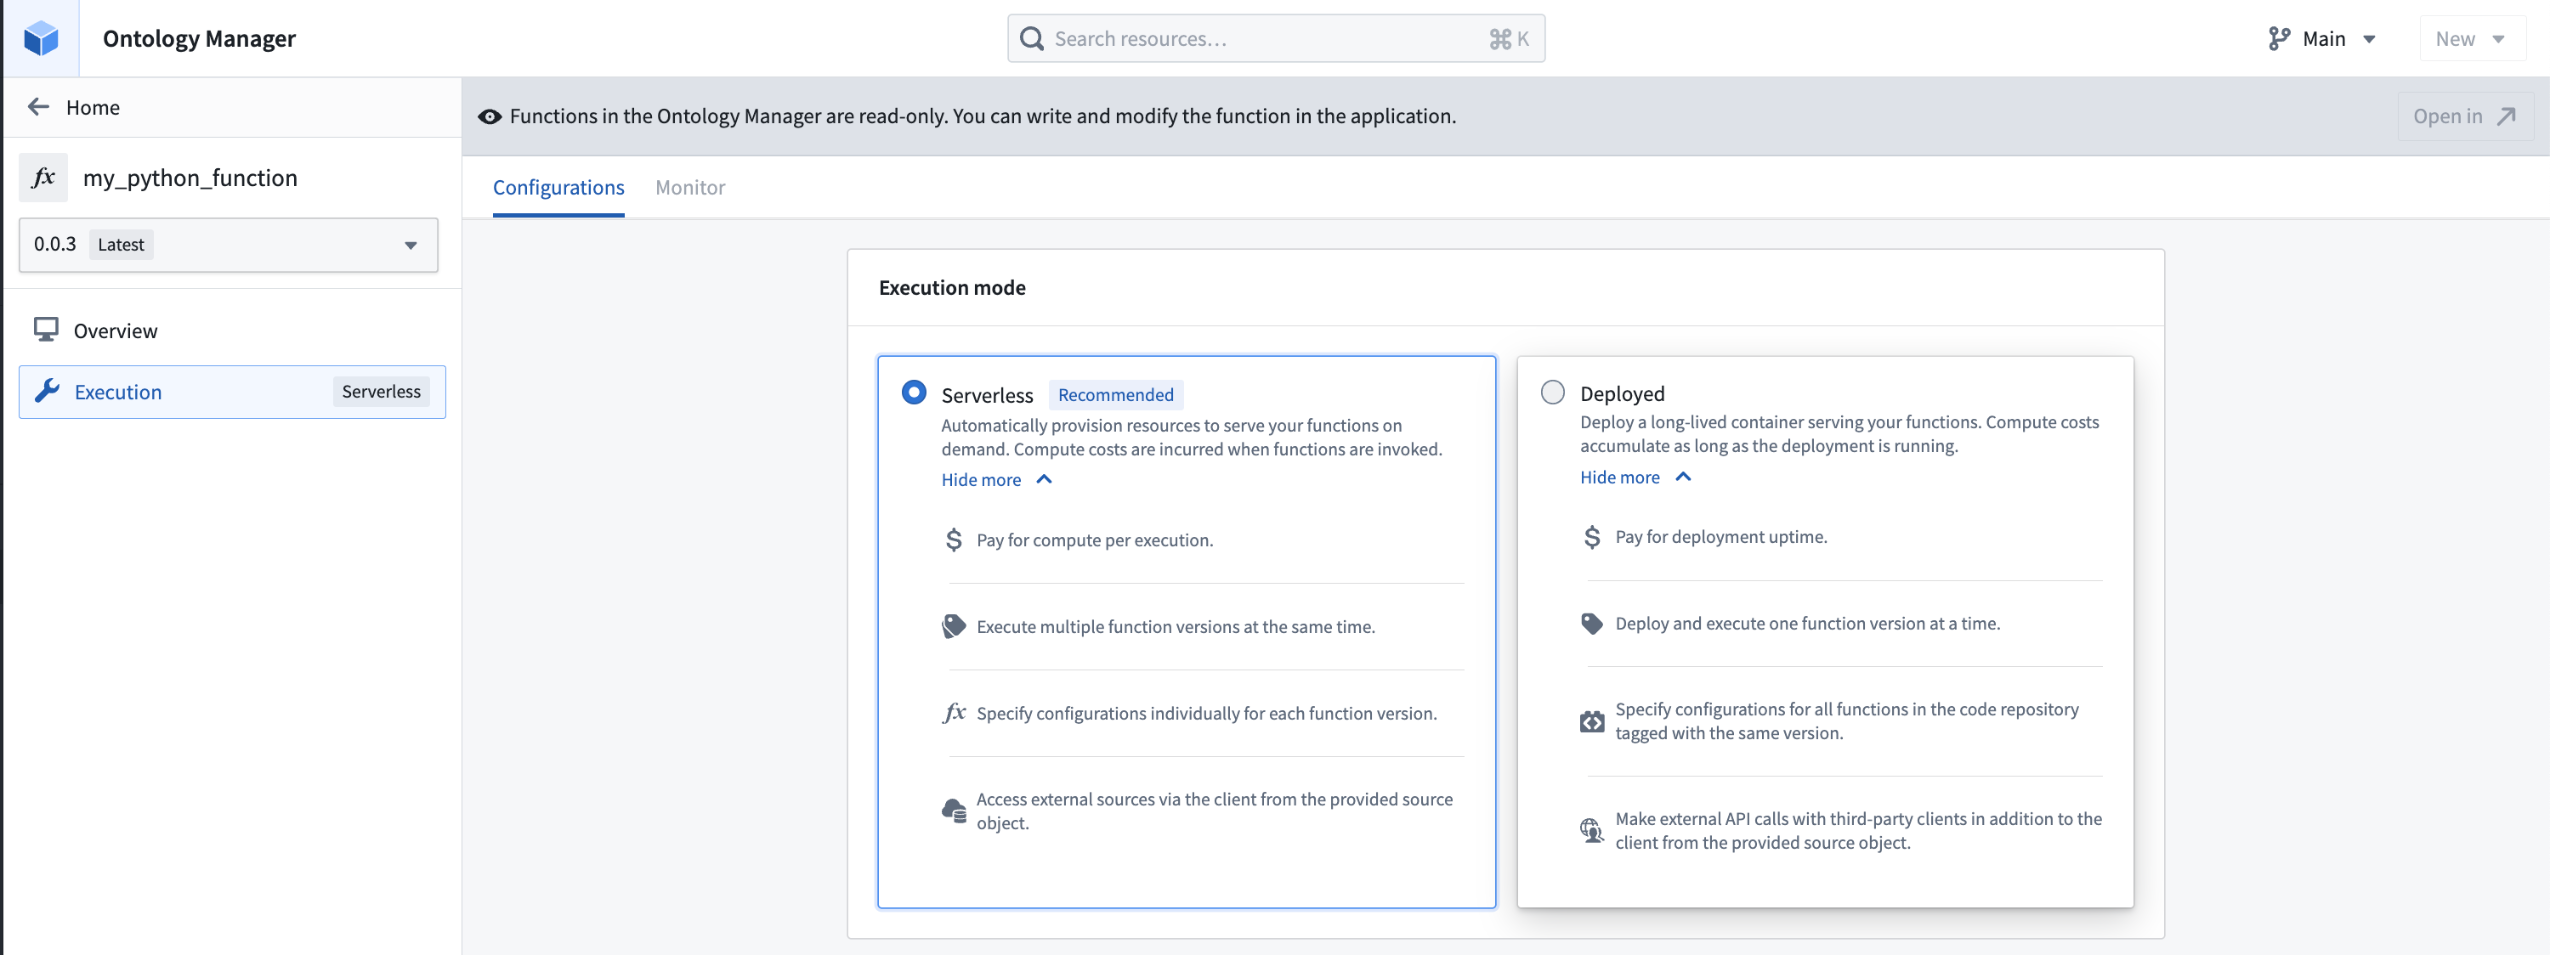
New configuration options for deployed Python functions are now available, providing increased visibility, improved usability, and an improved transition process for zero-downtime upgrades. This update allows users to allocate GPU resources for deployed Python functions, accelerating computationally intensive model training and inference workflows through parallel processing. Access these and other Python function deployment settings in Ontology Manager's new Execution page, which combines the previous Deployment and Configuration pages.
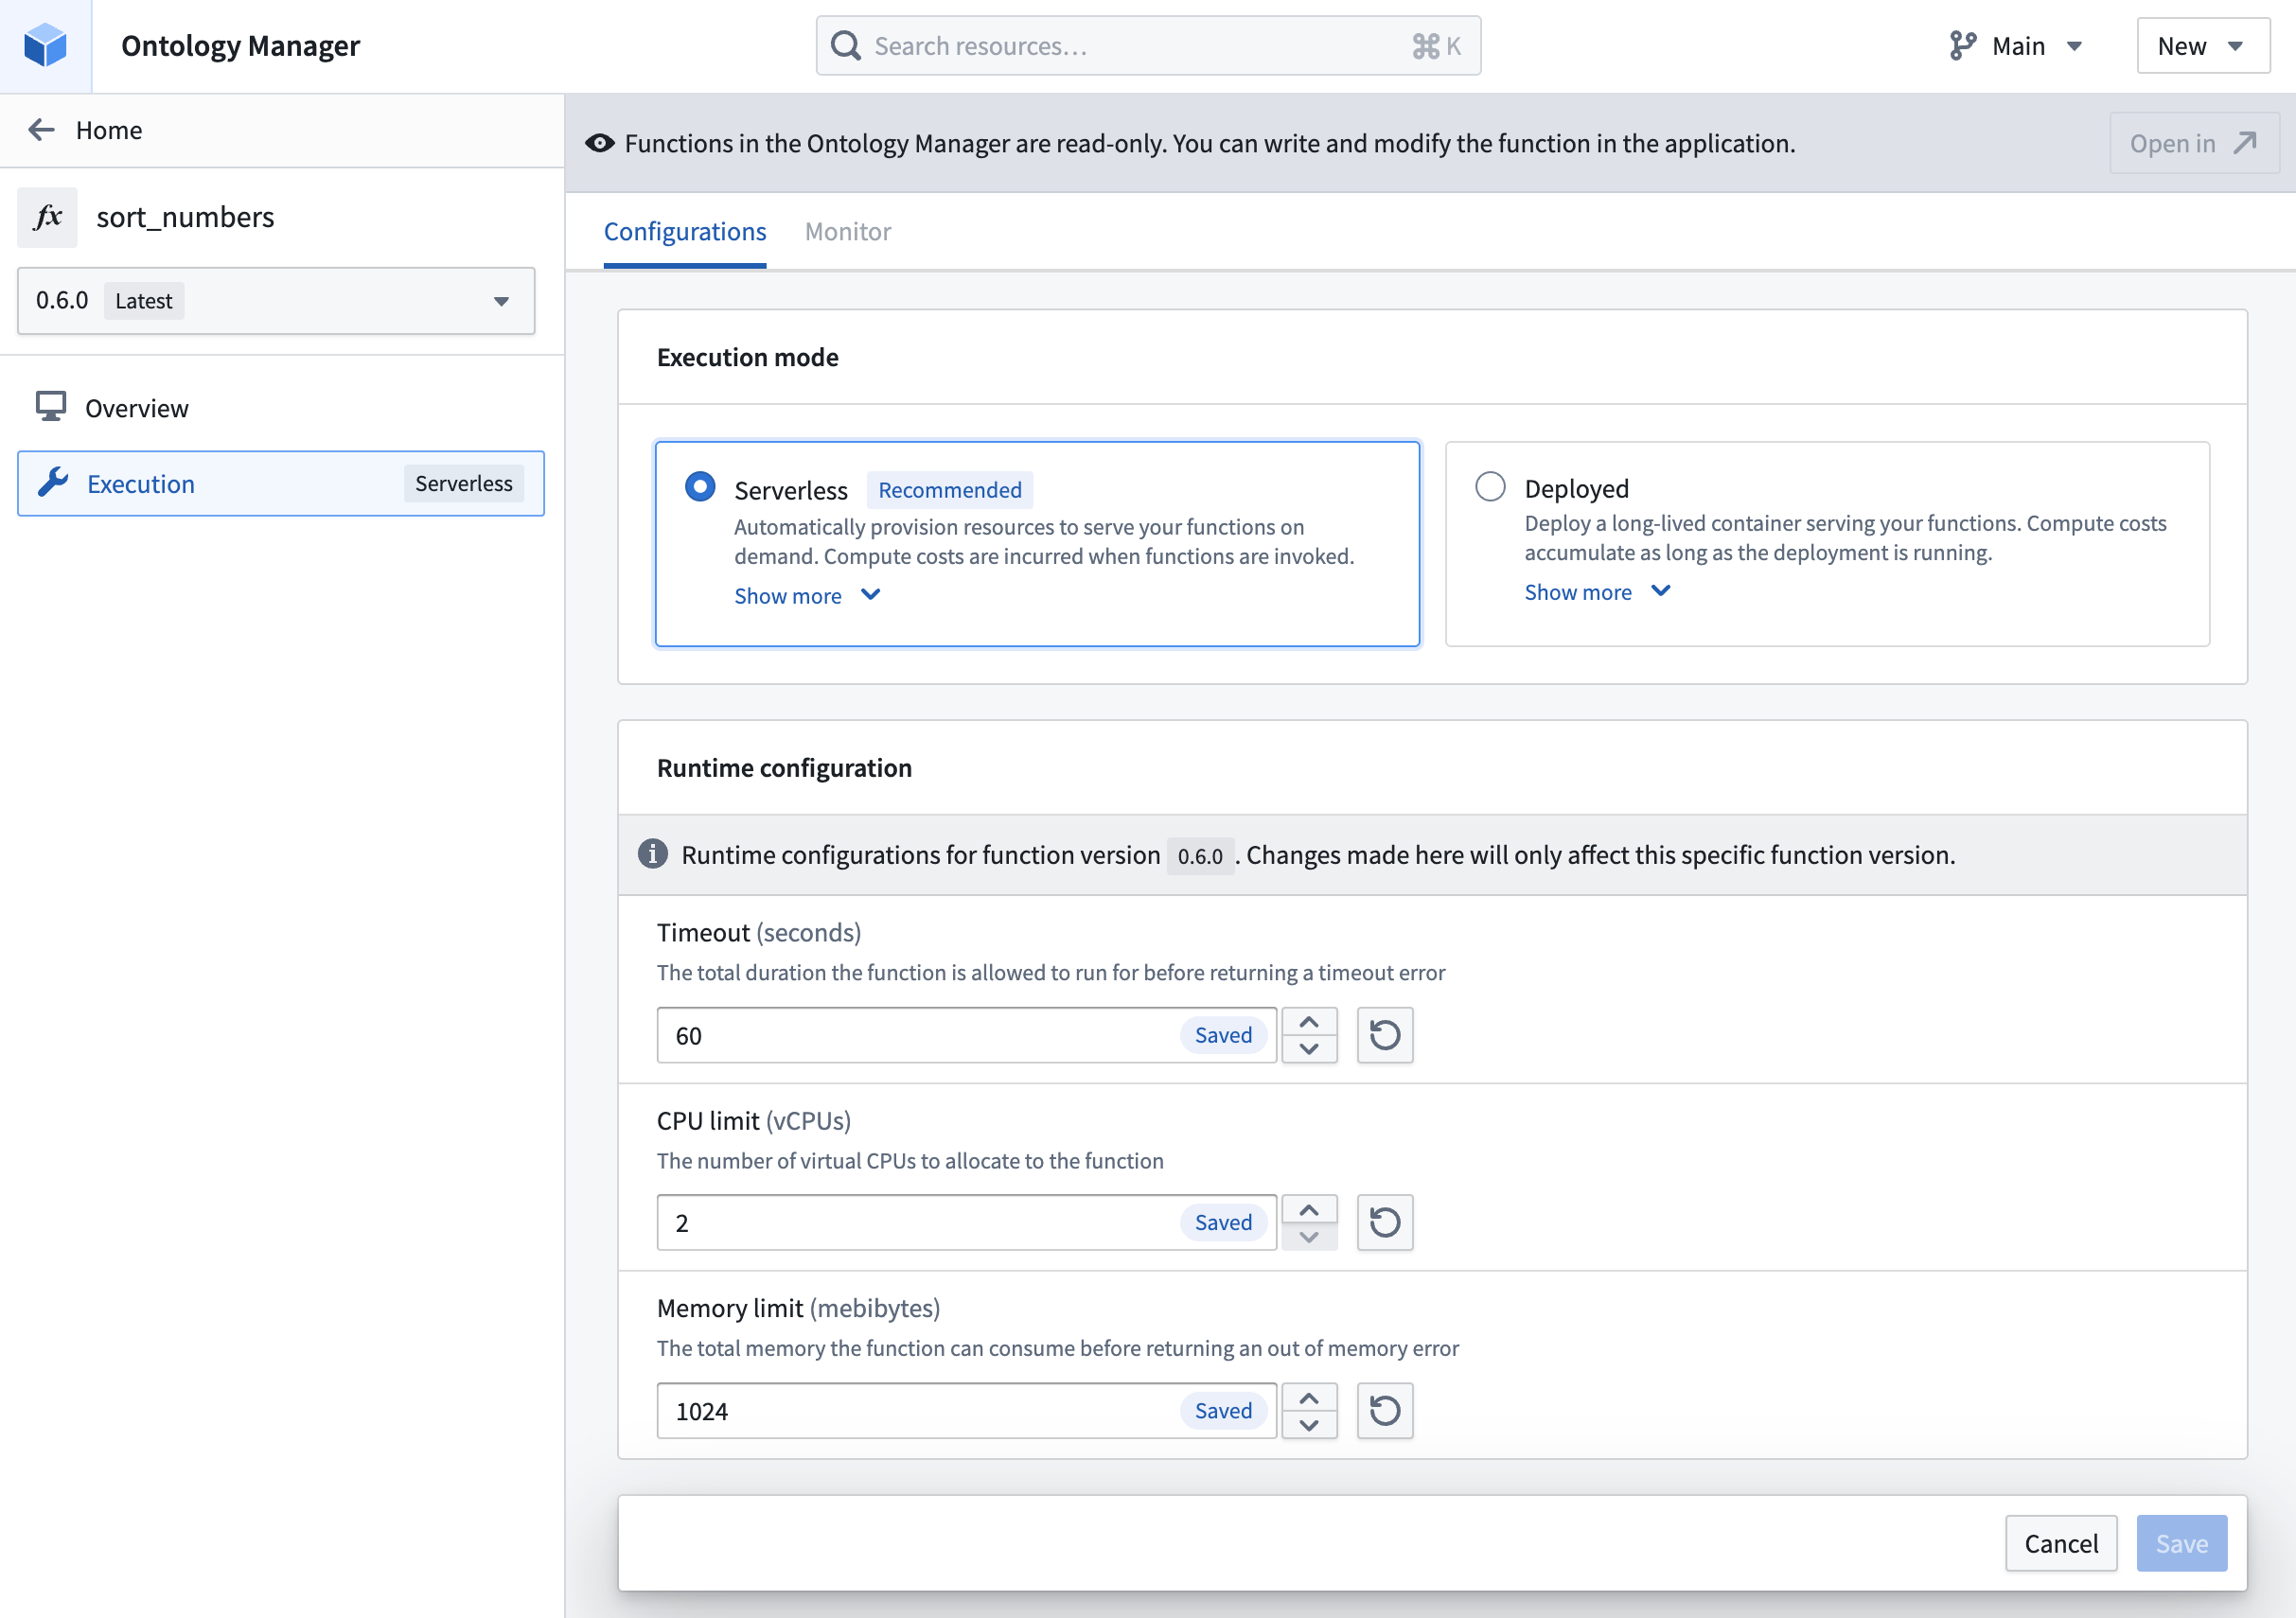
Modify timeout, CPU limit, and memory limit for functions in serverless mode.
Deployment options
- Compute resources: Specify CPU, GPU, and memory resources for the deployment. In addition to the requested amount, you can also specify the limit for CPU and memory resources.
- Horizontal autoscaling parameters: Specify the minimum and maximum limit for the number of replicas that can be launched for the deployment, ensuring effective use of compute resources based on demand.
- Environment variables: Specify environment variables for the deployment upon startup.
- Execution timeout: The total duration that the function is allowed to run before returning a timeout error. Unlike the other deployment settings, execution timeout is configured individually for each function version.
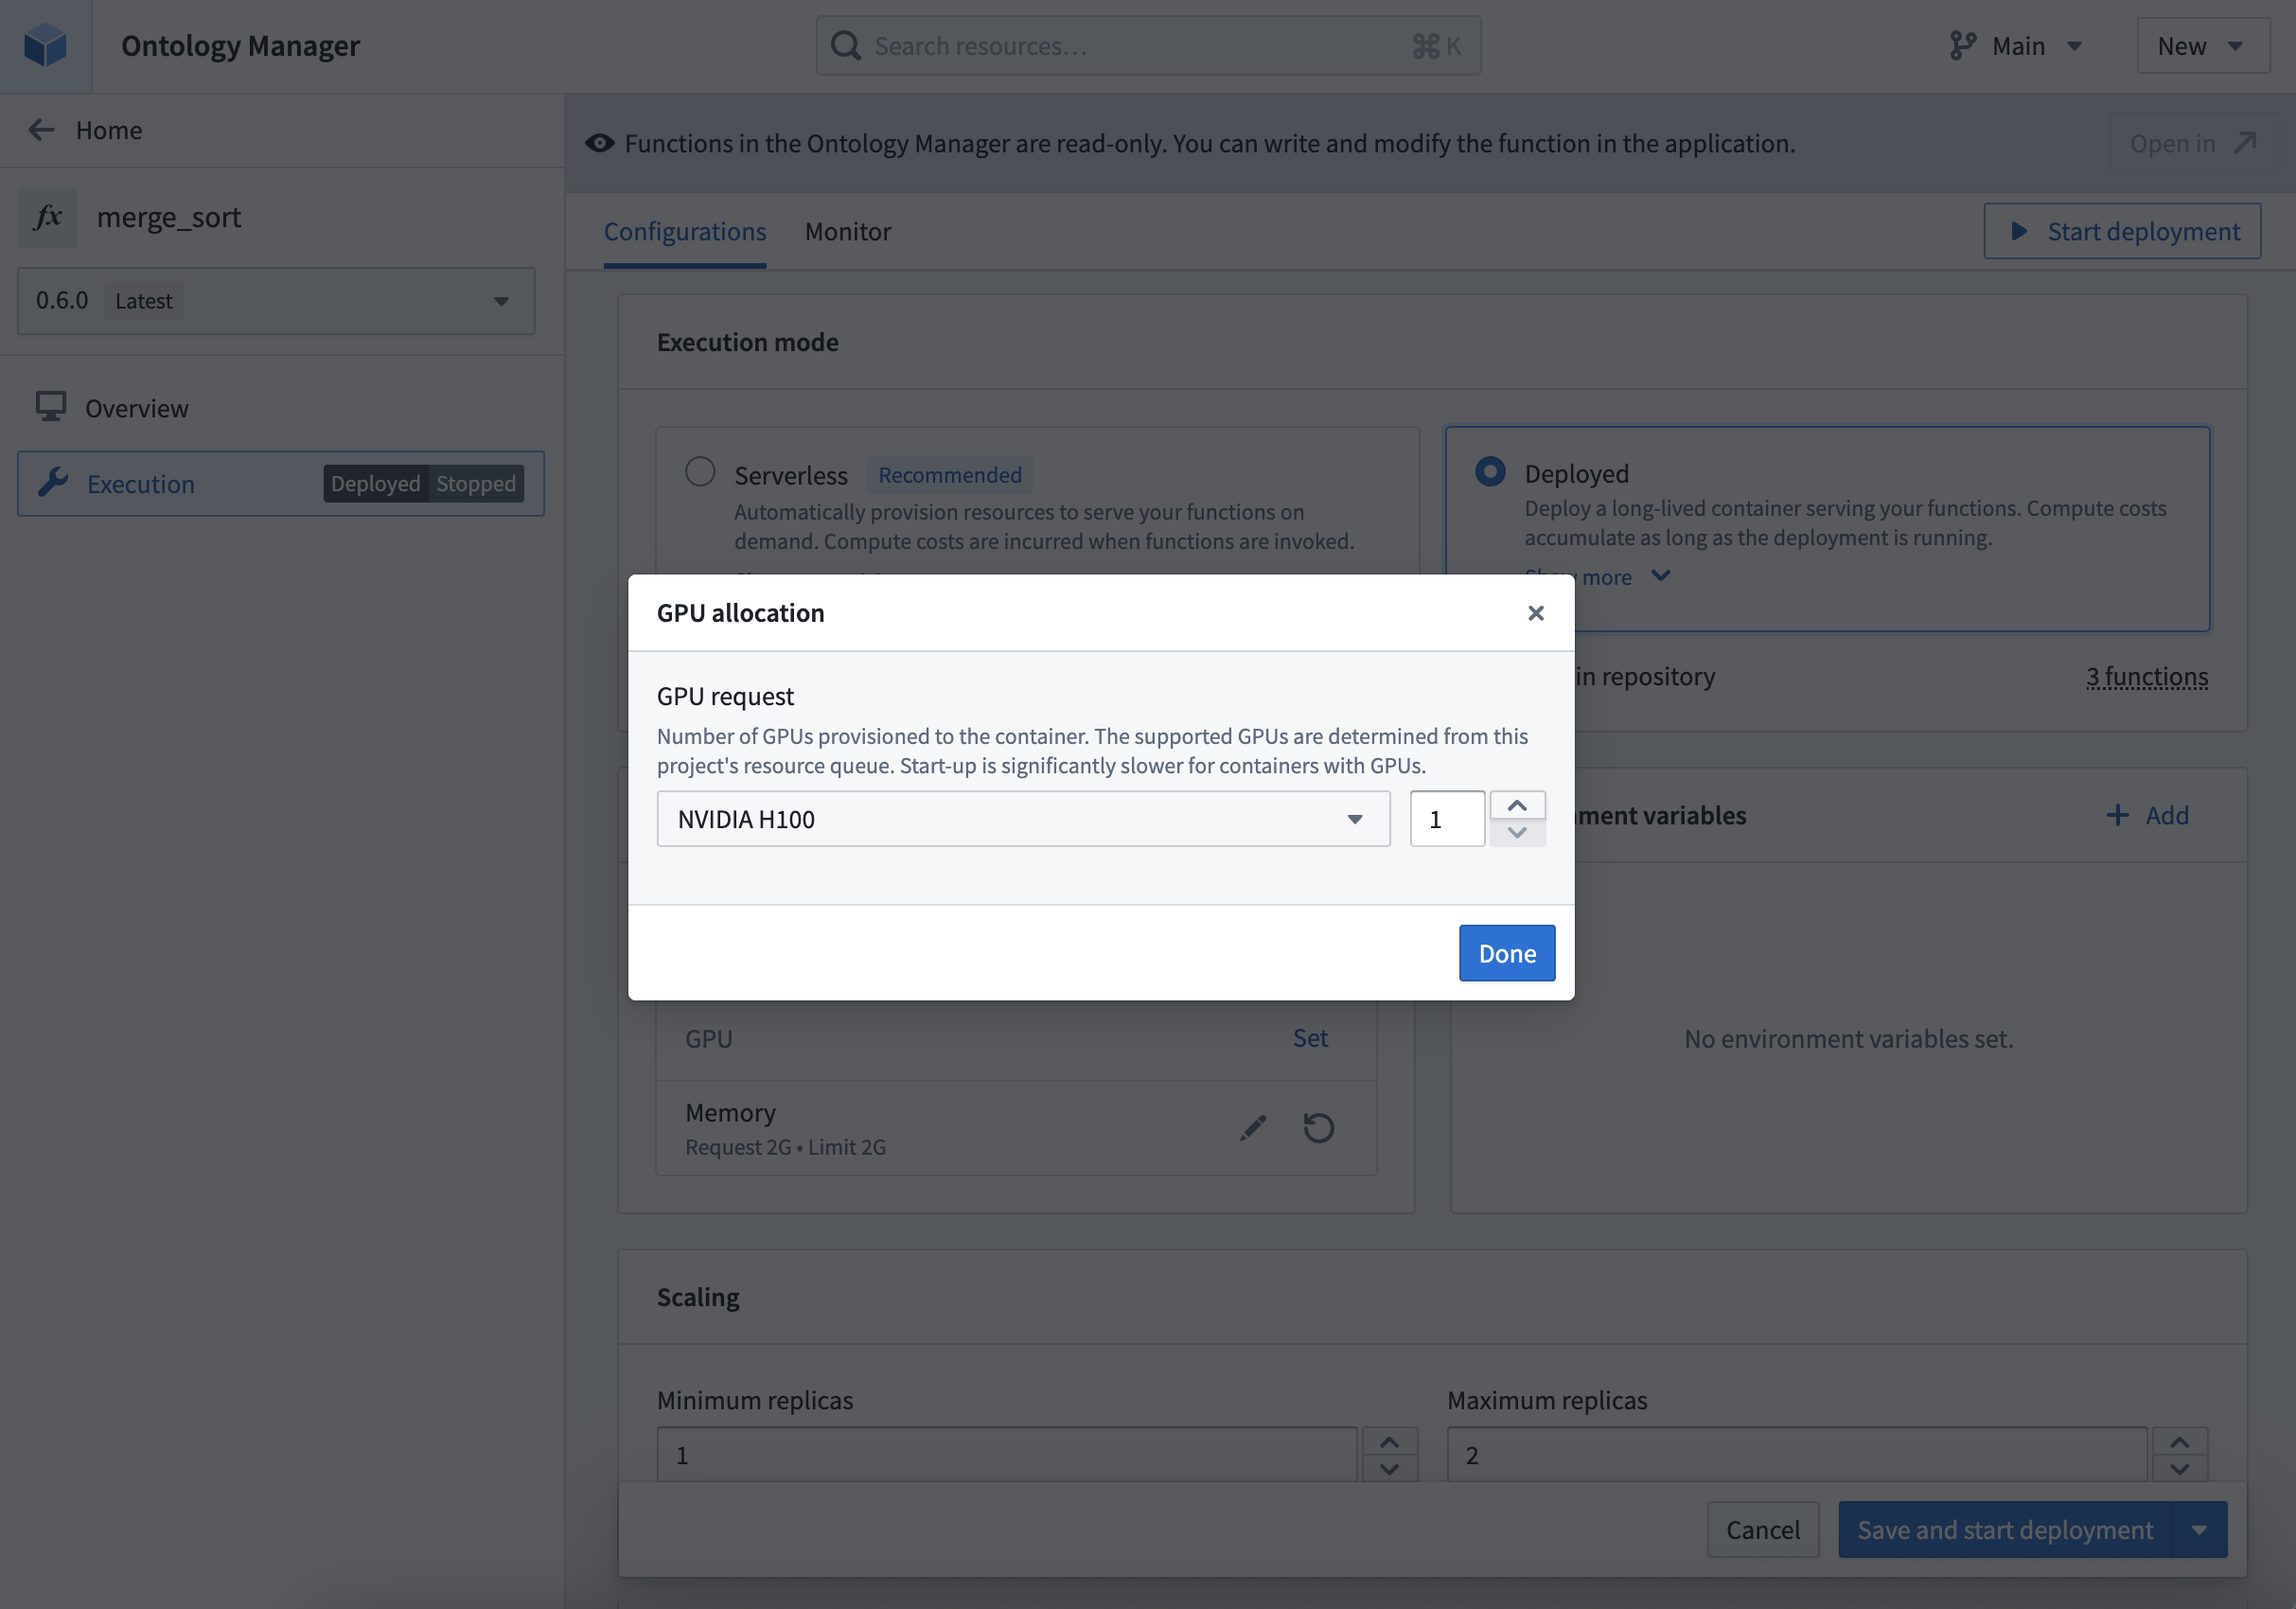
Allocate GPUs based on availability in the project's resource queue.
Get started
To get started, review the step-by-step guide to configure a Python function deployment. Refer to the documentation when deciding between deployed or serverless function execution modes.
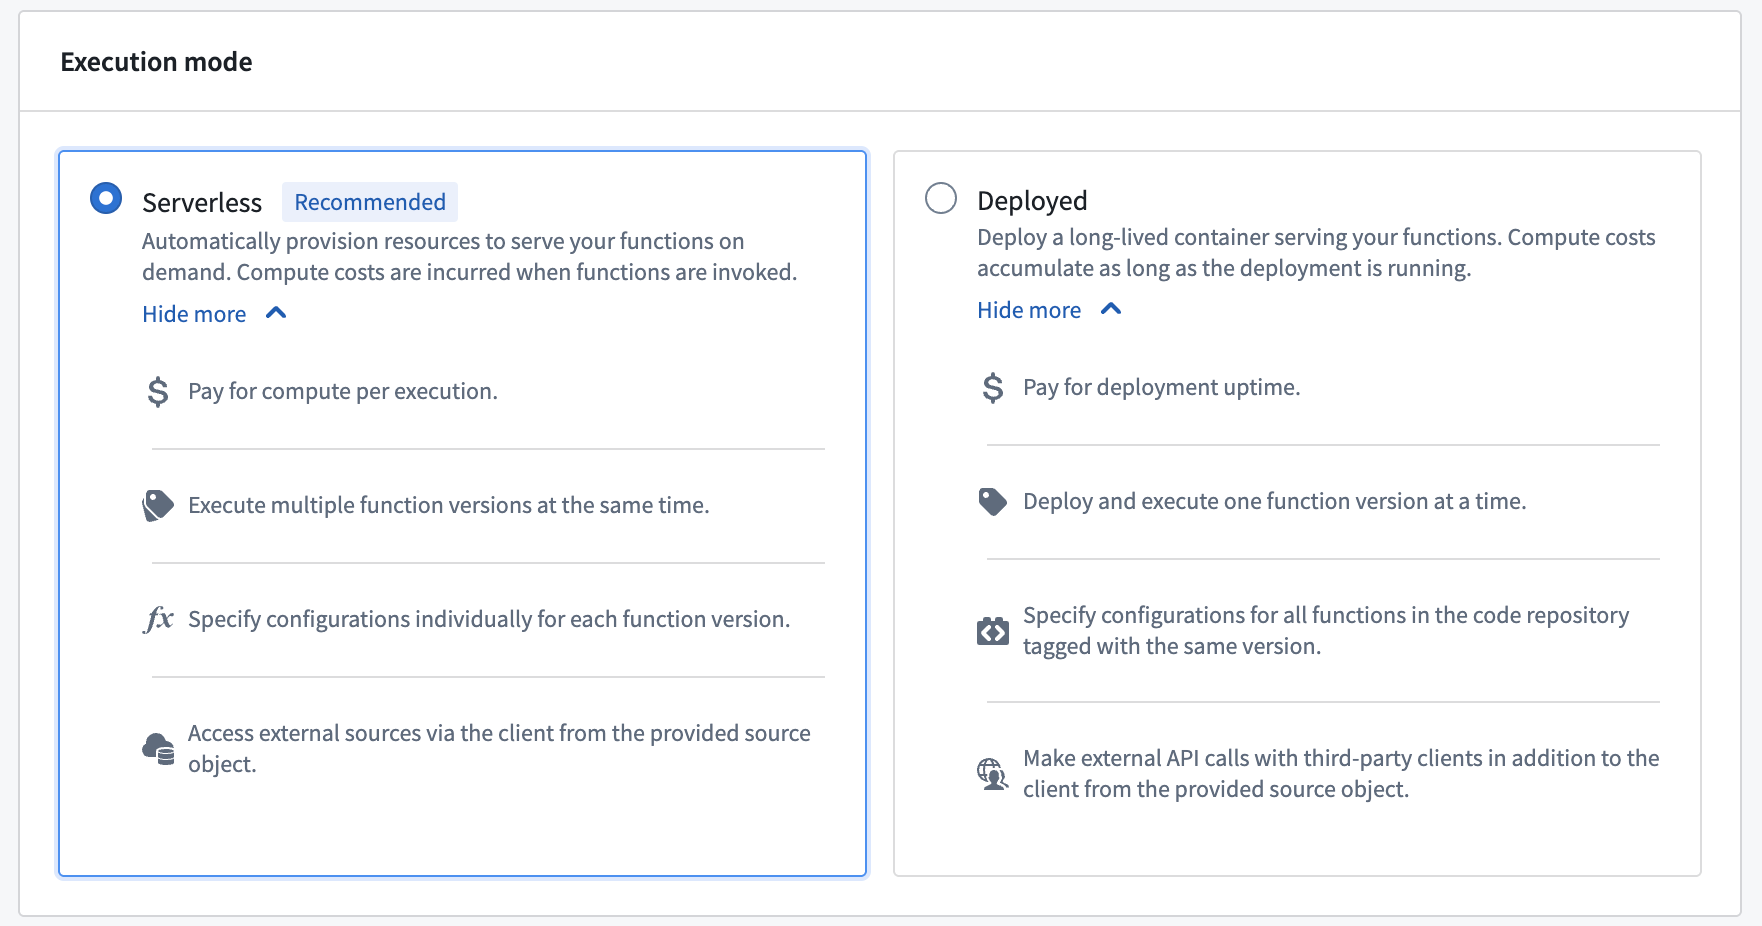
Comparison of serverless and deployed execution modes.
What's next?
We are working on supporting the capability to configure deployments for TypeScript v2 functions. As we continue to improve function execution mode capabilities, we want to hear about your experiences and welcome your feedback. Share your thoughts with Palantir Support channels, or on our Developer Community ↗ using the functions tag ↗.
Track freshness of object data with Workshop's Data Freshness widget
Date published: 2025-07-31
Workshop users can now easily track the freshness of data directly within their application using the new Data Freshness widget. This widget provides users with greater visibility into the state of their data and allows builders to more easily catch any unexpected staleness. Builders may select the object types and backing datasources they wish to display using the widget. The Last updated timestamp shown next to each object type and datasource corresponds to when the object type or datasource was last indexed.
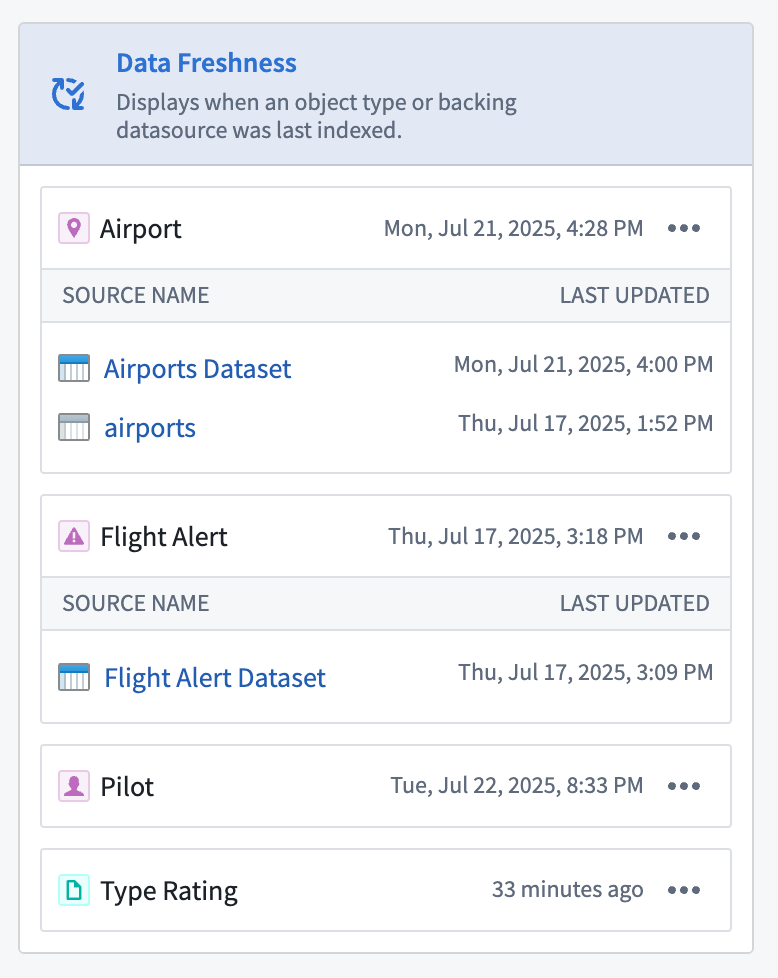
The Data Freshness widget shows when an object type and data source was last updated .
Refer to the Data Freshness widget documentation to learn more about configuring the widget.
Your feedback matters
We want to hear about your experiences with Workshop, and welcome your feedback. Share your thoughts with Palantir Support channels or on our Developer Community ↗ using the workshop ↗ tag.
Looping over arrays of structs and embedded module creation from loop layout configuration in Workshop
Date published: 2025-07-31
Loop over arrays of structs
Workshop builders may now configure loop layouts to use arrays of structs by passing in struct array variables output from a function or via an object property. This enables more performant looping setups, especially in cases where nested looped layouts are used.
For example, a builder may configure the display of object properties by constructing an array of structs using a function and passing it into a looped section, rather than looping through each object within an object set and loading each individual object’s properties. This approach reduces the number of network calls within a module and also offers greater flexibility when displaying data in a module, allowing builders to loop over and display non-ontologized data by constructing it as an array of structs output from a function.
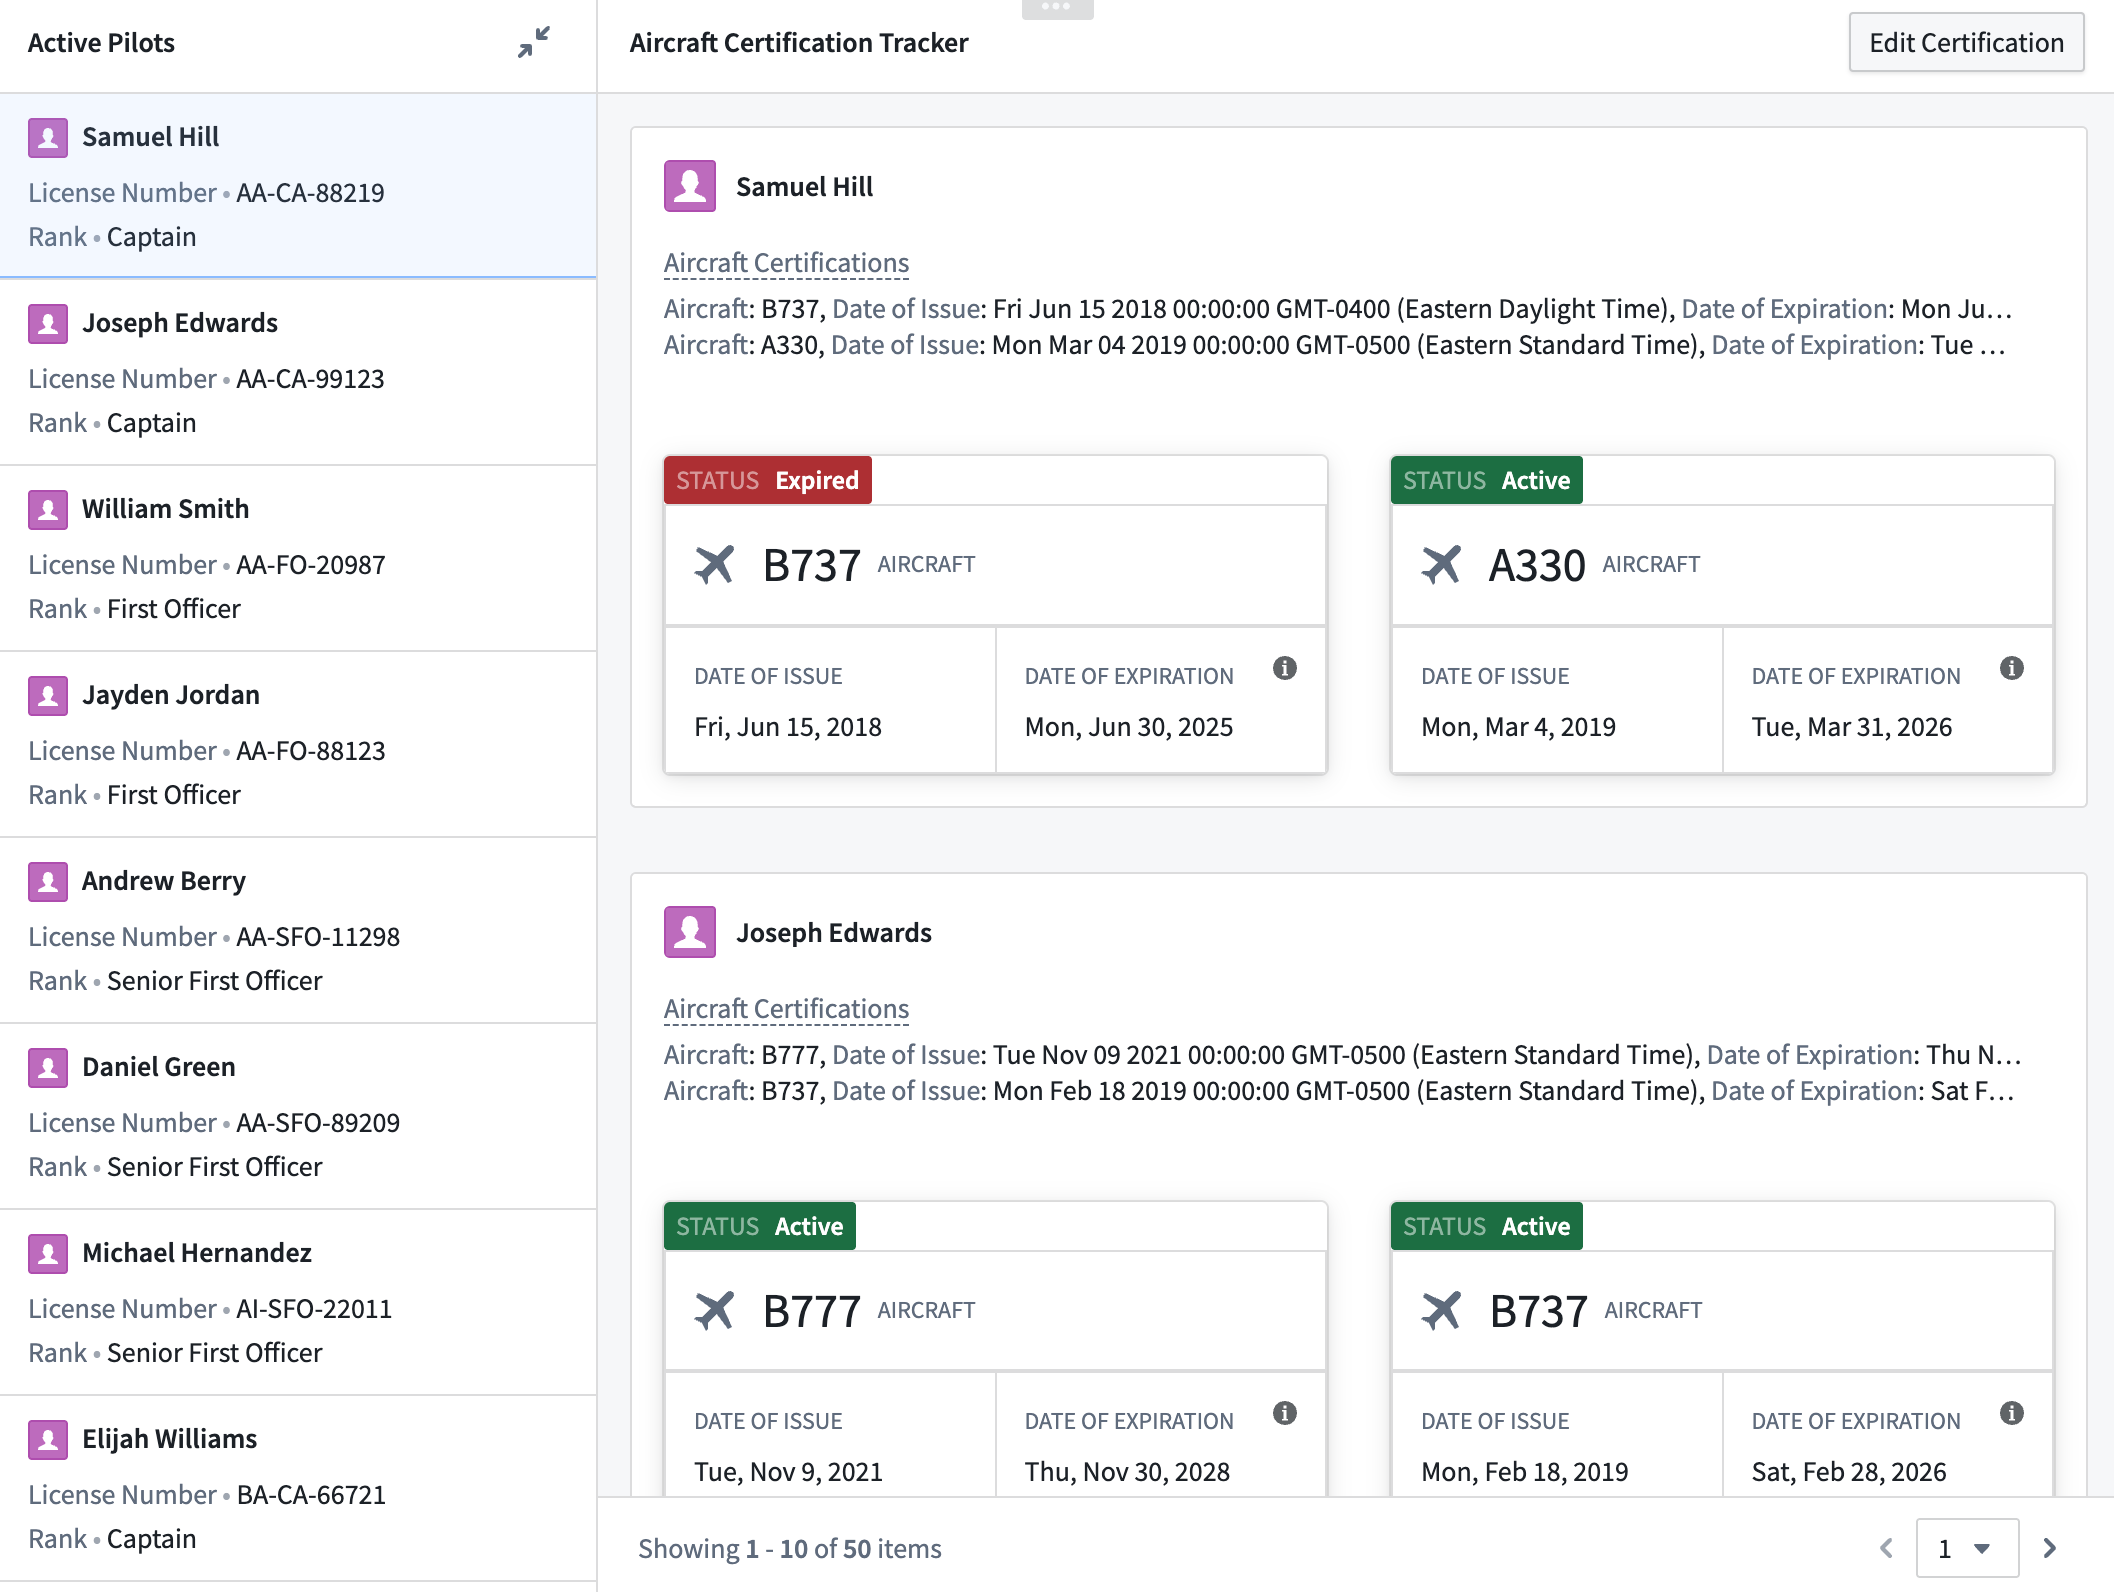
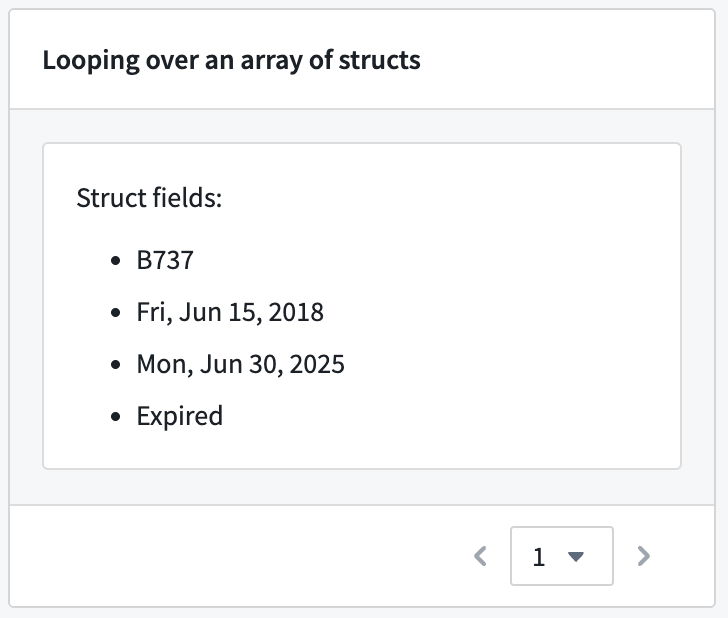
Example of a nested loop layout setup. The outer section loops over a Pilot object set displaying the array of structs typed Aircraft certification object property in a Property List widget. The inner section loops over the Aircraft certification property and displays each struct field’s value using Metric Card widgets.
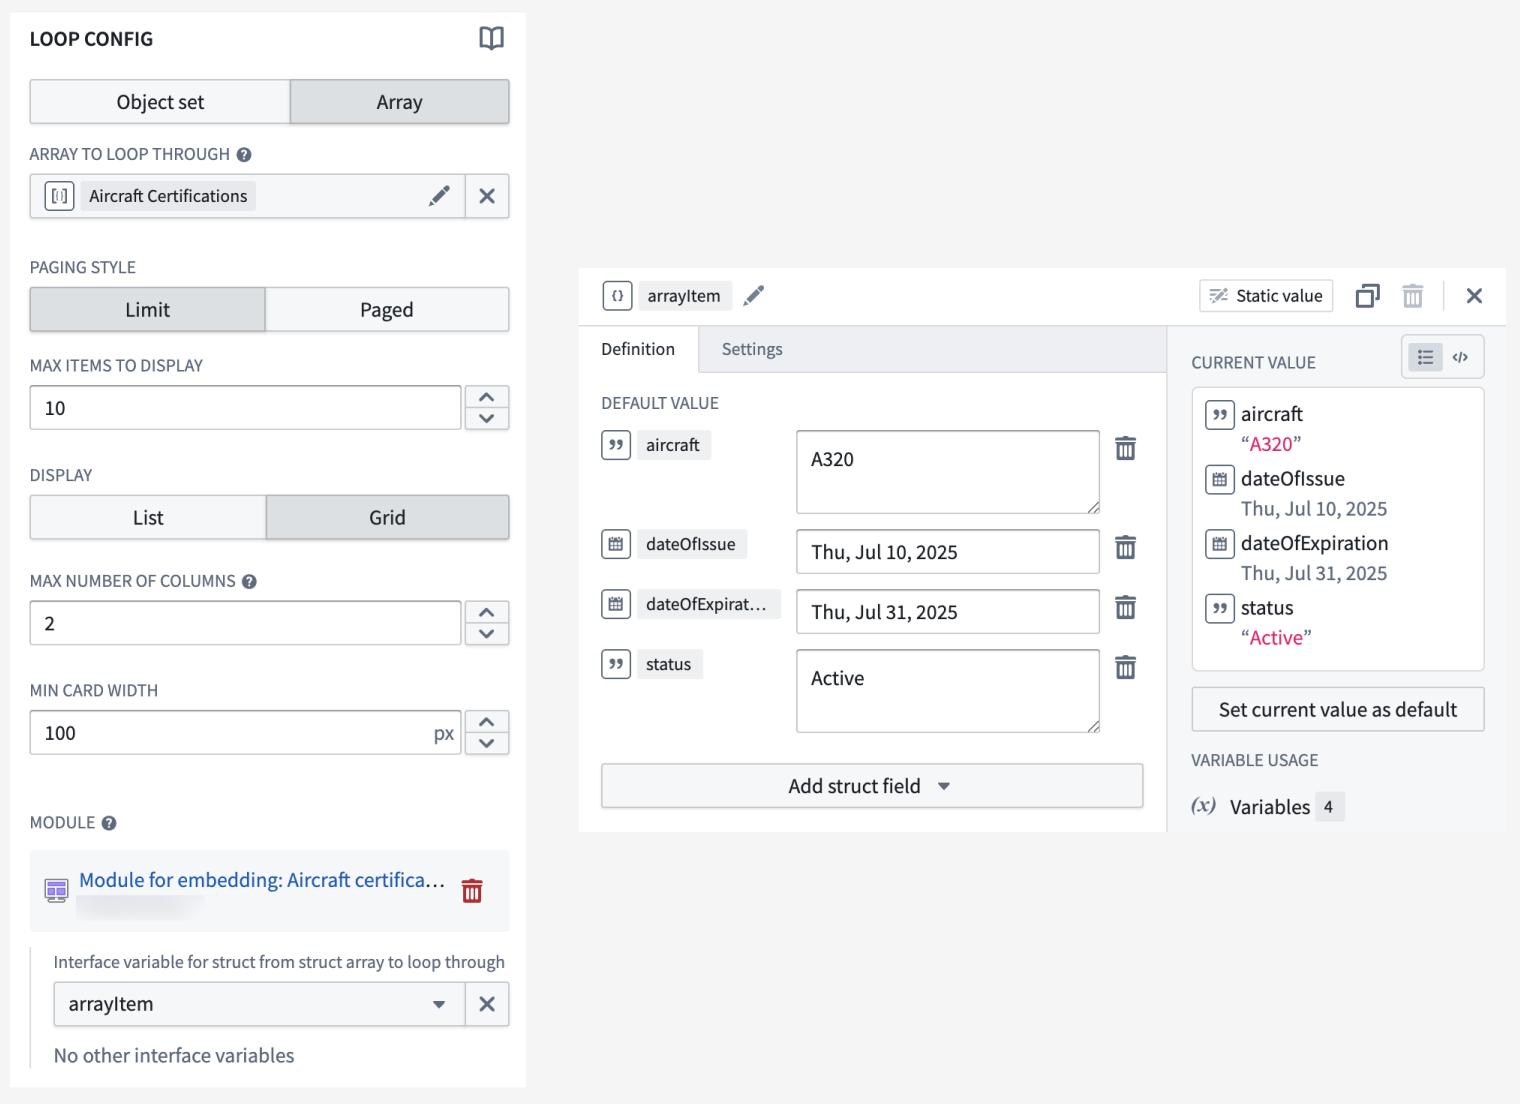
Create embedded modules from loop layout configuration
The loop layout configuration experience has been improved to allow the creation and use of an embedded module directly within the parent module. Embedded modules created using this method will feature a basic module with a preset module interface variable and a widget for display, allowing builders to quickly see their looped section in action.
Looped sections configured to use object sets will feature an Object Set Title widget, and looped sections configured to use arrays will feature a Markdown widget. When using an array of structs, the struct module interface variable will contain a predefined schema matching that of the struct item within the array, and the Markdown widget will display each field within the struct.

Section looping over an object set using an embedded module created from the parent module’s loop layout configuration.
Section looping over an array of structs using an embedded module created from the parent module’s loop layout configuration.
For more information on both features, review the documentation on struct variables and loop layout.
Your feedback matters
We want to hear about your experience with Workshop and welcome your feedback. Share your thoughts with Palantir Support channels or on our Developer Community ↗ using the workshop tag ↗.
AIP model family enablement now supported at the organization level
Date published: 2025-07-29
In AIP, enrollment administrators can enable model families for an entire enrollment. Model families represent contractual agreements with model providers for a set of models sharing the same legal and compliance status. As of this week, this capability has been expanded to support organization-level enablement on all AIP-enabled enrollments. Administrators can now grant specific organizations within the same enrollment access to a model family, while restricting others from using it.
To configure model family enablement at the organization level, go to Control Panel, and then navigate to AIP settings → Model enablement.
Similar to AIP enablement, for a project to use models from a model family, all organizations associated with the project must have that model family enabled.
For example, in the scenario shown below, only one organization, with the enrollment Test1, is provided access to AWS Bedrock Claude models. If a project’s AIP Logic resource is linked to both Test1 and Test2 enrollments, the resource will not display any AWS Bedrock Claude models, because Test2 does not have access to this model family.
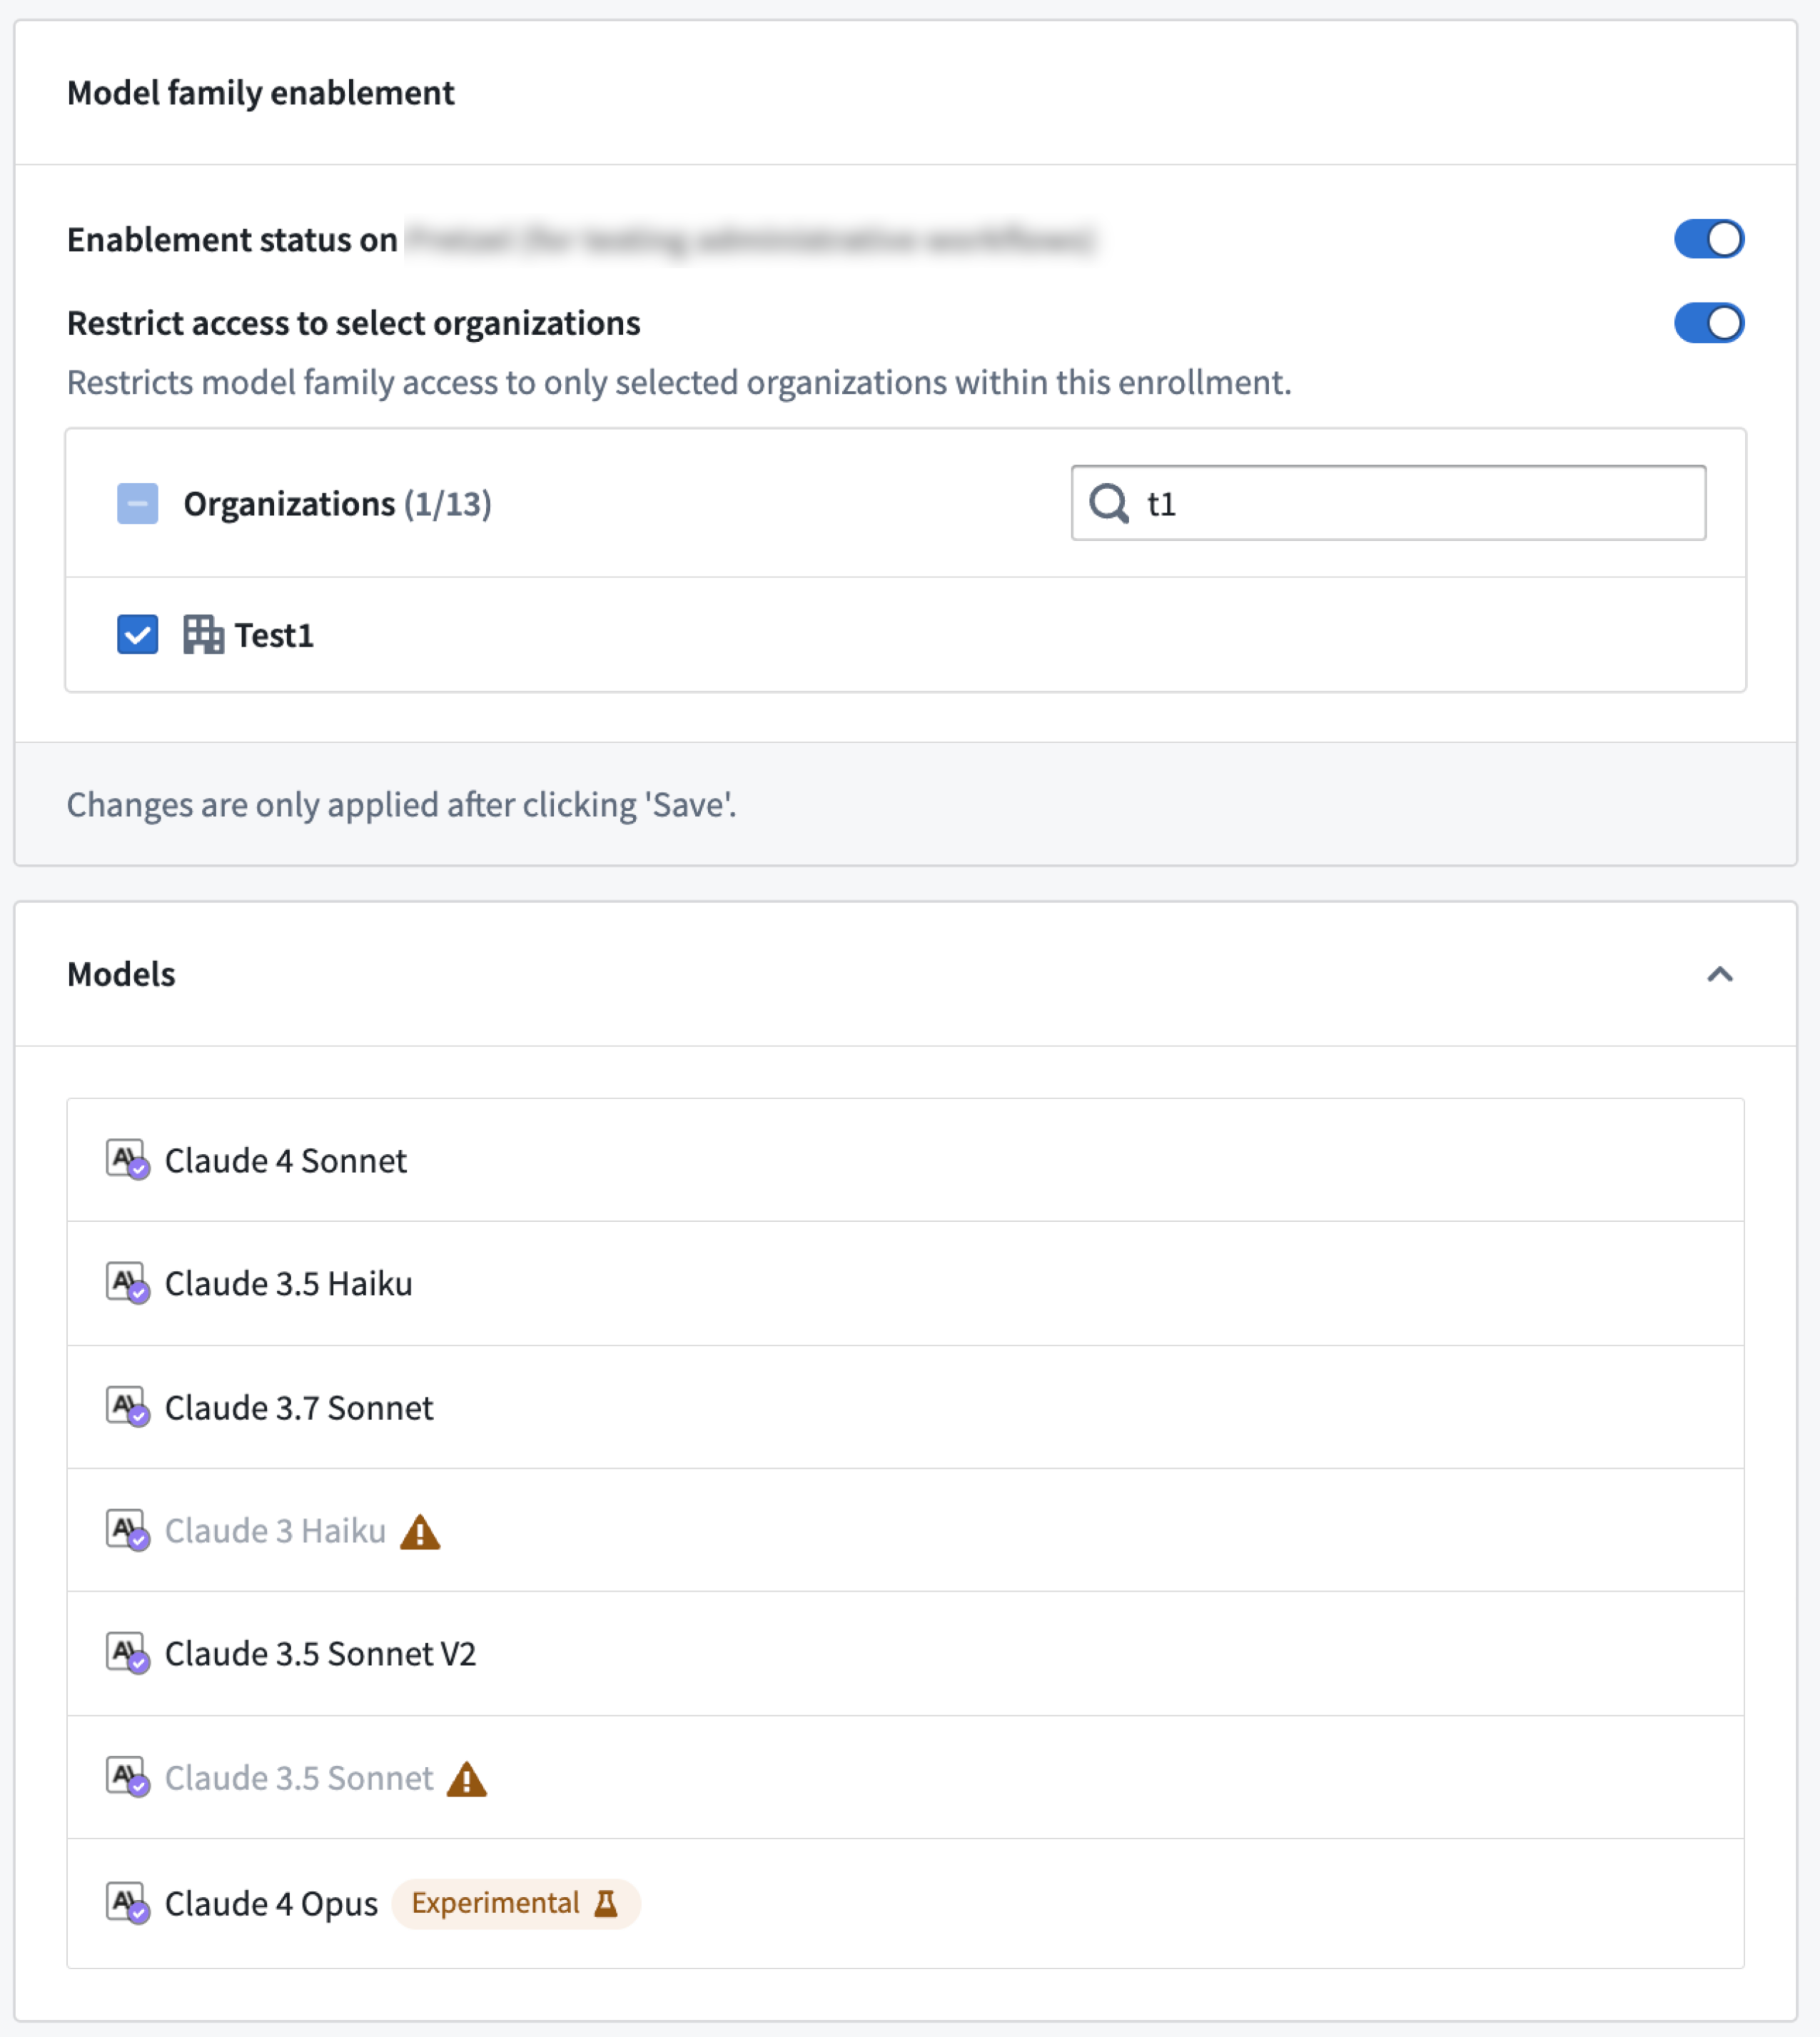
You can now restrict model family usage at the organization level in Control Panel on the AIP settings page under Model family enablement.
Review the documentation on restricting AIP usage through organizations for additional information.
Lightweight pipelines now available in Pipeline Builder
Date published: 2025-07-29
Lightweight pipelines are now available in Pipeline Builder as a beta feature, delivering faster execution for batch and incremental pipelines. This feature is particularly beneficial when working with small to medium-sized datasets. Compared to traditional Spark-based pipelines, lightweight pipelines can significantly accelerate compute processes for pipelines that typically run in under fifteen minutes.
What are lightweight pipelines?
Lightweight pipelines are powered by DataFusion ↗, an open-source query engine written in Rust.
Key features:
- Faster build times: Optimized for rapid, low-latency execution.
- Ideal for small and medium datasets: Substantial speed improvements over standard batch pipelines.
- Flexible experimentation: Easily test and compare lightweight pipelines with your existing configurations and switch back to batch in one go using the settings panel.
Get started
Lightweight pipelines are currently in beta and must be enabled for your organization. To do so, navigate to Control Panel, select your enrollment, and select All settings > Application configuration > Pipeline Builder. In the Pipeline Builder settings, toggle on Enable lightweight pipelines.
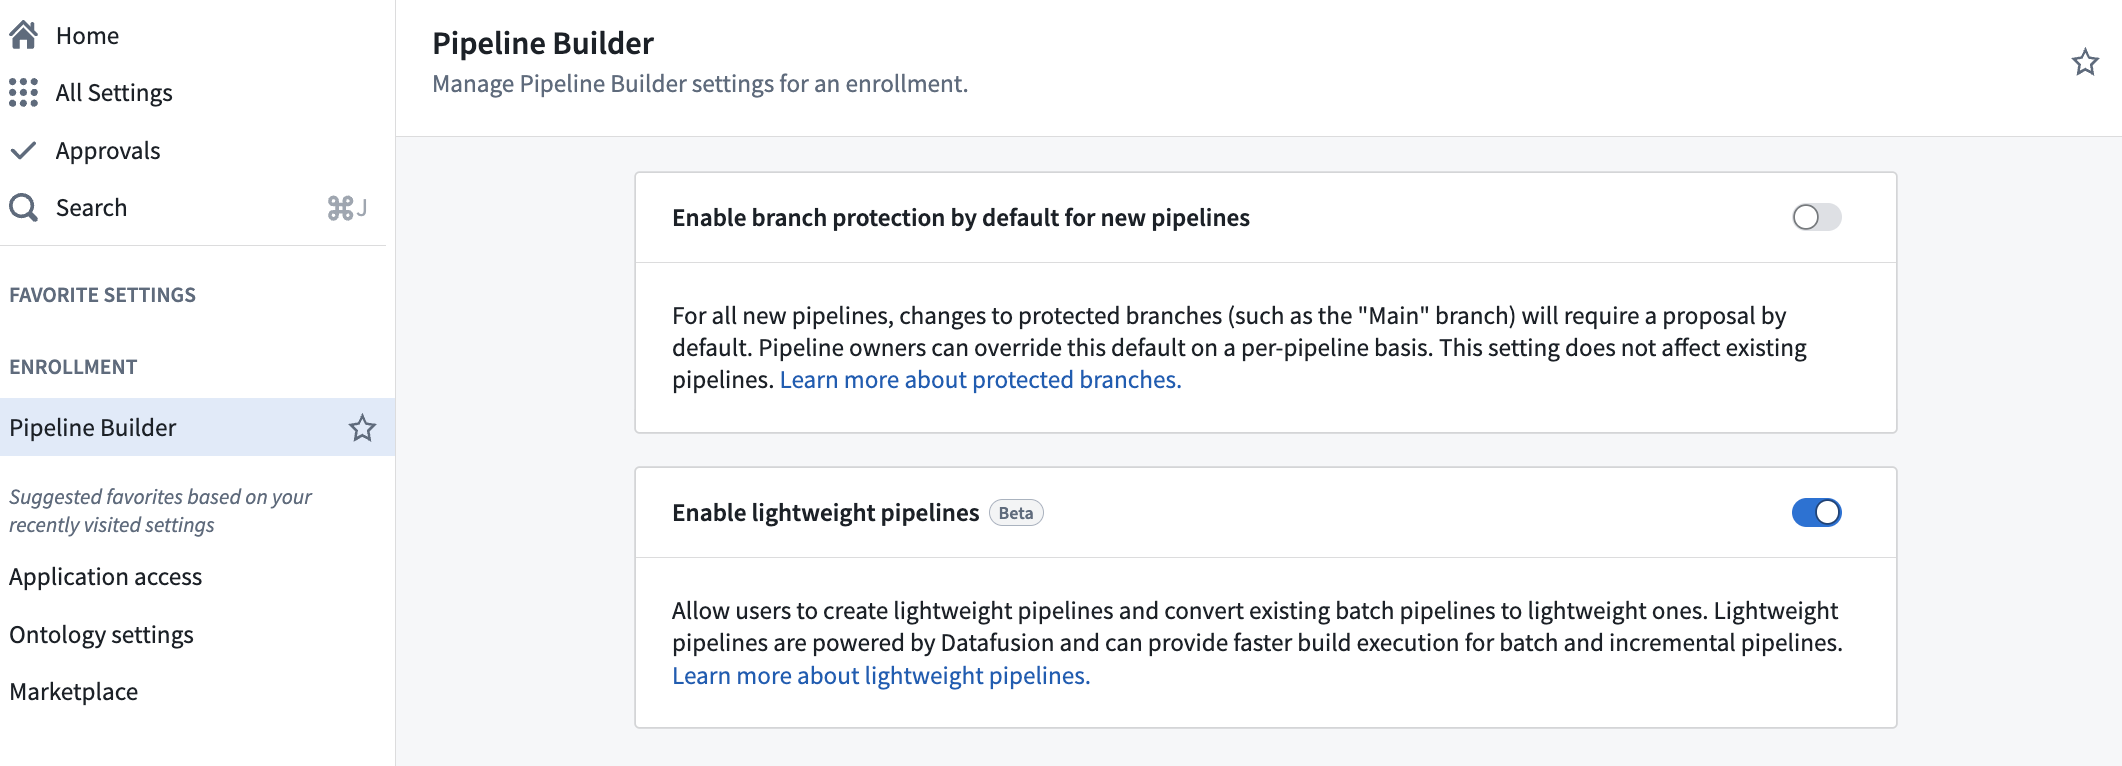
The Enable lightweight pipelines option in Control Panel.
To create a new lightweight pipeline, select Create new pipeline in Pipeline Builder, and choose the Lightweight pipeline option during configuration.
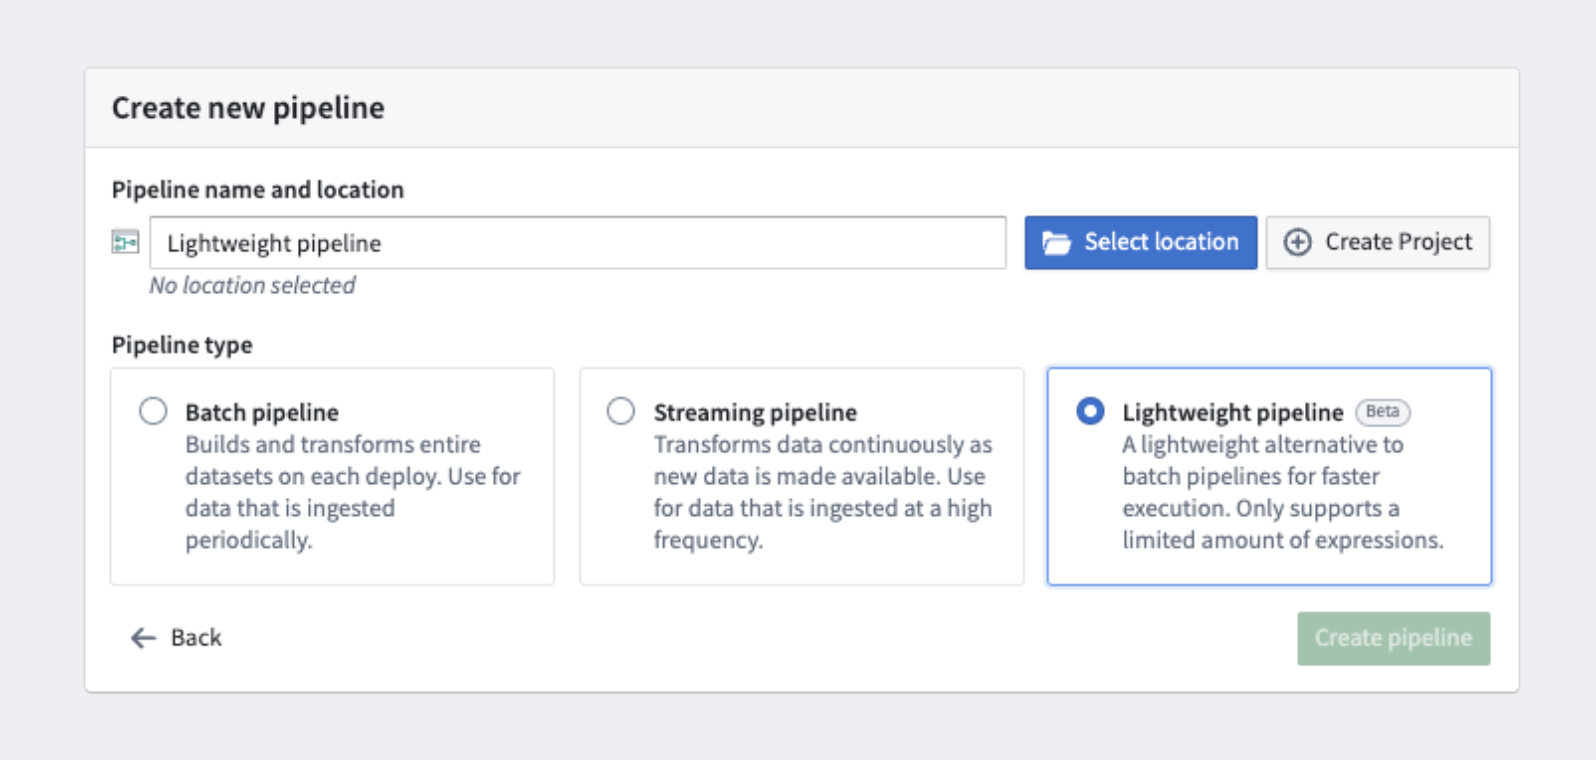
The option to select a lightweight pipeline during pipeline creation.
To convert existing pipelines to lightweight pipelines, select Convert to lightweight pipeline in the Settings dropdown, and ensure that your pipeline is compatible. You will receive a warning if your pipeline is incompatible.
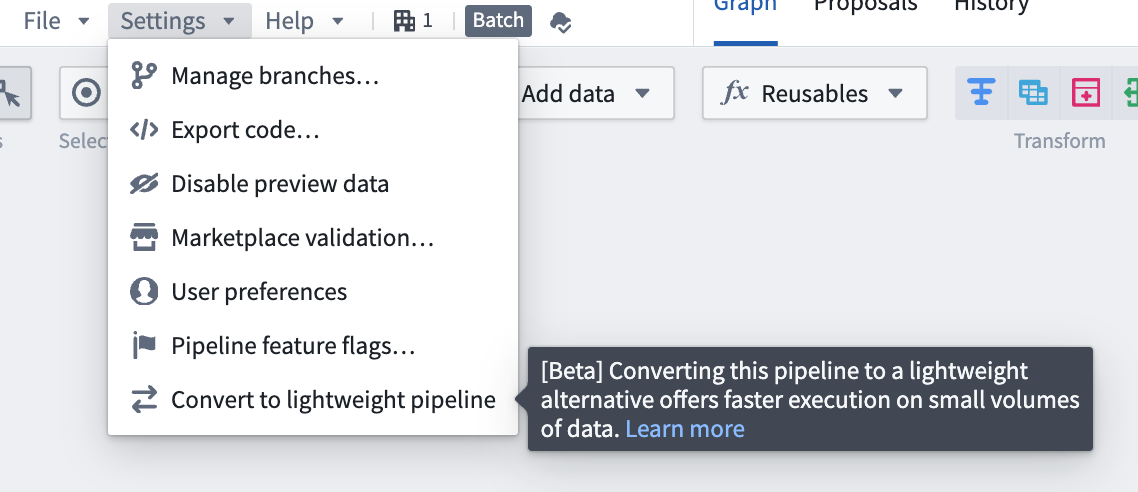
The Convert to lightweight pipeline option in pipeline settings.
Note that functionality may change as lightweight pipelines continue to be developed. Lightweight pipelines currently support a subset of the features supported by batch pipelines. Currently unsupported features include the Use LLM node, media set operations, and geospatial functionality.
We recommend verifying your results using preview, or by examining build outputs, especially when converting between pipeline types. You can experiment with lightweight pipelines by testing them on a branch or making a copy of an existing pipeline. Evaluate performance metrics and discover how lightweight pipelines can optimize your workflows.
Learn more about lightweight pipelines in Pipeline Builder.
Your feedback matters
We want to hear about your experiences with Pipeline Builder and welcome your feedback. Share your thoughts with Palantir Support channels or on our Developer Community ↗ using the pipeline-builder tag ↗.
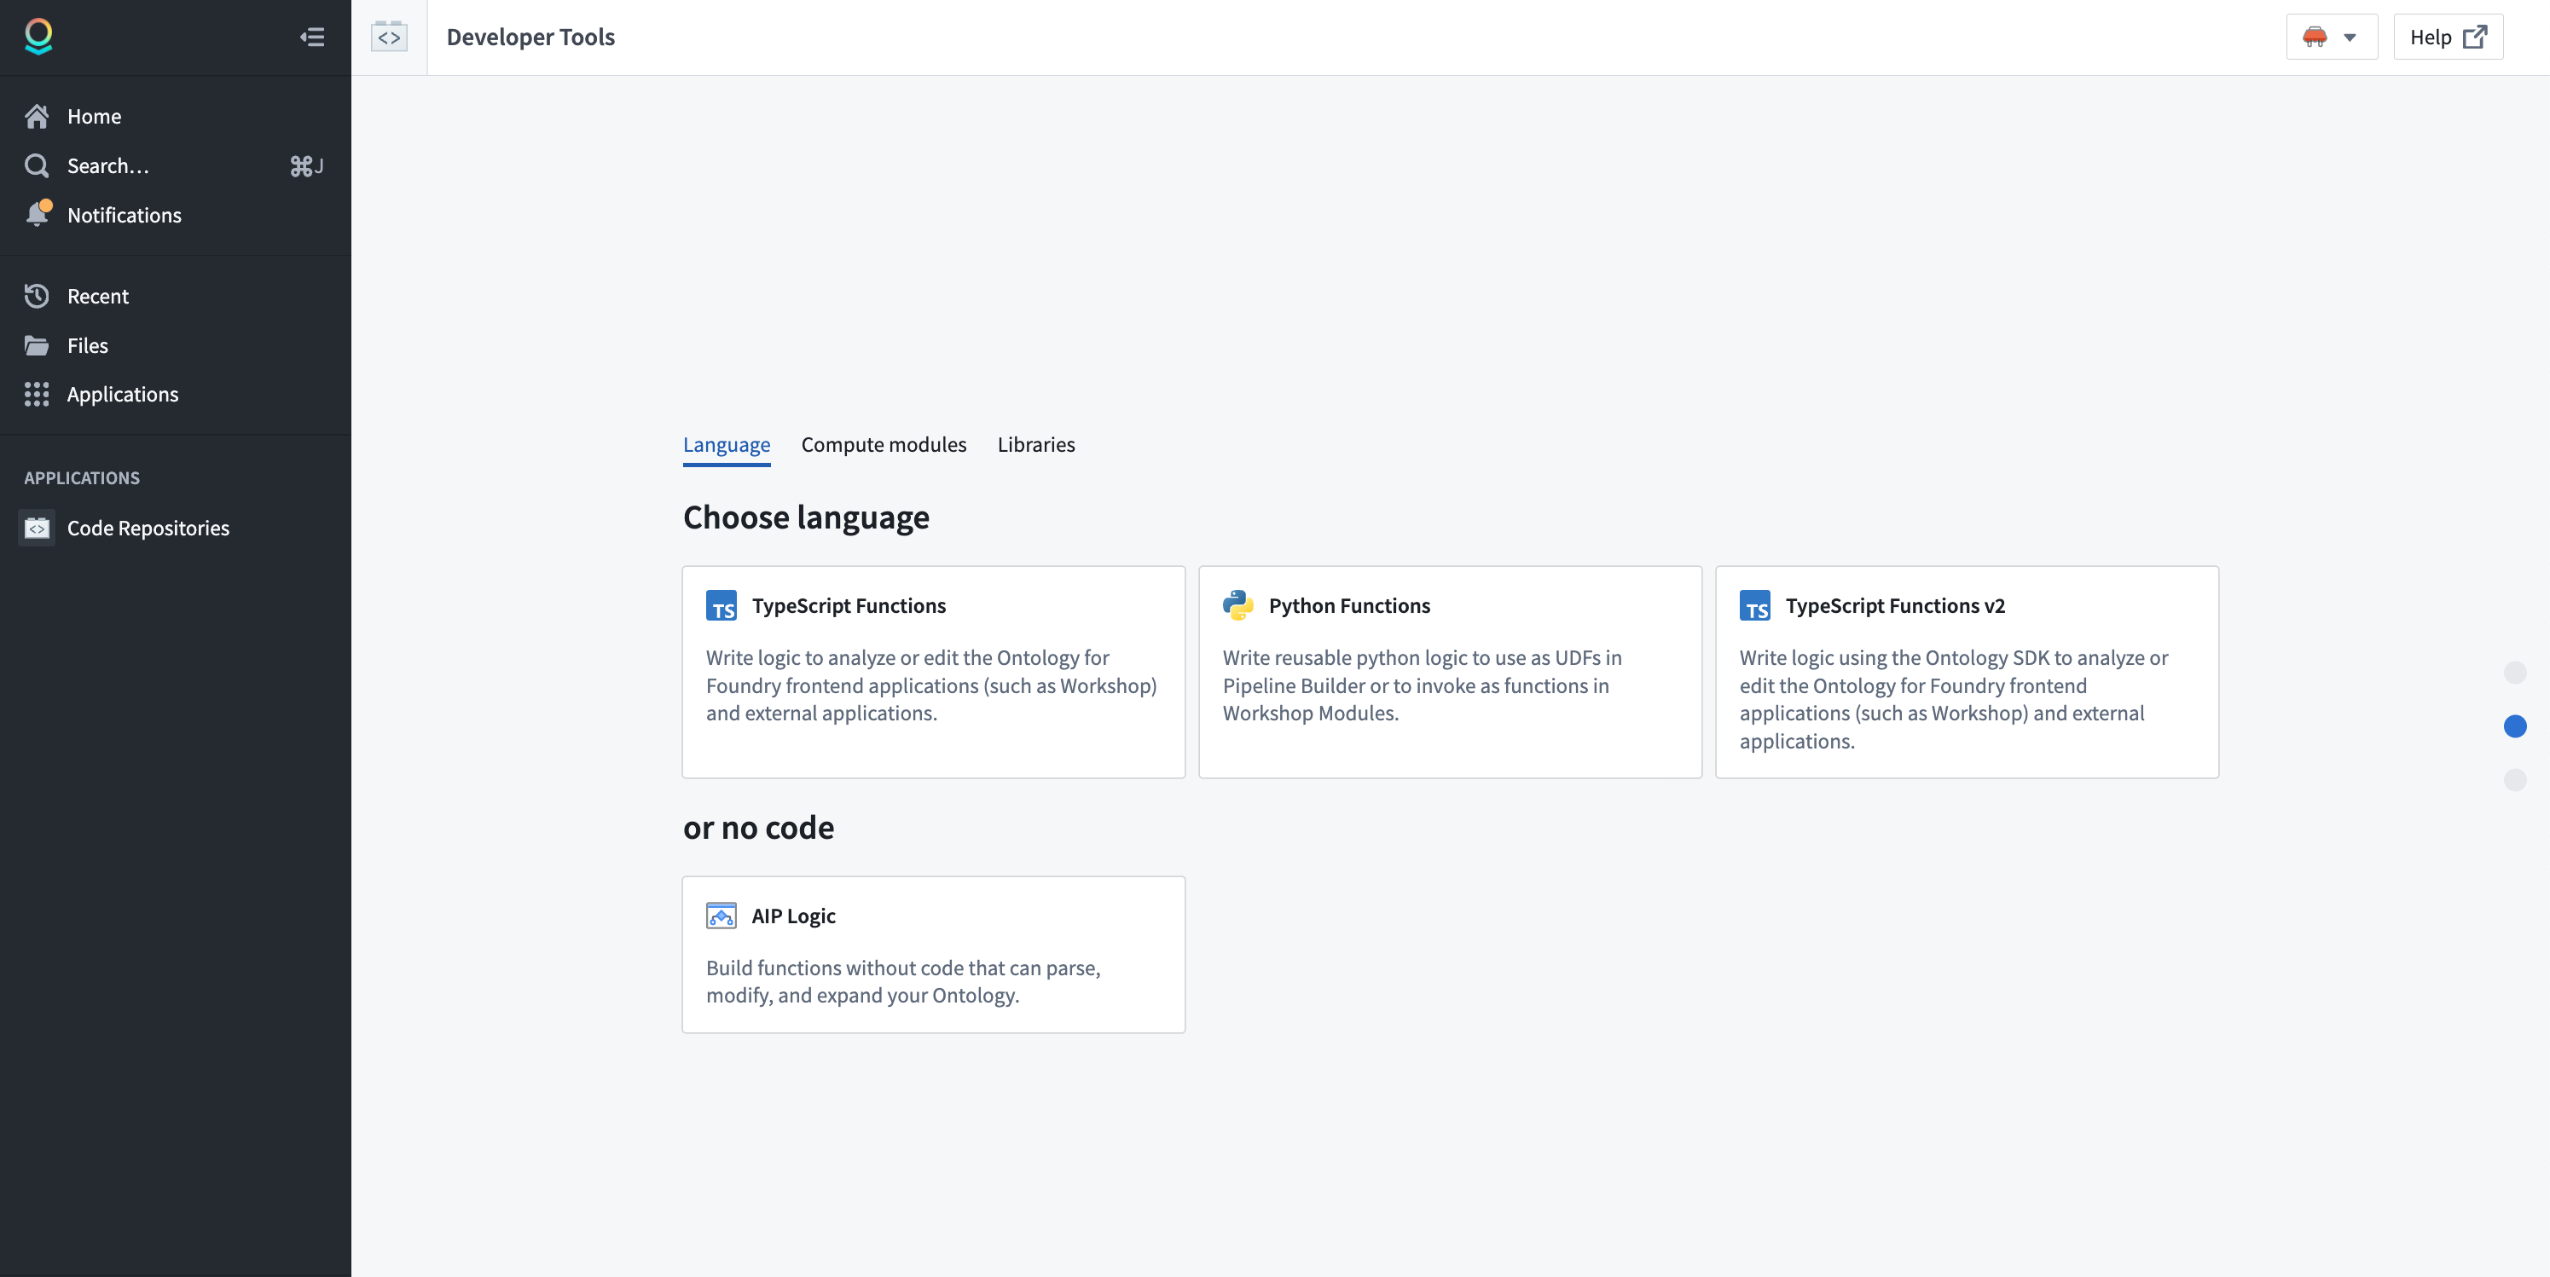
Python functions are now available
Date published: 2025-07-28
Starting the week of July 28, Python functions will be generally available for all enrollments. Get started with Python functions by creating a new code repository with the Python Functions template.

Choose the Python Functions template in Code Repositories.
Note that some features are not yet supported in Python functions. Review the feature support matrix to decide which template is best for you.
First-class support for OSDK
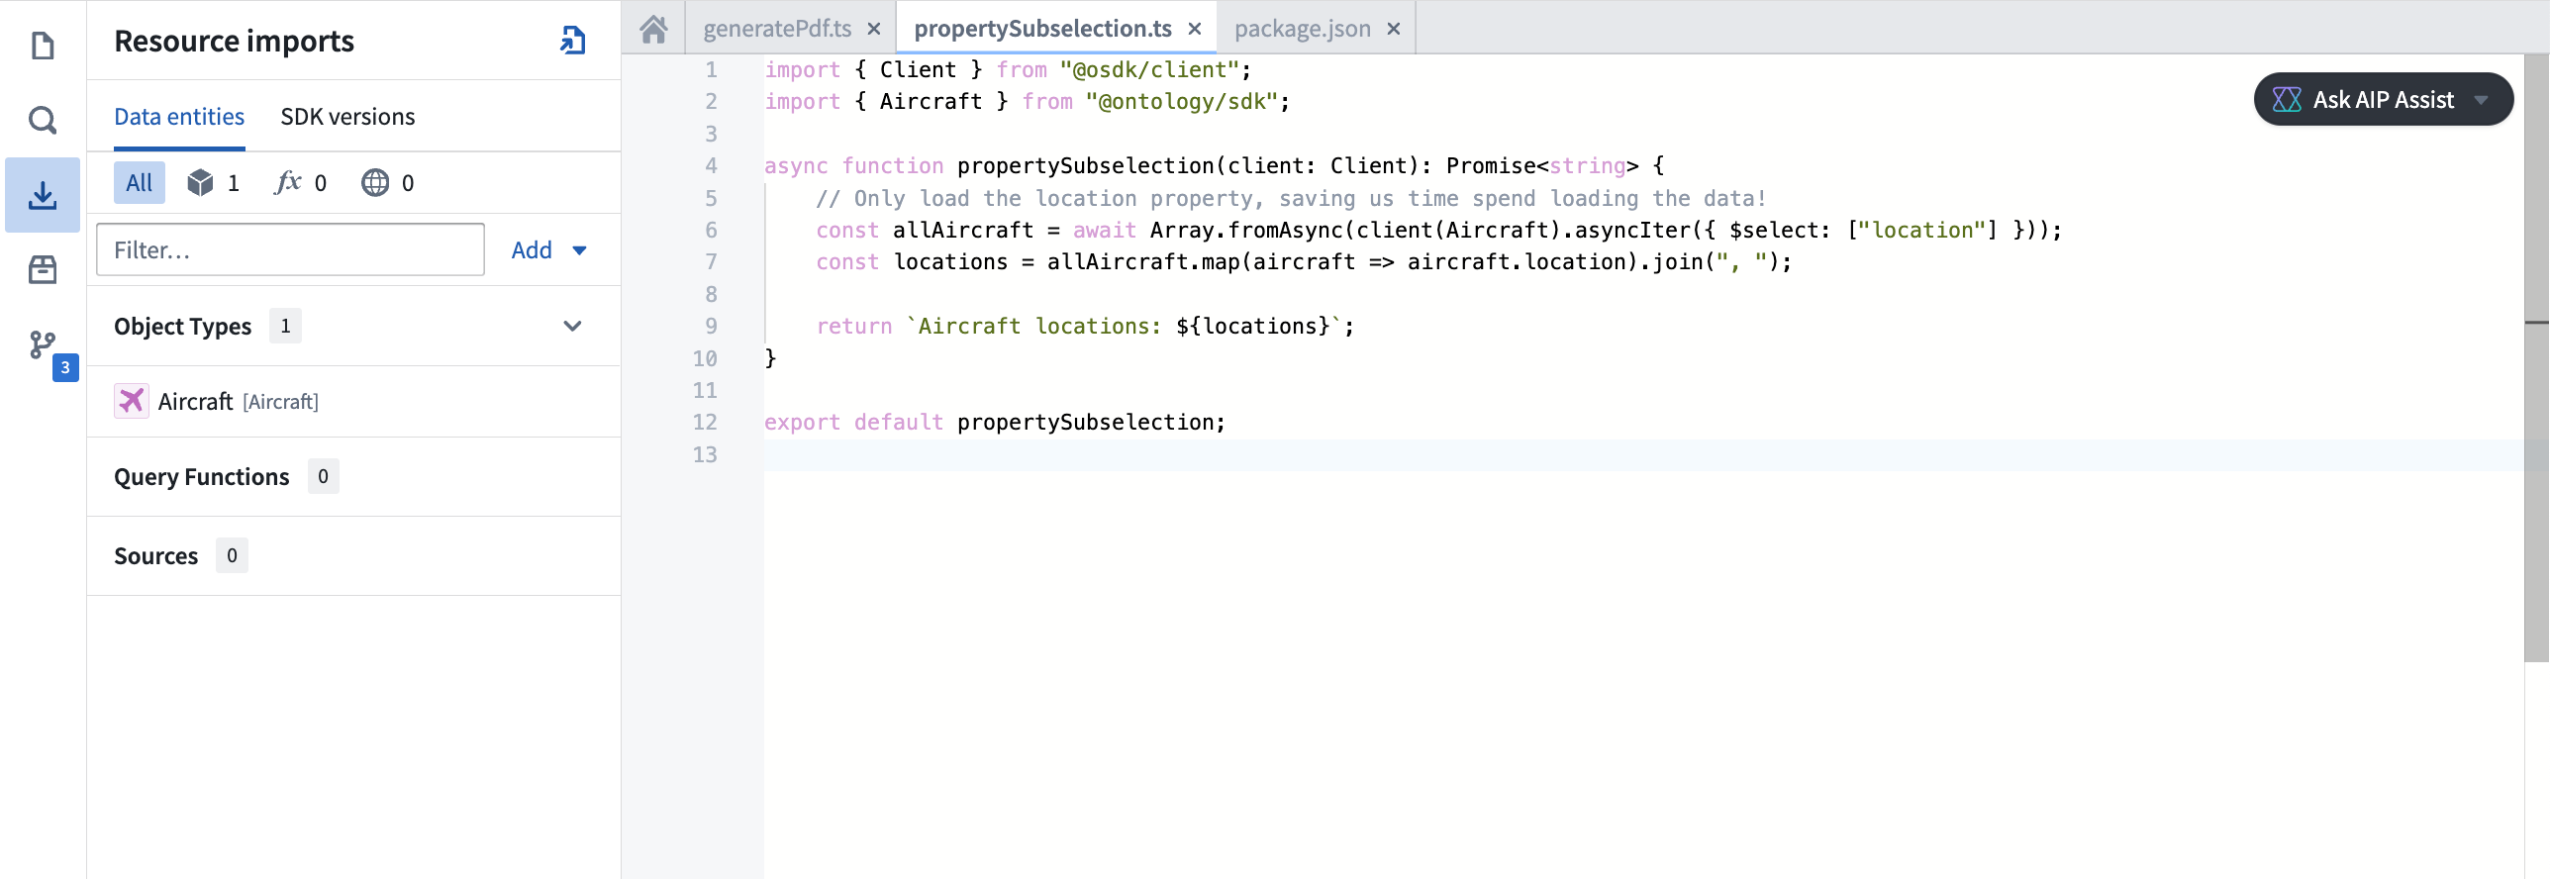
Python functions are designed around the Ontology SDK (OSDK). You no longer need to learn how to use different SDKs to write your functions. Additionally, powerful Python OSDK tools like property sub-selection will allow you to only load the data you need at a given time.

Use Python functions with the OSDK in your code repository.
You can find documentation generated for your OSDK in the Resource imports section of the code repository sidebar, providing you with examples of how to write code using your specific ontology.

Review OSDK documentation for Python functions in your code repository sidebar.
Make API calls
You can make API calls to external systems from Python functions, allowing you to interact with external systems. Use the provided functions.sources library to obtain pre-configured clients that ensure compatibility with the Python networking environment.
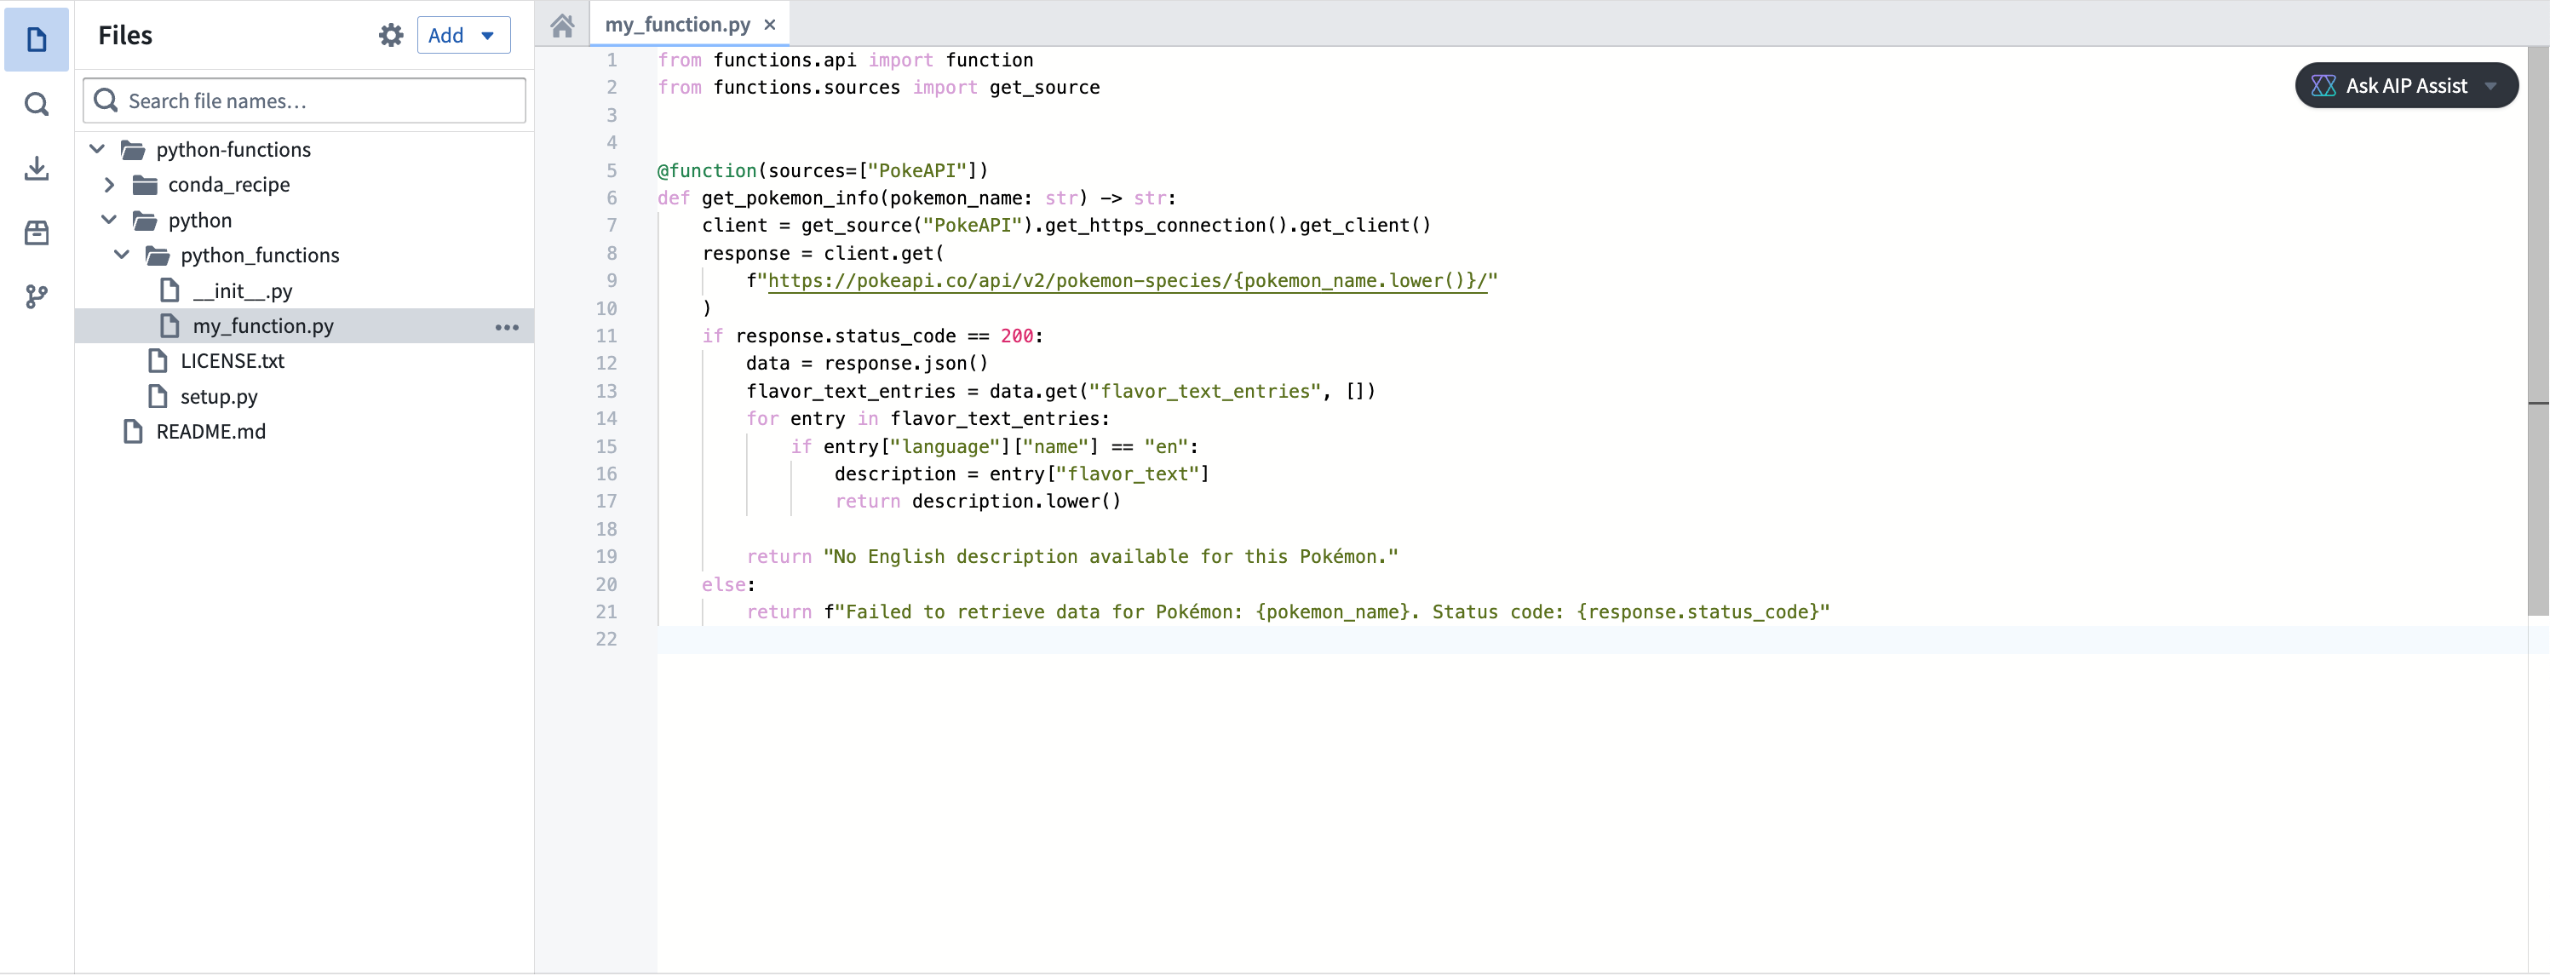
Make API calls with Python functions with the functions.sources library.
Flexible deployment modes
Python functions can run in either serverless or server-backed modes. This gives you the flexibility and low overhead of serverless functions, while also allowing you to use a stateful server if you need higher availability or want to keep stateful caches. Write your functions once, and decide on your deployment model later.
Choose either a serverless or server-backed deployment mode for your Python function in Ontology Mananger.
Compatibility with pipeline UDFs
Python functions can be used as user-defined functions (UDFs) in pipelines, allowing you to seamlessly integrate pro-code logic into existing pipelines.
Use a Python function as a UDF in Pipeline Builder.
Deploy Python functions through Marketplace
Python functions can be deployed through Marketplace, enabling you to distribute products containing Python functions within your organization and the Foundry community. Marketplace integration includes support for any usage of the OSDK in your function.
An example of a Python function deployed through Marketplace.
Additional resources
Learn more about Python functions in our documentation, or refer to the README.md file contained within a Python functions repository for more information.
TypeScript v2 functions are now available
Date published: 2025-07-28
Starting the week of July 28, TypeScript v2 functions will be generally available for all enrollments. Get started with TypeScript v2 functions by creating a new code repository with the TypeScript Functions v2 template. TypeScript v2 functions offer some distinct differences between TypeScript v1 functions, making it a powerful improvement to your platform workflows.
Choose the TypeScript Functions v2 template in Code Repositories.
Note that some features are not yet supported in TypeScript v2 functions. Review the feature support matrix to decide which template is best for you.
Full Node.js runtime
In TypeScript v2 functions, your code runs in a full Node.js runtime with support for core modules such as fs, child_process and crypto. You can use any libraries that are compatible with a Node.js runtime. Node.js runtime is a substantial improvement over the limited V8 runtime used for TypeScript v1 functions, which restricted functionality and available built-in APIs and resulted in compatibility issues with the open-source ecosystem.
The following example demonstrates using pdf-lib to generate a PDF:
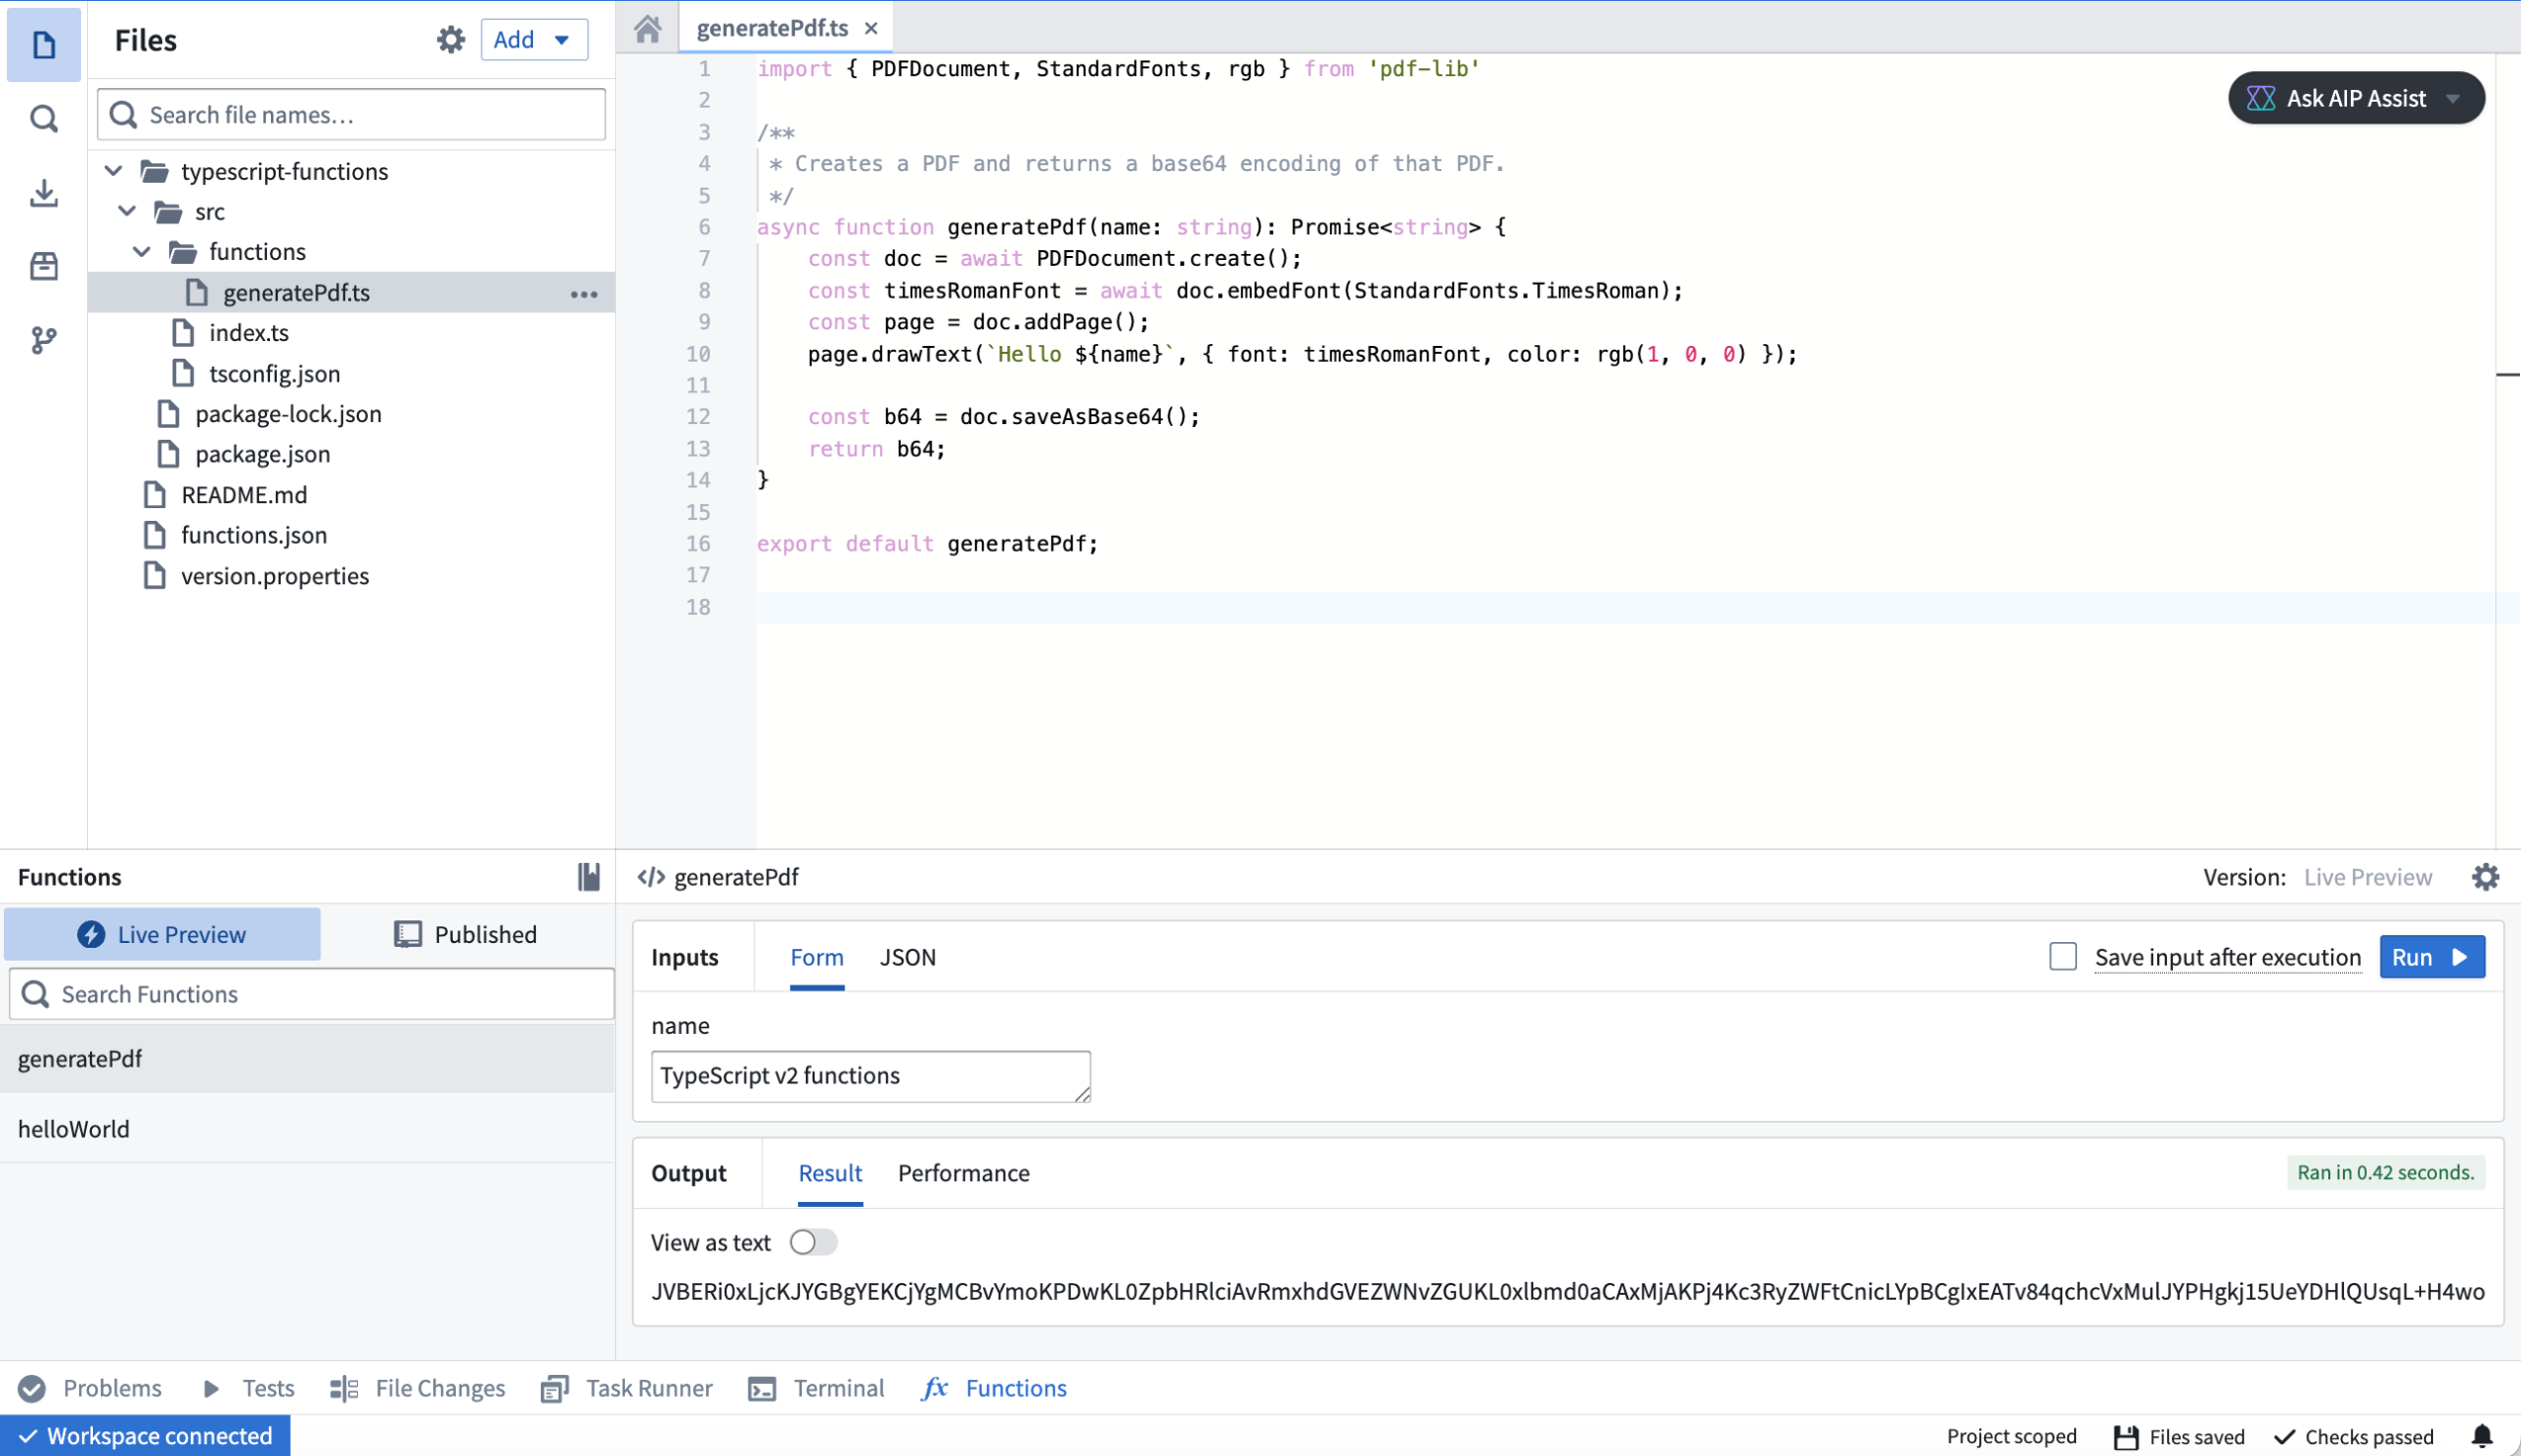
An example of a pdf-lib TypeScript v2 function in a code repository.
Configurable resources
In TypeScript v2, you can configure your function to have up to 5 GB of memory and 8 CPUs, versus 128 MB and a single CPU in Typescript v1. This upgrade makes it possible to deal with large-scale data, such as images, and use parallelism to quickly perform CPU-intensive tasks.
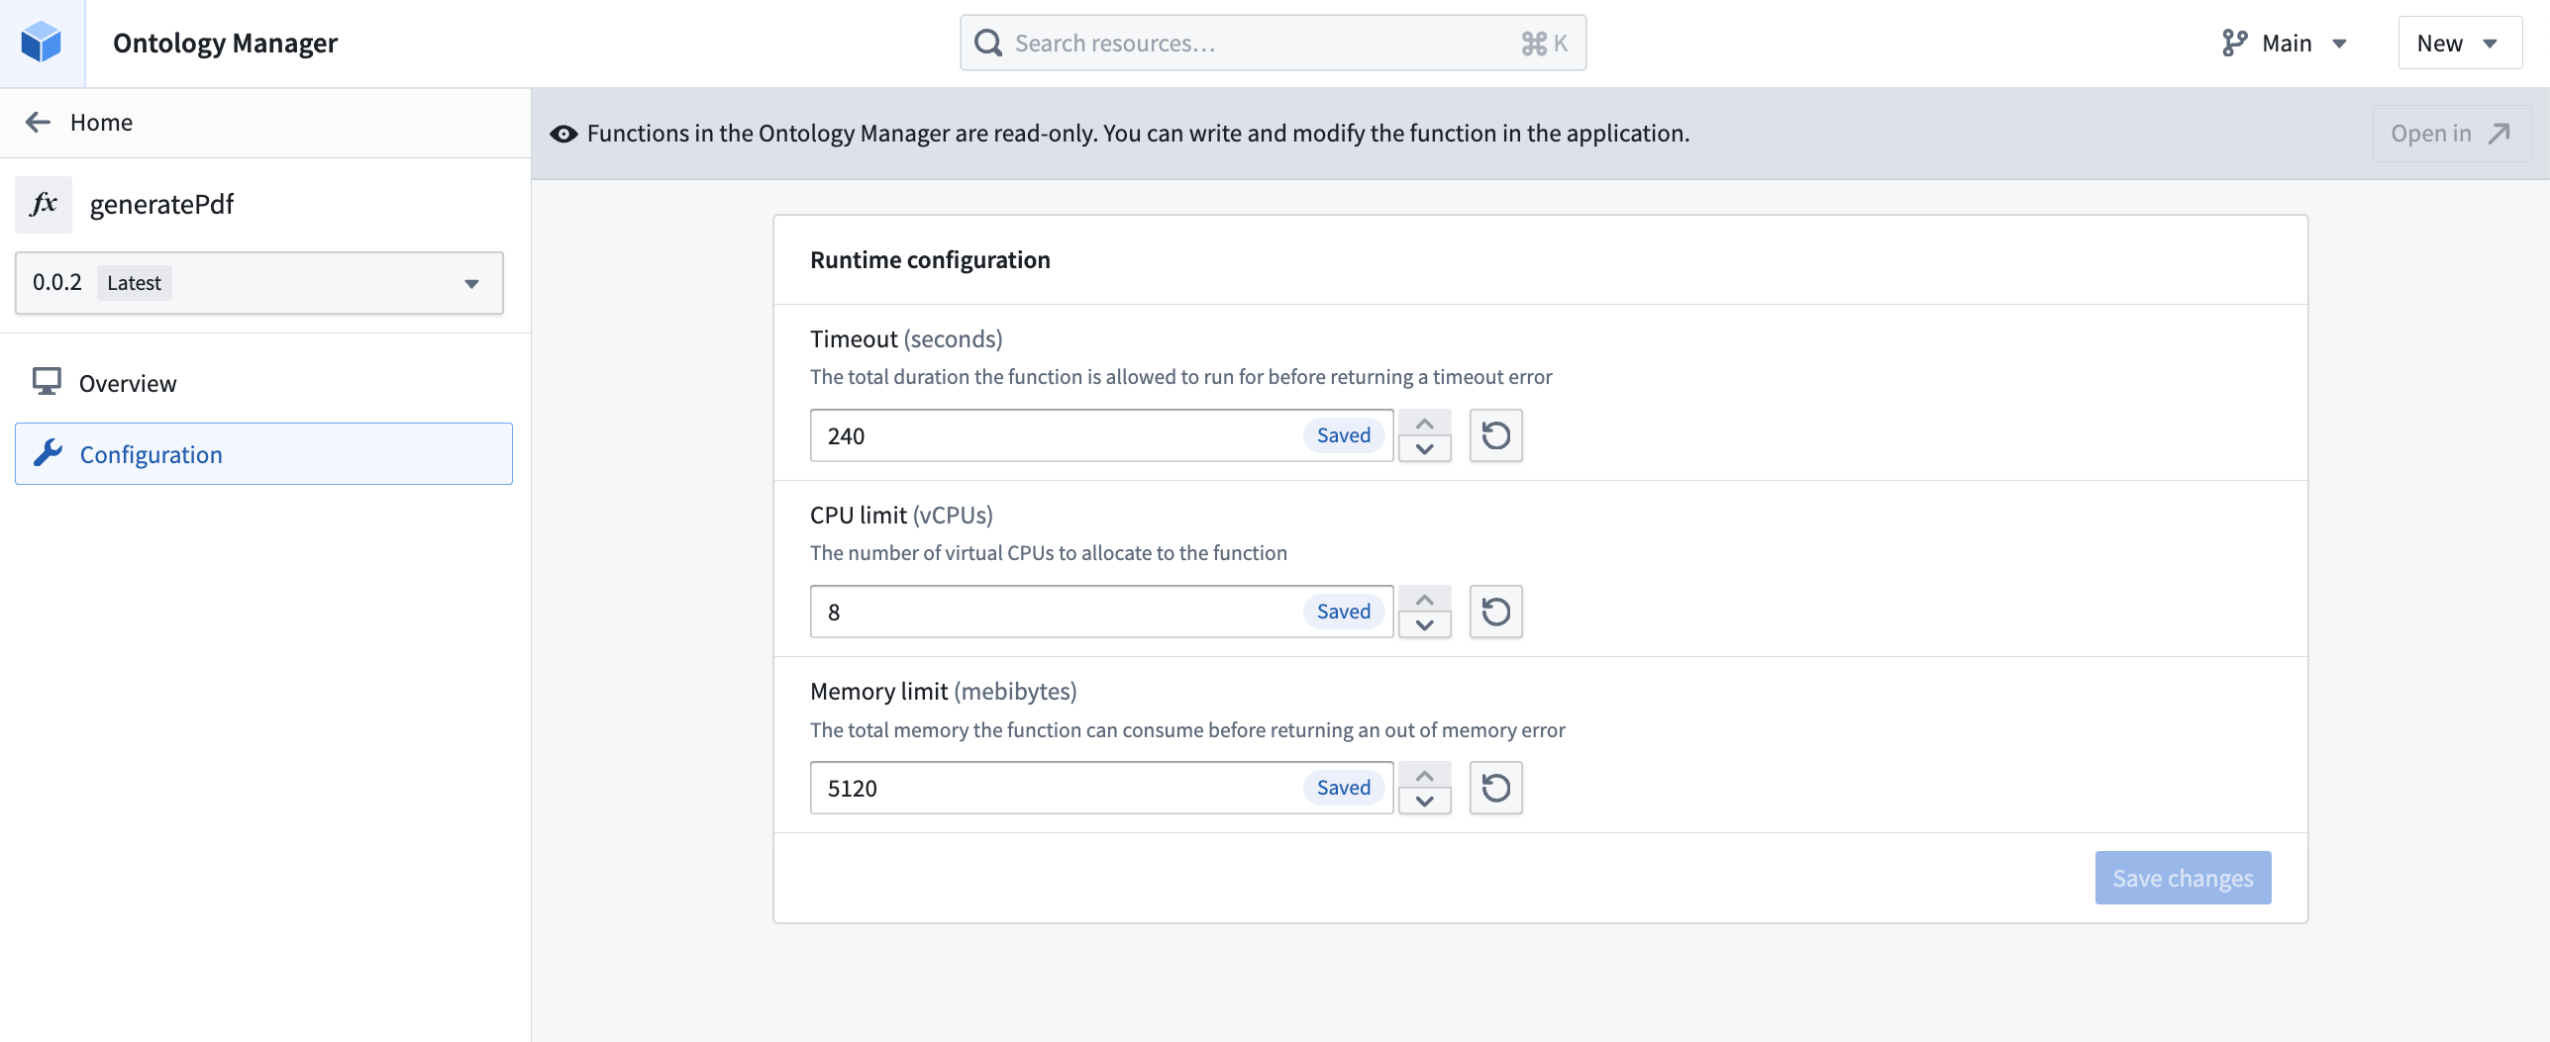
Edit TypeScript v2 function runtime configuration in Ontology Manager.
First-class support for OSDK
TypeScript v2 functions are designed around the Ontology SDK (OSDK). You no longer need to learn how to use different SDKs to write your functions. Additionally, powerful TypeScript OSDK tools like property sub-selection will allow you to only load the data you need at a given time.
Use TypeScript v2 functions with the Ontology SDK in your code repository.
You can find documentation generated for your OSDK in the Resource imports section of the code repository sidebar, providing you with examples of how to write code using your specific ontology.
Review OSDK documentation for TypeScript v2 functions in your code repository sidebar.
Make API calls
With TypeScript v2 functions, you can make API calls more flexibly, especially when used alongside open-source SDKs that rely on a Node.js runtime. You can use the provided @palantir/functions-sources library to obtain pre-configured fetch functions or HTTP agents that ensure compatibility with the TypeScript v2 networking environment.
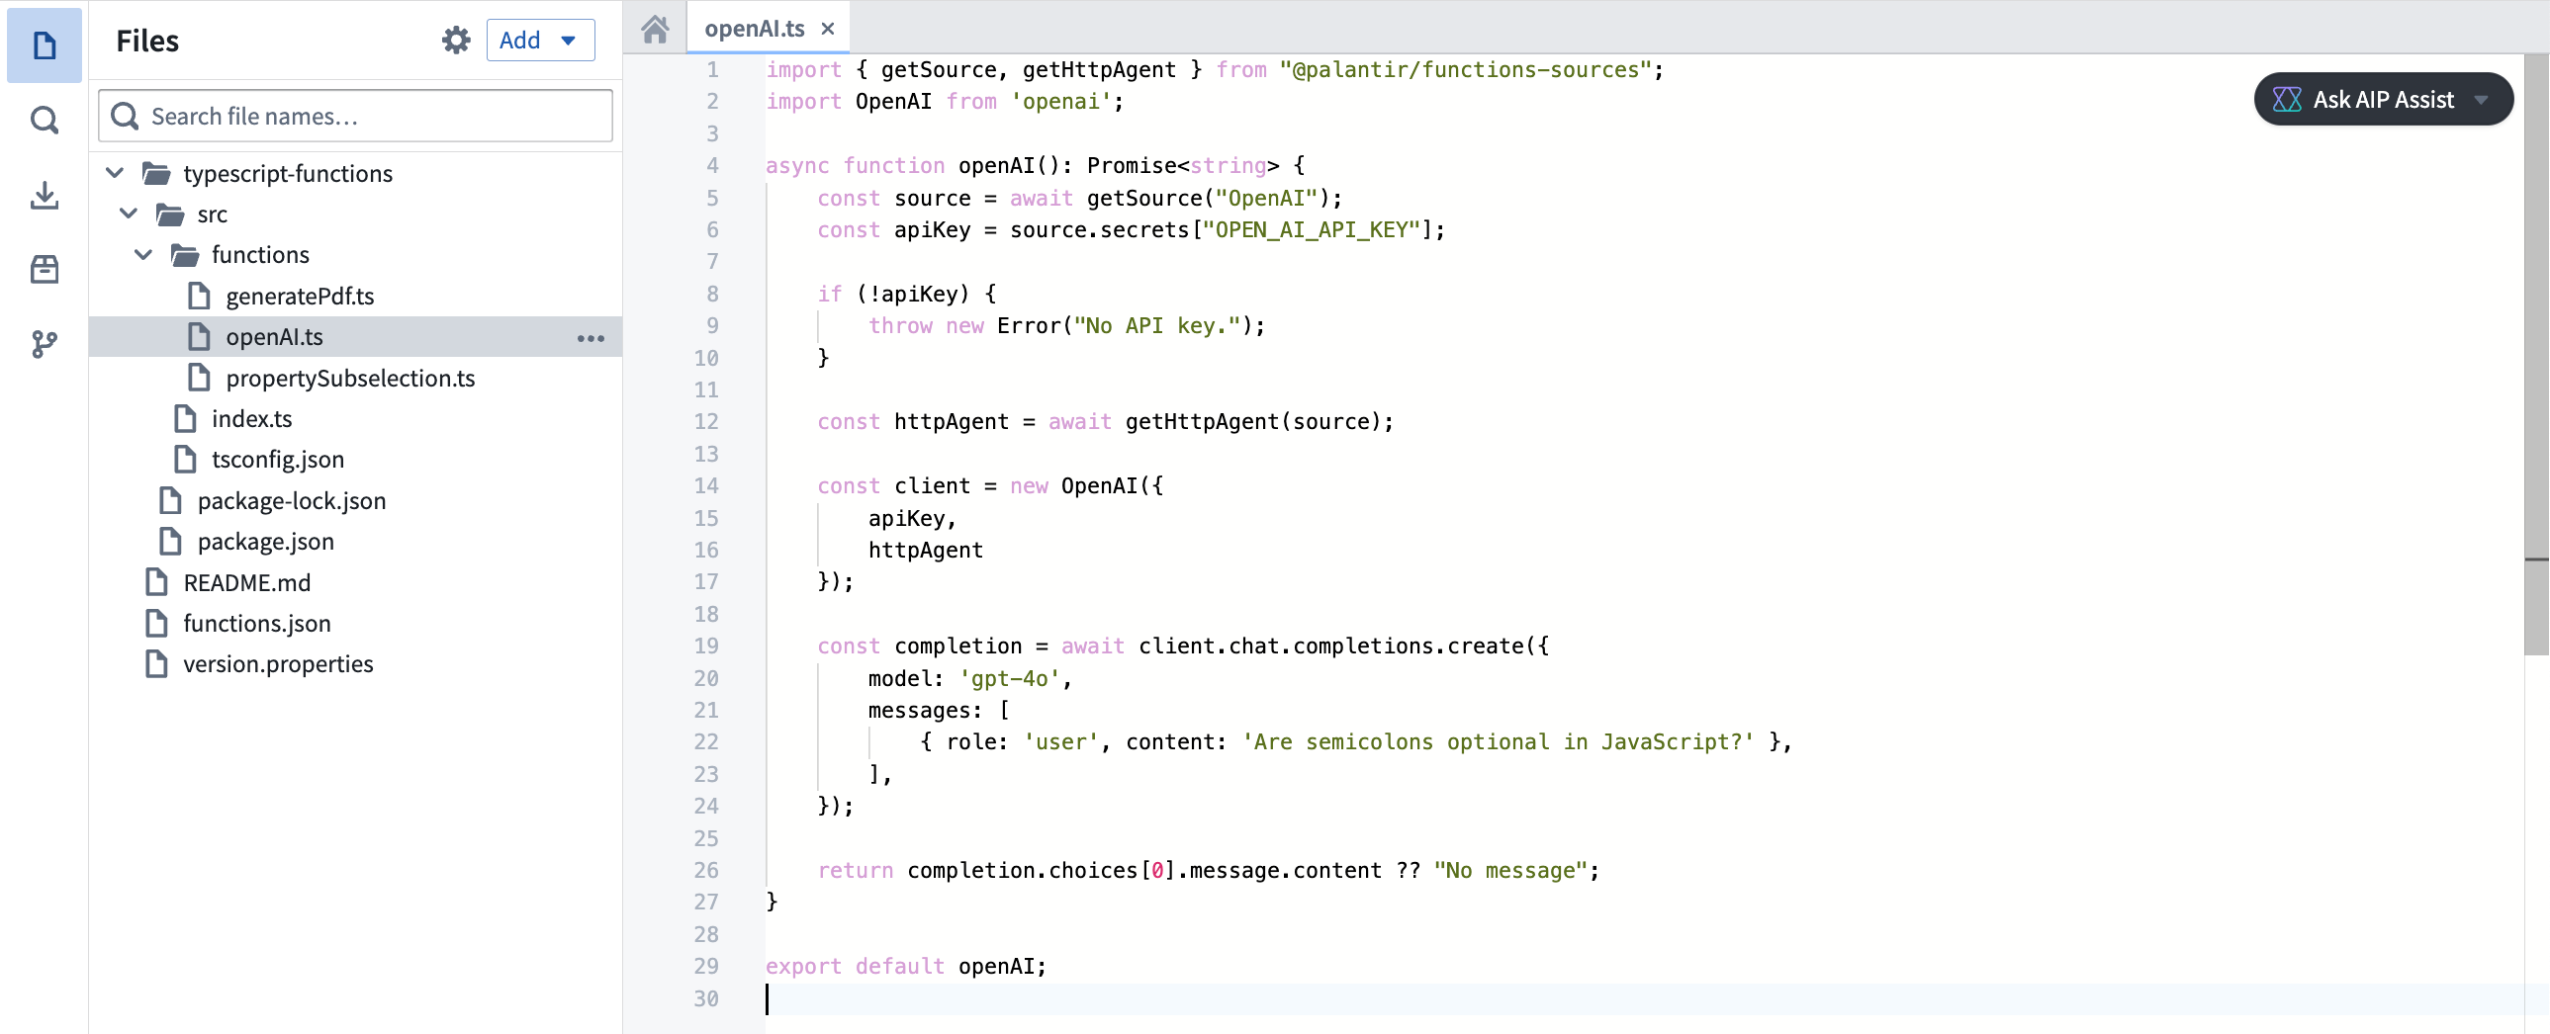
Make API calls with TypeScript v2 functions with the @palantir/functions-source library.
Deploy TypeScript v2 functions through Marketplace
TypeScript v2 functions can be deployed through Marketplace, enabling you to distribute products containing TypeScript v2 functions within your organization and the Foundry community. Marketplace integration includes support for any usage of the OSDK in your function.
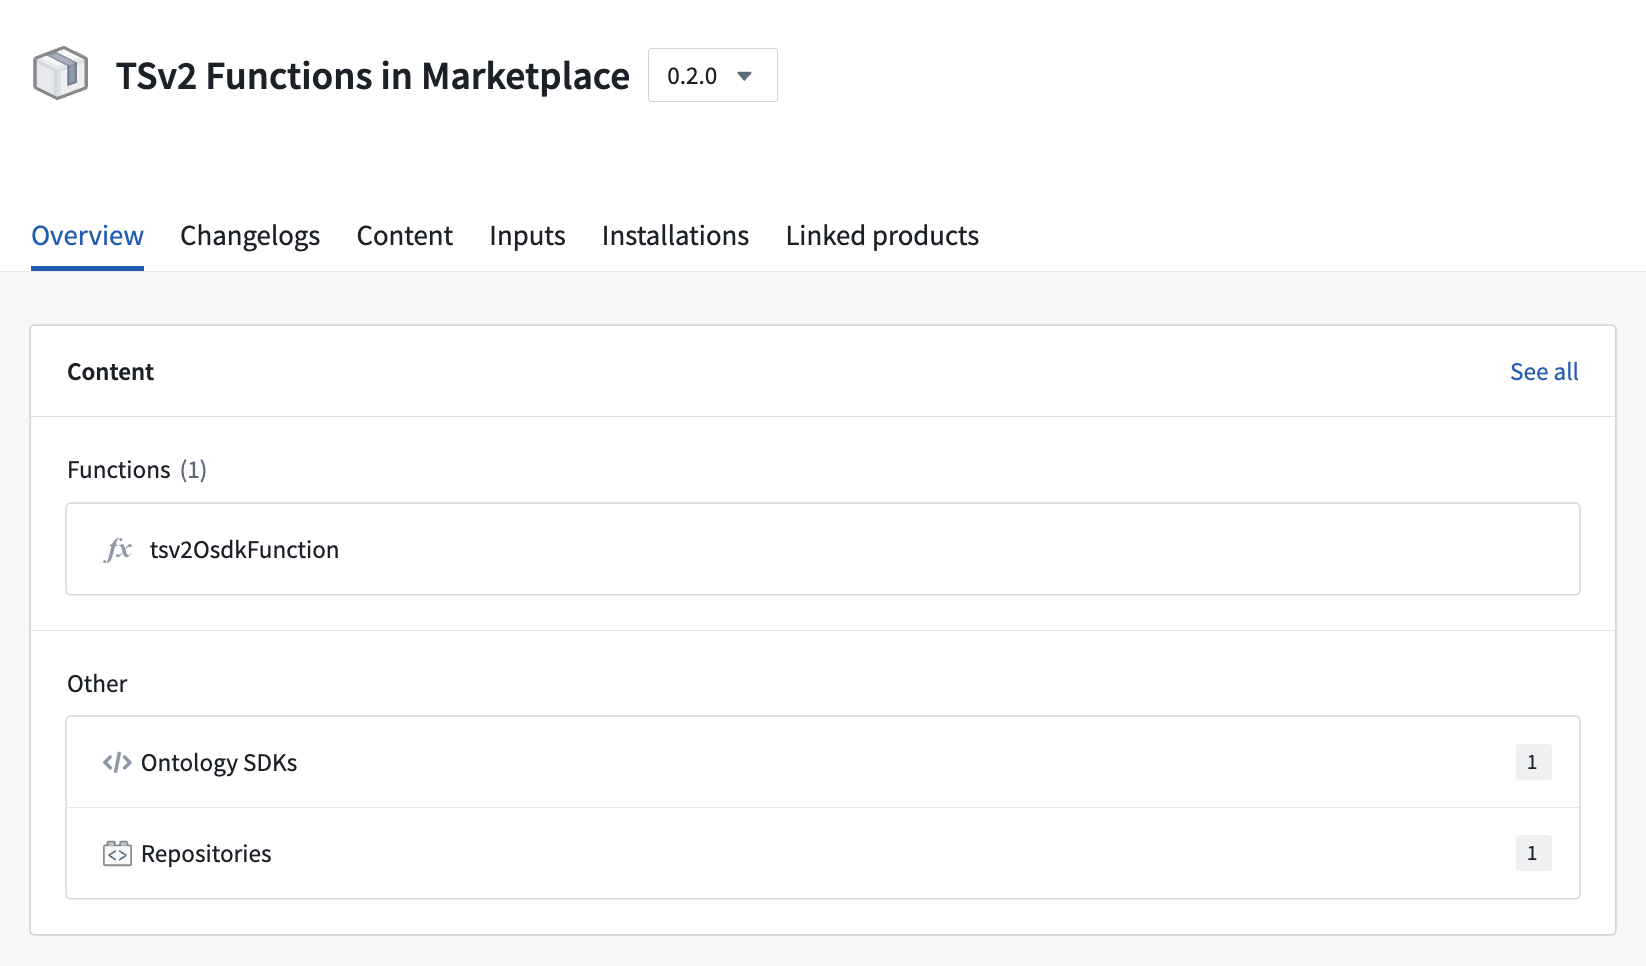
An example of a TypeScript v2 function deployed through Marketplace.
First-class support for NPM libraries
The TypeScript v2 functions template has built-in support to publish NPM libraries. You can define any exports and the name of your package in the package.json, then consume the published library in other TypeScript repositories
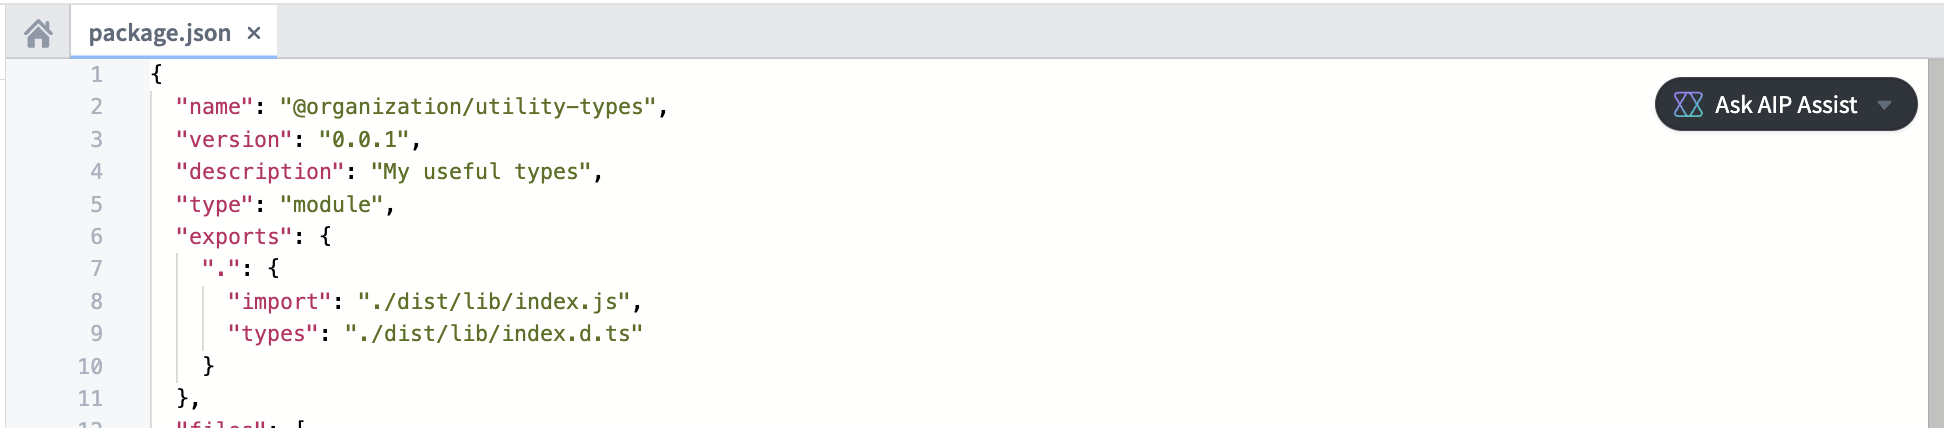
Define NPM libraries in a TypeScript v2 repository.
Additional resources
Learn more about TypeScript v2 functions in our documentation, or refer to the README.md file contained within a TypeScript v2 repository for more information.
Code-defined input filtering in the Palantir extension for Visual Studio Code
Date published: 2025-07-24
Code-defined input filtering is now available for Python transforms in the Palantir extension for Visual Studio Code in an experimental phase. This feature allows users to implement filtering strategies for VS Code previews based on custom code, in contrast to the previous functionality that only supported full and sampled dataset input strategy configurations. When applicable, custom filtering strategies will leverage pushdown predicates ↗ to ensure that only the most relevant data samples are used in previews.
The Palantir extension for Visual Studio Code automatically discovers all eligible filters throughout your codebase and displays them in the selection dropdown when configuring input sample strategies, making it easy to find and apply the needed processing functions. Users can select eligible functions from the repository using the multi-select dropdown menu, and arrange them in order of preference. Filters will be applied sequentially in the order they appear in the selection field.
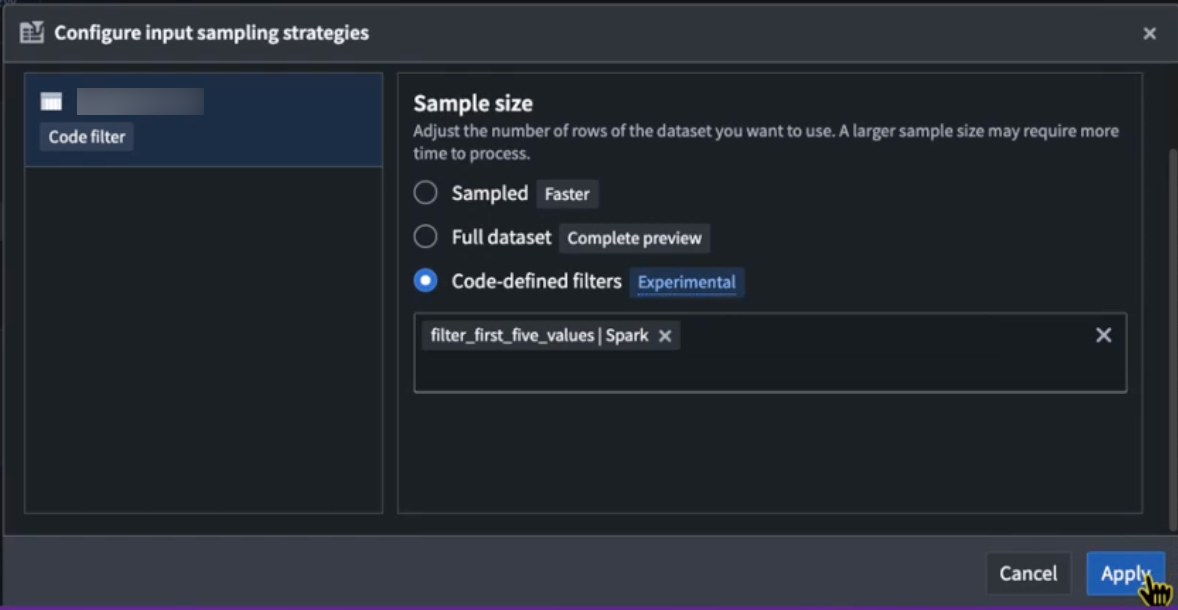
The Code-defined filters option in the Configure input sampling strategies dialog.
Any added input filtering configuration will be preserved across preview sessions. These configurations will be reset if the workspace is restarted, or if the .maestro/ configuration folder is deleted locally in VS Code.

Eligible preview filters will display a codelens hint stating that they are a valid preview filter.
Code-defined input filtering allows users greater flexibility and precision when shaping their data previews, enabling more targeted analyses in Python workflows. Note that structured inputs are supported in Spark and lightweight transforms, while unstructured inputs (raw files) are only supported for Spark.
Learn more about transform previews and code-defined input filtering.
Enhanced environment conflict visualization in Python repositories
Date published: 2025-07-24
The Palantir extension for Visual Studio Code now supports environment conflict visualization in Python repositories, featuring an intuitive and user-friendly interface. When a conflict occurs, users can now select the Resolve in environment debugger option to open an interactive view of environment conflicts.
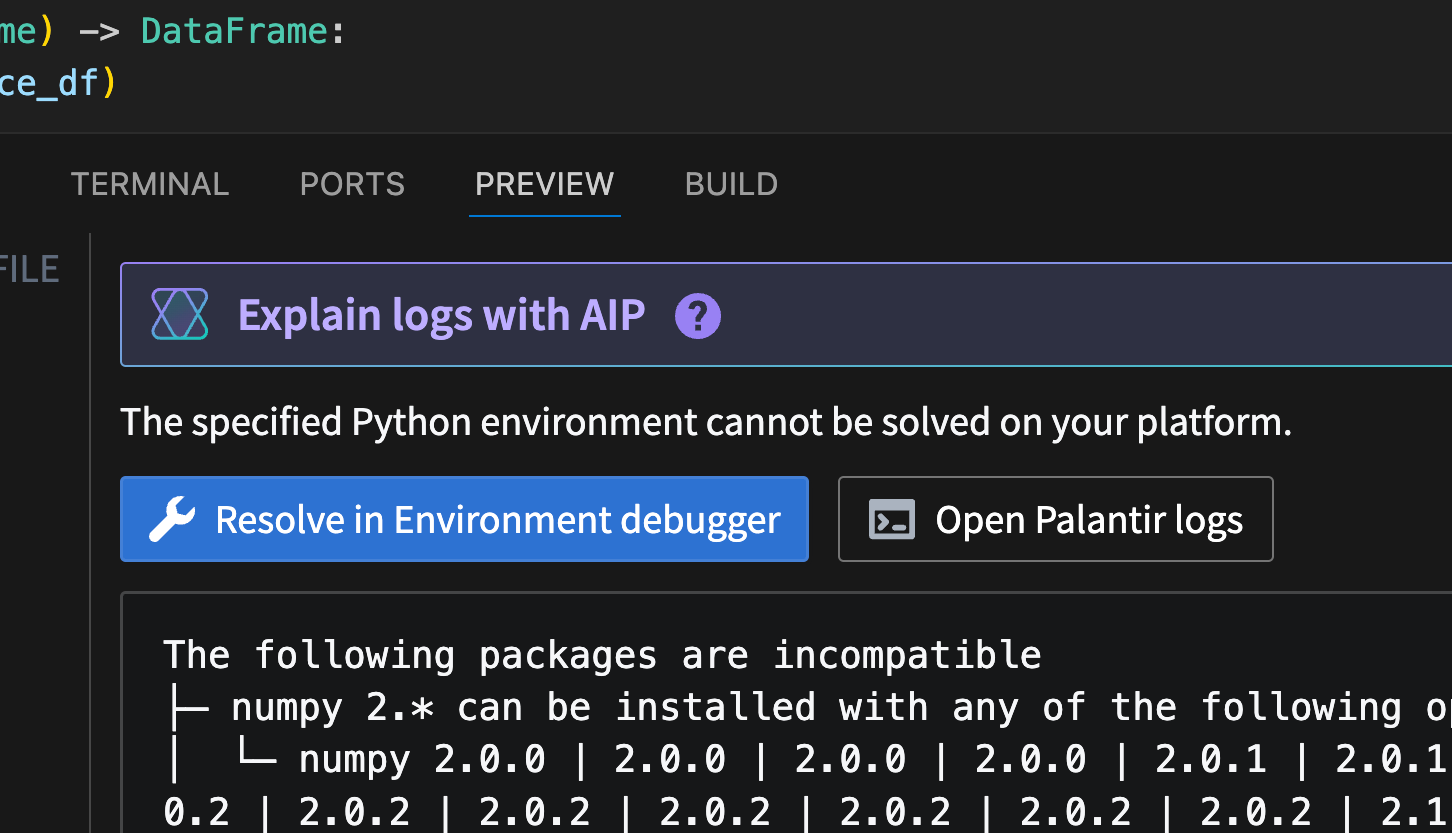
The Resolve in environment debugger option, displayed above an environment conflict error message.
This feature eliminates the need to interpret complex text outputs, and allows users to quickly identify, analyze, and resolve dependency issues with clear insights.
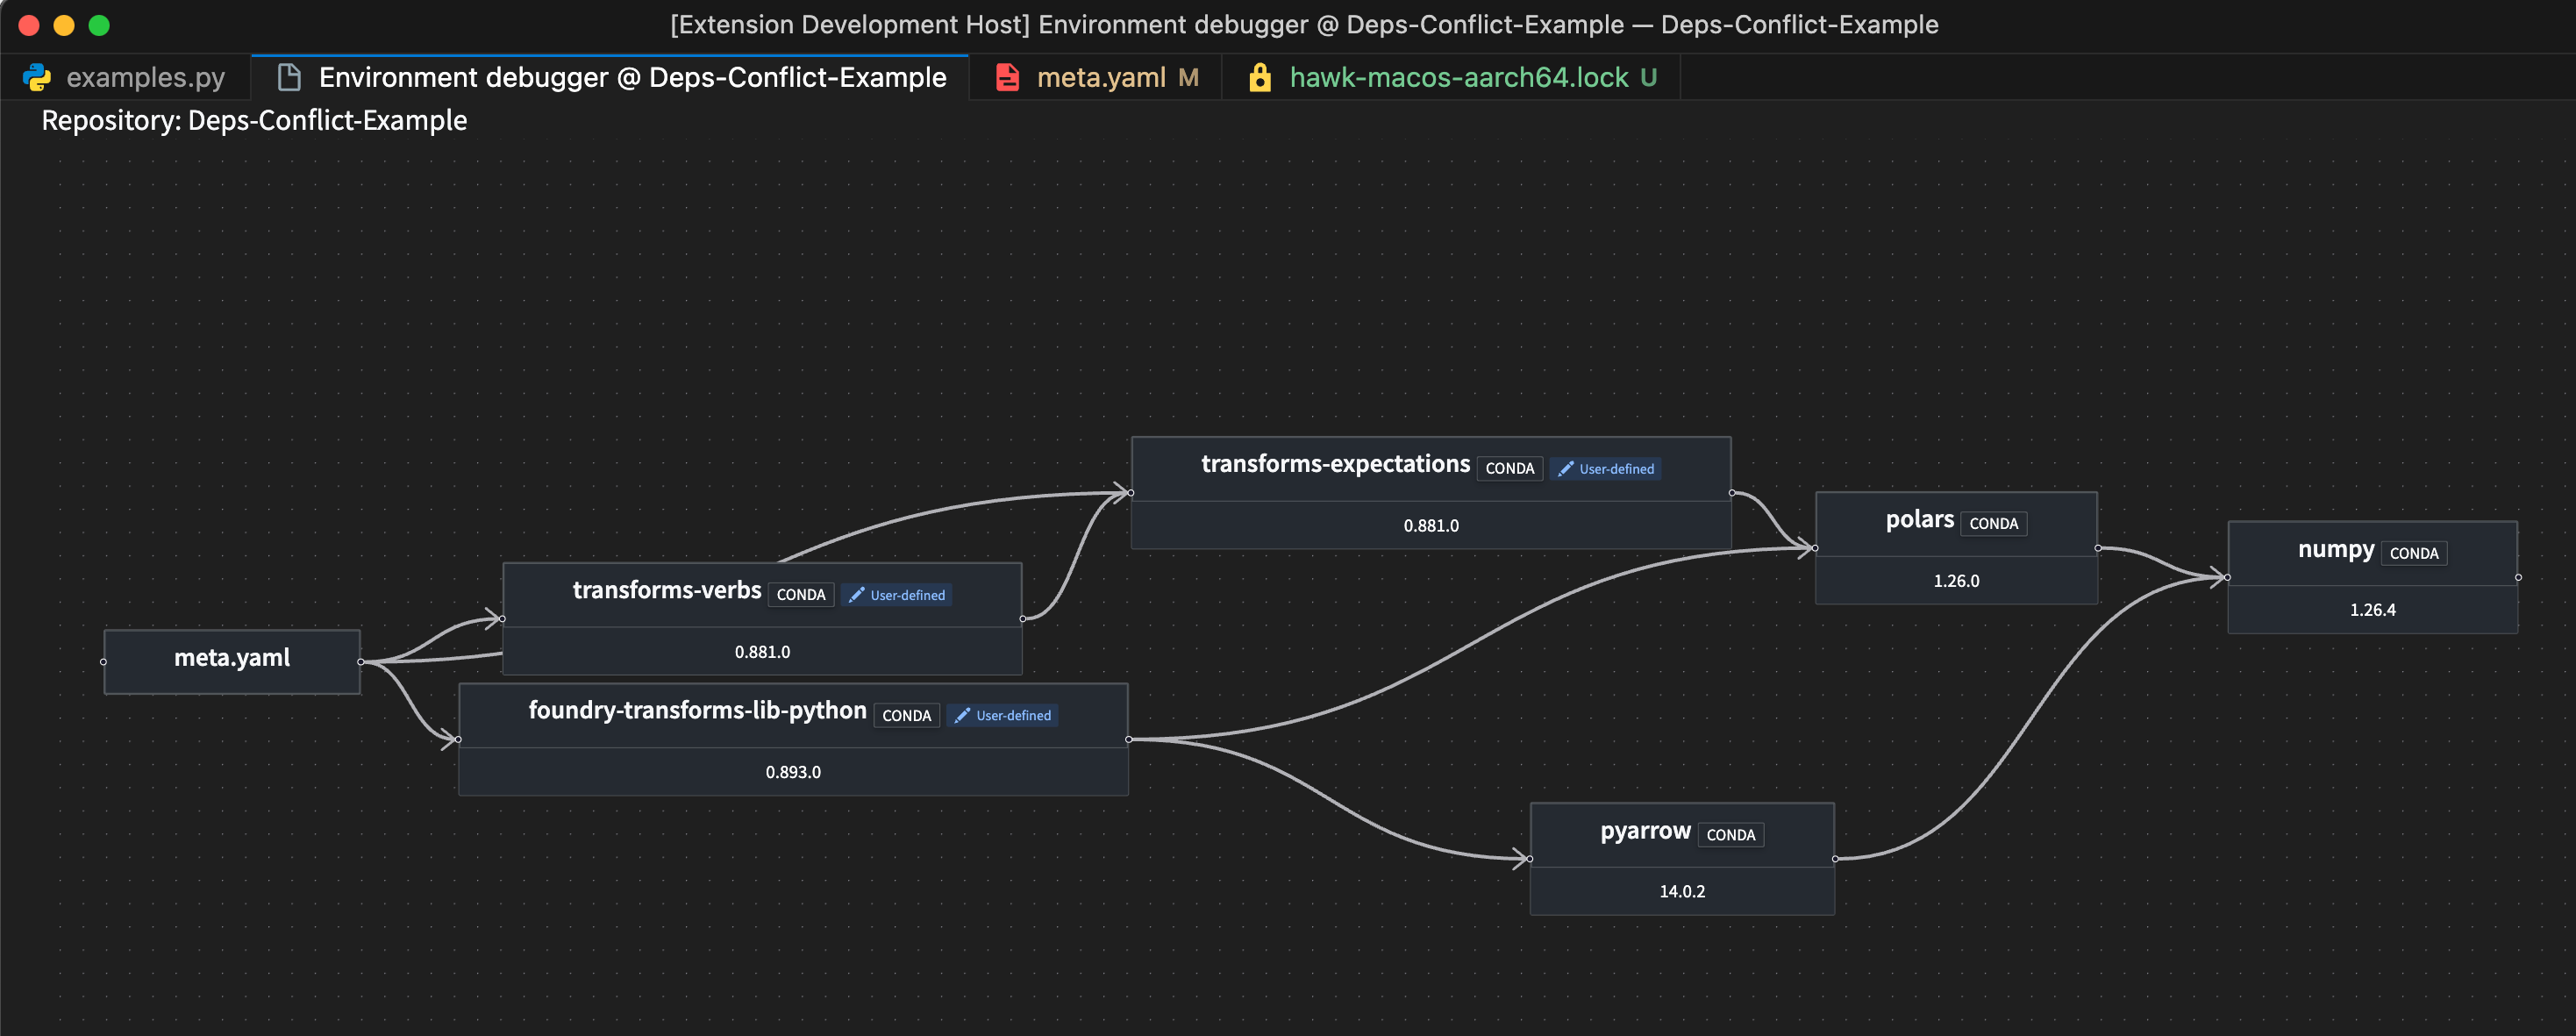
A sample environment debugger graph.
In addition to aiding conflict resolution, this feature also enables comprehensive environment exploration. Every package listed in your lockfile now includes a View package in environment debugger codelens option, allowing you to trace every dependency in your environment and identify its source.

The codelens hint above a highlighted package, providing the option to view the package in the environment debugger.
Leverage this new feature to enhance productivity, reduce time spent troubleshooting, and maintain stable and reliable Python environments.
Learn more about the environment debugger in the Palantir extension for Visual Studio Code.
Experience faster DevOps packaging with streamlined bulk operations and an intuitive workflow
Date published: 2025-07-24
The new DevOps packaging experience for creating product drafts is now available on all Foundry enrollments as of the week of July 21. This major update introduces a fully redesigned packaging experience, built for speed, bulk operations, and an intuitive workflow.
If you have an existing draft, note that it will not be compatible with the new packaging workflow and must be recreated after the release. During the rollout week, you can switch to the previous platform version to continue working on existing drafts.

The new landing page for drafts in DevOps offers a consolidated view of inputs and outputs, along with bulk edit options.
Key highlights of this new DevOps packaging experience include:
- Streamlined drafts: Enjoy a consolidated view of all your inputs and outputs, enabling powerful bulk actions and faster iteration.
- Faster iteration: Edits can be stacked and applied without waiting for previous changes to complete, and backend operations are significantly faster.
- Bulk edit operations: Move multiple resources to outputs, refresh groups of resources, and manage errors directly in the draft view.
- Expanded support for selecting outputs: Add all resources from the Data Lineage and Workflow Builder applications.
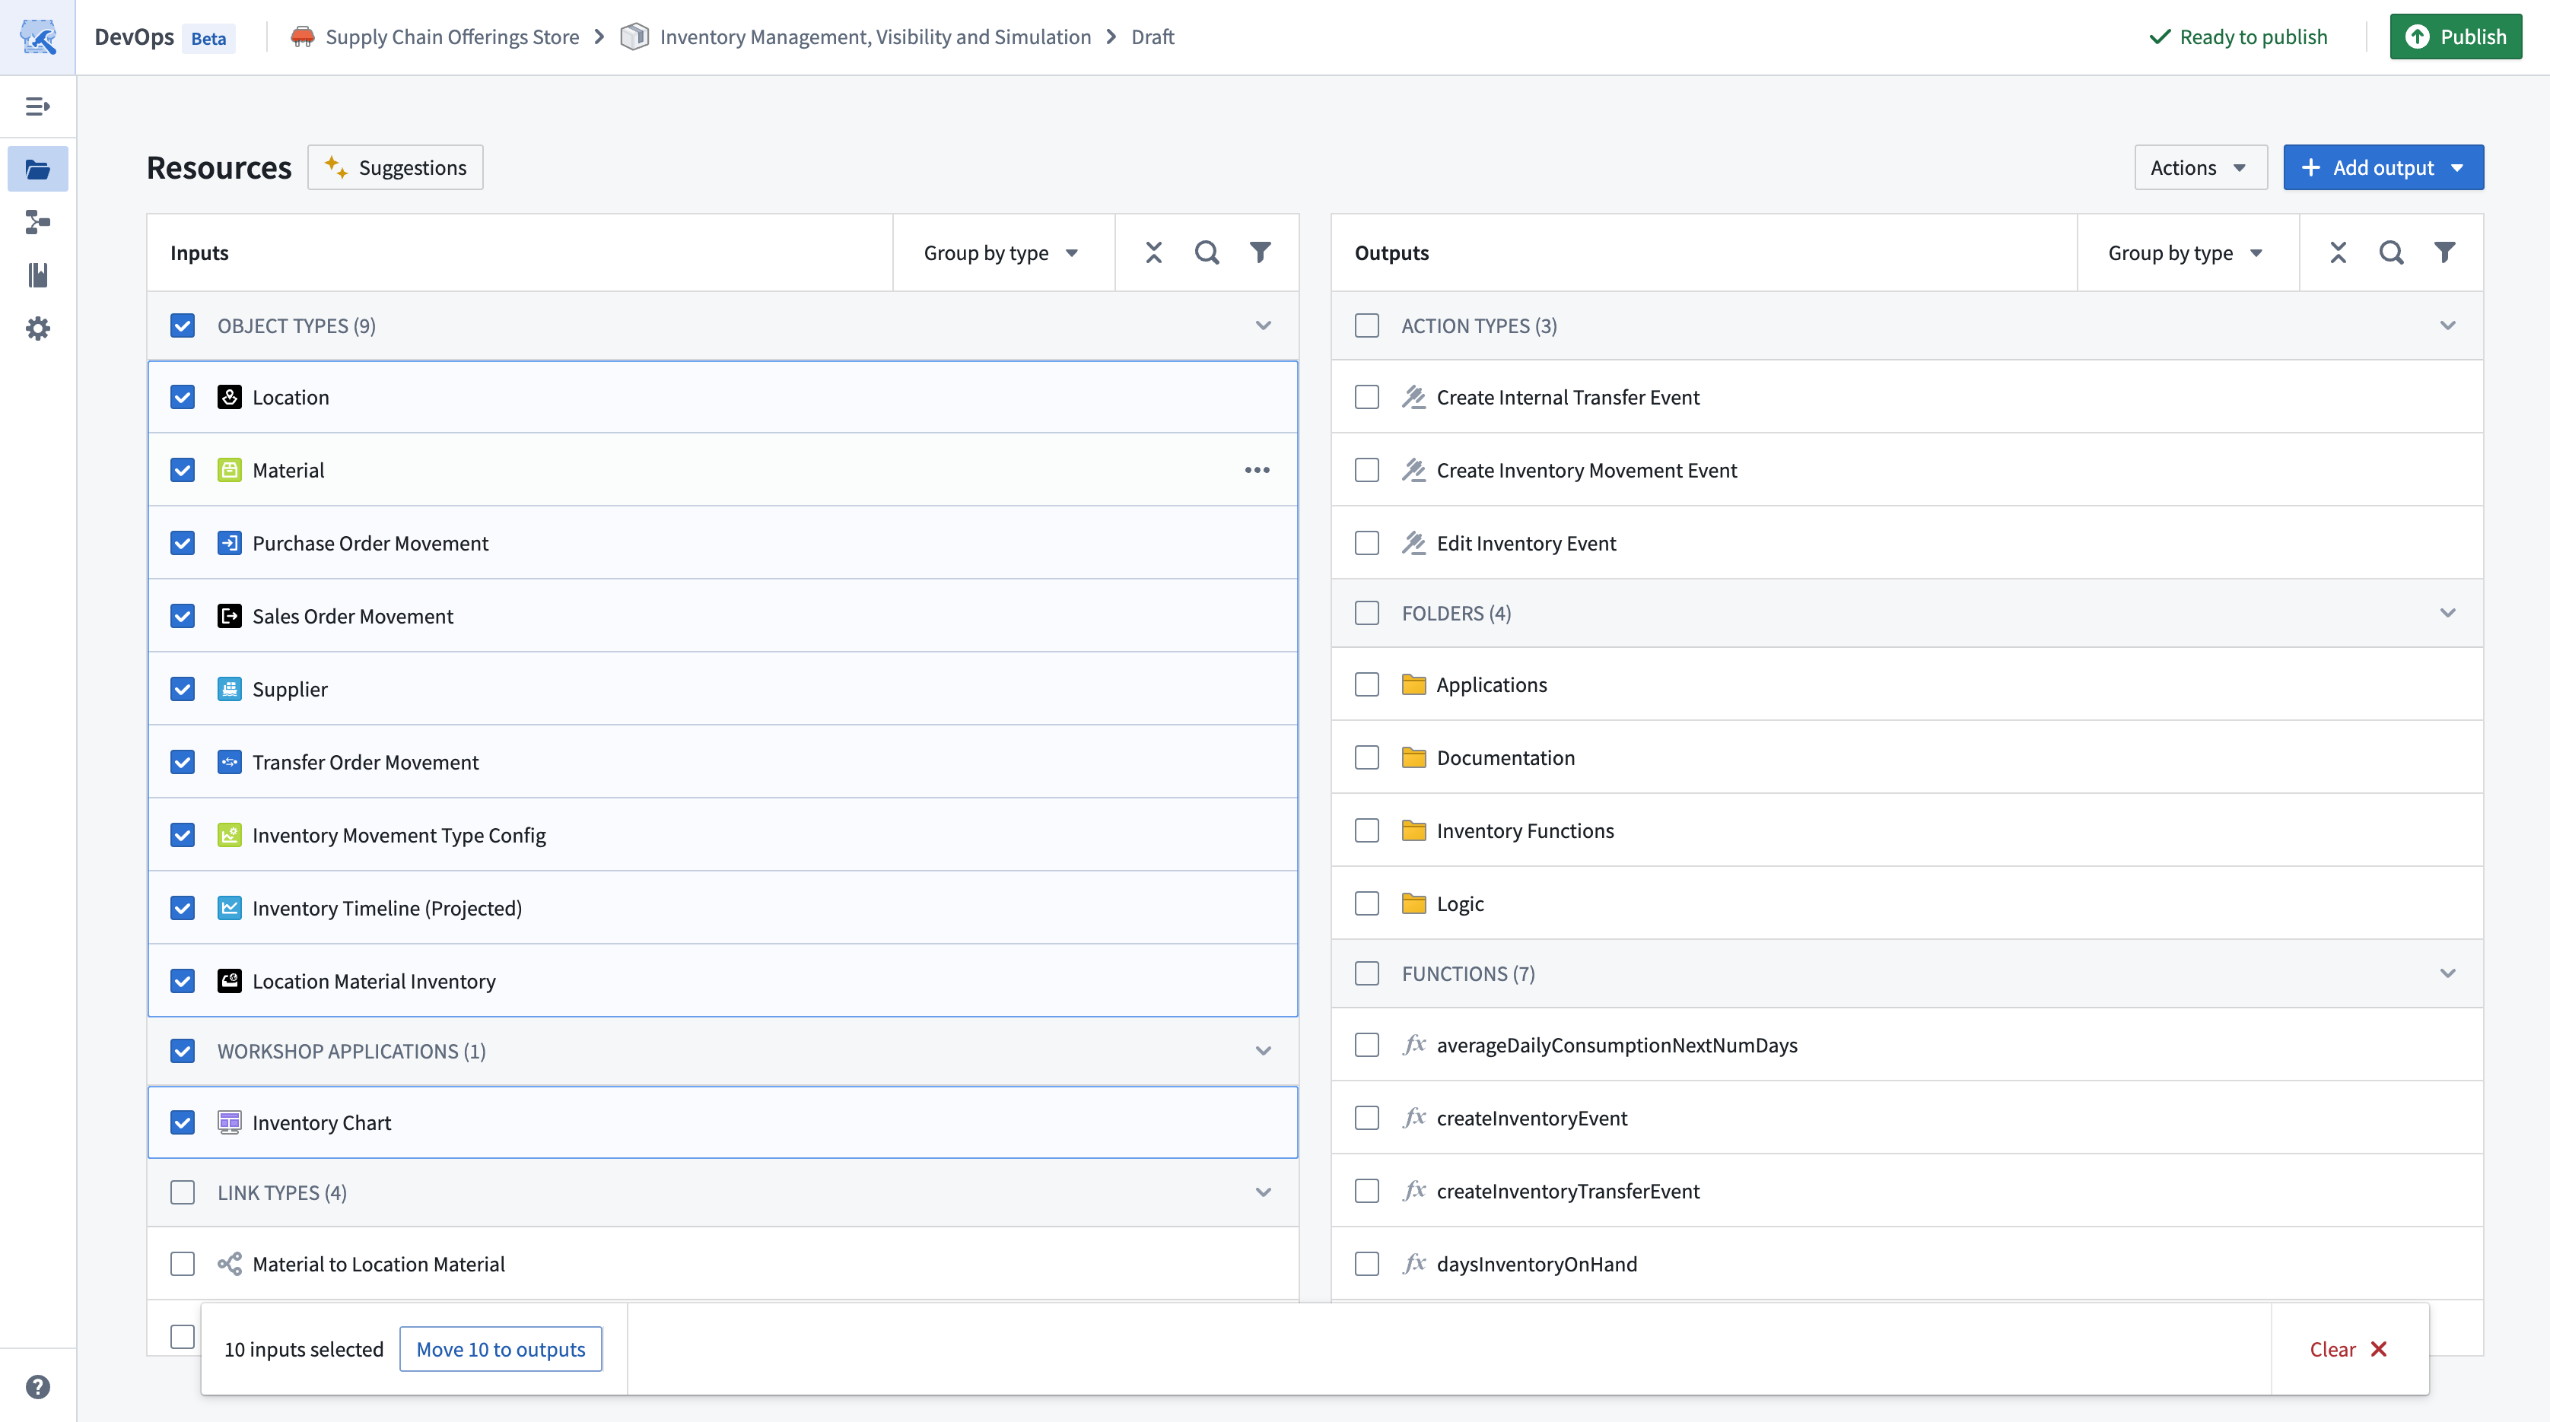
Bulk operations, such as moving multiple types of inputs to outputs, are now available with multi-select edits.
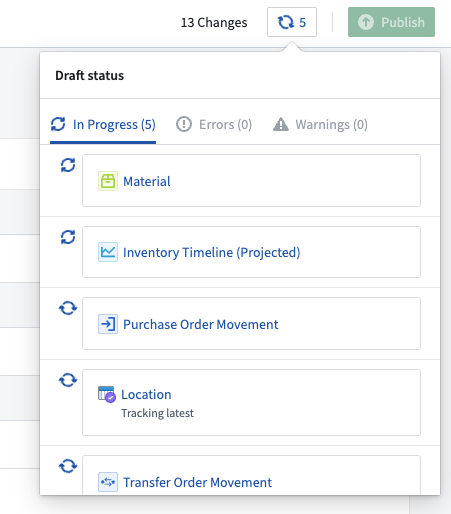
Multiple edits can be stacked and applied without waiting for previous changes to complete.
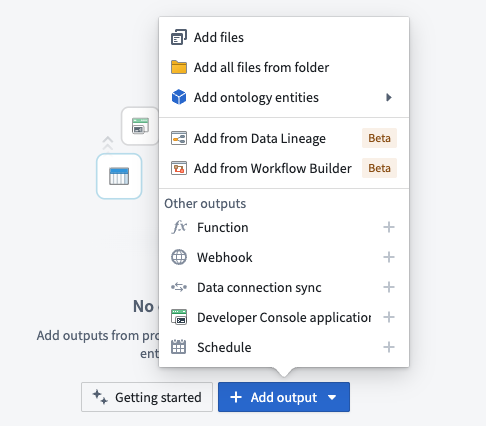
Outputs can now be added in bulk from an existing Data Lineage or Workflow Builder graph.
Review DevOps documentation on creating a product.
We want to hear from you
As we continue to improve DevOps, we want to hear about your experiences and welcome your feedback. Share your thoughts with Palantir Support channels or our Developer Community ↗.
Python Ontology SDK 2.x now generally available
Date published: 2025-07-22
The Python Ontology SDK (OSDK) 2.x is now generally available as of the week of July 14. This update offers improved syntax, return types, and features to improve performance and enable more complex applications. By default, any new Python applications created in Developer Console or Python functions will now use the latest 2.x generator.
Migrate existing applications to Python 2.x
The Python OSDK 2.x migration guide explains version differences, highlights relevant syntax and structure changes, and provides code examples to help you update applications built using legacy versions.
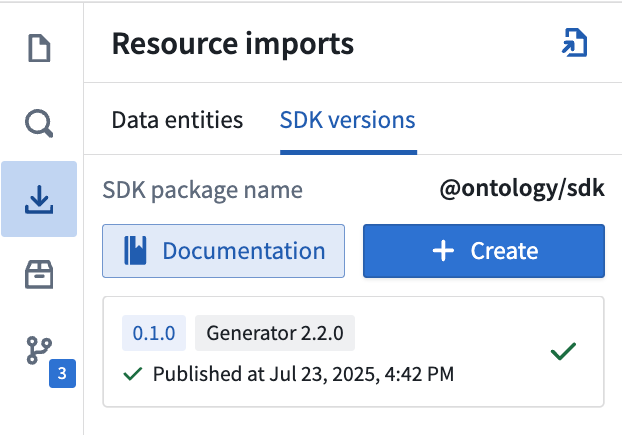
Migrating legacy applications to use version 2.x syntax is not currently mandatory, but existing and upcoming beta features, such as derived properties and media sets will only be available on Python OSDK 2.x releases. To generate Python OSDK 2.x for an existing application in Developer Console, select the SDK versions menu in the left side panel of your application.
Generate Python OSDK 2.x for an existing legacy version application in Developer Console.
To generate Python OSDK 2.x for an existing code repository in Python functions, select the SDK versions menu in the left side panel of your code repository.
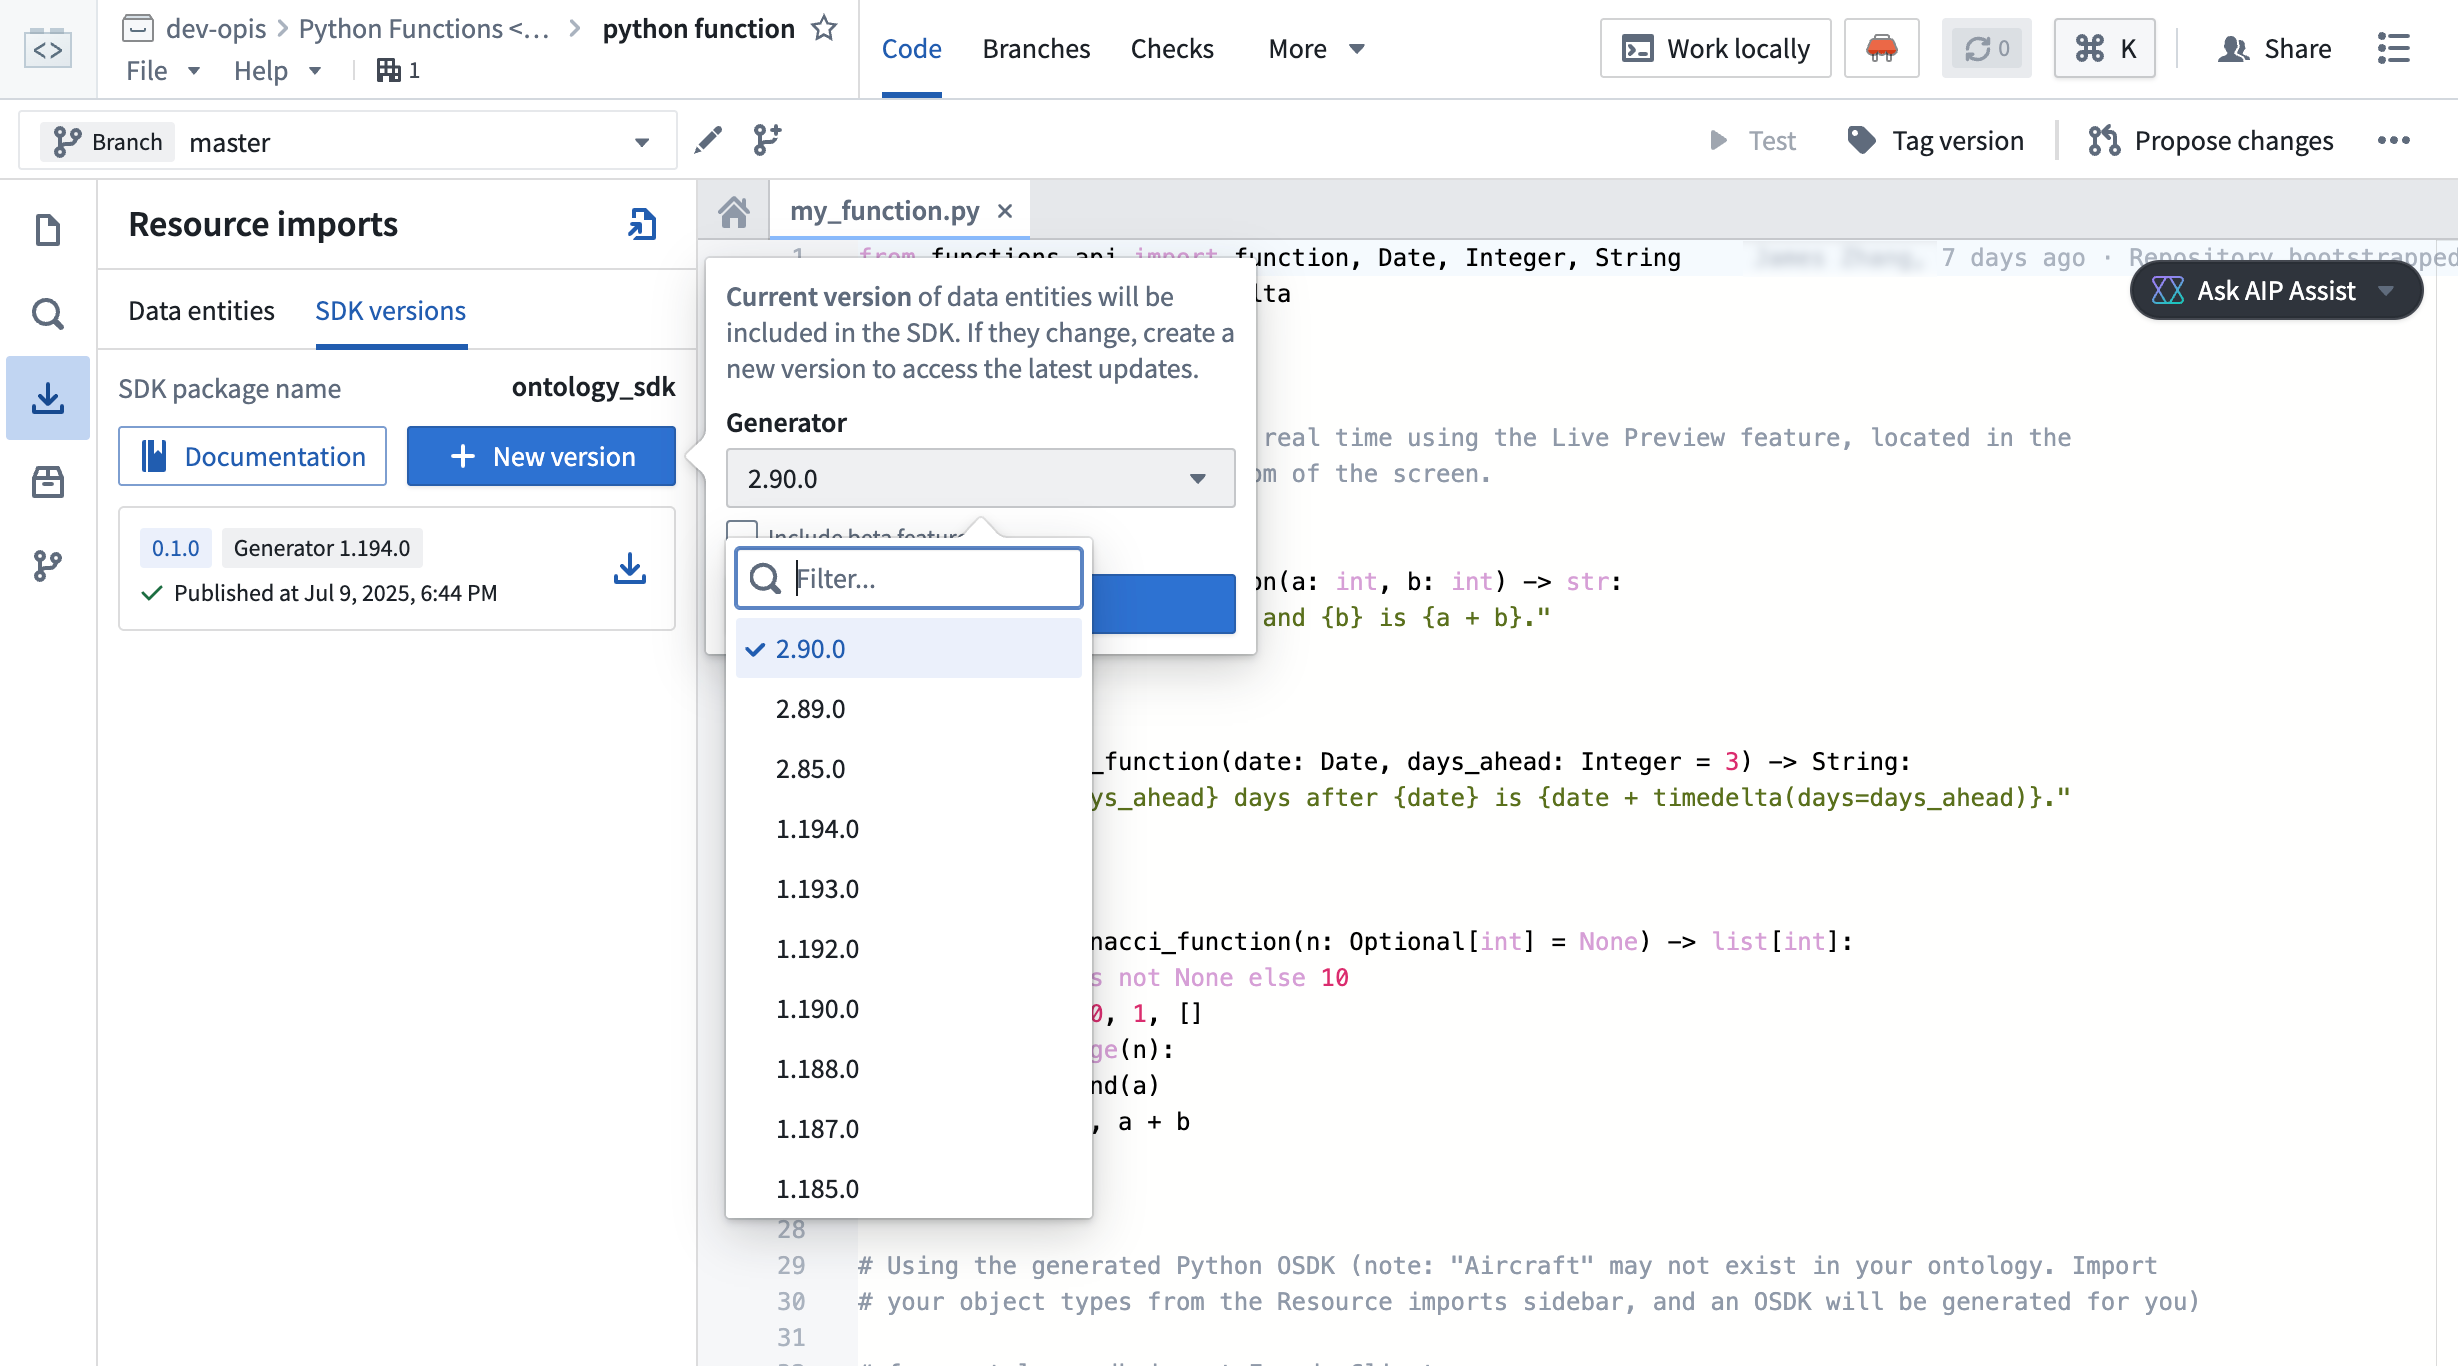
Generate Python OSDK 2.0 for an existing legacy version code repository in Python functions.
Palantir will maintain support for legacy Python applications for at least one year from the release of version 2.x.
Your feedback matters
As we continue to develop the OSDK, we want to hear about your experiences and welcome your feedback. Share your thoughts with Palantir Support channels, or our Developer Community ↗ using the ontology-sdk tag ↗.
Organization guest membership now managed in Control Panel
Date published: 2025-07-22
The interface for viewing and managing guests for your organization has moved from the Platform Settings page to Control Panel. You can now manage guests for your organization in the new Guest membership tab on the Organization permissions page.

The new Guest Membership tab in the Organization Permissions page in Control Panel.
Previously, all organization members could view its guests. Now, viewing guest members requires the Organization settings viewer role, while managing guests requires the Organization administrator role.
You can review information on guest membership and managing organization access on the Manage Access documentation page.
Configure sensitive data scans on a schedule
Date published: 2025-07-22
As of the week of July 21, Sensitive Data Scanner now allows you to schedule scans across all enrollments, giving you greater flexibility and control over your data governance workflows. Previously, scans could only be run as one-time scans or as recurring scans. Recurring scans would trigger each time an applicable resource was updated with new data, but this could be compute-intensive for teams working with high transaction volume resources or utilizing large and complex scans. Now, you can schedule scans to run daily, weekly, or monthly, helping reduce costs and better align your data governance workflows to your organization's needs.
The previously supported recurring scan type has been renamed to "continuous" recurring scans and remains available for use.
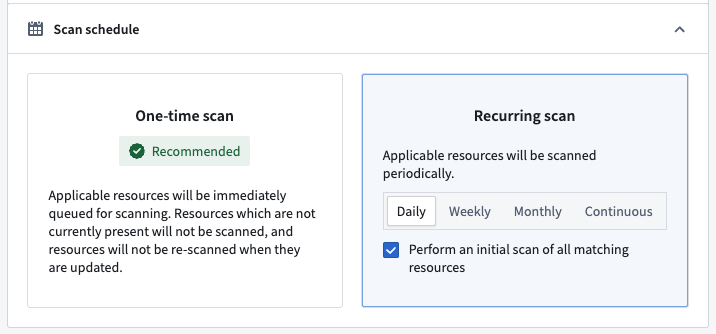
Scan schedule configuration panel, showing options for one-time and recurring scans, including new daily, weekly, and monthly scheduling choices.
What’s next
Scheduled scans are particularly helpful for running compute-intensive scans in an automated manner. In particular, this will offer additional flexibility for organizations configuring automated sensitive data scans on large document, image, and audio files through media set scanning [Beta]. We are looking forward to making media set scanning generally available in the coming weeks.
We want to hear from you!
We are continuing to improve Sensitive Data Scanner based on your feedback! Share your experiences via Palantir Support or our Developer Community and use the sensitive-data-scanner tag.
Palantir MCP enables AI IDEs and agents to design, build, edit, and review in the Palantir platform
Date published: 2025-07-17
Palantir Model Context Protocol (MCP) is now available across all enrollments as of the week of July 14. Palantir MCP enables AI IDEs and AI agents to autonomously design, build, edit, and review end-to-end applications within the Palantir platform. An implementation of Model Context Protocol ↗, Palantir MCP supports everything from data integration to ontology configuration and application development, all performed within the platform.
Key capabilities of Palantir MCP
Vibe code production applications: Enables developers to use AI to produce production-grade applications on top of the ontology while following Palantir's security best practices.
Data integration: Powers Python transforms generation by enabling AI IDEs to get context from Compass, dataset schemas, and execute SQL commands entirely locally.
Ontology configuration: Allows developers to configure their ontology locally without leaving the IDE.
Application development: Integrates with your OSDK to enable the development of TypeScript applications on top of your ontology.
Start using Palantir MCP
To get started, follow the installation steps and read the user guide for examples and best practices. We strongly encourage all local developers to install and regularly update the Palantir MCP to take advantage of the latest changes and tool releases.
Updated language models now available in TypeScript functions repositories
Date published: 2025-07-17
Updated language models are now available in TypeScript functions repositories. These updates provide better consistency between model APIs, making it easier to interchange underlying models. Model capabilities have also been enhanced, with improved support for vision and streaming.
We highly recommend updating your functions repositories with the new models to ensure you stay up to date with the latest AIP features. Review the updated documentation for language models in functions to learn how to update your repository.
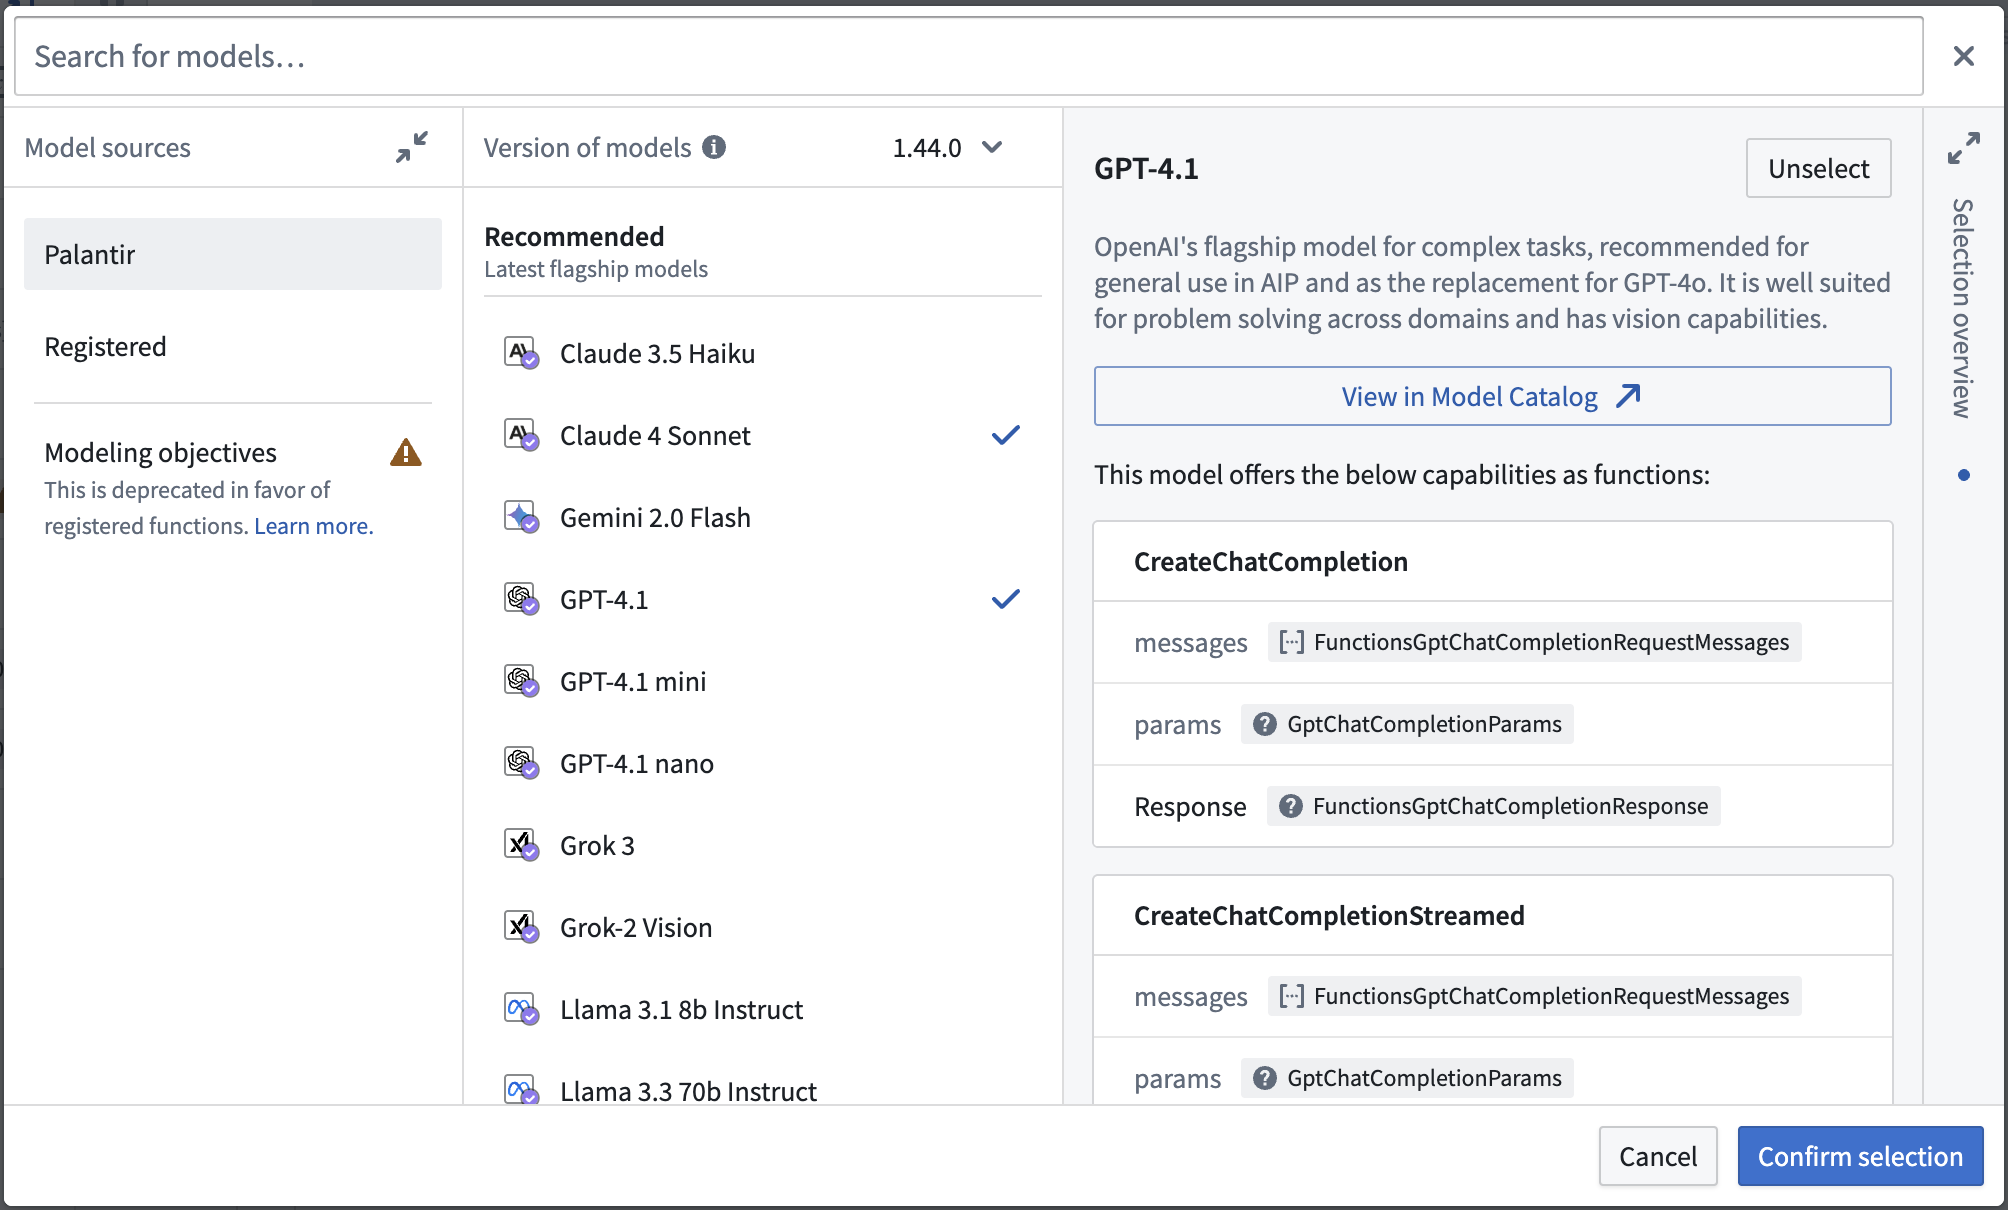
Viewing model capabilities when importing updated language models.
Share your feedback
Share your feedback about functions by contacting our Palantir Support teams, or let us know in our Developer Community ↗ using the functions tag ↗.
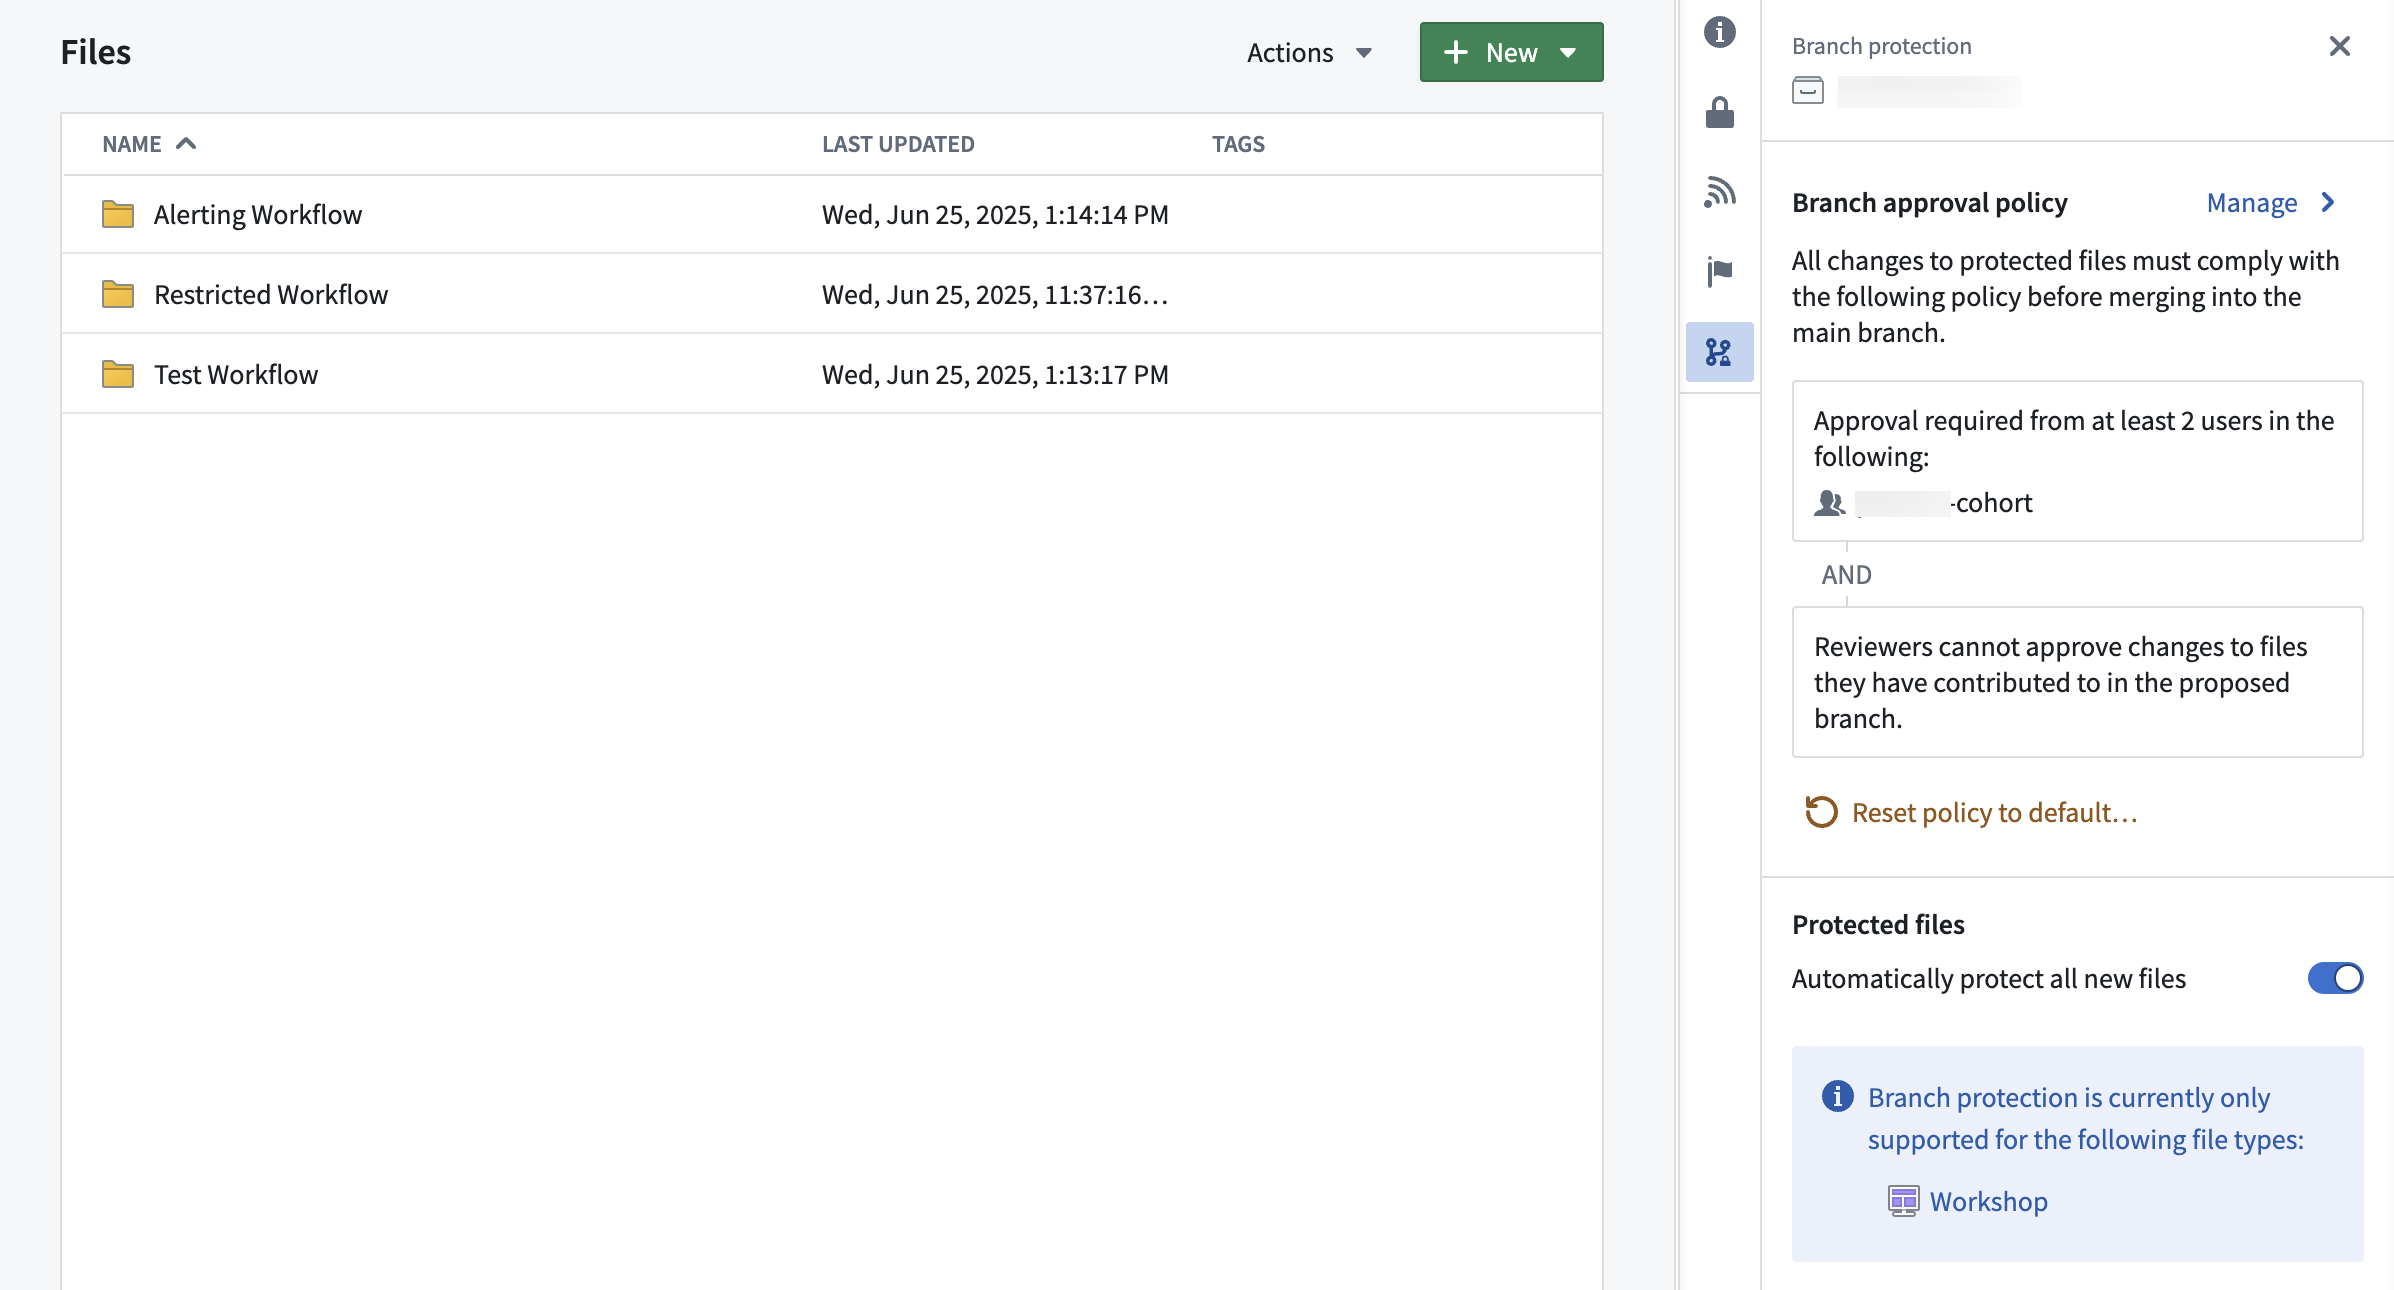
Protect the main branch of your resources and define approval policies for your projects
Date published: 2025-07-09
You can now protect the main branch of your Workshop modules and define custom approval policies. While this only applies to Workshop for now, all types of resources will eventually be supported, with support for ontology and Pipeline Builder resources coming next.
To safeguard critical workflows and maintain development best practices, you can protect the main branch of your resources. This means that any change to a protected resource must be made on a branch and will require approval to take effect.
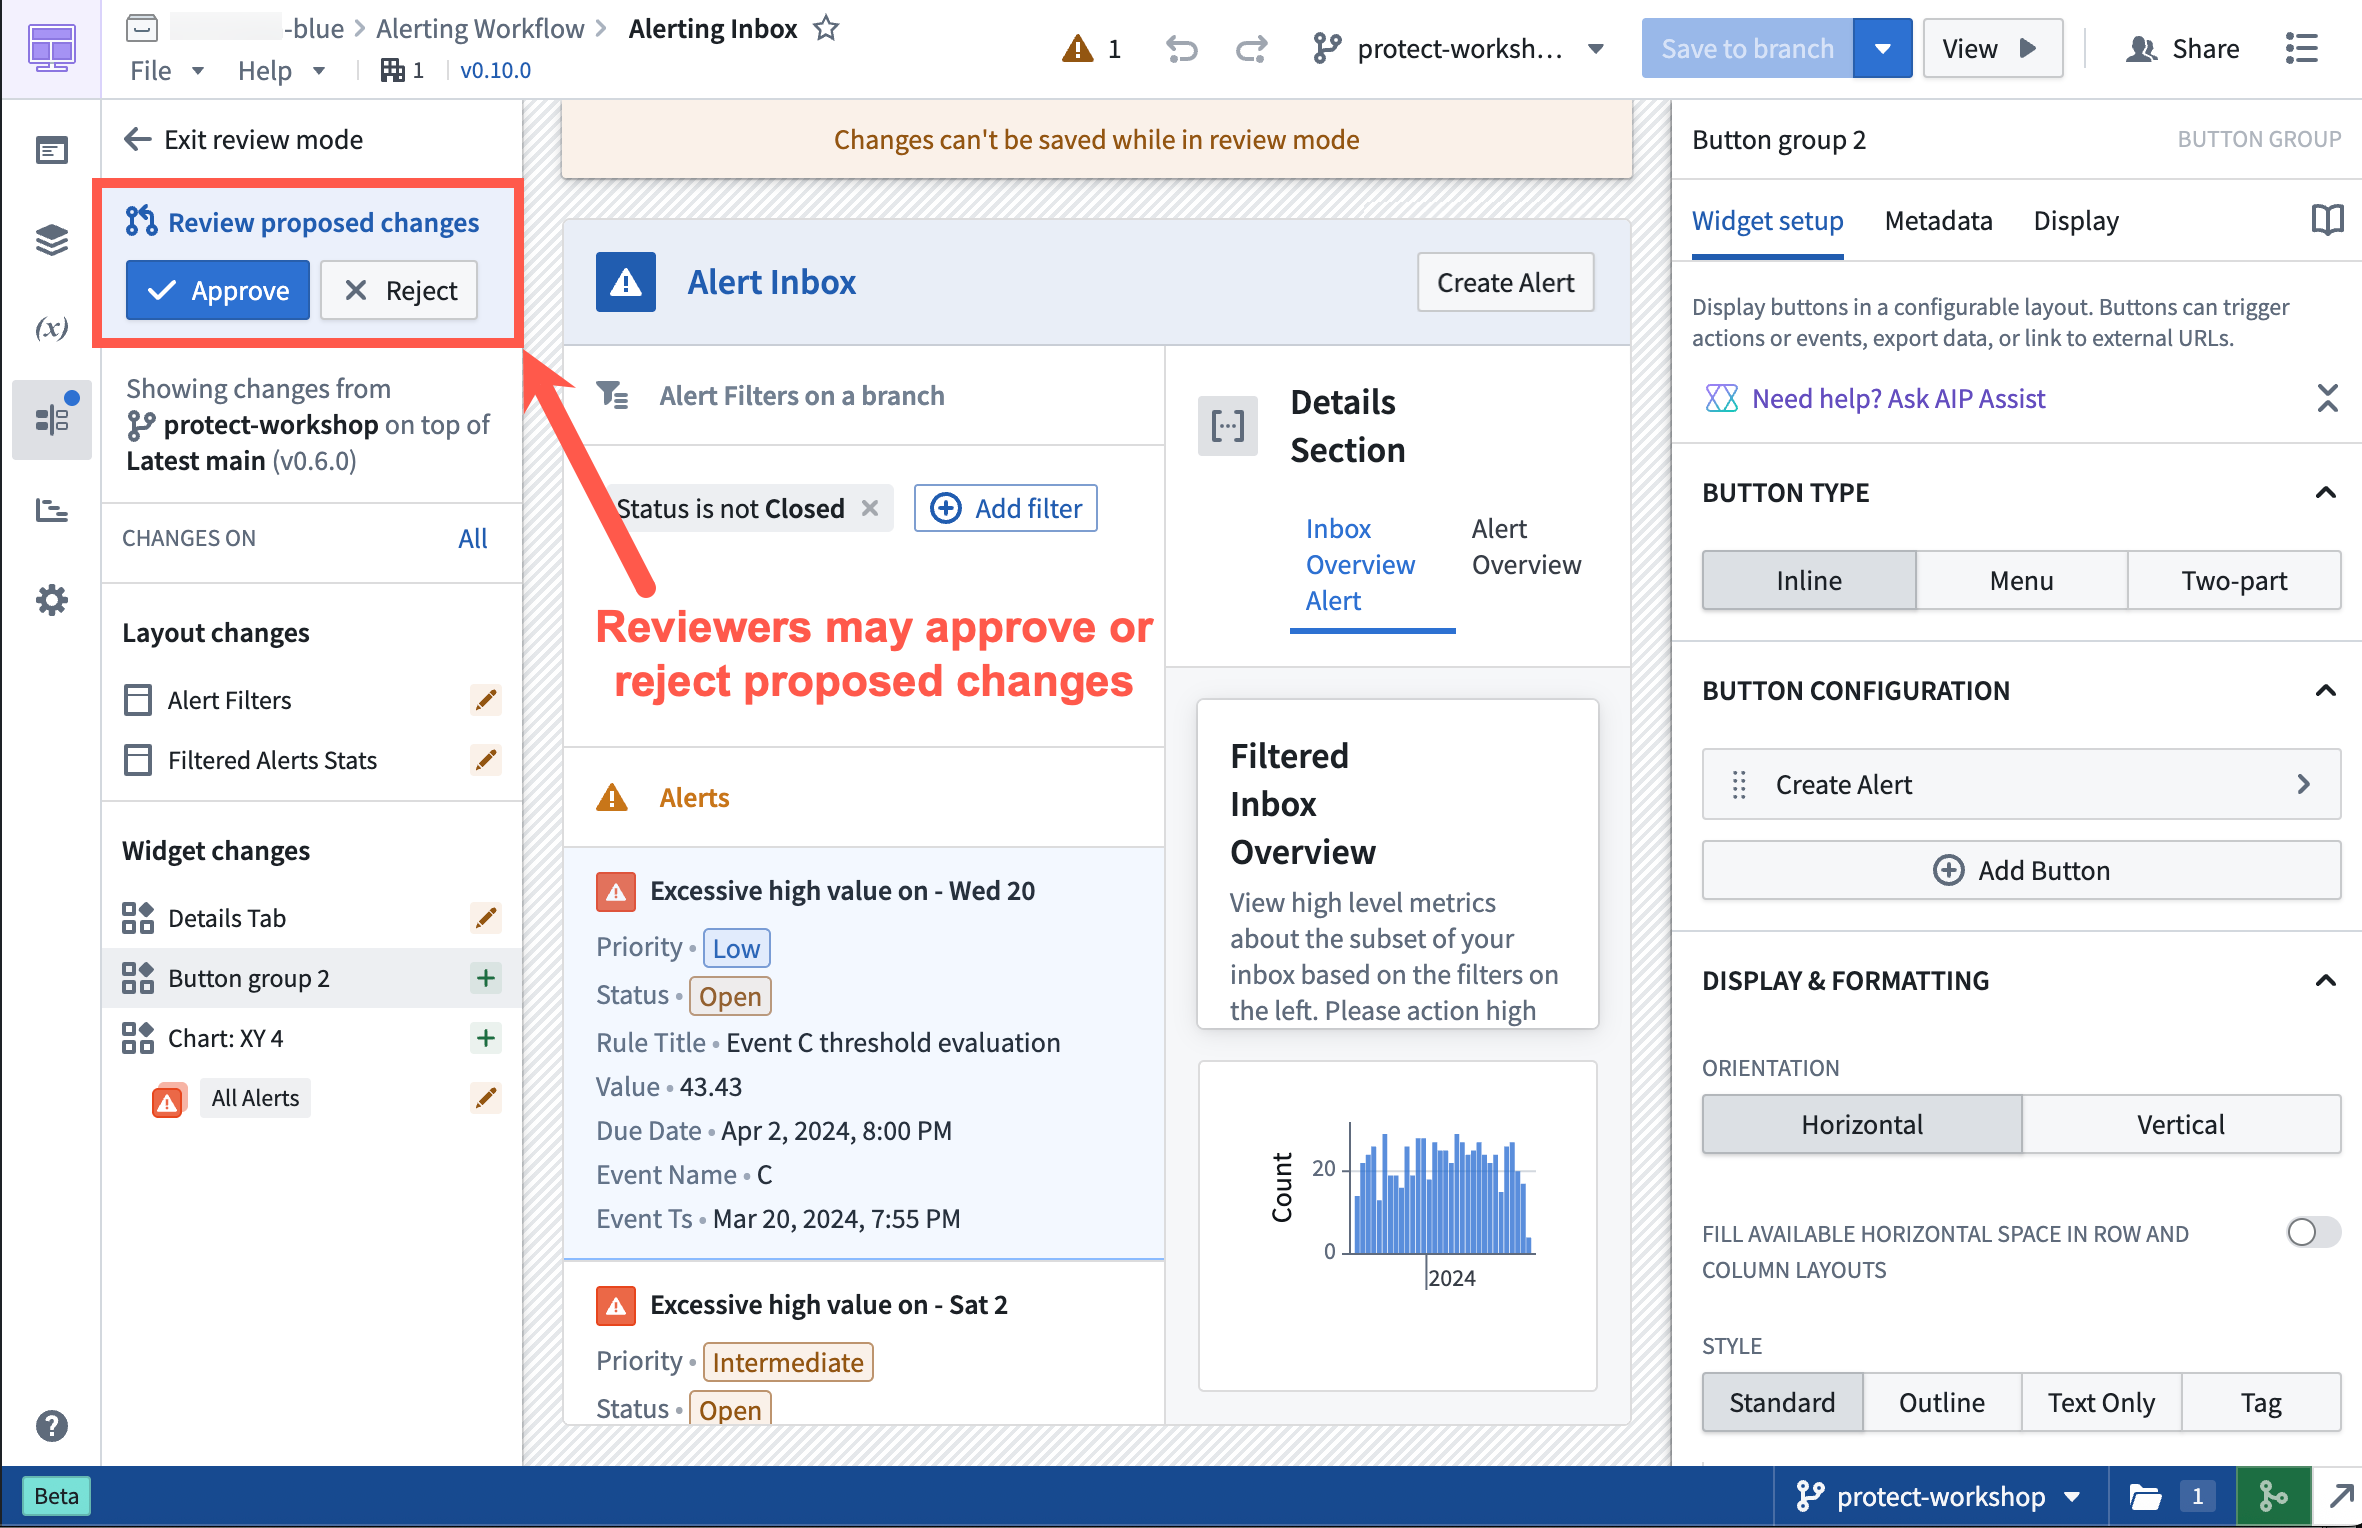
Approval Flow in a protected Workshop application.
Once a resource is protected, any change to that resource will have to be made on a branch and go through an approval process. The approval policy is set at the project level, and defines whose approval is required in order to merge changes to protected resources.

Project with default approval policy.
Project with custom approval policy.
Approval policies have three customizable parameters:
- Eligible reviewers: Define the users or groups that are allowed to review and approve changes to the main branch of a protected resource.
- Number of approvals required: Define the minimum number of approvals needed to enable merging of a change. Options include any eligible reviewer, all eligible reviewers, or custom (specify the number of eligible reviewers).
- Additional requirements: Control whether reviewers can approve changes to files they have contributed to in the proposed branch. A contributor is defined as any user who has made a change to that resource on the branch.
Note that branch protection currently only applies to Workshop resources, but support for protecting ontology resources is coming soon.
Combine multiple object sets and manual test cases in AIP evaluation suites
Date published: 2025-07-08
AIP Evals now supports combining multiple object sets and manual test cases within a single evaluation suite. The test case creation experience has been simplified, allowing you to add, delete, and duplicate object sets as needed. This flexibility enables you to leverage object sets while also adding specific manual test cases for comprehensive function testing.
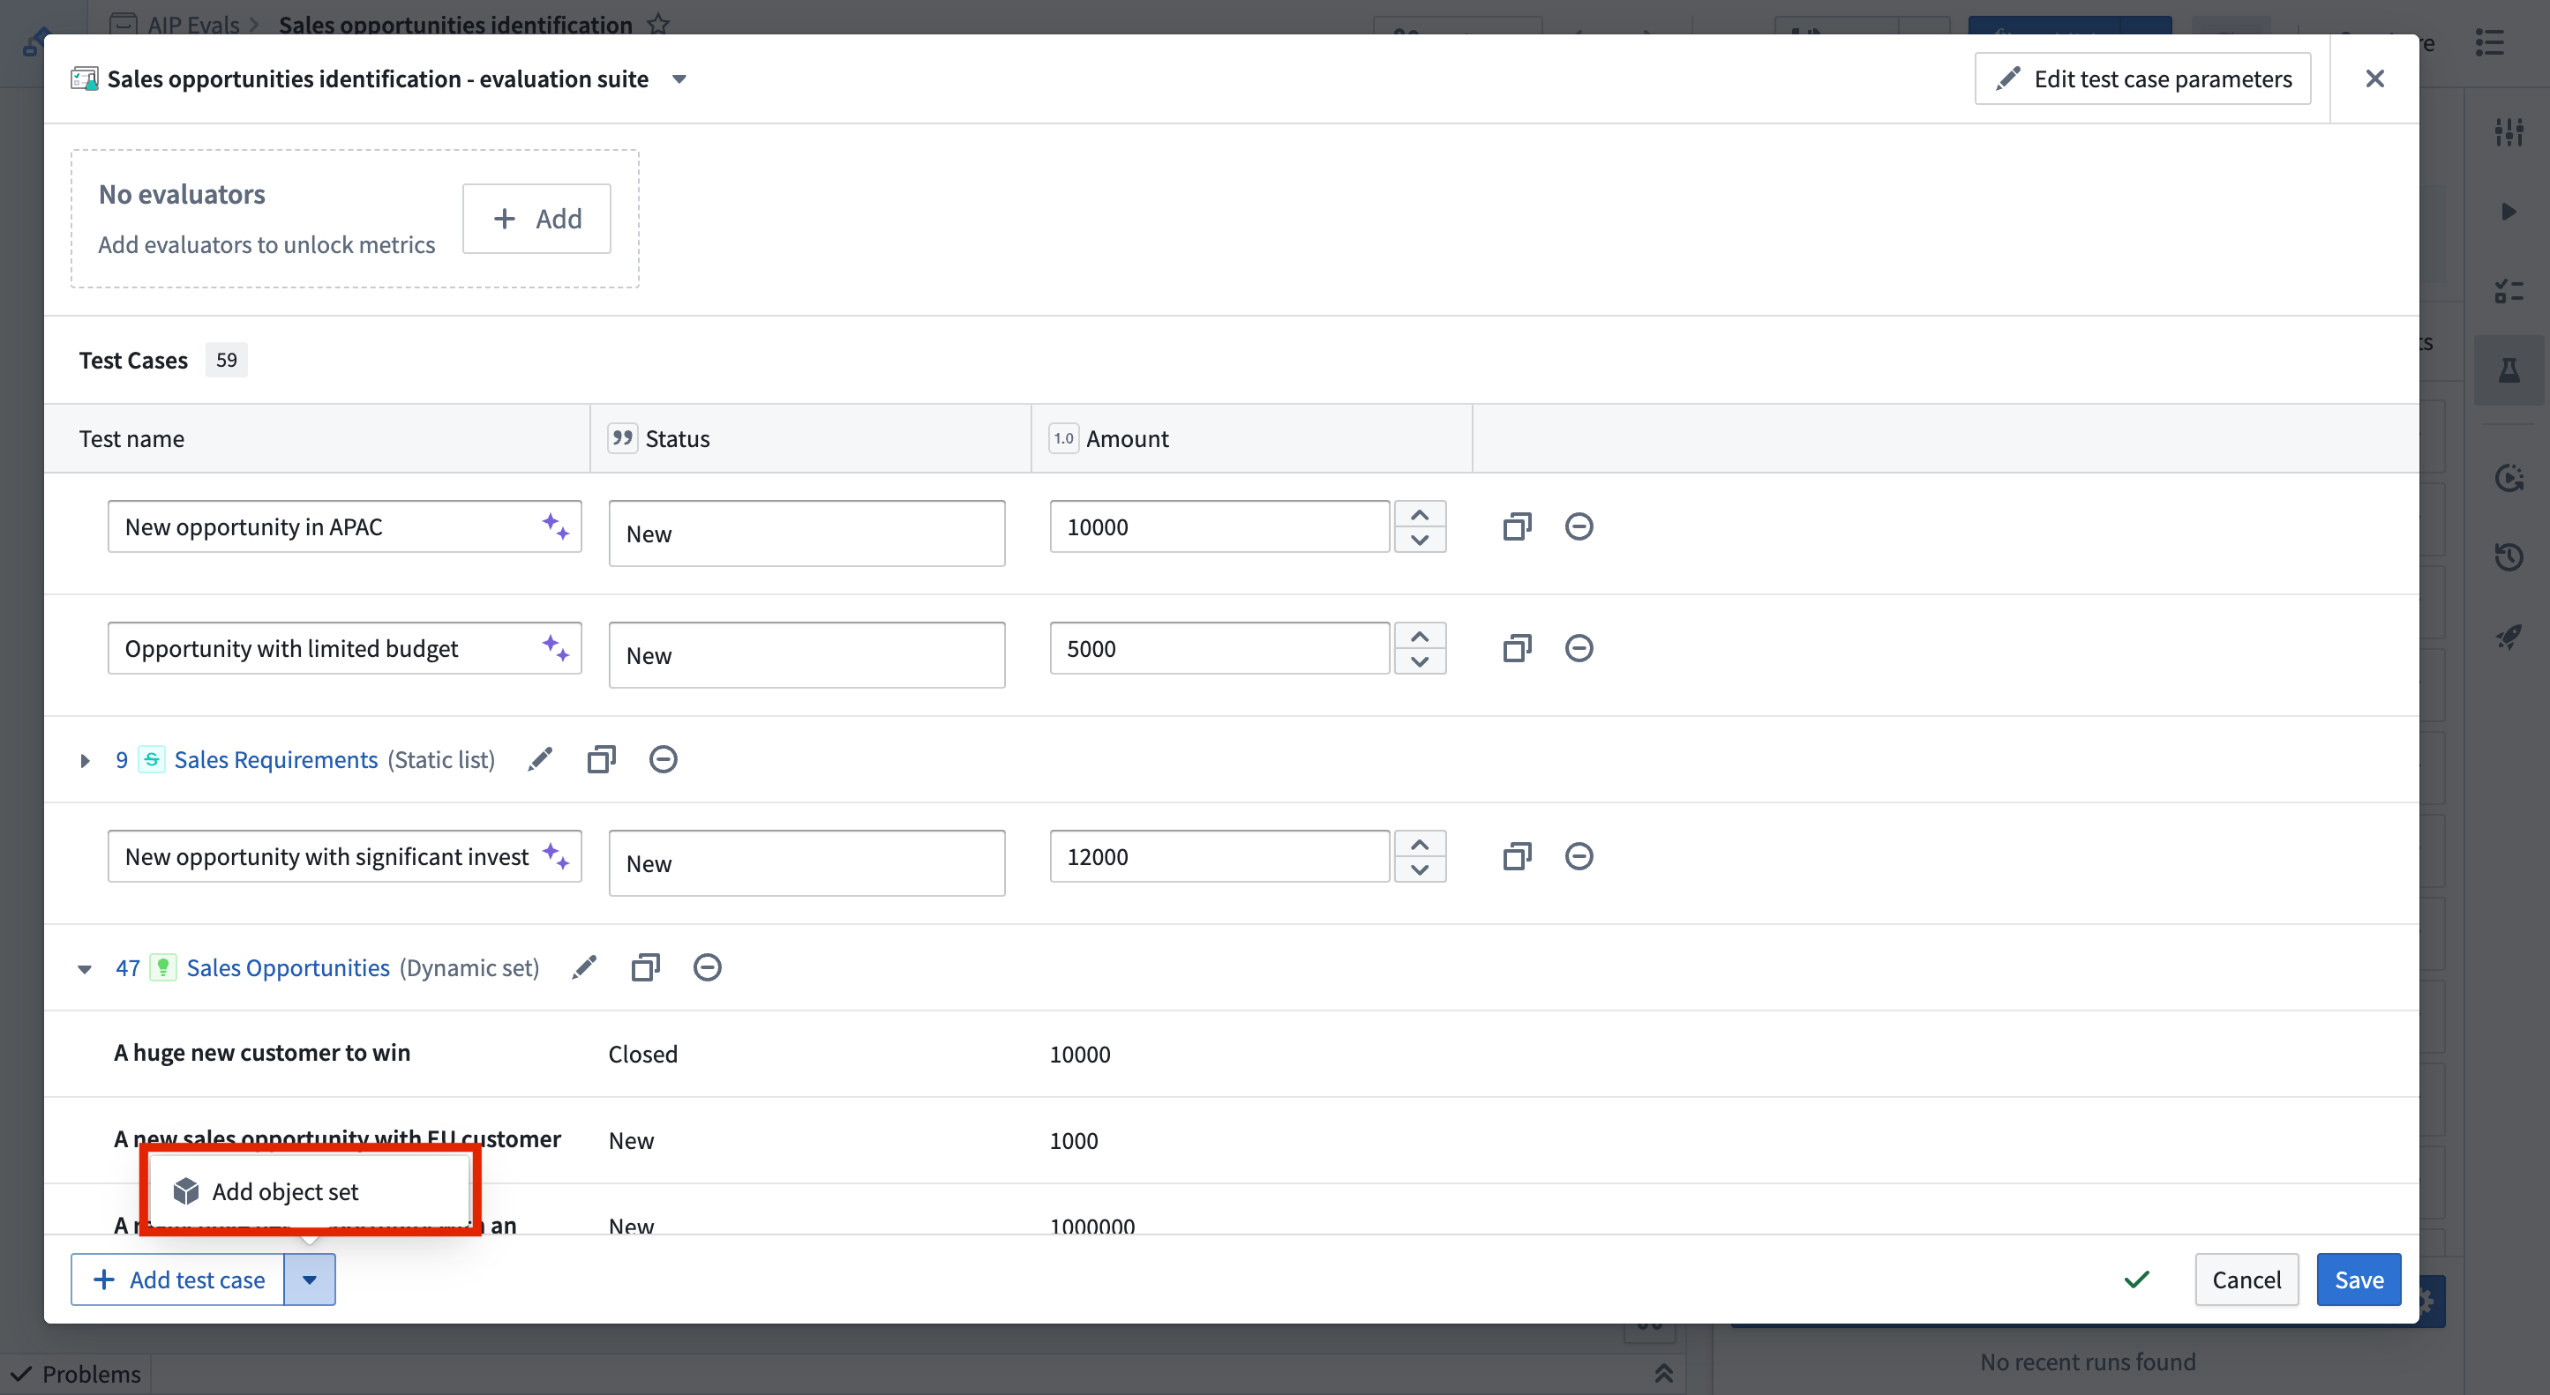
You can now combine multiple object sets and manual test cases to an evaluation suite.
Learn more about adding test cases in AIP Evals.
We want to hear from you
As we continue to build upon AIP Evals, we want to hear about your experiences and welcome your feedback. Share your thoughts with Palantir Support channels or our Developer Community ↗.
Annotate and tag text in Workshop with the Markdown widget
Date published: 2025-07-03
The Markdown widget in Workshop now supports text tagging with the new Annotation feature. With this feature, builders can seamlessly display, create, and interact with annotation objects on text directly in the Markdown widget.

An example of a Markdown widget with a configured "create annotation" action.
Key highlights of this feature include:
- Visual tags: Display annotation objects as highlighted or underlined text with configurable colors.
- On-click interactions: Users can interact with existing annotation objects in the widget by configuring actions and events.
- User tagging: Enable the creation of new annotation objects on specific portions of text.

An example of a Markdown widget with configured annotation interactions.
To learn more about configuring Annotations, refer to the Markdown widget documentation.
Your feedback matters
We want to hear about your experience with Workshop and welcome your feedback. Share your thoughts with Palantir Support channels or on our Developer Community ↗ using the workshop tag ↗.
Limit batch size of incremental inputs to save time and compute costs
Date published: 2025-07-01
When running an incremental transform, you may encounter the following situations:
- An output is built as a
SNAPSHOTbecause the entire input needs to be read from the beginning (for example, the semantic version of the incremental transform was increased). - An output is built incrementally, but one or more inputs to the transform receive numerous transactions that collectively contain a lot of unprocessed data.
Typically, when an output dataset is built incrementally, all unprocessed transactions of each input dataset are processed in the same job. This job can take days to finish, often with no incremental progress. If the job fails halfway through, all progress is lost, and the output would need to be rebuilt. This process often results in undesirable costs and errors and does not address pipelines where large amounts of data need to be frequently processed.
Limiting the maximum number of transactions that should be processed per job offers a solution to this time-consuming problem.
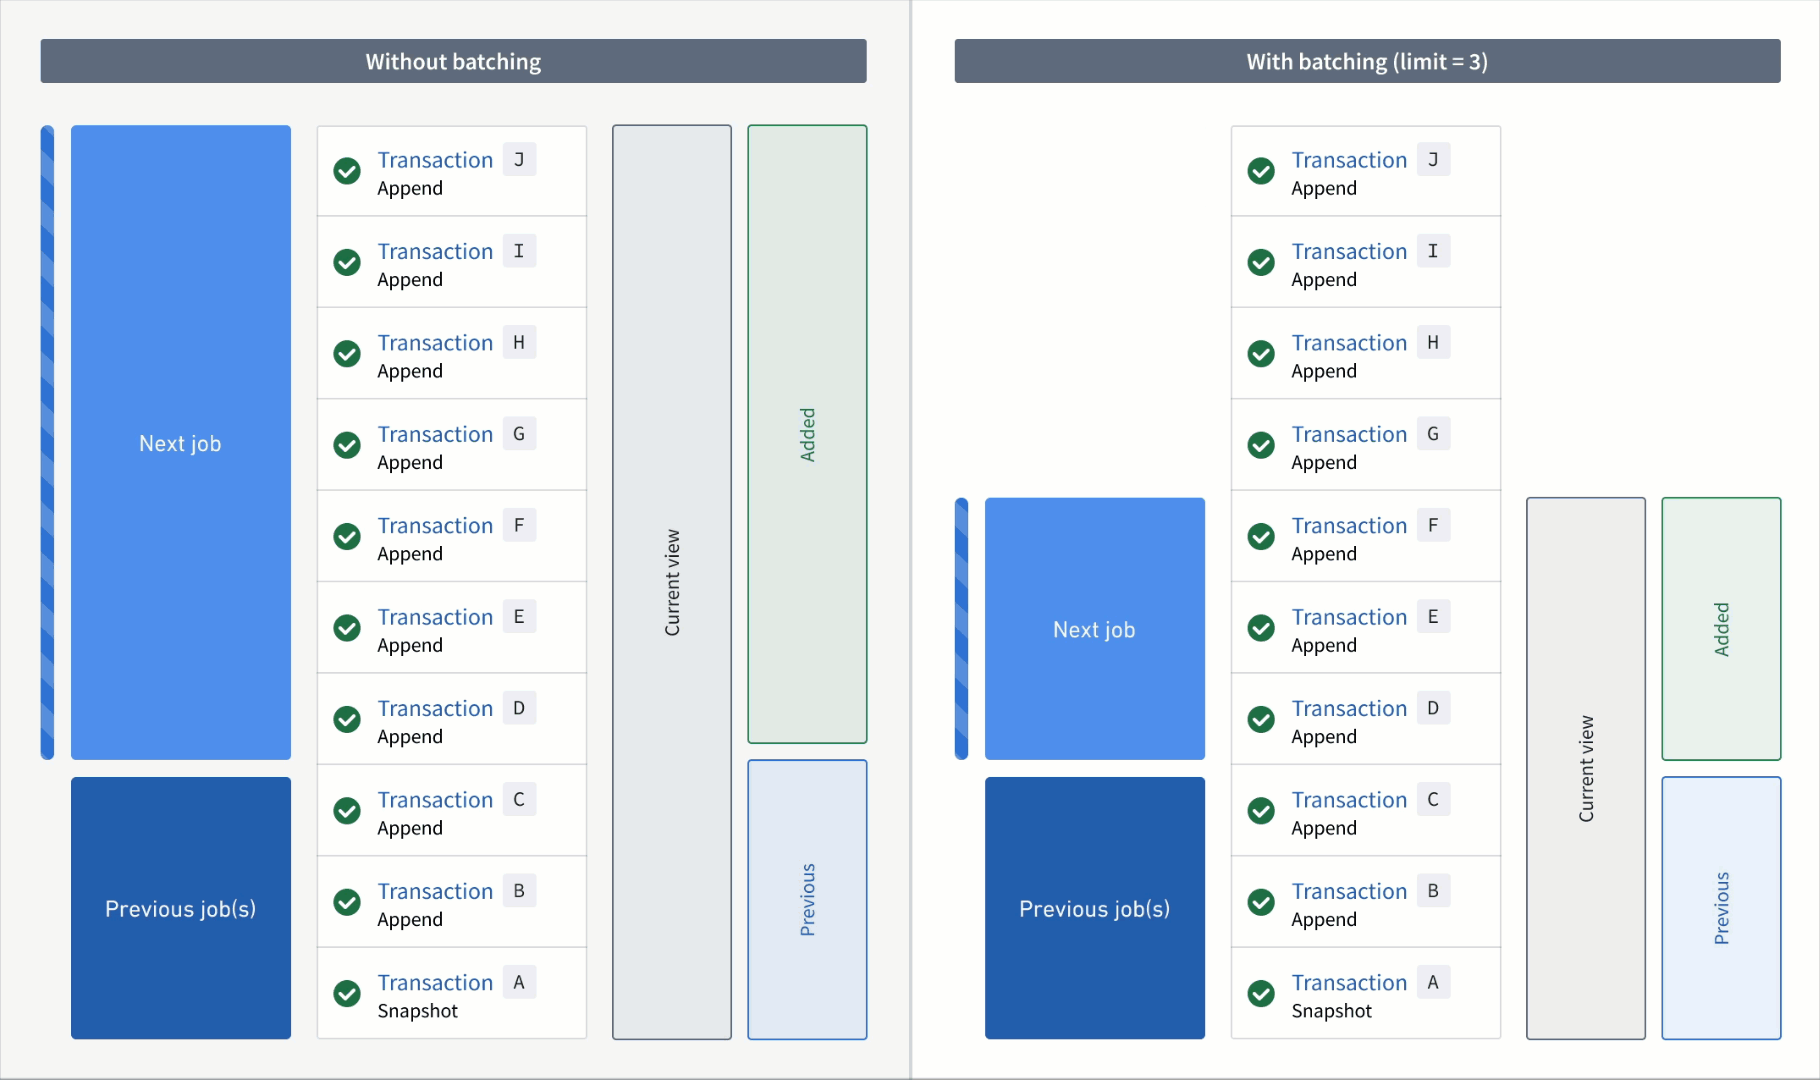
An animation of incremental transform builds. On the left, the transform without transaction limits is constantly working on one job without noticeable progress. On the right, the transform has set a transaction limit of 3 for the input and is progressing through jobs consistently.
Add transaction limits to inputs
If a transform and its inputs satisfy all requirements, you can configure each incremental input using the transaction_limit setting. Each input can be configured with a different limit. The example below configures an incremental transform to use the following:
- Two incremental inputs, each with a different transaction limit
- An incremental input that does not use a transaction limit
- A snapshot input
from transforms.api import transform, Input, Output, incremental

@incremental(
    v2_semantics=True,
    strict_append=True,
    snapshot_inputs=["snapshot_input"]
)
@transform(
    # Incremental input configured to read a maximum of 3 transactions
    input_1=Input("/examples/input_1", transaction_limit=3),

    # Incremental input configured to read a maximum of 2 transactions
    input_2=Input("/examples/input_2", transaction_limit=2),

    # Incremental input without a transaction limit
    input_3=Input("/examples/input_3"),

    # Snapshot input whose entire view is read each time
    snapshot_input=Input("/examples/input_4"),

    output=Output("/examples/output")
)
def compute(input_1, input_2, input_3, snapshot_input, output):
    ...
Next steps and additional resources
After configuring your incremental transform with transaction limits, you can continue to configure and monitor your builds with the following features and tools:
- Create a build schedule: Configure a schedule in Data Lineage to build at a regular interval, and enable an option that ensures your data is never stale.
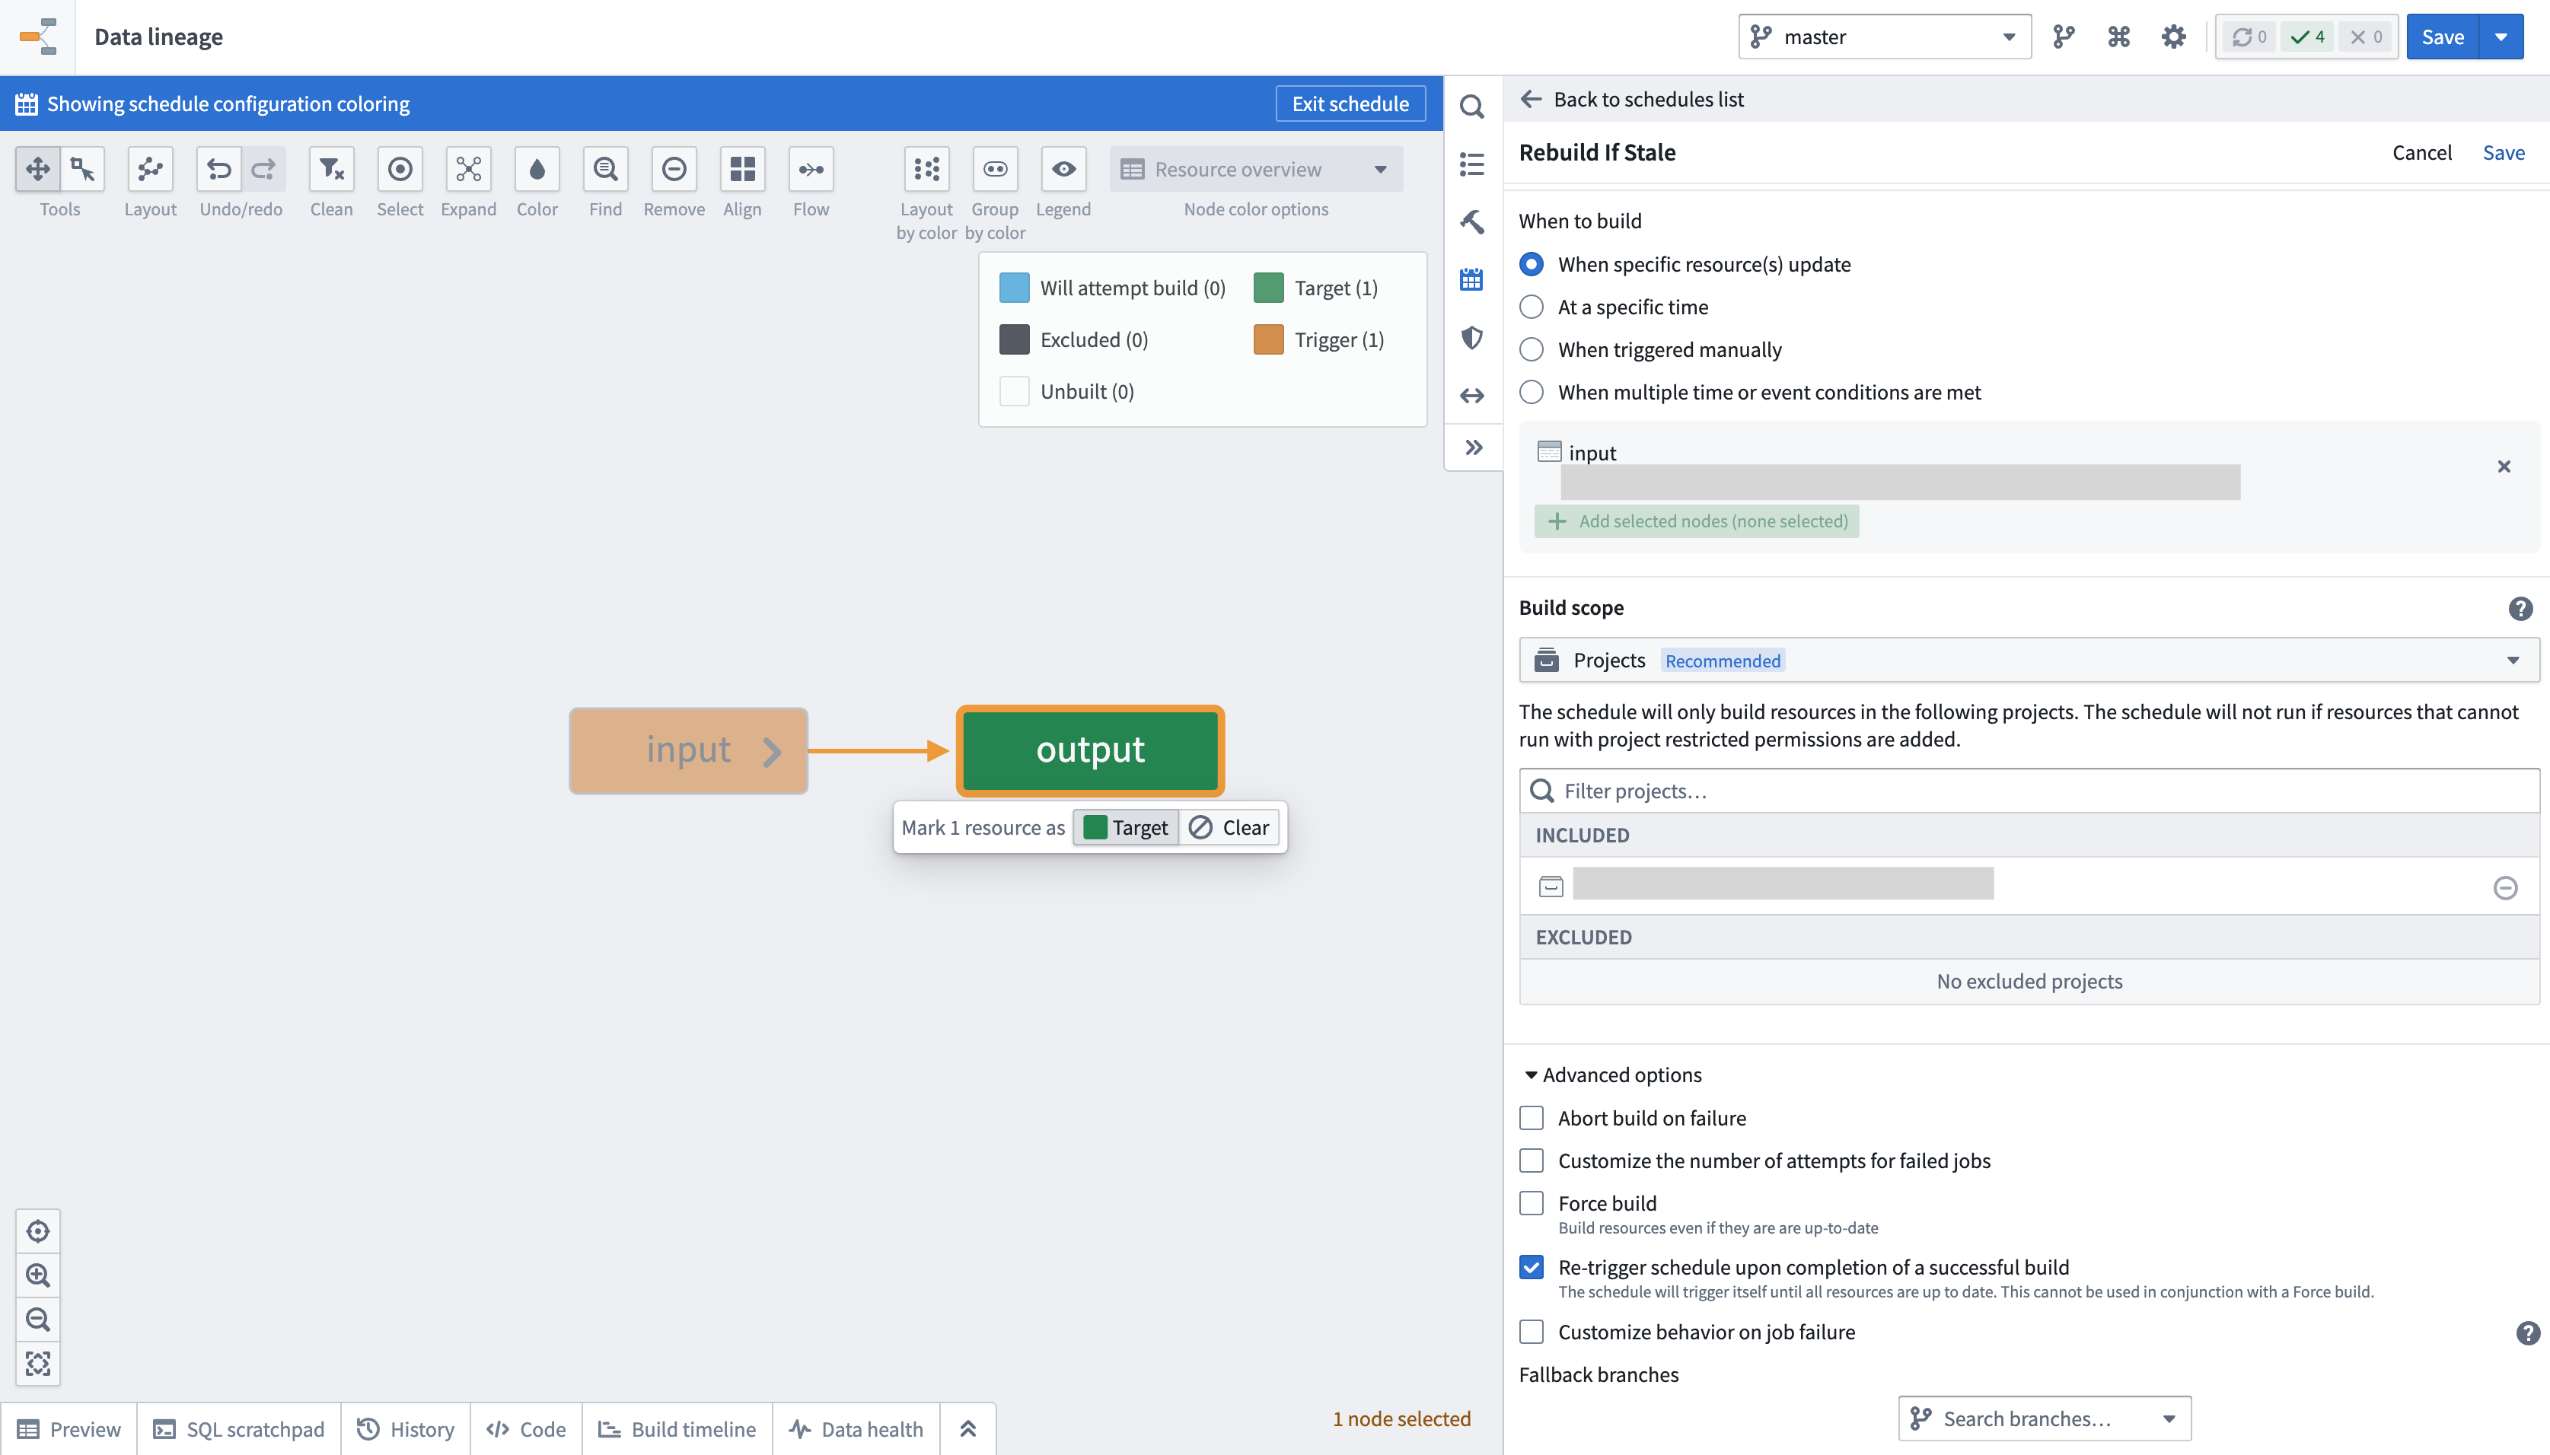
Ensure your data is always up-to-date by configuring a build schedule.
-
Verify job ranges: Review Spark details for your build jobs to verify the transaction limits read per input.
-
Learn about read ranges when transaction limits are set: Review how the
added,current, andpreviousread ranges are used differently when incremental transforms are configured with and without transaction limits.
Requirements and limitations
To use transaction limits in an incremental transform, ensure you have access to the necessary tools and services and that the transforms and datasets meet the requirements below.
The transform must meet the following conditions:
- The incremental decorator is used, and the
v2_semanticsargument is set toTrue. - It is configured to use Python transforms version
3.25.0or higher. Configure a job with module pinning to use a specific version of Python transforms. - It cannot be a lightweight transform.
Input datasets must meet the following conditions to be configured with a transaction limit:
- It must be a transactional dataset input.
- In the current view of the dataset, the input must have only
APPENDtransactions; however, the starting transaction can be aSNAPSHOT. - It cannot be a snapshot input.
Your feedback matters
We want to hear about your experiences when configuring incremental transforms with transaction limits, and we welcome your feedback. Share your thoughts with Palantir Support channels or our Developer Community ↗.
Roll back pipelines to a previous state in Data Lineage
Date published: 2025-07-01
When building your pipeline, you may need to roll back a dataset and all of its downstream dependents to an earlier version. There can be many reason for this, including the following:
- You identified a mistake in the logic required to build a dataset and need to revert it.
- Incorrect data was pushed into your pipeline from an upstream source.
- An outage occurred, and you want to quickly navigate back to an earlier state of your pipeline.
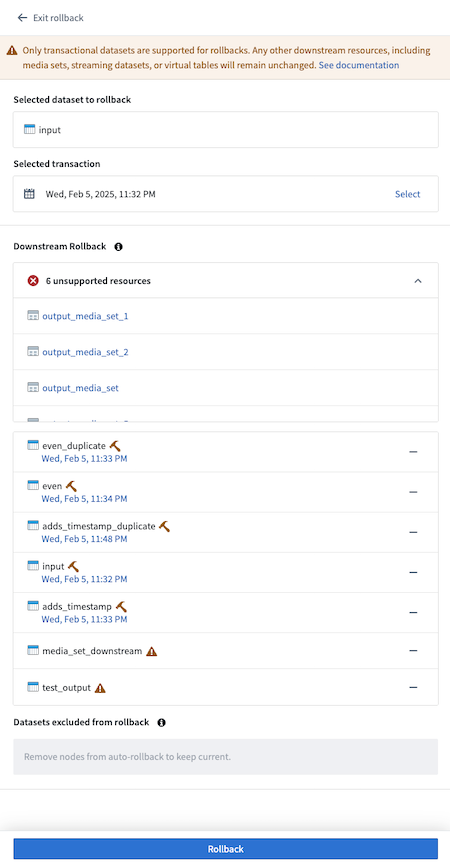
The pipeline rollback feature, in beta, allows you to revert back to a transaction of an upstream dataset. When performing a rollback, the data provenance of the upstream dataset transaction is used to identify its downstream datasets and their corresponding transactions to create a final pipeline rollback state. Typically, this process would require several steps to properly roll back each affected dataset. With pipeline rollback, this is reduced to a few simple steps discussed below, along with the ability to preview the final pipeline state before confirming and proceeding with the rollback. Pipeline rollback also ensures that the incrementality of your pipeline is preserved.
As you set up your rollback, you can choose to exclude any downstream datasets; these datasets will remain unchanged as the pipeline is rolled back to the selected transaction.
This feature is currently in the beta stage of development, and functionality may change before it is generally available.
Execute a pipeline rollback
- Navigate to a Data Lineage graph containing the upstream dataset you would like to roll back.
- Select the dataset in the graph. Then, from the branch selector at the top of the graph, select the branch on which you would like to perform the rollback.
- Select View node properties in the panel on the right.
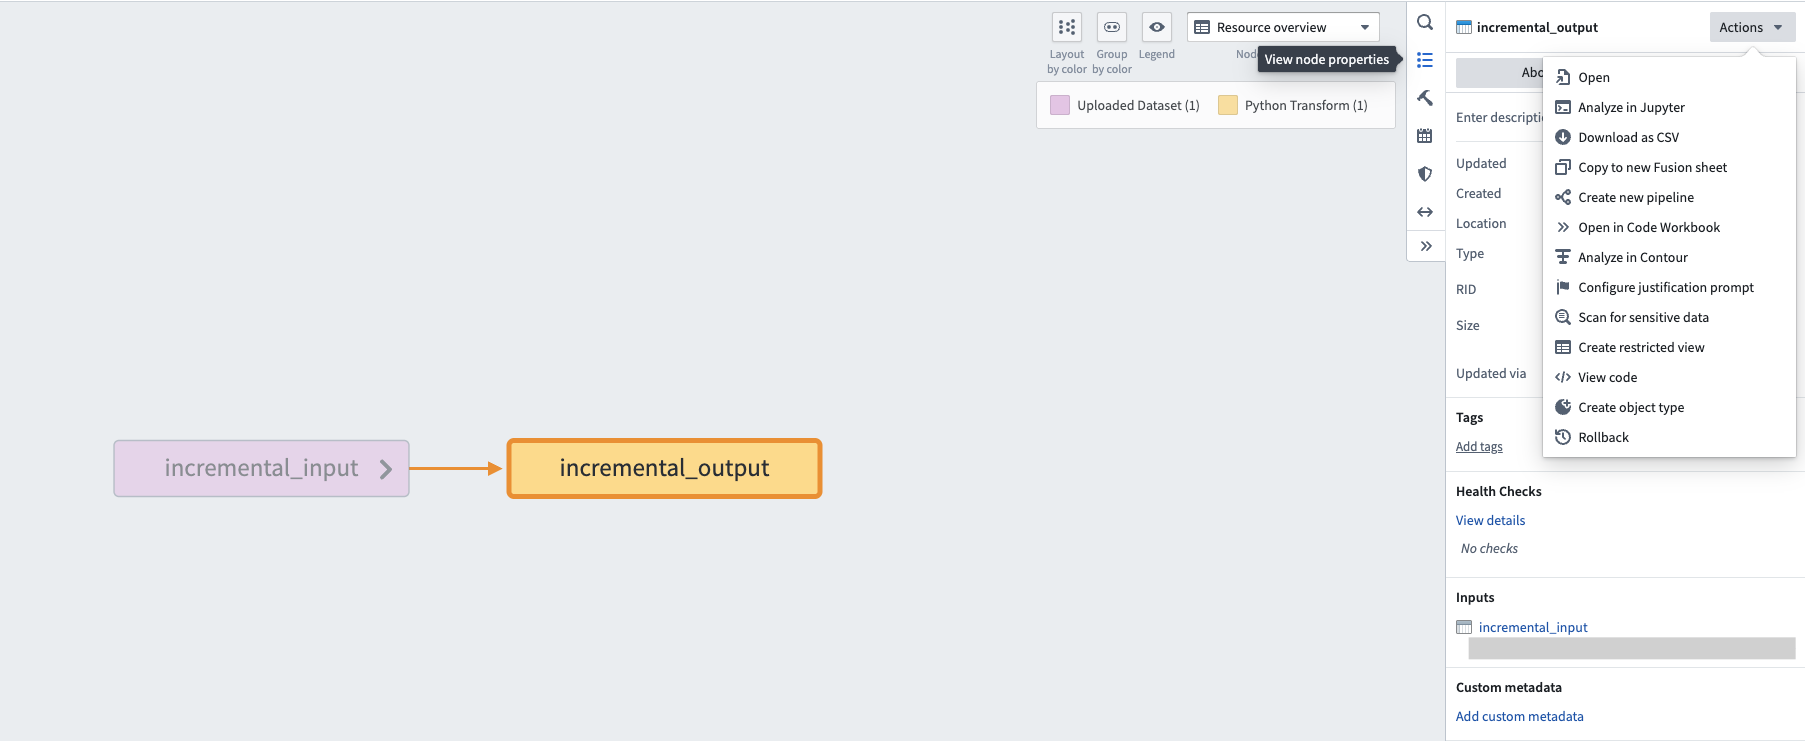
The right editor panel in Data Lineage, with the option to View node properties.
-
Select Actions, then Rollback.
-
Under Selected transaction, choose the transaction to which you would like to roll back.
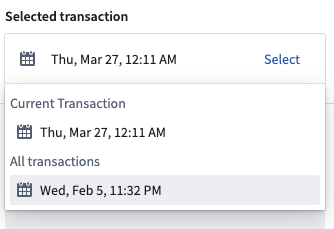
An example of a selected transaction.
After choosing the transaction, downstream datasets will automatically be found and the states they will revert to if the rollback is actioned will be displayed.
Resource types that are unable to be rolled back, including streaming datasets, media sets, and restricted views, will be displayed under the unsupported resources section. Transactional datasets on which you do not have Edit access will also be included in this list.
- Select the timestamp under each dataset to navigate to the History page of the input, where the corresponding transaction will be highlighted.
A list of datasets with timestamps of the builds.
- Select any datasets to exclude from the rollback by selecting — to the right of the dataset name. Once excluded from rollback, the dataset will appear in the Datasets excluded from rollback section.
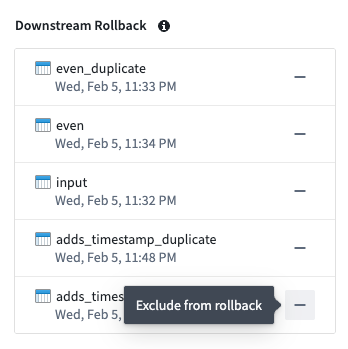
A list of datasets selected for rollback that you can exclude.
- To add an excluded dataset back to the rollback, select + to the right of the dataset name.
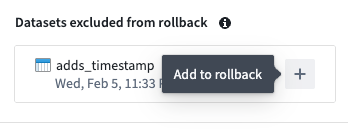
A dataset excluded from rollback that you can choose to add back.
- After finalizing the state of your desired rollback, select Rollback. A confirmation dialog will appear.
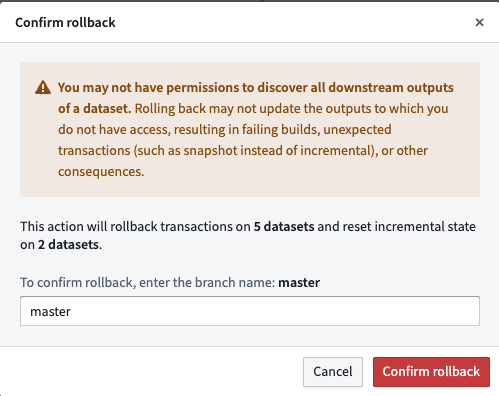
A confirmation dialog confirming the rollback of five dataset transactions and incremental state resets of two datasets.
- Enter the branch name as confirmation, then select Confirm rollback to proceed.
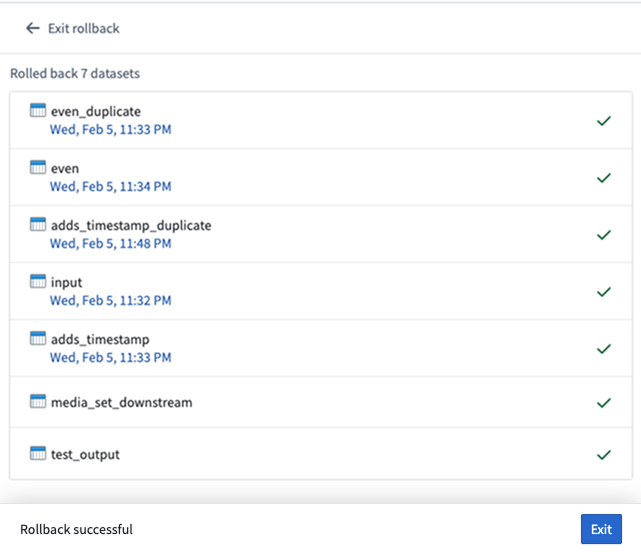
A confirmation of seven successful dataset rollbacks.
- Once the rollback is complete, navigate to the History tab of the datasets and notice that the rolled back transaction is now crossed out, as shown below:
An example of a dataset that was rolled back, with the rolled back transaction crossed out.
Additional resources and support
To learn more about pipeline rollbacks, review our public documentation. We also invite you to share your feedback and any questions you have with Palantir Support or our Developer Community ↗.
中文翻译
公告
提醒: 请注册 Foundry Newsletter(Foundry 新闻通讯),即可直接在收件箱中接收平台新产品、功能和改进的摘要。有关如何订阅的更多信息,请参阅 Foundry Newsletter and Product Feedback channels announcement(Foundry 新闻通讯与产品反馈渠道公告)。
欢迎在我们的 开发者社区论坛 ↗ 分享您对这些公告的看法。
使用 OSDK 的 Python 和 TypeScript v2 Functions 现已兼容 Marketplace
发布日期:2025-07-31
使用 OSDK(Ontology SDK) 的 Python 和 TypeScript v2 Functions 现在可以作为内容包含在 Marketplace 产品中。
在 Marketplace 产品中打包使用 OSDK 的 Python 函数。
当您将使用 OSDK 的函数添加到 Marketplace 产品时,该函数的 OSDK 将自动为您添加。此外,您的 OSDK 中使用的所有本体实体(ontology entities)都将作为输入(inputs)添加。当您安装 Marketplace 产品时,您可以重新配置 OSDK 使用的每个实体,改为引用安装目标本体中的实体。
安装包含 Python 函数的 Marketplace 产品时,重新配置 OSDK 使用的对象。
已部署 Python 函数的新配置选项及整合设置
发布日期:2025-07-31
现已提供已部署 Python 函数(deployed Python functions)的新配置选项,可提供更高的可见性、改进的可用性以及更完善的零停机升级过渡流程。此更新允许用户为已部署的 Python 函数分配 GPU 资源,通过并行处理加速计算密集型模型训练和推理工作流。请在 Ontology Manager 的新 Execution 页面访问这些及其他 Python 函数部署设置,该页面整合了之前的 Deployment 和 Configuration 页面。
在无服务器模式(serverless mode)下修改超时时间、CPU 限制和内存限制。
部署选项
- 计算资源(Compute resources): 为部署指定 CPU、GPU 和内存资源。除了请求量之外,您还可以指定 CPU 和内存资源的限制。
- 水平自动扩缩参数(Horizontal autoscaling parameters): 指定部署可启动的副本(replicas)数量的最小和最大限制,确保根据需求有效利用计算资源。
- 环境变量(Environment variables): 在启动时为部署指定环境变量。
- 执行超时(Execution timeout): 函数在返回超时错误之前允许运行的总时长。与其他部署设置不同,执行超时是为每个函数版本单独配置的。
根据项目资源队列中的可用性分配 GPU。
开始使用
要开始使用,请查看分步指南以配置 Python 函数部署。在决定使用已部署模式还是无服务器函数执行模式时,请参考文档。
无服务器与已部署执行模式的对比。
后续计划
我们正在努力支持为 TypeScript v2 函数配置部署的功能。随着我们持续改进函数执行模式功能,我们希望了解您的体验并欢迎您的反馈。请通过 Palantir Support 渠道,或使用 functions 标签 ↗ 在我们的开发者社区 ↗ 分享您的想法。
使用 Workshop 的 Data Freshness 小部件追踪对象数据的新鲜度
发布日期:2025-07-31
Workshop 用户现在可以使用新的 Data Freshness(数据新鲜度)小部件,直接在应用程序中轻松追踪数据的新鲜度。该小部件让用户能够更清晰地了解数据状态,并使构建者更容易发现任何意外的数据过时情况。构建者可以选择要使用该小部件显示的对象类型(object types)和底层数据源(backing datasources)。每个对象类型和数据源旁边显示的 Last updated 时间戳对应于对象类型或数据源最后被索引的时间。
Data Freshness 小部件显示对象类型和数据源最后更新的时间。
请参阅 Data Freshness 小部件文档以了解有关配置该小部件的更多信息。
您的反馈很重要
我们希望了解您使用 Workshop 的体验,并欢迎您的反馈。请通过 Palantir Support 渠道,或使用 workshop 标签 ↗ 在我们的开发者社区 ↗ 分享您的想法。
Workshop 中支持对结构体数组进行循环以及从循环布局配置创建嵌入模块
发布日期:2025-07-31
对结构体数组进行循环
Workshop 构建者现在可以配置循环布局(loop layouts)以使用结构体数组(arrays of structs),方法是通过函数输出或对象属性传入结构体数组变量。这可以实现更高性能的循环设置,尤其是在使用嵌套循环布局的情况下。
例如,构建者可以通过使用函数构建结构体数组并将其传入循环部分来配置对象属性的显示,而不是在对象集(object set)中循环遍历每个对象并加载每个单独对象的属性。这种方法减少了模块内的网络调用次数,并在模块中显示数据时提供了更大的灵活性,允许构建者通过将非本体化数据构建为函数输出的结构体数组来进行循环和显示。
嵌套循环布局设置的示例。外部部分循环遍历 Pilot 对象集,在 Property List 小部件中显示结构体数组类型的 Aircraft certification 对象属性。内部部分循环遍历 Aircraft certification 属性,并使用 Metric Card 小部件显示每个结构体字段的值。
从循环布局配置创建嵌入模块
循环布局配置体验已得到改进,允许直接在父模块内创建和使用嵌入模块(embedded module)。使用此方法创建的嵌入模块将包含一个基本模块,其中包含预设的模块接口变量和用于显示的小部件,使构建者能够快速查看其循环部分的效果。
配置为使用对象集的循环部分将包含一个 Object Set Title 小部件,而配置为使用数组的循环部分将包含一个 Markdown 小部件。当使用结构体数组时,结构体模块接口变量将包含与数组中结构体项匹配的预定义模式(predefined schema),Markdown 小部件将显示结构体内的每个字段。
使用从父模块循环布局配置创建的嵌入模块对对象集进行循环的部分。
使用从父模块循环布局配置创建的嵌入模块对结构体数组进行循环的部分。
有关这两个功能的更多信息,请查看关于结构体变量和循环布局的文档。
您的反馈很重要
我们希望了解您使用 Workshop 的体验,并欢迎您的反馈。请通过 Palantir Support 渠道,或使用 workshop 标签 ↗ 在我们的开发者社区 ↗ 分享您的想法。
AIP 模型系列启用现已支持组织级别
发布日期:2025-07-29
在 AIP 中,注册管理员(enrollment administrators)可以为整个注册启用模型系列(model families)。模型系列代表与模型提供商就一组共享相同法律和合规状态的模型达成的合同协议。自本周起,此功能已扩展为支持在所有启用 AIP 的注册上进行组织级别的启用。管理员现在可以授予同一注册内的特定组织访问某个模型系列的权限,同时限制其他组织使用该模型系列。
要在组织级别配置模型系列启用,请转到 Control Panel,然后导航至 AIP settings → Model enablement。
与 AIP 启用类似,要使项目能够使用某个模型系列中的模型,与该项目关联的所有组织都必须启用该模型系列。
例如,在下面所示的场景中,只有一个组织(注册为 Test1)被授予访问 AWS Bedrock Claude 模型的权限。如果某个项目的 AIP Logic 资源同时链接到 Test1 和 Test2 注册,则该资源将不会显示任何 AWS Bedrock Claude 模型,因为 Test2 没有访问此模型系列的权限。
您现在可以在 Control Panel 的 AIP settings 页面下的 Model family enablement 中,在组织级别限制模型系列的使用。
请查看关于通过组织限制 AIP 使用的文档以获取更多信息。
Pipeline Builder 中现已提供轻量级管道
发布日期:2025-07-29
轻量级管道(Lightweight pipelines)现已在 Pipeline Builder 中作为 Beta 功能提供,可为批处理和增量管道提供更快的执行速度。此功能在处理中小型数据集时尤其有益。与传统的基于 Spark 的管道相比,轻量级管道可以显著加速通常运行时间在十五分钟以内的管道的计算过程。
什么是轻量级管道?
轻量级管道由 DataFusion ↗ 提供支持,这是一个用 Rust 编写的开源查询引擎。
主要特点:
- 更快的构建时间: 针对快速、低延迟执行进行了优化。
- 适合中小型数据集: 相比标准批处理管道有显著的性能提升。
- 灵活的试验: 使用设置面板,可以轻松测试轻量级管道并将其与现有配置进行比较,并可一键切换回批处理模式。
开始使用
轻量级管道目前处于 Beta 阶段,需要为您的组织启用。为此,请导航至 Control Panel,选择您的注册,然后选择 All settings > Application configuration > Pipeline Builder。在 Pipeline Builder 设置中,打开 Enable lightweight pipelines 开关。
Control Panel 中的 Enable lightweight pipelines 选项。
要创建新的轻量级管道,请在 Pipeline Builder 中选择 Create new pipeline,然后在配置期间选择 Lightweight pipeline 选项。
创建管道期间选择轻量级管道的选项。
要将现有管道转换为轻量级管道,请在 Settings 下拉菜单中选择 Convert to lightweight pipeline,并确保您的管道兼容。如果您的管道不兼容,您将收到警告。
管道设置中的 Convert to lightweight pipeline 选项。
请注意,随着轻量级管道的持续开发,功能可能会发生变化。轻量级管道目前支持批处理管道所支持功能的一个子集。当前不支持的功能包括 Use LLM 节点、媒体集操作和地理空间功能。
我们建议您使用预览功能或检查构建输出来验证结果,尤其是在转换管道类型时。您可以通过在分支上测试或复制现有管道来试验轻量级管道。评估性能指标,了解轻量级管道如何优化您的工作流。
详细了解 Pipeline Builder 中的轻量级管道。
您的反馈很重要
我们希望了解您使用 Pipeline Builder 的体验,并欢迎您的反馈。请通过 Palantir Support 渠道,或使用 pipeline-builder 标签 ↗ 在我们的开发者社区 ↗ 分享您的想法。
Python 函数现已可用
发布日期:2025-07-28
自 2025 年 7 月 28 日当周起,Python 函数将对所有注册正式可用(GA)。通过使用 Python Functions 模板创建新的代码仓库,即可开始使用 Python 函数。
在 Code Repositories 中选择 Python Functions 模板。
请注意,Python 函数中尚不支持某些功能。请查看功能支持矩阵以决定哪个模板最适合您。
对 OSDK 的一流支持
Python 函数是围绕 Ontology SDK (OSDK) 设计的。您不再需要学习如何使用不同的 SDK 来编写函数。此外,强大的 Python OSDK 工具(如属性子选择 property sub-selection)将允许您仅在需要时加载所需的数据。
在您的代码仓库中将 Python 函数与 OSDK 结合使用。
您可以在代码仓库侧边栏的 Resource imports 部分找到为您的 OSDK 生成的文档,其中提供了如何使用您的特定本体编写代码的示例。
在代码仓库侧边栏中查看 Python 函数的 OSDK 文档。
进行 API 调用
您可以从 Python 函数向外部系统进行 API 调用,从而与外部系统交互。使用提供的 functions.sources 库获取预配置的客户端,这些客户端可确保与 Python 网络环境的兼容性。
使用 functions.sources 库通过 Python 函数进行 API 调用。
灵活的部署模式
Python 函数可以在无服务器模式(serverless)或服务器支持模式(server-backed)下运行。这为您提供了无服务器函数的灵活性和低开销,同时如果您需要更高的可用性或希望保持有状态缓存,也可以使用有状态服务器。只需编写一次函数,稍后再决定您的部署模型。
在 Ontology Manager 中为您的 Python 函数选择无服务器或服务器支持的部署模式。
与管道 UDF 的兼容性
Python 函数可以在管道中用作用户定义函数 (UDF),使您能够将专业代码逻辑无缝集成到现有管道中。
在 Pipeline Builder 中将 Python 函数用作 UDF。
通过 Marketplace 部署 Python 函数
Python 函数可以通过 Marketplace 部署,使您能够在组织内和 Foundry 社区中分发包含 Python 函数的产品。Marketplace 集成包括对函数中任何 OSDK 使用的支持。
通过 Marketplace 部署的 Python 函数示例。
其他资源
在我们的文档中了解更多关于 Python 函数的信息,或参考 Python 函数仓库中包含的 README.md 文件以获取更多信息。
TypeScript v2 函数现已可用
发布日期:2025-07-28
自 2025 年 7 月 28 日当周起,TypeScript v2 函数将对所有注册正式可用(GA)。通过使用 TypeScript Functions v2 模板创建新的代码仓库,即可开始使用 TypeScript v2 函数。TypeScript v2 函数与 TypeScript v1 函数相比有一些显著差异,使其成为您平台工作流的强大改进。
在 Code Repositories 中选择 TypeScript Functions v2 模板。
请注意,TypeScript v2 函数中尚不支持某些功能。请查看功能支持矩阵以决定哪个模板最适合您。
完整的 Node.js 运行时
在 TypeScript v2 函数中,您的代码在完整的 Node.js 运行时中运行,支持核心模块,如 fs、child_process 和 crypto。您可以使用任何与 Node.js 运行时兼容的库。Node.js 运行时是对 TypeScript v1 函数使用的受限 V8 运行时的重大改进,V8 运行时限制了功能和可用的内置 API,并导致与开源生态系统的兼容性问题。
以下示例演示了使用 pdf-lib 生成 PDF:
代码仓库中 pdf-lib TypeScript v2 函数的示例。
可配置的资源
在 TypeScript v2 中,您可以将函数配置为最多拥有 5 GB 内存和 8 个 CPU,而 TypeScript v1 中仅为 128 MB 内存和单个 CPU。此升级使得处理大规模数据(如图像)以及使用并行性快速执行 CPU 密集型任务成为可能。
在 Ontology Manager 中编辑 TypeScript v2 函数运行时配置。
对 OSDK 的一流支持
TypeScript v2 函数是围绕 Ontology SDK (OSDK) 设计的。您不再需要学习如何使用不同的 SDK 来编写函数。此外,强大的 TypeScript OSDK 工具(如属性子选择 property sub-selection)将允许您仅在需要时加载所需的数据。
在您的代码仓库中将 TypeScript v2 函数与 Ontology SDK 结合使用。
您可以在代码仓库侧边栏的 Resource imports 部分找到为您的 OSDK 生成的文档,其中提供了如何使用您的特定本体编写代码的示例。
在代码仓库侧边栏中查看 TypeScript v2 函数的 OSDK 文档。
进行 API 调用
使用 TypeScript v2 函数,您可以更灵活地进行 API 调用,尤其是在与依赖 Node.js 运行时的开源 SDK 一起使用时。您可以使用提供的 @palantir/functions-sources 库获取预配置的 fetch 函数或 HTTP 代理,以确保与 TypeScript v2 网络环境的兼容性。
使用 @palantir/functions-source 库通过 TypeScript v2 函数进行 API 调用。
通过 Marketplace 部署 TypeScript v2 函数
TypeScript v2 函数可以通过 Marketplace 部署,使您能够在组织内和 Foundry 社区中分发包含 TypeScript v2 函数的产品。Marketplace 集成包括对函数中任何 OSDK 使用的支持。
通过 Marketplace 部署的 TypeScript v2 函数示例。
对 NPM 库的一流支持
TypeScript v2 函数模板内置了对发布 NPM 库的支持。您可以在 package.json 中定义任何 exports 和包的 name,然后在其他 TypeScript 仓库中使用已发布的库。
在 TypeScript v2 仓库中定义 NPM 库。
其他资源
在我们的文档中了解更多关于 TypeScript v2 函数的信息,或参考 TypeScript v2 仓库中包含的 README.md 文件以获取更多信息。
Visual Studio Code 的 Palantir 扩展中的代码定义输入过滤
发布日期:2025-07-24
Visual Studio Code 的 Palantir 扩展现在在实验阶段为 Python 转换(transforms)提供代码定义输入过滤(Code-defined input filtering)功能。此功能允许用户基于自定义代码为 VS Code 预览实现过滤策略,而之前的功能仅支持完整数据集和采样数据集输入策略配置。在适用的情况下,自定义过滤策略将利用谓词下推 ↗ 确保预览中仅使用最相关的数据样本。
Visual Studio Code 的 Palantir 扩展会自动发现整个代码库中所有符合条件的过滤器,并在配置输入采样策略时将其显示在选择下拉菜单中,从而轻松找到并应用所需的处理函数。用户可以使用多选下拉菜单从仓库中选择符合条件的函数,并按偏好顺序排列。过滤器将按照在选择字段中出现的顺序依次应用。
Configure input sampling strategies* 对话框中的 Code-defined filters* 选项。
任何添加的输入过滤配置将在预览会话之间保留。如果工作区重新启动,或者 .maestro/ 配置文件夹在 VS Code 中被本地删除,这些配置将被重置。
符合条件的预览过滤器将显示一个 codelens 提示,表明它们是有效的预览过滤器。
代码定义输入过滤允许用户在塑造数据预览时获得更大的灵活性和精确度,从而在 Python 工作流中实现更有针对性的分析。请注意,结构化输入(structured inputs)在 Spark 和轻量级转换中受支持,而非结构化输入(原始文件)仅受 Spark 支持。
Python 仓库中增强的环境冲突可视化
发布日期:2025-07-24
Visual Studio Code 的 Palantir 扩展现在支持 Python 仓库中的环境冲突可视化(environment conflict visualization),具有直观且用户友好的界面。当发生冲突时,用户现在可以选择 Resolve in environment debugger 选项来打开环境冲突的交互式视图。
环境冲突错误消息上方显示的 Resolve in environment debugger 选项。
此功能消除了解释复杂文本输出的需要,并允许用户通过清晰的见解快速识别、分析和解决依赖性问题。
环境调试器图表示例。
除了帮助解决冲突外,此功能还支持全面的环境探索。您的锁定文件(lockfile)中列出的每个包现在都包含一个 View package in environment debugger codelens 选项,允许您追踪环境中的每个依赖项并识别其来源。
高亮包上方的 codelens 提示,提供在环境调试器中查看包的选项。
利用此新功能提高生产力,减少故障排除时间,并维护稳定可靠的 Python 环境。
了解有关 Visual Studio Code 的 Palantir 扩展中环境调试器的更多信息。
体验更快的 DevOps 打包:简化的批量操作和直观的工作流
发布日期:2025-07-24
自 2025 年 7 月 21 日当周起,用于创建产品草稿(product drafts)的新 DevOps 打包体验已在所有 Foundry 注册上可用。此重大更新引入了完全重新设计的打包体验,专为速度、批量操作和直观工作流而构建。
如果您有现有的草稿,请注意它将与新打包工作流不兼容,必须在发布后重新创建。在发布周期间,您可以切换到之前的平台版本以继续处理现有草稿。
DevOps 中草稿的新登录页面提供了输入和输出的整合视图以及批量编辑选项。
此新 DevOps 打包体验的主要亮点包括:
- 简化的草稿: 享受所有输入和输出的整合视图,实现强大的批量操作和更快的迭代。
- 更快的迭代: 编辑可以堆叠并在无需等待先前更改完成的情况下应用,后端操作也显著加快。
- 批量编辑操作: 将多个资源移动到输出,刷新资源组,并直接在草稿视图中管理错误。
- 扩展的输出选择支持: 从 Data Lineage 和 Workflow Builder 应用程序添加所有资源。
批量操作(例如将多种类型的输入移动到输出)现在可通过多选编辑实现。
多个编辑可以堆叠并在无需等待先前更改完成的情况下应用。
现在可以从现有的 Data Lineage 或 Workflow Builder 图中批量添加输出。
我们期待您的反馈
随着我们持续改进 DevOps,我们希望了解您的体验并欢迎您的反馈。请通过 Palantir Support 渠道或我们的开发者社区 ↗ 分享您的想法。
Python Ontology SDK 2.x 现已正式可用
发布日期:2025-07-22
Python Ontology SDK (OSDK) 2.x 自 2025 年 7 月 14 日当周起正式可用(GA)。此更新提供了改进的语法、返回类型和功能,以提升性能并支持更复杂的应用程序。默认情况下,在 Developer Console 或 Python 函数 中创建的任何新 Python 应用程序现在将使用最新的 2.x 生成器。
将现有应用程序迁移到 Python 2.x
Python OSDK 2.x 迁移指南解释了版本差异,突出了相关的语法和结构变化,并提供了代码示例以帮助您更新使用旧版本构建的应用程序。
目前不强制要求将旧版应用程序迁移到使用 2.x 语法,但现有和即将推出的 Beta 功能,如派生属性和媒体集,将仅在 Python OSDK 2.x 版本上可用。要在 Developer Console 中为现有应用程序生成 Python OSDK 2.x,请选择应用程序左侧面板中的 SDK versions 菜单。
在 Developer Console 中为现有的旧版本应用程序生成 Python OSDK 2.x。
要为 Python 函数中的现有代码仓库生成 Python OSDK 2.x,请选择代码仓库左侧面板中的 SDK versions 菜单。
在 Python 函数中为现有的旧版本代码仓库生成 Python OSDK 2.0。
Palantir 将在 2.x 版本发布后至少一年内继续支持旧版 Python 应用程序。
您的反馈很重要
随着我们持续开发 OSDK,我们希望了解您的体验并欢迎您的反馈。请通过 Palantir Support 渠道,或使用 ontology-sdk 标签 ↗ 在我们的开发者社区 ↗ 分享您的想法。
组织访客成员资格现已在 Control Panel 中管理
发布日期:2025-07-22
查看和管理组织访客(guests)的界面已从 Platform Settings 页面移至 Control Panel。您现在可以在 Organization permissions 页面的新 Guest membership 标签中管理组织的访客。
![Control Panel 中 Organization Permissions 页面的