Agent configuration reference(代理配置参考)
The following sections describe the various configurations available when creating, monitoring, and managing agents within your network. The following workflows will be explained:
- Agent permissions
- Proxy configuration
- Agent Manager proxy configuration
- Bootstrapper proxy configuration
- Source proxy configuration
- Agent metrics and health monitoring
- Metrics
- Health monitoring
- Automatic upgrade windows
- Upgrade windows
- Stagger upgrades
- Schedule dataset syncs
- Reinstall an agent
- Move an agent to a new directory
- Move an agent to a new host
- Install on a Windows host
- Backup and caches
- Configure host overrides
Learn more about agents and how to set them up in the Data Connection application.
Agent permissions
:::callout{theme="warning"} Permissions may be managed differently on enrollments provisioned before May 27, 2023. For questions about agent management for these enrollments, contact Palantir Support.
To start managing agent creation in Control Panel, users with Organization administrator permissions must be granted an additional workflow called Change agent creation authentication method. This workflow permission allows administrators to opt into strict enforcement of role-based agent creation management. This enforcement is done automatically for enrollments provisioned after the above date.
:::
Permission to create agents is administered in Control Panel. To create an agent, you must have either the Organization administrator or Data flows administrator role assigned to you. It is also possible to create a custom role and assign the Create agent workflow to that role. Organization roles are managed on the Organization permissions page in Control Panel.
Learn more about managing roles in Control Panel.
In addition to the Organization-level role, you must be an Editor or Owner of the Project in which you want to save a newly-created agent.
:::callout{theme="neutral"} After creation, project-based roles are used to control who may view, modify, and delete the agent or assign the agent as the worker for a specific source. This means that agent creators should ensure that the project where the agent is stored is configured with the correct roles. :::
Certificates
Agents communicate with both Foundry and your internal network. This means that agents need to have the correct certificates in their truststores for these connections to be established.
There are two situations that may require additional certificates to be configured on an agent:
- Certificates to allow agent communication with Foundry
- Certificates to allow agent communication with your systems (agent worker only)
In both cases, certificates may be added from the agent management page in the Data Connection application.
Add certificates to an agent
To add a certificate to an agent, navigate to the agent details page for your agent in Data Connection, then select Manage agent certificates.

From here, choose the certificate to be added, along with an alias if desired. Then, add the contents of the certificate. The certificate should be added as a string similar to the below example, including newlines but without a trailing newline character. The certificate shown below is the public certificate for https://palantir.com.
Note that you cannot enter a certificate chain; you must enter each certificate separately.
-----BEGIN CERTIFICATE-----
MIIGXjCCBUagAwIBAgIQASByQ6gv8Z6X7wEqsyBb1DANBgkqhkiG9w0BAQsFADBY
MQswCQYDVQQGEwJCRTEZMBcGA1UEChMQR2xvYmFsU2lnbiBudi1zYTEuMCwGA1UE
AxMlR2xvYmFsU2lnbiBBdGxhcyBSMyBEViBUTFMgQ0EgMjAyNCBRMjAeFw0yNDA2
MTcxNjUwMTVaFw0yNTA3MTkxNjUwMTRaMBkxFzAVBgNVBAMMDioucGFsYW50aXIu
Y29tMIIBIjANBgkqhkiG9w0BAQEFAAOCAQ8AMIIBCgKCAQEAvBalUG3JFYaSiRO2
enRnEwdeGUgtal9isJfB1++LxcPwo/DP2dncK+ur7URID0TVWOqu+4vXE2mmC9jz
Kx0o/URrMoz70i6qF6/Oyq6CuOHjZINiAN0ovNBBEPNGbSVD3Xq/eWgI7PNQ8hfI
9BJ/3WVA17oSG3zEXiWP3+CiL3Wm1Gn38oOt4URBMA0hgLqyOoU3ooqYIK8Fz2K/
OxAJvq45z2lonMZFFzj5thO5dBBch26mNAacO4MvI9mhUrMZtYvGBRZoXrph4EmF
TJDo2UTYiST0Tq6ibNW+NTuv66DrqFvzOpZybNuZsS6VrisYQ4huPN9jVz7RNFhJ
aeJvbQIDAQABo4IDYTCCA10wGQYDVR0RBBIwEIIOKi5wYWxhbnRpci5jb20wDgYD
VR0PAQH/BAQDAgWgMB0GA1UdJQQWMBQGCCsGAQUFBwMBBggrBgEFBQcDAjAdBgNV
HQ4EFgQUuAbgKrz0fIAXR1I/89IpUMN57AgwVwYDVR0gBFAwTjAIBgZngQwBAgEw
QgYKKwYBBAGgMgoBAzA0MDIGCCsGAQUFBwIBFiZodHRwczovL3d3dy5nbG9iYWxz
aWduLmNvbS9yZXBvc2l0b3J5LzAMBgNVHRMBAf8EAjAAMIGeBggrBgEFBQcBAQSB
kTCBjjBABggrBgEFBQcwAYY0aHR0cDovL29jc3AuZ2xvYmFsc2lnbi5jb20vY2Ev
Z3NhdGxhc3IzZHZ0bHNjYTIwMjRxMjBKBggrBgEFBQcwAoY+aHR0cDovL3NlY3Vy
ZS5nbG9iYWxzaWduLmNvbS9jYWNlcnQvZ3NhdGxhc3IzZHZ0bHNjYTIwMjRxMi5j
cnQwHwYDVR0jBBgwFoAUrw0C0MMbnlj47zdiLecDXZ5BSoowSAYDVR0fBEEwPzA9
oDugOYY3aHR0cDovL2NybC5nbG9iYWxzaWduLmNvbS9jYS9nc2F0bGFzcjNkdnRs
c2NhMjAyNHEyLmNybDCCAX0GCisGAQQB1nkCBAIEggFtBIIBaQFnAHUA5tIxY0B3
jMEQQQbXcbnOwdJA9paEhvu6hzId/R43jlAAAAGQJxs/FAAABAMARjBEAiATvomb
hMrUty8Vj703fTBSzY5qDxEMI473IigiGIiXugIgbj4/j24jloGdVoedM3jb6DFw
yAXkuZD3SMHBLsEvP9gAdgDd3Mo0ldfhFgXnlTL6x5/4PRxQ39sAOhQSdgosrLvI
KgAAAZAnGz7qAAAEAwBHMEUCIAHXbm9F2rwyxD36aHoGZRrnDtgg9UDRy5UtHK6D
OrmKAiEAjfomH4CGUrkBbwD8pzt9BbC6u6gPPveYiURxFIq//RUAdgB9WR4S4Xgq
exxhZ3xe/fjQh1wUoE6VnrkDL9kOjC55uAAAAZAnG0C6AAAEAwBHMEUCIQDDOg9s
KZqzbCu0mNBQMRAv6/2HkuLjZSGMxjq/F0R1/wIgKMHBSsNgeVED+LpTcIBYgp1q
SXgbwSizE6OD+1Ewol0wDQYJKoZIhvcNAQELBQADggEBAAr/tnc9dtTfwrczP7Ok
1+tLKmFRss4/1KQgLY8Tyy45Pag53ikn2n3tSPG1OpRTSmfPhPs9/UQRtMf7f2Gk
ObSXDVpPArtFBFDfZug+j22gVSYQr6zgFJu4Y9QD1GGtICqkmTScubfnjwdffTv6
5oNY4LbVGp5yctAd80OFUXspy+oVGsvv61a1pFO+s/NXleSrqDGL1oWcFW5Uj8GH
jnTM+Lt/HupqZ/ThVSkjMOug+hB875Yf8mWvadKYBX0Ga2s51cp8CI49FRswziY6
3oXPKfHHQybpIKhGosuSyzY8pL8UofHNp8gicAV80Vj6Mw+L8gWaAkCR6YnzQIyJ
9lc=
-----END CERTIFICATE-----
:::callout{theme="warning"} After modifying certificates, the agent must be restarted before changes will take effect. If certificates are added before the initial setup, they will be included in the download link after being added in Data Connection. :::
For client certificates, refer to our private key setup documentation.
Certificates to allow agent communication with Foundry
Certificates for connecting to your Foundry instance are included in the default agent install bundle. Generally, this means that no additional certificates will be required for your agent host to communicate with Foundry.
If traffic from your agent to Foundry is intermediated with an explicit or transparent proxy, certificates for the proxy may need to be added to the agent as part of initial setup. Since missing certificates in this scenario will prevent the agent from being managed by Foundry, these certificates must be added to the agent before downloading the initial install bundle.
If there are certificate-related errors on agent startup that prevent the agent from communicating with Foundry, these will appear in a logfile called <bootvisor_directory>/var/service.log.
If you encounter an error when attempting to set up your agent for the first time or know in advance that additional certificates will be required, you should:
- Skip through the agent setup page without attempting to download and install on your agent host.
- Add necessary certificates from the agent management page as described in the section above, then download and follow the standard installation instructions.
If your additional certificate is for an explicit proxy, additional configuration may be required.
Once an agent successfully connects to Foundry, these certificates should not need to be changed unless your network configuration between the agent host and Foundry changes.
Certificates to allow agent communication with your systems
When used as an agent worker, additional certificates may be required if the agent processes need to communicate with systems using secure protocols like HTTPS, or TLS/SSL-protected protocols. New certificates may need to be added for each new source connection, and these certificates should be updated if they expire or are rotated.
If required certificates are missing, errors like the following will appear when attempting to use a source capability such as exploration:
Wrapped by: javax.net.ssl.SSLHandshakeException: sun.security.validator.ValidatorException:
PKIX path building failed: sun.security.provider.certpath.SunCertPathBuilderException:
unable to find valid certification path to requested target
Agents in TLS-inspected environments
If you perform TLS inspection on traffic on the host where your agent is installed, you will need to manually import your root CA to the Agent Manager's truststore before the Agent Manager can connect to Foundry for the first time.
To do this, follow the instructions below:
- Obtain the public certificate for the root CA used to re-sign inspected traffic. Your network team should be able to provide this. Alternatively, you can use OpenSSL on the agent's host to inspect the certificate chain and find the root certificate:
openssl s_client -showcerts -connect FOUNDRY_URL:443. - Use SSH to access the agent's host and place the certificate somewhere accessible to the user that runs the Agent Manager. One such location may be
<agent-manager-install-directory>/var/security. - Navigate to the Agent Manager's Java installation:
cd <agent-manager-install-directory>/jdk/amazon-corretto*. - Import the certificate to the Agent Manager's truststore:
./bin/keytool -import -alias <CERT_NAME> -file /path/to/certificate.pem -keystore ../../var/security/truststore.jks(when prompted, the password istruststore). - Start the Agent Manager. You should see
Connected to Agent Manager, but no connection from agenton the agent detail page in Data Connection, confirming that the Agent Manager has successfully connected to Foundry. - To allow the agent to connect to Foundry, follow the instructions above to add the same certificate to the agent.
Proxy configuration
When configuring your agent for the first time, or when connecting to a remote source, you may need to configure a proxy depending on your organization's network configuration. A proxy may be used to manage communication from the agent to Foundry, or it may be needed to reach data sources within your network.
For your agent to use a proxy, you will need to configure the proxy in both the Agent and Bootstrapper configurations found in the Advanced tab of the Manage Configuration window in the agent configuration page within Data Connection. Make sure to provide the hostname without http:// at the beginning.
Agent Manager proxy configuration
The Agent Manager proxy configuration must be added to the <agent-manager-install-directory>/var/conf/runtime.yml file on the host where the agent was installed. Below is an example Agent Manager configuration snippet with a proxy-configuration block:
service-discovery:
    services:
    magritte-coordinator:
        ...
        proxy-configuration:
            hostAndPort: proxy-host.com:3128
            credentials: # these are optional
                username: USERNAME
                password: PASSWORD
This proxy will be used by the Agent Manager to connect back to Foundry's magritte-coordinator. It will not be used for connections from the agent to sources.
Bootstrapper proxy configuration
Once you have configured the Agent Manager proxy you can then configure the bootstrapper proxy. To do this, navigate to the agent configuration page within Data Connection, toggle the Advanced option in the Manage Configuration section, and finally select the Bootstrapper tab. Below is an example bootstrapper configuration snippet with a proxyConfiguration block:
coordinator:
    proxyConfiguration:
        host: HOST
        port: PORT
        credentials: # these are optional
            username: USERNAME
            password: PASSWORD
Once you have updated the configuration, you must save your changes and restart the agent for them to take effect.
This proxy will be used by the Bootstrapper for connecting back to Foundry's magritte-coordinator. It will not be used for connections from the agent to sources.
Source proxy configuration
For connecting from an agent to a data source through a proxy, configure the agent's JVM-level proxy on the Bootstrapper from the Bootstrapper tab in the Advanced section of the Manage Configuration page.
Use these JVM flags:
agent:
  jvmArguments: >-
    -Dhttp.proxyHost=<PROXY URL> -Dhttp.proxyPort=<PROXY PORT>
    -Dhttps.proxyHost=<PROXY URL> -Dhttps.proxyPort=<PROXY PORT>
If you do not want to use the configured proxy for specific hosts, add the additional JVM flag http.nonProxyHosts. A full proxy configuration may look like the following:
agent:
  jvmArguments: >-
    -Dhttp.nonProxyHosts=host1.com|*.host2.com
    -Dhttp.proxyHost=proxyhost.com -Dhttp.proxyPort=8000
    -Dhttps.proxyHost=proxyhost.com -Dhttps.proxyPort=8001
    ...
Note that quotes should not be used to encapsulate any of these configured values.
:::callout{theme="warning"} This configuration affects all outbound network requests from the agent. We recommend using source-specific proxy configuration when available. :::
Agent metrics and health monitoring
Once you set up an agent in Data Connection, you can view metrics and monitor health to maintain performance.
Metrics
Navigate to the agent page in Data Connection, then select the Metrics tab. The metrics available for your agent include, but may not be limited to, the following:
- OS physical memory
- Disk space
- Usable disk space
- OS load normalized WRT cores
- CPU utilization
- Time until next expiration in agent keystore
- Time until next expiration in agent truststore
- Agent heap memory
- Percentage of heap used
- Agent uptime
- Agent threads
- Syncs/tasks upload since last agent restart
- Running syncs/tasks
- Agent syncs/tasks queued
- Syncs/tasks duration
- Agent last heartbeat time
- Agent Manager version stale time
- Agent version stale time

Hover over the metric cards for timestamped details, and select the top right corner of the card to expand a detailed view.
"Time until next expiration" metrics
The Time until next expiration in agent keystore and Time until next expiration in agent truststore metrics refer to the time until the earliest certificate expiration in the agent keystore and truststore, respectively. For example, if the agent's keystore has two certificates, one that expires in a week and one that expires in a month, the number would be 1w as that is the closest expiration date.
The agent keystore and truststore include certificates added by users as well as those automatically added by the Agent Manager. Agent Manager certificates are automatically upgraded.
If the certificate has already expired, the metric will show 000ms. If there are no certificates stored for the agent, the graph will be empty.
"Version stale time" metrics
The Agent Manager version stale time and Agent version stale time metrics refer to how out of date the agent and agent manager are relative to what is available on your environment.
The version out of date metrics are calculated as the number of days between when the agent or agent manager was last updated and the release date of the latest version available. The below example illustrates how these metrics and associated monitors are expected to behave:
| Day | Latest released version | Agent / Agent Manager current version | Version stale time metric value | Notes |
|---|---|---|---|---|
| 0 | v1.0 | v1.0 | 0 |
Agent updates to current latest version. |
| 1 | v1.0 | v1.0 | 0 |
|
| 2 | v0.1 -> v2.0 | v1.0 | 0 -> 2 |
Metric jumps to 2 when a new version is released by Palantir. |
| 3 | v2.0 | v1.0 | 3 |
|
| 4 | v2.0 | v1.0 -> v2.0 | 4 -> 0 |
Metric goes back to 0 after a successful update during the maintenance window. |
In this example, the agent version stale time metric on the first two days is 0. The metric then jumps to 2 when the new version becomes available, and will then continue to increase until the next agent maintenance window, and finally drop back to 0 once an update completes successfully during a maintenance window.
:::callout{theme="neutral"} If a monitor is set to send alerts when a software version becomes too old, and Palantir's new version releases are spaced more than the allowed number of days apart, this monitor will start alerting as soon as the new version is available even if there has been no opportunity for a particular agent to update. These alerts will resolve automatically after the next successful update during a maintenance window.
In the example above, if the monitor is set to alert for stale time days >2, an alert will be issued on day 3 even though there has been no opportunity for the agent to upgrade to the latest version. The alert will automatically resolve after the successful update on day 4.
:::
Health monitoring
Health monitors allow you to configure alerts of varying severities (high, medium, or low) for any metric when certain conditions or thresholds are met.
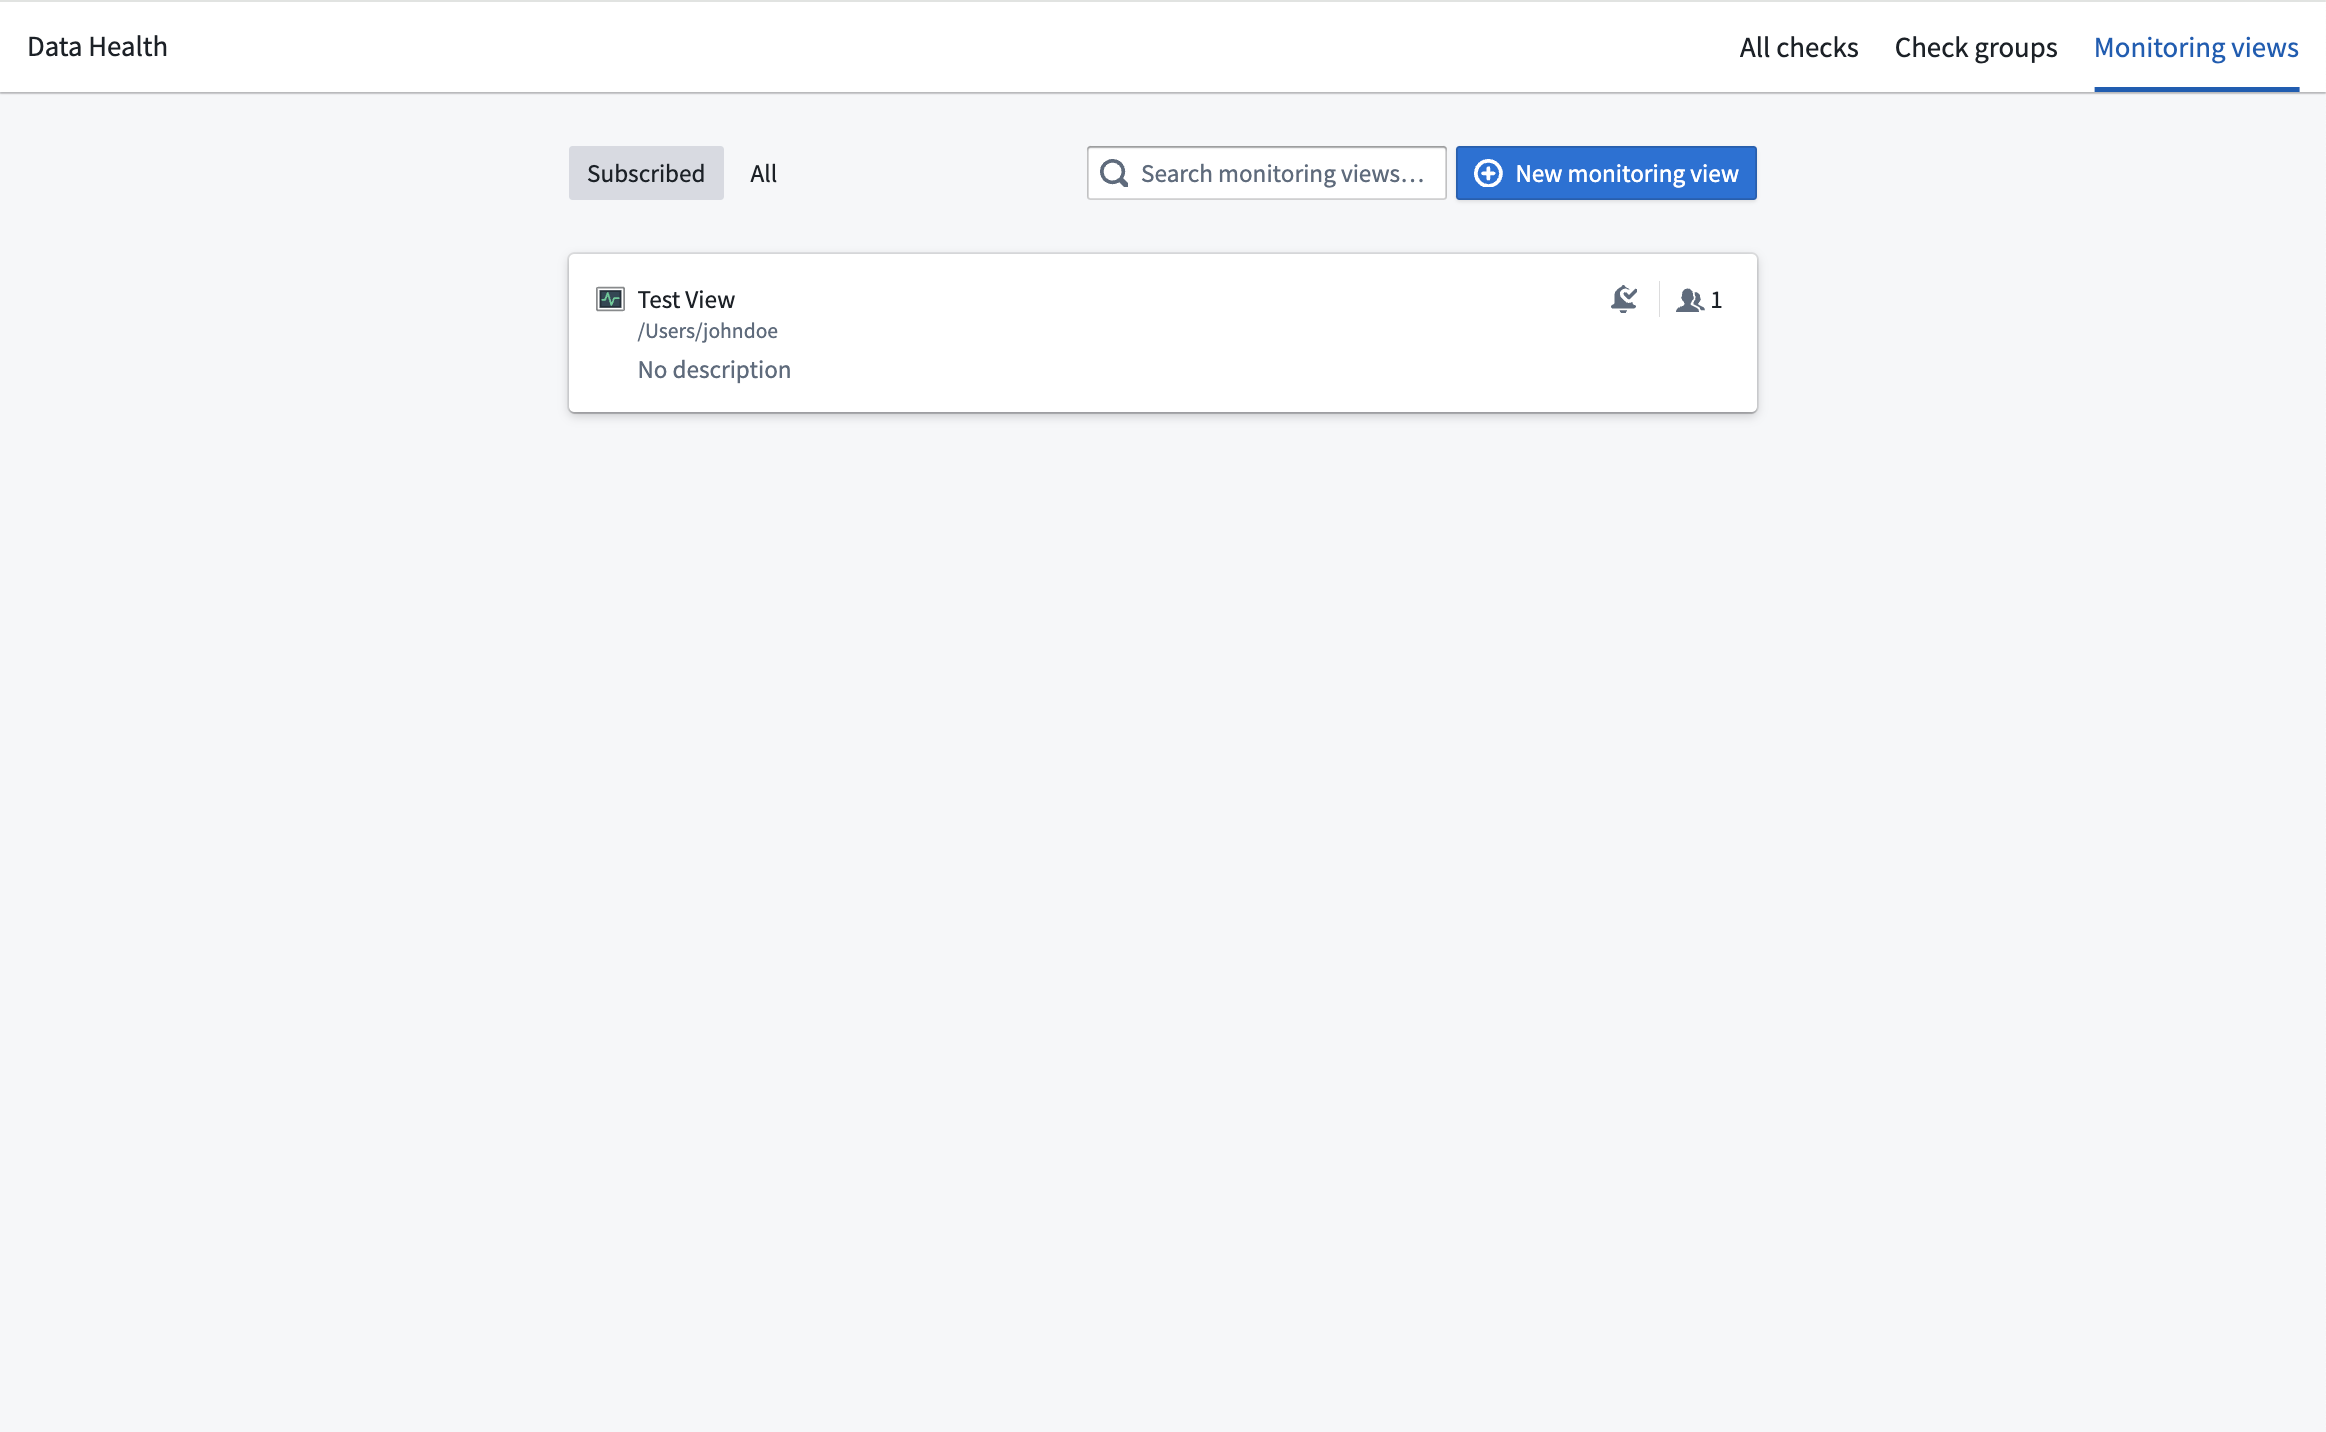
You can monitor an agent's health by creating a monitoring view in the Data Health application. A monitoring view is a collection of monitoring rules that are of particular interest to a subscribed group of users.
You can view existing monitoring views by selecting the Monitoring views tab.
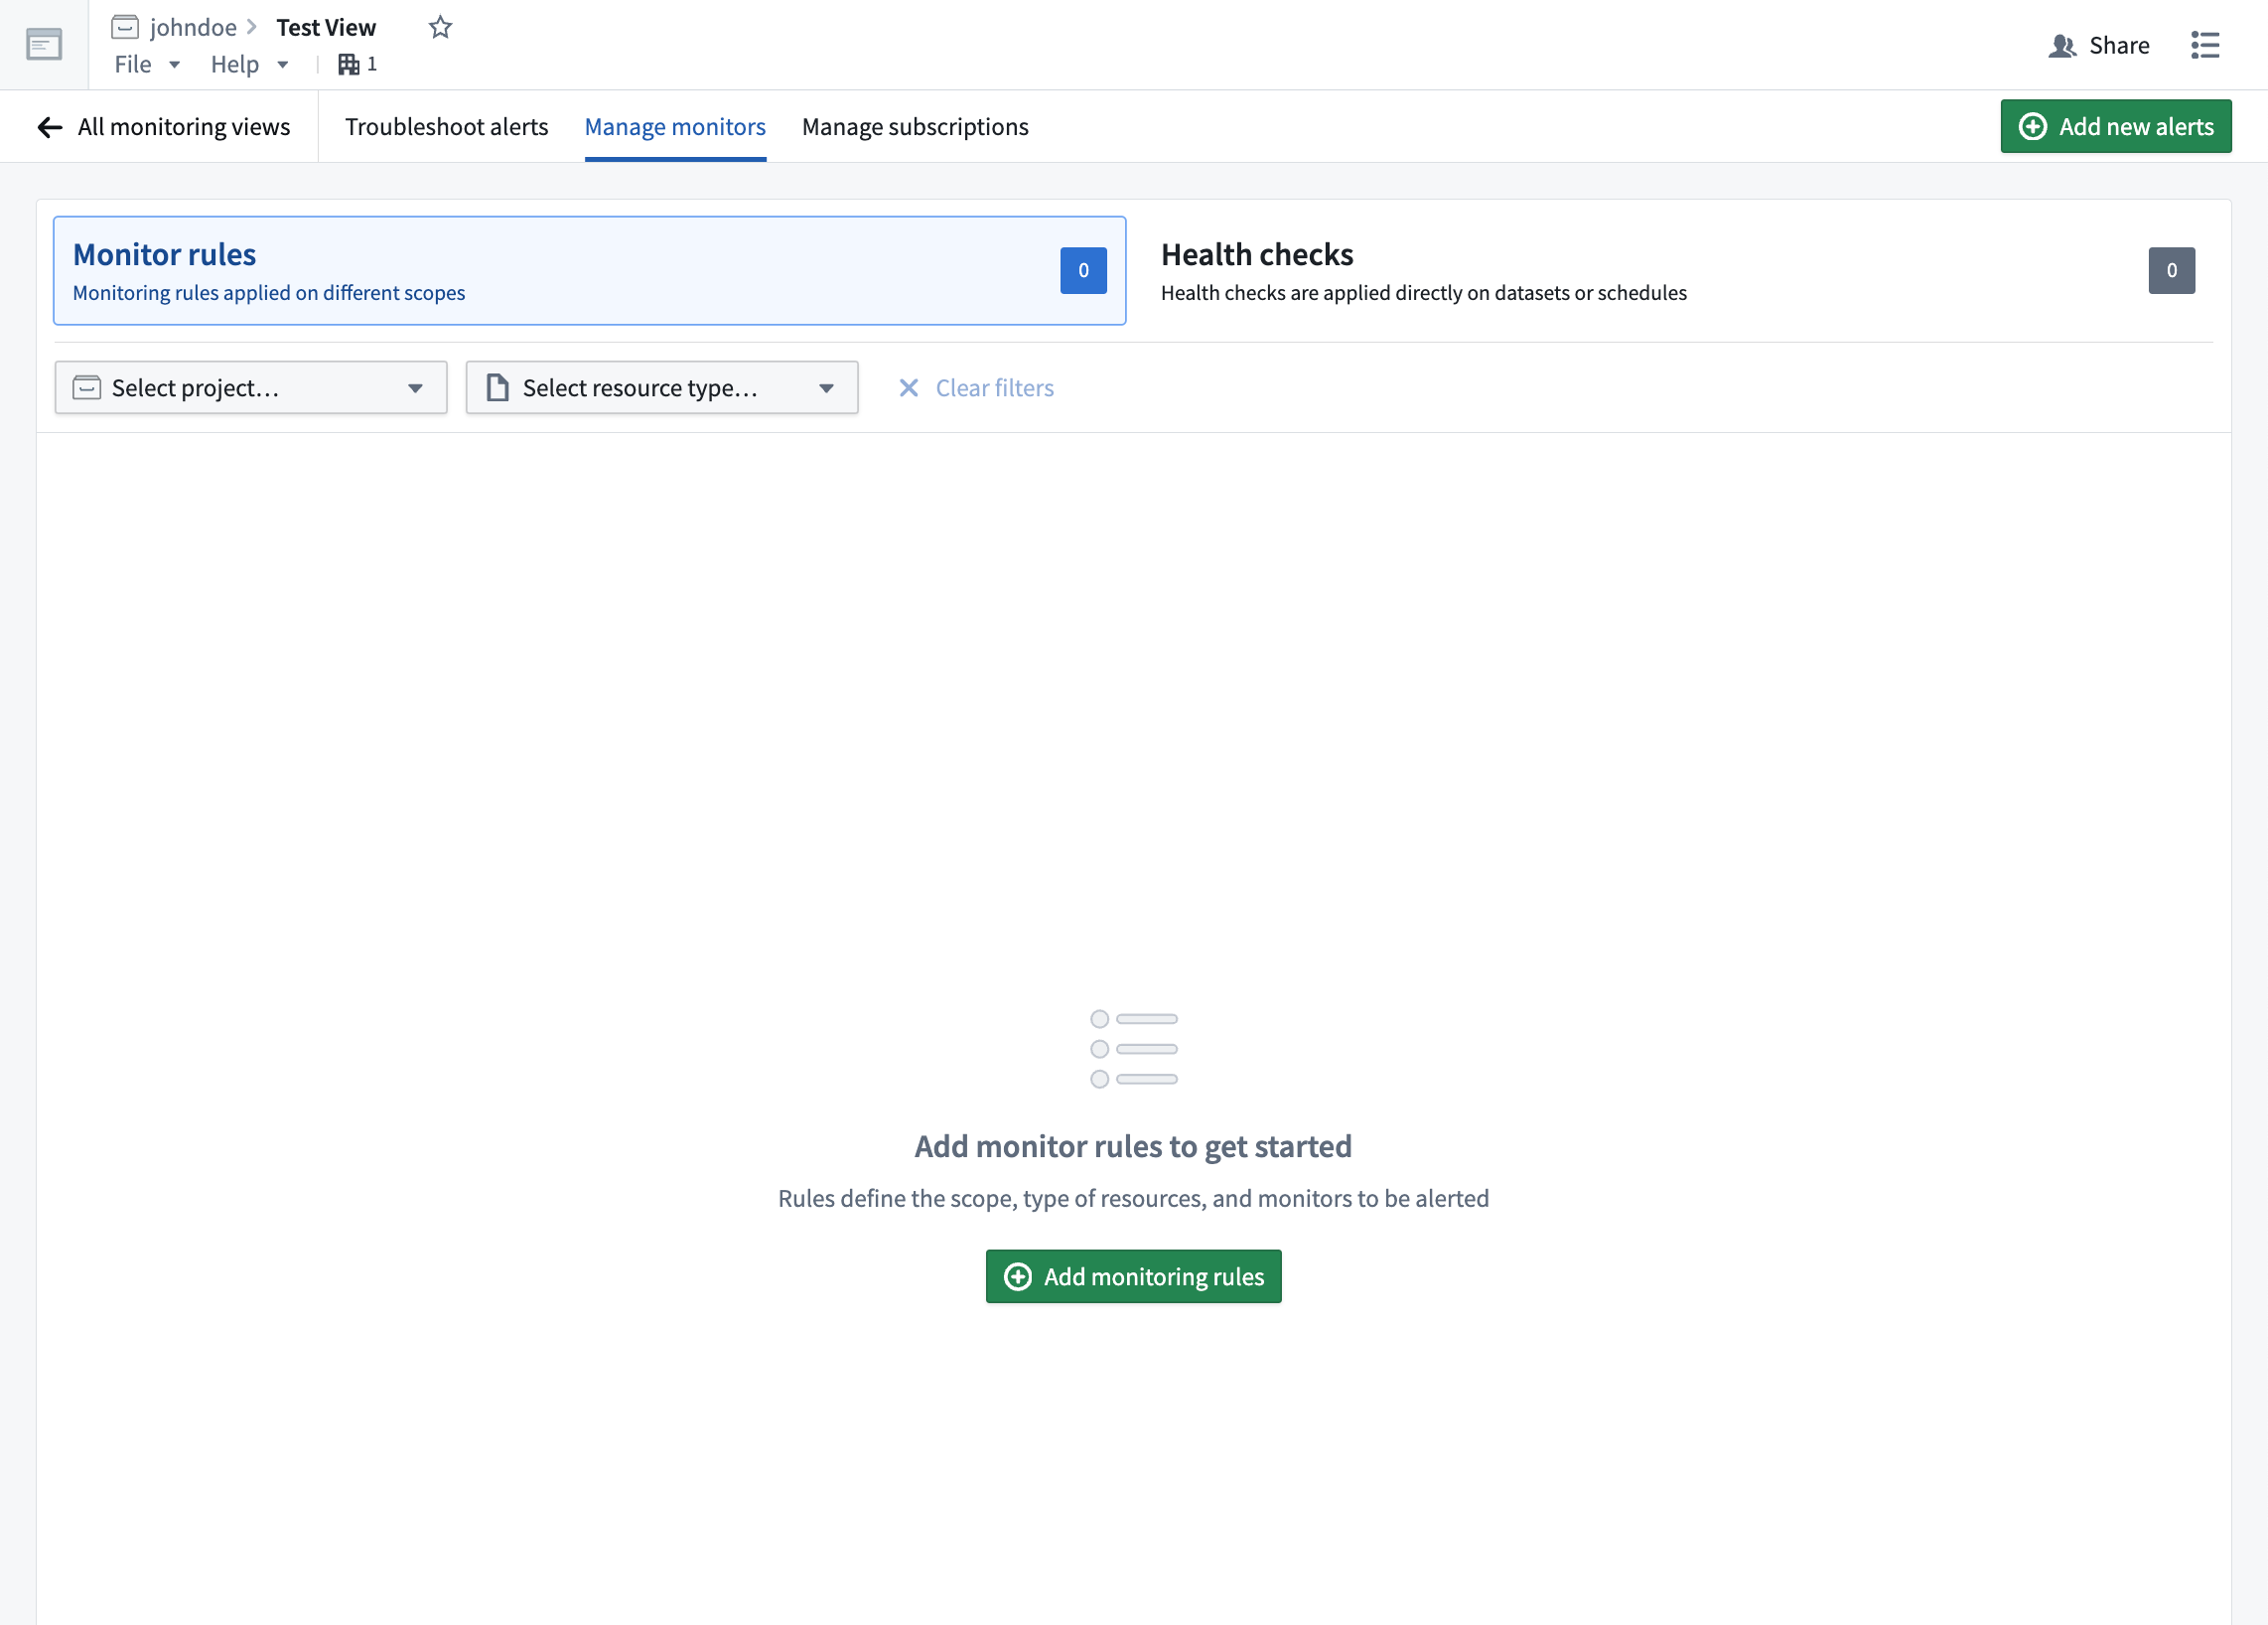
After selecting a specific monitoring view, you can configure the health monitors of an agent by selecting Manage monitors. From this page, you can create a new monitoring rule.
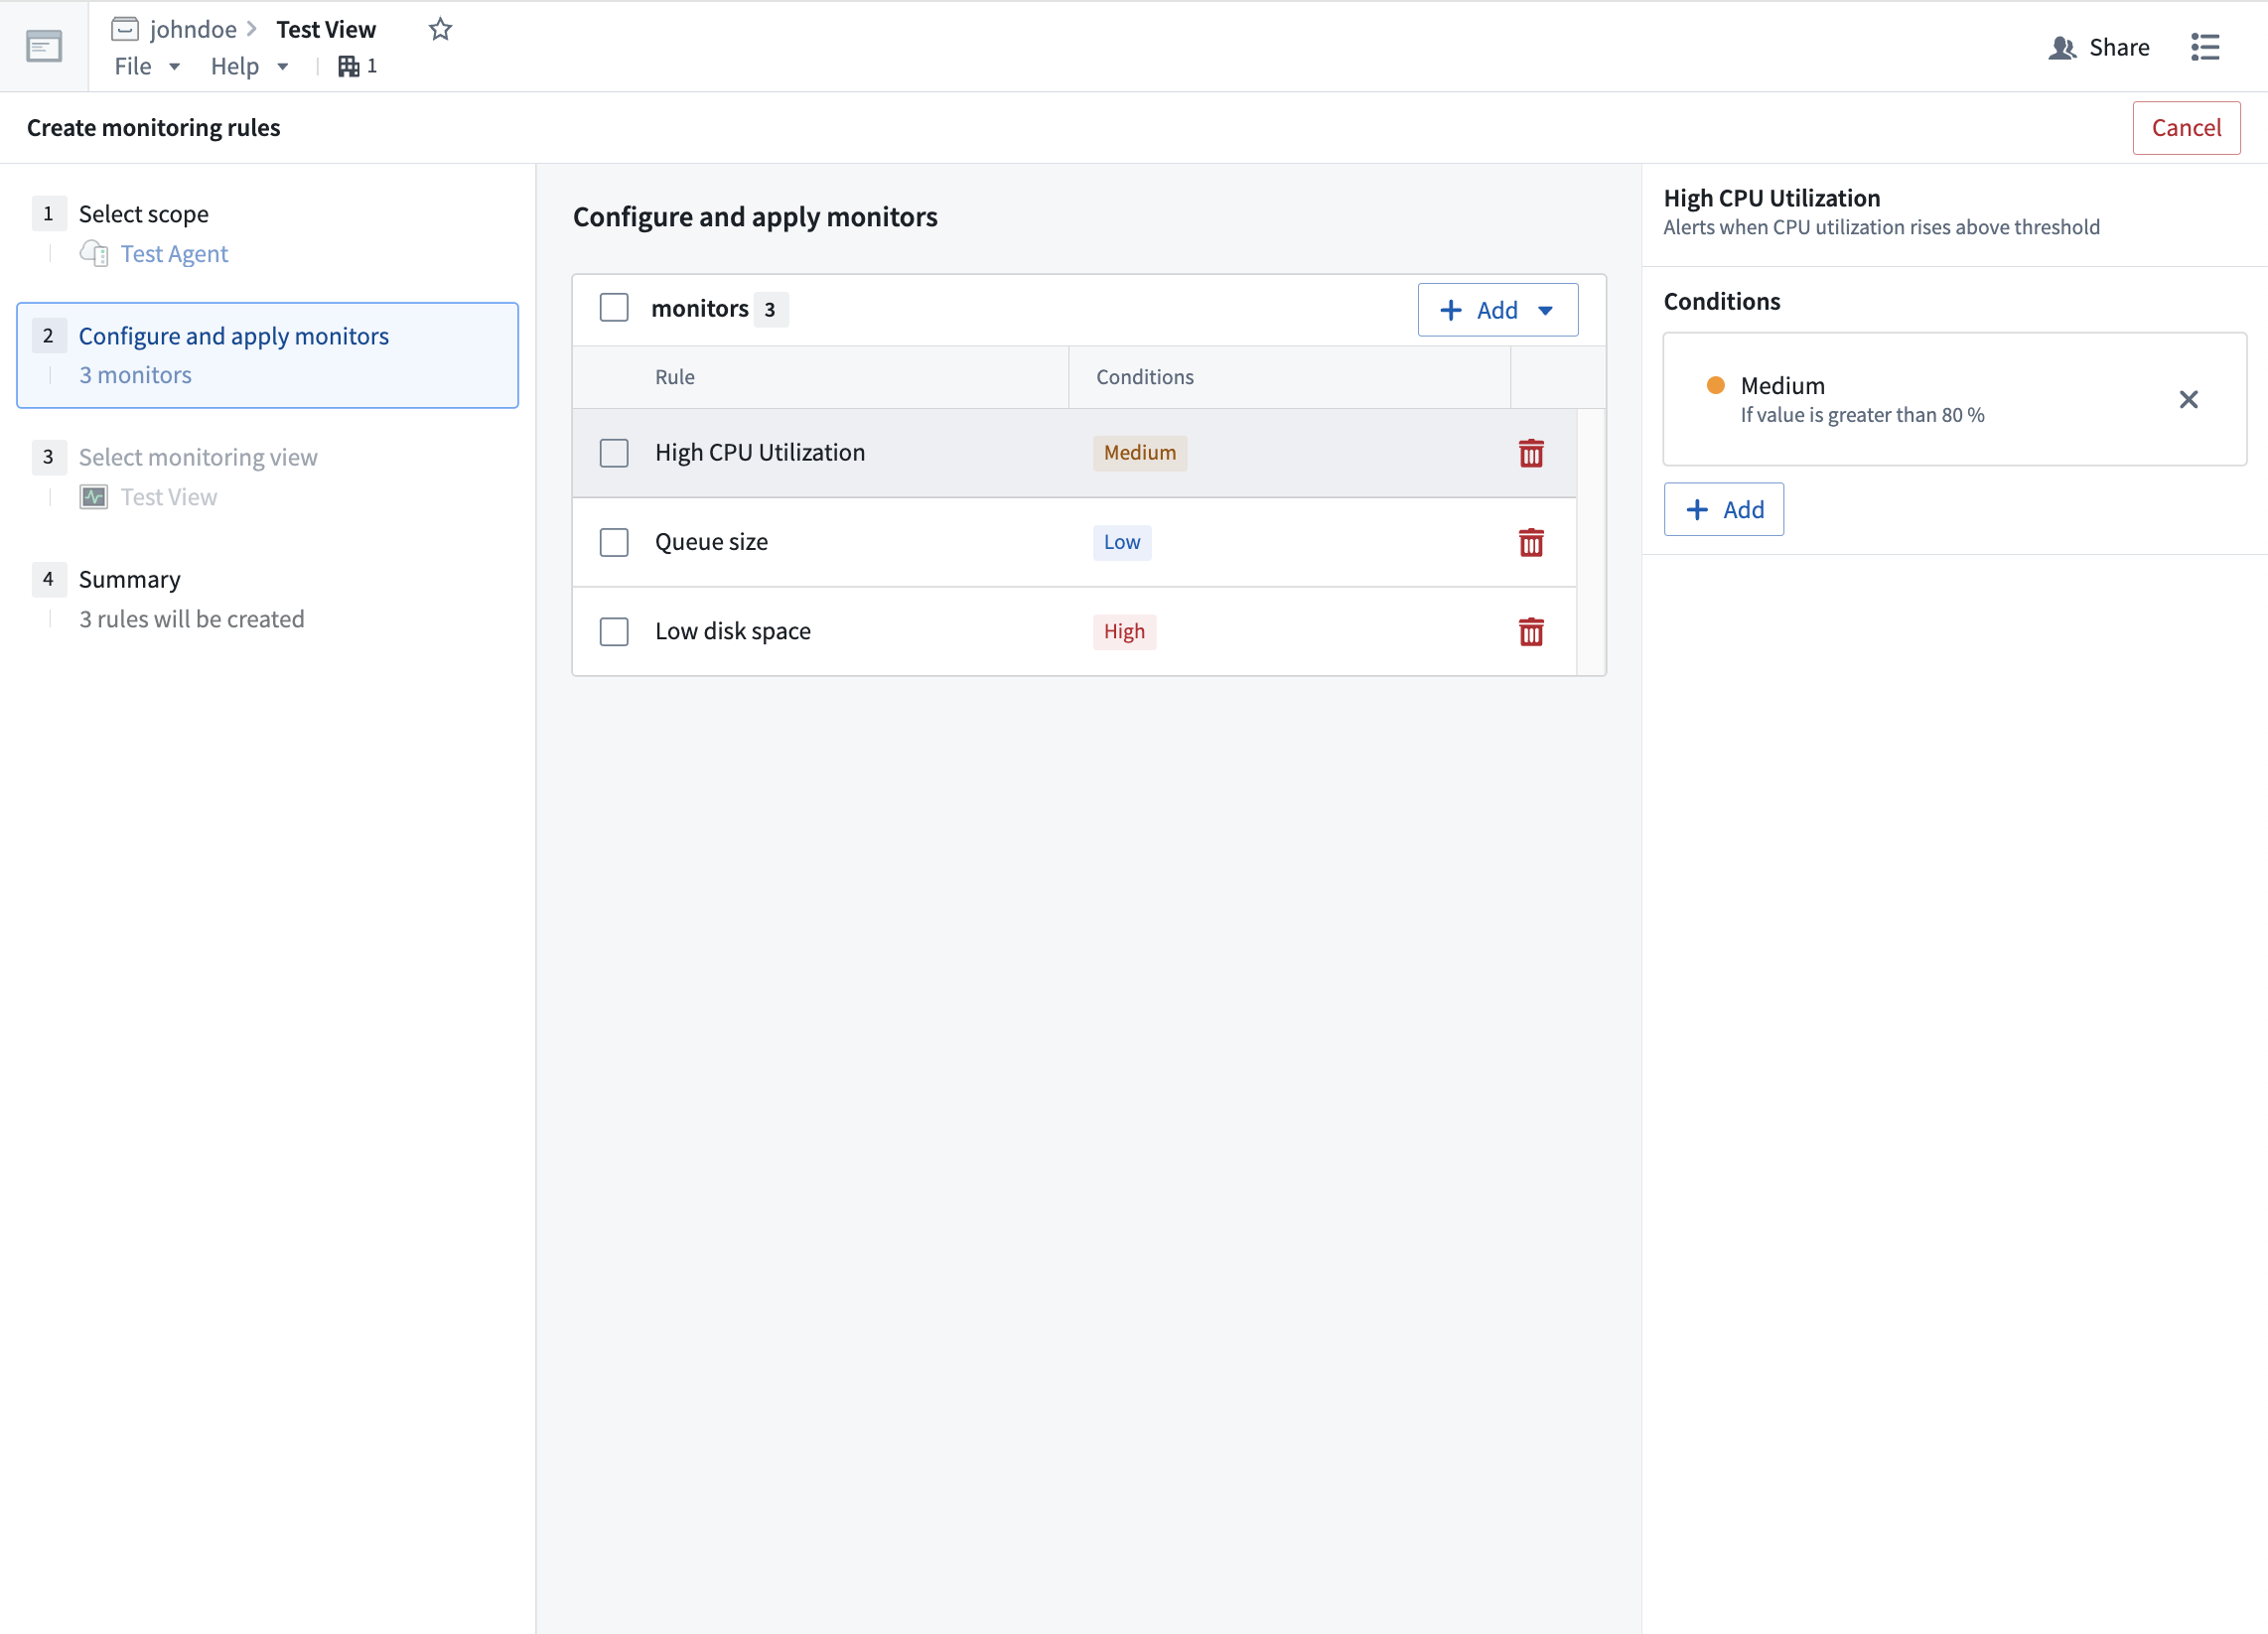
In the Create monitoring rules page, you can configure specific rules and alerts of varying severities.
Learn more about tracking data health with monitors and integrating monitors with PagerDuty.
Automatic upgrade windows
The Data Connection agent service is regularly updated with security, stability, and performance improvements. The best way to ensure that agents receive these important improvements in a timely manner is to configure upgrade windows for each agent in use. The sections below describe what happens during an upgrade window and provide best practice guidelines.
Upgrade windows
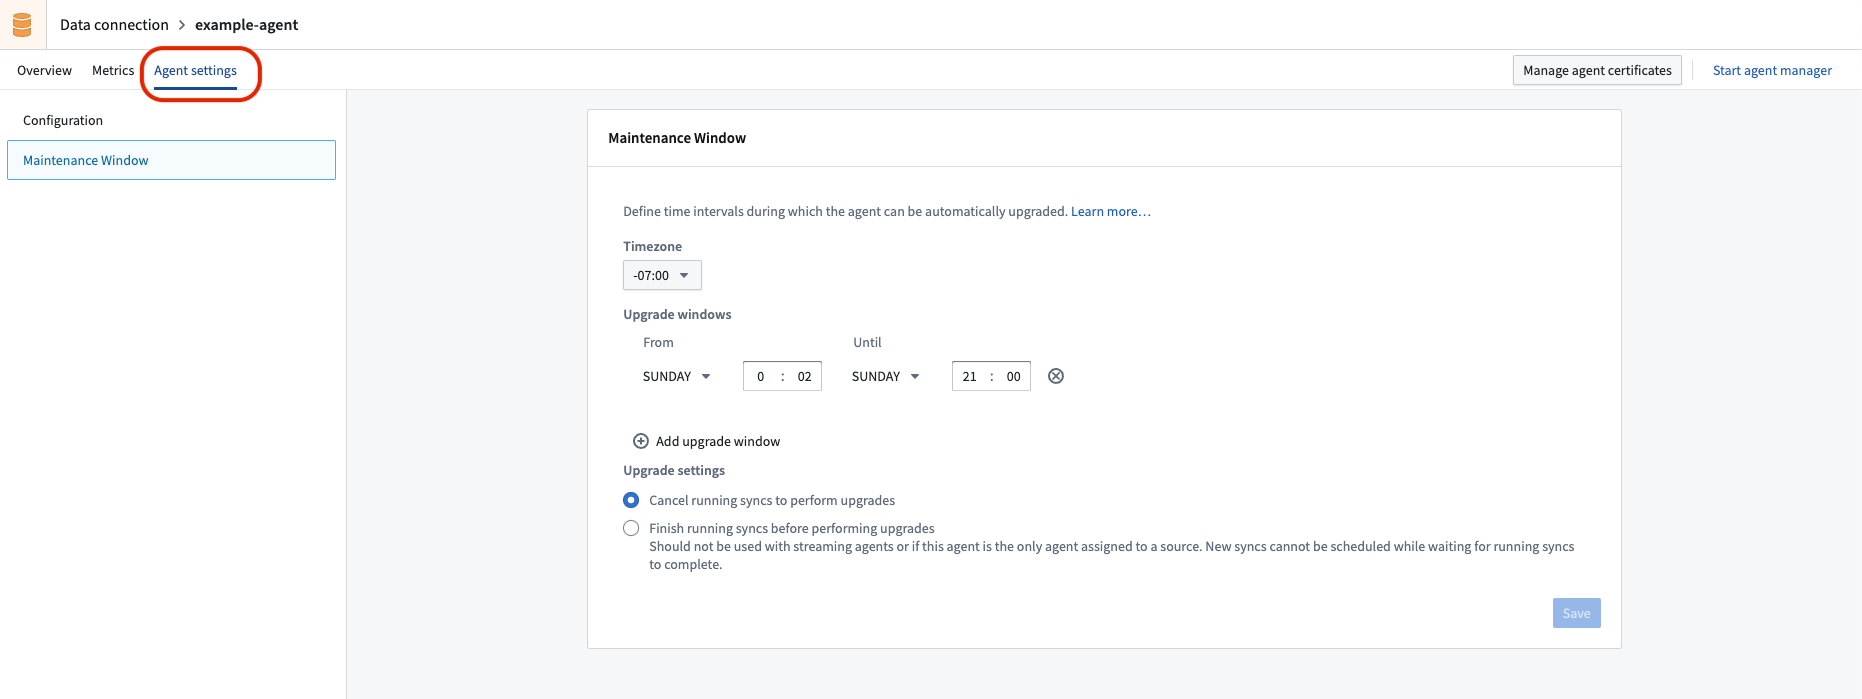
An agent upgrade window is a set of time intervals during which it is considered safe for the agent to be temporarily offline. These time intervals recur weekly and can be defined on the Maintenance Window page in the Agent settings tab for the given agent in the Data Connection application.
The Data Connection coordinator monitors agents and their respective upgrade windows; they will perform automatic upgrades of agents during these upgrade windows when new versions are available.
As part of the upgrade, the agent will be restarted. This will terminate any running jobs and briefly prevent new jobs from running on the agent.
Agent upgrade windows should be at least 60 minutes long. However, the actual upgrade should be relatively short; it should take approximately the same amount of time as a restart of the agent.
Stagger upgrades
To ensure minimal impact to data pipelines, we recommend assigning at least two agents to all Data Connection sources and to stagger upgrade windows for any given set of sources running on those agents. For example, one agent could have an upgrade window defined on Sundays, while the other has an upgrade window scheduled for Wednesdays. This ensures that during any given agent's upgrade window, jobs that are interrupted can be retried on the partner agent, and new jobs can continue to queue and run until the agent being upgraded is fully back online.
Schedule dataset syncs
When staggered upgrade windows cannot be used, it is important to schedule upgrade windows during periods of low (ideally zero) activity. In this case, dataset syncs should be scheduled such that they finish before the start of the upgrade window or start several minutes after the window (to account for the restart occurring towards the end of the window).
Reinstall an agent
If your agent has not upgraded or has been unhealthy for too long, the easiest solution is to reinstall the agent on the host. Reinstalling an agent is a safe operation and a similar process to initial installation.
The reinstallation process can be started by navigating to the agent overview page and selecting Reinstall the agent.
Follow the instructions in the reinstallation wizard as well as the additional steps below to ensure reinstallation is successful:
- Ensure that the agent is not running before reinstalling. To do so, SSH into the agent host using your computer's command line tool, navigate to the agent folder (
magritte-bootvisor-*) and stop it by running the following command:
./service/bin/init.sh stop
./service/bin/auto_restart.sh clear
- If you are reinstalling the agent in its existing directory, create a backup of the old agent.
mv magritte-bootvisor-* magritte-bootvisor-*-old
- Copy encryption keys from the old agent to the new agent folder.
cp $OLD_BOOTVISOR_DIR/var/data/source-encryption-key* $NEW_BOOTVISOR_DIR/var/data
- Confirm that everything works as expected, and delete the back up agent
magritte-bootvisor-*-oldto free up disk space.
rm -r magritte-bootvisor-*-old
Move an agent to a new directory
Follow the steps below to move an agent to a new installation directory for the same machine.
- In Data Connection, navigate to the Syncs page and ensure that no syncs are currently running.
- Check if syncs are running by using the filter on the left of the page to view only those that currently have a
Runningstatus. - If syncs are running, either wait for them to complete or cancel them by selecting their status link (for example,
Running 14 minutes ago), and then choosing Cancel build from the build page. Ensure that sync owners are appropriately notified if you need to cancel their syncs. - Navigate to the Agents page. Select the name of the agent you want to move.
- In the Configuration panel, select Advanced. For each tab of the Advanced settings, change all references that use an absolute path. Look for anything that starts with
/and modify these to what the new path will be. - Note: Kerberos settings require an absolute path.
- Stop the agent in Foundry. To do so, select the dropdown arrow next to Restart Agent in the upper right corner of the screen, then select
Stop (Unsafe). - Note: The
Unsafelabel is meant to warn that stopping the agent will interrupt any running syncs, which is why we took the precautions detailed in Step 1. - On the terminal of your machine, SSH into the agent.
- Change to the administrative user for the agent. Depending on your configurations, this could require entering
-- sudo -su palantiror-- sudo -su admin. - In your terminal, navigate to the agent installation directory using
cd. - Stop the agent by running
./service/bin/init.sh stop. - If the agent was previously configured to autostart:
- For Linux, run
./service/bin/auto_restart.sh clear. - For Windows, remove any scheduled tasks that were set up while following instructions on installing on a Windows host.
- Wait a few minutes and check that there are no Java processes being run by the administrative user. If there are, stop them manually.
- Optionally, remove the contents of
./var/data/binaries,./var/data/cache, and./var/data/processesfolders to reduce the amount of data being transferred. - Move the agent to the new directory folder by entering
mv <source directory> <new installation directory>. - Navigate to the new agent installation directory. Restart the agent by running
./service/bin/init.sh start. - If the agent was previously configured to auto-restart, re-enable it by following the auto-restart setup instructions.
- Wait five minutes, then refresh the agent page in Foundry to ensure that the agent is connected and syncs are successful.
Move an agent to a new host
When moving an agent to a new host, make sure that the new host meets the operating system requirements and has the same operating system and architecture as the previous agent. The new host must also have the same firewall network configurations as the old host. For example, if the agent was previously running on a linux distribution running on an x86_64 architecture, the new host can have any distribution of linux, but must be running on the same architecture. The instructions below will not work to move an agent from Linux to Windows or to an ARM architecture. For these cases, get a new download link from the UI and proceed with a new install.
When reinstalling the agent using a new download link from the UI, existing source credentials will not be able to be decrypted and must be re-entered manually. To preserve these credentials, consider the following steps to migrate the source secrets from the old agent to the new one:
- Navigate to the directory
<bootvisor dir>/var/dataon the old agent. - Copy the files
source-encryption-keyandsource-encryption-key.privateto the same directory (<bootvisor dir>/var/data) on the new agent. - If these files are lost or overwritten on the old agent before copying them, all source credentials will be lost, and they will need to be manually re-added to the new agent.
If the agent relies on other files in the file system, ensure they are also moved to the new agent installation to maintain proper functionality.
Follow the steps below to move an agent to a new host:
- Follow steps 1 through 11, excluding step 3 in the instructions for moving an agent to a new directory. This will stop the agent and prepare it to be transferred to a new host.
- Use rsync ↗ or any other file transfer tool to copy the agent folder from the old host to a location on the new host.
- Follow previously skipped step 3 from the instructions on moving an agent to a new directory. For each file or folder referenced by an absolute path, copy that resource to a location on the new host and update the configuration to point to the new path.
- Follow steps 13 through 16 from the moving an agent to a new directory guide.
Install on a Windows host
:::callout{theme="warning"} Linux hosts are the preferred option for setting up an agent. You should not use a Windows host unless there is no way to procure a Linux host or run Linux in a VM on your Windows host.
Some capabilities may not work on Windows agents, particularly when using a Windows agent as an agent worker. Specifically, table exports are not supported on Windows agents and will fail to run. :::
Follow the steps in the guide to setting up a agent, but select Windows as your operating system on the download and configure agent step. Once you install your agent, you will need to set up a Windows scheduled task that restarts the Agent Manager on crash or machine restart, as follows:
- Open Windows Task Scheduler as an Administrator.
- Create a new scheduled task.
- Under the General tab, perform the following:
- Set When running the task, use the following user account to
SYSTEM. - Make sure Run whether the user is logged in or not is selected.
- Make sure Do not store password... is NOT selected.
- Update Configure for to the correct operating system for the Windows virtual machine.
- Select Run with highest privileges.
- Under the Triggers tab, create two triggers:
- Set up one trigger on an event and choose on startup.
- Set Delay task for to 3 minutes to ensure no conflicts with windows upgrade processes on startup.
- Ensure the task is Enabled.
- Set up another trigger on a schedule:
- Set the task to run daily.
- Check the Repeat task every box, and choose 5 minutes for a duration of 1 day.
- Under the Actions tab:
- Add a new Start a Program action.
- Copy the whole path to the
magritte-bootvisor-winbatch file in the box for Program/script.- The full path will be similar to
C:\example\path\to\folder\containing\magritte\agentmagritte-bootvisor-win-{version}\service\bin\magritte-bootvisor-win.bat.
- The full path will be similar to
- Copy the whole path to the enclosing folder for the batch script into the box for Start in (optional).
- The full path will be similar to
C:\example\path\to\folder\containing\magritte\agent\magritte-bootvisor-win-{version}. - Though Windows states this is optional, this step is mandatory as the agent runs commands with relative paths.
- The full path will be similar to
- There are no arguments, so leave Add arguments (optional) blank.
- Select OK to save your task.
- Attempt to manually run the task by right-clicking on the task and choosing Run.
- This task should enter a Running status and remain there indefinitely indicating that the agent manager is running.
- You should see the agent start up successfully. This can take a minute or two to reflect in the interface in Foundry. If the agent does not start successfully, check the History tab of the scheduled task for errors. You can also verify the operation's success by using the Windows command prompt to change directory into the specific folder and then executing the associated .bat file.
Backups and caches
Agents may backup or cache files as part of installation, version upgrade, version downgrade, and ongoing usage. Normally, backups and cache may be safely ignored, and will be automatically deleted after 30 days. If backups and cached files are using up a higher than desired amount of disk space on the agent host, it is safe to delete them as long as this is performed outside of a maintenance window.
Backup and cache files will be found in the following sub-directories within the agent installation directory:
| Sub-Directory | Usage |
|---|---|
/backups |
Used to store backups of the agent configuration when performing upgrades. |
/var/data/cache |
Used to cache data during normal operation of the agent. |
Configure host overrides
Agents can be configured with custom hostname-to-IP address mappings that override standard DNS resolution, similar to entries in /etc/hosts on Unix systems. These host overrides allow the agent to resolve specific hostnames to IP addresses that differ from standard DNS lookups.
How to configure host overrides for an agent
Follow the steps below to add host overrides fo an agent directly from the Data Connection application:
- Navigate to the Agents page in Data Connection and select the agent you want to configure.
- Navigate to the Agent settings page and add a host override with the desired hostname and IP address mapping.
- Save your changes and restart the agent for the configuration to take effect.
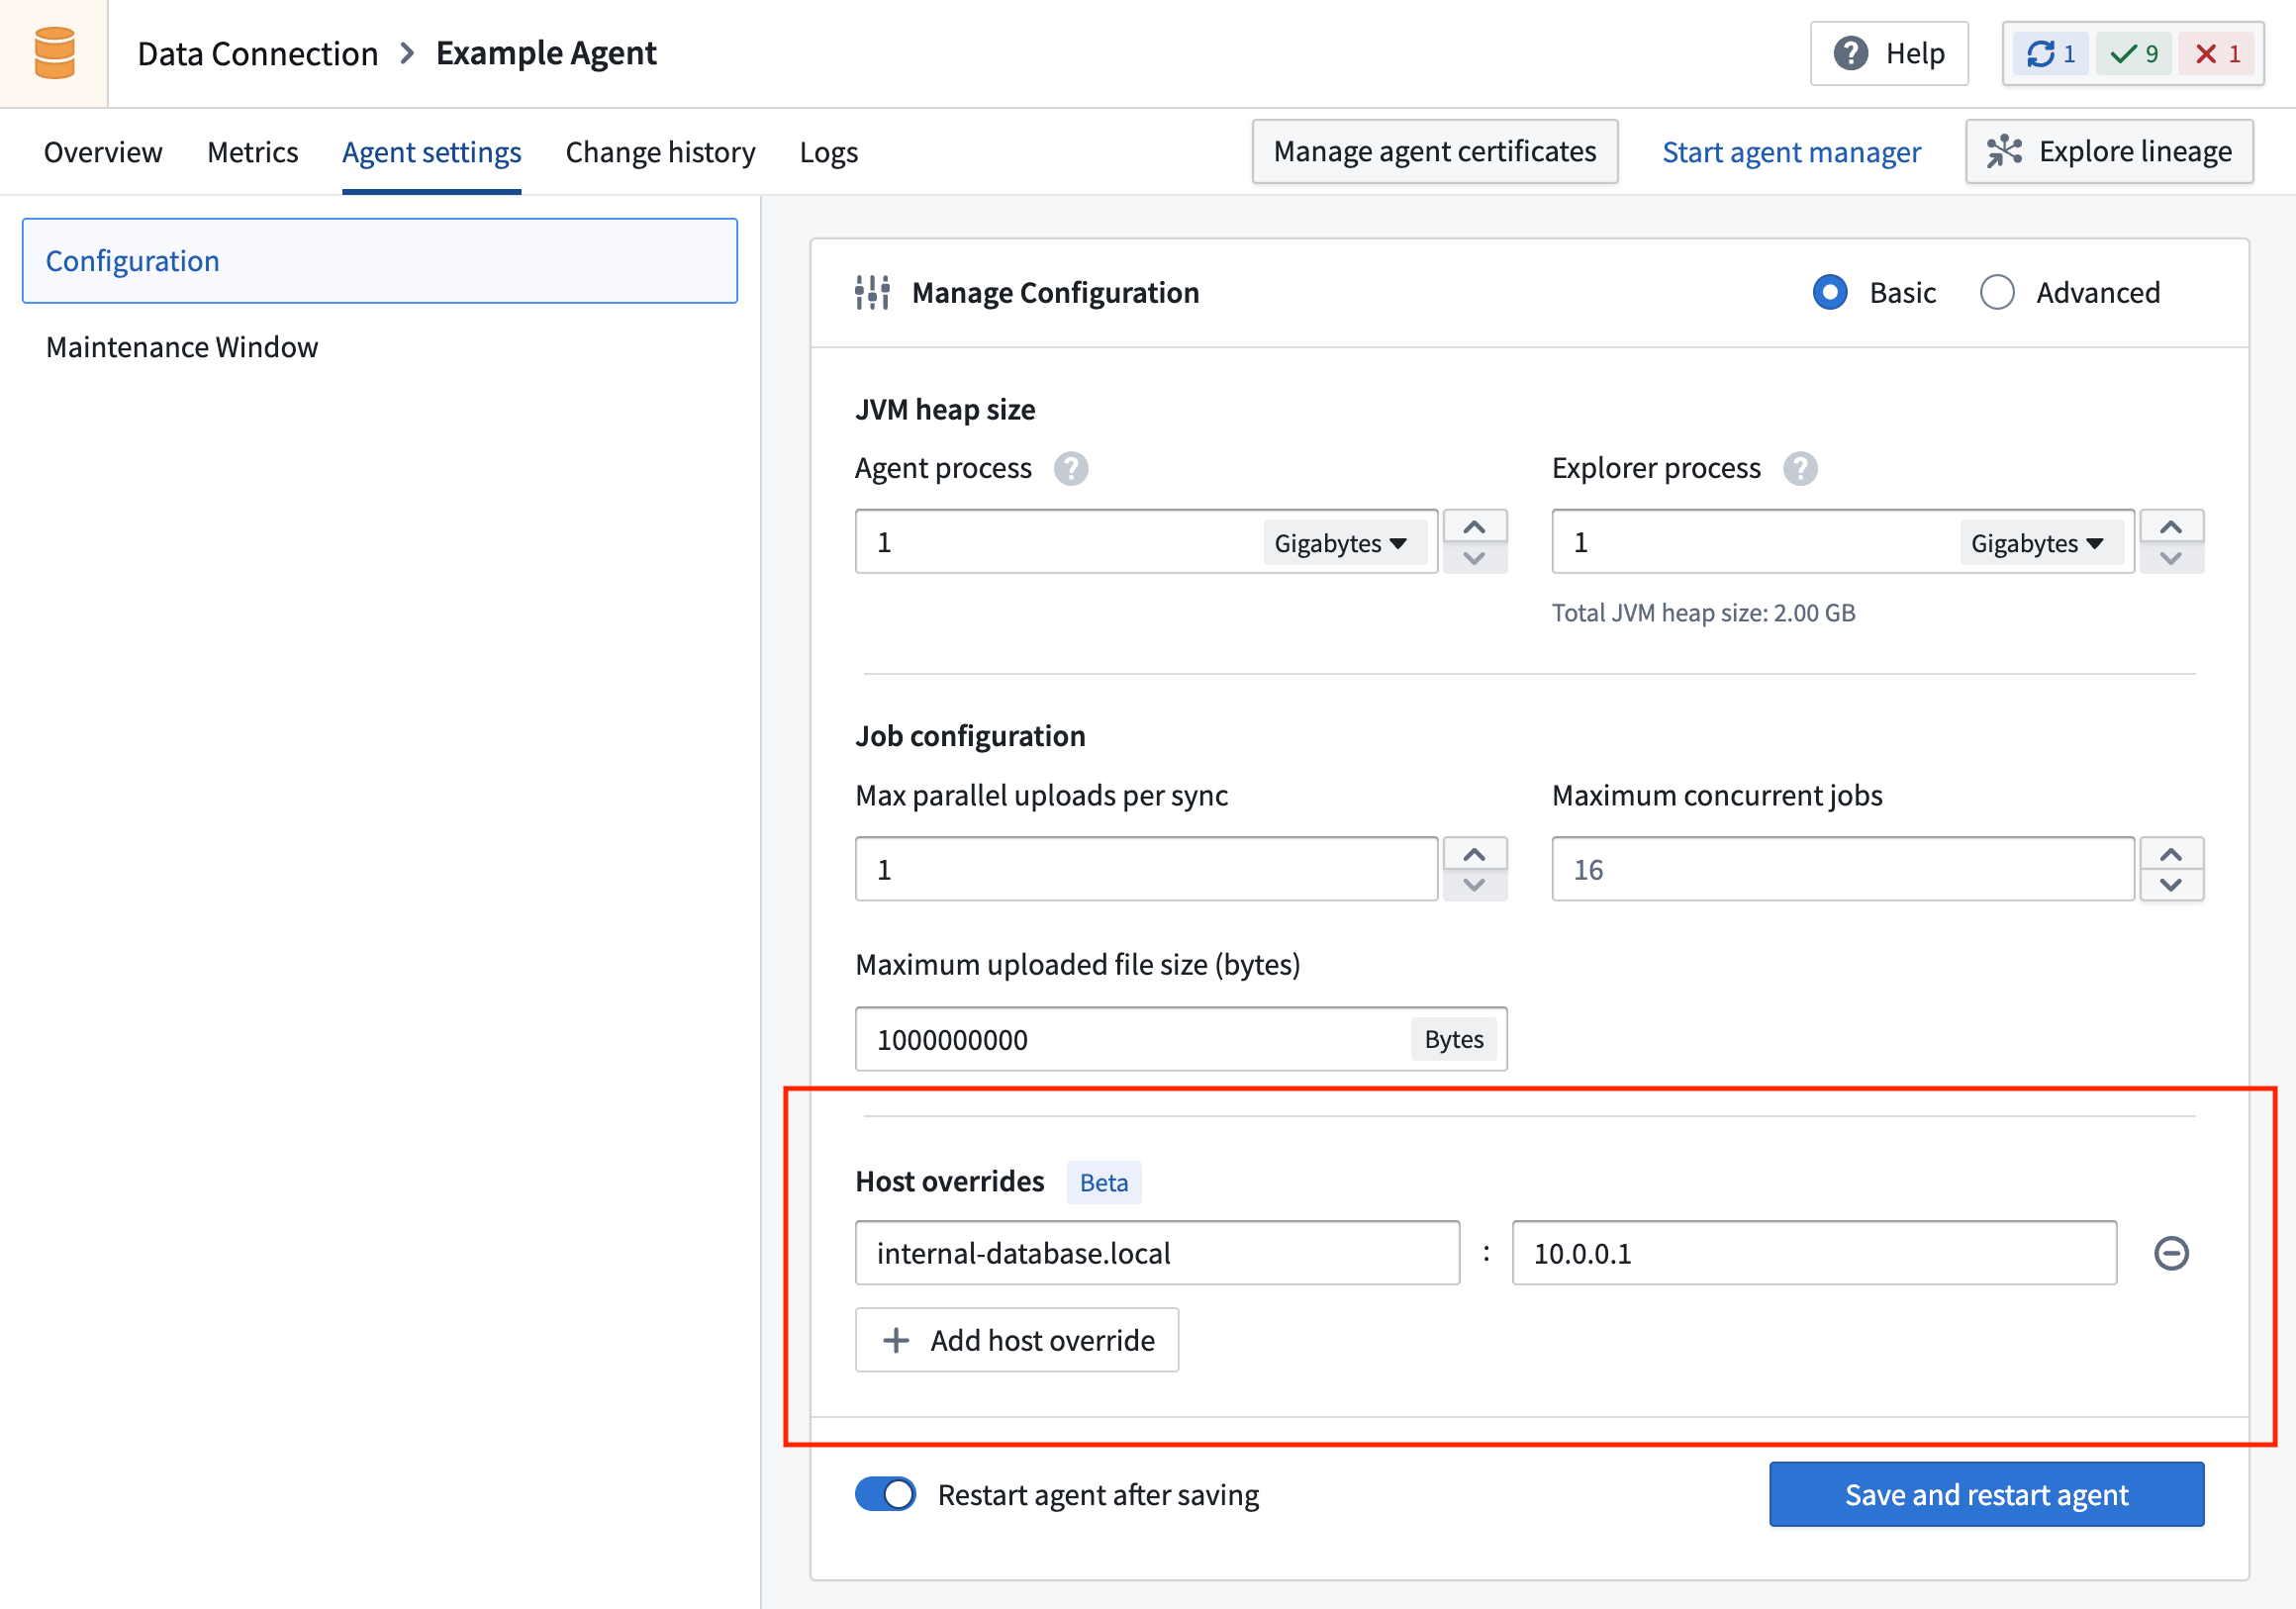
As an example, if your data source is only accessible at 10.0.0.1 within your private network:
- Configure a host override that maps an ad-hoc domain (such as
my-private-internal-database.local) to10.0.0.1. The chosen domain name can be anything, although we recommend a descriptive name of the system hosted at that IP. - Use this ad-hoc domain instead of
10.0.0.1in your source and egress policy configuration.
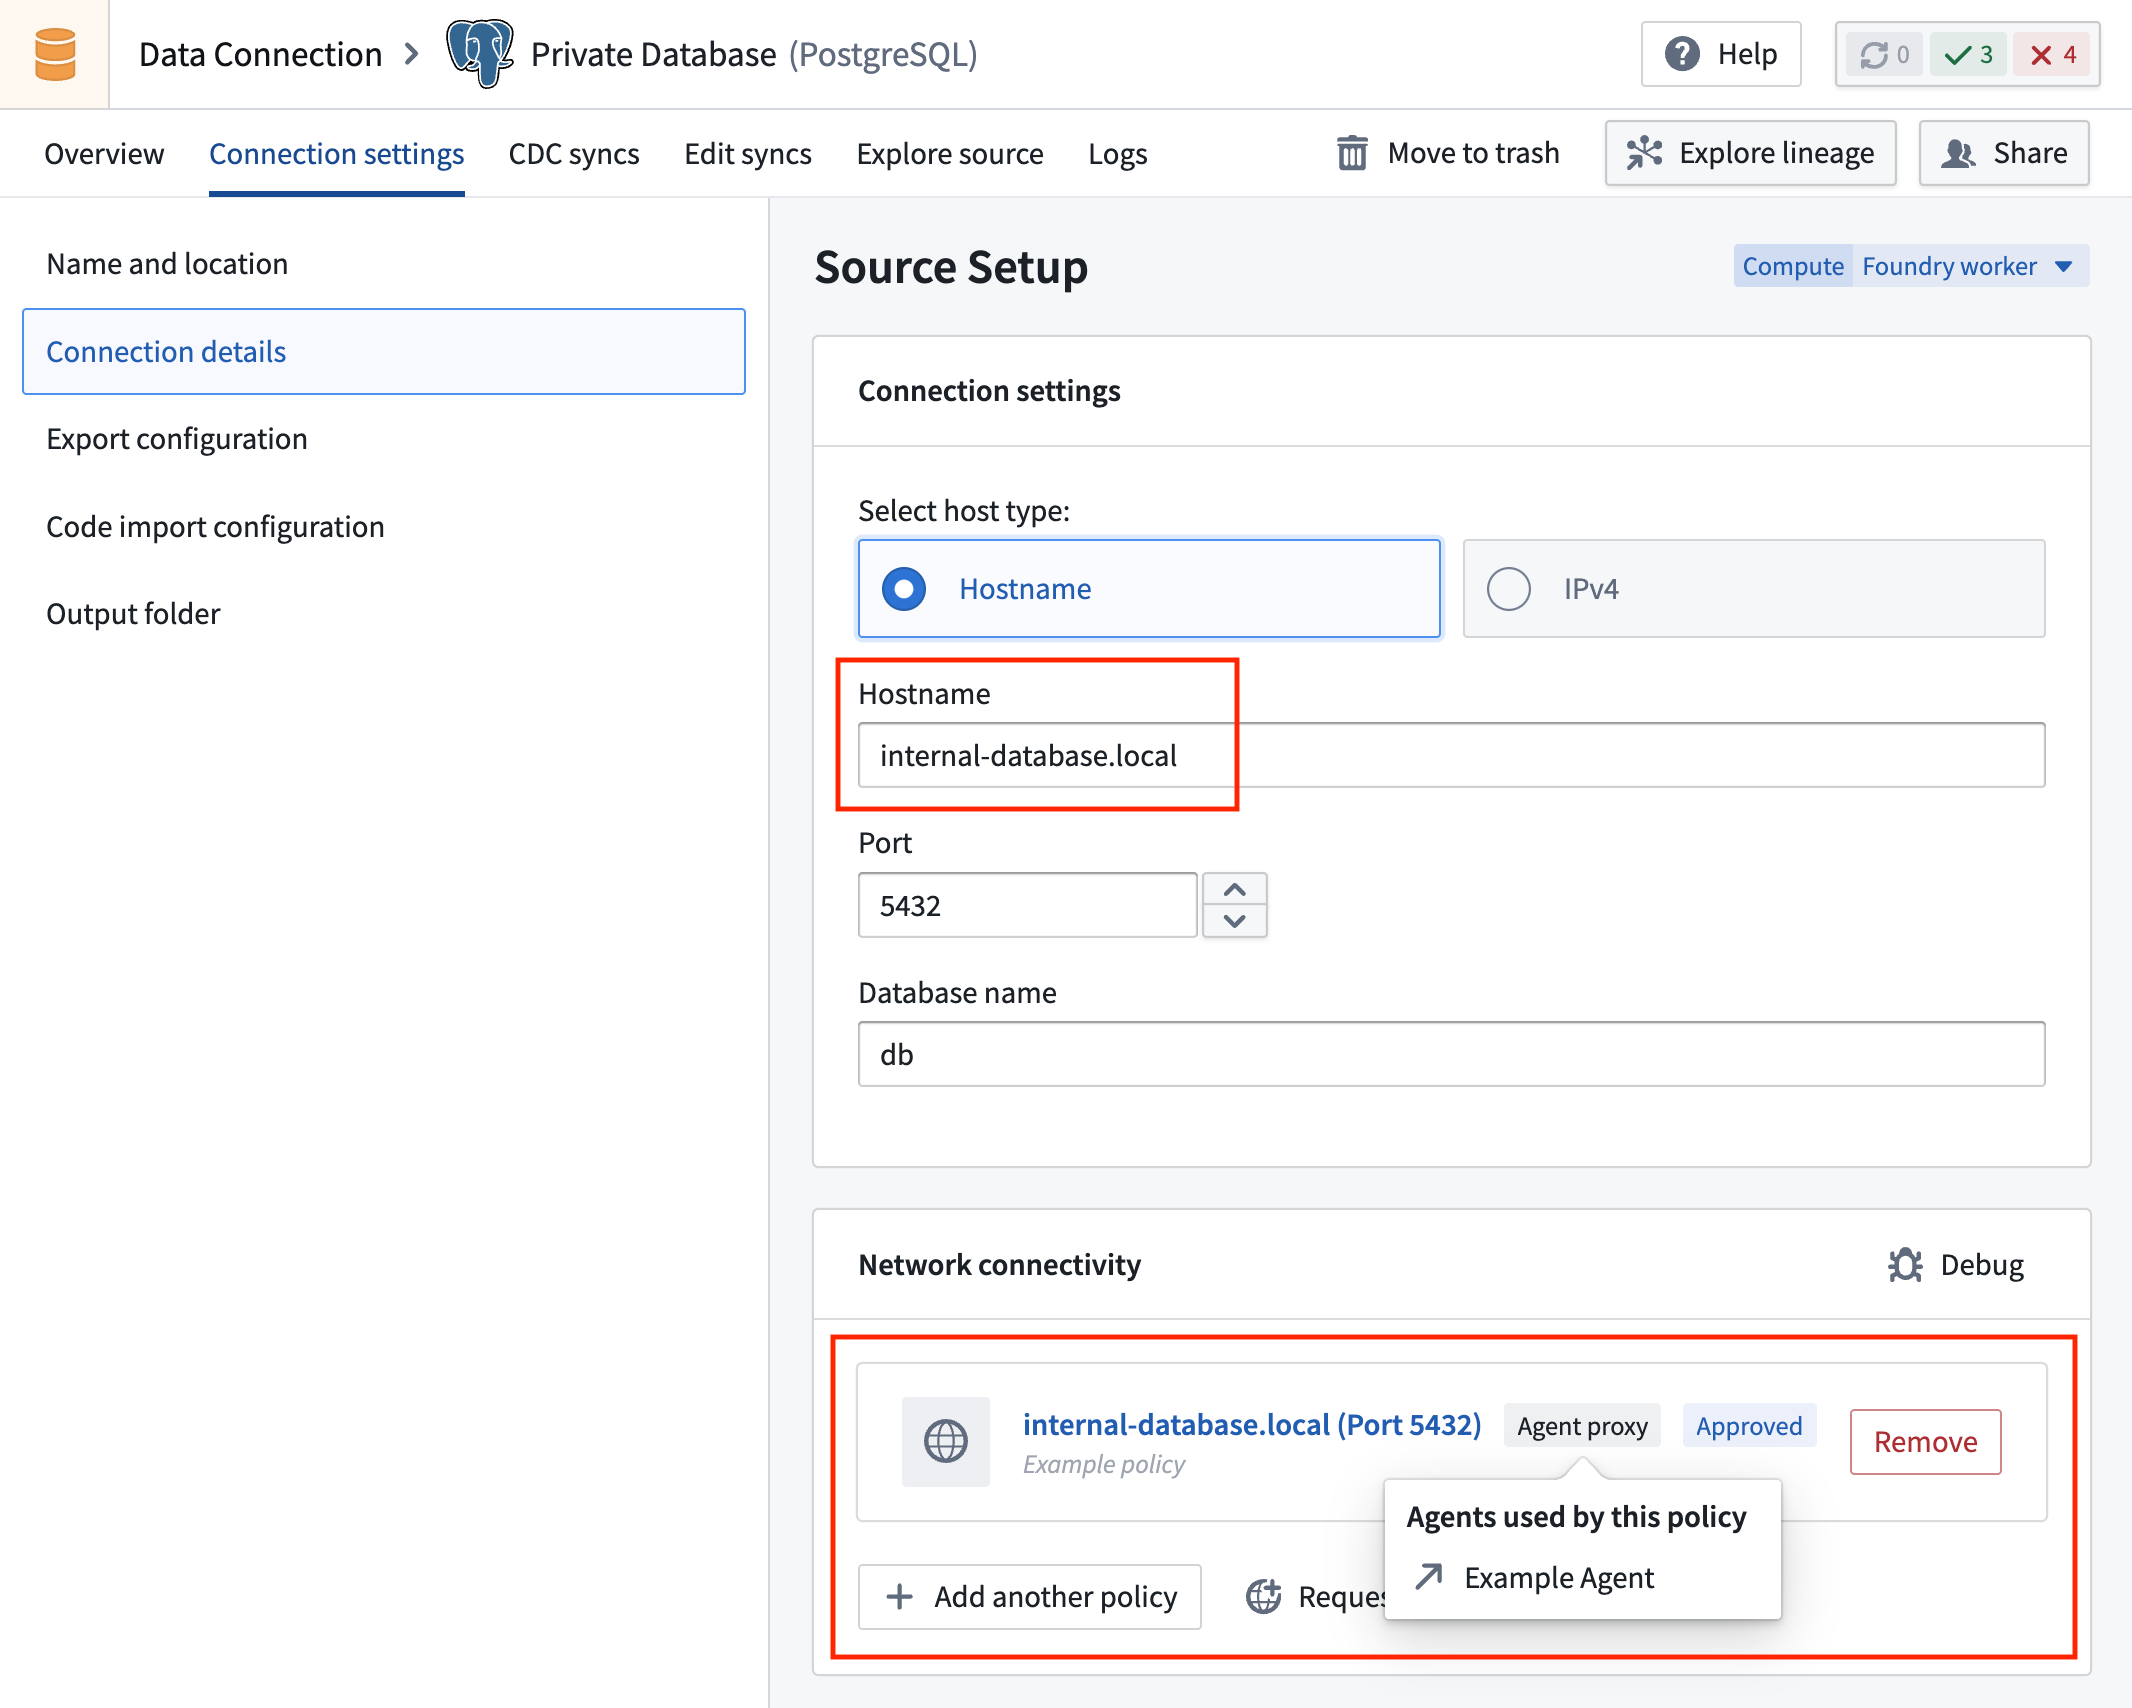
Network connections from within Foundry are initiated using the domain name, while the agent resolves it to the correct private IP address at the network edge.
:::callout{theme="warning"} Host override configurations affect DNS resolution at the agent level and apply to all connections made by that agent. These mappings take precedence over standard DNS lookups. :::
When to use host overrides
You should configure host overrides for the following scenarios:
-
Source systems in private networks that can only be referenced by IP address: Network requests initiated within Foundry must use non-private IP addresses to avoid infrastructure collisions. Therefore, when using an agent proxy egress policy to connect to a source accessible only through private IP addresses without a resolvable domain name, use host overrides to resolve a placeholder domain to the correct private IPs within the private network.
-
Local testing: When testing connections to localhost or other local services during development.
Host overrides require agent version 9.2446.0 or newer. You can verify your agent version from the agent Overview page in Data Connection.
中文翻译
代理配置参考
以下章节描述了在网络中创建、监控和管理代理时可用的各种配置。将说明以下工作流程:
- 代理权限
- 代理配置
- 代理管理器(Agent Manager)代理配置
- 引导程序(Bootstrapper)代理配置
- 源(Source)代理配置
- 代理指标与健康监控
- 指标
- 健康监控
- 自动升级窗口
- 升级窗口
- 错峰升级
- 调度数据集同步
- 重新安装代理
- 将代理移至新目录
- 将代理移至新主机
- 在Windows主机上安装
- 备份与缓存
- 配置主机覆盖
了解更多关于代理以及如何在Data Connection应用中设置代理的信息。
代理权限
:::callout{theme="warning"} 对于2023年5月27日之前配置的注册(Enrollment),权限管理方式可能有所不同。有关这些注册的代理管理问题,请联系Palantir支持。
要在Control Panel中开始管理代理创建,拥有组织管理员(Organization administrator)权限的用户必须被授予一个名为更改代理创建认证方式(Change agent creation authentication method)的额外工作流。此工作流权限允许管理员选择启用基于角色的严格代理创建管理。对于上述日期之后配置的注册,此强制措施将自动执行。
:::
创建代理的权限在Control Panel中进行管理。要创建代理,您必须被分配组织管理员(Organization administrator)或数据流管理员(Data flows administrator)角色。也可以创建自定义角色并将创建代理(Create agent)工作流分配给该角色。组织角色在Control Panel的组织权限(Organization permissions)页面上进行管理。
除了组织级角色外,您还必须是您想要保存新创建代理的项目的编辑者(Editor)或所有者(Owner)。
:::callout{theme="neutral"} 创建后,基于项目的角色用于控制谁可以查看、修改和删除代理,或将代理分配为特定源的工作节点(worker)。这意味着代理创建者应确保存储代理的项目配置了正确的角色。 :::
证书
代理与Foundry和您的内部网络进行通信。这意味着代理需要在其信任库(truststore)中拥有正确的证书才能建立这些连接。
有两种情况可能需要在代理上配置额外的证书:
在这两种情况下,都可以从Data Connection应用中的代理管理页面添加证书。
向代理添加证书
要向代理添加证书,请导航至Data Connection中您的代理的详细信息页面,然后选择管理代理证书(Manage agent certificates)。
在此处,选择要添加的证书,如果需要还可添加别名。然后,添加证书的内容。证书应作为类似以下示例的字符串添加,包括换行符但不包含尾随换行符。下面显示的证书是https://palantir.com的公共证书。
请注意,您不能输入证书链;您必须分别输入每个证书。
-----BEGIN CERTIFICATE-----
MIIGXjCCBUagAwIBAgIQASByQ6gv8Z6X7wEqsyBb1DANBgkqhkiG9w0BAQsFADBY
MQswCQYDVQQGEwJCRTEZMBcGA1UEChMQR2xvYmFsU2lnbiBudi1zYTEuMCwGA1UE
AxMlR2xvYmFsU2lnbiBBdGxhcyBSMyBEViBUTFMgQ0EgMjAyNCBRMjAeFw0yNDA2
MTcxNjUwMTVaFw0yNTA3MTkxNjUwMTRaMBkxFzAVBgNVBAMMDioucGFsYW50aXIu
Y29tMIIBIjANBgkqhkiG9w0BAQEFAAOCAQ8AMIIBCgKCAQEAvBalUG3JFYaSiRO2
enRnEwdeGUgtal9isJfB1++LxcPwo/DP2dncK+ur7URID0TVWOqu+4vXE2mmC9jz
Kx0o/URrMoz70i6qF6/Oyq6CuOHjZINiAN0ovNBBEPNGbSVD3Xq/eWgI7PNQ8hfI
9BJ/3WVA17oSG3zEXiWP3+CiL3Wm1Gn38oOt4URBMA0hgLqyOoU3ooqYIK8Fz2K/
OxAJvq45z2lonMZFFzj5thO5dBBch26mNAacO4MvI9mhUrMZtYvGBRZoXrph4EmF
TJDo2UTYiST0Tq6ibNW+NTuv66DrqFvzOpZybNuZsS6VrisYQ4huPN9jVz7RNFhJ
aeJvbQIDAQABo4IDYTCCA10wGQYDVR0RBBIwEIIOKi5wYWxhbnRpci5jb20wDgYD
VR0PAQH/BAQDAgWgMB0GA1UdJQQWMBQGCCsGAQUFBwMBBggrBgEFBQcDAjAdBgNV
HQ4EFgQUuAbgKrz0fIAXR1I/89IpUMN57AgwVwYDVR0gBFAwTjAIBgZngQwBAgEw
QgYKKwYBBAGgMgoBAzA0MDIGCCsGAQUFBwIBFiZodHRwczovL3d3dy5nbG9iYWxz
aWduLmNvbS9yZXBvc2l0b3J5LzAMBgNVHRMBAf8EAjAAMIGeBggrBgEFBQcBAQSB
kTCBjjBABggrBgEFBQcwAYY0aHR0cDovL29jc3AuZ2xvYmFsc2lnbi5jb20vY2Ev
Z3NhdGxhc3IzZHZ0bHNjYTIwMjRxMjBKBggrBgEFBQcwAoY+aHR0cDovL3NlY3Vy
ZS5nbG9iYWxzaWduLmNvbS9jYWNlcnQvZ3NhdGxhc3IzZHZ0bHNjYTIwMjRxMi5j
cnQwHwYDVR0jBBgwFoAUrw0C0MMbnlj47zdiLecDXZ5BSoowSAYDVR0fBEEwPzA9
oDugOYY3aHR0cDovL2NybC5nbG9iYWxzaWduLmNvbS9jYS9nc2F0bGFzcjNkdnRs
c2NhMjAyNHEyLmNybDCCAX0GCisGAQQB1nkCBAIEggFtBIIBaQFnAHUA5tIxY0B3
jMEQQQbXcbnOwdJA9paEhvu6hzId/R43jlAAAAGQJxs/FAAABAMARjBEAiATvomb
hMrUty8Vj703fTBSzY5qDxEMI473IigiGIiXugIgbj4/j24jloGdVoedM3jb6DFw
yAXkuZD3SMHBLsEvP9gAdgDd3Mo0ldfhFgXnlTL6x5/4PRxQ39sAOhQSdgosrLvI
KgAAAZAnGz7qAAAEAwBHMEUCIAHXbm9F2rwyxD36aHoGZRrnDtgg9UDRy5UtHK6D
OrmKAiEAjfomH4CGUrkBbwD8pzt9BbC6u6gPPveYiURxFIq//RUAdgB9WR4S4Xgq
exxhZ3xe/fjQh1wUoE6VnrkDL9kOjC55uAAAAZAnG0C6AAAEAwBHMEUCIQDDOg9s
KZqzbCu0mNBQMRAv6/2HkuLjZSGMxjq/F0R1/wIgKMHBSsNgeVED+LpTcIBYgp1q
SXgbwSizE6OD+1Ewol0wDQYJKoZIhvcNAQELBQADggEBAAr/tnc9dtTfwrczP7Ok
1+tLKmFRss4/1KQgLY8Tyy45Pag53ikn2n3tSPG1OpRTSmfPhPs9/UQRtMf7f2Gk
ObSXDVpPArtFBFDfZug+j22gVSYQr6zgFJu4Y9QD1GGtICqkmTScubfnjwdffTv6
5oNY4LbVGp5yctAd80OFUXspy+oVGsvv61a1pFO+s/NXleSrqDGL1oWcFW5Uj8GH
jnTM+Lt/HupqZ/ThVSkjMOug+hB875Yf8mWvadKYBX0Ga2s51cp8CI49FRswziY6
3oXPKfHHQybpIKhGosuSyzY8pL8UofHNp8gicAV80Vj6Mw+L8gWaAkCR6YnzQIyJ
9lc=
-----END CERTIFICATE-----
:::callout{theme="warning"} 修改证书后,必须重新启动代理,更改才会生效。如果在初始设置之前添加证书,则在Data Connection中添加后,它们将包含在下载链接中。 :::
有关客户端证书,请参阅我们的私钥设置文档。
允许代理与Foundry通信的证书
用于连接到您的Foundry实例的证书包含在默认的代理安装包中。通常,这意味着您的代理主机无需额外证书即可与Foundry通信。
如果从代理到Foundry的流量通过显式或透明代理进行中介,则可能需要在初始设置期间将代理的证书添加到代理中。由于在此场景中缺少证书将阻止代理被Foundry管理,因此必须在下载初始安装包之前将这些证书添加到代理中。
如果在代理启动时出现与证书相关的错误,阻止代理与Foundry通信,这些错误将出现在名为<bootvisor_directory>/var/service.log的日志文件中。
如果您在首次尝试设置代理时遇到错误,或者提前知道需要额外的证书,您应该:
- 跳过代理设置页面,不要尝试在代理主机上下载和安装。
- 按照上一节中的描述,从代理管理页面添加必要的证书,然后下载并遵循标准安装说明。
如果您的额外证书用于显式代理,则可能需要额外配置。
一旦代理成功连接到Foundry,除非代理主机和Foundry之间的网络配置发生变化,否则不应更改这些证书。
允许代理与您的系统通信的证书
当用作代理工作节点(agent worker)时,如果代理进程需要使用安全协议(如HTTPS或TLS/SSL保护的协议)与系统通信,则可能需要额外的证书。每个新的源连接可能都需要添加新证书,并且如果这些证书过期或轮换,则应进行更新。
如果缺少必需的证书,则在尝试使用源功能(如探索)时会出现类似以下的错误:
Wrapped by: javax.net.ssl.SSLHandshakeException: sun.security.validator.ValidatorException:
PKIX path building failed: sun.security.provider.certpath.SunCertPathBuilderException:
unable to find valid certification path to requested target
TLS检查环境中的代理
如果您对安装代理的主机上的流量执行TLS检查,您需要手动将您的根CA导入到代理管理器(Agent Manager)的信任库中,然后代理管理器才能首次连接到Foundry。
为此,请按照以下说明操作:
- 获取用于重新签名检查流量的根CA的公共证书。您的网络团队应能提供此证书。或者,您可以在代理主机上使用OpenSSL检查证书链并找到根证书:
openssl s_client -showcerts -connect FOUNDRY_URL:443。 - 使用SSH访问代理主机,并将证书放置在运行代理管理器的用户可以访问的位置。一个可能的位置是
<agent-manager-install-directory>/var/security。 - 导航到代理管理器的Java安装目录:
cd <agent-manager-install-directory>/jdk/amazon-corretto*。 - 将证书导入到代理管理器的信任库:
./bin/keytool -import -alias <CERT_NAME> -file /path/to/certificate.pem -keystore ../../var/security/truststore.jks(提示时,密码是truststore)。 - 启动代理管理器。您应该在Data Connection的代理详细信息页面上看到
已连接到代理管理器,但代理未连接(Connected to Agent Manager, but no connection from agent),确认代理管理器已成功连接到Foundry。 - 要允许代理连接到Foundry,请按照上述说明将相同的证书添加到代理。
代理配置
首次配置代理时,或连接到远程源时,您可能需要根据组织的网络配置配置代理(proxy)。代理可用于管理从代理到Foundry的通信,或者可能需要它来访问网络内的数据源。
为了使您的代理使用代理,您需要在Data Connection中代理配置页面的管理配置(Manage Configuration)窗口的高级(Advanced)选项卡中找到的代理(Agent)和引导程序(Bootstrapper)配置中配置代理。确保提供的主机名开头不带http://。
代理管理器代理配置
代理管理器代理配置必须添加到安装代理的主机上的<agent-manager-install-directory>/var/conf/runtime.yml文件中。以下是带有proxy-configuration块的代理管理器配置示例片段:
service-discovery:
    services:
    magritte-coordinator:
        ...
        proxy-configuration:
            hostAndPort: proxy-host.com:3128
            credentials: # these are optional
                username: USERNAME
                password: PASSWORD
此代理将由代理管理器用于连接回Foundry的magritte-coordinator。它不会用于从代理到源的连接。
引导程序代理配置
配置好代理管理器代理后,您可以配置引导程序代理。为此,请导航到Data Connection中的代理配置页面,切换管理配置(Manage Configuration)部分中的高级(Advanced)选项,最后选择引导程序(Bootstrapper)选项卡。以下是带有proxyConfiguration块的引导程序配置示例片段:
coordinator:
    proxyConfiguration:
        host: HOST
        port: PORT
        credentials: # these are optional
            username: USERNAME
            password: PASSWORD
更新配置后,您必须保存更改并重新启动代理才能使更改生效。
此代理将由引导程序用于连接回Foundry的magritte-coordinator。它不会用于从代理到源的连接。
源代理配置
对于通过代理从代理连接到数据源,请在管理配置(Manage Configuration)页面的高级(Advanced)部分的引导程序(Bootstrapper)选项卡上配置代理的JVM级代理。
使用以下JVM标志:
agent:
  jvmArguments: >-
    -Dhttp.proxyHost=<PROXY URL> -Dhttp.proxyPort=<PROXY PORT>
    -Dhttps.proxyHost=<PROXY URL> -Dhttps.proxyPort=<PROXY PORT>
如果您不想对特定主机使用配置的代理,请添加额外的JVM标志http.nonProxyHosts。完整的代理配置可能如下所示:
agent:
  jvmArguments: >-
    -Dhttp.nonProxyHosts=host1.com|*.host2.com
    -Dhttp.proxyHost=proxyhost.com -Dhttp.proxyPort=8000
    -Dhttps.proxyHost=proxyhost.com -Dhttps.proxyPort=8001
    ...
请注意,不应使用引号来封装任何这些配置值。
:::callout{theme="warning"} 此配置影响来自代理的所有出站网络请求。我们建议在可用时使用特定于源的代理配置。 :::
代理指标与健康监控
在Data Connection中设置代理后,您可以查看指标并监控健康状况以保持性能。
指标
导航到Data Connection中的代理页面,然后选择指标(Metrics)选项卡。您的代理可用的指标包括但不限于以下内容:
- 操作系统物理内存
- 磁盘空间
- 可用磁盘空间
- 操作系统负载(相对于核心数归一化)
- CPU利用率
- 代理密钥库(keystore)中距离下次过期的时间
- 代理信任库(truststore)中距离下次过期的时间
- 代理堆内存
- 已用堆百分比
- 代理运行时间
- 代理线程数
- 自上次代理重启以来的同步/任务上传数
- 正在运行的同步/任务数
- 代理排队中的同步/任务数
- 同步/任务持续时间
- 代理上次心跳时间
- 代理管理器版本过时时长
- 代理版本过时时长
将鼠标悬停在指标卡片上可查看带时间戳的详细信息,选择卡片右上角可展开详细视图。
"距离下次过期时间"指标
代理密钥库中距离下次过期的时间和代理信任库中距离下次过期的时间指标分别指代理密钥库和信任库中最早证书过期的时间。例如,如果代理的密钥库有两个证书,一个在一周后过期,另一个在一个月后过期,则该数字将为1w,因为这是最近的过期日期。
代理密钥库和信任库包括用户添加的证书以及代理管理器自动添加的证书。代理管理器证书会自动升级。
如果证书已过期,指标将显示000ms。如果没有为代理存储证书,则图表将为空。
"版本过时时长"指标
代理管理器版本过时时长和代理版本过时时长指标指代理和代理管理器相对于您的环境中可用版本的过时程度。
版本过时时长指标的计算方式是代理或代理管理器上次更新的时间与最新可用版本的发布日期之间的天数。以下示例说明了这些指标及相关监控器的预期行为:
| 天 | 最新发布版本 | 代理/代理管理器当前版本 | 版本过时时长指标值 | 备注 |
|---|---|---|---|---|
| 0 | v1.0 | v1.0 | 0 |
代理更新到当前最新版本。 |
| 1 | v1.0 | v1.0 | 0 |
|
| 2 | v0.1 -> v2.0 | v1.0 | 0 -> 2 |
当Palantir发布新版本时,指标跳转到2。 |
| 3 | v2.0 | v1.0 | 3 |
|
| 4 | v2.0 | v1.0 -> v2.0 | 4 -> 0 |
在维护窗口期间成功更新后,指标回到0。 |
在此示例中,前两天的代理版本过时时长指标为0。当新版本可用时,指标跳转到2,然后将继续增加,直到下一个代理维护窗口,最后在维护窗口期间成功完成更新后回落到0。
:::callout{theme="neutral"} 如果设置了监控器在软件版本过旧时发送警报,并且Palantir的新版本发布间隔超过允许的天数,则一旦新版本可用,此监控器将开始发出警报,即使特定代理没有机会更新。这些警报将在维护窗口期间下次成功更新后自动解决。
在上面的示例中,如果监控器设置为在过时时长天数>2时发出警报,则将在第3天发出警报,即使代理没有机会升级到最新版本。该警报将在第4天成功更新后自动解决。
:::
健康监控
健康监控器允许您为任何指标配置不同严重级别(高、中或低)的警报,当满足特定条件或阈值时触发。
您可以通过在数据健康(Data Health)应用中创建监控视图来监控代理的健康状况。监控视图是一组对特定订阅用户组特别关注的监控规则。
您可以通过选择监控视图(Monitoring views)选项卡来查看现有的监控视图。
选择特定监控视图后,您可以通过选择管理监控器(Manage monitors)来配置代理的健康监控器。在此页面,您可以创建新的监控规则。
在创建监控规则(Create monitoring rules)页面,您可以配置特定规则和不同严重级别的警报。
了解更多关于使用监控器跟踪数据健康和将监控器与PagerDuty集成的信息。
自动升级窗口
Data Connection代理服务会定期更新安全、稳定性和性能改进。确保代理及时获得这些重要改进的最佳方法是为每个正在使用的代理配置升级窗口。以下部分描述了升级窗口期间发生的情况,并提供了最佳实践指南。
升级窗口
代理升级窗口是一组时间间隔,在此期间认为代理暂时离线是安全的。这些时间间隔每周重复,可以在Data Connection应用中给定代理的代理设置(Agent settings)选项卡的维护窗口(Maintenance Window)页面上定义。
Data Connection协调器(coordinator)监控代理及其各自的升级窗口;当新版本可用时,它们将在这些升级窗口期间执行代理的自动升级。
作为升级的一部分,代理将重新启动。这将终止任何正在运行的作业,并暂时阻止新作业在代理上运行。
代理升级窗口应至少为60分钟。然而,实际升级应该相对较短;所需时间大约与代理重启时间相同。
错峰升级
为了确保对数据管道的影响最小,我们建议为所有Data Connection源分配至少两个代理,并为在这些代理上运行的任何给定源集错开升级窗口。例如,一个代理可以将升级窗口定义在周日,而另一个代理将升级窗口安排在周三。这确保了在任何给定代理的升级窗口期间,被中断的作业可以在伙伴代理上重试,并且新作业可以继续排队和运行,直到正在升级的代理完全恢复在线。
调度数据集同步
当无法使用错峰升级窗口时,重要的是在低活动(理想情况下为零)期间安排升级窗口。在这种情况下,数据集同步应安排在升级窗口开始之前完成,或在窗口结束后几分钟开始(以考虑在窗口结束时发生的重启)。
重新安装代理
如果您的代理未升级或长时间处于不健康状态,最简单的解决方案是在主机上重新安装代理。重新安装代理是一项安全操作,过程与初始安装类似。
可以通过导航到代理概览页面并选择重新安装代理(Reinstall the agent)来启动重新安装过程。
按照重新安装向导中的说明以及以下额外步骤操作,以确保重新安装成功:
- 在重新安装之前,确保代理未运行。为此,使用计算机的命令行工具SSH进入代理主机,导航到代理文件夹(
magritte-bootvisor-*)并通过运行以下命令停止它:
./service/bin/init.sh stop
./service/bin/auto_restart.sh clear
- 如果您在现有目录中重新安装代理,请创建旧代理的备份。
mv magritte-bootvisor-* magritte-bootvisor-*-old
- 将加密密钥从旧代理复制到新代理文件夹。
cp $OLD_BOOTVISOR_DIR/var/data/source-encryption-key* $NEW_BOOTVISOR_DIR/var/data
- 确认一切正常,然后删除备份代理
magritte-bootvisor-*-old以释放磁盘空间。
rm -r magritte-bootvisor-*-old
将代理移至新目录
按照以下步骤将代理移动到同一台机器的新安装目录。
- 在Data Connection中,导航到同步(Syncs)页面,确保当前没有正在运行的同步。
- 通过使用页面左侧的过滤器仅查看当前状态为
运行中(Running)的同步来检查同步是否正在运行。 - 如果同步正在运行,请等待它们完成,或通过选择其状态链接(例如,
14分钟前运行中(Running 14 minutes ago)),然后从构建页面选择取消构建(Cancel build)来取消它们。如果您需要取消同步,请确保适当通知同步所有者。 - 导航到代理(Agents)页面。选择您要移动的代理的名称。
- 在配置面板中,选择高级(Advanced)。对于高级(Advanced)设置的每个选项卡,更改所有使用绝对路径的引用。查找任何以
/开头的内容,并将其修改为新路径。 - 注意:Kerberos设置需要绝对路径。
- 在Foundry中停止代理。为此,选择屏幕右上角重启代理(Restart Agent)旁边的下拉箭头,然后选择
停止(不安全)(Stop (Unsafe))。 - 注意:
不安全(Unsafe)标签旨在警告停止代理将中断任何正在运行的同步,这就是我们在步骤1中采取预防措施的原因。 - 在您机器的终端上,SSH进入代理。
- 切换到代理的管理用户。根据您的配置,这可能需要输入
-- sudo -su palantir或-- sudo -su admin。 - 在您的终端中,使用
cd导航到代理安装目录。 - 通过运行
./service/bin/init.sh stop停止代理。 - 如果代理之前配置为自动启动:
- 对于Linux,运行
./service/bin/auto_restart.sh clear。 - 对于Windows,删除按照在Windows主机上安装说明设置的任何计划任务。
- 等待几分钟,检查管理用户是否正在运行任何Java进程。如果有,请手动停止它们。
- (可选)删除
./var/data/binaries、./var/data/cache和./var/data/processes文件夹的内容,以减少要传输的数据量。 - 通过输入
mv <source directory> <new installation directory>将代理移动到新目录文件夹。 - 导航到新的代理安装目录。通过运行
./service/bin/init.sh start重新启动代理。 - 如果代理之前配置为自动重启,请按照自动重启设置说明重新启用它。
- 等待五分钟,然后刷新Foundry中的代理页面,以确保代理已连接且同步成功。
将代理移至新主机
将代理移动到新主机时,请确保新主机满足操作系统要求,并且具有与先前代理相同的操作系统和架构。新主机还必须具有与旧主机相同的防火墙网络配置。例如,如果代理之前在运行x86_64架构的Linux发行版上运行,则新主机可以有任何Linux发行版,但必须运行在相同的架构上。以下说明不适用于将代理从Linux移动到Windows或ARM架构。对于这些情况,请从UI获取新的下载链接并进行新安装。
当使用来自UI的新下载链接重新安装代理时,现有的源凭据将无法解密,必须手动重新输入。要保留这些凭据,请考虑以下步骤将源密钥从旧代理迁移到新代理:
- 导航到旧代理上的目录
<bootvisor dir>/var/data。 - 将文件
source-encryption-key和source-encryption-key.private复制到新代理上的相同目录(<bootvisor dir>/var/data)。 - 如果在复制之前这些文件在旧代理上丢失或被覆盖,所有源凭据将丢失,并且需要手动重新添加到新代理。
如果代理依赖于文件系统中的其他文件,请确保它们也被移动到新代理安装中以保持正常功能。
按照以下步骤将代理移动到新主机:
- 按照将代理移至新目录说明中的步骤1至11(排除步骤3)操作。这将停止代理并准备将其传输到新主机。
- 使用rsync ↗或任何其他文件传输工具将代理文件夹从旧主机复制到新主机上的某个位置。
- 按照将代理移至新目录说明中先前跳过的步骤3操作。对于每个通过绝对路径引用的文件或文件夹,将该资源复制到新主机上的某个位置,并更新配置以指向新路径。
- 按照将代理移至新目录指南中的步骤13至16操作。
在Windows主机上安装
:::callout{theme="warning"} Linux主机是设置代理的首选选项。除非无法获取Linux主机或在Windows主机上运行Linux虚拟机,否则不应使用Windows主机。
某些功能可能无法在Windows代理上工作,特别是在将Windows代理用作代理工作节点(agent worker)时。具体来说,表导出(table exports)在Windows代理上不受支持,并且将无法运行。 :::
按照设置代理指南中的步骤操作,但在下载和配置代理步骤中选择Windows作为您的操作系统。安装代理后,您需要设置一个Windows计划任务,以便在崩溃或机器重启时重新启动代理管理器,如下所示:
- 以管理员身份打开Windows任务计划程序。
- 创建一个新的计划任务。
- 在常规(General)选项卡下,执行以下操作:
- 将运行任务时,使用以下用户帐户(When running the task, use the following user account)设置为
SYSTEM。 - 确保选中不管用户是否登录都要运行(Run whether the user is logged in or not)。
- 确保不选中不存储密码...(Do not store password...)。
- 将配置为(Configure for)更新为Windows虚拟机的正确操作系统。
- 选择使用最高权限运行(Run with highest privileges)。
- 在触发器(Triggers)选项卡下,创建两个触发器:
- 设置一个触发器在事件发生时(on an event)并选择在启动时(on startup)。
- 将延迟任务(Delay task for)设置为3分钟,以确保在启动时与Windows升级过程没有冲突。
- 确保任务已启用(Enabled)。
- 设置另一个基于计划的触发器:
- 将任务设置为每天运行。
- 选中重复任务间隔(Repeat task every)框,并选择5分钟,持续时间为1天。
- 在操作(Actions)选项卡下:
- 添加一个新的启动程序(Start a Program)操作。
- 将
magritte-bootvisor-win批处理文件的完整路径复制到程序/脚本(Program/script)框中。- 完整路径类似于
C:\example\path\to\folder\containing\magritte\agentmagritte-bootvisor-win-{version}\service\bin\magritte-bootvisor-win.bat。
- 完整路径类似于
- 将批处理脚本的父文件夹的完整路径复制到起始于(可选)(Start in (optional))框中。
- 完整路径类似于
C:\example\path\to\folder\containing\magritte\agent\magritte-bootvisor-win-{version}。 - 尽管Windows说明这是可选的,但此步骤是强制性的,因为代理使用相对路径运行命令。
- 完整路径类似于
- 没有参数,因此将添加参数(可选)(Add arguments (optional))留空。
- 选择确定(OK)保存您的任务。
- 尝试通过右键单击任务并选择运行(Run)来手动运行该任务。
- 此任务应进入运行中(Running)状态并无限期保持,表明代理管理器正在运行。
- 您应该会看到代理成功启动。这可能需要一两分钟才能在Foundry的界面中反映出来。如果代理未成功启动,请检查计划任务的历史记录(History)选项卡以查找错误。您还可以通过使用Windows命令提示符更改目录到特定文件夹,然后执行关联的.bat文件来验证操作是否成功。
备份与缓存
代理可能会在安装、版本升级、版本降级和持续使用过程中备份或缓存文件。通常,备份和缓存可以安全地忽略,并将在30天后自动删除。如果备份和缓存文件在代理主机上占用了超出预期的磁盘空间,只要在维护窗口之外执行,删除它们是安全的。
备份和缓存文件将在代理安装目录内的以下子目录中找到:
| 子目录 | 用途 |
|---|---|
/backups |
用于在执行升级时存储代理配置的备份。 |
/var/data/cache |
用于在代理正常运行期间缓存数据。 |
配置主机覆盖
代理可以配置自定义主机名到IP地址的映射,这些映射会覆盖标准的DNS解析,类似于Unix系统上/etc/hosts中的条目。这些主机覆盖允许代理将特定主机名解析为与标准DNS查找不同的IP地址。
如何为代理配置主机覆盖
按照以下步骤直接从Data Connection应用为代理添加主机覆盖:
- 导航到Data Connection中的代理(Agents)页面,选择您要配置的代理。
- 导航到代理设置(Agent settings)页面,并使用所需的主机名和IP地址映射添加主机覆盖。
- 保存您的更改并重新启动代理以使配置生效。
例如,如果您的数据源在您的私有网络中只能通过10.0.0.1访问:
- 配置一个主机覆盖,将临时域名(例如
my-private-internal-database.local)映射到10.0.0.1。选择的域名可以是任何内容,尽管我们建议使用托管在该IP地址的系统的描述性名称。 - 在您的源和出口策略配置中使用此临时域名而不是
10.0.0.1。
从Foundry内部发起的网络连接使用域名,而代理在网络边缘将其解析为正确的私有IP地址。
:::callout{theme="warning"} 主机覆盖配置影响代理级别的DNS解析,并适用于该代理进行的所有连接。这些映射优先于标准DNS查找。 :::
何时使用主机覆盖
您应在以下场景中配置主机覆盖:
-
私有网络中只能通过IP地址引用的源系统: 在Foundry内部发起的网络请求必须使用非私有IP地址,以避免基础设施冲突。因此,当使用代理代理出口策略(agent proxy egress policy)连接到只能通过私有IP地址访问且没有可解析域名的源时,使用主机覆盖将占位域名解析为私有网络内的正确私有IP。
-
本地测试: 在开发期间测试到localhost或其他本地服务的连接时。
主机覆盖需要代理版本9.2446.0或更新版本。您可以从代理的概览(Overview)页面验证您的代理版本。