Agent worker configuration reference(Agent Worker 配置参考)
:::callout{theme="warning" title="Legacy"} Agent worker is in the legacy phase of development, and no additional development is expected. Full support remains available. We recommend using Foundry worker connections when building a new source or updating existing workflows. See Foundry worker vs. agent worker for the operational reasons behind this recommendation. :::
This page describes the configuration options available when using an agent as a worker and assumes you are already familiar with data connection agents and their generic configuration options.
To migrate an existing agent worker source to a Foundry worker, see Switch source from agent worker to Foundry worker.
Set up an agent
You must set up an agent to use the agent worker. When configuring a source, you can select the Agent worker option and choose at least one available agent. Capabilities run over that source connection will be executed as jobs on the agent host.
Capability execution
When using an agent worker, capabilities are executed by running Java code on the agent host directly. These Java processes may pull data from your systems and push data up to Foundry (as with batch syncs), or pull data from Foundry and push to your systems (as with exports), which comes with known limitations.
Networking
All networking for agent worker sources is configured on the agent host. Foundry-side egress policies do not apply: the agent host must have firewalls, DNS, and proxy settings configured to reach the source systems directly. See Configure agent network access for the full reference.
Memory allocation and usage
Agent memory is one of the key factors determining the performance of capabilities executed using an agent worker.
The primary settings available for agent memory are:
- JVM heap: Configured on the agent settings page, and indicates how much memory the agent should allocate on startup. The allocated memory is reserved from the OS and must not exceed the available memory on the host machine. The default JVM heap value is 1 GB.
- Host memory: Based on the specification of the machine where the agent is installed. We recommend at least 16 GB of memory.
Actual memory usage observed on the host will vary based on the workload currently being executed by the agent worker, including other processes running on the same host.
When observing and monitoring memory usage for an agent used as an agent worker, there are two primary metrics:
- OS physical memory usage: The actual total memory usage on the agent host, including the agent process but also any other processes running on the same host. This may go beyond the allocated JVM heap size for the agent process, and up to the full physical memory available.
- Agent memory usage: The memory usage by the agent, which will always be smaller than the configured JVM heap size.
For information on monitoring memory usage on agents, review agent metrics and health monitoring.
Load balancing
When using an agent worker, multiple agents may be assigned to a single source connection. An agent is assigned jobs to execute specific capabilities configured on assigned source connections. Jobs are executed on one of the available agents at the time when the job is started.
Jobs are assigned randomly to one available agent amongst the assigned agents.
Maximum concurrent syncs defaults to 16, and is configurable under Agent settings. The Maximum concurrent syncs quota is enforced across all capabilities and all assigned sources, meaning that any run of any capability on any source uses up one unit of the available concurrent sync quota. This includes streaming syncs, change data capture syncs, exports, webhooks and legacy data connection tasks. If the assigned agent already has the maximum number of concurrent syncs currently running, then new jobs will be queued until enough running capabilities finish.
In general, we do not recommend using multiple agents as a way to load balance a larger workload than could be successfully run on a single agent. The primary intended use of multiple agents is to allow for agents being taken offline for maintenance. For optimal performance and reliability, we recommend that each agent in a multi-agent setup should be able to handle the full set of capabilities configured on the assigned source connection(s).
Direct vs. data proxy upload strategy
Agent workers support two options to specify how data from batch syncs should be uploaded to the Palantir platform:
Data proxy mode
In data proxy mode, data is uploaded using the public Foundry API using the data proxy service. This leverages the same API gateway that handles Foundry API calls for reading and writing datasets.
Agents configured to use data proxy mode will contain the following in the agent configuration YAML:
destinations:
  foundry:
    uploadStrategy:
      type: data-proxy
Direct mode [Sunset]
:::callout{theme="neutral"} Direct mode is not available on new agents or on enrollments set up after June 2024. Data proxy mode is the default and only option supported for new agents. Existing agents using direct mode will continue to work as long as the host IP addresses where the agent is installed do not change. :::
In direct mode, data is uploaded directly to the underlying storage buckets in the Foundry data catalog. While providing performance improvements, this is only possible with custom network configuration by Palantir Support, and is not available on our latest cloud infrastructure.
Agents configured to use direct mode will contain the following in the agent configuration YAML:
destinations:
  foundry:
    uploadStrategy:
      type: direct
Custom JDBC drivers
See the JDBC (custom) connector documentation for instructions on adding custom JDBC drivers to an agent.
Drivers must be signed by Palantir Support and added directly to the agent to work with the agent worker.
:::callout{theme="neutral"} Contact Palantir Support for assistance signing custom JDBC drivers. :::
Credentials
One unique aspect of the agent worker is that in-memory credential decryption happens outside of Foundry. When entering credentials in the Data Connection user interface, rather than Foundry encrypting credentials, they are encrypted with the public key of each agent assigned to the source in the browser before being sent to Foundry. The encrypted credentials are then stored in Foundry and can only be decrypted by the respective agent using its private key when needed.
Note that all data in Foundry, including credentials, is encrypted at rest and in transit. Data is only ever decrypted in-memory where access is required.
This means that the following caveats and restrictions apply to credential configuration when using the agent worker:
- If the set of agents assigned to the source changes, credentials must be re-entered in Data Connection.
- If an agent is reprovisioned using a fresh download link, credentials will not be automatically transferred. Encryption keys from the existing agent must be recovered or else all credentials must be re-entered in Data Connection.
More information on moving agents between directories and hosts is covered in the agent configuration reference documentation, including instructions for retaining encrypted credentials when moving an existing agent directory.
Certificates
Agents communicate with both Foundry and your internal network. This means that agents need to have the correct certificates in their truststores for these connections to be established.
Add a private key
If the system you are connecting to requires mutual TLS (mTLS), you must manually add a private key to the agent.
The default bootstrapper keystore and truststore are regenerated any time the agent is restarted, and any changes made to the default keystore will be overridden on restart. The below instructions explain how to override the default keystore to point at a custom keystore in a different location on the agent host, and how to modify this custom keystore to add your private key.
- Copy the default bootstrapper keystore and store it in a separate location on the agent host. Run the following commands with the same username that is running the agent on the host. You may choose to name the folder
securityor according to your preferences.
mkdir /home/<username>/security
cp <bootvisor_root>/var/data/processes/<bootstrapper_dir>/var/conf/keyStore.jks  /home/<username>/security/
- Import the keys from the customer-provided keystore into the copied agent keystore using the Java
keytoolcommand line tool. If this tool is not already installed, find it in thebindirectory of the JDK that is bundled with the agent.
$ keytool -importkeystore -srckeystore <CUSTOM_KEYSTORE.jks> -destkeystore /home/<username>/security/keyStore.jks
Importing keystore CUSTOM_KEYSTORE.jks to keyStore.jks...
Enter destination keystore password: keystore
Enter source keystore password:
-
You can verify that the key/keys were added to the copied keystore using the
keytool -listcommand:$ keytool -list -keystore /home/<username>/security/keyStore.jks Enter keystore password: Keystore type: jks Keystore provider: SUN Your keystore contains 2 entries <CUSTOM_KEY>>, 15-Dec-2022, PrivateKeyEntry, Certificate fingerprint (SHA-256): A5:B5:2F:1B:39:D3:DA:47:8B:6E:6A:DA:72:4B:0B:43:C7:2C:89:CD:0D:9D:03:B2:3F:35:7A:D4:7C:D3:3D:51 server, 15-Dec-2022, PrivateKeyEntry, Certificate fingerprint (SHA-256): DB:82:66:E8:09:43:30:9D:EF:0A:41:63:72:0C:2A:8D:F0:8A:C1:25:F7:89:B1:A3:6E:6F:C6:C5:2C:17:CB:B2 -
Use the
keytool -keypasswdcommand to update the imported key password. The agent keystore requires that both the key and keystore passwords match.
$ keytool -keypasswd -alias <CUSTOM_KEY> -new keystore -keystore /home/<username>/security/keyStore.jks
Enter keystore password:
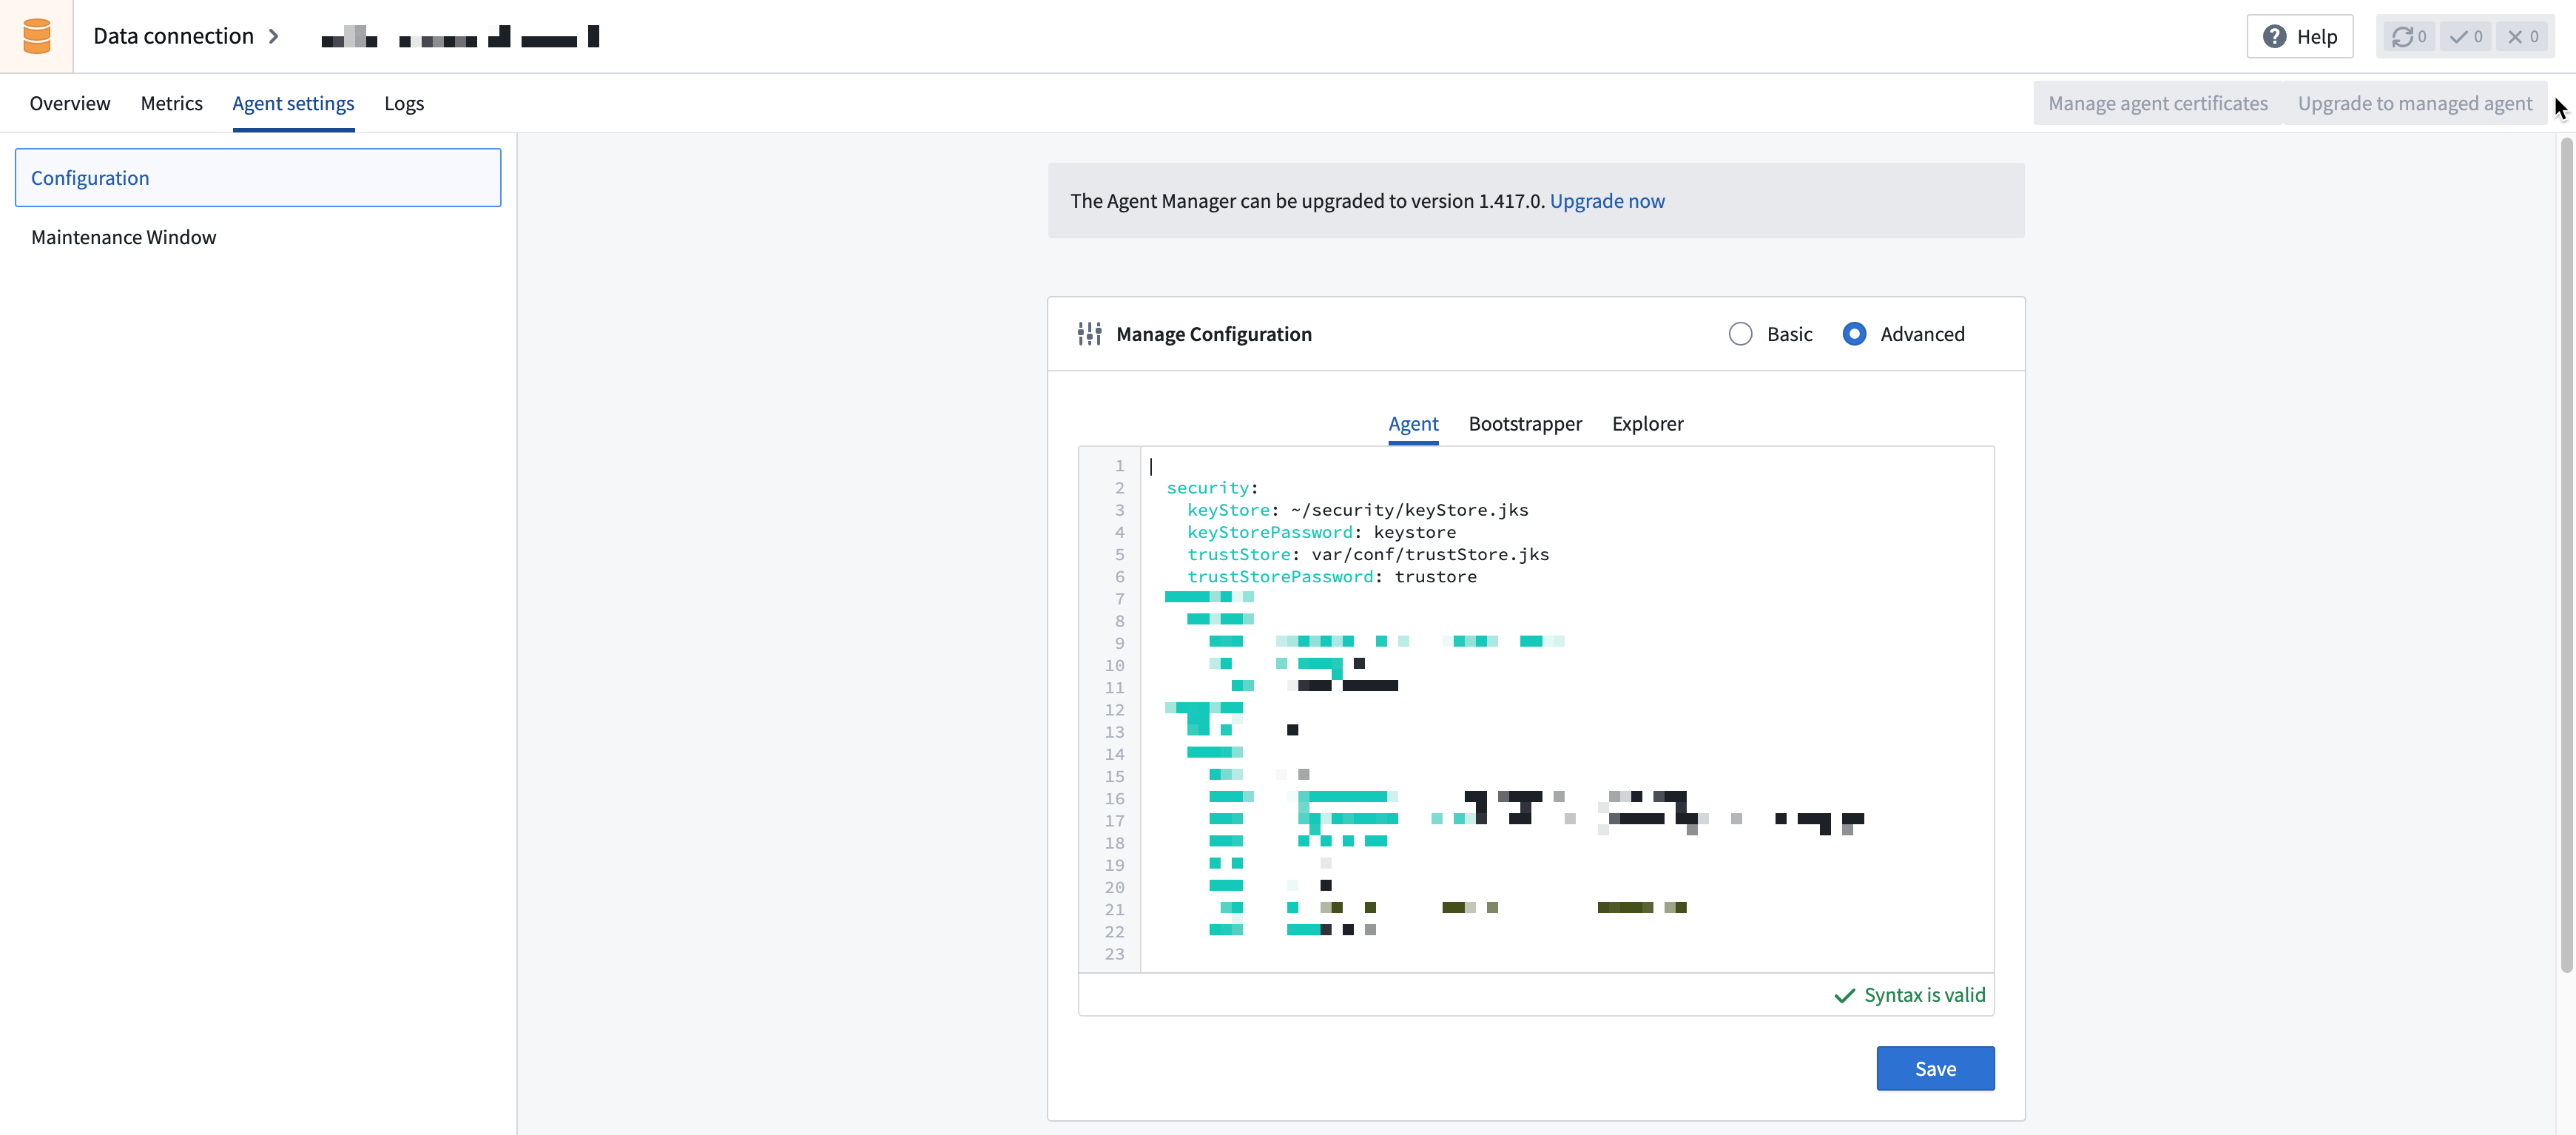
- In Data Connection, navigate to the agent, then open the Agent settings tab. In the Manage Configuration section, select Advanced, choose the Agent tab, and update the
keyStoreto point to the newly copied keystore. Then, addkeyStorePasswordand set it to the appropriate value (keystore, by default).
security:
    keyStore: /home/<username>/security/keyStore.jks
    keyStorePassword: keystore
    trustStore: var/conf/trustStore.jks
...
- Finally, choose the Explorer tab and update both the
keyStorePathandkeyStorePassword. Save the new configuration.
security:
    keyStorePath: /home/<username>/security/keyStore.jks
    keyStorePassword: keystore
    trustStorePath: var/conf/trustStore.jks
...
- Restart the agent.
:::callout{theme="neutral"}
Note that the field is named keyStore when configuring in the Agent tab and keyStorePath in the Explorer tab. No changes are required to the Bootstrapper configuration.
:::
Known limitations
Executing capabilities on the agent host directly comes with some downsides, such as:
- Potential classpath conflicts on the agent: This is particularly relevant for custom JDBC workflows, since custom JARs may conflict with dependencies that ship from Foundry and run on the agent classpath.
- Contention between jobs running on the agent: Jobs may arbitrarily use up to the entire memory and disk space allocated to the agent process and may cause other jobs to never start or crash. This is particularly problematic for webhooks run with an agent worker. In this scenario, we strongly recommend a dedicated agent for webhook executions so long-running syncs do not prevent short-running webhooks from executing.
- Lack of support for some capabilities: Some capabilities, such as use in code, virtual tables, and virtual media, are incompatible with the agent worker, since these require synchronous connections directly from Foundry and cannot run as jobs on the agent.
中文翻译
Agent Worker 配置参考
:::callout{theme="warning" title="旧版(Legacy)"} Agent Worker 目前处于旧版(Legacy)开发阶段,预计不会进行额外开发,但仍提供全面支持。在构建新数据源或更新现有工作流时,我们建议使用 Foundry Worker 连接。有关此建议背后的操作原因,请参阅 Foundry Worker 与 Agent Worker 对比。 :::
本文档描述了将 Agent 用作 Worker 时可用的配置选项,并假设您已熟悉数据连接 Agent 及其通用配置选项。
如需将现有 Agent Worker 数据源迁移至 Foundry Worker,请参阅将数据源从 Agent Worker 切换至 Foundry Worker。
设置 Agent
您必须设置 Agent 才能使用 Agent Worker。配置数据源时,您可以选择 Agent Worker 选项并至少选择一个可用 Agent。通过该数据源连接执行的功能将以作业形式在 Agent 主机上运行。
功能执行
使用 Agent Worker 时,功能通过直接在 Agent 主机上运行 Java 代码来执行。这些 Java 进程可以从您的系统中拉取数据并推送至 Foundry(如批量同步),或从 Foundry 拉取数据并推送至您的系统(如导出),但存在已知限制。
网络
Agent Worker 数据源的所有网络配置均在 Agent 主机上完成。Foundry 端的出站策略不适用:Agent 主机必须配置防火墙、DNS 和代理设置,以直接访问源系统。完整参考请参阅配置 Agent 网络访问。
内存分配与使用
Agent 内存是决定使用 Agent Worker 执行功能性能的关键因素之一。
Agent 内存的主要设置包括:
- JVM 堆(JVM heap): 在 Agent 设置页面配置,指示 Agent 启动时应分配的内存量。分配的内存从操作系统中预留,不得超过主机可用内存。默认 JVM 堆大小为 1 GB。
- 主机内存(Host memory): 基于安装 Agent 的机器规格。建议至少使用 16 GB 内存。
主机上实际观察到的内存使用量将根据 Agent Worker 当前执行的工作负载而变化,包括同一主机上运行的其他进程。
在监控用作 Agent Worker 的 Agent 的内存使用情况时,有两个主要指标:
- 操作系统物理内存使用量(OS physical memory usage): Agent 主机上的实际总内存使用量,包括 Agent 进程以及同一主机上运行的其他进程。该值可能超过为 Agent 进程分配的 JVM 堆大小,最高可达全部可用物理内存。
- Agent 内存使用量(Agent memory usage): Agent 的内存使用量,始终小于配置的 JVM 堆大小。
有关监控 Agent 内存使用情况的信息,请参阅 Agent 指标与健康监控。
负载均衡
使用 Agent Worker 时,可将多个 Agent 分配给单个数据源连接。Agent 会被分配作业,以执行已分配数据源连接上配置的特定功能。作业在启动时会在可用 Agent 中执行。
作业会随机分配给已分配 Agent 中的一个可用 Agent。
最大并发同步数(Maximum concurrent syncs) 默认为 16,可在 Agent 设置 中配置。该配额适用于所有功能和所有已分配数据源,意味着任何数据源上任何功能的每次运行都会占用一个可用并发同步配额。这包括流式同步、变更数据捕获同步、导出、Webhook 以及旧版数据连接任务。如果已分配的 Agent 当前正在运行最大数量的并发同步,则新作业将排队等待,直到有足够的功能完成。
通常,我们不建议使用多个 Agent 来负载均衡超出单个 Agent 可成功运行范围的工作负载。多个 Agent 的主要用途是允许 Agent 下线进行维护。为获得最佳性能和可靠性,我们建议多 Agent 设置中的每个 Agent 都应能够处理已分配数据源连接上配置的全部功能。
直连模式与数据代理上传策略
Agent Worker 支持两种选项来指定批量同步的数据如何上传至 Palantir 平台:
数据代理模式(Data proxy mode)
在数据代理模式下,数据通过公共 Foundry API 使用数据代理服务上传。这利用了处理数据集读写 Foundry API 调用的同一 API 网关。
配置为使用数据代理模式的 Agent 将在 Agent 配置 YAML 中包含以下内容:
destinations:
  foundry:
    uploadStrategy:
      type: data-proxy
直连模式(Direct mode) [已弃用]
:::callout{theme="neutral"} 直连模式不适用于新 Agent 或 2024 年 6 月之后设置的注册。数据代理模式是新 Agent 支持的默认且唯一的选项。使用直连模式的现有 Agent 将继续工作,前提是安装 Agent 的主机 IP 地址不变。 :::
在直连模式下,数据直接上传至 Foundry 数据目录中的底层存储桶。虽然能提升性能,但这需要 Palantir 支持团队进行自定义网络配置,且不适用于我们最新的云基础设施。
配置为使用直连模式的 Agent 将在 Agent 配置 YAML 中包含以下内容:
destinations:
  foundry:
    uploadStrategy:
      type: direct
自定义 JDBC 驱动
有关向 Agent 添加自定义 JDBC 驱动的说明,请参阅 JDBC(自定义)连接器文档。
驱动必须由 Palantir 支持团队签名并直接添加到 Agent 中,才能与 Agent Worker 配合使用。
:::callout{theme="neutral"} 请联系 Palantir 支持团队以获取自定义 JDBC 驱动签名协助。 :::
凭据
Agent Worker 的一个独特之处在于,内存中的凭据解密发生在 Foundry 之外。在数据连接用户界面中输入凭据时,Foundry 不会加密凭据,而是由浏览器使用分配给数据源的每个 Agent 的公钥进行加密,然后发送至 Foundry。加密后的凭据存储在 Foundry 中,只有在需要时才能由相应 Agent 使用其私钥解密。
请注意,Foundry 中的所有数据(包括凭据)在静态和传输过程中均经过加密。数据仅在需要访问时在内存中解密。
这意味着使用 Agent Worker 时,凭据配置存在以下注意事项和限制:
- 如果分配给数据源的 Agent 集合发生变化,则必须在数据连接中重新输入凭据。
- 如果使用新的下载链接重新配置 Agent,凭据不会自动转移。必须恢复现有 Agent 的加密密钥,否则必须在数据连接中重新输入所有凭据。
有关在目录和主机之间移动 Agent 的更多信息,请参阅 Agent 配置参考文档,其中包含在移动现有 Agent 目录时保留加密凭据的说明。
证书
Agent 与 Foundry 和您的内部网络进行通信。这意味着 Agent 需要在其信任库中拥有正确的证书才能建立这些连接。
添加私钥
如果您连接的系统需要双向 TLS(mTLS),则必须手动向 Agent 添加私钥。
默认的引导程序密钥库和信任库在 Agent 每次重启时都会重新生成,对默认密钥库所做的任何更改都将在重启时被覆盖。以下说明解释了如何覆盖默认密钥库,使其指向 Agent 主机上不同位置的自定义密钥库,以及如何修改此自定义密钥库以添加您的私钥。
- 复制默认的引导程序密钥库,并将其存储在 Agent 主机上的单独位置。使用与主机上运行 Agent 相同的用户名运行以下命令。您可以选择将文件夹命名为
security或根据您的偏好命名。
mkdir /home/<username>/security
cp <bootvisor_root>/var/data/processes/<bootstrapper_dir>/var/conf/keyStore.jks  /home/<username>/security/
- 使用 Java
keytool命令行工具将客户提供的密钥库中的密钥导入复制的 Agent 密钥库。如果此工具尚未安装,请在 Agent 捆绑的 JDK 的bin目录中找到它。
$ keytool -importkeystore -srckeystore <CUSTOM_KEYSTORE.jks> -destkeystore /home/<username>/security/keyStore.jks
Importing keystore CUSTOM_KEYSTORE.jks to keyStore.jks...
Enter destination keystore password: keystore
Enter source keystore password:
-
您可以使用
keytool -list命令验证密钥是否已添加到复制的密钥库中:$ keytool -list -keystore /home/<username>/security/keyStore.jks Enter keystore password: Keystore type: jks Keystore provider: SUN Your keystore contains 2 entries <CUSTOM_KEY>>, 15-Dec-2022, PrivateKeyEntry, Certificate fingerprint (SHA-256): A5:B5:2F:1B:39:D3:DA:47:8B:6E:6A:DA:72:4B:0B:43:C7:2C:89:CD:0D:9D:03:B2:3F:35:7A:D4:7C:D3:3D:51 server, 15-Dec-2022, PrivateKeyEntry, Certificate fingerprint (SHA-256): DB:82:66:E8:09:43:30:9D:EF:0A:41:63:72:0C:2A:8D:F0:8A:C1:25:F7:89:B1:A3:6E:6F:C6:C5:2C:17:CB:B2 -
使用
keytool -keypasswd命令更新导入的密钥密码。Agent 密钥库要求密钥密码和密钥库密码匹配。
$ keytool -keypasswd -alias <CUSTOM_KEY> -new keystore -keystore /home/<username>/security/keyStore.jks
Enter keystore password:
- 在数据连接中,导航至 Agent,然后打开 Agent 设置 选项卡。在 管理配置 部分,选择 高级,选择 Agent 选项卡,并将
keyStore更新为指向新复制的密钥库。然后,添加keyStorePassword并将其设置为适当的值(默认为keystore)。
security:
    keyStore: /home/<username>/security/keyStore.jks
    keyStorePassword: keystore
    trustStore: var/conf/trustStore.jks
...
- 最后,选择 Explorer 选项卡,并更新
keyStorePath和keyStorePassword。保存新配置。
security:
    keyStorePath: /home/<username>/security/keyStore.jks
    keyStorePassword: keystore
    trustStorePath: var/conf/trustStore.jks
...
- 重启 Agent。
:::callout{theme="neutral"}
请注意,在 Agent 选项卡中配置时字段名为 keyStore,在 Explorer 选项卡中为 keyStorePath。无需更改 Bootstrapper 配置。
:::
已知限制
直接在 Agent 主机上执行功能存在一些缺点,例如:
- Agent 上潜在的类路径冲突: 这对于自定义 JDBC 工作流尤其相关,因为自定义 JAR 可能与 Foundry 提供并在 Agent 类路径上运行的依赖项发生冲突。
- Agent 上运行作业之间的争用: 作业可能任意使用分配给 Agent 进程的全部内存和磁盘空间,并可能导致其他作业无法启动或崩溃。这对于使用 Agent Worker 运行的 Webhook 尤其成问题。在这种情况下,我们强烈建议为 Webhook 执行使用专用 Agent,以防止长时间运行的同步阻止短时间运行的 Webhook 执行。
- 缺乏对某些功能的支持: 某些功能(如代码中使用、虚拟表和虚拟媒体)与 Agent Worker 不兼容,因为这些功能需要从 Foundry 直接建立同步连接,无法作为作业在 Agent 上运行。