External transforms(外部转换(External transforms))
:::callout{theme="neutral"} Data Connection sources can now be directly imported into code repositories and are the preferred method to interact with external systems, superseding credentials-based legacy external transforms :::
External transforms allow connections to external systems from Python transforms repositories.
:::callout{theme="warning"} External transforms do not support sources using outbound applications for authentication. :::
External transforms are primarily used to perform batch sync, export, and media sync workflows when one of the following is true:
- An existing Data Connection source type is not available.
- The desired capability is not available for the target source type.
- The capability offered through the Data Connection user interface does not have the desired features.
Solutions to these situations may include the following:
- Connecting to REST APIs, both over the Internet and within a private network.
- Connecting to databases to arrange customized query logic not currently possible in the Data Connection user interface.
- Transforming data as needed during sync or export. This could include batching files together before writing to Foundry, handling custom encryption/decryption of data during transfer, and more.
Any transforms that use virtual tables are also considered to be external transforms, since the transforms job must be able to reach out to the external system that contains the virtualized data. To use virtual tables in Python transforms, follow the instructions below for details on how to set up the source.
Setup guide
In this setup guide, we will walk through creating a Python transforms repository that connects to the free public dictionary API ↗. The examples then use this API to explain various features of external transforms and how they can be used with the API.
:::callout{theme="neutral"} The dictionary API used in this setup guide is unaffiliated with Palantir and may change at any time. This tutorial is not an endorsement, recommendation, or suggestion to use this API for production use cases. :::
Prerequisite: Create a Python transforms repository
Before following this guide, be sure to first create a Python transforms repository and review how to author Python transforms as described in our tutorial. All features of Python transforms are compatible with external transforms.
Prerequisite: Create a Data Connection source
Before you can connect to an external system from your Python repository, you must create a Data Connection source that you can import into code. For this tutorial, we will create a REST API source that connects to the dictionary API mentioned above.
Option 1: Create source in the external systems sidebar
The quickest way to create a source for use in external transforms is from a Python transforms code repository. Once you have initialized a repository, complete the following steps to set up a generic source:
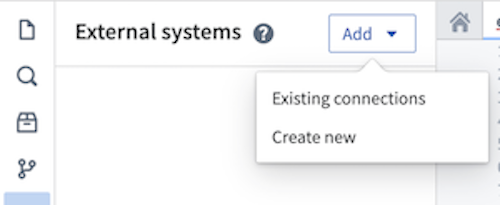
:::callout{theme="neutral"} If you are working in a Python transforms repository in a VS Code workspace, the External systems settings are located in the Settings tab of the top navigation bar. :::
- From the left side panel, open the External systems tab.
- Select Add > Create new.
- Choose a name for your source and a Project in which to store it. Upon creation, the newly created source will show up in the left side panel. Any egress policies, secrets and exportable markings can be directly configured from this panel.
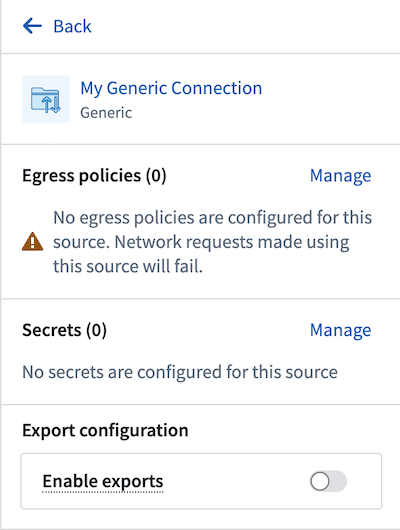
-
For this tutorial, you should add an egress policy for the dictionary API:
api.dictionaryapi.dev. You will not need any secrets since this API does not require authentication, and export controls may be skipped for now. However, they will be required to use Foundry data inputs with this source. -
Since this connection is to a REST API, you will be automatically prompted to convert your generic connector to a REST API source so that you can use the built-in Python requests client.
Option 2: Create a source in Data Connection
You may also create a source from the Data Connection application or use an existing source you have already configured. To use this option, follow the steps below:
- Navigate to the Data Connection application within Foundry and choose New Source. From the list of options, select REST API.
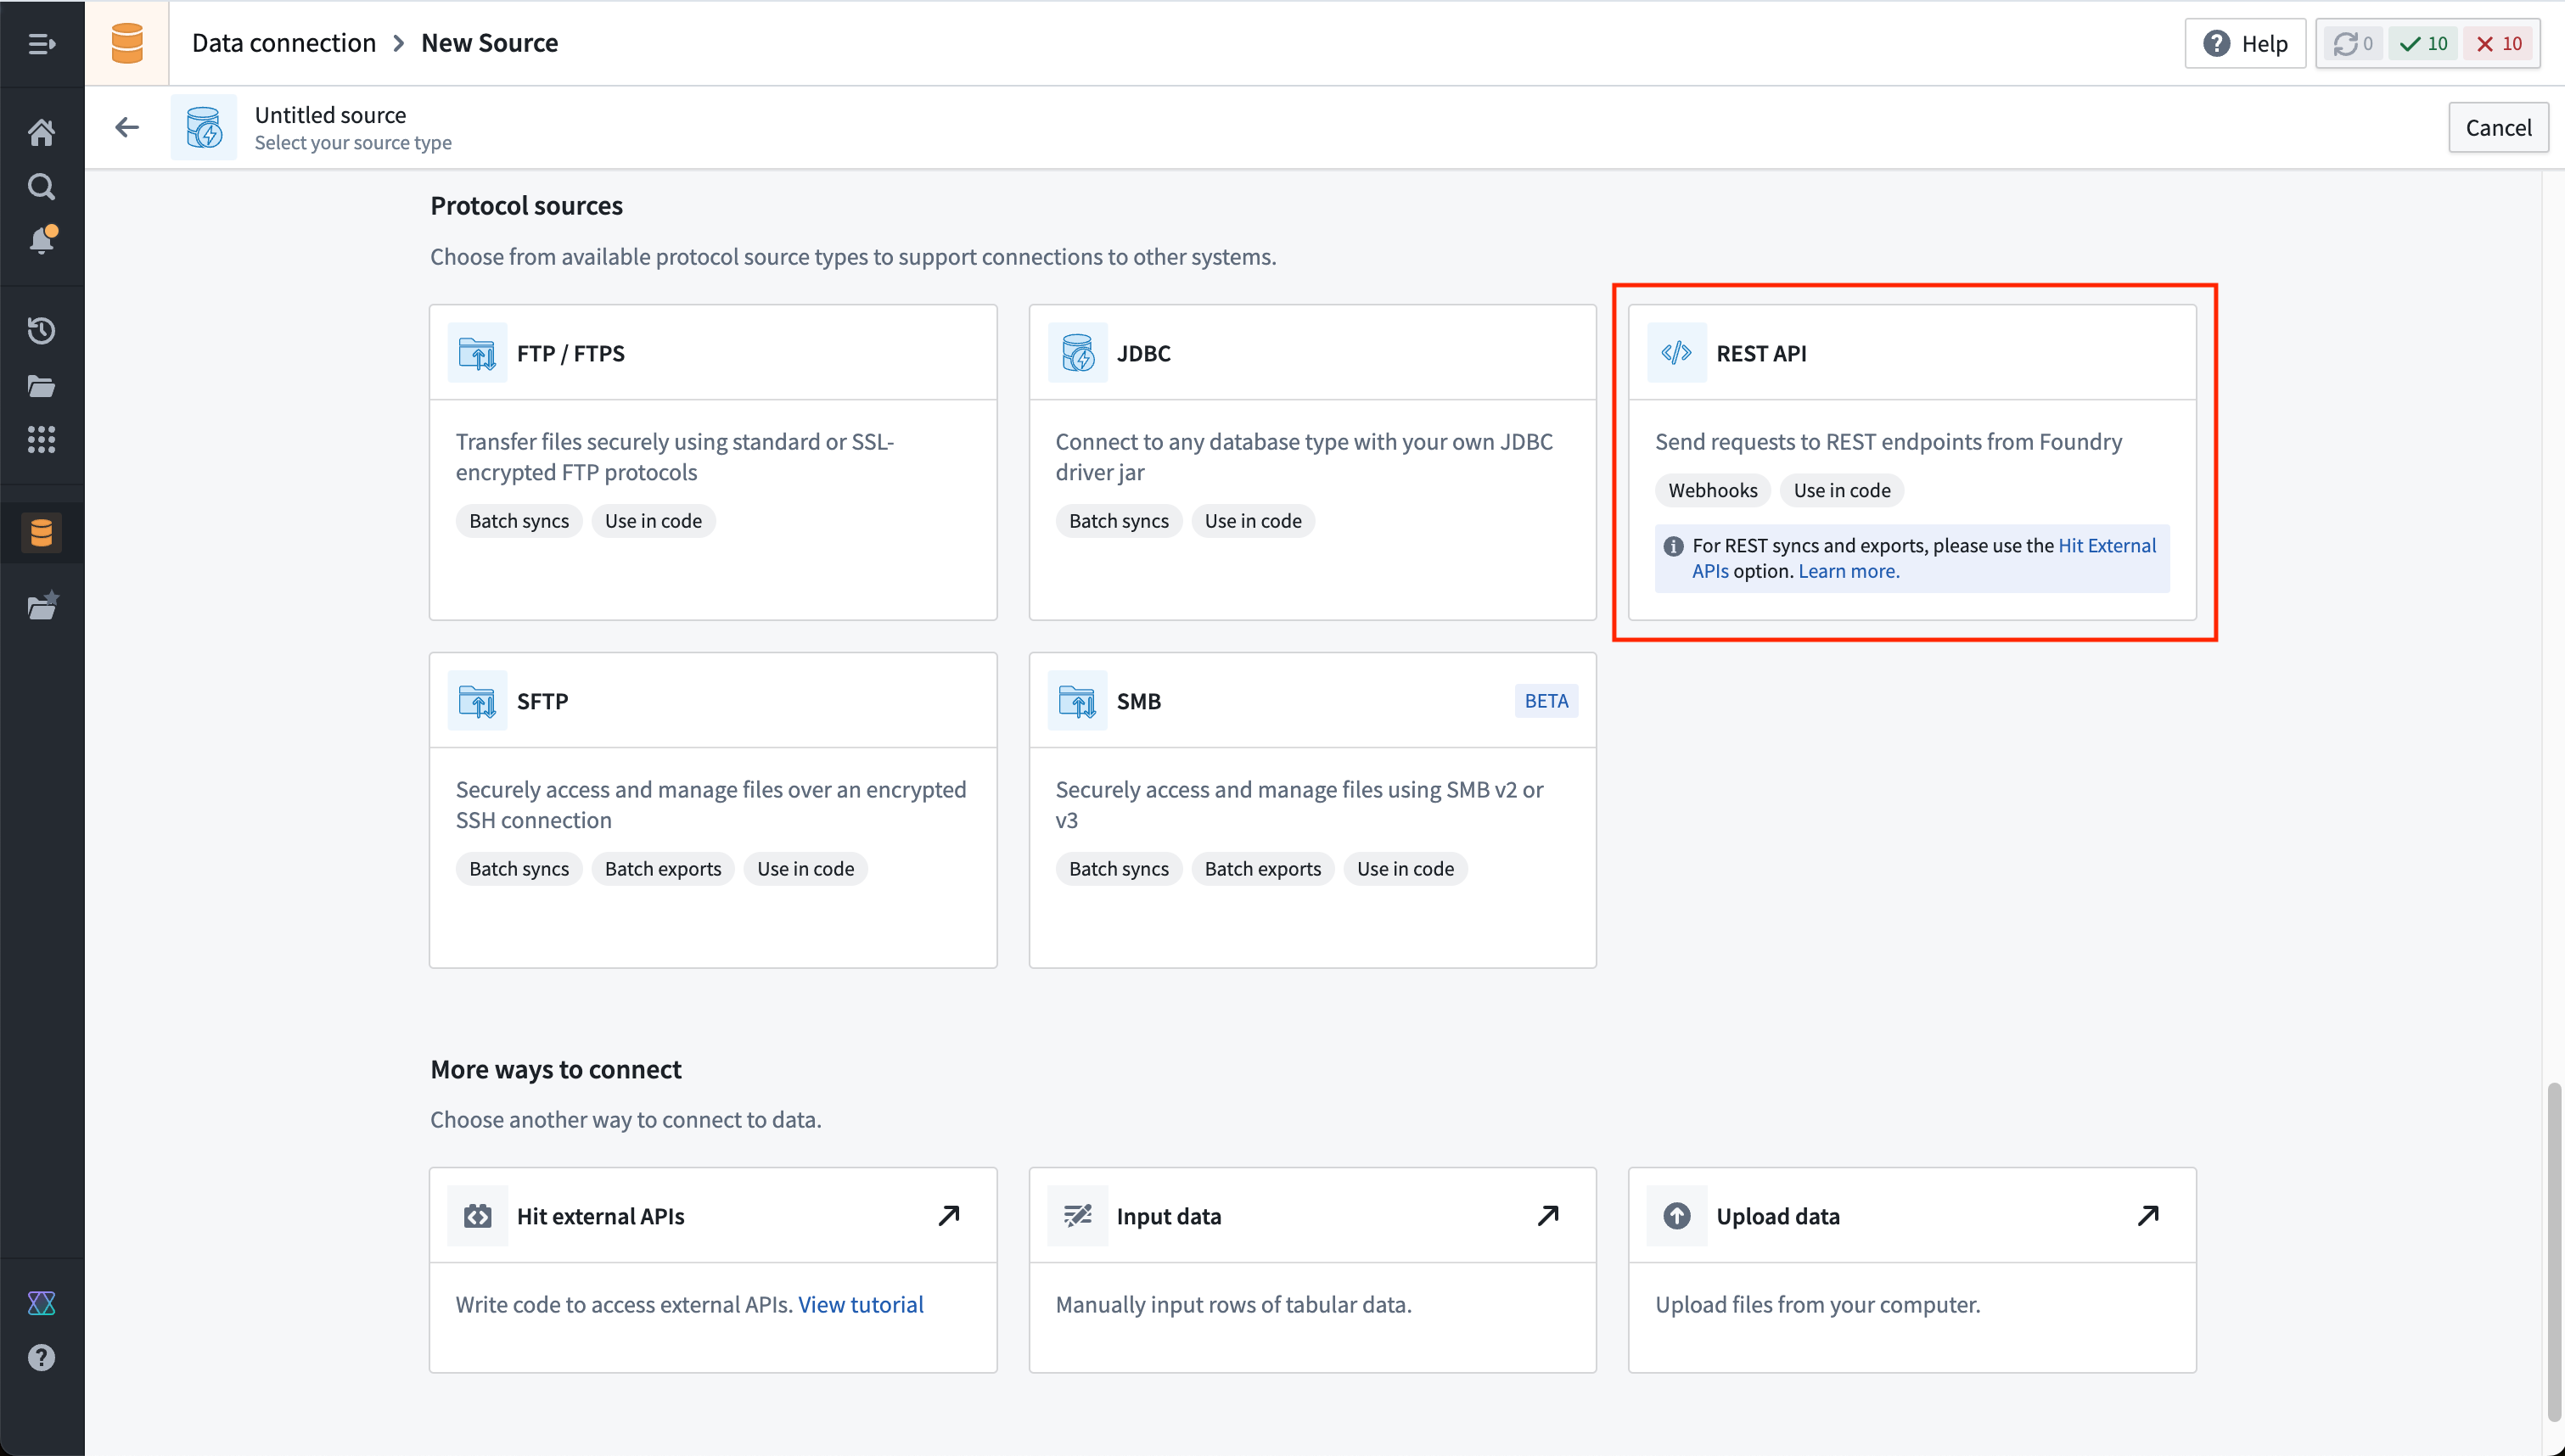
-
Review the Overview page, then select Continue in the bottom right. You will be prompted to choose the connection worker: pick a Foundry worker to connect to the dictionary API, because agent worker connections are not supported for external transforms.
-
Choose a name for your source, and select a Project to which it should be saved.
-
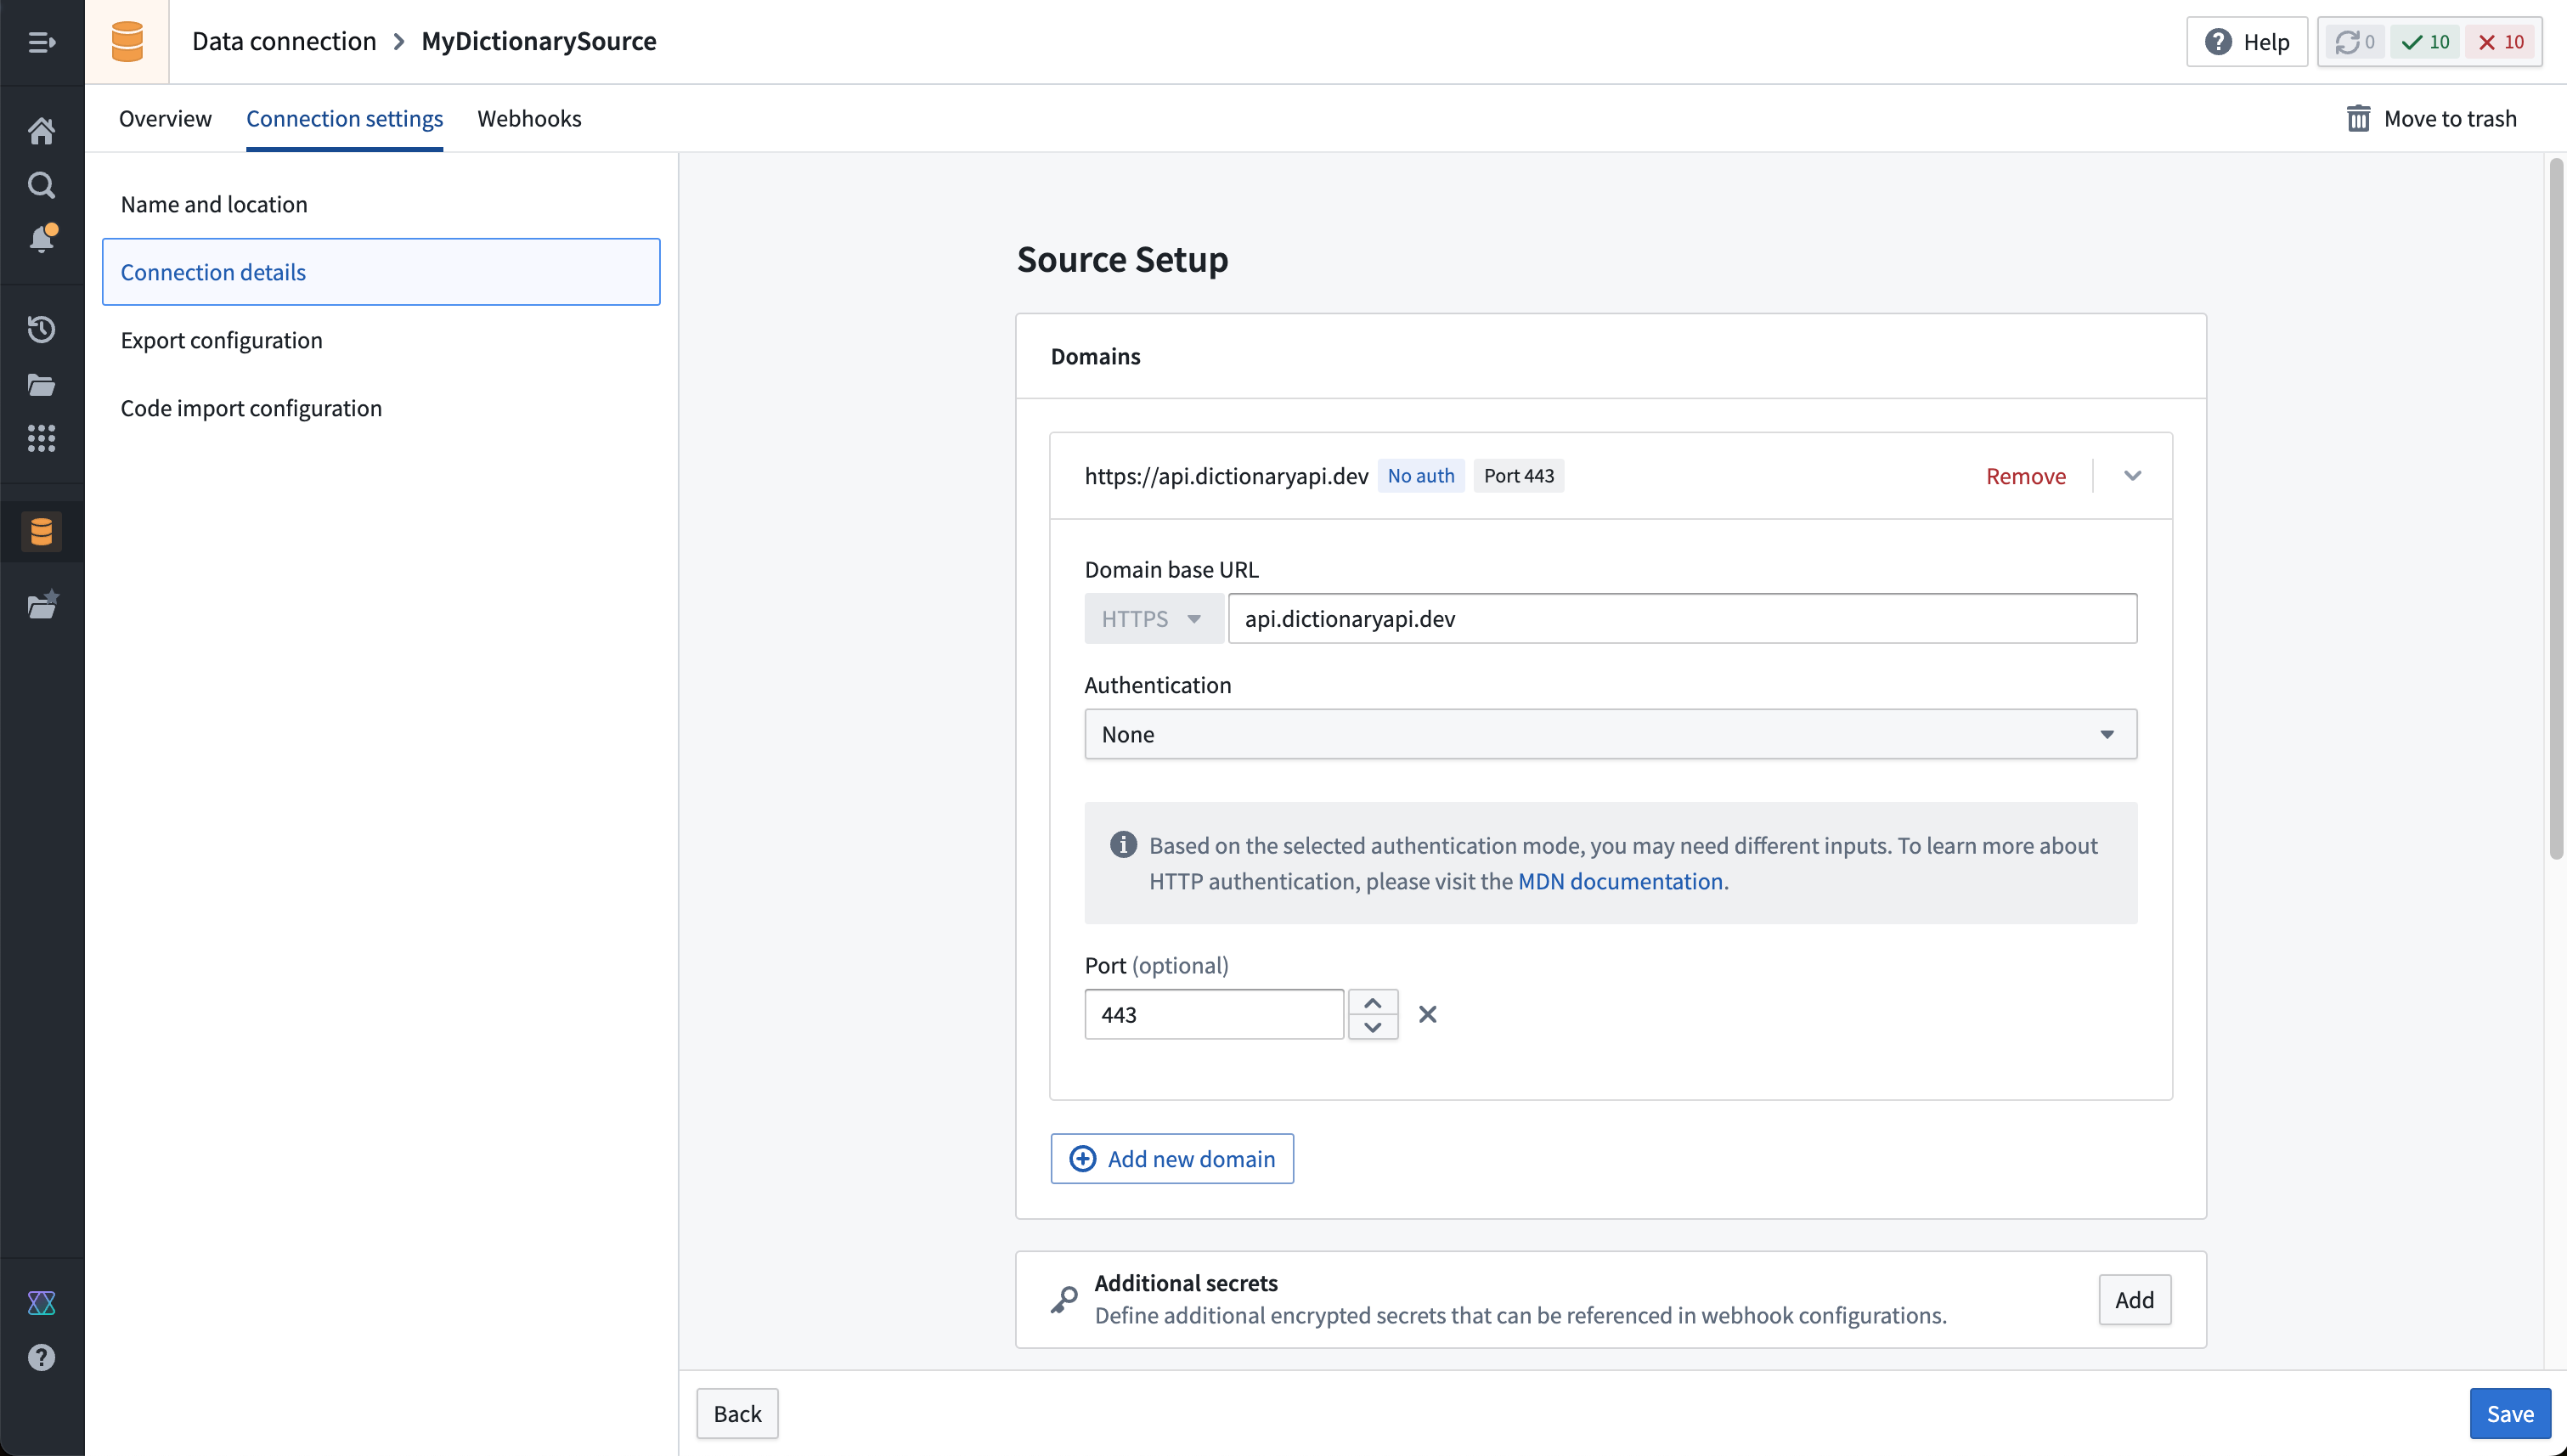
Fill out the Domains section with the connection information of the API source. The configuration for the dictionary API example is shown below:
- For this example, we also need to create the necessary egress policy. The policy will be automatically suggested in the Network Connectivity section if you completed the previous step:

- Select Save, then Save and continue to complete the source setup.
Prerequisite: Import the transforms-external-systems library in your repository
To use external transforms, you must first import the transforms-external-systems library in your repository. Libraries are installed using the Libraries tab in the left side panel, searching for the desired library, then selecting Install.
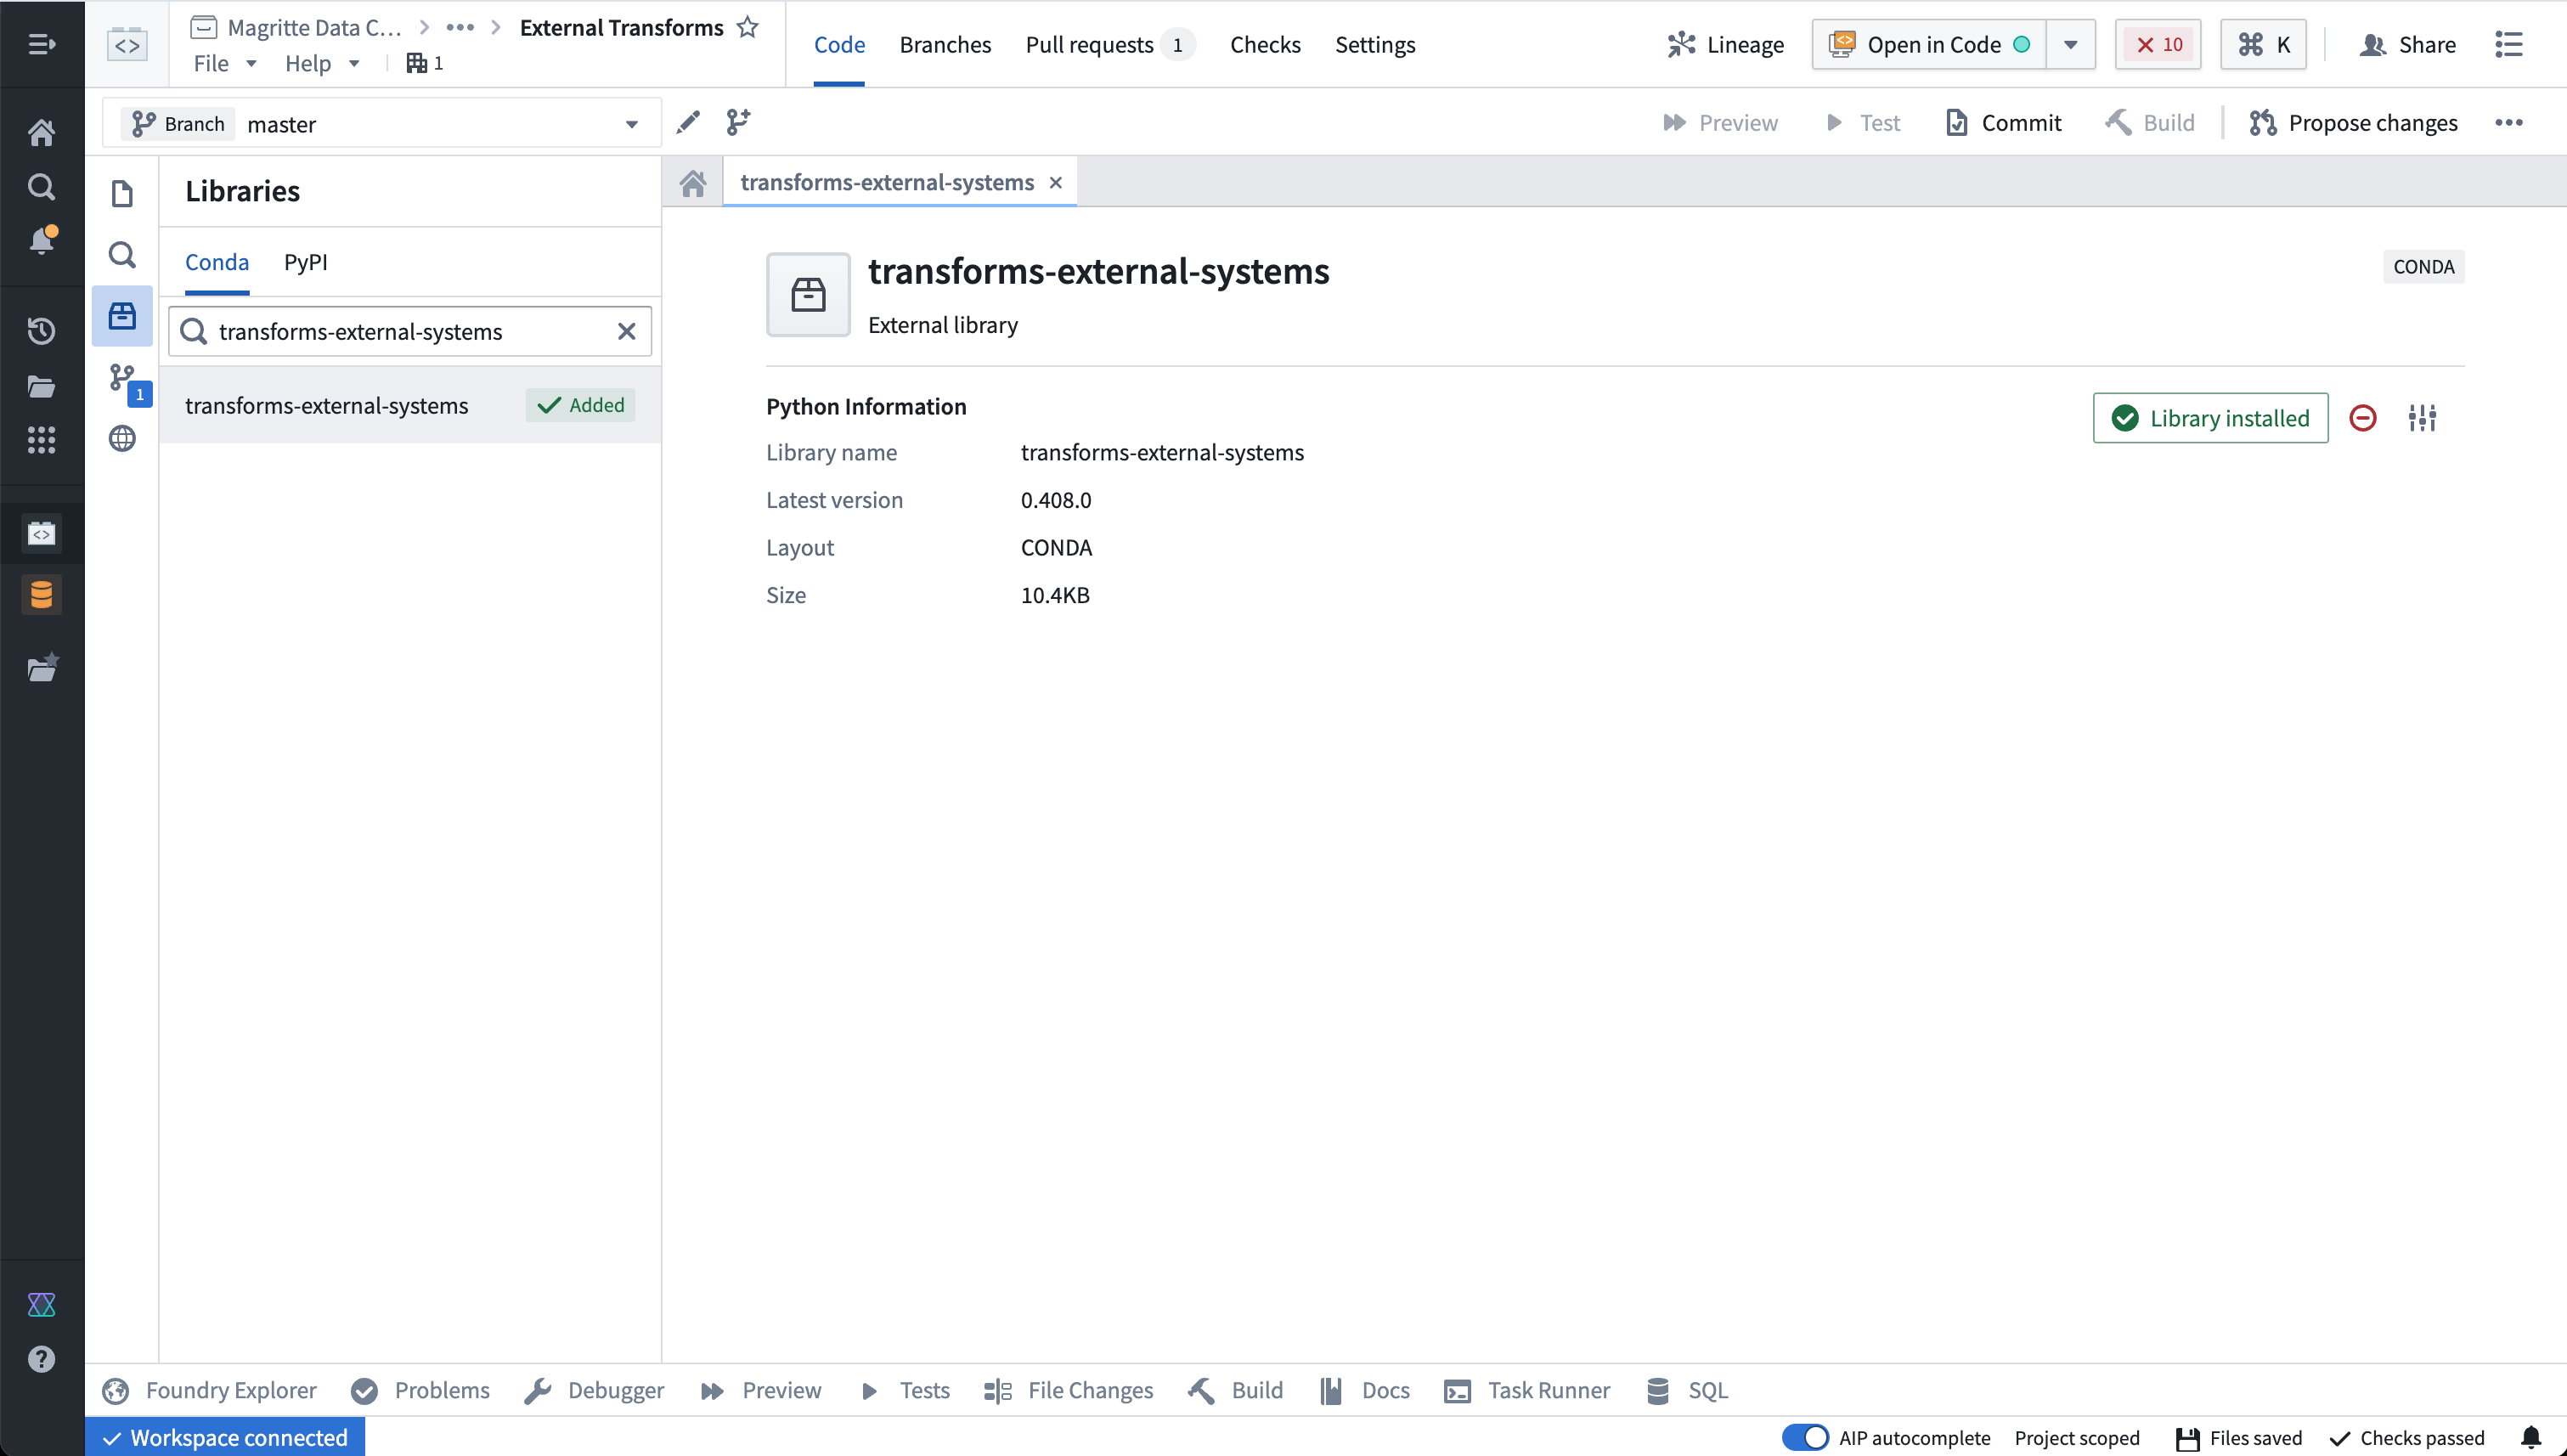
Learn more about installing and managing libraries..
Prerequisite: Import a source into code
:::callout{theme="neutral"} REST API sources with multiple domains may not be imported. Instead, you should create a separate REST API source per domain if multiple domains are required in the same external transform. :::
-
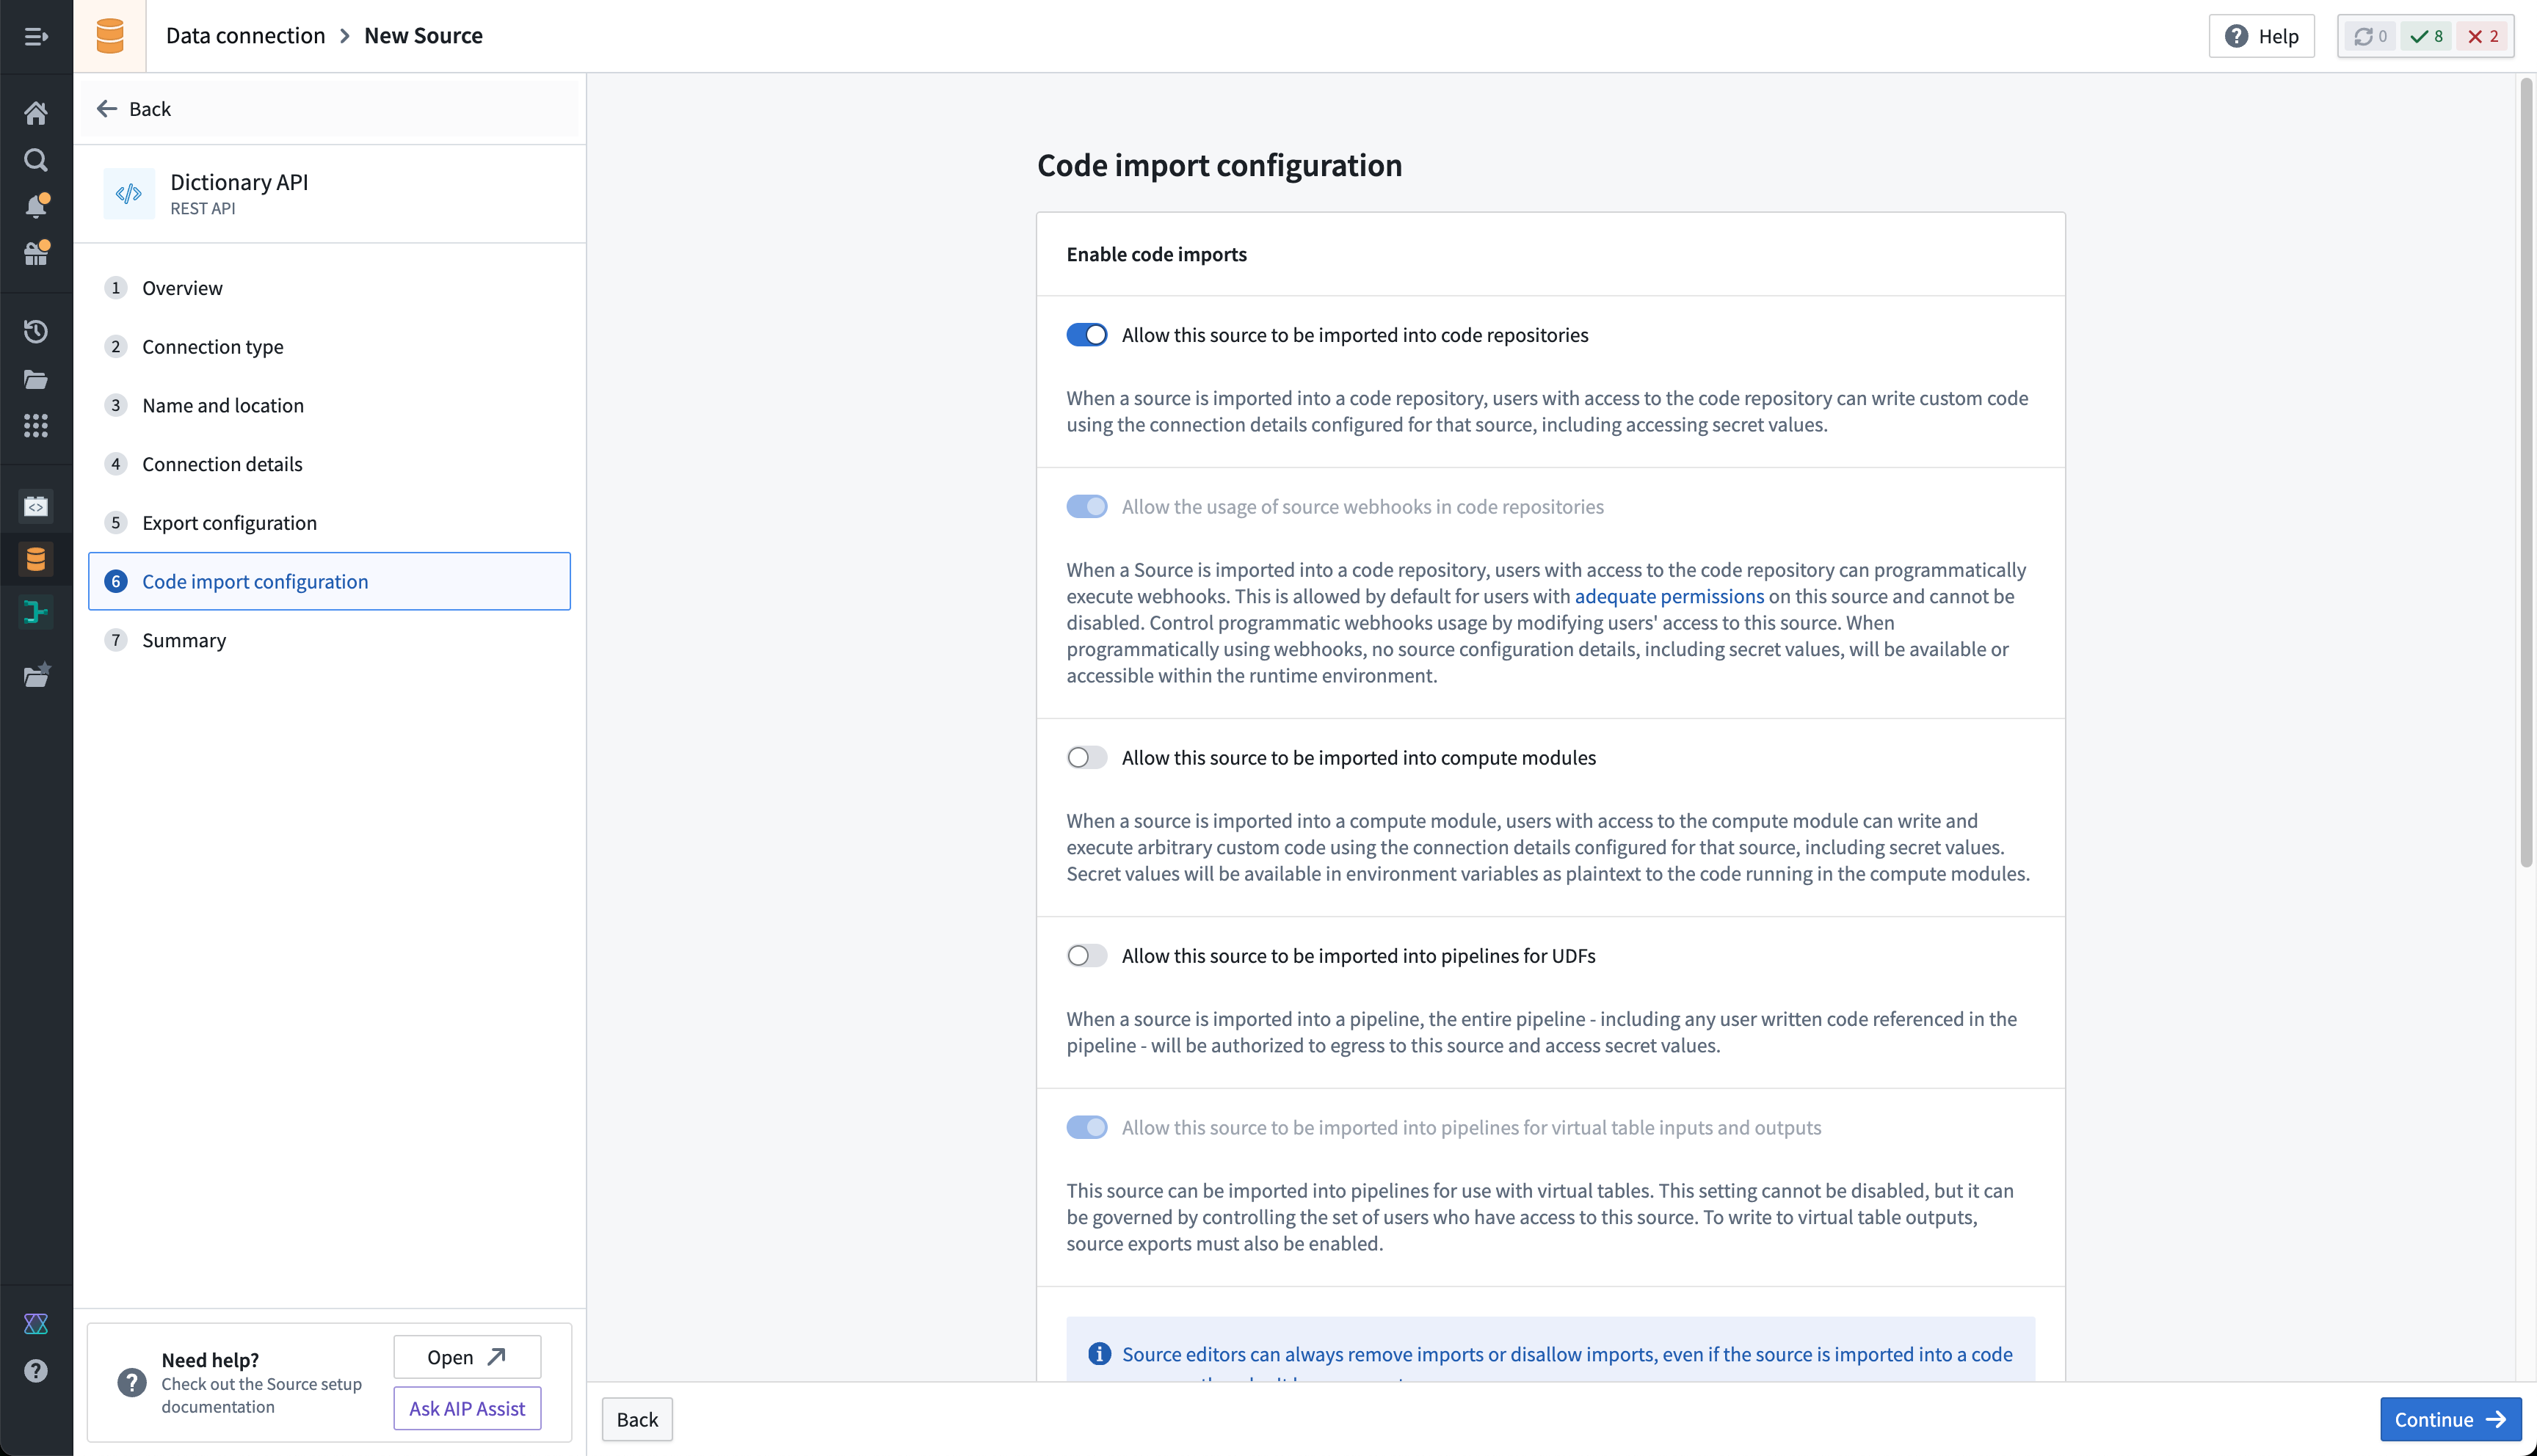
First, you must allow the REST API source to import into code. To configure this setting, navigate to the source in Data Connection, then to the Connection settings > Code import configuration tab.
-
Toggle on the option to Allow this source to be imported into code repositories. Any code repositories that import this source will be displayed on this page.
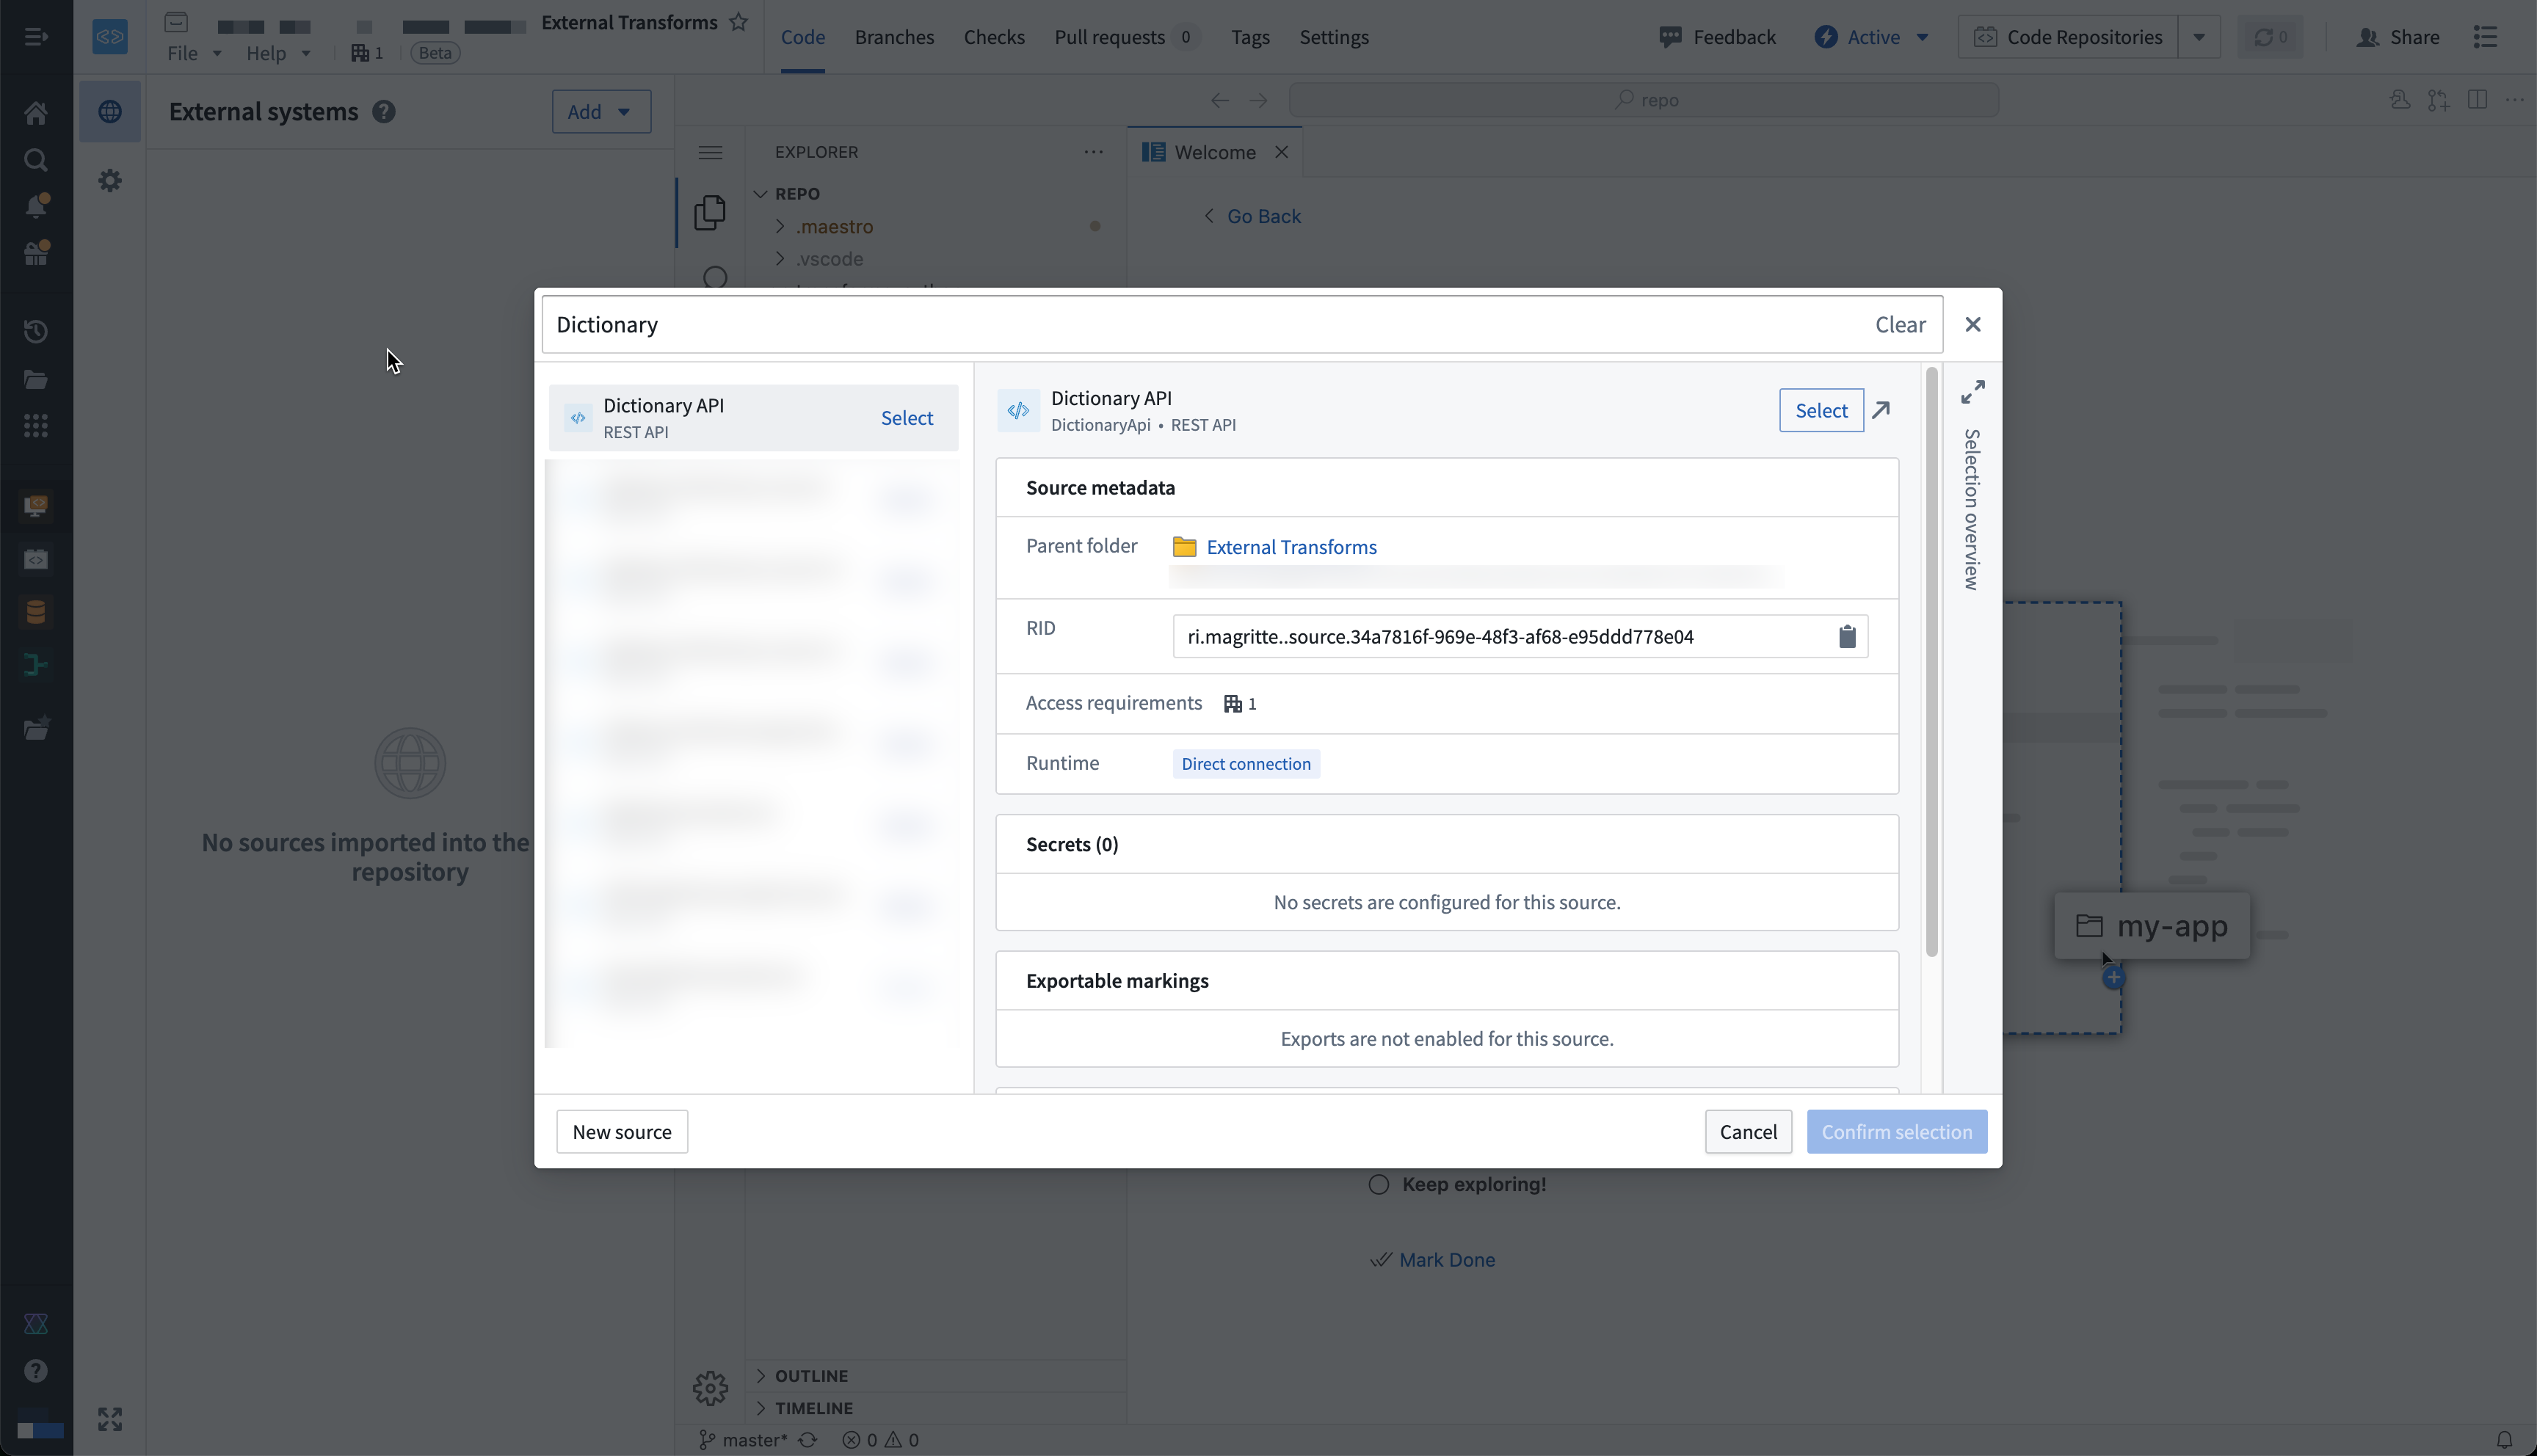
- You are now ready to return to your code repository and import the source. In the repository, navigate to the left side panel and select the External Systems tab represented by the globe icon. Within the side panel, select Add, then search for the Dictionary API source that you previously created. Select this source, then Confirm selection to import.
:::callout{theme="neutral"}
You must have at least Editor access to the source to be able to import it in the repository. Read more about permissions
:::
Write external transforms
Once you set up a Python transforms repository that imports your Dictionary API source, you are ready to start writing Python transforms code that uses the source to connect externally.
:::callout{theme="neutral"} Review our external transforms examples to find fully configured examples of typical read or write workflows on top of common systems. :::
Import and configure the @external_systems decorator
To use external transforms, you must import external_systems decorator and Source object from the transforms.external.systems library:
from transforms.external.systems import external_systems, Source
You should then specify the sources that should be included in a transform by using the external_systems decorator:
@external_systems(
    dictionary_api_source=Source("ri.magritte..source.e301d738-b532-431a-8bda-fa211228bba6")
)
Sources will automatically be rendered as links to open in Data Connection and will display the source name instead of the resource identifier.
Access source attributes and credentials
Once a source is imported into your transform, you can access attributes of the source using the built-in connection object using the get_https_connection() method. The example below shows how we can grab the base URL of the Dictionary API source we configured in the previous step.
dictionary_api_url = dictionary_api_source.get_https_connection().url
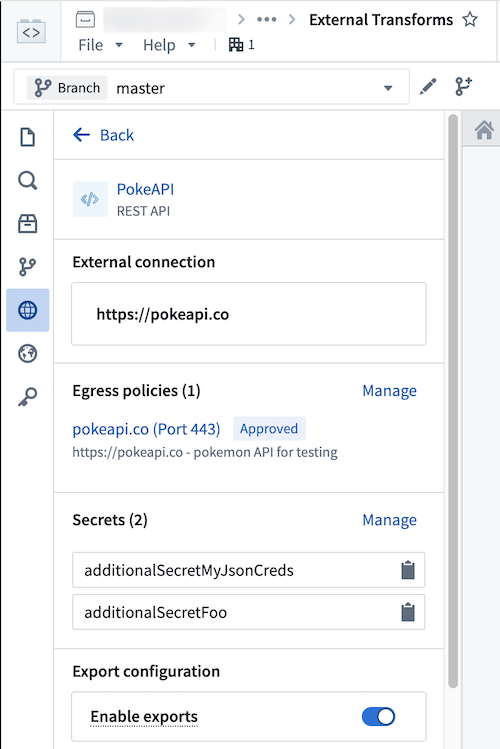
Additional secrets or credentials stored on the source can also be accessed from the source. To identify the secret names that can be accessed, navigate to the left panel in your transform.
Use the following syntax to access secrets in code:
dictionary_api_source.get_secret("additionalSecretFoo")
:::callout{theme="neutral"}
Currently, it is not possible to access source attributes that are not credentials unless the source provides an HTTPS client. For example, on a PostgreSQL source you will not be able to access the hostname or other non-secret attributes.
:::
Use the built-in HTTP client
For sources that provide a RESTful API, the source object allows you to interact with a built-in HTTPS client. This client will be pre-configured with all of the details specified on the source, including any server or client certificates, and you can simply start making requests to the external system.
dictionary_api_url = dictionary_api_source.get_https_connection().url
dictionary_api_client = dictionary_api_source.get_https_connection().get_client()

# dictionary_api_client is a pre-configured Session object from Python `requests` library.
# Example of GET request:
response = dictionary_api_client.get(dictionary_api_url + "/api/v2/entries/en/" + word, timeout=10)
Alternatively, you can use your own client or source-specific Python libraries and use the source object to retrieve attributes and credentials.
:::callout{theme="warning"}
Changing the working directory (for example, using os.chdir()) in your transforms or UDFs may break references to environment variables necessary for establishing secure connections.
:::
:::callout{theme="neutral"} When connecting to an on-premise system using an agent proxy runtime (sunset), you must use the built-in client since that will be automatically configured with the necessary agent proxy configuration. :::
Example: Import data from the Dictionary API
The below example illustrates a complete transform that runs through a list of words and retrieves their phonetic transcription from the Dictionary API.
from pandas import DataFrame
from transforms.api import transform
from transforms.api import Output, Input, TransformContext, transform_pandas
from transforms.external.systems import external_systems, Source
import pandas as pd
import logging

logger = logging.getLogger(__name__)


@external_systems(
    dictionary_api_source=Source(
        "<source_rid>"
    )
)
@transform_pandas(Output("<output_dataset_rid>"))
def compute(dictionary_api_source) -> DataFrame:
    dictionary_api_url = dictionary_api_source.get_https_connection().url
    dictionary_api_client = dictionary_api_source.get_https_connection().get_client()

    words = ["apple", "dog", "cat"]

    phonetics = []

    for word in words:
        logger.info("Fetching word from api.dictionaryapi.dev : " + word)

        response = dictionary_api_client.get(
            dictionary_api_url + "/api/v2/entries/en/" + word
        ).json()

        phonetics += [{"word": word, "phonetic": response[0]["phonetic"]}]

    return pd.DataFrame(phonetics)
Use Foundry inputs in external transforms
External transforms often need to use Foundry input data. For example, you might want to query an API to gather additional metadata for each row in a tabular dataset. Alternatively, you might have a workflow where you need to export Foundry data into an external software system.
Such cases are considered export-controlled workflows, as they open the possibility of exporting secure Foundry data into another system with unknown security guarantees and severed data provenance. When configuring a source connection, the source owner must specify whether or not data from Foundry may be exported, and provide the set of security markings and organizations may be exported. Foundry provides governance controls to ensure developers can clearly encode security intent, and Information Security Officers can audit the scope and intent of workflows interacting with external systems.
Configure export controls on the source
Exports are controlled using security markings. When configuring a source, the export configuration is used to specify which security markings and organizations are safe to export to the external system. This is done by navigating to the source in the data connection application, and then navigating to the Connection settings > Export configuration tab. You should then toggle on the option to Enable exports to this source and select the set of markings and organizations that may potentially be exported.
Doing this requires permission to remove markings on the relevant data and Organizations, since exporting is considered equivalent to removing markings on data within Foundry.
The setting to Enable exports to this source must be toggled on to allow the following:
- Use datasets, media sets, and streams as an input to Python transforms code importing this source.
- Use virtual tables registered on this source in Python transforms.
Below you can see an example export configuration for the Dictionary API source, allowing data from the Palantir organization with no additional security markings to be exported to the Dictionary API:
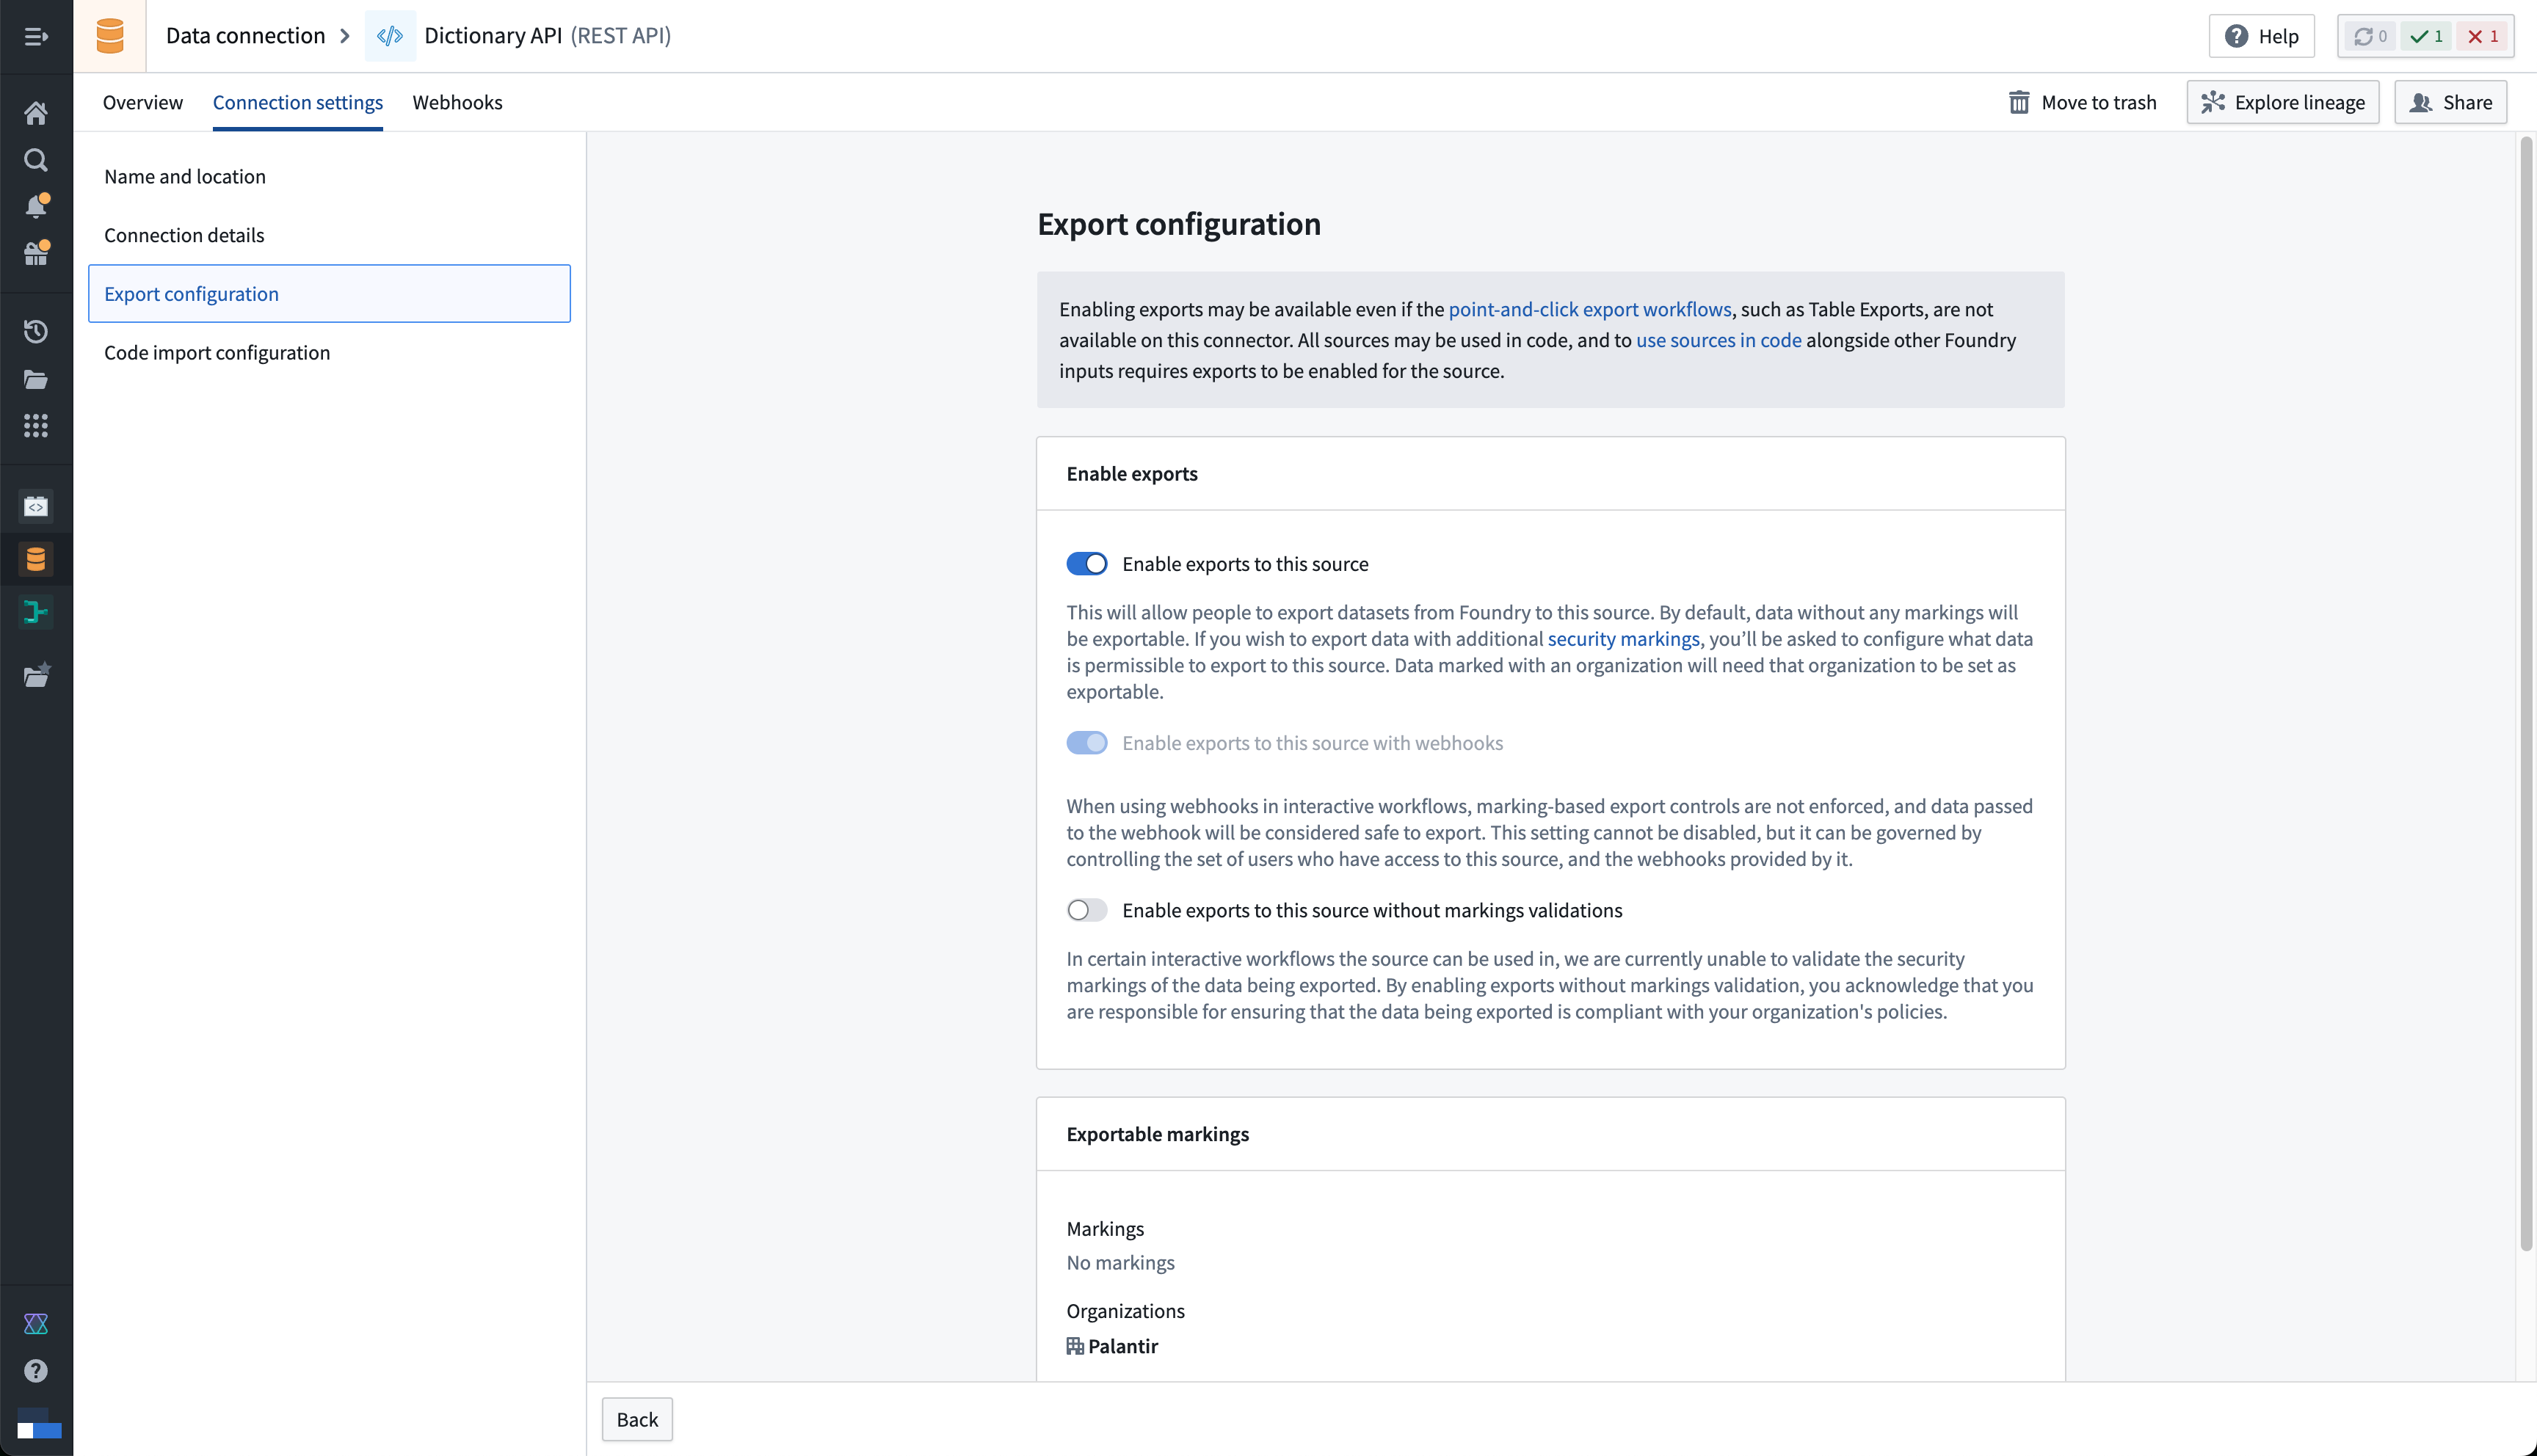
:::callout{theme="neutral"} Note that Enable exports to this source must be toggled on even if you are not actually exporting data to this system, since allowing Foundry data inputs into the same compute job with an open connection to this system means that data could be exported. :::
Example: Use Foundry imports alongside data from the Dictionary API
In this example, we use an input dataset of words instead of a static hard-coded list. It also illustrates basic error handling based on the status code of the response.
from pandas import DataFrame
from transforms.api import transform
from transforms.api import Output, Input, TransformContext, transform_pandas
from transforms.external.systems import external_systems, Source, ResolvedSource
import pandas as pd
import logging

logger = logging.getLogger(__name__)


@external_systems(
    dictionary_api_source=Source(
        "<source_rid>"
    )
)
@transform_pandas(
    Output("<output_dataset_rid>"),
    words_df=Input("<input_dataset_rid>"),
)
def compute(dictionary_api_source: ResolvedSource, words_df: DataFrame) -> DataFrame:
    dictionary_api_url = dictionary_api_source.get_https_connection().url
    dictionary_api_client = dictionary_api_source.get_https_connection().get_client()

    words = words_df["word"].tolist()

    phonetics= []

    for word in words:
        logger.info("Fetching word from api.dictionaryapi.dev: " + word)

        response = dictionary_api_client.get(
            dictionary_api_url + "/api/v2/entries/en/" + word
        )

        if response.status_code == 200:
            data = response.json()[0]

            if "phonetic" in data:
                phonetic_transcription = data["phonetic"]
            else:
                logger.warning(f"No phonetic transcription found for {word}.")
                phonetic_transcription = None
        else:
            logger.warning(f"Request for {words} failed with status code {response.status_code}.")
            phonetic_transcription = None

        phonetics += [{"word": word, "phonetic": phonetic_transcription}]

    return pd.DataFrame(phonetics)
End-to-end examples
Review the documentation below the find complex end-to-end examples for common systems:
- REST API sources
- OAuth Client Credentials grant
- Self-signed server certificates
- Foundry API
- Call the Foundry API from code
- File-based systems
- Amazon S3
- SMB
- Custom Python SDKs
- BigQuery
- Snowflake
- SharePoint
- SFTP
- Kafka
- Agent host file access
- Directory (SSH)
- JDBC-based systems
- PostgreSQL
- Microsoft SQL Server
Permissions
Before using external transforms, make sure to familiarize yourself with the Data Connection - Permissions reference page.
Comparison of external transforms and legacy external transforms
The following are some key workflow differences between external transforms and legacy external transforms:
- The tab for importing sources will always automatically show for external transforms. Previously, tabs for adding egress policy and credentials would only show after an Information Security Officer had toggled on the ability to use external systems in repository settings.
- Settings to allow external connections and the use of inputs are no longer located in repository settings. Instead, these are controlled on each individual source.
- Credentials, egress policies, and exportable markings are no longer specified in code. Instead, these settings are taken from the sources that are imported into the transform and applied automatically to the job.
- If this configuration is changed at the source level, it will automatically be picked up by transforms that import the source without any code change or version bump required. This allows centralized governance of credentials, egress, and exportable Markings which will propagate immediately to downstream workflows.
- Changes will take effect as of the start of a build and will not affect running builds.
- The decorator has changed from
@use_external_systems()to@external_systems().
Key advantages of external transforms include the following:
- Support for connecting to systems not accessible from the Internet
- Support for rotating/updating credentials without requiring code changes
- Support for sharing connection configuration across multiple repositories
- Out-of-the-box Python clients for selected source types
- Improved and simplified governance workflows for enabling and managing external transform repositories
- Visualization of external transforms connected to external sources in Data Lineage
Migrate to external transforms
There is currently no automatic migration path to update external transforms to external transforms. However, the manual action required is expected to be minimal for most workflows.
The following are the main steps to manually migrate to external transforms:
- Identify the set of credentials, egress policies, and export control Markings used in your existing legacy external transforms code.
- Identify or configure Data Connection sources that connect to the systems you wish to connect to from your external transforms. Ensure these sources are configured to allow imports into code.
- Import the relevant sources from step 2 into your existing Python transforms repository.
- Change your code to import and use the new
@external_systems()decorator with source references, then remove any instances of the@use_external_systems()decorator. This will likely involve updating any references to credentials in your transforms logic to instead reference credentials retrieved from the sources you are now importing. - Test your changes on a branch to ensure that your transforms continue to build successfully.
- After merging your updated transforms code, you can now un-toggle the repository settings.
Transforms cannot contain both external transforms and their legacy version. To remedy this, you can migrate all legacy external transforms to use source-based external transforms instead (preferred), or split your transform into multiple transforms. Transforms can be split into one that uses the use_external_systems decorator and another that uses the external_systems decorator.
Capabilities
lightweight external transforms
External transforms are also compatible with the single-node (lightweight) compute engines. Using lightweight compute can dramatically increase the execution speed for transforms operating on small and medium-sized data.
The below example shows how the @lightweight decorator can be added to a transform along with the @external_systems decorator. For more information on the options for configuring lightweight transforms, see the Python transforms documentation.
@lightweight
@external_systems(
    dictionary_api_source=Source("<source_rid>")
)
For more in-depth examples, refer to sources in Python.
Sources using agent proxy policies
External transforms support connecting to on-premise and privately hosted systems through Data Connection agents using agent proxy policies.
The example below demonstrates how to connect to a PostgreSQL database using a Spark sidecar transform. For more information, see the Spark sidecar transforms documentation.
Note that Spark sidecar transforms may not be needed for simpler use cases than the example below; other examples that do not need Spark sidecar transforms can be found elsewhere on this page.
Create a source using an Agent network policy
To configure external transforms with private network access:
- Create a PostgreSQL source with direct connection runtime: When creating your Data Connection source, select Direct connection as the runtime option.
- Configure network policy: In the source's network connectivity settings, create a network policy that defines the routing through your Data Connection agent. Select Agent proxy and then choose the agents that should be used to proxy.
 3. Enable code imports: In the code import configuration panel, toggle on Allow this source to be imported into code repositories.
4. Bootstrap a transform code repository and import the source.
Example: PostgreSQL connection via Spark sidecar
This example shows how to query a PostgreSQL database using a containerized Flask API within a sidecar container.
Dockerfile
FROM python:3.8-slim
WORKDIR /usr/src/app
COPY requirements.txt ./
RUN pip install --no-cache-dir -r requirements.txt
COPY . .
EXPOSE 1234
USER 5001
CMD ["python", "app.py"]
requirements.txt
flask
psycopg2-binary
Flask application (app.py)
from flask import Flask, jsonify
import psycopg2

app = Flask(__name__)

@app.route('/tables', methods=['POST'])
def tables():
    data = request.get_json()
    password = data.get('password')

    connection_params = {
        "dbname": "<databasename>",
        "user": "<user>",
        "password": password,
        "host": "postgres.com",
        "port": "5432",
    }


    data = {"schema": [], "table": []}
    with psycopg2.connect(**connection_params) as conn:
        with conn.cursor() as cur:
            cur.execute(
                "SELECT table_schema, table_name FROM information_schema.tables WHERE table_type = 'BASE TABLE'"
            )
            tables = cur.fetchall()
            for schema, table in tables:
                data["schema"].append(schema)
                data["table"].append(table)

    return jsonify(data)
Transform implementation
import requests
from transforms.sidecar import sidecar
from transforms.external.systems import external_systems, Source
from transforms.api import transform_df, Output

@external_systems(
    my_source=Source("<source_rid>")
)
@sidecar(image="simple", tag="0.0.1")
@transform_df(
    Output("<output_dataset_rid>"),
)
def compute(my_source, ctx):
    password = my_source.get_secret("PASSWORD")
    response = requests.post("http://localhost:1234/tables", json={"password": password})
    data = [(response.text,)]
    columns = ["table_schema_json"]
    return ctx.spark_session.createDataFrame(data, columns)
Advanced patterns
Write data to Parquet files with memory-aware buffering
When an external transform fetches many records from an external source, holding all records in memory before writing can cause out-of-memory errors. The BufferedParquetWriter class below periodically flushes accumulated rows to Parquet files once a configurable memory threshold is exceeded. The pattern works with any external data source and uses filesystem().open() to write raw files and put_metadata() to finalize schema inference.
import gc
import logging
from datetime import datetime

import pyarrow as pa
import pyarrow.parquet as pq
from pympler import asizeof

from transforms.api import Output, transform, LightweightOutput
from transforms.external.systems import external_systems, Source, ResolvedSource

logger = logging.getLogger(__name__)


class BufferedParquetWriter:
    """Buffers rows in memory and flushes them to Parquet files when the buffer
    exceeds a configurable size threshold."""

    def __init__(self, output: LightweightOutput, schema: pa.Schema, flush_threshold_mb: int = 64):
        self.output = output
        self.schema = schema
        self.flush_threshold_bytes = flush_threshold_mb * 1024 * 1024
        self.buffer = []
        self.buffer_size_bytes = 0
        self.file_index = 0
        self.row_size_estimate = None

    def append(self, row: dict):
        """Add a row to the buffer. If the buffer exceeds the threshold, flush to disk."""
        self.buffer.append(row)

        # Estimate row size from the first row, then use that estimate going forward
        if self.row_size_estimate is None:
            self.row_size_estimate = asizeof.asizeof(row)
        self.buffer_size_bytes += self.row_size_estimate

        if self.buffer_size_bytes >= self.flush_threshold_bytes:
            self.flush()

    def flush(self):
        """Write buffered rows to a Parquet file and clear the buffer."""
        if not self.buffer:
            return
        self.file_index += 1
        table = pa.Table.from_pylist(self.buffer, schema=self.schema)
        timestamp = datetime.now().strftime("%Y%m%d_%H%M%S")
        filename = f"output_{timestamp}_{self.file_index}.parquet"
        with self.output.filesystem().open(filename, "wb") as f:
            pq.write_table(table, f)
        logger.info(f"Flushed {len(self.buffer)} rows to {filename}")
        self.buffer = []
        self.buffer_size_bytes = 0
        gc.collect()

    def finalize(self):
        """Flush any remaining rows and trigger schema inference."""
        self.flush()
        if self.file_index > 0:
            self.output.put_metadata()


# Define the schema for your output records
OUTPUT_SCHEMA = pa.schema([
    ("id", pa.string()),
    ("name", pa.string()),
    ("value", pa.float64()),
])


@external_systems(
    my_source=Source("<source_rid>")
)
@transform.using(
    output=Output("<output_dataset_rid>"),
).with_resources(
    memory_gb=4,
)
def compute(my_source: ResolvedSource, output: LightweightOutput):
    output.set_mode("replace")
    writer = BufferedParquetWriter(output, OUTPUT_SCHEMA, flush_threshold_mb=64)

    # Replace the loop below with your data fetching logic.
    # For example, iterate over pages from an API, rows from a database cursor,
    # or messages from a message queue.
    # Each call to append() adds data to the writer, which automatically
    # flushes to a Parquet file when the buffer exceeds the threshold.
    for record in fetch_records_from_source(my_source):
        writer.append({
            "id": record["id"],
            "name": record["name"],
            "value": record["value"],
        })

    # Write any remaining buffered rows and finalize schema inference.
    writer.finalize()
Export a dataset as CSV
When you need to export data from Foundry as CSV, for example to deliver files to an external system that expects CSV format, you can use an external transform that reads an input dataset and writes a CSV file to the output using filesystem().open(). The output dataset can then be exported through Data Connection.
import csv

from transforms.api import Input, Output, transform, LightweightInput, LightweightOutput


@transform.using(
    source_data=Input("<input_dataset_rid>"),
    csv_output=Output("<output_dataset_rid>"),
)
def compute(source_data: LightweightInput, csv_output: LightweightOutput):
    OUTPUT_FILENAME = "export.csv"

    # Read the input dataset as a Polars DataFrame.
    df = source_data.polars()
    fieldnames = df.columns

    # Write the data as a CSV file.
    with csv_output.filesystem().open(OUTPUT_FILENAME, "w") as f:
        writer = csv.DictWriter(f, fieldnames=fieldnames)
        writer.writeheader()
        for row in df.iter_rows(named=True):
            writer.writerow(row)
中文翻译
外部转换(External transforms)
:::callout{theme="neutral"} 数据连接源(Data Connection sources)现在可以直接导入到代码仓库中,是与外部系统交互的首选方法,取代了基于凭证的传统外部转换(credentials-based legacy external transforms) :::
外部转换(External transforms)允许从Python转换(Python transforms)仓库连接到外部系统。
:::callout{theme="warning"} 外部转换不支持使用出站应用程序(outbound applications)进行身份验证的源。 :::
当满足以下任一条件时,外部转换主要用于执行批量同步(batch sync)、导出(export)和媒体同步(media sync)工作流:
- 现有的数据连接源类型不可用。
- 目标源类型不具备所需的功能。
- 通过数据连接用户界面提供的功能不具备所需的特性。
针对这些情况的解决方案可能包括以下内容:
- 连接REST API,包括通过互联网和私有网络。
- 连接数据库以安排当前在数据连接用户界面中无法实现的自定义查询逻辑。
- 在同步或导出期间根据需要转换数据。这可能包括在写入Foundry之前将文件批量组合在一起、在传输过程中处理数据的自定义加密/解密等。
任何使用虚拟表(virtual tables)的转换也被视为外部转换,因为转换作业必须能够连接到包含虚拟化数据的外部系统。要在Python转换中使用虚拟表(virtual tables),请按照以下说明了解如何设置源。
设置指南(Setup guide)
在本设置指南中,我们将逐步创建一个连接到免费公共词典API(free public dictionary API) ↗的Python转换仓库。然后,示例将使用此API来解释外部转换的各种特性以及如何与API一起使用。
:::callout{theme="neutral"} 本设置指南中使用的词典API与Palantir无关,可能随时更改。本教程并非认可、推荐或建议将此API用于生产用例。 :::
前提条件:创建Python转换仓库
在遵循本指南之前,请务必先创建一个Python转换仓库,并按照我们的教程了解如何编写Python转换。Python转换的所有功能都与外部转换兼容。
前提条件:创建数据连接源
在从Python仓库连接到外部系统之前,必须创建一个可以导入到代码中的数据连接源。在本教程中,我们将创建一个连接到上述词典API的REST API源。
选项1:在外部系统侧边栏中创建源
在外部转换中使用源的最快方法是从Python转换代码仓库中创建。初始化仓库后,请完成以下步骤来设置通用源:
:::callout{theme="neutral"} 如果您在VS Code工作区(VS Code workspace)中的Python转换仓库中工作,外部系统(External systems)设置位于顶部导航栏的设置(Settings)选项卡中。 :::
- 从左侧面板,打开外部系统(External systems)选项卡。
- 选择添加(Add) > 新建(Create new)。
- 为您的源选择一个名称以及一个用于存储它的项目(Project)。创建后,新创建的源将显示在左侧面板中。任何出站策略(egress policies)、密钥(secrets)和可导出标记(exportable markings)都可以直接从此面板配置。
-
对于本教程,您应该为词典API添加一个出站策略(egress policy):
api.dictionaryapi.dev。由于此API不需要身份验证,因此您不需要任何密钥,并且可以暂时跳过导出控制。但是,将此源与Foundry数据输入一起使用时需要它们。 -
由于此连接是连接到REST API,系统将自动提示您将通用连接器转换为REST API源,以便您可以使用内置的Python requests客户端。
选项2:在数据连接中创建源
您也可以从数据连接应用程序创建源,或使用已配置的现有源。要使用此选项,请按照以下步骤操作:
- 导航到Foundry中的数据连接应用程序,然后选择新建源(New Source)。从选项列表中,选择REST API。
-
查看概述(Overview)页面,然后选择右下角的继续(Continue)。系统将提示您选择连接工作节点:选择一个Foundry工作节点(Foundry worker)来连接到词典API,因为外部转换不支持代理工作节点(agent worker)连接。
-
为您的源选择一个名称,并选择一个用于保存它的项目(Project)。
-
填写域(Domains)部分,提供API源的连接信息。词典API示例的配置如下所示:
- 对于此示例,我们还需要创建必要的出站策略。如果您完成了上一步,该策略将在网络连接(Network Connectivity)部分自动建议:
- 选择保存(Save),然后选择保存并继续(Save and continue)以完成源设置。
前提条件:在仓库中导入transforms-external-systems库
要使用外部转换,必须先在仓库中导入transforms-external-systems库。使用左侧面板中的库(Libraries)选项卡,搜索所需库,然后选择安装(Install)来安装库。
前提条件:将源导入到代码中
:::callout{theme="neutral"} 具有多个域的REST API源可能无法导入。相反,如果同一外部转换中需要多个域,您应该为每个域创建一个单独的REST API源。 :::
-
首先,您必须允许REST API源导入到代码中。要配置此设置,请导航到数据连接中的源,然后转到连接设置(Connection settings) > 代码导入配置(Code import configuration)选项卡。
-
打开允许将此源导入到代码仓库(Allow this source to be imported into code repositories)选项。导入此源的任何代码仓库都将显示在此页面上。
- 现在,您可以返回代码仓库并导入该源。在仓库中,导航到左侧面板,选择由地球图标表示的外部系统(External Systems)选项卡。在侧面板中,选择添加(Add),然后搜索您之前创建的词典API源。选择此源,然后选择确认选择(Confirm selection)以导入。
:::callout{theme="neutral"}
您必须至少拥有对该源的编辑者(Editor)访问权限,才能将其导入到仓库中。了解更多关于权限(permissions)的信息。
:::
编写外部转换(Write external transforms)
一旦设置了导入词典API源的Python转换仓库,您就可以开始编写使用该源进行外部连接的Python转换代码。
:::callout{theme="neutral"} 查看我们的外部转换示例以查找在常见系统上典型的读取或写入工作流的完整配置示例。 :::
导入并配置@external_systems装饰器
要使用外部转换,必须从transforms.external.systems库中导入external_systems装饰器和Source对象:
from transforms.external.systems import external_systems, Source
然后,您应该通过使用external_systems装饰器来指定应包含在转换中的源:
@external_systems(
    dictionary_api_source=Source("ri.magritte..source.e301d738-b532-431a-8bda-fa211228bba6")
)
源将自动呈现为在数据连接中打开的链接,并显示源名称而不是资源标识符。
访问源属性和凭证
一旦源被导入到您的转换中,您可以使用内置的连接对象通过get_https_connection()方法访问源的属性。下面的示例展示了如何获取我们在上一步中配置的词典API源的基础URL。
dictionary_api_url = dictionary_api_source.get_https_connection().url
存储在源上的其他密钥或凭证也可以从源访问。要识别可以访问的密钥名称,请导航到转换中的左侧面板。
使用以下语法在代码中访问密钥:
dictionary_api_source.get_secret("additionalSecretFoo")
:::callout{theme="neutral"}
目前,除非源提供HTTPS客户端,否则无法访问非凭证的源属性。例如,在PostgreSQL源上,您将无法访问hostname或其他非密钥属性。
:::
使用内置HTTP客户端
对于提供RESTful API的源,源对象允许您与内置的HTTPS客户端进行交互。该客户端将预先配置源上指定的所有详细信息,包括任何服务器或客户端证书,您可以直接开始向外部系统发出请求。
dictionary_api_url = dictionary_api_source.get_https_connection().url
dictionary_api_client = dictionary_api_source.get_https_connection().get_client()

# dictionary_api_client 是来自Python `requests`库的预配置Session对象。
# GET请求示例:
response = dictionary_api_client.get(dictionary_api_url + "/api/v2/entries/en/" + word, timeout=10)
或者,您可以使用自己的客户端或特定于源的Python库,并使用源对象来检索属性和凭证。
:::callout{theme="warning"}
在转换或UDF中更改工作目录(例如,使用os.chdir())可能会破坏建立安全连接所需的环境变量的引用。
:::
:::callout{theme="neutral"} 当使用代理代理运行时(agent proxy runtime)(已弃用)连接到本地系统时,您必须使用内置客户端,因为它将自动配置必要的代理代理配置。 :::
示例:从词典API导入数据
下面的示例演示了一个完整的转换,该转换遍历一个单词列表并从词典API检索它们的音标转录。
from pandas import DataFrame
from transforms.api import transform
from transforms.api import Output, Input, TransformContext, transform_pandas
from transforms.external.systems import external_systems, Source
import pandas as pd
import logging

logger = logging.getLogger(__name__)


@external_systems(
    dictionary_api_source=Source(
        "<source_rid>"
    )
)
@transform_pandas(Output("<output_dataset_rid>"))
def compute(dictionary_api_source) -> DataFrame:
    dictionary_api_url = dictionary_api_source.get_https_connection().url
    dictionary_api_client = dictionary_api_source.get_https_connection().get_client()

    words = ["apple", "dog", "cat"]

    phonetics = []

    for word in words:
        logger.info("Fetching word from api.dictionaryapi.dev : " + word)

        response = dictionary_api_client.get(
            dictionary_api_url + "/api/v2/entries/en/" + word
        ).json()

        phonetics += [{"word": word, "phonetic": response[0]["phonetic"]}]

    return pd.DataFrame(phonetics)
在外部转换中使用Foundry输入(Use Foundry inputs in external transforms)
外部转换通常需要使用Foundry输入数据。例如,您可能想要查询API以收集表格数据集中每一行的额外元数据。或者,您可能有一个需要将Foundry数据导出到外部软件系统的工作流。
此类情况被视为导出控制(export-controlled)工作流,因为它们打开了将安全的Foundry数据导出到另一个具有未知安全保证和断开数据溯源的外部系统的可能性。在配置源连接时,源所有者必须指定是否可以从Foundry导出数据,并提供可以导出的安全标记和组织集合。Foundry提供治理控制,以确保开发人员可以清晰地编码安全意图,并且信息安全官可以审计与外部系统交互的工作流的范围和意图。
在源上配置导出控制
导出使用安全标记(security markings)进行控制。在配置源时,导出配置用于指定哪些安全标记和组织可以安全地导出到外部系统。这是通过导航到数据连接应用程序中的源,然后导航到连接设置(Connection settings) > 导出配置(Export configuration)选项卡来完成的。然后,您应该打开启用到此源的导出(Enable exports to this source)选项,并选择可能导出的标记和组织集合。
这样做需要具有删除相关数据和组织的标记的权限,因为导出被认为等同于删除Foundry内数据的标记。
必须打开启用到此源的导出(Enable exports to this source)设置,以允许以下操作:
- 使用数据集(datasets)、媒体集(media sets)和流(streams)作为导入此源的Python转换代码的输入。
- 在Python转换中使用在此源上注册的虚拟表。
下面您可以看到词典API源的示例导出配置,允许从Palantir组织导出数据,且无需额外的安全标记即可导出到词典API:
:::callout{theme="neutral"} 请注意,启用到此源的导出(Enable exports to this source)必须打开,即使您实际上并未将数据导出到此系统,因为允许Foundry数据输入到与此系统有开放连接的同一计算作业中意味着数据可能被导出。 :::
示例:将Foundry导入与词典API的数据一起使用
在此示例中,我们使用单词的输入数据集而不是静态硬编码列表。它还基于响应的状态码说明了基本的错误处理。
from pandas import DataFrame
from transforms.api import transform
from transforms.api import Output, Input, TransformContext, transform_pandas
from transforms.external.systems import external_systems, Source, ResolvedSource
import pandas as pd
import logging

logger = logging.getLogger(__name__)


@external_systems(
    dictionary_api_source=Source(
        "<source_rid>"
    )
)
@transform_pandas(
    Output("<output_dataset_rid>"),
    words_df=Input("<input_dataset_rid>"),
)
def compute(dictionary_api_source: ResolvedSource, words_df: DataFrame) -> DataFrame:
    dictionary_api_url = dictionary_api_source.get_https_connection().url
    dictionary_api_client = dictionary_api_source.get_https_connection().get_client()

    words = words_df["word"].tolist()

    phonetics= []

    for word in words:
        logger.info("Fetching word from api.dictionaryapi.dev: " + word)

        response = dictionary_api_client.get(
            dictionary_api_url + "/api/v2/entries/en/" + word
        )

        if response.status_code == 200:
            data = response.json()[0]

            if "phonetic" in data:
                phonetic_transcription = data["phonetic"]
            else:
                logger.warning(f"No phonetic transcription found for {word}.")
                phonetic_transcription = None
        else:
            logger.warning(f"Request for {words} failed with status code {response.status_code}.")
            phonetic_transcription = None

        phonetics += [{"word": word, "phonetic": phonetic_transcription}]

    return pd.DataFrame(phonetics)
端到端示例(End-to-end examples)
查看以下文档以查找常见系统的复杂端到端示例:
- REST API源
- OAuth客户端凭证授权(OAuth Client Credentials grant)
- 自签名服务器证书(Self-signed server certificates)
- Foundry API
- 从代码调用Foundry API(Call the Foundry API from code)
- 基于文件的系统
- Amazon S3
- SMB
- 自定义Python SDK
- BigQuery
- Snowflake
- SharePoint
- SFTP
- Kafka
- 代理主机文件访问
- 目录(SSH)(Directory (SSH))
- 基于JDBC的系统
- PostgreSQL
- Microsoft SQL Server
权限(Permissions)
在使用外部转换之前,请务必熟悉数据连接 - 权限参考(Data Connection - Permissions reference)页面。
外部转换与传统外部转换的比较(Comparison of external transforms and legacy external transforms)
以下是外部转换和传统外部转换之间的一些关键工作流差异:
- 导入源的选项卡将始终自动显示给外部转换。以前,只有在信息安全官在仓库设置中打开使用外部系统的功能后,才会显示添加出站策略和凭证的选项卡。
- 允许外部连接和使用输入的设置不再位于仓库设置中。相反,这些设置在每个单独的源上进行控制。
- 凭证、出站策略和可导出标记不再在代码中指定。相反,这些设置取自导入到转换中的源,并自动应用于作业。
- 如果此配置在源级别更改,则导入该源的转换将自动获取更改,无需任何代码更改或版本升级。这允许对凭证、出站和可导出标记进行集中治理,这些更改将立即传播到下游工作流。
- 更改将从构建开始时生效,不会影响正在运行的构建。
- 装饰器已从
@use_external_systems()更改为@external_systems()。
外部转换的主要优势包括:
- 支持连接到无法从互联网访问的系统
- 支持轮换/更新凭证而无需代码更改
- 支持跨多个仓库共享连接配置
- 为选定的源类型提供开箱即用的Python客户端
- 改进并简化了启用和管理外部转换仓库的治理工作流
- 在数据沿袭(Data Lineage)中可视化连接到外部源的外部转换
迁移到外部转换(Migrate to external transforms)
目前没有自动迁移路径来将外部转换更新为外部转换。但是,对于大多数工作流,所需的手动操作预计是最小的。
以下是手动迁移到外部转换的主要步骤:
- 识别现有传统外部转换代码中使用的一组凭证、出站策略和导出控制标记。
- 识别或配置连接到您希望从外部转换连接的系统的数据连接源。确保这些源已配置为允许导入到代码中。
- 将步骤2中的相关源导入到您现有的Python转换仓库中。
- 更改您的代码以导入并使用带有源引用的新
@external_systems()装饰器,然后删除任何@use_external_systems()装饰器的实例。这可能涉及更新转换逻辑中对凭证的任何引用,以改为引用从您现在正在导入的源中检索的凭证。 - 在分支上测试您的更改,以确保您的转换继续成功构建。
- 合并更新后的转换代码后,您现在可以关闭仓库设置。
转换不能同时包含外部转换及其传统版本。要解决此问题,您可以迁移所有传统外部转换以使用基于源的外部转换(首选),或者将您的转换拆分为多个转换。转换可以拆分为一个使用use_external_systems装饰器,另一个使用external_systems装饰器。
功能(Capabilities)
轻量级(lightweight)外部转换
外部转换也与单节点(轻量级)计算引擎(compute engines)兼容。对于处理中小型数据的转换,使用轻量级计算可以显著提高执行速度。
下面的示例展示了如何将@lightweight装饰器与@external_systems装饰器一起添加到转换中。有关配置轻量级转换选项的更多信息,请参阅Python转换文档(Python transforms documentation)。
@lightweight
@external_systems(
    dictionary_api_source=Source("<source_rid>")
)
有关更深入的示例,请参阅Python中的源(sources in Python)。
使用代理代理策略的源
外部转换支持通过数据连接代理使用代理代理策略(agent proxy policies)连接到本地和私有托管的系统。
下面的示例演示了如何使用Spark sidecar转换连接到PostgreSQL数据库。有关更多信息,请参阅Spark sidecar转换文档(Spark sidecar transforms documentation)。
请注意,对于比下面示例更简单的用例,可能不需要Spark sidecar转换;不需要Spark sidecar转换的其他示例可以在本页其他地方找到。
使用代理网络策略创建源
要配置具有私有网络访问权限的外部转换:
- 创建PostgreSQL源(PostgreSQL source)并选择直接连接运行时: 在创建数据连接源时,选择直接连接(Direct connection)作为运行时选项。
- 配置网络策略: 在源的网络连接设置中,创建一个定义通过数据连接代理路由的网络策略。选择代理代理(Agent proxy),然后选择应使用的代理进行代理。
3. 启用代码导入: 在代码导入配置面板中,打开允许将此源导入到代码仓库(Allow this source to be imported into code repositories)。
4. 引导一个转换代码仓库并导入该源。
示例:通过Spark sidecar连接PostgreSQL
此示例演示了如何使用sidecar容器中的容器化Flask API查询PostgreSQL数据库。
Dockerfile
FROM python:3.8-slim
WORKDIR /usr/src/app
COPY requirements.txt ./
RUN pip install --no-cache-dir -r requirements.txt
COPY . .
EXPOSE 1234
USER 5001
CMD ["python", "app.py"]
requirements.txt
flask
psycopg2-binary
Flask应用程序(app.py)
from flask import Flask, jsonify
import psycopg2

app = Flask(__name__)

@app.route('/tables', methods=['POST'])
def tables():
    data = request.get_json()
    password = data.get('password')

    connection_params = {
        "dbname": "<databasename>",
        "user": "<user>",
        "password": password,
        "host": "postgres.com",
        "port": "5432",
    }


    data = {"schema": [], "table": []}
    with psycopg2.connect(**connection_params) as conn:
        with conn.cursor() as cur:
            cur.execute(
                "SELECT table_schema, table_name FROM information_schema.tables WHERE table_type = 'BASE TABLE'"
            )
            tables = cur.fetchall()
            for schema, table in tables:
                data["schema"].append(schema)
                data["table"].append(table)

    return jsonify(data)
转换实现
import requests
from transforms.sidecar import sidecar
from transforms.external.systems import external_systems, Source
from transforms.api import transform_df, Output

@external_systems(
    my_source=Source("<source_rid>")
)
@sidecar(image="simple", tag="0.0.1")
@transform_df(
    Output("<output_dataset_rid>"),
)
def compute(my_source, ctx):
    password = my_source.get_secret("PASSWORD")
    response = requests.post("http://localhost:1234/tables", json={"password": password})
    data = [(response.text,)]
    columns = ["table_schema_json"]
    return ctx.spark_session.createDataFrame(data, columns)
高级模式(Advanced patterns)
使用内存感知缓冲将数据写入Parquet文件
当外部转换从外部源获取大量记录时,在写入之前将所有记录保存在内存中可能会导致内存不足错误。下面的BufferedParquetWriter类在超过可配置的内存阈值时,定期将累积的行刷新到Parquet文件中。该模式适用于任何外部数据源,并使用filesystem().open()写入原始文件,使用put_metadata()完成模式推断。
import gc
import logging
from datetime import datetime

import pyarrow as pa
import pyarrow.parquet as pq
from pympler import asizeof

from transforms.api import Output, transform, LightweightOutput
from transforms.external.systems import external_systems, Source, ResolvedSource

logger = logging.getLogger(__name__)


class BufferedParquetWriter:
    """在内存中缓冲行,并在缓冲区超过可配置的大小阈值时将其刷新到Parquet文件。"""

    def __init__(self, output: LightweightOutput, schema: pa.Schema, flush_threshold_mb: int = 64):
        self.output = output
        self.schema = schema
        self.flush_threshold_bytes = flush_threshold_mb * 1024 * 1024
        self.buffer = []
        self.buffer_size_bytes = 0
        self.file_index = 0
        self.row_size_estimate = None

    def append(self, row: dict):
        """向缓冲区添加一行。如果缓冲区超过阈值,则刷新到磁盘。"""
        self.buffer.append(row)

        # 从第一行估计行大小,然后继续使用该估计值
        if self.row_size_estimate is None:
            self.row_size_estimate = asizeof.asizeof(row)
        self.buffer_size_bytes += self.row_size_estimate

        if self.buffer_size_bytes >= self.flush_threshold_bytes:
            self.flush()

    def flush(self):
        """将缓冲的行写入Parquet文件并清除缓冲区。"""
        if not self.buffer:
            return
        self.file_index += 1
        table = pa.Table.from_pylist(self.buffer, schema=self.schema)
        timestamp = datetime.now().strftime("%Y%m%d_%H%M%S")
        filename = f"output_{timestamp}_{self.file_index}.parquet"
        with self.output.filesystem().open(filename, "wb") as f:
            pq.write_table(table, f)
        logger.info(f"Flushed {len(self.buffer)} rows to {filename}")
        self.buffer = []
        self.buffer_size_bytes = 0
        gc.collect()

    def finalize(self):
        """刷新任何剩余的行并触发模式推断。"""
        self.flush()
        if self.file_index > 0:
            self.output.put_metadata()


# 为输出记录定义模式
OUTPUT_SCHEMA = pa.schema([
    ("id", pa.string()),
    ("name", pa.string()),
    ("value", pa.float64()),
])


@external_systems(
    my_source=Source("<source_rid>")
)
@transform.using(
    output=Output("<output_dataset_rid>"),
).with_resources(
    memory_gb=4,
)
def compute(my_source: ResolvedSource, output: LightweightOutput):
    output.set_mode("replace")
    writer = BufferedParquetWriter(output, OUTPUT_SCHEMA, flush_threshold_mb=64)

    # 将下面的循环替换为您的数据获取逻辑。
    # 例如,遍历API的页面、数据库游标的行或消息队列的消息。
    # 每次调用append()都会向写入器添加数据,当缓冲区超过阈值时,
    # 写入器会自动刷新到Parquet文件。
    for record in fetch_records_from_source(my_source):
        writer.append({
            "id": record["id"],
            "name": record["name"],
            "value": record["value"],
        })

    # 写入任何剩余的缓冲行并完成模式推断。
    writer.finalize()
将数据集导出为CSV
当您需要将数据从Foundry导出为CSV时,例如将文件传送到期望CSV格式的外部系统,您可以使用外部转换来读取输入数据集并使用filesystem().open()将CSV文件写入输出。然后,可以通过数据连接(Data Connection)导出输出数据集。
import csv

from transforms.api import Input, Output, transform, LightweightInput, LightweightOutput


@transform.using(
    source_data=Input("<input_dataset_rid>"),
    csv_output=Output("<output_dataset_rid>"),
)
def compute(source_data: LightweightInput, csv_output: LightweightOutput):
    OUTPUT_FILENAME = "export.csv"

    # 将输入数据集读取为Polars DataFrame。
    df = source_data.polars()
    fieldnames = df.columns

    # 将数据写入CSV文件。
    with csv_output.filesystem().open(OUTPUT_FILENAME, "w") as f:
        writer = csv.DictWriter(f, fieldnames=fieldnames)
        writer.writeheader()
        for row in df.iter_rows(named=True):
            writer.writerow(row)