Create an AI-powered Slack bot with listeners(使用监听器创建AI驱动的Slack机器人)
You can use event listeners in Foundry to create AI-powered bots that can interact with chat workspaces outside of Foundry. This guide provides an example using Slack, but you can use similar methods to connect with other platforms, such as Microsoft Teams (via the Microsoft Bot Framework).
Overview
In this tutorial, you will build "Tennis Bot", an AI assistant that helps Slack users learn more about tennis.
This example Slack bot comprises the following components:
- A Slack listener to receive chat events.
- A Slack source to write back responses to the Slack API.
- An AIP chatbot to act as the "brain" of the bot.
- A TypeScript function to perform event processing.
- An automation to execute new events.
Step 1: Set up Slack listener
The first step is to create your Slack app, install it into your Slack workspace, and start ingesting chat events with a listener. Follow the Slack listener setup guide to create the Slack listener.
Since users will directly message the Tennis Bot with questions, you will need to add the relevant scopes, events, and configurations in the Slack app. For more information on configuring Slack apps, see the official Slack documentation ↗.
Add the im:history and chat:write scopes for your app.
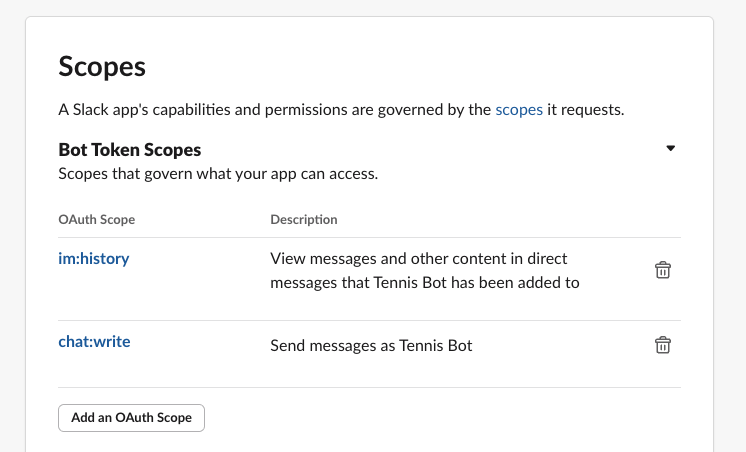
Additionally, subscribe your app to the message.im event.
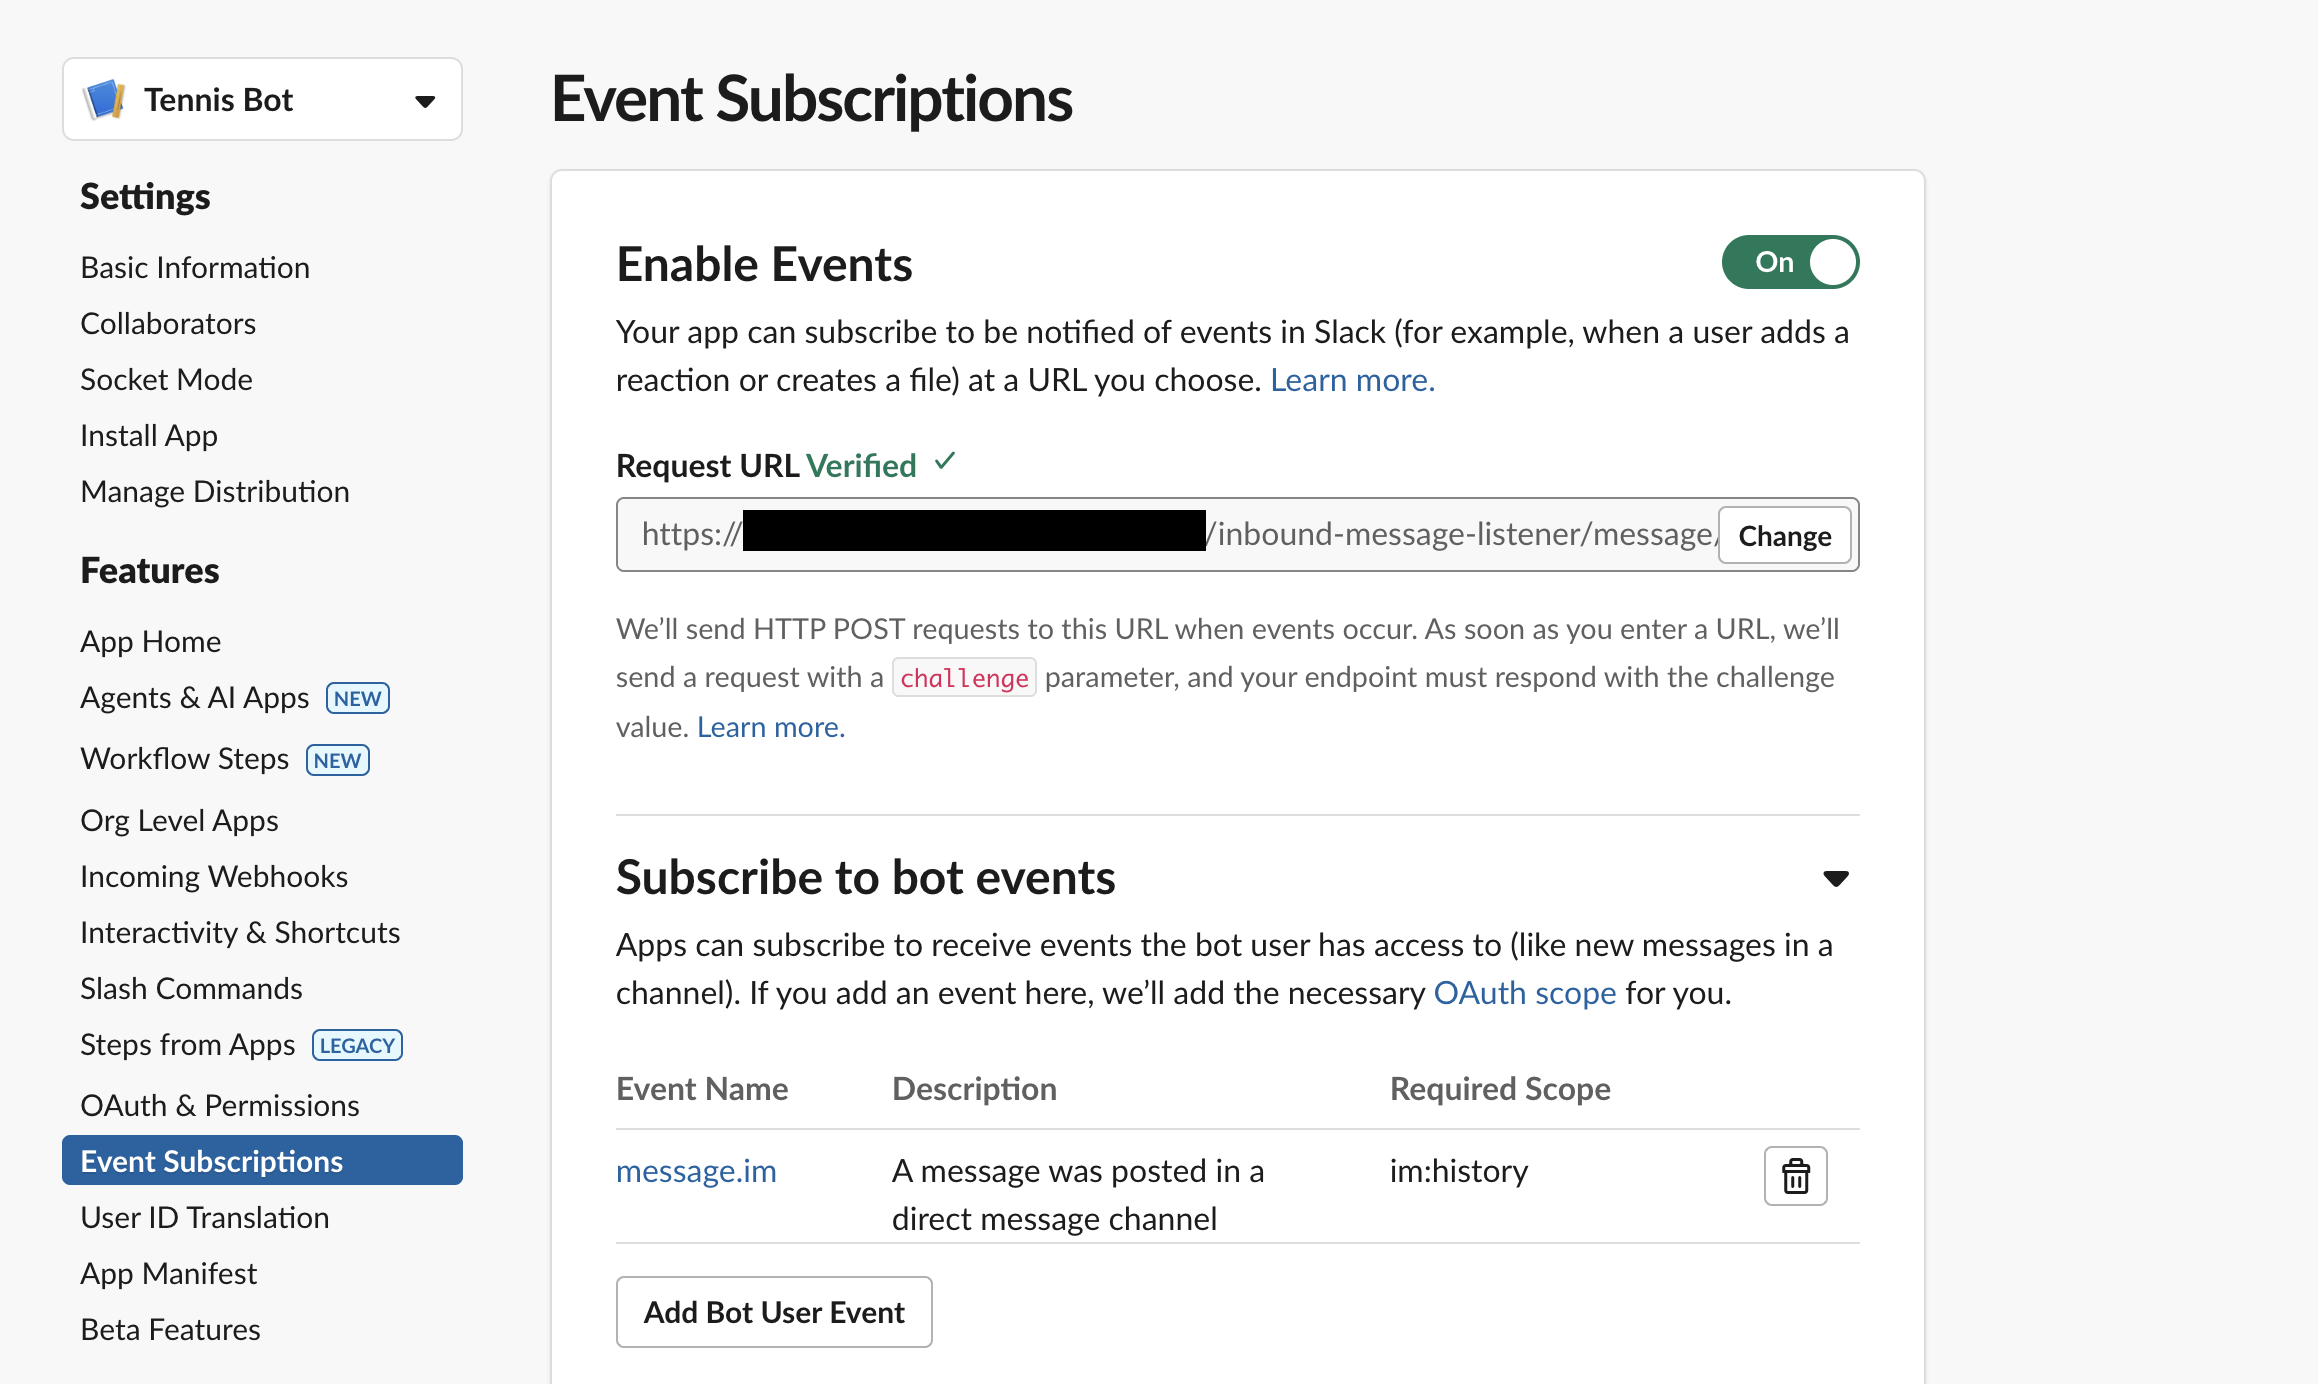
You will also need to allow users to directly message the bot. This setting can be found in your Slack app settings under Features > App Home.

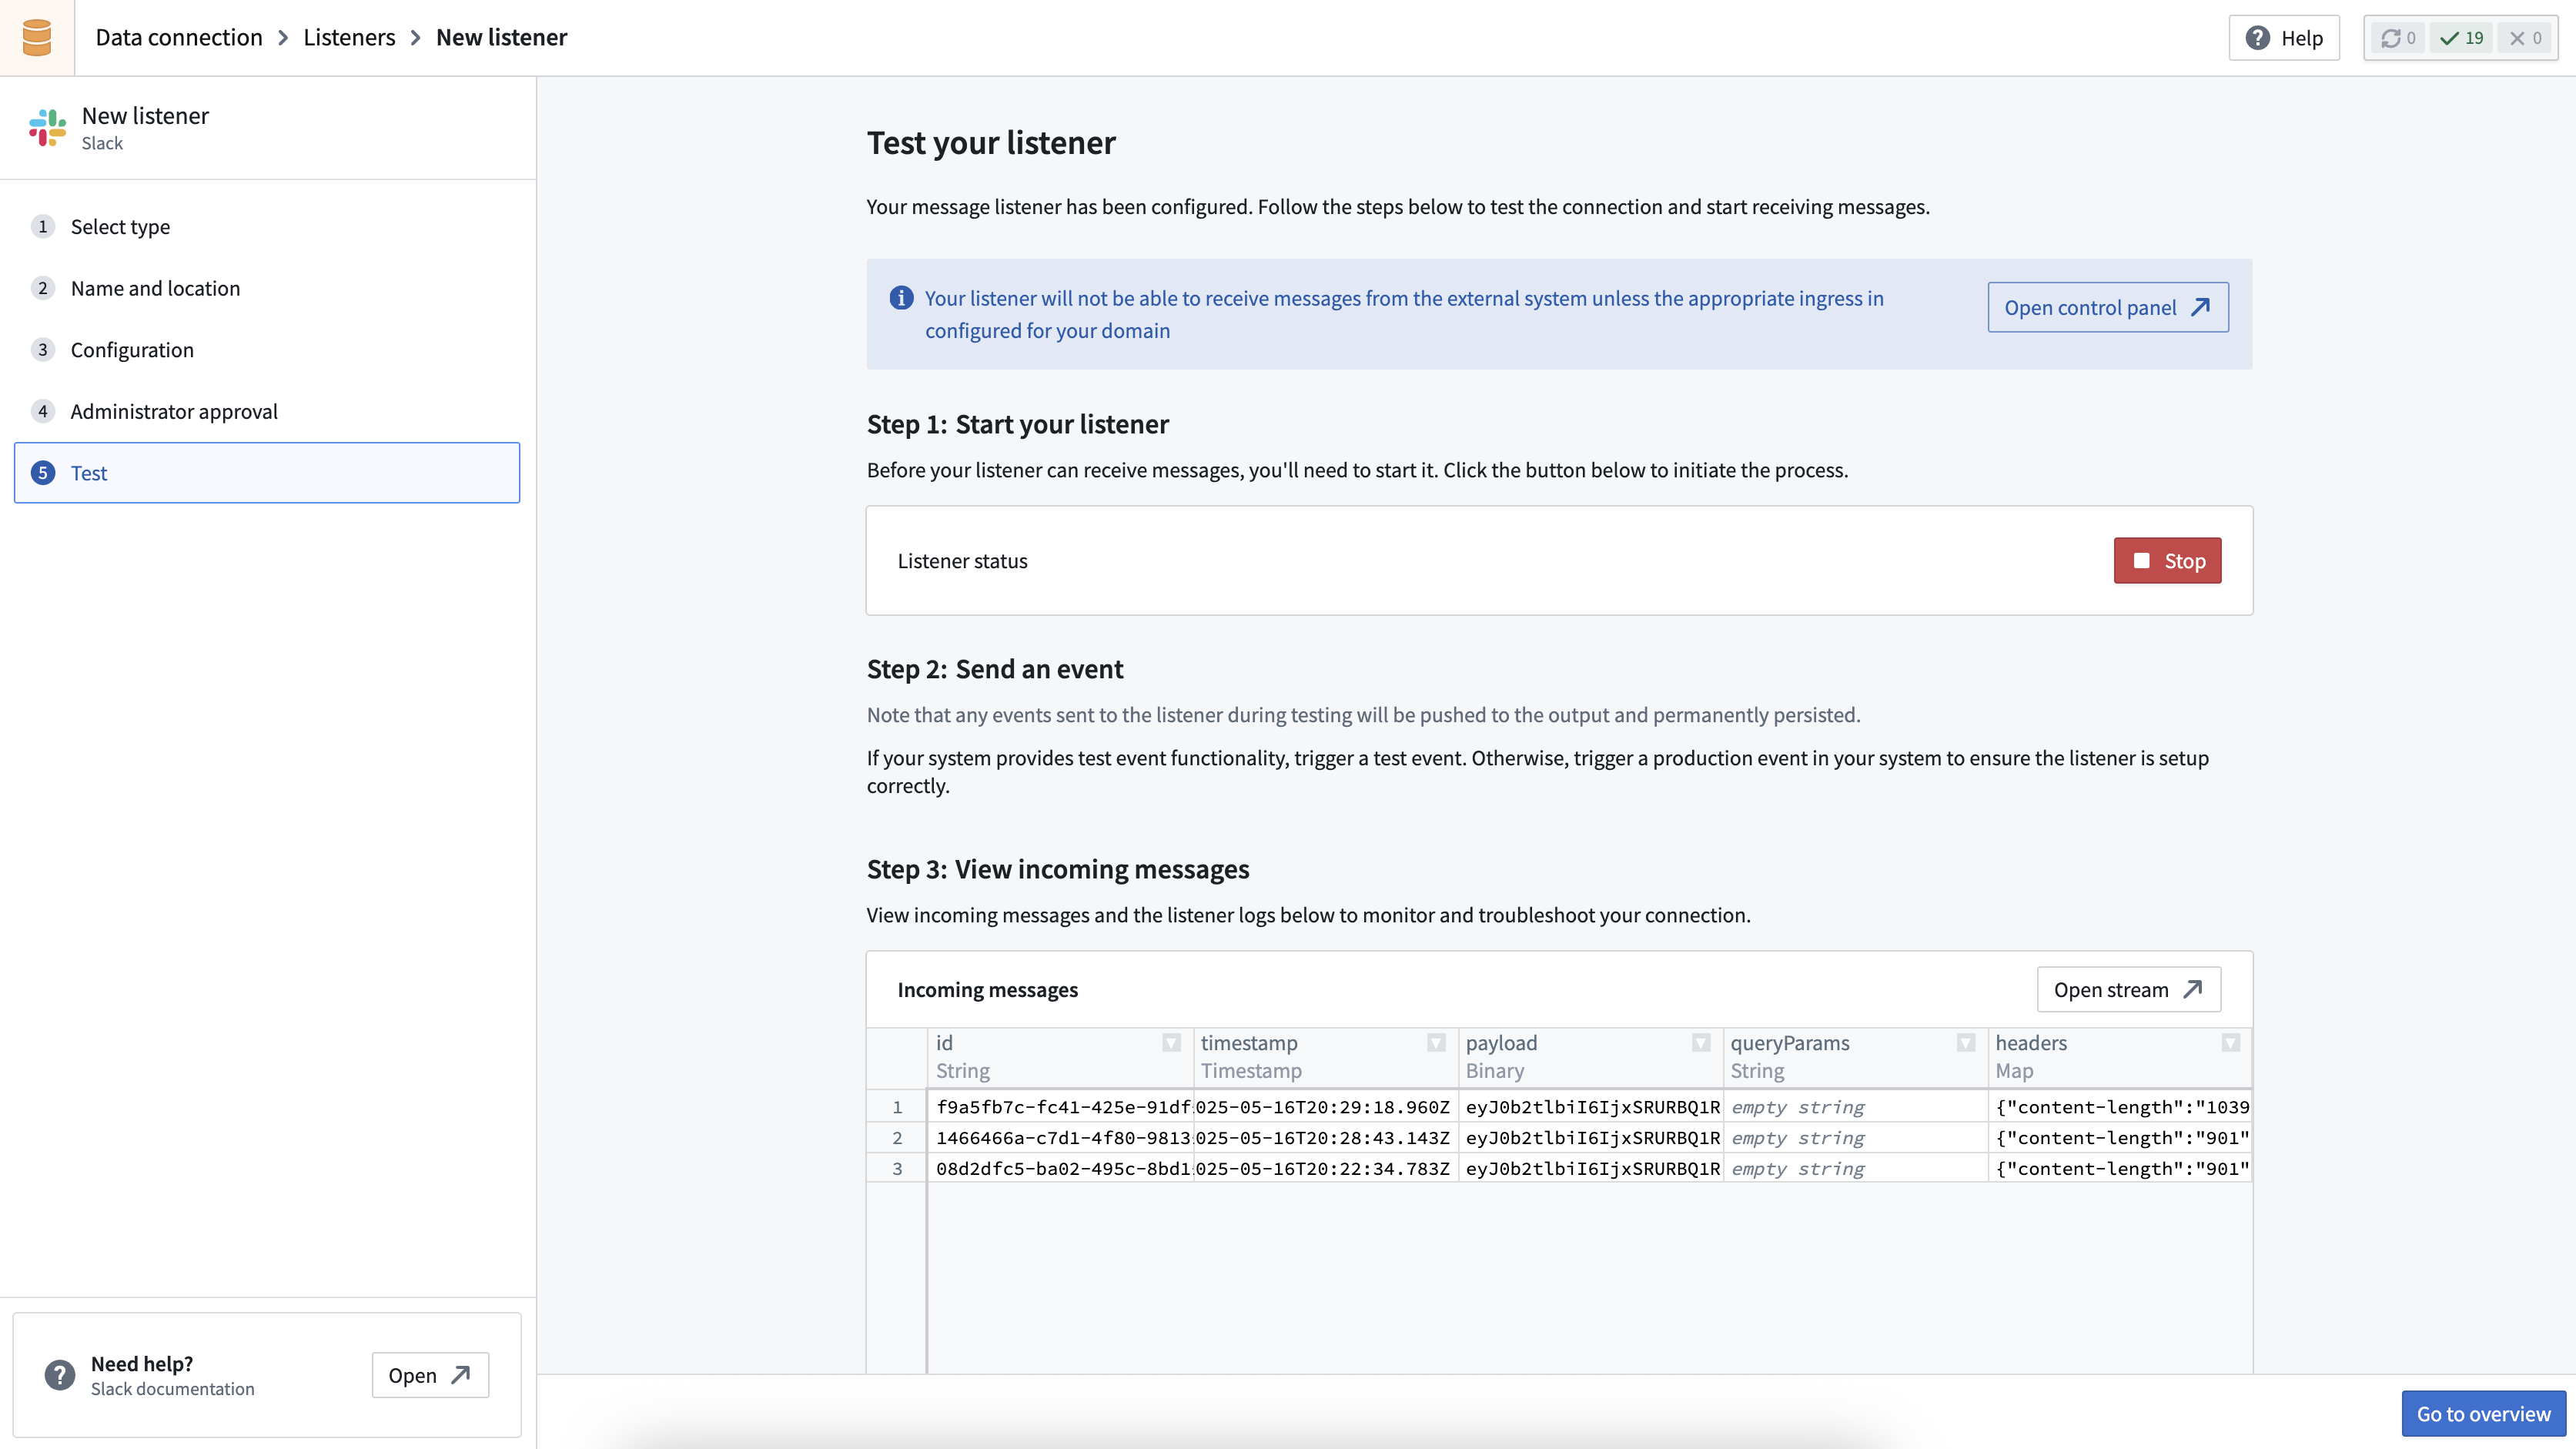
After you have configured the listener, you will be able to verify that the listener is correctly configured in the Test tab of the listener setup wizard.
Step 2: Set up Slack source
Next, you will need to create a new Slack source with credentials to write back to your chat platform.
After installing your Slack app into your workspace, you can find the bearer token to configure your source within Installed App Settings.

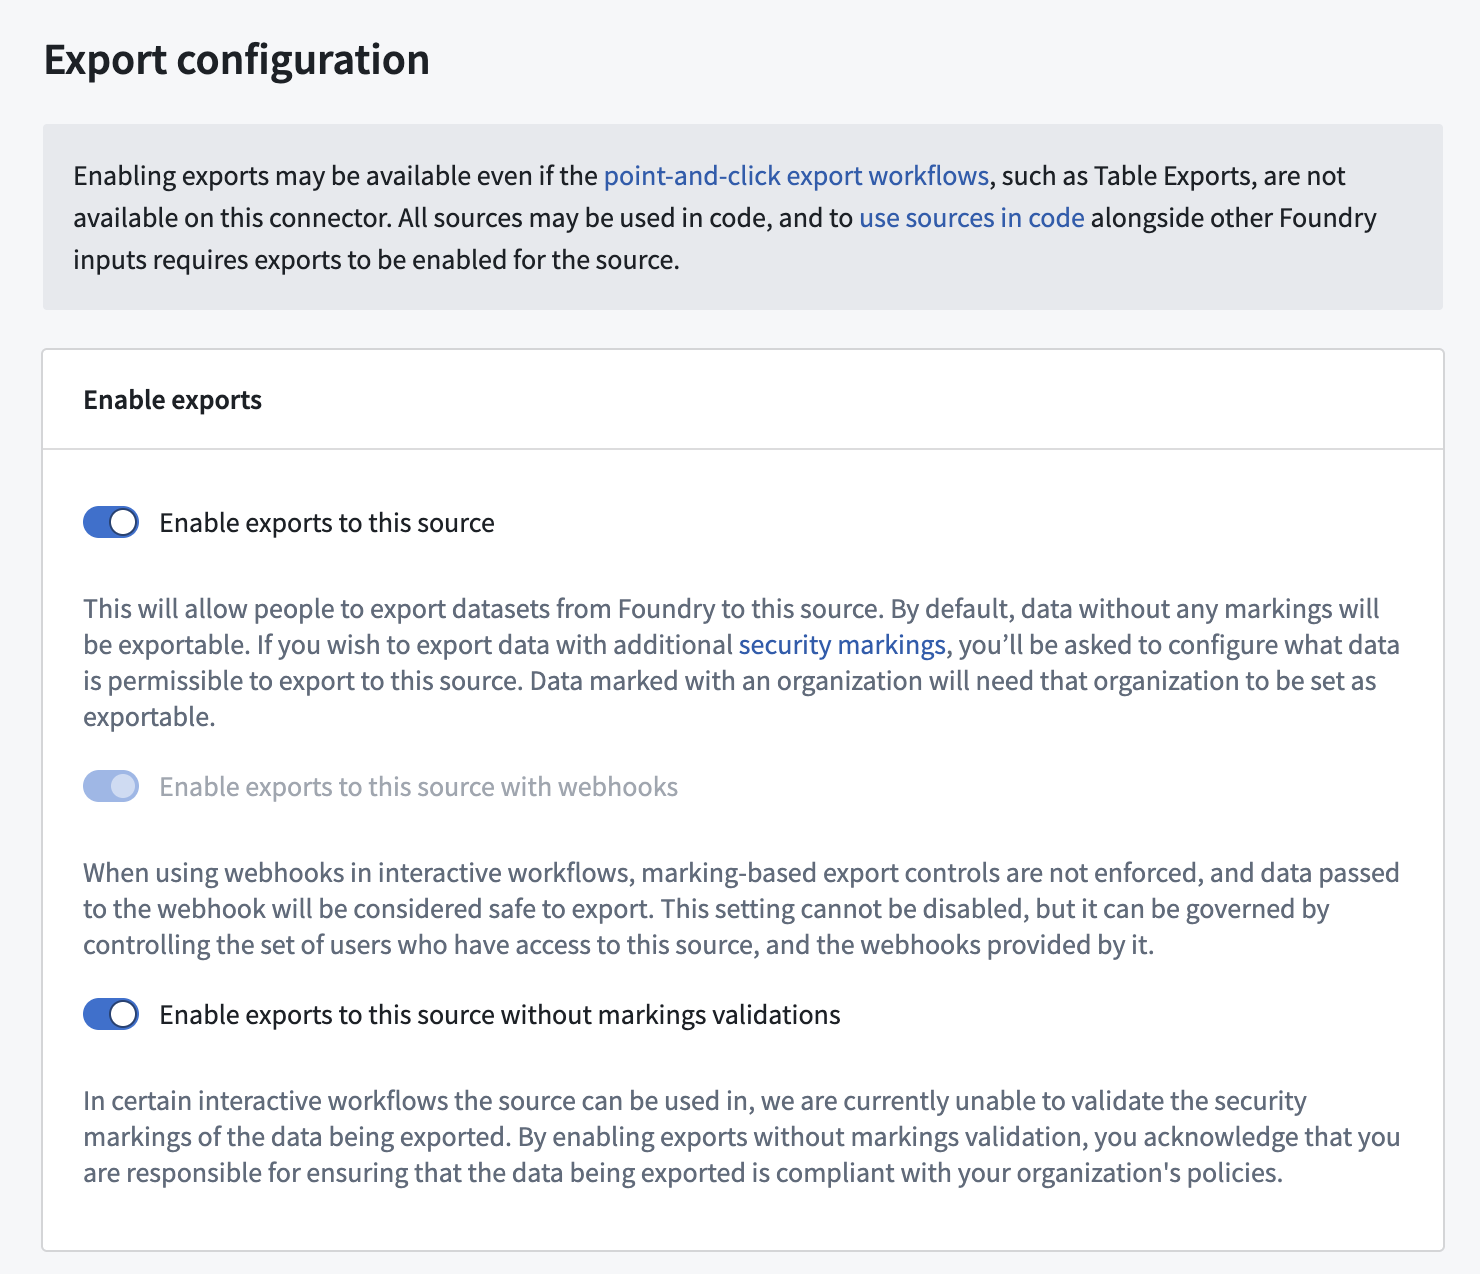
You will need to enable exports and code repository imports for your source by navigating to Connection settings.
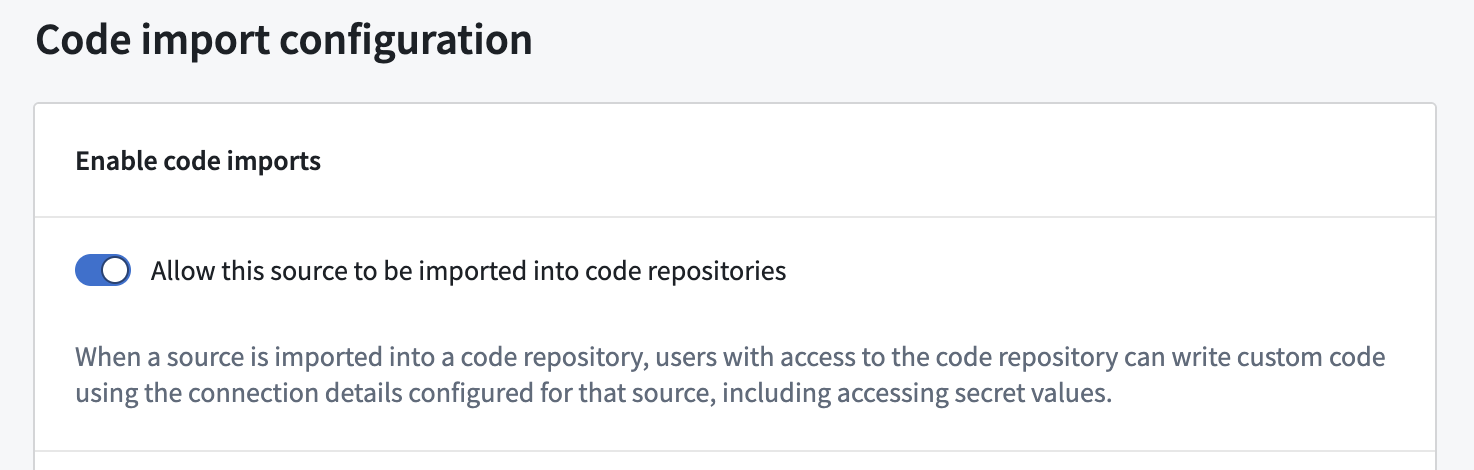
Additionally, you must configure an API name for your source so that the source can be referenced from code. The API name configuration can be found under Connection Settings > Code import configuration.
Step 3: Set up AIP Chatbot
In this step, you will create a new chatbot in AIP Chatbot Studio (formerly known as Agent Studio). You will need to configure instructions and retrieval context for the chatbot.
Specify chatbot instructions
To teach the chatbot how to respond as a tennis information bot, you can provide some task-specific instructions for the chatbot. An example prompt is:
You are an assistant for answering questions about tennis.

If a query is not related to tennis, you should respond politely and explain that your purpose is only for answering questions about tennis, and suggestion some possible topics the user may like to ask about related to tennis.

Keep your responses concise and friendly.
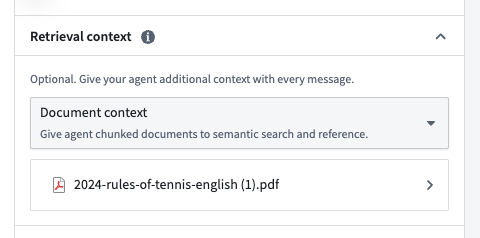
Provide retrieval context
To give the chatbot a source of information about tennis, you can provide a PDF with the rules of tennis as document context to the chatbot; the chatbot will then be able to use this context to answer user queries.
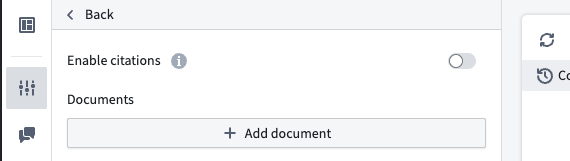
Ensure that you disable citations to avoid the chatbot including XML citations in its response; this will prevent the chatbot from including links back to the document in its Slack responses.
You can additionally test your chatbot to ensure it responds in an appropriate manner. Use Chatbot Studio for ad-hoc testing, or use AIP Evals to test against a full evaluation suite.

When you are satisfied with the chatbot's performance, publish the chatbot as a function so that you can use the chatbot in your event processing workflow.
Step 4: Import your source and chatbot function into a code repository
Once you have set up the chatbot, you will need to enable the chatbot to interact with Slack. First, create a new code repository for writing TypeScript functions. Once created, import both your created source and the published chatbot function into the repository.

Step 5: Set up listener event payload processing
To respond to messages, the bot will need to be able to process incoming listener event payloads. Create a TypeScript function to enable listener event payload processing.
import { OntologyEditFunction } from "@foundry/functions-api";
import { Queries } from "@foundry/ontology-api";
import { ExternalSystems } from "@foundry/functions-api";
import { TennisBotSlackSource } from "@foundry/external-systems/sources";

export class MyFunctions {
    @ExternalSystems({ sources: [TennisBotSlackSource] })
    @OntologyEditFunction()
    public async processTennisBotEvent(decodedEventPayload: string): Promise<void> {
        const message = (JSON.parse(decodedEventPayload) as any).event;

        // Only process non-bot messages (don't re-process messages that we send as the bot)
        if (message == null || message.bot_id != null) {
            return;
        }

        const messageText = message.text;
        const channel = message.channel;
        if (messageText == null || channel == null) {
            return;
        }

        // Pass the message to our agent
        const agentResponse = await Queries.tennisAgentDocumentContextExample({ userInput: messageText });

        // Forward the agent's response back to Slack
        const postMessageUrl = `${TennisBotSlackSource.getHttpsConnection().url}/api/chat.postMessage`;
        const response = await TennisBotSlackSource.fetch(postMessageUrl, {
            method: "POST",
            headers: {
                ["Authorization"]: `Bearer ${TennisBotSlackSource.getSecret("SLACK_BEARER_TOKEN_AUTH")}`,
                ["Content-Type"]: "application/json"
            },
            body: JSON.stringify({
                channel: channel,
                text: agentResponse.markdownResponse,
            })
        })
    }
}
For more information on using sources in TypeScript functions, see the relevant documentation.
Commit and tag a version to publish this function.
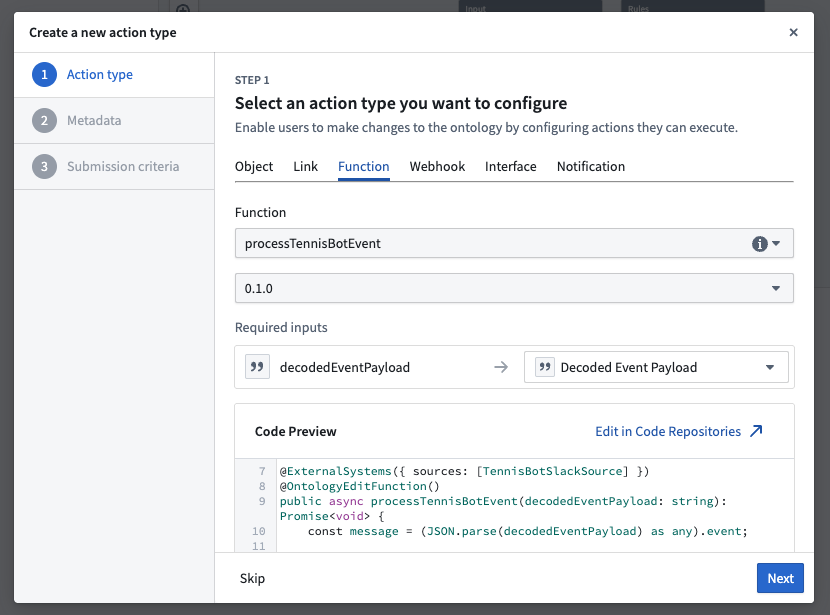
Step 6: Set up function-backed action
Navigate to Ontology Manager to create a function-backed action using your event processor function. This action will be triggered for each incoming Slack message event.
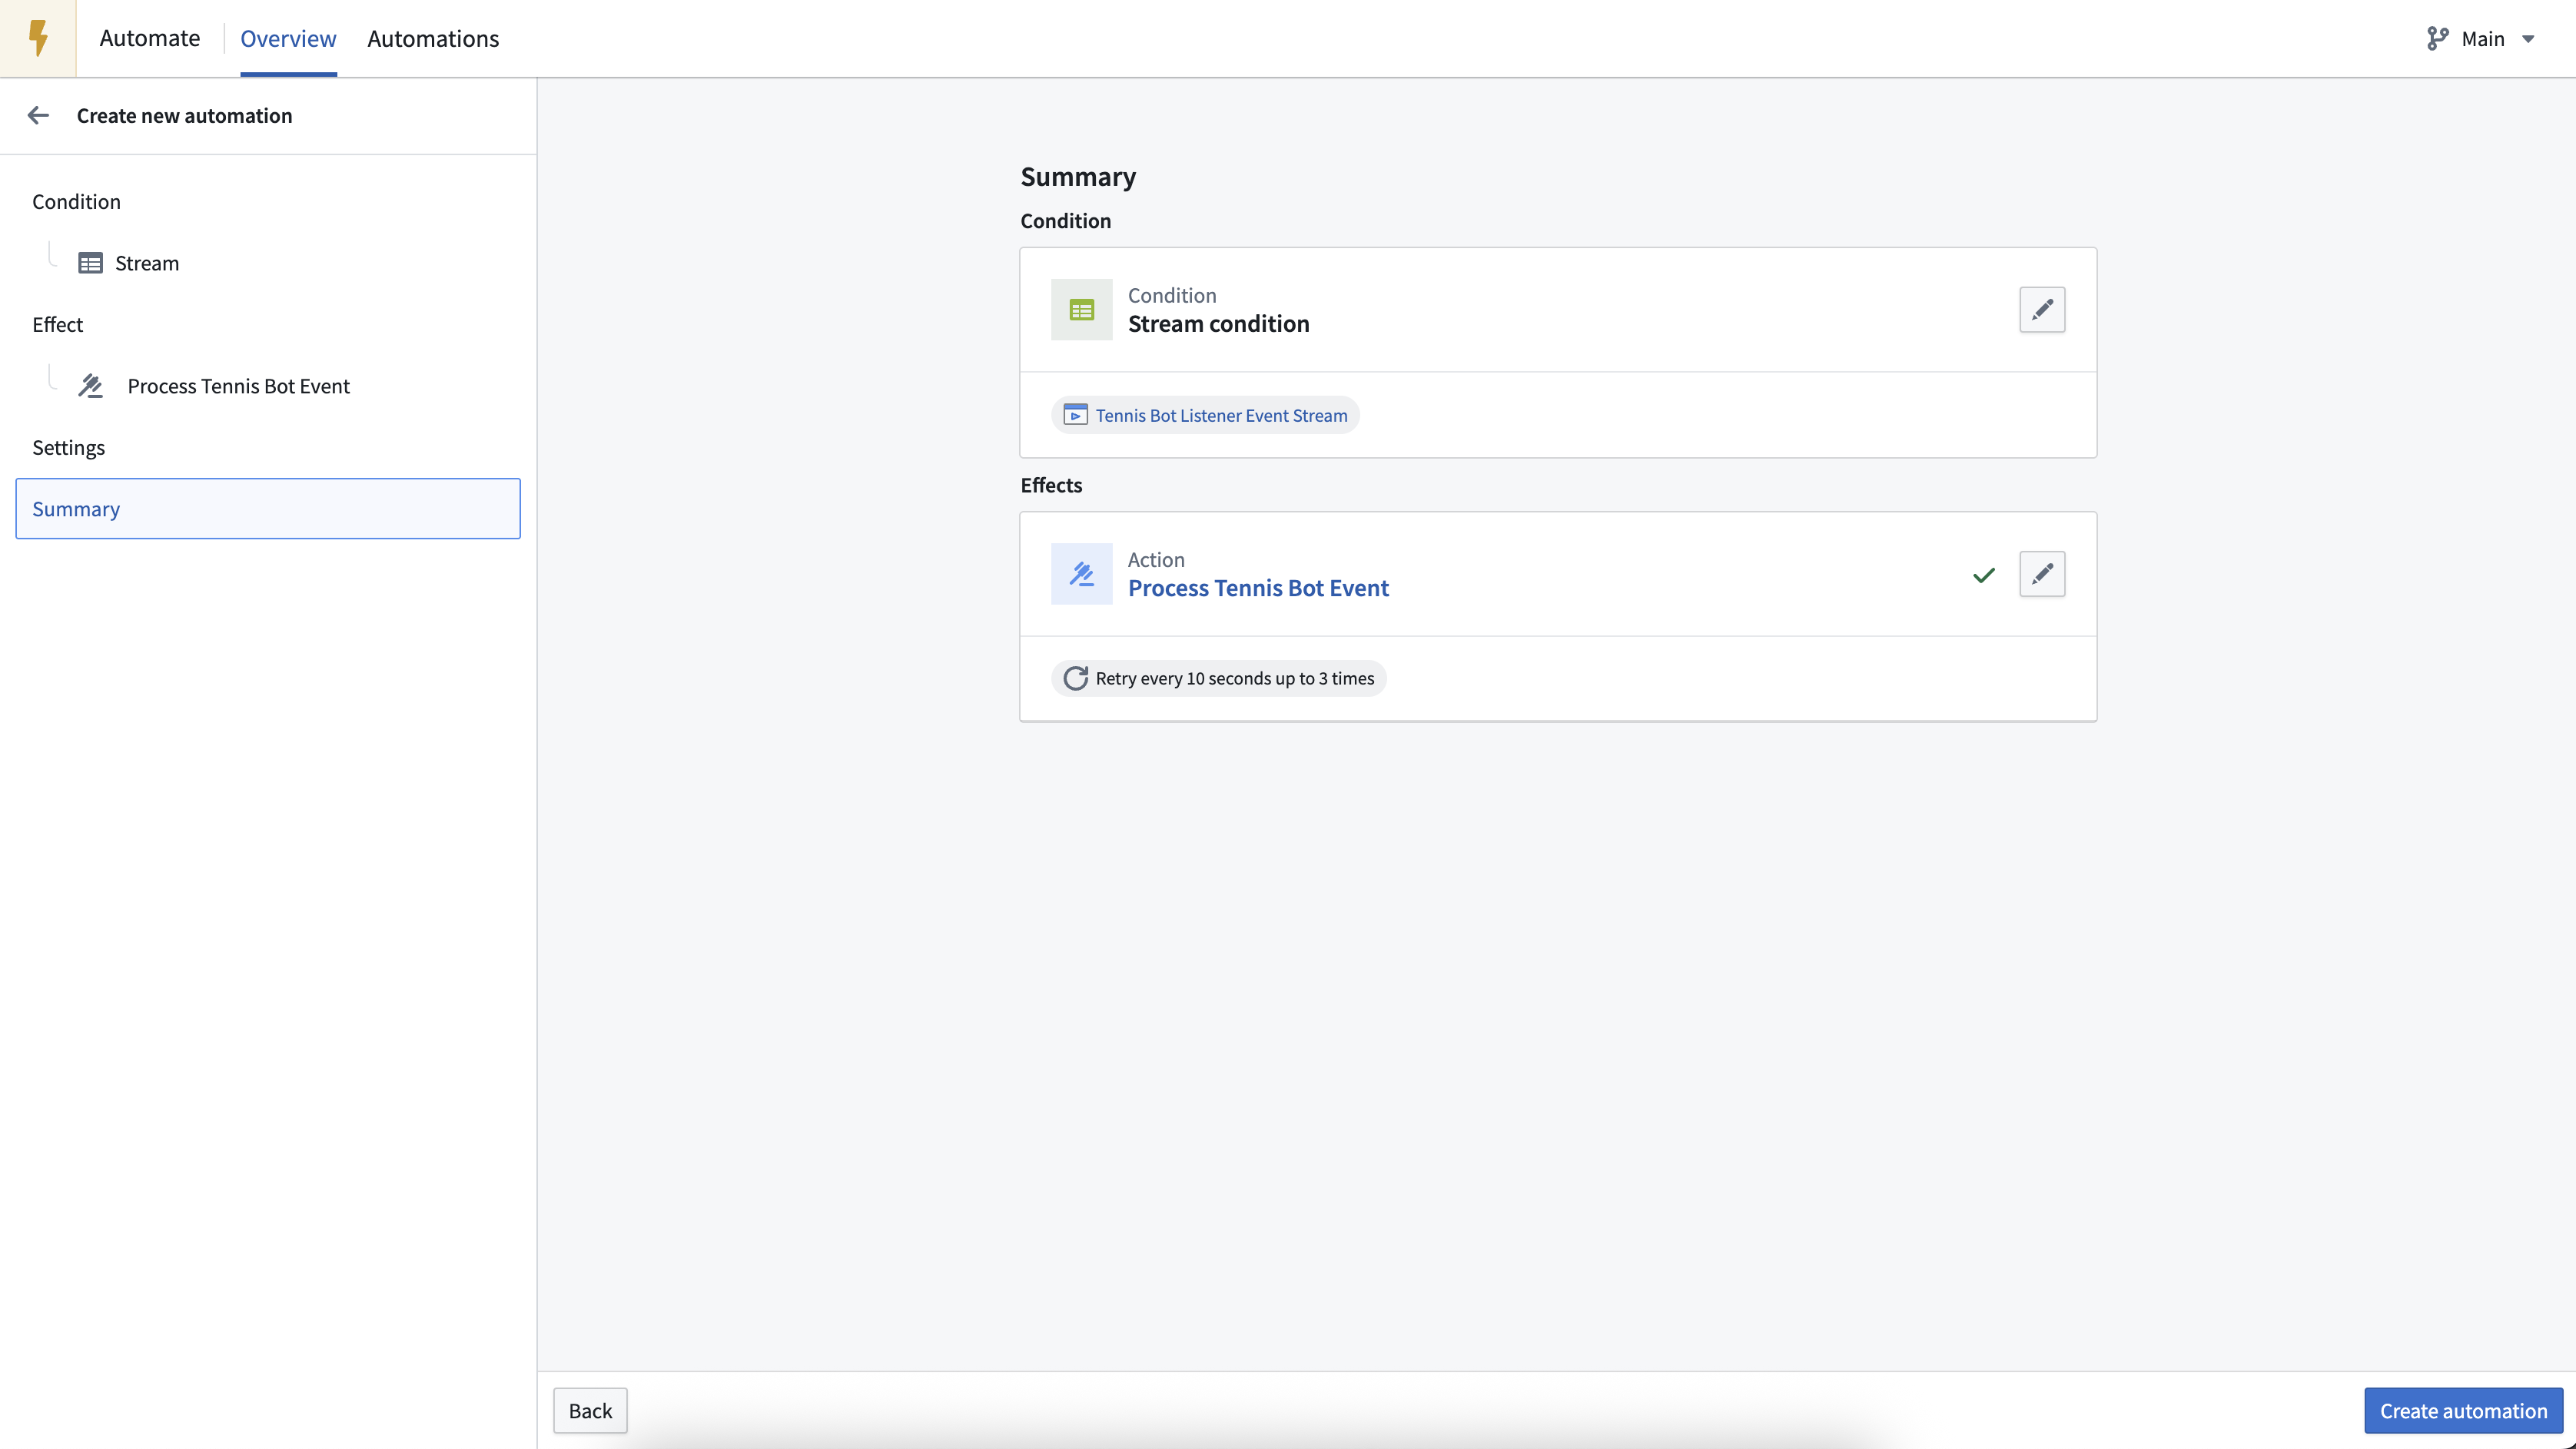
Step 7: Set up automation to execute function-backed actions
Next, create a new automation to execute the function-backed action for each new listener event. The new automation should have a "Stream" condition (it will execute when new rows are added to the stream). The input to this automation should be the output stream from the created Slack listener.
Step 8: Test the bot
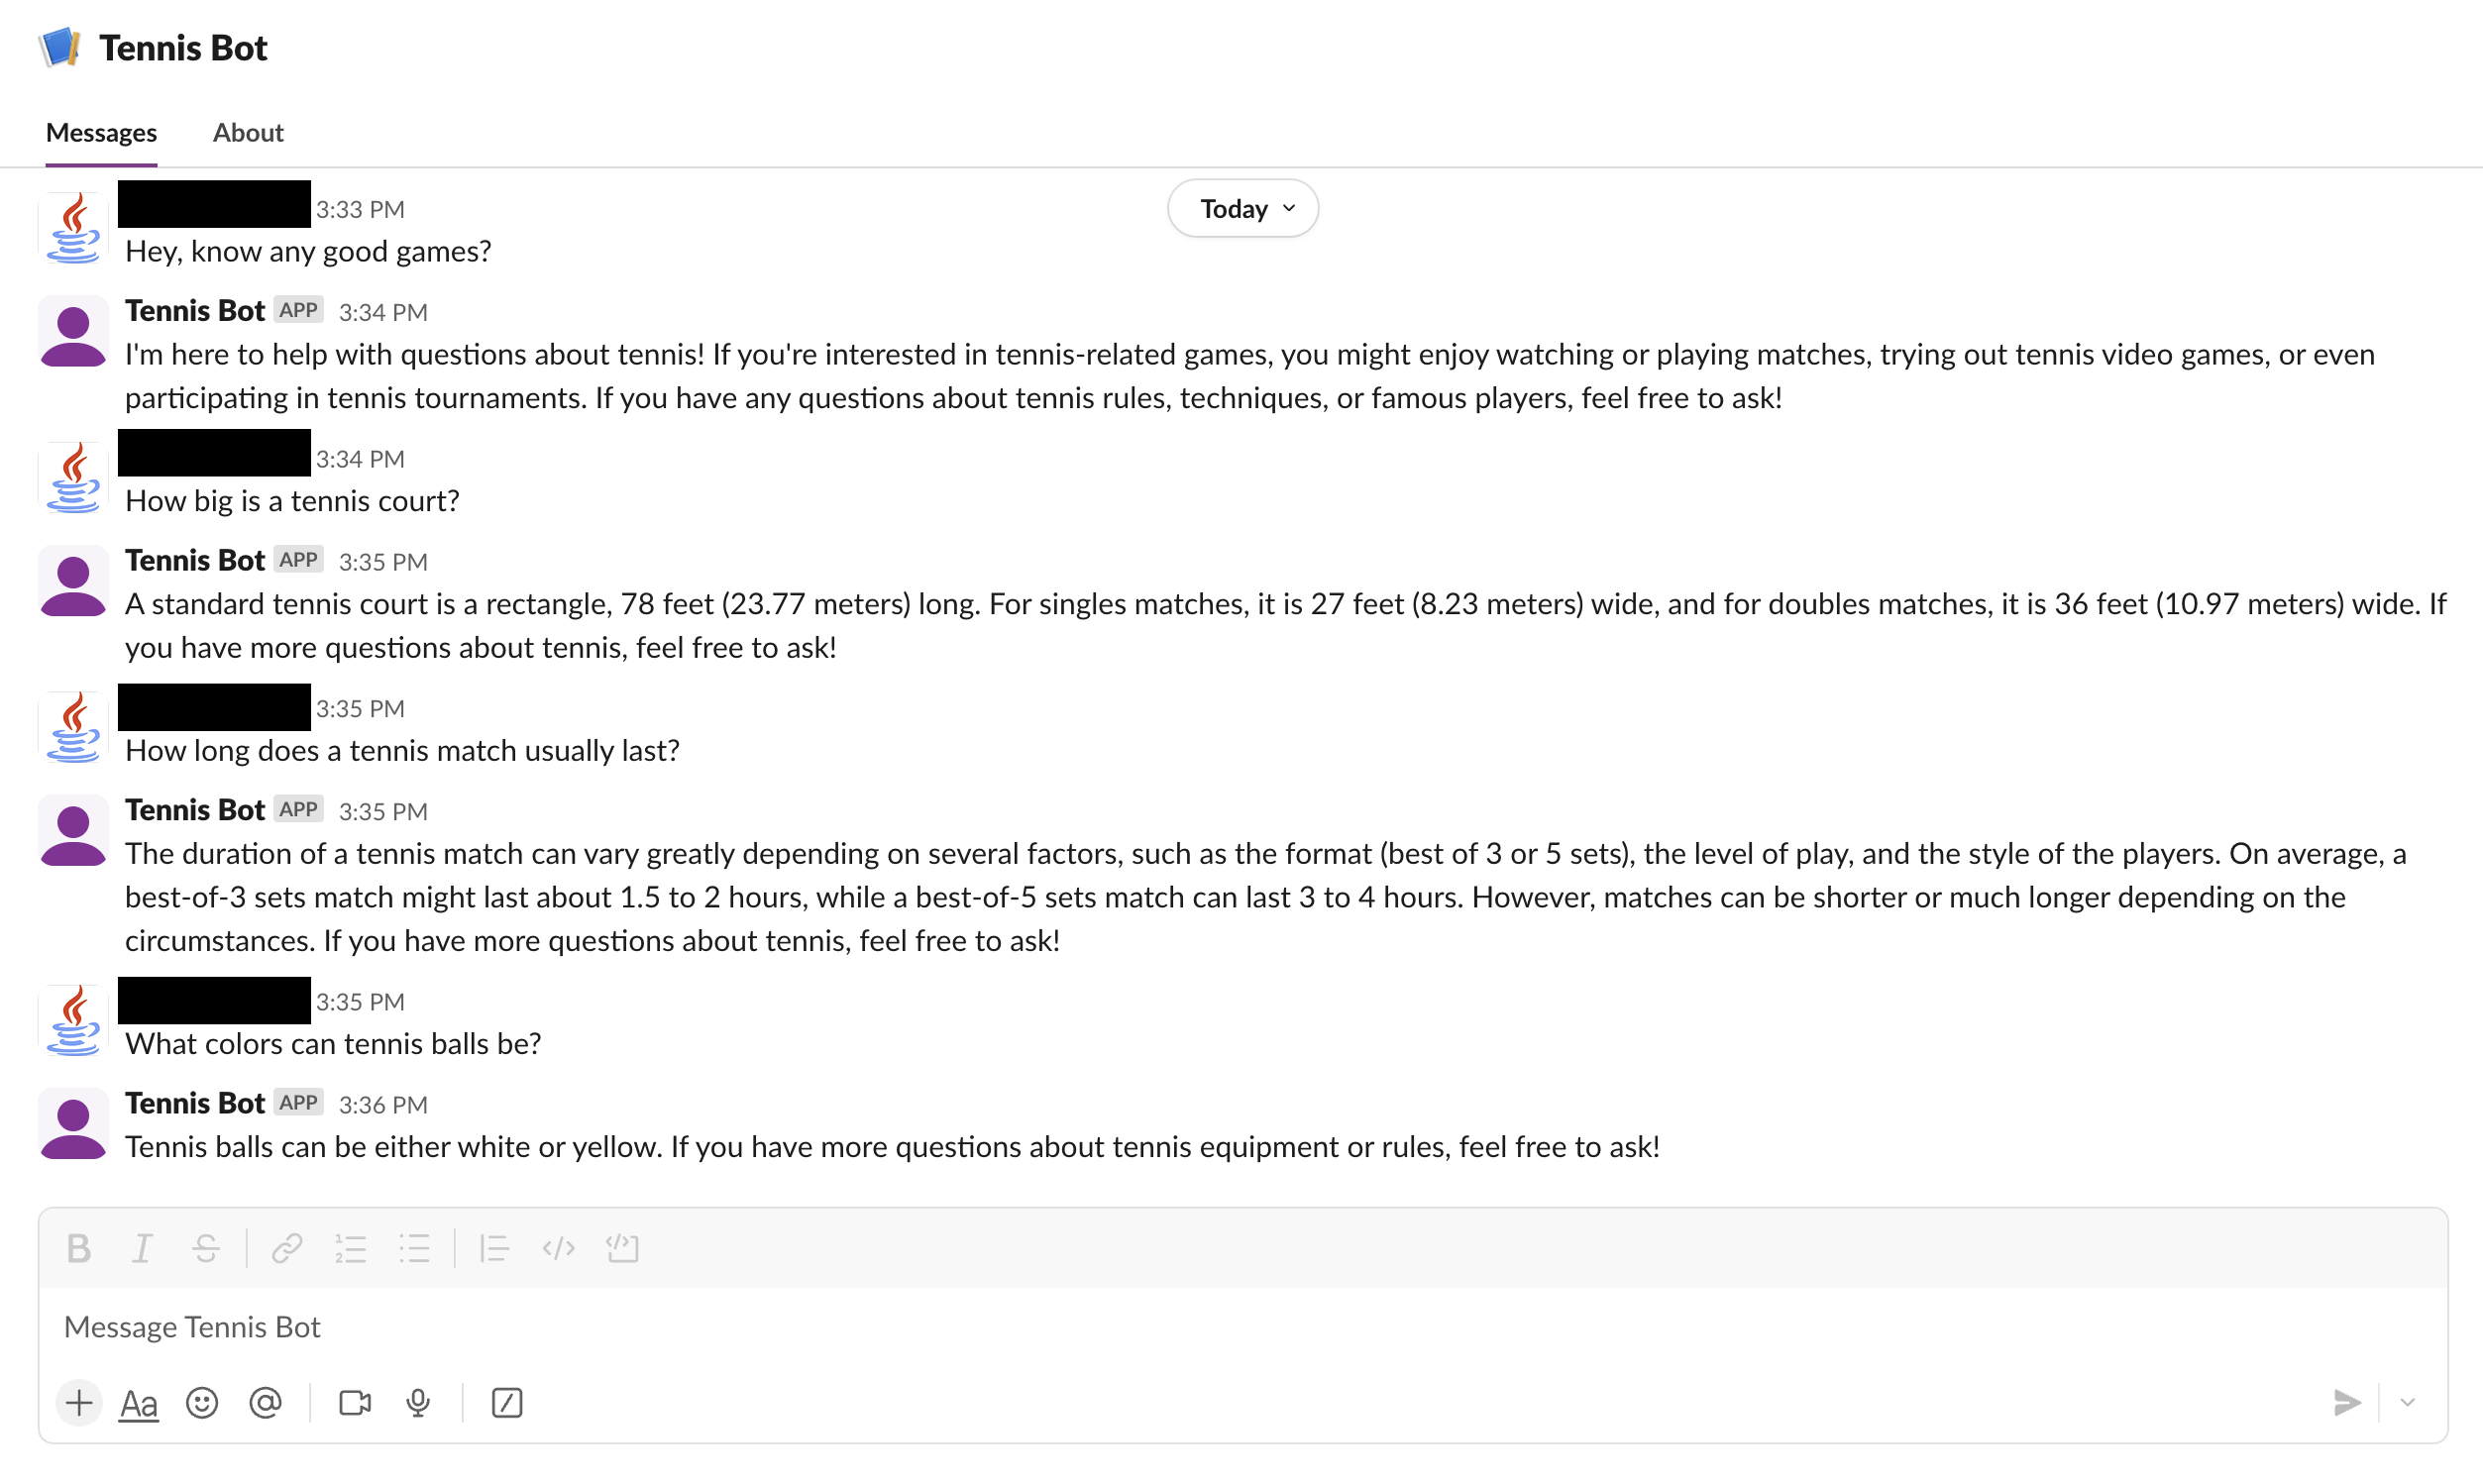
At this point, the Tennis Bot is ready for testing. Send a Slack direct message to your bot and wait for its response. The bot should respond with information about tennis.
Optional extensions and improvements
You have now created a basic AI-powered chatbot; from here, you can continue to add functionality to your bot. Example extensions and improvements include:
- Send an initial confirmation message when the event is first received (such as "Working on it!"), and then update the content of that message to the LLM response when the response is available. This reduces the time taken for the user to receive the first response.
- Maintain user conversation history in the chatbot conversation session; this enables conversations with past messages as context. You can use the
sessionRidparameter of the chatbot function to enable conversational context. - For example, you can store the session RID from the chatbot function output (created on the first message in a thread) to an ontology object type, then look up the associated session RID for new messages on this object type to use in the chatbot function input.
- To reduce processing latency, you can move the event processing implementation from an automation that calls an action to a streaming pipeline that calls an external UDF. For more information on using streaming pipelines to process events, see the documentation on event processing options.
All screenshots of Slack® are provided for reference purposes only and are the property of Slack Technologies, LLC.
中文翻译
使用监听器创建AI驱动的Slack机器人
您可以使用Foundry中的事件监听器(Event Listener)创建AI驱动的机器人,使其能够与Foundry外部的聊天工作区进行交互。本指南以Slack为例进行说明,但您可以使用类似的方法连接其他平台,例如Microsoft Teams(通过Microsoft Bot Framework)。
概述
在本教程中,您将构建"网球机器人(Tennis Bot)",这是一个帮助Slack用户了解网球知识的AI助手。
该Slack机器人示例包含以下组件:
- 一个Slack监听器(Slack Listener),用于接收聊天事件。
- 一个Slack数据源(Slack Source),用于将响应写回Slack API。
- 一个AIP聊天机器人(AIP Chatbot),作为机器人的"大脑"。
- 一个TypeScript函数(TypeScript Function),用于执行事件处理。
- 一个自动化(Automation),用于执行新事件。
步骤1:设置Slack监听器
第一步是创建您的Slack应用,将其安装到您的Slack工作区,并使用监听器开始接收聊天事件。请按照Slack监听器设置指南创建Slack监听器。
由于用户将直接向网球机器人发送消息提问,您需要在Slack应用中添加相关的权限范围(Scopes)、事件(Events)和配置。有关配置Slack应用的更多信息,请参阅官方Slack文档 ↗。
为您的应用添加im:history和chat:write权限范围。
此外,请将您的应用订阅到message.im事件。
您还需要允许用户直接向机器人发送消息。此设置可在Slack应用设置的功能 > 应用主页(Features > App Home)中找到。
配置监听器后,您可以在监听器设置向导的测试(Test)选项卡中验证监听器是否正确配置。
步骤2:设置Slack数据源
接下来,您需要创建一个新的Slack数据源,并配置凭据以写回您的聊天平台。
将Slack应用安装到工作区后,您可以在已安装应用设置(Installed App Settings)中找到用于配置数据源的Bearer令牌。
您需要通过导航到连接设置(Connection settings)来启用数据源的导出(Exports)和代码仓库导入(Code Repository Imports)。
此外,您必须为数据源配置一个API名称(API Name),以便在代码中引用该数据源。API名称配置可在连接设置 > 代码导入配置(Connection Settings > Code import configuration)中找到。
步骤3:设置AIP聊天机器人
在此步骤中,您将在AIP聊天机器人工作室(AIP Chatbot Studio)中创建一个新的聊天机器人(原Agent Studio)。您需要为聊天机器人配置指令和检索上下文。
指定聊天机器人指令
为了让聊天机器人学会如何作为网球信息机器人进行回复,您可以提供一些特定任务的指令。示例提示如下:
你是一个回答网球相关问题的助手。

如果查询与网球无关,你应该礼貌地回复,并说明你的目的仅在于回答网球相关问题,同时建议用户可能感兴趣的一些网球相关话题。

保持回复简洁友好。
提供检索上下文
为了让聊天机器人获得网球相关的信息来源,您可以提供一份包含网球规则的PDF文件作为文档上下文(Document Context);聊天机器人将能够利用此上下文来回答用户的问题。
确保禁用引用(Citations),以避免聊天机器人在回复中包含XML引用;这将防止聊天机器人在Slack回复中包含指向文档的链接。
您还可以测试聊天机器人,确保其以适当的方式回复。使用聊天机器人工作室(Chatbot Studio)进行临时测试,或使用AIP评估(AIP Evals)针对完整的评估套件进行测试。
当您对聊天机器人的表现满意后,将聊天机器人发布为函数,以便在事件处理工作流中使用该聊天机器人。
步骤4:将数据源和聊天机器人函数导入代码仓库
设置好聊天机器人后,您需要让聊天机器人能够与Slack交互。首先,创建一个新的代码仓库用于编写TypeScript函数。创建完成后,将您创建的数据源和已发布的聊天机器人函数都导入到该仓库中。
步骤5:设置监听器事件负载处理
为了回复消息,机器人需要能够处理传入的监听器事件负载。创建一个TypeScript函数来实现监听器事件负载处理。
import { OntologyEditFunction } from "@foundry/functions-api";
import { Queries } from "@foundry/ontology-api";
import { ExternalSystems } from "@foundry/functions-api";
import { TennisBotSlackSource } from "@foundry/external-systems/sources";

export class MyFunctions {
    @ExternalSystems({ sources: [TennisBotSlackSource] })
    @OntologyEditFunction()
    public async processTennisBotEvent(decodedEventPayload: string): Promise<void> {
        const message = (JSON.parse(decodedEventPayload) as any).event;

        // 仅处理非机器人消息(不重复处理我们作为机器人发送的消息)
        if (message == null || message.bot_id != null) {
            return;
        }

        const messageText = message.text;
        const channel = message.channel;
        if (messageText == null || channel == null) {
            return;
        }

        // 将消息传递给我们的智能体
        const agentResponse = await Queries.tennisAgentDocumentContextExample({ userInput: messageText });

        // 将智能体的回复转发回Slack
        const postMessageUrl = `${TennisBotSlackSource.getHttpsConnection().url}/api/chat.postMessage`;
        const response = await TennisBotSlackSource.fetch(postMessageUrl, {
            method: "POST",
            headers: {
                ["Authorization"]: `Bearer ${TennisBotSlackSource.getSecret("SLACK_BEARER_TOKEN_AUTH")}`,
                ["Content-Type"]: "application/json"
            },
            body: JSON.stringify({
                channel: channel,
                text: agentResponse.markdownResponse,
            })
        })
    }
}
有关在TypeScript函数中使用数据源的更多信息,请参阅相关文档。
提交并标记一个版本以发布此函数。
步骤6:设置函数支持的操作
导航到本体管理器(Ontology Manager),使用您的事件处理函数创建一个函数支持的操作(Function-backed Action)。此操作将在每个传入的Slack消息事件时被触发。
步骤7:设置自动化以执行函数支持的操作
接下来,创建一个新的自动化,为每个新的监听器事件执行函数支持的操作。新的自动化应具有"流(Stream)"条件(当新行添加到流中时执行)。此自动化的输入应为已创建的Slack监听器的输出流。
步骤8:测试机器人
至此,网球机器人已准备好进行测试。向您的机器人发送一条Slack直接消息,并等待其回复。机器人应回复有关网球的信息。
可选扩展与改进
现在您已经创建了一个基本的AI驱动聊天机器人;在此基础上,您可以继续为机器人添加功能。示例扩展和改进包括:
- 在首次接收到事件时发送一条初始确认消息(例如"正在处理中!"),然后在获得LLM响应时更新该消息的内容。这可以减少用户收到首次回复的时间。
- 在聊天机器人对话会话中维护用户对话历史;这使对话能够以上下文中的过往消息为基础。您可以使用聊天机器人函数的
sessionRid参数来启用对话上下文。 - 例如,您可以将聊天机器人函数输出中的会话RID(在线程的第一条消息时创建)存储到一个本体对象类型中,然后在该对象类型上查找新消息关联的会话RID,用于聊天机器人函数输入。
- 为减少处理延迟,您可以将事件处理实现从调用操作的自动化迁移到调用外部UDF的流式管道。有关使用流式管道处理事件的更多信息,请参阅事件处理选项文档。
所有Slack®截图仅供参考,其所有权归Slack Technologies, LLC所有。