Set up a direct connection(设置直接连接)
:::callout{theme="danger"} This documentation is outdated and retained for historical reference only. For updated guidance on connection set up, refer to our documentation on setting up a source. :::
:::callout{theme="warning"} Direct connections depend on Foundry's container infrastructure which is only available in Foundry's managed SaaS platform. As a result, cloud-based direct connections may not be available in your environment. :::
If you are trying to connect to a data source which is accessible over the Internet, such as a REST API, an SFTP server, or an Azure storage account, you can configure a direct connection to avoid needing to set up an agent. Using a direct connection has a number of advantages:
- No need to provision, configure, and manage an agent and its host
- Avoids routing Internet-to-Foundry through your network
- Offers excellent uptime and performance as cloud-based Syncs do not depend on an agent software package or its host
If you are interested in configuring a cloud-based direct connection, follow these steps:
- Configure a network egress policy for your enrollment.
- Provision credentials to connect to your data source.
- Create the Source in Data Connection.
Configure a network policy
:::callout{theme="warning"} You must have the Information security officer role on your Enrollment to configure network egress. If you do not have permissions to configure egress, contact your Palantir representative for help.
The Information security officer role can be found in the Enrollment permissions section of the Control Panel. An administrator needs to have the Enrollment administrator role in order to see this section. :::
To configure a network policy, navigate to Control Panel using the Other workspaces link in the Workspace sidebar. In Control Panel, select Network egress in the sidebar. If you can't see this option, contact your Palantir representative to go through the following steps.
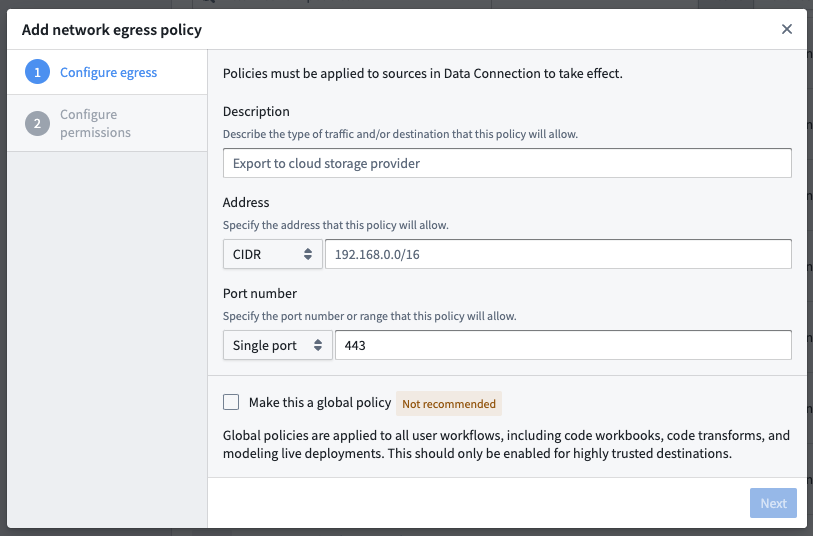
Add a network policy by selecting Add network policy. Add a description and connection details, similar to the details you provided when contacting Palantir:
- If you are connecting via HTTP(S), add the DNS hostname of your data source
- If you need to use a non-HTTP protocol, add a CIDR address and port
Keep the default Optional policy type selection, and select Add network policy.
Provision credentials
In the majority of cases, Foundry will require authorized credentials (such as a username and password) to access Sources. It is best practice to use a service account specifically for Foundry.
Provision a service account for the Source following any internal guidelines and processes that your organization has for establishing service accounts. Note the credentials before proceeding to the next step.
Create the Source in Data Connection
Once the above steps are done, you can proceed with creating the Source in Data Connection:
- After logging in, navigate to Data Connection using the sidebar.
- Select the Sources tab.
- Select New source in the top-right.
- Select the source type corresponding to your data source.
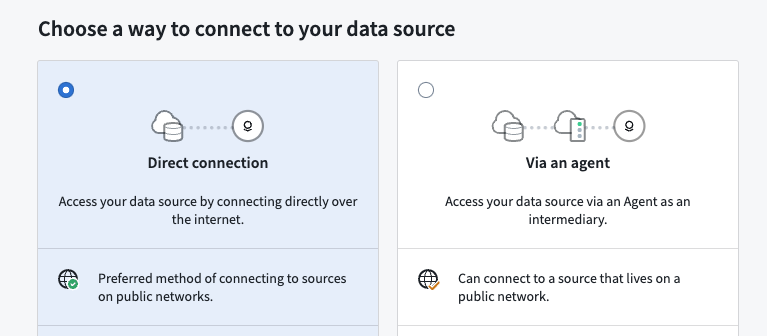
- Select Direct connection, then select Continue in the bottom right.
Save the Source in a Project
Next, name your Source and choose a Project to place it in. We generally recommend creating a new Project for each Source, as this provides the cleanest way to permission datasets derived from this Source. Consult the Source permission best practices for more information. Full guidance for how to structure data pipelines end-to-end in Foundry is available in the recommended Project structure documentation.
Select Create source and continue in the bottom right.
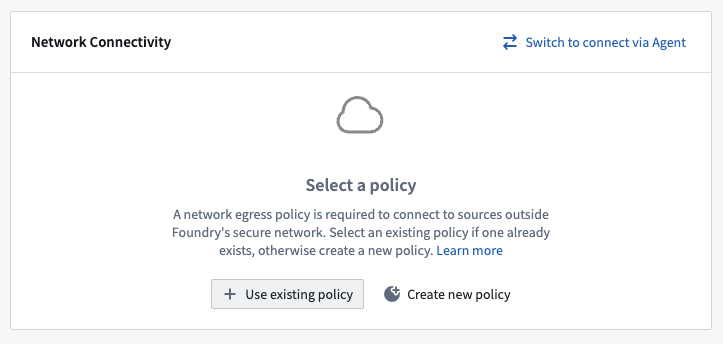
Choose your network policy
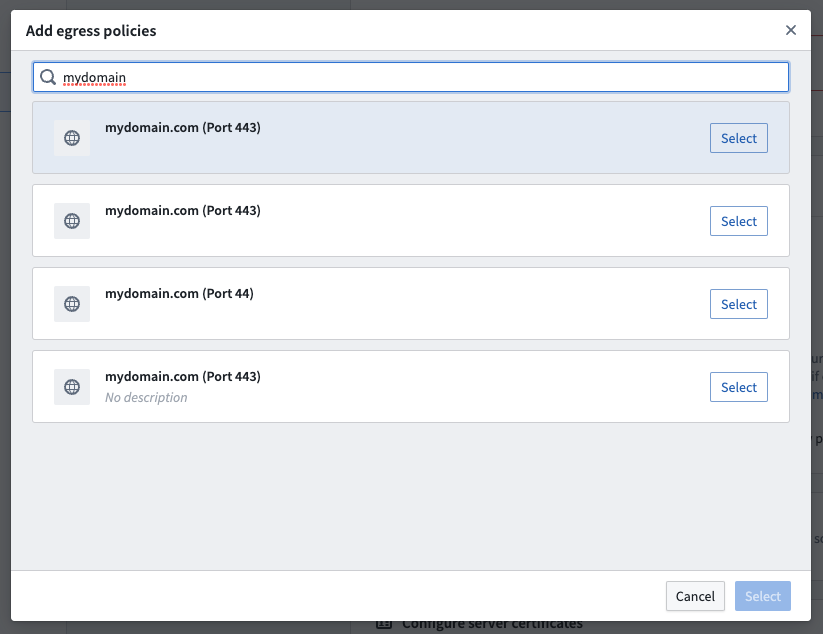
On the next page, select the network policy you configured earlier by clicking Use existing policy and searching for the policy name.
Configure Source and add drivers
Add details about how to connect to your source. These details will depend on the source type you are using and typically consist of basic credentials such as connection URLs, cloud provider regions, and so on.
JDBC sources may require adding and selecting drivers required to connect to your source. Although many drivers ship out-of-the-box with Foundry, you may need to upload and select a driver to proceed.
Add credentials
Add the credentials you provisioned previously to allow the direct connection to connect to your data.
Save and continue
Select Save in the bottom right to complete setting up your direct connection. Once your Source is fully set up, you can proceed to set up a Sync to bring data into Foundry.
中文翻译
设置直接连接
:::callout{theme="danger"} 本文档已过时,仅保留作为历史参考。如需获取关于连接设置的最新指导,请参阅我们关于设置数据源的文档。 :::
:::callout{theme="warning"} 直接连接依赖于Foundry的容器基础设施,该基础设施仅在Foundry托管的SaaS平台中可用。因此,基于云的直接连接可能在您的环境中不可用。 :::
如果您尝试连接可通过互联网访问的数据源(例如REST API、SFTP服务器或Azure存储账户),您可以配置直接连接,从而无需设置代理。使用直接连接具有多项优势:
- 无需配置、管理和维护代理及其主机
- 避免通过您的网络路由互联网到Foundry的流量
- 提供出色的正常运行时间和性能,因为基于云的同步(Sync)不依赖于代理软件包或其主机
如果您有兴趣配置基于云的直接连接,请按照以下步骤操作:
- 配置网络出口策略以用于您的注册(Enrollment)。
- 配置凭证以连接到您的数据源。
- 在数据连接(Data Connection)中创建数据源。
配置网络策略
:::callout{theme="warning"} 您必须在您的注册(Enrollment)中拥有信息安全官(Information security officer)角色才能配置网络出口。如果您没有配置出口的权限,请联系您的Palantir代表寻求帮助。
信息安全官(Information security officer)角色可以在控制面板(Control Panel)的注册权限部分找到。管理员需要拥有注册管理员(Enrollment administrator)角色才能看到此部分。 :::
要配置网络策略,请使用工作区侧边栏中的其他工作区(Other workspaces)链接导航到控制面板(Control Panel)。在控制面板中,选择侧边栏中的网络出口(Network egress)。如果您看不到此选项,请联系您的Palantir代表以完成以下步骤。
通过选择添加网络策略(Add network policy)来添加网络策略。添加描述和连接详细信息,类似于您在联系Palantir时提供的信息:
- 如果您通过HTTP(S)连接,请添加数据源的DNS主机名
- 如果您需要使用非HTTP协议,请添加CIDR地址和端口
保持默认的可选(Optional)策略类型选择,然后选择添加网络策略(Add network policy)。
配置凭证
在大多数情况下,Foundry需要授权凭证(例如用户名和密码)才能访问数据源(Source)。最佳实践是使用专门为Foundry创建的服务账户。
按照您组织为建立服务账户而制定的内部指南和流程,为数据源配置一个服务账户。在进入下一步之前,请记下凭证。
在数据连接中创建数据源
完成上述步骤后,您可以继续在数据连接(Data Connection)中创建数据源:
- 登录后,使用侧边栏导航到数据连接(Data Connection)。
- 选择数据源(Sources)选项卡。
- 选择右上角的新建数据源(New source)。
- 选择与您的数据源对应的数据源类型(Source type)。
- 选择直接连接(Direct connection),然后选择右下角的继续(Continue)。
将数据源保存到项目中
接下来,为您的数据源命名并选择一个项目(Project)来存放它。我们通常建议为每个数据源创建一个新项目,因为这为从此数据源派生的数据集提供了最清晰的权限管理方式。有关更多信息,请参阅数据源权限最佳实践。关于如何在Foundry中端到端构建数据管道的完整指导,请参阅推荐的项目结构文档。
选择右下角的创建数据源并继续(Create source and continue)。
选择您的网络策略
在下一页上,通过点击使用现有策略(Use existing policy)并搜索策略名称,选择您之前配置的网络策略。
配置数据源并添加驱动程序
添加有关如何连接到数据源的详细信息。这些详细信息取决于您使用的数据源类型(Source type),通常包括基本凭证,如连接URL、云提供商区域等。
JDBC数据源(JDBC sources)可能需要添加并选择连接到数据源所需的驱动程序(drivers)。虽然许多驱动程序随Foundry开箱即用,但您可能需要上传并选择一个驱动程序才能继续。
添加凭证
添加您之前配置的凭证,以允许直接连接连接到您的数据。
保存并继续
选择右下角的保存(Save)以完成直接连接的设置。一旦您的数据源完全设置完毕,您可以继续设置同步(Sync)以将数据导入Foundry。