Set up a batch sync(设置批量同步)
The batch sync capability enables syncing data from an external system into a Foundry dataset. Batch sync is the most widely supported capability and is available on almost all connectors. Batch syncs allow syncing tabular data with a schema as well as raw files without a schema.
Creating a batch sync will also create a new Foundry dataset where synced data will be written. Once the sync is configured, you can either manually run it or set up a schedule to trigger the build that will read data from the external system and write it to the output dataset.
Follow the steps below to set up a batch sync. This setup guide assumes you have already successfully configured a source connection that supports the batch sync capability.
Create a new batch sync
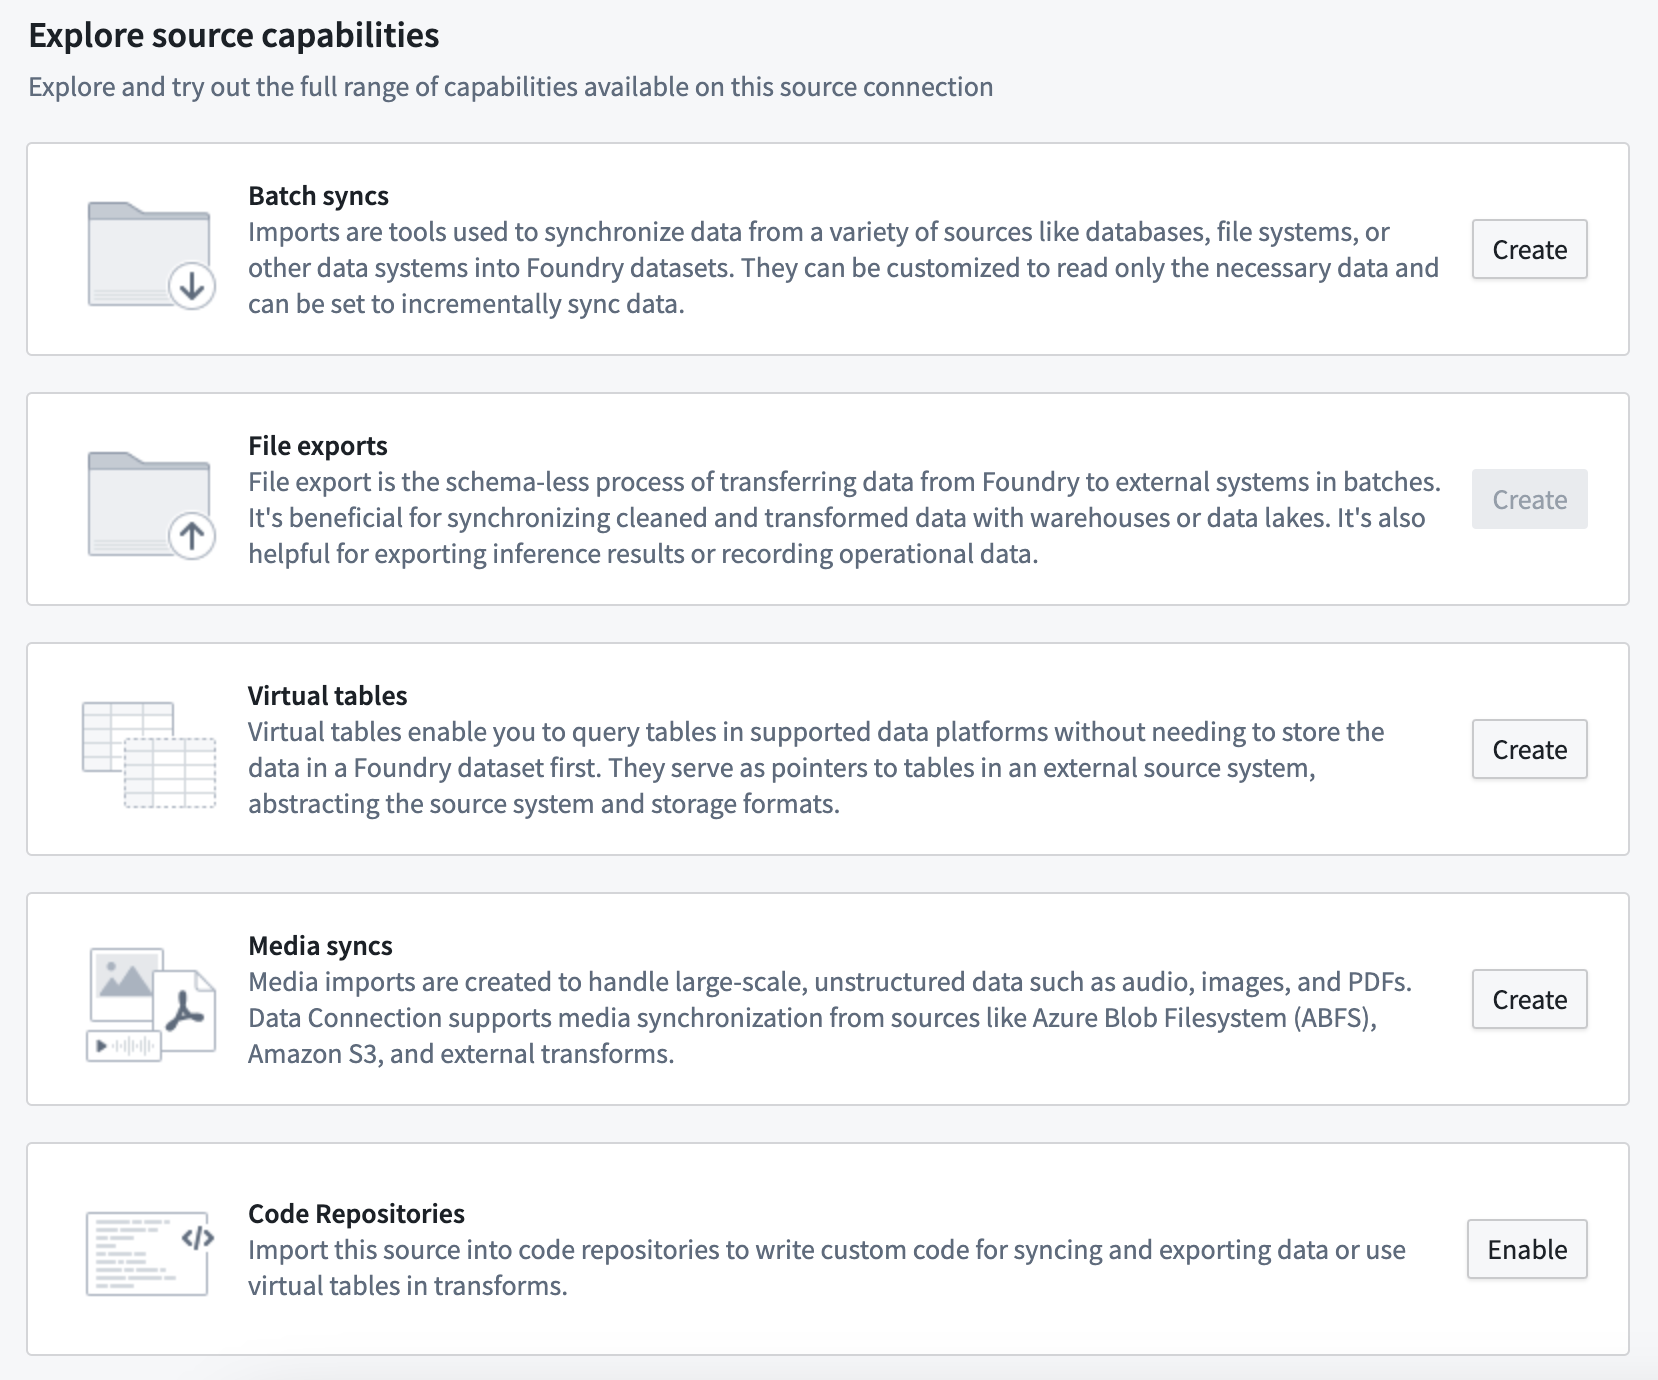
First, navigate to your source connection in the Data Connection application, then select New batch sync from the overview page. If this is a newly configured source, you should see the available capabilities as shown below, and select Create next to the batch sync option.
If your connector supports source exploration, you can also select Explore and create syncs to explore your data source and begin creating syncs directly from the exploration view. Refer to the source exploration documentation for details.
Specify output location
The output location defines where the dataset of synced data will be created and will determine who has permission to access the resulting data, based on Project-level permissions. A default output folder may be specified for the source, which can be overridden for each sync if desired.
The recommended best practice when creating a sync dataset is to save it alongside the connector. This enables the pattern of uniformly permissioning all data from a given connector, which is helpful when creating data pipelines. Learn more about the recommended Project structure for data pipelines.
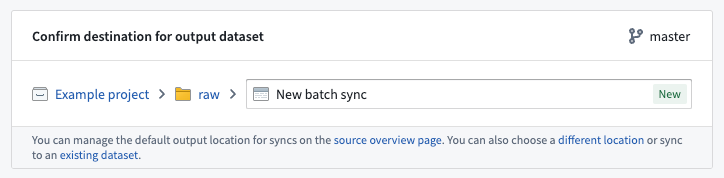
:::callout{theme="neutral"} Syncing to an existing dataset is supported but not recommended, since syncs may overwrite any data already in the selected dataset. :::
Configure batch sync
On the same page as the destination, you will see various settings for configuring your batch sync.
Depending on the source, different options may be available. The two most common types of batch syncs are:
- File batch syncs, where files are synced to a dataset without a schema.
- Table batch syncs, where a table with a schema is synced.
Most systems support either file or table batch syncs, but some systems may support both.
File batch sync example
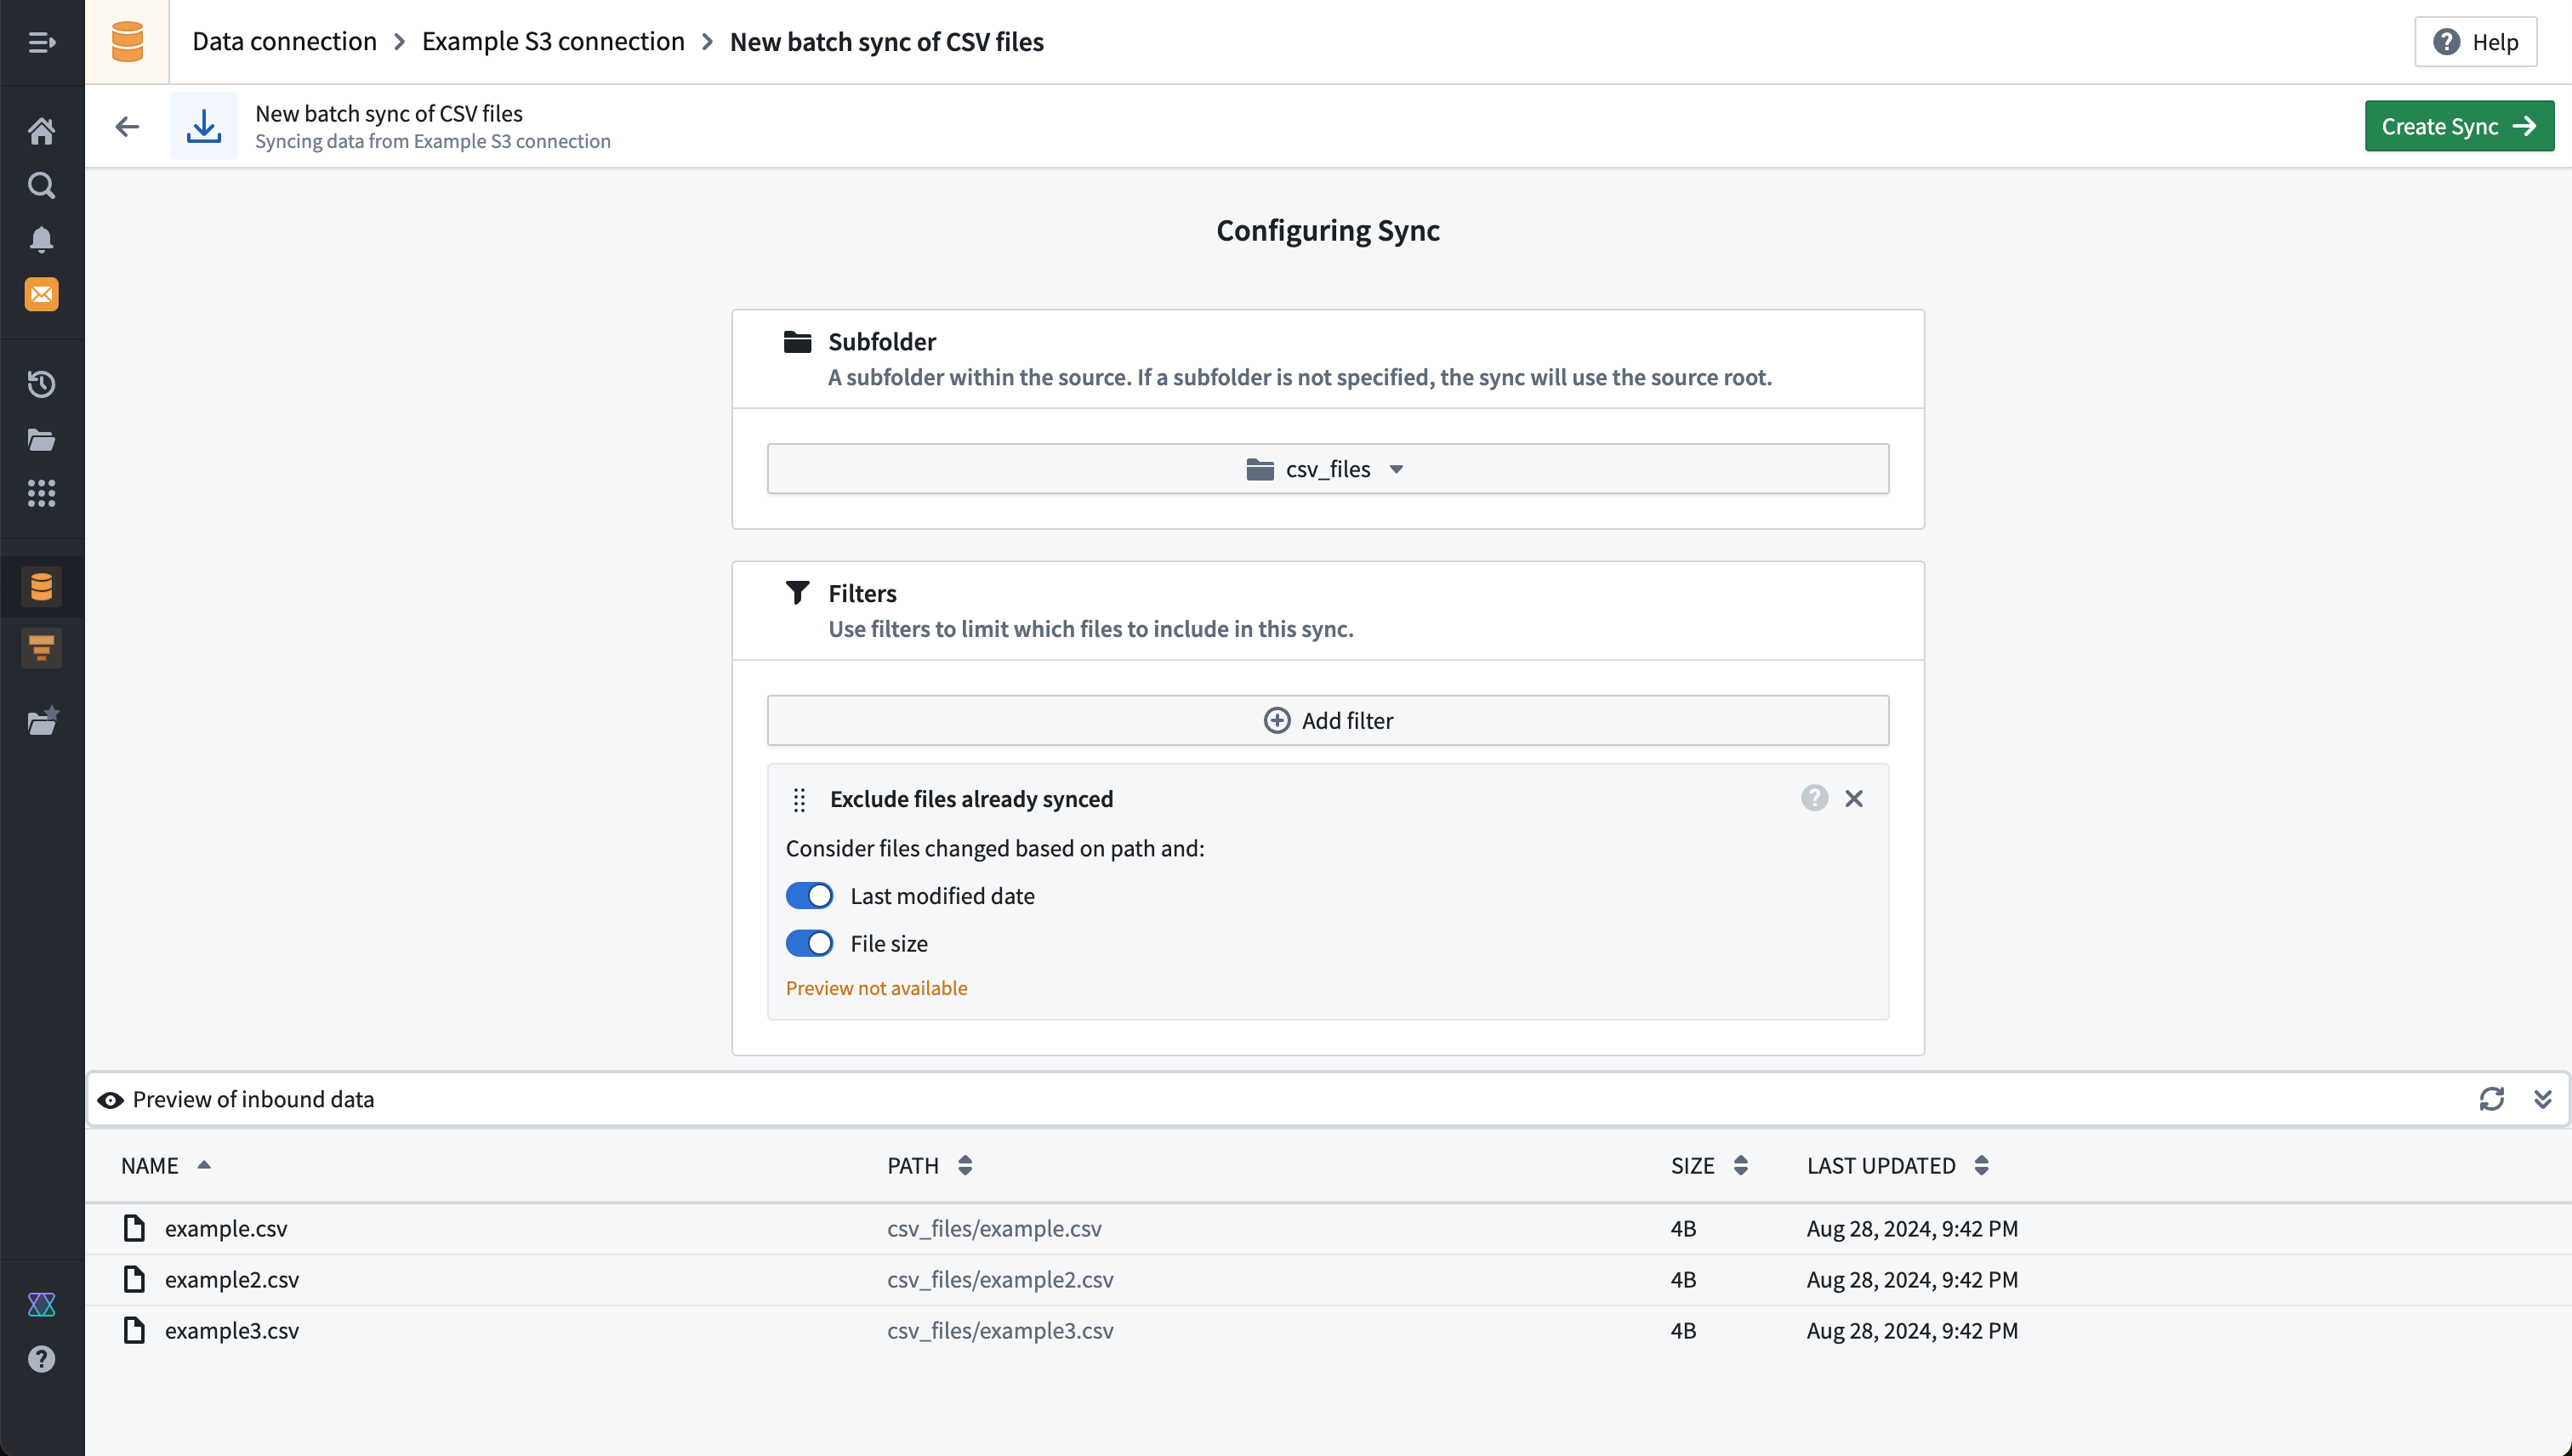
The below example shows the configuration for a file batch sync from S3 that does a SNAPSHOT update on each build. You may optionally specify a subdirectory and filters to narrow down the set of files to be synced to the output dataset. Our example does not specify a subdirectory or filters, meaning all files found under the root directory that was chosen when setting up the source connection will be synced.
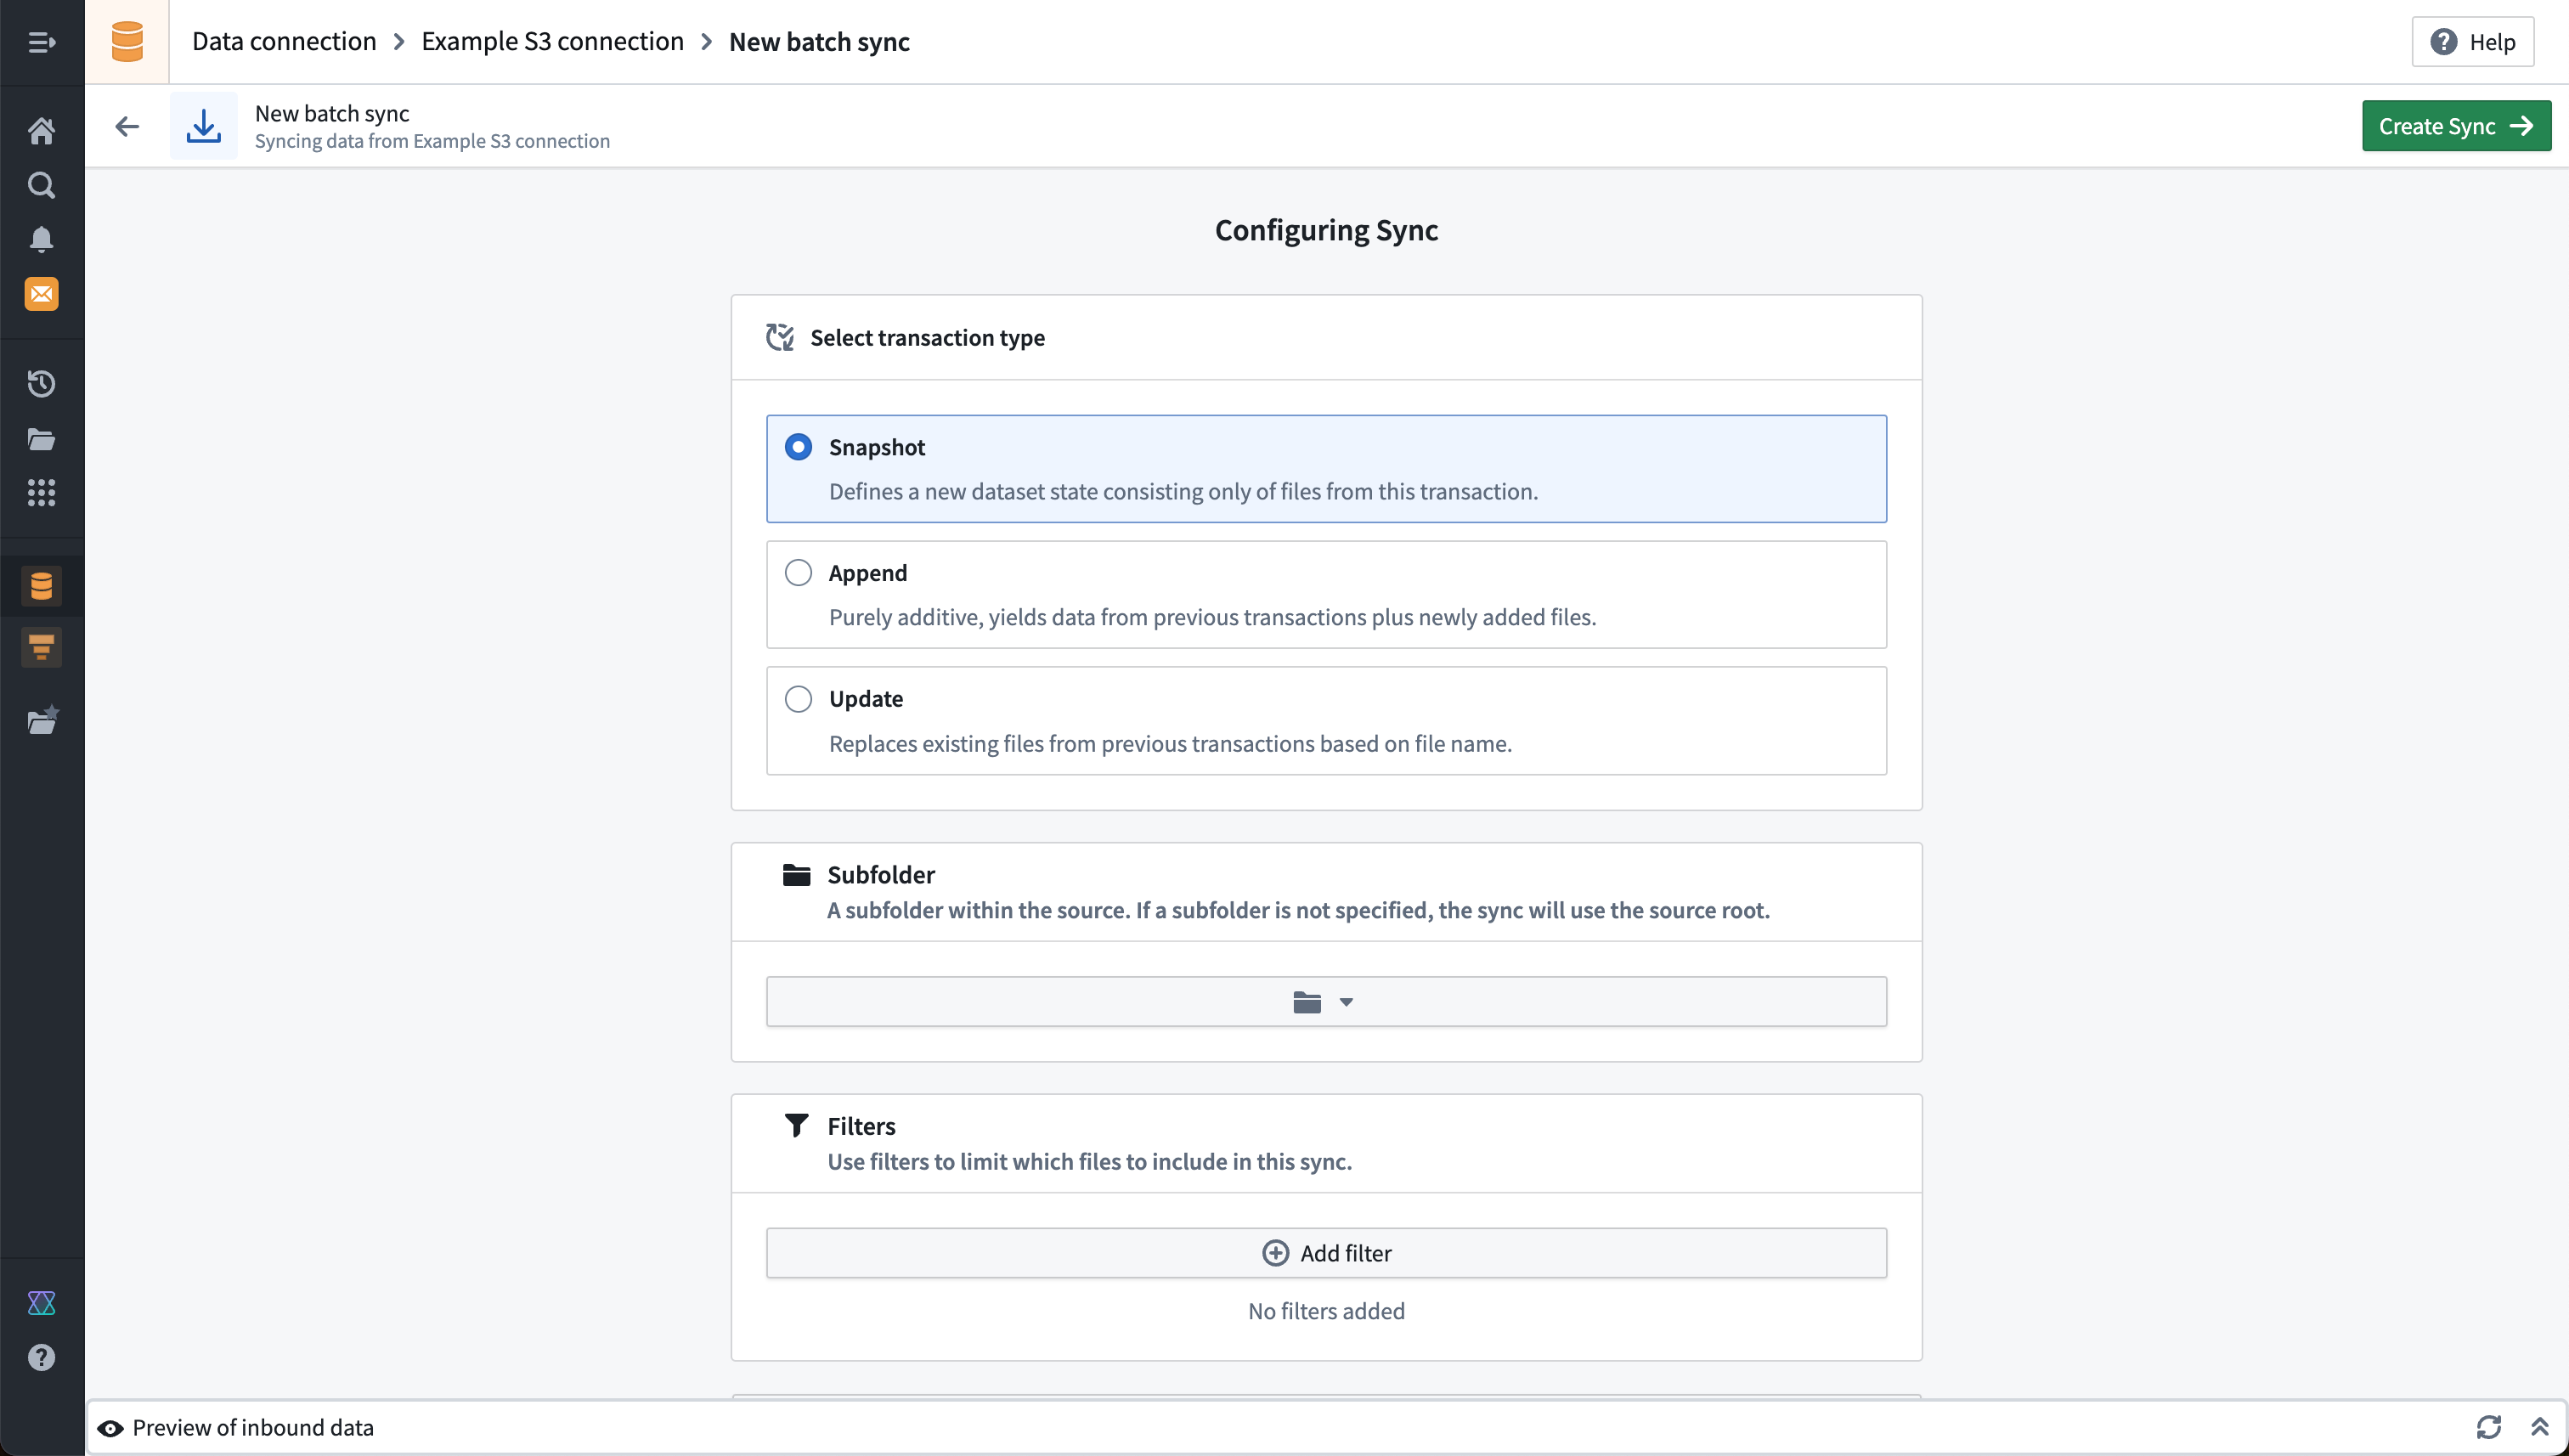
Additional settings for file batch syncs are described in the reference documentation for file batch syncs, including detailed documentation for the available filters.
Table batch sync example
This example shows the configuration for a table batch sync from Microsoft SQL Server. A query defines which data will be pulled from the target system. In this case, the incremental batch sync setting is also enabled, which allows data to be incrementally updated based on a monotonically increasing column.
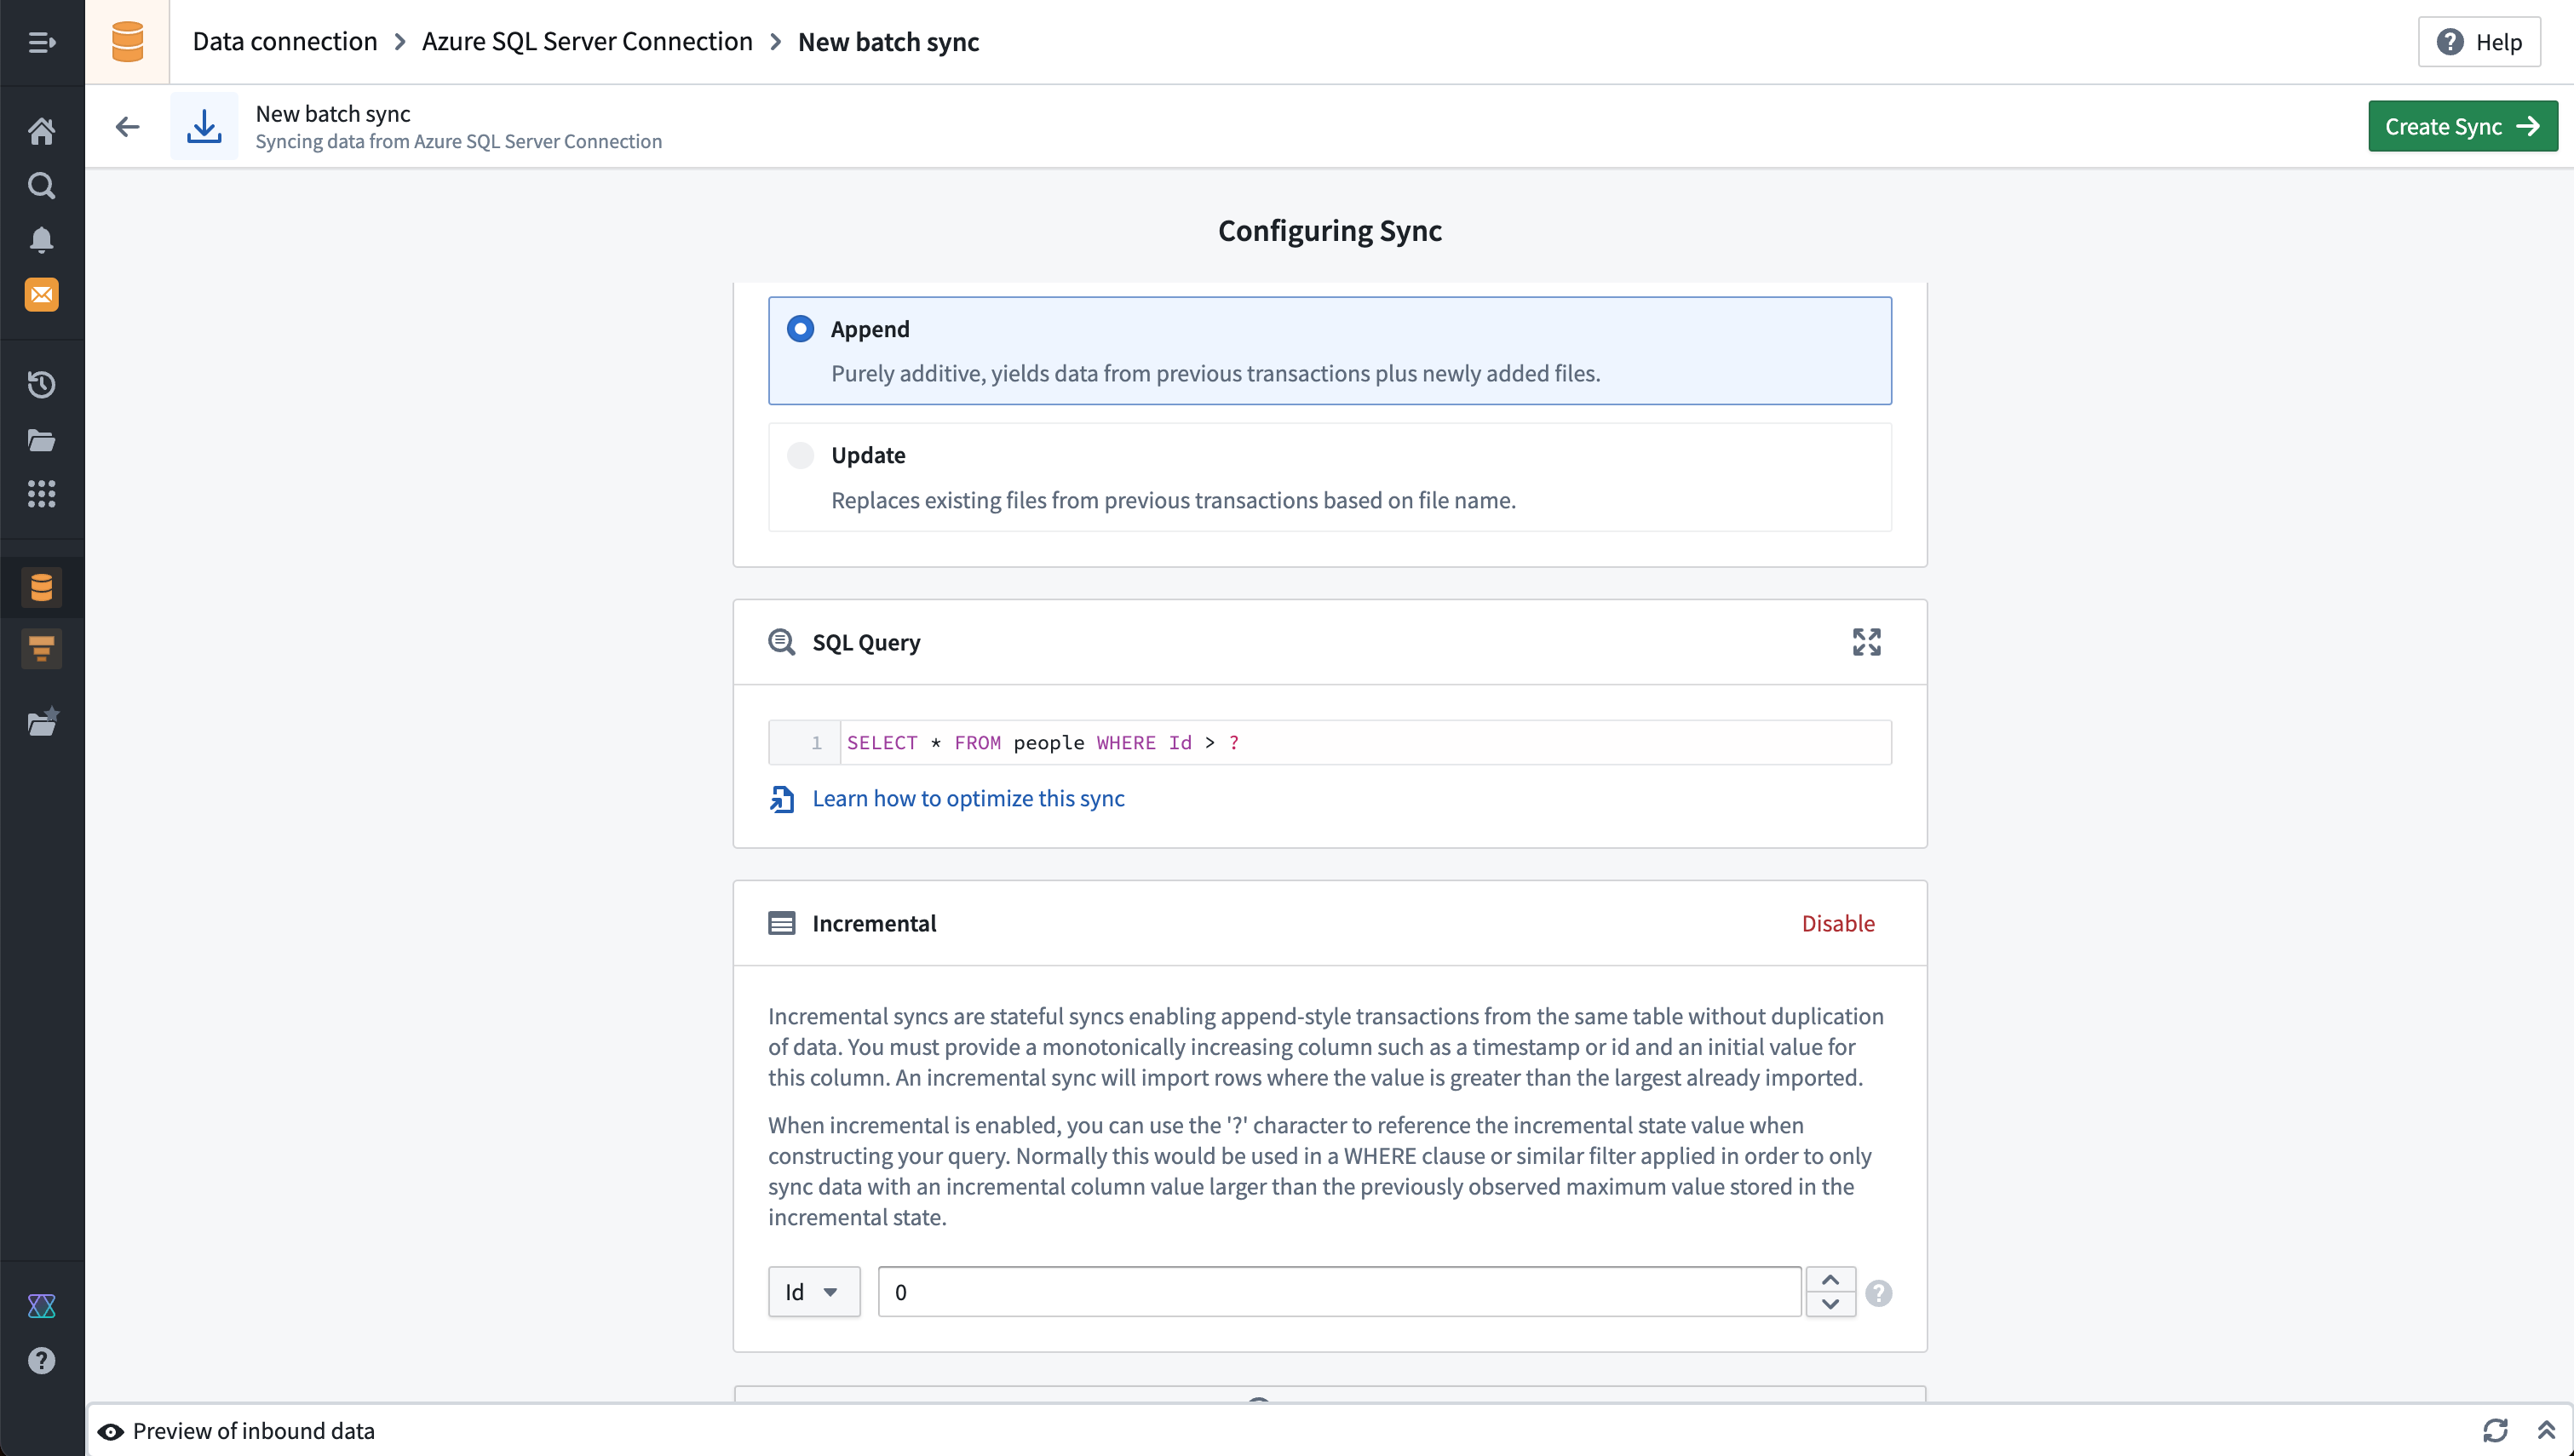
:::callout{theme="neutral"}
Although you cannot visualize SQL stored procedures on the Explore source tab, you can run a SQL stored procedure by running the EXEC command followed by the corresponding procedure in the SQL Query field.
:::
Additional options
A number of other options are available for most batch syncs and may vary depending on the connector. Some examples of widely available configuration options for batch syncs are listed below:
- The transaction type determines whether ingested data overwrites previously ingested data (
SNAPSHOT) or whether it is added incrementally (APPEND). Learn more about incremental syncs. - Schedules allow you to configure how often data should be synced using Foundry's build system. We recommend setting up a schedule for your newly created sync. Learn more about scheduling best practices.
- A build policy allows you to restrict when a sync is allowed to run, regardless of the configured schedule.
- Maximum duration allows you to automatically cancel syncs that run over a specified time limit. All syncs running on a Foundry worker will be cancelled automatically if they run longer than approximately 48 hours.
The following options are available for table batch syncs only:
- Timestamp without timezone settings allow you to customize how timestamp data without a timezone is handled when syncing into Foundry. By default, timestamps without timezones are synced as strings, but you may choose to sync as a
timestampwith a manually specified timezone, or as along. - Allow schema changes. This setting allows you to prevent batch syncs from running if there is a schema change in the external system. By default, schema changes are not allowed.
Preview your sync output
Before proceeding, you can run a preview of the data that will be synced based on the settings you have configured. You should use this to verify that your sync is configured as expected.
- For file batch syncs, the preview will show a list of files.
- For table batch syncs, the preview will show the selected table results, limited to the first 20 rows.
Below, we show an example preview for an S3 file batch sync, with a filter to a subfolder called csv_files:
:::callout{theme="neutral"}
The example above shows a warning Preview not available when using the Exclude files already synced filter. This is because this filter is not reflected in the preview results shown and will only be applied once the sync is scheduled or run manually.
:::
Build or schedule your batch sync
After saving your batch sync, you can choose when and how you want to run it.
Run your batch sync manually using the Run button shown on the overview page for the sync:

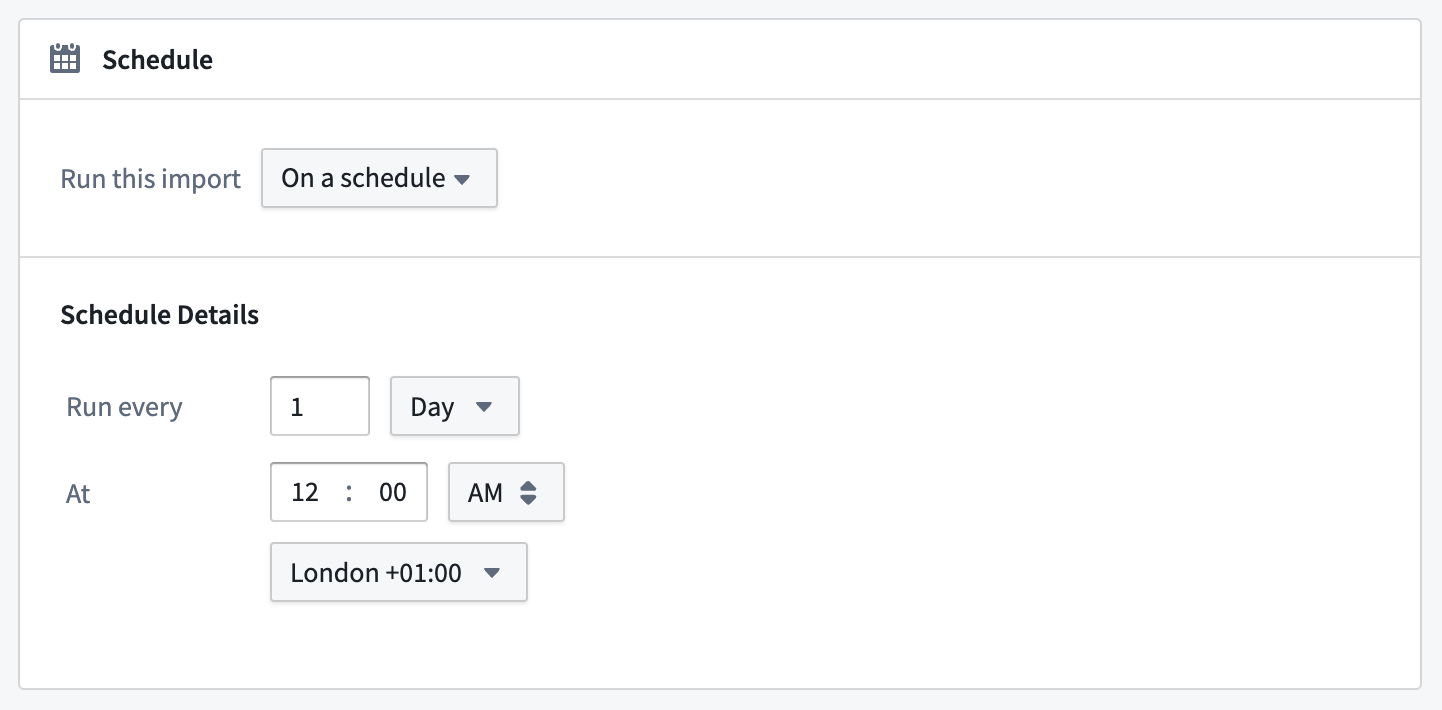
Configure a build schedule to trigger the batch sync to run on a regular schedule:
Use the Data Lineage application to set up a schedule for multiple syncs at the same time.
:::callout{theme="neutral"} Schedules should not be configured from both Data Connection and Data Lineage for the same batch sync. Schedules configured from Data Lineage should always use the Force build option when building Data Connection syncs. :::
Next steps
In this setup guide, you learned how to create a batch sync to bring data from a connector into a Foundry dataset. Here are some additional resources we recommend:
- Learn more about other capabilities including change data capture syncs, exports, and media set syncs.
- Refer to Building pipelines to learn about transforming datasets in Foundry.
- Browse the Source types reference to learn more about the configuration options for each connector type.
中文翻译
设置批量同步
批量同步(batch sync) 功能支持将外部系统的数据同步到 Foundry 数据集(dataset)。批量同步是支持最广泛的功能,几乎所有连接器(connector)都可用。批量同步可以同步带有模式(schema)的表格数据,也可以同步不带模式的原始文件。
创建批量同步时,还会创建一个新的 Foundry 数据集(dataset),用于写入同步数据。配置同步后,您可以手动运行它,或设置调度(schedule)来触发构建(build),该构建将从外部系统读取数据并写入输出数据集。
请按照以下步骤设置批量同步。本设置指南假设您已成功配置了支持批量同步功能的源连接(source connection)。
创建新的批量同步
首先,在 Data Connection 应用中导航到您的源连接,然后从概览页面选择 New batch sync。如果这是新配置的源,您应该会看到如下所示的可用的功能,然后选择批量同步选项旁边的 Create。
如果您的连接器支持源探索(source exploration),您还可以选择 Explore and create syncs 来探索数据源并直接从探索视图开始创建同步。详情请参阅源探索(source exploration)文档。
指定输出位置
输出位置定义了同步数据的数据集将在何处创建,并根据项目级(Project-level)权限决定谁有权访问结果数据。可以为源指定默认输出文件夹,如果需要,可以为每个同步覆盖该设置。
创建同步数据集时,推荐的最佳实践是将其与连接器保存在一起。这样可以实现对来自特定连接器的所有数据进行统一权限管理的模式,这在创建数据管道时非常有用。了解更多关于数据管道的推荐项目结构。
:::callout{theme="neutral"} 支持同步到现有数据集,但不推荐这样做,因为同步可能会覆盖所选数据集中已有的任何数据。 :::
配置批量同步
在目标页面上,您会看到用于配置批量同步的各种设置。
根据源的不同,可用的选项可能有所不同。两种最常见的批量同步类型是:
- 文件批量同步(file batch syncs),将文件同步到没有模式的数据集。
- 表批量同步(table batch syncs),同步带有模式的表。
大多数系统支持文件或表批量同步,但有些系统可能同时支持两者。
文件批量同步示例
以下示例显示了来自 S3 的文件批量同步的配置,该同步在每次构建时执行 SNAPSHOT 更新。您可以选择指定子目录和过滤器,以缩小要同步到输出数据集的文件范围。我们的示例没有指定子目录或过滤器,这意味着在设置源连接时选择的根目录下找到的所有文件都将被同步。
文件批量同步的其他设置请参阅文件批量同步(file batch syncs)的参考文档,其中包括可用过滤器(filters)的详细文档。
表批量同步示例
此示例显示了来自 Microsoft SQL Server 的表批量同步的配置。查询定义了将从目标系统中拉取哪些数据。在此例中,还启用了增量批量同步设置,这允许基于单调递增的列进行增量更新。
:::callout{theme="neutral"}
虽然您无法在 Explore source 选项卡上可视化 SQL 存储过程,但您可以通过在 SQL Query 字段中运行 EXEC 命令后跟相应的过程来运行 SQL 存储过程。
:::
其他选项
大多数批量同步还有许多其他可用选项,具体取决于连接器。以下是一些广泛可用的批量同步配置选项示例:
- 事务类型(transaction type) 决定摄取的数据是覆盖先前摄取的数据(
SNAPSHOT),还是增量添加(APPEND)。了解更多关于增量同步(incremental syncs)的信息。 - 调度(Schedules) 允许您使用 Foundry 的构建系统配置数据同步的频率。我们建议为新创建的同步设置调度。了解更多关于调度最佳实践的信息。
- 构建策略(build policy)允许您限制同步允许运行的时间,无论配置的调度如何。
- 最大持续时间(maximum duration)允许您自动取消运行超过指定时间限制的同步。所有在 Foundry 工作节点上运行的同步如果运行时间超过约 48 小时,将自动取消。
以下选项仅适用于表批量同步:
- 无时区时间戳设置允许您自定义在同步到 Foundry 时如何处理不带时区的时间戳数据。默认情况下,不带时区的时间戳会作为字符串同步,但您可以选择将其同步为带有手动指定时区的
timestamp,或同步为long。 - 允许模式更改(Allow schema changes)。此设置允许您在外部系统发生模式更改时阻止批量同步运行。默认情况下,不允许模式更改。
预览同步输出
在继续之前,您可以基于已配置的设置运行同步数据的预览。您应该使用此功能来验证同步是否按预期配置。
- 对于文件批量同步,预览将显示文件列表。
- 对于表批量同步,预览将显示所选表的结果,限制为前 20 行。
下面,我们展示了一个 S3 文件批量同步的示例预览,其中包含一个指向名为 csv_files 的子文件夹的过滤器:
:::callout{theme="neutral"}
上面的示例在使用 Exclude files already synced 过滤器时显示警告 Preview not available。这是因为此过滤器不会反映在显示的预览结果中,只有在同步被调度或手动运行时才会应用。
:::
构建或调度批量同步
保存批量同步后,您可以选择何时以及如何运行它。
使用同步概览页面上显示的 Run 按钮手动运行批量同步:
配置构建调度以定期触发批量同步运行:
使用数据沿袭应用(Data Lineage application)同时为多个同步设置调度(schedule)。
:::callout{theme="neutral"} 不应同时从 Data Connection 和 Data Lineage 为同一个批量同步配置调度。从 Data Lineage 配置的调度在构建 Data Connection 同步时应始终使用 Force build 选项。 :::
后续步骤
在本设置指南中,您学习了如何创建批量同步以将数据从连接器导入 Foundry 数据集。以下是我们推荐的一些其他资源:
- 了解更多关于其他功能的信息,包括变更数据捕获同步(change data capture syncs)、导出(exports)和媒体集同步(media set syncs)。
- 参考构建管道(Building pipelines)了解如何在 Foundry 中转换数据集。
- 浏览源类型参考(Source types reference)以了解更多关于每种连接器类型的配置选项。