Amazon S3
Connect Foundry to AWS S3 to read and sync data between S3 and Foundry.
Supported capabilities
| Capability | Status |
|---|---|
| Exploration | 🟢 Generally available |
| Bulk import | 🟢 Generally available |
| Incremental | 🟢 Generally available for supported file formats |
| Media sets | 🟢 Generally available |
| Virtual tables | 🟢 Generally available |
| File exports | 🟢 Generally available |
Setup
- Open the Data Connection application and select + New Source in the upper right corner of the screen.
- Select S3 from the available connector types.
- Follow the additional configuration prompts to continue the setup of your connector using the information in the sections below.
Learn more about setting up a connector in Foundry.
Connection details
| Option | Required? | Description |
|---|---|---|
URL |
Yes | URL of the S3 bucket. Data connection supports the s3a protocol. Should contain a trailing slash. See AWS's official documentation ↗ for more details. For example: s3://bucket-name/ |
Endpoint |
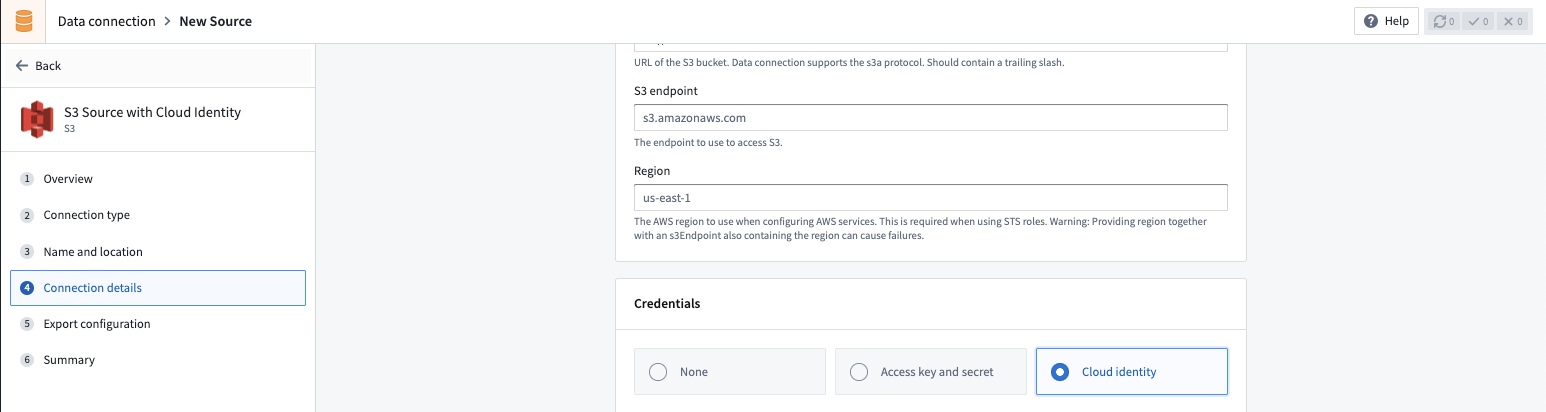
Yes | The endpoint to use to access S3. For example: s3.amazonaws.com or s3.us-east-1.amazonaws.com |
Region |
No | The AWS region to use when configuring AWS services. This is required when using STS roles. Warning: Providing region together with an S3 endpoint also containing the region can cause failures. For example: us-east-1 or eu-central-1 |
Network connectivity |
Yes | Step 1: Foundry egress policy Attach a Foundry egress policy to the bucket to allow Foundry to egress to S3. The Data Connection application suggests appropriate egress policies based on the connection details provided. For example: bucket-name.s3.us-east-1.amazonaws.com (Port 443) Step 2: AWS bucket policy Additionally, you will need to allowlist the relevant Foundry IP and/or bucket details for access from S3. Your Foundry IP details can be found under Network egress in the Control Panel application. See official AWS documentation ↗ for more details on how to configure bucket policies in S3. Note: Setting up access to an S3 bucket hosted in the same region as your Foundry enrollment requires additional configuration. Read more about these requirements in the network egress documentation. |
Client certificates & private key |
No | Client certificates and private keys may or may not be required by your source to secure the connection. |
Server certificates |
No | Server certificates may or may not be required by your source to secure the connection. |
Credentials |
Yes | Option 1: Access key and secret Provide the Access Key ID and Secret for connecting to S3. Credentials can be generated by creating a new IAM User for Foundry in your AWS Account, and granting that IAM User access to the S3 bucket. Option 2: OpenID Connect (OIDC) Follow the displayed source system configuration instructions to set up OIDC. See official AWS documentation ↗ for details on OpenID Connect and our documentation for details on how OIDC works with Foundry. See official AWS documentation ↗ for more details on creating an AWS IAM user. Review our documentation permissions for S3 for details on which AWS permissions Foundry expects the user to have. |
STS role |
No | The S3 connector can optionally assume a Security Token Service (STS) role ↗ when connecting to S3. See STS role configuration for more details. |
Connection timeout |
No | The amount of time to wait (in milliseconds) when initially establishing a connection before giving up and timing out. Default: 50000 |
Socket timeout |
No | The amount of time to wait (in milliseconds) for data to be transferred over an established, open connection before the connection times out and is closed. Default: 50000 |
Max connections |
No | The maximum number of allowed open HTTP connections. Default: 50 |
Max error retries |
No | The maximum number of retry attempts for failed retryable requests (ex: 5xx error responses from services). Default: 3 |
Client KMS key |
No | A KMS key name or alias used to perform client-side data encryption with the AWS SDK. Using this option on an agent in PCloud requires proxy changes. |
Client KMS region |
No | The AWS region to use for the KMS client. Only relevant if a AWS KMS key is provided. |
Match subfolder exactly |
No | Optionally match the path specified under subfolder as an exact subfolder in S3. If set to false, both s3://bucket-name/foo/bar/ and s3://bucket-name/foo/bar_baz/ will be matched with a subfolder setting of foo/bar/. |
Proxy configurations |
Yes - for agent-based connection only | Configure proxy settings for S3. Note: this is required if (a) your Foundry enrollment is hosted in AWS, (b) you are connecting to an S3 bucket hosted in a different AWS region than your Foundry enrollment, and (c) you are connecting via a data connection agent. See S3 proxy configuration for more details. |
Enable path style access |
No | Use Path-style access URLs (for example,https://s3.region-code.amazonaws.com/bucket-name/key-name) instead of Virtual-hosted-style access URLs (for example, https://bucket-name.s3.region-code.amazonaws.com/key-name). See official AWS documentation ↗ for more details. |
Catalog |
No | Configure a catalog for tables stored in this S3 bucket. See Virtual tables for more details. |
Required read and sync permissions for S3
The following AWS permission is required for interactive exploration of the S3 bucket:
{
    "Action": ["s3:ListBucket"],
    "Resource": ["arn:aws:s3:::path/to/bucket"],
    "Effect": "Allow",
}
The following AWS permission is required for batch syncs, virtual tables and media syncs from S3:
{
    "Action": ["s3:GetObject"],
    "Resource": ["arn:aws:s3:::path/to/bucket/*"],
    "Effect": "Allow",
}
See official AWS documentation on Policies and Permissions in Amazon S3 ↗ for more details on how to configure bucket policies in S3.
S3 proxy configuration (agent-based connections)
When connecting to S3 using a data connection agent, you can define proxy settings in two ways:
- Source Config: Define each proxy setting directly in the source configuration, as outlined in the table below.
- Agent's System Properties: As a fallback, you can configure the proxy settings within the agent's system properties. To achieve this, include the appropriate JVM arguments in the advanced configuration settings for the agent (for example,
-Dhttps.proxyHost=example.proxy.com).
| Parameter | Required? | Default | Description |
|---|---|---|---|
host |
Y | HTTP proxy host (no scheme). | |
port |
Y | Port for HTTP proxy. | |
protocol |
N | HTTPS |
The protocol to use. Either HTTPS or HTTP. |
nonProxyHosts |
N | List of host names (or wild card domain names) that should not use the proxy. For example: *.s3-external-1.amazonaws.com|*.example.com. |
|
credentials |
N | Include this block if your proxy requires basic HTTP authentication (prompted by a HTTP 407 response ↗). | |
credentials.username |
N | Plaintext username for the HTTP proxy. | |
credentials.password |
N | Encrypted password for the HTTP proxy. |
STS role configuration
STS role configuration allows you to make use of AWS Security Token Service ↗ to assume a role when reading from S3.
| Parameter | Required? | Default | Description |
|---|---|---|---|
roleArn |
Y | STS role ARN name. | |
roleSessionName |
Y | The session name to use when assuming this role. | |
roleSessionDuration |
N | 3600 seconds | The session duration. |
externalId |
N | An external ID to use when assuming a role. |
Cloud identity configuration
Cloud identity authentication allows Foundry to access resources in your AWS instance. Cloud identities are configured and managed at the enrollment level in Control Panel. Learn how to configure cloud identities.
When using cloud identity authentication, the role ARN will be displayed in the credentials section. After selecting the Cloud identity credential option, you must also configure the following:
- Configure an Identity and Access Management (IAM) role in the target Amazon AWS account.
- Grant the IAM role access to the S3 bucket to which you wish to connect. You can generally do this with a bucket policy ↗.
- In the S3 source configuration details, add the IAM role under the Security Token Service (STS) role ↗ configuration. The cloud identity IAM role in Foundry will attempt to assume the AWS Account IAM role ↗ when accessing S3.
- Configure a corresponding trust policy ↗ to allow the cloud identity IAM role to assume the target AWS account IAM role.
Virtual tables
This section provides additional details around using virtual tables from an S3 source. This section is not applicable when syncing to Foundry datasets.
The table below highlights the virtual table capabilities that are supported for S3.
| Capability | Status |
|---|---|
| Bulk registration | 🔴 Not available |
| Automatic registration | 🔴 Not available |
| Table inputs | 🟢 Generally available: Avro ↗, Delta ↗, Iceberg ↗, Parquet ↗ in Code Repositories, Pipeline Builder |
| Table outputs | 🟢 Generally available: Avro ↗, Delta ↗, Iceberg ↗, Parquet ↗ in Code Repositories, Pipeline Builder |
| Incremental pipelines | 🟢 Generally available for Delta tables: APPEND only (details)🟢 Generally available for Iceberg tables: APPEND only (details)🔴 Not available for Parquet tables |
| Compute pushdown | 🔴 Not available |
Consult the virtual tables documentation for details on the supported Foundry workflows where tables stored in S3 can be used as inputs or outputs.
Source configuration requirements
When registering virtual tables, remember the following source configuration requirements:
- You must use a Foundry worker source. Virtual tables do not support use of agent worker connections.
- Ensure that bi-directional connectivity and allowlisting is established as described under the Network Connectivity section in Connection details.
- If using virtual tables in Code Repositories, refer to the Virtual Tables documentation for details of additional source configuration required.
- If your bucket contains
., you must enable path-style access and set up the appropriate egress policy.
See the Connection Details section above for more details.
Delta
To enable incremental support for pipelines backed by virtual tables, ensure that Change Data Feed ↗ is enabled on the source Delta table. The current and added read modes in Python Transforms are supported. The _change_type, _commit_version and _commit_timestamp columns will be made available in Python Transforms.
Iceberg
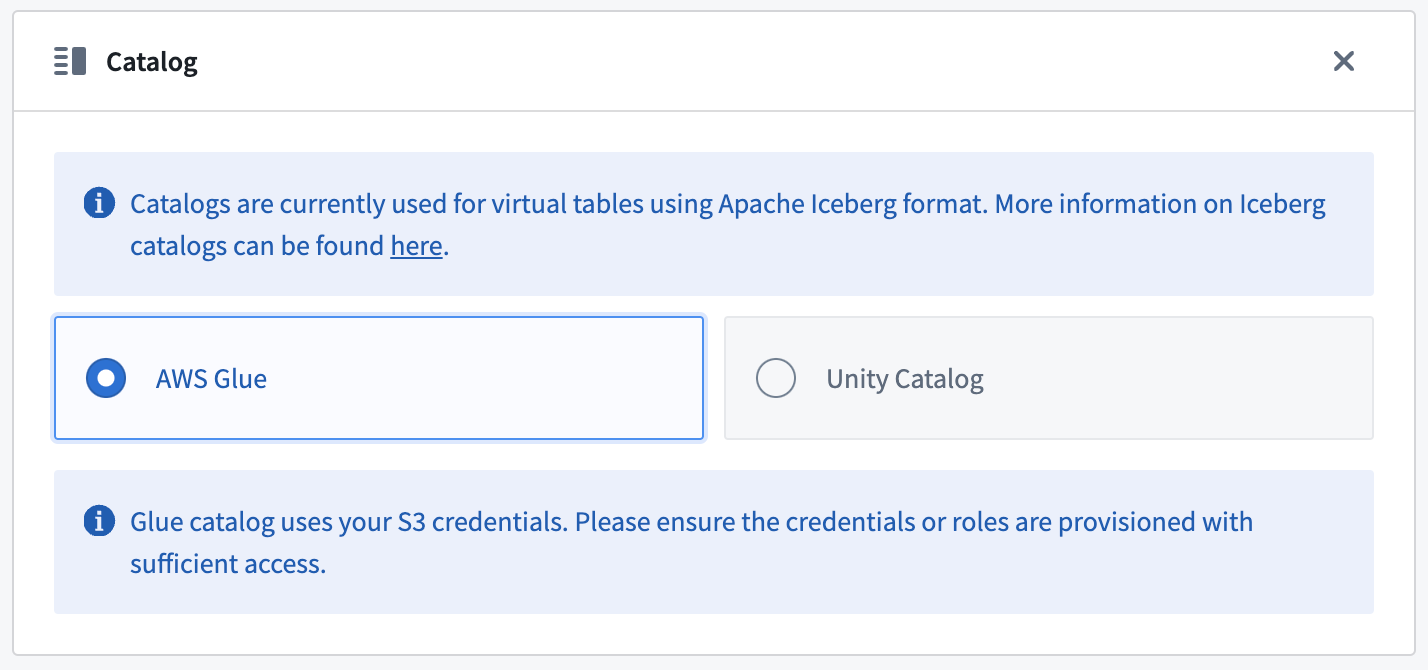
An Iceberg catalog is required to load virtual tables backed by an Apache Iceberg table. To learn more about Iceberg catalogs, see the Apache Iceberg documentation ↗. All Iceberg tables registered on a source must use the same Iceberg catalog.
By default, tables will be created using Iceberg metadata files in S3. A warehousePath indicating the location of these metadata files must be provided when registering a table.
AWS Glue ↗ can be used as an Iceberg catalog when tables are stored in S3. To learn more about this integration, see the AWS Glue documentation ↗. The credentials configured on the source must have access to your AWS Glue Data Catalog. AWS Glue can be configured in the Connection Details tab on the source. All Iceberg tables registered on this source will automatically use AWS Glue as the catalog. Tables should be registered using database_name.table_name naming pattern.
Unity Catalog ↗ can be used as an Iceberg catalog when using Delta Universal Format (UniForm) in Databricks. To learn more about this integration, see the Databricks documentation ↗. As with AWS Glue, the catalog can be configured in the Connection Details tab on the source. You will need to provide the endpoint and a personal access token to connect to Unity Catalog. Tables should be registered using catalog_name.schema_name.table_name naming pattern.
Incremental support relies on Iceberg Incremental Reads ↗ and is currently append-only. The current and added read modes in Python Transforms are supported.
Parquet
Virtual tables using Parquet rely on schema inference. At most 100 files will be used to determine the schema.
Export data to S3
To export to S3, first enable exports for your S3 connector. Then, create a new export.
Required export permissions for S3
The following AWS permission is required to export data to S3:
{
    "Action": ["s3:PutObject"],
    "Resource": ["arn:aws:s3:::path/to/bucket/*"],
    "Effect": "Allow",
}
See official AWS documentation on Policies and Permissions in Amazon S3 ↗ for more details on how to configure bucket policies in S3.
Export configuration options
| Option | Required? | Default | Description |
|---|---|---|---|
Path Prefix |
No | N/A | The path prefix that should be used for exported files. The full path for an exported file is calculated as s3://<bucket-name>/<path-in-source-config>/<path-prefix>/<exported-file> |
Canned ACL |
No | N/A | Set the AWS access control list (ACL) attached to the uploaded files, using one of the canned ACLs. See AWS documentation ↗ for a description of each ACL. |
Export tasks (legacy)
:::callout{theme="warning"} Export tasks are a legacy feature that is not recommended for new implementations. All new exports should use the current recommended export workflow. This documentation is provided for users who are still using legacy export tasks. :::
S3 export task configuration
To export files from a Foundry dataset to an S3 bucket using export tasks, the source must be of type s3-direct. The task type is export-s3-task.
Basic configuration
type: export-s3-task
directoryPath: /some/directory
Advanced configuration options
| Option | Required | Default | Description |
|---|---|---|---|
directoryPath |
Yes | N/A | The S3 path where files will be exported |
retriesPerFile |
No | 0 | Number of retry attempts for each file export |
setBucketPolicy |
No | true | Whether to apply bucket policy to exported files |
bucketPolicy |
No | N/A | Specific bucket policy to apply (for example, BucketOwnerFullControl). See AWS CannedAccessControlList ↗ |
incrementalType |
No | snapshot | Use incremental for incremental exports |
useMultipart |
No | false | Enable parallel export |
threads |
No | 1 | Number of objects to export in parallel |
rewritePaths |
No | N/A | Map of regex patterns for path rewriting |
Example configurations
Incremental export with retries:
type: export-s3-task
directoryPath: /exports/data
incrementalType: incremental
retriesPerFile: 2
Parallel export with custom bucket policy:
type: export-s3-task
directoryPath: /exports/data
useMultipart: false
threads: 4
bucketPolicy: BucketOwnerFullControl
setBucketPolicy: true
Path rewriting to remove Spark prefix:
type: export-s3-task
directoryPath: /exports/data
rewritePaths:
  "^spark/(.*)": "$1"
Use S3 sources in code
You can connect to S3 buckets from a Python transforms code repository to export datasets or process files using external transforms.
Write file to S3 bucket
The example below demonstrates how to export a set of dataset RIDs to an S3 bucket using a transforms generator:
# This example shows how to export a list of datasets to an S3 bucket using your AWS session credentials.
# For each exported dataset, an output log containing the dataset's RID, export timestamp, number of exported
# files, and S3 destination path will be generated.

from pyspark.sql import functions as F, types as T
from transforms.api import Input, Output, transform, Transform
from transforms.external.systems import external_systems, Source
from typing import List
from datetime import datetime
import boto3
import logging

log = logging.getLogger(__name__)

S3_BUCKET_REGION = "<region>"
S3_BUCKET_NAME = "<name>"
S3_ENDPOINT_URL = "<endpoint_url>"
S3_DEST_PATH = "<s3_dest_path>"

S3_SOURCE_RID = "<s3_source_rid>"

LOG_OUTPUT_PATH = "<log_output_path>"

DATASET_RID = "<dataset_rid>"

@external_systems(
    s3_source=Source(S3_SOURCE_RID)
)
@transform(
    export_log=Output(f"{LOG_OUTPUT_PATH}/export_{DATASET_RID}_log"),
    input_dataset=Input(f"{DATASET_RID}")
)
def compute_function(ctx, input_dataset, s3_source, export_log):
    # 1. Retrieve credentials for the S3 bucket
    refreshable_creds = s3_source.get_session_credentials()
    creds = refreshable_creds.get()

    # 2. Construct S3 key for the current dataset
    s3_dataset_key = f"{S3_DEST_PATH}/{DATASET_RID}/"

    # 3. Set up the boto3 client
    # NOTE: For large exports that may exceed credential TTL (~1 hour),
    # consider refreshing credentials periodically or implementing
    # boto3's RefreshableCredentials pattern
    s3_client = boto3.client(
        "s3",
        aws_access_key_id=creds.access_key_id,
        aws_secret_access_key=creds.secret_access_key,
        region_name=S3_BUCKET_REGION,
        endpoint_url=S3_ENDPOINT_URL,
    )

    # Helper function to write dataset files to S3
    def write_file(row):
        try:
            with input_dataset.filesystem().open(row.path, "rb") as in_f:
                s3_key = s3_dataset_key + row.path
                s3_client.upload_fileobj(in_f, S3_BUCKET_NAME, s3_key)

        except Exception as e:
            log.error(f"Exception when uploading {DATASET_RID} to S3: {e}")
            raise

    # 4. Write dataset files to S3
    result = input_dataset.filesystem().files()
    result.foreach(write_file)

    # 5. Define output export log schema
    schema = T.StructType([
        T.StructField("dataset_rid", T.StringType(), False),
        T.StructField("export_timestamp", T.TimestampType(), False),
        T.StructField("files_uploaded", T.IntegerType(), False),
        T.StructField("s3_dest_path", T.StringType(), False)
    ])
    file_count = result.count()
    output_df = ctx.spark_session.createDataFrame([(DATASET_RID, datetime.now(), file_count, s3_dataset_key)], schema)
    export_log.write_dataframe(output_df)
中文翻译
Amazon S3
将 Foundry 连接到 AWS S3,以在 S3 和 Foundry 之间读取和同步数据。
支持的功能
| 功能 | 状态 |
|---|---|
| 探索(Exploration) | 🟢 正式发布(Generally available) |
| 批量导入(Bulk import) | 🟢 正式发布(Generally available) |
| 增量同步(Incremental) | 🟢 正式发布(Generally available),适用于支持的文件格式 |
| 媒体集(Media sets) | 🟢 正式发布(Generally available) |
| 虚拟表(Virtual tables) | 🟢 正式发布(Generally available) |
| 文件导出(File exports) | 🟢 正式发布(Generally available) |
设置
- 打开 Data Connection 应用程序,在屏幕右上角选择 + New Source。
- 从可用的连接器类型中选择 S3。
- 按照额外的配置提示,使用以下各节中的信息继续设置您的连接器。
了解更多关于在 Foundry 中设置连接器的信息。
连接详情
| 选项 | 是否必需 | 描述 |
|---|---|---|
URL |
是 | S3 存储桶的 URL。Data Connection 支持 s3a 协议。URL 末尾应包含斜杠。更多详情请参见 AWS 的官方文档 ↗。 例如: s3://bucket-name/ |
Endpoint |
是 | 用于访问 S3 的端点。 例如: s3.amazonaws.com 或 s3.us-east-1.amazonaws.com |
Region |
否 | 配置 AWS 服务时使用的 AWS 区域。使用 STS 角色时需要此项。警告:同时提供区域和包含区域的 S3 端点可能导致失败。 例如: us-east-1 或 eu-central-1 |
Network connectivity |
是 | 步骤 1:Foundry 出站策略 为存储桶附加一个 Foundry 出站策略(Egress policy),以允许 Foundry 出站到 S3。Data Connection 应用程序会根据提供的连接详情建议合适的出站策略。 例如: bucket-name.s3.us-east-1.amazonaws.com (Port 443)步骤 2:AWS 存储桶策略 此外,您需要将相关的 Foundry IP 和/或存储桶详情加入白名单,以便从 S3 进行访问。您的 Foundry IP 详情可在 Control Panel 应用程序的 Network egress 下找到。有关如何在 S3 中配置存储桶策略的更多详情,请参见 AWS 官方文档 ↗。 注意:设置对与 Foundry 注册(Enrollment)位于同一区域的 S3 存储桶的访问需要额外配置。更多信息请阅读网络出站文档。 |
Client certificates & private key |
否 | 您的源可能需要也可能不需要客户端证书和私钥来保护连接。 |
Server certificates |
否 | 您的源可能需要也可能不需要服务器证书来保护连接。 |
Credentials |
是 | 选项 1:访问密钥和密钥(Access key and secret) 提供用于连接 S3 的访问密钥 ID 和密钥。 可以通过在您的 AWS 账户中为 Foundry 创建一个新的 IAM 用户,并授予该 IAM 用户对 S3 存储桶的访问权限来生成凭据。 选项 2:OpenID Connect (OIDC) 按照显示的源系统配置说明设置 OIDC。有关 OpenID Connect 的详情,请参见 AWS 官方文档 ↗;有关 OIDC 如何与 Foundry 配合使用的详情,请参见我们的文档。 有关创建 AWS IAM 用户的更多详情,请参见 AWS 官方文档 ↗。有关 Foundry 期望用户拥有哪些 AWS 权限的详情,请查看我们针对 S3 的文档权限。 |
STS role |
否 | S3 连接器可以选择在连接到 S3 时承担一个安全令牌服务(Security Token Service, STS)角色 ↗。更多详情请参见 STS 角色配置。 |
Connection timeout |
否 | 初始建立连接时等待的时间(以毫秒为单位),超时后放弃。 默认值: 50000 |
Socket timeout |
否 | 在已建立的开放连接上传输数据时等待的时间(以毫秒为单位),超时后连接将关闭。 默认值: 50000 |
Max connections |
否 | 允许的最大开放 HTTP 连接数。 默认值: 50 |
Max error retries |
否 | 对失败的可重试请求(例如来自服务的 5xx 错误响应)的最大重试次数。 默认值: 3 |
Client KMS key |
否 | 用于使用 AWS SDK 执行客户端数据加密的 KMS 密钥名称或别名。在 PCloud 中的代理上使用此选项需要更改代理设置。 |
Client KMS region |
否 | KMS 客户端使用的 AWS 区域。仅在提供了 AWS KMS 密钥时相关。 |
Match subfolder exactly |
否 | 可选地,将子文件夹下指定的路径与 S3 中的确切子文件夹匹配。如果设置为 false,则 s3://bucket-name/foo/bar/ 和 s3://bucket-name/foo/bar_baz/ 都将与子文件夹设置 foo/bar/ 匹配。 |
Proxy configurations |
是 - 仅适用于基于代理的连接 | 配置 S3 的代理设置。 注意:如果 (a) 您的 Foundry 注册(Enrollment)托管在 AWS 中,(b) 您正在连接到与 Foundry 注册(Enrollment)不同 AWS 区域的 S3 存储桶,并且 (c) 您通过数据连接代理(Data connection agent)进行连接,则此项为必需。更多详情请参见 S3 代理配置。 |
Enable path style access |
否 | 使用路径样式(Path-style)访问 URL(例如 https://s3.region-code.amazonaws.com/bucket-name/key-name)而不是虚拟托管样式(Virtual-hosted-style)访问 URL(例如 https://bucket-name.s3.region-code.amazonaws.com/key-name)。更多详情请参见 AWS 官方文档 ↗。 |
Catalog |
否 | 为此 S3 存储桶中存储的表配置目录(Catalog)。更多详情请参见虚拟表(Virtual tables)。 |
S3 所需的读取和同步权限
交互式探索 S3 存储桶需要以下 AWS 权限:
{
    "Action": ["s3:ListBucket"],
    "Resource": ["arn:aws:s3:::path/to/bucket"],
    "Effect": "Allow",
}
从 S3 进行批量同步、虚拟表和媒体同步需要以下 AWS 权限:
{
    "Action": ["s3:GetObject"],
    "Resource": ["arn:aws:s3:::path/to/bucket/*"],
    "Effect": "Allow",
}
有关如何在 S3 中配置存储桶策略的更多详情,请参见 AWS 关于 Amazon S3 策略和权限的官方文档 ↗。
S3 代理配置(基于代理的连接)
当使用数据连接代理(Data connection agent)连接到 S3 时,您可以通过两种方式定义代理设置:
- 源配置(Source Config):直接在源配置中定义每个代理设置,如下表所示。
- 代理的系统属性(Agent's System Properties):作为后备方案,您可以在代理的系统属性中配置代理设置。为此,请在代理的高级配置设置中包含适当的 JVM 参数(例如
-Dhttps.proxyHost=example.proxy.com)。
| 参数 | 是否必需 | 默认值 | 描述 |
|---|---|---|---|
host |
是 | HTTP 代理主机(无协议方案)。 | |
port |
是 | HTTP 代理的端口。 | |
protocol |
否 | HTTPS |
要使用的协议。HTTPS 或 HTTP。 |
nonProxyHosts |
否 | 不应使用代理的主机名(或通配符域名)列表。例如:*.s3-external-1.amazonaws.com|*.example.com。 |
|
credentials |
否 | 如果您的代理需要基本 HTTP 身份验证(由 HTTP 407 响应 ↗ 提示),请包含此块。 | |
credentials.username |
否 | HTTP 代理的明文用户名。 | |
credentials.password |
否 | HTTP 代理的加密密码。 |
STS 角色配置
STS 角色配置允许您利用 AWS Security Token Service ↗ 在从 S3 读取时承担一个角色。
| 参数 | 是否必需 | 默认值 | 描述 |
|---|---|---|---|
roleArn |
是 | STS 角色 ARN 名称。 | |
roleSessionName |
是 | 承担此角色时使用的会话名称。 | |
roleSessionDuration |
否 | 3600 秒 | 会话持续时间。 |
externalId |
否 | 承担角色时使用的外部 ID。 |
云身份配置
云身份认证(Cloud identity authentication)允许 Foundry 访问您 AWS 实例中的资源。云身份在 Control Panel 的注册(Enrollment)级别进行配置和管理。了解如何配置云身份。
使用云身份认证时,角色 ARN 将显示在凭据部分。选择 Cloud identity 凭据选项后,您还必须配置以下内容:
- 在目标 Amazon AWS 账户中配置一个身份和访问管理(Identity and Access Management, IAM)角色。
- 授予 IAM 角色对您要连接的 S3 存储桶的访问权限。通常可以通过存储桶策略 ↗来实现。
- 在 S3 源配置详情中,将 IAM 角色添加到安全令牌服务(Security Token Service, STS)角色 ↗配置下。Foundry 中的云身份 IAM 角色将在访问 S3 时尝试承担 AWS 账户 IAM 角色 ↗。
- 配置相应的信任策略 ↗,以允许云身份 IAM 角色承担目标 AWS 账户 IAM 角色。
虚拟表(Virtual tables)
本节提供有关从 S3 源使用虚拟表(Virtual tables)的额外详情。本节不适用于同步到 Foundry 数据集。
下表突出显示了 S3 支持的虚拟表功能。
| 功能 | 状态 |
|---|---|
| 批量注册(Bulk registration) | 🔴 不可用 |
| 自动注册(Automatic registration) | 🔴 不可用 |
| 表输入(Table inputs) | 🟢 正式发布(Generally available):Avro ↗、Delta ↗、Iceberg ↗、Parquet ↗,适用于代码仓库(Code Repositories)、Pipeline Builder |
| 表输出(Table outputs) | 🟢 正式发布(Generally available):Avro ↗、Delta ↗、Iceberg ↗、Parquet ↗,适用于代码仓库(Code Repositories)、Pipeline Builder |
| 增量管道(Incremental pipelines) | 🟢 正式发布(Generally available),适用于 Delta 表:仅 APPEND(详情)🟢 正式发布(Generally available),适用于 Iceberg 表:仅 APPEND(详情)🔴 不可用,适用于 Parquet 表 |
| 计算下推(Compute pushdown) | 🔴 不可用 |
请查阅虚拟表文档,了解支持的 Foundry 工作流详情,其中存储在 S3 中的表可用作输入或输出。
源配置要求
注册虚拟表(Virtual tables)时,请记住以下源配置要求:
- 您必须使用 Foundry 工作节点(Foundry worker) 源。虚拟表不支持使用代理工作节点(Agent worker)连接。
- 确保按照连接详情中 Network Connectivity 部分所述建立双向连接和加入白名单。
- 如果在代码仓库(Code Repositories)中使用虚拟表,请参阅虚拟表文档了解所需的额外源配置详情。
- 如果您的存储桶包含
.,则必须启用路径样式访问(Path-style access)并设置适当的出站策略。
更多详情请参见上面的连接详情部分。
Delta
要为基于虚拟表的管道启用增量支持,请确保在源 Delta 表上启用了变更数据馈送(Change Data Feed) ↗。Python 转换(Python Transforms) 中支持 current 和 added 读取模式。_change_type、_commit_version 和 _commit_timestamp 列将在 Python 转换(Python Transforms)中可用。
Iceberg
加载由 Apache Iceberg 表支持的虚拟表需要 Iceberg 目录(Catalog)。要了解有关 Iceberg 目录的更多信息,请参见 Apache Iceberg 文档 ↗。在源上注册的所有 Iceberg 表必须使用相同的 Iceberg 目录。
默认情况下,将使用 S3 中的 Iceberg 元数据文件创建表。注册表时必须提供指示这些元数据文件位置的 warehousePath。
当表存储在 S3 中时,AWS Glue ↗ 可用作 Iceberg 目录。要了解有关此集成的更多信息,请参见 AWS Glue 文档 ↗。在源上配置的凭据必须有权访问您的 AWS Glue Data Catalog。可以在源的连接详情选项卡中配置 AWS Glue。在此源上注册的所有 Iceberg 表将自动使用 AWS Glue 作为目录。应使用 database_name.table_name 命名模式注册表。
在 Databricks 中使用 Delta 通用格式(Delta Universal Format, UniForm)时,Unity Catalog ↗ 可用作 Iceberg 目录。要了解有关此集成的更多信息,请参见 Databricks 文档 ↗。与 AWS Glue 一样,可以在源的连接详情选项卡中配置目录。您需要提供端点和个人访问令牌以连接到 Unity Catalog。应使用 catalog_name.schema_name.table_name 命名模式注册表。
增量支持依赖于 Iceberg 增量读取(Incremental Reads) ↗,目前仅支持追加(Append-only)。Python 转换(Python Transforms) 中支持 current 和 added 读取模式。
Parquet
使用 Parquet 的虚拟表依赖于模式推断(Schema inference)。最多将使用 100 个文件来确定模式。
将数据导出到 S3
要导出到 S3,首先为您的 S3 连接器启用导出。然后,创建一个新的导出。
S3 所需的导出权限
将数据导出到 S3 需要以下 AWS 权限:
{
    "Action": ["s3:PutObject"],
    "Resource": ["arn:aws:s3:::path/to/bucket/*"],
    "Effect": "Allow",
}
有关如何在 S3 中配置存储桶策略的更多详情,请参见 AWS 关于 Amazon S3 策略和权限的官方文档 ↗。
导出配置选项
| 选项 | 是否必需 | 默认值 | 描述 |
|---|---|---|---|
Path Prefix |
否 | 不适用 | 导出文件应使用的路径前缀。导出文件的完整路径计算为 s3://<bucket-name>/<path-in-source-config>/<path-prefix>/<exported-file> |
Canned ACL |
否 | 不适用 | 使用预定义 ACL(Canned ACL)之一设置附加到上传文件的 AWS 访问控制列表(ACL)。有关每个 ACL 的描述,请参见 AWS 文档 ↗。 |
导出任务(旧版)
:::callout{theme="warning"} 导出任务(Export tasks) 是一项旧版功能,不推荐用于新实施。所有新的导出应使用当前推荐的导出工作流。本文档仅供仍在使用旧版导出任务的用户参考。 :::
S3 导出任务配置
要使用导出任务将文件从 Foundry 数据集导出到 S3 存储桶,源类型必须为 s3-direct。任务类型为 export-s3-task。
基本配置
type: export-s3-task
directoryPath: /some/directory
高级配置选项
| 选项 | 是否必需 | 默认值 | 描述 |
|---|---|---|---|
directoryPath |
是 | 不适用 | 文件将导出到的 S3 路径 |
retriesPerFile |
否 | 0 | 每个文件导出的重试次数 |
setBucketPolicy |
否 | true | 是否对导出的文件应用存储桶策略 |
bucketPolicy |
否 | 不适用 | 要应用的特定存储桶策略(例如 BucketOwnerFullControl)。请参见 AWS CannedAccessControlList ↗ |
incrementalType |
否 | snapshot | 使用 incremental 进行增量导出 |
useMultipart |
否 | false | 启用并行导出 |
threads |
否 | 1 | 并行导出的对象数量 |
rewritePaths |
否 | 不适用 | 用于路径重写的正则表达式模式映射 |
配置示例
带重试的增量导出:
type: export-s3-task
directoryPath: /exports/data
incrementalType: incremental
retriesPerFile: 2
带自定义存储桶策略的并行导出:
type: export-s3-task
directoryPath: /exports/data
useMultipart: false
threads: 4
bucketPolicy: BucketOwnerFullControl
setBucketPolicy: true
路径重写以移除 Spark 前缀:
type: export-s3-task
directoryPath: /exports/data
rewritePaths:
  "^spark/(.*)": "$1"
在代码中使用 S3 源
您可以从 Python 转换代码仓库(Python transforms code repository)连接到 S3 存储桶,以导出数据集或使用外部转换(External transforms)处理文件。
将文件写入 S3 存储桶
以下示例演示了如何使用转换生成器(Transforms generator)将一组数据集 RID 导出到 S3 存储桶:
# 此示例演示如何使用您的 AWS 会话凭据将数据集列表导出到 S3 存储桶。
# 对于每个导出的数据集,将生成一个输出日志,其中包含数据集的 RID、导出时间戳、导出的文件数量以及 S3 目标路径。

from pyspark.sql import functions as F, types as T
from transforms.api import Input, Output, transform, Transform
from transforms.external.systems import external_systems, Source
from typing import List
from datetime import datetime
import boto3
import logging

log = logging.getLogger(__name__)

S3_BUCKET_REGION = "<region>"
S3_BUCKET_NAME = "<name>"
S3_ENDPOINT_URL = "<endpoint_url>"
S3_DEST_PATH = "<s3_dest_path>"

S3_SOURCE_RID = "<s3_source_rid>"

LOG_OUTPUT_PATH = "<log_output_path>"

DATASET_RID = "<dataset_rid>"

@external_systems(
    s3_source=Source(S3_SOURCE_RID)
)
@transform(
    export_log=Output(f"{LOG_OUTPUT_PATH}/export_{DATASET_RID}_log"),
    input_dataset=Input(f"{DATASET_RID}")
)
def compute_function(ctx, input_dataset, s3_source, export_log):
    # 1. 检索 S3 存储桶的凭据
    refreshable_creds = s3_source.get_session_credentials()
    creds = refreshable_creds.get()

    # 2. 为当前数据集构建 S3 键
    s3_dataset_key = f"{S3_DEST_PATH}/{DATASET_RID}/"

    # 3. 设置 boto3 客户端
    # 注意:对于可能超过凭据 TTL(约 1 小时)的大型导出,
    # 请考虑定期刷新凭据或实现
    # boto3 的 RefreshableCredentials 模式
    s3_client = boto3.client(
        "s3",
        aws_access_key_id=creds.access_key_id,
        aws_secret_access_key=creds.secret_access_key,
        region_name=S3_BUCKET_REGION,
        endpoint_url=S3_ENDPOINT_URL,
    )

    # 辅助函数,用于将数据集文件写入 S3
    def write_file(row):
        try:
            with input_dataset.filesystem().open(row.path, "rb") as in_f:
                s3_key = s3_dataset_key + row.path
                s3_client.upload_fileobj(in_f, S3_BUCKET_NAME, s3_key)

        except Exception as e:
            log.error(f"上传 {DATASET_RID} 到 S3 时出现异常:{e}")
            raise

    # 4. 将数据集文件写入 S3
    result = input_dataset.filesystem().files()
    result.foreach(write_file)

    # 5. 定义输出导出日志模式
    schema = T.StructType([
        T.StructField("dataset_rid", T.StringType(), False),
        T.StructField("export_timestamp", T.TimestampType(), False),
        T.StructField("files_uploaded", T.IntegerType(), False),
        T.StructField("s3_dest_path", T.StringType(), False)
    ])
    file_count = result.count()
    output_df = ctx.spark_session.createDataFrame([(DATASET_RID, datetime.now(), file_count, s3_dataset_key)], schema)
    export_log.write_dataframe(output_df)