Oracle NetSuite SuiteQL
Connect Foundry to Oracle NetSuite using the SuiteQL framework and start syncing data from your NetSuite ERP to Foundry.
Supported capabilities
| Capability | Status |
|---|---|
| Exploration | 🟢 Generally available |
| Batch syncs | 🟢 Generally available |
| Incremental | 🟢 Generally available |
Setup
- Open the Data Connection application and select + New Source in the upper right corner of the screen.
- Select NetSuite SuiteQL from the available connector types.
- Follow the additional configuration prompts to continue the setup of your connector using the information in the sections below.
Learn more about setting up a connector in Foundry.
Authentication
The NetSuite SuiteQL source uses token-based authentication (TBA) ↗.
:::callout{theme="neutral"} The token-based authentication feature must be enabled on your account. To enable TBA, see NetSuite documentation ↗. :::
Configure user roles and permissions in NetSuite
Access control in NetSuite is configured via the assignment of roles to a user; each role is a collection of permissions that define what tasks the user can perform and what data they can access. We recommend the following configuration for the user that will connect to Foundry:
- Create a dedicated role with appropriate permissions.
- From NetSuite’s tool bar, select Setup > Users/Roles > Manage Roles > New and provide an explicit name to the role. We recommend using
foundry-role.- You can optionally tick the Web Services only configuration box.
- Add system-wide permissions to the role by navigating to the bottom of the role page and selecting Permissions > Setup. The minimal required permissions you need to add are:
- Log In using access tokens
- REST Web Services
- Custom Record Types
- Custom Fields
- Remember to Save after adding the required permissions.
- Add report permissions to the role by navigating to the bottom of the role page and selecting Permissions > Reports. Select:
- SuiteAnalytics Workbook,
- Remember to Add the permissions and then Save.
-
Add table permissions to the role for tables you want to be able to query from Foundry by navigating to the bottom of the role page and selecting Permissions > Lists. Select the tables you want, select Add then Save.
-
Assign the new role to a user.
- From NetSuite’s tool bar, select Setup > Users/Roles > Manage Users. Select the user you want to use to connect to Foundry, and select Edit.
- Navigate to the Access tab and make sure the Give Access checkbox is ticked.
- In the Roles tab, select the newly created role (
foundry-role) from the dropdown list, select Add then Save.
To verify that you added the correct permissions, log in as the user you have assigned the new role to, and check that you can view all the data that you expect.
Configure integration and access tokens in NetSuite
Integration records are used in NetSuite to manage connections to external systems. We recommend the following configuration to connect to Foundry:
- Create a new Integration record using TBA (see more details ↗).
- From NetSuite’s tool bar, select Setup > Integration > Manage Integrations > New and provide an explicit name to the integration. We recommend
foundry-integration. - Make sure the State is Enabled and that only Token-based Authentication is ticked. All other boxes should be unticked.
- After you Save, make a note of the
CLIENT IDandCLIENT SECRET. You will need them to configure Foundry.
:::callout{theme="neutral"}
CLIENT ID and CLIENT SECRET will be displayed only the first time you save the integration record. You must reset them to get new ones, which invalidates the previous values.
:::
- Create and assign a TBA token.
- From NetSuite’s tool bar, select Setup > User/Roles > Access Tokens > New.
- If you can't manage tokens for other users, navigate to the bottom-left Settings panel on NetSuite's homepage and select Manage Access Tokens.
- Select the newly created application (
foundry-integrationin our example), the user to which you've assigned the newly created role (foundry-role), and the newly created role.- If you can't manage tokens for other users, your user will be selected by default. Make sure your user has the newly created role (
foundry-role) assigned to it.
- If you can't manage tokens for other users, your user will be selected by default. Make sure your user has the newly created role (
- After you Save, make a note of the
TOKEN IDandTOKEN SECRET. You will need them to configure Foundry.
:::callout{theme="neutral"}
TOKEN ID and TOKEN SECRET will only be displayed the first time you save the token. You will need to create a new token to get a new TOKEN ID and TOKEN SECRET.
:::
Learn more about token management in NetSuite. ↗
Networking
The NetSuite SuiteQL connector requires network access to the NetSuite instance to which you want to connect.
Foundry worker connection
If your connection runs on a Foundry worker, you will need to add the following egress policy to the source:
- \
If this egress policy does not exist, you can request the egress policy; otherwise, you can add the egress policy.
Connection details
| Option | Required? | Description |
|---|---|---|
Account ID |
Yes | NetSuite Account ID, found as a prefix in your NetSuite's instance URL |
Client ID |
Yes | CLIENT ID copied when creating the foundry-integration |
Client secret |
Yes | CLIENT SECRET copied when creating the foundry-integration |
Access token |
Yes | TOKEN ID copied when creating the TBA token |
Access token secret |
Yes | TOKEN SECRET copied when creating the TBA token |
Creating a sync
The NetSuite SuiteQL source can be explored to discover tables and create new syncs. You can also manually create new syncs from the overview page of the source.
Notes
Schema definition of SuiteQL tables
The schema of native SuiteQL tables is hardcoded within the driver, but your account or role may not have permissions to see all columns; by default, the first 1000 extracted rows of a table are used to determine the exact columns that are available for viewing with your role.
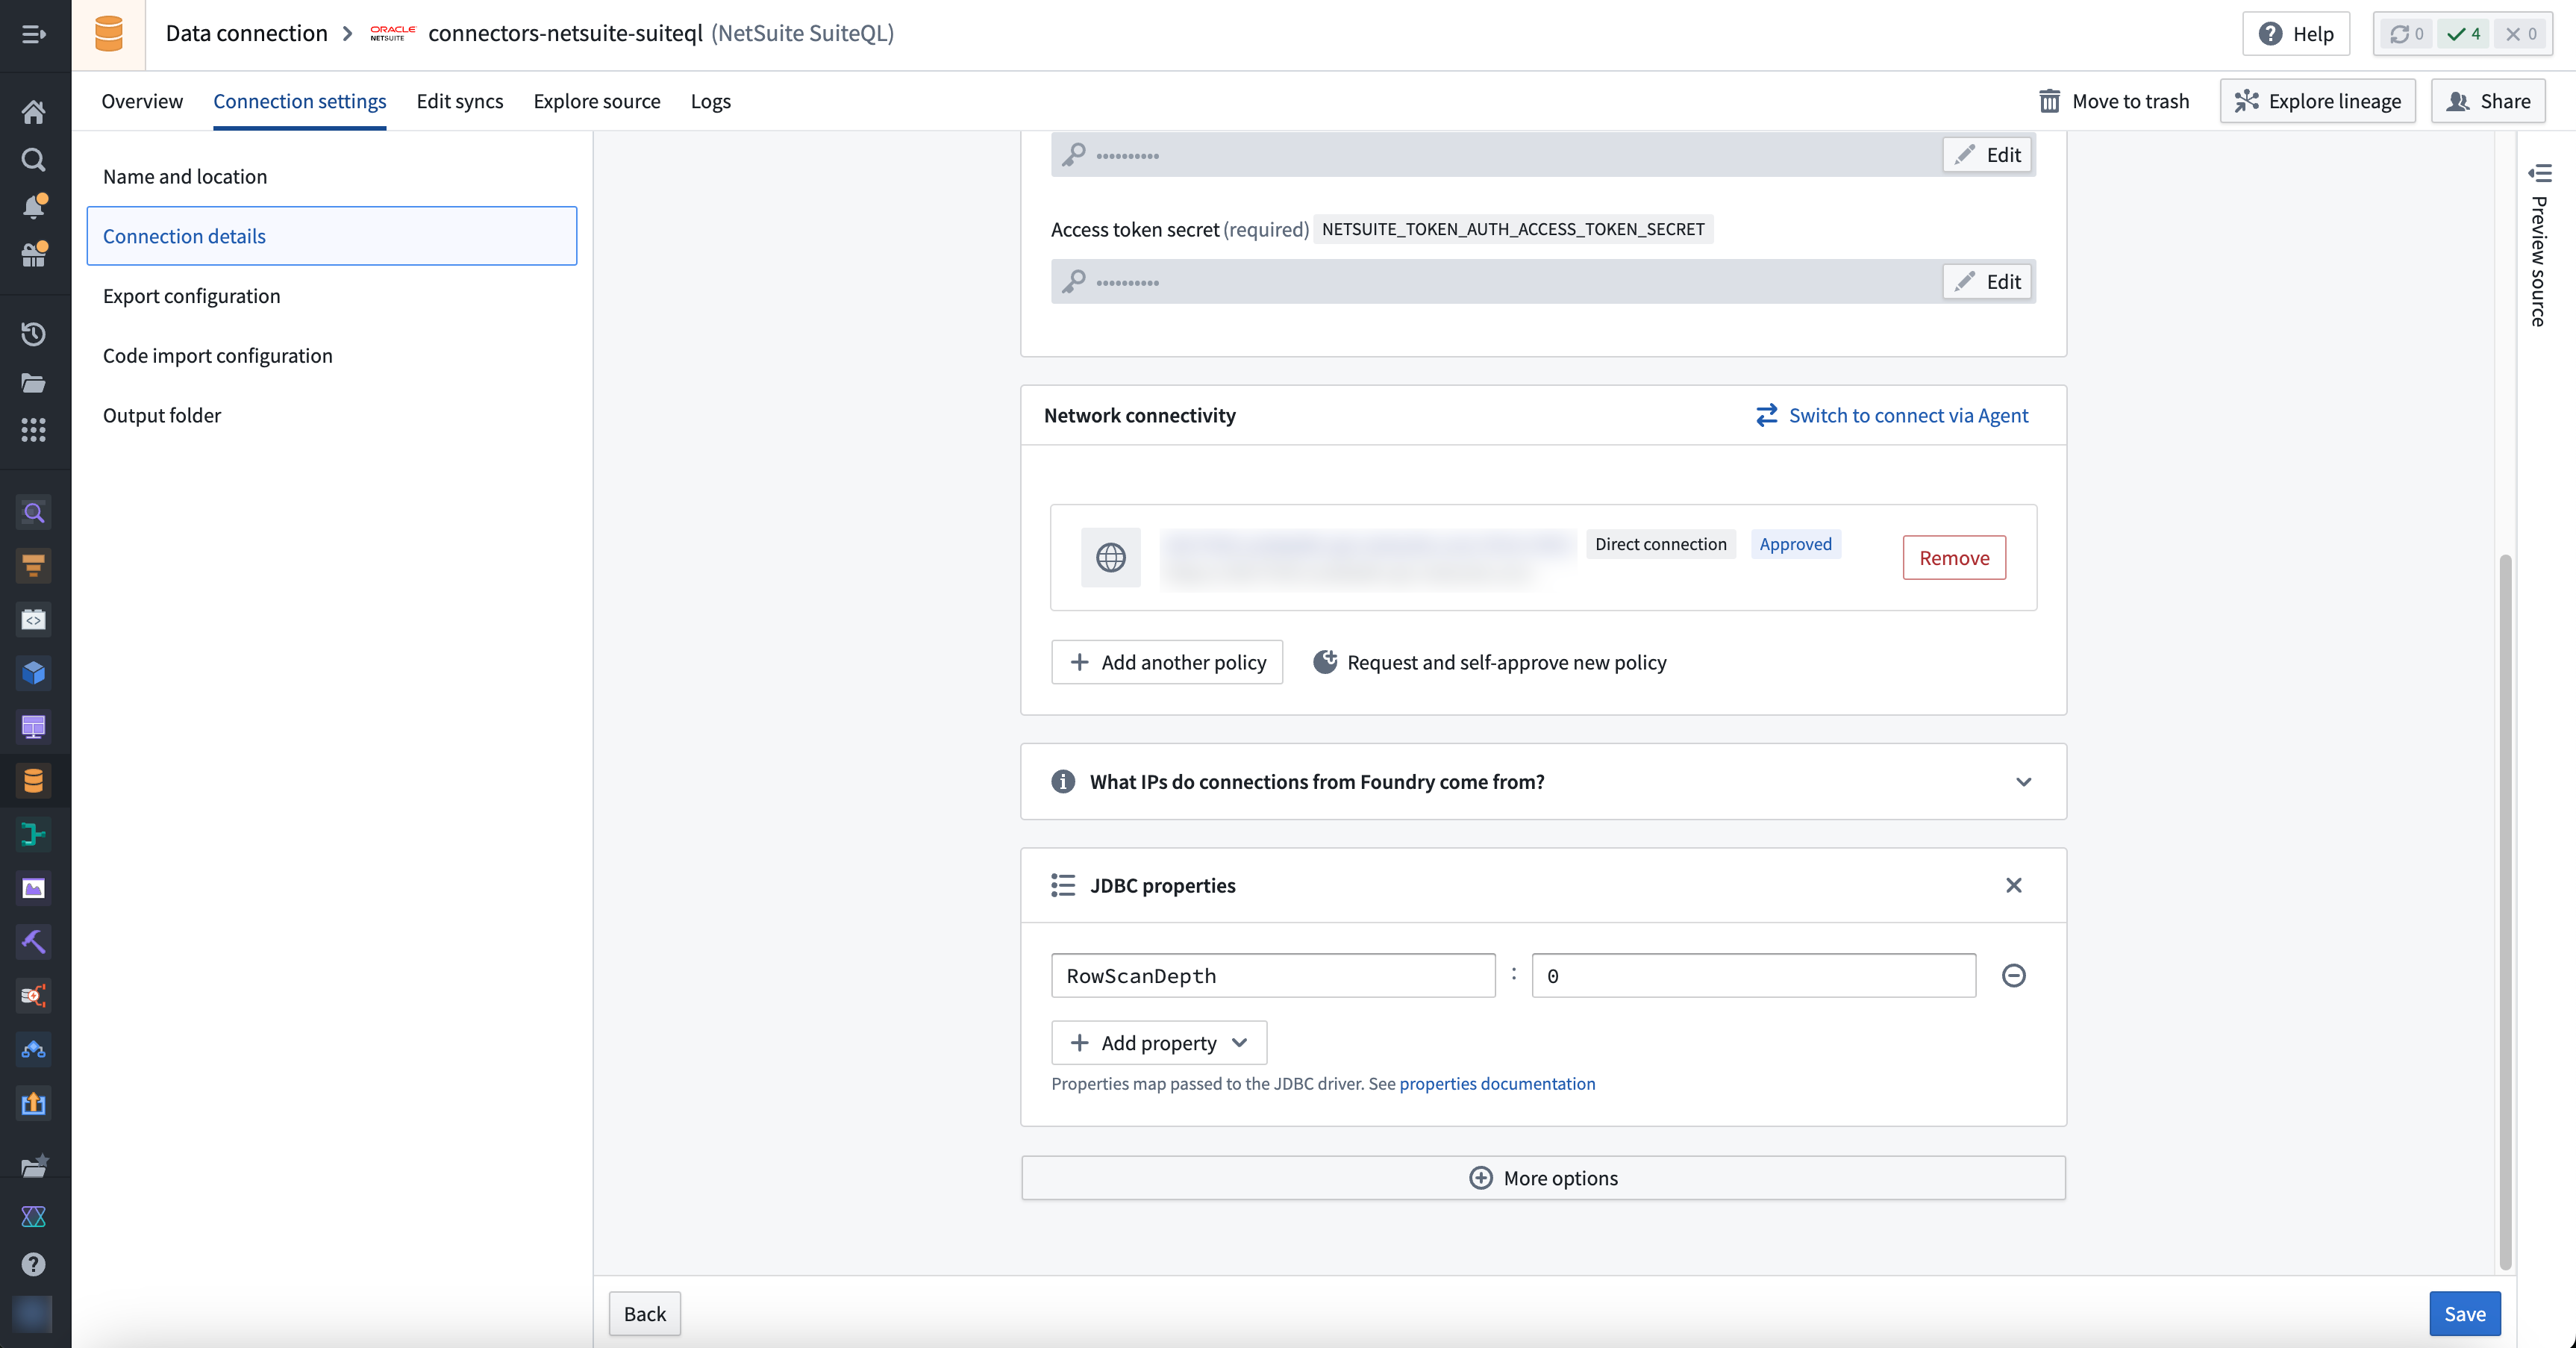
You can change this behavior by modifying the RowScanDepth connection property. In particular, setting RowScanDepth to 0 will allow you to see all columns, but may result in permission exceptions.
Read more about schema definition for native SuiteQL tables in the JDBC Driver for NetSuite documentation on SuiteQL ↗.
To change the value of RowScanDepth, navigate to the source Connection details page, then go to More options followed by JDBC properties.
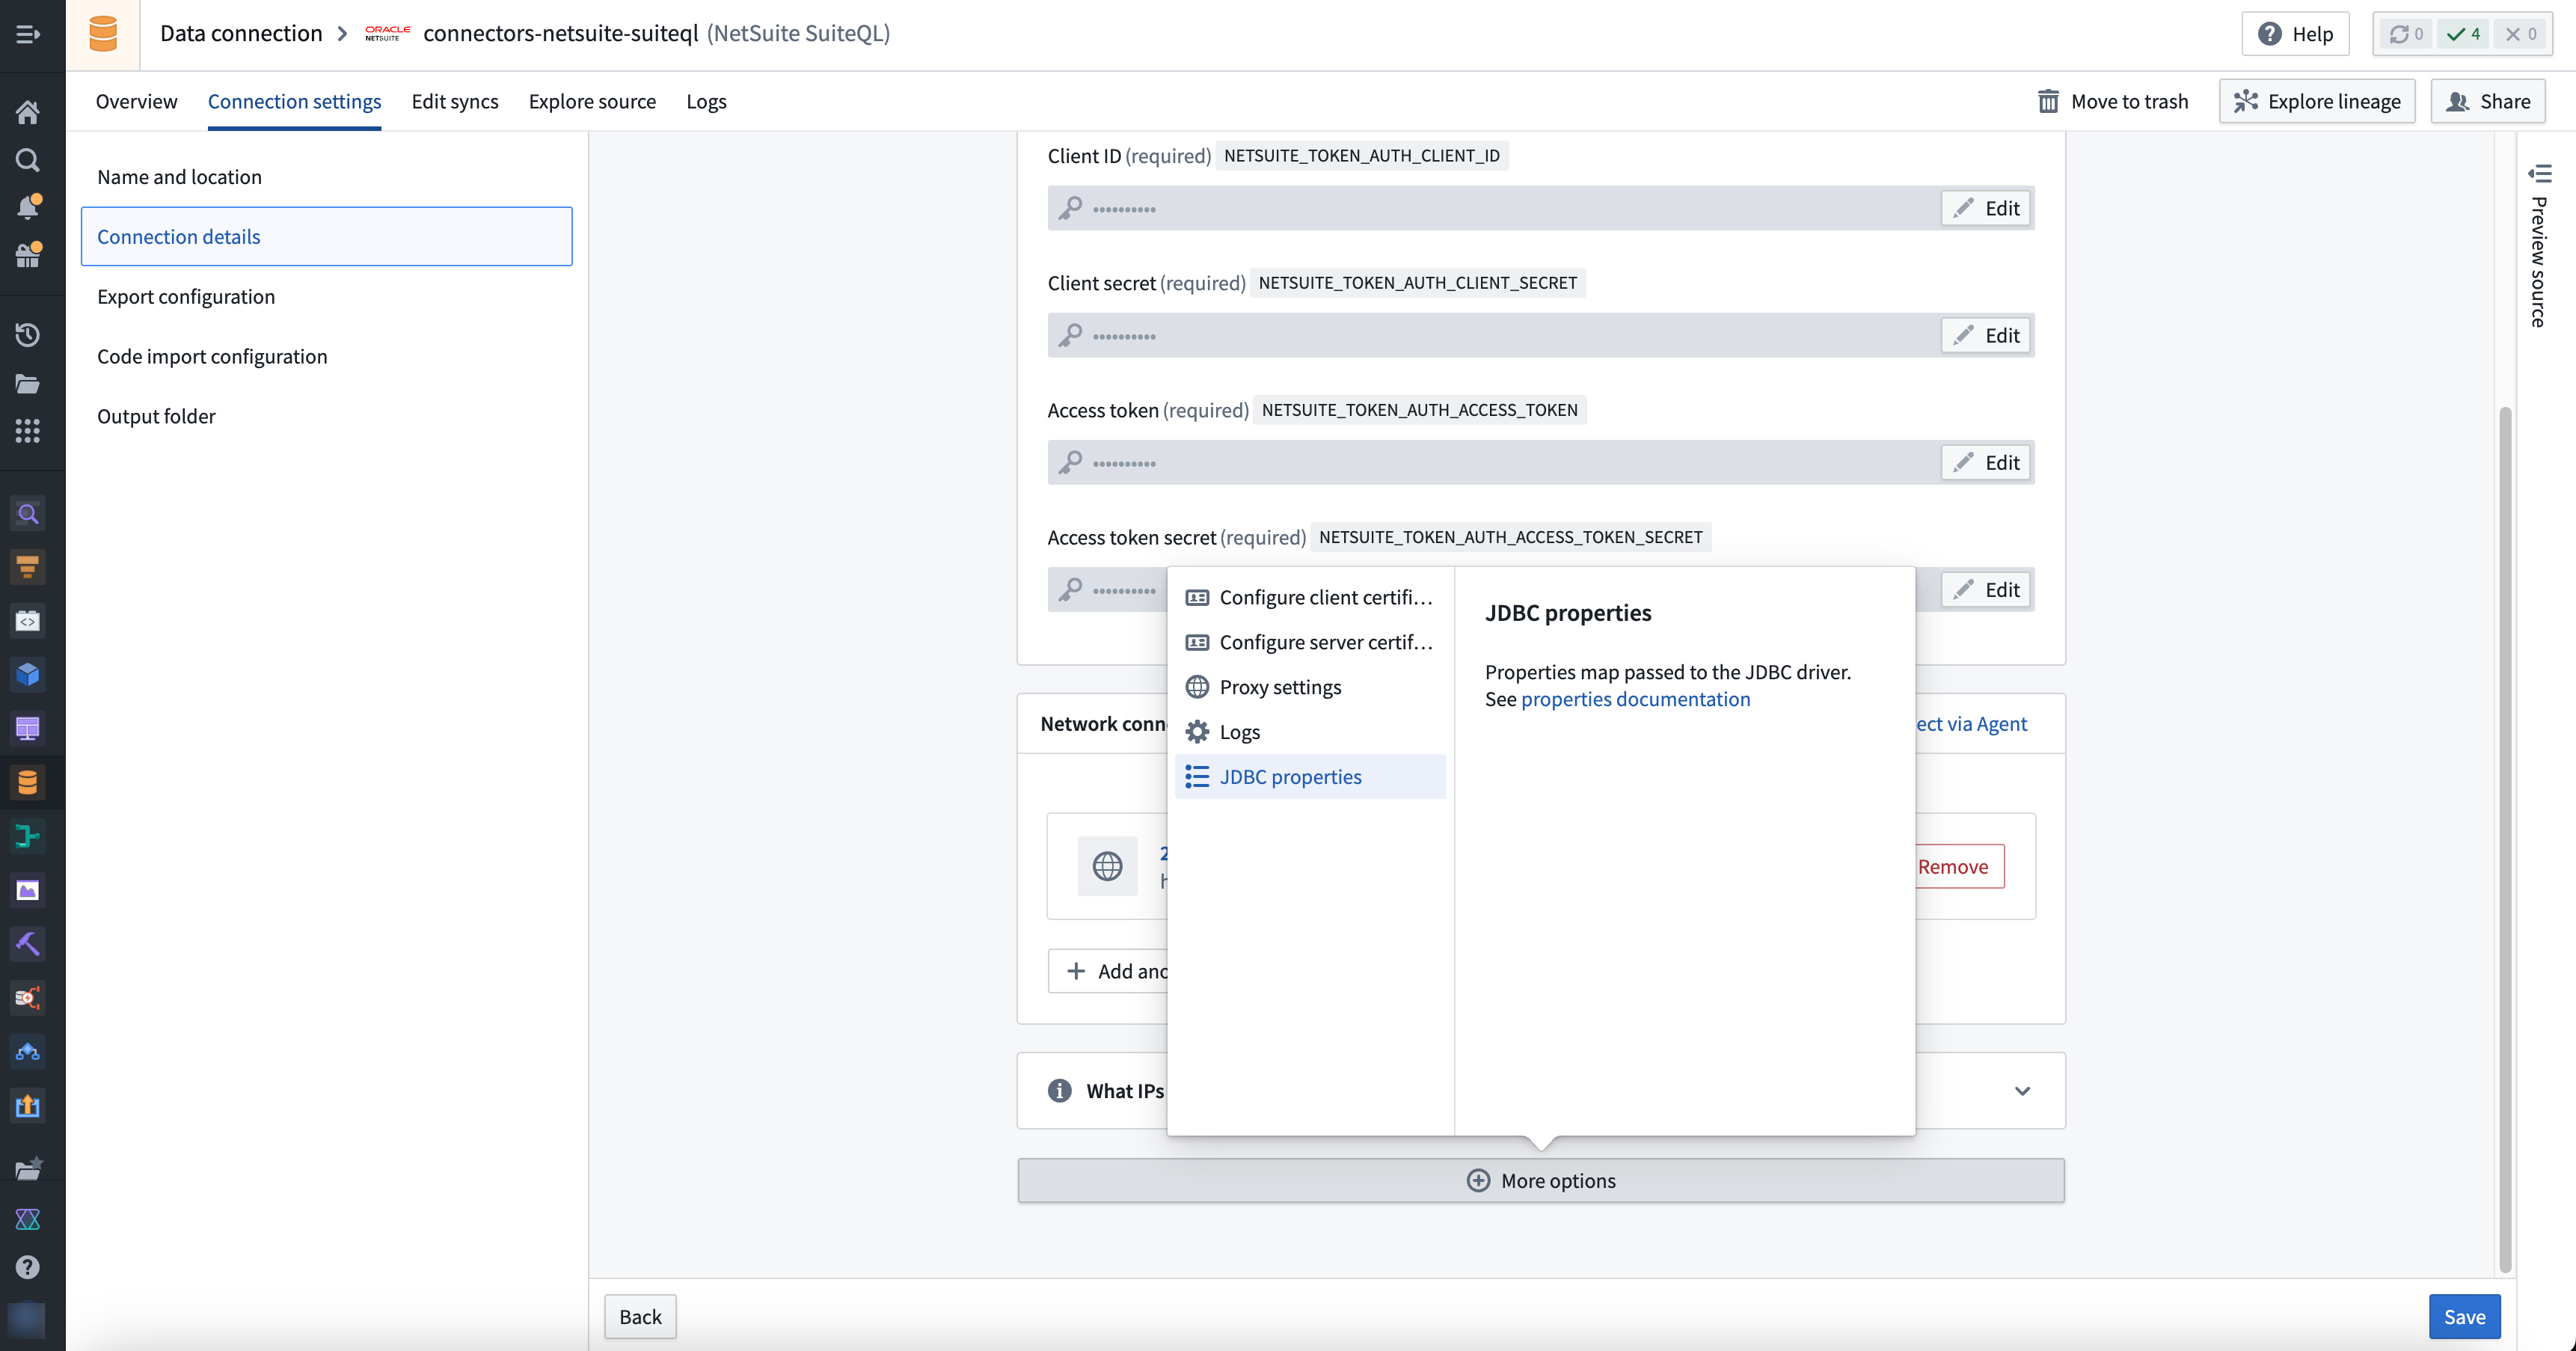
From the JDBC properties, you can add RowScanDepth and set the desired value.
中文翻译
Oracle NetSuite SuiteQL
使用 SuiteQL 框架将 Foundry 连接到 Oracle NetSuite,并开始将 NetSuite ERP 中的数据同步到 Foundry。
支持的功能
| 功能 | 状态 |
|---|---|
| 数据探索 | 🟢 正式发布 |
| 批量同步 | 🟢 正式发布 |
| 增量同步 | 🟢 正式发布 |
设置
- 打开数据连接应用程序,在屏幕右上角选择 + 新建数据源。
- 从可用的连接器类型中选择 NetSuite SuiteQL。
- 按照后续配置提示,使用以下各节中的信息完成连接器的设置。
了解更多关于在 Foundry 中设置连接器的信息。
身份验证
NetSuite SuiteQL 数据源使用基于令牌的身份验证(TBA) ↗。
:::callout{theme="neutral"} 您的账户必须启用基于令牌的身份验证功能。要启用 TBA,请参阅 NetSuite 文档 ↗。 :::
在 NetSuite 中配置用户角色和权限
NetSuite 中的访问控制通过为用户分配角色来配置;每个角色是一组权限的集合,定义了用户可以执行的任务和可以访问的数据。对于将连接到 Foundry 的用户,我们建议进行以下配置:
- 创建一个具有适当权限的专用角色。
- 从 NetSuite 工具栏中,选择 设置 > 用户/角色 > 管理角色 > 新建,并为该角色提供一个明确的名称。我们建议使用
foundry-role。- 您可以选择勾选 仅限 Web 服务 配置框。
- 通过导航到角色页面底部,选择 权限 > 设置,为角色添加系统级权限。您需要添加的最低必要权限包括:
- 使用访问令牌登录
- REST Web 服务
- 自定义记录类型
- 自定义字段
- 添加所需权限后,请记得 保存。
- 通过导航到角色页面底部,选择 权限 > 报表,为角色添加报表权限。选择:
- SuiteAnalytics 工作簿,
- 记得 添加 权限,然后 保存。
-
通过导航到角色页面底部,选择 权限 > 列表,为角色添加您希望从 Foundry 查询的表的权限。选择所需的表,选择 添加,然后 保存。
-
将新角色分配给用户。
- 从 NetSuite 工具栏中,选择 设置 > 用户/角色 > 管理用户。选择您要用于连接到 Foundry 的用户,然后选择 编辑。
- 导航到 访问 选项卡,确保 授予访问权限 复选框已勾选。
- 在 角色 选项卡中,从下拉列表中选择新创建的角色(
foundry-role),选择 添加,然后 保存。
要验证您是否添加了正确的权限,请以分配了新角色的用户身份登录,并检查您是否可以查看所有预期的数据。
在 NetSuite 中配置集成和访问令牌
NetSuite 中的集成记录用于管理对外部系统的连接。我们建议进行以下配置以连接到 Foundry:
- 使用 TBA 创建新的集成记录(参见更多详情 ↗)。
- 从 NetSuite 工具栏中,选择 设置 > 集成 > 管理集成 > 新建,并为集成提供一个明确的名称。我们建议使用
foundry-integration。 - 确保 状态 为 已启用,并且仅勾选 基于令牌的身份验证。所有其他框应保持未勾选状态。
- 保存 后,请记下
CLIENT ID和CLIENT SECRET。您将需要它们来配置 Foundry。
:::callout{theme="neutral"}
CLIENT ID 和 CLIENT SECRET 仅在您首次保存集成记录时显示。您必须重置它们才能获得新的值,这将使之前的值失效。
:::
- 创建并分配 TBA 令牌。
- 从 NetSuite 工具栏中,选择 设置 > 用户/角色 > 访问令牌 > 新建。
- 如果您无法管理其他用户的令牌,请导航到 NetSuite 主页左下角的 设置 面板,选择 管理访问令牌。
- 选择新创建的 应用程序(在我们的示例中为
foundry-integration)、已分配新创建角色(foundry-role)的用户以及新创建的角色。- 如果您无法管理其他用户的令牌,您的用户将被默认选中。请确保您的用户已分配了新创建的角色(
foundry-role)。
- 如果您无法管理其他用户的令牌,您的用户将被默认选中。请确保您的用户已分配了新创建的角色(
- 保存 后,请记下
TOKEN ID和TOKEN SECRET。您将需要它们来配置 Foundry。
:::callout{theme="neutral"}
TOKEN ID 和 TOKEN SECRET 仅在您首次保存令牌时显示。您需要创建新令牌才能获得新的 TOKEN ID 和 TOKEN SECRET。
:::
网络连接
NetSuite SuiteQL 连接器需要网络访问您要连接的 NetSuite 实例。
Foundry 工作节点连接
如果您的连接运行在 Foundry 工作节点上,您需要为数据源添加以下出站策略:
- \
如果此出站策略不存在,您可以请求出站策略;否则,您可以添加出站策略。
连接详情
| 选项 | 是否必需 | 描述 |
|---|---|---|
Account ID |
是 | NetSuite 账户 ID,可在 NetSuite 实例 URL 的前缀中找到 |
Client ID |
是 | 创建 foundry-integration 时复制的 CLIENT ID |
Client secret |
是 | 创建 foundry-integration 时复制的 CLIENT SECRET |
Access token |
是 | 创建 TBA 令牌 时复制的 TOKEN ID |
Access token secret |
是 | 创建 TBA 令牌 时复制的 TOKEN SECRET |
创建同步
可以探索 NetSuite SuiteQL 数据源以发现表并创建新的同步。 您也可以从数据源的概览页面手动创建新的同步。
注意事项
SuiteQL 表的模式定义
原生 SuiteQL 表的模式在驱动程序中是硬编码的,但您的账户或角色可能没有查看所有列的权限;默认情况下,使用表的前 1000 行提取数据来确定您的角色可以查看的确切列。
您可以通过修改 RowScanDepth 连接属性来更改此行为。特别是,将 RowScanDepth 设置为 0 将允许您查看所有列,但可能会导致权限异常。
在 JDBC Driver for NetSuite 文档中阅读更多关于 SuiteQL 表模式定义的信息 ↗。
要更改 RowScanDepth 的值,请导航到数据源的 连接详情 页面,然后转到 更多选项,接着选择 JDBC 属性。
在 JDBC 属性 中,您可以添加 RowScanDepth 并设置所需的值。