Approve a change(审批变更)
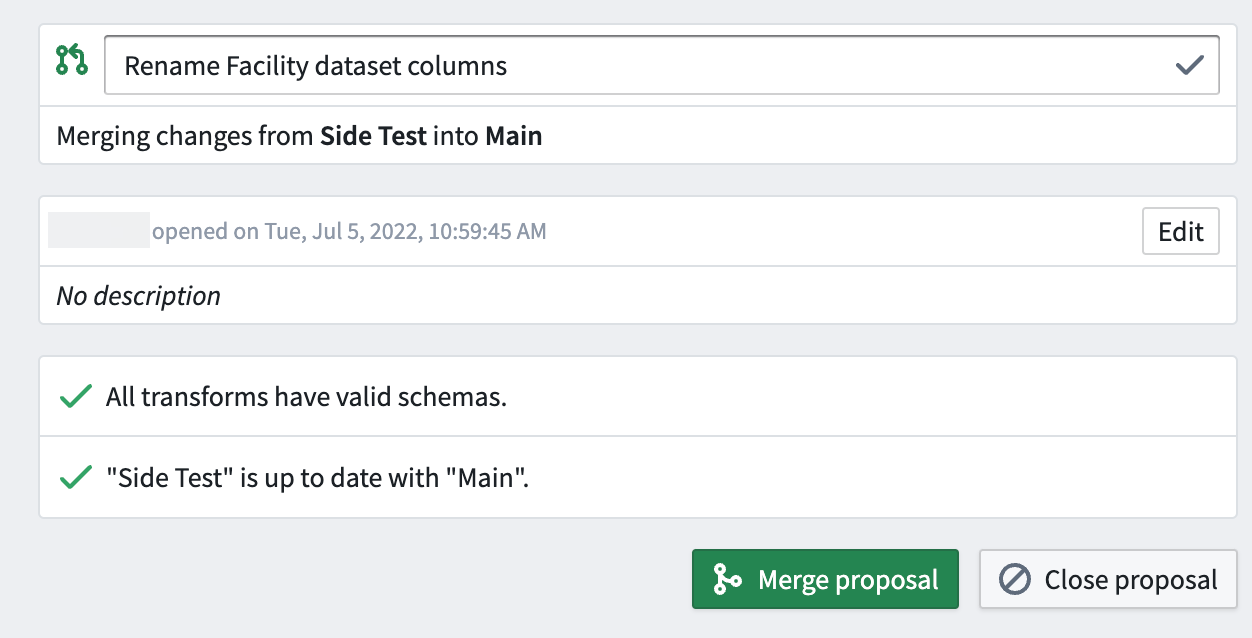
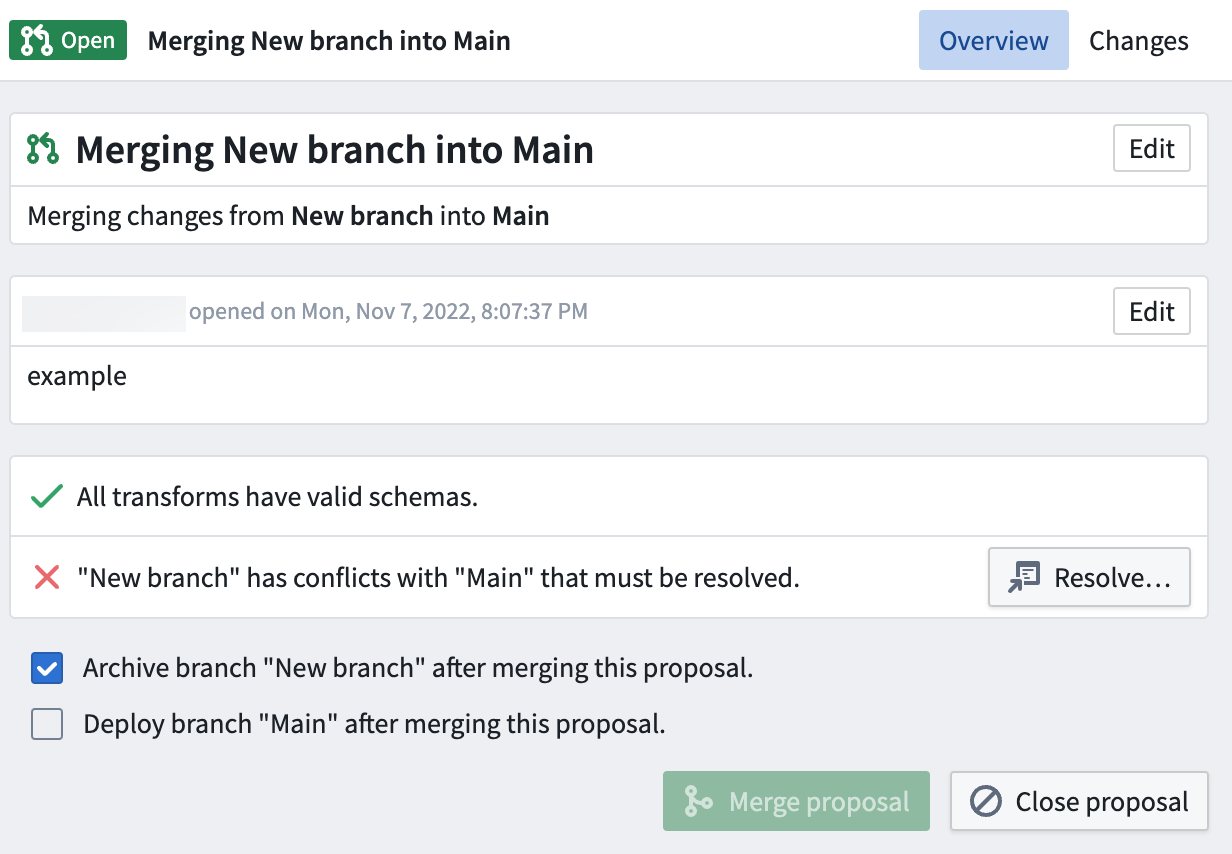
Pipeline Builder users with Edit access in a workflow project can approve change proposals to the Main pipeline branch. To approve a proposal, first open the Builder Proposal view and select it from the list of open proposals. Here, you can view details including the merge behavior (for example, from test/branch into Main), a description of the change, and any errors found in the proposal.
View changes
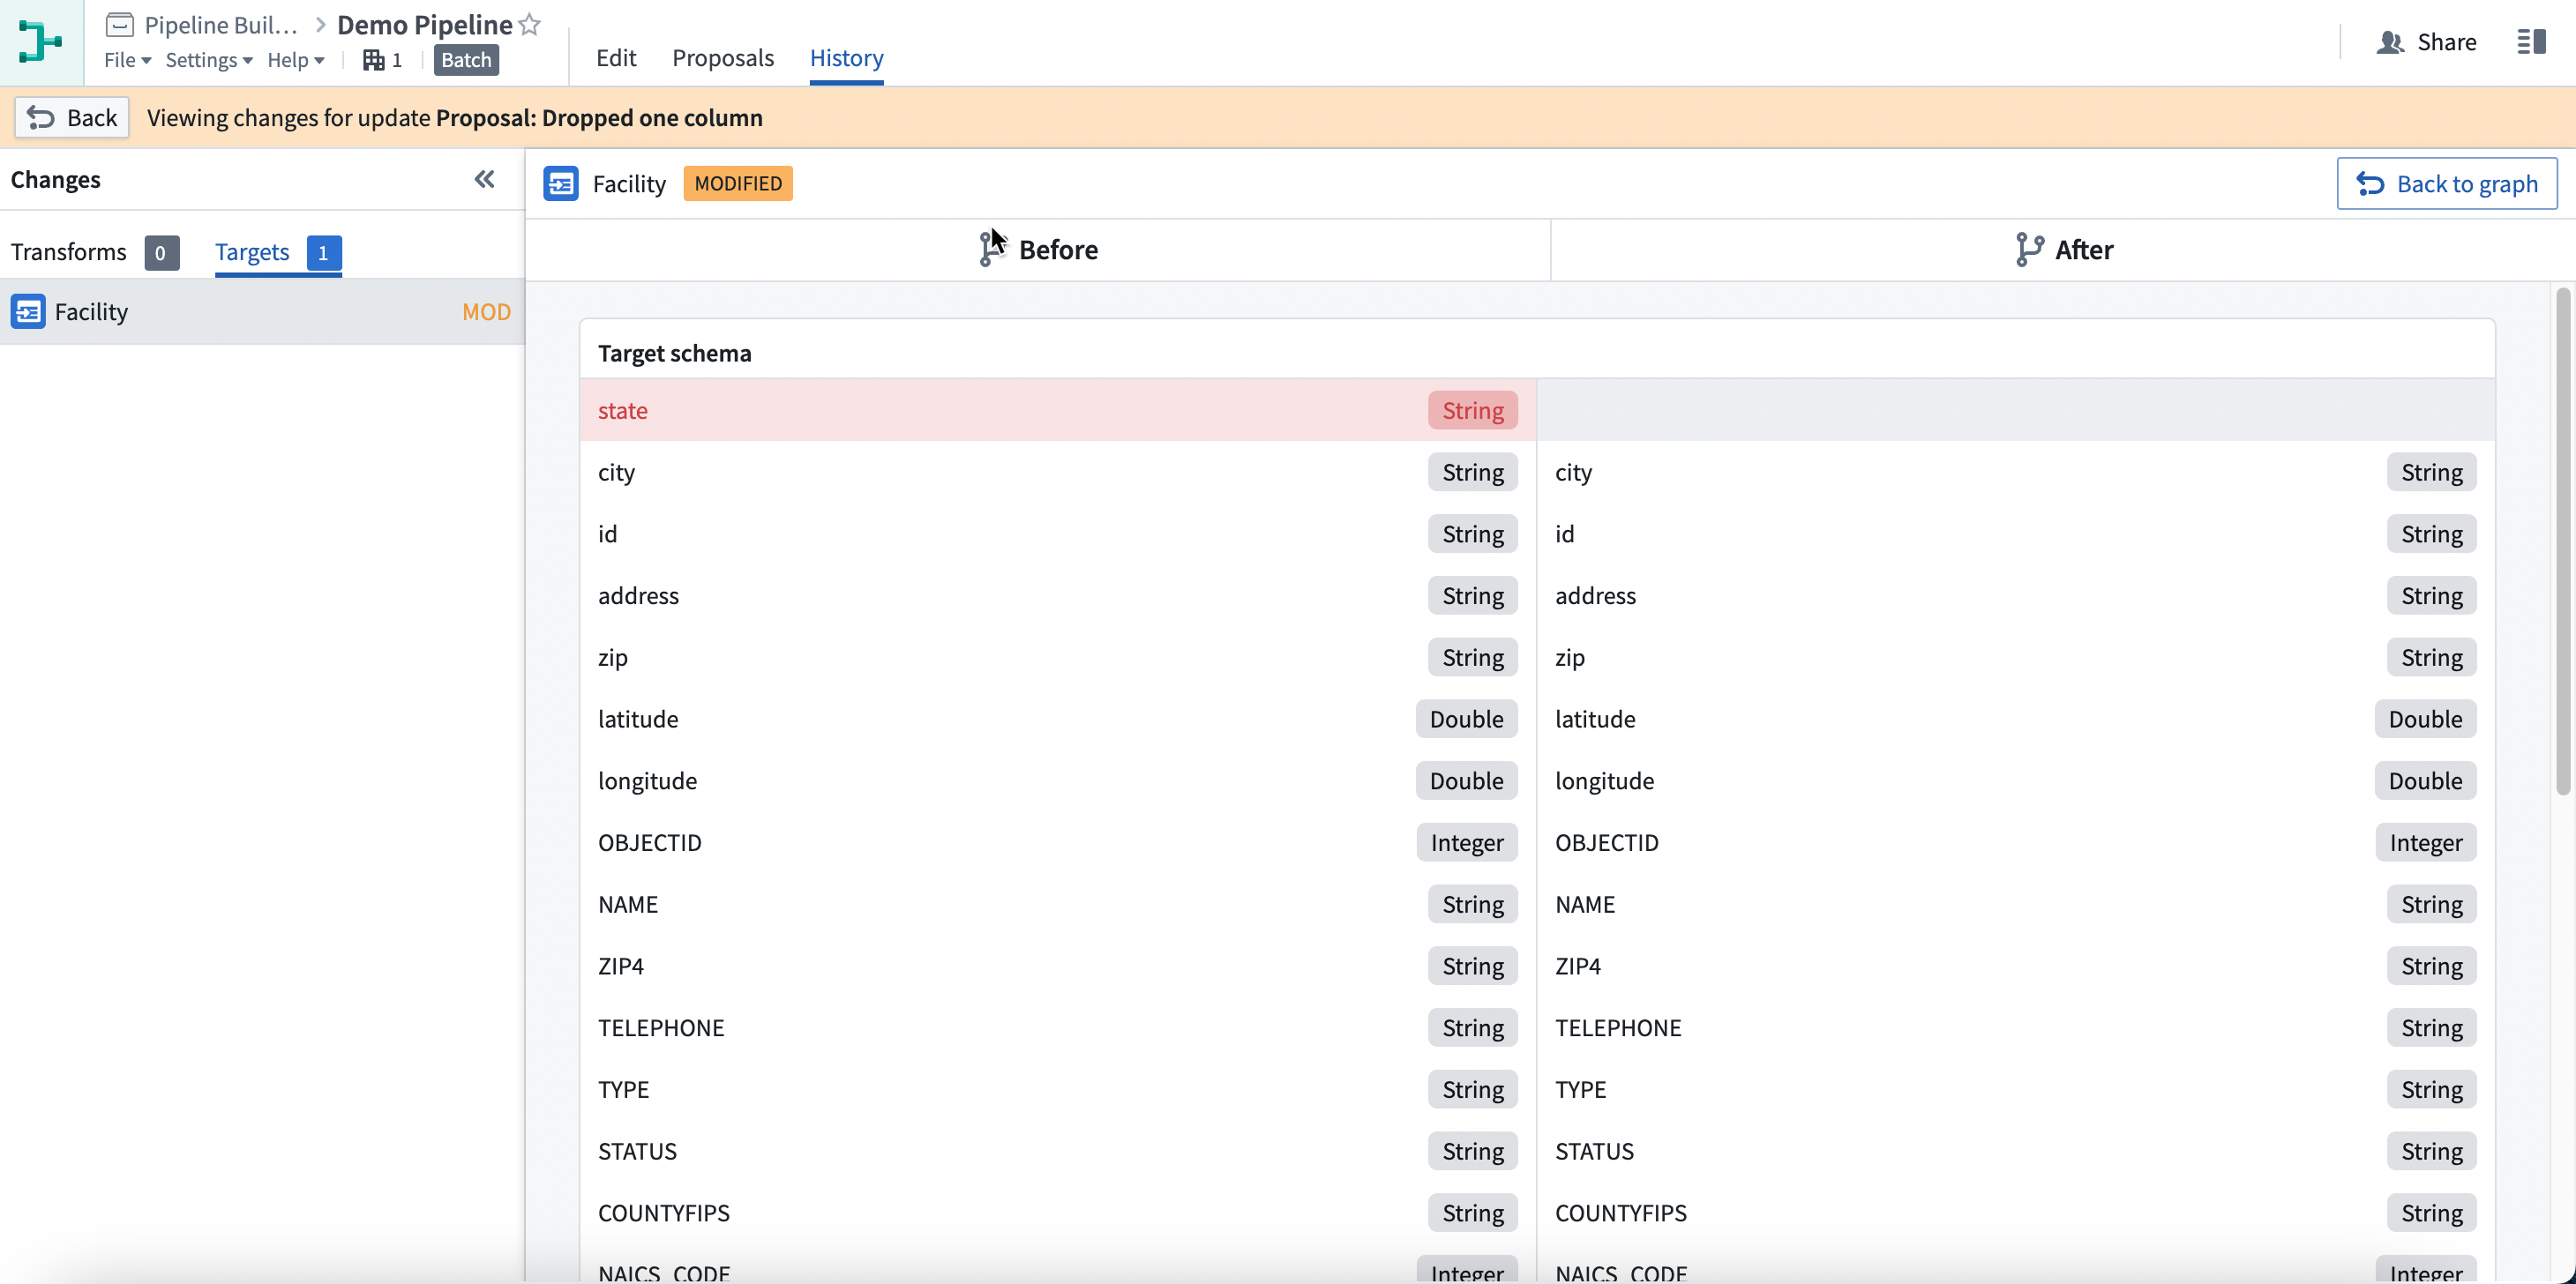
Switch to the Changes tab to compare proposed changes to the Main branch workflow. In the left panel, you can filter between types of changes. In the example below, the proposed changes include four edits to Transforms and three edits to Outputs.
Each proposed edit is tagged by proposal type: ADD, MOD, or DEL.
ADD: The edit is a new addition to the workflow.MOD: The edit is a modification of an existing workflow node.DEL: The edit removes a node from the workflow.
Click on an individual edit for a side-by-side view of differences between the Main branch and proposal branch. In the example below, the proposed Join person data modification adds the CITY column to the existing join.
View and compare statistics
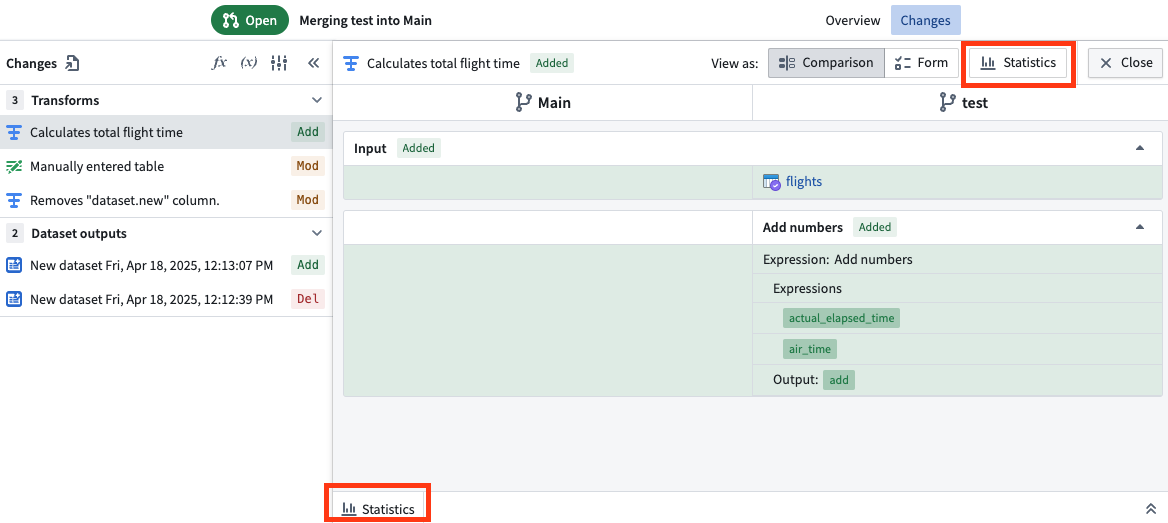
You can view and compare column statistics on any transforms on your branch. Double click into the transform and select Statistics at the top right or the tab on the bottom panel.
Select the View column stats icon to view and compare the statistics of the select column.
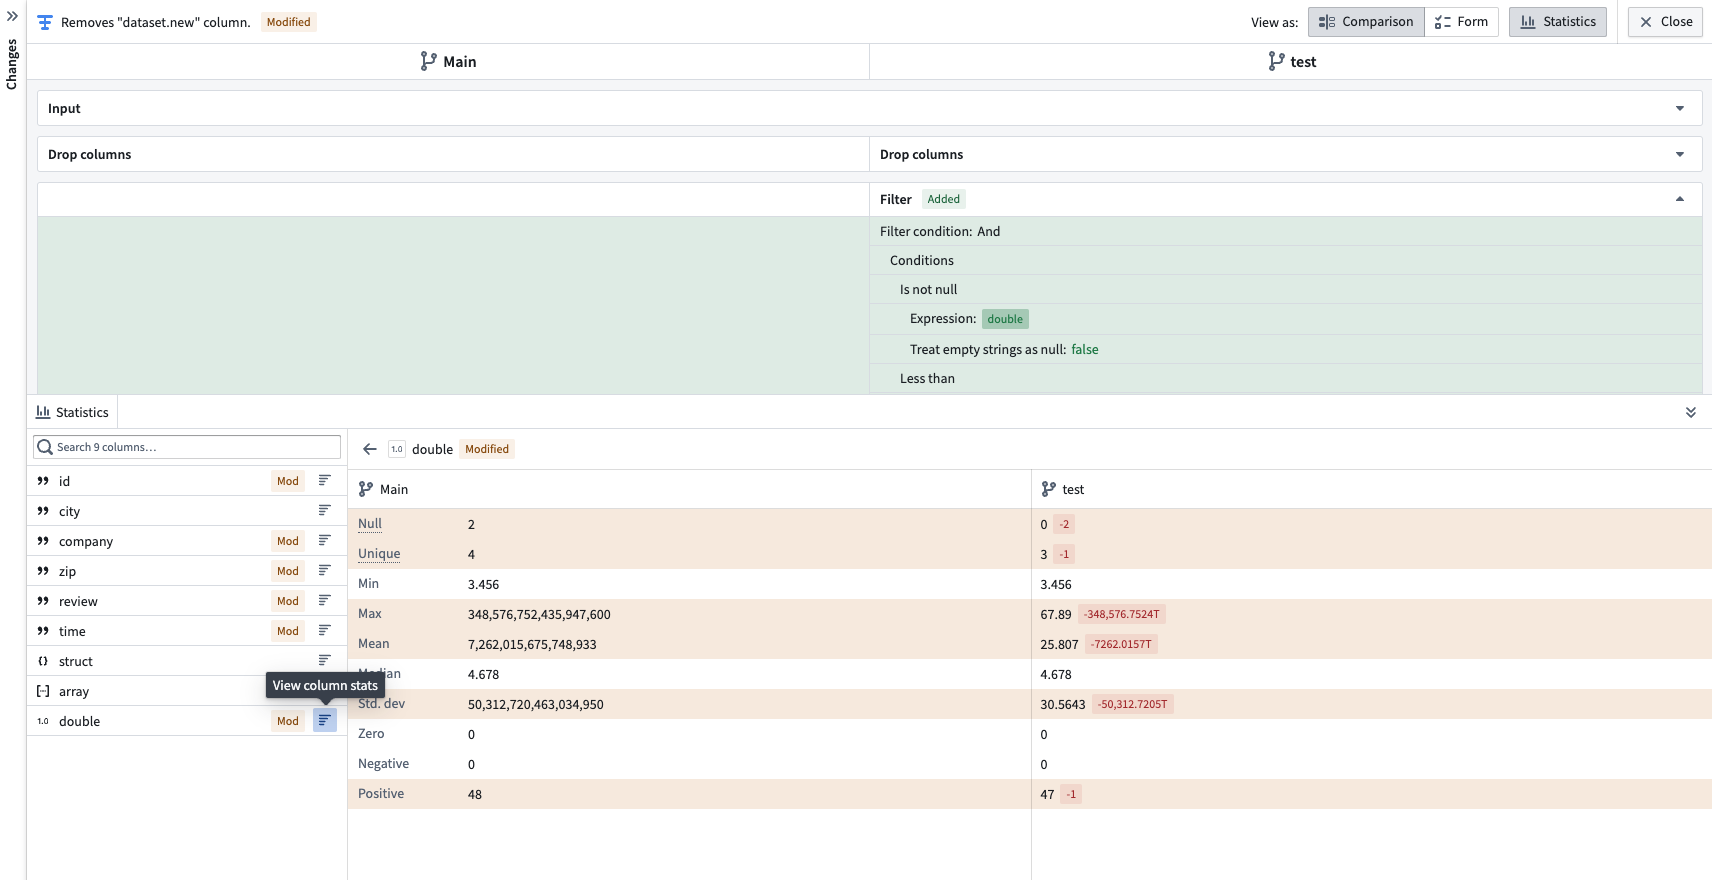
Here you can view a variety of metrics such as:
- The number of null values.
- The number of unique values.
- For strings: The minimum and maximum lengths, and how many strings need trimming.
- For numeric values: The minimum, maximum, media, standard deviation, negative, and positive values.
Differences between the statistics between your branch and the main branch will be color coded to the right of the metric.
Switch back to the Overview tab to continue reviewing the proposal.
Track and mark changes as reviewed
In the Changes tab, you can mark each node or setting change as "reviewed". Pipeline Builder tracks and displays how many changes you have reviewed as well as the total number of changes, making it easy to see your review progress at a glance.
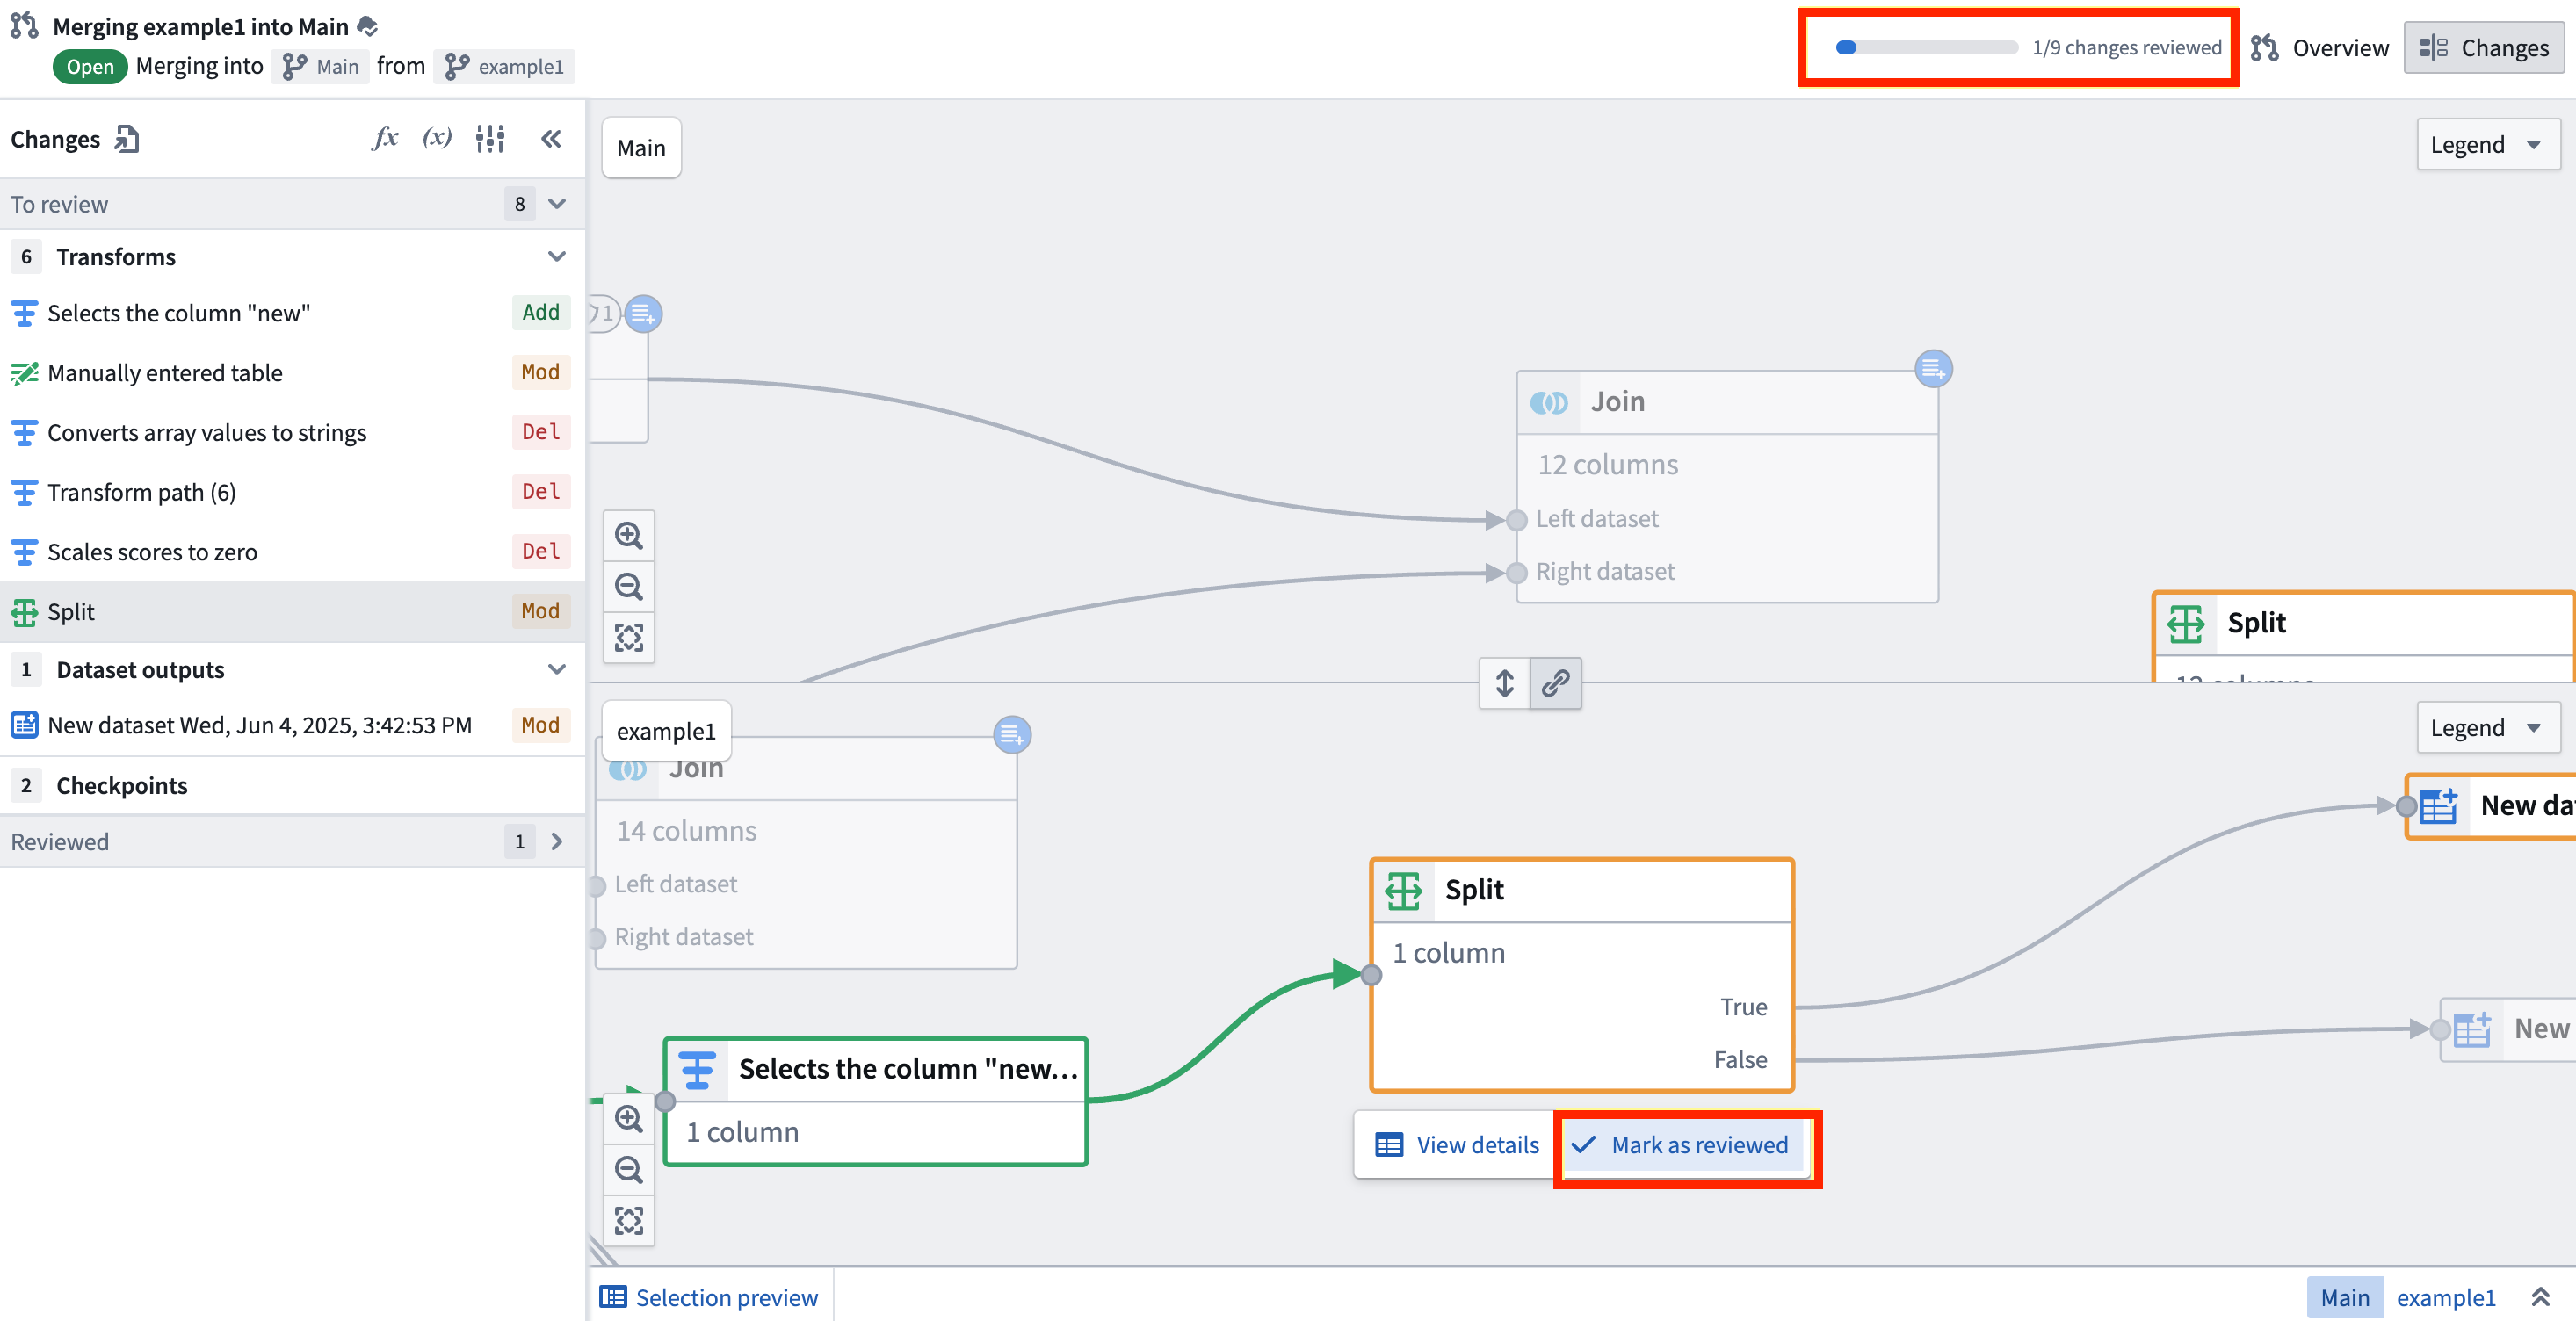
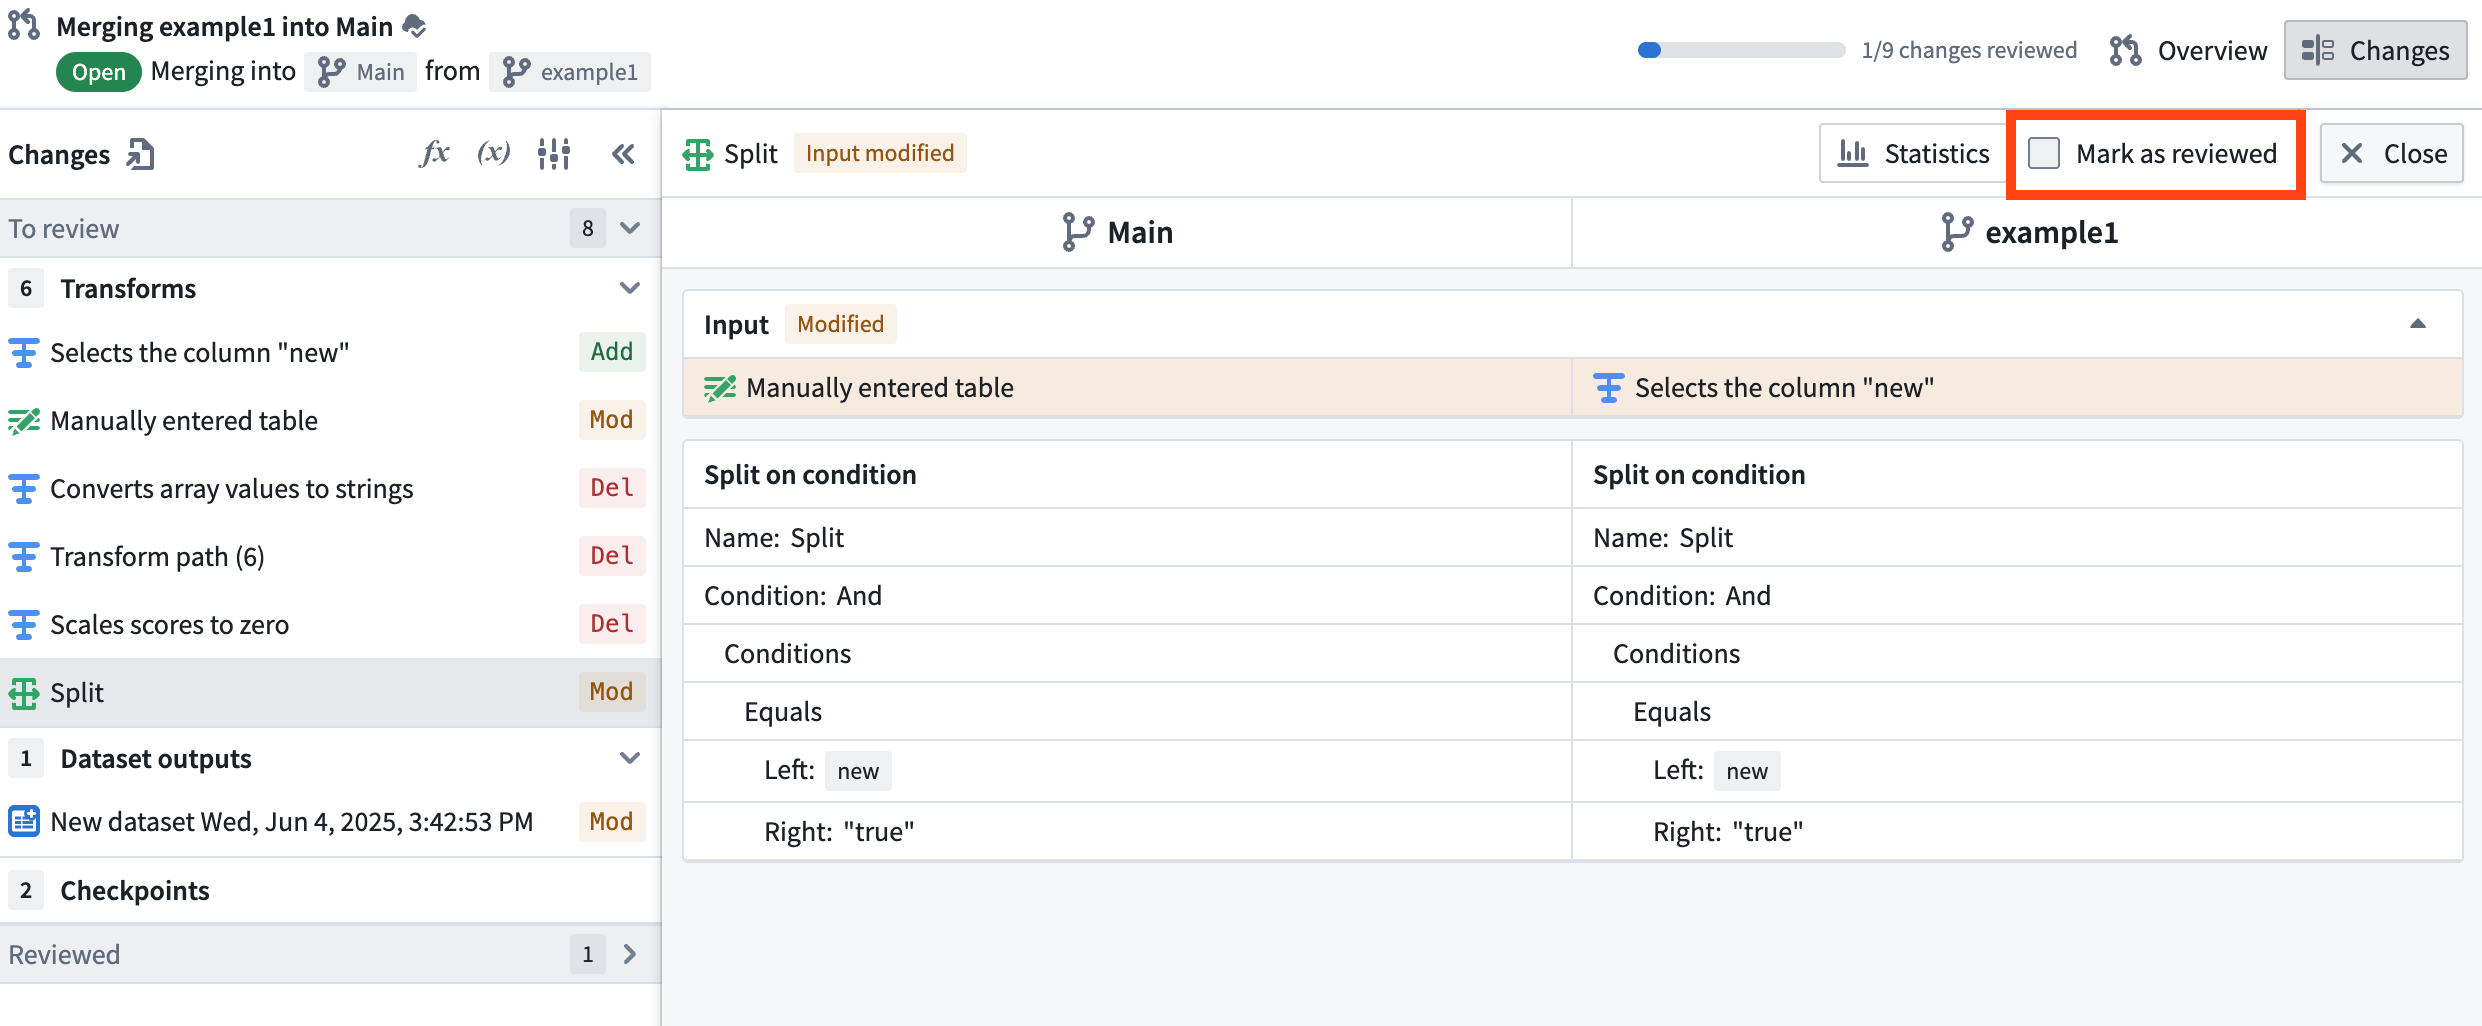
Select a node from the side panel or directly on the graph. Then, you can either select Mark as reviewed directly underneath the node on the graph, or select the node or setting and check Mark as reviewed.
At the top right of the interface, a progress bar shows how many changes you have reviewed out of the total changes in the proposal.
Note that if a change is made to something that was previously marked as reviewed, it will automatically be unmarked as reviewed.
:::callout{theme="neutral"} Marking changes as reviewed is user-specific. When you mark changes as reviewed, it only applies to your user. Other users can independently mark the same changes as reviewed without affecting your review status. :::
Comments
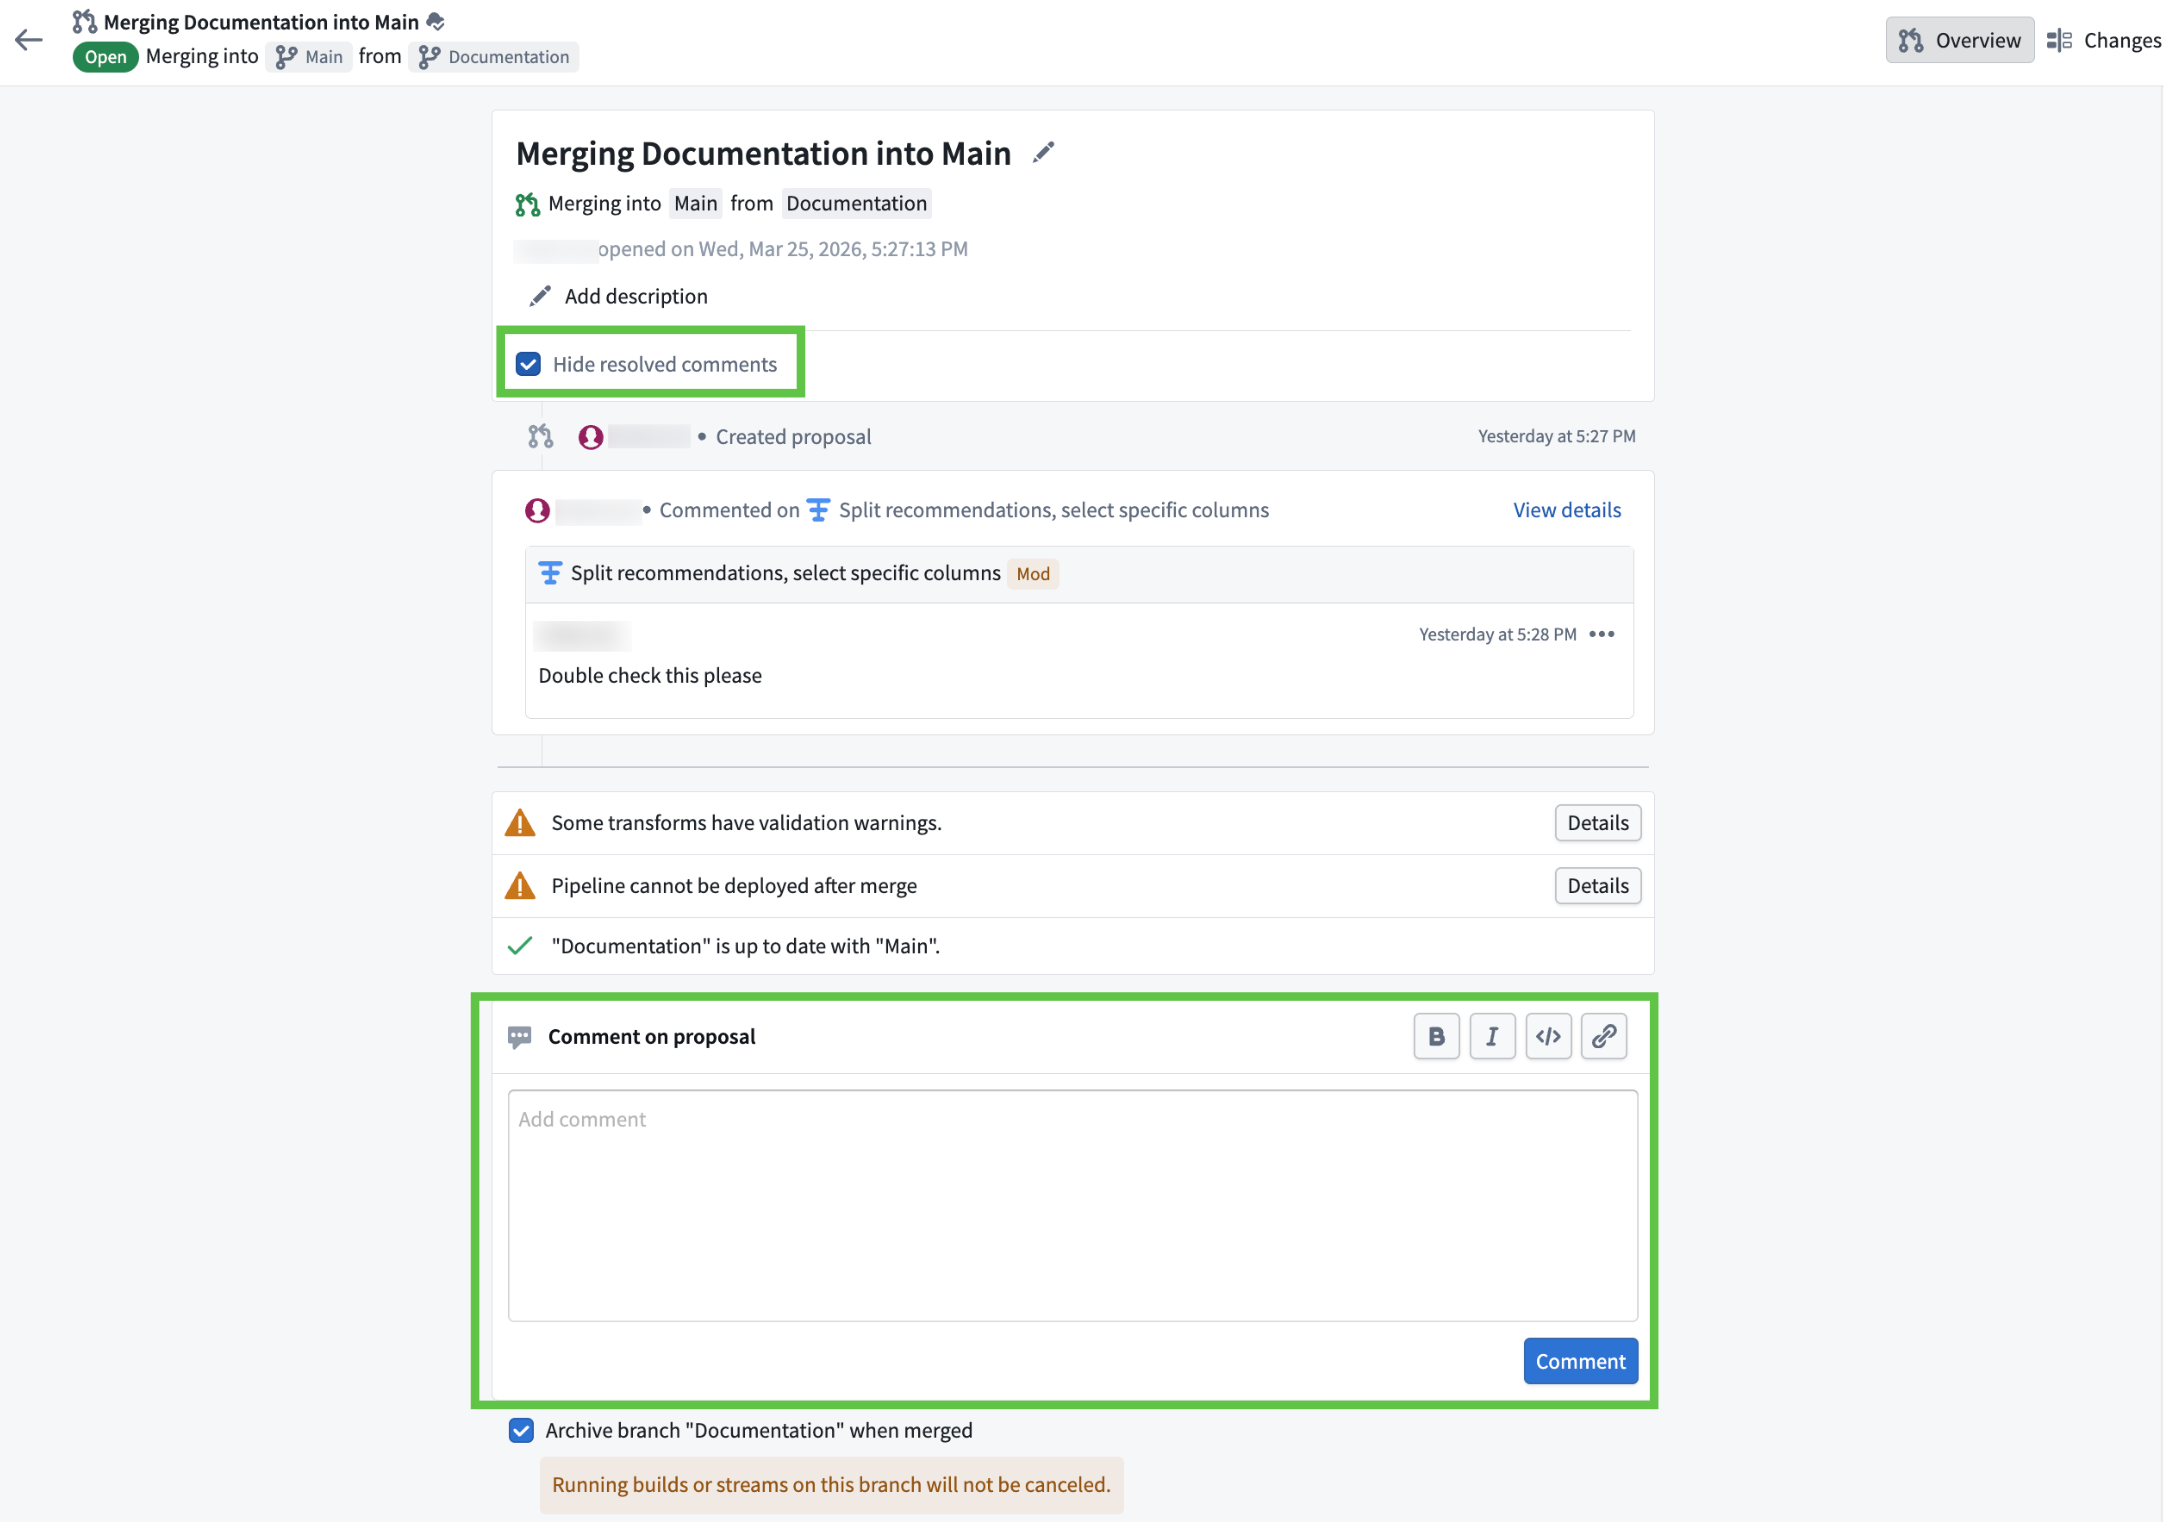
You can add and view comments on the main Overview tab of your proposal. To comment, scroll to the bottom of the Overview page and enter your comment directly, or comment on a specific node in the Changes tab. By default, resolved comments are hidden on the main Overview page, but you can toggle to view them if needed.
To comment on a specific node, navigate to the Changes tab in the top right. On the left side panel, open the Comments section to view all comments. To add a comment to a node, either select the node and then select the comment icon or click directly into the node itself.
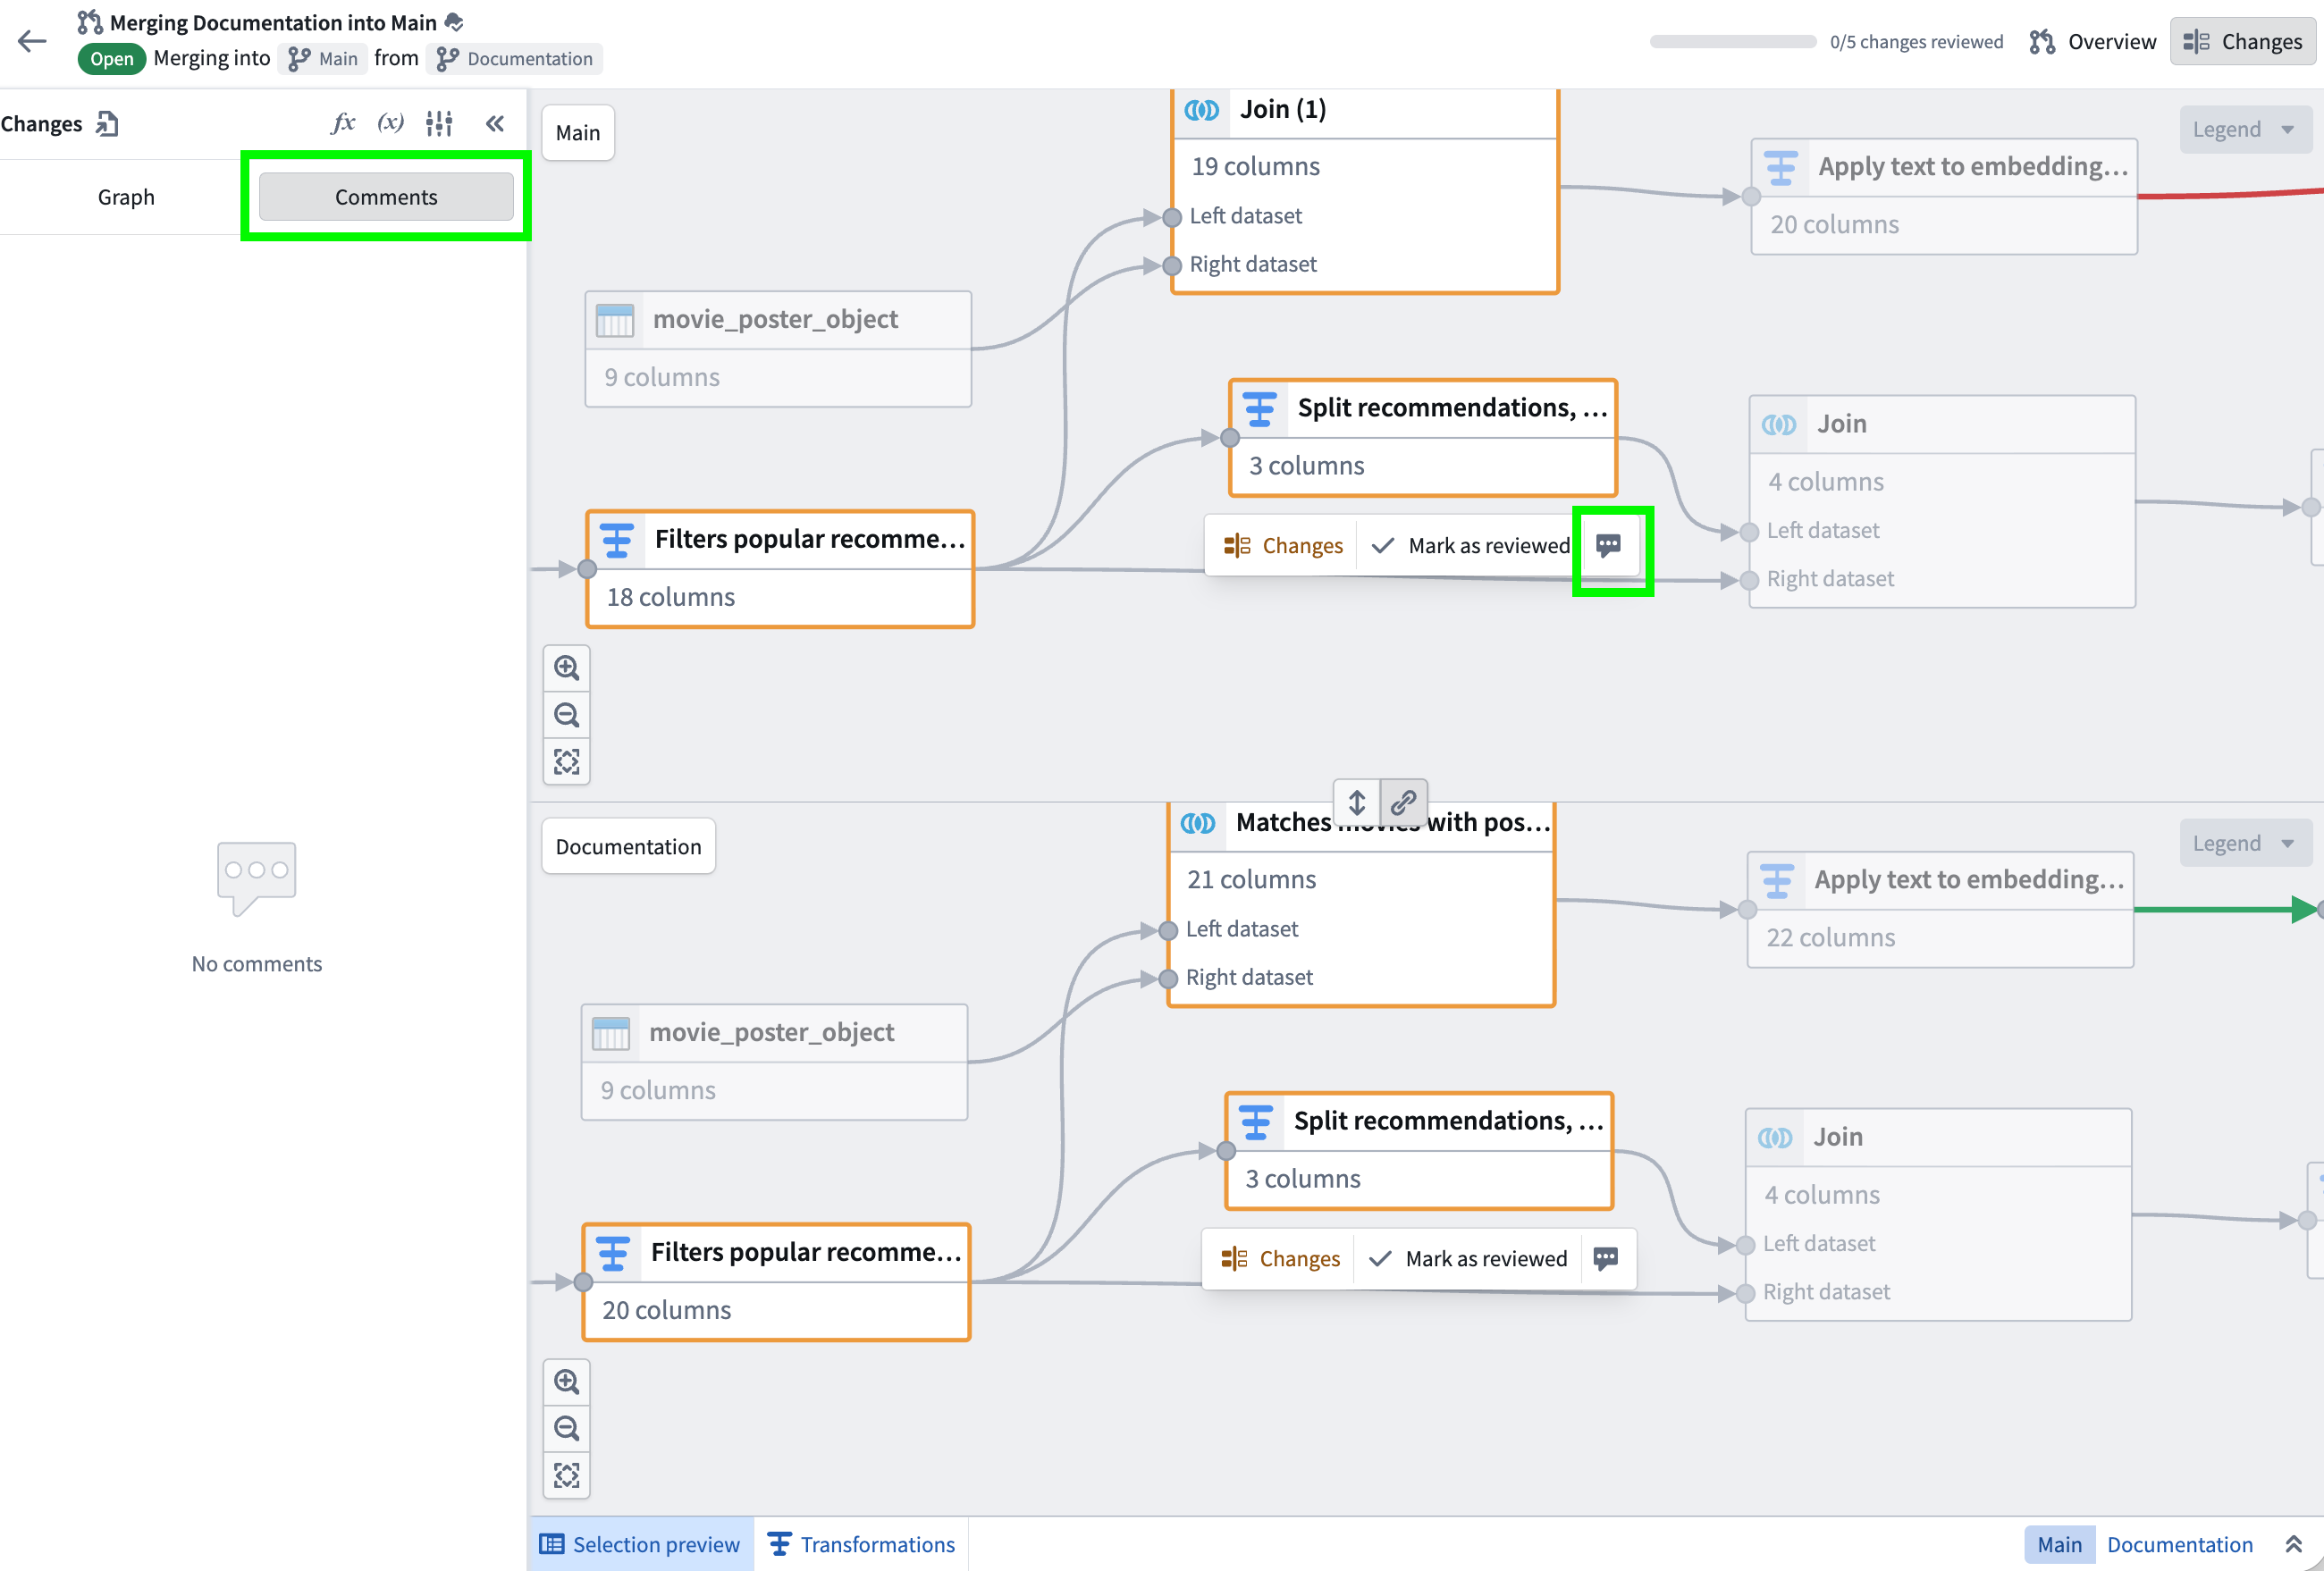
When viewing a specific node, select the comment icon in the top right corner to add a comment. You can view the total number of comments on the node, as well as how many have been resolved. The left-hand panel will continue to show the list of all comments for your pipeline.
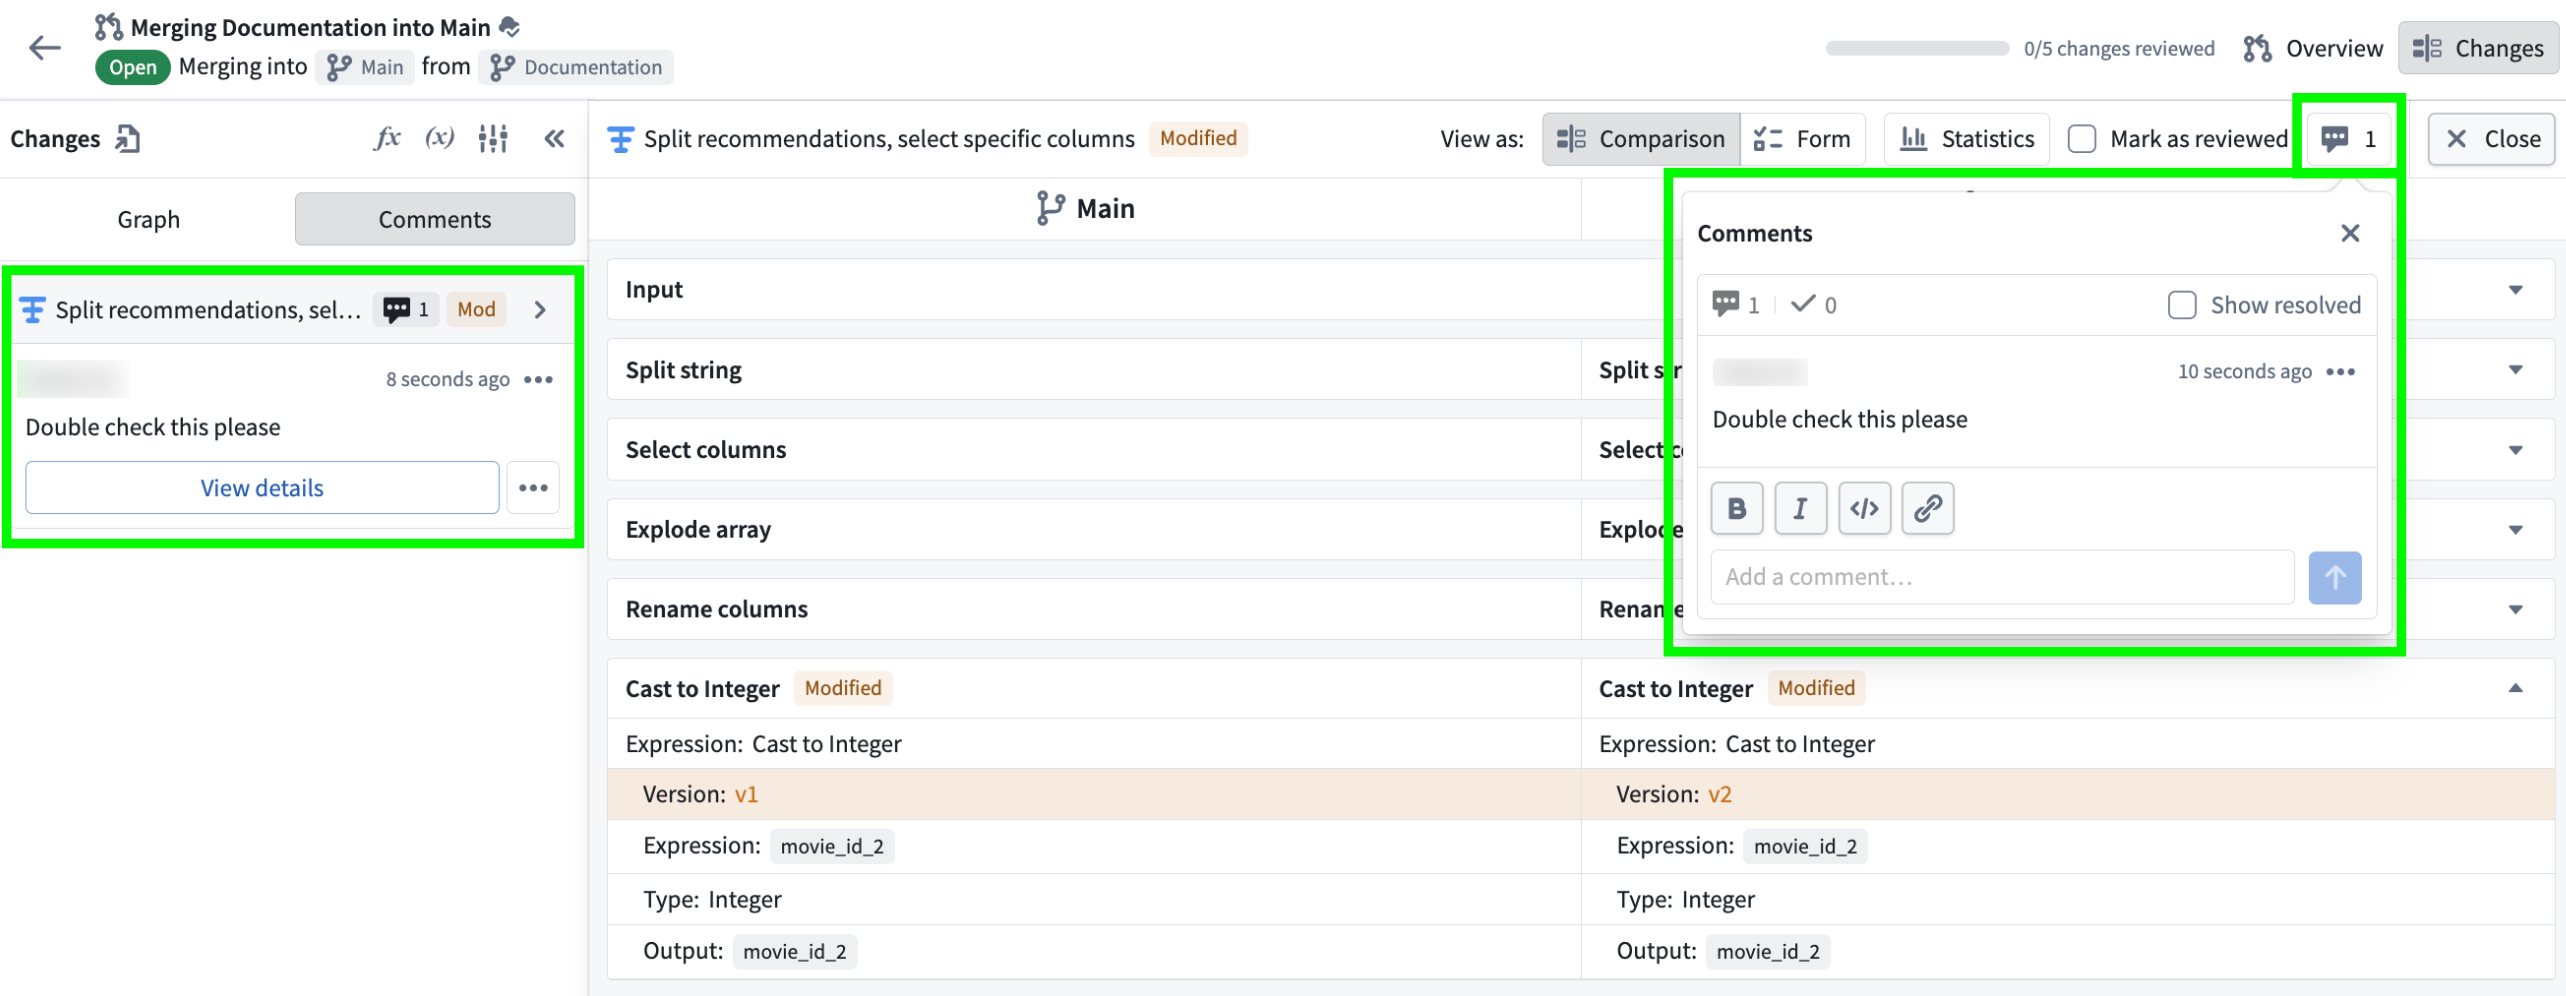
All comments support Markdown formatting, including bold, italics, links, and code blocks. After submitting a comment, you can Edit, Copy, Resolve, or Delete it. You can also tag specific users in your comments by using the @ key.

Resolve comments
You can resolve comments either from the Comments side panel or from the pop-up within a node. When a comment is resolved, it is hidden by default. You can expand the unresolved section in the Comments panel or enable Show resolved in the Comments pop-up to view them.
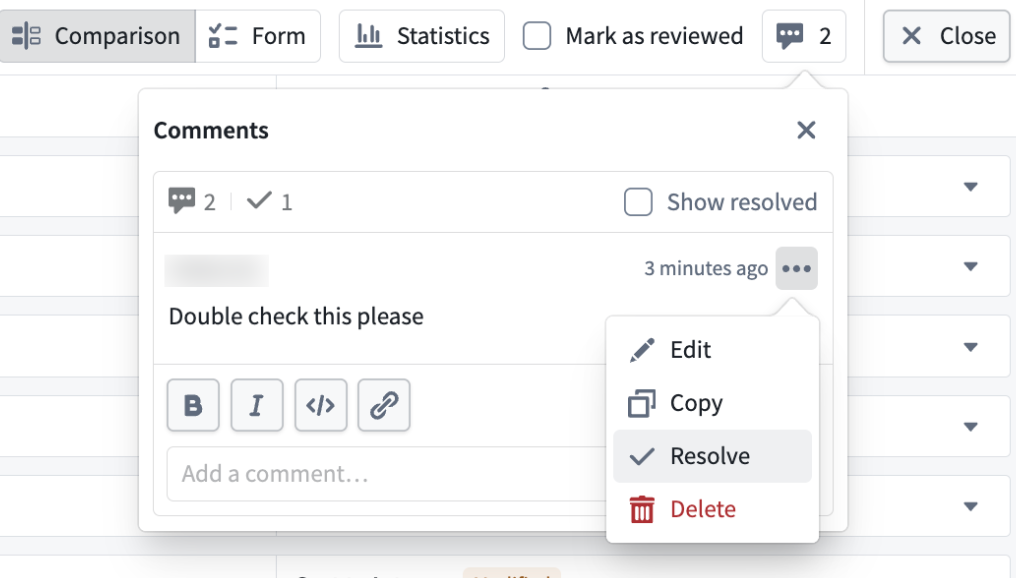
To resolve a comment from within a node, navigate to the comment, select the three dots, and select Resolve.
You can also resolve comments in the Comments side panel. Select the three dots next to the comment and select Resolve.
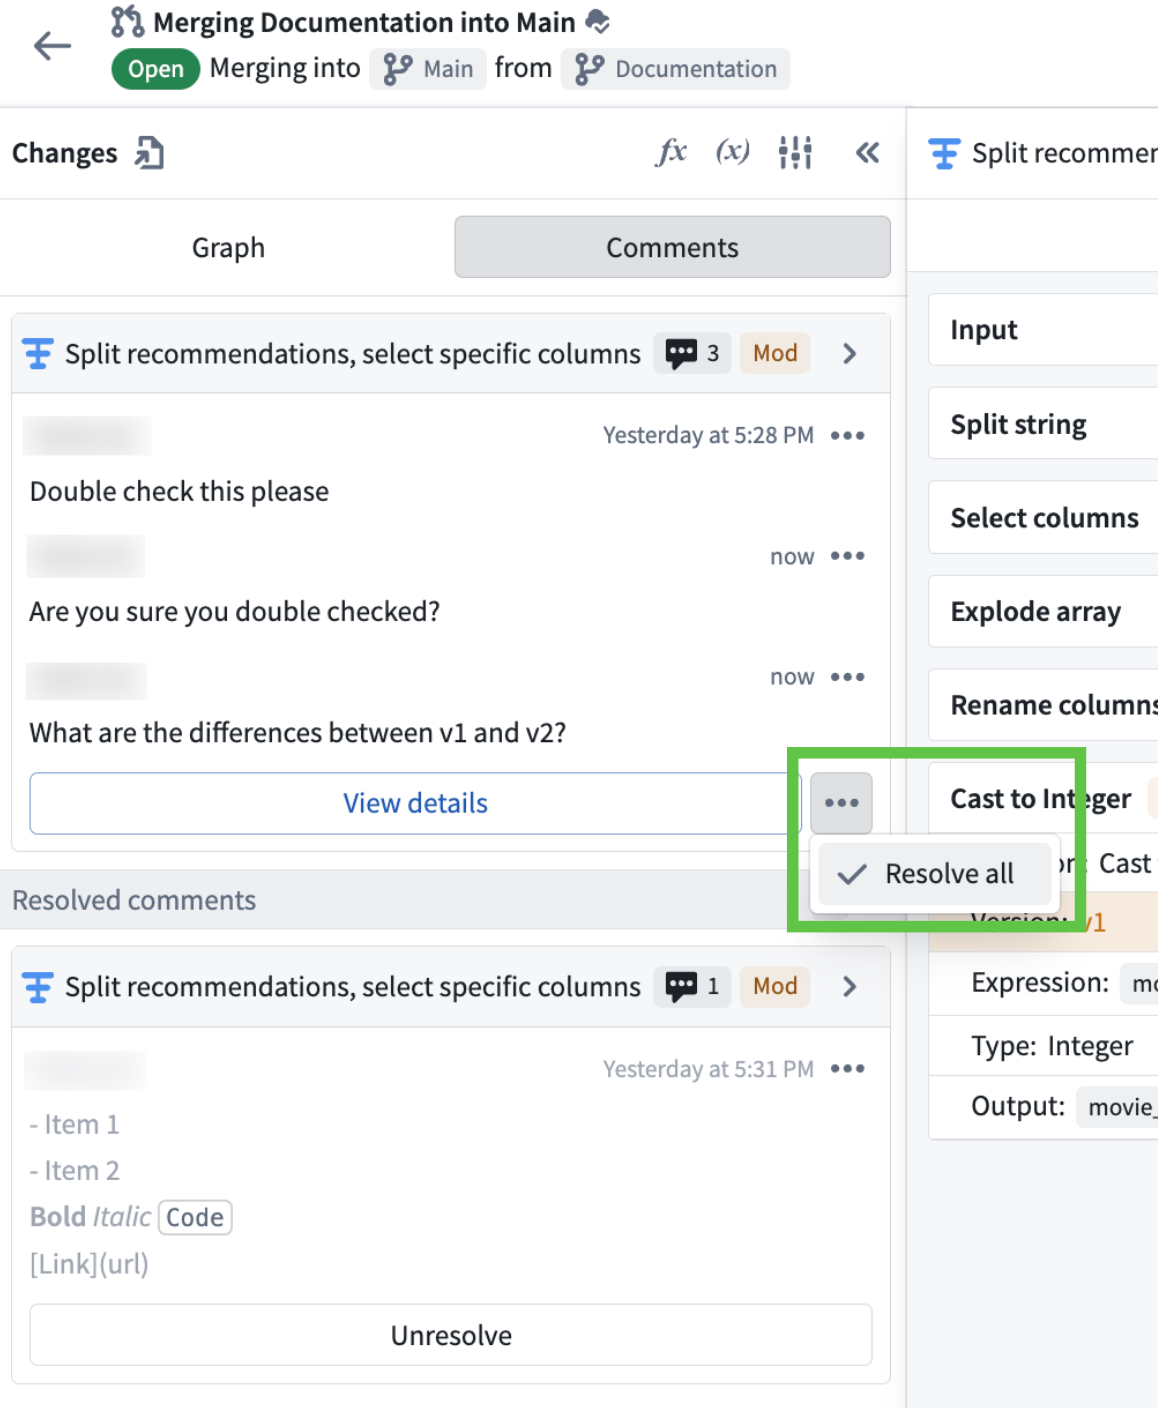
To resolve all comments associated with a node, use the side panel to view all unresolved comments for that node. Select the three dots and select Resolve all.
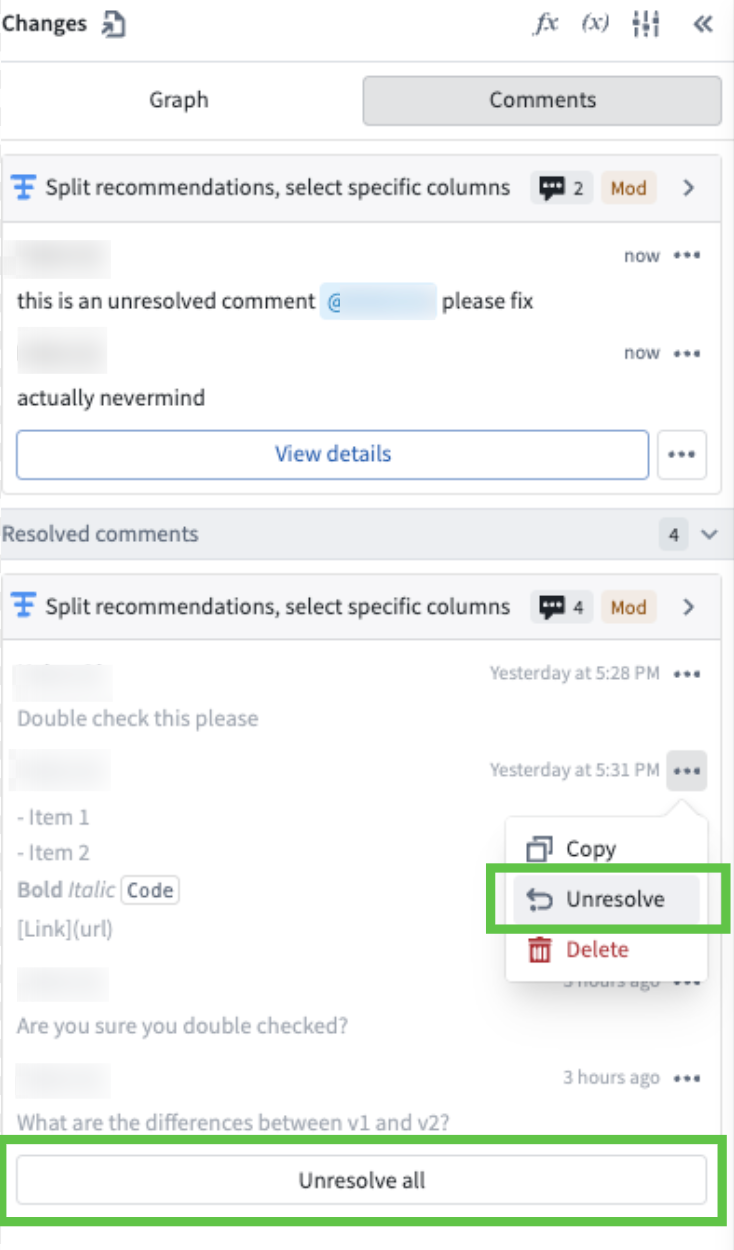
You can also unresolve resolved comments by selecting Unresolve or Unresolve all under the Resolved comments section.
Resolve errors
In some cases, a proposal will show schema or edit errors that must be resolved before merging.
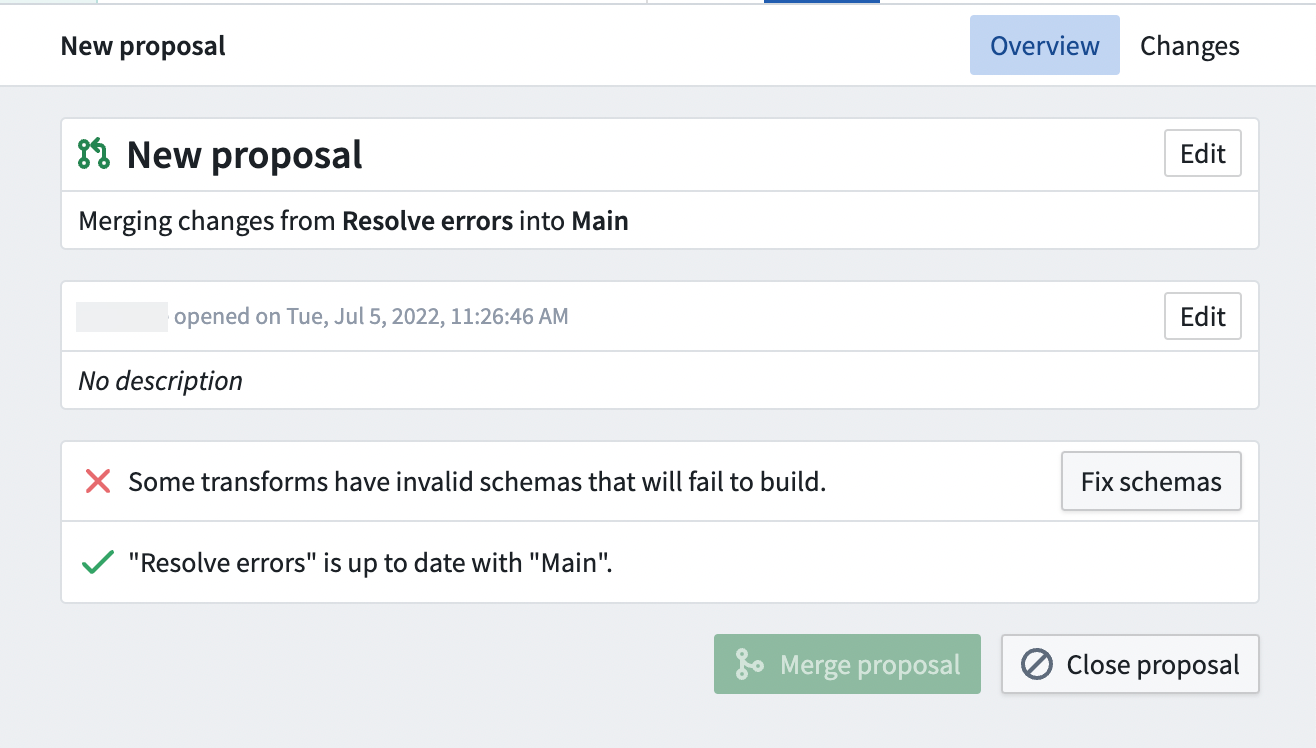
To resolve a schema error preventing a successful build and merge, select Fix schemas.
This will bring you back to the graph where the schema error is.
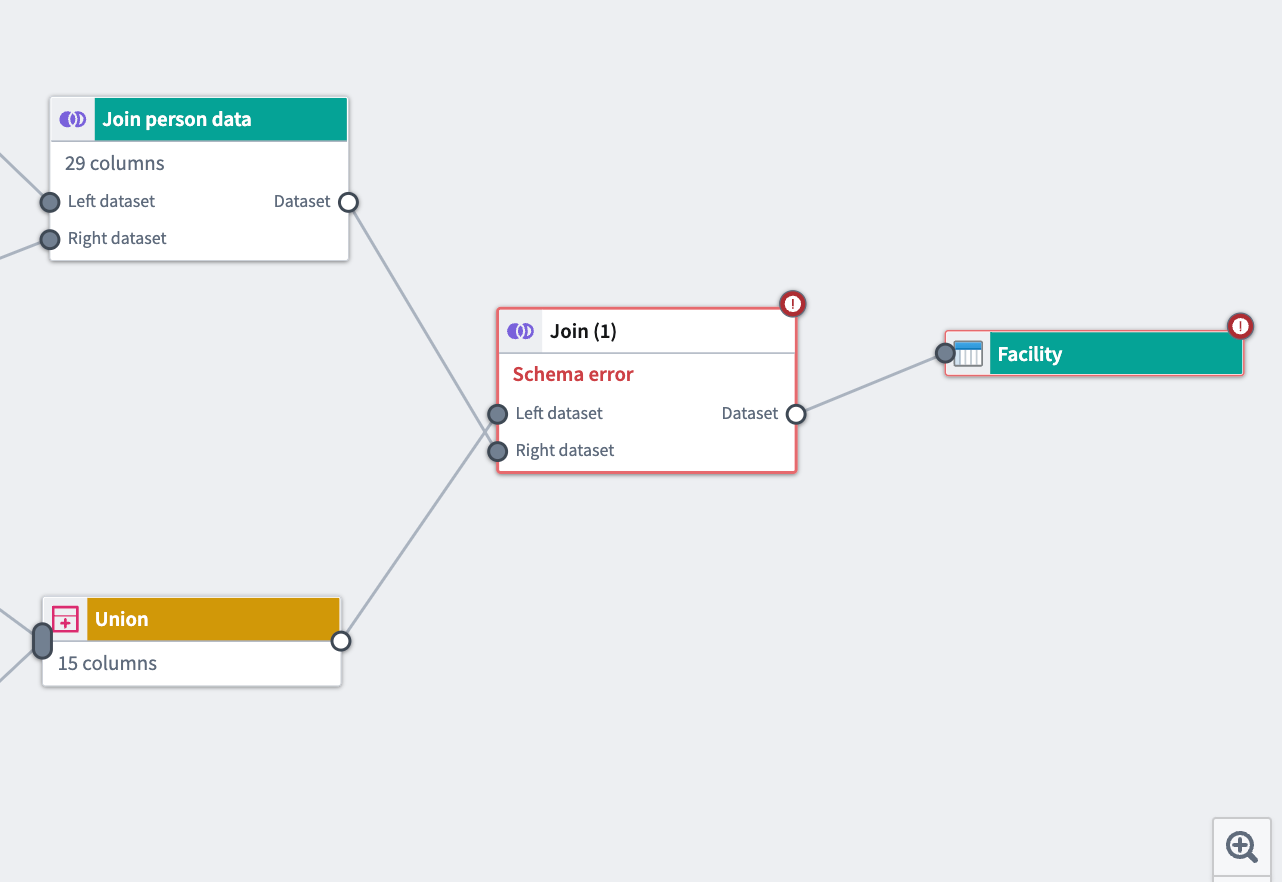
Double-click on the step in the graph that has the error and resolve the conditions that are problematic.
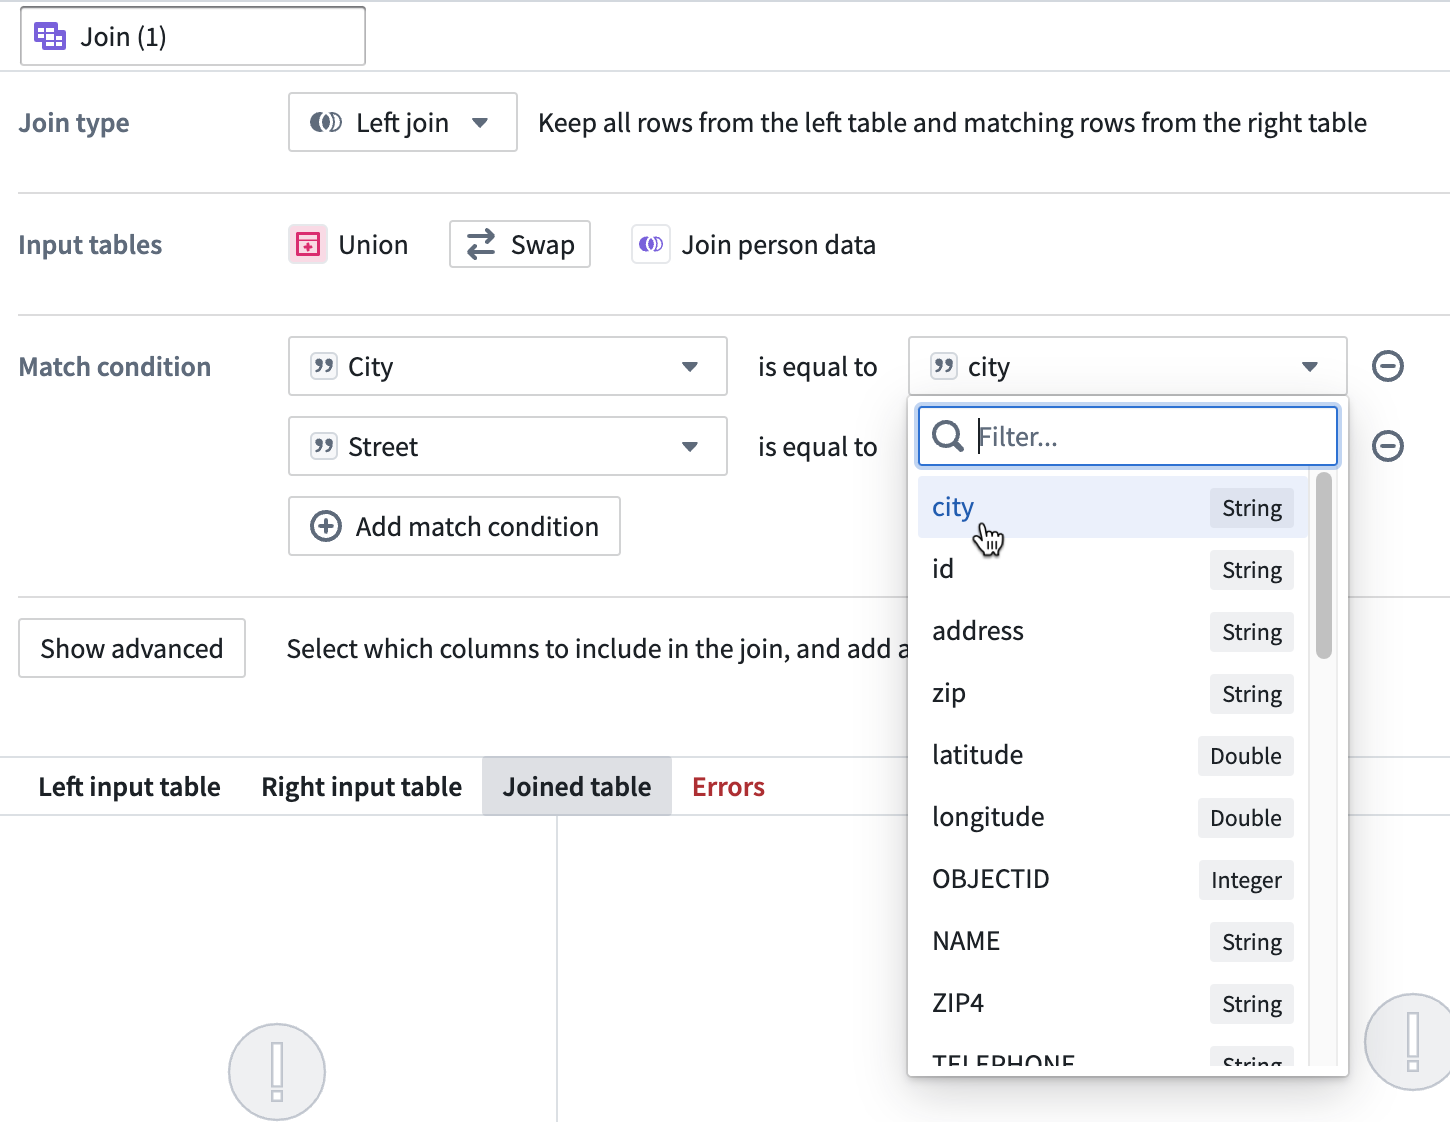
Click Propose to automatically save and propose the resolved branch.
Resolve merge conflicts
In some cases, a proposal will show merge conflicts that must be resolved before merging. Merge conflicts are changes that were made to the base branch in the time since you created a branch from it. Merge conflicts must be resolved to ensure the correct changes are merged into the base branch of your pipeline. To resolve these conflicts, you need to rebase your branch. Rebasing in Pipeline Builder allows you to combine your unpublished changes in your local branch with the latest published changes on your remote branch.
To start resolving conflicts through rebasing, select Resolve in the proposal.
This will bring you to the graph in the Rebasing branches view. Here, you can view and resolve the list of conflicts from the top bar or the left side bar and investigate individual conflicts and changes.
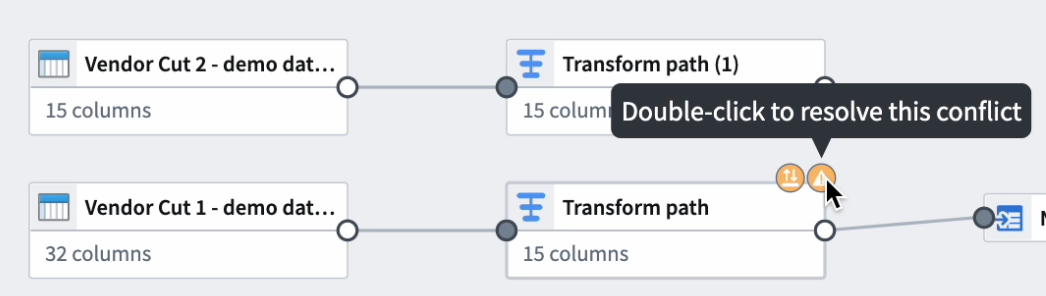
In the rebase branch, you can view the conflicts and changes on the graph. Find more details, including explanations and possible solutions, by hovering over the symbols in the upper right corners of the affected nodes. In the example below, you can resolve the merge conflict by double-clicking on the symbol.
Once you are done resolving all conflicts, you can submit the changes to your branch and proposal by clicking Submit in the upper right of your graph.
中文翻译
审批变更
拥有工作流项目(workflow project)Edit(编辑)权限的流水线构建器(Pipeline Builder)用户,可审批提交至主(Main)流水线分支的变更提案。要审批提案,首先打开构建器的提案(Proposal)视图,从open(待处理)状态的提案列表中选中目标提案。在该页面你可以查看各类详情,包括合并行为(例如从test/branch合并到Main)、变更描述,以及提案中存在的所有错误。
查看变更
切换到变更(Changes)标签页,即可将提案变更与主分支的工作流做对比。左侧面板支持按变更类型筛选。在下方示例中,提案变更包含4项对转换(Transforms)的编辑,以及3项对输出(Outputs)的编辑。
每项提案编辑都会标注变更类型标签:ADD、MOD或DEL。
* ADD:该编辑为工作流新增的内容。
* MOD:该编辑是对现有工作流节点的修改。
* DEL:该编辑会从工作流中移除一个节点。
点击单个编辑项,可并排查看主分支和提案分支的差异。在下方示例中,被提议修改的Join person data节点为现有 join 逻辑新增了CITY列。
查看并对比统计数据
你可以查看并对比分支上任意转换的列统计数据。双击进入对应转换,选择右上角的统计(Statistics)选项,或底部面板的统计标签页即可。
选择View column stats(查看列统计)图标,即可查看并对比选中列的统计数据。
你可以在此查看各类指标,包括: * 空值数量 * 唯一值数量 * 字符串类型:最小/最大长度,以及需要裁剪的字符串数量 * 数值类型:最小值、最大值、中位数、标准差、负值和正值数量
你的分支与主分支的统计数据差异会以颜色编码的形式标注在指标右侧。
切换回概览(Overview)标签页即可继续审阅提案。
跟踪变更并标记为已审阅
在变更标签页中,你可以将每个节点或配置变更标记为「已审阅(reviewed)」。Pipeline Builder会跟踪并展示你已审阅的变更数量和总变更数量,让你可以一眼掌握审阅进度。
从侧边面板选择节点,或直接在画布上点击节点。你既可以点击画布上节点下方的Mark as reviewed(标记为已审阅),也可以选中节点/配置后勾选「标记为已审阅」选项。
界面右上角的进度条会展示你已审阅的变更数占提案总变更数的比例。
请注意:如果此前已标记为已审阅的内容又发生了变更,系统会自动取消其已审阅标记。
:::callout{theme="neutral"} 标记变更为已审阅是用户专属的操作。你标记的已阅状态仅对你自己生效,其他用户可独立将相同变更标记为已审阅,不会影响你的审阅状态。 :::
评论
你可以在提案的概览主标签页添加和查看评论。要发表评论,滚动到概览页面底部直接输入内容即可,也可以在变更标签页对特定节点发表评论。默认情况下,已解决的评论会在概览主页面隐藏,你可以按需切换开关显示已解决评论。
要对特定节点发表评论,点击右上角的变更标签页,在左侧面板打开评论(Comments)板块即可查看所有评论。要给节点添加评论,既可以选中节点后点击评论图标,也可以直接点击节点本身。
查看特定节点时,点击右上角的评论图标即可添加评论。你可以查看该节点的总评论数,以及已解决的评论数量。左侧面板会持续展示流水线的所有评论列表。
所有评论都支持Markdown格式(Markdown formatting),包括粗体、斜体、链接和代码块。提交评论后,你可以对其进行Edit(编辑)、Copy(复制)、Resolve(解决)或Delete(删除)操作。你也可以在评论中使用@键标记特定用户。
解决评论
你可以从评论侧边面板或节点内的评论弹窗中解决评论。评论被解决后默认会隐藏,你可以展开评论面板的未解决分区,或在评论弹窗中开启Show resolved(显示已解决)开关来查看已解决评论。
要在节点内解决评论,找到对应评论,点击三个点的更多按钮,选择Resolve(解决)即可。
你也可以在评论侧边面板中解决评论:点击评论旁的更多按钮,选择「解决」。
要解决和某个节点关联的所有评论,可在侧边面板查看该节点的所有未解决评论,点击更多按钮后选择Resolve all(全部解决)。
你也可以在「已解决评论」分区下选择Unresolve(取消解决)或Unresolve all(全部取消解决),恢复评论的未解决状态。
解决错误
部分情况下,提案会存在模式(schema)错误或编辑错误,必须解决后才能合并。
要解决导致构建和合并失败的模式错误,点击Fix schemas(修复模式)。
点击后会跳转至存在模式错误的画布页面。
双击画布中存在错误的步骤,修复问题条件即可。
点击Propose(提交提案)即可自动保存修改并提交修复后的分支提案。
解决合并冲突
部分情况下,提案会存在合并冲突(merge conflicts),必须解决后才能合并。合并冲突指的是从基分支拉出新分支后,基分支又发生了变更的情况。你必须解决合并冲突,才能确保正确的变更被合并到流水线的基分支中。要解决这些冲突,你需要对你的分支执行变基(rebase)操作。Pipeline Builder中的变基功能可以将你本地分支的未发布变更,与远程分支的最新已发布变更合并到一起。
要通过变基解决冲突,点击提案中的Resolve(解决)按钮。
点击后会跳转至Rebasing branches(变基分支)视图的画布页面。你可以在顶部栏或左侧边栏查看冲突列表并进行解决,也可以逐个查看冲突和变更的详情。
在变基分支中,你可以在画布上查看冲突和变更。将鼠标悬停在受影响节点右上角的标识上,可查看更多详情,包括问题说明和可能的解决方案。在下方示例中,你可以双击该标识来解决合并冲突。
解决完所有冲突后,点击画布右上角的Submit(提交)按钮,即可将变更提交到你的分支和提案中。