Custom functions(自定义函数)
Custom functions include both custom expressions and custom transforms. Both capabilities are useful for repeating logic across your pipeline while managing it in a single location.
Custom transforms enable you to save a series of transform boards as a single transform for reuse across your pipeline.
Custom expressions enable you to save a single expression with optional parameters for reuse across your pipeline. Custom expressions can be used inside of other transforms such as filters or case statements.
A custom function generally consists of a name (required), description (optional), function arguments (optional), and the function definition (required).
Create a custom expression
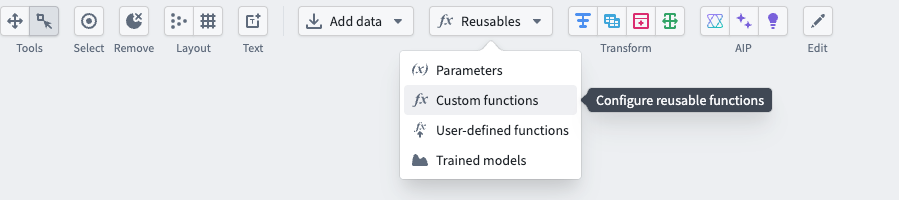
To create a custom expression, select the Reusables dropdown at the top of the graph, then choose Custom functions.
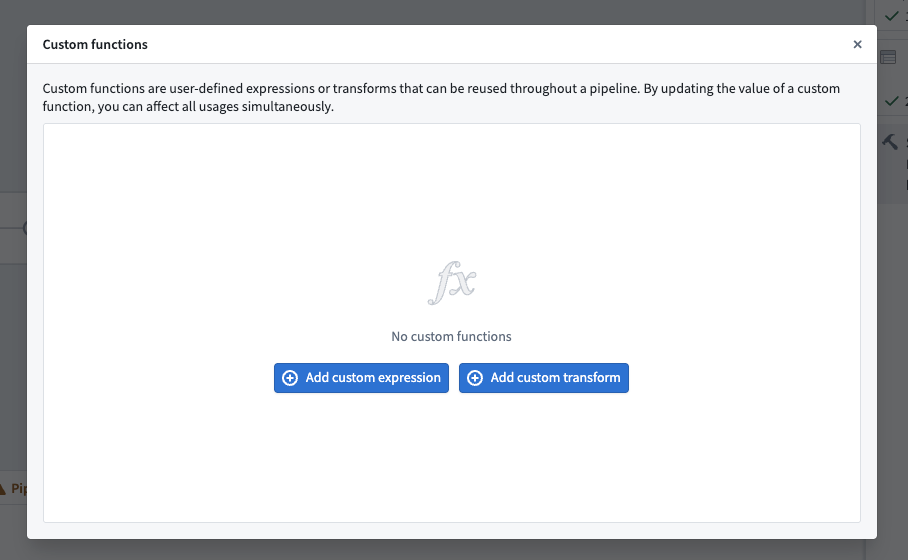
Select Add custom expression.
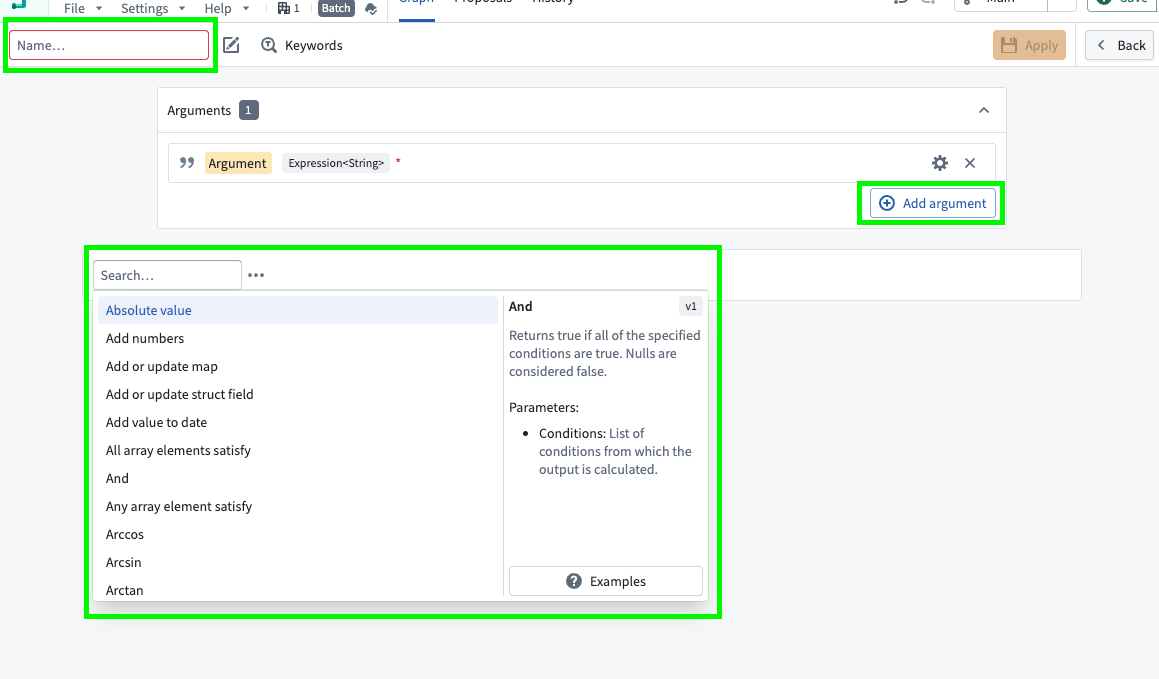
In the new window, configure your custom expression. Enter a name in the top left, add any arguments in the Arguments window using the Add argument option, and define your expression. Select Apply when finished.
After creating a custom expression, you can search for it the same as any other expression in a transform node or in a transform.
Create a custom transform
Two steps are required to create a custom transform:
- Define your logic as a series of transform boards.
- Convert the transform boards into a new custom function.
Below, we will review an example for each step.
Define a series of transform boards
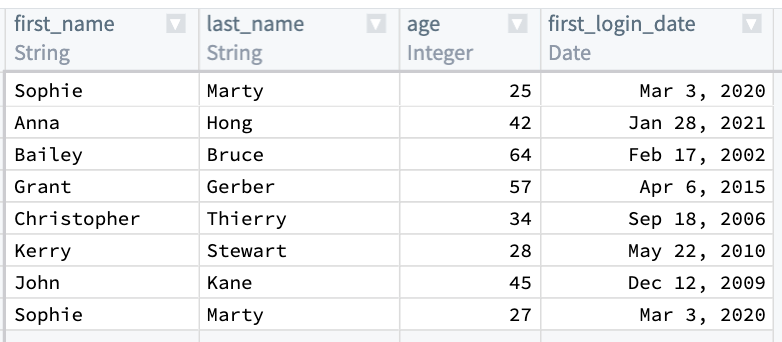
Suppose you have a table of users, and you want to create a primary key to uniquely identify each user. You know that each user’s first_name, last_name, and first_login_date is a unique combination. You would like to add a column primary_key of type String to the dataset, which is a hash of those three columns, then drop first_name, last_name, and first_login_date. Finally, you want to keep only one row per user if there are duplicates, retaining the row with the lowest age value.
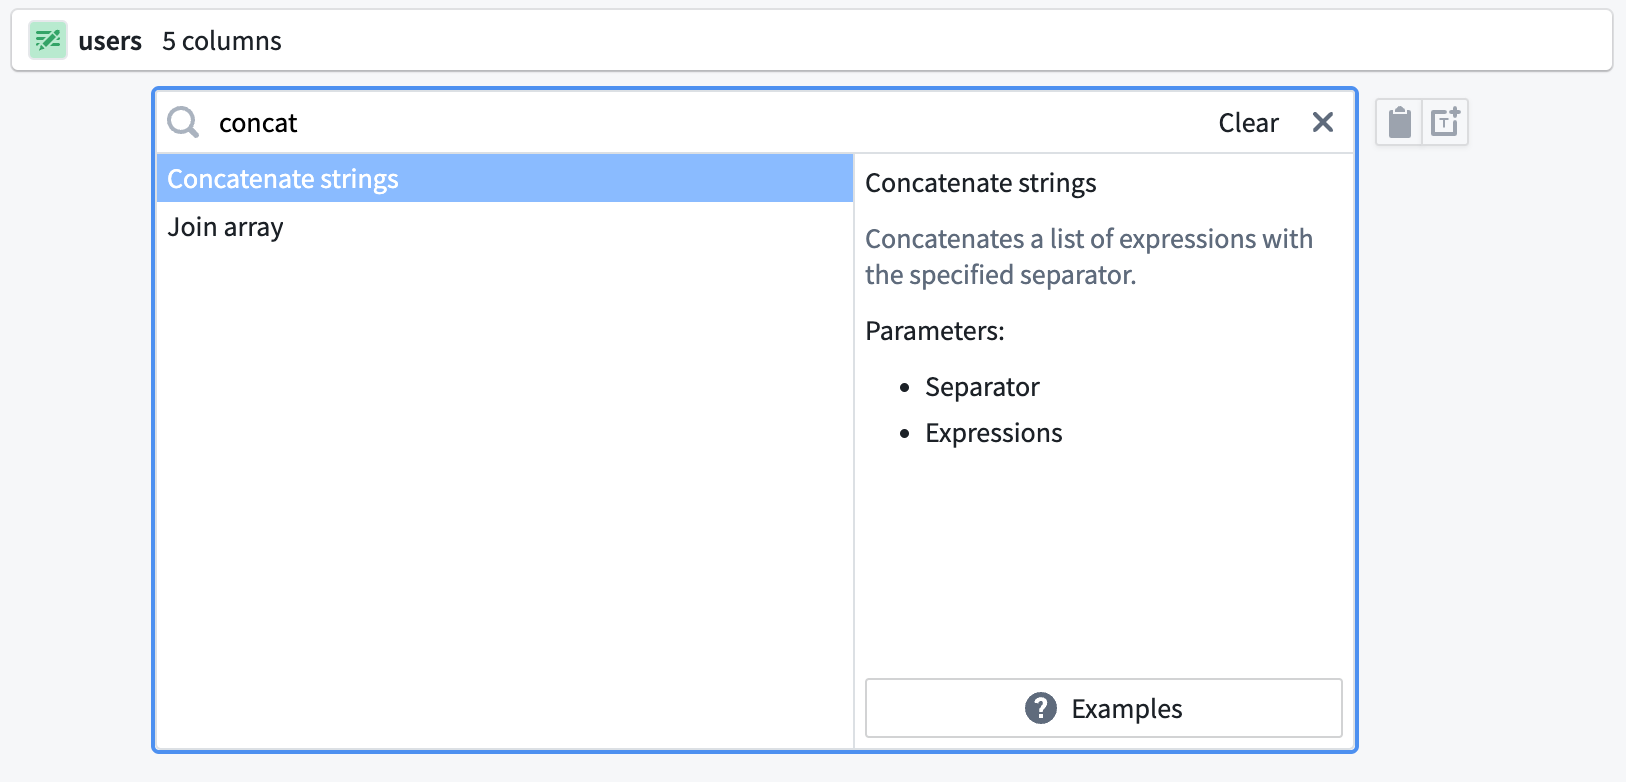
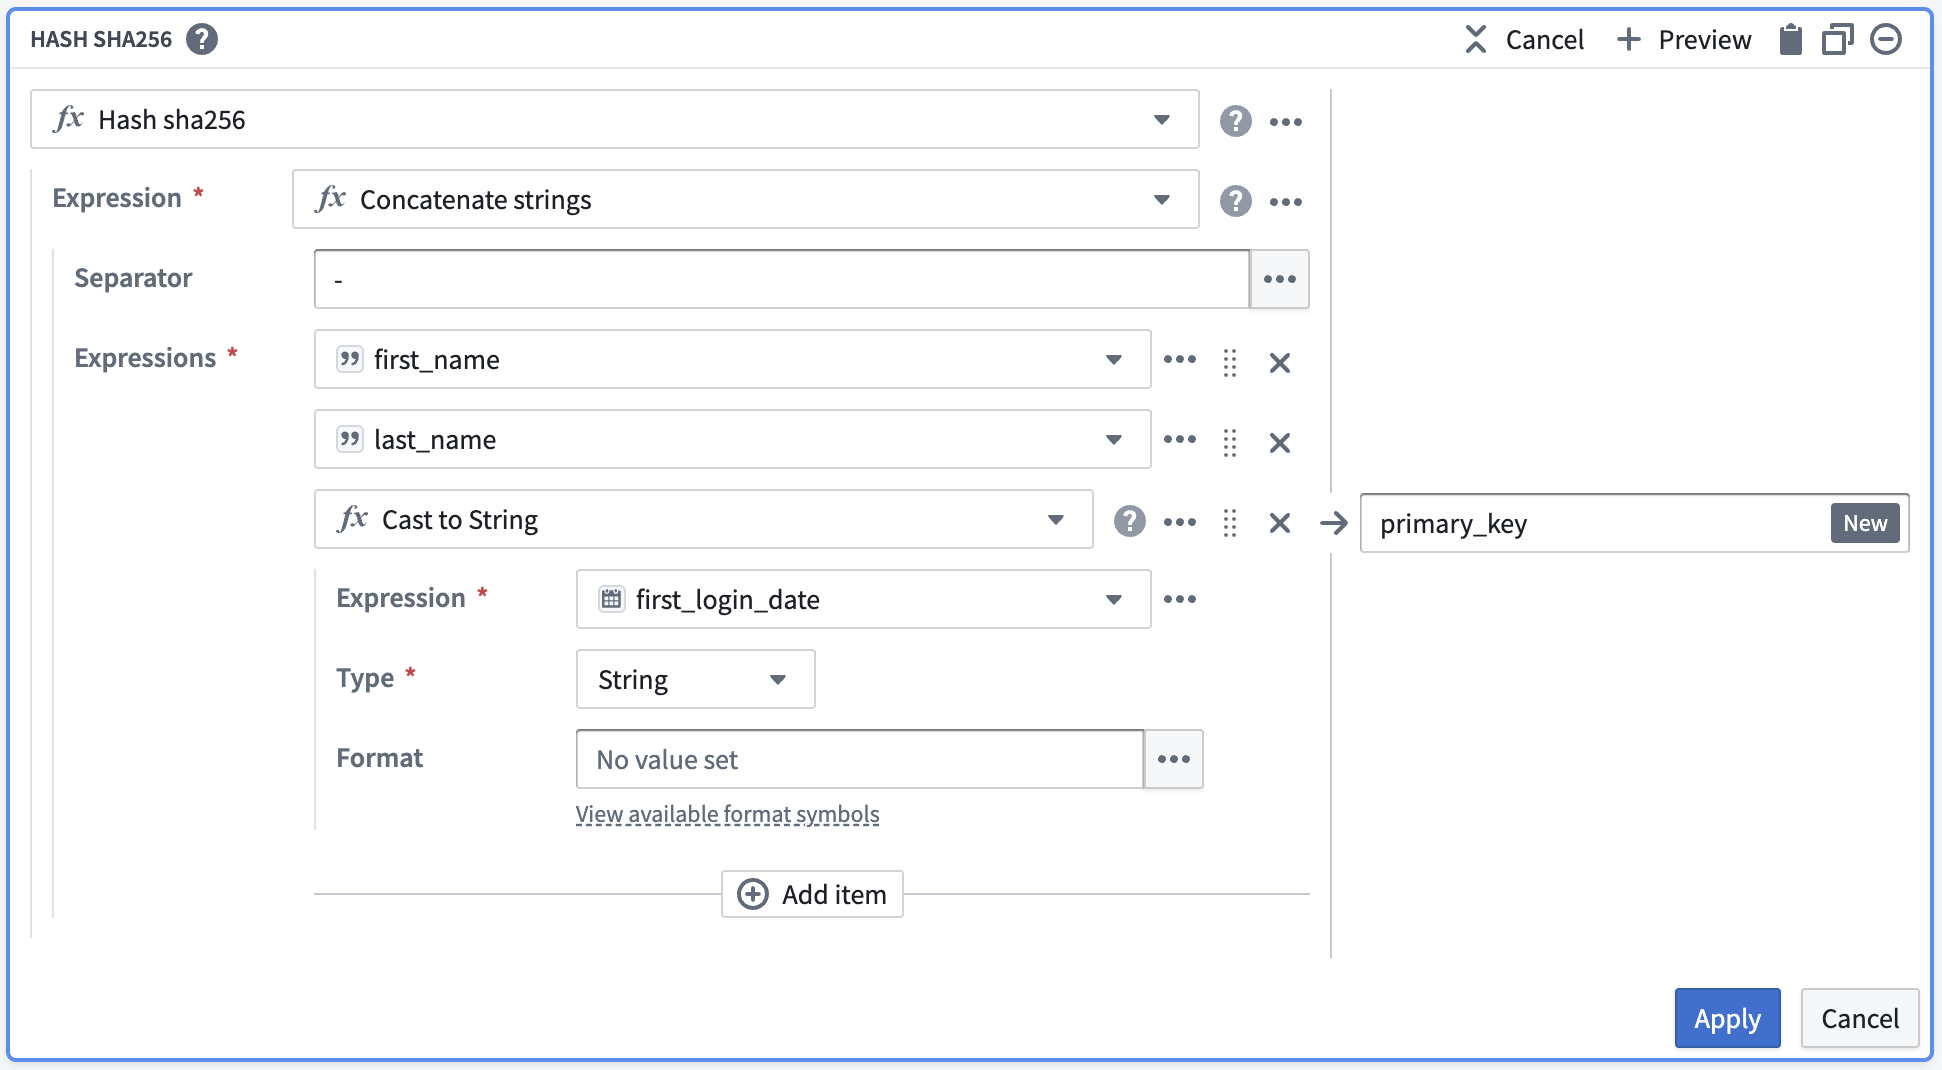
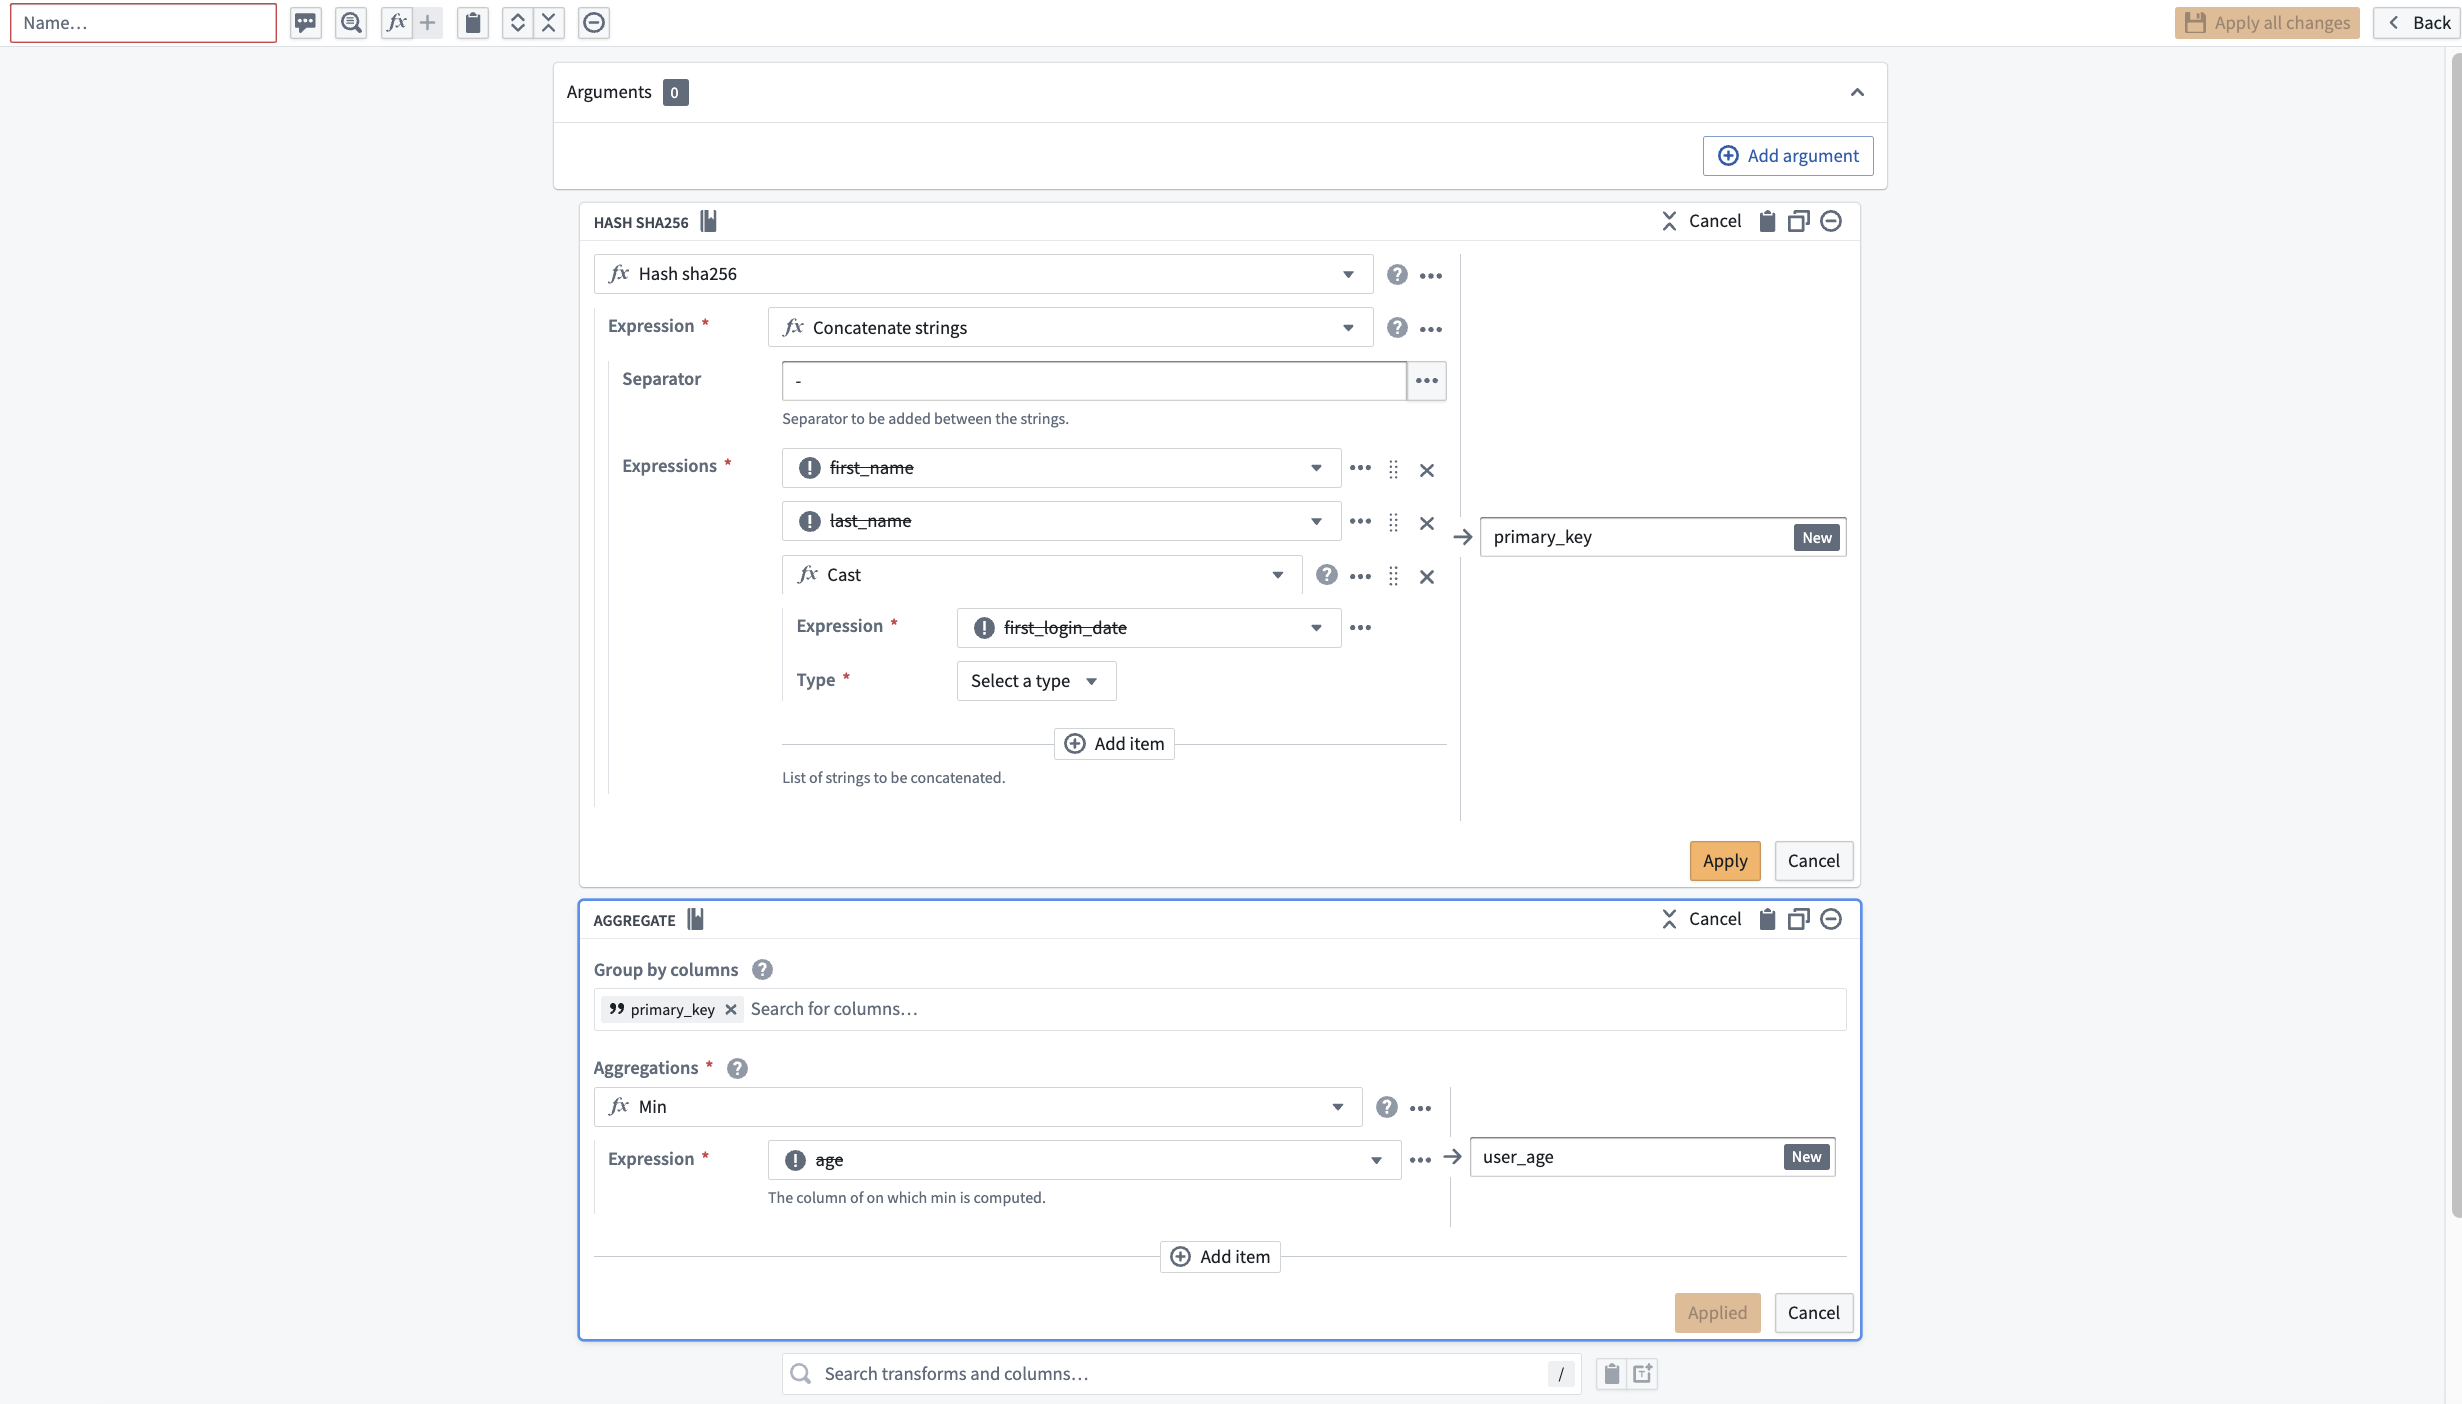
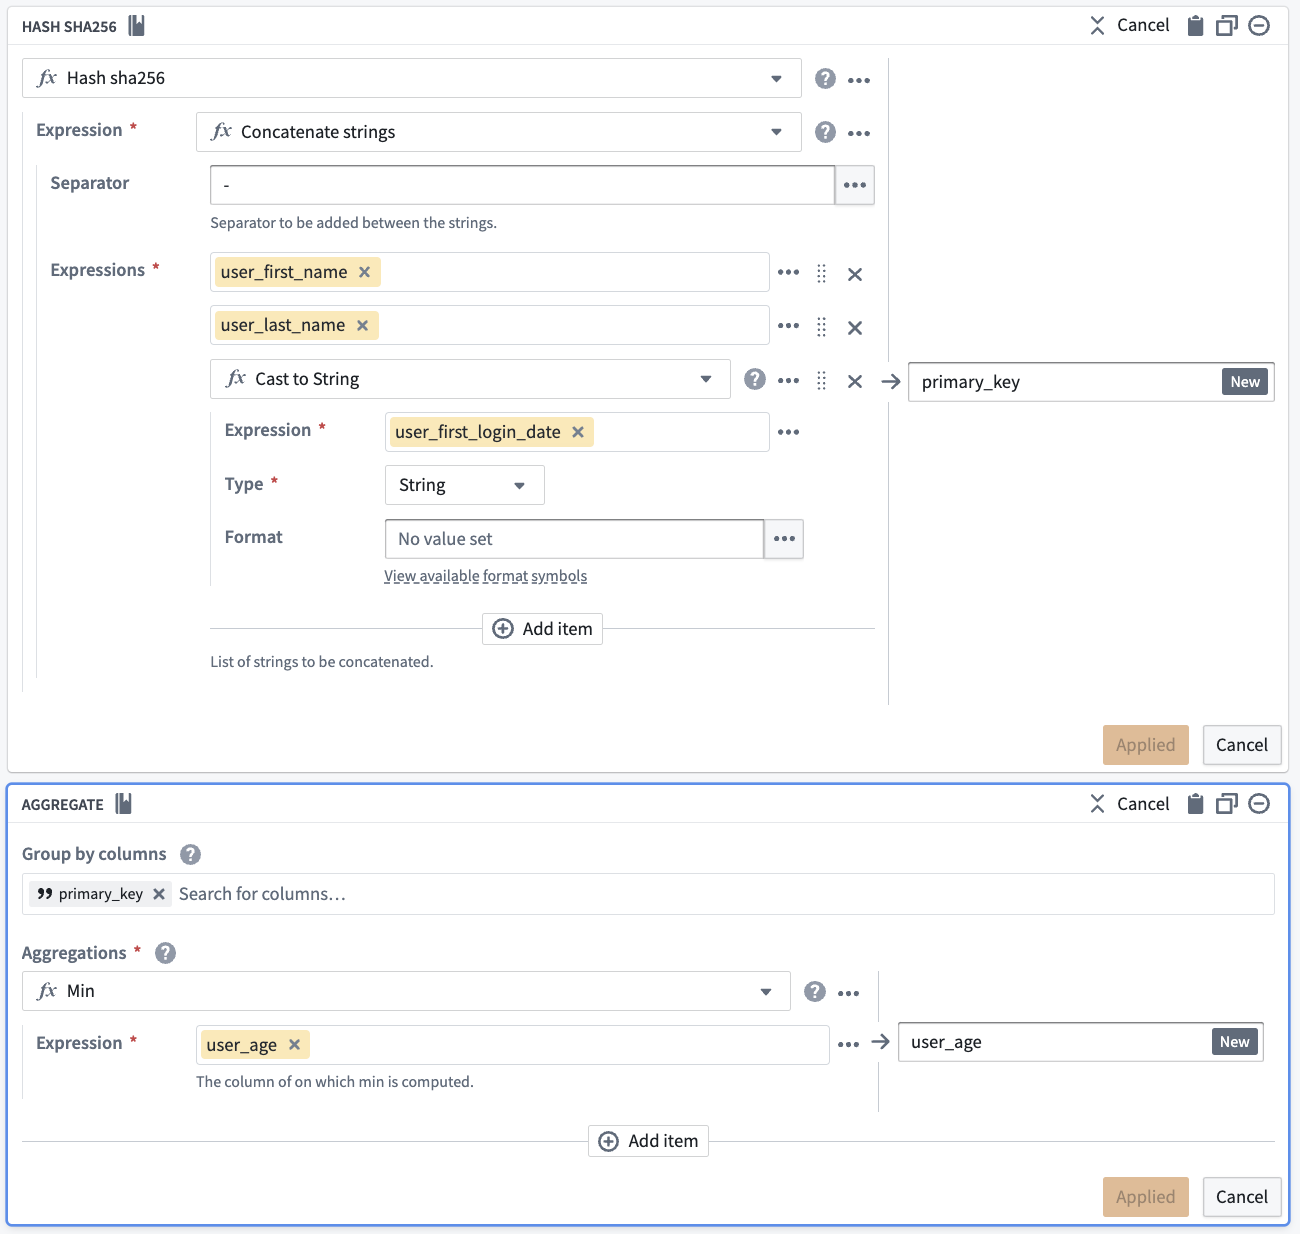
First, combine first_name, last_name, and first_login_date into one column. You can use the Concatenate strings transform to add those three columns together.
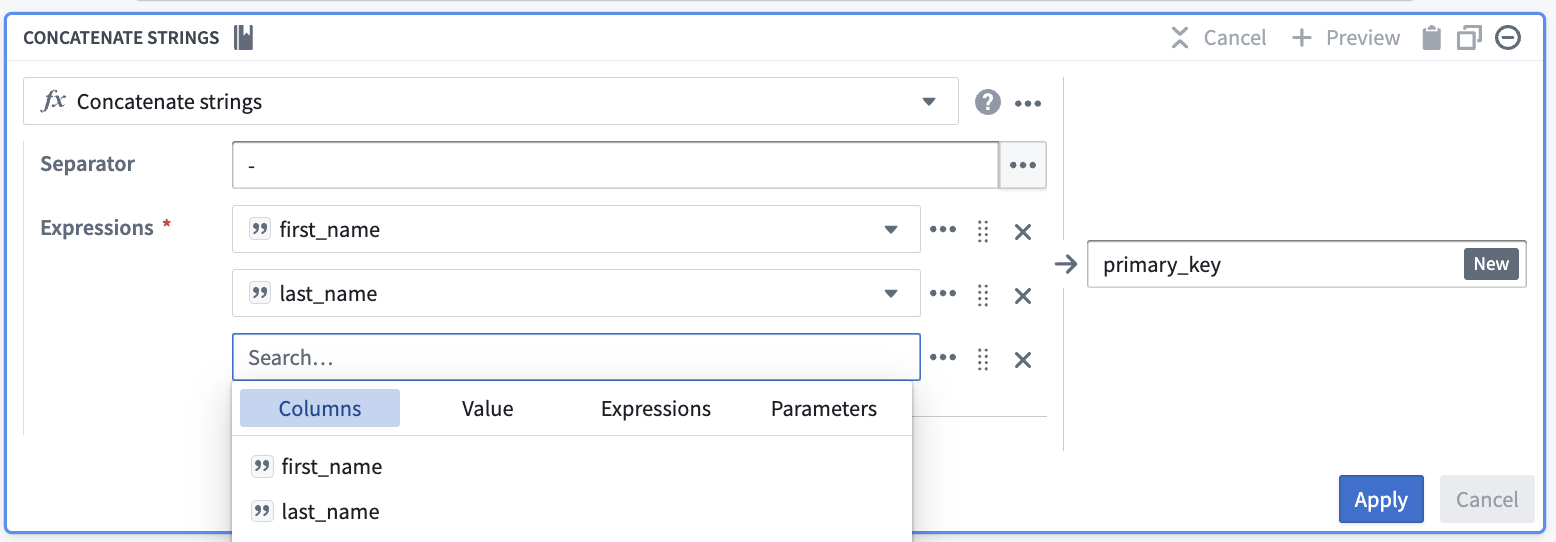
For the Separator field, enter a -. Then, choose each column in the Expressions dropdown. For the first two columns, choose first_name and last_name. However, first_login_date column is not an option for us to choose from for our third field. This is because it is a Date type, and the Concatenate strings function only accepts String types.
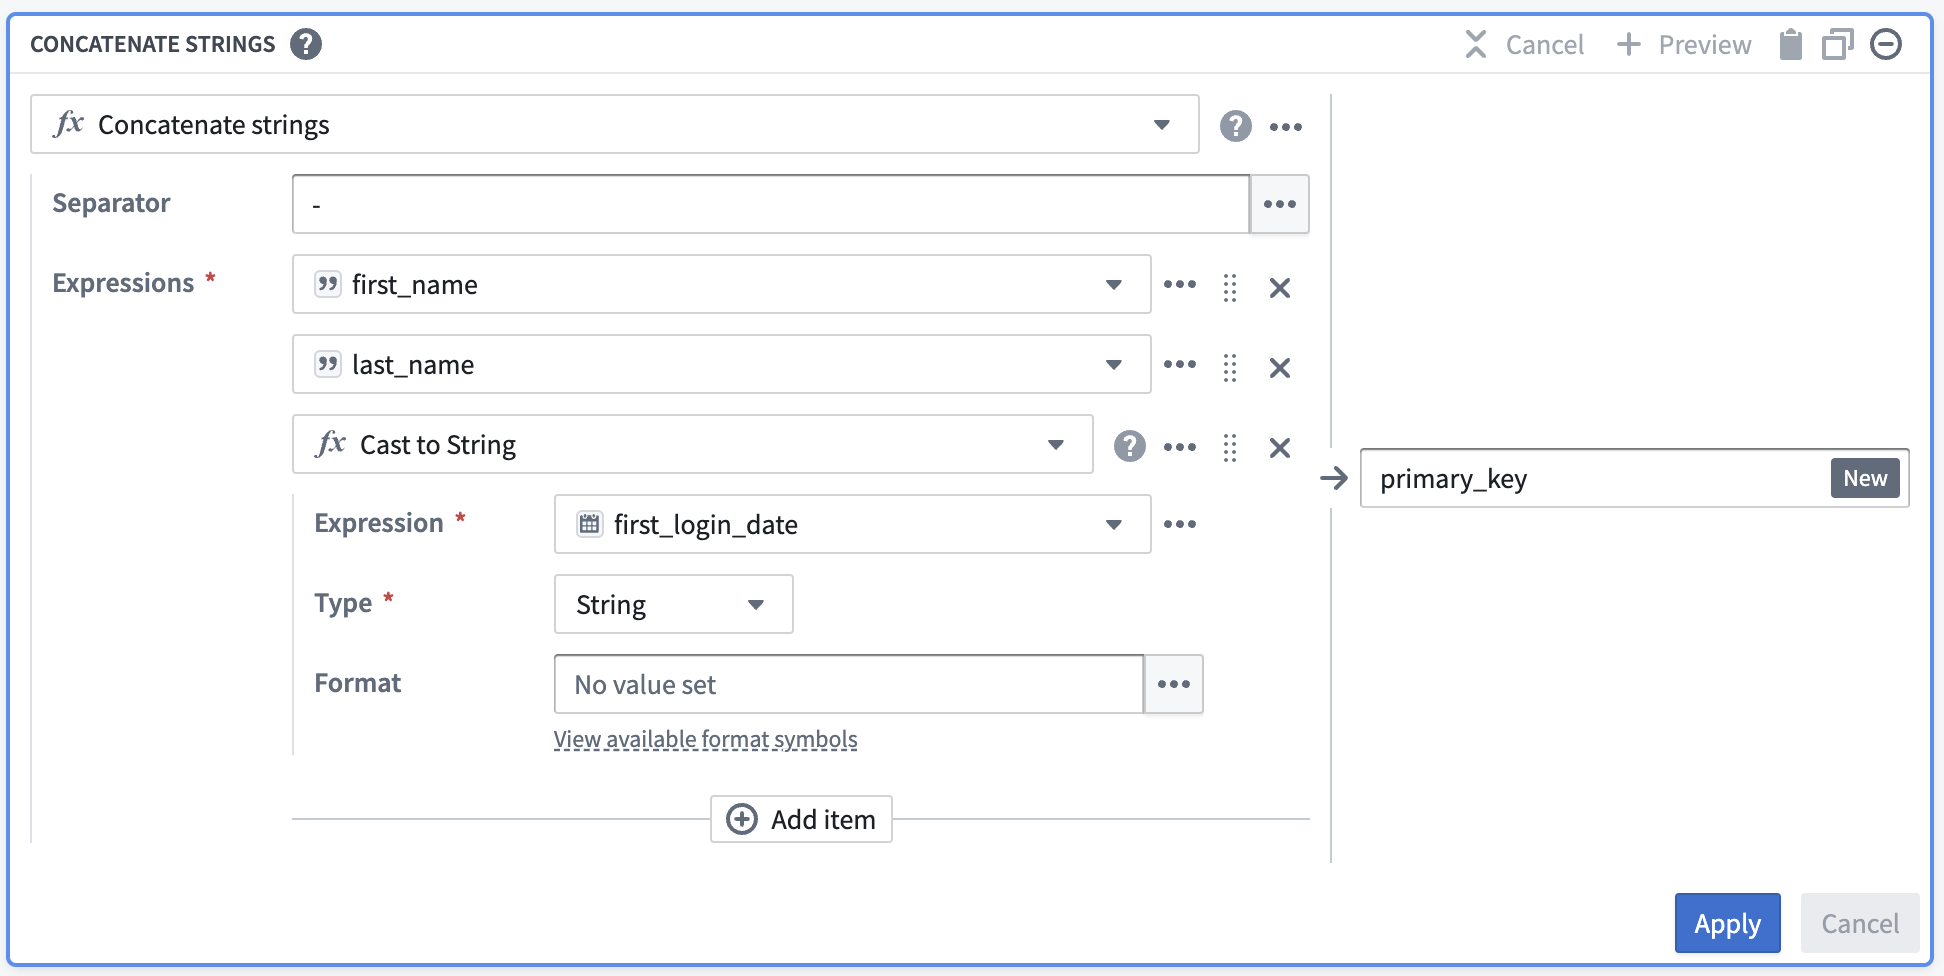
To resolve this, insert a Cast expression from the Expressions tab. The parameters will be first_login_date for the Expression and String for the Type to cast it to. This prevents you from needing to change first_login_date globally, which would affect all downstream transform boards.
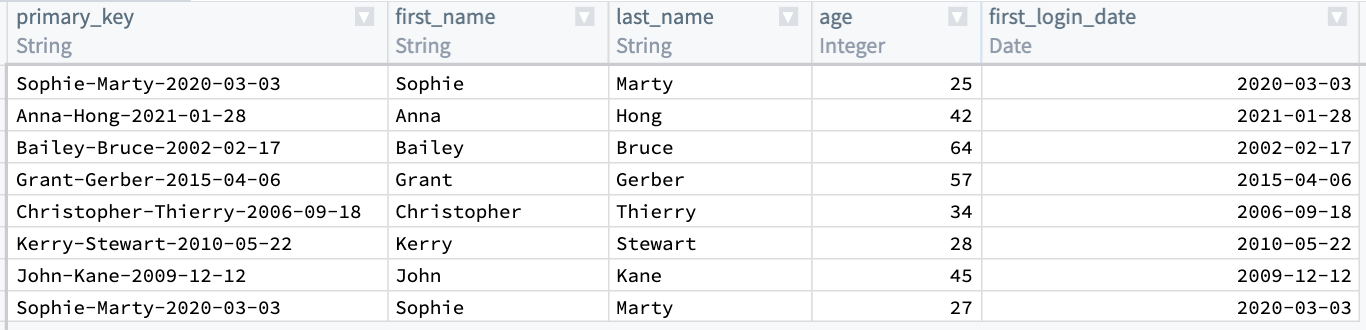
Once you select Apply, the output table should look like this:
Now, you must de-identify the data within primary_key. One way to do this is to create a hash for each value in primary_key by applying the Hash sha256 transform. You can do this in the same board by selecting the Reuse value option to replace Concatenate strings with Hash sha256.
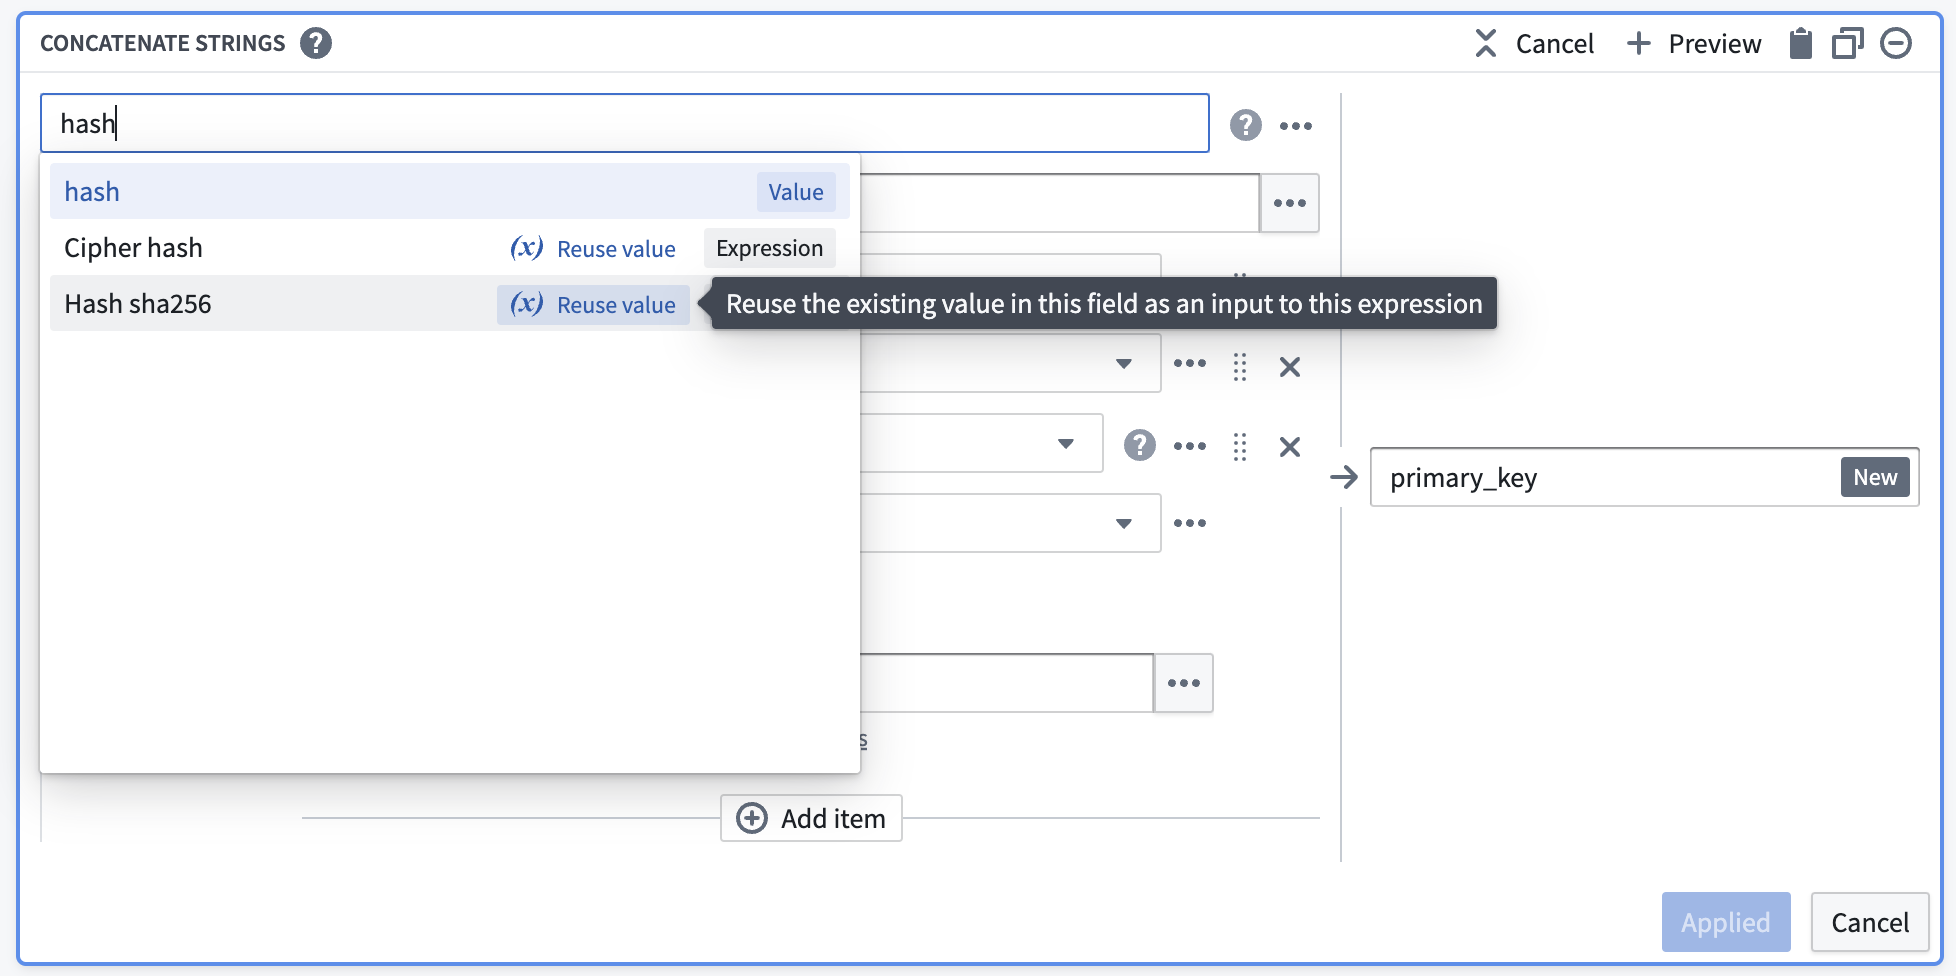
This option keeps the existing values and makes them the first input to the new transform.
After selecting Apply, validate that your output matches what you would expect: a primary_key: String column that contains unique data about each row.

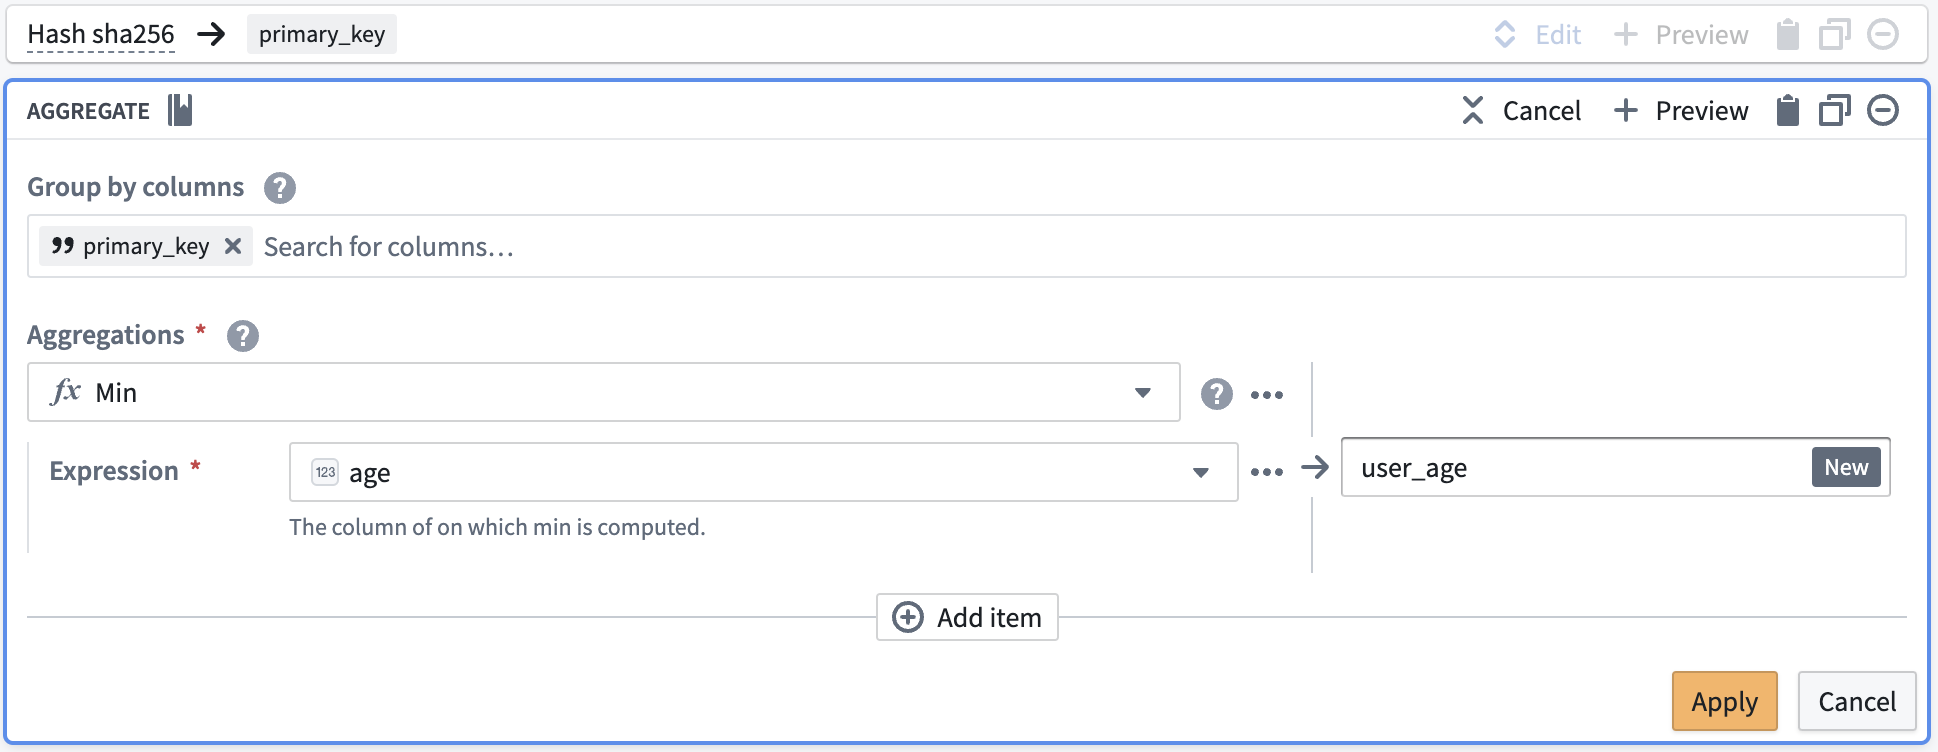
Now, you will notice that the first and last row in primary_key are the same. You want to keep the row with the lower age of 25, and drop first_name, last_name, and first_login_date. To do this, add an Aggregate transform. Input primary_key in the first field Group by columns, and age in the second field Aggregations with a Min expression:
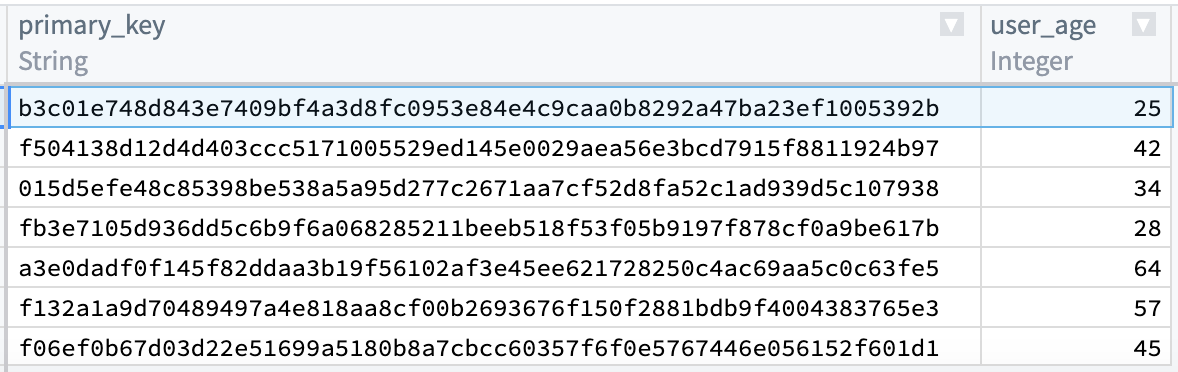
Finally, the output table should look like the image below. You can verify that there is only one row for primary_key = b3c01... and age is 25.
Convert a series of transform boards into a custom function
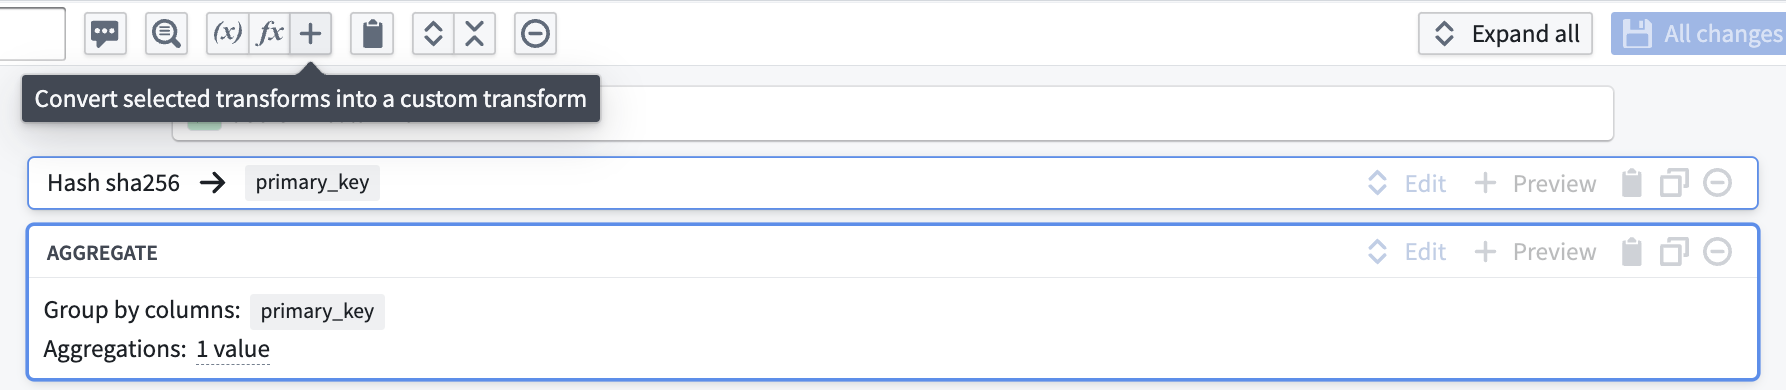
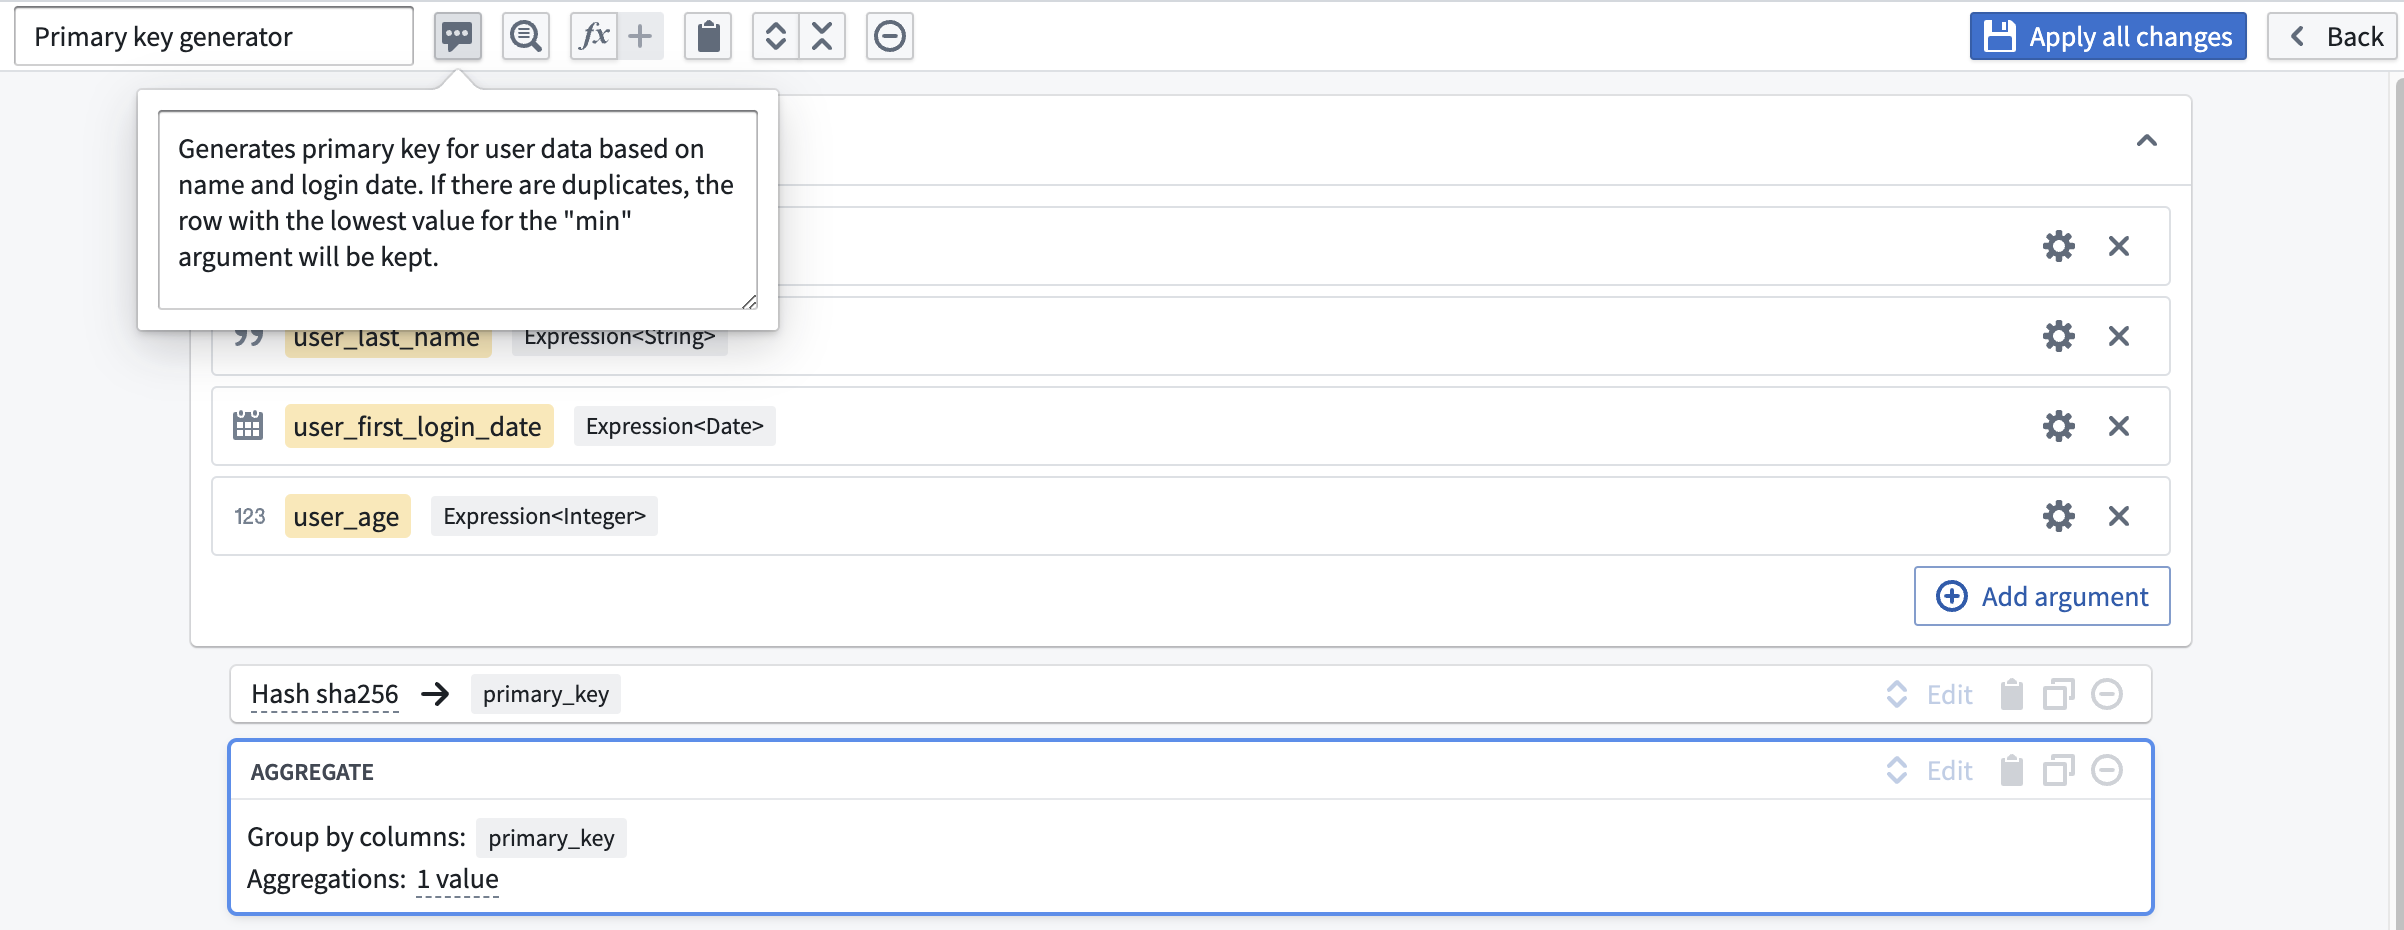
Now, suppose that you want to reuse this logic in three different places within your pipeline. We can convert our logic into a custom function by using Shift + Down Arrow to select both boards, then selecting the + button in the top bar.
This will take you to the custom function creation page. You will notice that the column inputs first_name, last_name, first_login_date, and age are crossed out; this is because the function you are creating will be generic for any four inputs of the correct types within your pipeline regardless of column name.
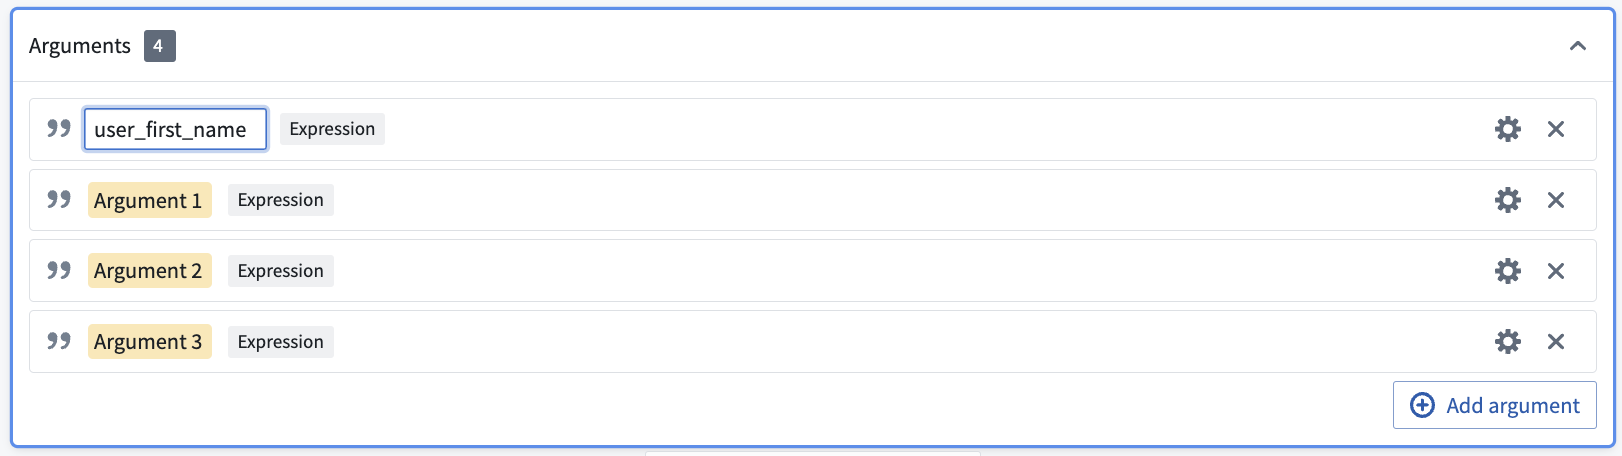
To define these inputs, select Add argument four times. Configure the argument names by clicking into the yellow box.
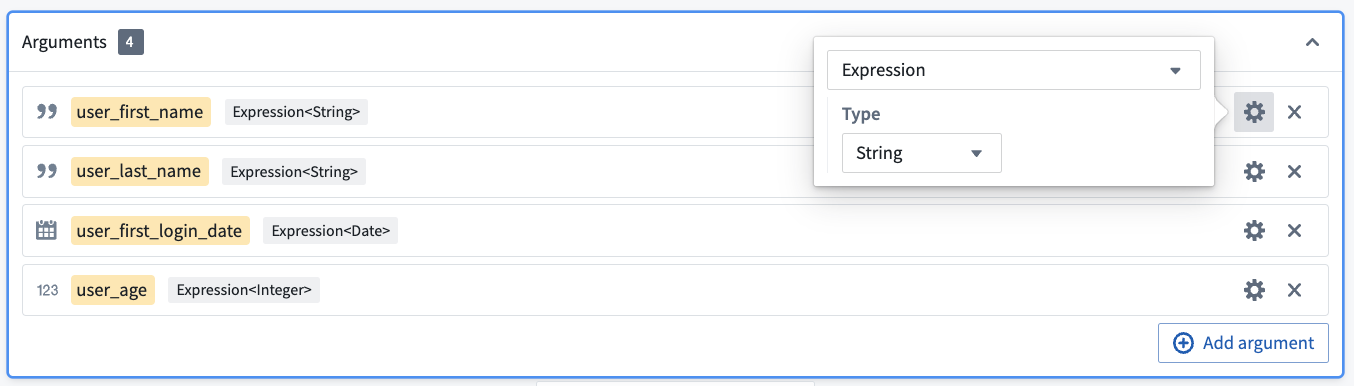
Then, configure the argument types by clicking into the gear icon to the right of each argument. Here, you want the first two arguments to be type Expression<String> to represent columns of String type, the third argument to be type Expression<Date>, and the last column to be type Expression<Integer>.
Now, you can add your new arguments to the two boards as before. However, they will now be available in the Parameters section instead of the Columns section.
Once you have finished your configuration, name the function Primary key generator, give it an optional description, and select Apply all changes.
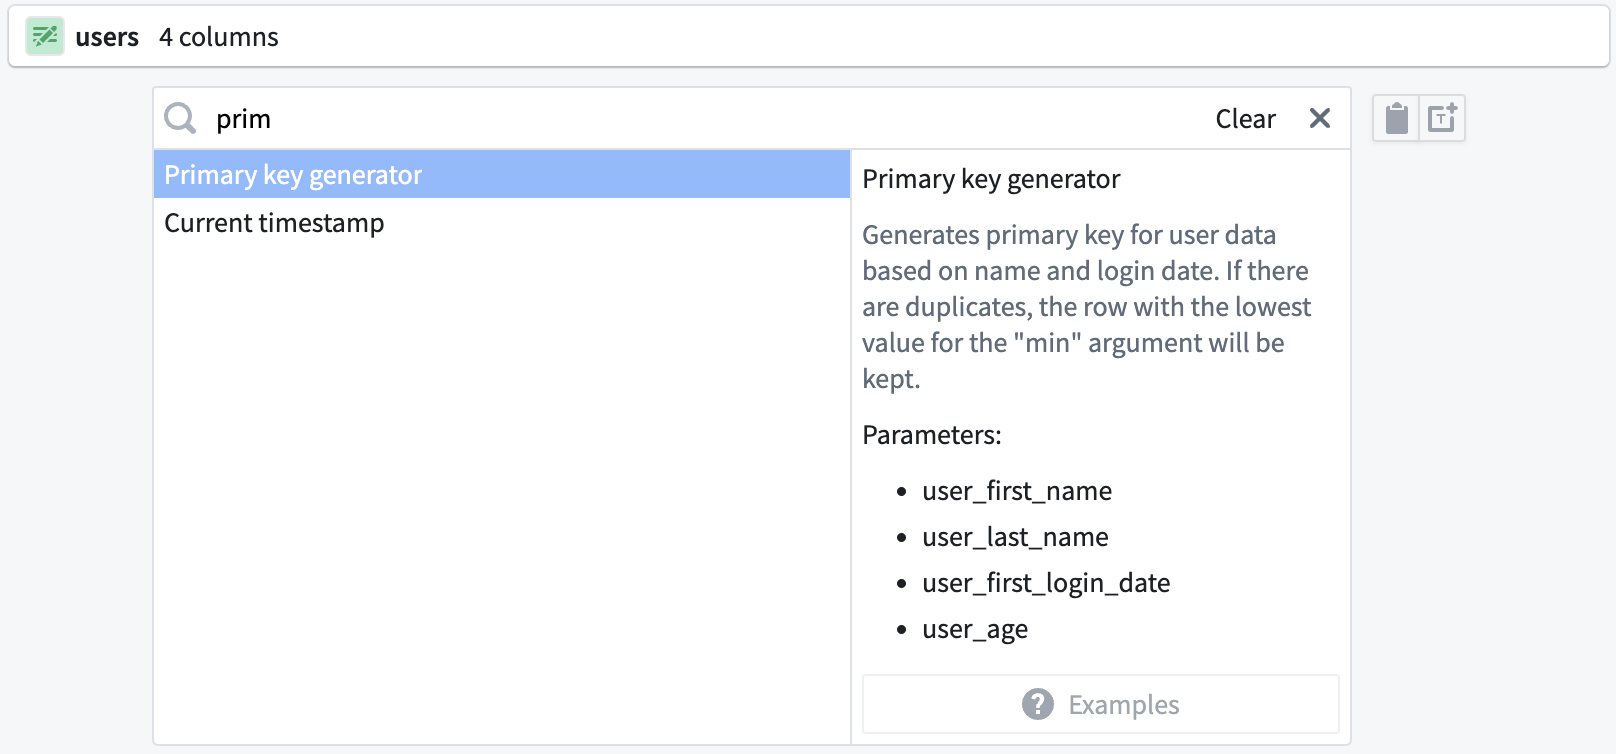
The new function is now available for use in any transform path. The next time you need to create a primary key with this pattern, you can search Primary key generator in the transform dropdown.
You can populate your custom function with the original columns: first_name, last_name, first_login_date, and age.
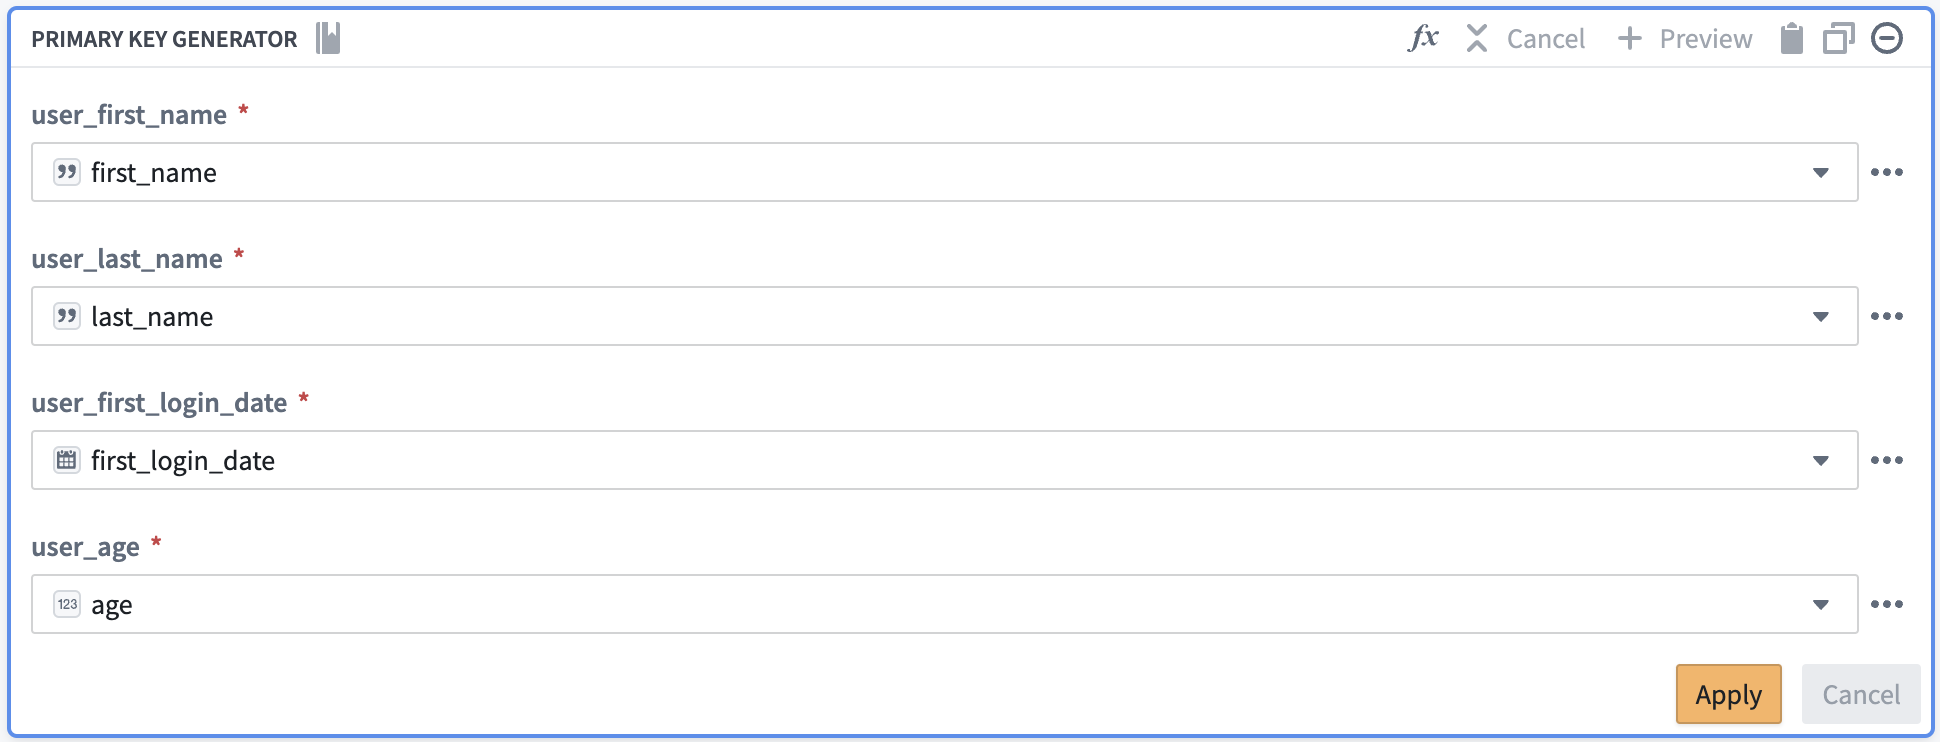
By populating the relevant column names into your custom function, you are producing the same result as if you had created the function with the same transforms in the path. However, by creating the custom function, you can save the function logic to reuse across your pipeline rather than recreating logic with separate transform boards.
中文翻译
自定义函数
自定义函数(Custom functions)包括自定义表达式(Custom expressions)和自定义转换(Custom transforms)。这两种功能都适用于在管道中重复使用逻辑,同时只需在单一位置进行管理。
自定义转换(Custom transforms)使您能够将一系列转换面板保存为单个转换,以便在管道中重复使用。
自定义表达式(Custom expressions)使您能够保存带有可选参数的单个表达式,以便在管道中重复使用。自定义表达式可以在其他转换(如过滤器或条件语句)中使用。
自定义函数通常包含名称(必填)、描述(可选)、函数参数(可选)和函数定义(必填)。
创建自定义表达式
要创建自定义表达式,请选择图表顶部的可复用组件(Reusables)下拉菜单,然后选择自定义函数(Custom functions)。
选择添加自定义表达式(Add custom expression)。
在新窗口中,配置您的自定义表达式。在左上角输入名称,在参数(Arguments)窗口中使用添加参数(Add argument)选项添加任何参数,然后定义您的表达式。完成后选择应用(Apply)。
创建自定义表达式后,您可以像在转换节点或转换中搜索任何其他表达式一样搜索它。
创建自定义转换
创建自定义转换需要两个步骤:
- 将您的逻辑定义为一组转换面板。
- 将转换面板转换为新的自定义函数。
下面,我们将通过示例逐步说明每个步骤。
定义一组转换面板
假设您有一个users表,并且想要创建一个主键来唯一标识每个用户。您知道每个用户的first_name、last_name和first_login_date是一个唯一的组合。您想要向数据集添加一个String类型的primary_key列,该列是这三个列的哈希值,然后删除first_name、last_name和first_login_date。最后,如果存在重复行,您希望每个用户只保留一行,并保留age值最小的行。
首先,将first_name、last_name和first_login_date合并为一列。您可以使用连接字符串(Concatenate strings)转换将这三列合并在一起。
在分隔符(Separator)字段中输入-。然后,在表达式(Expressions)下拉菜单中选择每一列。对于前两列,选择first_name和last_name。但是,first_login_date列并不是我们第三个字段的可选项。这是因为它是Date类型,而连接字符串(Concatenate strings)函数只接受String类型。
要解决此问题,请从表达式(Expressions)选项卡中插入一个类型转换(Cast)表达式。参数设置为:Expression为first_login_date,Type为String以进行类型转换。这样您就不需要全局更改first_login_date,从而避免影响所有下游转换面板。
选择应用(Apply)后,输出表应如下所示:
现在,您需要对primary_key中的数据进行去标识化处理。一种方法是通过应用Hash sha256转换为primary_key中的每个值创建哈希。您可以在同一个面板中通过选择复用值(Reuse value)选项,将连接字符串(Concatenate strings)替换为Hash sha256来实现。
此选项会保留现有值,并将其作为新转换的第一个输入。
选择应用(Apply)后,验证输出是否符合预期:一个包含每行唯一数据的primary_key: String列。
现在,您会注意到primary_key中的第一行和最后一行是相同的。您希望保留age值较低(25)的行,并删除first_name、last_name和first_login_date。为此,请添加一个聚合(Aggregate)转换。在第一个字段分组依据列(Group by columns)中输入primary_key,在第二个字段聚合(Aggregations)中输入age,并使用Min表达式:
最后,输出表应如下图所示。您可以验证primary_key = b3c01...只有一行,且age为25。
将一组转换面板转换为自定义函数
现在,假设您想在管道中的三个不同位置重复使用此逻辑。我们可以通过使用Shift + 向下箭头选择两个面板,然后选择顶部栏中的+按钮,将逻辑转换为自定义函数。
这将带您进入自定义函数创建页面。您会注意到列输入first_name、last_name、first_login_date和age被划掉了;这是因为您正在创建的函数对于管道中任何四个正确类型的输入都是通用的,无论列名是什么。
要定义这些输入,请选择添加参数(Add argument)四次。通过点击黄色框来配置参数名称。
然后,通过点击每个参数右侧的齿轮图标来配置参数类型。在这里,您希望前两个参数为Expression<String>类型以表示String类型的列,第三个参数为Expression<Date>类型,最后一个列为Expression<Integer>类型。
现在,您可以像之前一样将新参数添加到两个面板中。不过,它们现在将出现在参数(Parameters)部分,而不是列(Columns)部分。
完成配置后,将函数命名为Primary key generator,添加可选描述,然后选择应用所有更改(Apply all changes)。
现在,新函数可在任何转换路径中使用。下次您需要使用此模式创建主键时,可以在转换下拉菜单中搜索Primary key generator。
您可以使用原始列first_name、last_name、first_login_date和age来填充自定义函数。
通过将相关列名填充到自定义函数中,您将产生与在路径中使用相同转换创建函数相同的结果。然而,通过创建自定义函数,您可以保存函数逻辑以便在管道中重复使用,而无需使用单独的转换面板重新创建逻辑。