Add an Ontology output(添加本体论输出(Add an Ontology output))
You can choose to add an Ontology output to guide your pipeline integration towards clean, structured data that defines new elements of your global Ontology. Adding output guidance can help save time on compute checks and help inform the end-to-end creation of your workflow.
Pipeline Builder currently supports creating Ontology objects and links from both batch and streaming datasets. However, it is not possible to enable edits or configure many-to-many links for objects backed by streaming datasets in Pipeline Builder.
Add an object type output
There are two ways to add an object type output. You can create a blank object via the pipeline outputs panel, or create a populated object on the graph connected to a transform node.
With the pipeline outputs panel
Open the Pipeline outputs panel located on the right side of Pipeline Builder, then select Object type > Add to create a blank object template where you can edit the object name, icon, and properties.

Note that the Plural name and Object type ID will auto-populate from Name for convenience.
:::callout{theme="warning"} You can define new objects in Pipeline Builder, but you cannot modify or delete existing objects unless they were created in Pipeline Builder. After the first deploy, the object type ID cannot be modified. :::

You can now populate your object with data by selecting Enter data manually or by dragging the output of an existing dataset or transform to this node's input.

With the graph
Select the transform node that you want to create the object from, then select Add output > New object type.


:::callout{theme="warning"}
If your enrollment has multiple Ontologies, you need to select the Ontology that an object belongs to on object creation. Otherwise, the error message An ontology must be specified to publish ontology type outputs will be displayed. To set the Ontology, select Set ontology in the bottom panel or on the object, as shown below.
:::

Enable edits on object types
You can enable edits on object types in Pipeline Builder or in Ontology Manager if the object was created in Pipeline Builder and is backed by a batch dataset.
:::callout{theme="warning"} Stream backed object types do not currently support edits. To enable edits on stream-backed object types, use the direct datasources feature. :::
To enable edits, hover on the object type in the right panel and select Edit. Toggle Allow edits to objects of this type. Save and deploy your pipeline for this to go into effect.

Enable direct datasources [Beta]
:::callout{theme="neutral" title="Beta"} Direct datasources are in the beta phase of development and may not be available on your enrollment. Functionality may change during active development. :::
Direct datasources provide low-latency, low-throughput writes into the Ontology, including edits on object types backed by stream based data.
To enable a direct datasource:
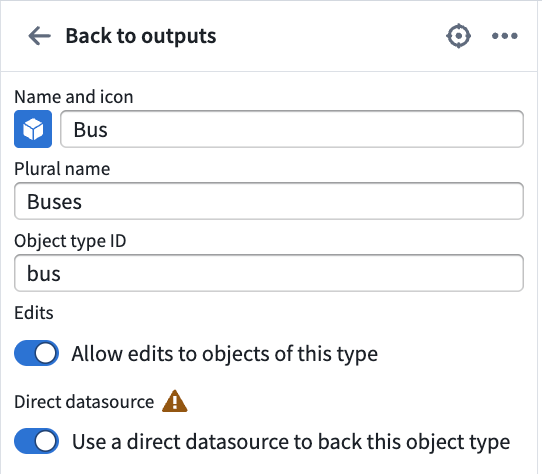
- Create a streaming pipeline with an object type output. You should have the option to Use a direct datasource to back this object type and Allow edits to objects of this type. Enable both settings.
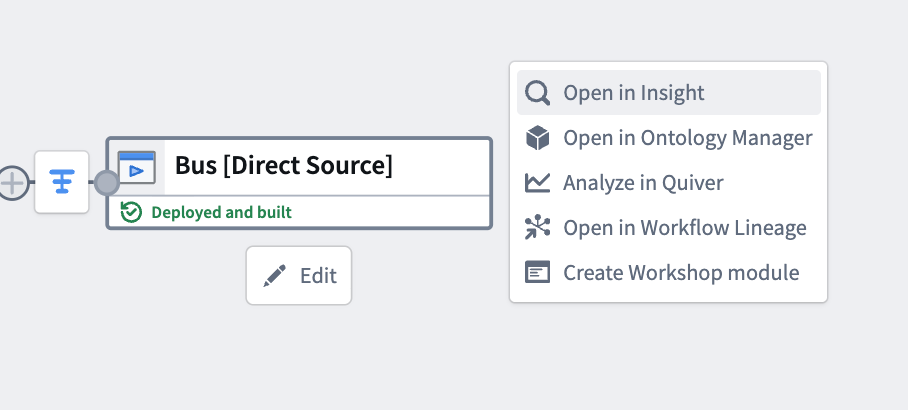
- Configure the object target as needed, then deploy. Once deployed, the object type appears in Ontology Manager, and its objects are viewable in Insight and Object Explorer.
Learn more about monitoring and debugging a direct datasource after deployment..
:::callout{theme="neutral"} If you disown a direct datasource-backed object target, the disowned node in the graph displays as a stream dataset. However, this node represents the direct datasource backing the object type, not a streaming dataset. Unlike stream datasets, direct datasources do not store data directly; the data is stored in the Ontology. After disowning, you can still navigate to the object type in Ontology Manager or Insight. :::
Known limitations
As a beta feature under active development, direct datasources currently have the following limitations:
- Replay wipes the object view: Replaying a streaming pipeline removes the existing object view to serve the new view immediately. Because the swap is instant, the new view is not yet fully populated, so the object view can be temporarily incomplete or empty. The complete view will populate over time. replays to address this limitation are in development, and this documentation will be updated accordingly.
- Initial deployment timeouts: A streaming job may fail before submission on initial deployment, or when replaying with reset outputs, because of initial setup performed during deployment that can cause a timeout.
- Branching is not supported: Direct datasources cannot be used on branches.
- Backfill can be slow: Backfilling data after replay can be slow. Improvements are in development.
For remediation steps and other common issues, see the direct datasources FAQ.
Add a link type output
Once object type outputs have been added, you can define link type outputs. Similar to object outputs, these can be created in the panel or on the graph.
With the pipeline outputs panel
In the Pipeline outputs panel, select Link type > Add. This opens a form in which you can define the left and right sides of your link type.
:::callout{theme="warning"}
Links defined in Pipeline Builder can only use objects created within the same pipeline. Within the Ontology Manager application itself, you can create links between objects created in Pipeline Builder and objects created in Ontology Manager.
After the first deploy, the link type ID or the source and target object types can no longer be modified.
:::

Legend
Link type ID: This is an auto-generated ID that uniquely represents this link.
Choose an object type output: Select an object type from the dropdown menu. If you do not have any object outputs in your pipeline, you will need to configure an object output type first.
Cardinality: Choose the cardinality of each side of the link type. Two types of cardinality are supported: one-to-many and many-to-many. One-to-one link types are currently not supported. In the examples below, assume that there are two object types that are related to each other through a cardinality: an Aircraft object type and a Flight object type.
- One-to-many cardinality: This indicates that one
Aircraftcan be linked to manyFlights. - Many-to-many cardinality: This indicates that one
Aircraftcan be linked to manyFlightsand oneFlightcan be linked to manyAircraft. - Note that when you select a many-to-many cardinality, you will see a prompt to Click and drag the output from a dataset or transform to use as the join table. This table should contain all combinations of links between the primary key of the first object type (
Aircraftin this example) and the second object type (Flightin this example). - Below is an example of many-to-many cardinality, where a
Classobject can be linked to manyStudentobjects and aStudentobject can be linked to manyClassobjects:

Primary key/column: Choose which property to use to create the left side of the link.
- In a one-to-many cardinality link type, the primary key will be determined by the object type.
- In a many-to-many cardinality link type, select which columns in the join table map to the primary keys of each of the linked object types.
Foreign key/column: Choose which property to use to create the right side of the link.
- In a one-to-many cardinality link type, the foreign key property of one object type must refer to the primary key property of the other object type.
- In a many-to-many cardinality link type, select which columns in the join table map to the primary keys of each of the linked object types.
Name: Fill in the display name for each side of the link type. A side of the link type represents the link to that object type. The display name for the Aircraft object type describes the link from Flight to Aircraft. In this example, you could choose the display name "Assigned Aircraft" since one Flight has one assigned Aircraft.
Plural display name: For sides of a link type with the cardinality many, you will also be prompted to fill in a plural display name so user applications can display the correct name when displaying the linked objects. In our example, the plural display name for the Flight object type will describe the link from Aircraft to Flight. We might choose the plural display name to be "Scheduled Flights" as one Aircraft has many scheduled Flights.
With the graph
Select the two object outputs that you want to create the link from, then right-click and select New link type. This will create a link with all the object information populated.


Alternatively, select a single object on the graph to create a New link type with one side populated.


Resolve Ontology validation errors
Users may make pipeline changes that result in validation errors in the Ontology. Some examples of errors include:
- Conflicting changes made to the same object type or link type in both Pipeline Builder and Ontology Manager.
- Changing the primary key of an object type that is referenced by a link type outside of the pipeline.
- Making breaking changes to an object type's schema such that a schema migration is required.
Any errors will show up on the right side panel under the Deploy this pipeline section. In the Errors tab, there will be a message describing what type of resolution needs to happen before deployment.
You must resolve these errors before you are able to deploy your pipeline.

When the Resolve button displays an arrow, selecting it will take you to Ontology Manager to resolve validation errors. Otherwise, you will be able to resolve the errors directly in Pipeline Builder.
Resolve merge conflicts in Ontology Manager

Follow the prompts in Ontology Manager to apply the merge conflict resolutions. If your changes affect potential edits, you can decide whether to drop edits or make your edits compatible with the latest version of the object. Otherwise, no additional specifications are needed for the merge conflict to be resolved, and you can select Apply.

Once changes are applied, the Ontology will be updated with the latest changes and you can select Go back to pipeline.

After resolving conflicts, you may occasionally encounter the error Ontology type outputs are out of date with the ontology when returning to your pipeline. This is because the pipeline has yet to pick up changes to your Ontology outputs made through the conflict resolution workflow above.

Selecting Resolve should fix this issue and allow you to deploy your pipeline.
Resolve conflicts in Pipeline Builder
Some Ontology validation errors do not require switching to Ontology Manager. In the example below, a schema migration is required, which happens when an object type schema in Pipeline Builder has been modified from the latest schema on the main branch of the Ontology. Select Resolve to choose the migration strategy directly in Pipeline Builder.

For impacted properties, you can choose whether to Drop edits from property or migrate your edits to make them compatible with the latest version of the property.

Once you have chosen the best approach, select Apply migrations.
Bring object type outputs back into Pipeline Builder
You can bring object types backed by a dataset output from your pipeline into Pipeline Builder following the steps below:
On the right side panel, select the cog icon next to Pipeline outputs.

Select Replace with objects. This will open the Replace datasets with ontology type outputs dialog.

Select the dataset outputs you want to convert back to the corresponding objects in your pipeline and select Import selected outputs.

Save your changes and deploy your pipeline.
Disown Ontology type outputs in Pipeline Builder [Deprecated]
Disowning Ontology type outputs in Pipeline Builder will transfer management of those Ontology types to Ontology Manager. This means that all future modifications to those Ontology types will only be possible in Ontology Manager. This is useful when you need an object type configuration that Pipeline Builder does not support, such as shared property types or runtime-derived properties. To disown Ontology types, select the object types you want to disown. Any link types that reference the selected object types will automatically transfer to Ontology Manager.
:::callout{theme="warning"}
Ontology type outputs can only be replaced with dataset outputs if the latest saved version of the main branch was successfully deployed.
:::

Select Disown selected object and link types.
In this pipeline, the object type output nodes will convert to dataset output nodes that back the object types in Ontology Manager. From the far right panel, navigate to the object type in Ontology Manager by selecting the icon next to the output.

Deploy your pipeline after disowning the selected objects.
:::callout{theme="warning"}
Column names in the backing datasource must exactly match the backing column names configured for a given object type's properties. Mismatched column names will lead to missing data or broken indexing jobs. For example, a property with backing column routeId requires a column named routeId in the backing datasource.
:::
Configure granular security permissions
You can configure granular security permissions on objects by using a Restricted view policy or an Object security policy:
- Restricted views (RVs) enable row-level security.
- Object security policies enable both row-level and column-level security.
:::callout{theme="warning"} Object security policies in Pipeline Builder currently support a subset of features when compared with object security policies in Ontology Manager. See below for supported features. :::
To set up your granular security policies, go to the output object and select Configure granular security.

Select either Restricted view policy or Object security policy in the pop-up window.

Object security policy
The Object security policy option lets you configure cell level granular security using row level policies, property security policies, marking removal management, and classification changes.
By default, object security policies are applied to all properties. When a property security policy includes a property, the user must pass both the object security policy and the property security policy to view the property value.

To add a row-level policy, select the plus sign (+) icon next to Granular security.

In the policy editor, you can create rules that compare property values, user properties, or constant values to define your security conditions.

Note that to create a policy based on the Marking or classification user property, ensure that the value types are set to Marking or Classification.
To enforce the correct type, use the Logical Type Cast expression in the transform node.

Additionally, markings and classifications must be wrapped in an array for compatibility with the ontology. Mapping a single marking or classification directly to an object property will result in an error.

:::callout{theme="neutral"} Markings must use the associated marking ID. Learn more about the expected format of marking IDs. :::
After configuring your granular security policy, select Back (bottom left) to return to the main configuration window. If no further changes are needed, select Apply to save your policy.
You can go to Mandatory controls to remove any inherited markings or Classification to adjust the classification.

:::callout{theme="warning"} Pipeline Builder does not currently support adjusting classifications for manually entered tables. :::
Property security policies can be added in a similar way. Select Add in the Property security policies section. This will create a new property security policy. To configure the property security policies, select the arrow on the policy you want to edit.

Under Policy name, you can rename your property security policy. Select one or more columns you want to apply this policy to under Properties affected, and then configure the granular security, mandatory control, or classification in the same way you would do so above.

After configuring your property security policy, select Back (bottom left) to return to the main configuration window. Use Apply to save your policy.
Restricted view policy
To configure which rows a user can view on your output, you can create a restricted view policy to apply to your object. The policy is backed by a Restricted View, which is built after your changes are merged and deployed to main.
You can configure your policy directly in the restricted view policy window. The same rules for markings and classifications apply here as stated above. Learn more about restricted view policies and best practices. You also have the option to convert the restricted view policy into an object policy for greater configurability.

Once you have finished creating your granular security policy, save your pipeline and propose your changes. The backing security policies will only be created and go into effect after you have deployed successfully on the main branch.
中文翻译
添加本体论输出(Add an Ontology output)
您可以选择添加本体论输出(Ontology output),以引导您的管道集成走向清晰、结构化的数据,从而定义全局本体论(global Ontology)的新元素。添加输出指导有助于节省计算检查的时间,并帮助告知工作流的端到端创建过程。
管道构建器(Pipeline Builder)目前支持从批处理和流式数据集创建本体论对象(Ontology objects)和链接(links)。但是,无法为管道构建器中由流式数据集支持的对象启用编辑或配置多对多链接。
添加对象类型输出(Add an object type output)
有两种方式添加对象类型输出。您可以通过管道输出面板创建一个空白对象,或者在图形上创建一个连接到转换节点的已填充对象。
使用管道输出面板(With the pipeline outputs panel)
打开位于管道构建器右侧的管道输出(Pipeline outputs)面板,然后选择对象类型(Object type) > 添加(Add)来创建一个空白对象模板,您可以在其中编辑对象名称、图标和属性。
请注意,复数名称(Plural name)和对象类型ID(Object type ID)将根据名称(Name)自动填充,以方便使用。
:::callout{theme="warning"} 您可以在管道构建器中定义新对象,但除非这些对象是在管道构建器中创建的,否则无法修改或删除现有对象。首次部署后,对象类型ID将无法修改。 :::
现在,您可以通过选择手动输入数据(Enter data manually)或将现有数据集或转换的输出拖放到此节点的输入来用数据填充对象。
使用图形(With the graph)
选择您想要从中创建对象的转换节点,然后选择添加输出(Add output) > 新建对象类型(New object type)。
:::callout{theme="warning"}
如果您的注册环境有多个本体论(Ontologies),您需要在创建对象时选择该对象所属的本体论。否则,将显示错误消息必须指定一个本体论才能发布本体论类型输出(An ontology must be specified to publish ontology type outputs)。要设置本体论,请选择底部面板或对象上的设置本体论(Set ontology),如下所示。
:::
启用对对象类型的编辑(Enable edits on object types)
如果对象是在管道构建器中创建的并且由批处理数据集支持,您可以在管道构建器或本体论管理器(Ontology Manager)中启用对对象类型的编辑。
:::callout{theme="warning"} 流支持的对象类型目前不支持编辑。要启用对流支持的对象类型的编辑,请使用直接数据源功能。 :::
要启用编辑,请将鼠标悬停在右侧面板中的对象类型上并选择编辑(Edit)。切换允许编辑此类型的对象(Allow edits to objects of this type)。保存并部署您的管道以使此更改生效。
启用直接数据源(Enable direct datasources) [Beta]
:::callout{theme="neutral" title="Beta"} 直接数据源(Direct datasources)处于beta开发阶段,可能在您的注册环境中不可用。功能在活跃开发期间可能会发生变化。 :::
直接数据源提供低延迟、低吞吐量的写入到本体论,包括对基于流数据支持的对象类型的编辑。
要启用直接数据源:
- 创建一个带有对象类型输出的流式管道。您应该可以选择使用直接数据源支持此对象类型(Use a direct datasource to back this object type)和允许编辑此类型的对象(Allow edits to objects of this type)。启用这两个设置。
- 根据需要配置对象目标,然后部署。部署后,对象类型会出现在本体论管理器中,其对象可在Insight和对象浏览器(Object Explorer)中查看。
:::callout{theme="neutral"} 如果您放弃(disown)一个由直接数据源支持的对象目标,图形中被放弃的节点将显示为流数据集。但是,此节点代表支持对象类型的直接数据源,而不是流数据集。与流数据集不同,直接数据源不直接存储数据;数据存储在本体论中。放弃后,您仍然可以在本体论管理器或Insight中导航到该对象类型。 :::
已知限制(Known limitations)
作为活跃开发中的beta功能,直接数据源目前有以下限制:
- 重放会清除对象视图(Replay wipes the object view): 重放流式管道会移除现有对象视图以立即提供新视图。由于切换是即时的,新视图尚未完全填充,因此对象视图可能暂时不完整或为空。完整的视图将随时间填充。解决此限制的重放功能正在开发中,本文档将相应更新。
- 初始部署超时(Initial deployment timeouts): 由于部署期间执行的初始设置可能导致超时,流式作业可能在初始部署时或在重置输出重放时在提交前失败。
- 不支持分支(Branching is not supported): 直接数据源不能在分支上使用。
- 回填可能很慢(Backfill can be slow): 重放后回填数据可能很慢。改进正在开发中。
有关补救步骤和其他常见问题,请参阅直接数据源FAQ。
添加链接类型输出(Add a link type output)
一旦添加了对象类型输出,您就可以定义链接类型输出。与对象输出类似,这些可以在面板中或图形上创建。
使用管道输出面板(With the pipeline outputs panel)
在管道输出(Pipeline outputs)面板中,选择链接类型(Link type) > 添加(Add)。这将打开一个表单,您可以在其中定义链接类型的左侧和右侧。
:::callout{theme="warning"}
在管道构建器中定义的链接只能使用在同一管道内创建的对象。在本体论管理器应用程序本身中,您可以在管道构建器中创建的对象和本体论管理器中创建的对象之间创建链接。
首次部署后,链接类型ID或源和目标对象类型将无法再修改。
:::
图例(Legend)
链接类型ID(Link type ID): 这是一个自动生成的ID,唯一标识此链接。
选择对象类型输出(Choose an object type output): 从下拉菜单中选择一个对象类型。如果您的管道中没有对象输出,您需要先配置一个对象输出类型。
基数(Cardinality): 选择链接类型每一侧的基数。支持两种基数类型:一对多(one-to-many)和多对多(many-to-many)。目前不支持一对一链接类型。在下面的示例中,假设有两个通过基数相互关联的对象类型:一个Aircraft对象类型和一个Flight对象类型。
- 一对多基数(One-to-many cardinality): 这表示一个
Aircraft可以链接到多个Flights。 - 多对多基数(Many-to-many cardinality): 这表示一个
Aircraft可以链接到多个Flights,并且一个Flight可以链接到多个Aircraft。 - 请注意,当您选择多对多基数时,您将看到提示点击并拖动数据集或转换的输出以用作连接表(Click and drag the output from a dataset or transform to use as the join table)。此表应包含第一个对象类型(此示例中为
Aircraft)的主键与第二个对象类型(此示例中为Flight)之间的所有链接组合。 - 以下是多对多基数的示例,其中
Class对象可以链接到多个Student对象,并且Student对象可以链接到多个Class对象:
主键/列(Primary key/column): 选择用于创建链接左侧的属性。
- 在一对多基数链接类型中,主键将由对象类型决定。
- 在多对多基数链接类型中,选择连接表中的哪些列映射到每个链接对象类型的主键。
外键/列(Foreign key/column): 选择用于创建链接右侧的属性。
- 在一对多基数链接类型中,一个对象类型的外键属性必须引用另一个对象类型的主键属性。
- 在多对多基数链接类型中,选择连接表中的哪些列映射到每个链接对象类型的主键。
名称(Name): 填写链接类型每一侧的显示名称。链接类型的一侧表示到该对象类型的链接。Aircraft对象类型的显示名称描述了从Flight到Aircraft的链接。在此示例中,您可以选择显示名称"已分配飞机(Assigned Aircraft)",因为一个Flight有一架已分配的Aircraft。
复数显示名称(Plural display name): 对于基数为多的链接类型侧,您还需要填写复数显示名称,以便用户应用程序在显示链接对象时可以显示正确的名称。在我们的示例中,Flight对象类型的复数显示名称将描述从Aircraft到Flight的链接。我们可能选择复数显示名称为"预定航班(Scheduled Flights)",因为一架Aircraft有多个预定的Flights。
使用图形(With the graph)
选择您想要从中创建链接的两个对象输出,然后右键单击并选择新建链接类型(New link type)。这将创建一个包含所有已填充对象信息的链接。
或者,选择图形上的单个对象来创建一侧已填充的新建链接类型(New link type)。
解决本体论验证错误(Resolve Ontology validation errors)
用户可能进行管道更改,导致本体论中出现验证错误。一些错误示例包括:
- 在管道构建器和本体论管理器中对同一对象类型或链接类型进行了冲突更改。
- 更改了被管道外链接类型引用的对象类型的主键。
- 对对象类型的模式进行了破坏性更改,以至于需要进行模式迁移(schema migration)。
任何错误都会显示在右侧面板的部署此管道(Deploy this pipeline)部分下。在错误(Errors)选项卡中,将有一条消息描述在部署之前需要哪种类型的解决方案。
您必须在能够部署管道之前解决这些错误。
当解决(Resolve)按钮显示箭头时,选择它将带您到本体论管理器以解决验证错误。否则,您将能够直接在管道构建器中解决错误。
在本体论管理器中解决合并冲突(Resolve merge conflicts in Ontology Manager)
按照本体论管理器中的提示应用合并冲突解决方案。如果您的更改影响潜在的编辑,您可以决定是放弃编辑还是使您的编辑与对象的最新版本兼容。否则,不需要额外的规范来解决合并冲突,您可以选择应用(Apply)。
一旦应用了更改,本体论将使用最新更改进行更新,您可以选择返回管道(Go back to pipeline)。
解决冲突后,返回管道时偶尔会遇到错误本体论类型输出与本本体论不同步(Ontology type outputs are out of date with the ontology)。这是因为管道尚未获取通过上述冲突解决工作流对本体论输出所做的更改。
选择解决(Resolve)应该可以修复此问题并允许您部署管道。
在管道构建器中解决冲突(Resolve conflicts in Pipeline Builder)
某些本体论验证错误不需要切换到本体论管理器。在下面的示例中,需要进行模式迁移,当管道构建器中的对象类型模式已从本体论主分支上的最新模式修改时会发生这种情况。选择解决(Resolve)以直接在管道构建器中选择迁移策略。
对于受影响的属性,您可以选择从属性中删除编辑(Drop edits from property)或迁移您的编辑以使其与属性的最新版本兼容。
一旦您选择了最佳方法,选择应用迁移(Apply migrations)。
将对象类型输出带回管道构建器(Bring object type outputs back into Pipeline Builder)
您可以按照以下步骤将管道中由数据集输出支持的对象类型带回管道构建器:
在右侧面板上,选择管道输出(Pipeline outputs)旁边的齿轮图标。
选择替换为对象(Replace with objects)。这将打开用本体论类型输出替换数据集(Replace datasets with ontology type outputs)对话框。
选择您想要转换回管道中相应对象的数据集输出,然后选择导入所选输出(Import selected outputs)。
保存您的更改并部署您的管道。
在管道构建器中放弃本体论类型输出(Disown Ontology type outputs in Pipeline Builder) [已弃用(Deprecated)]
在管道构建器中放弃本体论类型输出将把这些本体论类型的管理权转移到本体论管理器。这意味着对这些本体论类型的所有未来修改将只能在本体论管理器中进行。当您需要管道构建器不支持的对象类型配置(如共享属性类型或运行时派生属性)时,这很有用。要放弃本体论类型,请选择您想要放弃的对象类型。任何引用所选对象类型的链接类型将自动转移到本体论管理器。
:::callout{theme="warning"}
只有当main分支的最新保存版本已成功部署时,本体论类型输出才能被数据集输出替换。
:::
选择放弃所选对象和链接类型(Disown selected object and link types)。
在此管道中,对象类型输出节点将转换为数据集输出节点,这些节点在本体论管理器中支持对象类型。从最右侧面板,通过选择输出旁边的图标导航到本体论管理器中的对象类型。
在放弃所选对象后部署您的管道。
:::callout{theme="warning"}
支持数据源中的列名必须与为给定对象类型属性配置的支持列名完全匹配。列名不匹配将导致数据丢失或索引作业中断。例如,具有支持列routeId的属性需要在支持数据源中有一个名为routeId的列。
:::
配置细粒度安全权限(Configure granular security permissions)
您可以通过使用受限视图策略(Restricted view policy)或对象安全策略(Object security policy)在对象上配置细粒度安全权限:
- 受限视图(Restricted views) (RVs) 启用行级安全。
- 对象安全策略(Object security policies) 启用行级和列级安全。
:::callout{theme="warning"} 与本体论管理器中的对象安全策略相比,管道构建器中的对象安全策略目前支持功能子集。请参阅下文了解支持的功能。 :::
要设置您的细粒度安全策略,请转到输出对象并选择配置细粒度安全(Configure granular security)。
在弹出窗口中选择受限视图策略(Restricted view policy)或对象安全策略(Object security policy)。
对象安全策略(Object security policy)
对象安全策略(Object security policy)选项允许您使用行级策略、属性安全策略、标记移除管理和分类更改来配置单元格级细粒度安全。
默认情况下,对象安全策略应用于所有属性。当属性安全策略包含一个属性时,用户必须同时通过对象安全策略和属性安全策略才能查看属性值。
要添加行级策略,请选择细粒度安全(Granular security)旁边的加号(+)图标。
在策略编辑器中,您可以创建比较属性值、用户属性或常量值的规则来定义您的安全条件。
请注意,要创建基于标记或分类(Marking or classification)用户属性的策略,请确保值类型设置为标记(Marking)或分类(Classification)。
要强制执行正确的类型,请在转换节点中使用逻辑类型转换(Logical Type Cast)表达式。
此外,标记和分类必须包装在数组中以便与本体论兼容。将单个标记或分类直接映射到对象属性将导致错误。
:::callout{theme="neutral"} 标记必须使用关联的标记ID。了解更多关于标记ID的预期格式。 :::
配置完细粒度安全策略后,选择返回(Back)(左下角)以返回主配置窗口。如果不需要进一步更改,选择应用(Apply)以保存您的策略。
您可以转到强制控制(Mandatory controls)以移除任何继承的标记,或转到分类(Classification)以调整分类。
:::callout{theme="warning"} 管道构建器目前不支持调整手动输入表的分类。 :::
属性安全策略可以类似的方式添加。在属性安全策略(Property security policies)部分选择添加(Add)。这将创建一个新的属性安全策略。要配置属性安全策略,请选择您想要编辑的策略上的箭头。
在策略名称(Policy name)下,您可以重命名您的属性安全策略。在受影响的属性(Properties affected)下选择您想要应用此策略的一个或多个列,然后以与上述相同的方式配置细粒度安全、强制控制或分类。
配置完属性安全策略后,选择返回(Back)(左下角)以返回主配置窗口。使用应用(Apply)保存您的策略。
受限视图策略(Restricted view policy)
要配置用户可以在输出上查看哪些行,您可以创建一个应用于对象的受限视图策略。该策略由受限视图(Restricted View)支持,该视图在您的更改合并并部署到main后构建。
您可以直接在受限视图策略窗口中配置您的策略。此处适用于标记和分类的规则与上述相同。了解更多关于受限视图策略和最佳实践。您还可以选择将受限视图策略转换为对象策略以获得更大的可配置性。
完成创建细粒度安全策略后,保存您的管道并提出您的更改。支持的安全策略只有在您在main分支上成功部署后才会创建并生效。