Deliver pipeline(交付管道)
Once you finish describing your pipeline in Pipeline Builder and resolving schema errors, you are ready to deliver your pipeline.
Deploy vs. build
A deploy updates the logic on your pipeline outputs and a build executes that logic to materialize logic changes.
Builds can be time and resource intensive, especially if your data scale is large or if you are reprocessing the entirety of your pipeline's inputs. For this reason and others, you might choose to deploy your pipeline without building. By choosing only to deploy, you can defer the cost of the build until building is necessary.
Delivering changes
If you want to deliver your first end-to-end pipeline and include all defined logic, select Deploy in the right of the top toolbar.

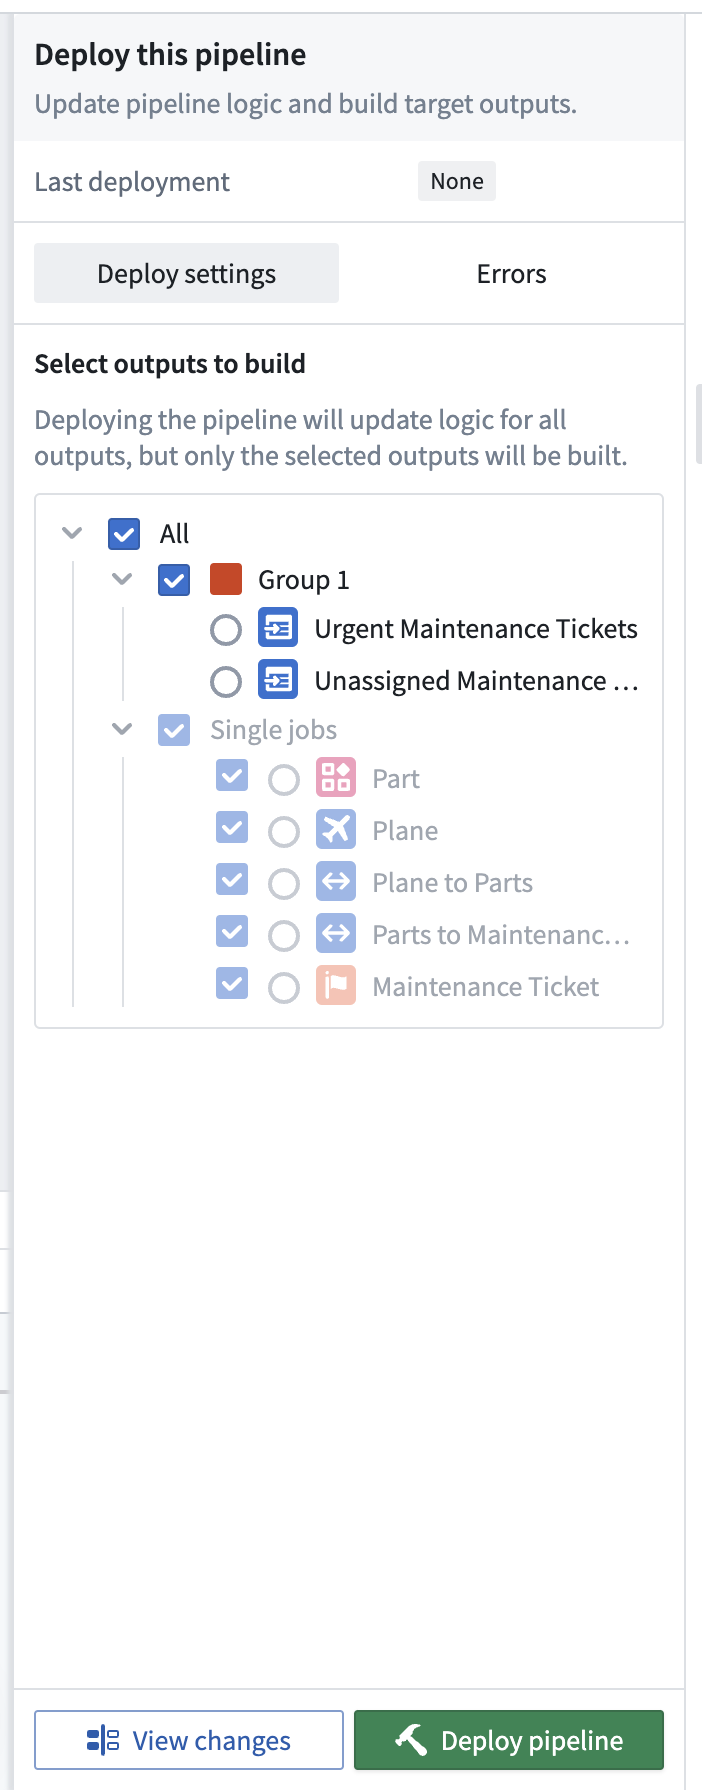
You can choose which outputs to build after your logic changes are deployed. Builds are done per job group, meaning you can optionally build all outputs in any given job group or individual outputs that are ungrouped. Ontology type outputs must always be built, meaning any job group with an Ontology type output must be built.
After successfully initiating a deployment, a blue banner will appear at the top of your graph. Select View to access the Build details view.

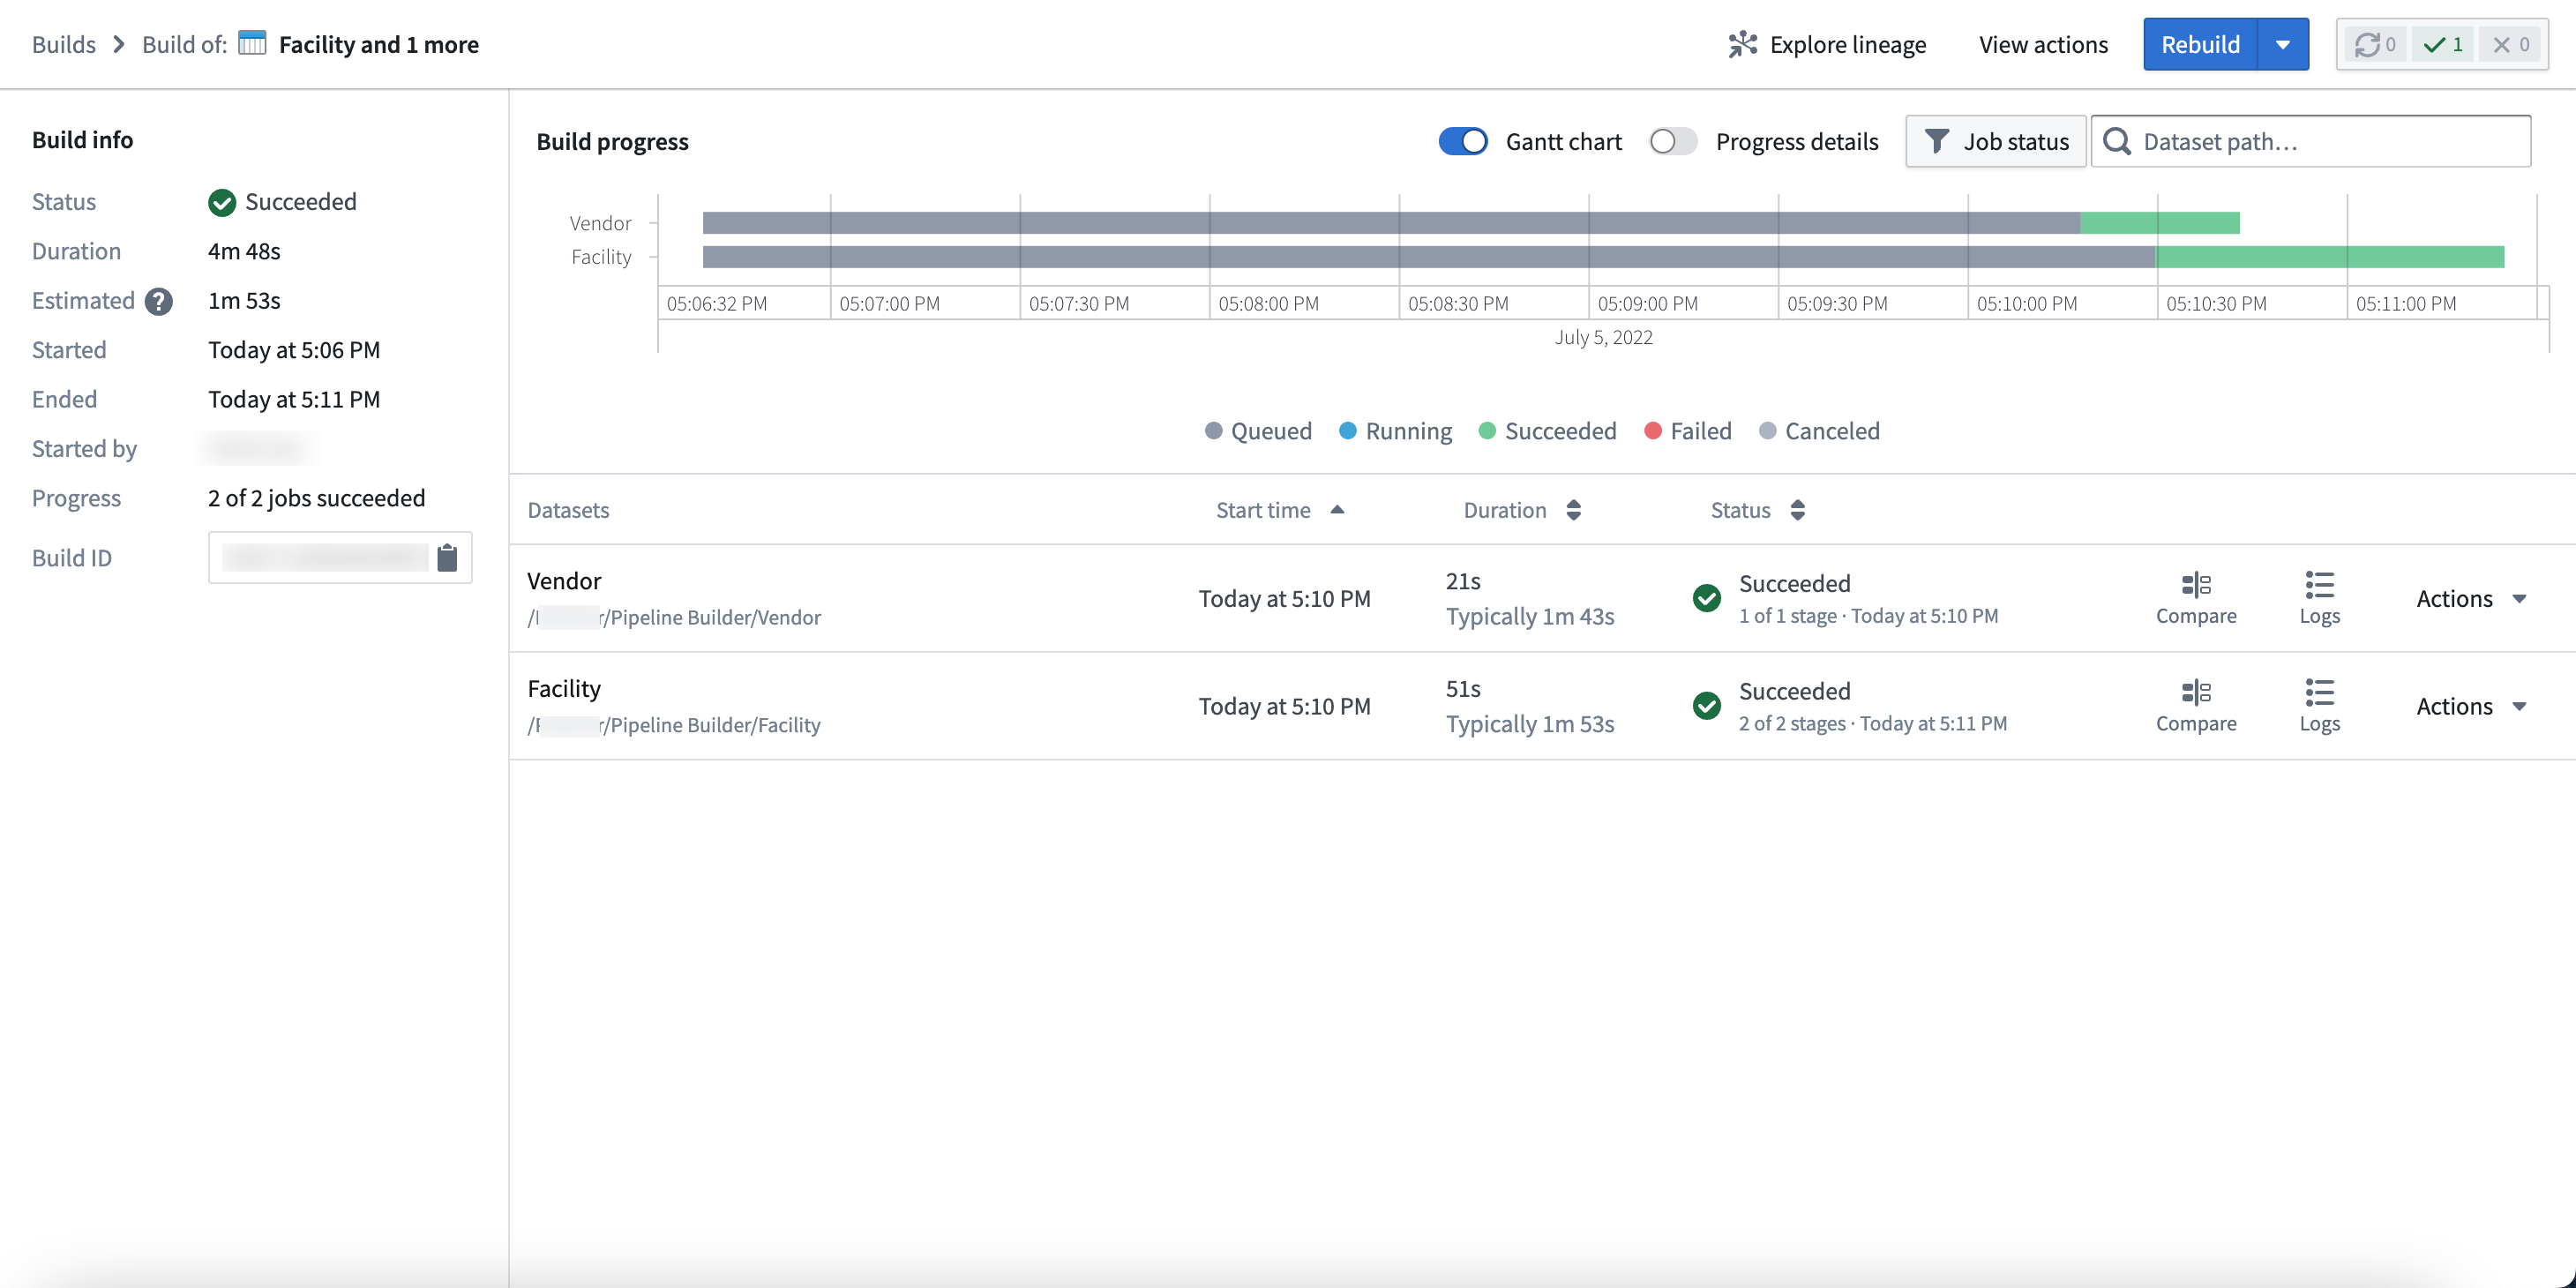
In the Build details view, you can find build information, progress metrics, and build schedule details.
-
Build info: Shows the status, total duration, and estimated duration of your pipeline. You can also view a variety of metadata, including the start and end times, initiating user, progress within a job list, and build ID.
-
Build progress: Displays details of the pipeline build over time as a Gantt chart.
-
Build schedule: Displays the name, frequency, status history, and last modified date of the pipeline build schedule.
-
Learn more about creating a build schedule.
-
Progress details: Toggle to see whether the build is starting, waiting in the Project's resource queue, initializing Spark application, running, or finishing.
Build settings
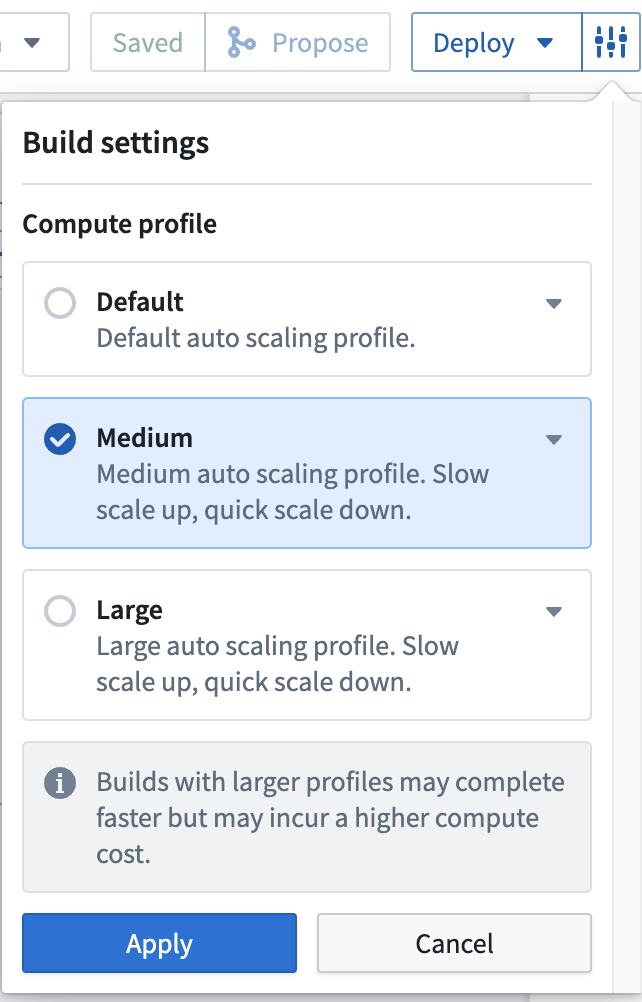
You can choose to edit the Build settings of your pipeline by clicking the settings icon next to Deploy. Choose from the following compute settings:
- Default: The default auto scaling profile. It uses the least amount of executor cores and memory.
- Medium: Offers a slow scale up and quick scale down compute.
- Large: Offers a slow scale up and quick scale down compute.
- Note: Builds with larger profiles may complete faster but incur a higher compute cost.
Save
In Pipeline Builder, you can choose to save changes to your pipeline without initiating a deployment. This flexibility allows you to edit your workflow without committing logic changes to production.
After making a change to your workflow, select Save in the top toolbar.

If you click Propose first, the current state will be automatically saved.
:::callout{theme="neutral"} If you only save your changes without deploying them, your pipeline logic will not update to the latest changes. You must deploy the pipeline to capture changes to transform logic. :::
Build from an output node
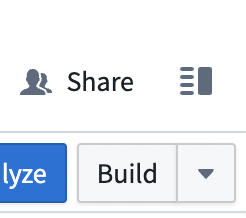
You can also choose to start a build of your pipeline even when you navigate outside the pipeline graph. For instance, you can open a dataset preview by right-clicking on the output node and selecting Open. You can then initiate a build by clicking Build in the upper right corner of the interface.
:::callout{theme="neutral"} The Build option outside the pipeline graph will not update the pipeline logic with any changes made since the last deployment. To update logic and push to output, return to the pipeline graph and use Deploy. :::
Additional options for streaming pipelines
If you are running a streaming pipeline, additional options will be available to you. Note that streaming pipelines are only available on some accounts. For more information, contact your Palantir representative.
You can use Replay on deploy if necessary to instruct your pipeline to begin computation from a specific historical point in time.
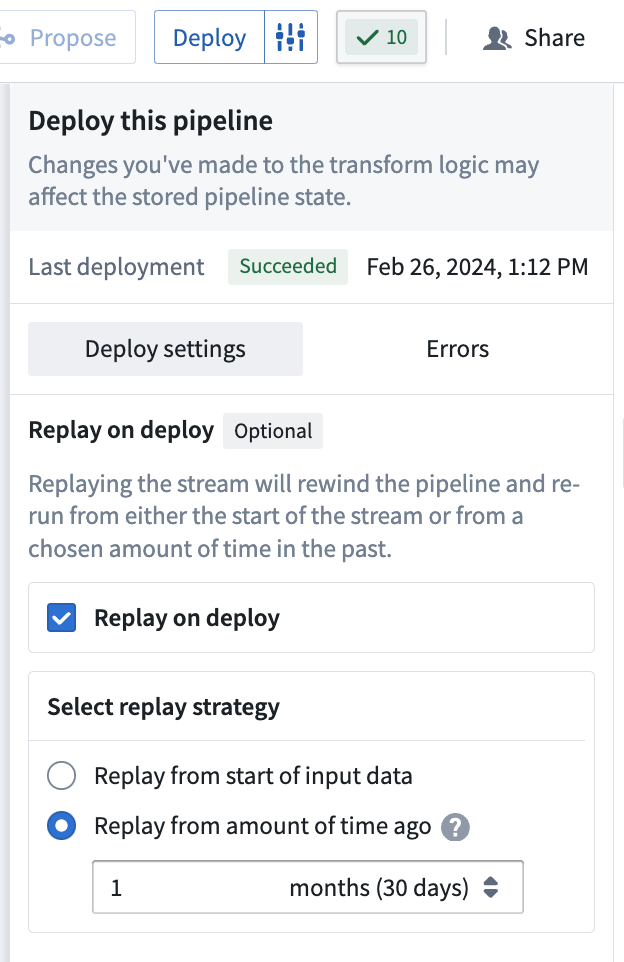
In the Deploy window, choose the start time for data processing in your pipeline delivery:
- Start of input data: All data from the start of your input stream will be processed.
- From a specified time: Select the time value from when you would like data to be processed. Any data from before this time will not be processed. For example, to only include data from the last two months, select
2 monthsago.
:::callout{theme="danger" title="Danger"} Replaying your pipeline could lead to lengthy downtimes, possibly as long as multiple days. When you replay your pipeline, your stream history will be lost and all downstream pipeline consumers will be required to replay. :::
For more information on replays, refer to the documentation on breaking changes.
Redeploy vs. replay
Stream redeployment refers to the process of resuming a streaming job from a previously saved checkpoint. When a streaming job is paused or stopped, a bookmark is created within the data, indicating the position up to which records have been read. Bookmarks, also called checkpoints, are also created periodically while a stream is running. This enables recovery in case the stream encounters a failure for any reason.
By doing so, when the stream is restarted, it resumes processing from that specific checkpoint. During redeployment, the existing output streams are preserved, and new data is appended to them.
On the other hand, stream replay entails generating a new view of the output stream. Establishing a new view on the dataset is considered as a new stream containing fresh data; however, accessing data from a prior view is still possible. Various situations may necessitate or provide advantages for stream replay, including the following:
- If you modify the logic in your Pipeline Builder pipeline and require the output data to adhere to the updated logic, replaying the stream can facilitate this by restarting the processing either from the beginning or from a specified point in time. This ensures that the output stream's data aligns with the updated transformation rules.
- In case of breaking changes, a replay will be enforced. More details can be found in the breaking changes documentation.
- If an input stream in your pipeline has been replayed, you must also replay the downstream pipeline as well to maintain data consistency in the output stream.
Be aware that replaying a pipeline may result in extended downtimes, which could last several days depending on the replay starting point. When you replay a pipeline, all data in the output stream is lost. If you wish to retain the data from the previous stream, you can direct the output to a new destination. However, if you intend to push records to the original output stream in the future, you will need to replay the pipeline.
To redeploy a stream, follow the same procedure used for the initial deployment; select Deploy in the Pipeline Builder interface.
To replay a stream, add the additional setting to either replay from Start of input data or From a specified time.
中文翻译
交付管道
在 Pipeline Builder 中完成管道描述并解决模式(Schema)错误后,您就可以交付管道了。
部署与构建
部署会更新管道输出的逻辑,而构建则执行该逻辑以实现逻辑变更的实体化。
构建可能需要消耗大量时间和资源,尤其是在数据规模较大或需要重新处理管道所有输入的情况下。出于这些原因,您可以选择仅部署管道而不进行构建。通过仅选择部署,您可以将构建成本推迟到确实需要构建时再承担。
交付变更
如果您想交付第一个端到端管道并包含所有已定义的逻辑,请在顶部工具栏右侧选择 Deploy。
逻辑变更部署后,您可以选择要构建的输出。构建是按作业组(Job group)进行的,这意味着您可以选择构建任意给定作业组中的所有输出,或构建未分组的单个输出。本体(Ontology)类型的输出必须始终进行构建,这意味着包含本体类型输出的任何作业组都必须进行构建。
成功启动部署后,图表顶部会出现一个蓝色横幅。选择 View 以访问 Build details 视图。
在 Build details 视图中,您可以找到构建信息、进度指标和构建计划详情。
-
构建信息: 显示管道的状态、总持续时间和预计持续时间。您还可以查看各种元数据,包括开始和结束时间、启动用户、作业列表中的进度以及构建 ID。
-
构建进度: 以甘特图(Gantt chart)的形式显示管道构建随时间变化的详细信息。
-
构建计划: 显示管道构建计划的名称、频率、状态历史记录和最后修改日期。
-
了解有关创建构建计划的更多信息。
-
进度详情: 切换以查看构建是正在启动、在项目资源队列中等待、初始化 Spark 应用程序、运行中还是正在完成。
构建设置
您可以点击 Deploy 旁边的设置图标来编辑管道的 Build settings。从以下计算设置中进行选择:
- Default: 默认的自动扩缩容配置。它使用最少的执行器核心和内存。
- Medium: 提供缓慢扩容和快速缩容的计算资源。
- Large: 提供缓慢扩容和快速缩容的计算资源。
- 注意:使用较大配置的构建可能会更快完成,但会产生更高的计算成本。
保存
在 Pipeline Builder 中,您可以选择保存对管道的更改而不启动部署。这种灵活性允许您编辑工作流,而无需将逻辑更改提交到生产环境。
对工作流进行更改后,在顶部工具栏中选择 Save。
如果您先点击 Propose,当前状态将被自动保存。
:::callout{theme="neutral"} 如果您仅保存更改而不进行部署,您的管道逻辑将不会更新为最新更改。您必须部署管道才能捕获转换逻辑的更改。 :::
从输出节点构建
即使导航到管道图表之外,您也可以选择启动管道构建。例如,您可以通过右键单击输出节点并选择 Open 来打开数据集预览。然后,您可以点击界面右上角的 Build 来启动构建。
:::callout{theme="neutral"} 管道图表外部的 Build 选项不会使用自上次部署以来所做的任何更改来更新管道逻辑。要更新逻辑并推送到输出,请返回管道图表并使用 Deploy。 :::
流式管道的附加选项
如果您正在运行流式管道(Streaming pipeline),将有其他选项可用。请注意,流式管道仅在某些账户上可用。有关更多信息,请联系您的 Palantir 代表。
如有必要,您可以使用 Replay on deploy 指示管道从特定的历史时间点开始计算。
在 Deploy 窗口中,选择管道交付中数据处理的开始时间:
- Start of input data: 将处理输入流开始以来的所有数据。
- From a specified time: 选择您希望开始处理数据的时间值。此时间之前的任何数据都不会被处理。例如,要仅包含过去两个月的数据,请选择
2 months前。
:::callout{theme="danger" title="Danger"} 重放管道可能会导致长时间的停机,甚至可能长达数天。当您重放管道时,流历史记录将丢失,并且所有下游管道使用者都需要进行重放。 :::
有关重放的更多信息,请参阅关于重大变更的文档。
重新部署与重放
流重新部署是指从先前保存的检查点(Checkpoint)恢复流式作业的过程。当流式作业暂停或停止时,会在数据中创建一个书签(Bookmark),指示已读取记录的位置。书签也称为检查点,在流运行期间也会定期创建。这使得流在因任何原因遇到故障时能够进行恢复。
这样一来,当流重新启动时,它将从该特定检查点恢复处理。在重新部署期间,现有的输出流将被保留,新数据将追加到其中。
另一方面,流重放意味着生成输出流的新视图。在数据集上建立新视图被视为包含全新数据的新流;但是,仍然可以访问先前视图中的数据。各种情况可能需要流重放或从中受益,包括以下情况:
- 如果您修改了 Pipeline Builder 管道中的逻辑,并要求输出数据遵循更新后的逻辑,重放流可以通过从开头或指定时间点重新开始处理来促进这一过程。这确保了输出流的数据与更新后的转换规则保持一致。
- 如果发生重大变更,将强制执行重放。更多详细信息可在重大变更文档中找到。
- 如果管道中的输入流已被重放,您还必须重放下游管道,以保持输出流中的数据一致性。
请注意,重放管道可能会导致停机时间延长,具体取决于重放起点,可能会持续数天。当您重放管道时,输出流中的所有数据都会丢失。如果您希望保留先前流中的数据,可以将输出指向新目标。但是,如果您打算将来将记录推送到原始输出流,则需要重放管道。
要重新部署流,请遵循与初始部署相同的步骤;在 Pipeline Builder 界面中选择 Deploy。
要重放流,请添加额外设置,以从 Start of input data 或 From a specified time 进行重放。