Use LLM node in Pipeline Builder(在 Pipeline Builder 中使用 Use LLM 节点)
The Use LLM node in Pipeline Builder offers a convenient method for executing Large Language Models (LLMs) on your data at scale. The integration of this node within Pipeline Builder allows you to seamlessly incorporate LLM processing logic between various data transformations, simplifying the integration of LLMs into your pipeline with no coding required.
The Use LLM node includes pre-engineered prompt templates. These templates provide a beginner-friendly start to using LLMs that leverages the expertise of experienced prompt engineers. You can also run trials over a few rows of your input dataset to iterate on your prompt before running your model on an entire dataset. This preview functionality computes in seconds, speeding up the feedback loop and enhancing the overall development process.
To use, users must be granted permission for AIP capabilities for custom workflows by a platform administrator.
Select a dataset
To apply an LLM to a dataset, select a dataset node in your workspace and select Use LLM.

Select prompt
Below are different examples of the available template prompts. To create your own, select Empty prompt.
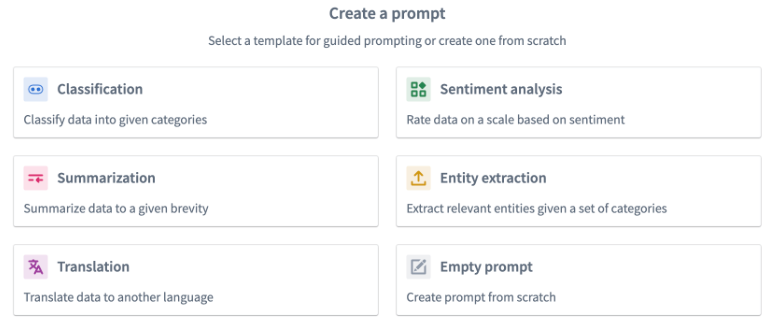
Classification
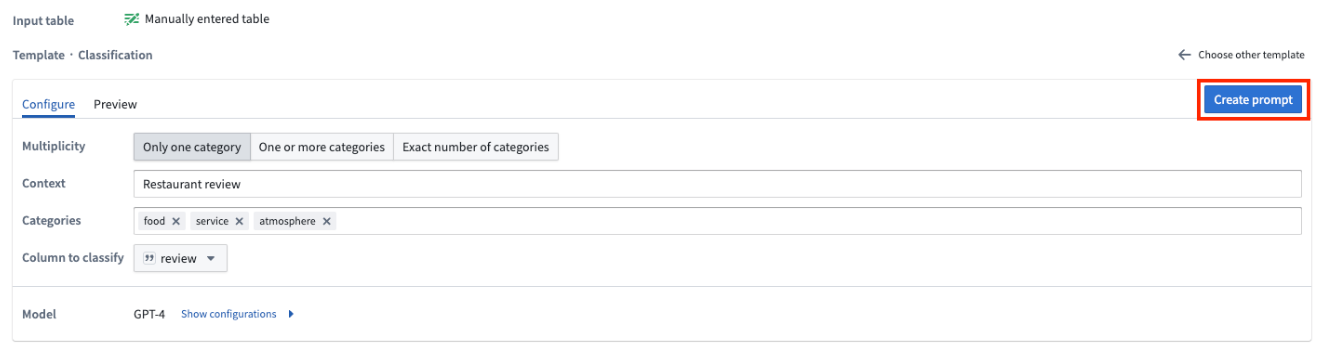
You should use the classification prompt when you want to categorize data into different categories.
The example below demonstrates how the prompt would be filled out for our notional objective of classifying restaurant reviews into three categories: Service, Food, and Atmosphere.
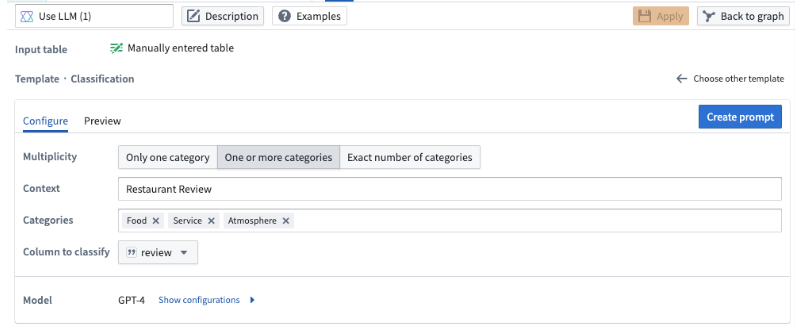
The Multiplicity field allows you to choose whether you want the output column to have one category, multiple categories, or an exact number of categories. In our example, we want to include all the categories a review could fall in to, so we will choose the One or more categories option.
In the Context field, enter a description for your data. In our example, we will input Restaurant Review.
In the Categories field, input the distinct categories to which you want to assign your data. In our example we specify the three categories: Food, Service, and Atmosphere because we want to categorize our restaurant reviews into any of these three categories.
In the Column to classify field, choose the column that contains the data you want to classify. In our example, we choose the review column because that is the column containing our restaurant reviews.
Summarization
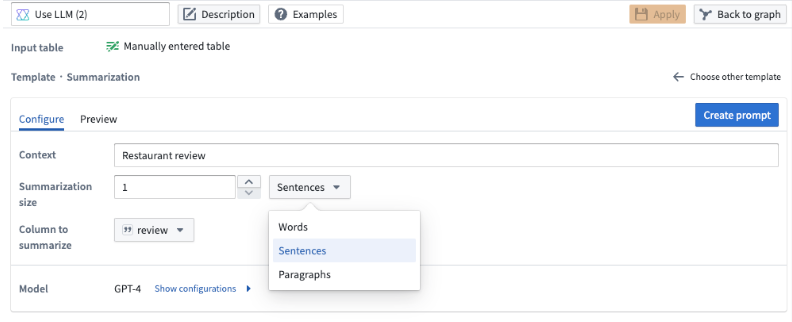
You can use the summarization template to summarize your data to a given length.
In this template, you can specify the length of the summarization. You can choose the number of words, sentences, or paragraphs and specify the size in the Summarization size field.
In our example, we want a one sentence summary of the restaurant review, so we specify 1 as the summarization size, and we choose Sentences from the dropdown.
Translation
To translate your data into a different language, use the translation prompt. Specify the language you want to translate the data to in the Language field. In our example below, we want to translate the restaurant reviews to Spanish, so we specify Spanish under the Language field.

Sentiment analysis
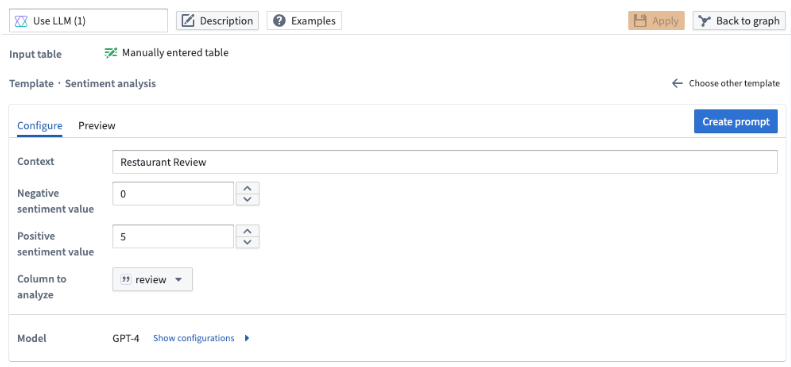
Use the sentiment analysis prompt when you want to assign a numeric score to your data based on its positive or negative sentiment.
In this template, you can configure the scale of the output score. For our example below, we want a number from zero to five where five denotes a review being the most positive and zero being the most negative.
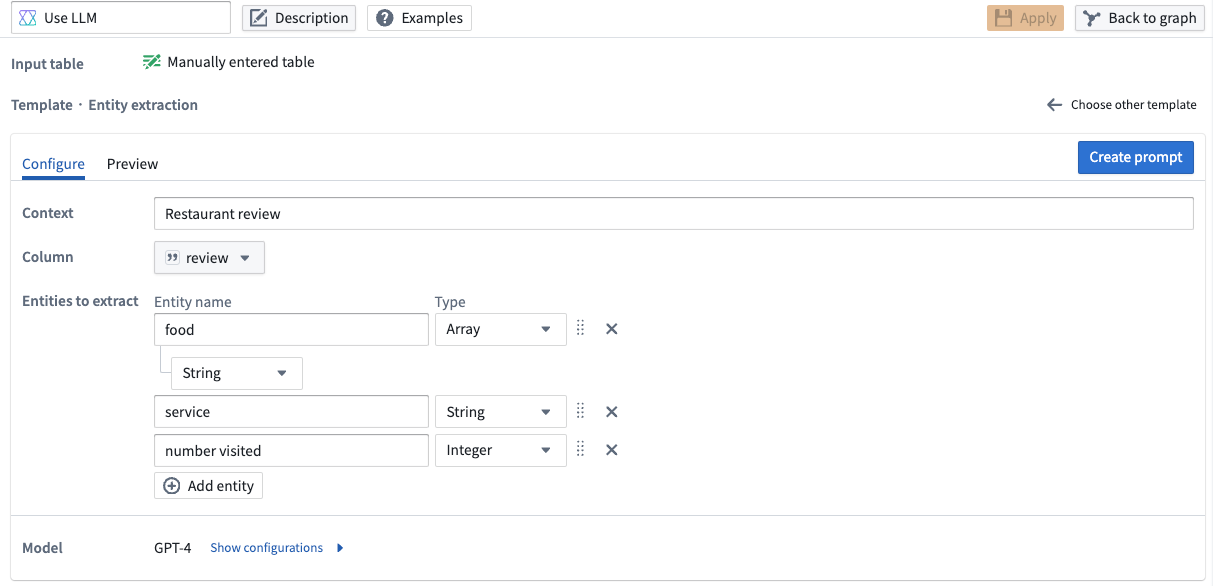
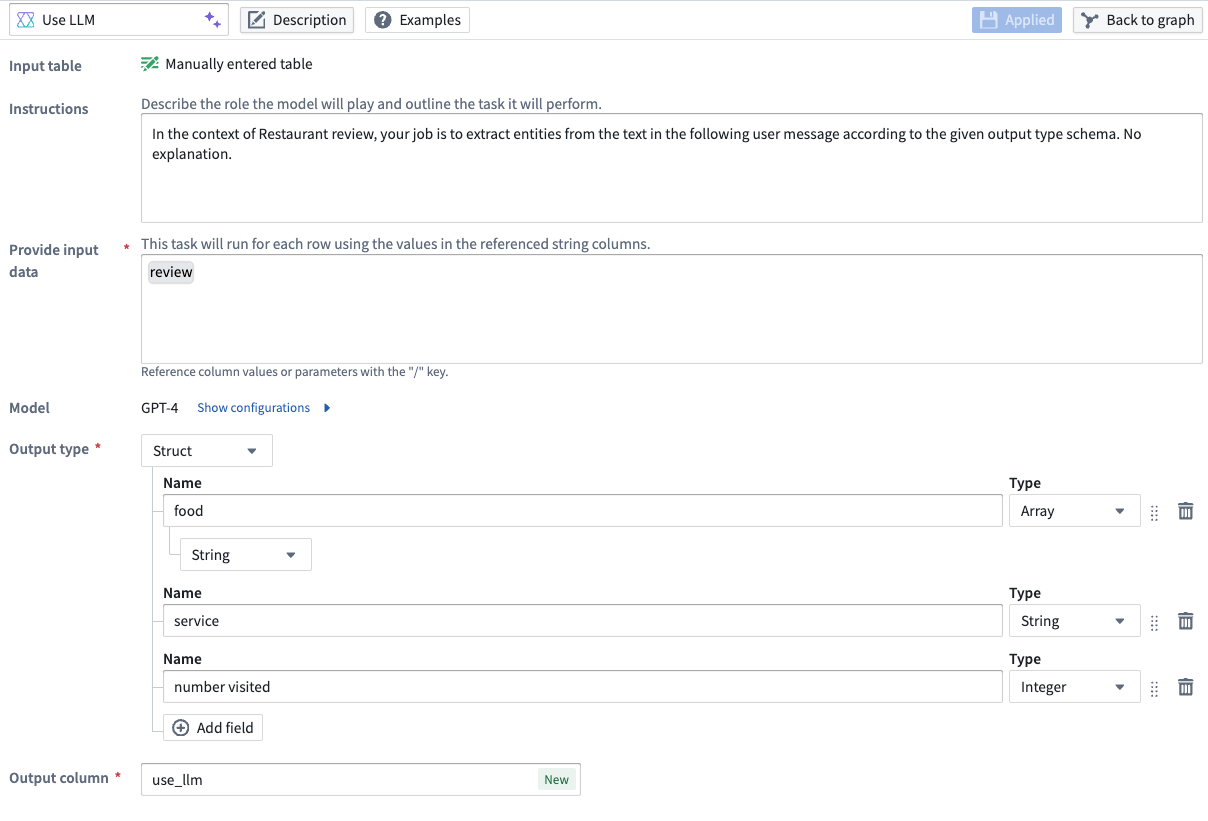
Entity extraction
Use the entity extraction prompt when there are specific elements you want to extract from your data. In our example, we want to extract all the food, service, and times visited elements in our restaurant reviews.
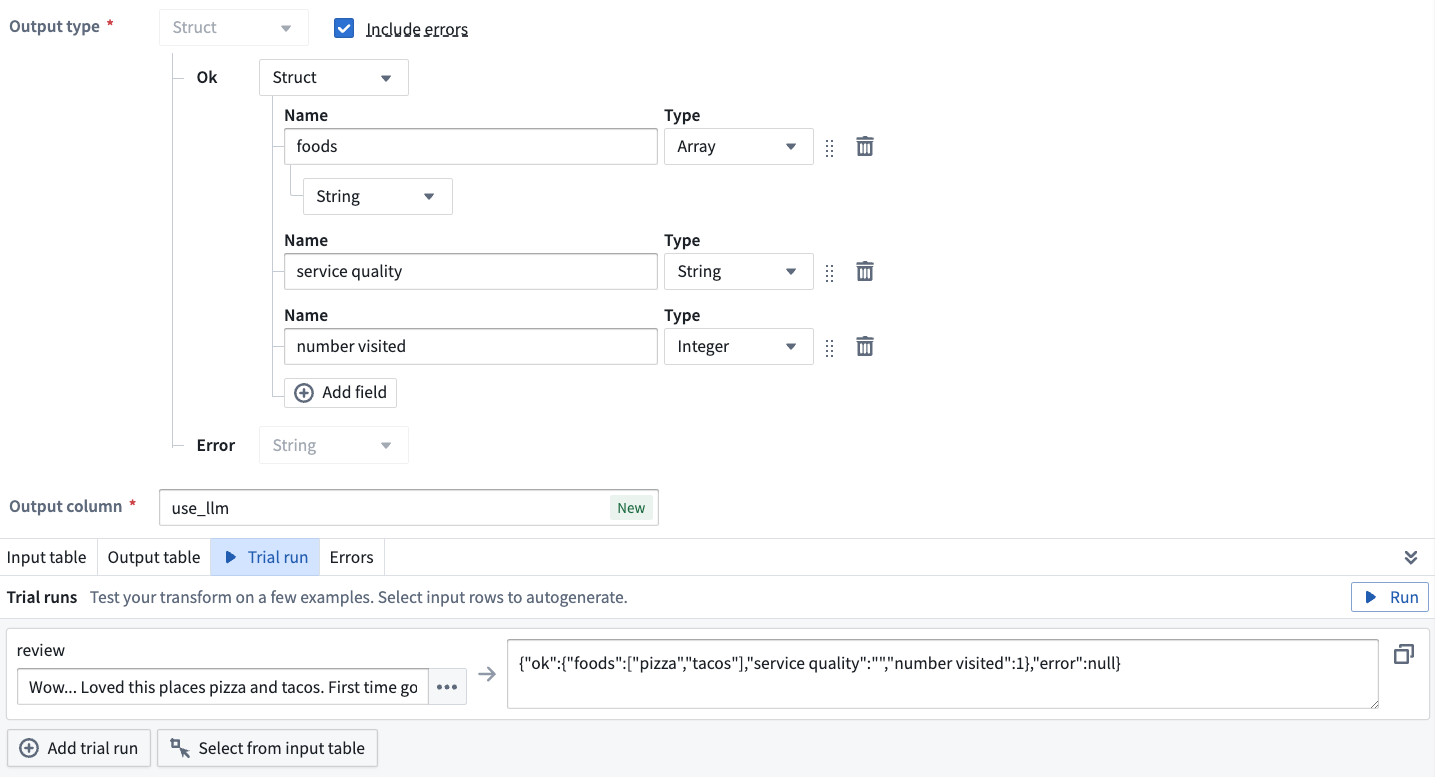
In particular, we want to extract all food elements in a String Array, the service quality as a String, and an Integer denoting the number of times that person has visited the restaurant.
To obtain those results, we update the Entities to extract field. Enter food, service, and number visited under Entity name with the following properties:
- For
food, specify anArrayfor the Type and selectStringas the type for that array. - For
service, selectStringas the type - For
number visited, selectInteger.
The LLM output is now configured to conform to our specified types for this example.
You can also adjust the types of the extracted entities within the struct under the Output type on the prompt page.
Empty prompt
If none of the prompt templates fit your use case, you can create your own by selecting Empty prompt.
Vision
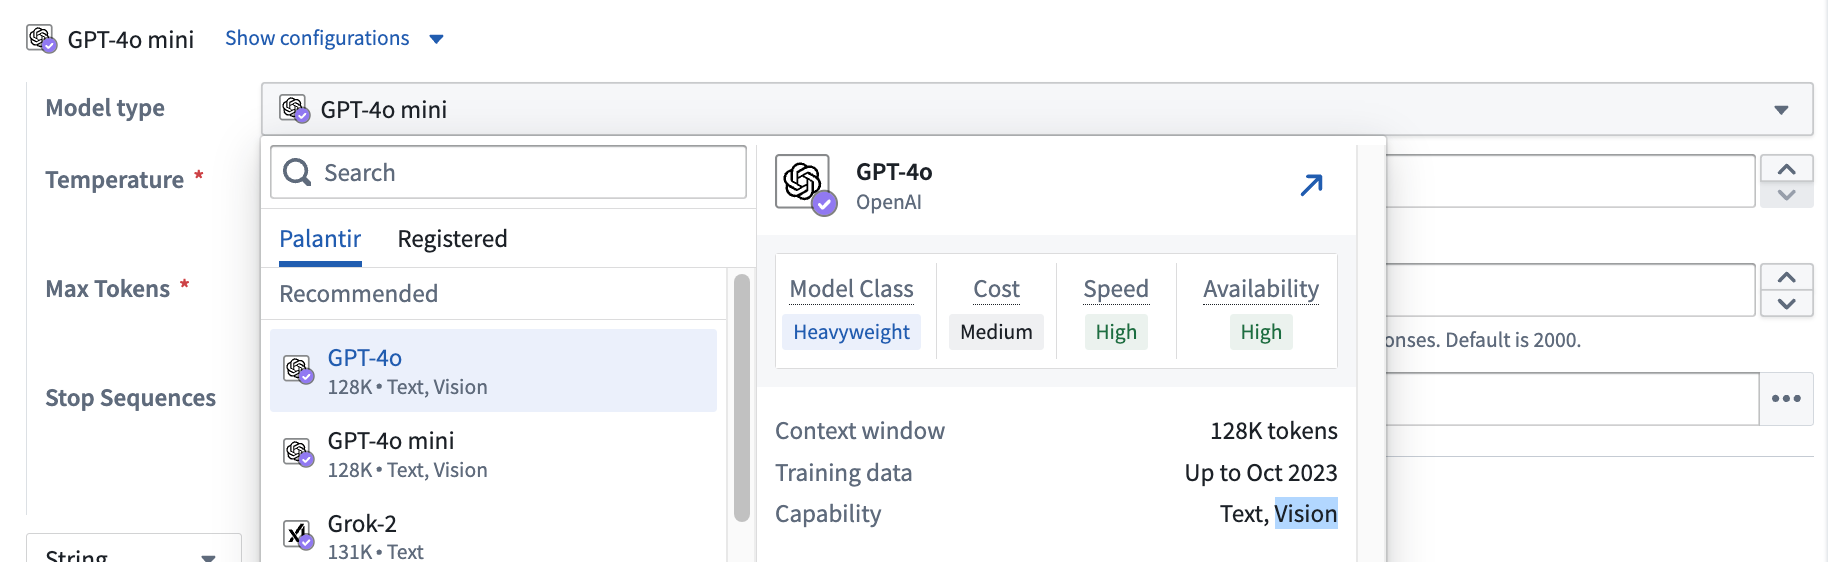
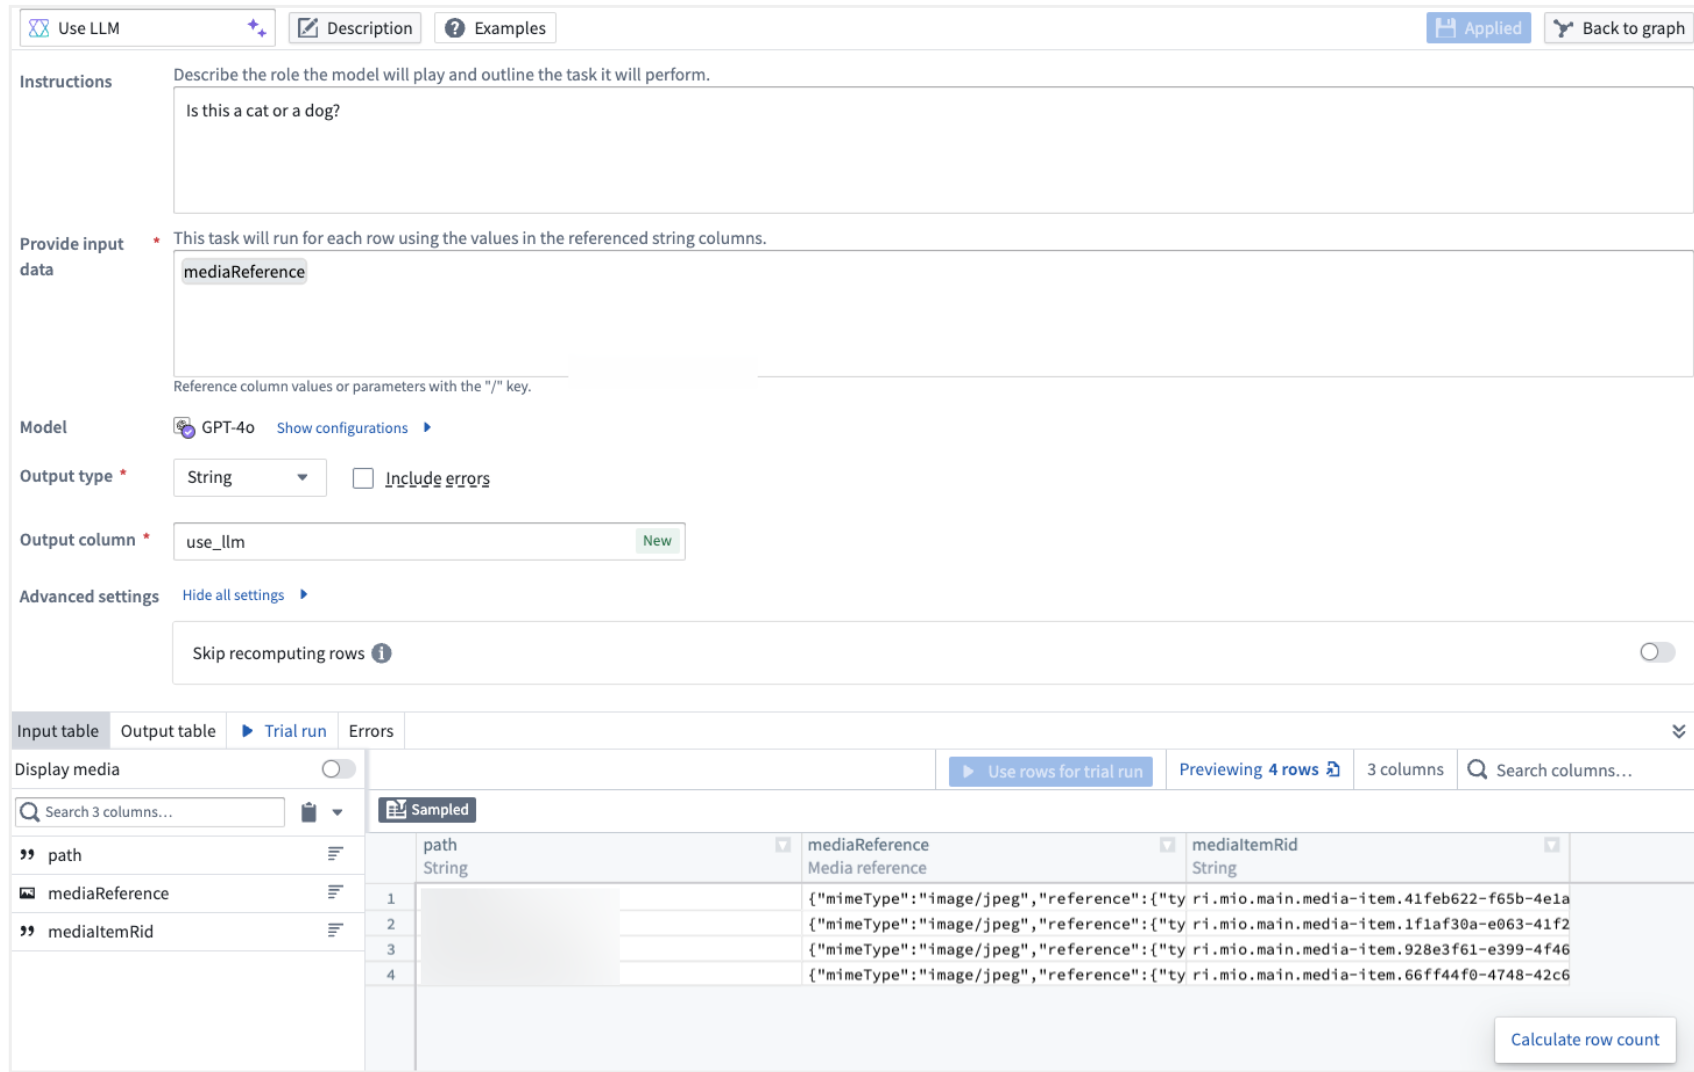
Pipeline Builder also supports vision capabilities, allowing vision compatible models to analyze images and answer questions based on visual input. To check whether a model has vision capabilities, check for the Vision label under the Capability of the model in the model selector.
 To use vision functionality, enter the media reference column in the Provide input data section of an empty prompt template and select the desired vision model.
:::callout{theme="neutral"}
Currently, the vision prompt does not support media sets as a direct input. Use the Convert Media Set to Table Rows transform to get the mediaReference column that you can feed into the Use LLM node.
:::
Optional configurations
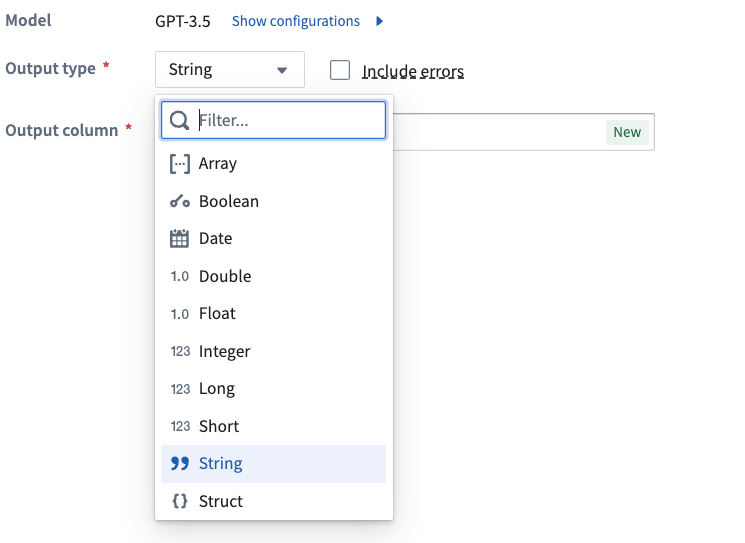
Output types
On the prompt page, you can designate the desired output type for your LLM output to conform to. Select the Output type option located near the bottom of the screen, then choose the preferred type from the dropdown menu.
Include errors
Also on the prompt page, you can configure your output to show the LLM errors alongside your output value. This configuration will change your output type to a struct consisting of your original output type and the error string. To include the LLM error, tick the box next to Include errors.
To change your output back to the original output without errors, untick the Include errors box.
Skip computing already processed rows
To save on compute costs and time, you can skip computing already processed rows by toggling Skip recomputing rows.
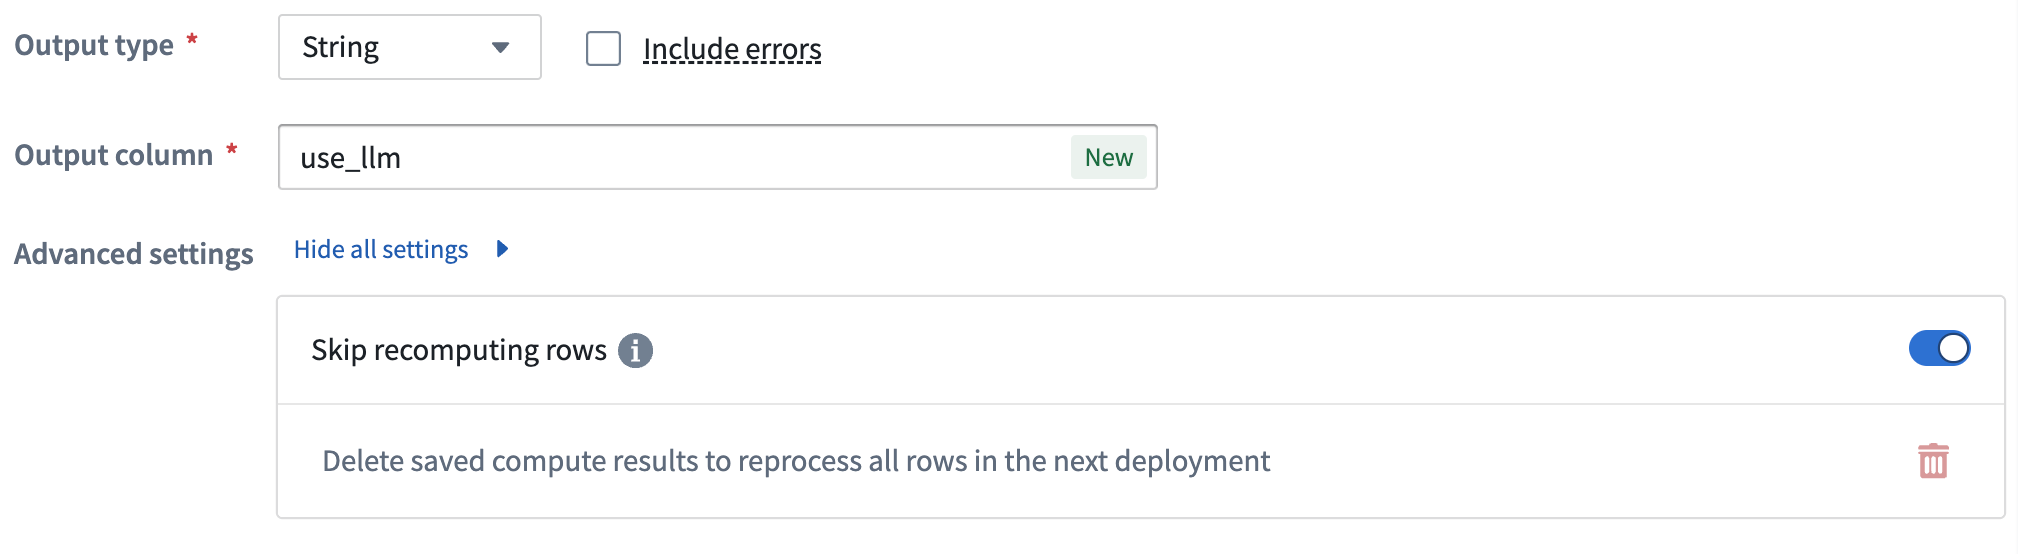
When Skip recomputing rows is enabled, rows will be compared with previously processed rows based on the columns and parameters passed into the input prompt. Matching rows with the same column and parameter values will get the cached output value without reprocessing in future deployments.
:::callout{theme="warning"} Skip recomputing rows will not apply to rows whose output value in the previous deployment was either an error or null. In such cases, those rows will be recomputed on the next run. :::
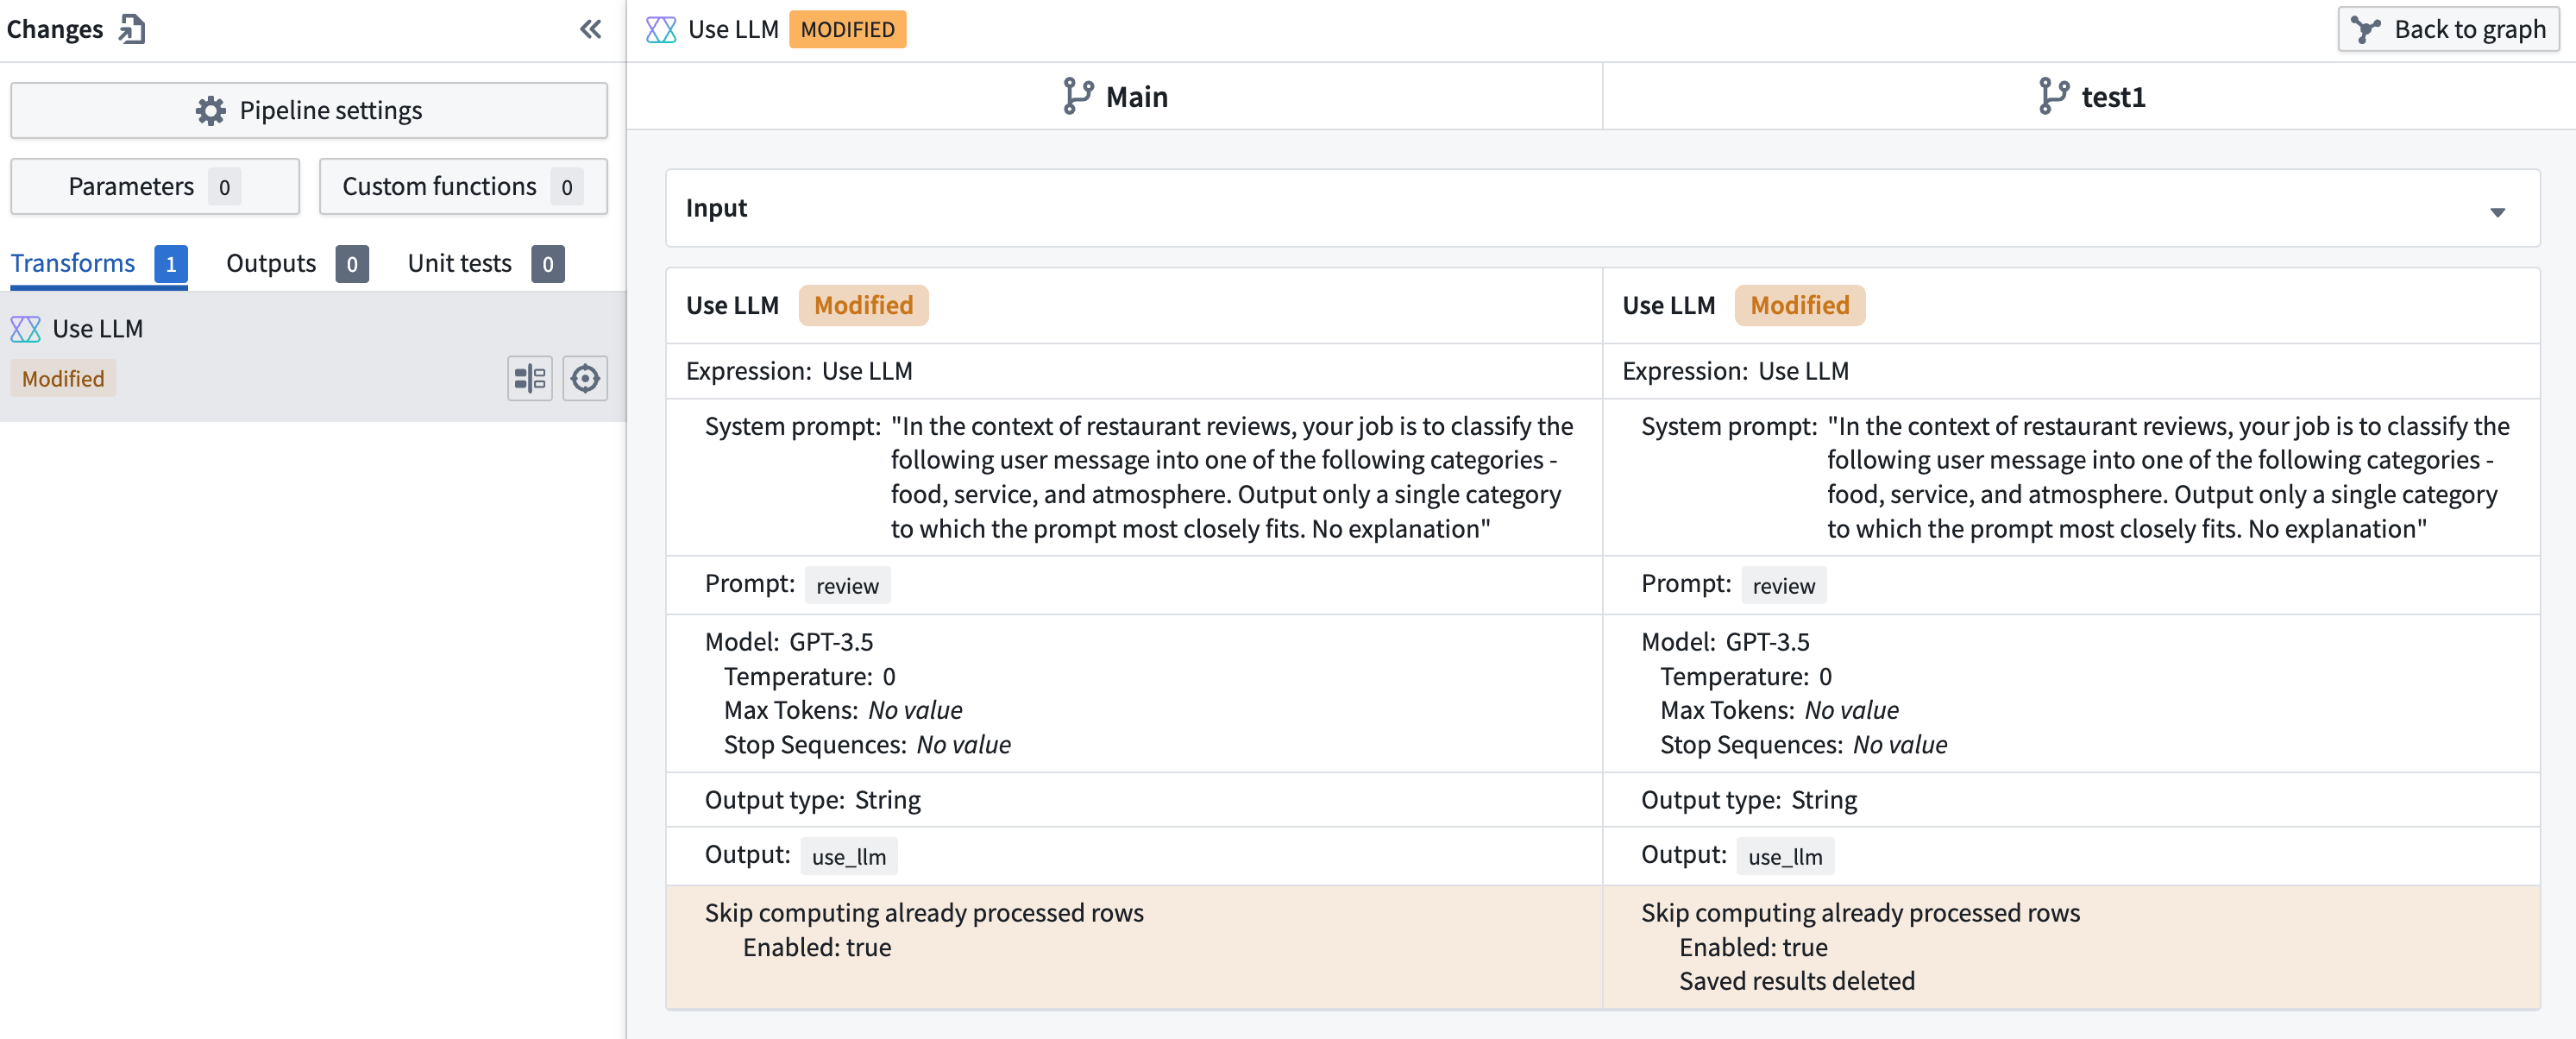
The cache can be cleared if changes that require all rows to be recomputed are made to the prompt. A warning banner will appear over the LLM view.

To clear the cache, select the red wastebasket icon. If the cache is cleared, all rows will be reprocessed in the next deployment.
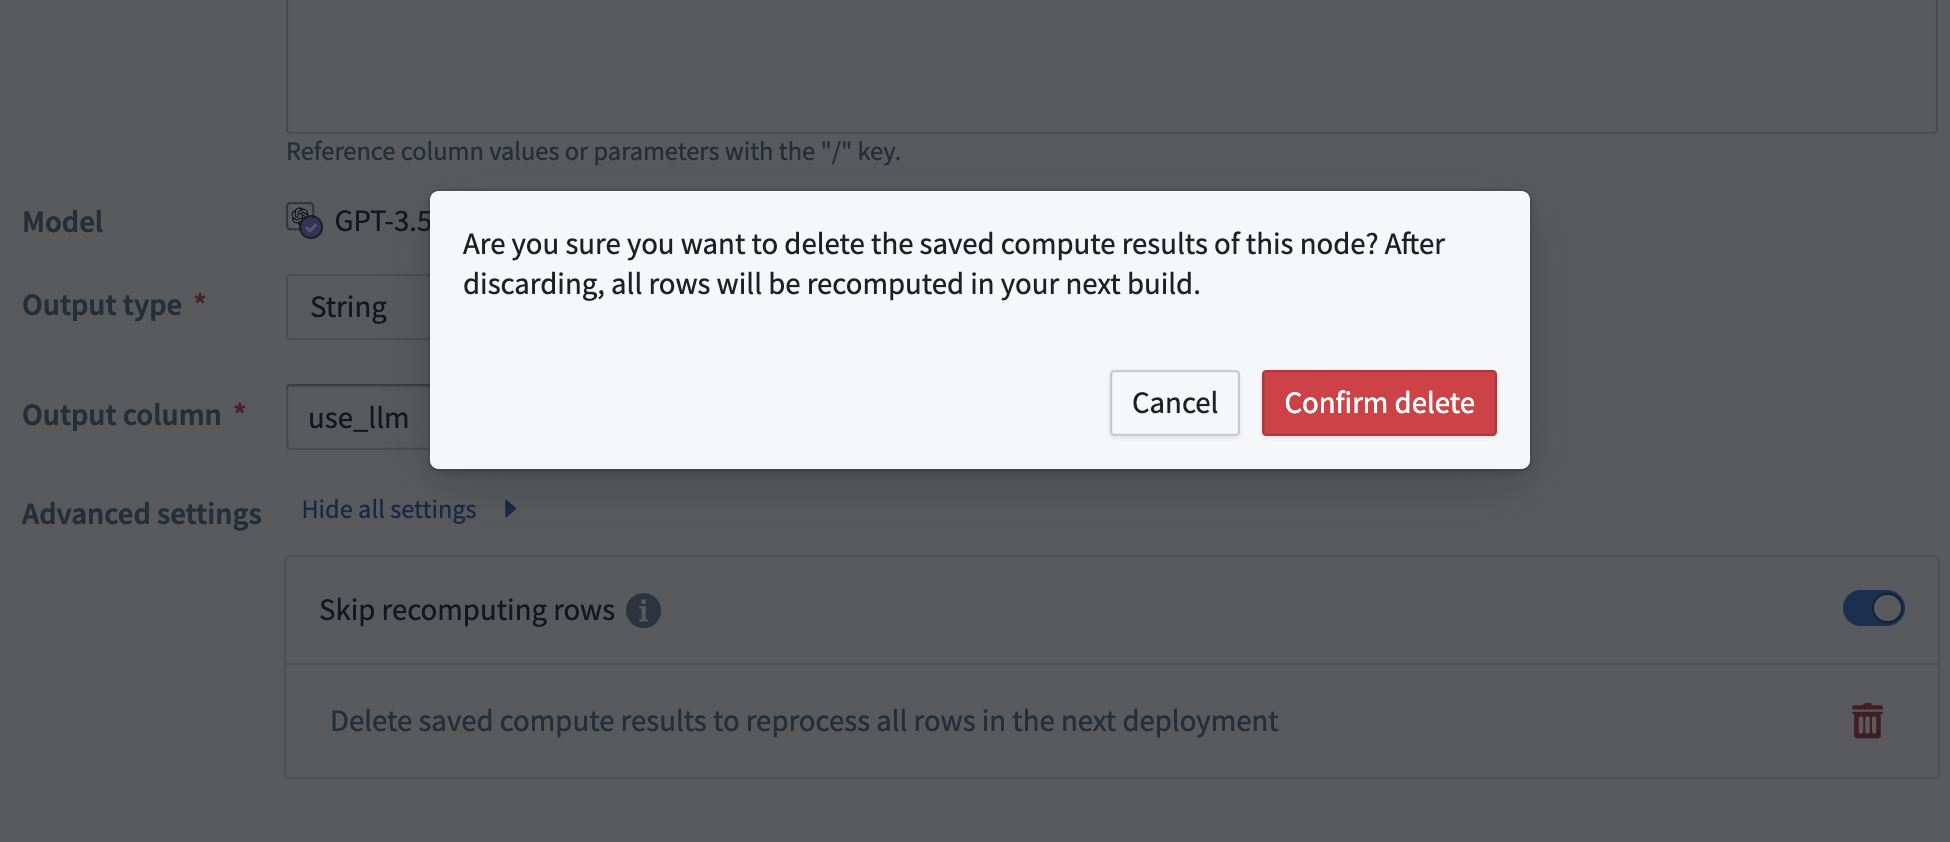
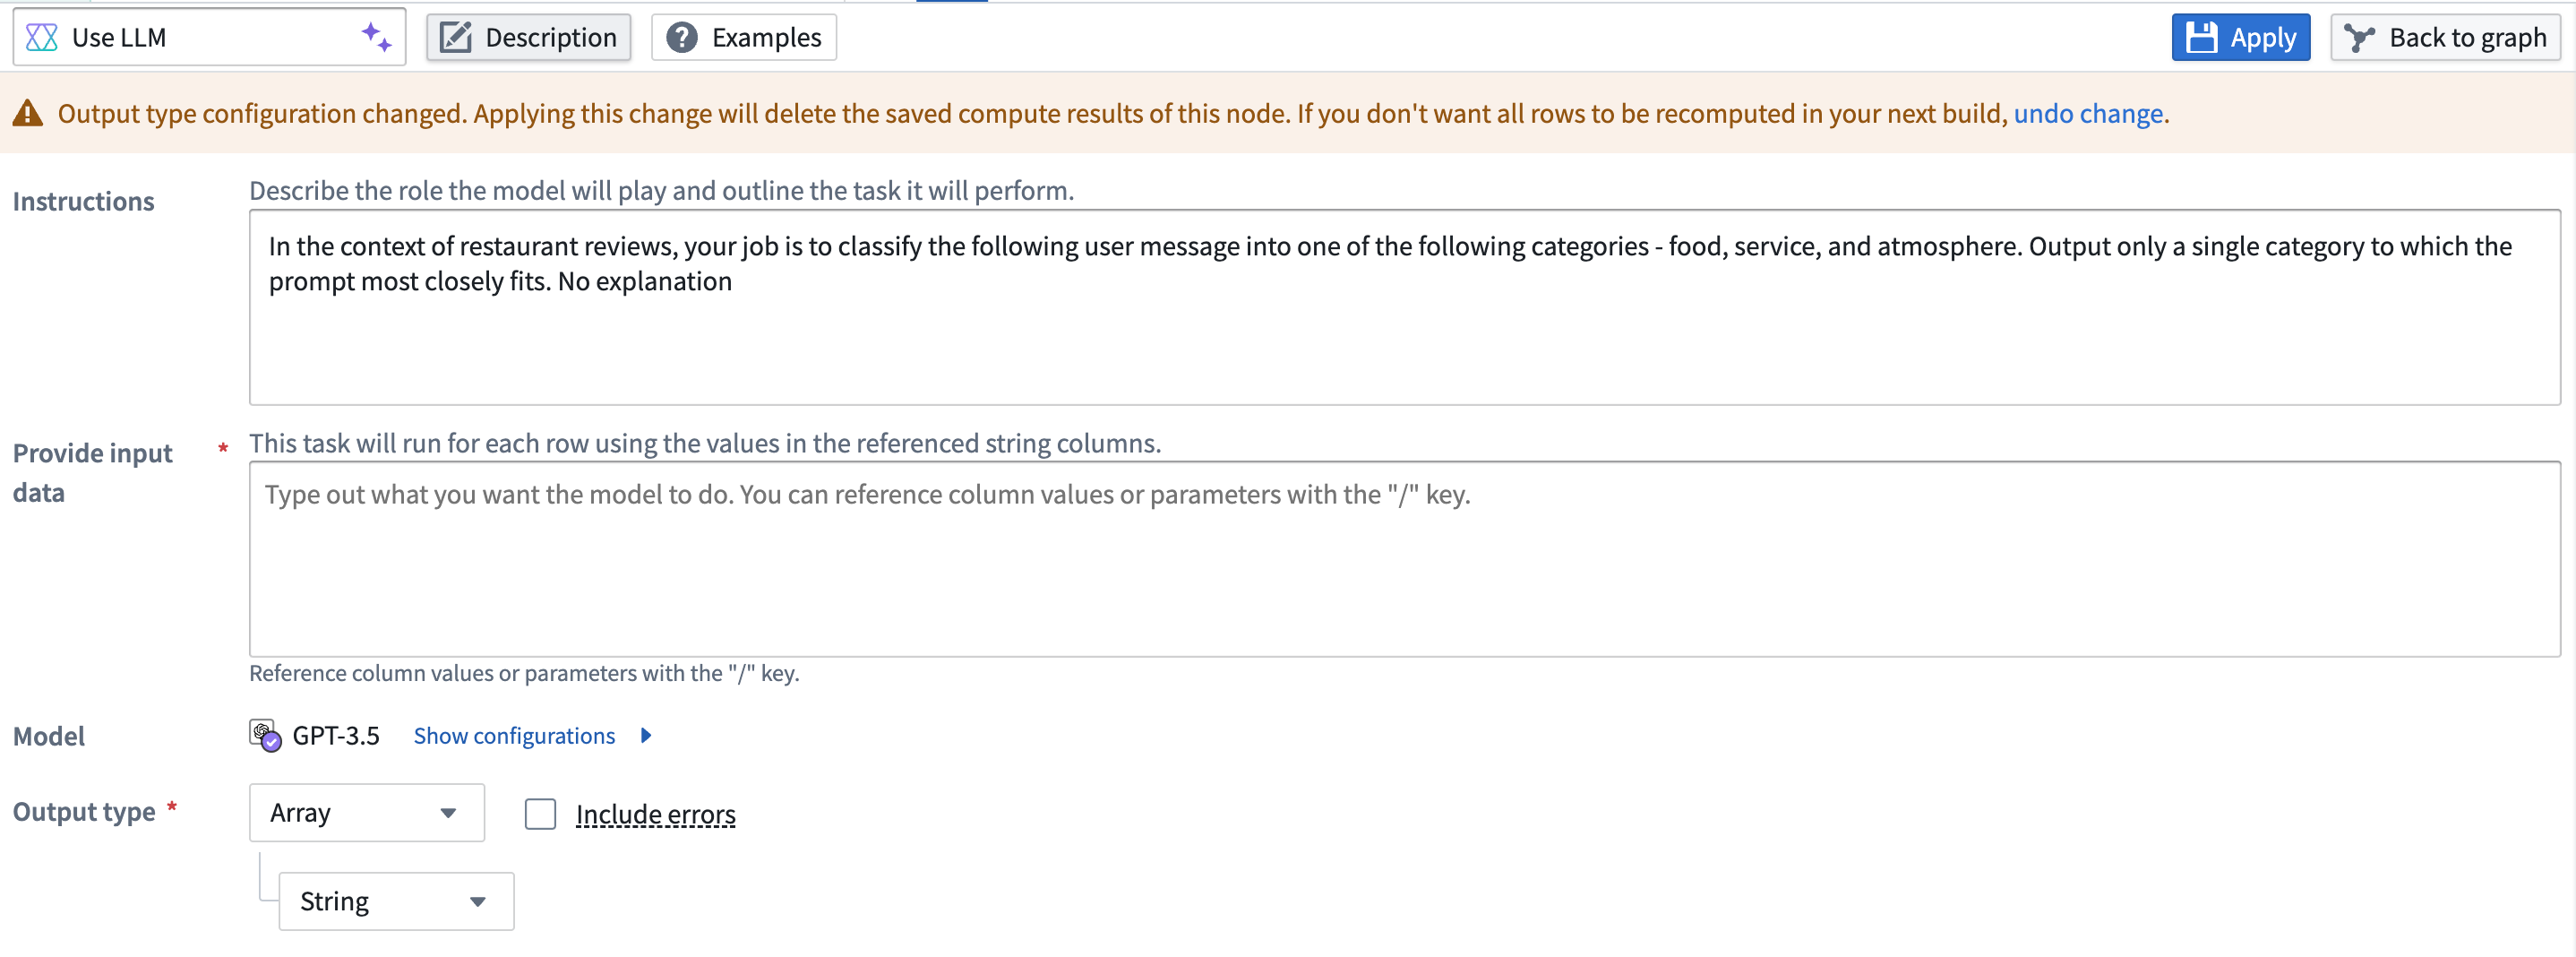
The cache will automatically be cleared if the output type is changed. When this happens, a warning banner will appear. If this was a mistake, you can select undo change in the banner.
Any changes to the cache's state will show up in the Changes page when merging a branch.
If a use LLM node with multiple downstream outputs has Skip recomputing rows enabled, you must put these outputs in the same job group. Otherwise, you will get the following error when attempting to deploy:

Create a new job group outside of the default job group to fix this error.
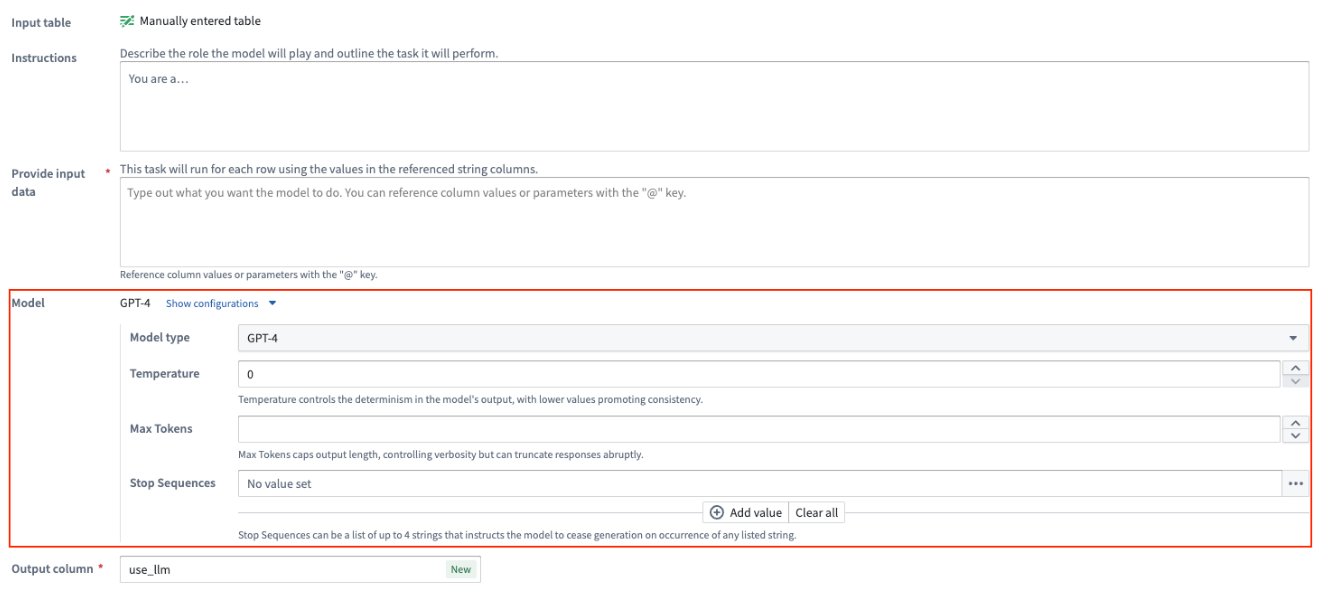
[Advanced] Show configurations for model
For every prompt, you can configure the model being used for that Use LLM node:
- Model Type: The model type of the GPT instance, such as
3.5or4. The Use LLM node also supports open source models like Mistral AI's Mixtral 8x7b. - Temperature: Higher value temperatures will make the output more random while lower values will make it more focused and deterministic.
- Max Tokens: This will limit the number of tokens in the output. You can consider tokens as small text pieces that language models use as building blocks to understand and process written language.
- Stop Sequence: This will stop the LLM generation if it hits any of the stop sequence values. You can configure up to four stop sequences.
Trial runs
At the bottom of each Use LLM board, you have the option to test out your specific LLM with examples. Select the Trial run tab and enter the value you want to test on the left hand side. Then select Run.

To test out more examples, you can select Add trial run.
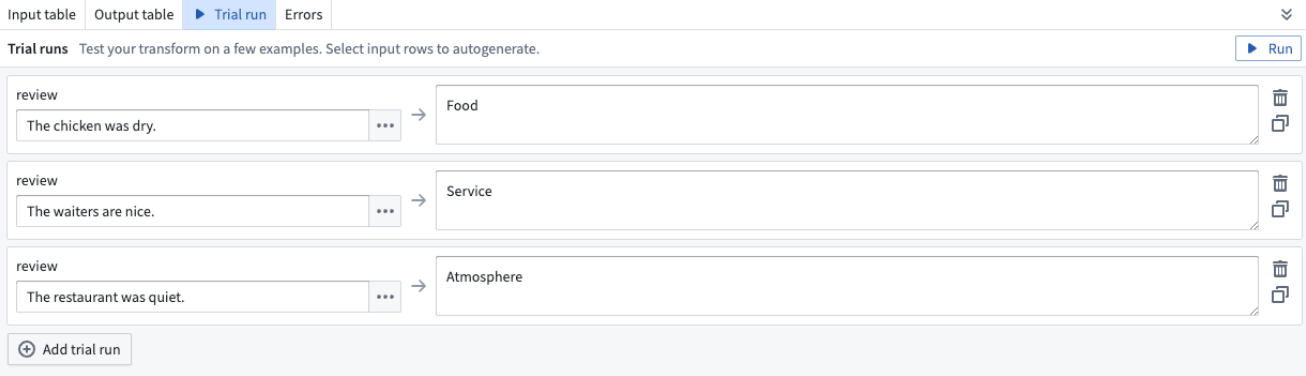
To add examples directly from your input data, navigate to the Input table tab and select the rows you want to use in your trial run. Select Use rows for trial run, then you will automatically be brought back to the Trial run tab with the rows that you selected, populated as trial runs.

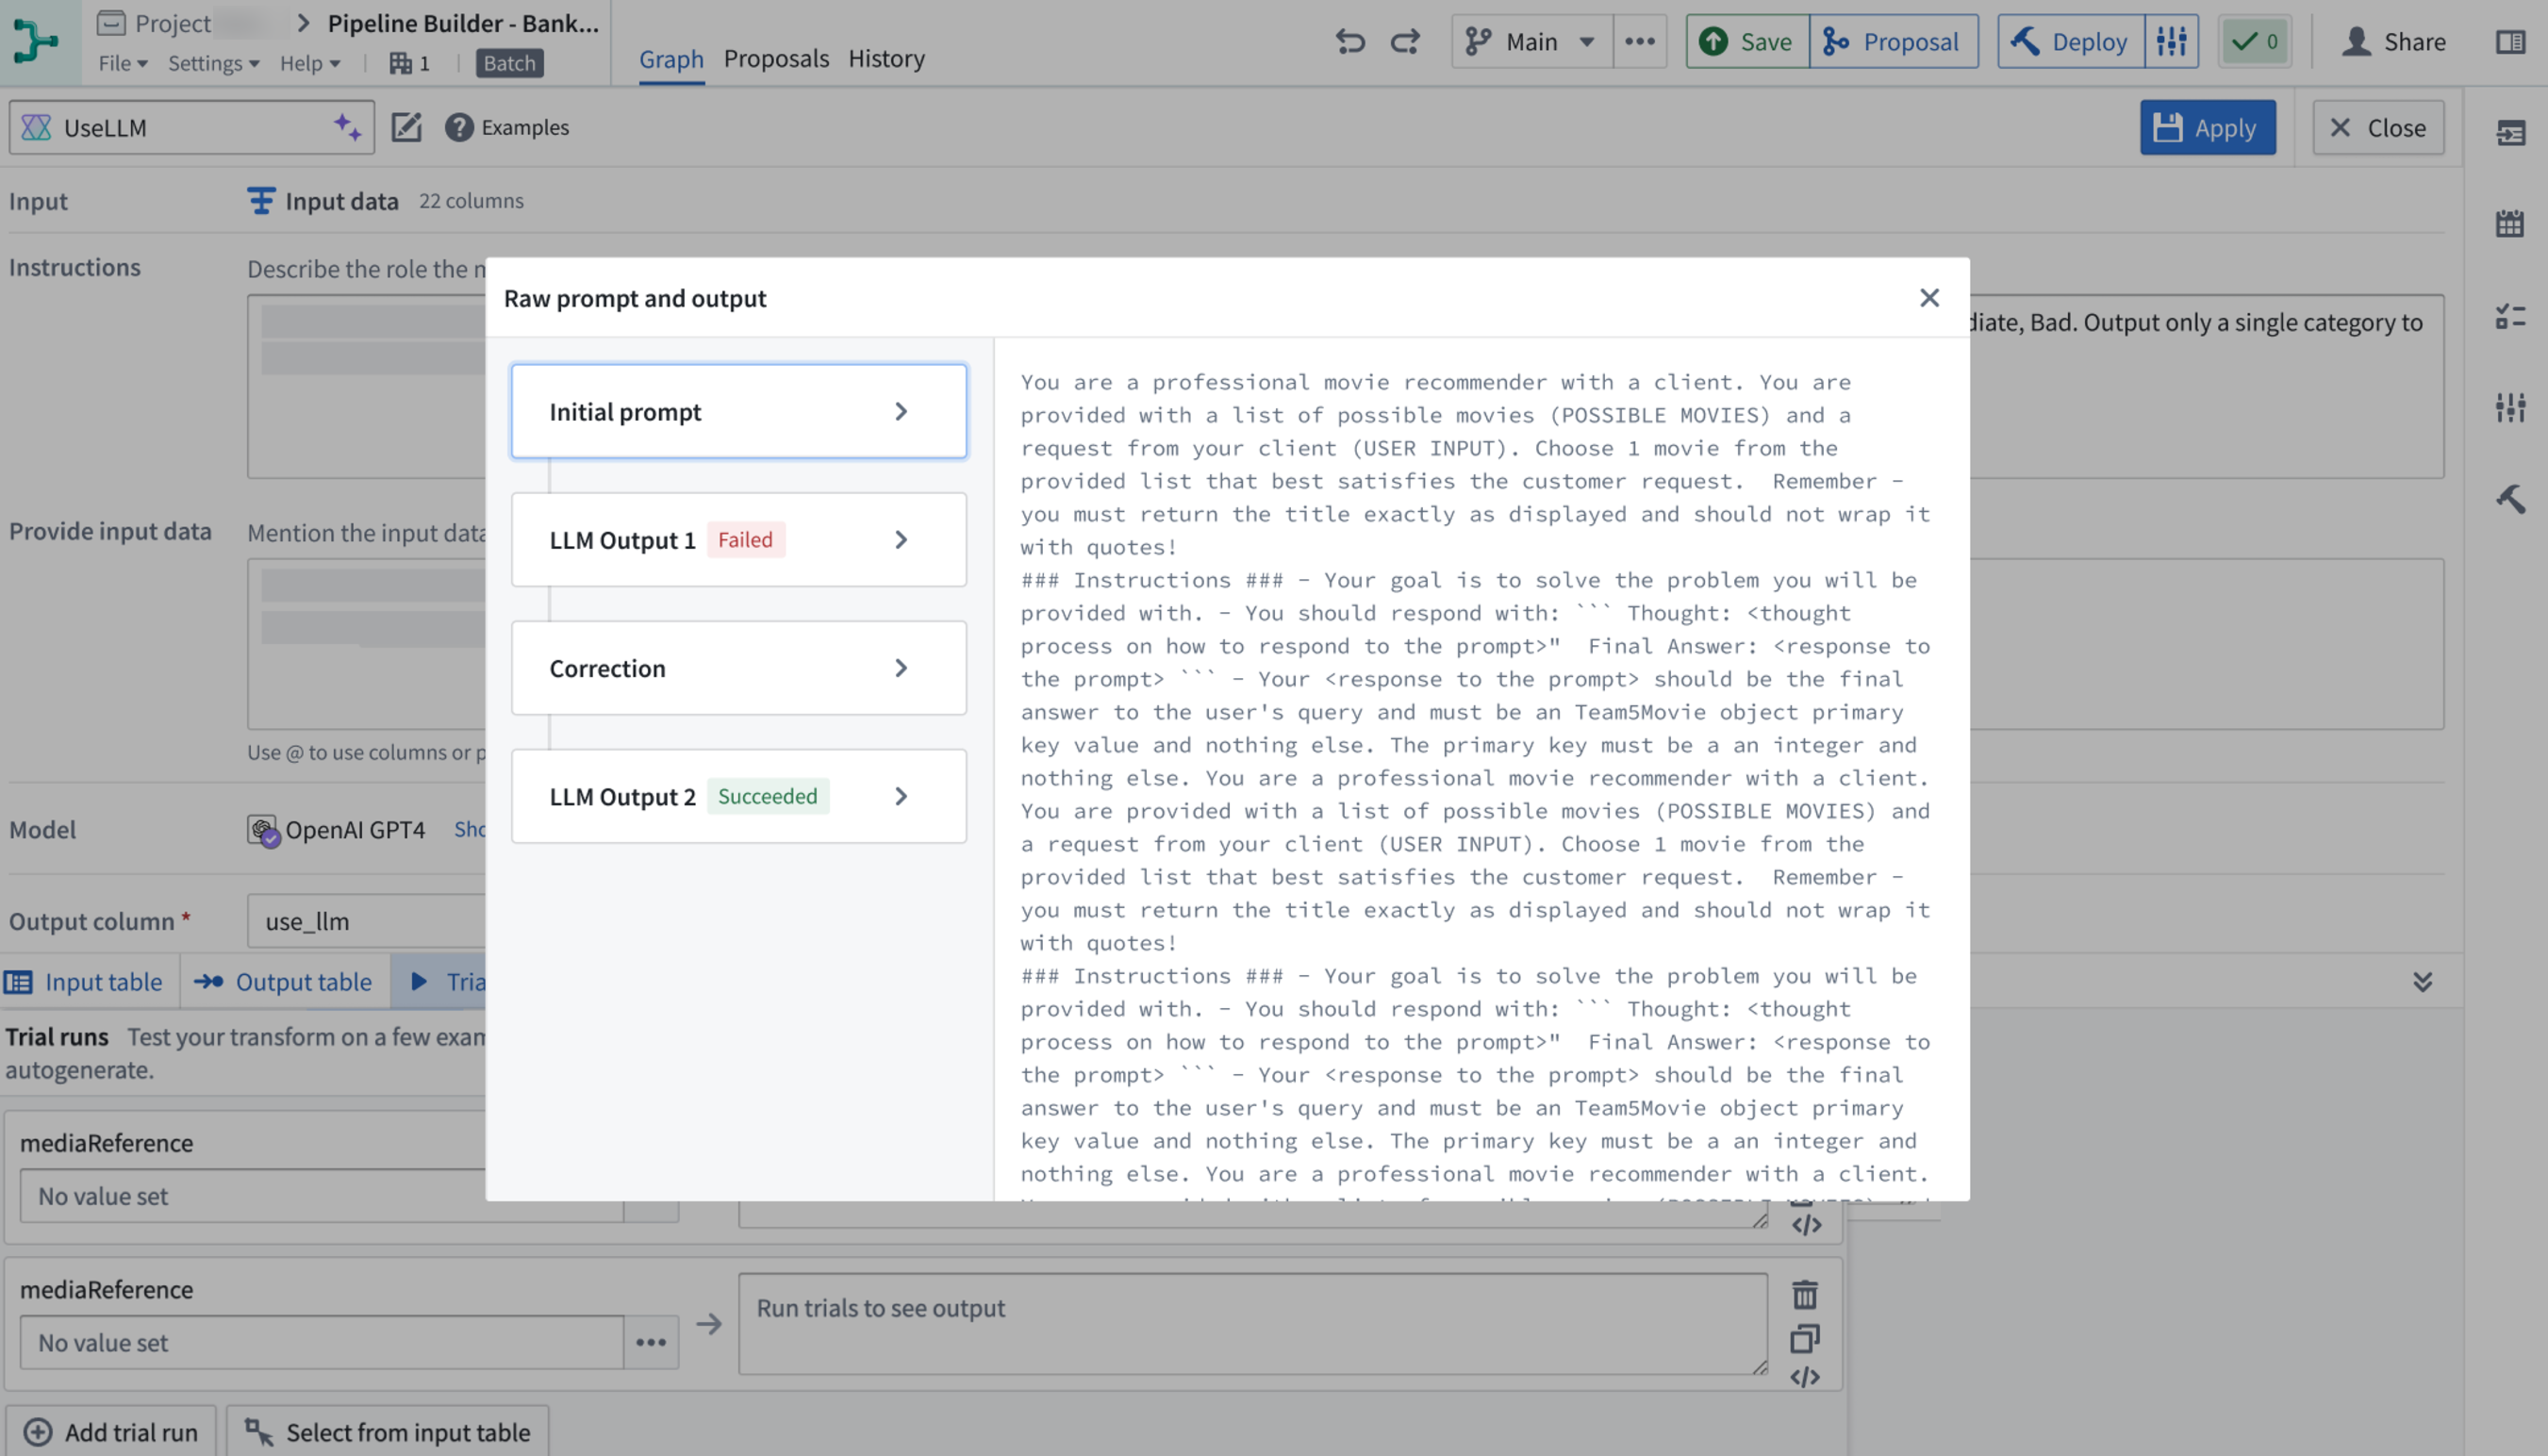
After running the trial runs, you can see the raw prompts sent to the model and the raw outputs. Simply select the </> icon to the right of the selected trial run.
![]()
This will open up a dialog with details including:
- Initial prompt: The exact prompt sent to the model including any modifications or additions our backend makes.
- Intermediate LLM outputs: All outputs from the LLM including any failed outputs.
- Corrections: Details on corrections made for any failures.
- Final output: The ultimate result provided by the LLM.
Select the respective title on the left side to see the raw text on the right side of the panel.
Preview and create
If you use one of the five templates, you can preview the LLM prompt instructions before creating the prompt by selecting the Preview tab. You will only be able to view but not edit the instructions in the Preview tab. If you want to edit the template, go back to the Configure tab.
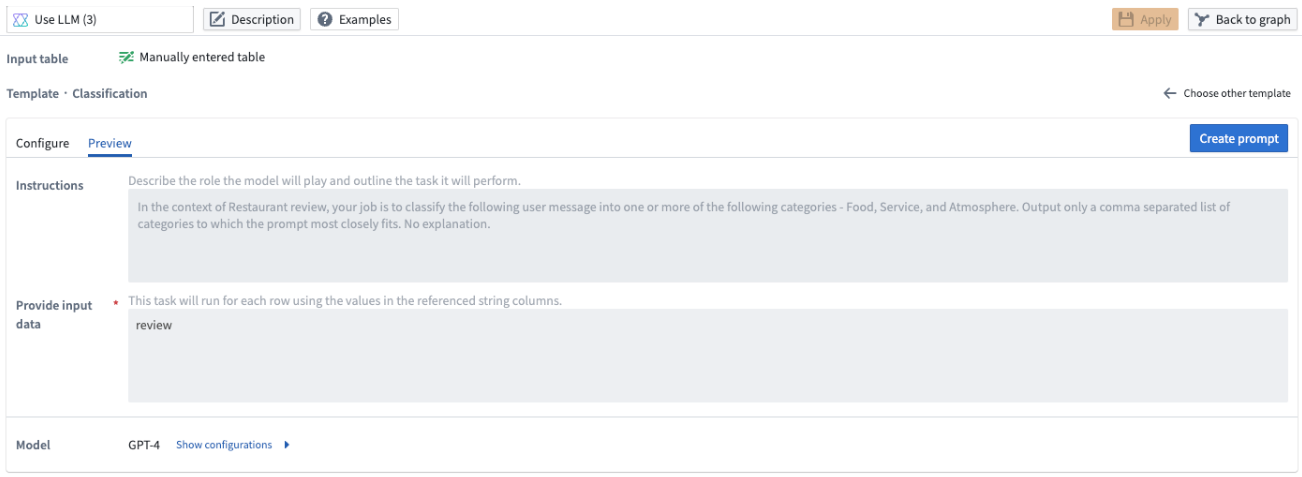
You should select Create prompt to edit the name of the new output column and preview the results in the Output column.
:::callout{theme="neutral"} Once you select Create prompt, you will not be able to go back to the template for that particular board. :::
To change the output column name, edit the Output column section. To view your changes applied to the output table preview, select Applied. To preview the output table, select the Output table tab. This preview will only show the first 50 rows.
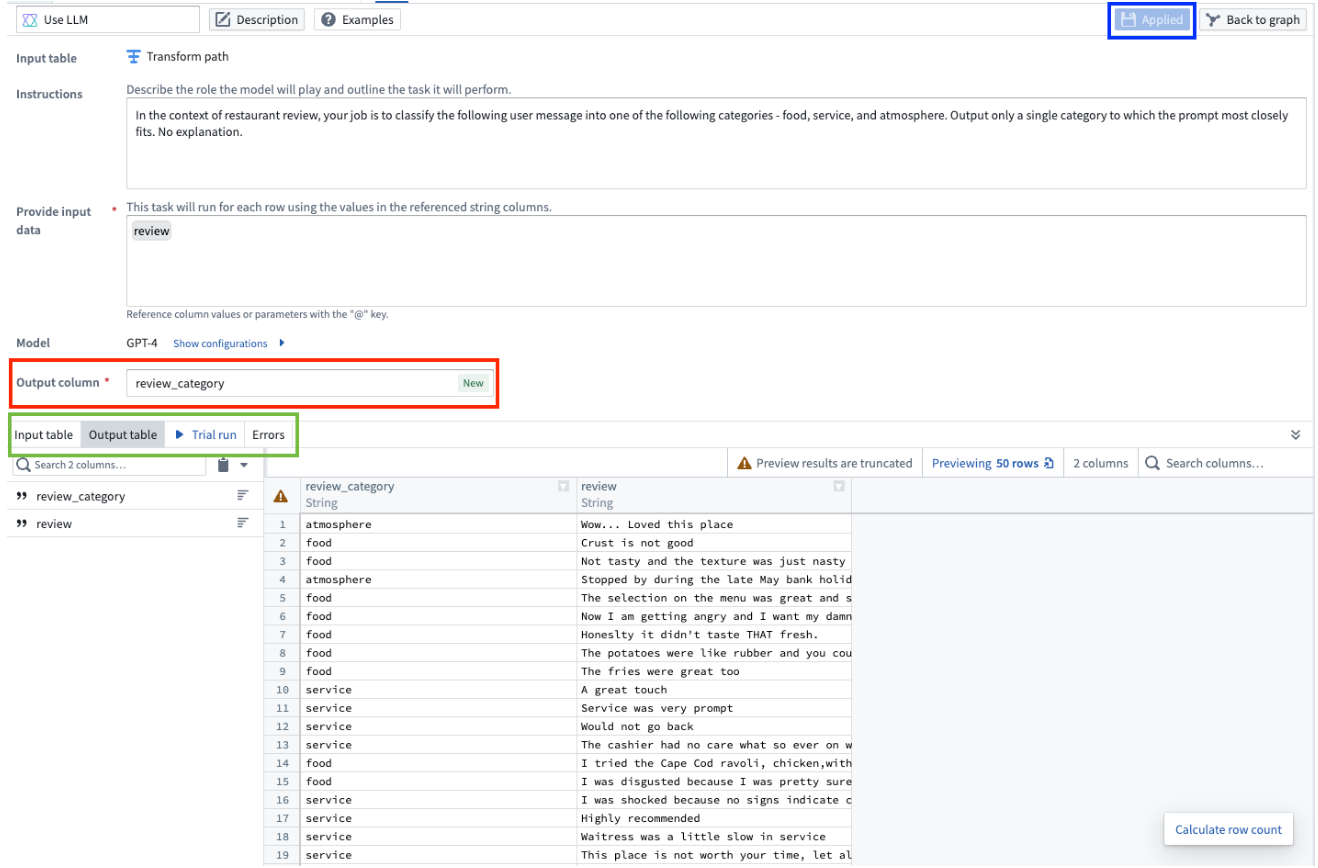
Finally, when you are finished configuring your Use LLM node, select Apply in the top right. This allows you to add transform logic to the output of your LLM board, and to view the preview of the first 50 rows when you select the LLM board in the main Pipeline Builder workspace.
Compute usage in Spark batch pipelines
Spark usually performs parallel processing roughly at the granularity of the CPU core; a helpful (though slightly simplified) mental model is that each core operates on a single row of data at a time. For most operations, such as arithmetic, this architecture is efficient, since all of the computation happens locally. However, when a process interacts with an external LLM, the bulk of the computation happens externally, and the process spends most of its time waiting for a response. In cases like this, it is much more efficient to achieve concurrency using multiple threads per core, making effective use of the waiting time to dispatch new requests.
Per the above, the Use LLM node uses multiple threads per core to send many concurrent requests. Even when using the default Extra Small compute profile, which uses a single core, the degree of concurrency is very high.
You can increase the degree of concurrency further by using a compute profile that provides more cores (either more executors or more cores per executor), but there is a risk that as the number of cores increases, your job will encounter rate limits imposed by the LLM provider or by AIP. The implementation of the Use LLM node has retry logic so that jobs can succeed even when they encounter these rate limits, but it can be inefficient or wasteful to provision multiple cores that spend much of their time retrying failed requests.
When tuning concurrency, we recommend that you use the default Extra Small compute profile as a baseline. If you want to increase concurrency further, scale up very slowly (adding no more than two cores at a time) and monitor trends in the correlation between "total runtime across all tasks" and "job duration" in the job's Spark details page. Ideally, as you add cores, job duration should decrease, while total runtime across all tasks should stay the same or only slightly increase. If total runtime across all tasks begins to significantly increase, especially without a corresponding decrease in job duration, you have too many cores and should scale down.
中文翻译
在 Pipeline Builder 中使用 Use LLM 节点
Pipeline Builder 中的 Use LLM 节点提供了一种便捷的方法,用于在您的数据上大规模执行大型语言模型(LLMs)。将该节点集成到 Pipeline Builder 中,使您能够在各种数据转换之间无缝融入 LLM 处理逻辑,从而无需编写代码即可简化 LLM 与管道的集成。
Use LLM 节点包含预先设计的提示词(Prompt)模板。这些模板为初学者使用 LLM 提供了友好的起点,并充分利用了经验丰富的提示词工程师的专业知识。您还可以在对整个数据集运行模型之前,对输入数据集的几行数据进行试运行以迭代优化提示词。此预览功能可在数秒内完成计算,加快了反馈循环并提升了整体开发流程。
若要使用此功能,用户必须由平台管理员授予自定义工作流的 AIP 功能权限。
选择数据集
要将 LLM 应用于数据集,请在工作区中选择一个数据集节点,然后选择 Use LLM。
选择提示词
以下是可用模板提示词的不同示例。要创建自己的提示词,请选择 Empty prompt。
分类
当您希望将数据归类到不同类别时,应使用分类提示词。
以下示例展示了如何填写提示词,以实现我们将餐厅评论分为三个类别(服务、食物和氛围)的假设目标。
Multiplicity 字段允许您选择输出列是包含一个类别、多个类别还是确切数量的类别。在我们的示例中,我们希望包含评论可能涉及的所有类别,因此我们将选择 One or more categories 选项。
在 Context 字段中,输入对数据的描述。在我们的示例中,我们将输入 Restaurant Review。
在 Categories 字段中,输入您希望将数据分配到的不同类别。在我们的示例中,我们指定了三个类别:Food、Service 和 Atmosphere,因为我们希望将餐厅评论归类到这三个类别中的任意一个。
在 Column to classify 字段中,选择包含要分类数据的列。在我们的示例中,我们选择 review 列,因为该列包含我们的餐厅评论。
摘要
您可以使用摘要模板将数据总结为指定长度。
在此模板中,您可以指定摘要的长度。您可以选择字数、句子数或段落数,并在 Summarization size 字段中指定具体大小。
在我们的示例中,我们希望用一句话总结餐厅评论,因此我们将摘要大小指定为 1,并从下拉菜单中选择 Sentences。
翻译
要将数据翻译成其他语言,请使用翻译提示词。在 Language 字段中指定要翻译成的目标语言。在下面的示例中,我们希望将餐厅评论翻译成西班牙语,因此在 Language 字段下指定 Spanish。
情感分析
当您希望根据数据的正面或负面情感为其分配数值分数时,请使用情感分析提示词。
在此模板中,您可以配置输出分数的范围。在下面的示例中,我们希望得到一个从零到五的数字,其中五表示评论最正面,零表示最负面。
实体提取
当您希望从数据中提取特定元素时,请使用实体提取提示词。在我们的示例中,我们希望从餐厅评论中提取所有 food、service 和 times visited 元素。
具体而言,我们希望将所有食物元素提取为 String Array,将服务质量提取为 String,并将该人访问餐厅的次数提取为 Integer。
为了获得这些结果,我们更新 Entities to extract 字段。在 Entity name 下输入 food、service 和 number visited,并设置以下属性:
- 对于
food,将 Type 指定为Array,并选择String作为该数组的类型。 - 对于
service,选择String作为类型。 - 对于
number visited,选择Integer。
现在,LLM 输出已配置为符合我们在此示例中指定的类型。
您还可以在提示词页面的 Output type 下的结构体中调整提取实体的类型。
空提示词
如果所有提示词模板都不符合您的用例,您可以通过选择 Empty prompt 来创建自己的提示词。
视觉
Pipeline Builder 还支持视觉功能,允许兼容视觉的模型分析图像并根据视觉输入回答问题。要检查模型是否具有视觉功能,请在模型选择器的模型 Capability 下查看是否有 Vision 标签。
要使用视觉功能,请在空提示词模板的 Provide input data 部分输入媒体引用列,然后选择所需的视觉模型。
:::callout{theme="neutral"}
目前,视觉提示词不支持直接将媒体集作为输入。请使用 Convert Media Set to Table Rows 转换获取 mediaReference 列,然后将其输入到 Use LLM 节点。
:::
可选配置
输出类型
在提示词页面上,您可以指定 LLM 输出所需符合的输出类型。选择屏幕底部附近的 Output type 选项,然后从下拉菜单中选择首选类型。
包含错误
同样在提示词页面上,您可以配置输出,使其在显示输出值的同时显示 LLM 错误。此配置会将您的输出类型更改为一个结构体,其中包含原始输出类型和错误字符串。要包含 LLM 错误,请勾选 Include errors 旁边的复选框。
要将输出改回不包含错误的原始输出,请取消勾选 Include errors 复选框。
跳过计算已处理的行
为了节省计算成本和时间,您可以通过切换 Skip recomputing rows 来跳过对已处理行的计算。
启用 Skip recomputing rows 后,系统将根据输入提示词中传递的列和参数,将当前行与之前处理过的行进行比较。具有相同列和参数值的匹配行将获取缓存的输出值,而不会在未来的部署中重新处理。
:::callout{theme="warning"} Skip recomputing rows 不适用于在上次部署中输出值为错误或 null 的行。在这种情况下,这些行将在下次运行时重新计算。 :::
如果对提示词进行了需要重新计算所有行的更改,则可以清除缓存。LLM 视图上方将出现一个警告横幅。
要清除缓存,请选择红色的废纸篓图标。如果清除了缓存,所有行都将在下次部署中重新处理。
如果更改了输出类型,缓存将自动清除。发生这种情况时,将出现一个警告横幅。如果这是误操作,您可以在横幅中选择 undo change。
对缓存状态的任何更改都将显示在合并分支时的 Changes 页面中。
如果具有多个下游输出的 Use LLM 节点启用了 Skip recomputing rows,则必须将这些输出放在同一个作业组(Job group)中。否则,在尝试部署时您将收到以下错误:
在默认作业组之外创建一个新作业组以修复此错误。
[高级] 显示模型配置
对于每个提示词,您可以配置该 Use LLM 节点所使用的模型:
- Model Type: GPT 实例的模型类型,例如
3.5或4。Use LLM 节点还支持开源模型,如 Mistral AI 的 Mixtral 8x7b。 - Temperature: 较高的温度值会使输出更具随机性,而较低的值会使输出更集中和确定。
- Max Tokens: 这将限制输出中的词元(Token)数量。您可以将词元视为语言模型用来理解和处理书面语言的构建块,即小段文本。
- Stop Sequence: 如果 LLM 生成过程中遇到任何停止序列值,这将停止生成。您最多可以配置四个停止序列。
试运行
在每个 Use LLM 面板的底部,您可以选择使用示例来测试特定的 LLM。选择 Trial run 选项卡,并在左侧输入要测试的值。然后选择 Run。
要测试更多示例,您可以选择 Add trial run。
要直接从输入数据中添加示例,请导航到 Input table 选项卡,并选择要在试运行中使用的行。选择 Use rows for trial run,然后您将自动返回到 Trial run 选项卡,所选行将作为试运行数据填充。
运行试运行后,您可以查看发送给模型的原始提示词和原始输出。只需选择所选试运行右侧的 </> 图标。
![]()
这将打开一个包含以下详细信息的对话框:
- Initial prompt: 发送给模型的确切提示词,包括我们后端进行的任何修改或添加。
- Intermediate LLM outputs: LLM 的所有输出,包括任何失败的输出。
- Corrections: 针对任何失败所做的更正详情。
- Final output: LLM 提供的最终结果。
选择左侧的相应标题,以在面板右侧查看原始文本。
预览和创建
如果您使用五个模板之一,可以通过选择 Preview 选项卡在创建提示词之前预览 LLM 提示词指令。在 Preview 选项卡中,您只能查看而不能编辑指令。如果要编辑模板,请返回 Configure 选项卡。
您应选择 Create prompt 以编辑新输出列的名称,并在 Output column 中预览结果。
:::callout{theme="neutral"} 选择 Create prompt 后,您将无法返回该特定面板的模板。 :::
要更改输出列名称,请编辑 Output column 部分。要查看应用于输出表预览的更改,请选择 Applied。要预览输出表,请选择 Output table 选项卡。此预览仅显示前 50 行。
最后,当您完成 Use LLM 节点的配置后,请选择右上角的 Apply。这允许您将转换逻辑添加到 LLM 面板的输出中,并在主 Pipeline Builder 工作区中选择 LLM 面板时查看前 50 行的预览。
Spark 批处理管道中的计算资源使用情况
Spark 通常以大约 CPU 核心的粒度执行并行处理;一个有用(虽然略微简化)的心智模型是,每个核心一次处理一行数据。对于大多数操作(如算术运算),这种架构非常高效,因为所有计算都在本地进行。然而,当进程与外部 LLM 交互时,大部分计算发生在外部,进程将大部分时间花在等待响应上。在这种情况下,使用每个核心多个线程来实现并发会高效得多,从而有效利用等待时间来调度新请求。
基于上述原因,Use LLM 节点使用每个核心多个线程来发送大量并发请求。即使使用默认的 Extra Small 计算配置文件(仅使用单个核心),并发度也非常高。
您可以通过使用提供更多核心(更多执行器或每个执行器更多核心)的计算配置文件来进一步提高并发度,但存在一种风险:随着核心数量的增加,您的作业可能会遇到 LLM 提供商或 AIP 施加的速率限制。Use LLM 节点的实现包含重试逻辑,因此即使遇到这些速率限制,作业也能成功完成,但如果配置多个核心却将大部分时间花在重试失败的请求上,则可能效率低下或造成浪费。
在调整并发时,我们建议您使用默认的 Extra Small 计算配置文件作为基准。如果您想进一步提高并发,请非常缓慢地扩展(每次最多增加两个核心),并在作业的 Spark 详细信息页面中监控“所有任务的总运行时间”与“作业持续时间”之间的相关性趋势。理想情况下,随着您增加核心,作业持续时间应减少,而所有任务的总运行时间应保持不变或仅略有增加。如果所有任务的总运行时间开始显著增加,尤其是在作业持续时间没有相应减少的情况下,则说明核心过多,应缩减规模。