Pipeline Builder tips and tricks(Pipeline Builder 技巧与窍门)
Whether you are building your first pipeline or refining a production workflow, the following tips help you work faster, stay organized, and get more out of Pipeline Builder. If you already have a pipeline set up, you can skip to Improve pipelines for tips on improving performance and reliability.
- Build faster
- Configure user preferences
- Hotkeys (auto-layout, zoom, hide, and more)
- Copy and paste nodes
- Click and drag to connect nodes
- View unsaved changes
- Decide how many transforms to put per node
- Generate notional data with LLMs
- Faster pipeline mode
- Compute profiles to reduce build times
- Filter preview data
- Folders and color groups for organization
- Text nodes for documentation
- Find and replace column names
- Auto-layout nodes and grid snapping
Build faster
Configure user preferences
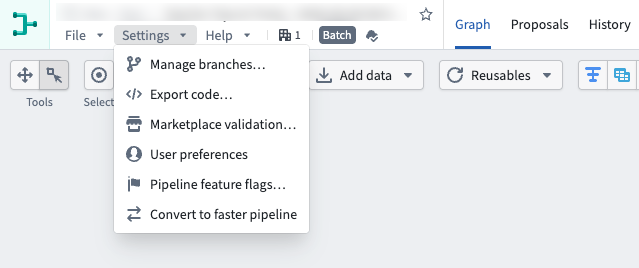
- Navigate to the settings menu in the top right of the Pipeline Builder view and select User preferences, then configure and save your settings.
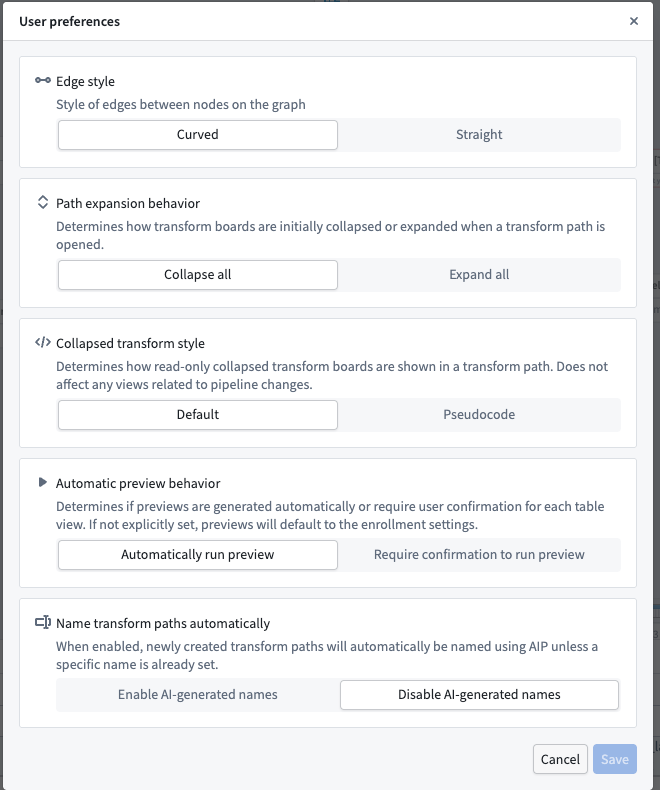
:::callout{theme="neutral"} Two of the most commonly used settings are Collapsed transform style and Name transform paths automatically. Within the Collapsed transform style selector in User preferences, toggling the setting to Pseudocode renders your transforms in a format that resembles programming code. Pseudocode does not follow the syntax of any specific programming language. :::
Hotkeys (auto-layout, zoom, hide, and more)
- Open the Help dropdown menu in the top left of Pipeline Builder.
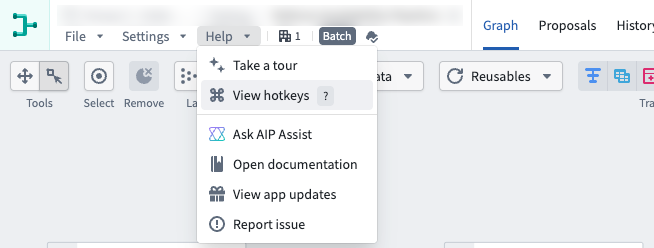
- Select View hotkeys to open the full hotkey reference for Pipeline Builder.
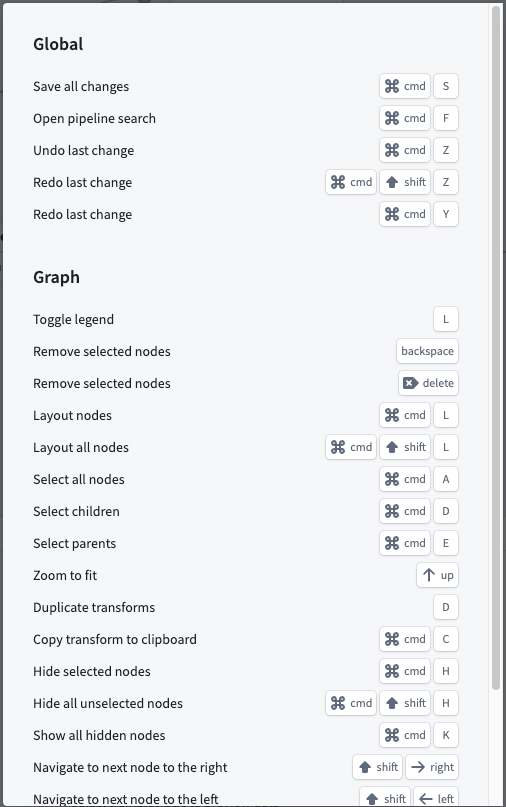
:::callout{theme="neutral"} Some of the most commonly used hotkeys include:
Up Arrowto zoom and fit all pipeline nodes to the screenCmd+H(macOS) orCtrl+H(Windows) to hide selected nodesCmd+K(macOS) orCtrl+K(Windows) to unhide all hidden nodesCmd+D(macOS) orCtrl+D(Windows) to select children of a nodeCmd+E(macOS) orCtrl+E(Windows) to select parents of a nodeCmd+C(macOS) orCtrl+C(Windows) to copy nodes to the clipboard :::
Copy and paste nodes
- Select the nodes you want to copy. Use the Select button in the top right, or use
Cmd+A(macOS) orCtrl+A(Windows) to select all nodes in the current pipeline. If required, you can also select individual nodes, or select groups of nodes by selecting and dragging around them. - Copy your selection by right-clicking and choosing Copy, or use
Cmd+C(macOS) orCtrl+C(Windows).
- Navigate to the destination pipeline and paste by right-clicking and choosing Paste, or use
Cmd+V(macOS) orCtrl+V(Windows).
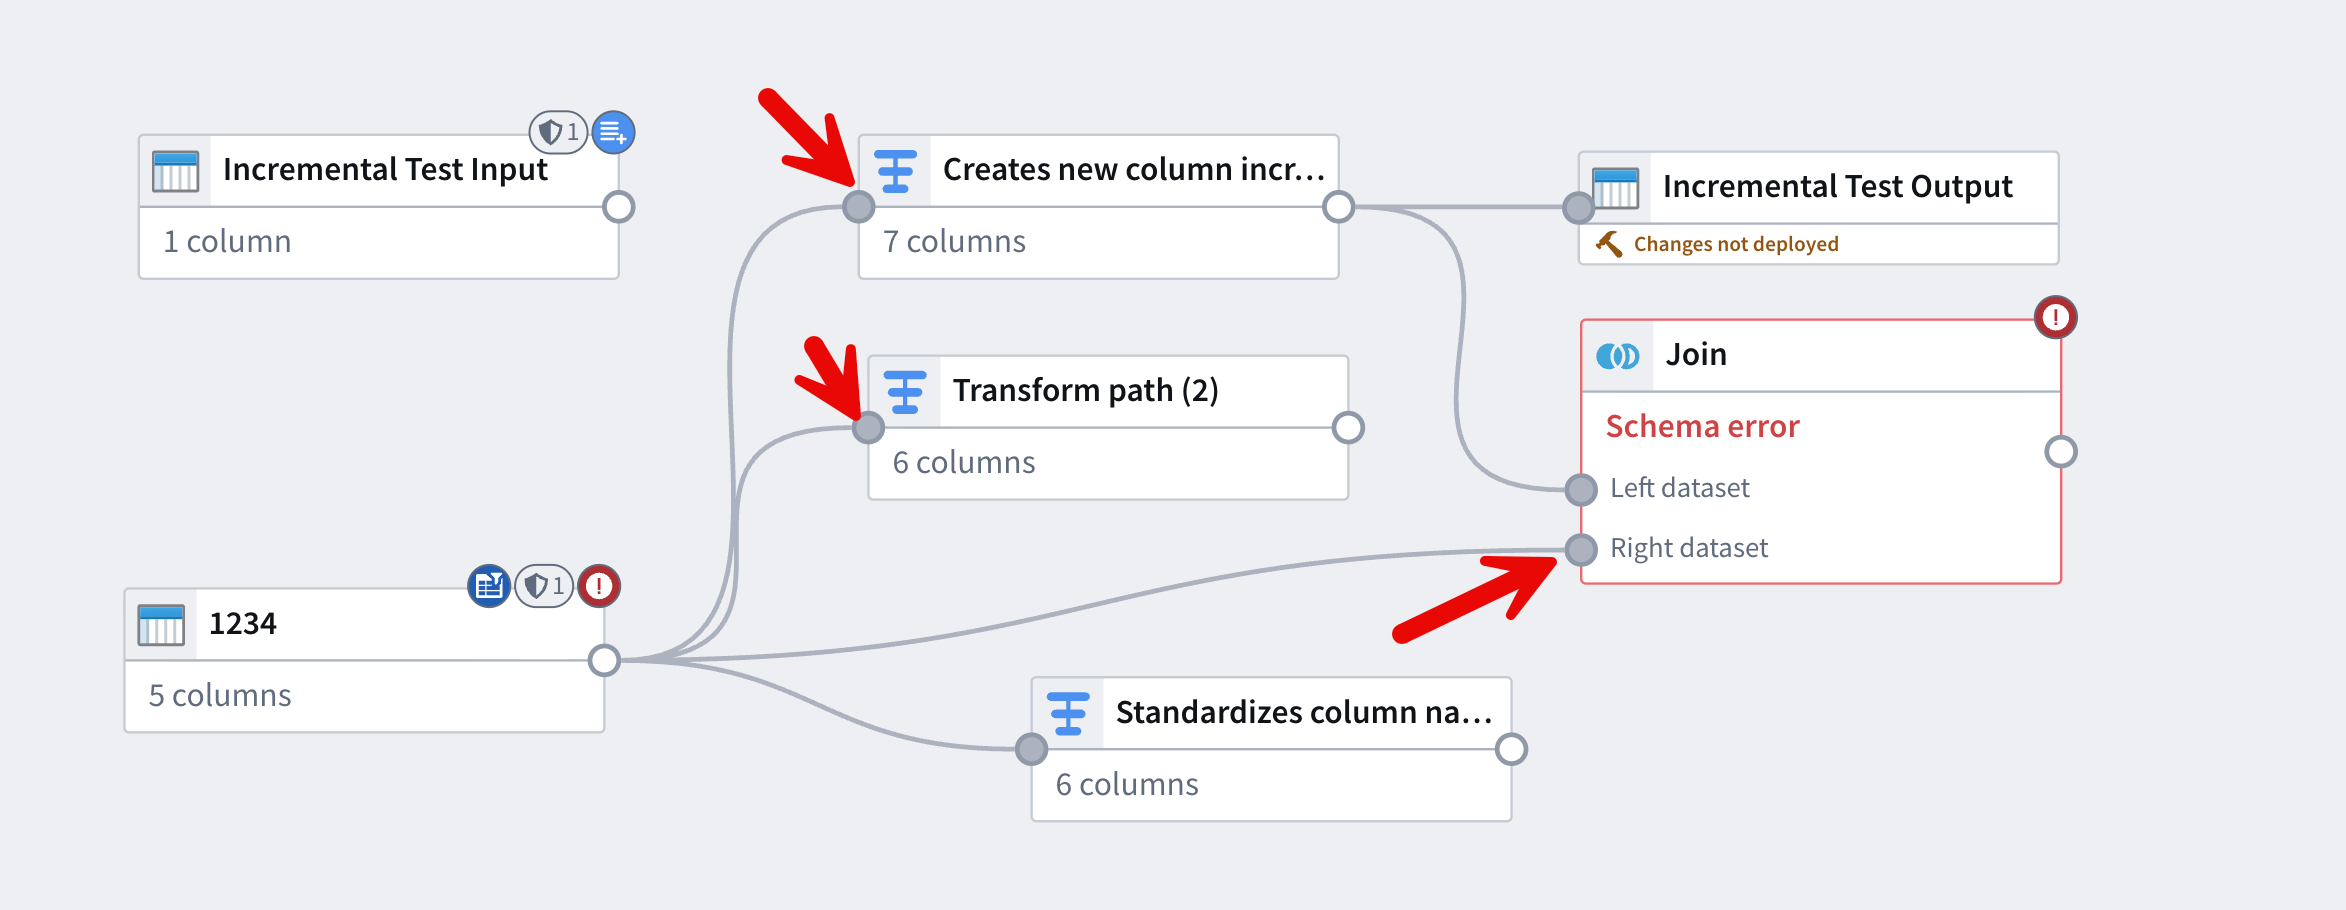
Click and drag to connect nodes
- Select the output circle of the node to use as input.
- Drag that output to the input circles of the nodes that should receive its output.
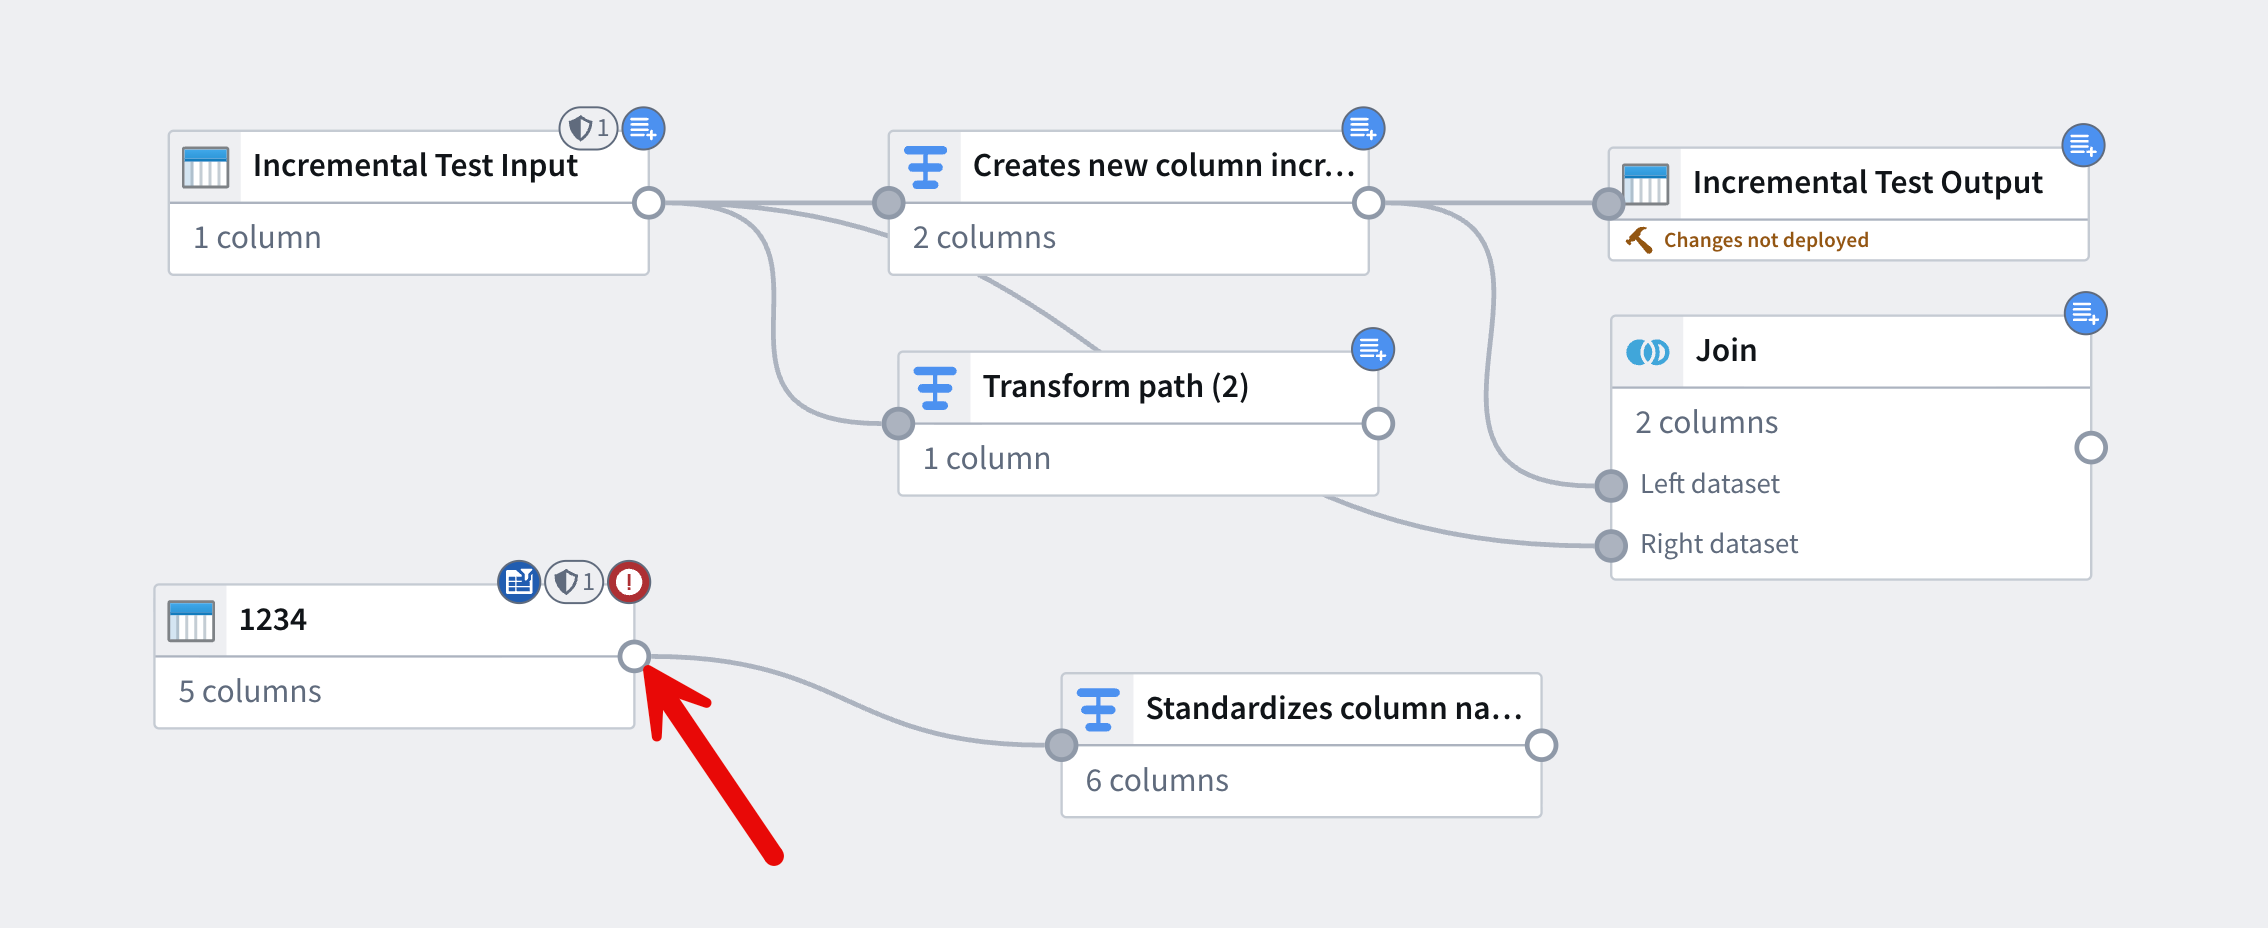
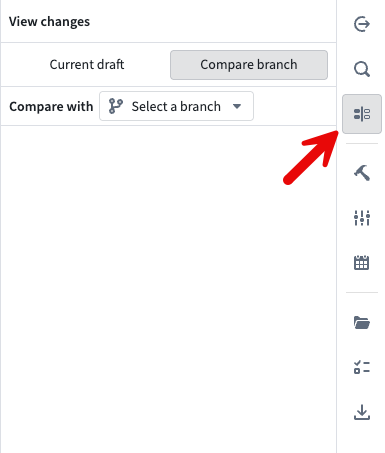
View unsaved changes
- Navigate to the sidebar menu on the right-hand side of your screen and select View changes. From here, you can view unsaved changes in your current branch and compare them with other Pipeline Builder branches.
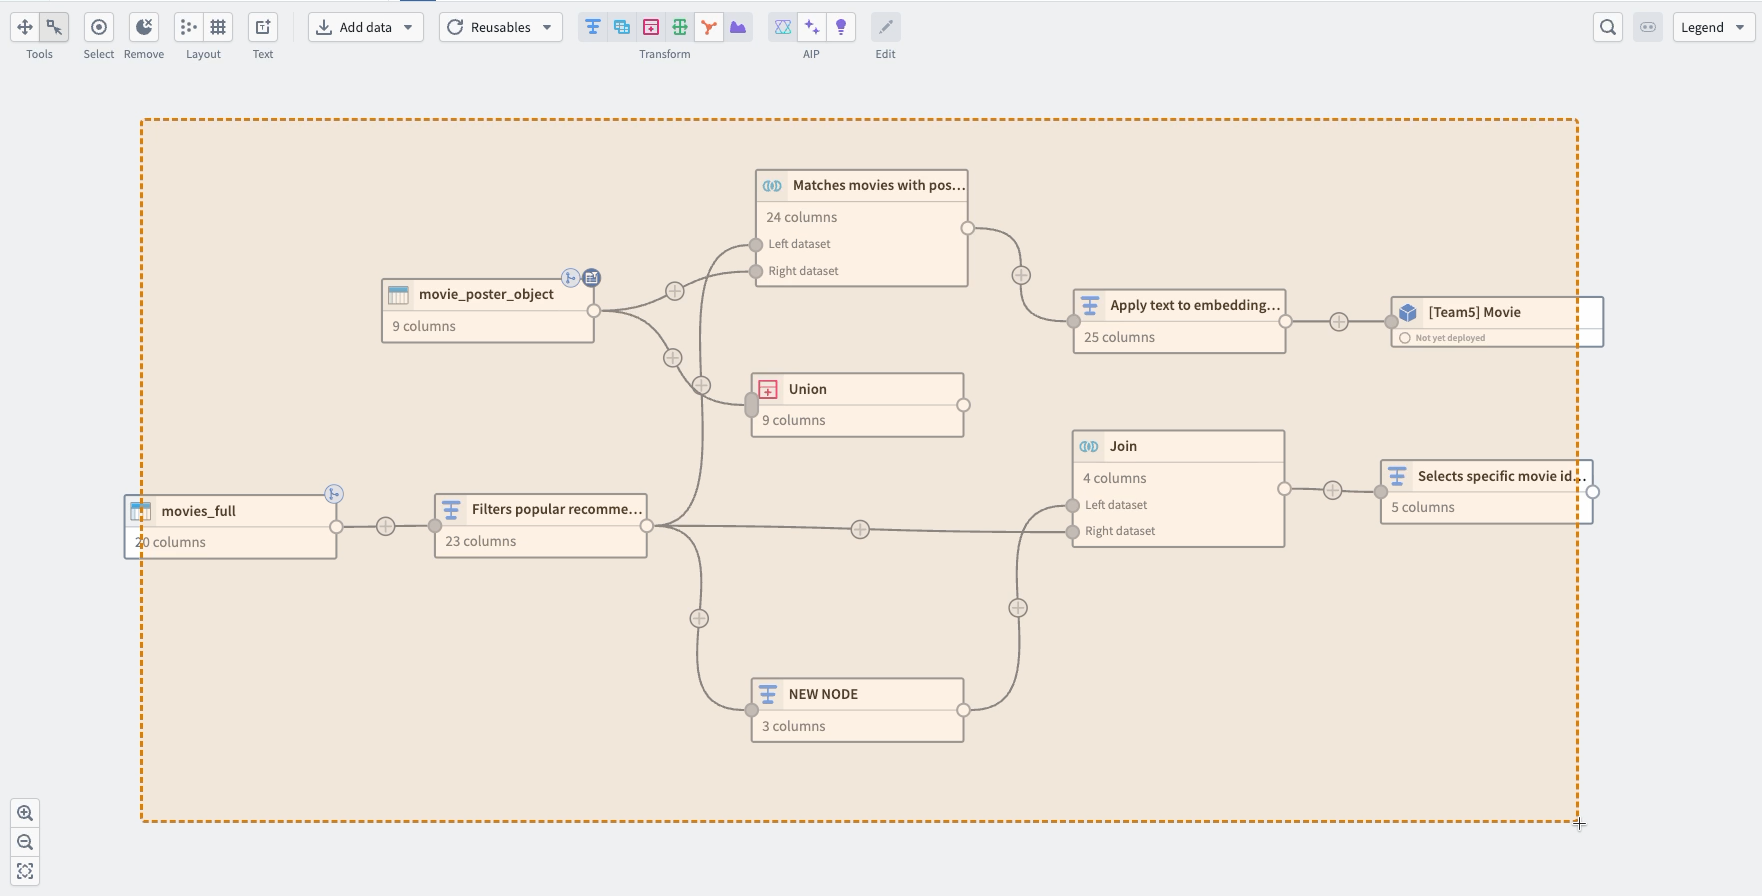
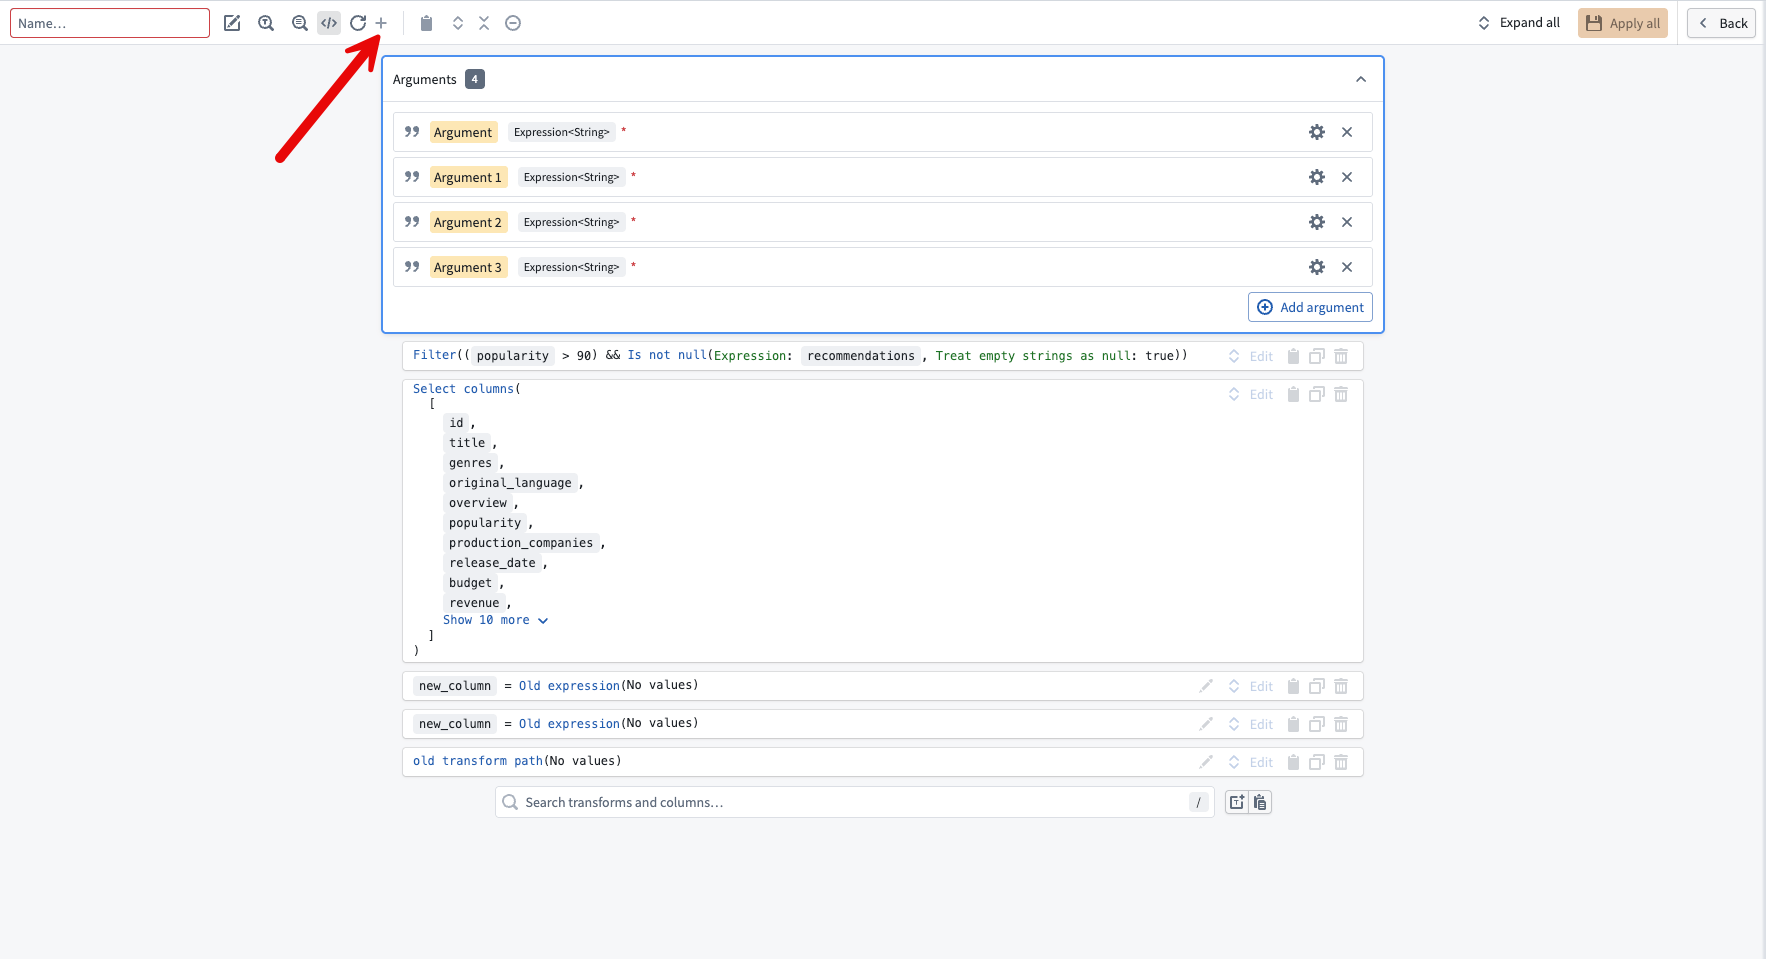
Decide how many transforms to put per node
- There is no fixed limit on the number of transforms per node. As a general best practice, string larger transform functions together across multiple nodes rather than grouping everything into a single node. This makes your pipeline easier to maintain, troubleshoot, and update.
- Pipeline Builder also supports custom functions, which allow you to package a series of transform boards into a single reusable transform and reuse it throughout the pipeline. Select the + icon when in a transform node to configure a custom transform path.
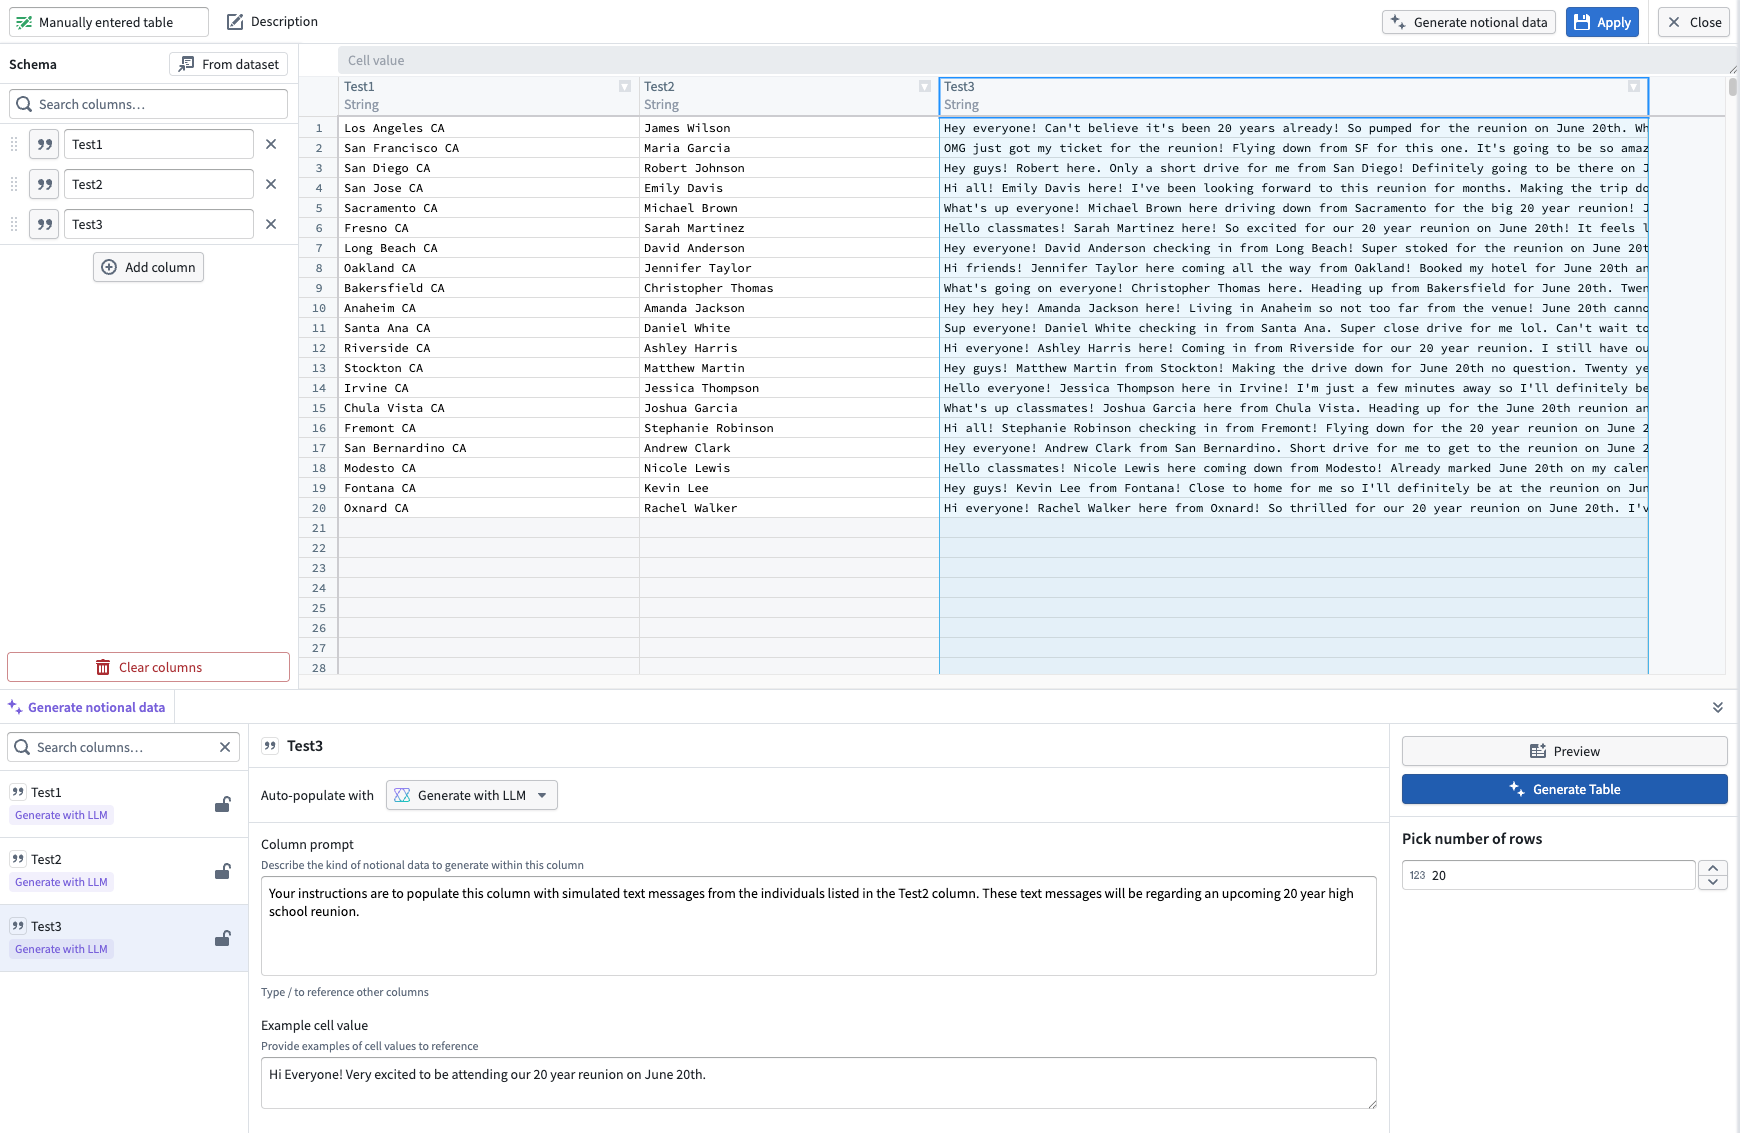
Generate notional data with LLMs
- After you add columns to your manually entered table, select Generate data from the top right.
- For each column, use the Auto-populate with dropdown to choose a data type, or select Generate with LLM to enter a custom prompt.
- Once your prompts are configured, select Generate table in the bottom right to populate the table.
AI tools for building and understanding
:::callout{theme="neutral"} To use large language models (LLMs) directly in your pipeline, see Use LLMs in Pipeline Builder. :::
Use AI generate to build new transform nodes
- Select the node you want to build from and select Generate from the menu.
- Next, enter your prompt in the text box and select Generate.

- Pipeline Builder generates the new node after the selected node, and you can rename it like any other node in your pipeline.
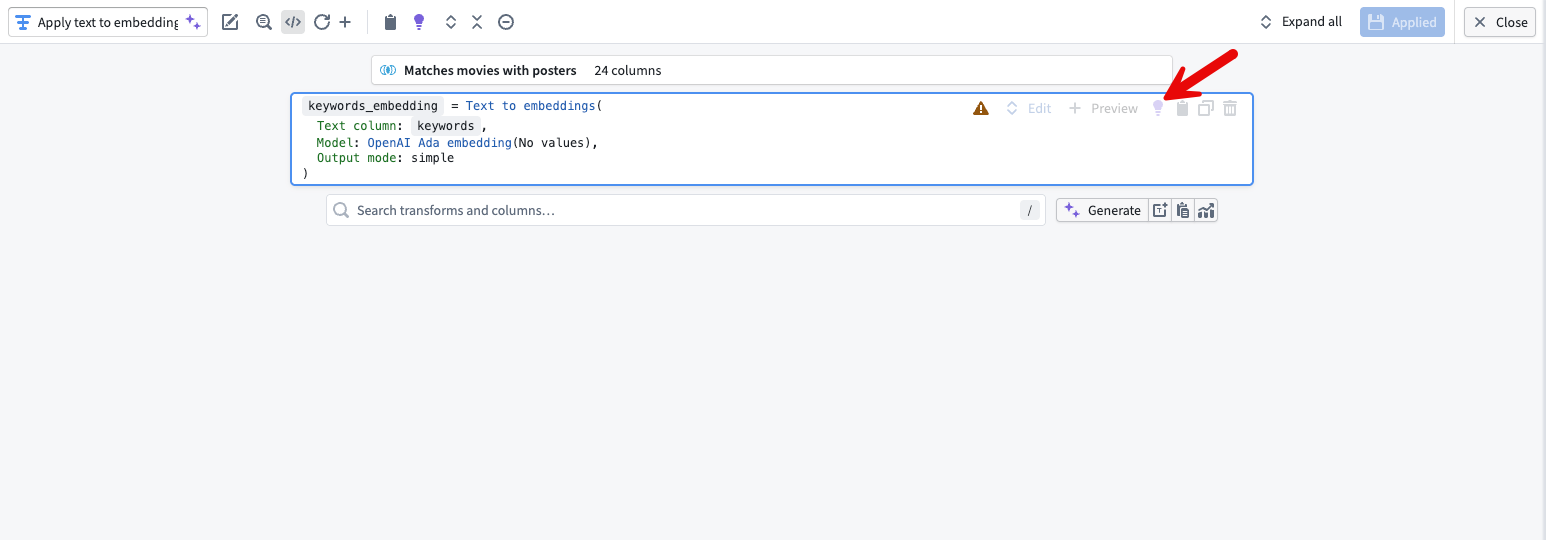
Use AI explain to generate a summary of your pipeline logic
- Select the nodes you want to explain and select the purple light bulb icon in the top center of the graph view. Pipeline Builder generates a written summary of the selected nodes' logic in the text box.
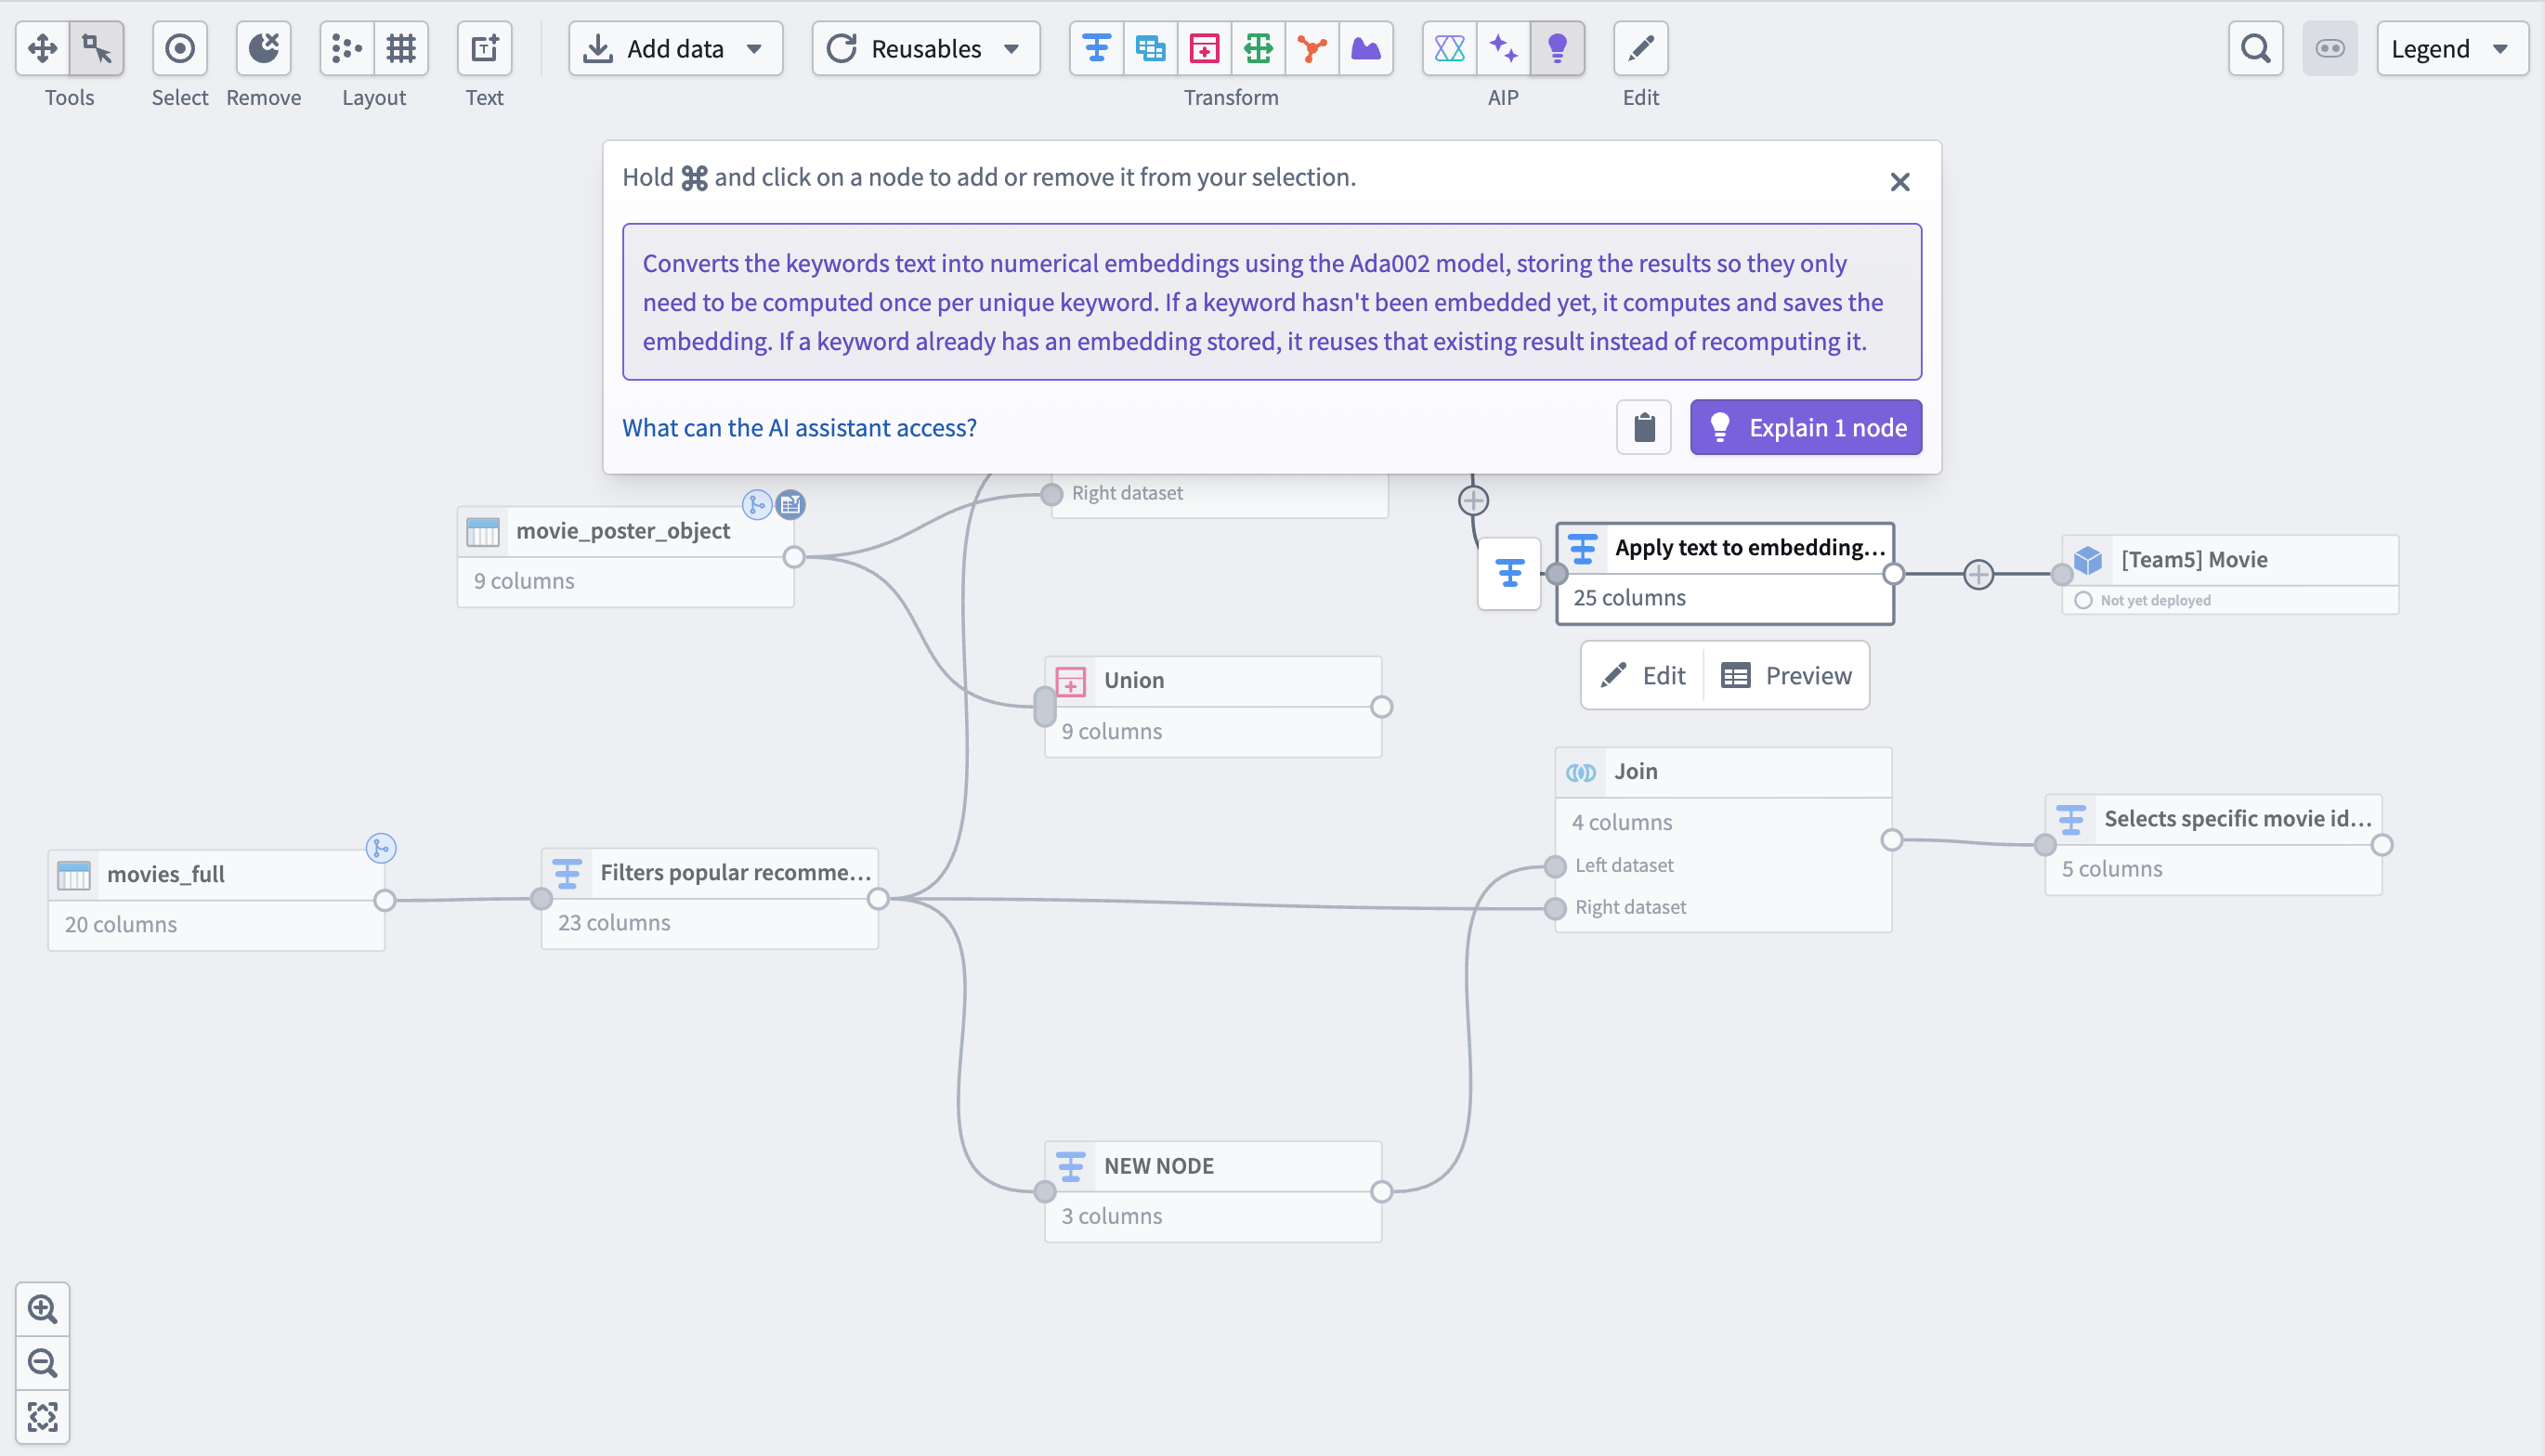
- You can also use explain directly in the node by selecting the purple light bulb in the top right of a transform board.
Use the AIP regex helper to generate regex patterns with an LLM
- Select the dataset you want to run a regex function on, then open the Transforms panel.
- In the Transforms window, select the regex function you need and the target column.
- Select the purple star icon to the right of the pattern input box and enter your prompt.
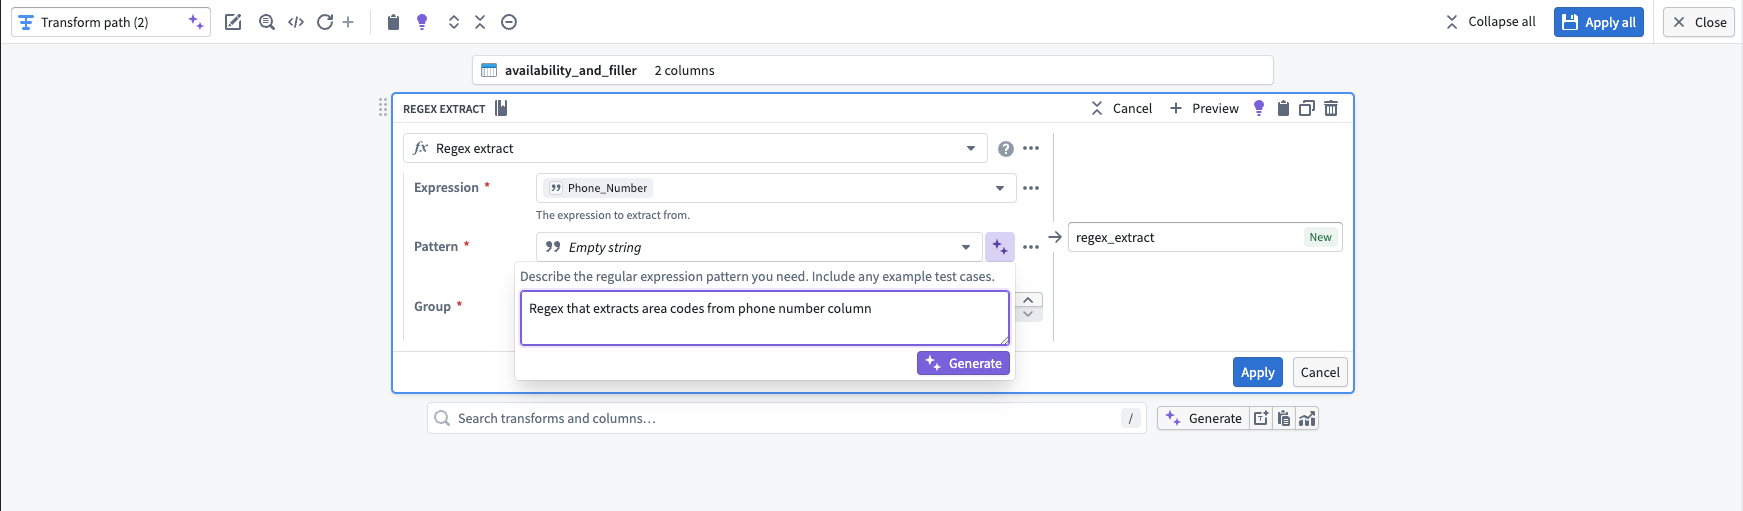
- Select Generate, then verify the output by selecting Apply. Return to the graph view and preview the transform's output to confirm the result.
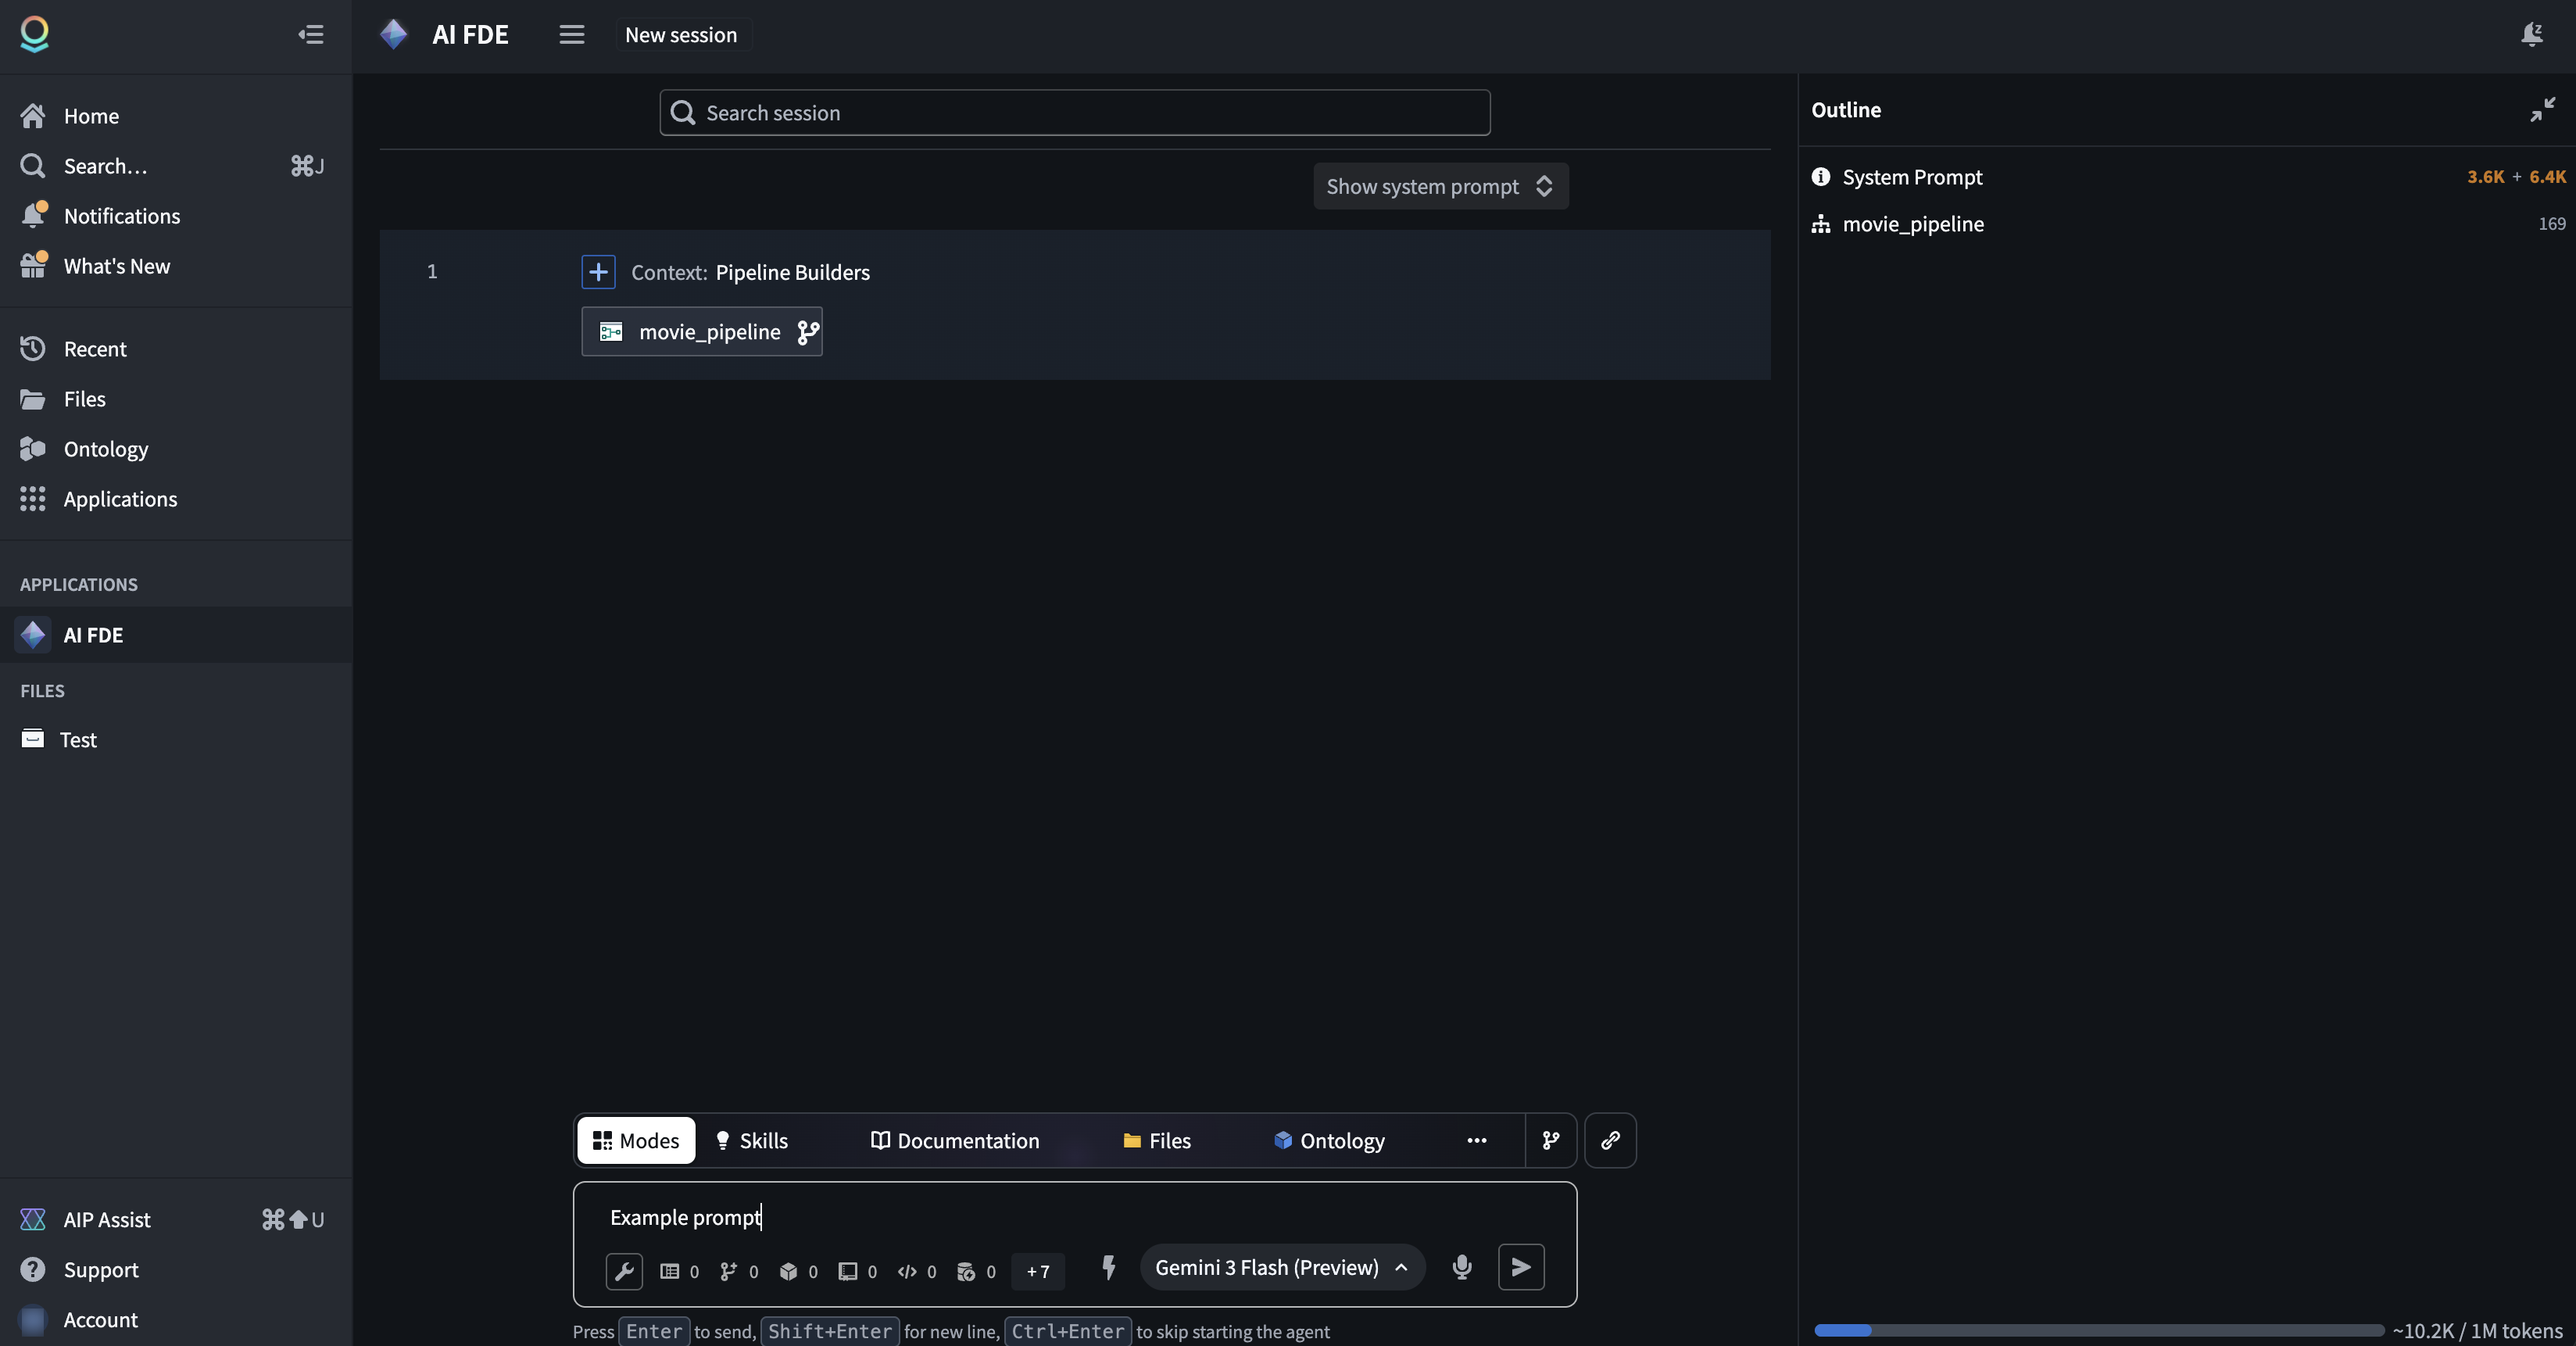
Use AI FDE to support pipeline creation and building
- Navigate to the Applications menu on the left of your screen and search for AI FDE.
- Once you open the AI FDE application, you can add your existing pipeline as a resource by copying and pasting the link into the chat box.
- From there, you can prompt AI FDE to build additional nodes in your pipeline.
Improve pipelines
Faster pipeline mode
- When creating a new batch pipeline, select Faster from the Select batch compute menu.
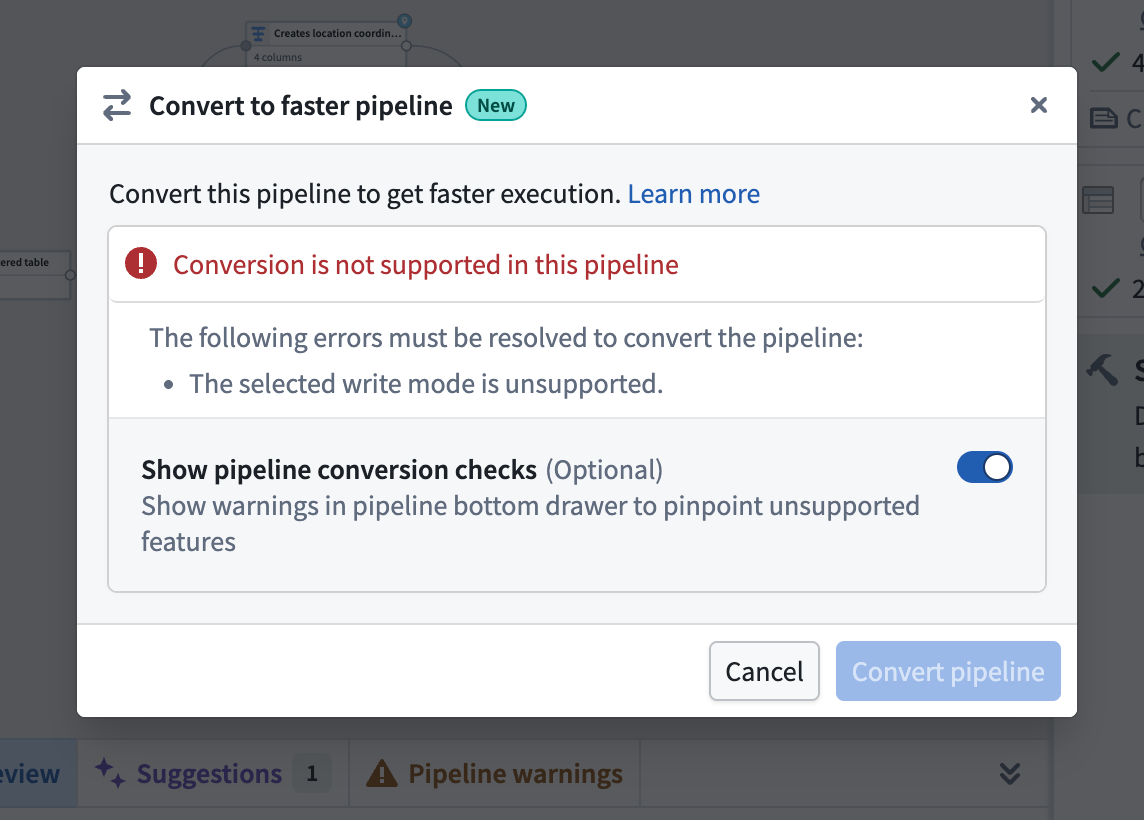
- You can also convert an existing standard batch pipeline to a faster pipeline. Select the Convert to faster pipeline option from the Settings menu in your standard pipeline.
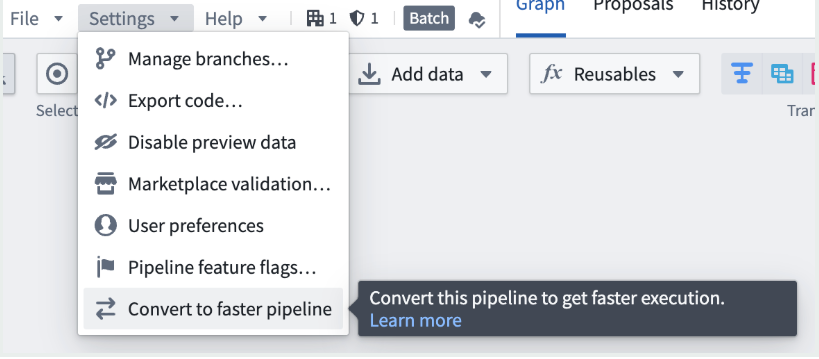
- Once you have selected the Convert to faster pipeline option, select the Convert pipeline button to confirm the conversion.
:::callout{theme="warning"} If your pipeline contains functionality that is not compatible with faster pipelines, you will receive an error message indicating what to remove or change before converting. You can also turn on conversion checks to view these warnings in your pipeline using the bottom panel. :::
:::callout{theme="warning" title="Faster pipelines feature support"} Faster pipelines support a subset of the functionality available in standard batch pipelines. Learn more about faster pipelines with Pipeline Builder. :::
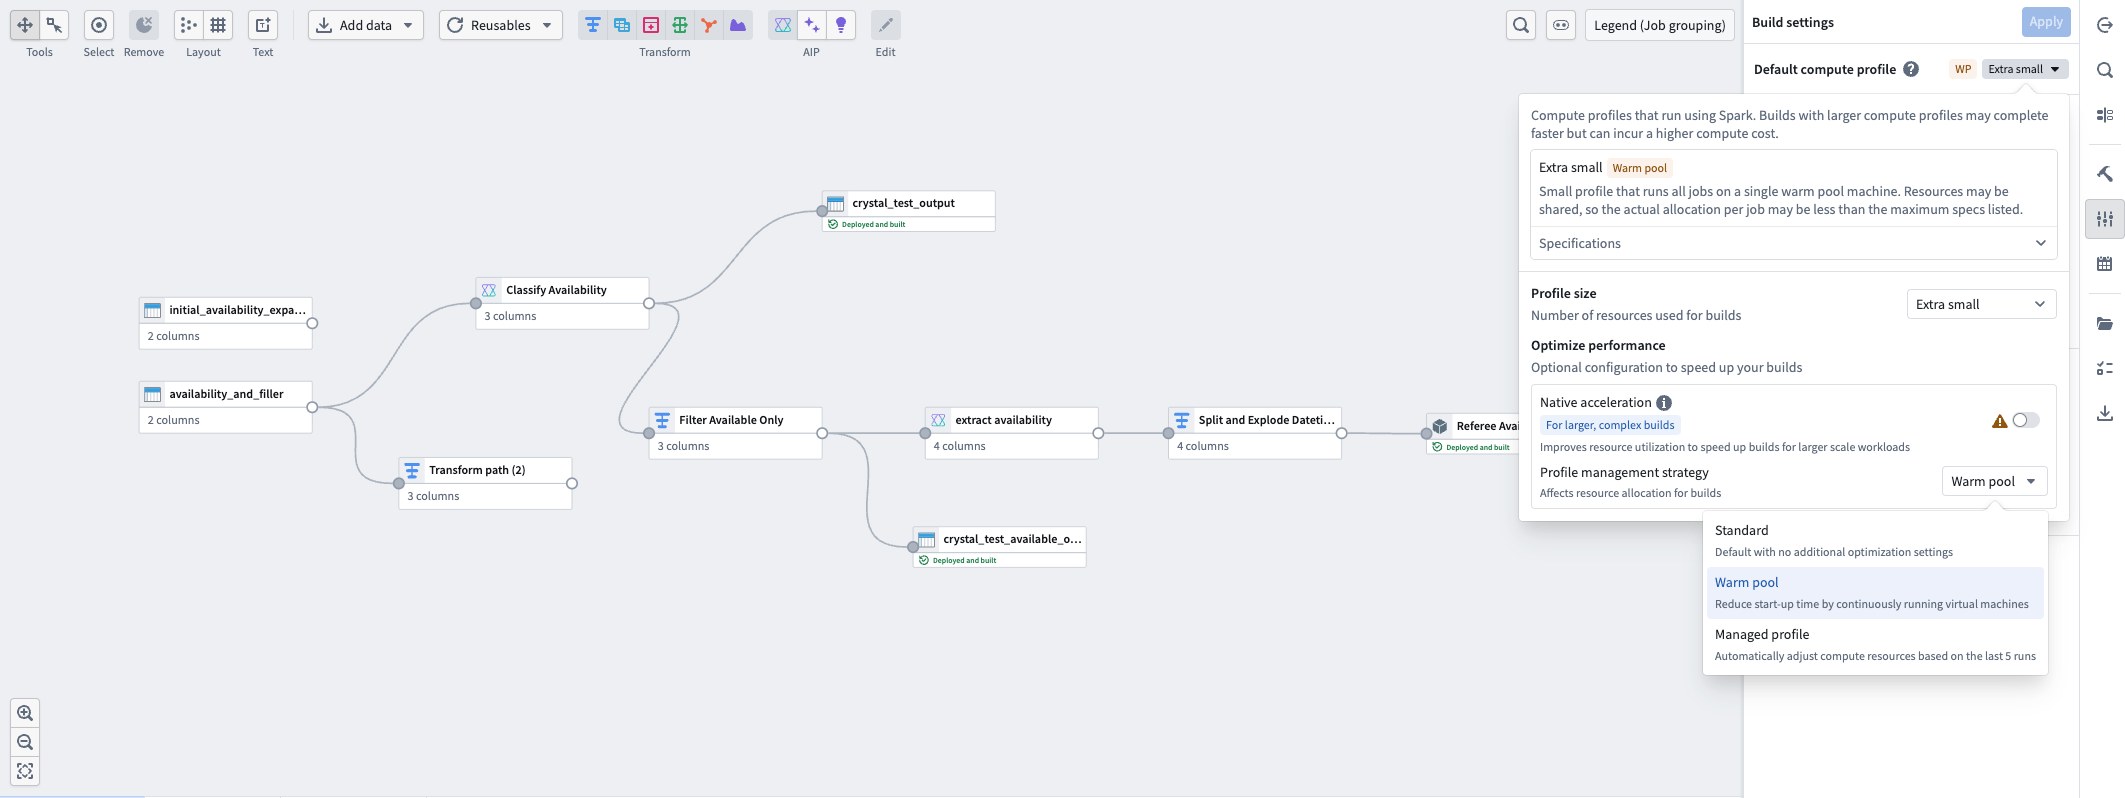
Compute profiles to reduce build times
- Once your pipeline is created, navigate to the Build settings menu on the far right of your screen to further adjust compute settings.
- In the Build settings menu, go to Default compute profile and select the dropdown showing your current compute profile size.
- Select the Profile management strategy dropdown. Three options are available. Select the one that best fits your needs:
- Standard: The default compute profile setting with no additional optimizations. Best for production-scale pipelines with predictable data volumes.
- Warm pool: Continuously runs virtual machines to reduce pipeline startup time. Best for small-scale, iterative pipelines and low-latency development tasks.
- Managed profile: Automatically adjusts compute resource allocation based on the last five runs of your pipeline. Best for pipelines with fluctuating data sizes or a need for compute cost management.
:::callout{theme="neutral" title="Compute profiles support in faster pipelines"} Faster pipelines only support the Standard profile management strategy. :::
Filter preview data
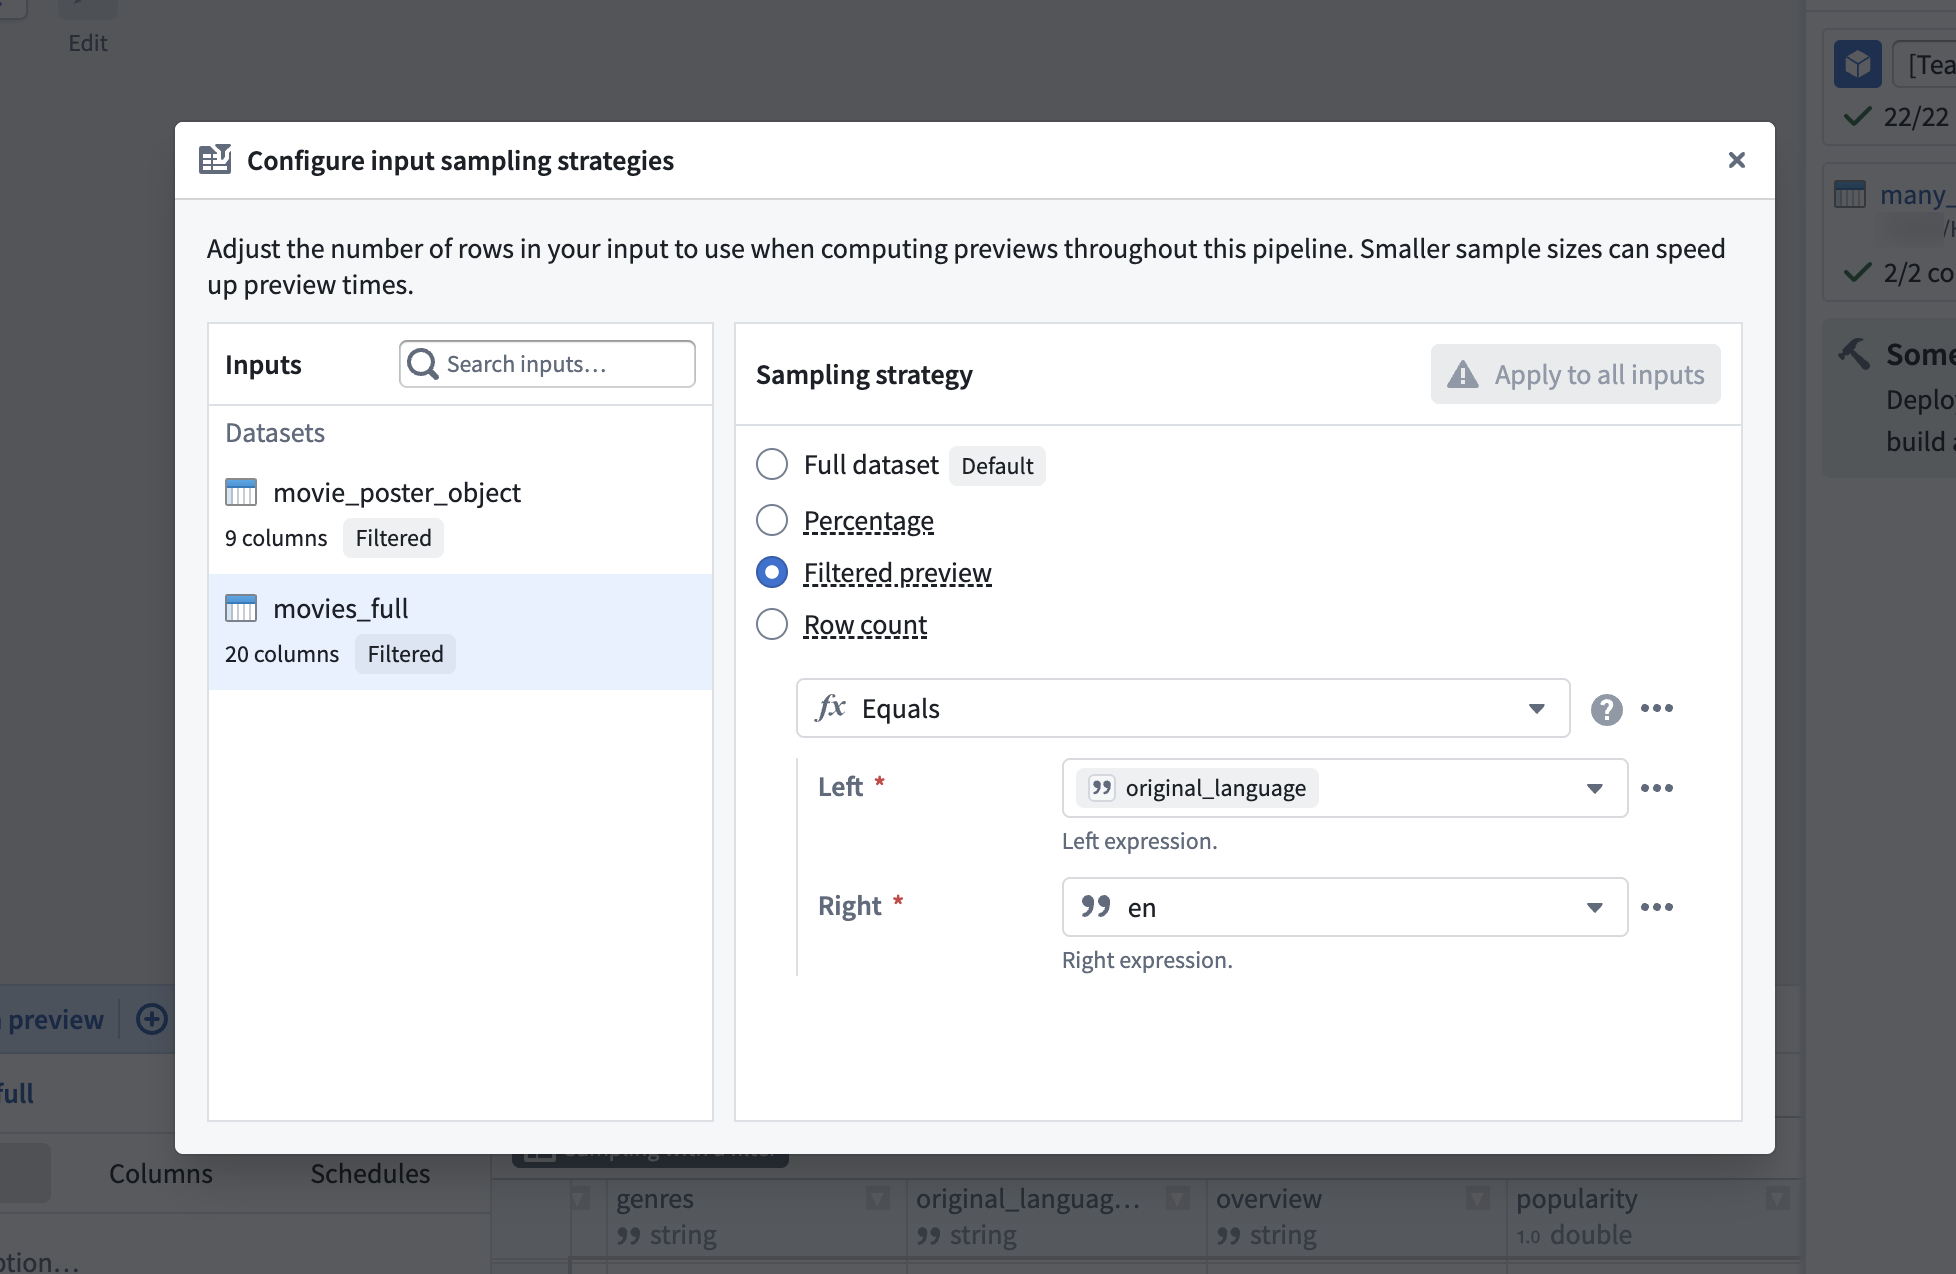
- Right-click the input dataset to sample from and select Sampling strategies from the dropdown menu. The sampling strategy you configure applies to every node that follows the sampled input.
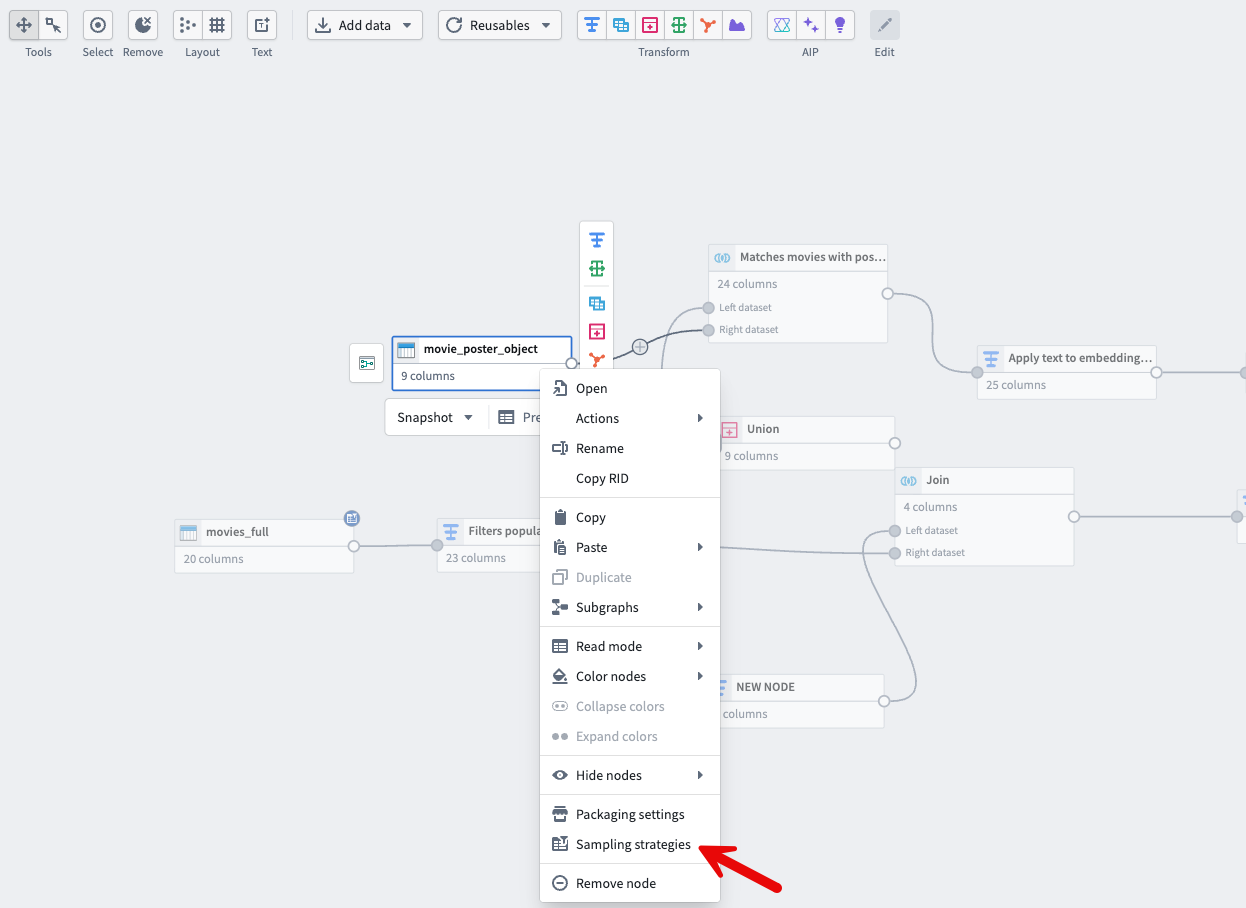
- Select which dataset in your pipeline to configure your sampling strategy on. Filtered preview allows you to filter rows based on any expression. In the following example, only rows where
original_languageisenare kept.
Unit tests for pipeline reliability
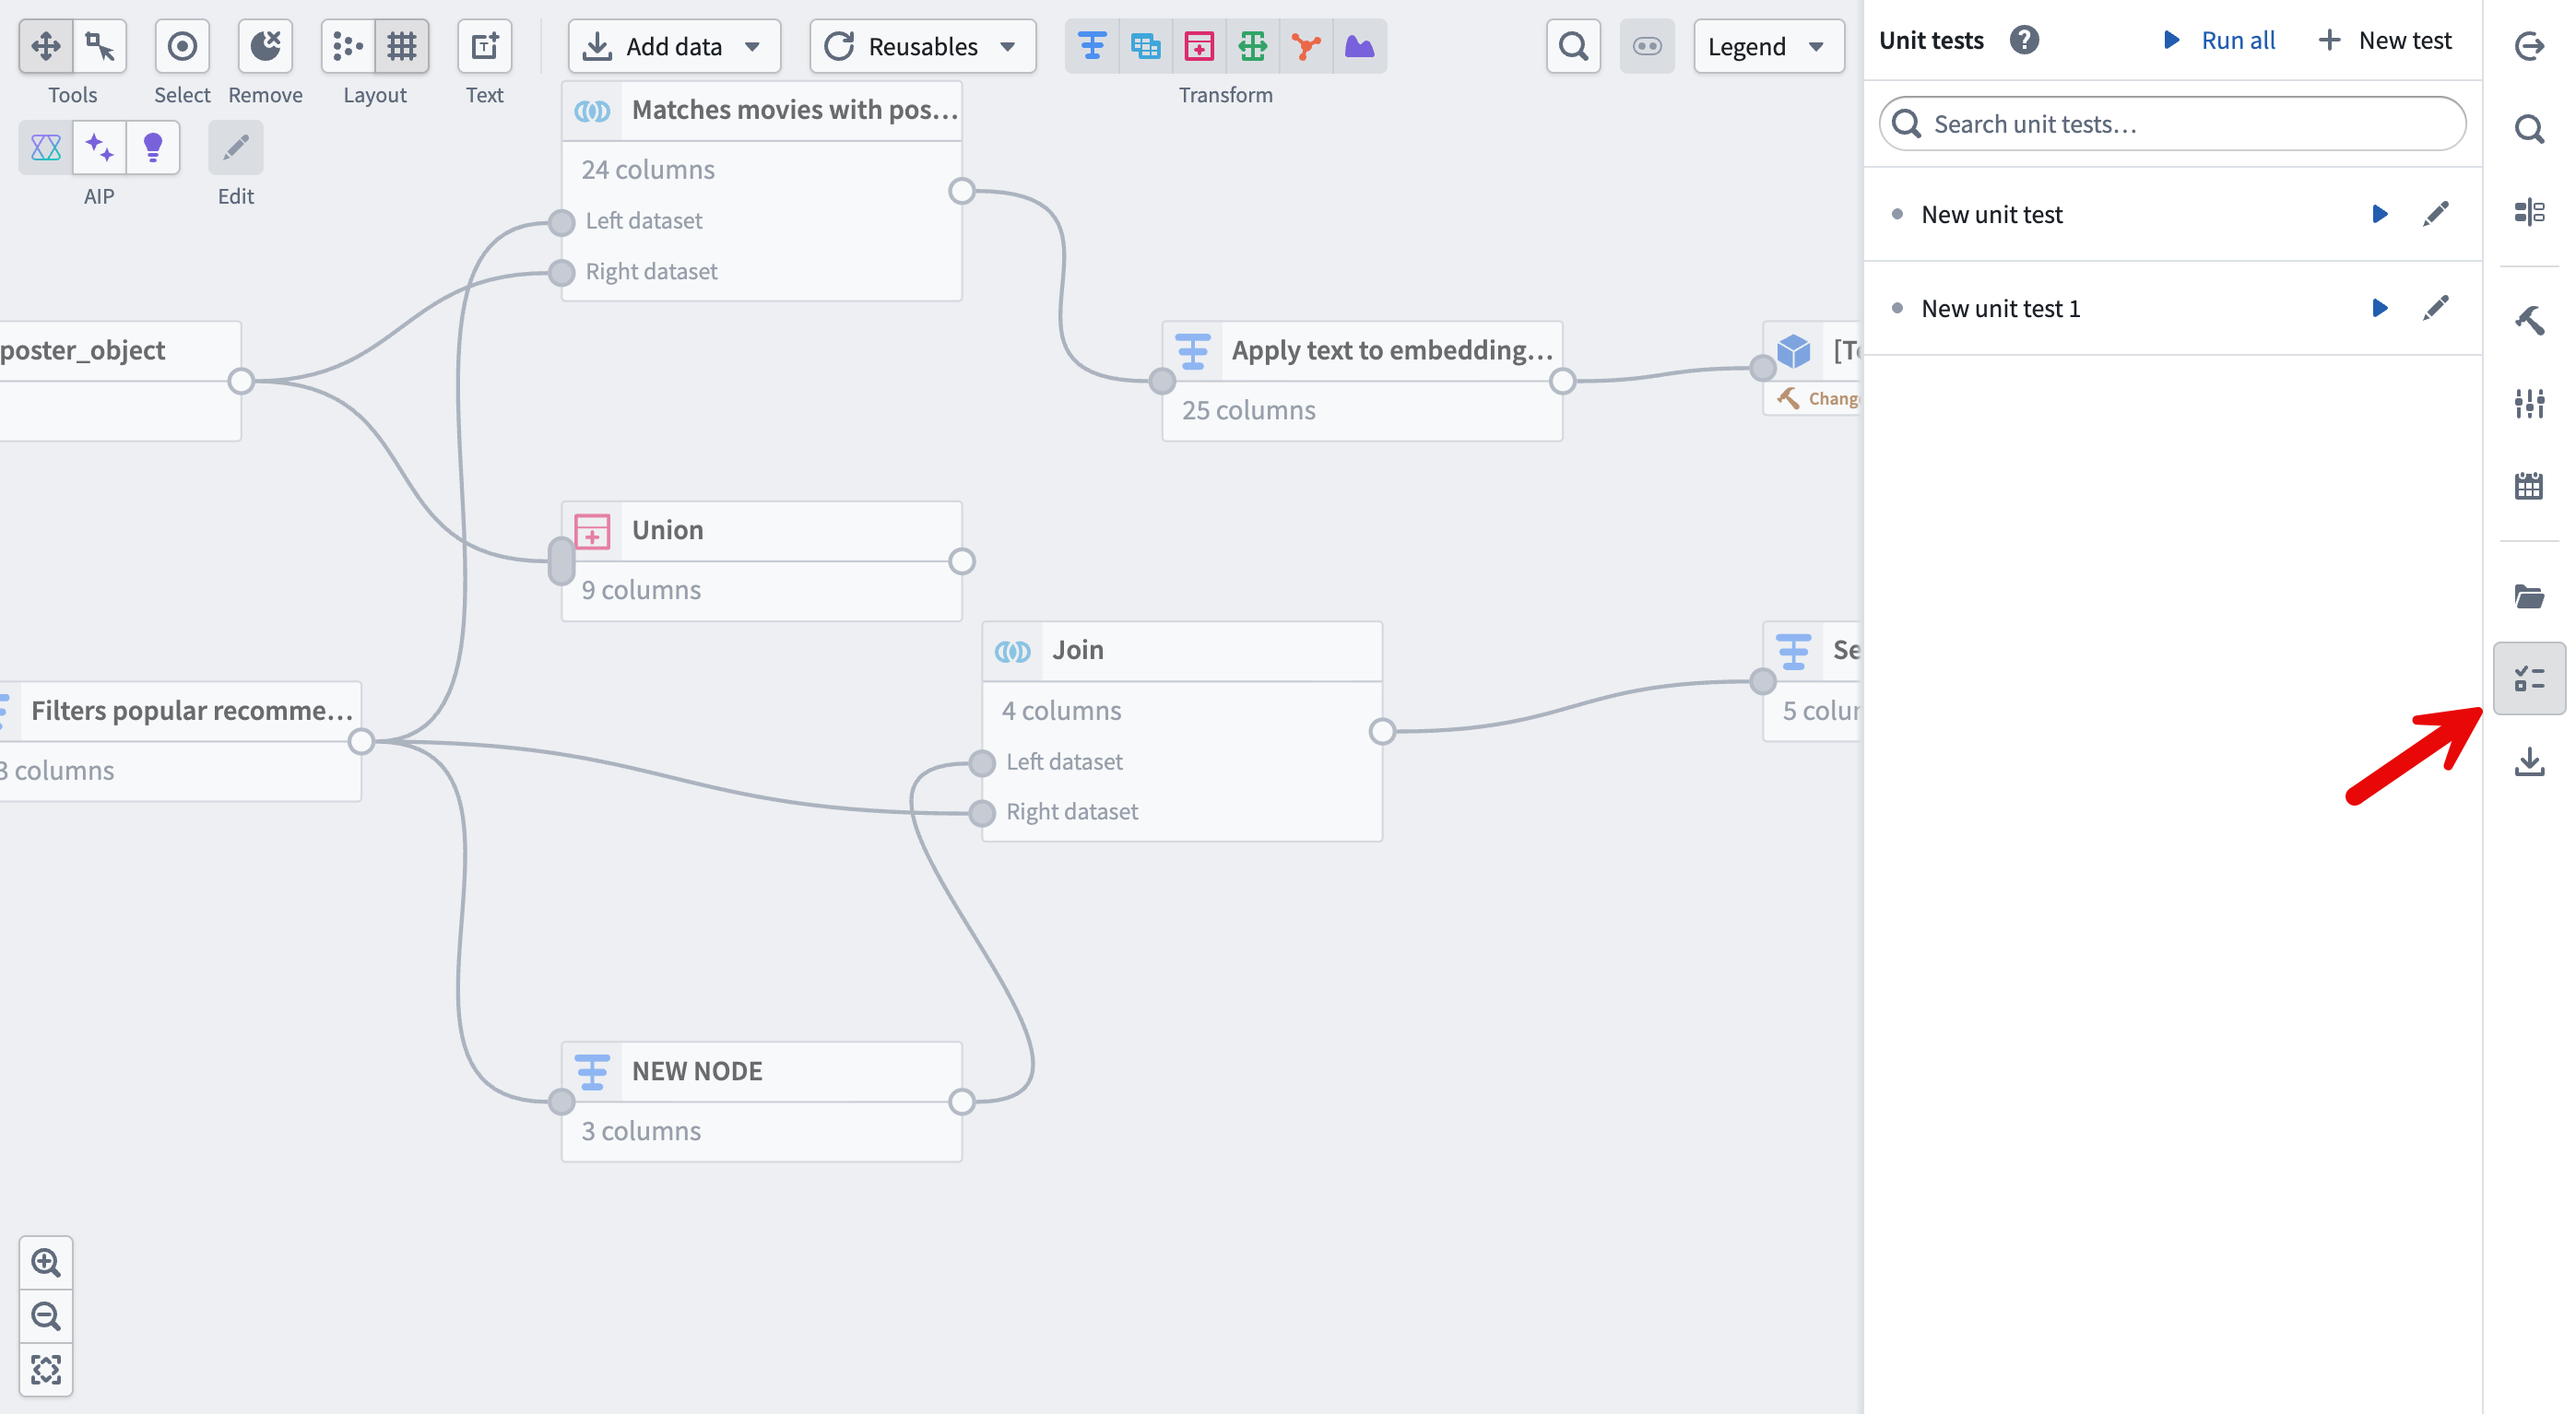
- Create a new unit test by selecting the icon on the right-hand side menu, selecting the + New test button, and selecting the transform you want to test.
- Next, configure your test by choosing a schema (manually or from an existing dataset), entering a line of test data in your Unit test input node, and entering the expected output in the Unit test output node.
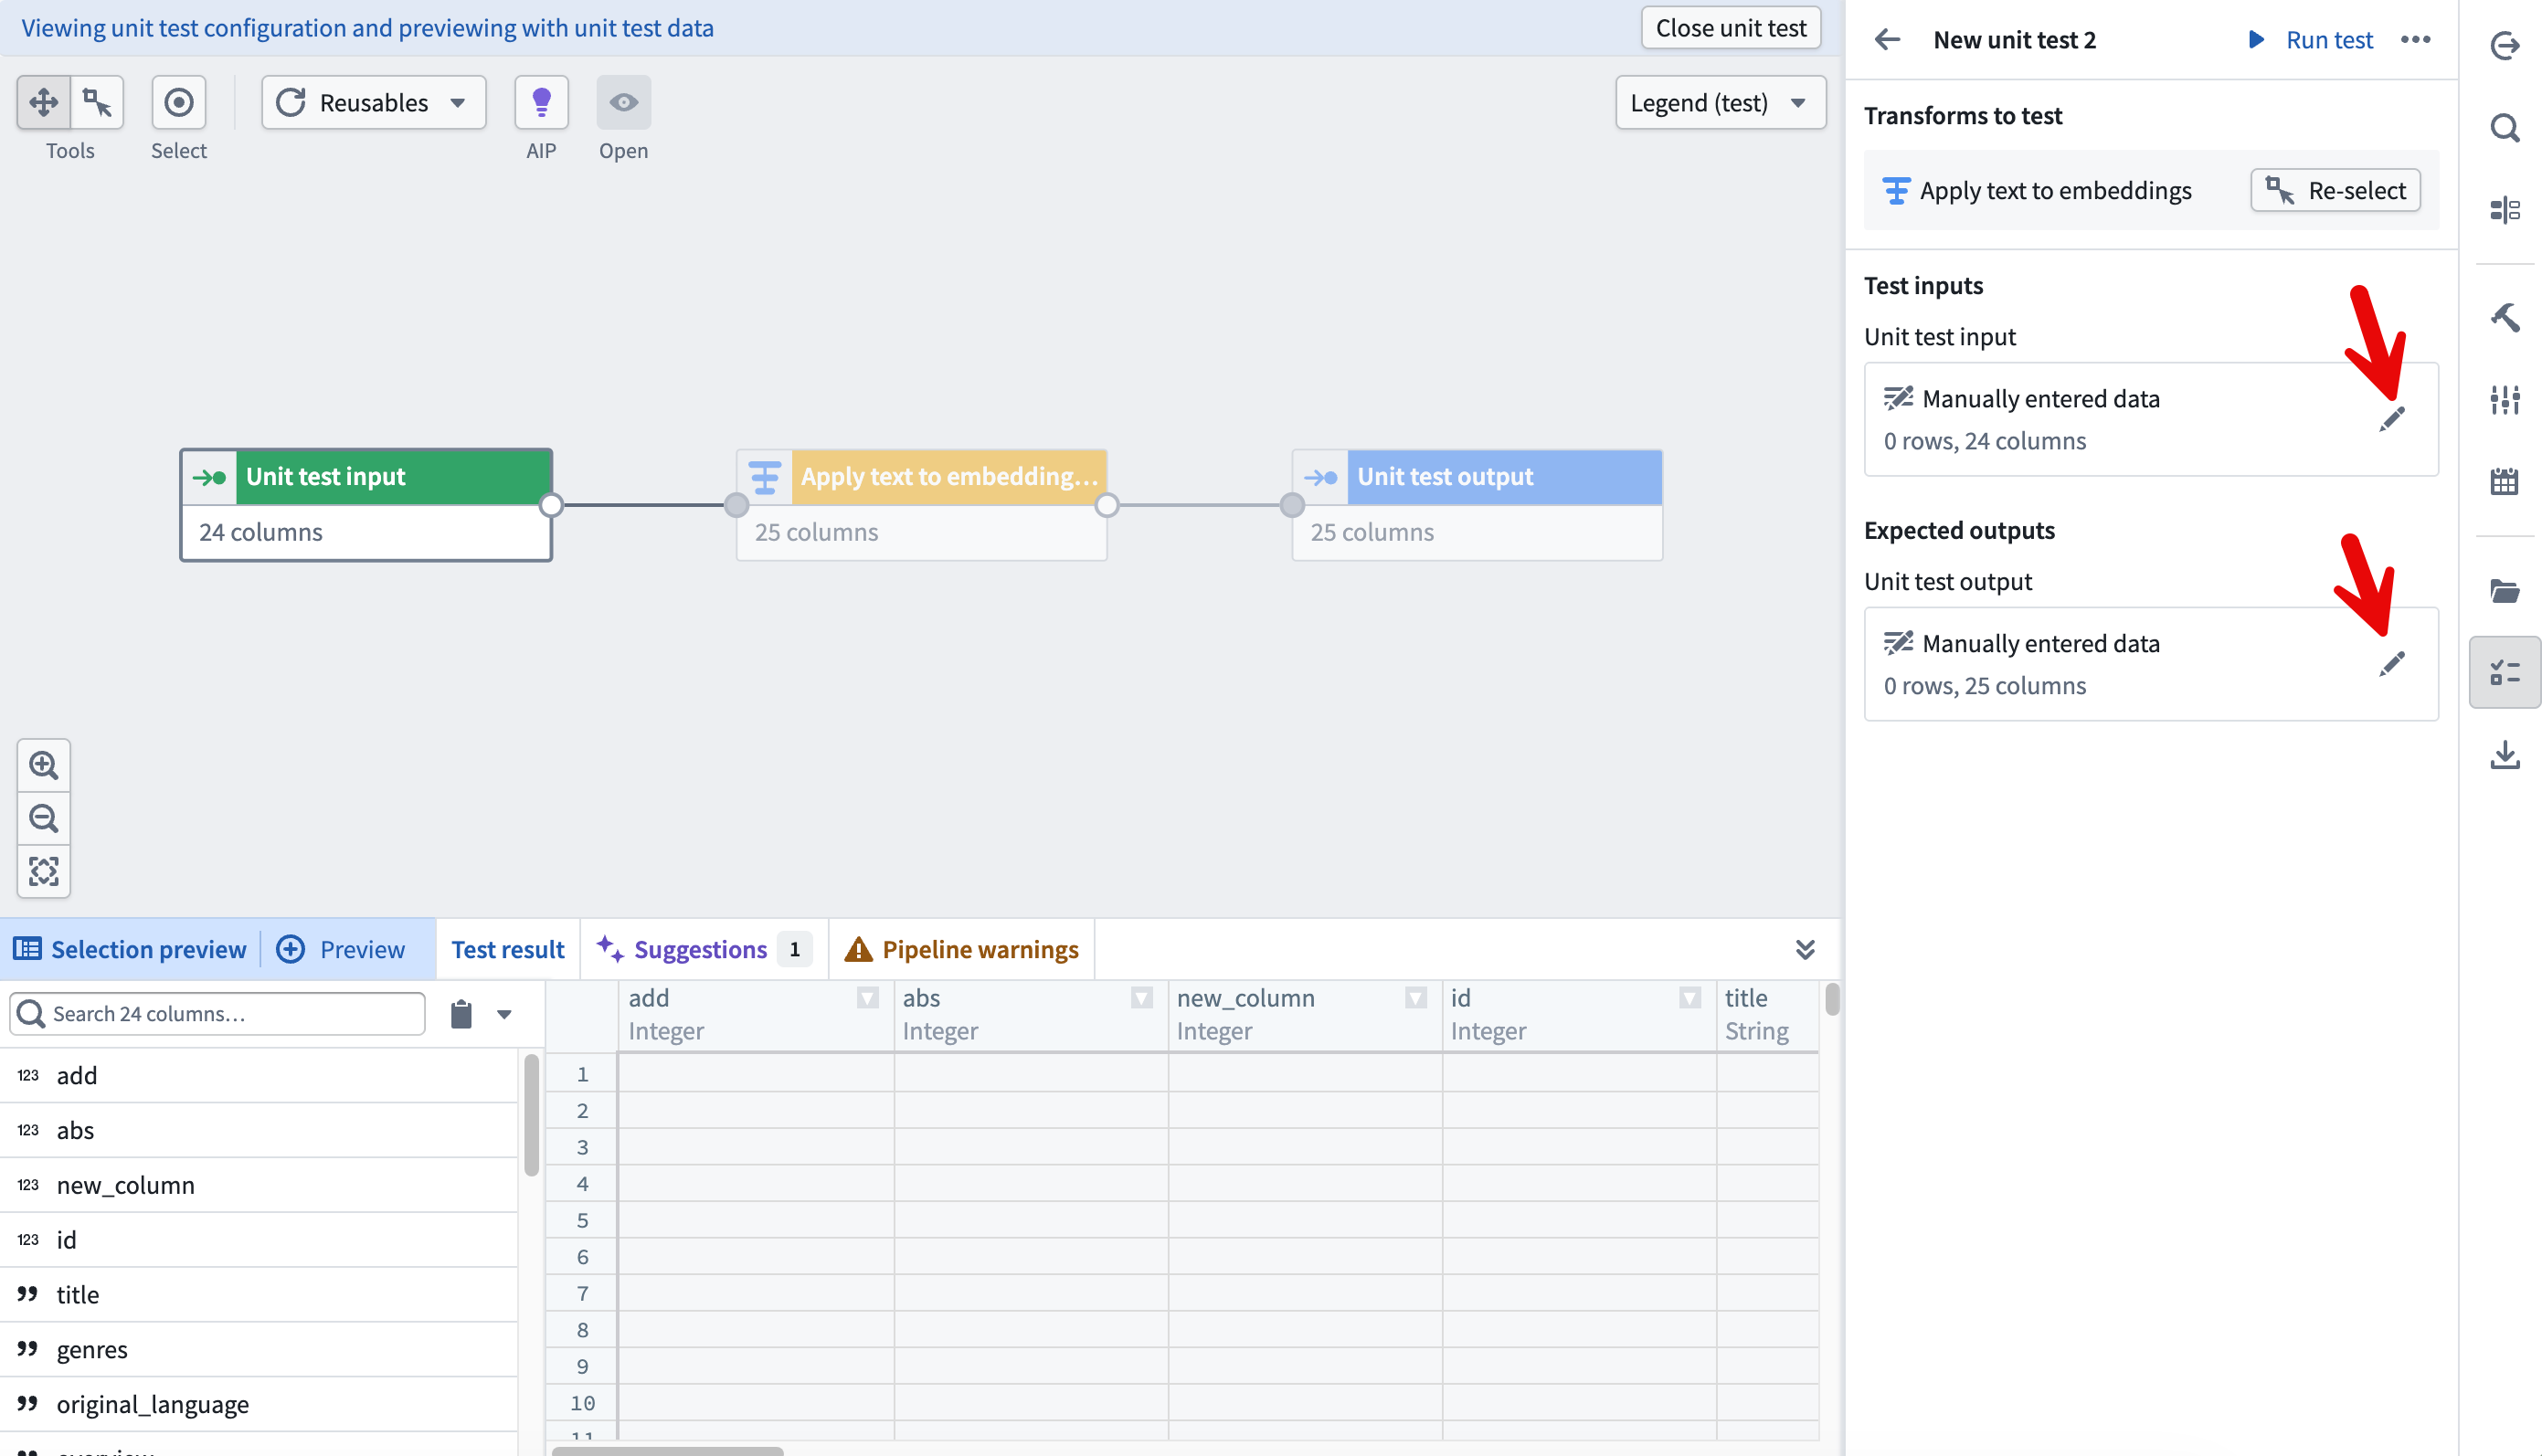
- Once your test is configured, select Run test and view the results. For more information, see Unit testing in Pipeline Builder.
Organize clearly
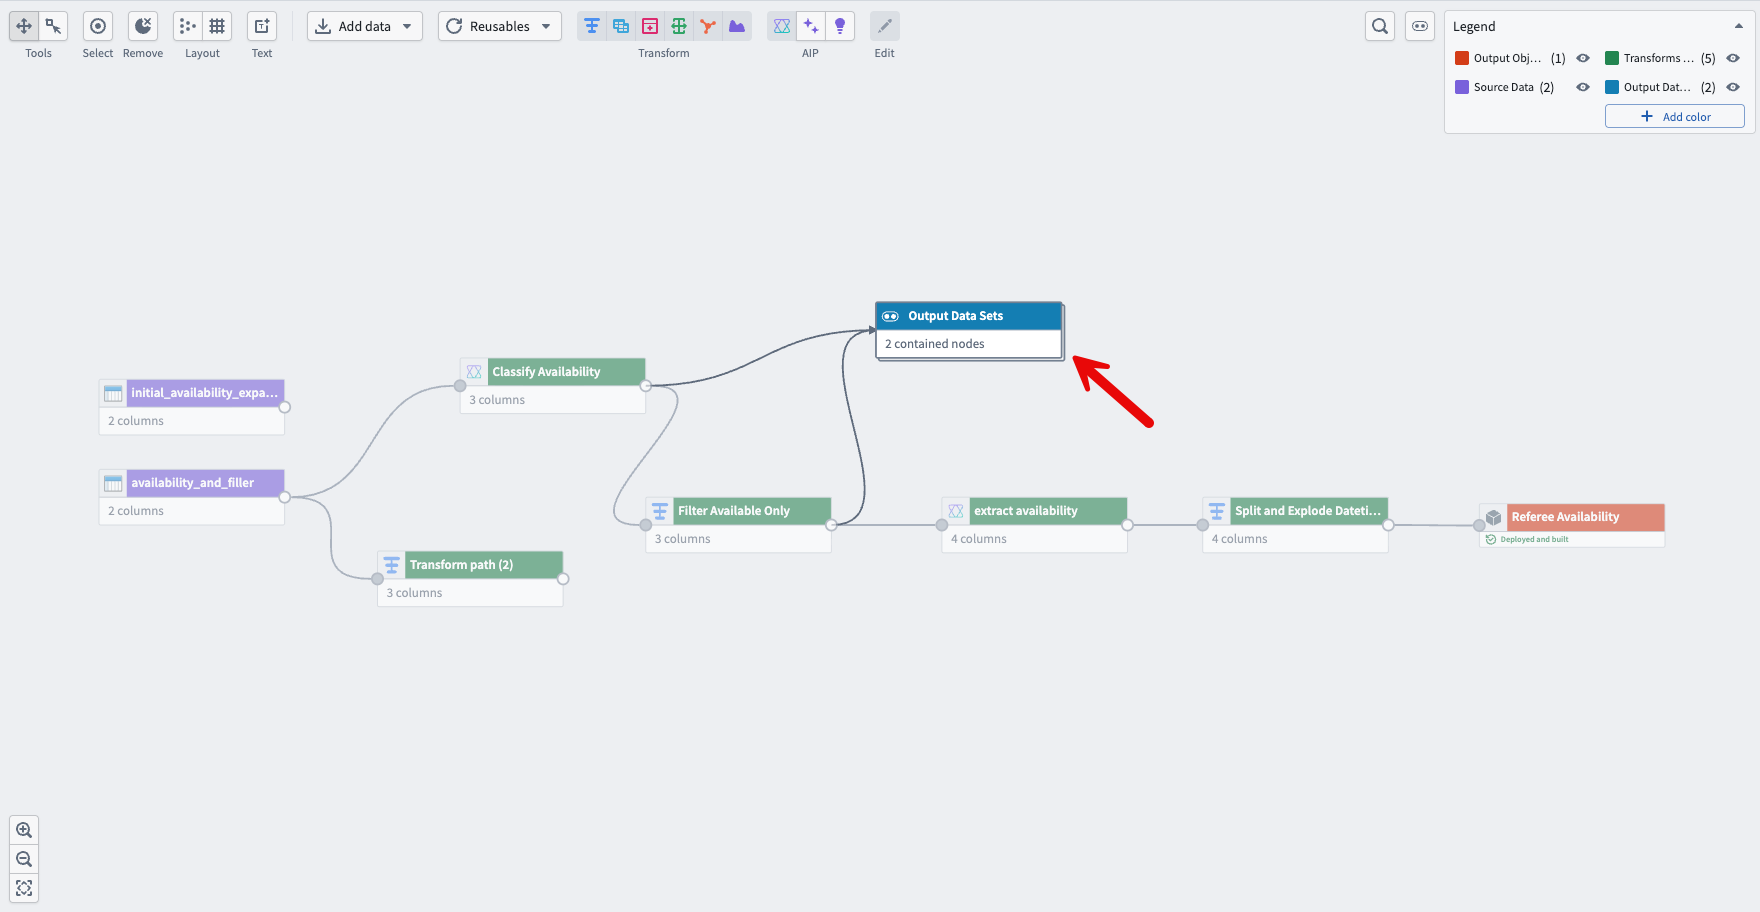
Folders and color groups for organization
- To set up folders for your nodes in Pipeline Builder, select the file icon on the far right of the screen. In the Pipeline file tree panel, you can create new folders, place nodes into folders, and show or hide nodes in specific folders.

- You can also color nodes and collapse multiple nodes into a single node based on the coloring.
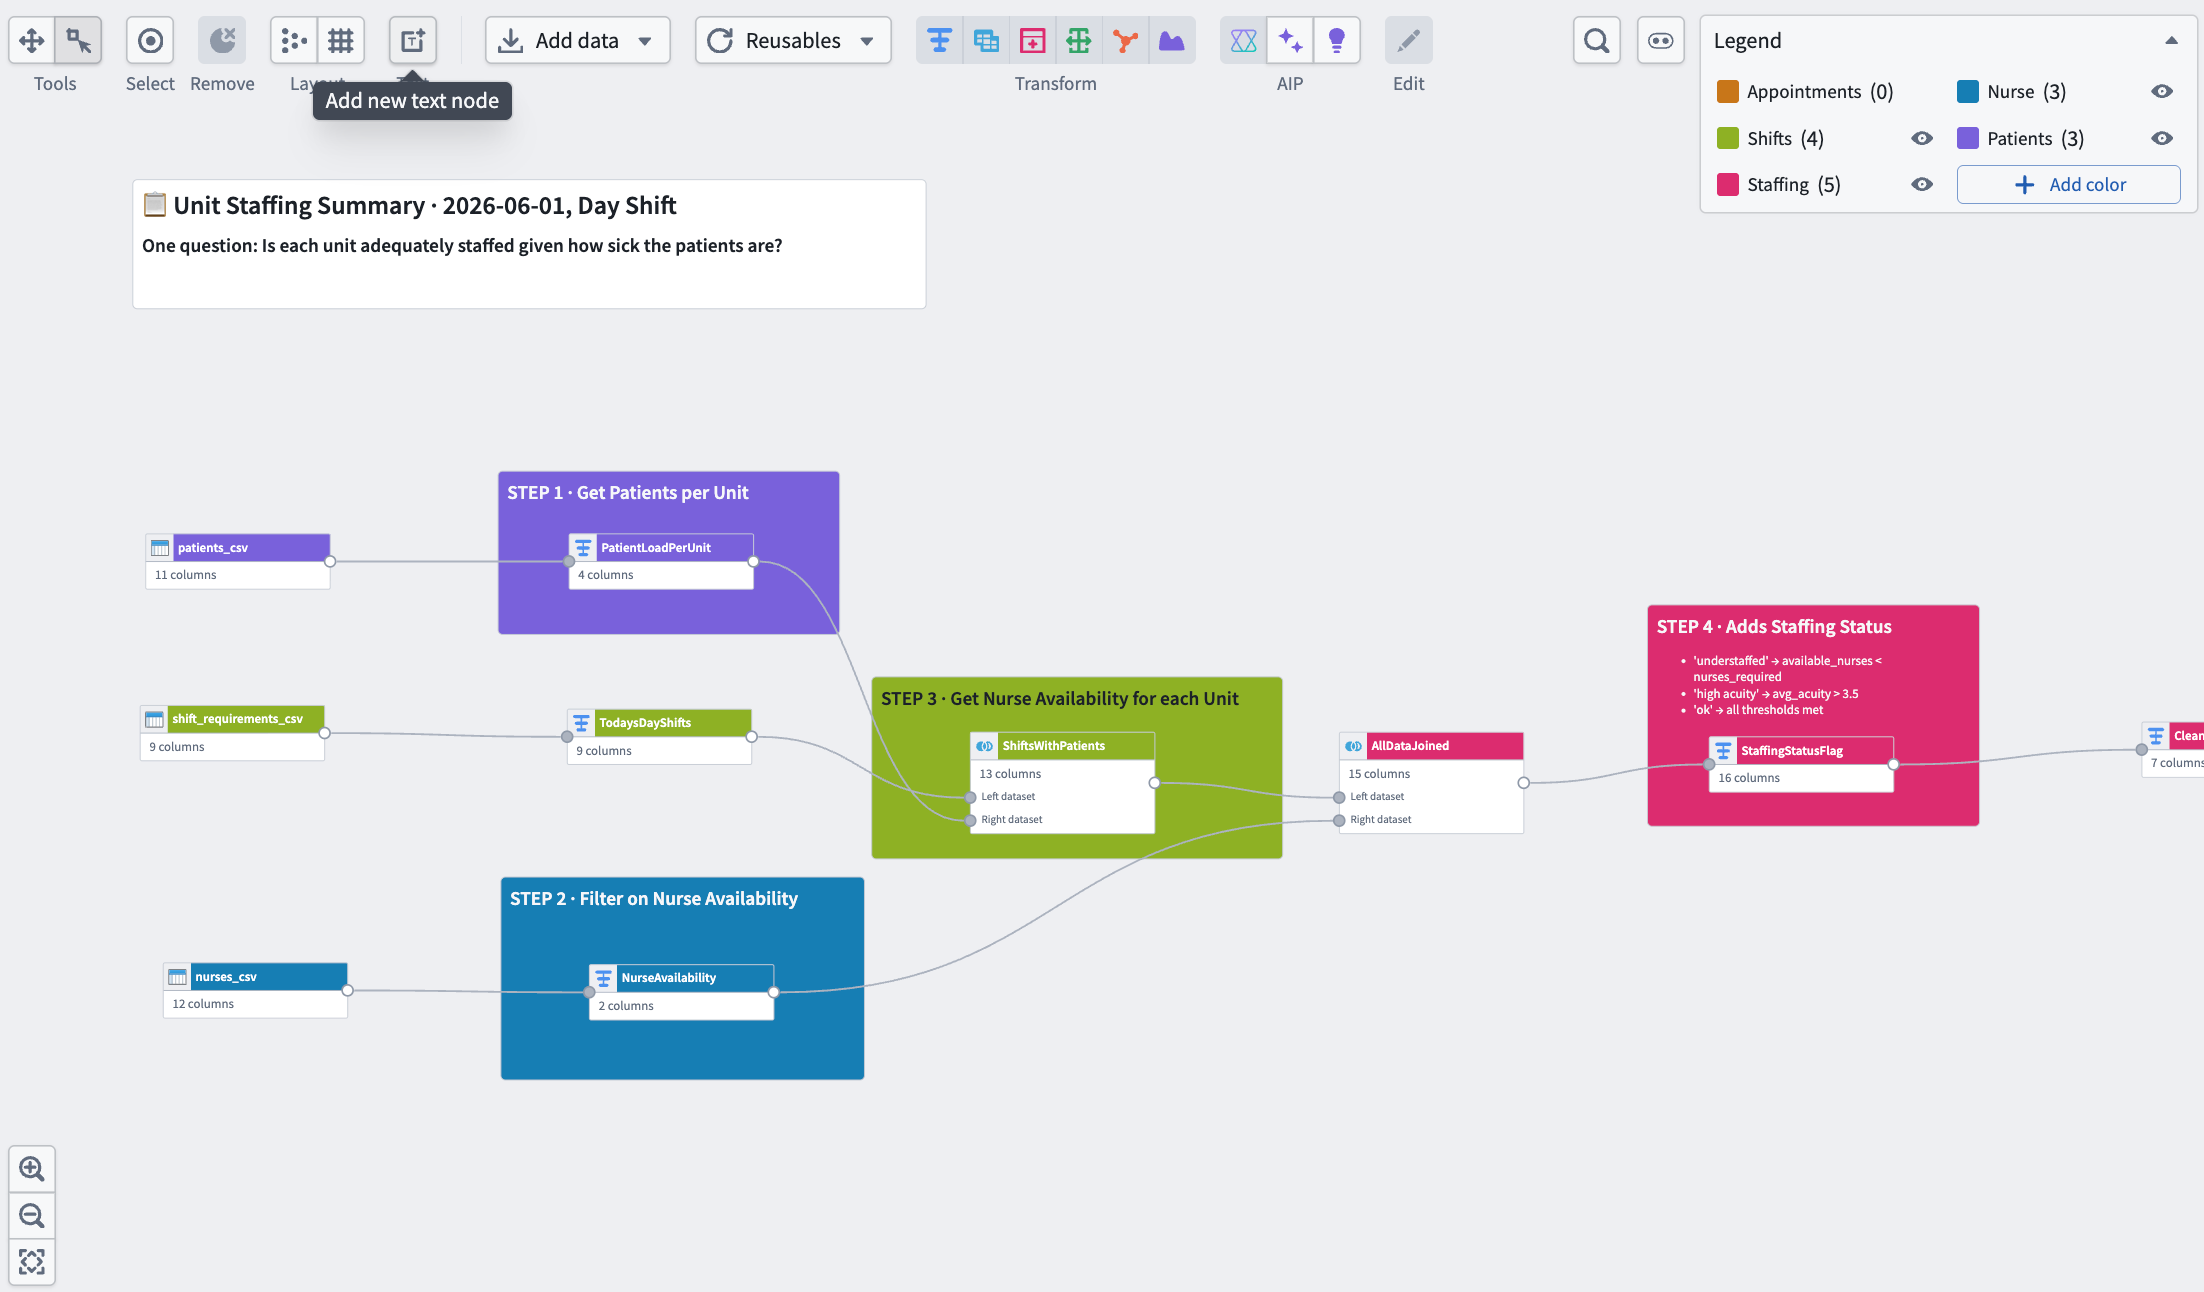
Text nodes for documentation
- Select Add new text node from the graph view toolbar. Text nodes support Markdown and are positioned behind any nodes in your graph. Learn more about text nodes.
Find and replace column names
- Navigate to the search panel on the right-hand side of your screen. From there, you can search for and replace column names in your pipeline.

Auto-layout nodes and grid snapping
Use the automatic layout and grid snapping options from the graph view toolbar to align your nodes and improve readability.

中文翻译
Pipeline Builder 技巧与窍门
无论您是构建第一个管道(Pipeline)还是优化生产工作流,以下技巧都能帮助您提高工作效率、保持条理清晰,并更好地利用 Pipeline Builder。如果您已设置好管道,可直接跳至优化管道部分,获取提升性能和可靠性的建议。
- 加速构建
- 配置用户偏好
- 快捷键(自动布局、缩放、隐藏等)
- 复制粘贴节点
- 点击拖拽连接节点
- 查看未保存的更改
- 决定每个节点放置的转换数量
- 使用大语言模型(LLM)生成模拟数据
- 更快的管道模式
- 使用计算配置文件(Compute profiles)缩短构建时间
- 过滤预览数据
- 使用文件夹和颜色组进行组织
- 使用文本节点编写文档
- 查找和替换列名
- 自动布局节点与网格对齐
加速构建
配置用户偏好
- 导航至 Pipeline Builder 视图右上角的设置菜单,选择用户偏好(User preferences),然后配置并保存您的设置。
:::callout{theme="neutral"} 两个最常用的设置是折叠转换样式(Collapsed transform style)和自动命名转换路径(Name transform paths automatically)。在用户偏好的折叠转换样式选择器中,将设置切换为伪代码(Pseudocode)后,您的转换将以类似编程代码的格式呈现。伪代码不遵循任何特定编程语言的语法。 :::
快捷键(自动布局、缩放、隐藏等)
- 打开 Pipeline Builder 左上角的帮助(Help)下拉菜单。
- 选择查看快捷键(View hotkeys)以打开 Pipeline Builder 的完整快捷键参考。
:::callout{theme="neutral"} 一些最常用的快捷键包括:
上箭头(Up Arrow):缩放并适配所有管道节点至屏幕Cmd+H(macOS)或Ctrl+H(Windows):隐藏选中的节点Cmd+K(macOS)或Ctrl+K(Windows):显示所有隐藏的节点Cmd+D(macOS)或Ctrl+D(Windows):选择节点的子节点Cmd+E(macOS)或Ctrl+E(Windows):选择节点的父节点Cmd+C(macOS)或Ctrl+C(Windows):复制节点到剪贴板 :::
复制粘贴节点
- 选择要复制的节点。使用右上角的选择(Select)按钮,或使用
Cmd+A(macOS)或Ctrl+A(Windows)选择当前管道中的所有节点。如有需要,您也可以单独选择节点,或通过选择并拖拽来框选一组节点。 - 右键单击并选择复制(Copy),或使用
Cmd+C(macOS)或Ctrl+C(Windows)复制您的选择。
- 导航至目标管道,右键单击并选择粘贴(Paste),或使用
Cmd+V(macOS)或Ctrl+V(Windows)进行粘贴。
点击拖拽连接节点
- 选择要用作输入的节点的输出圆点(output circle)。
- 将该输出拖拽至应接收其输出的节点的输入圆点(input circles)。
查看未保存的更改
- 导航至屏幕右侧的侧边栏菜单,选择查看更改(View changes)。在此处,您可以查看当前分支中的未保存更改,并将其与其他 Pipeline Builder 分支进行比较。
决定每个节点放置的转换数量
- 每个节点的转换数量没有固定限制。作为一般最佳实践,建议将较大的转换函数分散到多个节点中,而不是将所有内容集中到一个节点中。这使您的管道更易于维护、故障排除和更新。
- Pipeline Builder 还支持自定义函数(custom functions),允许您将一系列转换板打包成一个可重复使用的转换,并在整个管道中重复使用。在转换节点中选择 + 图标以配置自定义转换路径。
使用大语言模型(LLM)生成模拟数据
- 向手动输入的表中添加列后,从右上角选择生成数据(Generate data)。
- 对于每一列,使用自动填充(Auto-populate with)下拉菜单选择数据类型,或选择使用LLM生成(Generate with LLM)输入自定义提示词。
- 配置好提示词后,选择右下角的生成表格(Generate table)以填充表格。
用于构建和理解的AI工具
:::callout{theme="neutral"} 要直接在管道中使用大语言模型(LLM),请参阅在 Pipeline Builder 中使用 LLM。 :::
使用AI生成(AI generate)构建新的转换节点
- 选择要从中构建的节点,然后从菜单中选择生成(Generate)。
- 接下来,在文本框中输入您的提示词并选择生成(Generate)。
- Pipeline Builder 会在所选节点之后生成新节点,您可以像管道中的其他节点一样对其进行重命名。
使用AI解释(AI explain)生成管道逻辑摘要
- 选择要解释的节点,然后选择图形视图顶部中央的紫色灯泡图标。Pipeline Builder 会在文本框中生成所选节点逻辑的文字摘要。
- 您也可以直接在节点中使用解释功能,方法是选择转换板右上角的紫色灯泡。
使用AIP正则表达式助手(AIP regex helper)通过LLM生成正则表达式模式
- 选择要运行正则表达式函数的数据集,然后打开转换(Transforms)面板。
- 在转换窗口中,选择所需的正则表达式函数和目标列。
- 选择模式输入框右侧的紫色星形图标,然后输入您的提示词。
- 选择生成(Generate),然后通过选择应用(Apply)验证输出。返回图形视图并预览转换的输出以确认结果。
使用AI FDE支持管道创建和构建
- 导航至屏幕左侧的应用程序(Applications)菜单,搜索 AI FDE。
- 打开 AI FDE 应用程序后,您可以通过将现有管道的链接复制粘贴到聊天框中,将其添加为资源。
- 然后,您可以提示 AI FDE 在您的管道中构建其他节点。
优化管道
更快的管道模式
- 创建新的批处理管道(Batch pipeline)时,从选择批处理计算(Select batch compute)菜单中选择更快(Faster)。
- 您也可以将现有的标准批处理管道转换为更快的管道。在标准管道的设置(Settings)菜单中选择转换为更快管道(Convert to faster pipeline)选项。
- 选择转换为更快管道选项后,选择转换管道(Convert pipeline)按钮以确认转换。
:::callout{theme="warning"} 如果您的管道包含与更快管道不兼容的功能,您将收到一条错误消息,指示在转换前需要删除或更改的内容。您也可以打开转换检查,使用底部面板在管道中查看这些警告。 :::
:::callout{theme="warning" title="更快管道的功能支持"} 更快管道支持标准批处理管道中可用功能的一个子集。了解更多关于使用 Pipeline Builder 创建更快管道的信息。 :::
使用计算配置文件(Compute profiles)缩短构建时间
- 创建管道后,导航至屏幕最右侧的构建设置(Build settings)菜单,进一步调整计算设置。
- 在构建设置菜单中,转到默认计算配置文件(Default compute profile),选择显示当前计算配置文件大小的下拉菜单。
- 选择配置文件管理策略(Profile management strategy)下拉菜单。共有三个选项可供选择。选择最适合您需求的选项:
- 标准(Standard): 默认计算配置文件设置,无额外优化。最适合具有可预测数据量的生产规模管道。
- 热池(Warm pool): 持续运行虚拟机以减少管道启动时间。最适合小规模、迭代式管道和低延迟开发任务。
- 托管配置文件(Managed profile): 根据管道最近五次运行自动调整计算资源分配。最适合数据大小波动或需要计算成本管理的管道。
:::callout{theme="neutral" title="更快管道中的计算配置文件支持"} 更快管道仅支持标准(Standard)配置文件管理策略。 :::
过滤预览数据
- 右键单击要从中采样的输入数据集,然后从下拉菜单中选择采样策略(Sampling strategies)。您配置的采样策略将应用于采样输入之后的所有节点。
- 选择要在管道中配置采样策略的数据集。过滤预览(Filtered preview)允许您基于任何表达式过滤行。在以下示例中,仅保留
original_language为en的行。
单元测试确保管道可靠性
- 通过选择右侧菜单中的图标,选择 + 新建测试(+ New test)按钮,然后选择要测试的转换,创建新的单元测试。
- 接下来,通过选择模式(手动或从现有数据集选择),在单元测试输入节点(Unit test input node)中输入一行测试数据,并在单元测试输出节点(Unit test output node)中输入预期输出来配置您的测试。
- 测试配置完成后,选择运行测试(Run test)并查看结果。有关更多信息,请参阅Pipeline Builder 中的单元测试。
清晰组织
使用文件夹和颜色组进行组织
- 要在 Pipeline Builder 中为节点设置文件夹,请选择屏幕最右侧的文件图标。在管道文件树(Pipeline file tree)面板中,您可以创建新文件夹、将节点放入文件夹,以及显示或隐藏特定文件夹中的节点。
- 您还可以为节点着色,并根据颜色将多个节点折叠成一个节点。
使用文本节点编写文档
- 从图形视图工具栏中选择添加新文本节点(Add new text node)。文本节点支持 Markdown,并位于图形中任何节点的后面。了解更多关于文本节点的信息。
查找和替换列名
- 导航至屏幕右侧的搜索面板。在此处,您可以搜索并替换管道中的列名。
自动布局节点与网格对齐
使用图形视图工具栏中的自动布局和网格对齐选项来对齐节点并提高可读性。