Widget configuration(微件配置)
Widget modes
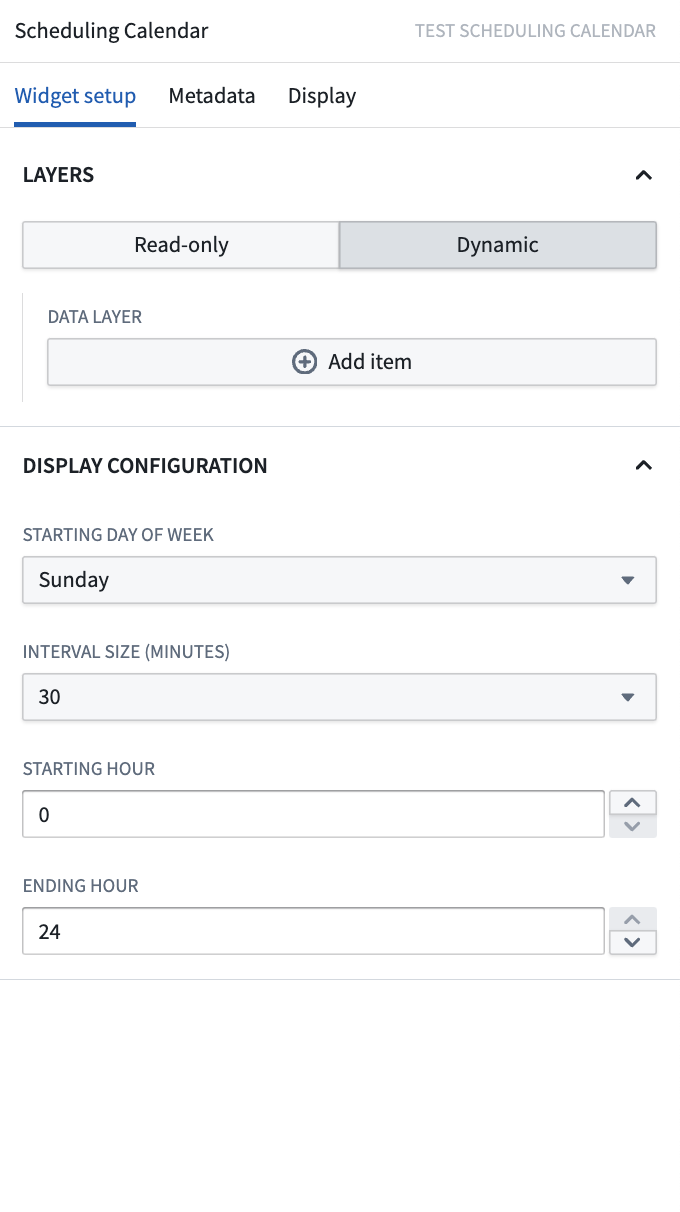
The Scheduling Calendar widget has two modes: read-only and dynamic. By default, the widget begins on read-only mode, which is designed for viewing and analyzing data without making any changes. Switching to dynamic mode enables you to add, edit, or delete schedule objects directly in the widget.
Dynamic mode requires specific Ontology settings on your schedule object type. You will need to add type classes to the properties that represent the start (schedules:schedulable-start-time) and end time (schedules:schedulable-end-time) for your object. You can do this by:
- Navigate to your schedule object type in Ontology Manager.
- In the Properties tab, select the property that needs a type class.
- Select the Interaction tab from the property details panel on the right.
- Scroll down and select Add new type class, then enter the type class kind and value in the provided text boxes.
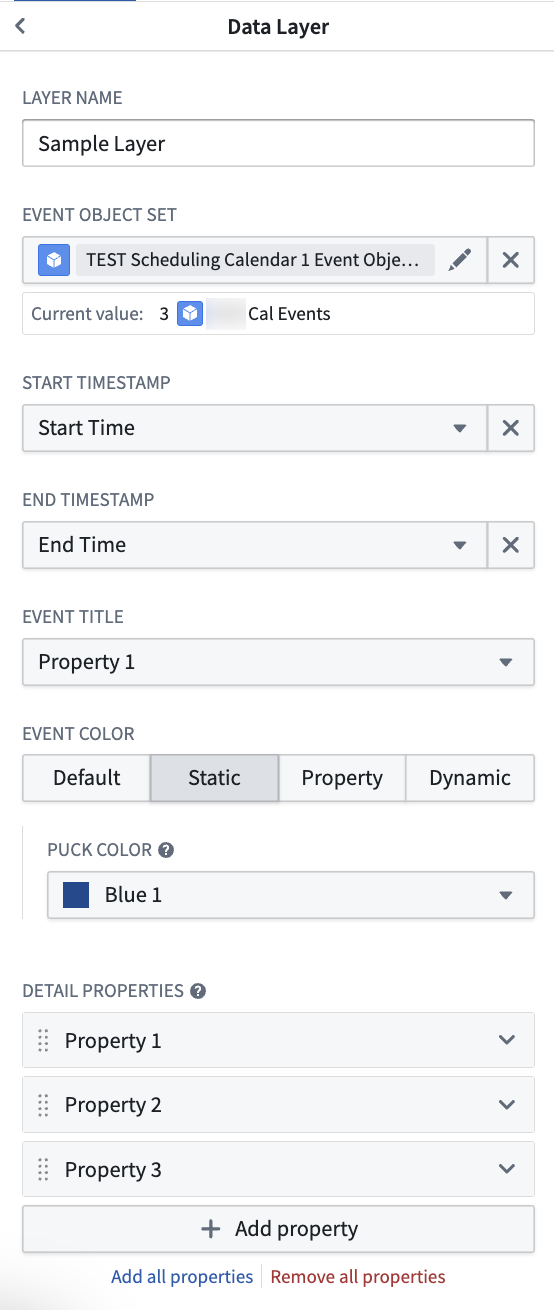
Input data (pucks)
-
Schedule Name: The name of the layer to help differentiate between different layers during configuration. This value is not displayed in the widget itself.
-
Schedule Object Set: This is the input variable to the Scheduling Calendar widget and determines what data will be displayed. The object type selected for this object set must have properties that represent a start time and an end time.
-
Start Time (read-only mode): Select a date or timestamp property to use as the start time of the events. In dynamic mode, the widget will infer this value if the correct Ontology settings have been applied.
-
End Time (read-only mode): Select a date or timestamp property to use as the end time of the events. In dynamic mode, the widget will infer this value if the correct Ontology settings have been applied.
-
Title: Select a property to use as the displayed label value for the object pucks in the widget.
-
Color: Select the color(s) to use when displaying events in the chart.
- Static: Select a single color for all pucks.
- Segment-by: Select a property and the widget will automatically color-code pucks based on the values of the selected property.
-
Dynamic: Configure conditional formatting rules to apply to pucks in the chart.
-
Pop-over Properties: This section determines the properties that will be displayed on the popover card when a user’s cursor hovers over a puck on the calendar.
-
Save Handler Action (Dynamic mode): Select an action that will be used for drag-and-drop interactions. This action should be a Modify action that edits the schedule objects start and end time properties.
- The action must have parameters for modifying the start time and end time of the schedule object.
- The parameter IDs in your action must exactly match the property IDs you selected for start and end time. For example:
- If your start time property is
start_time, the action parameter ID must also bestart_time. - If your end time property is
end_time, the action parameter ID must also beend_time.
- If your start time property is
- The action parameters must have the same type classes (
schedules:schedulable-start-timeandschedules:schedulable-end-time) as the corresponding properties. -
All parameters should be marked as optional.
-
Enable Drag to Create (Dynamic mode): Select an action to let end users create new schedule objects by dragging across empty space on the calendar. See Drag to create for setup and usage details.
Display configuration
-
Starting Day of Week: This selection determines which day will serve as the beginning of the week when your chart is in either week or month view.
-
Interval Size (Dynamic only): By default, users can assign objects to any time on the Scheduling Calendar widget, down to the specific minute. Snap behavior allows builders to set defined intervals of when objects can be assigned. Once a puck is dropped to a new placement in the chart, the puck will snap to the beginning of the closest interval.
-
Starting Hour: This selection determines when the chart will begin in day or week view.
-
Ending Hour: This selection determines when the chart will end in day or week view.
Drag to create
The Calendar widget lets end users create new schedule objects by holding a modifier key and dragging across the calendar.
Set up drag-to-create behavior
-
In Ontology Manager, make a
Create Actionfor the object type displayed in your calendar layer. This action needs the following parameters: -
The
Start Timeproperty of the object - The
End Timeproperty of the object - Optionally, any additional properties you want users to fill out when an object is created.
The start and end time parameters can be typed as either timestamp or date, to match the corresponding properties on your object type.
2. In Workshop, navigate to Input Data (Pucks) > [your calendar layer] > Interactions > Enable Drag to Create.
3. Select the Create Action you configured.
4. Choose Select parameter to configure, then bind the start and end time parameters under Local Default Value:
* For the start time parameter, select SELECTED START TIMESTAMP (or SELECTED START DATE if the parameter is date-typed) so that, on drag to create, the widget passes in the time you dragged from.
* For the end time parameter, select SELECTED END TIMESTAMP (or SELECTED END DATE) so that, on drag to create, the widget passes in the time you dragged to.
Use
To create a new object, hold the modifier key for your operating system and drag across empty space in the calendar:
- macOS: hold
Cmd(⌘) and drag. - Windows: hold the
Windowskey and drag.
When you release the drag, the widget displays the new proposed object immediately based on the start and end times of your drag. By default, a form will pop up on every create for maximum configurability. Selecting the Hide form and apply immediately if valid configuration will hide this form. New objects are only created in the Ontology upon saving changes.
Common configuration issues
Error: "The action parameter ids must align with the ids of the selected properties"
This error occurs when the save handler action's parameter IDs do not exactly match the property IDs used in the widget configuration.
Cause: The widget requires an exact match between:
- The property IDs of your start and end time properties
- The parameter IDs in your save handler action
Solution:
- Check your property IDs in Ontology Manager:
- Navigate to your schedule object type.
- Note the exact property IDs (for example,
start_time,end_time). - Check your action parameter IDs:
- Open your save handler action in Ontology Manager.
- In the action's parameter configuration, verify that parameter IDs exactly match your property IDs.
- Parameter names can differ, but the parameter IDs must be identical to property IDs.
- Verify type classes are applied to both properties and action parameters:
- Properties should have
schedules:schedulable-start-timeandschedules:schedulable-end-timetype classes. - The corresponding action parameters should have the same type classes.
- If needed, edit the action parameter IDs to match your property IDs.
中文翻译
微件配置
微件模式
排程日历微件(Scheduling Calendar widget)有两种模式:只读模式(read-only)和动态模式(dynamic)。默认情况下,微件以只读模式启动,该模式专为查看和分析数据而设计,不允许进行任何更改。切换到动态模式后,您可以直接在微件中添加、编辑或删除排程对象。
动态模式需要在您的排程对象类型上设置特定的本体(Ontology)设置。您需要为表示对象开始时间(schedules:schedulable-start-time)和结束时间(schedules:schedulable-end-time)的属性添加类型类(type classes)。具体操作如下:
- 在本体管理器(Ontology Manager)中导航至您的排程对象类型。
- 在属性选项卡中,选择需要添加类型类的属性。
- 在右侧的属性详情面板中选择交互选项卡。
- 向下滚动并选择添加新类型类,然后在提供的文本框中输入类型类种类和值。
输入数据(数据块)
-
排程名称: 层的名称,用于在配置过程中区分不同的层。该值不会在微件本身中显示。
-
排程对象集: 这是排程日历微件的输入变量,决定了将显示哪些数据。为此对象集选择的对象类型必须包含表示开始时间和结束时间的属性。
-
开始时间(只读模式): 选择一个日期或时间戳属性作为事件的开始时间。在动态模式下,如果已应用正确的本体设置,微件将自动推断此值。
-
结束时间(只读模式): 选择一个日期或时间戳属性作为事件的结束时间。在动态模式下,如果已应用正确的本体设置,微件将自动推断此值。
-
标题: 选择一个属性,用作微件中对象数据块显示的标签值。
-
颜色: 选择在图表中显示事件时使用的颜色。
- 静态: 为所有数据块选择单一颜色。
- 按字段分段: 选择一个属性,微件将根据所选属性的值自动为数据块分配颜色。
-
动态: 配置条件格式规则,应用于图表中的数据块。
-
弹出卡片属性: 此部分决定当用户将光标悬停在日历上的数据块时,弹出卡片上显示的属性。
-
保存处理程序操作(动态模式): 选择一个用于拖放交互的操作。此操作应为修改(Modify)操作,用于编辑排程对象的开始时间和结束时间属性。
- 该操作必须包含用于修改排程对象开始时间和结束时间的参数。
- 操作中的参数ID必须与您为开始时间和结束时间选择的属性ID完全匹配。例如:
- 如果您的开始时间属性是
start_time,则操作参数ID也必须是start_time。 - 如果您的结束时间属性是
end_time,则操作参数ID也必须是end_time。
- 如果您的开始时间属性是
- 操作参数必须具有与相应属性相同的类型类(
schedules:schedulable-start-time和schedules:schedulable-end-time)。 -
所有参数都应标记为可选。
-
启用拖拽创建(动态模式): 选择一个操作,允许最终用户通过在日历的空白区域拖拽来创建新的排程对象。有关设置和使用详情,请参阅拖拽创建。
显示配置
-
每周起始日: 此选项决定当图表处于周视图或月视图时,哪一天作为一周的开始。
-
间隔大小(仅动态模式): 默认情况下,用户可以将对象分配到排程日历微件上的任何时间,精确到分钟。吸附行为(Snap behavior)允许构建者设置定义的时间间隔,用于分配对象。当数据块被拖放到图表中的新位置时,它将吸附到最近间隔的开始处。
-
起始小时: 此选项决定图表在日视图或周视图中的开始时间。
-
结束小时: 此选项决定图表在日视图或周视图中的结束时间。
拖拽创建
日历微件允许最终用户按住修饰键并在日历上拖拽来创建新的排程对象。
设置拖拽创建行为
-
在本体管理器中,为日历层中显示的对象类型创建一个创建操作(Create Action)。此操作需要以下参数:
-
对象的开始时间属性
- 对象的结束时间属性
- 可选地,您希望用户在创建对象时填写的任何其他属性。
开始时间和结束时间参数的类型可以是时间戳或日期,以匹配对象类型上的相应属性。 2. 在 Workshop 中,导航至输入数据(数据块)> [您的日历层] > 交互 > 启用拖拽创建。 3. 选择您配置的创建操作。 4. 选择选择要配置的参数,然后在本地默认值下绑定开始时间和结束时间参数: * 对于开始时间参数,选择SELECTED START TIMESTAMP(如果参数是日期类型,则选择SELECTED START DATE),这样在拖拽创建时,微件会传入您开始拖拽的时间。 * 对于结束时间参数,选择SELECTED END TIMESTAMP(或SELECTED END DATE),这样在拖拽创建时,微件会传入您拖拽结束的时间。
使用
要创建新对象,请按住您操作系统的修饰键并在日历的空白区域拖拽:
- macOS: 按住
Cmd(⌘) 键并拖拽。 - Windows: 按住
Windows键并拖拽。
当您释放拖拽时,微件会根据您拖拽的开始和结束时间立即显示新的建议对象。默认情况下,每次创建时都会弹出一个表单以实现最大可配置性。选择如果有效则隐藏表单并立即应用配置将隐藏此表单。新对象仅在保存更改后才会在本体中创建。
常见配置问题
错误:"操作参数ID必须与所选属性的ID一致"
当保存处理程序操作的参数ID与微件配置中使用的属性ID不完全匹配时,会出现此错误。
原因: 微件要求以下内容完全匹配:
- 开始时间和结束时间属性的属性ID
- 保存处理程序操作中的参数ID
解决方案:
- 在本体管理器中检查您的属性ID:
- 导航至您的排程对象类型。
- 记下确切的属性ID(例如
start_time、end_time)。 - 检查您的操作参数ID:
- 在本体管理器中打开您的保存处理程序操作。
- 在操作的参数配置中,验证参数ID是否与您的属性ID完全匹配。
- 参数名称可以不同,但参数ID必须与属性ID相同。
- 验证类型类是否已应用于属性和操作参数:
- 属性应具有
schedules:schedulable-start-time和schedules:schedulable-end-time类型类。 - 相应的操作参数应具有相同的类型类。
- 如有必要,编辑操作参数ID以匹配您的属性ID。