Configure checkpoints(配置检查点(Checkpoint))
Checkpoints allow Foundry administrators to request justifications for a variety of Foundry interactions by creating checkpoint configurations. These instructions will walk you through the following steps of creating a new checkpoint configuration.
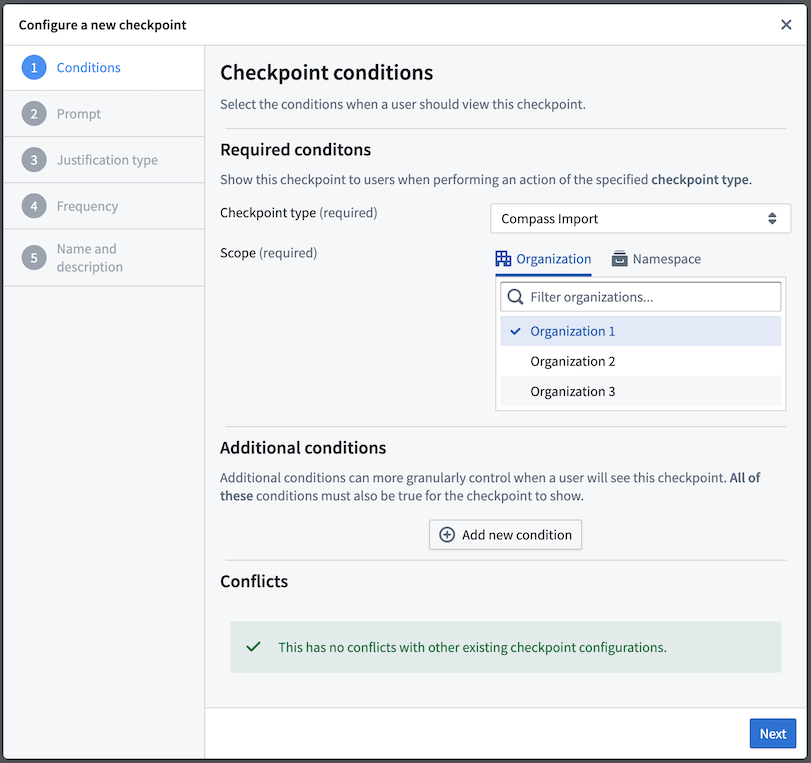
Configure checkpoint conditions
The first step of creating a new checkpoint configuration is to determine the conditions under which a user should see the checkpoint.
Required conditions
These conditions are required for every checkpoint configuration:
- Checkpoint type: Select the type of interaction that should trigger the checkpoint. Users may select multiple checkpoint types.
- Scope: Select an Organization or space to determine which user interactions should require the checkpoint.
:::callout{theme="neutral" title="Extra steps for login checkpoints"} To use the Login checkpoint type, first enable the Checkpoints Login Asynchronous User Manager (AUM) in Control Panel's AUM Section. :::
Organization scope
A checkpoint configured with an organization scope will only prompt users who are members of that organization. Checkpoints scoped to an organization will not be shown to users who are guests of that organization.
To configure a checkpoint scoped to an organization, you will need the Data governance officer role for that organization in Control Panel.
Space scope
A checkpoint configured with a space scope will only prompt users when they are interacting with a resource that is contained within that space, regardless of the user's organization. Some checkpoint types (like Login) do not describe interactions that involve resources in spaces, and so these checkpoint types cannot be configured with a space scope.
To configure a checkpoint with a space scope, you will need a role which includes the Administer resource-scoped checkpoint configurations operation. If you are configuring a checkpoint which uses a location matcher to target a specific resource, you will need the Owner role on that resource or the Space Administrator role on the space which is serving as scope. If you are configuring a checkpoint which does not include a location matcher, you will need the Space Administrator role on the space itself.
Additional conditions
Some checkpoint types also allow you to add additional conditions to more granularly specify when a checkpoint will appear for a user. These additional conditions allow you to create checkpoints that more specifically target certain interactions in the platform or present a user with multiple checkpoints for a particular interaction.
Different checkpoint types support different sets of condition types. For checkpoint configurations that include multiple checkpoint types, only the condition types common to all of those checkpoint types can be used. The available conditions include:
- Locations: A location condition specifies that the user is interacting with a resource at a certain location in the filesystem. Location conditions are optional and can be set at one of several levels of granularity, including on a specific resource (a dataset or file, for example), a Project, or an entire space. For example, you can configure a Compass export checkpoint to only be shown when a user tries to export resources within a specific Project.
- User submitting checkpoint: A
User submitting checkpointcondition specifies that the interacting user is a certain user or a member of a certain group. For example, you can configure a Build log export checkpoint to apply to members of an administration group; only members of that specific group will see the checkpoint when attempting to export a build log. - Selected user or group: A
Selected user or groupcondition specifies that a specific user or group was selected as part of the interaction. For groups, you can further configure whether the condition should also apply to its member groups. For example, you can configure a Group member addition checkpoint to only appear when a user is being added to a sensitiveAdministratorsgroup or one of its member groups. - Markings: A marking condition specifies that the user is interacting with a certain marking or on a resource with that marking. For example, you can configure a Compass export checkpoint to only appear when a user attempts to export resources that have a given marking.
- Action type: An action type condition specifies that a specific action type is involved in the user interaction. For example, you can use this matcher type to restrict a Submit action checkpoint to only apply to submissions of a specific action type.
- Object set: An object set condition specifies that the user is interacting with an object set matching specified conditions. For example, you can configure an Object set export checkpoint to only be shown when a user tries to export an object set containing an instance of a specific object type. There are several variants of this matcher type:
- Object type: Matches object sets containing at least one instance of the chosen object type.
- Type group: Matches object sets containing at least one instance of an object type in the chosen object type group.
- Ontology: Matches object sets containing at least one object in the chosen Ontology.
- Datasource location: Matches object sets containing at least one instance of an object type backed by a datasource matching the chosen location.
- Datasource marking: Matches object sets containing at least one instance of an object type backed by a datasource marked with the chosen marking.
- Saved exploration or list: Matches when a specific saved exploration or list is exported.
These conditions can optionally be negated:
- Matchers (
AND): If theANDoption is selected, the checkpoint will show up only if the condition is true. Every newANDwill further restrict where the checkpoint appears. - Exemption matchers (
NOT): If theNOToption is selected, the checkpoint will only show up if the condition is false.
You can specify only one matcher of each type per checkpoint configuration, but there is no limit on the number of groups, users, resources, or markings you can exempt with exemption matchers.
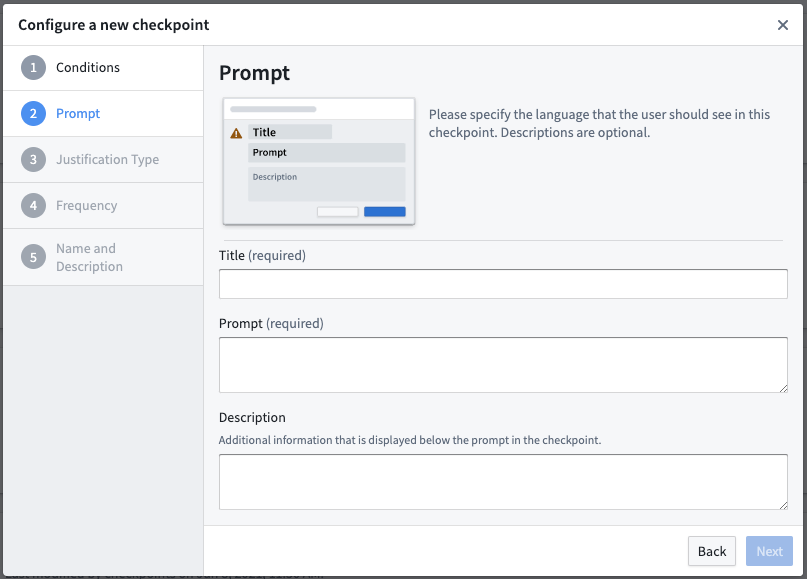
Configure checkpoint prompt
The next step is to define the language associated with the checkpoint. This allows you to customize how the checkpoint will appear to a user. For example, the prompt can remind users of policies and best practices for downloading, or let them know that they are attempting a sensitive interaction and that their justification will be reviewable.
- Checkpoint title (required): This field will be the title of the checkpoint. Use less than 45 characters to render fully within the checkpoint.
- Checkpoint prompt (required): This field contains the prompt for the justification that a user will need to provide in this checkpoint.
- Checkpoint description: This field is optional and will appear on the checkpoint in lighter text between the checkpoint prompt and justification.
:::callout{theme="success"} The checkpoint description and prompt fields support Markdown syntax. You can use Markdown to include rich text formatting, bullet points, or links in the checkpoint. :::
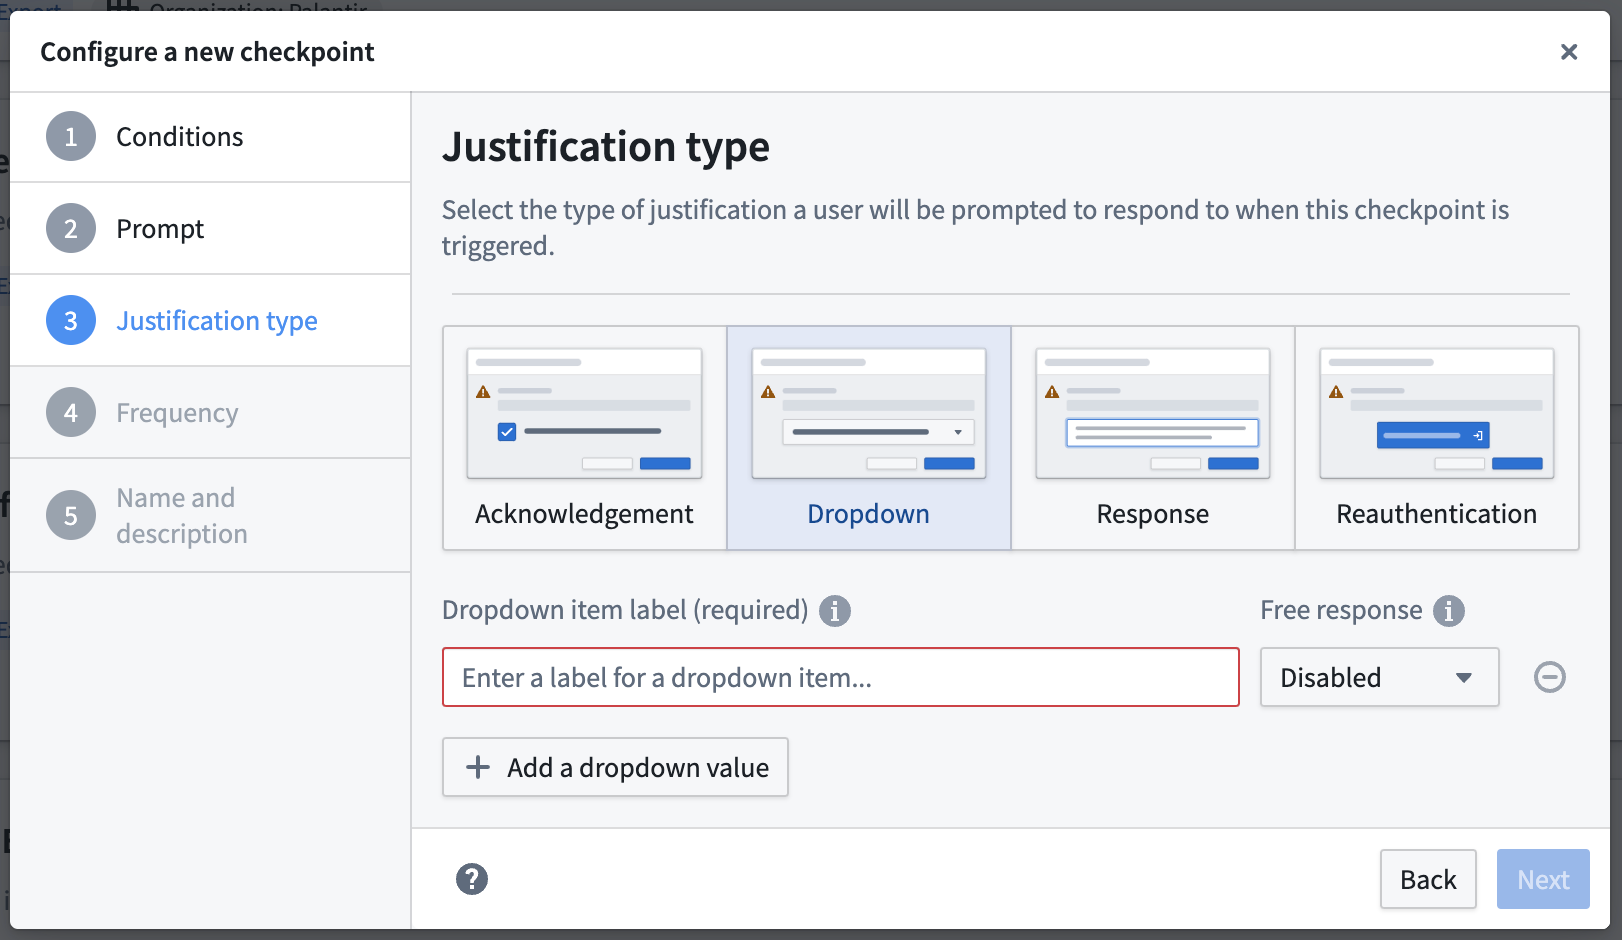
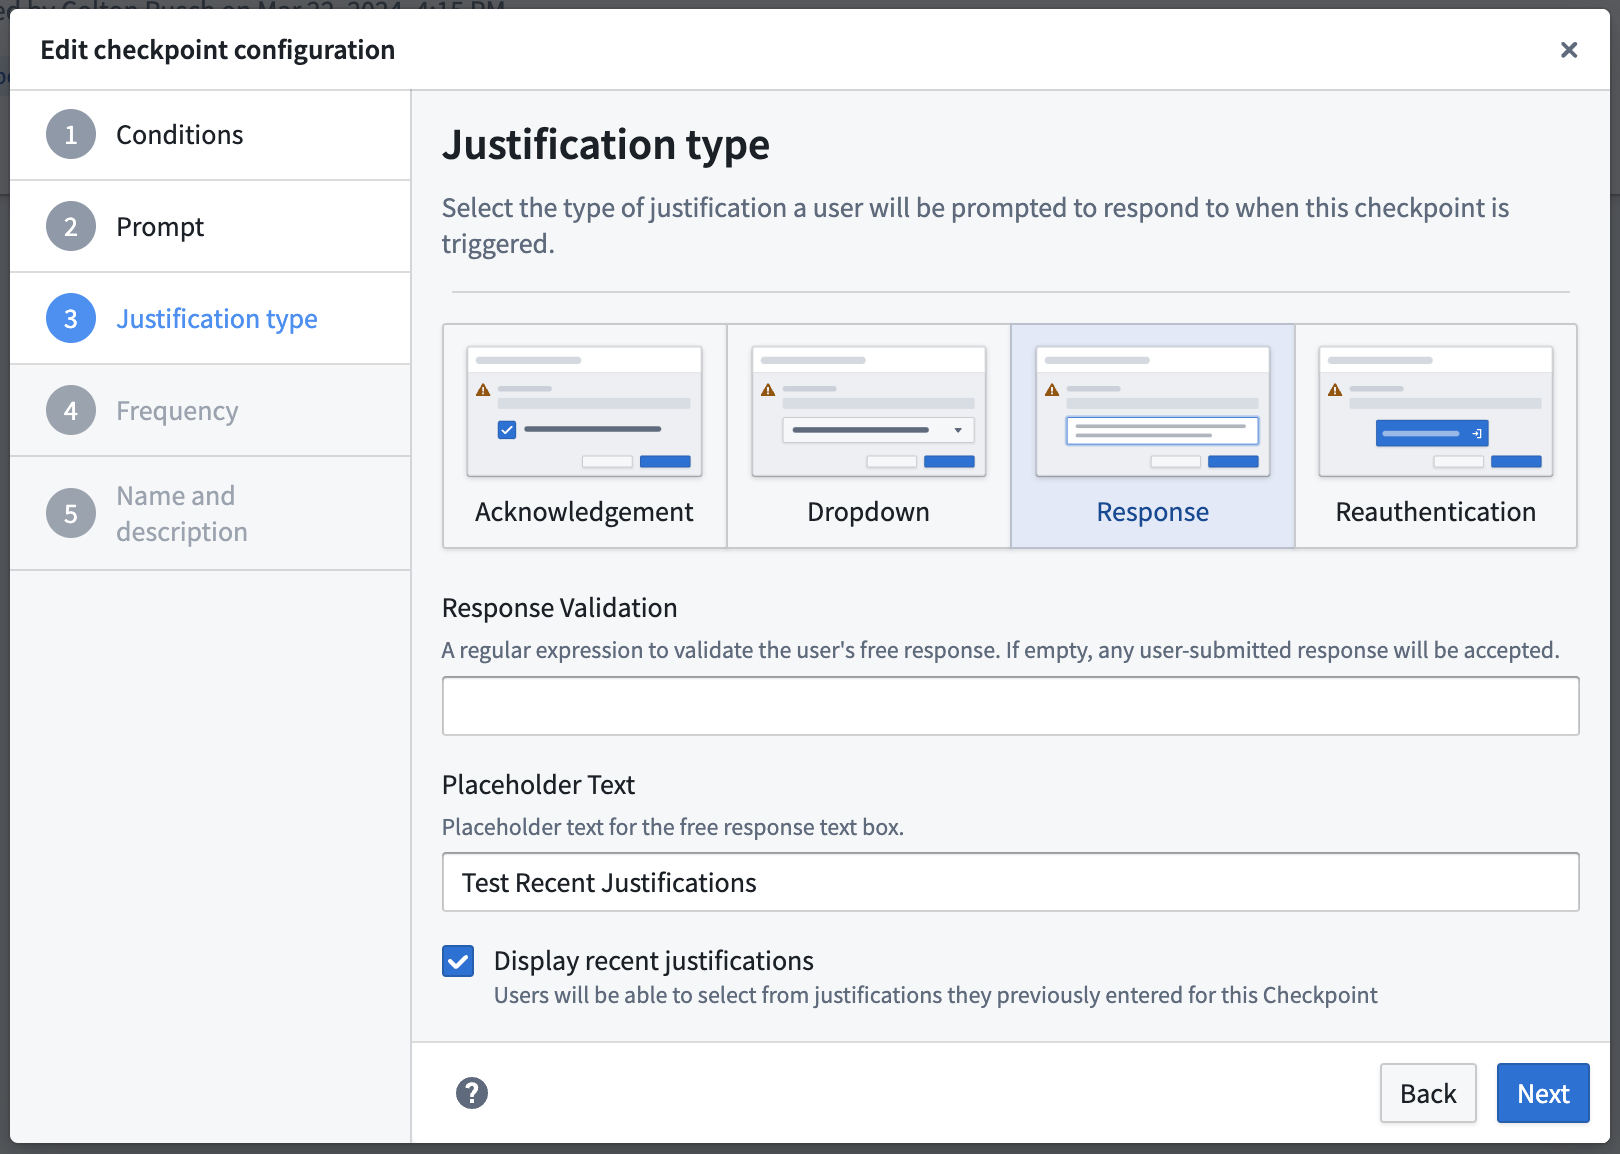
Configure checkpoint justification type
Under this section, you will be asked to define how the user should submit their justification. Different justification types offer flexibility around how much information you might want a user to provide before the interaction. There are multiple ways to submit a justification to a checkpoint:
- Acknowledgment: This will allow users to submit a justification by checking on a checkbox. Use the Checkbox Text field to enter the text that will display next to the checkbox.
- Response: This will allow users to submit a justification by entering a free-text response. Use the Response Validation field to provide a regular expression to validate users' free-text responses. If left empty, any user-submitted response will be accepted.
- Dropdown: This will allow users the possibility to select one or more justifications based on predefined dropdown values. These values can also be complemented by an optional or mandatory free-text response(s). There is no limit to how many dropdown values can be created. If users can select multiple options, the dropdown will be presented as a set of checkboxes to the user.
- Reauthentication: This will allow users to submit a justification by reauthenticating with the platform. A checkpoint with a reauthentication justification will prompt users to reauthenticate with the identity provider configured for them in Control Panel. Reauthentication justifications are not available for Login or Scoped session select checkpoint types.
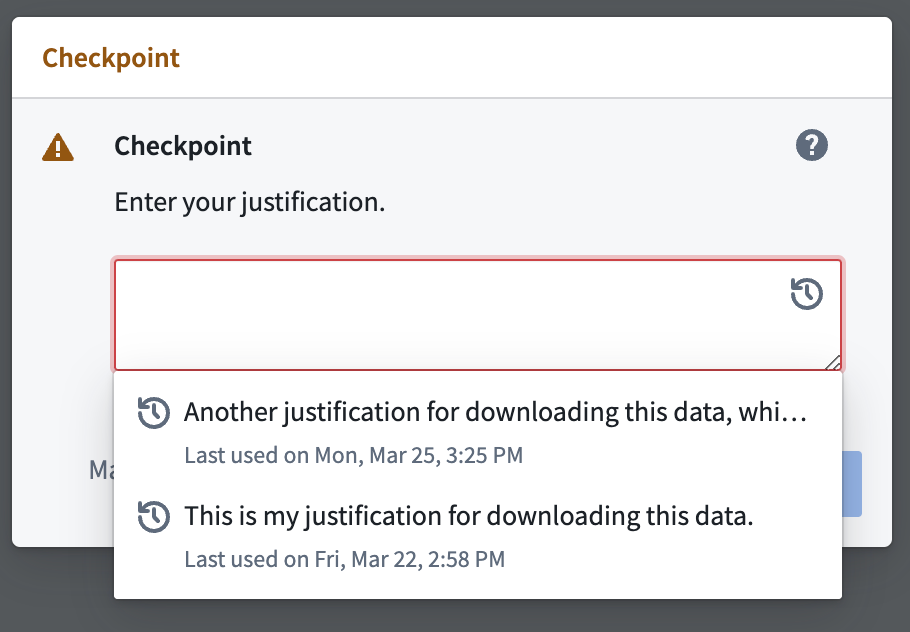
Configure recent justifications
For Response and Dropdown justification types, you can optionally choose to Display recent justifications. Enabling this option for a given free-text response field will allow users to auto-populate their free-text response by selecting one of their 5 most recently submitted justifications from the past month for this checkpoint configuration.
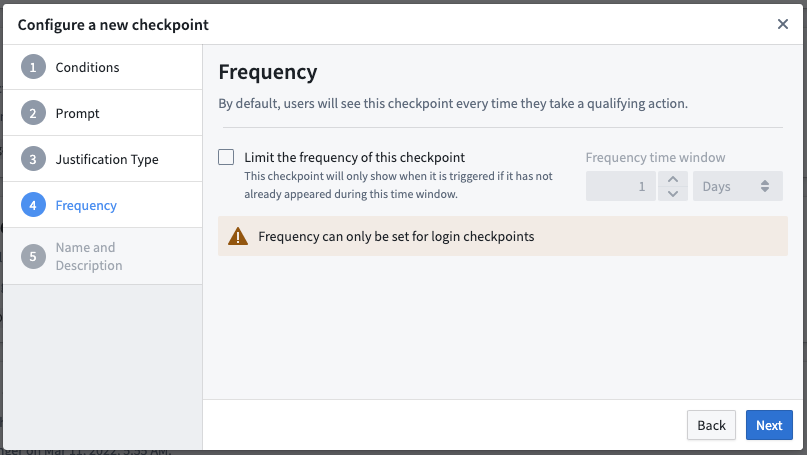
Configure checkpoint frequency
:::callout{theme="neutral"} This step is only available for Login checkpoints. :::
By default, users will see the checkpoint every time they have an interaction that meets all of the configured conditions. Under this section, you can specify how frequently a checkpoint should show up for a user. You can configure the checkpoint to display for a user only after some specified amount of time has passed since the user last saw the same checkpoint.
Configure checkpoint name and description
In this final section, you will be asked to provide a name and description for this checkpoint configuration. Other users who can create and edit checkpoint configurations will be able to see these details, but users who see and satisfy the checkpoint will not be able to see the name and description.
- Checkpoint name (required): This will be the title of the newly created checkpoint configuration, which will appear in the configuration tab in the Checkpoints application.
- Checkpoint description: If filled, this field should provide more information about what the checkpoint configuration aims to achieve to raise situational awareness for other reviewers. For example, the description could specify data governance policies that this checkpoint configuration enforces.

中文翻译
配置检查点(Checkpoint)
检查点允许Foundry管理员通过创建检查点配置,要求用户对各类Foundry操作提交合理性说明。本指南将带你逐步完成新建检查点配置的全流程。
配置检查点触发条件
新建检查点配置的第一步是确定触发用户看到检查点的条件。
必填条件
每个检查点配置都必须设置以下条件:
- 检查点类型(Checkpoint type): 选择需要触发检查点的操作类型,支持选择多个检查点类型。
- 作用范围(Scope): 选择组织(Organization)或空间(Space),以此划定哪些用户操作需要触发检查点。
:::callout{theme="neutral" title="登录检查点额外配置步骤"} 要使用登录(Login)类型的检查点,你需要先在控制面板的异步用户管理器板块中启用Checkpoints Login 异步用户管理器(Asynchronous User Manager, AUM)。 :::
组织级作用范围
配置为组织级作用范围的检查点,仅会对属于该组织的用户触发,不会向该组织的访客用户展示。
要配置组织级作用范围的检查点,你需要在控制面板中拥有该组织的数据治理专员(Data governance officer) 角色(Role)权限。
空间级作用范围
配置为空间级作用范围的检查点,仅会在用户操作该空间内的资源时触发,与用户所属组织无关。部分检查点类型(例如登录(Login))不涉及空间内资源的操作,因此无法配置为空间级作用范围。
要配置空间级作用范围的检查点,你需要持有包含Administer resource-scoped checkpoint configurations操作(Operation)权限的角色(Role)。如果你配置的检查点使用位置匹配器定向到特定资源,你需要持有该资源的Owner角色,或其所属空间的Space Administrator角色。如果你配置的检查点不包含位置匹配器,你需要持有该空间本身的Space Administrator角色。
附加条件
部分检查点类型支持添加附加条件,更精细地控制检查点对用户的触发时机。你可以通过这些附加条件创建更有针对性的检查点,定向触发平台内特定操作的校验,或者为某一类操作设置多个检查点。
不同的检查点类型支持的条件类型不同。如果一个检查点配置包含多个检查点类型,则仅能使用所有这些检查点类型共同支持的条件类型。可用的附加条件包括:
- 位置(Locations): 位置条件指定检查点仅在用户操作文件系统特定位置的资源时触发。位置条件为可选项,支持多个粒度层级的设置,包括特定资源(Resource)(例如数据集或文件)、项目(Project) 或整个空间(Space)。举例来说,你可以配置Compass export检查点,仅在用户尝试导出指定项目内的资源时触发。
- 检查点提交用户(User submitting checkpoint):
User submitting checkpoint条件指定检查点仅在操作用户为特定用户或特定用户组成员时触发。举例来说,你可以配置Build log export检查点,仅对管理员组的成员生效:只有该组的成员尝试导出构建日志时才会看到检查点。 - 选定用户或用户组(Selected user or group):
Selected user or group条件指定检查点仅在操作中选中了特定用户或用户组时触发。针对用户组,你还可以进一步配置条件是否同时作用于其下属子用户组。举例来说,你可以配置Group member addition检查点,仅在用户被添加到敏感的Administrators组或其下属子组时触发。 - 标记(Marking): 标记条件指定检查点仅在用户操作特定标记,或带有该标记的资源时触发。举例来说,你可以配置Compass export检查点,仅在用户尝试导出带有指定标记的资源时触发。
- 操作类型(Action type): 操作类型条件指定用户操作涉及特定操作类型(Action type)时触发检查点。举例来说,你可以使用该匹配器将Submit action检查点的生效范围限制为仅针对特定操作类型的提交。
- 对象集(Object set): 对象集条件指定检查点仅在用户操作符合指定条件的对象集时触发。举例来说,你可以配置Object set export检查点,仅在用户尝试导出包含特定对象类型实例的对象集时触发。该匹配器类型包含多个子类:
- 对象类型(Object type): 匹配包含至少一个选定对象类型实例的对象集。
- 类型组(Type group): 匹配包含至少一个属于选定对象类型组(Object type group)的对象类型实例的对象集。
- 本体(Ontology): 匹配包含至少一个属于选定本体的对象的对象集。
- 数据源位置(Datasource location): 匹配包含至少一个对象类型实例的对象集,且支撑该对象类型的数据源符合选定位置要求。
- 数据源标记(Datasource marking): 匹配包含至少一个对象类型实例的对象集,且支撑该对象类型的数据源带有选定标记。
- 已保存探索或列表(Saved exploration or list): 匹配导出特定已保存探索(Saved exploration)或列表(List)的操作。
这些条件支持设置反向匹配:
- 匹配器(
AND): 选择AND选项时,仅当条件为真时才会触发检查点。每新增一个AND条件都会进一步缩小检查点的触发范围。 - 豁免匹配器(
NOT): 选择NOT选项时,仅当条件为假时才会触发检查点。
每个检查点配置的同类型匹配器仅能设置一个,但你可以通过豁免匹配器设置不限数量的豁免用户组、用户、资源或标记。
配置检查点提示内容
下一步是定义检查点关联的文案内容,你可以自定义检查点对用户的展示样式。例如,提示内容可以提醒用户下载相关的政策和最佳实践,或者告知用户正在进行敏感操作,其提交的合理性说明会被存档审核。
- 检查点标题(Checkpoint title,必填): 该字段为检查点的标题,建议字符数不超过45,以保证在检查点弹窗中完整展示。
- 检查点提示语(Checkpoint prompt,必填): 该字段为用户在检查点中需要提交合理性说明的提示内容。
- 检查点描述(Checkpoint description): 该字段为可选项,会以浅灰色文字展示在检查点提示语和合理性说明输入框之间。
:::callout{theme="success"} 检查点描述和提示语字段支持Markdown语法,你可以使用Markdown添加富文本格式、项目符号或链接。 :::
配置检查点合理性说明提交类型
在该板块中,你需要定义用户提交合理性说明的方式。不同的提交类型可以灵活适配你对用户操作前需要提交的信息丰富度的要求。检查点支持多种合理性说明提交方式:
- 确认(Acknowledgment): 用户勾选复选框即可完成合理性说明提交,你可以在Checkbox Text字段中设置复选框旁边展示的提示内容。
- 自定义回复(Response): 用户需要输入自由文本内容完成合理性说明提交,你可以在Response Validation字段中设置正则表达式,校验用户输入的自由文本是否符合要求。如果留空,将接受用户提交的任意内容。
- 下拉选择(Dropdown): 用户可以从预定义的下拉选项中选择一个或多个合理性说明,还可以搭配可选或必填的自由文本补充内容。下拉选项的数量没有限制,如果允许用户选择多个选项,下拉选择会以复选框组的形式展示给用户。
- 重新认证(Reauthentication): 用户需要通过平台重新认证即可完成合理性说明提交。配置了重新认证提交方式的检查点,会提示用户使用控制面板中为其配置的身份提供商(Identity Provider)重新登录。Login或Scoped session select检查点类型不支持重新认证提交方式。
配置近期合理性说明复用
针对自定义回复和下拉选择类型的合理性说明,你可以选择开启Display recent justifications功能。为自由文本回复字段开启该功能后,用户可以选择过去一个月内为该检查点配置提交的最近5条合理性说明,自动填充输入框。
配置检查点触发频率
:::callout{theme="neutral"} 该步骤仅适用于Login类型的检查点。 :::
默认情况下,用户每次进行符合所有配置条件的操作时都会触发检查点。在该板块中,你可以指定检查点对用户的触发频率,设置为仅当用户距离上一次看到同一检查点的时间超过指定时长时,才会再次触发。
配置检查点名称和描述
在最后一个板块中,你需要为该检查点配置设置名称和描述。其他拥有检查点配置创建和编辑权限的用户可以看到这些信息,但看到并完成检查点校验的普通用户无法查看该名称和描述。
- 检查点名称(Checkpoint name,必填): 这是你新建的检查点配置的标题,会展示在检查点应用的配置标签页中。
- 检查点描述(Checkpoint description): 选填,该字段应该说明该检查点配置的设计目的,帮助其他审核人员了解上下文。例如,描述可以注明该检查点配置落地的数据治理政策要求。