Iceberg with Jupyter® notebook in Code Workspaces(在 Code Workspaces 中使用 Jupyter® notebook 操作 Iceberg)
You can interact with Iceberg tables from a Jupyter® notebook in Code Workspaces using PyIceberg, SQL, or Spark.
:::callout{theme="neutral"} For virtual Iceberg tables, SQL does not require you to add the source to the workspace, meaning you do not need to enable code imports on the source. This may be your preferred option if the source should not be used in code. :::
PyIceberg
Follow the instructions below to read and write Iceberg tables using PyIceberg in a Jupyter® notebook:
- Open a Jupyter® workspace in Code Workspaces.
- Select Add > Read data from the Data panel to add the Iceberg table to your workspace.
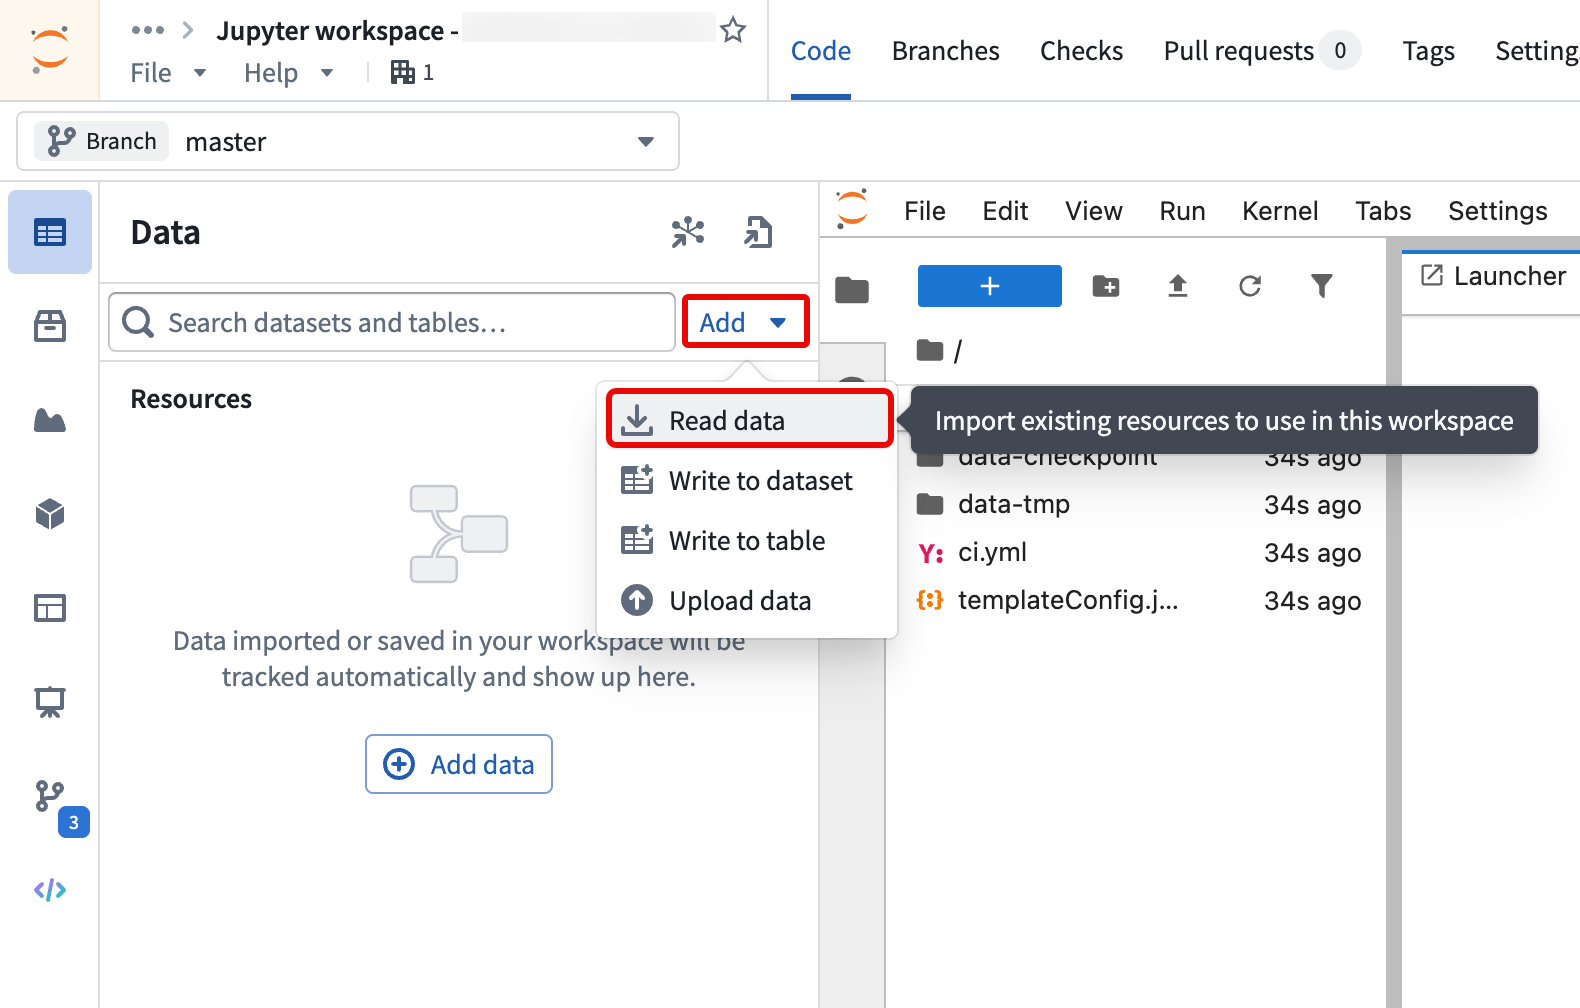
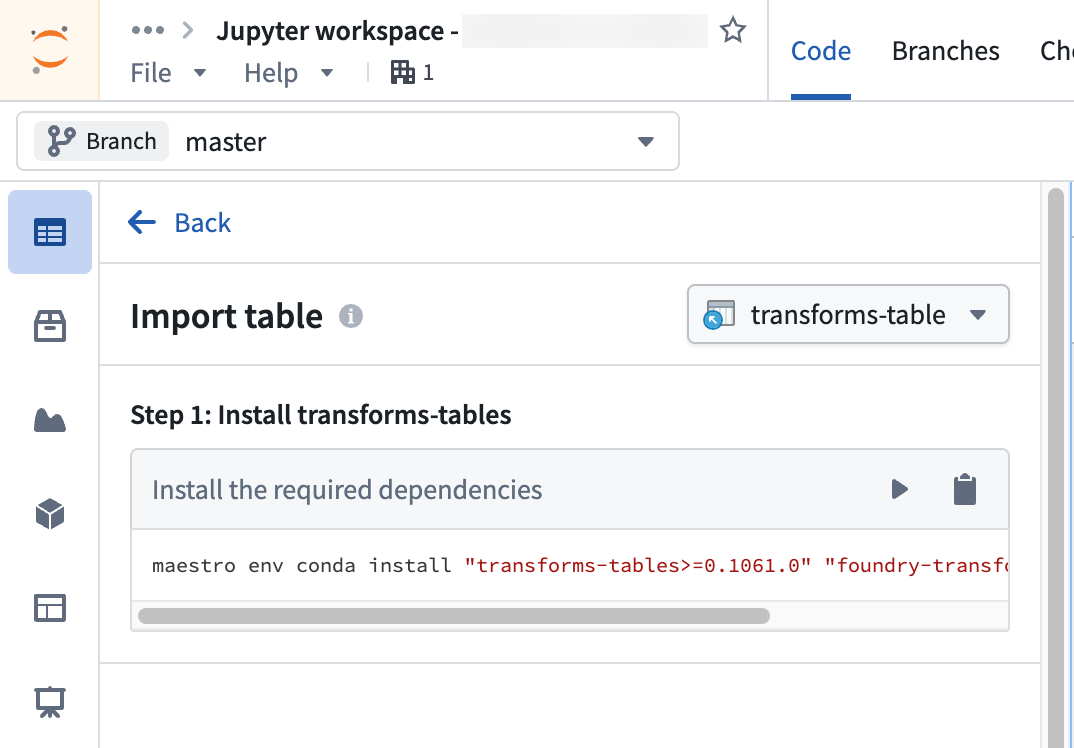
- Follow the steps outlined in the Import table section of the Data panel to install the required client libraries, add an alias for the table, and copy code snippets to interact with your data.
SQL
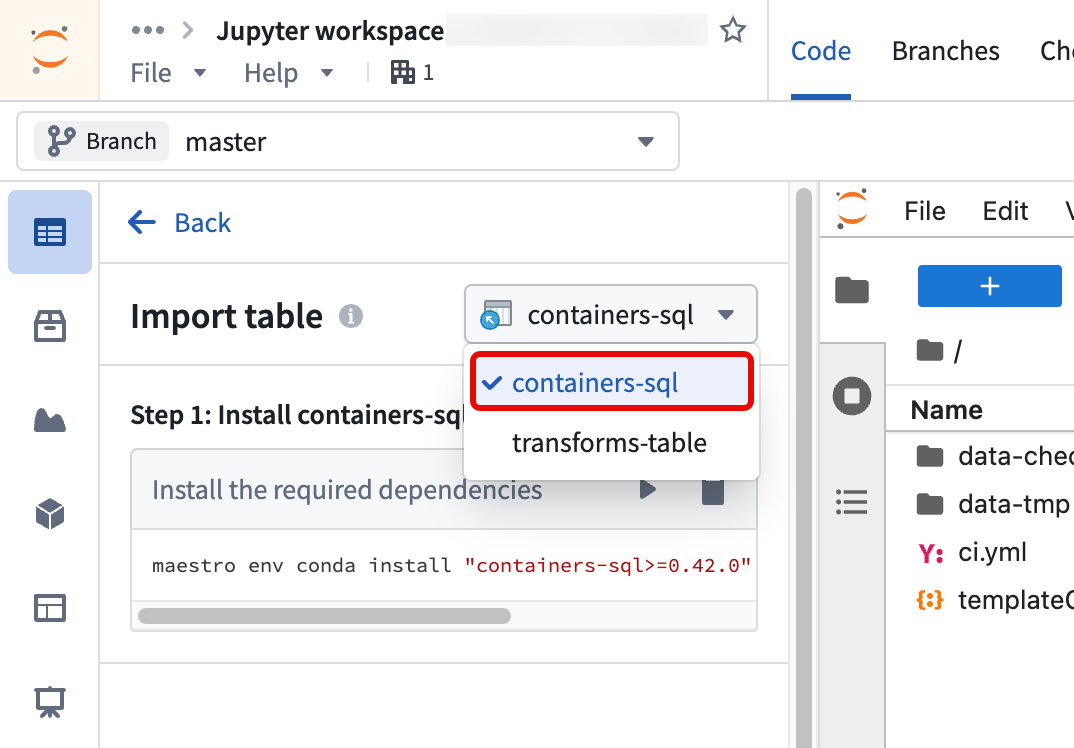
Follow the same steps above to query Iceberg tables using SQL in a Jupyter® notebook. After you select Read data to add the Iceberg table to your workspace, switch the mode to containers-sql instead of transforms-table.
Learn more about how to query tabular datasets with SQL in Code Workspaces.
Spark (advanced usage)
Follow the instructions in the sections below to read and write to Iceberg tables using Spark in a Jupyter® notebook.
Set up Code Workspaces to use Iceberg
- PySpark setup: Set up a code workspace to use PySpark following the instructions in the Code Workspaces FAQ documentation.
- Upload Iceberg JARs: Download the
Spark 3.5 with Scala 2.12andaws-bundleJARs from Iceberg's releases page ↗. Create a new folder called/libs, and upload the JARs into this folder. - Network policy: Import the network policy for your Iceberg storage bucket into your code workspace.
Example Jupyter® notebook code
To begin, create a Spark session. Note that running this code will prompt you to enter a user token, which can be generated in your account settings. See User-generated tokens for a step-by-step guide on creating a token.
from pyspark.sql import SparkSession
from getpass import getpass

spark = (
    SparkSession.builder
        .master("local[*]")
        .appName("foundry")
        .config("spark.jars", "file:///home/user/repo/libs/iceberg-spark-runtime-3.5_2.12-1.9.1.jar,file:///home/user/repo/libs/iceberg-aws-bundle-1.9.1.jar")
        .config("spark.sql.extensions", "org.apache.iceberg.spark.extensions.IcebergSparkSessionExtensions")
        .config("spark.sql.catalog.foundry", "org.apache.iceberg.spark.SparkCatalog")
        .config("spark.sql.catalog.foundry.type", "rest")
        .config("spark.sql.catalog.foundry.uri", "https://<your_foundry_url>/iceberg")
        .config("spark.sql.catalog.foundry.default-namespace", "foundry")
        .config("spark.sql.catalog.foundry.token", getpass("Foundry token:"))
        .config("spark.sql.defaultCatalog", "foundry")
        .getOrCreate()
)
Iceberg's documentation ↗ provides more context on the above parameters which are used to establish connectivity to the Iceberg catalog. Remember to update the spark.jars filepaths using the names of the JARs you uploaded in Step 2.
Of these, the Foundry-specific Iceberg catalog parameters ↗ are:
| Parameter | Value | Description |
|---|---|---|
spark.sql.catalog.foundry |
org.apache.iceberg.spark.SparkCatalog |
Catalog implementation class ↗. |
spark.sql.catalog.foundry.type |
rest |
Underlying catalog implementation type, i.e. REST |
spark.sql.catalog.foundry.uri |
https://<your_foundry_url>/iceberg |
URL for the REST catalog |
spark.sql.catalog.foundry.default-namespace |
foundry |
Default namespace for the catalog |
spark.sql.catalog.foundry.token |
getpass("Foundry token:") |
Prompts for token access credentials |
:::callout{theme="warning" title="Escaping whitespace"}
If your path contains a whitespace, you must ensure that the space is correctly escaped. With Spark, you can use backticks (`) to escape whitespace, for example `/.../My folder/Iceberg table`. With PyIceberg, you can use URL encoding.
:::
Now you can use your Spark session to read and write from your Iceberg tables. For example, following the Iceberg documentation's quickstart guide ↗, you can create a table and insert rows.
```python tab="PySpark" from pyspark.sql.types import DoubleType, FloatType, LongType, StructType, StructField, StringType schema = StructType([ StructField("vendor_id", LongType(), True), StructField("trip_id", LongType(), True), StructField("trip_distance", FloatType(), True), StructField("fare_amount", DoubleType(), True), StructField("store_and_fwd_flag", StringType(), True) ])
df = spark.createDataFrame([], schema)
df.writeTo("/.../taxis").create()
schema = spark.table("/.../taxis").schema
data = [
(1, 1000371, 1.8, 15.32, "N"),
(2, 1000372, 2.5, 22.15, "N"),
(2, 1000373, 0.9, 9.01, "N"),
(1, 1000374, 8.4, 42.13, "Y")
]
df = spark.createDataFrame(data, schema)
df.writeTo("/.../taxis").append()
```python tab="Spark SQL"
spark.sql("""
        CREATE TABLE `/.../taxis`
        (
        vendor_id bigint,
        trip_id bigint,
        trip_distance float,
        fare_amount double,
        store_and_fwd_flag string
        )
        PARTITIONED BY (vendor_id);
    """)

spark.sql("""
        INSERT INTO `/.../taxis`
        VALUES (1, 1000371, 1.8, 15.32, 'N'), (2, 1000372, 2.5, 22.15, 'N'), (2, 1000373, 0.9, 9.01, 'N'), (1, 1000374, 8.4, 42.13, 'Y');
    """)
Jupyter®, JupyterLab®, and the Jupyter® logos are trademarks or registered trademarks of NumFOCUS.
All third-party trademarks (including logos and icons) referenced remain the property of their respective owners. No affiliation or endorsement is implied.
中文翻译
在 Code Workspaces 中使用 Jupyter® notebook 操作 Iceberg
您可以通过 PyIceberg、SQL 或 Spark,在 Code Workspaces 的 Jupyter® notebook 中与 Iceberg 表进行交互。
:::callout{theme="neutral"} 对于虚拟 Iceberg 表,SQL 无需将数据源添加到工作区,这意味着您无需在数据源上启用代码导入。如果该数据源不应在代码中使用,这可能是您的首选方案。 :::
PyIceberg
按照以下说明,在 Jupyter® notebook 中使用 PyIceberg 读取和写入 Iceberg 表:
- 在 Code Workspaces 中打开一个 Jupyter® 工作区。
- 从 数据 面板中选择 添加 > 读取数据,将 Iceberg 表添加到您的工作区。
- 按照 数据 面板中 导入表 部分的步骤,安装所需的客户端库,为表添加别名,并复制代码片段以与您的数据进行交互。
SQL
按照 上述相同步骤,在 Jupyter® notebook 中使用 SQL 查询 Iceberg 表。在选择 读取数据 将 Iceberg 表添加到工作区后,将模式切换为 containers-sql 而不是 transforms-table。
了解更多关于如何在 Code Workspaces 中使用 SQL 查询表格数据集的信息。
Spark(高级用法)
按照以下各节的说明,在 Jupyter® notebook 中使用 Spark 读取和写入 Iceberg 表。
设置 Code Workspaces 以使用 Iceberg
- PySpark 设置: 按照 Code Workspaces 常见问题文档 中的说明,设置一个使用 PySpark 的代码工作区。
- 上传 Iceberg JAR 包: 从 Iceberg 的发布页面 ↗ 下载
Spark 3.5 with Scala 2.12和aws-bundleJAR 包。创建一个名为/libs的新文件夹,并将这些 JAR 包上传到该文件夹中。 - 网络策略: 将 Iceberg 存储桶的网络策略导入到您的代码工作区中。
Jupyter® notebook 代码示例
首先,创建一个 Spark 会话。请注意,运行此代码将提示您输入用户令牌(token),该令牌可在您的账户设置中生成。有关创建令牌的分步指南,请参阅 用户生成的令牌。
from pyspark.sql import SparkSession
from getpass import getpass

spark = (
    SparkSession.builder
        .master("local[*]")
        .appName("foundry")
        .config("spark.jars", "file:///home/user/repo/libs/iceberg-spark-runtime-3.5_2.12-1.9.1.jar,file:///home/user/repo/libs/iceberg-aws-bundle-1.9.1.jar")
        .config("spark.sql.extensions", "org.apache.iceberg.spark.extensions.IcebergSparkSessionExtensions")
        .config("spark.sql.catalog.foundry", "org.apache.iceberg.spark.SparkCatalog")
        .config("spark.sql.catalog.foundry.type", "rest")
        .config("spark.sql.catalog.foundry.uri", "https://<your_foundry_url>/iceberg")
        .config("spark.sql.catalog.foundry.default-namespace", "foundry")
        .config("spark.sql.catalog.foundry.token", getpass("Foundry token:"))
        .config("spark.sql.defaultCatalog", "foundry")
        .getOrCreate()
)
Iceberg 的文档 ↗ 提供了关于上述参数的更多背景信息,这些参数用于建立与 Iceberg 目录的连接。请记得使用您在步骤 2 中上传的 JAR 包名称更新 spark.jars 文件路径。
其中,Foundry 特定的 Iceberg 目录参数 ↗ 如下:
| 参数 | 值 | 描述 |
|---|---|---|
spark.sql.catalog.foundry |
org.apache.iceberg.spark.SparkCatalog |
目录 实现类 ↗。 |
spark.sql.catalog.foundry.type |
rest |
底层目录实现类型,即 REST |
spark.sql.catalog.foundry.uri |
https://<your_foundry_url>/iceberg |
REST 目录的 URL |
spark.sql.catalog.foundry.default-namespace |
foundry |
目录的默认命名空间 |
spark.sql.catalog.foundry.token |
getpass("Foundry token:") |
提示输入令牌访问凭据 |
:::callout{theme="warning" title="转义空格"}
如果您的路径包含空格,必须确保正确转义该空格。使用 Spark 时,您可以使用反引号(`)来转义空格,例如 `/.../My folder/Iceberg table`。使用 PyIceberg 时,您可以使用 URL 编码。
:::
现在,您可以使用 Spark 会话从 Iceberg 表中读取数据或向其写入数据。例如,按照 Iceberg 文档的 快速入门指南 ↗,您可以创建一个表并插入行。
```python tab="PySpark" from pyspark.sql.types import DoubleType, FloatType, LongType, StructType, StructField, StringType schema = StructType([ StructField("vendor_id", LongType(), True), StructField("trip_id", LongType(), True), StructField("trip_distance", FloatType(), True), StructField("fare_amount", DoubleType(), True), StructField("store_and_fwd_flag", StringType(), True) ])
df = spark.createDataFrame([], schema)
df.writeTo("/.../taxis").create()
schema = spark.table("/.../taxis").schema
data = [
(1, 1000371, 1.8, 15.32, "N"),
(2, 1000372, 2.5, 22.15, "N"),
(2, 1000373, 0.9, 9.01, "N"),
(1, 1000374, 8.4, 42.13, "Y")
]
df = spark.createDataFrame(data, schema)
df.writeTo("/.../taxis").append()
```python tab="Spark SQL"
spark.sql("""
        CREATE TABLE `/.../taxis`
        (
        vendor_id bigint,
        trip_id bigint,
        trip_distance float,
        fare_amount double,
        store_and_fwd_flag string
        )
        PARTITIONED BY (vendor_id);
    """)

spark.sql("""
        INSERT INTO `/.../taxis`
        VALUES (1, 1000371, 1.8, 15.32, 'N'), (2, 1000372, 2.5, 22.15, 'N'), (2, 1000373, 0.9, 9.01, 'N'), (1, 1000374, 8.4, 42.13, 'Y');
    """)
Jupyter®、JupyterLab® 以及 Jupyter® 标识是 NumFOCUS 的商标或注册商标。
所有第三方商标(包括标识和图标)均归其各自所有者所有。不暗示任何隶属关系或认可。