Getting started(入门)
As you create Workbooks of increasing scale and complexity, you may encounter new challenges:
- You may want to experiment with a Workbook by introducing new changes, but must preserve existing logic and avoid breaking production pipelines.
- You may want to collaborate with a colleague on a Workbook, but need to avoid conflicts when making changes to the same Workbook simultaneously.
Branching provides a solution to these challenges. In this tutorial, we explore the following concepts:
Creating a branch
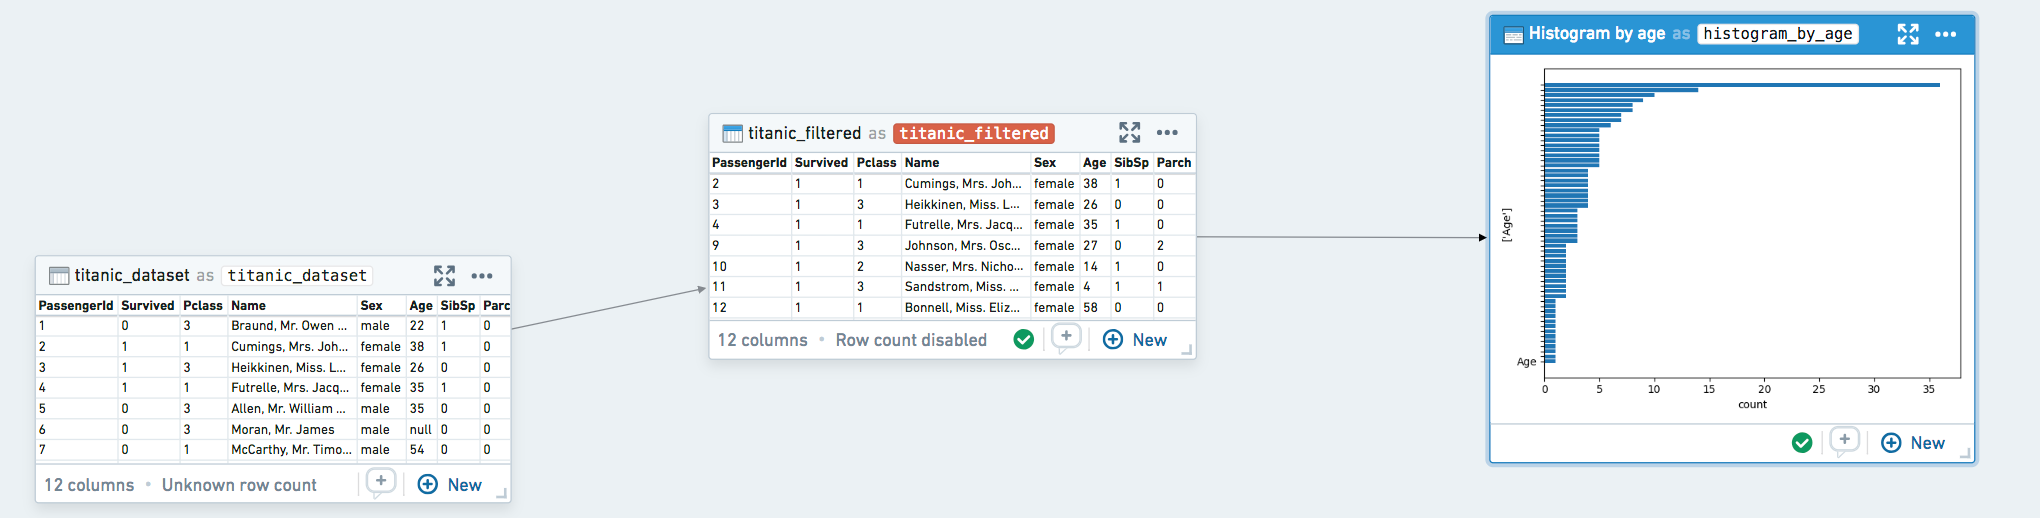
In this example, we’re working on a short pipeline that starts with a dataset of passengers on the Titanic and applies a few filters to it.
:::callout{theme="success" title="Tip"} A branch is a working copy of your Workbook that allows you to make changes safely and incorporate them into the master version later. Learn more about branching. :::
Click the branch menu in the top left of the Workbook, enter the name of your new branch, and click Create. Branch names are commonly prefixed based on the type of change being made (e.g. feature/ or bugfix/), or by your username or initials (e.g. jdoe/ or jd/).

After feature/filter-logic is created, transforms reflect data and logic at the time of branch creation. If master changes, your branch feature/filter-logic will continue to function as before. Likewise, any changes you make on feature/filter-logic will not interfere with logic or data changes on master.

Make any changes on your new branch as you normally would. In this example, we’ll change the logic for a line of filtering code.

Previewing a merge
:::callout{theme="success" title="Tip"} A merge is a copy of the work you’ve done in your branch, combined with the current state of the master copy. This allows you to review changes before incorporating them back into master. :::
When you’re ready to introduce the changes on your branch back into the original branch, click Preview merge in the top right.

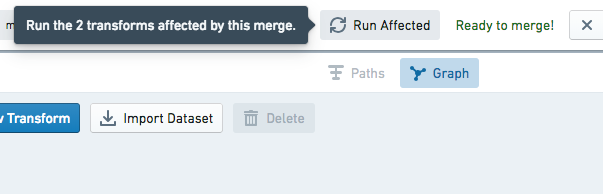
You’re now taken into a merge. In this state, you can continue to make changes to your logic and run transforms until you’re satisfied with the changes that will be introduced. The Run Affected button at the top allows you to run all affected transforms in this Workbook—those with logic changes and anything downstream of them—with a single click.
While in a merge, the sidebar shows changes in row counts or columns that will be introduced through this merge. This can help surface changes your branch has introduced, both in transforms you actually edited as well as downstream transforms.

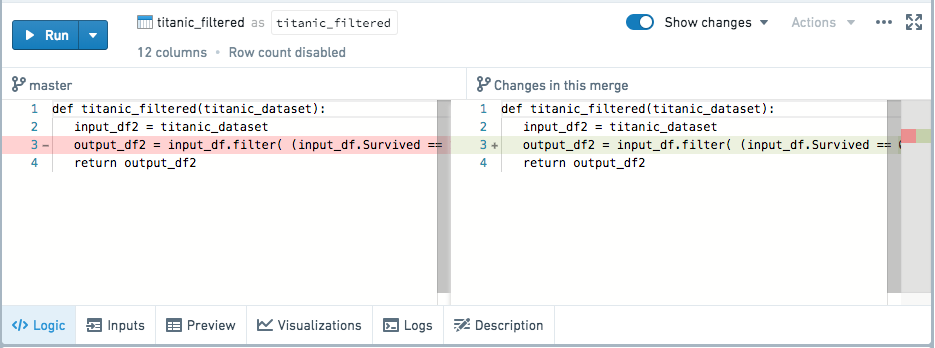
To see what logic changes will be introduced through this merge, select any modified transform and click Show Changes. This will show a split-screen view of the logic that has changed.
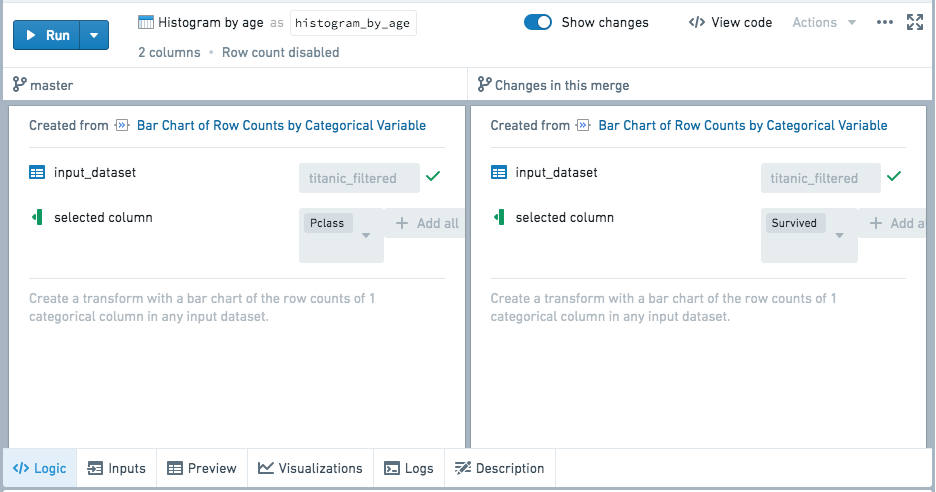
This also works for templates, as shown below:
Completing a merge
When you’re satisfied with the changes you’re introducing, click Merge Branch to finish merging into your master branch. You will be presented with a dialog box with two toggles:

The first toggle allows you to choose whether to copy the transactions from the merging branch into the branch you are merging into. Let's imagine that after branching, we have done additional work on master and committed new transactions on the derived datasets' master branch. If this toggle is set to True, the transactions created on master since the feature/filter-logic branch was created will no longer appear on the dataset after merging.
The second toggle allows you to choose whether to delete the merging branch from the datasets. Note this is different than deleting the workbook branch itself, which is always done with a merge and not configurable. If the second toggle is True, the merging branch will be deleted from the derived datasets created in the Workbook.
Let's say as above, you choose not to copy the data from the merging branch into master. After you click Merge into master, the master branch will be updated with the logic from your merge.
Resolving merge conflicts
As you use branching more frequently, especially while collaborating with colleagues, you may end up modifying the same piece of logic in two different branches. Let’s walk through what happens in this scenario.
When you click Preview merge, if conflicting changes have already been introduced to master, a prompt will indicate that you need to resolve conflicts before proceeding with the merge.

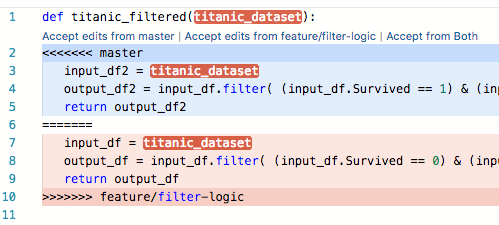
Clicking on the conflicting transform will show a merge conflict view. For code, inline conflict markers allow you to pick which logic you want to use.
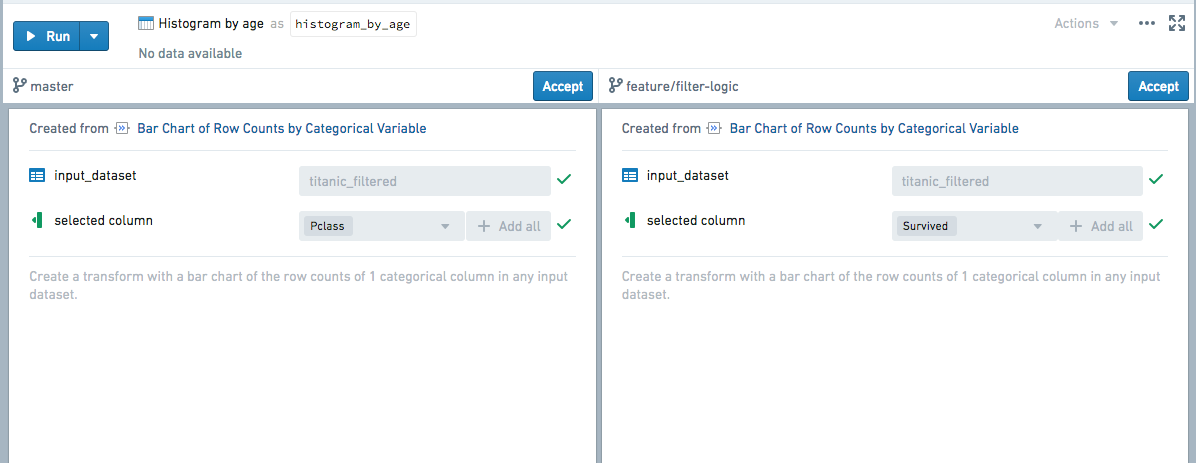
If the conflict involves a template, or a transform has been deleted on one of the branches, you can resolve conflicts using a split-screen view.
After resolving conflicts, you can continue to make further edits and run transforms to verify that your merged logic functions as expected. When you’re ready, click Complete merge to finish merging as usual.
中文翻译
入门
随着您创建的工作簿(Workbook)规模不断扩大、复杂度日益增加,可能会面临一些新的挑战:
- 您可能希望通过引入新更改来对工作簿进行实验,但必须保留现有逻辑并避免破坏生产环境的数据管道(Pipeline)。
- 您可能希望与同事协作处理同一个工作簿,但需要避免在同时修改该工作簿时产生冲突。
分支(Branch)功能为这些挑战提供了解决方案。在本教程中,我们将探讨以下概念:
创建分支
在本例中,我们将处理一个简短的数据管道,该管道以泰坦尼克号乘客数据集(Dataset)为起点,并对其进行一些过滤操作。
:::callout{theme="success" title="Tip"} 分支是工作簿的工作副本,允许您安全地进行更改,并在稍后将其合并到 master 版本中。了解有关分支的更多信息。 :::
点击工作簿左上角的分支菜单,输入新分支的名称,然后点击创建。分支名称通常会根据所做更改的类型添加前缀(例如 feature/ 或 bugfix/),或者使用您的用户名或姓名首字母作为前缀(例如 jdoe/ 或 jd/)。
创建 feature/filter-logic 后,转换(Transform)将反映分支创建时的数据和逻辑。如果 master 发生更改,您的 feature/filter-logic 分支将继续像以前一样运行。同样,您在 feature/filter-logic 上所做的任何更改也不会干扰 master 上的逻辑或数据更改。
您可以像往常一样在新分支上进行任何更改。在本例中,我们将更改一行过滤代码的逻辑。
预览合并
:::callout{theme="success" title="Tip"} 合并(Merge) 是您在分支中所做工作的副本,并与主副本的当前状态相结合。这使您可以在将更改合并回 master 之前对其进行审查。 :::
当您准备好将分支上的更改引入回原始分支时,请点击右上角的预览合并。
现在您将进入合并状态。在此状态下,您可以继续修改逻辑并运行转换,直到对即将引入的更改感到满意为止。顶部的运行受影响项按钮允许您一键运行此工作簿中所有受影响的转换——即逻辑发生更改的转换及其所有下游转换。
在合并状态下,侧边栏会显示通过此次合并将引入的行数或列数变化。这有助于显现您的分支所引入的更改,包括您实际编辑的转换以及下游转换中的变化。
要查看通过此次合并将引入哪些逻辑更改,请选择任何已修改的转换并点击显示更改。这将显示已更改逻辑的分屏视图。
这也适用于模板,如下所示:
完成合并
当您对即将引入的更改感到满意时,点击合并分支以完成向 master 分支的合并。系统将显示一个包含两个切换开关的对话框:
第一个切换开关允许您选择是否将来自合并分支的事务(Transaction)复制到目标分支中。假设在创建分支后,我们在 master 上进行了额外工作,并在派生数据集的 master 分支上提交了新事务。如果将此开关设置为 True,则在合并后,自创建 feature/filter-logic 分支以来在 master 上创建的事务将不再出现在数据集中。
第二个切换开关允许您选择是否从数据集中删除合并分支。请注意,这与删除工作簿分支本身不同,后者在合并时始终会执行且不可配置。如果第二个开关设置为 True,合并分支将从工作簿中创建的派生数据集中删除。
如上所述,假设您选择不将合并分支中的数据复制到 master。点击合并到 master 后,master 分支将使用您合并的逻辑进行更新。
解决合并冲突
随着您更频繁地使用分支功能,尤其是在与同事协作时,您可能最终会在两个不同的分支中修改同一段逻辑。让我们来看看在这种情况下会发生什么。
当您点击预览合并时,如果 master 中已经引入了冲突的更改,系统会提示您需要先解决冲突才能继续合并。
点击冲突的转换将显示合并冲突视图。对于代码,内联冲突标记允许您选择要使用的逻辑。
如果冲突涉及模板,或者某个转换在其中一个分支上被删除,您可以使用分屏视图来解决冲突。
解决冲突后,您可以继续进行进一步编辑并运行转换,以验证合并后的逻辑是否按预期运行。准备就绪后,点击完成合并以像往常一样完成合并。