Merging branches(合并分支)
Merges allow you to stage the changes that will be introduced into the parent branch before deciding to copy them over. If there are logical conflicts between your branch and the parent branch, you can resolve conflicts during the merge and rerun your transforms to check that results are correct.
Throughout the rest of this documentation, we refer to the branch that you are attempting to merge as the source branch, and the branch you are attempting to merge into as the target branch.
Previewing merges

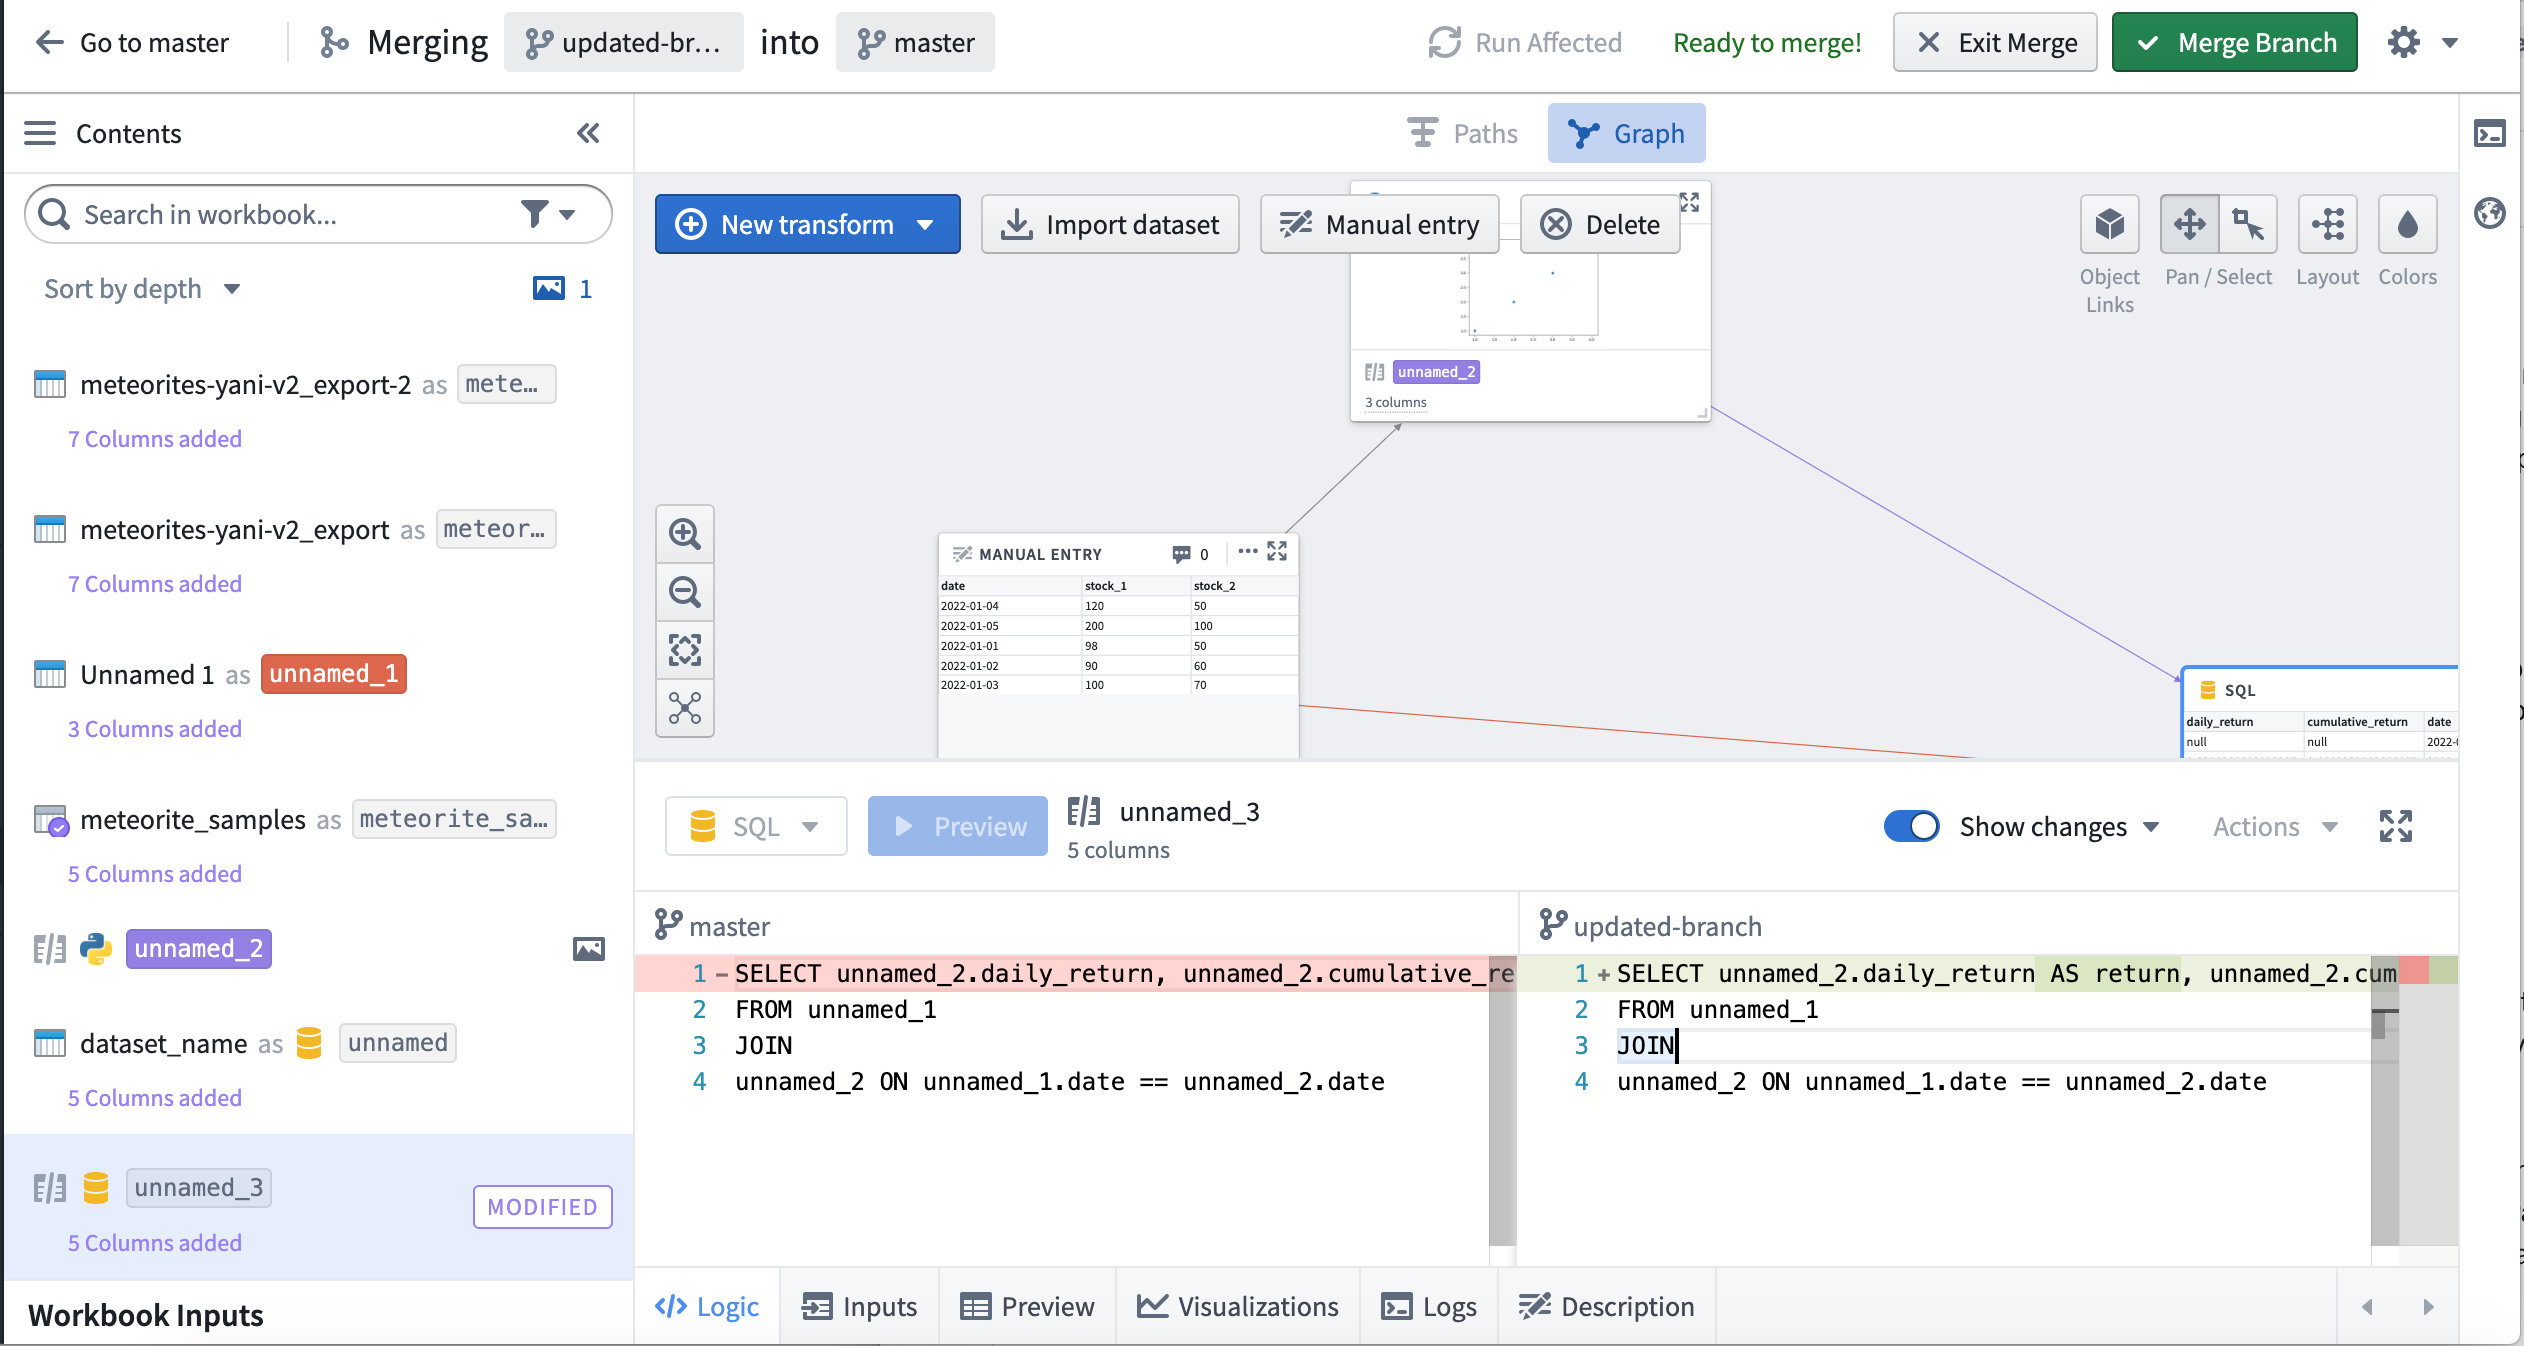
At any point while editing your branch, you can click the Preview merge button in the toolbar to enter a merge state and view changes between the source branch and the target branch. Note that Code Workbook only allows branches to be merged into their immediate parent. After entering the merge, differences between the source and target branch will be highlighted on each transform. Look for Modified and Conflict tags in the Contents panel to see changes. In the below screenshot, code changes between the source branch (on the right) and the target branch (on the left) are highlighted in green.
When you run transforms while merging, Code Workbook automatically creates a merge branch on output datasets. This allows the merge to be isolated from both the target branch and the source branch. These merge branches will appear on your dataset in the form vector-merge-{source}-{target}-{uuid}.
Resolving merge conflicts
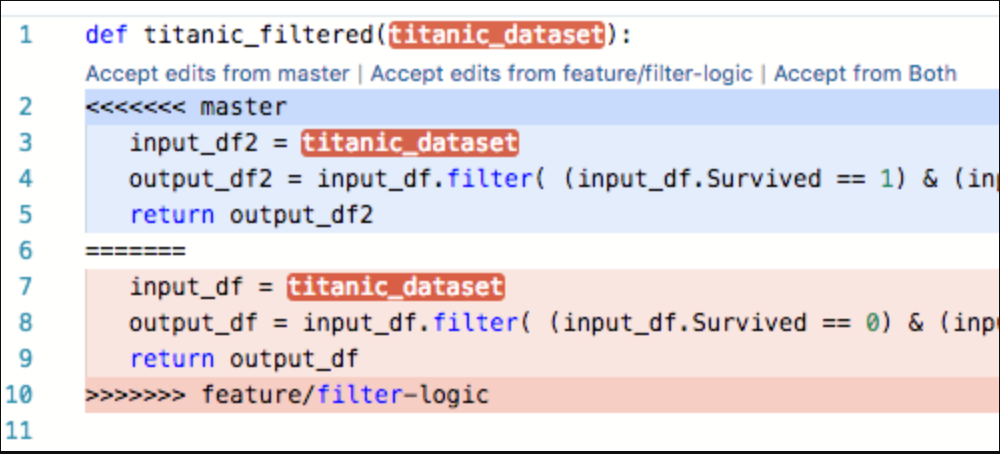
Merge conflicts may arise if the same transform is modified in both the source and target branch. Let’s walk through what happens in this scenario.
After clicking Preview Merge, a prompt will indicate you need to resolve conflicts before proceeding with the merge.

Clicking on the conflicting transform will show a merge conflict view. For code, inline conflict markers allow you to pick which logic to choose.
After resolving the merge conflicts, the Merge branch button will become enabled.
Managing merges
While a branch is being merged, you can use the back button in the top left of the toolbar to go back to the target branch. To go back to the source branch before you started the merge, click Exit merge. Any changes you made in the merge will be removed when exiting.
Note that preparing and exiting merges is completely safe and will not affect changes you have made on your branch - you can freely preview and exit merges to see the changes that will be introduced to the target branch. If changes are introduced on the target branch after you begin your merge, an Update merge button will appear in the toolbar. You can use this button to update your merge with the latest logic from the target branch.
Completing a merge
Once you have resolved conflicts and any other branch-specific checks have succeeded, click Merge branch to introduce changes into your target branch. You will be presented with a dialog with two toggles:
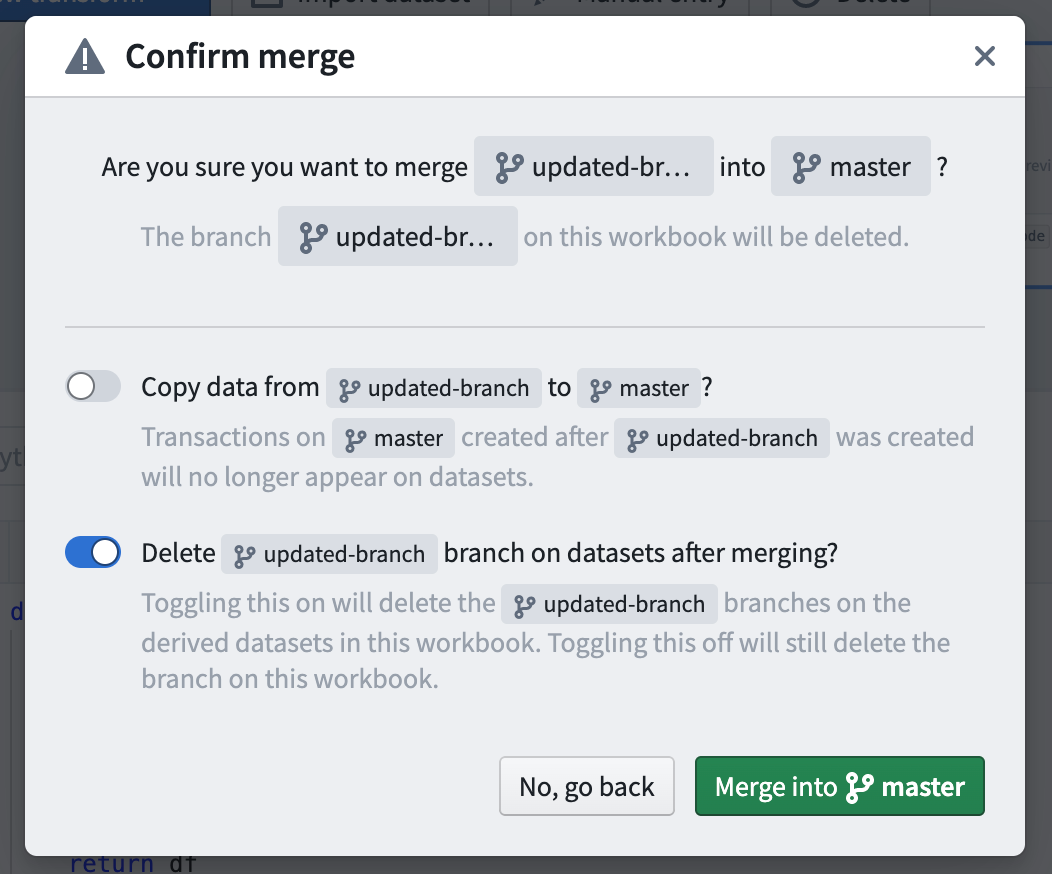
The first toggle allows you to choose whether to copy the transactions from the source branch into the target branch. Let's imagine that after branching, we have done additional work on master and committed new transactions on the derived datasets' master branch. If this toggle is set to True, the transactions created on master since the updated-branch branch was created will no longer appear on the dataset after merging.
The second toggle allows you to choose whether to delete the source branch from the datasets. Note this is different than deleting the workbook branch itself, which is always done with a merge and not configurable. If the second toggle is True, the source branch will be deleted from the derived datasets created in the Workbook.
Completing a merge may take some time. After the merge is completed, the branch you just merged will be deleted automatically, unless it still has child branches.
中文翻译
合并分支
合并(Merges) 允许您在决定将更改复制到父分支之前,暂存即将引入父分支的更改。如果您的分支与父分支之间存在逻辑冲突,您可以在合并期间解决冲突,并重新运行转换(Transforms)以检查结果是否正确。
在本文档的后续内容中,我们将尝试合并的分支称为源分支(Source branch),将尝试合并到的分支称为目标分支(Target branch)。
预览合并
在编辑分支的任何时候,您都可以点击工具栏中的 Preview merge 按钮进入合并状态,并查看源分支与目标分支之间的更改。请注意,Code Workbook 仅允许将分支合并到其直接父分支。进入合并状态后,每个转换上将高亮显示源分支和目标分支之间的差异。在内容面板中查找 Modified 和 Conflict 标签以查看更改。在下面的截图中,源分支(右侧)和目标分支(左侧)之间的代码更改以绿色高亮显示。
在合并期间运行转换时,Code Workbook 会自动在输出数据集上创建一个合并分支(Merge branch)。这使得合并操作能够与目标分支和源分支隔离。这些合并分支将以 vector-merge-{source}-{target}-{uuid} 的形式显示在您的数据集上。
解决合并冲突
如果在源分支和目标分支中修改了同一个转换,则可能会出现合并冲突。让我们来看看在这种情况下会发生什么。
点击 Preview Merge 后,系统会提示您需要先解决冲突才能继续合并。
点击存在冲突的转换将显示合并冲突视图。对于代码,内联冲突标记允许您选择要保留的逻辑。
解决合并冲突后,Merge branch 按钮将变为可用状态。
管理合并
在合并分支时,您可以使用工具栏左上角的返回按钮返回目标分支。要返回到开始合并前的源分支,请点击 Exit merge。退出时,您在合并过程中所做的任何更改都将被清除。
请注意,准备和退出合并是完全安全的,不会影响您在分支上所做的更改——您可以自由地预览和退出合并,以查看即将引入目标分支的更改。如果在开始合并后目标分支引入了新的更改,工具栏中将出现 Update merge 按钮。您可以使用此按钮将目标分支的最新逻辑更新到您的合并中。
完成合并
解决冲突并成功通过所有其他特定于分支的检查后,点击 Merge branch 将更改引入目标分支。系统将显示一个包含两个切换开关的对话框:
第一个切换开关允许您选择是否将事务(Transactions)从源分支复制到目标分支。假设在创建分支后,我们在 master 上进行了额外工作,并在派生数据集的 master 分支上提交了新事务。如果将此开关设置为 True,那么在合并后,自创建 updated-branch 分支以来在 master 上创建的事务将不再显示在数据集上。
第二个切换开关允许您选择是否从数据集中删除源分支。请注意,这与删除工作簿分支本身不同,后者在合并时始终会执行且不可配置。如果第二个开关设置为 True,源分支将从工作簿中创建的派生数据集中删除。
完成合并可能需要一些时间。合并完成后,您刚刚合并的分支将被自动删除,除非它仍有子分支。