Environment creation(环境创建)
:::callout{theme="neutral"} This is an advanced guide that goes into detail about the environment initialization process. It is intended for users who are interested in the technical considerations that can affect initialization performance.
For general guidance regarding common environment-related issues, see the Environment Troubleshooting Guide. :::
Conda is an open-source language-agnostic package and environment manager. Mamba is an open-source reimplementation of the Conda package manager. Code Workbook has moved to using Mamba to resolve package dependencies and install sets of packages into independent environments. Mamba offers several advantages in package resolution over Conda, most notably in increased speed and increased legibility of error messages.
This page introduces the most important concepts and outlines the environment creation process; for more information, consult the official Conda documentation ↗ and Mamba documentation ↗.
Important Terms
Package
A package is a collection of files that commonly contains metadata, libraries, and/or binaries. Code Workbook provides access to a broad selection of packages (numpy, for example) to supplement the core language features.
A package is versioned, and nearly always has a set of dependencies—other packages that must also be installed for it to function properly. A dependency might be a specific version of a package, a range of acceptable versions, or any version at all.
Channel
A channel, sometimes called a repository, is any location where packages are stored. One channel might be a directory in the local file system, and another might be a directory hosted on a web server.
Regardless of type, each channel is a directory tree that separates packages by platform architecture. Each platform subdirectory contains a file called repodata.json, which is an index of all packages in that subdirectory.
Conda searches a set of preconfigured channels whenever it needs to fetch a package. For more information about channel management in Foundry, see the Code Repositories documentation.
Environment
A Conda environment is a directory that contains a specific collection of packages. An environment is created for each Workbook by passing to Conda the packages specified in the Environment Configuration panel. Conda constructs a set of packages that satisfies the configuration and all dependencies, and installs these packages onto the Spark module that backs the Workbook.
Performance
The following explanation of performance draws on this Anaconda blog post ↗, which discusses Conda performance at length, but will similarly apply to a Mamba implementation. The next two sections summarize this material and outline the performance factors that are most relevant to Code Workbook:
Creating an Environment
Environment creation comprises two major steps: the solve step and the install step.
Solve step
In the solve step, the designated package manager, either Conda or Mamba, attempts to find packages and versions that satisfy all transient dependencies. Transient dependencies comprise the dependencies of the packages specified in the Environment Configuration panel, those dependencies' dependencies, and so on. This step contains four stages:
- Download and process package indices. Conda will download relevant
repodata.jsonfiles from each configured channel, and will convert the index entries into objects in memory. - Reduce the index. Conda builds up a set of all packages that could possibly be used for the environment. To do this, the algorithm begins with the provided package specification and recurses through all dependencies. All unneeded packages—primarily those that are not in the dependency graph—are pruned away.
- Express dependency constraints as a Boolean satisfiability (SAT) problem. Conda prefers certain types of solutions (e.g. use the newest possible versions of packages), and these biases are baked into clause construction.
- Run the SAT solver.
Install step
If the solve succeeds, the install step is next. Here, each artifact is retrieved from the proper channel and uses them to construct the environment. This step contains three stages:
- Download and extract all packages in the solved environment.
- Verify package contents. Depending on configuration, Conda will either use a checksum or will verify that the file size is correct.
- Link packages into the environment.
Limitations
All of the steps outlined above can be susceptible to slowness in certain situations. Causes of slowness usually fall into one of three categories:
Upstream changes
A significant portion of slowness is caused by factors external to Foundry.
- Downloading and processing channel indices scale with total size of index files; the more channels that are needed to consider and the larger these channels are, the longer these steps will take.
- Index reduction also scales with the number of transitive dependencies; the number of transitive dependencies is determined by which dependencies packages choose to declare.
Because these factors are external and opaque, it can be difficult to perform root cause analysis on performance regressions. An environment may suddenly take longer to load because a channel recently increased in size, or because a package declared several new dependencies in its newest release.
Environment specification
More commonly, slow initialization is directly tied to the environment specification itself. The solve step scales superlinearly with environment size, so as a general rule of thumb, environments with more packages will take disproportionately longer to initialize.
There are two ways to remediate these situations.
- First, remove unneeded packages from the environment definition. It is much more performant to have small, specialized environments than to have large, general-purpose ones.
- Second, try adding version constraints to some of the packages in the Environment Configuration panel. It is most effective to pin versions for packages with many extant builds like
pythonand for packages with complex dependency graphs likescipy. Doing so will allow Conda to more aggressively reduce the indices, meaning that the SAT solve will not need to account for as many package versions.
Package size
Package size is typically less problematic than the other factors in this section, but it is still relevant in some cases.
Downloading and extracting even a single package may not be trivial. For example, the pytorch package is about 460 MB in size, and can take 35+ seconds to extract.
Download, extraction, and verification all scale linearly with the size and number of packages in the environment. Due to transitive dependencies, the solved environment typically contains many more packages than were explicitly specified in the environment definition, and the increase in packages may cause slowness.
Remediation in this case is similar to the suggestions for environment specification: try to keep environments as small as possible.
Environment optimizations
The previous sections of this page describe the environment initialization process and factors that affect initialization performance. The following diagram summarizes the standard process of obtaining an environment:

To decrease time spent in the “Waiting for resources” and “Initializing environment” stages of the process, Code Workbook uses a series of optimizations designed to obtain an environment as quickly as possible.
Solve step optimization: Spec files
If no changes are made to the set of requested packages of the environment, there should be no need to solve the environment again, as that would lead to the same resolved environment. As a result, Code Workbook avoids the solve step of the environment initialization by storing the result of a successful solve in a spec file. The next time that an identical environment needs to be initialized, Code Workbook skips the solve step by referring instead to the spec file. This allows for a strictly better initialization time, since Code Workbook only has to perform the install step. As a precautionary measure for the rare cases where previously successful environments stop working, Code Workbook will, by default, invalidate a spec file after 24 hours. After that, a new spec file will be generated on the next successful solve of the environment.
As a result, with spec files, every subsequent initialization attempt of a known environment will look like the following diagram:

:::callout{theme="neutral"} Initializing a new environment that Code Workbook has never seen before will naturally lead to slower initialization times. However, once the environment initializes successfully, all subsequent initialization attempts should succeed much faster. :::
Initialization optimization: Conda Docker
:::callout{theme="neutral"} Conda Docker is an optimization only available on Kubernetes-enabled environments. More information on Kubernetes can be found in the blog post Introducing Rubix: Kubernetes at Palantir ↗. :::
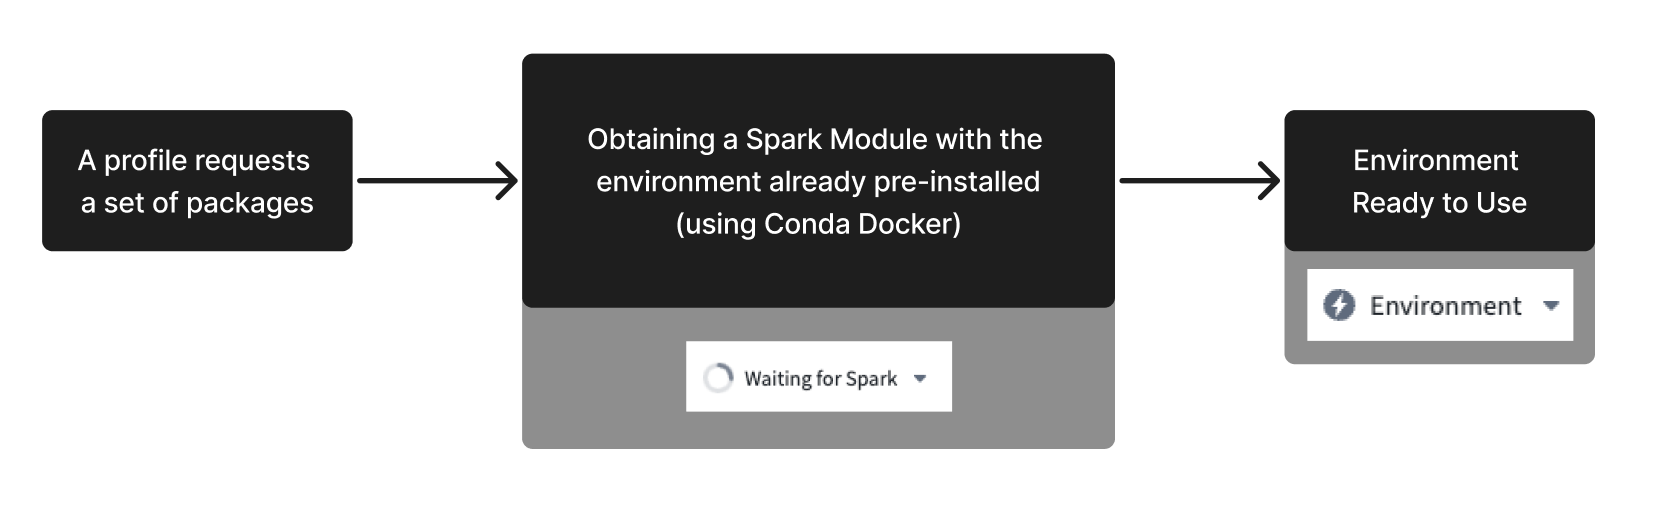
As indicated in the diagrams above, to initialize an environment, Code Workbook must first obtain a Spark module, then install packages onto the module. Similarly to how Code Workbook stores the result of a successful solve in a spec file, valid environments can also be stored as a Docker image. Using this image, Code Workbook can request subsequent Spark modules with all necessary packages already present on the module. This bypasses both the solve step and the on-module Conda install step, leading to much faster environment initialization times. Code Workbook will, by default, invalidate a Docker image after 24 hours. A new image will be generated on the next successful solve of the environment.
The following diagram illustrates how Conda Docker simplifies the initialization process:
Disable Conda Docker
In rare cases, environments using Conda Docker may fail at runtime if their packages contain pre-link or post-link scripts ↗. If an environment containing such scripts appears to be failing, you can manually disable this optimization in the bottom left of Code Workbook’s environment configuration tab. After disabling Conda Docker, environments will still benefit from the other available optimizations. This configuration will persist for the combination of the profile used and the workbook branch on which it was toggled.

Prewarming
While the optimizations mentioned above can shorten the initialization time of an environment, you can avoid waiting for an environment altogether by proactively initializing some number of modules. Those modules are referred to as “warm” modules. By configuring a warm module queue, Code Workbook ensures that a set of pre-initialized Spark modules are always ready to be assigned. For more information on how to configure warm modules, see the Prewarming section of the Code Workbook configuration documentation.
:::callout{theme="neutral"} If you regularly encounter long times waiting for an environment to initialize, consider implementing a warm module queue for the profile in question. :::
:::callout{theme="warning"} The optimizations mentioned above benefit environments that Code Workbook has already stored. When requesting a custom environment, Code Workbook must perform the standard initialization process, which will not benefit from any optimizations. As a result, custom environments will generally have slower initialization times. To troubleshoot a slow initialization process of a custom profile, consult the troubleshooting documentation. :::
中文翻译
环境创建
:::callout{theme="neutral"} 这是一份高级指南,详细介绍了环境初始化过程。它面向对环境初始化性能相关技术考量感兴趣的用户。
有关常见环境相关问题的常规指导,请参阅环境故障排除指南。 :::
Conda 是一个开源的、语言无关的包和环境管理器。Mamba 是 Conda 包管理器的开源重新实现。Code Workbook 已转而使用 Mamba 来解析包依赖项并将包集合安装到独立环境中。与 Conda 相比,Mamba 在包解析方面具有多项优势,最显著的是速度更快且错误信息更具可读性。
本页介绍了最重要的概念并概述了环境创建过程;如需更多信息,请参阅 Conda 官方文档 ↗ 和 Mamba 文档 ↗。
重要术语
包 (Package)
包是文件的集合,通常包含元数据、库和/或二进制文件。Code Workbook 提供了广泛的包(例如 numpy)以补充核心语言功能。
包具有版本控制,并且几乎总是有一组依赖项——即必须同时安装才能使其正常运行的其他包。依赖项可以是包的特定版本、可接受的版本范围或任意版本。
通道 (Channel)
通道(有时称为存储库)是存储包的任何位置。一个通道可能是本地文件系统中的目录,另一个可能是 Web 服务器上托管的目录。
无论类型如何,每个通道都是一个按平台架构分隔包的目录树。每个平台子目录都包含一个名为 repodata.json 的文件,它是该子目录中所有包的索引。
Conda 在需要获取包时会搜索一组预配置的通道。有关 Foundry 中通道管理的更多信息,请参阅 Code Repositories 文档。
环境 (Environment)
Conda 环境是包含特定包集合的目录。通过将环境配置面板中指定的包传递给 Conda,会为每个 Workbook 创建一个环境。Conda 会构建一组满足配置及所有依赖项的包,并将这些包安装到支持该 Workbook 的 Spark 模块上。
性能
以下关于性能的解释借鉴了这篇 Anaconda 博客文章 ↗,该文详细讨论了 Conda 的性能,但同样适用于 Mamba 实现。接下来的两节总结了这些内容,并概述了与 Code Workbook 最相关的性能因素:
创建环境
环境创建包括两个主要步骤:求解步骤和安装步骤。
求解步骤
在求解步骤中,指定的包管理器(Conda 或 Mamba)会尝试查找满足所有瞬态依赖项的包和版本。瞬态依赖项包括环境配置面板中指定包的依赖项、这些依赖项的依赖项,依此类推。此步骤包含四个阶段:
- 下载并处理包索引。Conda 将从每个配置的通道下载相关的
repodata.json文件,并将索引条目转换为内存中的对象。 - 缩减索引。Conda 构建一组可能用于该环境的所有包。为此,算法从提供的包规范开始,递归遍历所有依赖项。所有不需要的包(主要是不在依赖图中的包)都会被修剪掉。
- 将依赖约束表示为布尔可满足性 (SAT) 问题。Conda 倾向于某些类型的解(例如使用尽可能新的包版本),这些偏好被内置到子句构造中。
- 运行 SAT 求解器。
安装步骤
如果求解成功,接下来就是安装步骤。在此步骤中,从相应的通道检索每个构件,并使用它们来构建环境。此步骤包含三个阶段:
- 下载并解压已求解环境中的所有包。
- 验证包内容。根据配置,Conda 将使用校验和或验证文件大小是否正确。
- 将包链接到环境中。
限制
上述所有步骤在某些情况下都可能会出现缓慢。导致缓慢的原因通常属于以下三类之一:
上游更改
很大一部分缓慢是由 Foundry 外部的因素引起的。
- 下载和处理通道索引的耗时与索引文件的总大小成正比;需要考虑的通道越多、这些通道越大,这些步骤花费的时间就越长。
- 索引缩减的耗时也与传递依赖项的数量成正比;传递依赖项的数量由包选择声明的依赖项决定。
由于这些因素是外部且不透明的,因此很难对性能下降进行根本原因分析。环境可能会突然需要更长的加载时间,因为某个通道最近体积增大,或者某个包在其最新版本中声明了几个新的依赖项。
环境规范
更常见的是,初始化缓慢直接与环境规范本身有关。求解步骤的耗时随环境大小呈超线性增长,因此作为一般经验法则,包含更多包的环境将需要不成比例的更长初始化时间。
有两种方法可以缓解这些情况。
- 首先,从环境定义中移除不需要的包。拥有小型、专用的环境比拥有大型、通用的环境性能要高得多。
- 其次,尝试在环境配置面板中为某些包添加版本约束。对于具有大量现有构建的包(如
python)和具有复杂依赖图的包(如scipy),固定版本最为有效。这样做将使 Conda 能够更积极地缩减索引,这意味着 SAT 求解不需要考虑那么多的包版本。
包大小
包大小通常不如本节中的其他因素那么成问题,但在某些情况下仍然相关。
下载和解压哪怕一个包也可能并非易事。例如,pytorch 包的大小约为 460 MB,解压可能需要 35 秒以上。
下载、解压和验证的耗时都与环境中包的大小和数量呈线性增长。由于传递依赖项,求解后的环境通常包含比环境定义中明确指定的多得多的包,包的增加可能会导致缓慢。
这种情况下的缓解措施与环境规范的建议类似:尽量保持环境尽可能小。
环境优化
本页的前几节描述了环境初始化过程和影响初始化性能的因素。下图总结了获取环境的标准过程:
为了减少在过程的“等待资源”和“初始化环境”阶段花费的时间,Code Workbook 使用了一系列优化措施,旨在尽可能快地获取环境。
求解步骤优化:Spec 文件
如果未对环境请求的包集合进行任何更改,则无需再次求解环境,因为这将产生相同的已解析环境。因此,Code Workbook 通过将成功求解的结果存储在 spec 文件中来避免环境初始化的求解步骤。下次需要初始化相同的环境时,Code Workbook 会通过引用 spec 文件来跳过求解步骤。这使得初始化时间得到严格优化,因为 Code Workbook 只需执行安装步骤。作为预防措施,针对以前成功的环境停止工作的罕见情况,Code Workbook 默认会在 24 小时后使 spec 文件失效。之后,在环境下次成功求解时将生成新的 spec 文件。
因此,使用 spec 文件后,已知环境的每次后续初始化尝试都将如下图所示:
:::callout{theme="neutral"} 初始化 Code Workbook 从未见过的新环境自然会导致初始化时间变慢。但是,一旦环境成功初始化,所有后续的初始化尝试都应该快得多。 :::
初始化优化:Conda Docker
:::callout{theme="neutral"} Conda Docker 是一项仅在启用 Kubernetes 的环境中可用的优化。有关 Kubernetes 的更多信息,请参阅博客文章 Introducing Rubix: Kubernetes at Palantir ↗。 :::
如上图所示,要初始化环境,Code Workbook 必须首先获取 Spark 模块,然后将包安装到该模块上。与 Code Workbook 将成功求解的结果存储在 spec 文件中类似,有效的环境也可以存储为 Docker 镜像。使用此镜像,Code Workbook 可以请求后续的 Spark 模块,且所有必需的包已存在于该模块上。这绕过了求解步骤和模块上的 Conda 安装步骤,从而大大加快了环境初始化速度。Code Workbook 默认会在 24 小时后使 Docker 镜像失效。在环境下次成功求解时将生成新镜像。
下图说明了 Conda Docker 如何简化初始化过程:
禁用 Conda Docker
在极少数情况下,如果使用 Conda Docker 的环境的包包含预链接或后链接脚本 ↗,则可能会在运行时失败。如果包含此类脚本的环境似乎出现故障,您可以在 Code Workbook 环境配置选项卡的左下角手动禁用此优化。禁用 Conda Docker 后,环境仍将从其他可用优化中受益。此配置将对所使用的配置文件及其切换所在的工作簿分支的组合持续生效。
预热 (Prewarming)
虽然上述优化可以缩短环境的初始化时间,但您可以通过主动初始化一定数量的模块来完全避免等待环境。这些模块被称为“预热”模块。通过配置预热模块队列,Code Workbook 确保始终有一组预初始化的 Spark 模块准备就绪以供分配。有关如何配置预热模块的更多信息,请参阅 Code Workbook 配置文档的预热部分。
:::callout{theme="neutral"} 如果您经常遇到环境初始化等待时间过长的情况,请考虑为相关配置文件实施预热模块队列。 :::
:::callout{theme="warning"} 上述优化有利于 Code Workbook 已存储的环境。在请求自定义环境时,Code Workbook 必须执行标准初始化过程,该过程不会受益于任何优化。因此,自定义环境的初始化时间通常较慢。要排查自定义配置文件初始化过程缓慢的问题,请参阅故障排除文档。 :::