Navigation(导航)
There are five different tabs that you can select at the top of the Code Repositories interface:
Code tab
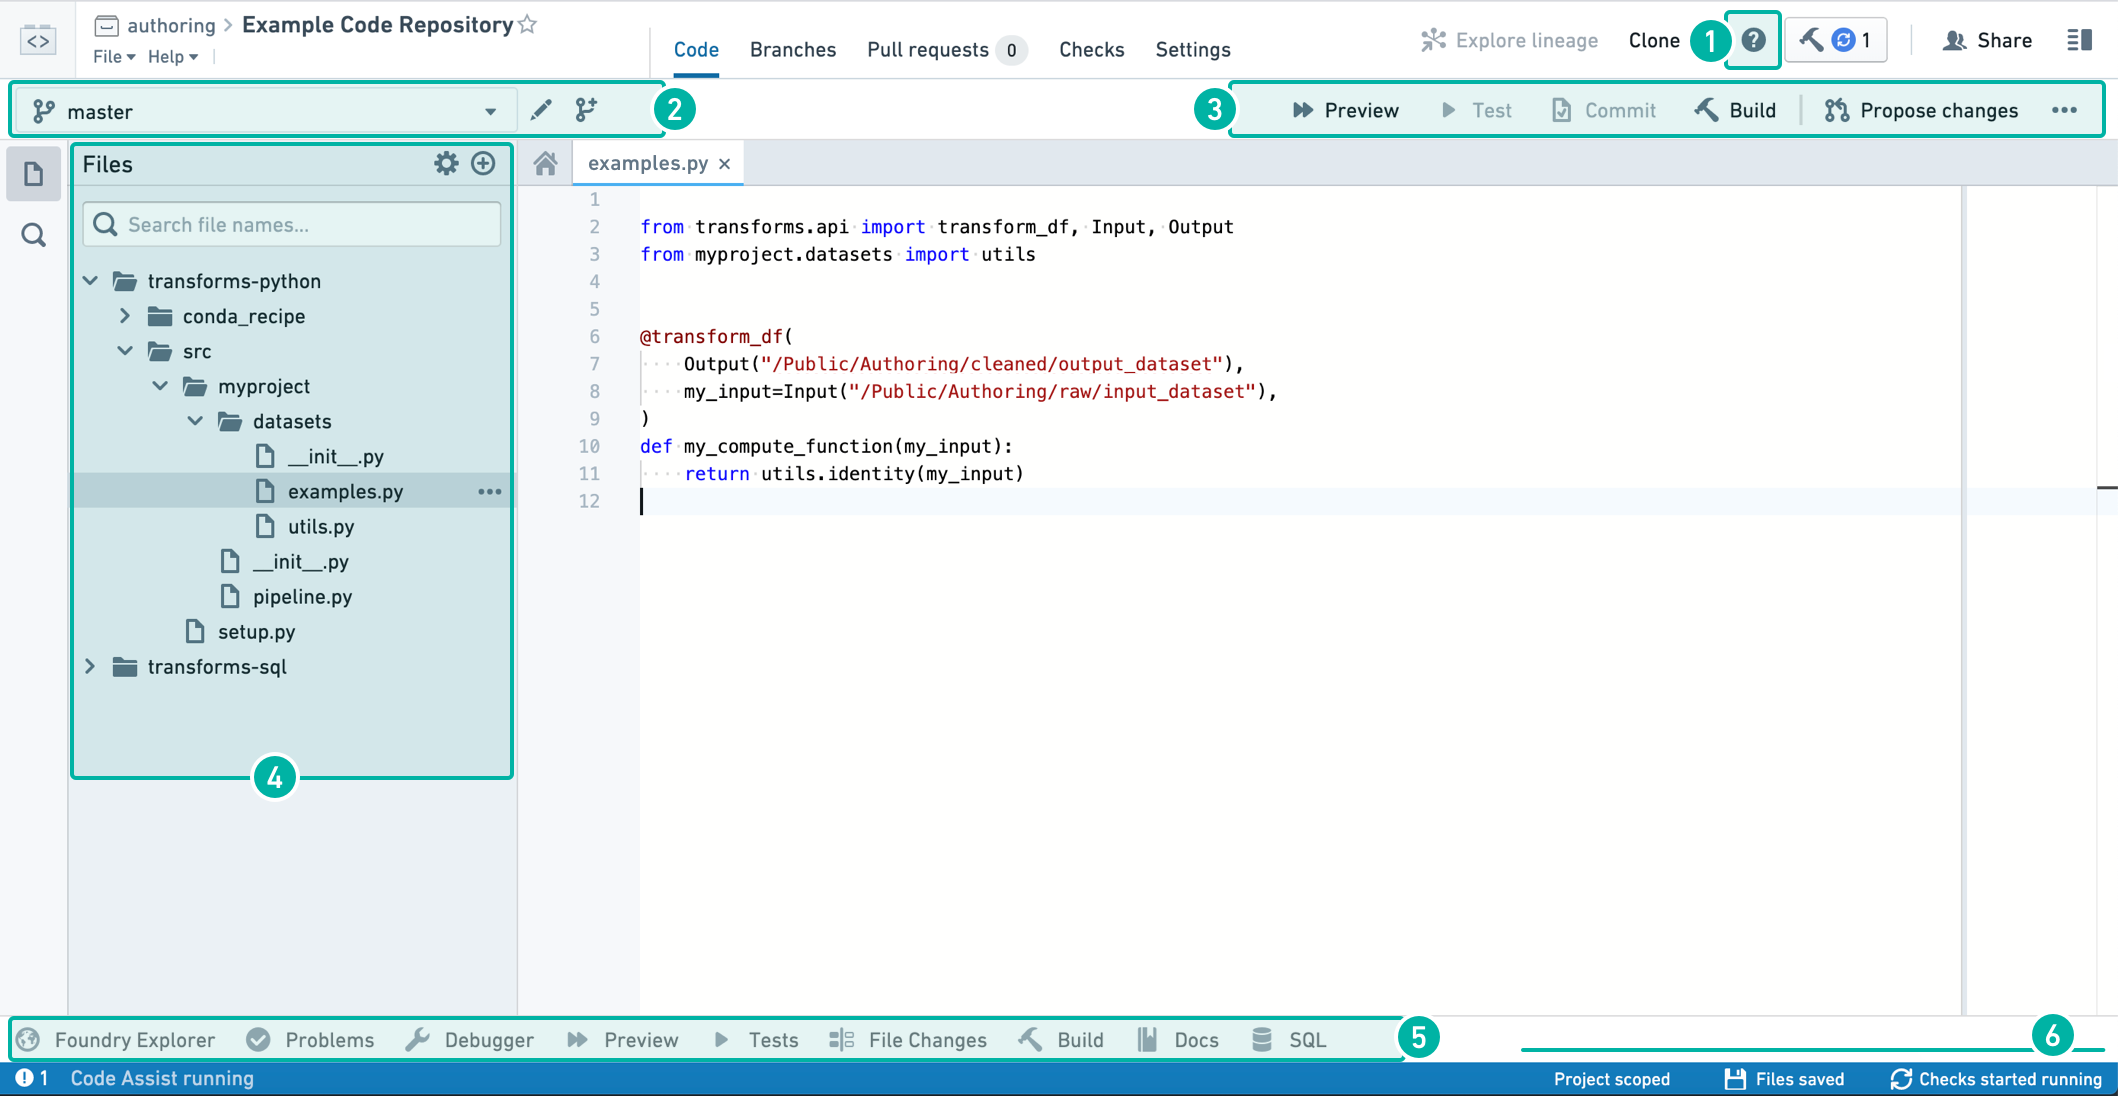
In-App help
In the Code tab, you can click the ![]() button to start a step-by-step walkthrough that guides you through the core functionalities available in your Code Repository. The in-app help is currently only available in the Code view.
button to start a step-by-step walkthrough that guides you through the core functionalities available in your Code Repository. The in-app help is currently only available in the Code view.
To expose keyboard shortcuts via the command palette, use the F1 key in Windows or Fn+F1 on macOS:

Branch options
Use the dropdown branch menu to select one of your existing sandbox branches to work in. Alternatively, click the ![]() icon to create a new sandbox branch which contains a copy of the code on an existing branch. To edit code in your repository, you must work in a sandbox branch — protected branches cannot be directly edited.
icon to create a new sandbox branch which contains a copy of the code on an existing branch. To edit code in your repository, you must work in a sandbox branch — protected branches cannot be directly edited.
You can choose between a Code Repositories branch and, for supported repository types, a Global branch. Global branches are supported in Python Transforms and TypeScript v1 repositories, and can contain changes across multiple Palantir applications. Learn more about global branches.
Global branches must be based on the main branch of the repository, while Code Repositories branches can be based on any branch.

Code editor options
As you write and edit code in your repository, you can do the following:
- Click the
 button to run the Transform on a sample of the input datasets. This is a quick way to preview your code changes on real data.
 - Click the
 button to run all unit tests defined in the current file. See Python Tests or Java Tests for information about how to add unit tests to your repository.
 - Click the
 button to commit any changes in your sandbox branch. Once you commit changes, automatic checks run on your code.
 - If you select a dataset source file (a file that defines a transformation, see e.g. Python Transforms), you can click the
 button to build a new version of your output dataset after running automatic checks on your code. Clicking the button will trigger a build on all output datasets of the current file; if the current file does not generate any datasets, no build is triggered.
 - Click the
 button to create a new Pull request containing your changes. This allows others to review and comment on your code before merging it into the main code.
 - Click on the ... button to access several additional actions:
- Merge: Merge another branch into your current branch.
- Reset: Reset the contents of all files to match the latest commit on your remote branch. This will clear any changes that have not yet been committed on your branch.
- Upgrade: Upgrade your branch to the latest language versions.
File editor
Click the ![]() icon to create a new file, folder, or sub-project. Select the “New sub-project” option if you want to add another language-specific sub-project to your Code Repository.
icon to create a new file, folder, or sub-project. Select the “New sub-project” option if you want to add another language-specific sub-project to your Code Repository.
Helper panels
Foundry Explorer Helper
The Foundry Explorer helper is a file navigation interface that lets you quickly browse all files and folders. Once you select a specific dataset, you can click “Open” to view the full dataset.
Problems Helper
The Problems helper tells you about any issues detected in your code. Click on a specific issue listed here to open up the problematic code.
Debugger Helper
The Debugger allows you to examine your transform behavior while it runs (see Debug Transforms).
Preview Helper
The Preview helper lets you run your code on a limited sample of the input datasets to quickly preview the code without committing your changes (see Preview Transforms).
Tests Helper
When your repository contains unit tests (see Python Tests and Java Tests), the Tests Helper lets you run those tests and displays their results.
File Changes Helper
The File Changes helper can be used to view any uncommitted changes to the current file, as well as compare previous versions of the file.
Build Helper
The Build helper lets you trigger dataset builds and view the progress for your builds. Once you select a dataset source file, you can click the build button to build a new version of your output dataset as well as run automatic checks on your code. You can then view the progress of the running tasks in the Build helper.
:::callout{theme="neutral"} Clicking the Build button at the top right corner of the Code Repositories interface is equivalent to triggering a build from the Build helper. :::
Docs Helper
The Docs helper contains references for the available languages that you can write code in. For more detailed language-specific documentation that isn’t available in the in-product documentation, refer to the supported languages.
SQL Scratchpad
The SQL helper lets you quickly test out SQL queries. Write a SQL query and click  to preview the results of your query. You can also test out an existing query you’ve written in your repository by selecting the appropriate
 .sql file and clicking  .
.
To view queries marked as favorites, go to the ![]() tab. To view a history of queries ran in the SQL helper, go to the
tab. To view a history of queries ran in the SQL helper, go to the ![]() tab.
tab.
:::callout{theme="neutral"}
To access a specific branch of an input dataset in SQL Scratchpad, you prepend the name of the branch to the query: e.g. SELECT * FROM `branch_A`.`/path/to/dataset`. If no branch is specified it will default to master.
:::
Status bar
The status bar provides information on the state of the environment and checks results. Information you can find in the status bar includes:
- Code Assist state - Code Assist is essential for detecting problems in your code and running previews. You can write code without Code Assist, but will need it to be up and running to complete your work. Hover over the Code Assist status you can get details on the initialization progress. If Code Assist fails to initialize, raise a support request.
- Problems - When problems are detected in your code, an indication appears on the left side of the status bar. Click on the indication to open the Problems helper.
- Checks status - The checks status is displayed on the right side of the status bar. More details of checks are in the Checks tab.
- File saving - After any change, the file saving status displays when the automatic save progress.
Branches tab
:::callout{theme="neutral"} This section summarizes how to create new branches and create new Pull requests in the Branches tab. These functionalities are also available in the Code tab. :::
In the Branches tab, you can see a list of branches existing in your Code Repository — this includes your own branches as well as other users’ branches. Click the  button to create a new sandbox branch which contains a copy of the code on a specific branch.
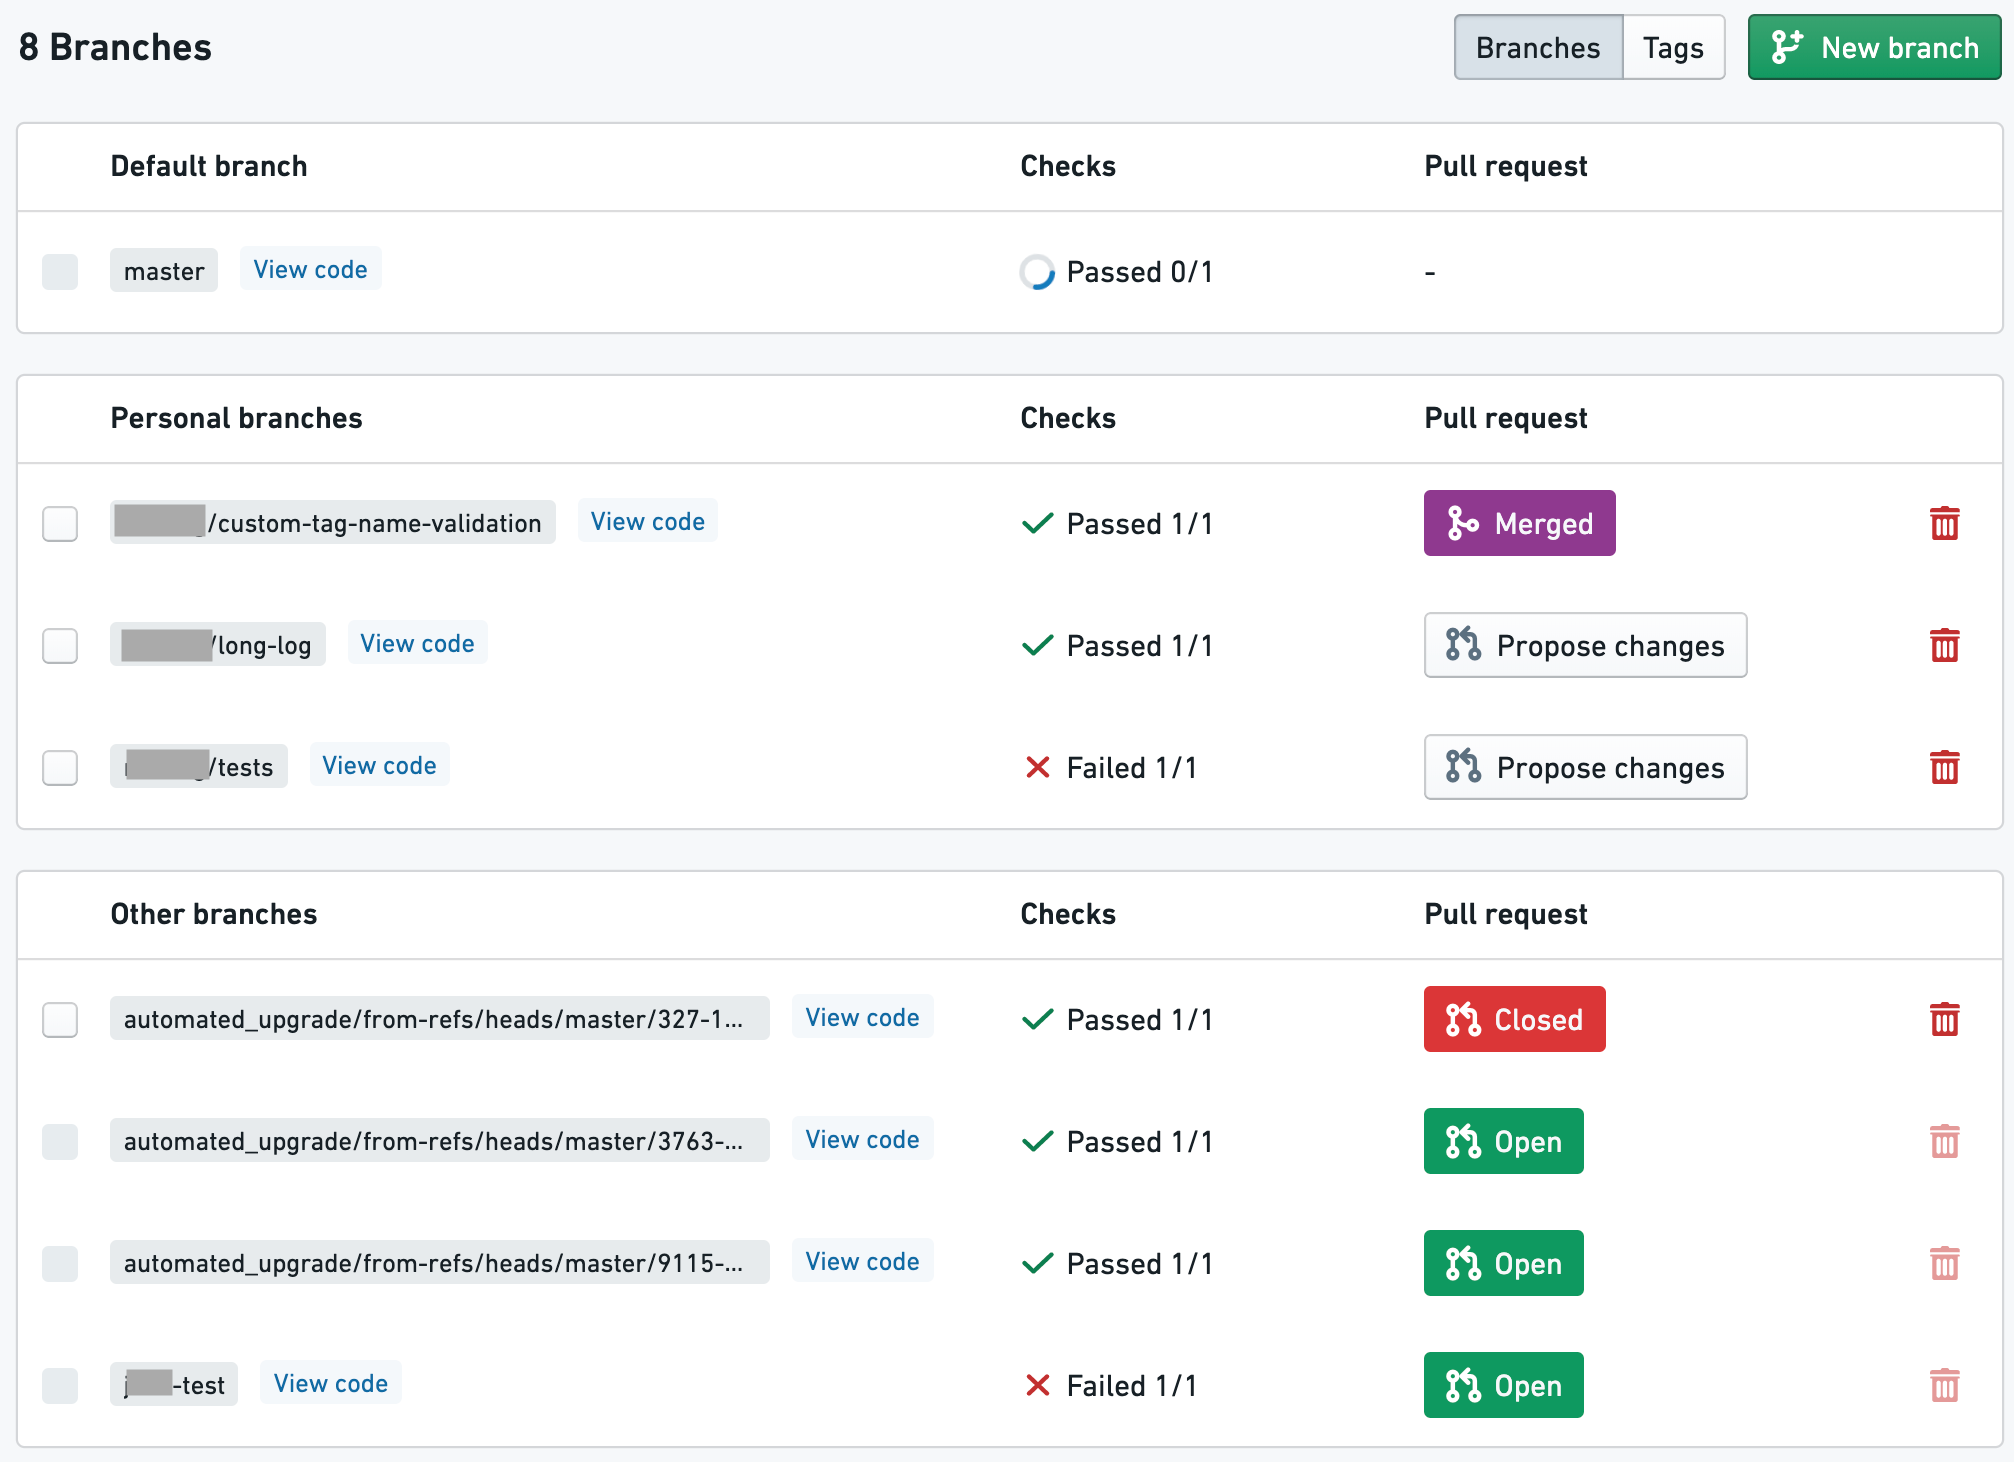
Each listed branch contains a summary with the following available functionalities:
- The “Checks” column indicates whether or not the automatic code checks have passed for a branch.
- The “Pull request” column tells you about any existing Pull requests in a branch and lets you create new Pull requests. To create a new Pull request that contains the changes on a branch, click the “Propose changes” button. This will create a new Pull request for merging your changes into the master branch by default. If you want to merge your changes into a branch other than master, select a different branch from the dropdown menu. If you don’t see the button to create a new Pull request, it means that a Pull request already exists for a branch. Click on the “Open” / “Closed” / “Merged” button to open the full Pull request.
- Click “View code” next to a branch name to view the code on that branch.
- To delete a branch, click the
 icon. You should not delete any branches that you did not create. This can result in lost work for others.
Tags
The branches tab also lets you access a list of tags, which are like immutable branches. A tag can be used to mark a significant version of the code for future reference by giving it a version number or name. To create a new tag, navigate to the tags section of the branches tab and click the "New Tag" button. A tag can be created from the current version of a branch, or from any arbitrary commit.
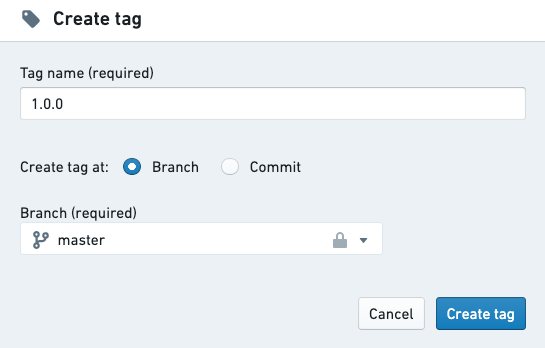
:::callout{theme="neutral"}
To enforce that all tag names follow a specific naming convention, you can add a tagNameValidation configuration block to a file called repoSettings.json at the root of the repository, e.g.: "tagNameValidation": { "regex": "^(0|[1-9]\\d*)\\.(0|[1-9]\\d*)\\.(0|[1-9]\\d*)(-rc\\d+)?$", "errorMessage": "Tag name must have the format x.x.x or x.x.x-rcx." }
:::
For more information about the recommended git development workflow, refer to the Developer Best Practices.
Pull requests tab
:::callout{theme="neutral"} This section summarizes how to create new Pull requests in the Pull requests tab. This functionality is also available in the Code tab. :::
In the Pull requests tab, you can find information about Pull requests in your Code Repository. A Pull request lets users view a history of the changes on your branch and review your code on a line-by-line basis before merging your changes. Any time you want to merge the changes on your branch into the main code, you should create a new Pull request.
Click the  button to create a new Pull request. By default, the new Pull request created will merge your changes into the main branch of your repository (this is usually the master branch). Select which branch you want to base your new Pull request off of.
Filtering pull requests
You can switch between a list of open and closed Pull requests by clicking the "Open" / "Closed" button at the top of the pull requests list, and use the search bar to further filter the list based on title or author.

Reviewing pull requests
Click on one of the Pull requests to review the proposed code changes line-by-line and add comments. Depending on the repository settings, each Pull request may require at least one approving review before they can be merged.
When reviewing changes to Transforms code, you can also check how these changes affect your datasets.
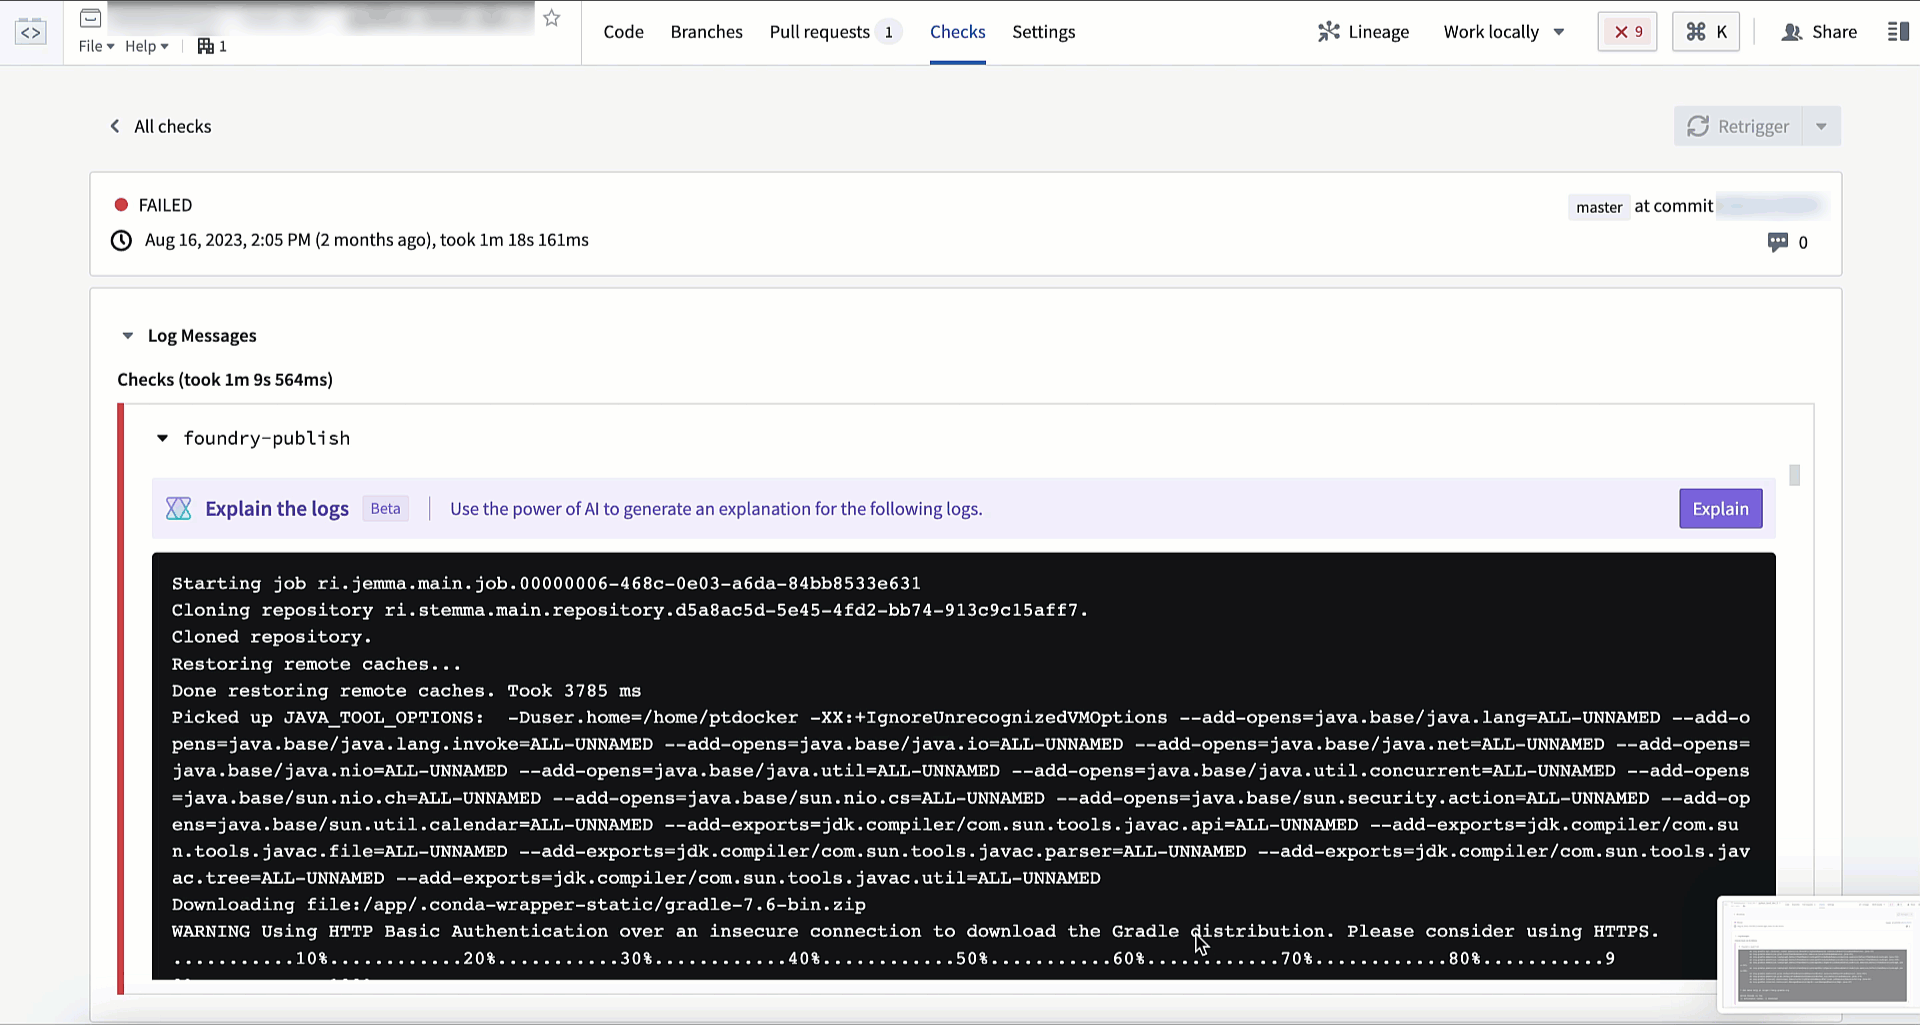
Checks tab
In the Checks tab, you can view a summary of running and completed checks on each branch. Use the dropdown branch menu to select a different branch. Click on a specific check to view more detailed information.
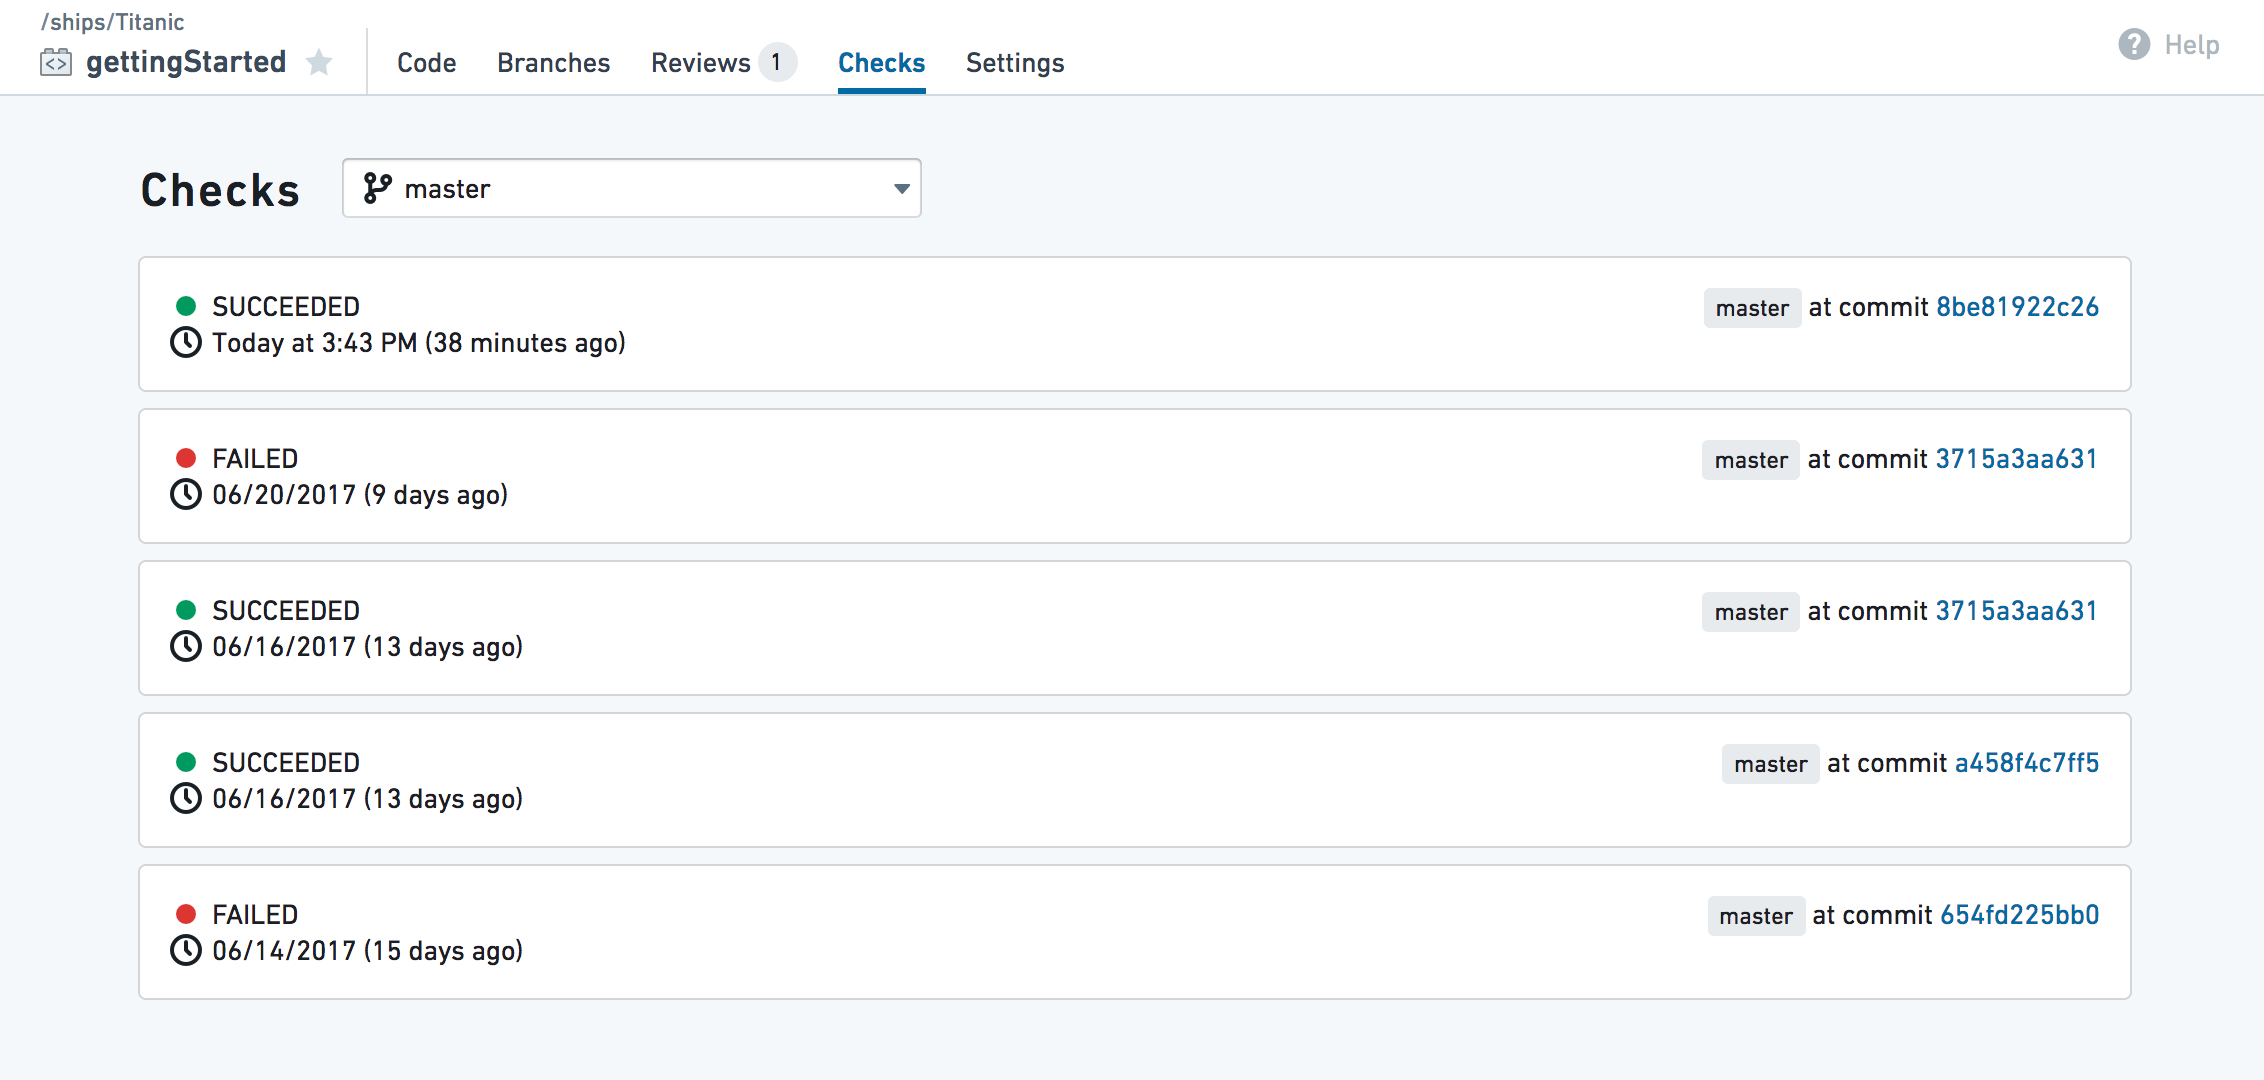
The Checks tab will also include the output of any unit tests that have been defined for your repo. You can define unit tests for Python and Java.
:::callout{theme="neutral"} If AIP is enabled on your stack, the error enhancer widget complements the detail view of a failed check to help you better understand and resolve issues that arise. :::
Settings tab
In the Settings tab, code authors can configure their personal editor preferences and repository administrators can control the repository's behavior and policies. To learn more about the Settings tab, see Administering Code Repositories.
:::callout{theme="neutral"} Most options in the Settings tab are aimed for administrators and will be available only to users with the appropriate permissions (by default, repository owners). :::
中文翻译
导航
代码仓库(Code Repositories)界面顶部共有五个可选标签页: 1. 代码标签页 2. 分支标签页 3. 拉取请求标签页 4. 检查标签页 5. 设置标签页
代码标签页(Code tab)
1. 应用内帮助
2. 分支选项
3. 代码编辑器选项
4. 文件编辑器
5. 辅助面板
6. 状态栏
应用内帮助(In-App help)
在代码标签页中,你可以点击![]() 按钮开启分步引导,带你了解代码仓库提供的核心功能。目前应用内帮助仅在代码视图中可用。
按钮开启分步引导,带你了解代码仓库提供的核心功能。目前应用内帮助仅在代码视图中可用。
如需通过命令面板(command palette)调出快捷键列表,Windows系统按F1键,macOS系统按Fn+F1键即可:
分支选项(Branch options)
你可以通过分支下拉菜单选择已有的沙箱分支(sandbox branch)开展工作,也可以点击![]() 图标创建新的沙箱分支,新分支会复刻现有分支的代码。要编辑仓库内的代码,你必须在沙箱分支中操作——受保护分支(protected branch)不支持直接编辑。
图标创建新的沙箱分支,新分支会复刻现有分支的代码。要编辑仓库内的代码,你必须在沙箱分支中操作——受保护分支(protected branch)不支持直接编辑。
你可以选择创建代码仓库分支(Code Repositories branch),对于支持的仓库类型,也可以选择全局分支(Global branch)。Python Transforms和TypeScript v1仓库支持全局分支,全局分支可容纳跨多个Palantir应用的变更。了解更多全局分支相关内容。
全局分支必须基于仓库的main分支创建,而代码仓库分支可以基于任意分支创建。
代码编辑器选项(Code editor options)
在仓库中编写和编辑代码时,你可以执行以下操作:
* 点击按钮,基于输入数据集的样本运行转换(Transform),这是在真实数据上预览代码变更的快捷方式。
* 点击按钮,运行当前文件中定义的所有单元测试(unit test)。如需了解如何为仓库添加单元测试,可查看Python测试或Java测试文档。
* 点击按钮,提交沙箱分支中的所有变更。提交完成后,系统会自动对你的代码运行自动检查(automatic check)。
* 如果你选中了一个数据集源文件(即定义转换的文件,参考Python转换),可以点击按钮,在代码自动检查通过后构建输出数据集的新版本。点击该按钮会触发当前文件所有输出数据集的构建;如果当前文件不生成任何数据集,则不会触发构建。
* 点击按钮,创建包含你的变更的拉取请求(Pull request),方便其他人在代码合并到主分支前对你的代码进行评审和评论。
* 点击...按钮可以访问更多附加操作:
* 合并(Merge): 将另一个分支合并到当前分支。
* 重置(Reset): 重置所有文件内容,匹配远程分支的最新提交,该操作会清除你分支上所有未提交的变更。
* 升级(Upgrade): 将你的分支升级到最新的语言版本。
文件编辑器(File editor)
点击![]() 图标可以创建新文件、文件夹或子项目(sub-project)。如果你需要在代码仓库中添加另一个语言专属的子项目,可选择「新建子项目」选项。
图标可以创建新文件、文件夹或子项目(sub-project)。如果你需要在代码仓库中添加另一个语言专属的子项目,可选择「新建子项目」选项。
辅助面板(Helper panels)
Foundry资源管理器辅助面板(Foundry Explorer Helper) Foundry资源管理器辅助面板是一个文件导航界面,你可以快速浏览所有文件和文件夹。选中某个数据集后,点击「打开」即可查看完整数据集。
问题辅助面板(Problems Helper) 问题辅助面板会提示代码中检测到的所有问题,点击列出的具体问题即可跳转至存在问题的代码位置。
调试器辅助面板(Debugger Helper) 调试器支持你在转换运行时检查其行为(参考调试转换)。
预览辅助面板(Preview Helper) 预览辅助面板支持你在输入数据集的有限样本上运行代码,无需提交变更即可快速预览代码效果(参考预览转换)。
测试辅助面板(Tests Helper) 如果你的仓库包含单元测试(参考Python测试和Java测试),测试辅助面板支持你运行这些测试并展示结果。
文件变更辅助面板(File Changes Helper) 文件变更辅助面板可用于查看当前文件的所有未提交变更,也可以对比文件的历史版本。
构建辅助面板(Build Helper) 构建辅助面板支持你触发数据集构建并查看构建进度。选中数据集源文件后,你可以点击构建按钮在代码自动检查通过后构建输出数据集的新版本,之后可以在构建辅助面板中查看运行任务的进度。
:::callout{theme="neutral"} 点击代码仓库界面右上角的构建按钮,和从构建辅助面板触发构建的效果完全一致。 :::
文档辅助面板(Docs Helper) 文档辅助面板包含支持的代码语言参考文档。如果需要查找产品内置文档中没有的、更详细的语言专属文档,可参考支持的语言文档。
SQL便笺(SQL Scratchpad)
SQL辅助面板支持你快速测试SQL查询。编写SQL查询后点击即可预览查询结果。你也可以选中仓库中已编写的.sql文件,点击测试已有查询。
如需查看标记为收藏的查询,可前往![]() 标签页。如需查看SQL辅助面板中运行过的查询历史,可前往
标签页。如需查看SQL辅助面板中运行过的查询历史,可前往![]() 标签页。
标签页。
:::callout{theme="neutral"}
要在SQL便笺中访问输入数据集的特定分支,你需要在查询前加上分支名,例如:SELECT * FROM `branch_A`.`/path/to/dataset`。如果未指定分支,默认使用master分支。
:::
状态栏(Status bar)
状态栏提供环境状态和检查结果相关信息,你可以在状态栏中看到以下内容: * 代码辅助(Code Assist)状态:代码辅助是检测代码问题、运行预览的核心功能。你可以在代码辅助未启动时编写代码,但需要等待其正常启动后才能完成后续工作。悬停在代码辅助状态上可以查看初始化进度详情,如果代码辅助初始化失败,请提交支持工单。 * 问题:当代码中检测到问题时,状态栏左侧会出现提示,点击提示即可打开问题辅助面板。 * 检查状态:检查状态展示在状态栏右侧,更多检查详情可查看检查标签页。 * 文件保存:做出任何变更后,自动保存进度会展示在文件保存状态中。
分支标签页(Branches tab)
:::callout{theme="neutral"} 本节概述了如何在分支标签页创建新分支和新拉取请求,这些功能在代码标签页中也可用。 :::
在分支标签页中,你可以看到代码仓库中存在的所有分支列表——包括你自己的分支和其他用户的分支。点击按钮可以创建新的沙箱分支,新分支会复刻指定分支的代码。
每个列出的分支都附带摘要信息,支持以下功能:
* 「检查」列显示分支的代码自动检查是否通过。
* 「拉取请求」列展示分支上已有的拉取请求,也支持你创建新的拉取请求。
要创建包含分支变更的新拉取请求,点击「提交变更」按钮即可,默认会创建将你的变更合并到master分支的拉取请求。如果你需要将变更合并到master以外的分支,可以从下拉菜单中选择目标分支。
如果你看不到创建新拉取请求的按钮,说明该分支已经存在一个拉取请求,点击「打开」/「已关闭」/「已合并」按钮即可打开完整的拉取请求页面。
* 点击分支名旁边的「查看代码」可以查看该分支上的代码。
* 如需删除分支,点击![]() 图标即可。请勿删除非你创建的分支,否则可能导致其他用户的工作成果丢失。
图标即可。请勿删除非你创建的分支,否则可能导致其他用户的工作成果丢失。
标签(Tags)
分支标签页也支持你访问标签列表,标签类似不可变分支(immutable branch),可以通过赋予版本号或名称来标记重要的代码版本,供后续参考。如需创建新标签,前往分支标签页的标签部分,点击「新建标签」按钮即可。标签可以基于分支的当前版本创建,也可以基于任意提交创建。
:::callout{theme="neutral"}
要强制所有标签名遵循特定命名规范,你可以在仓库根目录的repoSettings.json文件中添加tagNameValidation配置块,例如:
"tagNameValidation": { "regex": "^(0|\[1-9]\\\d\*)\\\\.(0|\[1-9]\\\d\*)\\\\.(0|\[1-9]\\\d\*)(-rc\\\d+)?$", "errorMessage": "Tag name must have the format x.x.x or x.x.x-rcx." }
如需了解推荐的Git开发工作流,可参考开发者最佳实践文档。
拉取请求标签页(Pull requests tab)
:::callout{theme="neutral"} 本节概述了如何在拉取请求标签页创建新拉取请求,该功能在代码标签页中也可用。 :::
在拉取请求标签页中,你可以查看代码仓库中所有拉取请求的相关信息。拉取请求支持其他用户查看你分支上的变更历史,在代码合并前逐行评审你的代码。任何时候你想要将分支上的变更合并到主代码中,都应该创建一个新的拉取请求。
点击按钮即可创建新拉取请求,默认创建的拉取请求会将你的变更合并到仓库的主分支(通常是master分支),你也可以选择新拉取请求的源分支。
筛选拉取请求
你可以点击拉取请求列表顶部的「打开」/「已关闭」按钮切换查看开放和关闭的拉取请求,也可以使用搜索栏基于标题或作者进一步筛选列表。
评审拉取请求(Reviewing pull requests)
点击任意拉取请求即可逐行评审提交的代码变更并添加评论。根据仓库设置,每个拉取请求可能需要至少一个批准评审才能合并。
评审转换代码的变更时,你也可以查看这些变更对数据集的影响。
检查标签页(Checks tab)
在检查标签页中,你可以查看每个分支上正在运行和已完成的检查摘要。使用分支下拉菜单可以切换查看其他分支,点击具体的检查可以查看更详细的信息。
检查标签页也会包含仓库中定义的所有单元测试的输出。你可以为Python和Java代码定义单元测试。
:::callout{theme="neutral"}
如果你的栈(stack)启用了AIP,错误增强部件会补充失败检查的详情视图,帮助你更好地理解和解决出现的问题。
:::
设置标签页(Settings tab)
在设置标签页中,代码作者可以配置个人编辑器偏好,仓库管理员(repository administrator)可以控制仓库的行为和策略。如需了解更多设置标签页相关内容,可查看代码仓库管理文档。
:::callout{theme="neutral"} 设置标签页中的大部分选项面向管理员,仅拥有对应权限(permission)的用户可用(默认仅仓库所有者可访问)。 :::