Getting started with Code Workspaces(Code Workspaces 入门指南)
This tutorial provides an introduction to Code Workspaces by setting up a workspace for either JupyterLab® or RStudio® Workbench.
Backing code repository
All code workspaces are backed by a Palantir platform code repository. This enables code workspaces to have industry-standard version control features like branching, merging, and commit history, allowing other users to view the code and safely operate in the same workspace.
:::callout{theme="warning"} Previously, code workspaces and associated code repositories were represented by separate resources. Now, code workspaces and associated code repositories are represented by a single resource; the code repository. Selecting the code repository from any folder in Foundry will automatically open the associated Jupyter or RStudio® workspace.
This change applies to new code workspaces, and does not affect existing code workspaces and code repositories, which will continue to be separate resources.. :::
Launch a code workspace
To launch a code workspace, open the Code Workspaces application and navigate to the General tab. Then, select a folder in which to create your code workspace.
:::callout{theme="neutral"}
Users with Editor or Owner roles on the project will be able to modify the settings of the code workspace. Users with Viewer roles on the project will be able to launch the workspace. You can select your home folder as a location, but this may cause your code workspace and data to be restricted to a project.
:::
Choose the type of workspace to launch. Currently, the supported workspaces are JupyterLab and RStudio® Workbench.

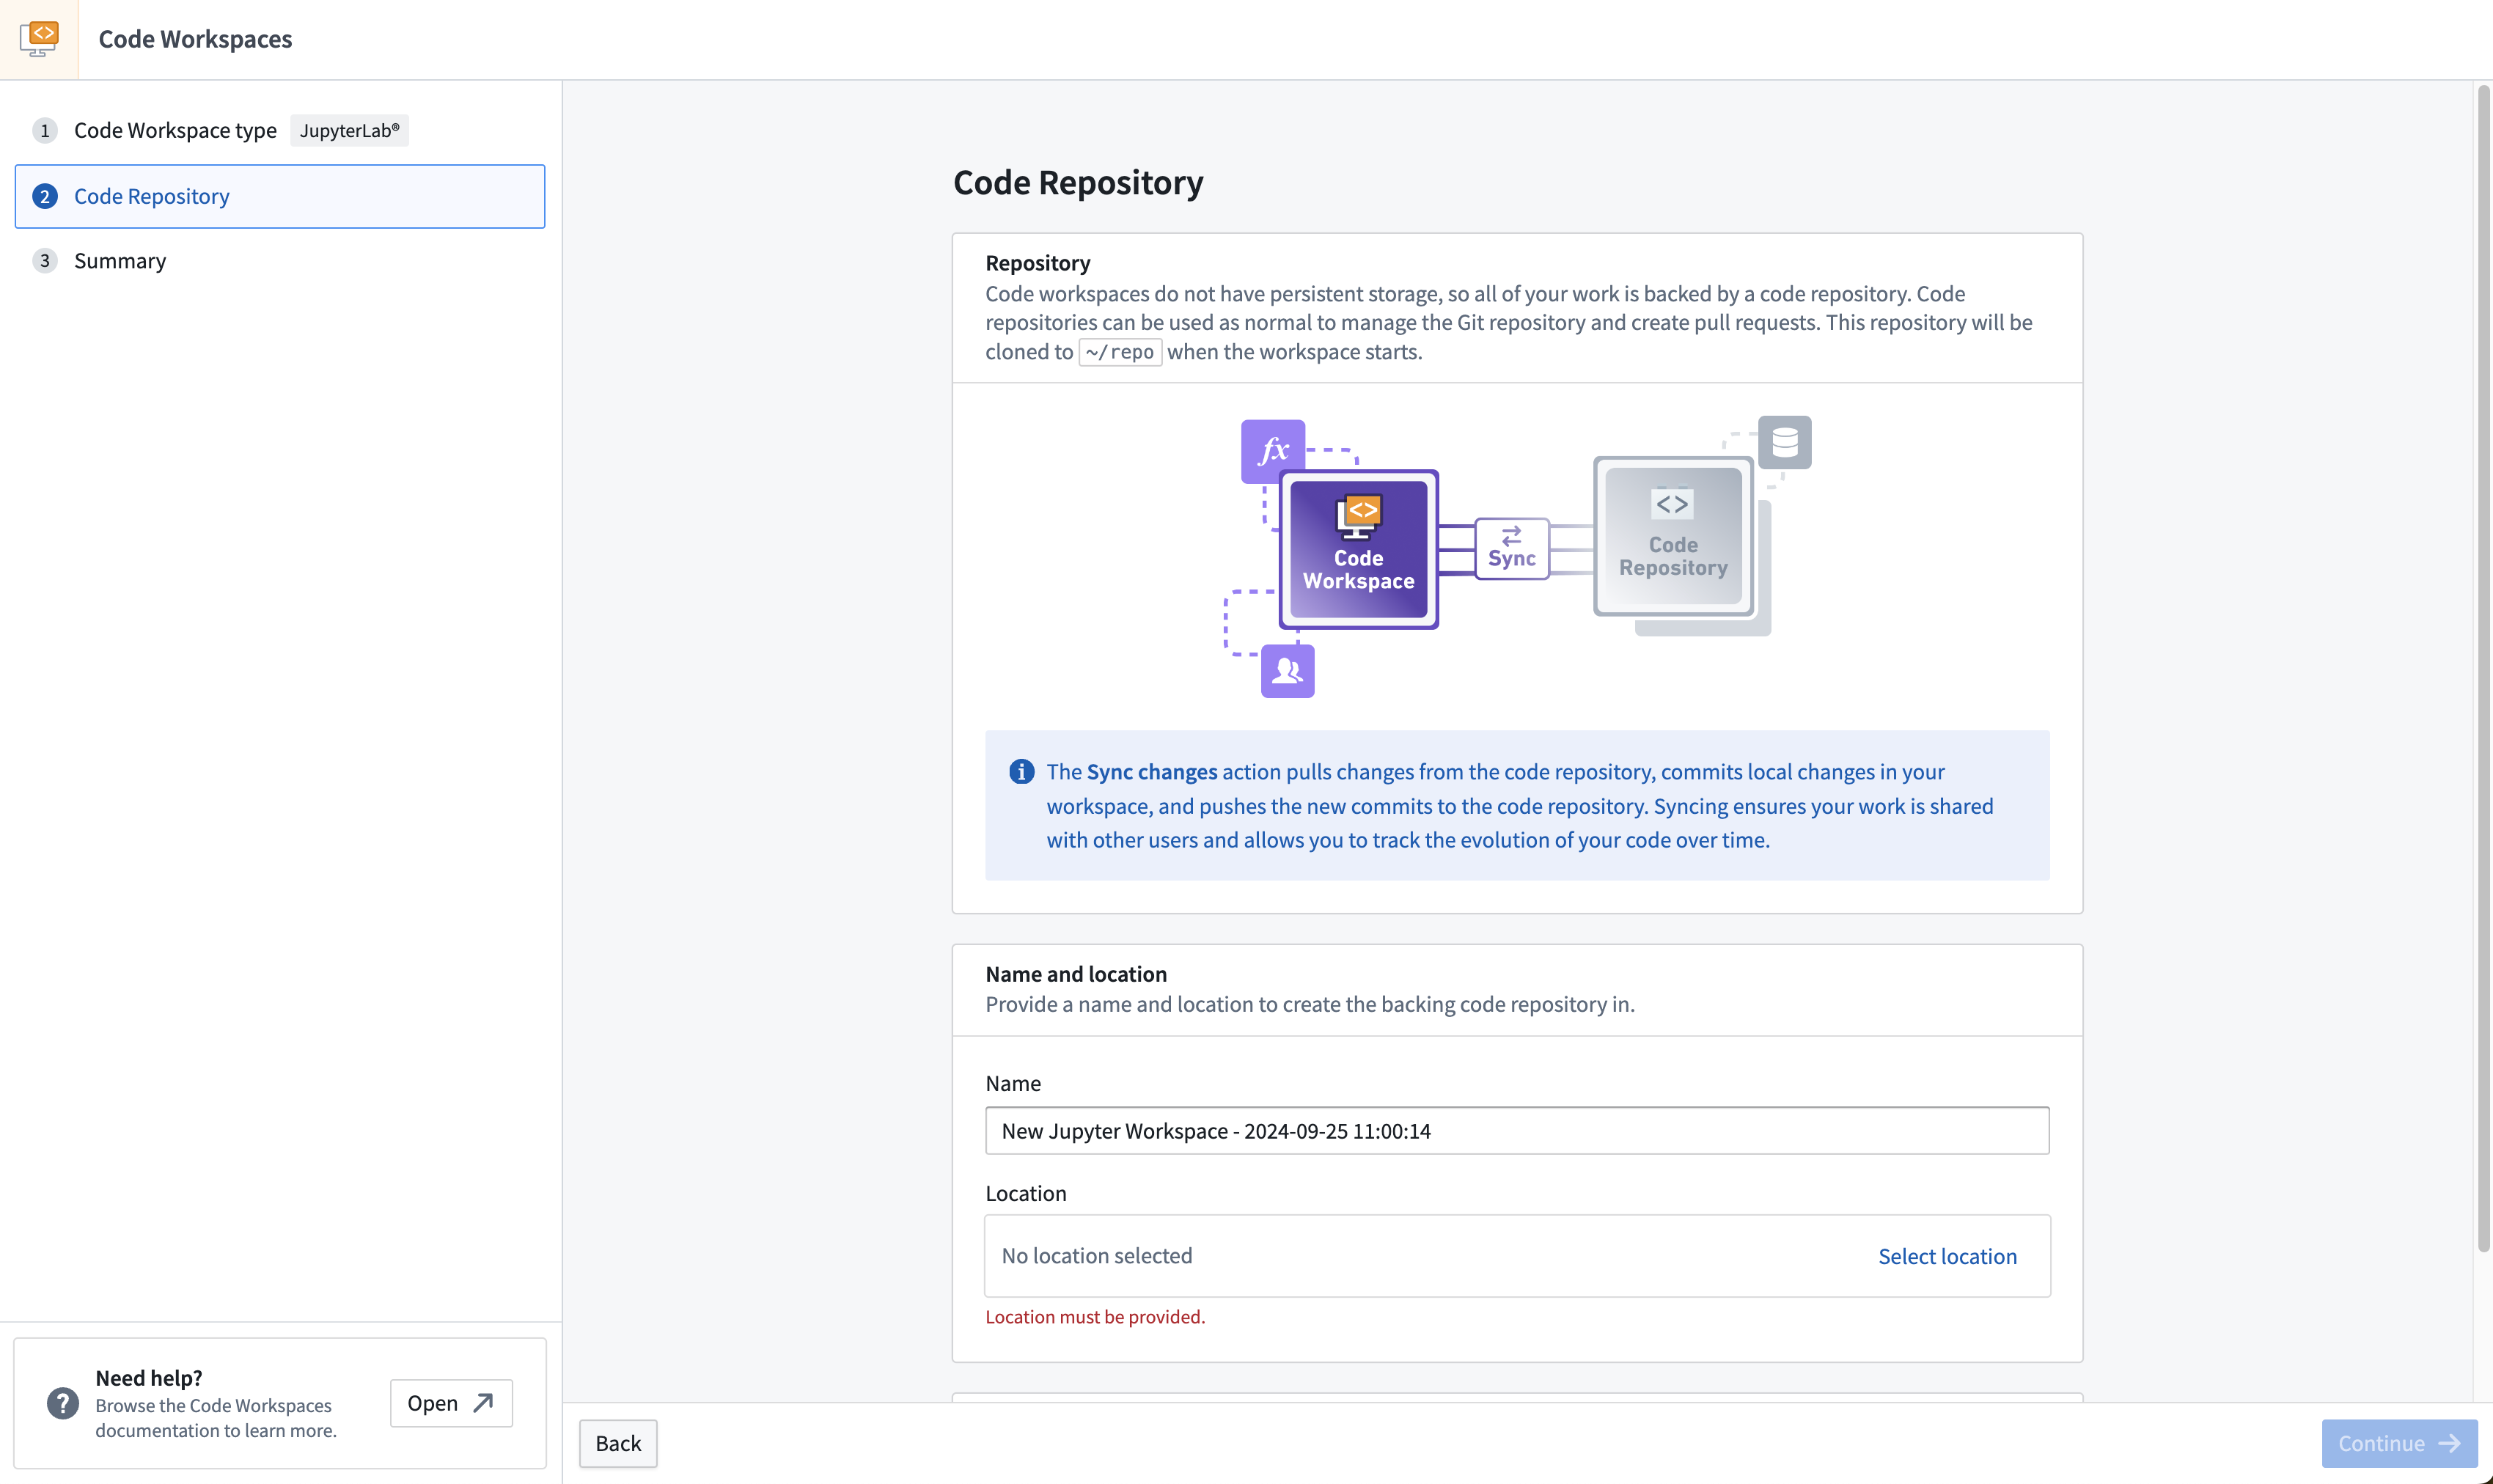
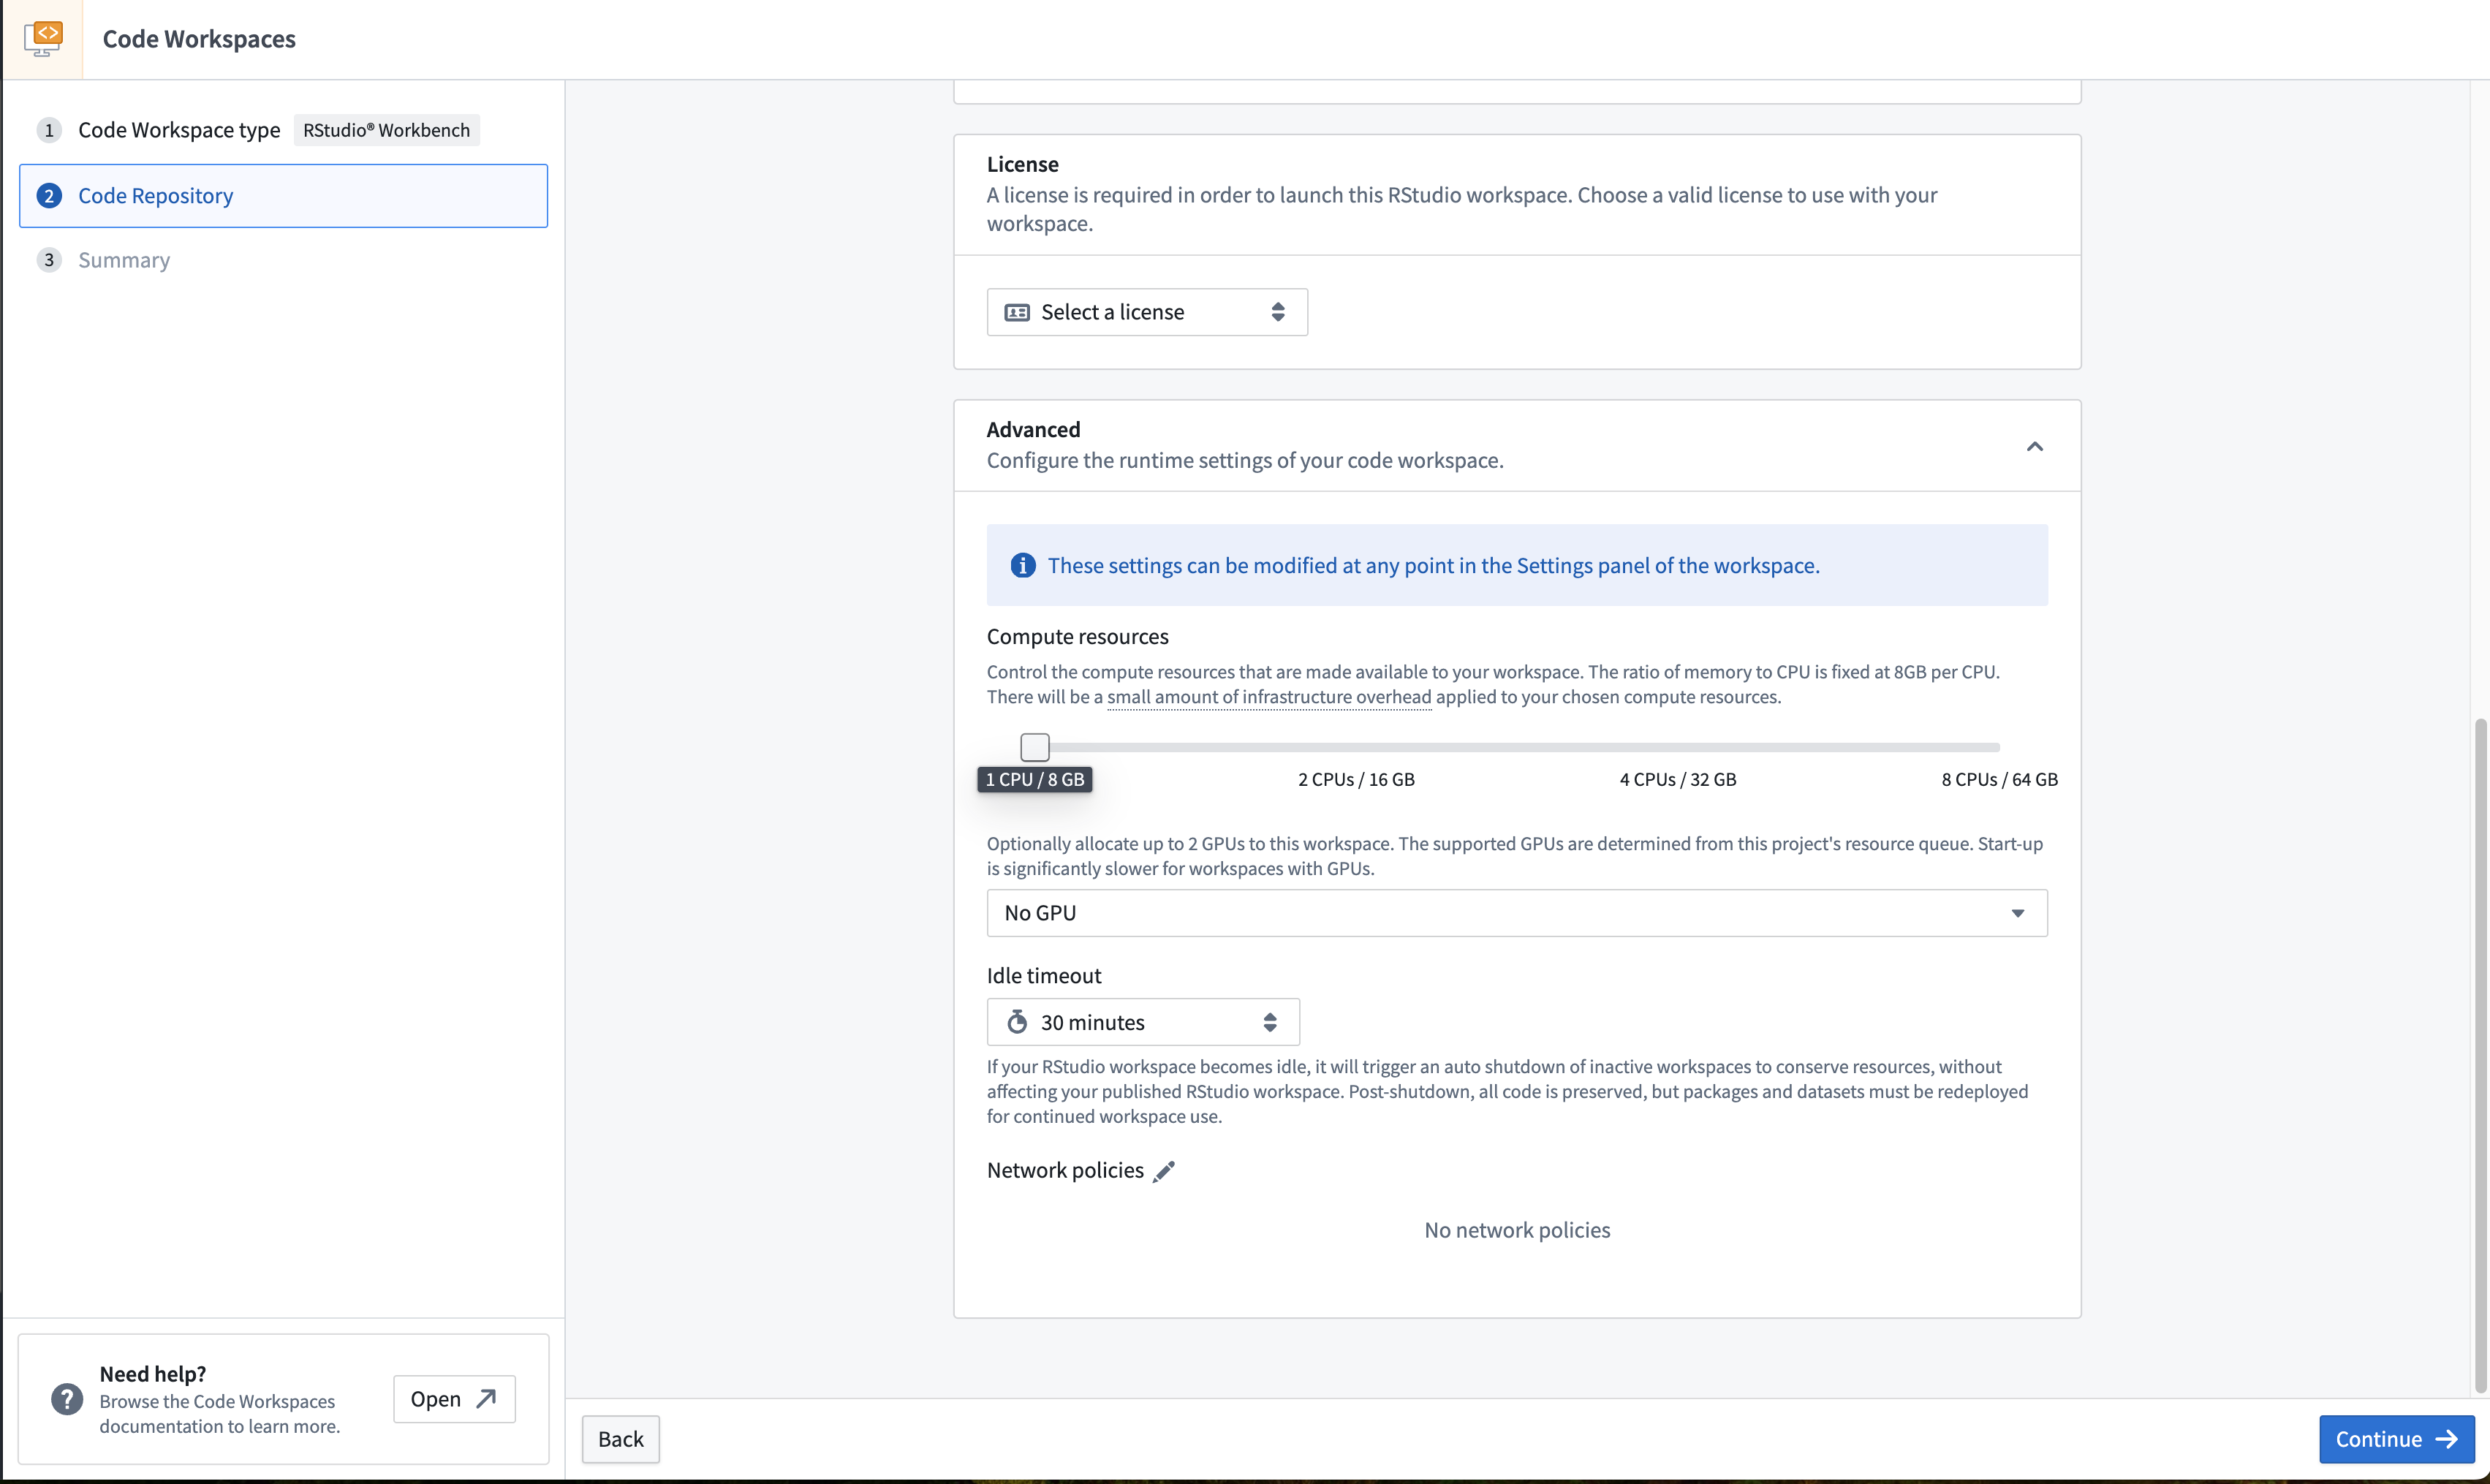
Then, set the name and location of the backing code repository for the workspace you want to create. If you are creating an RStudio® workspace, you will be able to select a license. In most cases, the license will be automatically selected.

Each user who launches the workspace will run their own isolated session. If two or more users will be using the same workspace, ensure that all users have Viewer permission or higher for the underlying code repository. See above for more information about a code workspace’s underlying code repository.
Advanced settings
Advanced settings allow you to define idle time and the resource profile for your code workspace. These settings can be modified at any time in the Settings panel of the workspace accessible by selecting the gear icon in the top right corner.

- Auto-shutdown
- The auto-shutdown setting defines the period of time that your container will remain active. The workspace will automatically be shut down after this period of inactivity in order to reduce resource usage. After an auto-shutdown, packages and datasets will need to be redeployed to your container. Note that your code will persist after the auto-shutdown.
- The default auto-shutdown period is 30 minutes. The maximum auto-shutdown setting is 6 hours, and the maximum session length is 24 hours.
- Longer auto-shutdown settings can incur higher costs. We recommend setting a shorter auto-shutdown period to reduce cost, and to rely on code committed to Foundry rather than uncommitted changes which would be restored across sessions (see the code workspace lifecycle documentation below).
- Compute Resources
- Larger resource profiles can incur higher costs.
- Network Policies
- If enabled by your administrator, you will be able to select network policies to attach to your workspace in order to make external API calls from your workspace.
Transforms
:::callout{theme="neutral"} Users cannot publish transforms directly in an underlying code repository, since the repository is customized for use as infrastructure for Code Workspaces. All code must be published from the code workspace. :::
Import data
You can import data from sources in Foundry directly by navigating to the Data tab and then selecting Add > Read data. This includes Foundry datasets, Iceberg tables, and virtual tables. Any data that is imported from outside the code workspace’s current project (including the user’s home folder) will require a reference to be added.
Alternatively, for data that has not yet been ingested into Foundry, select Upload data to import data directly from your device.

:::callout{theme="warning"} Dataset views cannot be used as imported datasets in a code workspace. Instead, copy the dataset view to a new or existing dataset where necessary. :::
Import packages
You can import packages into your code workspace by navigating to the Packages tab in the left panel, or you can install packages directly using Conda or PyPI for Jupyter® and CRAN for RStudio®.
JupyterLab® Packages
JupyterLab® workspaces support installation of packages from Conda or PyPI. By default, Code Workspaces exposes conda-forge and pypi.org. You can add other channels to a code workspace by adding them to the backing code repository and restarting your code workspace.
Conda/PyPI environments in JupyterLab® can be consistently restored across workflows in JupyterLab®, applications, or transforms using managed environments.
You can browse packages from the Packages tab and select the package you wish to install. This will automatically execute an installation command for you in a new JupyterLab® terminal.
To install packages manually, you can use maestro env conda install <packages> for Conda packages and maestro env pip install <packages> for PyPI packages in the JupyterLab® terminal.
Review managed Conda/PyPI environments in Jupyter® Notebooks for more information.
:::callout{theme="warning"}
Installing packages directly with mamba and pip is now deprecated.
:::
CRAN
RStudio® Workspaces support installation of packages from CRAN, Posit™ Package Manager, or Bioconductor. By default, Code Workspaces exposes all of Posit™ Public Package Manager ↗ as well as Bioconductor ↗. You can add other channels (such as MRAN) by adding them to the backing code repository and restarting your code workspace.
To install packages, you can use renv since renv supports authenticated CRAN channels.
You can browse packages from the Packages tab and select the package you wish to install. This will generate an installation command for you to copy-paste in RStudio® Workbench and execute. Generally, CRAN packages are installed with renv::install("<package>") and Bioconductor packages with renv::install("bioc::<package>").
Publish your code
In order for other users of the same workspace to view your code, you must publish your code to the branch you are working on.
Note that publishing your code will cause CI checks to run, which will publish a new version of every registered Code Workspace application. As a best practice, we recommend keeping code workspaces focused on a single type of task (such as building a application, analyzing data, writing data transformations, or building models), rather than attempting to accomplish multiple independent workflows in a single code workspace.
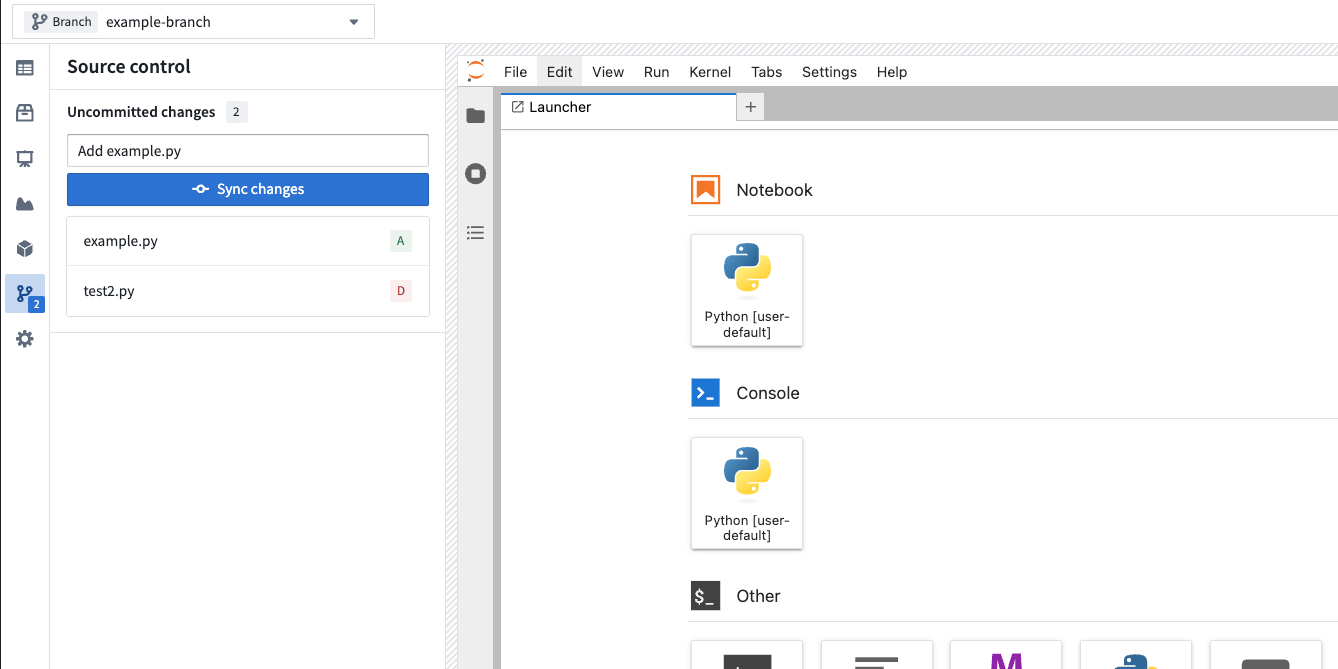
Unpublished changes can be viewed in the Source control side panel. Optionally supply a commit message and then select Sync changes to publish your code. When collapsed, the number of file changes is displayed over the source control icon.
Branch your code workspace
You can branch your code workspace, check out branches, and perform other version control activities with the branch manager.
To create or find a branch, use the branch selector at the top of the screen. Selecting the branch selector opens a menu displaying the list of existing branches. Alternatively, a new branch can be created by selecting Create new branch. If you have unpublished code changes, you will be prompted to sync before checking out the selected branch.

In the same way as branching elsewhere in Foundry, the data available in a code workspace comes from the branch you are currently on (with fallbacks). If you write data to an output dataset, the data will be written to your current branch.
You can merge your branch into master by selecting Propose changes. After proposing changes, a pull request (PR) preview will appear.
Share your code workspace
You can share your code workspace by selecting Share in the upper-right corner of the interface.
:::callout{theme="warning"} If the code workspace and code repository are separate resources, you must also share the permissions on the underlying repository for others to see the code in your workspace. :::
Users with Editor or Owner roles on the project will be able to modify the settings of the code workspace. Users with Viewer roles on the project will be able to launch the workspace.

Restart a code workspace
You can manually restart a code workspace (for instance, to pick up configuration changes) by selecting Active > Restart workspace in the upper-right corner of the interface.

This will result in a new session in the initial state. The workspace will automatically restart with all the changes that were committed to the backing code repository. However, the workspace will not contain everything from the state present before the restart, including imported data, variables stored in memory, installed packages, and more.
Before restarting a workspace, the application will automatically create a checkpoint and prompt you to sync your latest changes.
You can select Active > Restore checkpoint to restore the workspace to the state of a previous checkpoint. See the checkpoints section below for more information. Code Workspaces will not automatically restore the workspace to a previous checkpoint following a workspace restart.
Code workspace lifecycle
Users who open Code Workspaces for the first time will receive a blank workspace with the backing repository cloned in /home/user/repo.
Code Workspaces sessions are automatically shut down when there is no user activity, and can last at most 24 hours (see more about automatic shutdowns in the advanced settings documentation).
When a session shuts down, all the relevant state is persisted in Foundry in a checkpoint and restored the next time the same user opens the code workspace. This allows users to pick up where they were at the time of shutdown.
Save work in a code workspace
Code Workspaces has two distinct ways to save existing work: manual code syncing and automated checkpointing.
:::callout{theme="neutral"} We recommend relying on code synced to the underlying code repository (with the required package installations as part of the code) rather than relying on workspace checkpoints. Code syncing will help ensure a resilient workflow and facilitate collaboration with other users who may not have access to a given checkpoint. :::
Code syncs
Code syncing is a manual action and the recommended way to save existing work in a code workspace. Syncing code means committing your files to the backing code repository of the workspace. Any work saved through code syncing is permanently saved in the repository, and everything in the /home/user/repo folder is stored as part of that sync. Code syncing does not save existing states such as variable contents, installed packages on the environment, data, or code cell outputs. The sync history of the workspace can be consulted through the backing code repository of the workspace. We generally recommend to frequently sync your code to both maintain a history of changes and ensure all relevant work is properly and permanently stored.
To save all of your existing changes in a workspace, select Sync changes in the top right corner of the workspace. Once that succeeds, the changes are committed to the backing repository of the workspace, which you can access by selecting the gear icon in the top right corner then choosing Open code repository.
Checkpoints
Checkpointing is a feature that automatically takes snapshots of the existing state of a workspace to be able to restore it across sessions. There are two types of checkpoints: data checkpoints and code checkpoints.
Data checkpoints
Unlike code syncs that only store committed files, data checkpoints store all contents of /home/user/repo (including uncommitted code changes), /home/user/libs (including installed packages), /home/user/envs (Conda environments), and /home/user/data (extra data downloaded by the user). In the case of RStudio®, variables stored in memory are stored in /home/user/repo/.RData.
By default, Code Workspaces saves a data checkpoint of a given user's session every ten minutes. Data checkpoints are not shared across users. Code Workspaces also creates a data checkpoint before the workspace shuts down (through a manual restart, a manual shutdown, or an automatic shutdown, for example). An inactive code workspace does not generate any new data checkpoints, and any given data checkpoint lasts up to a maximum of 30 days. As a result, since no valid data checkpoints will be available, a workspace left untouched for more than 30 days will only be able to restore work from what was synced to the backing repository or from a code checkpoint. Data checkpoints are designed to be a safety net to persist the workspaces's state across sessions; they should not be relied on as a primary form of saving. We strongly recommend frequently syncing existing work in the workspace.
Restoring a data checkpoint will restart the workspace and restore the home folder to how it was at the time the checkpoint was created.
Code checkpoints
Code checkpoints store only the workspace code (not data) by saving the contents of /home/user/repo (including uncommitted code changes) while excluding files that are either above a certain size or have extensions commonly associated with data. This filtering is done on a best-effort basis. Code checkpoints are created only before the workspace is shut down. Unlike data checkpoints, there is no retention period for code checkpoints.
Code checkpoints are not subject to filtering that would prevent you from committing common data files to your workspace's backing repository. You must ensure that code files do not contain data. For example, a .py code file should never contain tabular data that exists in a Foundry dataset.
Manage data files
Code Workspaces automatically scans your /home/user/repo/ folder for files with large sizes or common data file extensions, such as .csv, .gz, .parquet, .pdf, or .xlsx. Moving these files to either the data-checkpoint or data-tmp directory optimizes workspace startup times and improves security, acting as a safeguard in case you or another user unintentionally commit these files to the workspace's backing repository.
data-checkpoint: The recommended place to store data files that you want to save and restore across sessions. These files will be saved to checkpoints and restored in the background without blocking workspace startup. Additionally, this folder will be excluded from syncs to prevent committing large, unsecured data to the backing code repository.data-tmp: The recommended place to store temporary files that you do not want to save across sessions. These files will not be saved to checkpoints or the backing code repository; they will instead be discarded when your workspace shuts down.
If you want data to be available to published dashboards or transforms, or to other users, we recommend that you persist data to a Foundry dataset instead of saving it in your workspace.
When the workspace detects data files, you will see a warning that prompts you to move them to either the data-checkpoint or data-tmp directory. Select the files you want to relocate and follow the dialog to move them. Remember to update your code with the new path prefixes, or else the warning will appear again as soon as you write a new data file in the /home/user/repo/ folder.

RStudio® and Shiny® are trademarks of Posit™.
Jupyter®, JupyterLab®, and the Jupyter® logos are trademarks or registered trademarks of NumFOCUS.
All third-party trademarks (including logos and icons) referenced remain the property of their respective owners. No affiliation or endorsement is implied.
中文翻译
Code Workspaces 入门指南
本教程将通过设置 JupyterLab® 或 RStudio® Workbench 工作区,介绍 Code Workspaces 的基本使用方法。
底层代码仓库(Backing Code Repository)
所有代码工作区都由 Palantir 平台的代码仓库提供支持。这使得代码工作区具备行业标准的版本控制功能,如分支、合并和提交历史记录,允许其他用户查看代码并在同一工作区中安全操作。
:::callout{theme="warning"} 此前,代码工作区及其关联的代码仓库以独立资源形式呈现。现在,代码工作区和关联的代码仓库已合并为单一资源,即代码仓库。在 Foundry 的任何文件夹中选择该代码仓库,将自动打开关联的 Jupyter 或 RStudio® 工作区。
此变更仅适用于新建的代码工作区,不影响现有的代码工作区和代码仓库,后者将继续作为独立资源存在。 :::
启动代码工作区
要启动代码工作区,请打开 Code Workspaces 应用程序并导航至 General 选项卡。然后,选择一个文件夹来创建您的代码工作区。
:::callout{theme="neutral"}
对项目拥有 Editor 或 Owner 角色的用户可以修改代码工作区的设置。对项目拥有 Viewer 角色的用户可以启动工作区。您可以选择主文件夹作为位置,但这可能导致您的代码工作区和数据被限制在某个项目内。
:::
选择要启动的工作区类型。目前支持的工作区包括 JupyterLab 和 RStudio® Workbench。
然后,设置要创建的工作区底层代码仓库的名称和位置。如果您正在创建 RStudio® 工作区,您可以选择许可证。在大多数情况下,许可证会自动选择。
每个启动工作区的用户都将运行自己独立的会话。如果两个或更多用户将使用同一个工作区,请确保所有用户对底层代码仓库拥有 Viewer 或更高权限。有关代码工作区底层代码仓库的更多信息,请参见上文。
高级设置(Advanced Settings)
高级设置允许您定义代码工作区的空闲时间和资源配置。这些设置可随时在工作区的 Settings 面板中修改,点击右上角的齿轮图标即可访问。
- 自动关闭(Auto-shutdown)
- 自动关闭设置定义了容器保持活动状态的时间。在此非活动时间段后,工作区将自动关闭以减少资源使用。自动关闭后,需要重新将包和数据集部署到您的容器中。请注意,您的代码在自动关闭后仍会保留。
- 默认自动关闭时间为 30 分钟。最大自动关闭设置为 6 小时,最大会话时长为 24 小时。
- 较长的自动关闭设置可能会产生更高的成本。我们建议设置较短的自动关闭时间以降低成本,并依赖提交到 Foundry 的代码,而不是跨会话恢复的未提交更改(请参见下面的代码工作区生命周期文档)。
- 计算资源(Compute Resources)
- 较大的资源配置可能会产生更高的成本。
- 网络策略(Network Policies)
- 如果管理员启用了此功能,您可以选择要附加到工作区的网络策略,以便从工作区进行外部 API 调用。
转换(Transforms)
:::callout{theme="neutral"} 用户无法直接在底层代码仓库中发布转换,因为该仓库已定制为用作 Code Workspaces 的基础设施。所有代码必须从代码工作区发布。 :::
导入数据
您可以通过导航至 Data 选项卡,然后选择 Add > Read data,直接从 Foundry 中的源导入数据。这包括 Foundry 数据集、Iceberg 表和虚拟表。从代码工作区当前项目外部(包括用户的主文件夹)导入的任何数据都需要添加引用。
或者,对于尚未导入 Foundry 的数据,请选择 Upload data 直接从您的设备导入数据。
:::callout{theme="warning"} 数据集视图不能用作代码工作区中的导入数据集。如有必要,请将数据集视图复制到新的或现有的数据集中。 :::
导入包
您可以通过导航至左侧面板中的 Packages 选项卡将包导入代码工作区,也可以直接使用 Conda 或 PyPI(适用于 Jupyter®)以及 CRAN(适用于 RStudio®)安装包。
JupyterLab® 包
JupyterLab® 工作区支持从 Conda 或 PyPI 安装包。默认情况下,Code Workspaces 会暴露 conda-forge 和 pypi.org。您可以通过将其他渠道添加到底层代码仓库并重启代码工作区来添加它们。
JupyterLab® 中的 Conda/PyPI 环境可以使用托管环境在 JupyterLab®、应用程序或转换的工作流中一致地恢复。
您可以从 Packages 选项卡浏览包,并选择要安装的包。这将自动在新建的 JupyterLab® 终端中为您执行安装命令。
要手动安装包,您可以在 JupyterLab® 终端中使用 maestro env conda install <packages> 安装 Conda 包,使用 maestro env pip install <packages> 安装 PyPI 包。
有关更多信息,请查看Jupyter® Notebook 中的托管 Conda/PyPI 环境。
:::callout{theme="warning"}
直接使用 mamba 和 pip 安装包现已弃用。
:::
CRAN
RStudio® 工作区支持从 CRAN、Posit™ Package Manager 或 Bioconductor 安装包。默认情况下,Code Workspaces 会暴露所有 Posit™ Public Package Manager ↗ 以及 Bioconductor ↗。您可以通过将其他渠道(如 MRAN)添加到底层代码仓库并重启代码工作区来添加它们。
要安装包,您可以使用 renv,因为 renv 支持经过身份验证的 CRAN 渠道。
您可以从 Packages 选项卡浏览包,并选择要安装的包。这将生成一个安装命令,供您复制粘贴到 RStudio® Workbench 中执行。通常,CRAN 包使用 renv::install("<package>") 安装,Bioconductor 包使用 renv::install("bioc::<package>") 安装。
发布代码
为了让同一工作区的其他用户查看您的代码,您必须将代码发布到您正在处理的分支。
请注意,发布代码将触发 CI 检查,这将发布每个已注册 Code Workspace 应用程序的新版本。作为最佳实践,我们建议将代码工作区专注于单一类型的任务(例如构建应用程序、分析数据、编写数据转换或构建模型),而不是尝试在单个代码工作区中完成多个独立的工作流。
未发布的更改可以在 Source control 侧面板中查看。可选地提供提交消息,然后选择 Sync changes 以发布您的代码。当折叠时,文件更改的数量会显示在源代码控制图标上。
分支代码工作区
您可以使用分支管理器分支代码工作区、检出分支以及执行其他版本控制活动。
要创建或查找分支,请使用屏幕顶部的分支选择器。选择分支选择器会打开一个菜单,显示现有分支列表。或者,可以通过选择 Create new branch 来创建新分支。如果您有未发布的代码更改,系统会提示您在检出所选分支之前进行同步。
与 Foundry 其他位置的分支 类似,代码工作区中可用的数据来自您当前所在的分支(带有回退)。如果您将数据写入输出数据集,数据将写入您当前的分支。
您可以通过选择 Propose changes 将您的分支合并到主分支。提出更改后,将显示拉取请求(PR)预览。
共享代码工作区
您可以通过选择界面右上角的 Share 来共享您的代码工作区。
:::callout{theme="warning"} 如果代码工作区和代码仓库是独立资源,您还必须共享底层仓库的权限,以便其他人查看您工作区中的代码。 :::
对项目拥有 Editor 或 Owner 角色的用户可以修改代码工作区的设置。对项目拥有 Viewer 角色的用户可以启动工作区。
重启代码工作区
您可以通过选择界面右上角的 Active > Restart workspace 手动重启代码工作区(例如,以应用配置更改)。
这将导致一个处于初始状态的新会话。工作区将自动重启,并包含所有已提交到底层代码仓库的更改。但是,工作区不会包含重启前状态中的所有内容,包括导入的数据、存储在内存中的变量、已安装的包等。
在重启工作区之前,应用程序会自动创建一个检查点,并提示您同步最新更改。
您可以选择 Active > Restore checkpoint 将工作区恢复到之前检查点的状态。有关更多信息,请参见下面的检查点部分。工作区重启后,Code Workspaces 不会自动将工作区恢复到之前的检查点。
代码工作区生命周期(Code Workspace Lifecycle)
首次打开 Code Workspaces 的用户将获得一个空白工作区,底层仓库克隆在 /home/user/repo 中。
Code Workspaces 会话在没有用户活动时会自动关闭,并且最长可持续 24 小时(有关自动关闭的更多信息,请参见高级设置文档)。
当会话关闭时,所有相关状态都会以检查点的形式持久保存在 Foundry 中,并在同一用户下次打开代码工作区时恢复。这允许用户从关闭时的状态继续工作。
在代码工作区中保存工作
Code Workspaces 有两种不同的方式保存现有工作:手动代码同步和自动检查点。
:::callout{theme="neutral"} 我们建议依赖同步到底层代码仓库的代码(以及作为代码一部分所需的包安装),而不是依赖工作区检查点。代码同步有助于确保工作流的弹性,并促进与可能无法访问特定检查点的其他用户的协作。 :::
代码同步(Code Syncs)
代码同步是一种手动操作,也是推荐的在代码工作区中保存现有工作的方法。同步代码意味着将您的文件提交到工作区的底层代码仓库。通过代码同步保存的任何工作都会永久保存在仓库中,/home/user/repo 文件夹中的所有内容都会作为该同步的一部分存储。代码同步不会保存现有状态,例如变量内容、环境中安装的包、数据或代码单元输出。工作区的同步历史可以通过工作区的底层代码仓库查看。我们通常建议频繁同步您的代码,以维护更改历史并确保所有相关工作得到正确且永久的存储。
要保存工作区中所有现有的更改,请选择工作区右上角的 Sync changes。成功后,更改将提交到工作区的底层仓库,您可以通过选择右上角的齿轮图标,然后选择 Open code repository 来访问该仓库。
检查点(Checkpoints)
检查点是一项功能,可自动拍摄工作区现有状态的快照,以便跨会话恢复。有两种类型的检查点:数据检查点和代码检查点。
数据检查点(Data Checkpoints)
与仅存储已提交文件的代码同步不同,数据检查点存储 /home/user/repo(包括未提交的代码更改)、/home/user/libs(包括已安装的包)、/home/user/envs(Conda 环境)和 /home/user/data(用户下载的额外数据)的所有内容。对于 RStudio®,存储在内存中的变量存储在 /home/user/repo/.RData 中。
默认情况下,Code Workspaces 每十分钟保存一次给定用户会话的数据检查点。数据检查点不在用户之间共享。Code Workspaces 还会在工作区关闭之前(例如,通过手动重启、手动关闭或自动关闭)创建一个数据检查点。非活动的代码工作区不会生成任何新的数据检查点,任何给定的数据检查点最长保留 30 天。因此,由于没有有效的数据检查点可用,超过 30 天未使用的工作区只能从同步到底层仓库的内容或代码检查点恢复工作。数据检查点旨在作为跨会话持久保存工作区状态的安全网;不应将其作为主要保存方式依赖。我们强烈建议频繁同步工作区中的现有工作。
恢复数据检查点将重启工作区,并将主文件夹恢复到创建检查点时的状态。
代码检查点(Code Checkpoints)
代码检查点仅存储工作区代码(不存储数据),通过保存 /home/user/repo 的内容(包括未提交的代码更改),同时排除超过特定大小或具有通常与数据关联的扩展名的文件。此过滤基于尽力而为的原则。代码检查点仅在工作区关闭之前创建。与数据检查点不同,代码检查点没有保留期限。
代码检查点不受过滤限制,不会阻止您将常见数据文件提交到工作区的底层仓库。您必须确保代码文件不包含数据。例如,.py 代码文件绝不应包含存在于 Foundry 数据集中的表格数据。
管理数据文件
Code Workspaces 会自动扫描您的 /home/user/repo/ 文件夹,查找大文件或常见数据文件扩展名(如 .csv、.gz、.parquet、.pdf 或 .xlsx)的文件。将这些文件移动到 data-checkpoint 或 data-tmp 目录可以优化工作区启动时间并提高安全性,作为防止您或其他用户无意中将这些文件提交到工作区底层仓库的安全措施。
data-checkpoint: 推荐用于存储您希望跨会话保存和恢复的数据文件的位置。这些文件将保存到检查点,并在后台恢复,不会阻塞工作区启动。此外,此文件夹将被排除在同步之外,以防止将大型、不安全的数据库提交到底层代码仓库。data-tmp: 推荐用于存储您不希望跨会话保留的临时文件的位置。这些文件不会保存到检查点或底层代码仓库;它们将在工作区关闭时被丢弃。
如果您希望数据可用于已发布的仪表板或转换,或供其他用户使用,我们建议您将数据持久保存到 Foundry 数据集,而不是将其保存在工作区中。
当工作区检测到数据文件时,您将看到一个警告,提示您将它们移动到 data-checkpoint 或 data-tmp 目录。选择要移动的文件并按照对话框进行操作。请记住使用新的路径前缀更新您的代码,否则一旦您在 /home/user/repo/ 文件夹中写入新的数据文件,警告将再次出现。
RStudio® 和 Shiny® 是 Posit™ 的商标。
Jupyter®、JupyterLab® 和 Jupyter® 标志是 NumFOCUS 的商标或注册商标。
所有引用的第三方商标(包括徽标和图标)均为其各自所有者的财产。不暗示任何隶属关系或认可。