Interact with the Ontology(与本体(Ontology)交互)
:::callout{theme="warning"} Restricted View-backed Ontology entities and query functions are not yet supported in Code Workspaces. :::
Code Workspaces supports interacting with the Ontology using object, link, and action types in JupyterLab® and RStudio®.
Create a new Ontology SDK
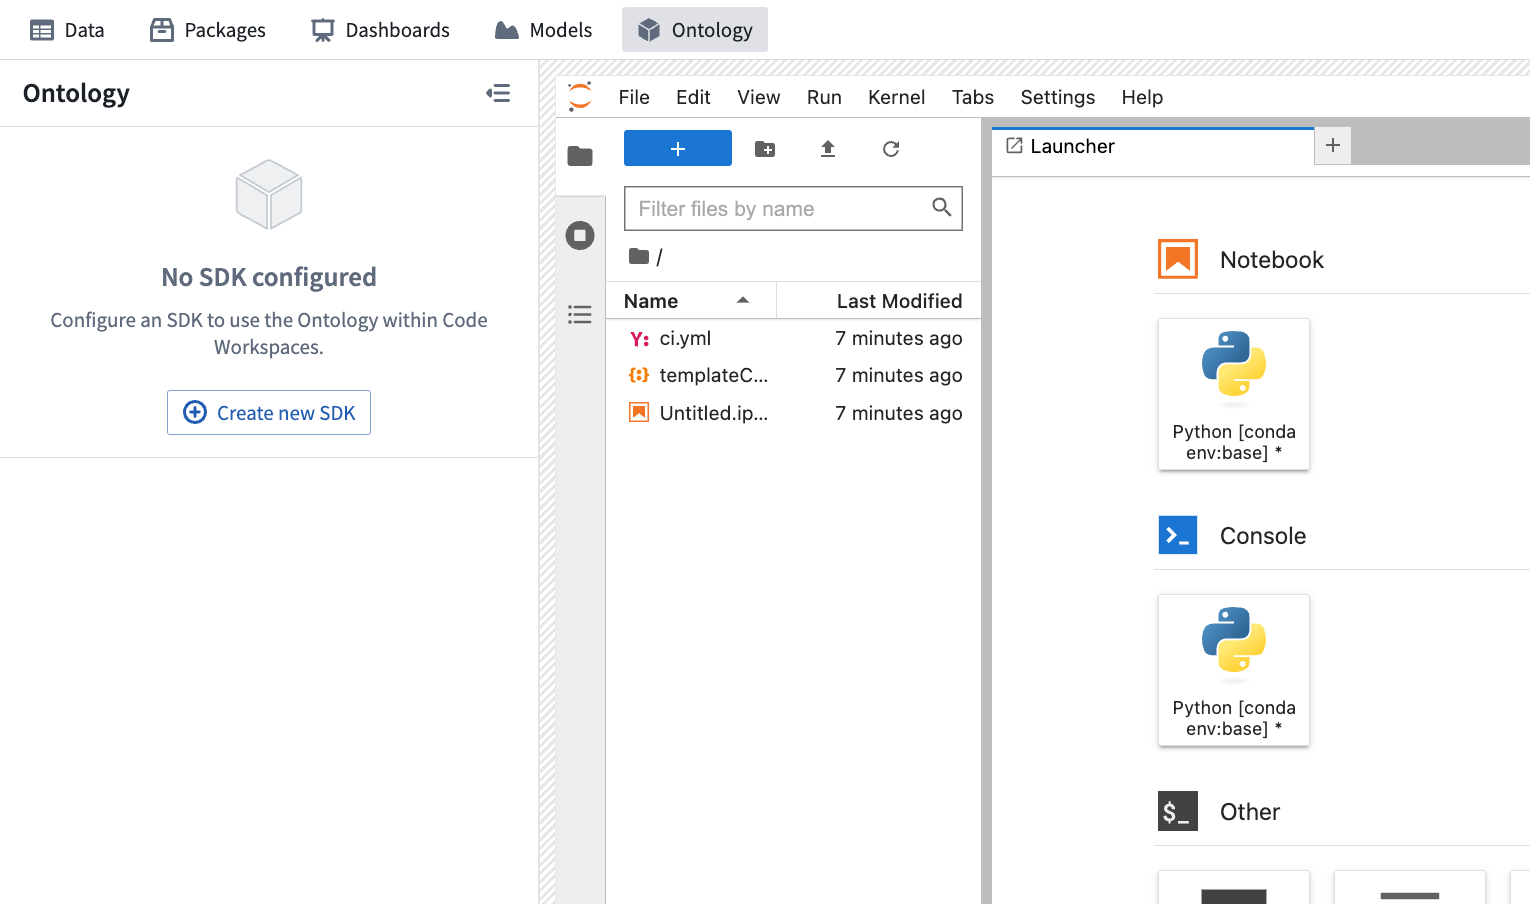
To create a new Ontology SDK in Code Workspaces, first navigate to the Ontology side panel. Each Code Workspace can have one SDK, and multiple versions of each SDK can be created. From the Ontology side panel, select Create new SDK to open the SDK configuration form.
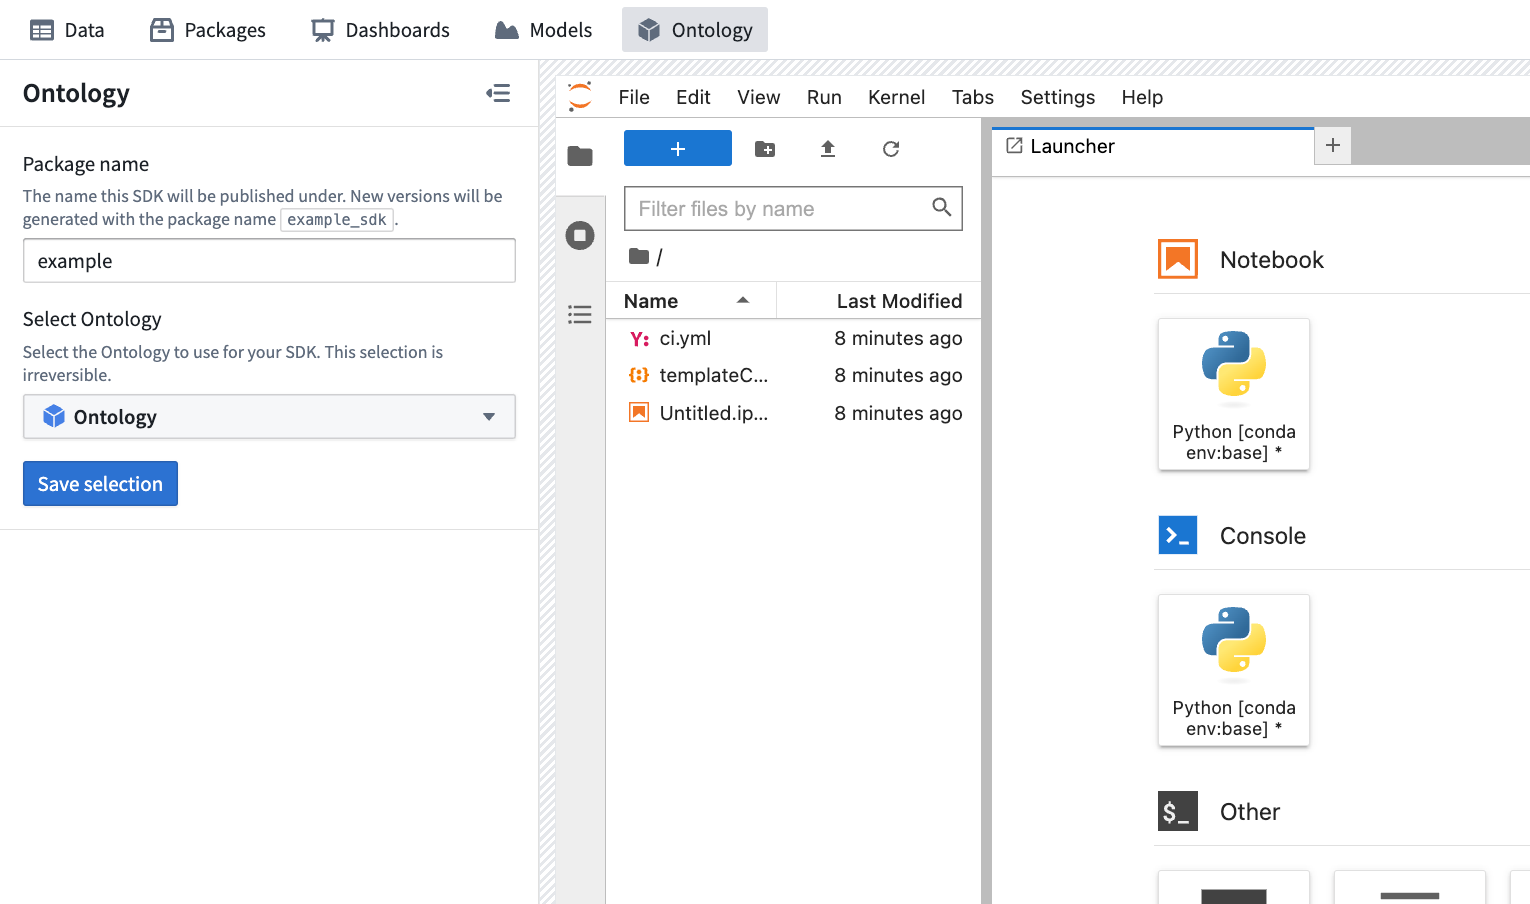
New Ontology SDKs require a package name and an associated Ontology. The package name is used to determine how your SDK is accessed in code: versions of an SDK with a package name of example would be importable under the library name example_sdk. SDK package names can only contain letters, numbers and hyphens, and cannot end with a hyphen. Once published, SDK package names cannot be changed.
After configuring your SDK, select Save selection to continue.
Select data entities
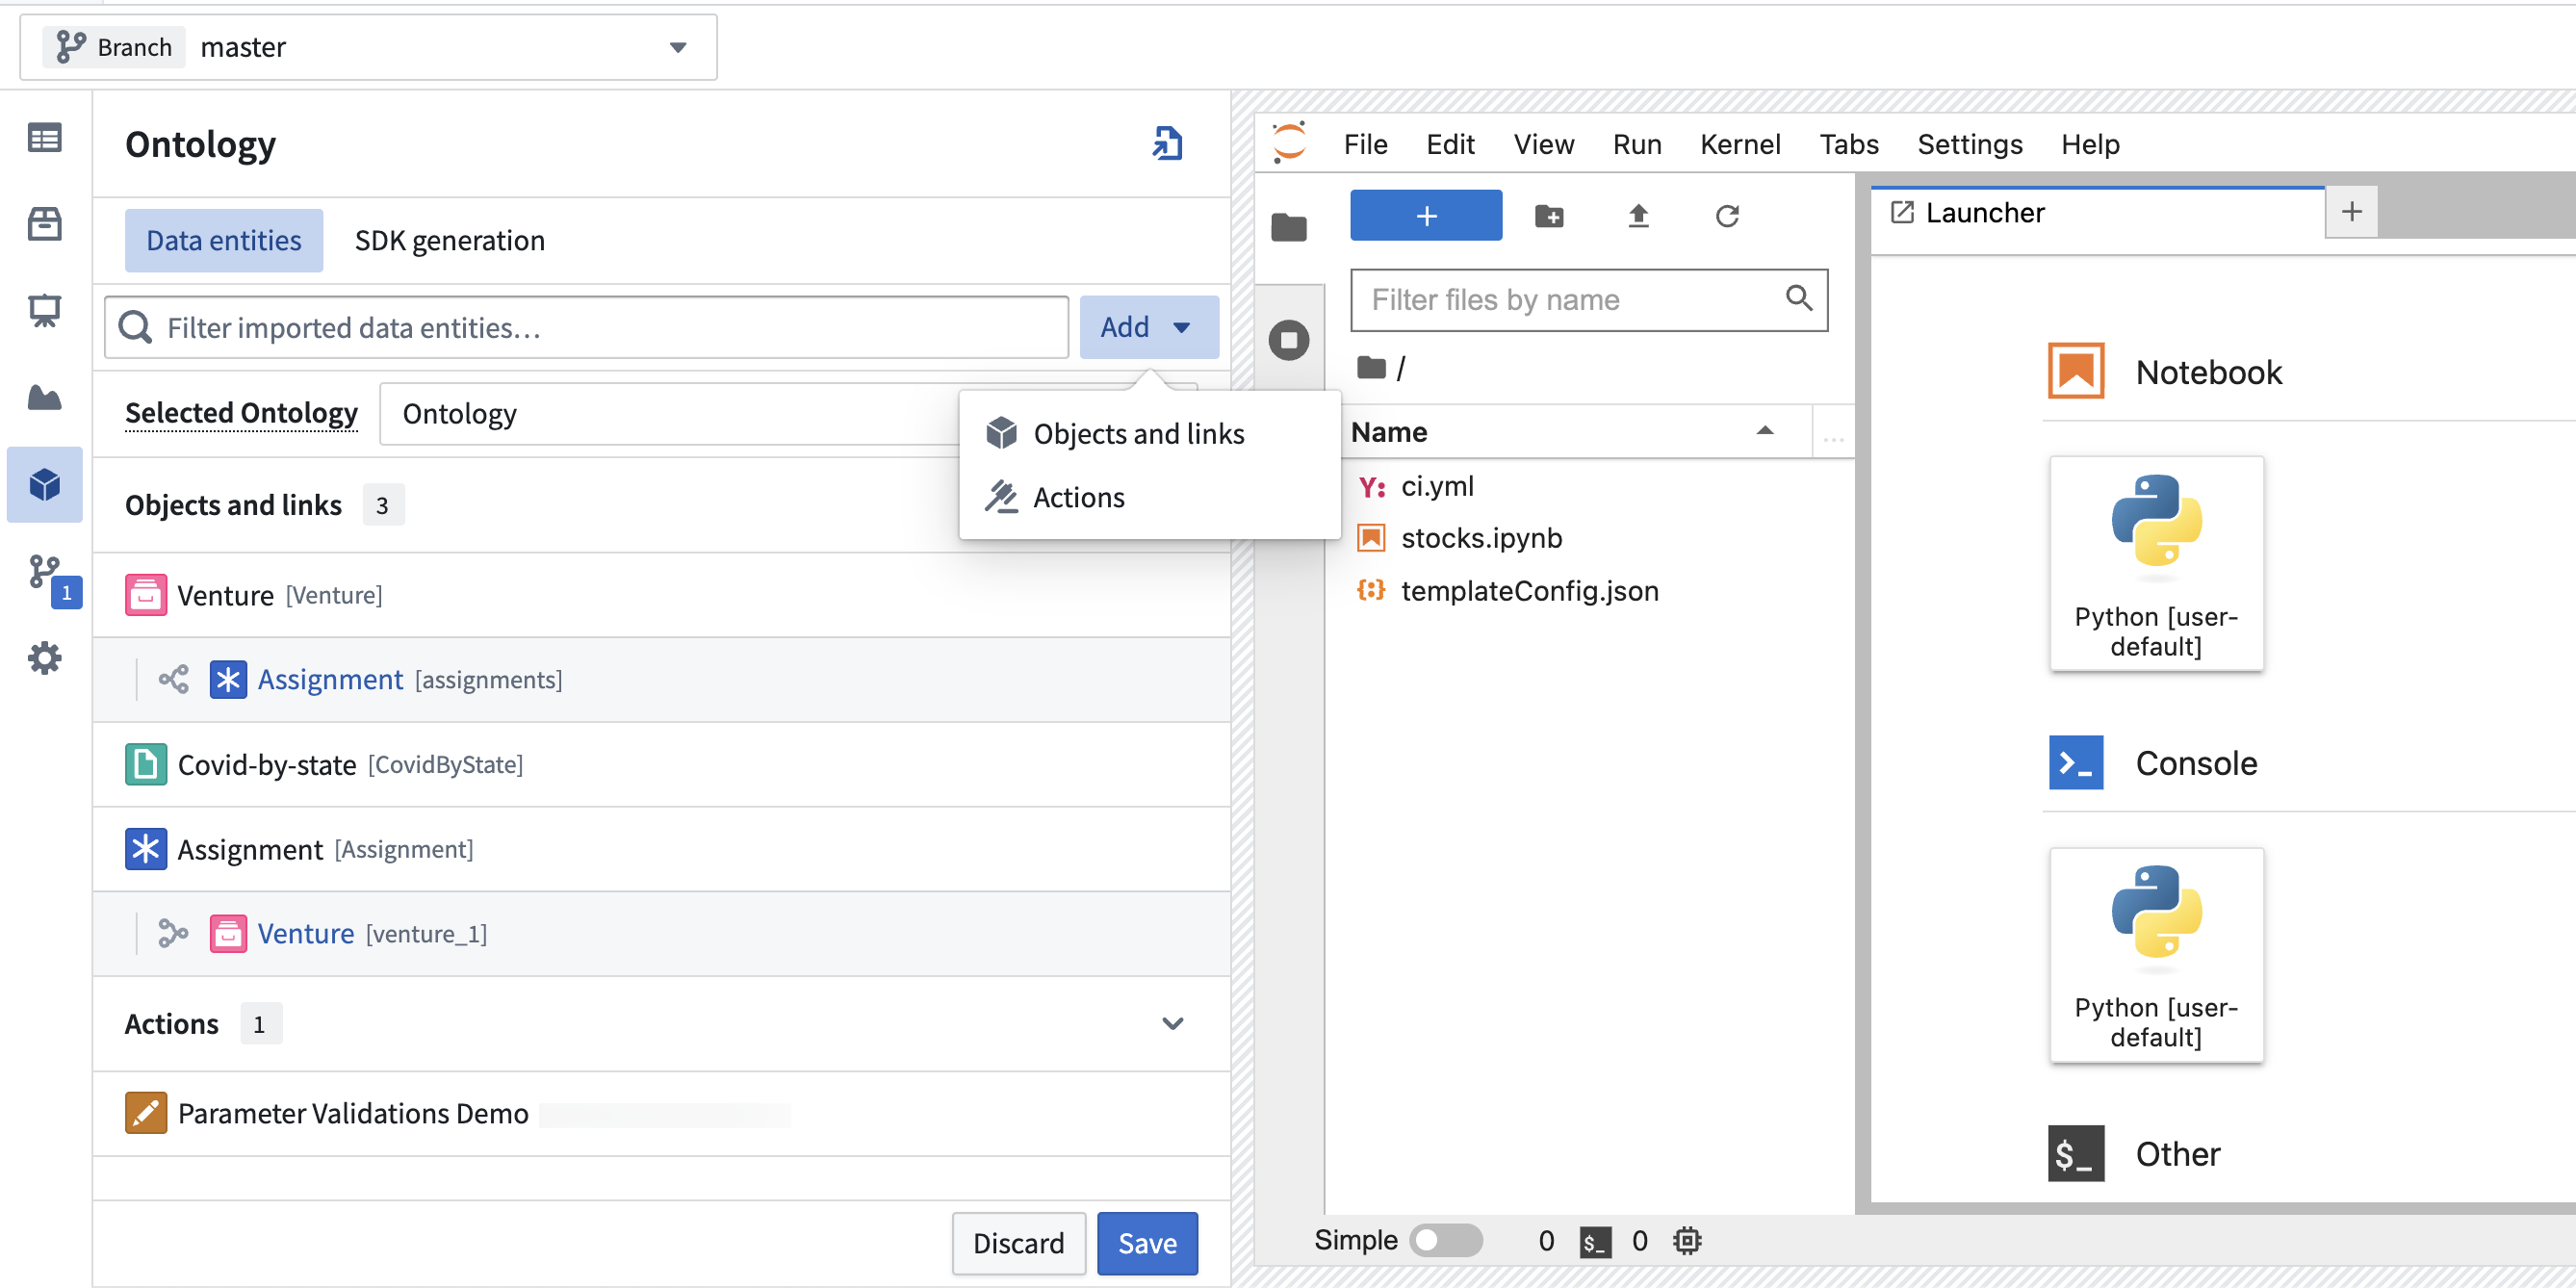
The Ontology side panel contains two tabs: Data entities and SDK generation.
- The Data entities tab is used to import object and action types from your Ontology.
- The SDK generation tab is used to inspect and install SDK versions.
To select data entities, navigate to the Data entities tab. Select Add and choose the desired data entity type to open a resource selector dialog which enables browsing for and selecting data entities. After selecting data entities, your selection can be saved using the Save button at the bottom of the side panel. After selecting Save, a new SDK version will be generated with access to the selected data entities.
When selecting action types that affect object types or have object types as parameters, those object types will also be added to the selection automatically. If any selected object types have backing data sources which have not yet been imported into the project scope of your Code Workspace, you will also be prompted to confirm the automatic import of these data sources.

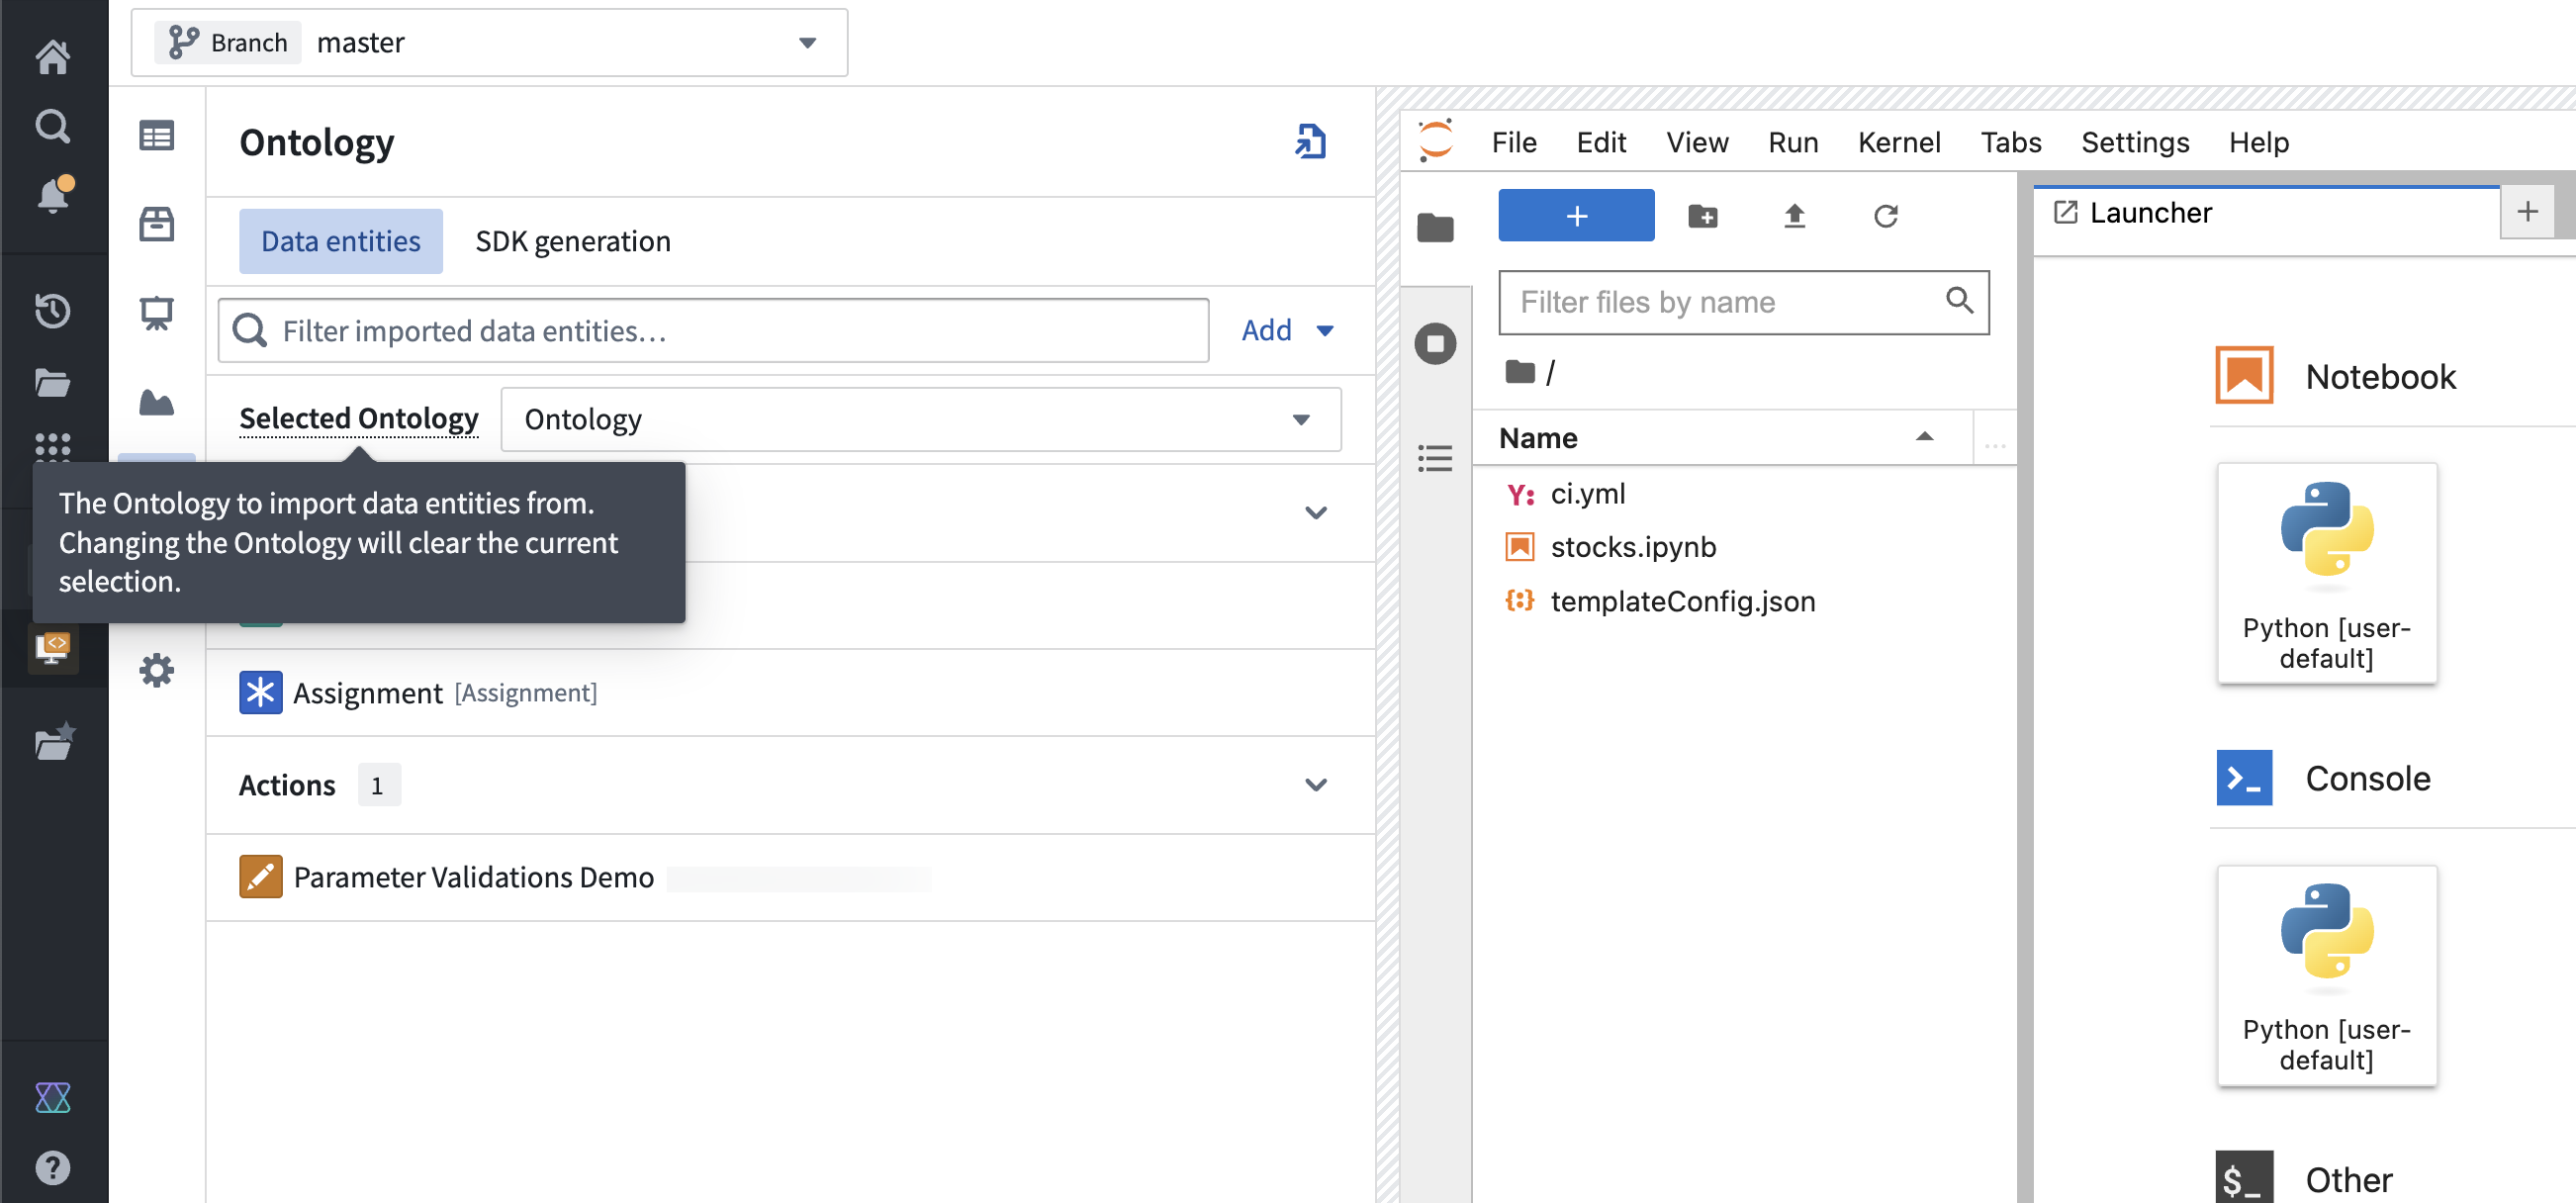
Change the selected Ontology
To import Ontology entities from a different Ontology, use the Ontology selector found in the Data entities tab. After selecting a different Ontology, select Save to apply changes and generate a new version. Changing the selected Ontology will reset the data scope of the SDK, clearing any selected object, action or link types.
Publish new Ontology SDK versions
Once configured, new Ontology SDK versions can be published using the Generate new version button found at the bottom of the Ontology side panel. Published and pending versions can be inspected through the SDK generation tab.

After selecting Generate new version, the newly created version will be visible in the SDK generation tab. SDK versions are not usable until the status shows as “Published”.
Common reasons for publishing to fail include:
- Using action types without importing dependent object types.
- Using object types that have backing data sources which are not present in the project scope.

Use Ontology SDK versions in code
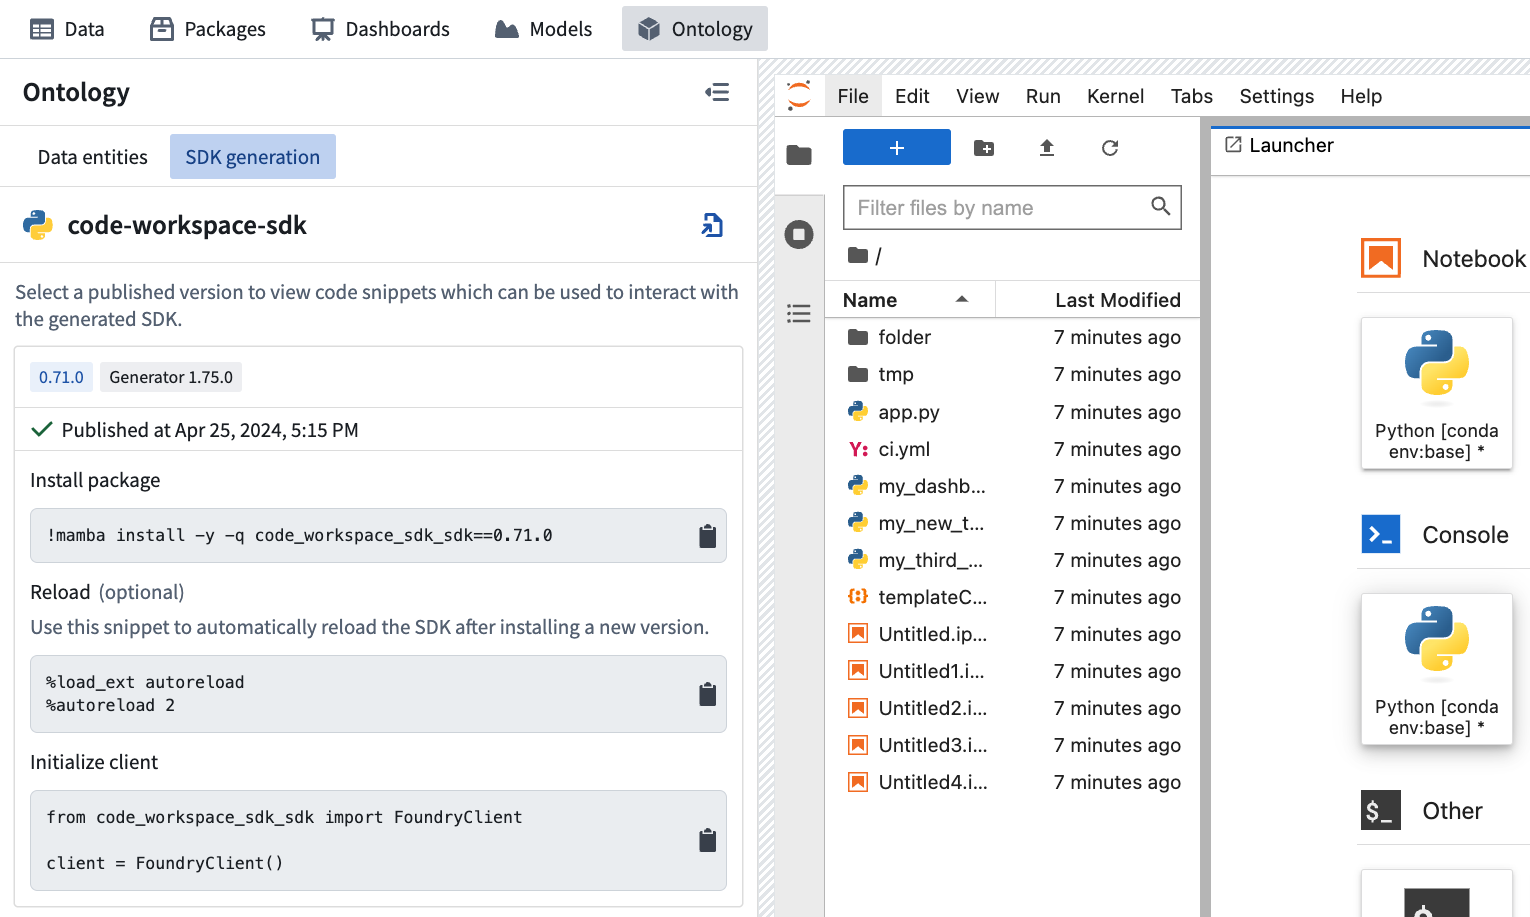
Successfully published versions can be imported and used in code from within your editor. First, click on the card for the version you want to use within the SDK generation tab of the Ontology side panel. This will expand the card with several code snippets tailored to your editor’s language. Clicking on a snippet will add it to the clipboard so that it can be pasted into your editor.
The visible snippets will vary depending on your editor’s language. All supported languages have the “Install package” snippet which is used to install a version of your SDK and the “Initialize client” snippet which is used to import the SDK and initialize a Foundry client to interact with the Ontology.
Use the Ontology SDK
After the Ontology SDK has been successfully published, follow the instructions to install and import the SDK. You can run the following the command:
!mamba install -y -q my_sdk_package
Next, the following code snippet is used to initialize the FoundryClient, which will enable you to start using the Ontology SDK.
from my_sdk_package import FoundryClient
client = FoundryClient()
Basic usage examples
Any imported object or link type can be selected in the Data entities tab to view usage examples for that specific resource. The following examples are longer, more general examples that demonstrate end-to-end OSDK usage in Code Workspaces.
Python OSDK usage example
The following example demonstrates how to interact with the OSDK using Python. This example assumes that the last successfully published version of your SDK includes object type "Aircraft" and action type "ActionMode". The term my_sdk_package in this example should be replaced with the package name of your SDK.
AircraftObject = client.ontology.objects.Aircraft

# Retrieve an object and view properties
my_aircraft = AircraftObject.get(1)
my_aircraft.date_of_manufacture

# Iterate over objects
for aircraft in AircraftObject.take(2):
    print(aircraft.current_location)

# Aggregations
AircraftObject.aggregate({"min_id": Aircraft.id.min(),
                          "max_id": Aircraft.id.max(),
                          "aircraft_count": Aircraft.count()}).compute()

# Filter
my_a330s = AircraftObject.where((Aircraft.type == "A330") | (Aircraft.id == 160)).take(1)

# Actions: Validate and apply
import datetime
from my_sdk_package.types import ActionMode

action_validation = client.ontology.actions.change_manufacture_date({"mode": ActionMode.VALIDATION_ONLY},
                                                                     aircraft=1,
                                                                     date_of_manufacture="2020-05-01")
if action_validation.result == "VALID":
    client.ontology.actions.change_manufacture_date(aircraft=1, date_of_manufacture="2023-05-26")
Time series properties
To access time series properties in a workspace, follow the preceding steps to create, publish, and import an Ontology SDK. Then access time series properties and manipulate them with the foundryTS library. This example shows how to retrieve the Denver object from a set of City objects and access its electricity price as a time series:
from my_sdk_package import FoundryClient
from foundryts import TimeSeries

client = FoundryClient()
city_objects = client.ontology.objects.City

denver = city_objects.get("Denver")  # This is the object's primary key
denver_electricity_price_tsp = TimeSeries.from_osdk(denver.electricity_price)

# Convert the series into a foundryts node
node = denver_electricity_price_tsp.node()

# Convert the series into a pandas dataframe
df = denver_electricity_price_tsp.to_pandas()
R OSDK usage example
Code Workspaces supports OSDK in R via the reticulate ↗ package, which allows you to call Python from R.
This example demonstrates how to import a Python OSDK version into R and interact with an object type. This example assumes that your SDK includes an object type called "Aircraft". The term my_sdk_package should be replaced with the package name of your SDK.
library(reticulate)

osdk <- import("my_sdk_package")
client <- osdk$FoundryClient()

aircraft_object = client$ontology$objects$Aircraft

# Retrieve 1 object
aircraft_object$take(1L)

# Retrieve object by ID
aircraft_object$get("1")
As R and Python have different default numeric types, the L suffix has to be used within R when a Python API expects an integer. Learn more at the official documentation for reticulate. ↗
Jupyter®, JupyterLab®, and the Jupyter® logos are trademarks or registered trademarks of NumFOCUS.
RStudio® and Shiny® are trademarks of Posit™.
All third-party trademarks (including logos and icons) referenced remain the property of their respective owners. No affiliation or endorsement is implied.
中文翻译
与本体(Ontology)交互
:::callout{theme="warning"} 代码工作区(Code Workspaces)尚不支持受限制视图支持的本体实体(Restricted View-backed Ontology entities)和查询函数(query functions)。 :::
代码工作区支持在 JupyterLab® 和 RStudio® 中使用对象类型(object types)、链接类型(link types)和操作类型(action types)与本体(Ontology)进行交互。
创建新的 Ontology SDK
要在代码工作区中创建新的 Ontology SDK,请先导航至本体侧边栏。每个代码工作区只能有一个 SDK,但可以为每个 SDK 创建多个版本。在本体侧边栏中,选择创建新 SDK以打开 SDK 配置表单。
新的 Ontology SDK 需要一个包名和一个关联的本体。包名用于确定如何在代码中访问您的 SDK:包名为 example 的 SDK 版本将可通过库名 example_sdk 导入。SDK 包名只能包含字母、数字和连字符,且不能以连字符结尾。发布后,SDK 包名无法更改。
配置好 SDK 后,选择保存选择以继续。
选择数据实体
本体侧边栏包含两个选项卡:数据实体和 SDK 生成。
- 数据实体选项卡用于从您的本体中导入对象类型和操作类型。
- SDK 生成选项卡用于检查和安装 SDK 版本。
要选择数据实体,请导航至数据实体选项卡。选择添加并选择所需的数据实体类型,以打开资源选择器对话框,从而浏览并选择数据实体。选择数据实体后,可以使用侧边栏底部的保存按钮保存您的选择。选择保存后,将生成一个具有所选数据实体访问权限的新 SDK 版本。
在选择影响对象类型或以对象类型作为参数的操作类型时,这些对象类型也会自动添加到选择中。如果任何选定的对象类型具有尚未导入到代码工作区项目范围内的支持数据源,系统还会提示您确认自动导入这些数据源。
更改所选本体
要从不同的本体导入本体实体,请使用数据实体选项卡中的本体选择器。选择不同的本体后,选择保存以应用更改并生成新版本。更改所选本体会重置 SDK 的数据范围,清除所有已选定的对象、操作或链接类型。
发布新的 Ontology SDK 版本
配置完成后,可以使用本体侧边栏底部的生成新版本按钮发布新的 Ontology SDK 版本。可以通过 SDK 生成选项卡检查已发布和待处理的版本。
选择生成新版本后,新创建的版本将显示在 SDK 生成选项卡中。在状态显示为“已发布”之前,SDK 版本不可用。
发布失败的常见原因包括:
- 使用操作类型时未导入依赖的对象类型。
- 使用的对象类型具有项目范围内不存在的支持数据源。
在代码中使用 Ontology SDK 版本
成功发布的版本可以在编辑器中导入并用于代码。首先,在本体侧边栏的 SDK 生成选项卡中,点击您要使用的版本卡片。这将展开卡片,显示几个针对您编辑器语言定制的代码片段。点击代码片段会将其添加到剪贴板,以便粘贴到编辑器中。
显示的代码片段会因编辑器语言而异。所有支持的语言都包含“安装包”片段(用于安装 SDK 版本)和“初始化客户端”片段(用于导入 SDK 并初始化 Foundry 客户端以与本体交互)。
使用 Ontology SDK
Ontology SDK 成功发布后,请按照说明安装并导入 SDK。您可以运行以下命令:
!mamba install -y -q my_sdk_package
接下来,使用以下代码片段初始化 FoundryClient,这将使您能够开始使用 Ontology SDK。
from my_sdk_package import FoundryClient
client = FoundryClient()
基本用法示例
可以在数据实体选项卡中选择任何导入的对象或链接类型,以查看该特定资源的用法示例。以下示例是更长、更通用的示例,演示了代码工作区中端到端的 OSDK 用法。
Python OSDK 用法示例
以下示例演示了如何使用 Python 与 OSDK 交互。此示例假设您最近成功发布的 SDK 版本包含对象类型 "Aircraft" 和操作类型 "ActionMode"。此示例中的 my_sdk_package 应替换为您 SDK 的包名。
AircraftObject = client.ontology.objects.Aircraft

# Retrieve an object and view properties
my_aircraft = AircraftObject.get(1)
my_aircraft.date_of_manufacture

# Iterate over objects
for aircraft in AircraftObject.take(2):
    print(aircraft.current_location)

# Aggregations
AircraftObject.aggregate({"min_id": Aircraft.id.min(),
                          "max_id": Aircraft.id.max(),
                          "aircraft_count": Aircraft.count()}).compute()

# Filter
my_a330s = AircraftObject.where((Aircraft.type == "A330") | (Aircraft.id == 160)).take(1)

# Actions: Validate and apply
import datetime
from my_sdk_package.types import ActionMode

action_validation = client.ontology.actions.change_manufacture_date({"mode": ActionMode.VALIDATION_ONLY},
                                                                     aircraft=1,
                                                                     date_of_manufacture="2020-05-01")
if action_validation.result == "VALID":
    client.ontology.actions.change_manufacture_date(aircraft=1, date_of_manufacture="2023-05-26")
时间序列属性
要在工作区中访问时间序列属性(time series properties),请按照前面的步骤创建、发布并导入 Ontology SDK。然后使用 foundryTS 库访问时间序列属性并对其进行操作。此示例展示了如何从一组 City 对象中检索 Denver 对象,并将其电价作为时间序列进行访问:
from my_sdk_package import FoundryClient
from foundryts import TimeSeries

client = FoundryClient()
city_objects = client.ontology.objects.City

denver = city_objects.get("Denver")  # This is the object's primary key
denver_electricity_price_tsp = TimeSeries.from_osdk(denver.electricity_price)

# Convert the series into a foundryts node
node = denver_electricity_price_tsp.node()

# Convert the series into a pandas dataframe
df = denver_electricity_price_tsp.to_pandas()
R OSDK 用法示例
代码工作区通过 reticulate ↗ 包支持在 R 中使用 OSDK,该包允许您从 R 调用 Python。
此示例演示了如何将 Python OSDK 版本导入 R 并与对象类型交互。此示例假设您的 SDK 包含一个名为 "Aircraft" 的对象类型。my_sdk_package 应替换为您 SDK 的包名。
library(reticulate)

osdk <- import("my_sdk_package")
client <- osdk$FoundryClient()

aircraft_object = client$ontology$objects$Aircraft

# Retrieve 1 object
aircraft_object$take(1L)

# Retrieve object by ID
aircraft_object$get("1")
由于 R 和 Python 具有不同的默认数值类型,当 Python API 需要整数时,必须在 R 中使用 L 后缀。在 reticulate 官方文档中了解更多信息。↗
Jupyter®、JupyterLab® 和 Jupyter® 徽标是 NumFOCUS 的商标或注册商标。
RStudio® 和 Shiny® 是 Posit™ 的商标。
所引用的所有第三方商标(包括徽标和图标)均归其各自所有者所有。不暗示任何附属关系或背书。