RStudio® Workbench
:::callout{theme="neutral"} To use RStudio® Workbench, your platform administrator must first configure its operational license in Control Panel. If you are a platform administrator and are unable to configure licenses in Control Panel, contact Palantir Support. :::
Code Workspaces enables you to use RStudio® Workbench ↗ in Foundry. RStudio® Workbench in Code Workspaces supports:
- Reading and writing tabular datasets using the Palantir R SDK ↗.
- Downloading or uploading files from non-structured datasets.
- Importing R libraries from CRAN, Posit™ library Manager, and Bioconductor.
- Publishing Shiny® applications.
- Publishing R transforms.
Code Workspaces currently supports Shiny® ↗ for R applications. Users can create applications directly in Code Workspaces with Foundry’s version control, branching, and data governance features built-in.
:::callout{theme="neutral"} Code Workspace applications support branching. If you create a new Workspace branch, publishing a new application or synchronizing the changes will publish a new version of the application on that branch. This allows you to preview your application before exposing it to your users. To publish on the master branch, simply merge your branch into master. :::
Shiny®
With Code Workspaces, you can create a Shiny® application and preview it directly from the RStudio® UI.
:::callout{theme="warning"}
By default, RStudio® generates Shiny® applications in the home folder (/home/user) but Foundry requires applications to be in the git repository /home/user/repo for them to be persisted across sessions and published.
:::
In Code Workspaces, select Publish application, select a location in your Files and Projects for your new application, and enter the name of the directory in which a new Shiny® app.R file should be automatically created, relative to the repository root /home/user/repo. This field can be left blank to create the application at the root of the repository. By default, the application settings will match the RStudio® workspace settings, and configuring advanced settings is optional.
:::callout{theme="warning"} Published Shiny applications are subject to a 30-second timeout, meaning that the Shiny server must start up within 30 seconds of executing your Shiny application file. Otherwise, your Shiny application will fail to start up. :::
Select Publish and sync to register your new Shiny® application and sync the code to the backing code repository. After CI checks and publishing are complete, you can select the link in the Applications panel to view the published application.
To develop locally against a Shiny® application:
- Open
app.Rin RStudio®. - Select Run App. A preview of your application will appear in a new window.
Configure Shiny® applications to automatically reconnect
By default, Shiny greys out if the websocket connection is closed, for instance if there is a network outage for over 15 seconds. To ensure your application can recover when the network connection is restored, we recommend updating the server function to set session$allowReconnect("force"):
server <- function(input, output, session) {
  # Handle input changes
  session$allowReconnect("force")
}
This will cause the frontend to trigger a new websocket when the network is available again, and to send the last input information that was set in the UI.
R Transform
:::callout{theme="warning"} R transforms currently do not support making API calls to external services, even if the network policy was added in the RStudio Code Workspace. :::
R scripts written in Code Workspaces can be registered as transforms for output datasets in Code Workspaces.
Follow the steps below to register a transform for an output dataset:
- Select the blue Build icon next to the dataset in the Data panel.

- Follow the interface to configure your transform. Code Workspaces infers the R script used along with the inputs added to produce the output dataset.

- Select Sync and run to save the transform configuration and trigger CI checks for publishing the transform and JobSpecs on the output dataset(s).
Once CI checks are completed, your transform is ready for build. You can then use other Foundry data integration tools to manage your transform and the data pipeline to which it belongs.
:::callout{theme="neutral"}
The transform does not automatically use the environment of the Code Workspace. You should install all the libraries needed at runtime at the top of the script file. The code snippet to install a library can be found in the libraries panel.
For example, to use dplyr and tidyr in your transform, add this code snippet to the top of the file:
renv::install(c("dplyr", "tidyr"))
Learn more about R transforms.
RStudio® and Shiny® are trademarks of Posit™.
All third-party trademarks (including logos and icons) referenced remain the property of their respective owners. No affiliation or endorsement is implied.
Markdown Reports
R Markdown or Quarto files written in RStudio® workspaces can be shared with other Palantir platform users as reports. A report is a dataset built from a Markdown file using a transform that contains HTML produced by rendering the Markdown file with Quarto ↗.
Reports are built using transforms, so they can be configured to automatically update based on the latest changes to the Markdown file using a schedule. This ensures that your analyses and visualizations are up to date and built with a reproducible, customizable workflow that integrates with the rest of the Palantir platform.
Publish reports from an RStudio® workspace
A Markdown report can be published from an RStudio® workspace using the following steps:
- Create the Markdown file (
.Rmdor.qmd) you wish to use to create a report. This Markdown file can read from Foundry datasets that have been added to your workspace using the data side panel. - Open the Applications side panel and select the Reports tab.
- Select Add to open the report configuration dialog.
- Provide a name and location; this determines where the dataset containing the report will be saved.
- Select the Markdown file to build your report from. If your Markdown reads from Foundry datasets, add these datasets as report inputs. Select Auto-configure inputs and outputs to automatically parse your Markdown file and populate the form with any detected datasets.
- Select Create. This will create a dataset at the specified location. The transform that builds the report will then run. Note that this can take several minutes to complete.
- Once the report has been built, select the report name in the Applications side panel to open the report in a new tab. This link can be shared with other users.
To edit or delete an existing report, select ... on the right of the report card. This will open a menu with options to edit or delete the report, and an option to copy the link to the report.
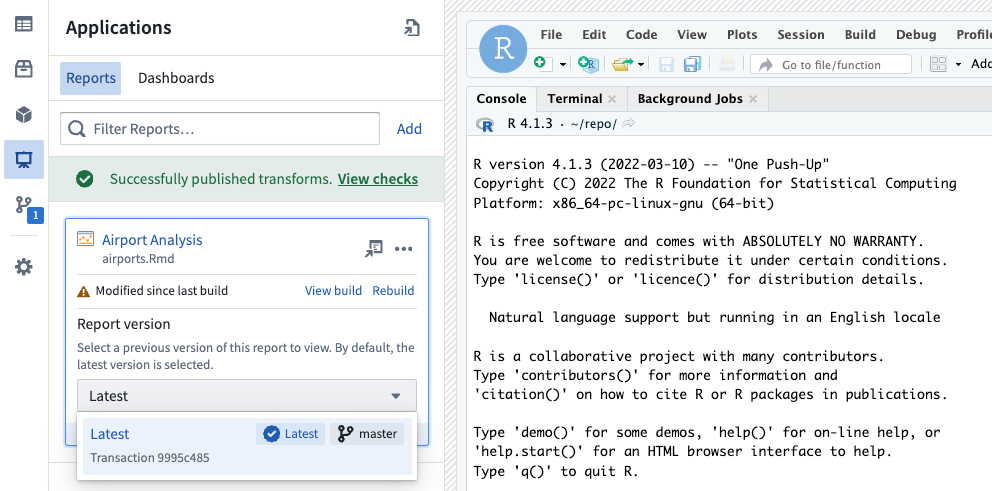
View previous report versions
Reports support full version history. To view a previous version of a report, expand the report card in the Applications side panel or use the version selector in the page header when viewing a report in a new tab.
Selecting a report version will update the link used to share the report, enabling you to share a specific historical version of a report that will not be updated if the underlying Markdown is modified.
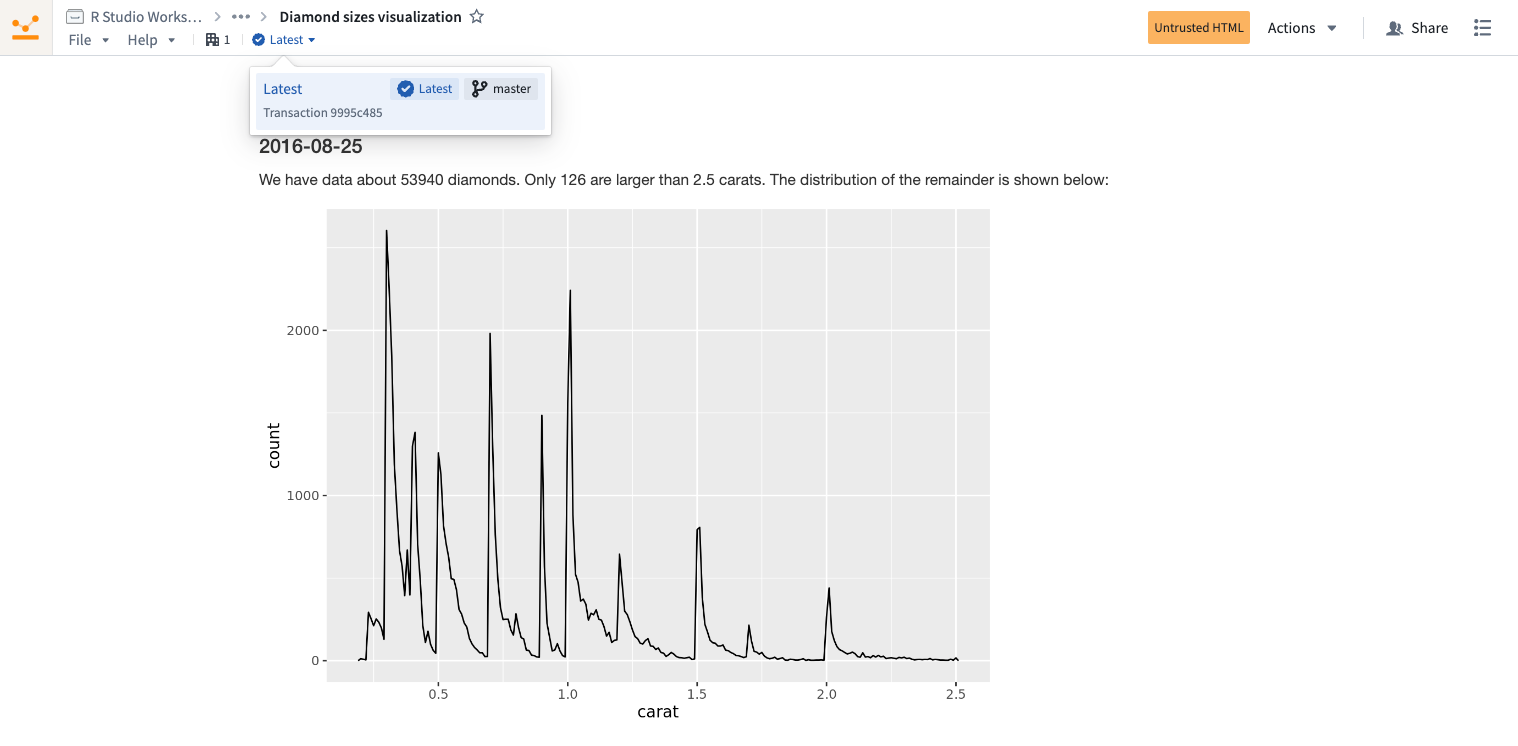
The latest version of a report will be selected by default, so readers of your report automatically receive the latest changes.
Managed conda environments in RStudio®
RStudio® conda environments can be consistently restored across RStudio® workspaces, Shiny applications, transforms, and model outputs using managed environments. Managed environments are consistent across Code Workspace workflows, eliminating the need to re-run the same renv::install command every time you restart your workspace, start a Shiny application, or run an RStudio® transform.
:::callout{theme="neutral"} This feature now includes CRAN library management through Maestro, a Foundry library management tool that seamlessly integrates with conda and CRAN to efficiently handle library installations and maintain managed environments. Newly-installed CRAN libraries will be tracked in your environment files and consistently restored across RStudio® workspaces, Shiny applications, transforms, and model outputs, improving the reproducibility of your environments. See the get started section below to enable this feature. :::
To convert library install commands to Maestro, refer to the instructions below for either conda or CRAN. With a managed environment, installed libraries in your working environment are tracked through the following files, allowing the environment to be restored to its original state across workflows:
/home/user/repo/.envs/maestro/meta.yaml: Known as the environment manifest, it contains the set of requested libraries and versions for your environment./home/user/repo/.envs/maestro/hawk.lock: Known as the environment lock file, it contains the set of resolved libraries and versions for your environment, solved from the constraints specified in the manifest. Thehawk.lockfile replacesconda.lock, which has been deprecated.
When you sync any new code in your conda environments, the files above will be synced as well. When you start your next session, the restored code will include the maestro files and your environment will be recreated.
:::callout{theme="warning"}
We do not recommend modifying the hawk.lock lock file. Instead, rely on installation commands to update the files on your behalf. Unless there is a git conflict, you do not need to modify the meta.yaml file either; it will automatically update when libraries are interactively installed. If you do modify these files, you risk restoring an outdated conda environment or failing the environment build.
:::
Your managed environment is installed in your /home/user/envs/default folder. This environment will be restored before any of the following events:
- Startup of your RStudio® workspace
- Startup of Shiny applications produced from your workspace
- Runs of RStudio® transforms produced from your workspace
- Renderings of Markdown reports
Get started
1. Enable managed environments
To enable managed environments in RStudio® workspaces, navigate to your workspace settings from the left sidebar, then toggle on Managed Conda environments under Advanced features. It may already be turned on by default.
Then, restart the workspace:

To enable CRAN library management by Maestro in RStudio® workspaces, navigate to your workspace settings using the left sidebar, then toggle on Managed CRAN environments under Experimental features. This option may already be enabled by default.
Then, restart the workspace.
2. Update your managed environment
Follow the steps below to update your managed environment and manage new libraries:
Manage conda libraries with Maestro (recommended)
:::callout{theme="default"} Install R libraries with conda instead of CRAN to significantly reduce workspace startup time. :::
- Install using the Libraries panel:
- For standard libraries: Search for the library name with an
r-prefix (for example,r-ggplot2notggplot2) and install. -
For Bioconductor libraries: Search for the lowercase library name with a bioconductor- prefix (for example,
bioconductor-genomeinfodb) and install. -
Install using the terminal: To install the latest version of a library, run the following command in the terminal:
maestro env conda install <library_name>
To install a specific version, run the following command:
maestro env conda install <library_name>==<library_version>
- Uninstall using the terminal: To uninstall a library, run the following command in the terminal:
maestro env uninstall --conda-dependencies <library_names>
Manage CRAN libraries with Maestro
- Install using the Libraries panel:
- For standard libraries: Search for the library name (for example,
ggplot2) and install. -
For Bioconductor libraries: Search for the library name with initial capitalization format (for example,
GenomeInfoDb) and install. -
Install using the terminal: To install the latest version of a library, run the following command in the terminal:
maestro env cran install <library_name>
To install a specific version, run the following command:
maestro env cran install <library_name>@<library_version>
- Uninstall using the terminal: To uninstall a library, run the following command in the terminal:
maestro env uninstall --cran-dependencies <library_names>
:::callout{theme="warning"}
When installing a library through the Libraries tab, the install command is executed directly in the RStudio® console rather than executed within your script or application code. Every time an install command is run, the meta.yaml manifest will be updated with your requested library, and the hawk.lock file will reflect the libraries installed in the current environment.
:::
3. View currently installed libraries in your managed environment
Your installed conda libraries are visible in the Libraries tab in the left sidebar:

You can also choose to view the meta.yaml and hawk.lock files in the RStudio® interface.
4. Synchronize your managed environment with changes to the hawk.lock file
After checking out a new branch or pulling new git changes, the contents of your hawk.lock file may change.
To synchronize your managed environment, execute the following command in your workspace terminal:
maestro env install
:::callout{theme="neutral"}
maestro is the command line interface that updates managed environments. The above command re-resolves the lock file from the manifest and installs the environment into the /home/user/envs/default folder.
:::
5. Resolve git conflicts to your environment files
To resolve git conflicts in your managed environment, first delete the hawk.lock file. Navigate to the meta.yaml file to resolve any conflicts, then merge your branch.
After merging, run the maestro env install command in your terminal to regenerate the hawk.lock file and reinstall your managed environment.
6. Upgrade your managed environment
To upgrade your managed environment to a more recent version, first remove the hawk.lock file. Then, delete your /home/user/envs/default folder (rm -rf /home/user/envs/default). Finally, run the maestro env install command in your terminal to regenerate your hawk.lock file. Your environment will be re-installed with upgraded library versions.
RStudio® and Shiny® are trademarks of Posit™.
All third-party trademarks (including logos and icons) referenced remain the property of their respective owners. No affiliation or endorsement is implied.
中文翻译
RStudio® Workbench
:::callout{theme="neutral"} 要使用 RStudio® Workbench,您的平台管理员必须首先在控制面板中配置其操作许可证。如果您是平台管理员但无法在控制面板中配置许可证,请联系 Palantir 支持部门。 :::
代码工作台(Code Workspaces)使您能够在 Foundry 中使用 RStudio® Workbench ↗。代码工作台中的 RStudio® Workbench 支持:
- 使用 Palantir R SDK ↗ 读取和写入表格数据集。
- 从非结构化数据集下载或上传文件。
- 从 CRAN、Posit™ 库管理器(Posit™ library Manager)和 Bioconductor 导入 R 库。
- 发布 Shiny® 应用程序。
- 发布 R 转换(R transforms)。
代码工作台目前支持用于 R 应用程序的 Shiny® ↗。用户可以直接在代码工作台中创建应用程序,并内置了 Foundry 的版本控制、分支和数据治理功能。
:::callout{theme="neutral"} 代码工作台应用程序支持分支。如果您创建新的工作台分支,发布新应用程序或同步更改将在该分支上发布新版本的应用程序。这使您可以在向用户公开应用程序之前进行预览。要在主分支上发布,只需将您的分支合并到主分支即可。 :::
Shiny®
使用代码工作台,您可以创建 Shiny® 应用程序并直接从 RStudio® 用户界面进行预览。
:::callout{theme="warning"}
默认情况下,RStudio® 在主文件夹 (/home/user) 中生成 Shiny® 应用程序,但 Foundry 要求应用程序位于 git 仓库 /home/user/repo 中,以便在会话之间持久保存并发布。
:::
在代码工作台中,选择 发布应用程序(Publish application),在 文件和项目(Files and Projects) 中为新应用程序选择一个位置,然后输入目录名称,新的 Shiny® app.R 文件将相对于仓库根目录 /home/user/repo 自动创建在该目录中。此字段可以留空,以便在仓库根目录创建应用程序。默认情况下,应用程序设置将与 RStudio® 工作区设置匹配,配置高级设置是可选的。
:::callout{theme="warning"} 已发布的 Shiny 应用程序有 30 秒的超时限制,这意味着 Shiny 服务器必须在执行 Shiny 应用程序文件后的 30 秒内启动。否则,您的 Shiny 应用程序将无法启动。 :::
选择 发布并同步(Publish and sync) 以注册您的新 Shiny® 应用程序并将代码同步到后端代码仓库。在 CI 检查和发布完成后,您可以选择应用程序面板中的链接来查看已发布的应用程序。
要针对 Shiny® 应用程序进行本地开发:
- 在 RStudio® 中打开
app.R。 - 选择 运行应用程序(Run App)。您的应用程序预览将出现在新窗口中。
配置 Shiny® 应用程序以自动重新连接
默认情况下,如果 WebSocket 连接关闭(例如网络中断超过 15 秒),Shiny 会变灰。为确保您的应用程序在网络连接恢复时能够恢复,我们建议更新 server 函数以设置 session$allowReconnect("force"):
server <- function(input, output, session) {
  # 处理输入更改
  session$allowReconnect("force")
}
这将使前端在网络可用时触发新的 WebSocket,并发送 UI 中设置的最后输入信息。
R 转换(R Transform)
:::callout{theme="warning"} R 转换目前不支持向外部服务进行 API 调用,即使在 RStudio 代码工作台中添加了网络策略也是如此。 :::
在代码工作台中编写的 R 脚本可以注册为代码工作台中输出数据集的转换。
按照以下步骤为输出数据集注册转换:
- 在 数据(Data) 面板中,选择数据集旁边的蓝色 构建(Build) 图标。
- 按照界面配置您的转换。代码工作台会推断用于生成输出数据集的 R 脚本以及添加的输入。
- 选择 同步并运行(Sync and run) 以保存转换配置并触发 CI 检查,以便在输出数据集上发布转换和 JobSpec。
CI 检查完成后,您的转换即可进行构建。然后,您可以使用其他 Foundry 数据集成工具来管理您的转换及其所属的数据管道。
:::callout{theme="neutral"}
转换不会自动使用代码工作台的环境。您应该在脚本文件顶部安装运行时所需的所有库。安装库的代码片段可以在 库(libraries) 面板中找到。
例如,要在转换中使用 dplyr 和 tidyr,请将以下代码片段添加到文件顶部:
renv::install(c("dplyr", "tidyr"))
RStudio® 和 Shiny® 是 Posit™ 的商标。
所有引用的第三方商标(包括徽标和图标)仍归其各自所有者所有。不暗示任何隶属关系或认可。
Markdown 报告(Markdown Reports)
在 RStudio® 工作区中编写的 R Markdown 或 Quarto 文件可以作为报告与其他 Palantir 平台用户共享。报告是一个数据集,由 Markdown 文件通过转换构建而成,该转换包含使用 Quarto ↗ 渲染 Markdown 文件生成的 HTML。
报告是使用转换构建的,因此可以配置为根据 Markdown 文件的最新更改通过计划自动更新。这确保了您的分析和可视化是最新的,并且使用可重现、可定制的工作流程构建,该工作流程与 Palantir 平台的其余部分集成。
从 RStudio® 工作区发布报告
可以使用以下步骤从 RStudio® 工作区发布 Markdown 报告:
- 创建您希望用于创建报告的 Markdown 文件(
.Rmd或.qmd)。此 Markdown 文件可以读取已使用数据侧面板添加到工作区的 Foundry 数据集。 - 打开 应用程序(Applications) 侧面板并选择 报告(Reports) 选项卡。
- 选择 添加(Add) 以打开报告配置对话框。
- 提供名称和位置;这将确定包含报告的数据集的保存位置。
- 选择用于构建报告的 Markdown 文件。如果您的 Markdown 读取 Foundry 数据集,请将这些数据集添加为报告输入。选择 自动配置输入和输出(Auto-configure inputs and outputs) 以自动解析您的 Markdown 文件并使用任何检测到的数据集填充表单。
- 选择 创建(Create)。这将在指定位置创建一个数据集。然后,构建报告的转换将运行。请注意,这可能需要几分钟才能完成。
- 报告构建完成后,在 应用程序(Applications) 侧面板中选择报告名称,以在新选项卡中打开报告。此链接可以与其他用户共享。
要编辑或删除现有报告,请选择报告卡片右侧的 ...。这将打开一个菜单,其中包含编辑或删除报告的选项,以及复制报告链接的选项。
查看以前的报告版本
报告支持完整的版本历史记录。要查看报告的先前版本,请展开 应用程序(Applications) 侧面板中的报告卡片,或者在新选项卡中查看报告时使用页面标题中的版本选择器。
选择报告版本将更新用于共享报告的链接,使您能够共享报告的特定历史版本,该版本不会因底层 Markdown 的修改而更新。
默认情况下会选择报告的最新版本,因此报告的读者会自动收到最新的更改。
RStudio® 中的托管 conda 环境(Managed conda environments)
使用托管环境(managed environments),RStudio® conda 环境可以在 RStudio® 工作区、Shiny 应用程序、转换和模型输出之间一致地恢复。托管环境在代码工作台工作流程中保持一致,无需在每次重新启动工作区、启动 Shiny 应用程序或运行 RStudio® 转换时重新运行相同的 renv::install 命令。
:::callout{theme="neutral"} 此功能现在通过 Maestro(一个 Foundry 库管理工具)包含 CRAN 库管理,该工具与 conda 和 CRAN 无缝集成,以高效处理库安装并维护托管环境。新安装的 CRAN 库将记录在您的环境文件中,并在 RStudio® 工作区、Shiny 应用程序、转换和模型输出之间一致地恢复,从而提高环境的可重现性。请参阅下面的入门部分以启用此功能。 :::
要将库安装命令转换为 Maestro,请参考下面针对 conda 或 CRAN 的说明。使用托管环境,工作环境中安装的库通过以下文件进行跟踪,从而允许环境在工作流程之间恢复到其原始状态:
/home/user/repo/.envs/maestro/meta.yaml:称为环境清单(manifest),它包含环境的请求(requested)库和版本集。/home/user/repo/.envs/maestro/hawk.lock:称为环境锁定文件(lock file),它包含环境的已解析(resolved)库和版本集,根据清单中指定的约束条件求解得出。hawk.lock文件取代了已弃用的conda.lock。
当您在 conda 环境中同步任何新代码时,上述文件也将同步。当您开始下一个会话时,恢复的代码将包含 maestro 文件,并且您的环境将被重新创建。
:::callout{theme="warning"}
我们不建议修改 hawk.lock 锁定文件。相反,应依赖安装命令为您更新文件。除非存在 git 冲突,否则您也不需要修改 meta.yaml 文件;当以交互方式安装库时,它会自动更新。如果您确实修改了这些文件,则存在恢复过时的 conda 环境或导致环境构建失败的风险。
:::
您的托管环境安装在 /home/user/envs/default 文件夹中。此环境将在以下任何事件之前恢复:
- 启动您的 RStudio® 工作区
- 启动从您的工作区生成的 Shiny 应用程序
- 运行从您的工作区生成的 RStudio® 转换
- 渲染 Markdown 报告
入门
1. 启用托管环境
要在 RStudio® 工作区中启用托管环境,请从左侧边栏导航到您的工作区设置,然后在 高级功能(Advanced features) 下打开 托管 Conda 环境(Managed Conda environments)。它可能默认已打开。
然后,重新启动工作区:
要启用 Maestro 在 RStudio® 工作区中进行 CRAN 库管理,请使用左侧边栏导航到您的工作区设置,然后在 实验性功能(Experimental features) 下打开 托管 CRAN 环境(Managed CRAN environments)。此选项可能默认已启用。
然后,重新启动工作区。
2. 更新您的托管环境
按照以下步骤更新您的托管环境并管理新库:
使用 Maestro 管理 conda 库(推荐)
:::callout{theme="default"} 使用 conda 而不是 CRAN 安装 R 库可以显著减少工作区启动时间。 :::
- 使用库面板安装:
- 对于标准库:搜索带有
r-前缀的库名称(例如,r-ggplot2而不是ggplot2)并安装。 -
对于 Bioconductor 库:搜索带有
bioconductor-前缀的小写库名称(例如,bioconductor-genomeinfodb)并安装。 -
使用终端安装: 要安装最新版本的库,请在终端中运行以下命令:
maestro env conda install <library_name>
要安装特定版本,请运行以下命令:
maestro env conda install <library_name>==<library_version>
- 使用终端卸载: 要卸载库,请在终端中运行以下命令:
maestro env uninstall --conda-dependencies <library_names>
使用 Maestro 管理 CRAN 库
- 使用库面板安装:
- 对于标准库:搜索库名称(例如,
ggplot2)并安装。 -
对于 Bioconductor 库:搜索首字母大写的库名称(例如,
GenomeInfoDb)并安装。 -
使用终端安装: 要安装最新版本的库,请在终端中运行以下命令:
maestro env cran install <library_name>
要安装特定版本,请运行以下命令:
maestro env cran install <library_name>@<library_version>
- 使用终端卸载: 要卸载库,请在终端中运行以下命令:
maestro env uninstall --cran-dependencies <library_names>
:::callout{theme="warning"}
当通过 库(Libraries) 选项卡安装库时,安装命令直接在 RStudio® 控制台中执行,而不是在您的脚本或应用程序代码中执行。每次运行安装命令时,meta.yaml 清单将使用您请求的库进行更新,并且 hawk.lock 文件将反映当前环境中安装的库。
:::
3. 查看托管环境中当前安装的库
您安装的 conda 库在左侧边栏的 库(Libraries) 选项卡中可见:
您也可以选择在 RStudio® 界面中查看 meta.yaml 和 hawk.lock 文件。
4. 将您的托管环境与 hawk.lock 文件的更改同步
在检出新分支或拉取新的 git 更改后,您的 hawk.lock 文件的内容可能会发生变化。
要同步您的托管环境,请在工作区终端中执行以下命令:
maestro env install
:::callout{theme="neutral"}
maestro 是更新托管环境的命令行界面。上述命令从清单重新解析锁定文件,并将环境安装到 /home/user/envs/default 文件夹中。
:::
5. 解决环境文件的 git 冲突
要解决托管环境中的 git 冲突,首先删除 hawk.lock 文件。导航到 meta.yaml 文件以解决任何冲突,然后合并您的分支。
合并后,在终端中运行 maestro env install 命令以重新生成 hawk.lock 文件并重新安装您的托管环境。
6. 升级您的托管环境
要将您的托管环境升级到更新的版本,首先删除 hawk.lock 文件。然后,删除您的 /home/user/envs/default 文件夹(rm -rf /home/user/envs/default)。最后,在终端中运行 maestro env install 命令以重新生成您的 hawk.lock 文件。您的环境将使用升级的库版本重新安装。
RStudio® 和 Shiny® 是 Posit™ 的商标。
所有引用的第三方商标(包括徽标和图标)仍归其各自所有者所有。不暗示任何隶属关系或认可。