Train and interact with models(训练模型并与之交互)
:::callout{theme="neutral"} Interacting with models is only supported in JupyterLab® code workspaces. :::
Code Workspaces allows you to train and publish models, as well as import them to interact with previously published models.
Code Workspaces requires you to create a model alias for every Foundry model asset referenced in the workspace. The model alias acts as a reference to a specific model, allowing you to interact with models to publish new versions or download the saved model files.
When registering a model in the Models tab, Code Workspaces creates a mapping between the chosen model alias and the Foundry model's unique identifier in a hidden file located under the /home/user/repo/.foundry folder of the workspace.
To learn how to publish a model from Jupyter® notebooks, review the model integration documentation.
Add models to the workspace
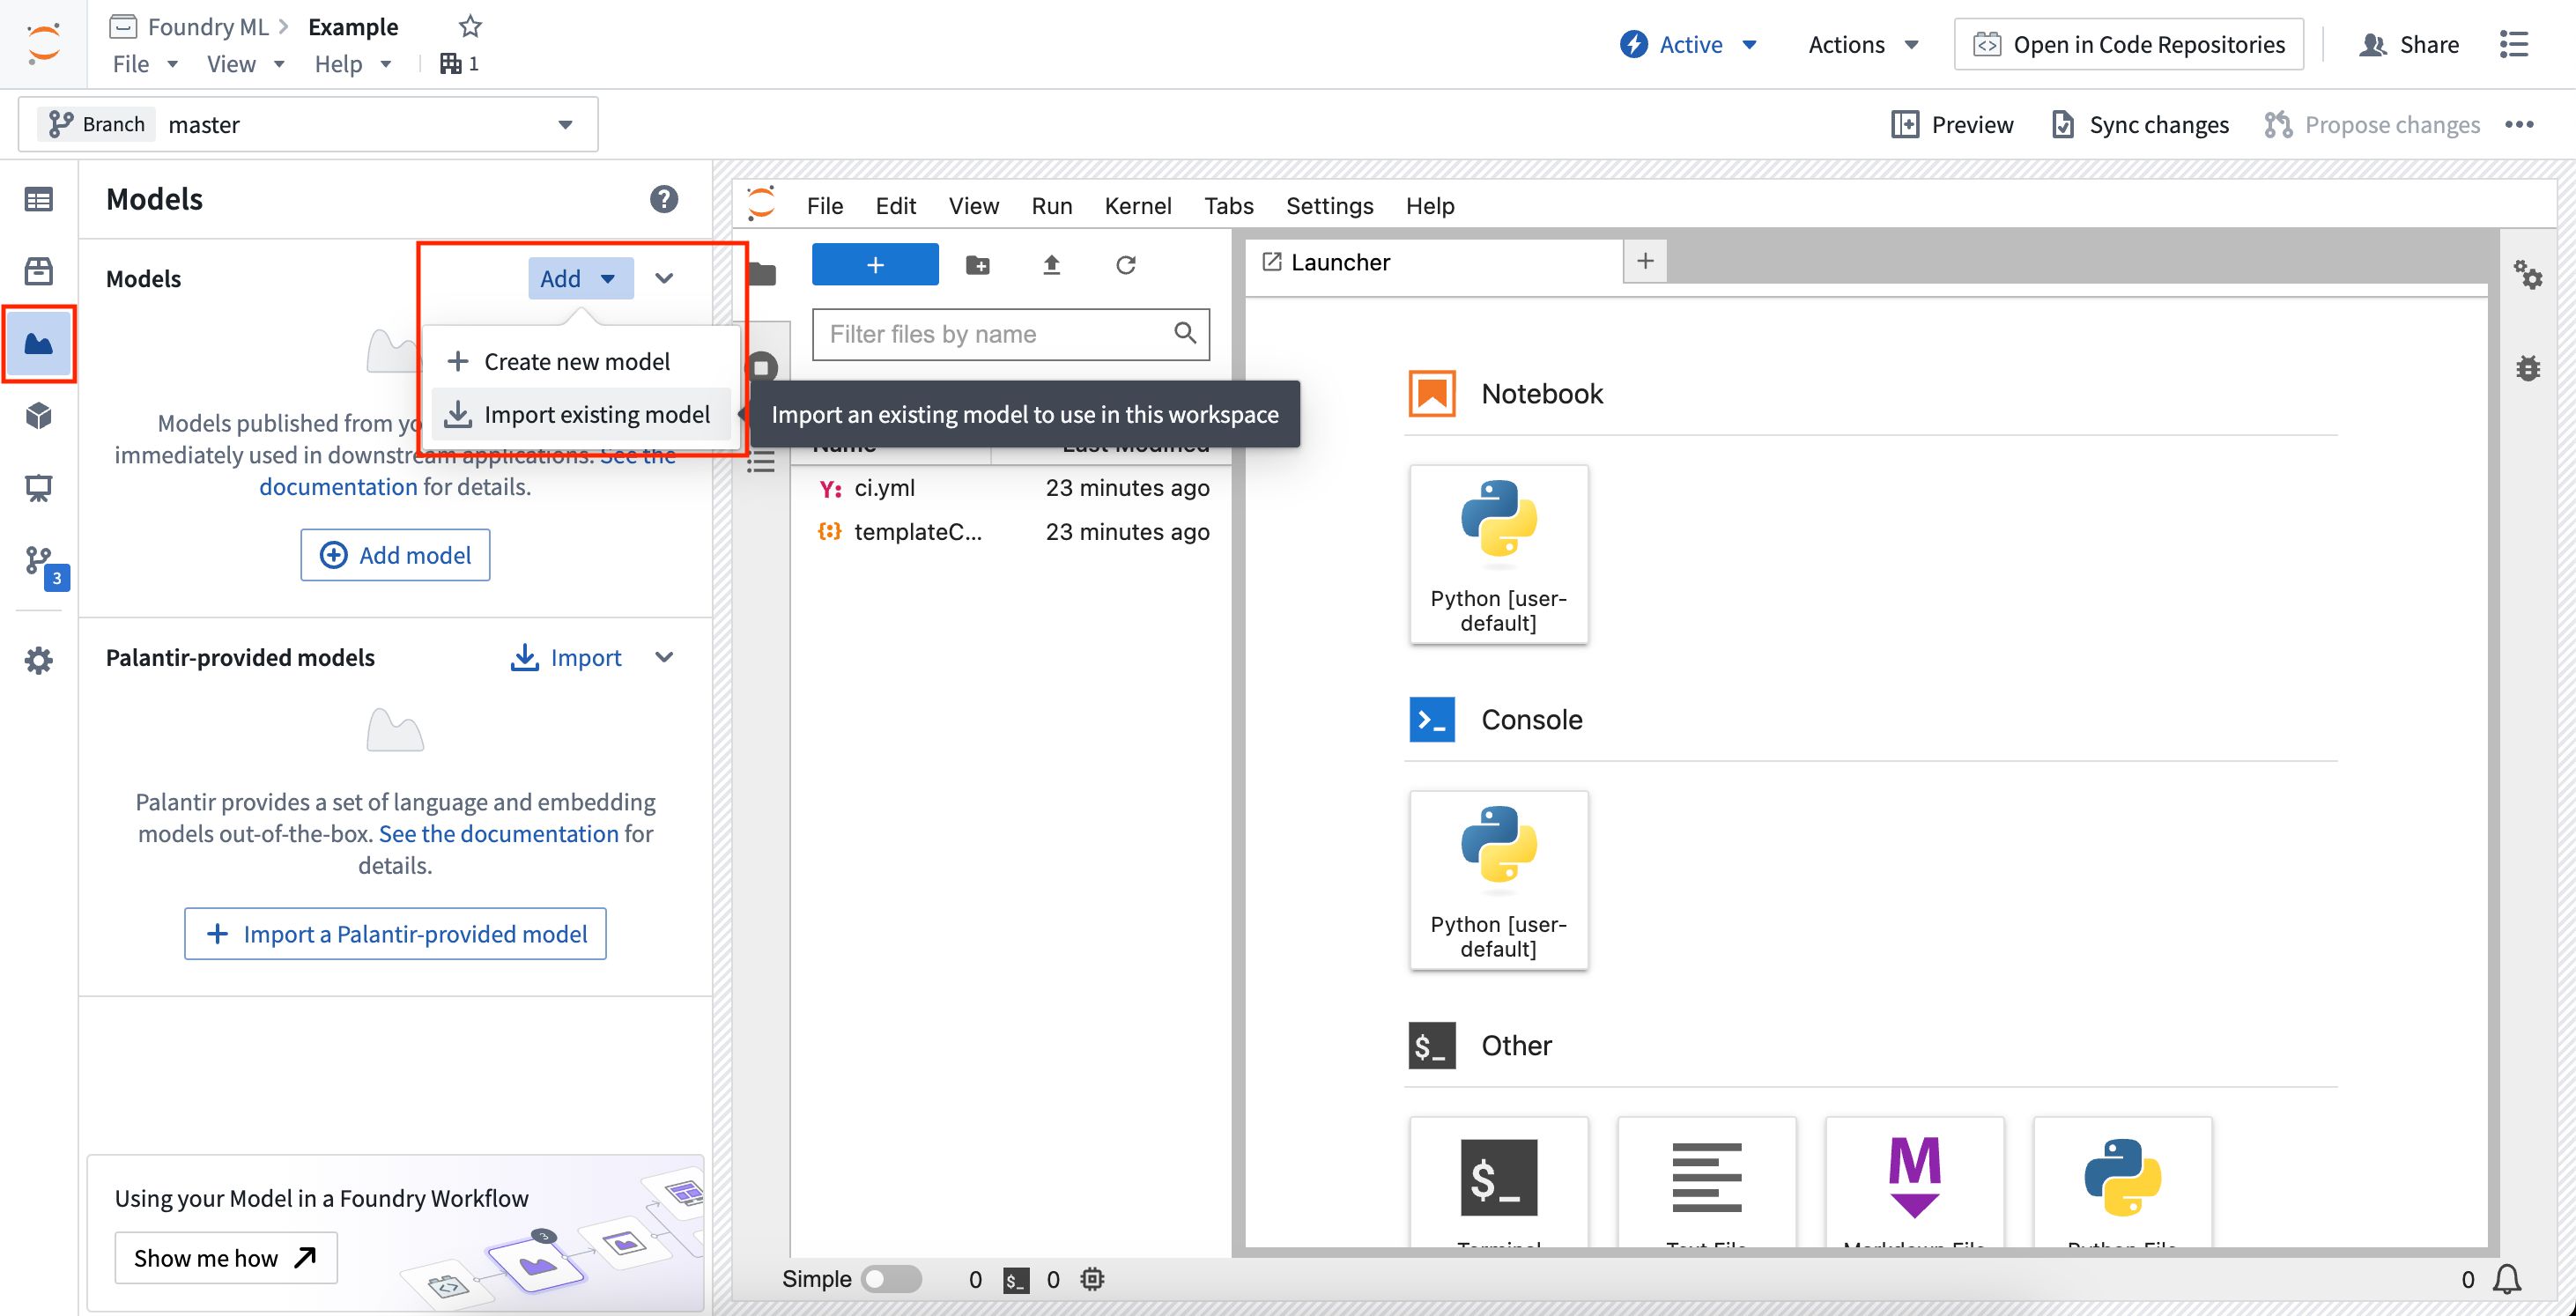
Models can be created or imported into the workspace all from the Models sidebar panel.
To create a new model, open the Models sidebar panel and select Add > Create new model. This will walk you through creating a new model, registering the alias, and will provide snippets for publishing to the model. This will also generate a skeleton model adapter Python file which must be implemented to publish the model back to Foundry.
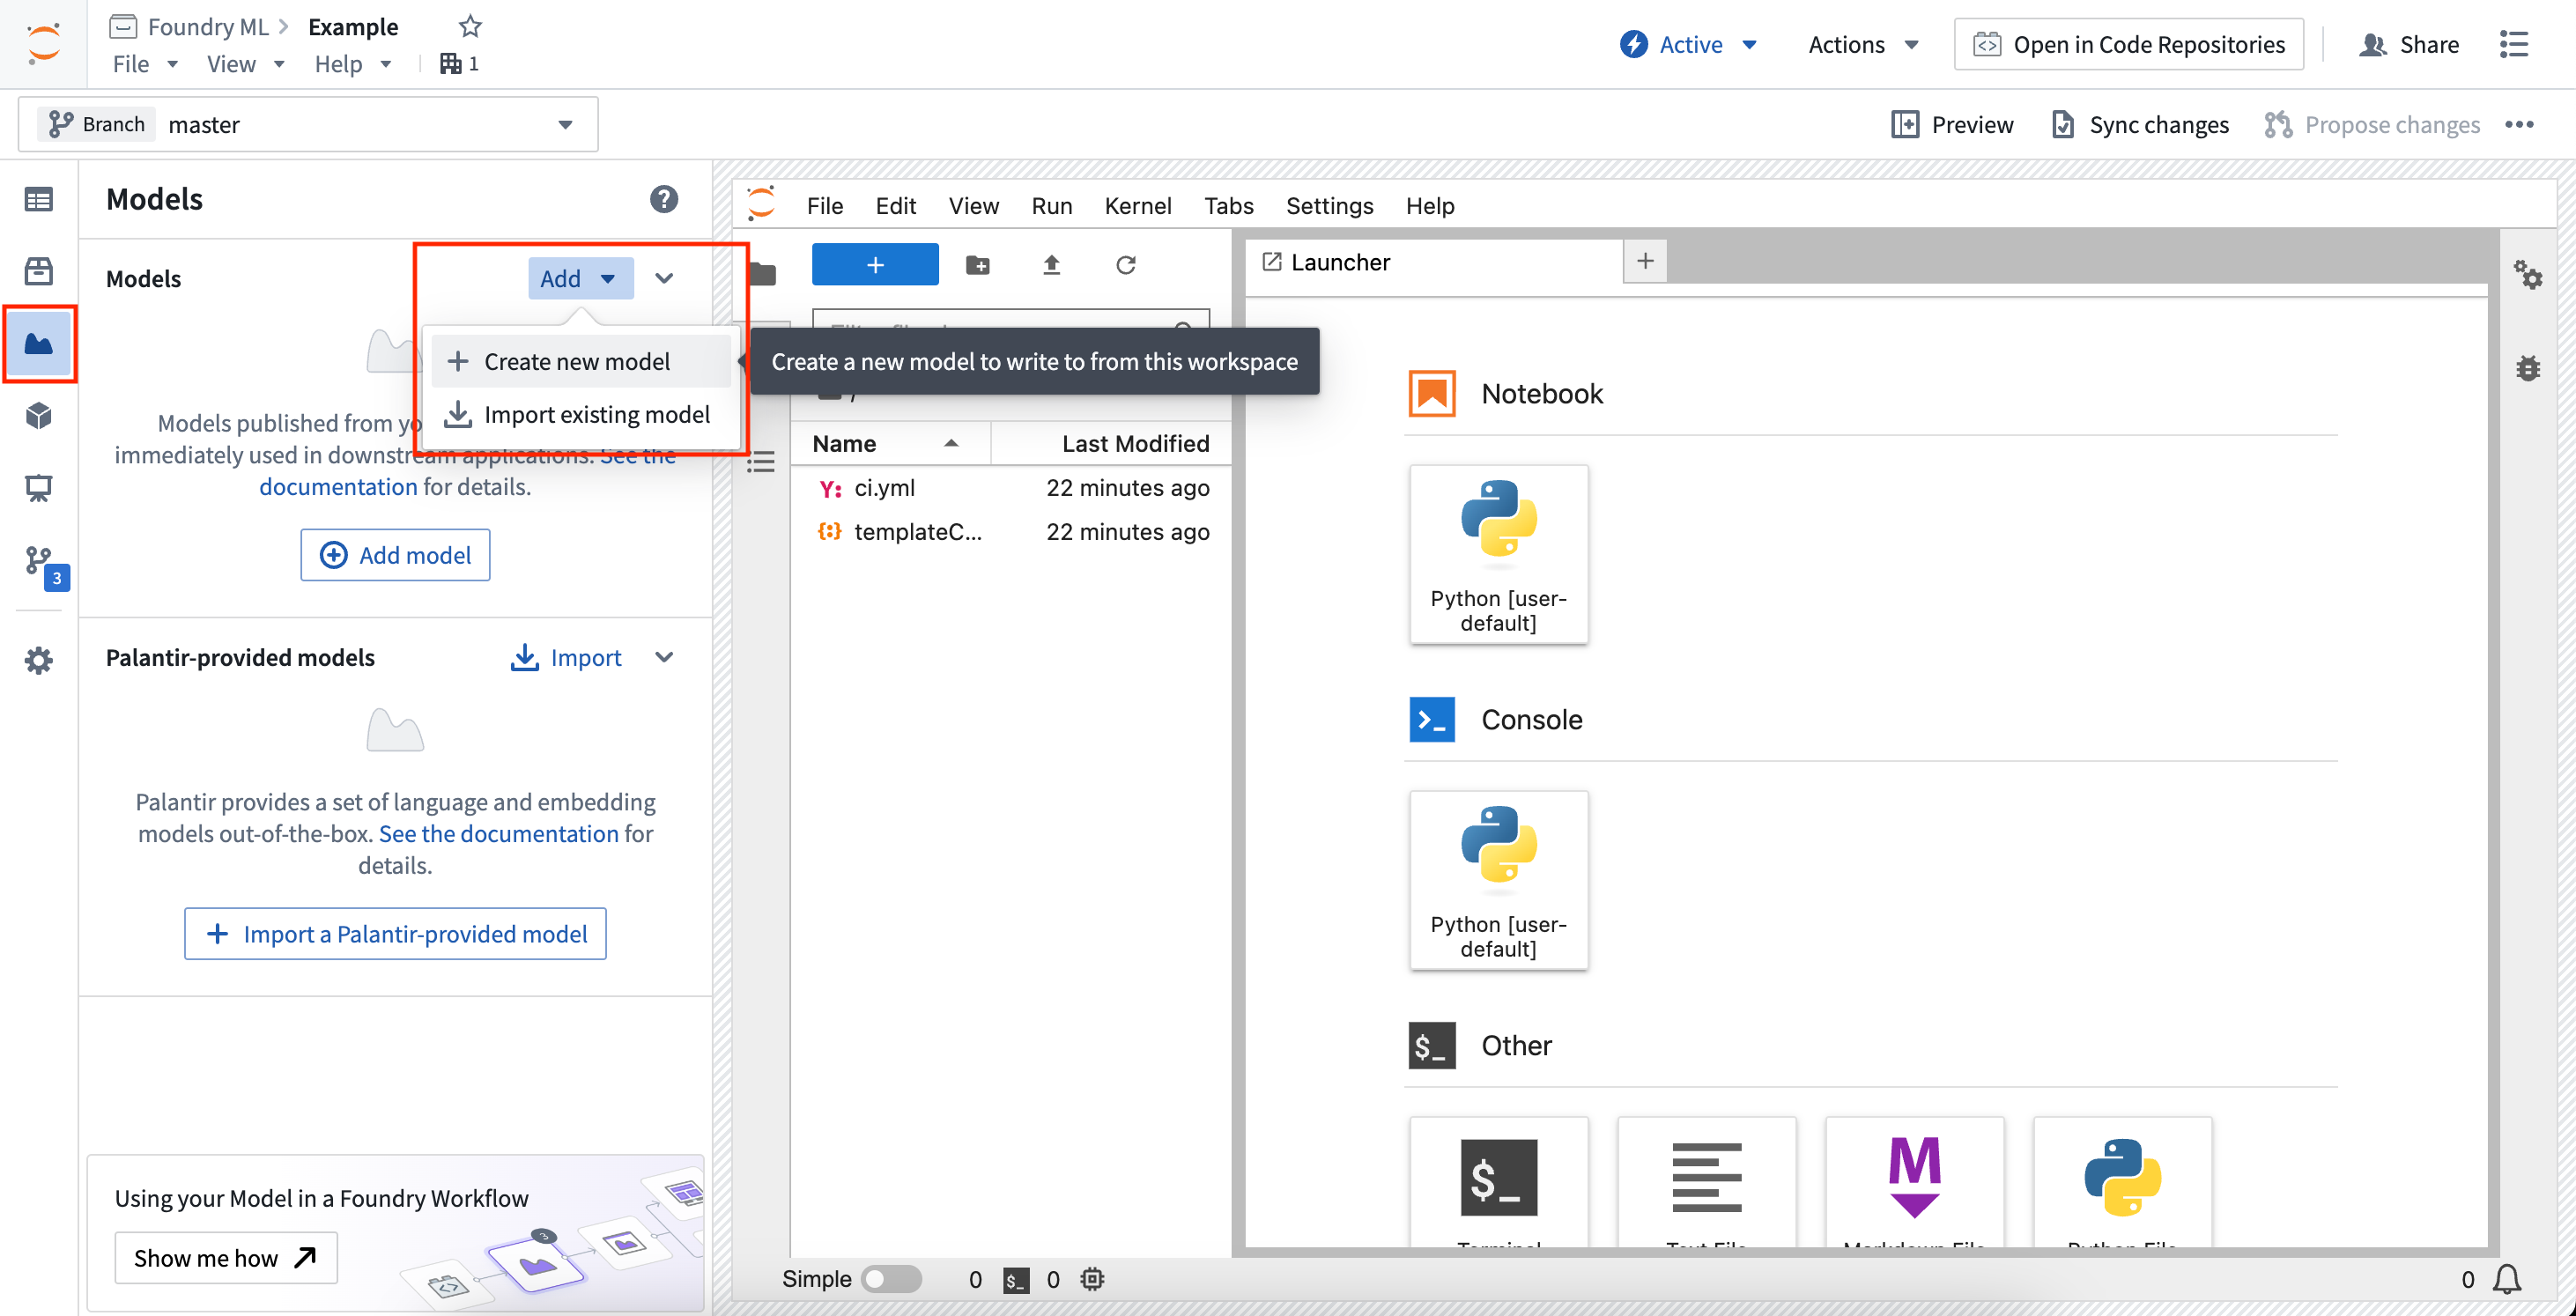
To import an existing model, open the Models sidebar panel and select Add > Import existing model. This will walk you through importing the model and registering the alias, and will provide snippets for downloading the saved model state files.
Imported models load the serialized model state from a given model version. Code Workspaces gives different controls over which model version is used when importing a model, allowing you to select the latest on the current workspace branch, the latest on a provided branch, or a specified model version.
Available snippets
The Models sidebar panel provides snippets to copy and paste into a notebook for common workflows. All snippets will instruct you to install palantir_models, which is the Palantir-provided library for developing and interacting with models.
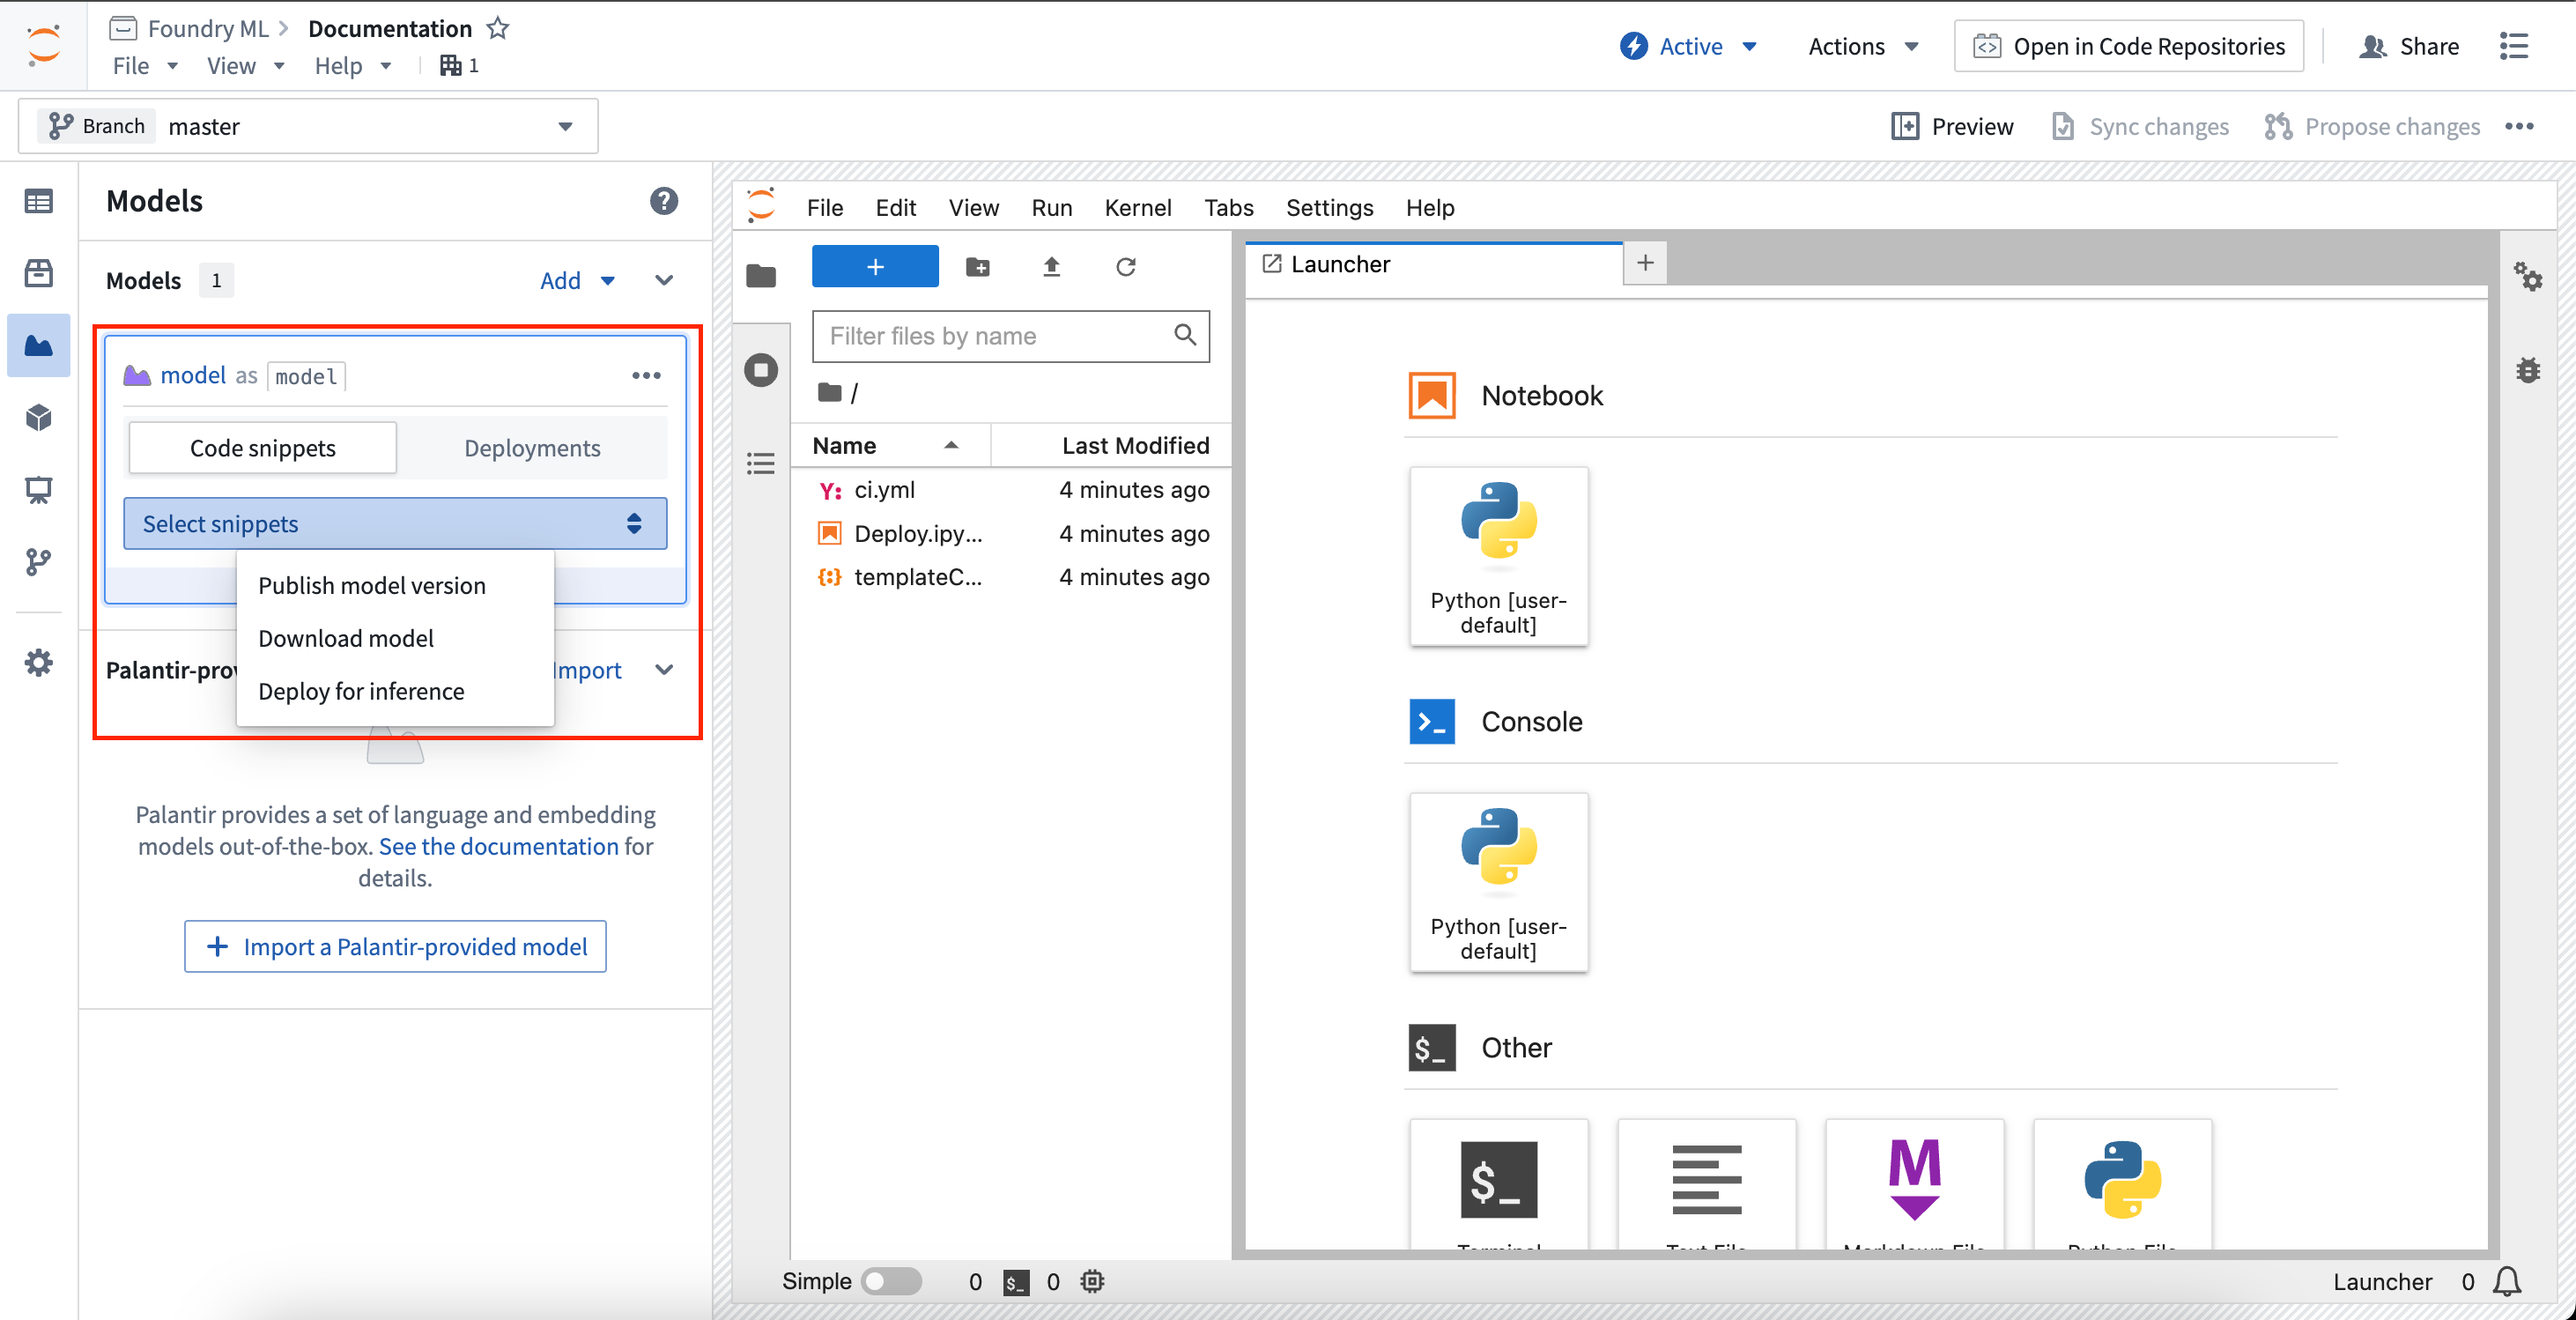
Each model card in the sidebar will create unique snippets specific to that model. Selecting the model card will expand the card and reveal a selector to choose to show snippet for a specific task.
Publish model version
To publish a model version, you must first develop a model adapter. For models created inside Code Workspaces, a skeleton adapter will be created for you to implement in a Python file named after the alias given to the model. The model card will provide in-depth instructions on developing your model adapter and publishing your model back to Foundry.
The snippet below is for a model with the alias linear_regression_model. Assuming a model adapter has been written in linear_regression_model_adapter.py, the model publishing code should look like the following:
from palantir_models.code_workspaces import ModelOutput

# Model adapter api has been defined in linear_regression_model_adapter.py
from linear_regression_model_adapter import LinearRegressionModelAdapter

# sklearn_model is a model trained in another cell
linear_regression_model_adapter = LinearRegressionModelAdapter(sklearn_model)

model_output = ModelOutput("linear_regression_model")
model_output.publish(linear_regression_model_adapter)
Download model
To download a previously published model version, change the snippet selector to Download model. This will provide controls on resolving a model version, which will control which model version gets used for downloading the model files.
- Latest on current branch: The selected model version will be the latest on the current workspace branch.
- Latest on branch: The selected model version will be the latest on the selected branch.
- Specific model version: The selected model version will be pinned to the given model version RID.
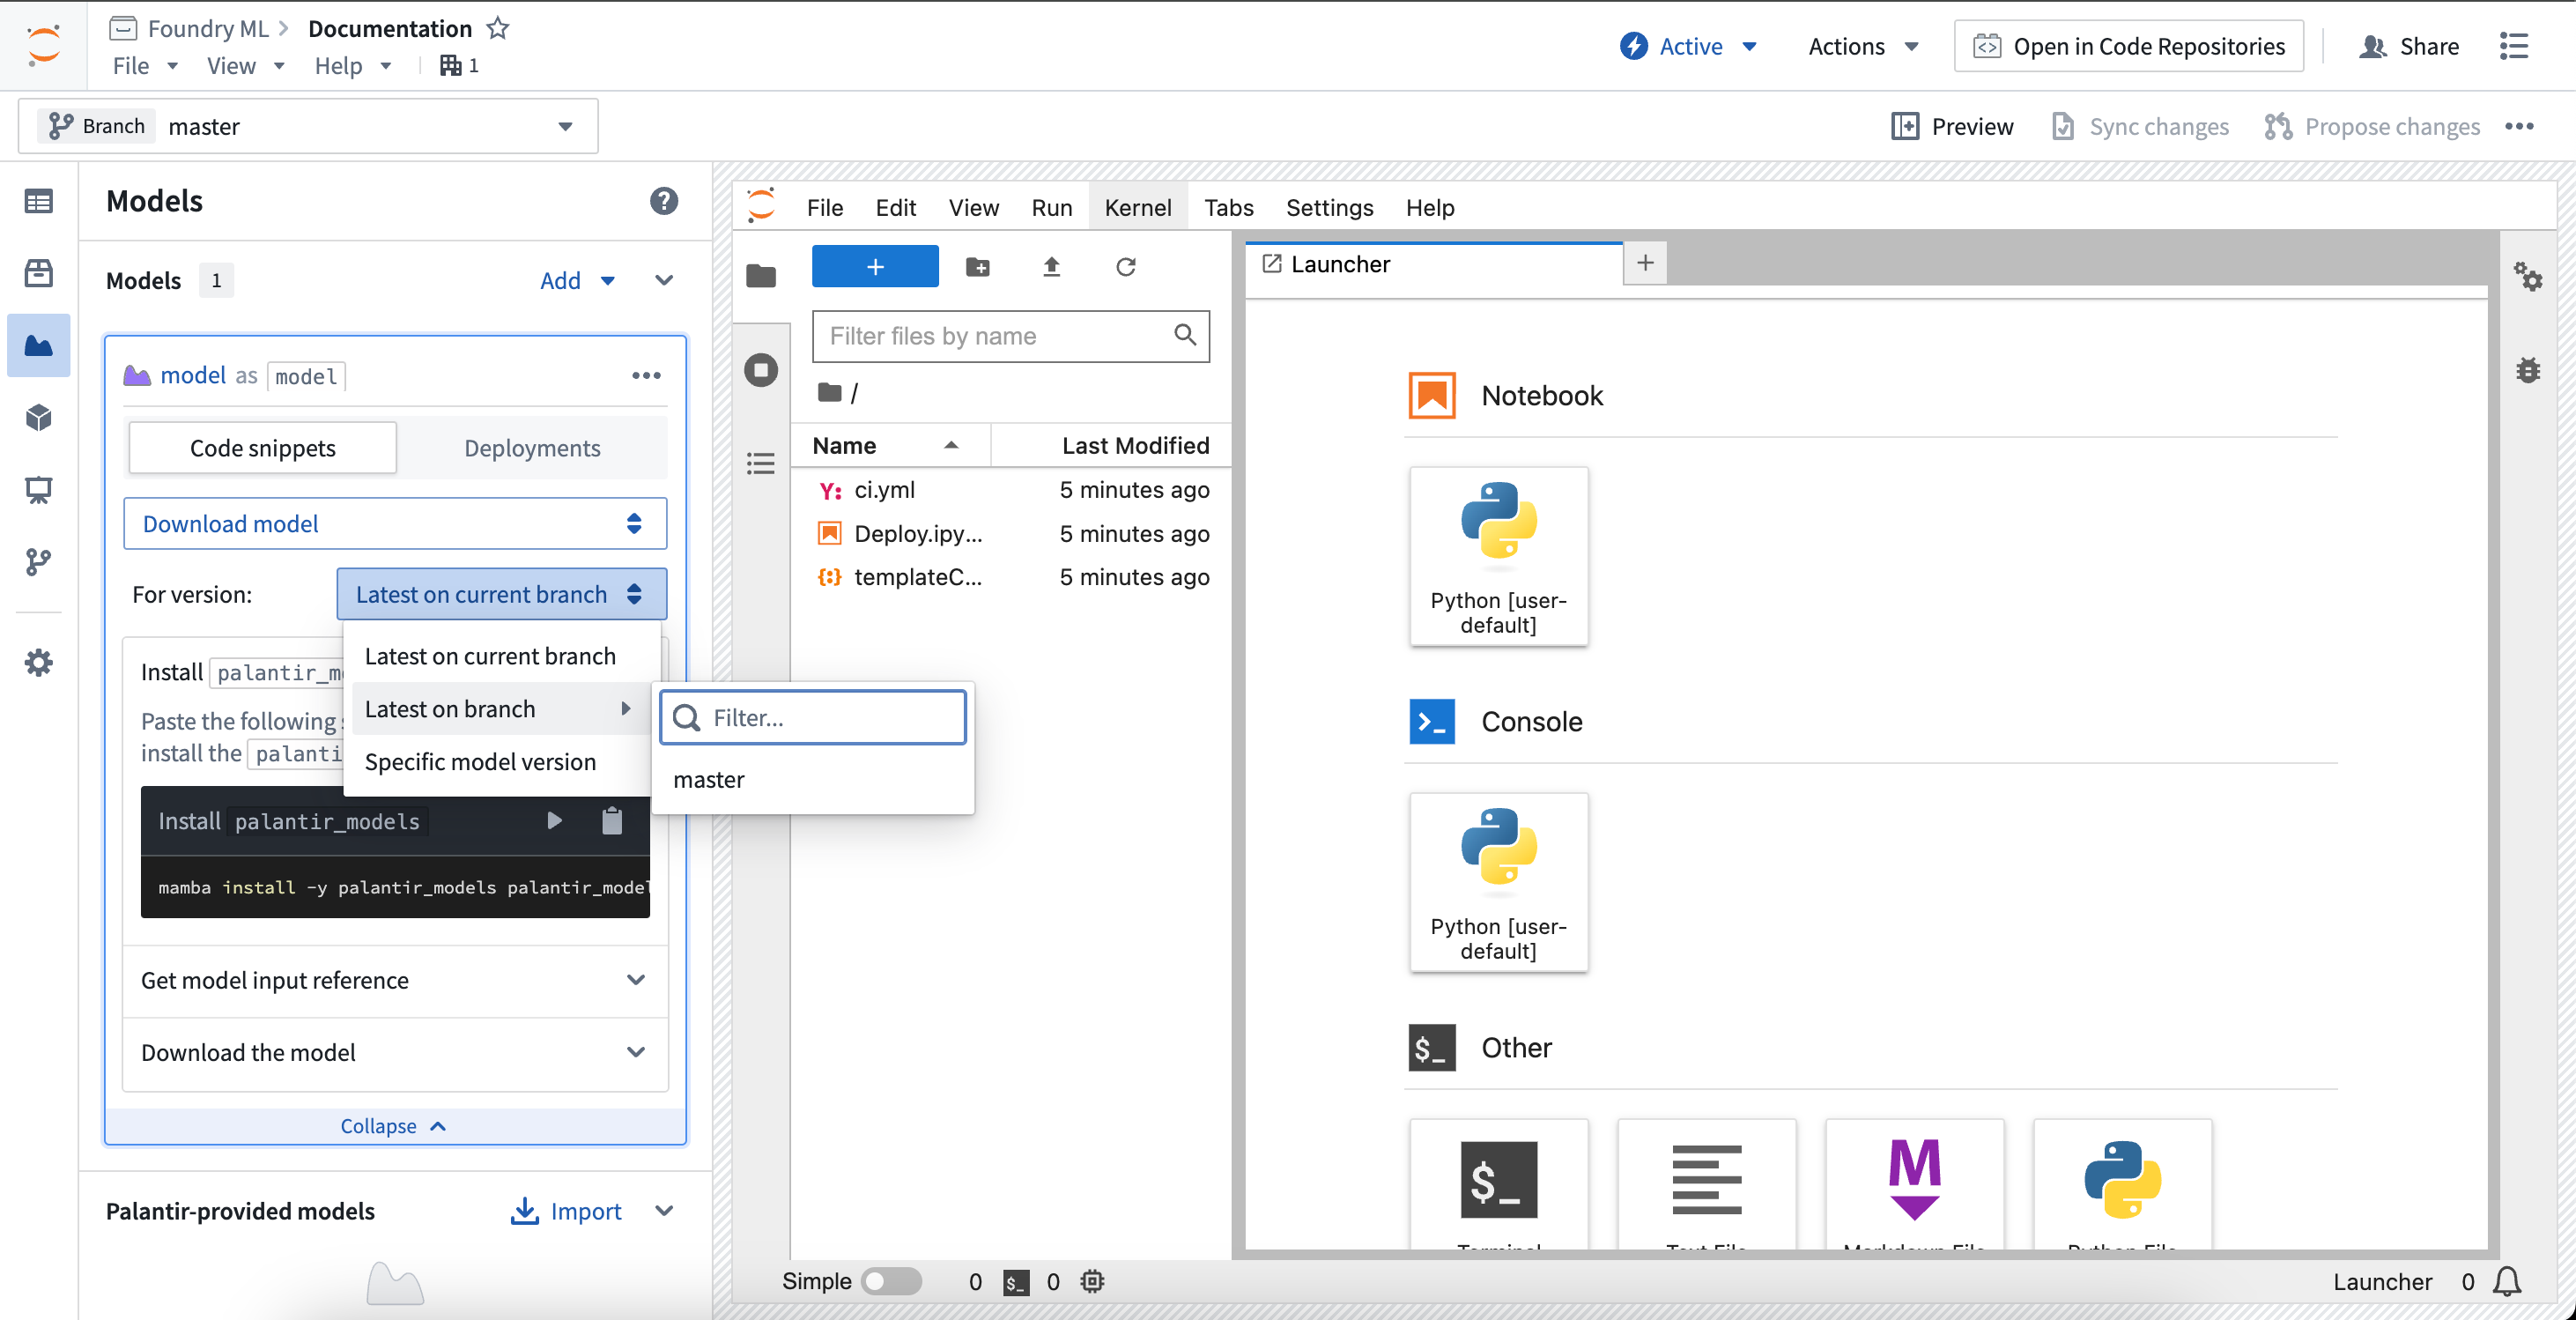
The snippets will automatically update to support the selected model version resolution control. Review the ModelInput class documentation below to learn more.
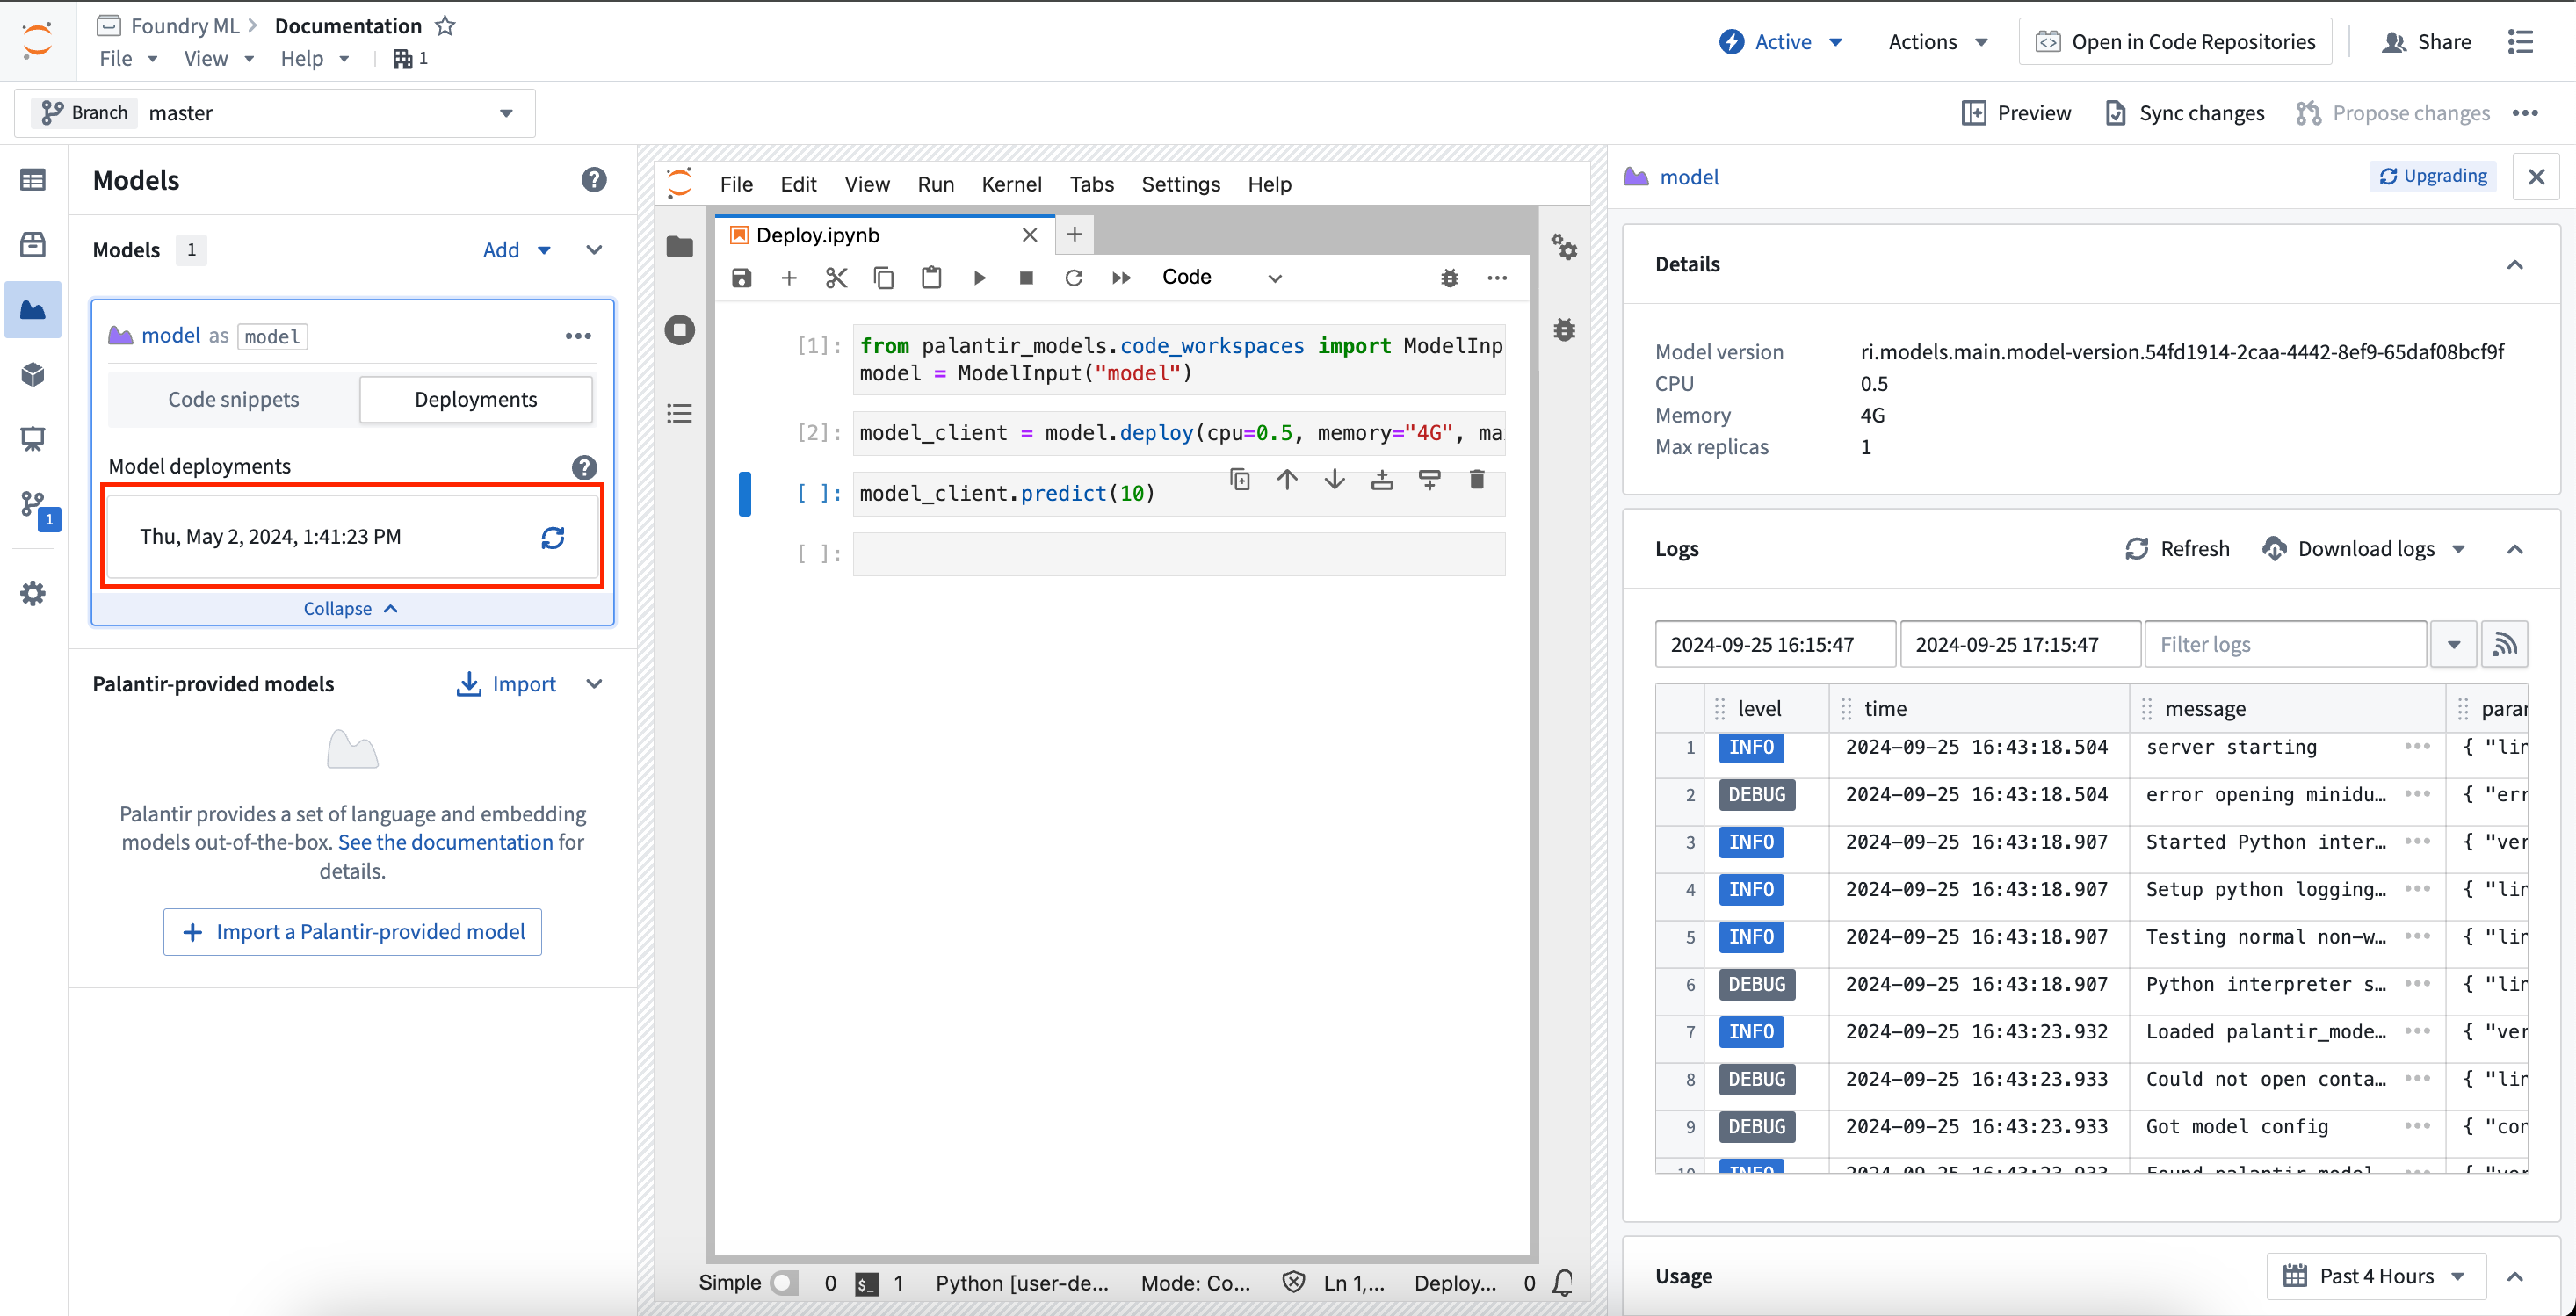
Deploy model for inference
Models can be deployed in Code Workspaces for inference. These deployments are shared per model version, meaning a given model version can have at most one associated deployment, and these deployments are fully separate from existing modeling objective live deployments and model deployments. Deployments are fully configurable from code and have a default scaling policy that will shut down the deployment after 20 minutes of no use.
To load the deployment for a given model version, use the Select snippets dropdown menu and change the option to Deploy for inference. This will load the snippets for deploying the model and will display the same selector as the Download files option for choosing a model version. The snippets will walk through deploying the model and running inference against it.
To monitor a deployment from within Code Workspaces, expand the model card for the model you are working with and select Deployments. In the deployments tab, a list of deployed model versions will be available. Selecting a model version will expand a new panel on the right that contains information about the deployment, such as resources used, logs, and more.
See the ModelInput class documentation below to learn more.
Develop model adapters
Model adapters are used to instruct Foundry on how to save, load, and execute a model across the platform. When publishing a model, you must wrap the model with a model adapter.
In Code Workspaces, model adapters must be defined in a separate .py file. When a new model is added to the workspace, a file is generated based on the alias name given. For example, if the alias is my_model, a file named my_model_adapter.py is generated, with a skeleton model adapter class named MyModelAdapter.
The code snippets provided in the Models panel are generated under the assumption that the alias, file name, and class name match. If the file is moved or the adapter class is renamed, you may have to make manual edits to the generated snippets.
Learn more about developing model adapters.
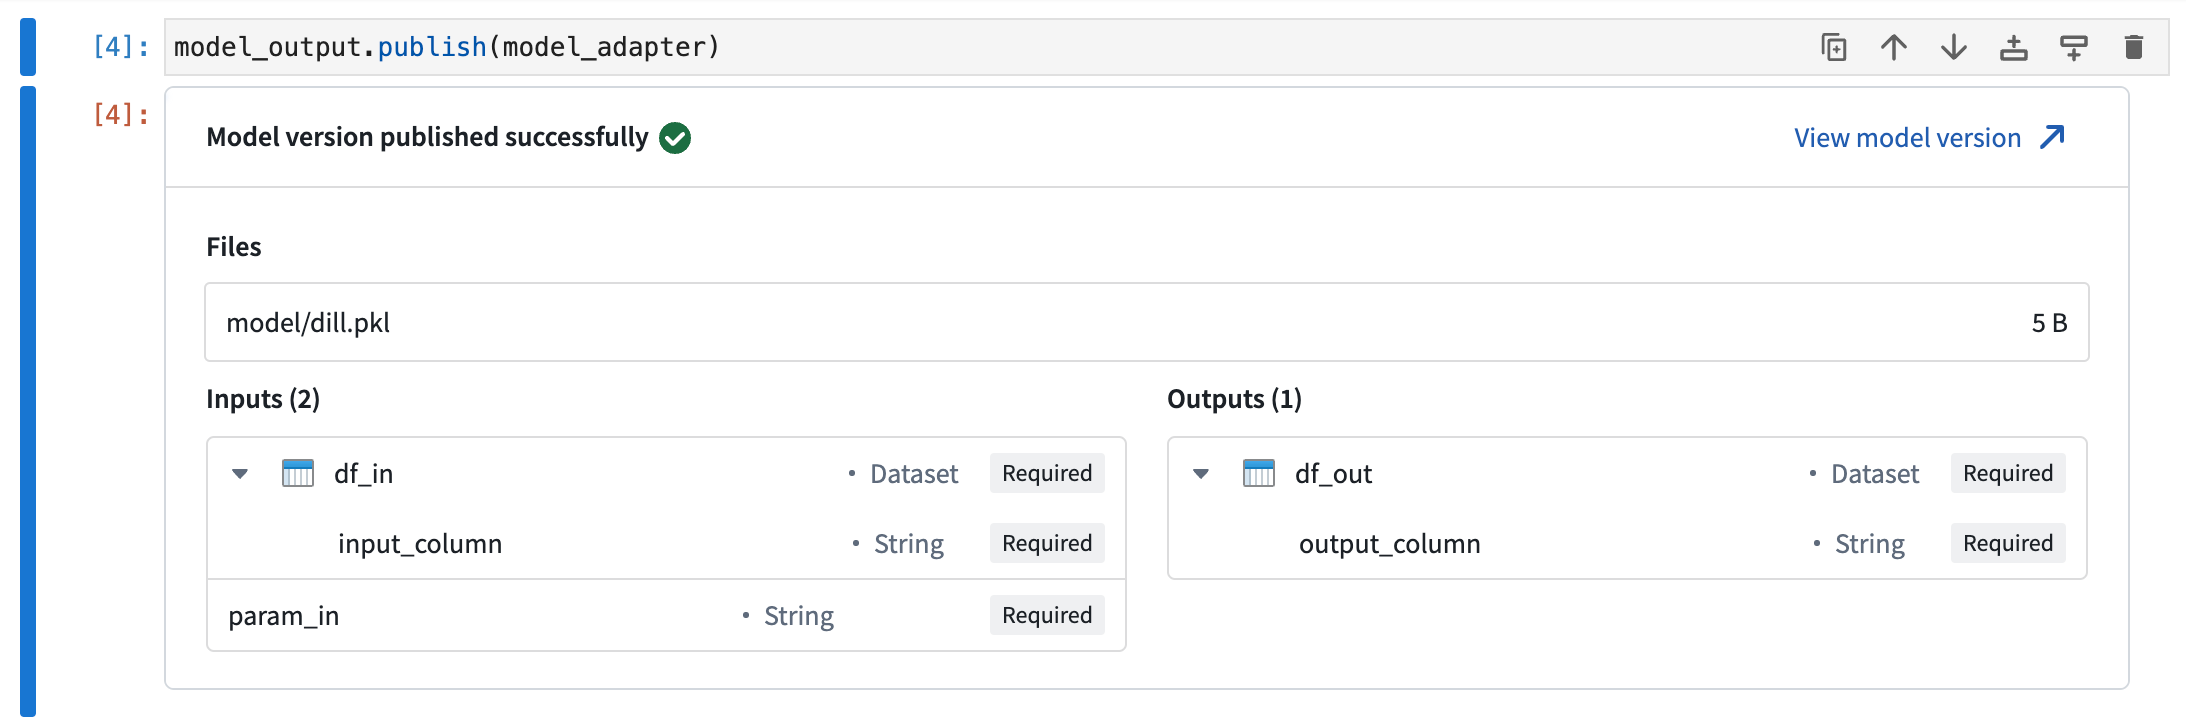
Model output class
The ModelOutput class imported from palantir_models.code_workspaces provides a writeable reference to your Foundry model. To publish your model, you must wrap the model in a model adapter and pass to the reference with the publish method.
Calling the publish method will save the model as a new model version. If the model_output.publish method call is the last line in any Jupyter® notebook cell, a preview window will be displayed confirming that the model has been published successfully.
Model input class
The ModelInput class imported from palantir_models.code_workspaces provides a lightweight readable reference to your Foundry model which allows reading the serialized state of a published models and deploying the model locally for inference. The code below shows an example of getting a readable reference to a model with the alias my_model, getting the latest model version on the test branch:
from palantir_models.code_workspaces import ModelInput
my_model_input = ModelInput("my_alias", branch="test")
Download models
ModelInput allows downloading the serialized model weights that are stored when the model is published.
from palantir_models.code_workspaces import ModelInput
# get the latest model version
my_model_input = ModelInput("my_alias")

# download the files
my_model_input.download_files()
This returns a path to a temporary directory where the files are downloaded.
Initialize model adapters
For workflows involving model fine-tuning/republishing, it is often useful to be able to download the model files and load them into an adapter. If the workspace has a local copy of the adapter used to publish the model or the adapter comes from a shared adapter package and you have added it as a dependency in the workspace, you can load the adapter and use the adapter as you would anywhere else.
# in this example, the adapter is in a local python file `my_adapter_file.py`
from my_adapter_file import MyAdapter
from palantir_models.code_workspaces import ModelInput

my_model_input = ModelInput("my_alias", model_version="ri.models.main.model-version...")

# initialize the adapter
initialized_adapter = my_model_input.initialize_adapter(MyAdapter)

# the initialized adapter can now be republished using `ModelOutput`, or you can access the python objects stored inside my adapter
# for example, if there is a variable `pipeline` that holds a huggingface pipeline. Note that this code varies depending on your
# adapter definition.
pipeline = initialized_adapter.pipeline
Deploy models for inference
Models can also be deployed for inference within the code workspace. These deployments are shared per model version, so multiple concurrent sessions using the same model version will send requests to the same deployment.
To interact with a model deployment, you must get a deployment client for the model.
from palantir_models.code_workspaces import ModelInput

my_model_input = ModelInput("my_alias")

deployment_client = my_model_input.deploy(cpu=2, memory="8G", max_replicas=1)
The deployment client has a number of methods available for controlling the deployment.
# wait until the model is ready
client.wait_for_readiness()

# scale the deployment
client.scale(cpu=4)

# run inference
client.predict(...)

# manually shutdown (deployments will auto-shutdown after 20 minutes of no use)
client.disable()
Inference input size limit
There is a 40 MB limit on the size of a single inference request, as this approach is intended for quick iteration involving other models rather than production-scale inference. In practice, this often corresponds to an average dataset of around 100,000 rows, depending on row size.
If you need to run your model over larger datasets, you can enable chunking, which breaks down a large dataset into manageable pieces and sends them to the model one chunk at a time. You can enable chunking by setting the client.use_chunking method to True as follows:
client.use_chunking = True
client.predict(...)
Note that chunking currently supports only one dataset as input, but you can include any number of other parameters. If your dataset exceeds these limits or the chunking approach is insufficient for your workflow, consider using Code Repositories and transforms to handle larger-scale data processing.
Transforms
Jupyter® notebooks that produce model outputs can also be used in transforms created from Code Workspaces. Follow the steps below to register a transform for a model output:
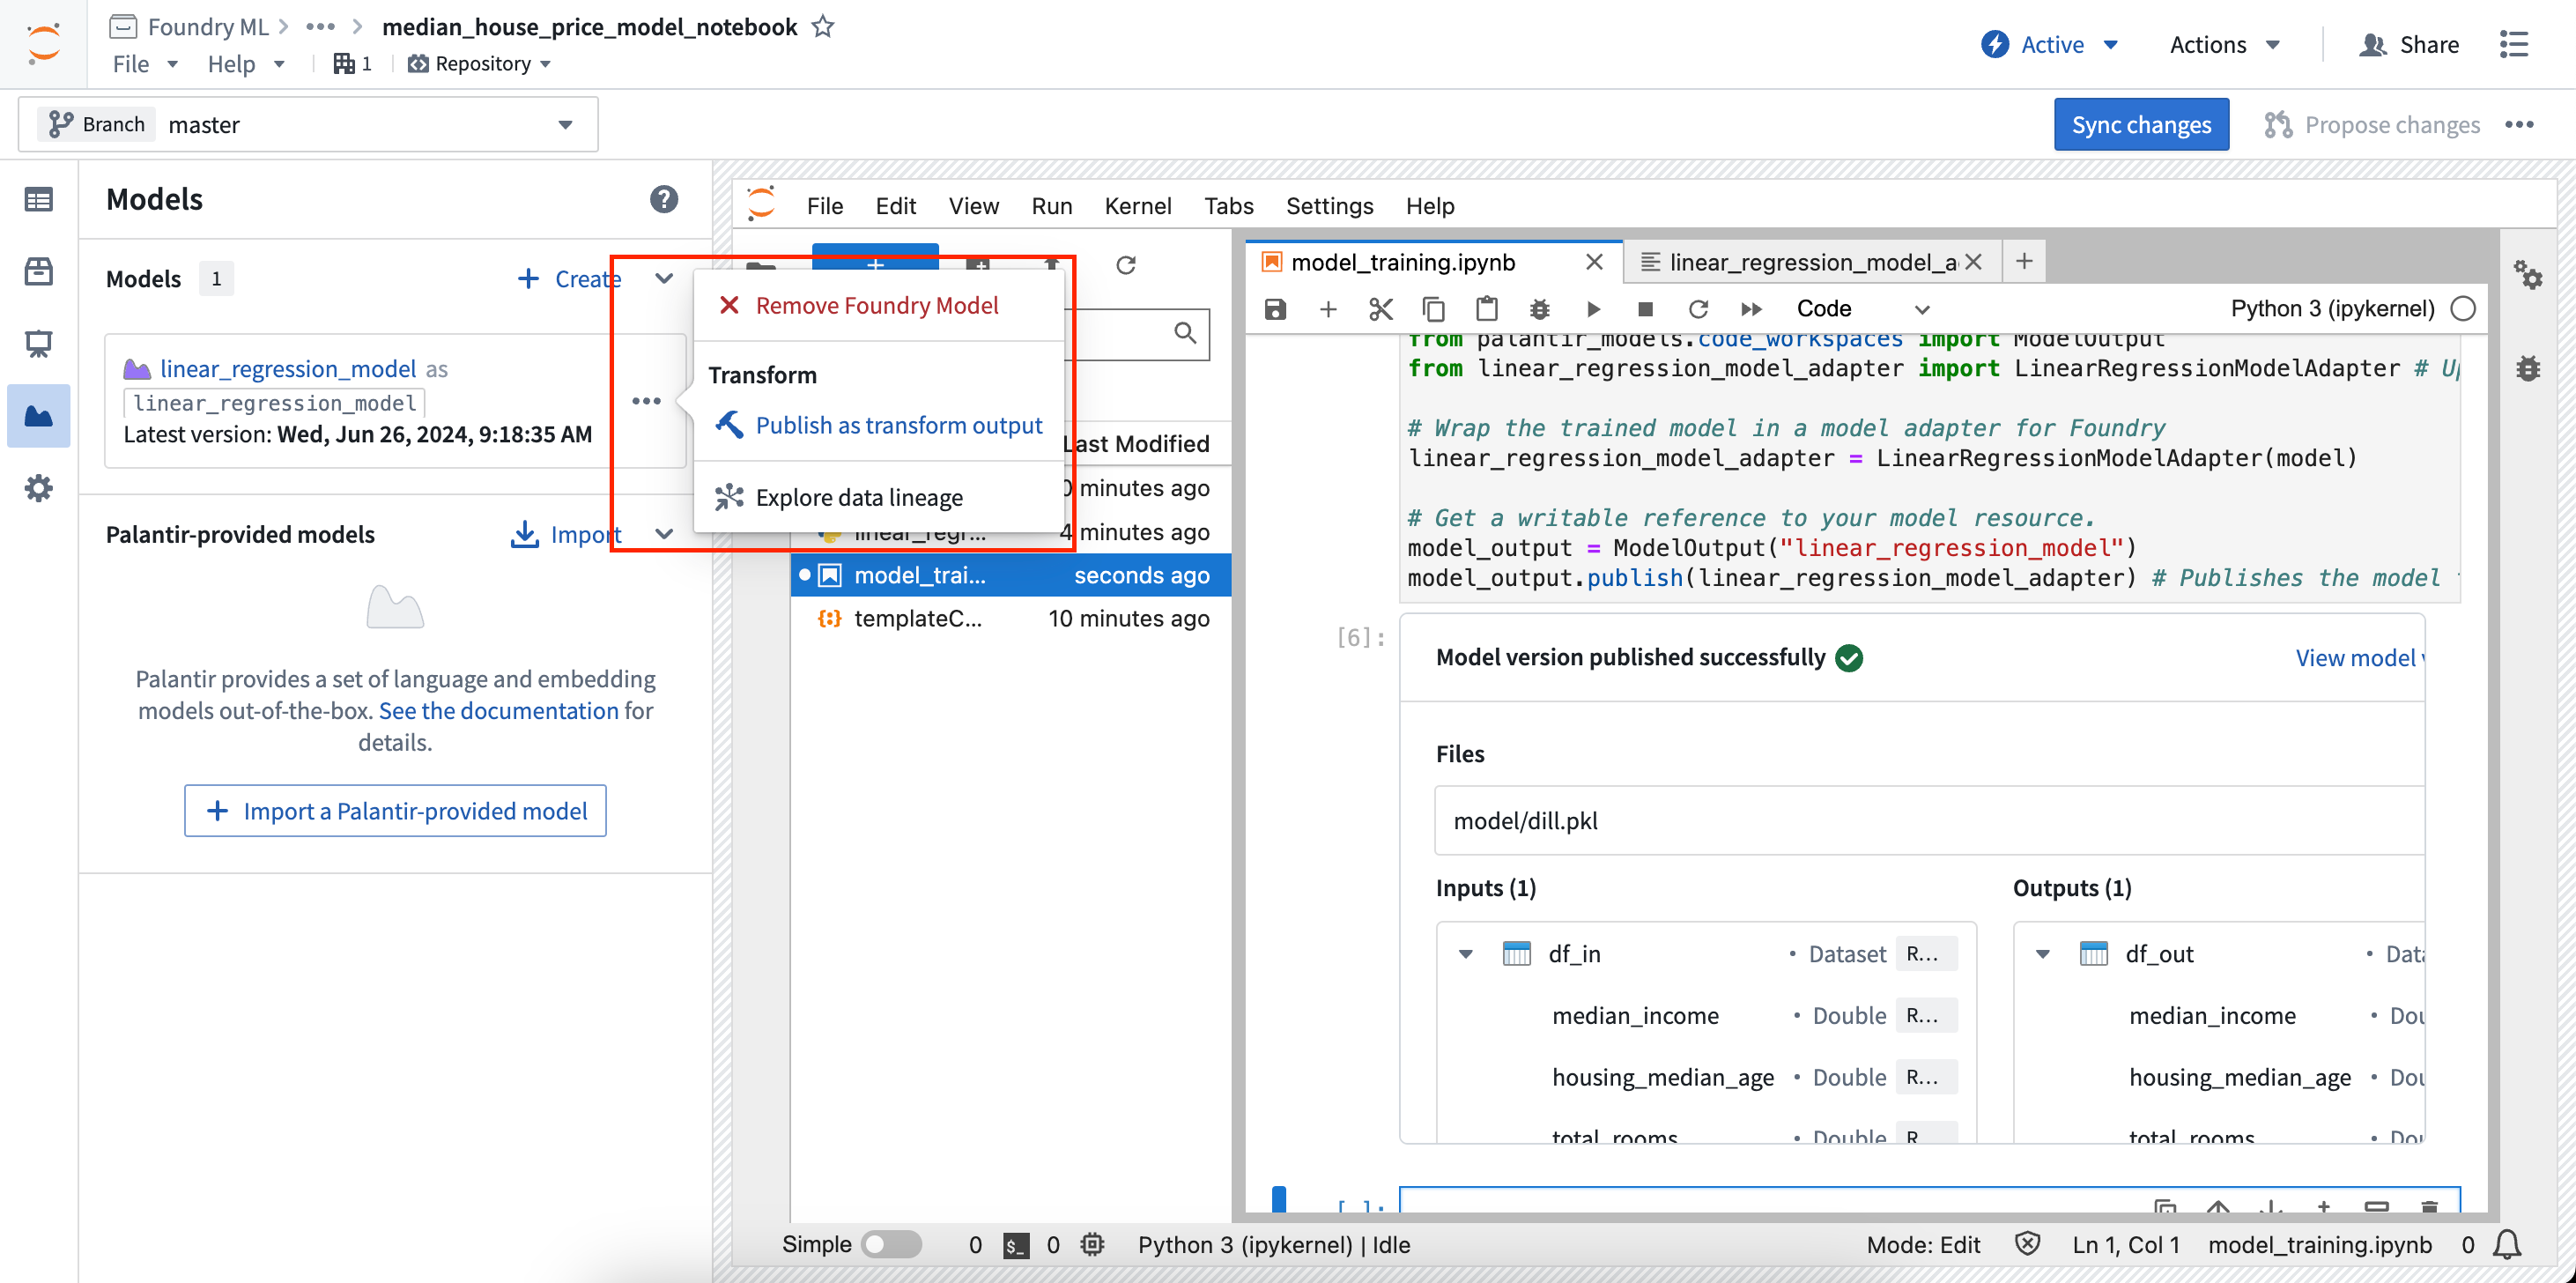
- In the Models panel, find the model card for the model you want to output from a transform, then select Publish as transform output in the menu.
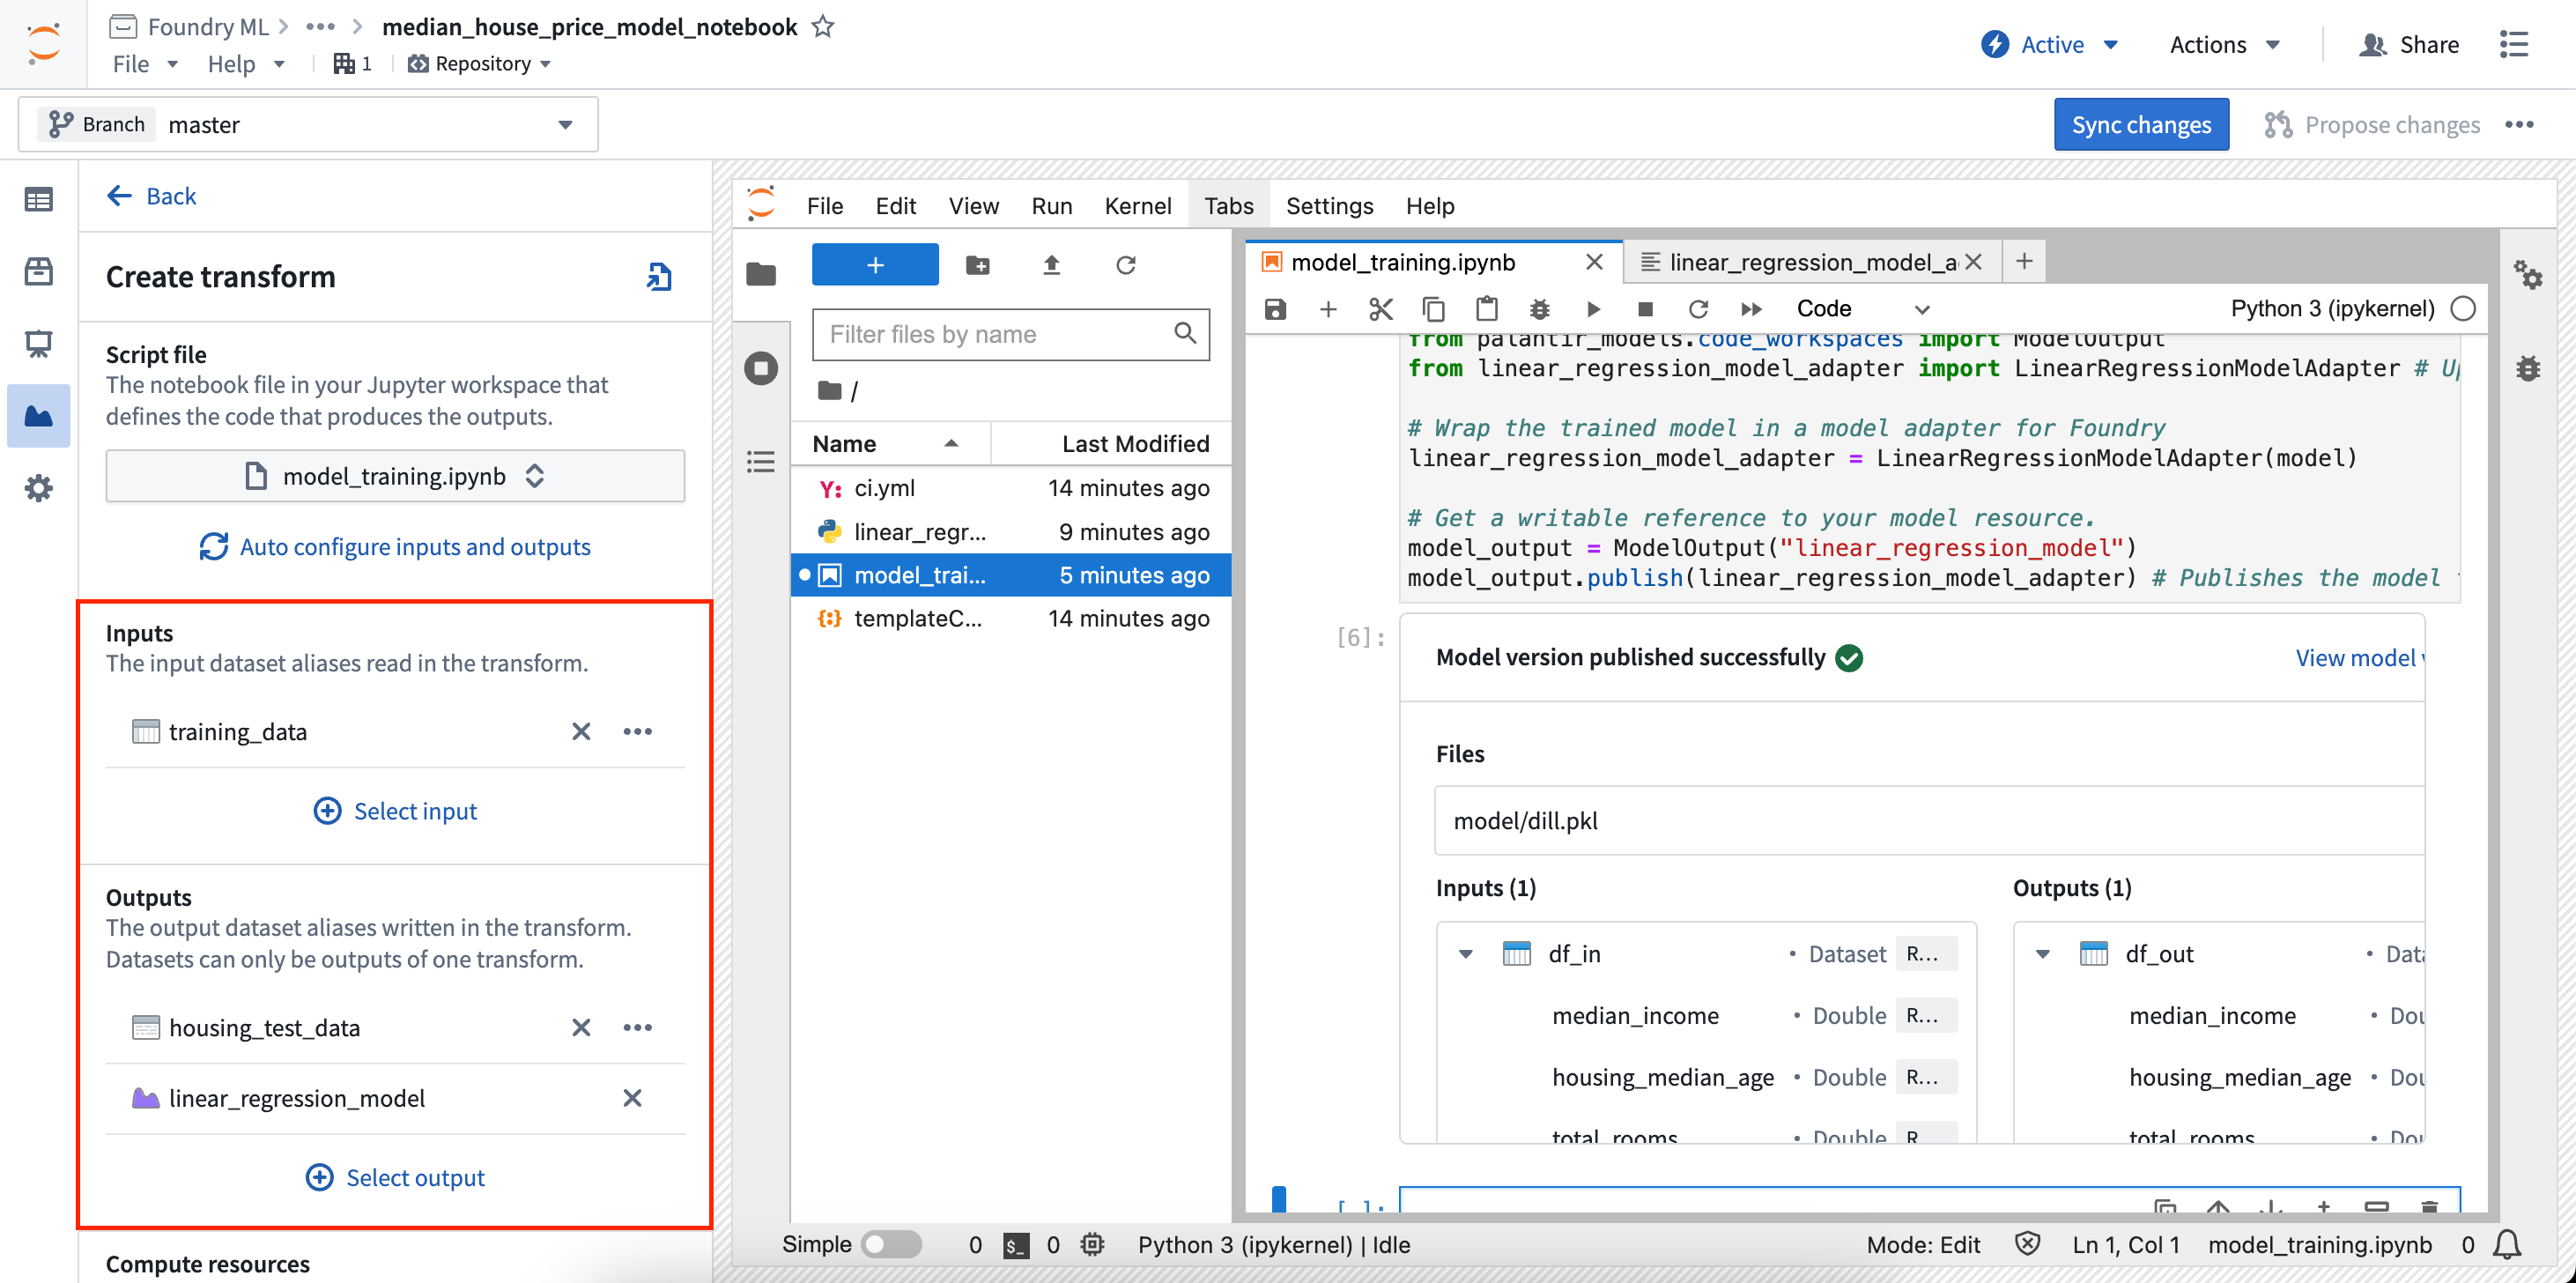
- In the Create transform panel, you can configure the file to execute as well as the required inputs and outputs of your transform. In the example below, training data is used as an input and a test dataset and model are used as outputs.
- Once the inputs and outputs are configured, select Sync and run at the bottom of the configuration page to save your current code changes and create the transform. The transform will start running, and the status of the job will be displayed with the associated datasets and models in the Models panel.
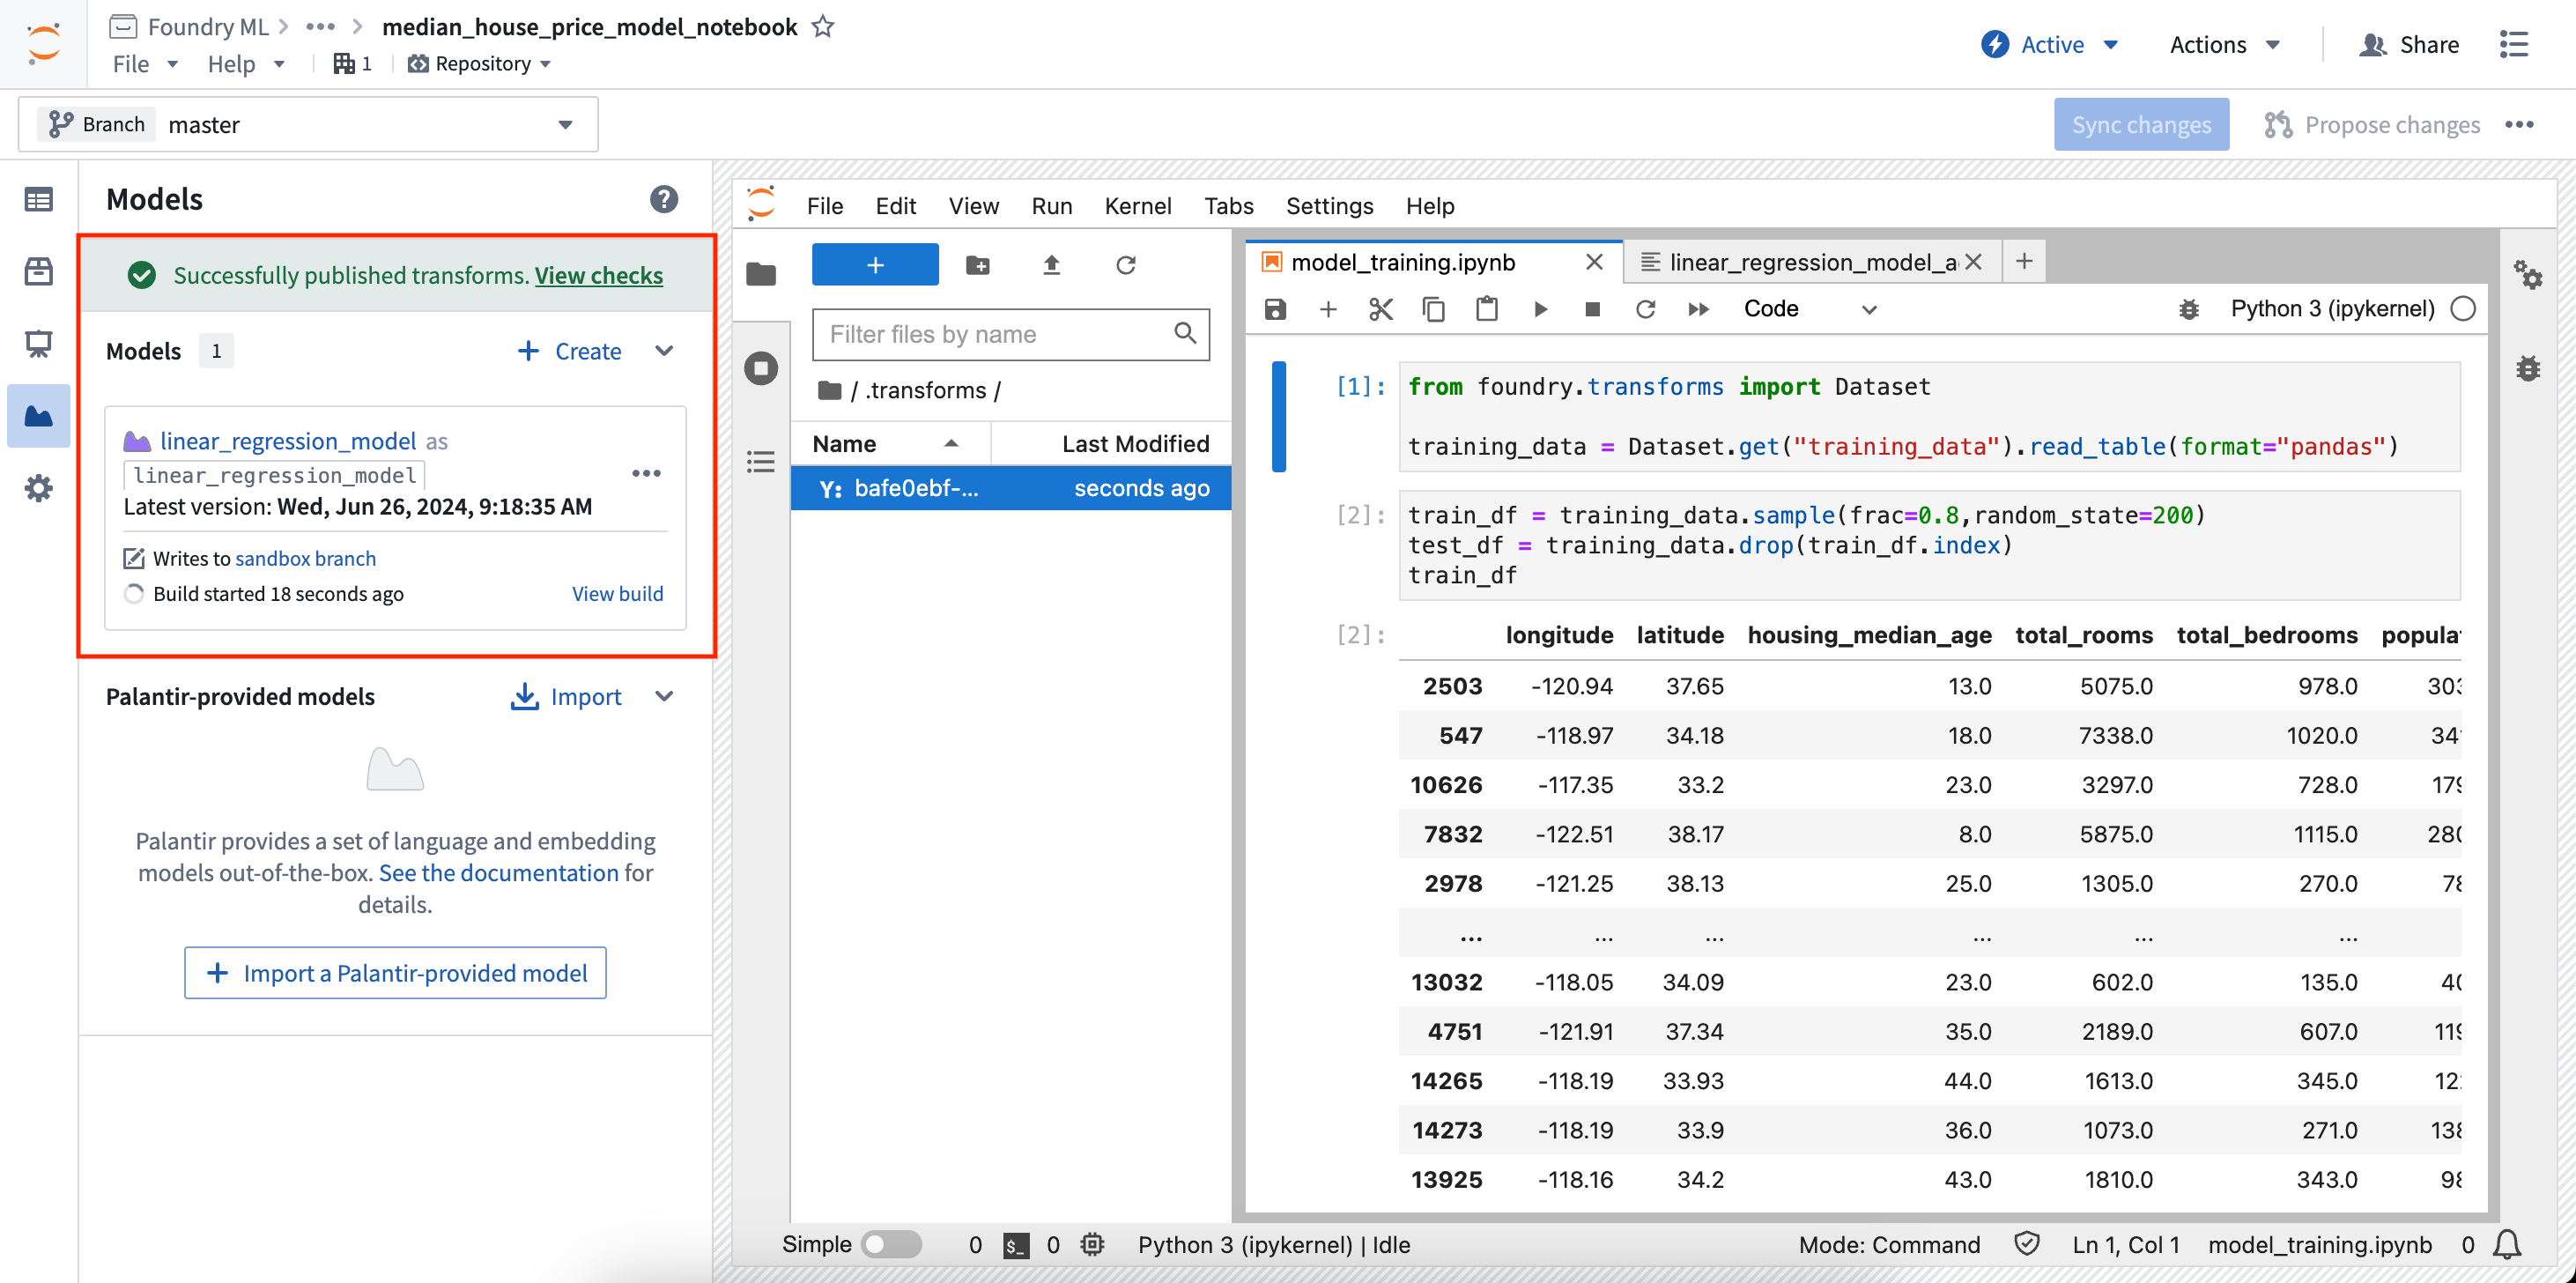
You can then select View build to see the running transforms job. If you make a change to your notebook code and want to rebuild the model, select Rebuild in the model card to re-run the build. Models and datasets created with a transform can be scheduled just like transforms created elsewhere in the platform. Learn more about scheduling transforms.
Jupyter®, JupyterLab®, and the Jupyter® logos are trademarks or registered trademarks of NumFOCUS.
All third-party trademarks (including logos and icons) referenced remain the property of their respective owners. No affiliation or endorsement is implied.
中文翻译
训练模型并与之交互
:::callout{theme="neutral"} 与模型交互仅在 JupyterLab® 代码工作区 中受支持。 :::
代码工作区 (Code Workspaces) 允许您训练和发布模型,以及导入模型以便与之前发布的模型进行交互。
代码工作区要求您为工作区中引用的每个 Foundry 模型资产 (model asset) 创建一个模型别名 (model alias)。模型别名作为对特定模型的引用,使您能够与模型交互,从而发布新版本或下载已保存的模型文件。
在模型 (Models) 选项卡中注册模型时,代码工作区会在位于工作区 /home/user/repo/.foundry 文件夹下的隐藏文件中,创建所选模型别名与 Foundry 模型唯一标识符之间的映射。
要了解如何从 Jupyter® 笔记本发布模型,请参阅模型集成文档。
将模型添加到工作区
您可以直接在模型侧边栏面板中创建模型或将其导入工作区。
要创建新模型,请打开模型侧边栏面板并选择添加 > 创建新模型。这将引导您完成新模型的创建、别名的注册,并提供用于发布模型的代码片段。同时,系统还会生成一个骨架模型适配器 (model adapter) Python 文件,您必须实现该文件才能将模型发布回 Foundry。
要导入现有模型,请打开模型侧边栏面板并选择添加 > 导入现有模型。这将引导您完成模型的导入和别名的注册,并提供用于下载已保存模型状态文件的代码片段。
导入的模型会从指定的模型版本加载序列化的模型状态。代码工作区提供了不同的控件来控制导入模型时使用的模型版本,允许您选择当前工作区分支上的最新版本、指定分支上的最新版本或特定的模型版本。
可用代码片段
模型侧边栏面板提供了用于常见工作流的代码片段,您可以将其复制并粘贴到笔记本中。所有片段都会提示您安装 palantir_models,这是 Palantir 提供的用于开发和与模型交互的库。
侧边栏中的每个模型卡片都会生成特定于该模型的唯一代码片段。选择模型卡片将展开该卡片,并显示一个选择器,用于选择显示特定任务的代码片段。
发布模型版本
要发布模型版本,您必须首先开发模型适配器。对于在代码工作区内创建的模型,系统会为您创建一个骨架适配器,您需要在以模型别名命名的 Python 文件中实现它。模型卡片将提供有关开发模型适配器和将模型发布回 Foundry的详细说明。
以下代码片段适用于别名为 linear_regression_model 的模型。假设已在 linear_regression_model_adapter.py 中编写了模型适配器,模型发布代码应如下所示:
from palantir_models.code_workspaces import ModelOutput

# Model adapter api has been defined in linear_regression_model_adapter.py
from linear_regression_model_adapter import LinearRegressionModelAdapter

# sklearn_model is a model trained in another cell
linear_regression_model_adapter = LinearRegressionModelAdapter(sklearn_model)

model_output = ModelOutput("linear_regression_model")
model_output.publish(linear_regression_model_adapter)
下载模型
要下载之前发布的模型版本,请将代码片段选择器更改为下载模型。这将提供解析模型版本的控件,用于控制下载模型文件时使用的模型版本。
- 当前分支上的最新版本: 所选模型版本将是当前工作区分支上的最新版本。
- 分支上的最新版本: 所选模型版本将是所选分支上的最新版本。
- 特定模型版本: 所选模型版本将固定为给定的模型版本 RID。
代码片段将自动更新以支持所选的模型版本解析控件。请参阅下方的 ModelInput 类文档以了解更多信息。
部署模型以进行推理
可以在代码工作区中部署模型以进行推理 (inference)。这些部署是按模型版本共享的,这意味着给定的模型版本最多只能有一个关联的部署,并且这些部署与现有的建模目标实时部署和模型部署完全独立。部署可通过代码进行完全配置,并采用默认的扩缩容策略,即在闲置 20 分钟后自动关闭部署。
要加载给定模型版本的部署,请使用选择代码片段下拉菜单并将选项更改为部署以进行推理。这将加载用于部署模型的代码片段,并显示与下载文件选项相同的选择器以供选择模型版本。这些代码片段将引导您完成模型部署并对其进行推理。
要在代码工作区内监控部署,请展开您正在使用的模型的模型卡片,然后选择部署。在部署选项卡中,将提供已部署模型版本的列表。选择一个模型版本将在右侧展开一个新面板,其中包含有关部署的信息,例如使用的资源、日志等。
请参阅下方的 ModelInput 类文档以了解更多信息。
开发模型适配器
模型适配器用于指示 Foundry 如何在整个平台中保存、加载和执行模型。发布模型时,必须使用模型适配器包装该模型。
在代码工作区中,模型适配器必须在单独的 .py 文件中定义。将新模型添加到工作区时,系统会根据给定的别名生成一个文件。例如,如果别名为 my_model,则会生成一个名为 my_model_adapter.py 的文件,其中包含一个名为 MyModelAdapter 的骨架模型适配器类。
模型面板中提供的代码片段是在假设别名、文件名和类名匹配的前提下生成的。如果移动了文件或重命名了适配器类,您可能需要手动编辑生成的代码片段。
ModelOutput 类
从 palantir_models.code_workspaces 导入的 ModelOutput 类提供了对 Foundry 模型的可写引用。要发布模型,必须将模型包装在模型适配器中,并通过 publish 方法传递给该引用。
调用 publish 方法会将模型保存为新的模型版本。如果 model_output.publish 方法调用是任何 Jupyter® 笔记本单元格中的最后一行,系统将显示一个预览窗口,确认模型已成功发布。
ModelInput 类
从 palantir_models.code_workspaces 导入的 ModelInput 类提供了对 Foundry 模型的轻量级只读引用,允许读取已发布模型的序列化状态并在本地部署模型以进行推理。以下代码展示了如何获取别名为 my_model 的模型的只读引用,并获取 test 分支上的最新模型版本:
from palantir_models.code_workspaces import ModelInput
my_model_input = ModelInput("my_alias", branch="test")
下载模型
ModelInput 允许下载在发布模型时存储的序列化模型权重。
from palantir_models.code_workspaces import ModelInput
# get the latest model version
my_model_input = ModelInput("my_alias")

# download the files
my_model_input.download_files()
这将返回一个临时目录的路径,文件将下载到该目录中。
初始化模型适配器
对于涉及模型微调或重新发布的工作流,能够下载模型文件并将其加载到适配器中通常非常有用。如果工作区具有用于发布模型的适配器的本地副本,或者该适配器来自共享适配器包且您已将其添加为工作区中的依赖项,则可以加载该适配器并像在其他任何地方一样使用它。
# in this example, the adapter is in a local python file `my_adapter_file.py`
from my_adapter_file import MyAdapter
from palantir_models.code_workspaces import ModelInput

my_model_input = ModelInput("my_alias", model_version="ri.models.main.model-version...")

# initialize the adapter
initialized_adapter = my_model_input.initialize_adapter(MyAdapter)

# the initialized adapter can now be republished using `ModelOutput`, or you can access the python objects stored inside my adapter
# for example, if there is a variable `pipeline` that holds a huggingface pipeline. Note that this code varies depending on your
# adapter definition.
pipeline = initialized_adapter.pipeline
部署模型以进行推理
还可以在代码工作区内署模型以进行推理。这些部署是按模型版本共享的,因此使用同一模型版本的多个并发会话会将请求发送到同一部署。
要与模型部署进行交互,您必须获取该模型的部署客户端。
from palantir_models.code_workspaces import ModelInput

my_model_input = ModelInput("my_alias")

deployment_client = my_model_input.deploy(cpu=2, memory="8G", max_replicas=1)
部署客户端提供了多种可用于控制部署的方法。
# wait until the model is ready
client.wait_for_readiness()

# scale the deployment
client.scale(cpu=4)

# run inference
client.predict(...)

# manually shutdown (deployments will auto-shutdown after 20 minutes of no use)
client.disable()
推理输入大小限制
单个推理请求的大小限制为 40 MB,因为此方法旨在用于涉及其他模型的快速迭代,而非生产规模的推理。在实践中,这通常对应于大约 100,000 行的平均数据集,具体取决于行大小。
如果您需要在更大的数据集上运行模型,可以启用分块 (chunking),它会将大型数据集分解为可管理的块,并一次一个块地发送给模型。您可以通过将 client.use_chunking 方法设置为 True 来启用分块,如下所示:
client.use_chunking = True
client.predict(...)
请注意,分块目前仅支持一个数据集作为输入,但您可以包含任意数量的其他参数。如果您的数据集超出这些限制,或者分块方法无法满足您的工作流需求,请考虑使用代码库和转换 (Transforms) 来处理更大规模的数据。
转换
生成模型输出的 Jupyter® 笔记本也可用于从代码工作区创建的转换中。请按照以下步骤为模型输出注册转换:
- 在模型面板中,找到您希望作为转换输出的模型的模型卡片,然后在菜单中选择发布为转换输出。
- 在创建转换面板中,您可以配置要执行的文件以及转换所需的输入和输出。在下面的示例中,训练数据用作输入,测试数据集和模型用作输出。
- 配置好输入和输出后,选择配置页面底部的同步并运行以保存当前的代码更改并创建转换。转换将开始运行,作业的状态将与关联的数据集和模型一起显示在模型面板中。
然后,您可以选择查看构建以查看正在运行的转换作业。如果您对笔记本代码进行了更改并希望重新构建模型,请在模型卡片中选择重新构建以重新运行构建。使用转换创建的模型和数据集可以像平台中其他位置创建的转换一样进行调度。了解有关调度转换的更多信息。
Jupyter®、JupyterLab® 和 Jupyter® 徽标是 NumFOCUS 的商标或注册商标。
所有引用的第三方商标(包括徽标和图标)均归其各自所有者所有。不暗示任何附属关系或认可。