User-defined functions (UDF)(用户自定义函数 (UDF))
:::callout{theme="neutral"} Pipeline Builder supports both Java and Python user-defined functions (UDFs). Learn more about using Python UDFs in Pipeline Builder. :::
If you cannot manipulate your data with existing transformation options in Pipeline Builder, want to incorporate external Java or Python libraries, or have complex logic you want to reuse across pipelines, you can create your own user-defined function (UDF). User-defined functions let you run your own arbitrary Java or Python code in Pipeline Builder or in Code Repositories that can be versioned and upgraded.
:::callout{theme="warning"} User-defined functions should only be applied when necessary, and we recommend using existing transformations in Pipeline Builder or Java transform repositories when possible.
Enrollments must be on Palantir's cloud-hosted infrastructure to use UDFs. Only row map and flat map UDFs are currently supported in Pipeline Builder, though support for other types will be added. User-defined functions are an advanced feature. Be sure to thoroughly review the following documentation to understand the impact of using user-defined functions in your pipeline. :::
Create a user-defined function (UDF)
To create a user-defined function repository, first navigate to a Project where you would like to save the repository.
Then, select New and choose Code Repositiory. Under the Foundry UDF Definitions option, select Map UDF Definition/Implementation to bootstrap your repository with a UDF template. Finally, select Initialize repository.
You can choose to work locally with your own local environment (recommended) or directly in Code Repositories.
Set up local developer environment (recommended)
We recommend working locally to create UDFs. Follow the steps below to set up your local environment.
- To clone your repository, select Work locally in the upper right of the screen, then copy the URL.

-
Open your command line interface (CLI) and run
git clone <repo url>. -
Open the project in your developer environment with the following commands:
-
IntelliJ IDEA:
./gradlew idea open - Eclipse IDE:
./gradlew eclipse open
Key CLI commands:
- Re-run code generation files after editing UDF definitions or Java implementation files:
- IntelliJ IDEA:
./gradlew idea - Eclipse IDE:
./gradlew eclipse. - Create a lockfile to publish to Pipeline Builder:
./gradlew generateEddieLockfile- Run tests:
- Run only testExamples:
./gradlew test --tests examples.ExamplesTest.testExamples - Run all tests:
./gradlew test
Set up Code Repositories environment
If you are unable to work in your local IDE, you can edit files directly in Code Repositories and run the key commands in Task Runner.
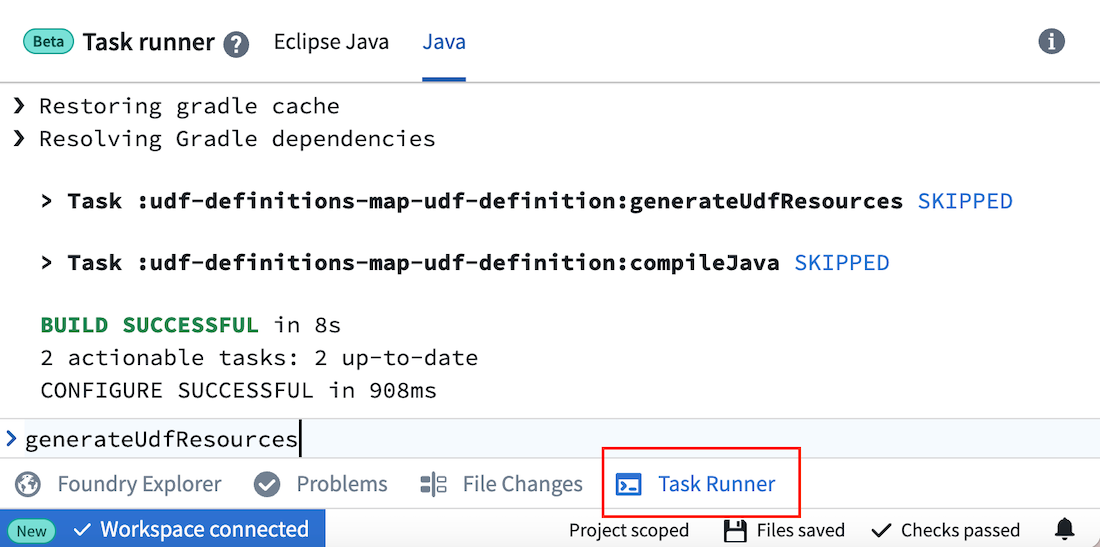
Key commands:
- Re-run code generation files after editing UDF definitions or Java implementation files:
generateUdfResources- Create a lockfile to publish to Pipeline Builder:
generateEddieLockfile- Run tests:
- Run all tests:
test
Define a user-defined function
UDFs are defined in a file that specifies its name, input schema, output schema, and argument types. Java classes will be generated based on this file, and the file name will be visible in Pipeline Builder once you publish.
To create a new UDF, add a file called <YourUdfName>.yml under src/main/resources/udfs/definitions/ with the following fields:
name: The name for the UDF that will be used by code generation to create classes describing its inputs, outputs, and arguments. This name will also be used to refer to this UDF in thedeployment.ymlfile of the deployment repository and is visible as a transform in Pipeline Builder.customTypes(optional): A block to define custom types that can be reused throughout theinputSchemaandoutputSchemadefinitions. See the Custom types section below for details.inputSchema: The schema to which input rows must adhere to run against the UDF. Datasets with more columns than this schema are accepted if the runtime can select into this schema. Code generation will create strongly-typed input objects against this schema. Parameters will be visible in Pipeline Builder. See the schema definition section below for details.outputSchema: The schema for rows output by this UDF. Code generation will create strongly-typed output objects against this schema. See the schema definition section below for details.arguments: A description of parameters for the UDF. These arguments will be specified by a user at build time in Pipeline Builder or a corresponding deployment repository. Code generation will create a strongly-typed arguments object against this definition.
An example definition is provided in your repository template under src/main/resources/udfs/definitions/Multiply.yml. Read more about arguments in the UDF definition section below.
You can define multiple UDFs in this repository by adding another definition file in src/main/resources/udfs/definitions.
Implement a user-defined function
Once you create or edit your UDF definition file, run code generation with the commands below. Code generation will create strongly-typed objects from your definition file and place them in udf-definitions-map-udf-definition/build/generated/sources/udf/main/java. The generated classes include input and output objects that match your definition's schema as well as interfaces to implement for your transformation creation and logic. You should also re-run code generation any time you make changes to your YourUdfNameMapUdfFactoryImpl orYourUdfNameMapUdfImplclasses so it can compile your Java package and provide errors if checks do not pass.
Local environment:
- IntelliJ IDEA:
./gradlew idea - Eclipse IDE:
./gradlew eclipse
Code Repositories:
- Run
generateUdfResourcesin the Java Task Runner. Generated files are not visible in Code Repositories, but this command provides code completion.
Implement a row map user-defined function
Row map UDFs take one row as input, then output exactly one row per input. Row map is the default UDF type.
To implement your UDF creation and transformation logic, create two new Java class files under src/main/resources/java/myprojectwith the following:
YourUdfNameMapUdfFactoryImpl.java: Responsible for creating an instance of the UDF and providing it any parameters for execution.- This class should implement the generated
YourUdfNameMapUdfFactoryinterface. - Any UDF arguments are available through the
args.config()parameter. - The
createmethod will be invoked once at runtime to instantiate the UDF. YourUdfNameMapUdfImpl.java: Implements the actual transformation logic from the input object to the output object.- This class should implement the generated
YourUdfNameMapUdfinterface. - This logic will be called once for every row passing through the transform.
- Input and output class properties and configuration arguments can be accessed with methods of the same name, but in camelCase. For example,
argument_onewill have a matching method ofargumentOne().
The repository template includes example implementations of the Java classes listed below. You can use these examples to model your own implementations. Re-run code generation after editing to ensure there are no issues.
src/main/java/myproject/MultiplyMapUdfFactoryImpl.javasrc/main/java/myproject/MultiplyMapUdfImpl.java
Implement a flat map user-defined function
Flat map UDFs take one row as input and can output 0, 1, or many rows per input.
To implement your flat map UDF creation and transformation logic, create two new Java class files under src/main/resources/java/myproject using the examples below.
YourUdfNameFlatMapUdfFactoryImpl.java: Responsible for creating an instance of the UDF and providing it parameters for execution.
- This class should implement the generated
YourUdfNameFlatMapUdfFactoryinterface. - Any UDF arguments are available through the
args.config()parameter. - The
createmethod will be invoked once at runtime to instantiate the UDF.
Example: DuplicateRowsFlatMapUdfFactoryImpl.java
package myproject;

import com.google.auto.service.AutoService;
import com.palantir.foundry.duplicaterows.config.DuplicateRowsConfiguration;
import com.palantir.foundry.duplicaterows.DuplicateRowsFlatMapUdf;
import com.palantir.foundry.duplicaterows.DuplicateRowsFlatMapUdfAdapter;
import com.palantir.foundry.duplicaterows.DuplicateRowsFlatMapUdfFactory;
import com.palantir.foundry.udf.api.flatmap.FoundryRowFlatMapUdf;
import com.palantir.foundry.udf.api.flatmap.FoundryRowFlatMapUdfFactory;

/**
 * Factory for creating the "ChangeMe" UDF.
 */
@AutoService(FoundryRowFlatMapUdfFactory.class)
public final class DuplicateRowsFlatMapUdfFactoryImpl implements DuplicateRowsFlatMapUdfFactory {

    /**
     * Service-loading at runtime requires a public, no-arg constructor.
     */
    public DuplicateRowsFlatMapUdfFactoryImpl() {}

    /**
     * Creates the UDF implementation to use at runtime. Authors should return the adapter wrapping their UDF implementation.
     */
    @Override
    public final FoundryRowFlatMapUdf create(FoundryRowFlatMapUdfFactory.Arguments<DuplicateRowsConfiguration> args) {
        DuplicateRowsFlatMapUdf impl = new DuplicateRowsFlatMapUdfImpl(args.config());
        return new DuplicateRowsFlatMapUdfAdapter(impl);
    }
}
YourUdfNameFlatMapUdfImpl.java: Implements the actual transformation logic from the input object to the output object.
- This class should implement the generated
YourUdfNameFlatMapUdfinterface. - This logic will be called once for every row passing through the transform.
- Input and output class properties and configurations arguments can be accessed with methods of the same name, but in camelCase. For example,
argument_onewill have a matching method ofargumentOne().
Example: DuplicateRowsFlatMapUdfImpl.java
package myproject;

import com.palantir.foundry.duplicaterows.config.DuplicateRowsConfiguration;
import com.palantir.foundry.duplicaterows.DuplicateRowsFlatMapUdf;
import com.palantir.foundry.duplicaterows.input.InputRow;
import com.palantir.foundry.duplicaterows.output.OutputRow;
import com.palantir.foundry.udf.api.flatmap.Collector;
/**
 * Implementation for the "DuplicateRows" UDF logic.
 */
public final class DuplicateRowsFlatMapUdfImpl implements DuplicateRowsFlatMapUdf {

    private final DuplicateRowsConfiguration config;

    public DuplicateRowsFlatMapUdfImpl(DuplicateRowsConfiguration config) {
        this.config = config;
    }

    @Override
    public void flatMap(Context ctx, InputRow input, Collector<OutputRow> out) throws Exception {
        OutputRow outputRow = OutputRow.create(ctx.getRowBuilderFactory())
                .key(input.key())
                .value(input.value());
        // Duplicate all input rows by collecting twice
        out.collect(outputRow);
        out.collect(outputRow);
    }
}
Write examples for row map user-defined functions
Examples provide information on a given user-defined function and can be used as a unit testing framework. These examples also appear in Pipeline Builder when importing a UDF into a pipeline, making it easier to understand UDF functionality. Only row map user defined functions are supported by the Examples framework, for flat map user defined functions we recommend writing your own JUnit tests, these will not be visible in the Builder transform documentation.
Defining an Example test case is optional but it is strongly recommended as it will be visible in Pipeline Builder, under the transform documentation, making it a lot easier for users to understand what the UDF does. If you don’t want to include an Example, delete the folder src/test and continue on to the next section.
You can find a sample Examples class in the default template of the Map UDF Definition/Implementation repository.
src/test/java/examples/registry/MultiplyExamples.java
To define new examples for a UDF, create a class under examples.registry that implements the Examples interface. Refer to MultiplyExamples.java for interface expectations.
:::callout{theme="warning"}
The name() method of the examples implementation must return the same name as the UDF being tested. Otherwise, the examples will not be properly registered or published to the Pipeline Builder interface.
:::
Actual examples should be defined in the examples() method. The following is the examples() method implementation as defined in the default MultiplyExamples class:
@Override
public List<UdfExample<SettableMultiplicand, Product, MultiplyConfiguration>> examples() {
    return List.of(UdfExample.<SettableMultiplicand, Product, MultiplyConfiguration>builder()
            // A unique ID for this example
            .id(ExampleId.of("baseCase"))
            // Optional: A description of what this example represents
            .description("Multiply values by 2.")
            // Whether this example should have PROMINENT or DEFAULT visibility in Pipeline Builder
            .visibility(ExampleVisibility.DEFAULT)
            // The case that this example illustrates (base case, null case, edge case)
            .category(ExampleCategory.BASE)
            // The arguments to pass to the UDF that this example illustrates
            .configuration(MultiplyConfiguration.builder().multiplier(2.0d).build())
            // The example input rows to the UDF
            .input(
                    SettableMultiplicand.create(ctx().getRowBuilderFactory())
                            .key("key")
                            .value(1.5d),
                    SettableMultiplicand.create(ctx().getRowBuilderFactory())
                            .key("key")
                            .value(3.0d))
            // The example output rows (what the input rows should look like after the UDF has been called on them)
            .output(
                    Product.create(ctx().getRowBuilderFactory()).key("key").value(3.0d),
                    Product.create(ctx().getRowBuilderFactory()).key("key").value(6.0d))
            .build());
}
Once you define your examples, you can run all tests.
- Local environment:
- Run just testExamples:
./gradlew test --tests examples.ExamplesTest.testExamples - Run all tests:
./gradlew test - Code Repositories:
- Run all tests: Run
testin the Java Task Runner.
Running ExamplesTest.testExamples() will load implementations of Examples under the examples.registry package and check for their validity. In the case of the MultiplyExamples.examples() method shown above, it will execute the UDF on the two input rows (["key", 1.5d] and ["key", 3.0d]) using the arguments provided in configuration (multiplier = 2.0d), and verify that it results in the specified output rows (["key", 3.0d] and ["key", 6.0d]).
Save changes
Once your development work is complete, be sure to commit your changes.
Local environment: Push the changes back to Foundry Code Repositories by running the following commands in order.
git add .git commit -m "<commit message>"git push- A blue pop-up window in Code Repositories will appear, stating that “A new commit has been made to this branch”. Select Update to most recent version to view your changes.
Code Repositories: Select Commit.
Deploy a user-defined function
You can deploy a UDF through Pipeline Builder (recommended) or a standard UDF deployment repository.
Publish to Pipeline Builder (recommended)
:::callout{theme="warning"} Publishing to Pipeline Builder is currently only available for row map and flat map UDFs on Rubix enrollments. Support for other UDF types will be added. :::
Follow the steps below to publish your UDF to Pipeline Builder:
- Open Task Runner from the bottom panel. Then, select the Java tab and enter
generateEddieLockfileto generate a file containing a unique identifier for Pipeline Builder to register each of the UDFs in your repository.
:::callout{theme="warning"}
The generateEddieLockfile command returns a random unique identifier based on the UDF name. If you rename the UDF after publishing, the code will publish as a new UDF rather than overwriting the previous UDF. Similarly, if you delete and regenerate the lockfile, the UDFs will receive new unique identifiers and register as new UDFs. All versions of the UDF, including old names, new names, and new lockfiles, will appear in the pop-up window that appears when importing a UDF in Pipeline Builder.
:::
- Commit the lockfile and your changes.
- Tag your release with a version (
0.0.1, for example). - Verify that checks pass. If checks fail, the UDF will not publish to Pipeline Builder.
:::callout{theme="warning"}
If a lockfile is not present, the UDF will not register to Pipeline Builder for import into a pipeline. To generate a lockfile, run generateEddieLockfile. You do not need a lockfile if you are working in Code Repositories.
:::
- Once checks pass, navigate to a current or new Pipeline Builder pipeline.
- Go to Reusables > User-defined functions > Import UDF.
- Choose your UDF from the list, then select
Add. Your UDF should appear in the Pipeline Builder transform picker and can be used like any other transform in your pipeline.
To deploy new changes or fixes after the first version of your UDF, including edits to the definition YML, repeat the implementation and publishing steps above. Then, in your Pipeline Builder pipeline:
- Go to Reusables > User-defined functions.
- Select Edit version for your UDF, and choose the updated version.
Publish to a deployment repository
Follow the steps below to publish your UDF to Code Repositories:
- Choose to Commit your changes and Tag version to set a version for your release.
- After tag checks pass, create another repository using a Foundry UDF Definitions > Foundry Streaming UDF Deployment template for streaming or a Foundry UDF Definitions > Foundry Batch UDF Deployment template for batch
- Follow the instructions in the template to deploy the UDF.
To deploy new changes or fixes after the first version of your UDF, including edits to the definition YAML, repeat the implementation and publishing steps above. Then, update the tag version referenced in the deployment repository's build.gradle dependencies.
User-defined function definition YAML
UDF definition YAML files take the following shape:
name: # (string) The name for this UDF.
customTypes: # (optional<CustomTypes>) Custom types that can be referenced within the current UDF definition. See the [Custom Types](#custom-types) section below for details.
inputSchema: # (Schema) The schema to which input rows must adhere to run against this UDF. See the [Schema YAML definition](#schema-yaml-definition-documentation) section below for details.
outputSchema: # (Schema) The schema for output rows of this UDF. See the [Schema YAML definition](#schema-yaml-definition-documentation) section below for details.
arguments: # (map<ArgumentId, Argument>) The arguments specified at build time and made available to the UDF author at deployment time.
  # (ArgumentId: string) A locally-unique name for an argument.
  [ArgumentId]:
    required: # (Boolean) Whether this argument is required
    description: # (optional<string>) A description to be displayed in Pipeline Builder to help users understand how this argument is used.
    type: # (FieldType) The data type of the argument.
# Specific to Keyed Process UDFs
keyColumns: # (list<string>) Key columns for partitioning. The columns must exist in the input schema.
eventTimeColumn: # (string) The column containing event time. This column must exist in the input schema.
# Specific to all other UDF types
description: # (optional<string>) A description of this UDF to be displayed in Pipeline Builder to help users understand what this UDF is.
type: # (optional<Type>) The type of this UDF which determines how the UDF's logic will be defined and executed.
  # Allowed values for Type enum:
  # - DEFAULT
  # - ASYNC_DEPLOYED_APP_UDF
  # - ASYNC_CUSTOM_UDF
  # - FLAT_MAP_UDF
:::callout{theme="warning"}
We highly recommend including the optional description fields for the UDF and its arguments, especially if the UDF will be deployed in Pipeline Builder. These descriptions can increase user understanding on what the UDF does and how changing arguments can affect the output.
:::
Schema definition YAML
UDF schemas take the following shape:
name: # (string) A project-unique name for the schema that code generation will used to prefix generated objects.
description: # (optional<string>) A description for this schema that is displayed for context when using this UDF in Pipeline Builder.
fields: # (list<Field>) All the fields in this schema
  - name: # (string) A locally-unique name for this field
    nullable: # (boolean) Whether the value is possibly null
    type: # (FieldType) The data type of this field, along with any associated metadata. For example:
      type: double
      double: {}
As mentioned above, we highly recommend that you include a description for each schema to help users in Pipeline Builder understand input and output expectations.
All Foundry dataset types are supported by UDF FieldTypes and take the following shapes:
# arrays
type: array
array:
  elementType:
    type: <FieldType>
    nullable: # (boolean) Whether the array values are possibly null
# binary
type: binary
binary: {}
# boolean
type: boolean
boolean: {}
# byte
type: byte
byte: {}
# custom
type: custom
custom: # (string) The name of the custom type defined in the `customTypes` block.
# date
type: date
date: {}
# decimal
type: decimal
decimal:
  precision: # (integer) An integer between 1 and 38 (inclusive).
  scale: # (integer) An integer between 0 and precision (inclusive).
# double
type: double
double: {}
# float
type: float
float: {}
# integer
type: integer
integer: {}
# long
type: long
long: {}
# map
type: map
map:
  keyType:
    type: <FieldType>
    nullable: # (boolean) Whether the map keys are possibly null
  valueType:
    type: <FieldType>
    nullable: # (boolean) Whether the map values are possibly null
# short
type: short
short: {}
# string
type: string
string: {}
# timestamp
type: timestamp
timestamp: {}
# struct
type: struct
struct:
  fields: [] # (list<Field>)
Custom types
Custom types in UDFs allow for defining types that can be repeatedly referenced throughout a schema definition.
customTypes: # This block is optional and does not need to be included if no custom types are being used.
  types: # Do not forget this `types` block! This block is here in case we add later support for additional fields in `customTypes`, such as `imports`.
    customType: # The key should be a unique name for this custom type
      # (FieldType) the data type of this custom field,  along with any associated metadata. For example:
      type: double
      double: {}
    anotherCustomType:
      # define the custom type
      # ...
Custom types can be defined as an alias for any field type, including primitives, arrays, maps, and structs. In general, however, custom types are most useful when defining struct types that are repeated throughout input and output schemas.
customTypes:
  types:
    customStruct:
      type: struct
      struct:
        fields:
          - name: "doubleField"
            nullable: false
            type:
              type: double
              double: {}
The custom type can be referenced within a schema as follows:
inputSchema:
  name: "Input"
  fields:
    - name: "inputStruct"
      nullable: false
      type:
        type: custom
        custom: customStruct # The name of the custom type defined above
outputSchema:
  name: "Output"
  fields:
    - name: "outputStruct"
      nullable: false
      type:
        type: custom
        custom: customStruct # The name of the custom type defined above
When a custom struct is referenced within a UDF schema as above, code generation does not create separate classes for InputStruct and OutputStruct. Instead, both input and output objects reference the same code generation class for the custom type being referenced (CustomStruct, in the example below):
public final Output map(FoundryRowMapUdf.Context ctx, Input input) {
    // A no-op UDF that passes the input struct field to the output struct field
    Output output = Output.create(ctx.getRowBuilderFactory());
    CustomStruct inputStruct = input.inputStruct(); // Returns a `CustomStruct`
    output.outputStruct(inputStruct); // Expects a `CustomStruct` arg
    return output;
}
Custom structs are a major benefit of using custom types; no additional work needs to be done to convert the input code generation type into the output code generation type when they are structurally the same.
Troubleshooting
This section describes some common issues with user-defined function implementation and deployment, with steps to debug.
Code generation is not running
Usually, this is caused by an unparseable UDF definition YAML.
Follow the steps below to resolve:
- Check Code Assist for any identifiable errors in a red
Code Assist task failedpop-up. - Verify all fields are provided and that there are no typos. You can cross-check against the initial example definition.
- If failures persist, refresh Code Assist by hovering over the
Code Assist runningmessage at the bottom of the code editor and selecting Refresh. - Download the repository locally, and execute the
./gradlew ideaor./gradlew eclipsecommands to see errors produced to the console.
Can I unregister a UDF?
Once published, UDFs cannot be unpublished from Pipeline Builder. If you delete the lockfile entry and re-run the generateEddieLockfile command on your repository, a new ID will be granted to your UDF that will cause it to surface twice in the UDFs section of the Pipeline Builder transform list.
Local environment: Unsupported class file major version
If ./gradlew idea open or ./gradlew eclipse open fails with the error Could not open proj generic class cache for build file <build.gradle> ... Unsupported class file major version you are likely running a Java version that is incompatible with Gradle.
Follow the steps below to resolve:
- Check your Java and Gradle version by running
./gradlew --version. - Cross-check that your JVM version is compatible with the Gradle version listed in the Gradle documentation ↗.
- If your JVM version is not compatible and you do not already have another compatible version locally available, download a compatible Java version ↗.
- Set your JAVA_HOME to
export JAVA_HOME=<jdk install directory>/Contents/Home/.
You should now be able to successfully run the open commands.
I cannot run the generateEddieLockfile task in Task Runner
If you receive a Failed to start Java server error, or if you cannot run the command in Task Runner, verify the following:
- Your repository template is on version 0.517.0 or higher.
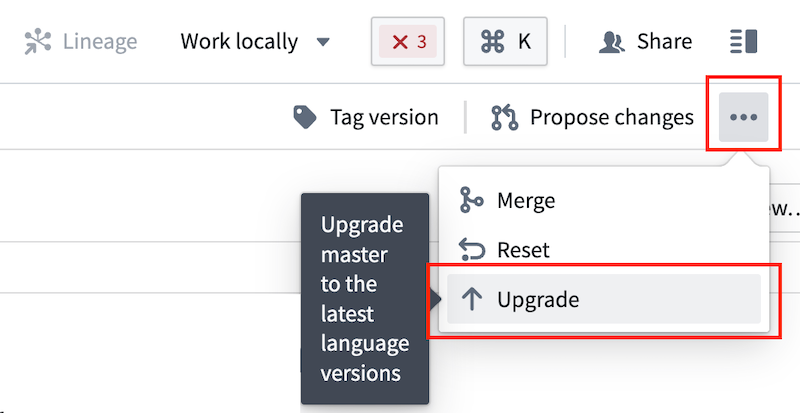
- To check this, navigate to the file editor, then select Display settings > Show hidden files and folders. The templateConfig.json file will appear in the file list.
- If the repository is not on a compatible version, select ... > Upgrade from the far right or your repository view to generate a pull request with the latest template. Approve the pull request, then rebuild your workspace once the request is merged and checks pass.
- Your workspace is connected.
- If your workspace is not connected, rebuild your workspace.
- You selected the Java tab in Task Runner, not Eclipse Java.
中文翻译
用户自定义函数 (UDF)
:::callout{theme="neutral"} Pipeline Builder 同时支持 Java 和 Python 用户自定义函数 (UDF)。了解如何在 Pipeline Builder 中使用 Python UDF。 :::
当 Pipeline Builder 中现有的转换选项无法满足数据处理需求,或需要集成外部 Java/Python 库,亦或存在需要在多个管道间复用的复杂逻辑时,您可以创建自己的用户自定义函数 (UDF)。用户自定义函数允许您在 Pipeline Builder 或代码仓库中运行自定义的 Java/Python 代码,并支持版本管理和升级。
:::callout{theme="warning"} 建议仅在必要时使用用户自定义函数,并尽可能使用 Pipeline Builder 或 Java 转换仓库 中的现有转换功能。
使用 UDF 需要租户部署在 Palantir 的云托管基础设施上。Pipeline Builder 目前仅支持行映射 (row map) 和扁平映射 (flat map) 类型的 UDF,其他类型将陆续支持。用户自定义函数属于高级功能,请务必仔细阅读以下文档,充分了解在管道中使用 UDF 的影响。 :::
创建用户自定义函数 (UDF)
要创建用户自定义函数仓库,首先导航至您希望保存仓库的项目。
然后,选择 新建 并点击 代码仓库。在 Foundry UDF 定义 选项下,选择 映射 UDF 定义/实现 以使用 UDF 模板初始化仓库。最后,点击 初始化仓库。
您可以选择在本地环境中工作(推荐),或直接在 代码仓库 中进行操作。
设置本地开发环境(推荐)
我们建议在本地创建 UDF。请按照以下步骤设置本地环境:
- 要克隆仓库,请点击屏幕右上角的 本地工作,然后复制 URL。
-
打开命令行界面 (CLI) 并运行
git clone <仓库 URL>。 -
使用以下命令在开发环境中打开项目:
-
IntelliJ IDEA:
./gradlew idea open - Eclipse IDE:
./gradlew eclipse open
关键 CLI 命令:
- 编辑 UDF 定义或 Java 实现文件后重新运行代码生成:
- IntelliJ IDEA:
./gradlew idea - Eclipse IDE:
./gradlew eclipse - 创建锁文件以发布到 Pipeline Builder:
./gradlew generateEddieLockfile- 运行测试:
- 仅运行 testExamples:
./gradlew test --tests examples.ExamplesTest.testExamples - 运行所有测试:
./gradlew test
设置代码仓库环境
如果无法在本地 IDE 中工作,您可以直接在代码仓库中编辑文件,并通过任务运行器 (Task Runner) 执行关键命令。
关键命令:
- 编辑 UDF 定义或 Java 实现文件后重新运行代码生成:
generateUdfResources- 创建锁文件以发布到 Pipeline Builder:
generateEddieLockfile- 运行测试:
- 运行所有测试:
test
定义用户自定义函数
UDF 在文件中定义,需指定其名称、输入模式、输出模式和参数类型。Java 类将基于此文件生成,文件名在发布后将在 Pipeline Builder 中可见。
要创建新的 UDF,请在 src/main/resources/udfs/definitions/ 目录下添加名为 <YourUdfName>.yml 的文件,包含以下字段:
name:UDF 的名称,代码生成将使用此名称创建描述其输入、输出和参数的类。此名称也用于在部署仓库的deployment.yml文件中引用该 UDF,并在 Pipeline Builder 中作为转换项显示。customTypes(可选):用于定义可在inputSchema和outputSchema定义中复用的自定义类型。详见下文自定义类型部分。inputSchema:输入行必须遵循的模式才能运行该 UDF。如果运行时能够选择进入此模式,则接受包含更多列的数据集。代码生成将根据此模式创建强类型的输入对象。参数将在 Pipeline Builder 中可见。详见下文模式定义部分。outputSchema:此 UDF 输出行的模式。代码生成将根据此模式创建强类型的输出对象。详见下文模式定义部分。arguments:UDF 参数的描述。这些参数将由用户在 Pipeline Builder 或相应的部署仓库中构建时指定。代码生成将根据此定义创建强类型的参数对象。
仓库模板中提供了示例定义,位于 src/main/resources/udfs/definitions/Multiply.yml。更多关于参数的信息,请参阅下文UDF 定义部分。
您可以通过在 src/main/resources/udfs/definitions 中添加另一个定义文件来在此仓库中定义多个 UDF。
实现用户自定义函数
创建或编辑 UDF 定义文件后,使用以下命令运行代码生成。代码生成将从您的定义文件创建强类型对象,并将其放置在 udf-definitions-map-udf-definition/build/generated/sources/udf/main/java 目录下。生成的类包括与定义模式匹配的输入和输出对象,以及用于实现转换创建和逻辑的接口。每当您对 YourUdfNameMapUdfFactoryImpl 或 YourUdfNameMapUdfImpl 类进行更改时,也应重新运行代码生成,以便编译 Java 包并在检查未通过时提供错误信息。
本地环境:
- IntelliJ IDEA:
./gradlew idea - Eclipse IDE:
./gradlew eclipse
代码仓库:
- 在 Java 任务运行器中运行
generateUdfResources。生成的文件在代码仓库中不可见,但此命令提供代码补全功能。
实现行映射用户自定义函数
行映射 UDF 将一行作为输入,并为每个输入行输出恰好一行。行映射是默认的 UDF 类型。
要实现 UDF 的创建和转换逻辑,请在 src/main/resources/java/myproject 下创建两个新的 Java 类文件,内容如下:
YourUdfNameMapUdfFactoryImpl.java:负责创建 UDF 实例并为其提供执行参数。- 此类应实现生成的
YourUdfNameMapUdfFactory接口。 - 任何 UDF 参数均可通过
args.config()参数获取。 create方法将在运行时被调用一次以实例化 UDF。YourUdfNameMapUdfImpl.java:实现从输入对象到输出对象的实际转换逻辑。- 此类应实现生成的
YourUdfNameMapUdf接口。 - 此逻辑将对通过转换的每一行调用一次。
- 输入和输出类的属性以及配置参数可通过同名方法访问,但需使用驼峰命名法。例如,
argument_one将对应方法argumentOne()。
仓库模板包含以下 Java 类的示例实现。您可以使用这些示例来构建自己的实现。编辑后重新运行代码生成以确保没有问题。
src/main/java/myproject/MultiplyMapUdfFactoryImpl.javasrc/main/java/myproject/MultiplyMapUdfImpl.java
实现扁平映射用户自定义函数
扁平映射 UDF 将一行作为输入,可以为每个输入行输出 0 行、1 行或多行。
要实现扁平映射 UDF 的创建和转换逻辑,请在 src/main/resources/java/myproject 下使用以下示例创建两个新的 Java 类文件。
YourUdfNameFlatMapUdfFactoryImpl.java:负责创建 UDF 实例并为其提供执行参数。
- 此类应实现生成的
YourUdfNameFlatMapUdfFactory接口。 - 任何 UDF 参数均可通过
args.config()参数获取。 create方法将在运行时被调用一次以实例化 UDF。
示例:DuplicateRowsFlatMapUdfFactoryImpl.java
package myproject;

import com.google.auto.service.AutoService;
import com.palantir.foundry.duplicaterows.config.DuplicateRowsConfiguration;
import com.palantir.foundry.duplicaterows.DuplicateRowsFlatMapUdf;
import com.palantir.foundry.duplicaterows.DuplicateRowsFlatMapUdfAdapter;
import com.palantir.foundry.duplicaterows.DuplicateRowsFlatMapUdfFactory;
import com.palantir.foundry.udf.api.flatmap.FoundryRowFlatMapUdf;
import com.palantir.foundry.udf.api.flatmap.FoundryRowFlatMapUdfFactory;

/**
 * 用于创建 "ChangeMe" UDF 的工厂类。
 */
@AutoService(FoundryRowFlatMapUdfFactory.class)
public final class DuplicateRowsFlatMapUdfFactoryImpl implements DuplicateRowsFlatMapUdfFactory {

    /**
     * 运行时服务加载需要公共的无参构造函数。
     */
    public DuplicateRowsFlatMapUdfFactoryImpl() {}

    /**
     * 创建运行时使用的 UDF 实现。作者应返回包装了其 UDF 实现的适配器。
     */
    @Override
    public final FoundryRowFlatMapUdf create(FoundryRowFlatMapUdfFactory.Arguments<DuplicateRowsConfiguration> args) {
        DuplicateRowsFlatMapUdf impl = new DuplicateRowsFlatMapUdfImpl(args.config());
        return new DuplicateRowsFlatMapUdfAdapter(impl);
    }
}
YourUdfNameFlatMapUdfImpl.java:实现从输入对象到输出对象的实际转换逻辑。
- 此类应实现生成的
YourUdfNameFlatMapUdf接口。 - 此逻辑将对通过转换的每一行调用一次。
- 输入和输出类的属性以及配置参数可通过同名方法访问,但需使用驼峰命名法。例如,
argument_one将对应方法argumentOne()。
示例:DuplicateRowsFlatMapUdfImpl.java
package myproject;

import com.palantir.foundry.duplicaterows.config.DuplicateRowsConfiguration;
import com.palantir.foundry.duplicaterows.DuplicateRowsFlatMapUdf;
import com.palantir.foundry.duplicaterows.input.InputRow;
import com.palantir.foundry.duplicaterows.output.OutputRow;
import com.palantir.foundry.udf.api.flatmap.Collector;
/**
 * "DuplicateRows" UDF 逻辑的实现。
 */
public final class DuplicateRowsFlatMapUdfImpl implements DuplicateRowsFlatMapUdf {

    private final DuplicateRowsConfiguration config;

    public DuplicateRowsFlatMapUdfImpl(DuplicateRowsConfiguration config) {
        this.config = config;
    }

    @Override
    public void flatMap(Context ctx, InputRow input, Collector<OutputRow> out) throws Exception {
        OutputRow outputRow = OutputRow.create(ctx.getRowBuilderFactory())
                .key(input.key())
                .value(input.value());
        // 通过收集两次来复制所有输入行
        out.collect(outputRow);
        out.collect(outputRow);
    }
}
为行映射用户自定义函数编写示例
示例提供有关给定用户自定义函数的信息,并可用作单元测试框架。这些示例在将 UDF 导入管道时也会出现在 Pipeline Builder 中,使理解 UDF 功能更加容易。示例框架仅支持行映射用户自定义函数,对于扁平映射用户自定义函数,我们建议编写自己的 JUnit 测试,这些测试不会在 Builder 转换文档中显示。
定义示例测试用例是可选的,但强烈建议,因为它将在 Pipeline Builder 的转换文档中显示,使用户更容易理解 UDF 的功能。如果您不想包含示例,请删除 src/test 文件夹并继续下一部分。
您可以在 Map UDF Definition/Implementation 仓库的默认模板中找到示例 Examples 类。
src/test/java/examples/registry/MultiplyExamples.java
要为 UDF 定义新示例,请在 examples.registry 下创建一个实现 Examples 接口的类。有关接口期望,请参考 MultiplyExamples.java。
:::callout{theme="warning"}
示例实现的 name() 方法必须返回与被测试 UDF 相同的名称。否则,示例将无法正确注册或发布到 Pipeline Builder 界面。
:::
实际示例应在 examples() 方法中定义。以下是默认 MultiplyExamples 类中定义的 examples() 方法实现:
@Override
public List<UdfExample<SettableMultiplicand, Product, MultiplyConfiguration>> examples() {
    return List.of(UdfExample.<SettableMultiplicand, Product, MultiplyConfiguration>builder()
            // 此示例的唯一 ID
            .id(ExampleId.of("baseCase"))
            // 可选:此示例代表的描述
            .description("将值乘以 2。")
            // 此示例在 Pipeline Builder 中应具有 PROMINENT 还是 DEFAULT 可见性
            .visibility(ExampleVisibility.DEFAULT)
            // 此示例说明的情况(基本情况、空值情况、边缘情况)
            .category(ExampleCategory.BASE)
            // 此示例说明的要传递给 UDF 的参数
            .configuration(MultiplyConfiguration.builder().multiplier(2.0d).build())
            // UDF 的示例输入行
            .input(
                    SettableMultiplicand.create(ctx().getRowBuilderFactory())
                            .key("key")
                            .value(1.5d),
                    SettableMultiplicand.create(ctx().getRowBuilderFactory())
                            .key("key")
                            .value(3.0d))
            // 示例输出行(输入行在调用 UDF 后应呈现的样子)
            .output(
                    Product.create(ctx().getRowBuilderFactory()).key("key").value(3.0d),
                    Product.create(ctx().getRowBuilderFactory()).key("key").value(6.0d))
            .build());
}
定义示例后,您可以运行所有测试。
- 本地环境:
- 仅运行 testExamples:
./gradlew test --tests examples.ExamplesTest.testExamples - 运行所有测试:
./gradlew test - 代码仓库:
- 运行所有测试:在 Java 任务运行器中运行
test。
运行 ExamplesTest.testExamples() 将加载 examples.registry 包下的 Examples 实现并检查其有效性。对于上面显示的 MultiplyExamples.examples() 方法,它将使用 configuration 中提供的参数(multiplier = 2.0d)对两个 input 行(["key", 1.5d] 和 ["key", 3.0d])执行 UDF,并验证结果是否与指定的输出行(["key", 3.0d] 和 ["key", 6.0d])匹配。
保存更改
开发工作完成后,请务必提交更改。
本地环境:按顺序运行以下命令将更改推送回 Foundry 代码仓库。
git add .git commit -m "<提交信息>"git push- 代码仓库中将出现一个蓝色弹出窗口,显示“此分支已有一个新提交”。选择 更新到最新版本 以查看您的更改。
代码仓库:选择 提交。
部署用户自定义函数
您可以通过 Pipeline Builder(推荐)或标准 UDF 部署仓库来部署 UDF。
发布到 Pipeline Builder(推荐)
:::callout{theme="warning"} 发布到 Pipeline Builder 目前仅适用于 Rubix 租户上的行映射和扁平映射 UDF。其他 UDF 类型的支持将陆续添加。 :::
按照以下步骤将您的 UDF 发布到 Pipeline Builder:
- 从底部面板打开任务运行器。然后,选择 Java 选项卡并输入
generateEddieLockfile以生成一个文件,其中包含用于 Pipeline Builder 注册仓库中每个 UDF 的唯一标识符。
:::callout{theme="warning"}
generateEddieLockfile 命令基于 UDF 名称返回一个随机唯一标识符。如果在发布后重命名 UDF,代码将作为新 UDF 发布,而不是覆盖之前的 UDF。同样,如果删除并重新生成锁文件,UDF 将获得新的唯一标识符并注册为新 UDF。UDF 的所有版本,包括旧名称、新名称和新锁文件,都将出现在 Pipeline Builder 中导入 UDF 时弹出的窗口中。
:::
- 提交锁文件和您的更改。
- 为您的发布版本打标签(例如
0.0.1)。 - 验证检查是否通过。如果检查失败,UDF 将不会发布到 Pipeline Builder。
:::callout{theme="warning"}
如果锁文件不存在,UDF 将不会注册到 Pipeline Builder 以供导入管道。要生成锁文件,请运行 generateEddieLockfile。如果您在代码仓库中工作,则不需要锁文件。
:::
- 检查通过后,导航到当前或新的 Pipeline Builder 管道。
- 转到 可复用组件 > 用户自定义函数 > 导入 UDF。
- 从列表中选择您的 UDF,然后选择
添加。您的 UDF 应出现在 Pipeline Builder 转换选择器中,并且可以像管道中的任何其他转换一样使用。
要在第一个版本的 UDF 之后部署新的更改或修复(包括对定义 YML 的编辑),请重复上述实现和发布步骤。然后,在您的 Pipeline Builder 管道中:
- 转到 可复用组件 > 用户自定义函数。
- 为您的 UDF 选择 编辑版本,然后选择更新后的版本。
发布到部署仓库
按照以下步骤将您的 UDF 发布到代码仓库:
- 选择 提交 您的更改并 打标签版本 以为您的发布设置版本。
- 标签检查通过后,使用 Foundry UDF 定义 > Foundry 流式 UDF 部署 模板(用于流式)或 Foundry UDF 定义 > Foundry 批处理 UDF 部署 模板(用于批处理)创建另一个仓库。
- 按照模板中的说明部署 UDF。
要在第一个版本的 UDF 之后部署新的更改或修复(包括对定义 YAML 的编辑),请重复上述实现和发布步骤。然后,更新部署仓库的 build.gradle 依赖项中引用的标签版本。
用户自定义函数定义 YAML
UDF 定义 YAML 文件采用以下格式:
name: # (字符串) 此 UDF 的名称。
customTypes: # (可选<CustomTypes>) 可在当前 UDF 定义中引用的自定义类型。详见下文[自定义类型](#custom-types)部分。
inputSchema: # (Schema) 输入行必须遵循的模式才能运行此 UDF。详见下文[模式 YAML 定义](#schema-yaml-definition-documentation)部分。
outputSchema: # (Schema) 此 UDF 输出行的模式。详见下文[模式 YAML 定义](#schema-yaml-definition-documentation)部分。
arguments: # (map<ArgumentId, Argument>) 在构建时指定并在部署时提供给 UDF 作者的参数。
  # (ArgumentId: string) 参数的本地唯一名称。
  [ArgumentId]:
    required: # (Boolean) 此参数是否必需
    description: # (可选<string>) 将在 Pipeline Builder 中显示的描述,帮助用户理解此参数的用途。
    type: # (FieldType) 参数的数据类型。
# 特定于键控处理 UDF
keyColumns: # (list<string>) 用于分区的键列。这些列必须存在于输入模式中。
eventTimeColumn: # (string) 包含事件时间的列。此列必须存在于输入模式中。
# 特定于所有其他 UDF 类型
description: # (可选<string>) 此 UDF 的描述,将在 Pipeline Builder 中显示,帮助用户理解此 UDF 的功能。
type: # (可选<Type>) 此 UDF 的类型,决定 UDF 逻辑的定义和执行方式。
  # Type 枚举的允许值:
  # - DEFAULT
  # - ASYNC_DEPLOYED_APP_UDF
  # - ASYNC_CUSTOM_UDF
  # - FLAT_MAP_UDF
:::callout{theme="warning"}
我们强烈建议为 UDF 及其参数包含可选的 description 字段,特别是当 UDF 将部署在 Pipeline Builder 中时。这些描述可以增加用户对 UDF 功能以及更改参数如何影响输出的理解。
:::
模式定义 YAML
UDF 模式采用以下格式:
name: # (字符串) 项目内唯一的模式名称,代码生成将使用它作为生成对象的前缀。
description: # (可选<string>) 此模式的描述,在 Pipeline Builder 中使用此 UDF 时显示以提供上下文。
fields: # (list<Field>) 此模式中的所有字段
  - name: # (字符串) 字段的本地唯一名称
    nullable: # (boolean) 该值是否可能为空
    type: # (FieldType) 此字段的数据类型及其关联元数据。例如:
      type: double
      double: {}
如上所述,我们强烈建议为每个模式包含描述,以帮助 Pipeline Builder 中的用户理解输入和输出期望。
所有 Foundry 数据集类型都受 UDF FieldType 支持,并采用以下格式:
# 数组
type: array
array:
  elementType:
    type: <FieldType>
    nullable: # (boolean) 数组值是否可能为空
# 二进制
type: binary
binary: {}
# 布尔
type: boolean
boolean: {}
# 字节
type: byte
byte: {}
# 自定义
type: custom
custom: # (字符串) 在 `customTypes` 块中定义的自定义类型名称。
# 日期
type: date
date: {}
# 十进制
type: decimal
decimal:
  precision: # (整数) 介于 1 和 38(含)之间的整数。
  scale: # (整数) 介于 0 和 precision(含)之间的整数。
# 双精度
type: double
double: {}
# 浮点
type: float
float: {}
# 整数
type: integer
integer: {}
# 长整数
type: long
long: {}
# 映射
type: map
map:
  keyType:
    type: <FieldType>
    nullable: # (boolean) 映射键是否可能为空
  valueType:
    type: <FieldType>
    nullable: # (boolean) 映射值是否可能为空
# 短整数
type: short
short: {}
# 字符串
type: string
string: {}
# 时间戳
type: timestamp
timestamp: {}
# 结构体
type: struct
struct:
  fields: [] # (list<Field>)
自定义类型
UDF 中的自定义类型允许定义可在模式定义中重复引用的类型。
customTypes: # 此块是可选的,如果不使用自定义类型则无需包含。
  types: # 不要忘记这个 `types` 块!此块的存在是为了将来在 `customTypes` 中添加对其他字段(如 `imports`)的支持。
    customType: # 键应为该自定义类型的唯一名称
      # (FieldType) 此自定义字段的数据类型及其关联元数据。例如:
      type: double
      double: {}
    anotherCustomType:
      # 定义自定义类型
      # ...
自定义类型可以定义为任何字段类型的别名,包括原始类型、数组、映射和结构体。但通常,自定义类型在定义输入和输出模式中重复出现的结构体类型时最为有用。
customTypes:
  types:
    customStruct:
      type: struct
      struct:
        fields:
          - name: "doubleField"
            nullable: false
            type:
              type: double
              double: {}
自定义类型可以在模式中按如下方式引用:
inputSchema:
  name: "Input"
  fields:
    - name: "inputStruct"
      nullable: false
      type:
        type: custom
        custom: customStruct # 上面定义的自定义类型名称
outputSchema:
  name: "Output"
  fields:
    - name: "outputStruct"
      nullable: false
      type:
        type: custom
        custom: customStruct # 上面定义的自定义类型名称
当自定义结构体如上所述在 UDF 模式中被引用时,代码生成不会为 InputStruct 和 OutputStruct 创建单独的类。相反,输入和输出对象都引用被引用的自定义类型的同一个代码生成类(在下面的示例中为 CustomStruct):
public final Output map(FoundryRowMapUdf.Context ctx, Input input) {
    // 一个无操作 UDF,将输入结构体字段传递给输出结构体字段
    Output output = Output.create(ctx.getRowBuilderFactory());
    CustomStruct inputStruct = input.inputStruct(); // 返回一个 `CustomStruct`
    output.outputStruct(inputStruct); // 期望一个 `CustomStruct` 参数
    return output;
}
自定义结构体是使用自定义类型的主要好处;当输入和输出代码生成类型结构相同时,无需额外工作即可将输入类型转换为输出类型。
故障排除
本节描述用户自定义函数实现和部署中的一些常见问题及调试步骤。
代码生成未运行
通常,这是由于 UDF 定义 YAML 无法解析造成的。
请按照以下步骤解决:
- 检查代码助手 (Code Assist) 是否有任何可识别的错误,如红色弹出窗口中的
Code Assist task failed。 - 验证所有字段是否都已提供,并且没有拼写错误。您可以对照初始示例定义进行检查。
- 如果失败仍然存在,请将鼠标悬停在代码编辑器底部的
Code Assist running消息上,然后选择 刷新 来刷新代码助手。 - 在本地下载仓库,并执行
./gradlew idea或./gradlew eclipse命令以查看控制台输出的错误。
我可以注销 UDF 吗?
一旦发布,UDF 无法从 Pipeline Builder 中取消发布。如果您删除锁文件条目并重新运行仓库上的 generateEddieLockfile 命令,您的 UDF 将被授予一个新 ID,这将导致它在 Pipeline Builder 转换列表的 UDF 部分中出现两次。
本地环境:不支持的类文件主版本
如果 ./gradlew idea open 或 ./gradlew eclipse open 失败并显示错误 Could not open proj generic class cache for build file <build.gradle> ... Unsupported class file major version,您可能正在运行与 Gradle 不兼容的 Java 版本。
请按照以下步骤解决:
- 通过运行
./gradlew --version检查您的 Java 和 Gradle 版本。 - 对照 Gradle 文档 ↗ 中列出的 Gradle 版本,检查您的 JVM 版本是否兼容。
- 如果您的 JVM 版本不兼容,并且本地没有其他兼容版本,请下载兼容的 Java 版本 ↗。
- 将您的 JAVA_HOME 设置为
export JAVA_HOME=<jdk 安装目录>/Contents/Home/。
您现在应该能够成功运行打开命令。
我无法在任务运行器中运行 generateEddieLockfile 任务
如果您收到 Failed to start Java server 错误,或者无法在任务运行器中运行该命令,请验证以下内容:
- 您的仓库模板版本为 0.517.0 或更高。
- 要检查这一点,请导航到文件编辑器,然后选择 显示设置 > 显示隐藏文件和文件夹。templateConfig.json 文件将出现在文件列表中。
- 如果仓库版本不兼容,请从仓库视图的最右侧选择 ... > 升级 以生成包含最新模板的拉取请求。批准拉取请求,然后在请求合并且检查通过后重建您的工作空间。
- 您的工作空间已连接。
- 如果您的工作空间未连接,请重建您的工作空间。
- 您在任务运行器中选择了 Java 选项卡,而不是 Eclipse Java。