Getting started with functions on objects(对象函数入门)
One of core features of functions is they can easily access data that has been integrated into the Foundry Ontology. The Ontology provides semantic modeling of data for your organization, which makes it easy to access structured data and reuse logic across use cases.
:::callout{title="Prerequisites"} This tutorial assumes that you have created and set up a TypeScript repository. If you haven't yet, complete the Getting started tutorial first. :::
Import Ontology types
Any object, interface, or link types you want to use in your function must be imported into the Project that contains your repository. Selecting the Resource Imports side bar shows you the object types which have been imported into the Project.
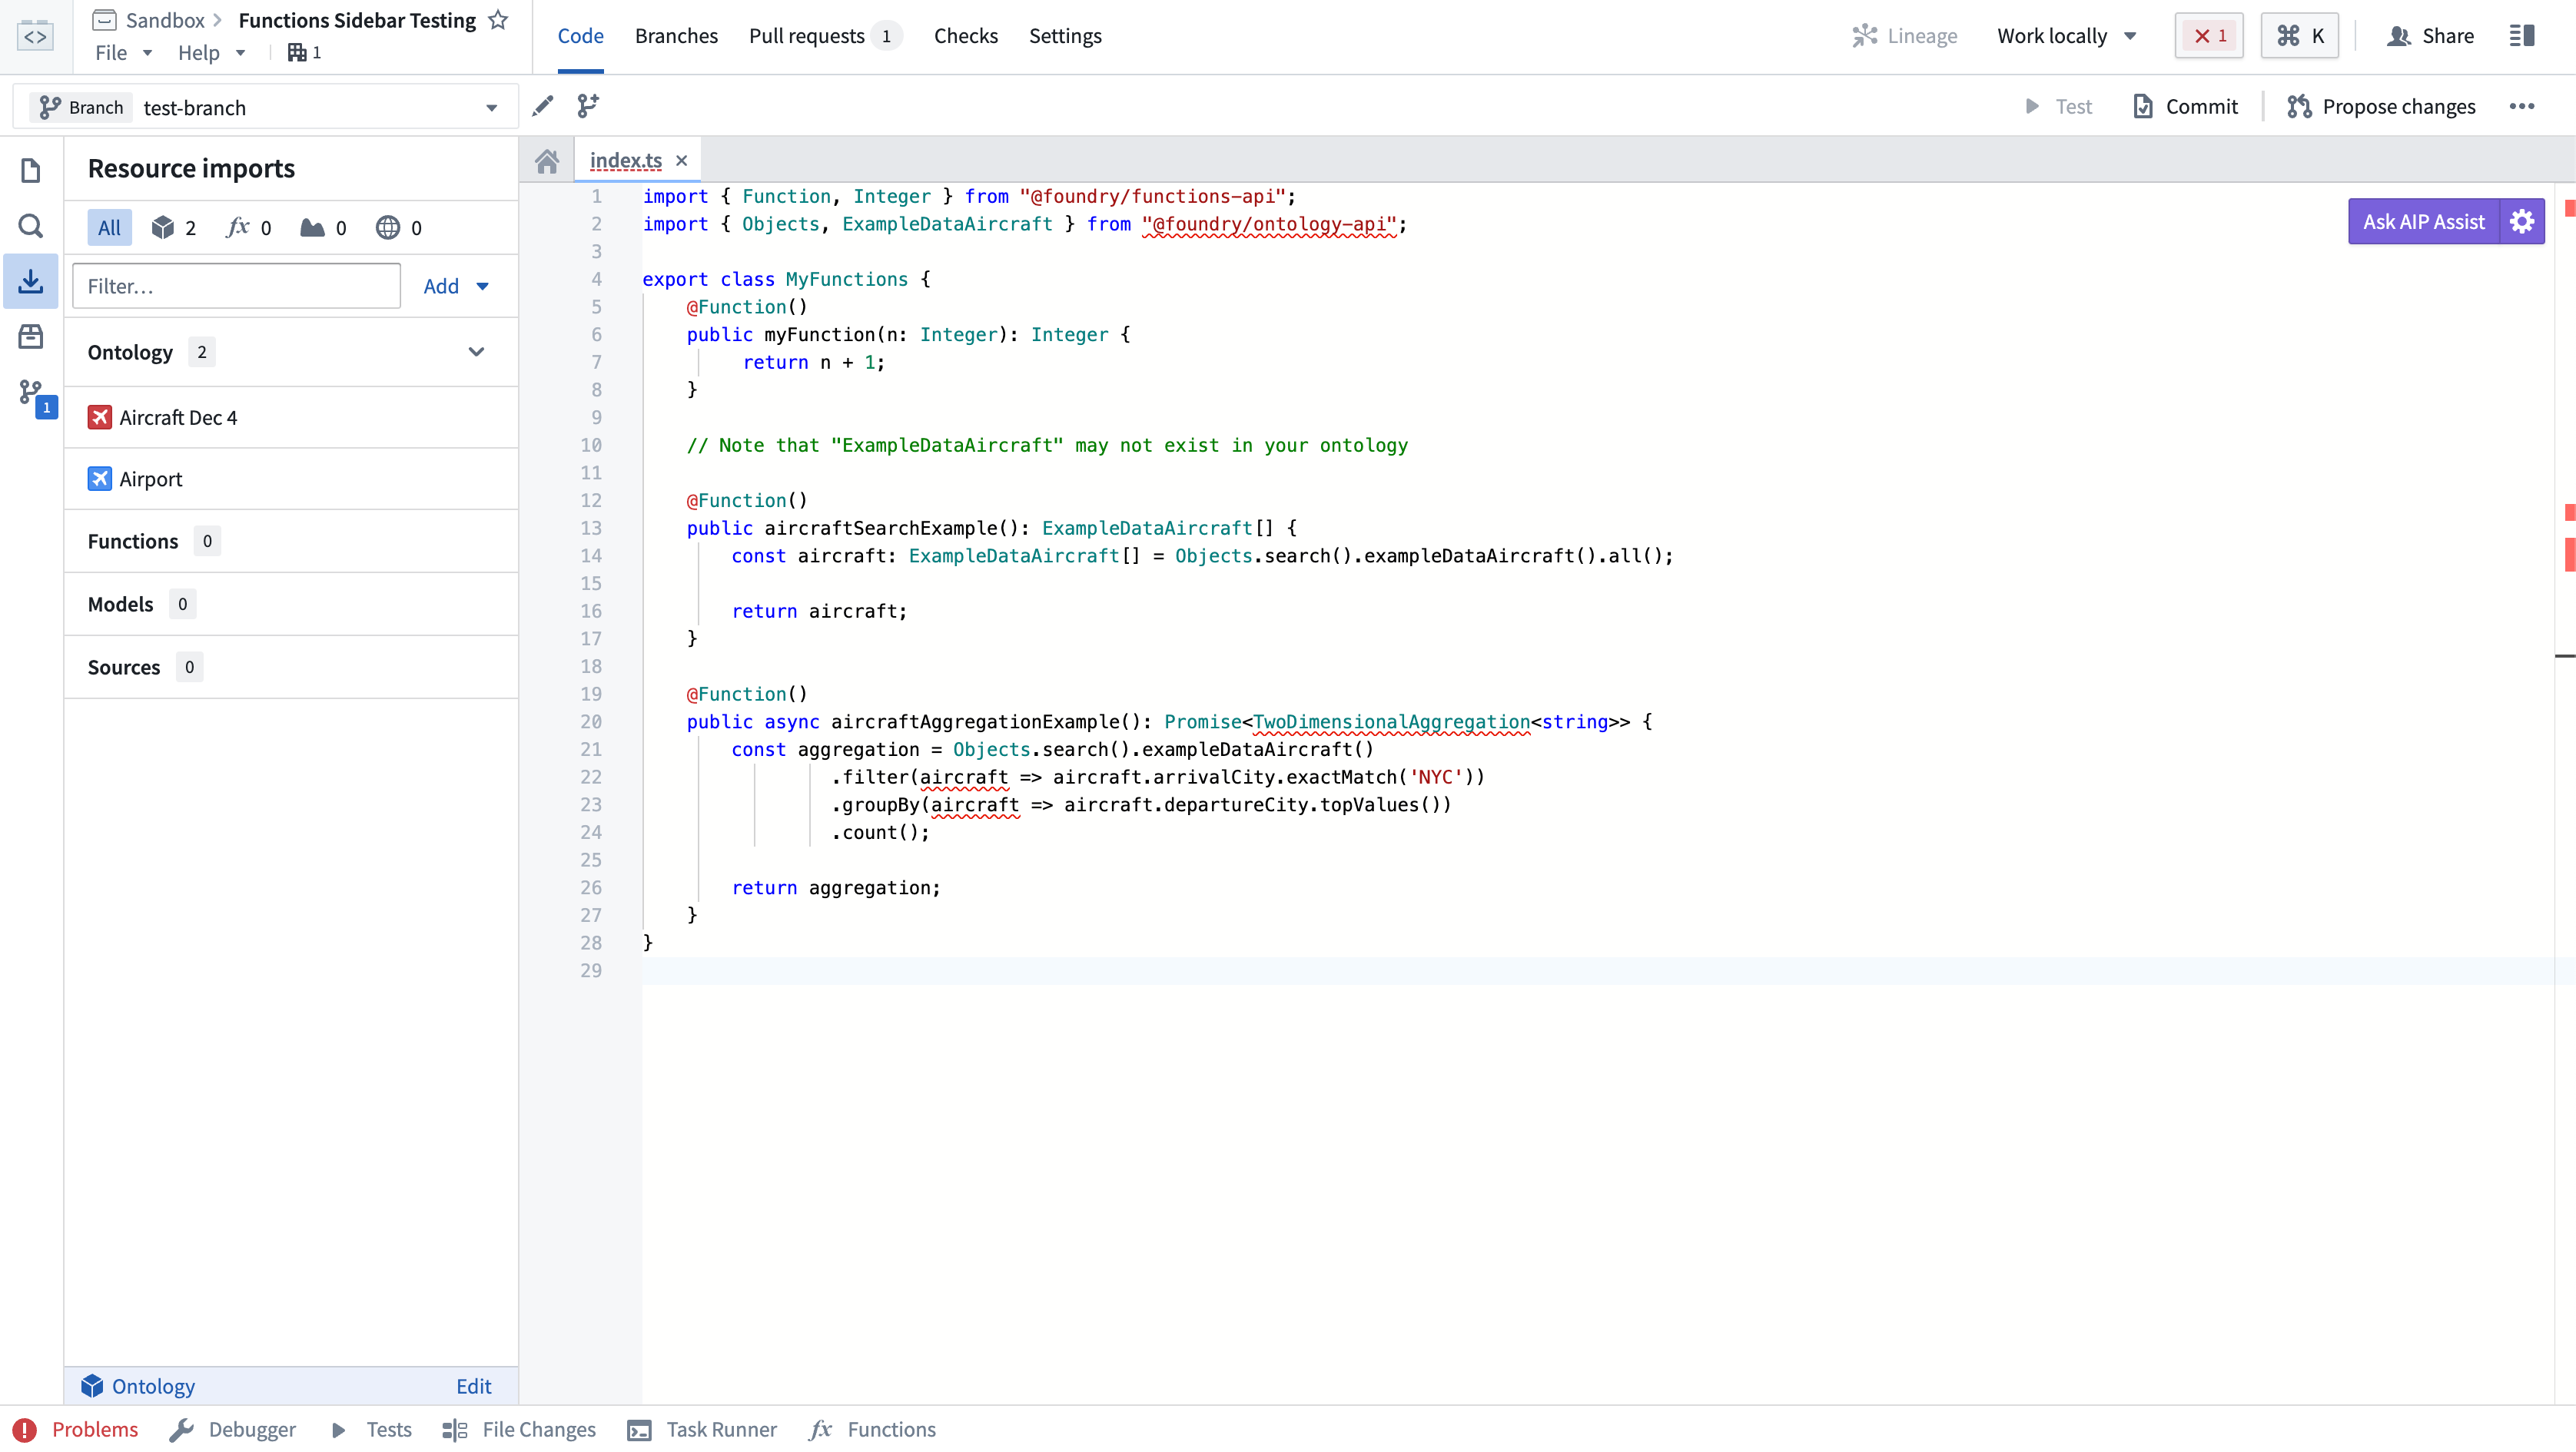
:::callout{theme="neutral"} Your organization may not have the Airport and Flight objects. Use any object types you have access to when following along. :::
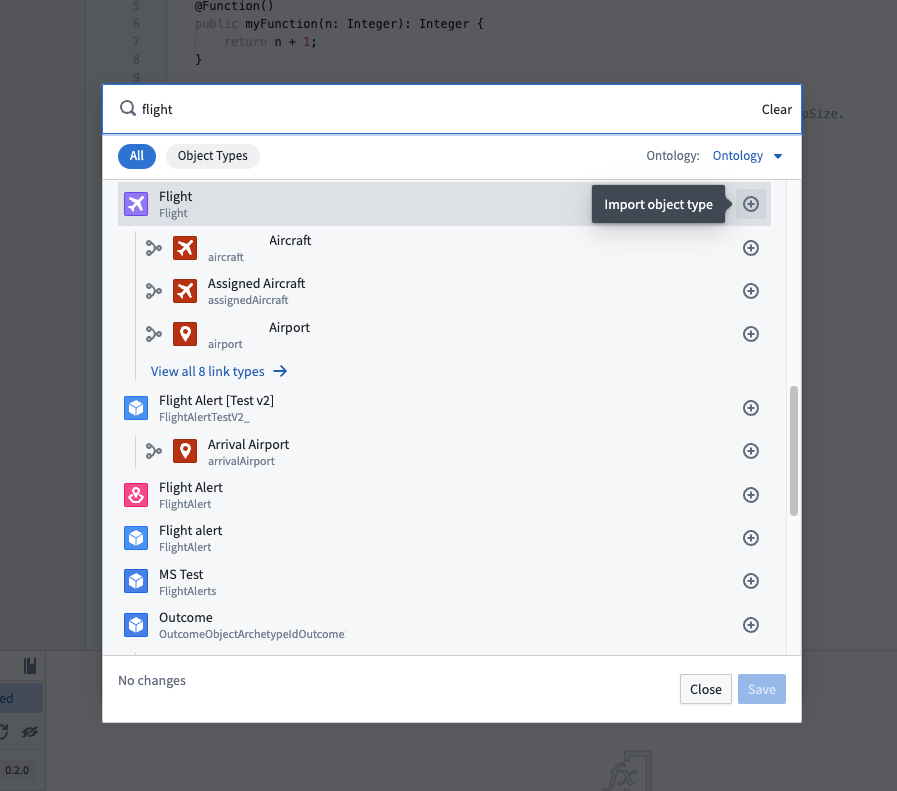
To import additional object types, you will need to select the Add button in the Resource Imports side bar. If no Ontology has been selected you will be prompted to select an Ontology. If you have at least one imported Ontology type, the selected Ontology will automatically be resolved.
Once an Ontology is selected, a search modal will appear. Your Ontology will depend on the object types available in your organization. Start by selecting a few object types and link types that connect them. In this example, we'll import the Airport and Flight objects, in addition to the link type between them.
Choose Confirm selection to import the Ontology types into the project. Code Assist will automatically be restarted to regenerate code bindings to reflect the new object and link types you have imported.
In your code, you may now import Ontology types from the @foundry/ontology-api package. If you are using a private Ontology, the package name will instead be @foundry/ontology-api/<ontology-api-name>.
:::callout{title="Private Ontologies"}
If you are using a private Ontology, replace @foundry/ontology-api with @foundry/ontology-api/your-private-ontology-api-name-here in all the following examples.
:::
Add an object-backed function
Next, let's write a function using an object type you just imported. Your code will depend on the object types, properties, and link types available to you. Switch back to the Code tab, and try importing one of the object types you just added:
import { Airport } from "@foundry/ontology-api";
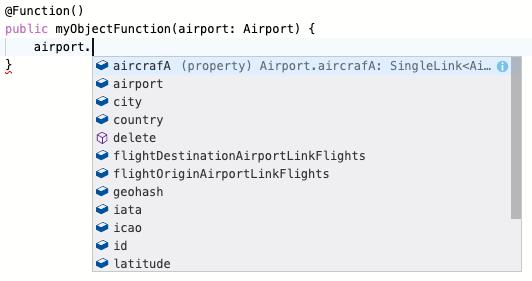
Then, write a function that takes that object as input:
@Function()
public myObjectFunction(airport: Airport) {
    airport.
}
Once Code Assist has started, simply type airport. to see autocomplete for the properties and link types available to you:
In this example, we use a template string ↗ to combine the city and country fields on an Airport into a human-readable location:
@Function()
public airportLocation(airport: Airport): string {
    return `${airport.city}, ${airport.country}`;
}
Experiment with the APIs based on your own Ontology and write a function that returns a value based on your object type.
Test in live preview
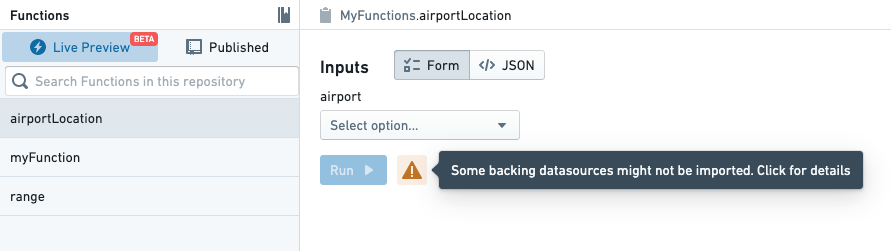
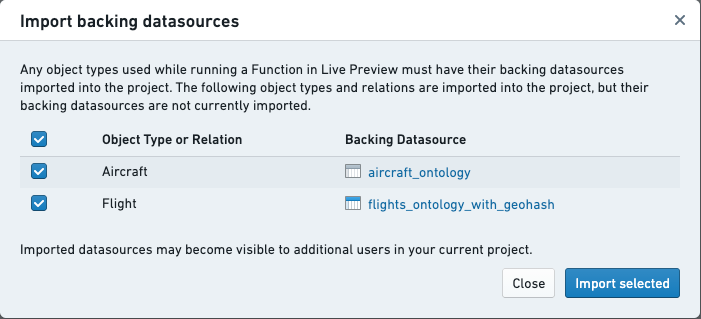
Open the functions helper, toggle to Live Preview, and choose the function that you wrote above. To run an object-backed function in live preview, you have to import the backing datasource for the object type. Select the warning icon next to the Run option:
Then, use the dialog to import the backing datasources for your object types:
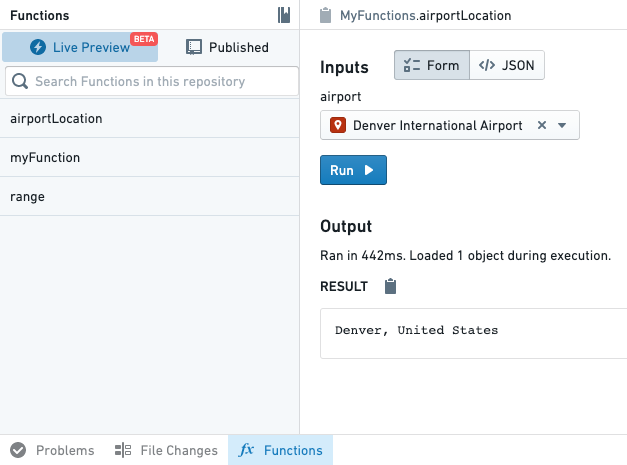
After you've imported the datasources, choose an object and select Run to see results:
:::callout{theme="warning" title="Live preview permissions"} The permissions on object types in live preview are determined by the TypeScript repository's permissions on the backing datasources underlying each object type. When testing functions that create notifications, the recipients' permissions are not enforced. For this reason, a function that creates a notification may succeed in live preview but fail when used by an action elsewhere in Foundry.
Learn more about configuring notifications for actions. :::
Publish the new function
Publish the new function by committing your code and publishing a new tag using the Branches tab. Once your function has been published, you can test it using the functions helper.
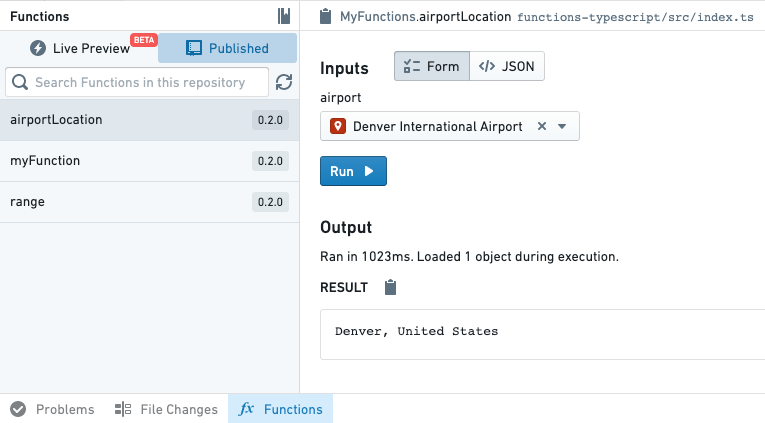
After the function has been published, you can start using it in other applications throughout the platform.
Next steps
This tutorial just scratches the surface of what you can do with functions on objects. To learn more, refer to these resources:
- Refer to the object API documentation to learn what you can do with objects
- Read the object Sets documentation to learn about searching for objects and aggregations on-demand
- Learn about ways you can use functions in the platform
中文翻译
对象函数入门
函数的核心特性之一,是能够轻松访问已集成到 Foundry Ontology(本体)中的数据。Ontology 为您的组织提供了数据的语义建模,使您能够轻松访问结构化数据,并在不同用例间复用逻辑。
:::callout{title="前提条件"} 本教程假设您已创建并设置好 TypeScript 仓库。如果尚未完成,请先完成入门教程。 :::
导入 Ontology 类型
任何要在函数中使用的对象、接口或链接类型,都必须先导入到包含您仓库的 Project(项目)中。选择侧边栏的 Resource Imports(资源导入),即可查看已导入到项目中的对象类型。
:::callout{theme="neutral"} 您的组织可能没有 Airport 和 Flight 对象。请根据实际情况,使用您有权访问的任何对象类型进行后续操作。 :::
要导入更多对象类型,您需要点击 Resource Imports 侧边栏中的 Add(添加) 按钮。如果尚未选择 Ontology,系统会提示您选择一个 Ontology。如果您已导入至少一个 Ontology 类型,则所选 Ontology 将自动解析。
选择 Ontology 后,会弹出一个搜索对话框。您的 Ontology 将取决于您组织中可用的对象类型。首先选择几个对象类型以及连接它们的链接类型。在本示例中,我们将导入 Airport 和 Flight 对象,以及它们之间的链接类型。
选择 Confirm selection(确认选择) 将 Ontology 类型导入项目。Code Assist 将自动重启,以重新生成代码绑定,从而反映您导入的新对象和链接类型。
现在,您可以在代码中从 @foundry/ontology-api 包导入 Ontology 类型。如果您使用的是私有 Ontology,则包名将改为 @foundry/ontology-api/<ontology-api-name>。
:::callout{title="私有 Ontology"}
如果您使用的是私有 Ontology,请在以下所有示例中将 @foundry/ontology-api 替换为 @foundry/ontology-api/您的私有ontology-api名称。
:::
添加对象支持函数
接下来,让我们使用刚刚导入的对象类型编写一个函数。您的代码将取决于您可用的对象类型、属性和链接类型。切换回 Code(代码) 选项卡,尝试导入您刚刚添加的某个对象类型:
import { Airport } from "@foundry/ontology-api";
然后,编写一个以该对象作为输入的函数:
@Function()
public myObjectFunction(airport: Airport) {
    airport.
}
Code Assist 启动后,只需输入 airport. 即可看到可用的属性和链接类型的自动补全提示:
在本示例中,我们使用模板字符串 ↗ 将 Airport 上的 city 和 country 字段组合成人类可读的位置信息:
@Function()
public airportLocation(airport: Airport): string {
    return `${airport.city}, ${airport.country}`;
}
根据您自己的 Ontology 尝试使用这些 API,并编写一个基于您的对象类型返回值的函数。
在实时预览中测试
打开 functions helper(函数助手),切换到 Live Preview(实时预览),然后选择您上面编写的函数。要在实时预览中运行对象支持函数,您需要导入该对象类型的底层数据源。点击 Run(运行) 选项旁边的警告图标:
然后,使用对话框导入您的对象类型的底层数据源:
导入数据源后,选择一个对象并点击 Run 查看结果:
:::callout{theme="warning" title="实时预览权限"} 实时预览中对象类型的权限由 TypeScript 仓库对每个对象类型底层数据源的权限 决定。在测试创建通知的函数时,收件人的权限不会被强制执行。因此,创建通知的函数可能在实时预览中成功,但在 Foundry 其他位置通过操作使用时却会失败。
了解更多关于为操作配置通知的信息。 :::
发布新函数
通过提交代码并使用 Branches(分支) 选项卡发布新标签来发布新函数。函数发布后,您可以使用 functions helper 进行测试。
函数发布后,您就可以在整个平台的其他应用程序中使用它了。
后续步骤
本教程仅触及了对象函数的皮毛。要了解更多,请参考以下资源: