Local development(本地开发)
You can carry out local development of Python functions repositories, allowing for high-speed iteration in your customized environment.
Setting up local development for Python functions repositories
Clone the repository
-
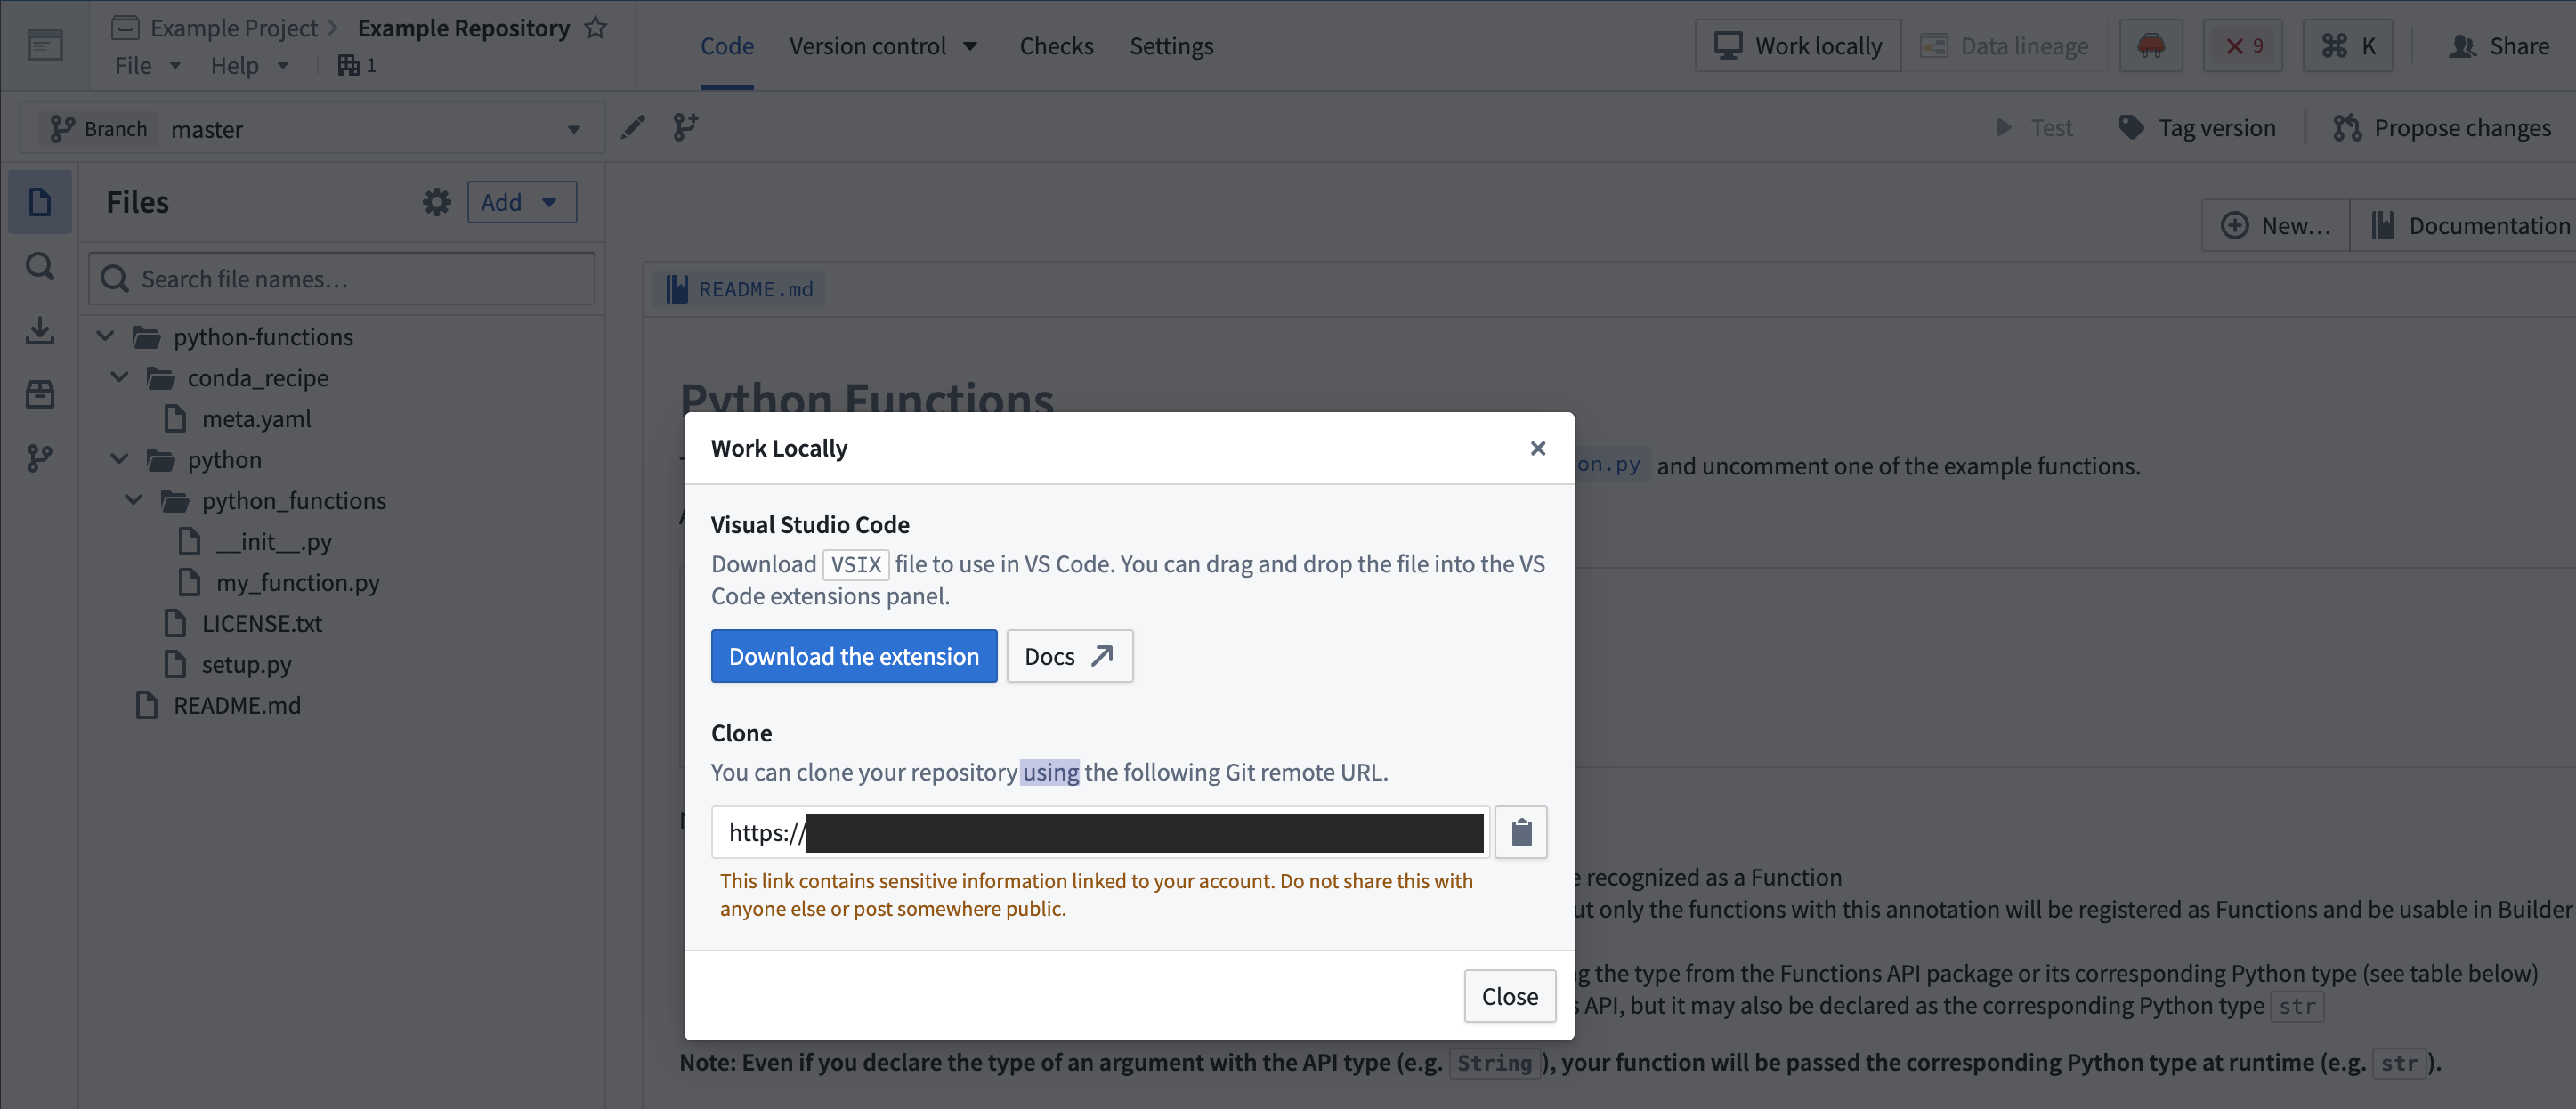
In the menu bar of your repository, select Work locally to open the dialog and copy the given repository URL.

-
Using the command line, run
git clone <URI>on your local machine in a directory of your choice. Then use thecdcommand to navigate to the repository.
Limitations
- The token granted for cloning is short-lived and read-only, with the exception of pushing back to your repository.
- You will still need to push your changes to Foundry to publish artifacts, or if you wish to run checks or build.
Set up the development environment
Prerequisites
- Ensure Java 17 is installed and that the environment variable
JAVA_HOMEpoints to the right Java installation. Java 17 can be downloaded from the Oracle website ↗.
:::callout{theme="neutral"}
Setting the JAVA_HOME environment variable based on your operating system:
- Windows: Run
SETX JAVA_HOME -m "<java-home-dir>"in PowerShell. This modifies the system environment variable and you will need to restart the shell for changes to take effect. Alternatively you can run[System.Environment]::SetEnvironmentVariable("JAVA_HOME", "<java-home-dir>")to setJAVA_HOMEin the running process. -
Linux or macOS: Run
export JAVA_HOME=<java-home-dir>. ::: -
Ensure your repository is upgraded to the latest template version by following the steps outline here.
- Ensure that the environment variables
CI,JEMMA, andCAare not set. - If running on an Apple silicon Mac, ensure that Rosetta 2 ↗ is installed. You can install Rosetta 2 by running
/usr/sbin/softwareupdate --install-rosetta --agree-to-licensein the terminal.
Visual Studio Code
- Ensure you have Visual Studio Code ↗ installed.
- Install the Python extension ↗ from the Visual Studio Code site or from the Extensions tab in the application.
- To auto-generate settings files that configure the Python interpreter for Visual Studio Code, run the command
./gradlew vsCode.
PyCharm
-
To set up a Python development environment, run the command
./gradlew condaDevelop. -
Ensure you have JetBrains PyCharm ↗ installed locally.
-
Import the project following the steps outlined here ↗.
-
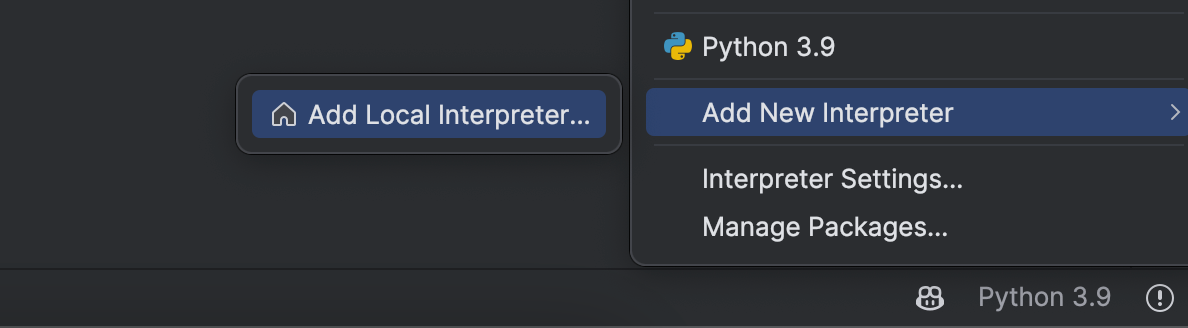
Choose Add New Interpreter from the Python Interpreter selector ↗ on the status bar.
-
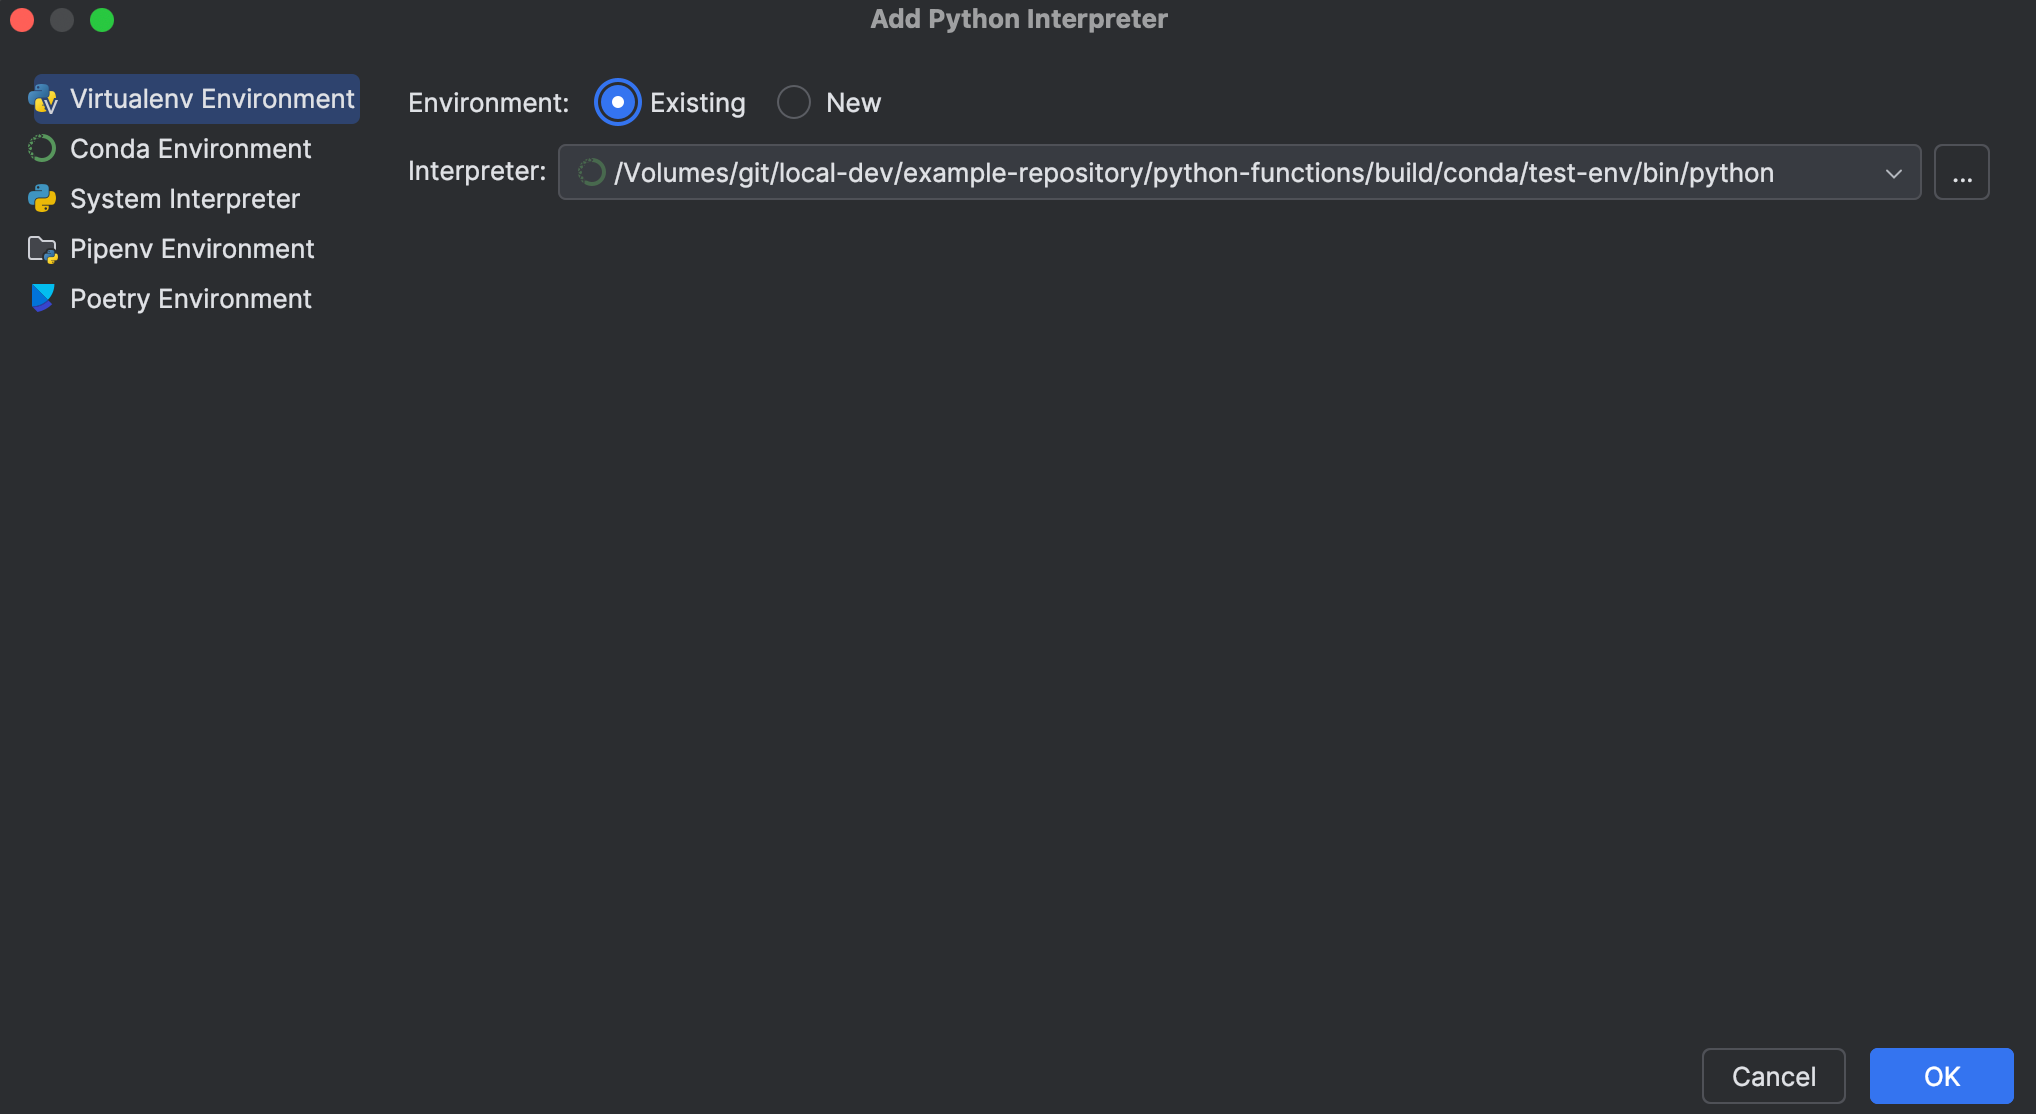
In the left-hand pane of the Add Python Interpreter dialog, select Virtualenv Environment.
-
Choose Existing environment and set the Interpreter field to the Python interpreter from your Conda environment.
- For Unix, the Python interpreter path is
\./bin/python - For Windows, the Python interpreter path is
\.\python.exe
:::callout{theme="neutral"}
Depending on whether the test plugin is enabled, the installed environments would include ./python-functions/build/conda/run-env, ./python-functions/build/conda/test-env, or both. You should pick the test environment if you plan on running tests.
:::
- Select Ok.
中文翻译
本地开发
您可以在 Python 函数仓库中进行本地开发,从而在自定义环境中实现高速迭代。
为 Python 函数仓库设置本地开发环境
克隆仓库
-
在仓库的菜单栏中,选择 Work locally(本地工作)以打开对话框并复制提供的仓库 URL。
-
在命令行中,在本地计算机的指定目录下运行
git clone <URI>。然后使用cd命令导航至该仓库。
限制条件
- 用于克隆的令牌(token)有效期短且为只读权限,但推送回仓库的操作除外。
- 您仍需将更改推送至 Foundry 以发布工件(artifact),或运行检查及构建。
设置开发环境
前提条件
- 确保已安装 Java 17,并且环境变量
JAVA_HOME指向正确的 Java 安装目录。Java 17 可从 Oracle 网站 ↗ 下载。
:::callout{theme="neutral"}
根据操作系统设置 JAVA_HOME 环境变量:
- Windows:在 PowerShell 中运行
SETX JAVA_HOME -m "<java-home-dir>"。此命令会修改系统环境变量,需重启 shell 才能生效。或者,运行[System.Environment]::SetEnvironmentVariable("JAVA_HOME", "<java-home-dir>")在当前进程中设置JAVA_HOME。 -
Linux 或 macOS:运行
export JAVA_HOME=<java-home-dir>。 ::: -
按照此处的步骤,确保您的仓库已升级至最新模板版本。
- 确保未设置环境变量
CI、JEMMA和CA。 - 如果在 Apple silicon Mac 上运行,请确保已安装 Rosetta 2 ↗。您可以在终端中运行
/usr/sbin/softwareupdate --install-rosetta --agree-to-license来安装 Rosetta 2。
Visual Studio Code
- 确保已安装 Visual Studio Code ↗。
- 从 Visual Studio Code 网站或应用程序中的 Extensions(扩展)选项卡安装 Python 扩展 ↗。
- 运行命令
./gradlew vsCode以自动生成配置文件,为 Visual Studio Code 配置 Python 解释器。
PyCharm
-
运行命令
./gradlew condaDevelop以设置 Python 开发环境。 -
确保已在本地安装 JetBrains PyCharm ↗。
-
按照此处 ↗的步骤导入项目。
-
从状态栏的 Python Interpreter selector ↗(Python 解释器选择器)中选择 Add New Interpreter(添加新解释器)。
-
在 Add Python Interpreter(添加 Python 解释器)对话框的左侧窗格中,选择 Virtualenv Environment(虚拟环境)。
-
选择 Existing environment(现有环境),并将 Interpreter(解释器)字段设置为 Conda 环境中的 Python 解释器。
- 对于 Unix 系统,Python 解释器路径为
\。/bin/python - 对于 Windows 系统,Python 解释器路径为
\。\python.exe
:::callout{theme="neutral"}
根据是否启用测试插件,已安装的环境可能包含 ./python-functions/build/conda/run-env、./python-functions/build/conda/test-env,或两者皆有。如果您计划运行测试,应选择测试环境。
:::
- 选择 Ok(确定)。