Containers(容器(Containers))
This page provides information on Docker basics for use with compute modules. For full explanations, visit the Docker documentation ↗.
Get started with Docker
To build and publish images, you first need to install Docker. Follow the official instructions in the Docker documentation ↗.
To verify that Docker is running, you can run the docker info command. If you see Cannot connect to the Docker daemon, visit the troubleshooting guide ↗ to remediate.
What is Docker?
Docker is a tool for packaging and deploying applications. Docker enables easy distribution, consistency in execution across runtime environments, and security through isolation. This is achieved with a process called containerization that packages everything required to run an application while ensuring it runs consistently wherever it is deployed. There are two core primitives of Docker containerization: images and containers.
- Image: An immutable file that contains all of the code, dependencies, and more necessary to run your application. In other words, an image only describes what should be run; it is the template from which containers are created.
- Container: A single running instance of an image. A container is a live, lightweight, isolated environment in which your application is actually running.
Create images
Creating images in Docker involves packaging an application along with its dependencies, libraries, and configuration files into a single, portable unit. Packaging instructions are defined in a Dockerfile.
Dockerfiles
A Dockerfile is a text document made of sequential commands that instructs how to configure and run your application. The following list gives an overview of the most common commands you may need while creating images for compute modules. For a full guide, visit the Dockerfile reference documentation ↗:
- FROM: Declare the base image. The base image is the foundational layer upon which your image configuration will build. A base image can be minimal (just an operating system) or more comprehensive (including pre-existing software such as Python).
FROMmust be the first statement in your Dockerfile. You can also add the--platform linux/amd64flag to specify the target platform. - WORKDIR: Set the working directory. The working directory is the base location in your image where commands will run.
- RUN: Run shell commands during the image build. Shell commands are typically used to install dependencies, compile your code, and perform filesystem operations.
- COPY: Copy files from your computer into the image.
- USER: Set the user for the container. The user must be a non-root numeric value.
- ENTRYPOINT: Set the default command that will run at container startup. This command specifies what your container will actually be doing.
- EXPOSE: Document the port(s) on which your container will be listening. All exposed ports must be between 1024 and 65535, excluding 8945 and 8946.
- ENV: Set environment variables. These variables can be used to configure and provide runtime information for your container to read during execution.
Image requirements for compute modules
- Images must be run as a non-root numeric user.
- Images must be built for the linux/amd64 platform.
- You must use a digest or any tag except
latest. - All exposed ports must be between 1024 and 65535, excluding 8945 and 8946.
Use your image in compute modules
Once you have an image compatible for a compute module, you can follow the steps below to upload it to Foundry. For full instructions, review our documentation on publishing an Artifact documentation.
- Create an Artifacts repository.
- Navigate to Publish and select Docker.
- Follow the provided instructions to push your image to the repository.
Build an image: Example
We have an application that we want to deploy as a compute module, and it is structured as follows:
Project structure
myapplication
├── Dockerfile
├── requirements.txt
└── src
    └── application.py
We can construct a Dockerfile line-by-line using the steps below:
- Specify the base image.
FROM python:3.12
- Set the current directory.
WORKDIR /app
- Install necessary dependencies.
COPY ./requirements.txt /app
RUN pip install --no-cache-dir -r requirements.txt
- Specify a non-root numeric user for the container to run as.
RUN adduser --uid 5001 user
USER 5001
- Copy in the application code. This is done separately from the dependencies to leverage Docker image layer caching.
COPY ./src/application.py /app
- Specify the container to run the application at startup.
ENTRYPOINT ["python", "application.py"]
Your Dockerfile should look something like this:
FROM python:3.12
WORKDIR /app
COPY ./requirements.txt /app
RUN pip install --no-cache-dir -r requirements.txt
RUN adduser --uid 5001 user
USER 5001
COPY ./src/application.py /app
ENTRYPOINT ["python", "application.py"]
Now, you can run the following command to build an image called myimage with the tag 0.0.0 from your Dockerfile:
docker build . -t myimage:0.0.0 --platform linux/amd64
Logs
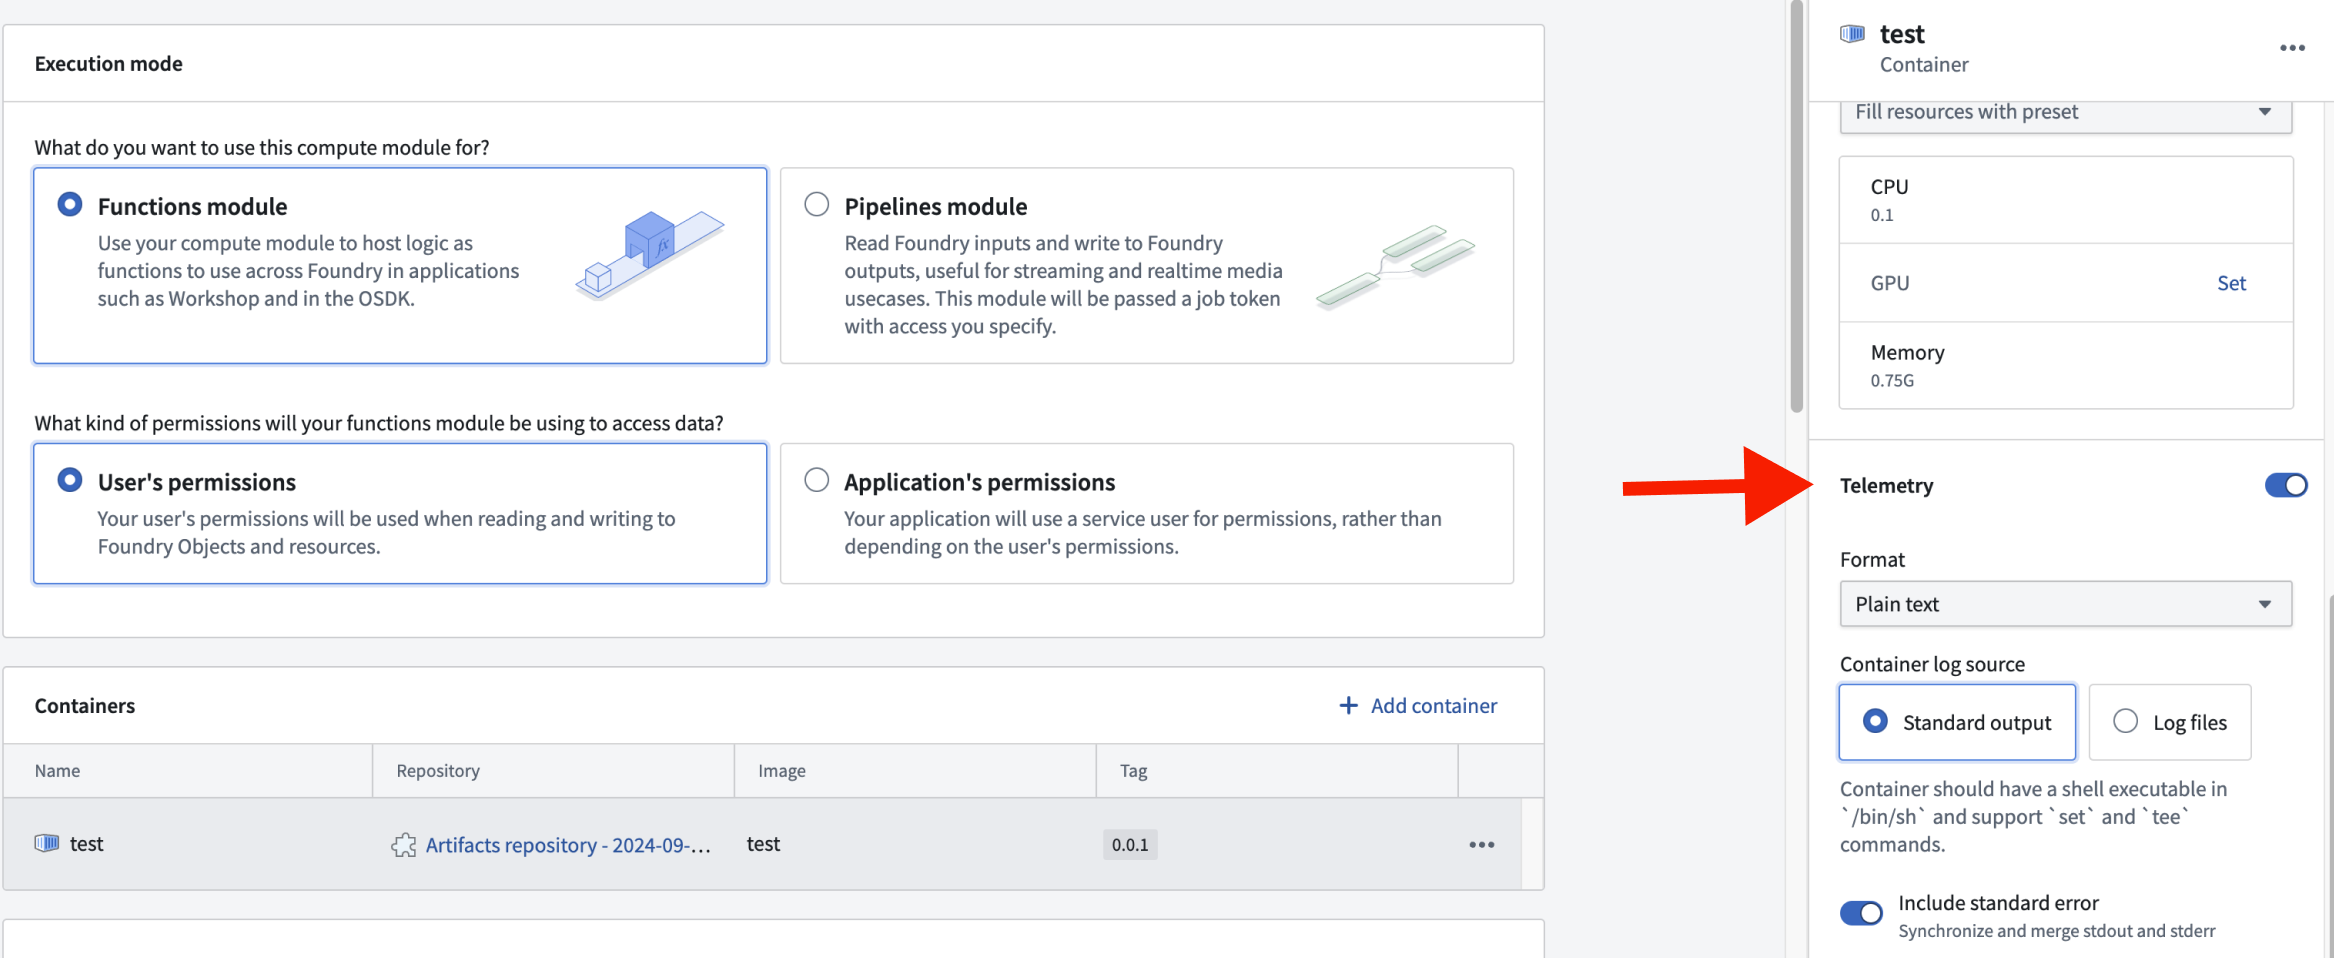
Logging can be configured at the container level, allowing you to enable or disable logging for each container. This granular control helps optimize resource usage and focuses on the most relevant log data. To access the logging configuration for a specific container, select the container's row in the Containers section. This will open a side panel where you can adjust the logging settings.
Log formats
SLS format
The SLS format is a structured logging format that provides consistent and easily parsable logs. SLS logging is designed to support additional metadata for each log entry.
The following is an example of logging in the SLS format:
package myproject;

import com.palantir.interactive.module.api.SafeArg;
import com.palantir.interactive.module.api.UnsafeArg;
import com.palantir.interactive.module.tasks.deployedapps.DeployedAppRuntime;
import org.slf4j.Logger;
import org.slf4j.LoggerFactory;

final class DeployedApp {

    private static final Logger log = LoggerFactory.getLogger(DeployedApp.class);

    public static void main(String[] _args) {
        DeployedAppRuntime.builder()
                .addQueryRunner(DeployedApp::hello, String.class, String.class, "hello")
                .buildAndStart();
    }

    static String hello(String name) {
        // SLS format for error
        log.error("This is an SLS error log with unsafe parameter", UnsafeArg.of("name", name));

        // This is not in SLS format. As a result, it won't be logged if SLS format is selected.
        System.out.println("This message will not be logged iff SLS format");

        // SLS format for info
        log.info("This is an SLS info log with safe parameter", SafeArg.of("name", name));

        return "Hello, " + name + "!";
    }

    private DeployedApp() {}
}
Notice that the logging adheres to the following styles and constrains:
- Use
UnsafeArgfor potentially sensitive data andSafeArgfor non-sensitive data. Standard System.out.println()statements are not captured in SLS format.
The following is an example of an SLS-formatted log entry in JSON:
{
  "type": "service.1",
  "level": "INFO",
  "time": "2024-01-15T12:00:00.000Z",
  "origin": "com.example.MyClass",
  "thread": "main",
  "message": "Processing request",
  "params": {
    "requestId": "abc-123"
  },
  "uid": "unique-log-id",
  "sid": "session-id"
}
Python SDK logging
If you are using the Python compute modules SDK, you can use the built-in logging utilities. The get_logger function returns a logger configured for the SLS format, and set_internal_log_level controls the verbosity of internal SDK logs.
import logging
from dataclasses import dataclass
from compute_modules.annotations import function
from compute_modules.logging import get_logger, set_internal_log_level

set_internal_log_level(logging.INFO)
logger = get_logger(__name__)
logger.setLevel(logging.INFO)

@dataclass
class AddPayload:
    x: int
    y: int

@function
def add(context, event: AddPayload) -> int:
    try:
        logger.info("Received add request")
        result = event.x + event.y
        return result
    except Exception as e:
        logger.error("There was an error")
        raise e
The following log levels are available, listed from most verbose to least verbose:
DEBUG: Detailed diagnostic information for troubleshooting.INFO: General informational messages about normal operation.WARNING: An indication that something unexpected happened, or may happen in the near future.ERROR: A serious issue that prevented a specific operation from completing.CRITICAL: A severe error indicating the application may not be able to continue running.
Plaintext format
Plaintext format provides human-readable logs without a specific structure. Plaintext logs are easier to read directly but may be more challenging to parse programmatically.
When plaintext is configured, the output is inserted into the message field of the SLS log. This allows for compatibility with existing SLS-based tools while maintaining readability.
:::callout{theme="neutral"} Using plaintext logging as a default ensures that both plaintext and SLS logs are captured, with SLS logs appearing in JSON form in the messages field. :::
Container log sources
Container logs can be captured from two primary sources. Each source has specific requirements and configurations to ensure effective log collection.
Standard output
The standard output (stdout) source collects logs directly from the container's standard output stream. To enable this logging method, ensure your container meets the following requirements:
- Must have a shell executable at
/bin/sh - Must support the shell commands
setandtee
Standard error inclusion: Optionally include standard error (stderr) in your logs. When set to true, stdout and stderr are synchronized and merged into a single stream.
Log files
The log files source captures logs from specific files within the container. There are two configuration parameters:
- Directory path: The base directory where log files are located.
- File path patterns: The patterns to match log files for capture. This parameter supports common wildcards for flexible file matching. Each pattern should include the specified directory path.
Example: To capture logs from all .log files in /var/log/foo/ and the specific file /var/log/bar.txt, set the directoryPath to be /var/log and the filePathPatterns to be /var/log/foo/*.log and /var/log/bar.txt
:::callout{theme="warning"} When using log files, the specified directory path must be empty when the compute module starts. :::
Environment variables
Docker environment variables are dynamic, named values that can customize the behavior of Docker containers and applications without changing the Dockerfile or container images. Environment variables can be used for many purposes, including the following:
- Configure parameters: Set parameters for Docker images, such as the CPU set and CPU shares.
- Define behavior: Define the behavior of an application or script.
- Store credentials: Securely store sensitive information like API keys and database credentials.
- Create reusable configurations: Use environment variables and interpolation to create reusable configurations that make it easier to manage and deploy Dockerized applications.
- Override default values: Override default configuration values specified in the Dockerfile when running a container.
Example
We have two code paths, production and test, where test might return some extra metadata about a request. You can create a production environment variable that your code can read and use to execute different paths, without having to change and redeploy your code.
# app.py
import os

if os.environ["production"] == "true":
    ...
else:
    ...
Reserved environment variables reference
Some environment variable names are reserved. You cannot overwrite reserved environment variables, as they may contain important information when writing your compute module. Review the list of reserved environment variables below:
CLIENT_ID string
- When present, this is the client ID of the third-party application associated with this compute module. It is present in functions execution mode and when using application permissions. Use it to obtain a Foundry-scoped token from your third-party application service user.
- Example value:
038120ac-ac39-4d91-be0e-55afabbb0912
# app.py
import requests
import os
token_response = requests.post("https://{FOUNDRY_URL}/multipass/api/oauth2/token",
    data={
        "grant_type": "client_credentials",
        "client_id": os.environ["CLIENT_ID"],
        "client_secret": os.environ["CLIENT_SECRET"],
        "scope": "compass:edit"
    },
    headers={
        "Content-Type": "application/x-www-form-urlencoded",
    }
)
access_token = token_response.json()["access_token"]
CLIENT_SECRET string
- When present, this is the client secret of the third-party application associated with this compute module. It is present when in functions execution mode and when using application permission. Use it to obtain a Foundry-scoped token from your third-party application service user.
- Example value:
038120ac-ac39-4d91-be0e-55afabbb0912
# app.py
import requests
import os
token_response = requests.post("https://{FOUNDRY_URL}/multipass/api/oauth2/token",
    data={
        "grant_type": "client_credentials",
        "client_id": os.environ["CLIENT_ID"],
        "client_secret": os.environ["CLIENT_SECRET"],
        "scope": "compass:edit"
    },
    headers={
        "Content-Type": "application/x-www-form-urlencoded",
    }
)
access_token = token_response.json()["access_token"]
RUNTIME_HOST host
- The host used to connect to the compute module service. Use it to construct a URI when creating a custom client.
- Example value:
localhost
# app.py
import os
runtime_host = os.environ["RUNTIME_HOST"]
RUNTIME_PORT port
- The port used to connect to the compute module service. Use it to construct a URI when creating a custom client.
- Example value:
8945
# app.py
import os
runtime_port = os.environ["RUNTIME_PORT"]
RUNTIME_API hostname
- The API path used to connect to the compute module service. Use it to construct a URI when creating a custom client.
- Example value:
localhost:8945
# app.py
import os
runtime_api = os.environ["RUNTIME_API"]
GET_JOB_PATH uri path
- The path used to get a job from the compute module service. Use it to construct a URI when creating a custom client.
- Example value:
/interactive-module/api/internal-query/job
# app.py
import os
get_job_path = os.environ["GET_JOB_PATH"]
GET_JOB_URI uri
- The fully qualified URI to get a job from the compute module service. Use it to construct a URI when creating a custom client.
- Example value:
https://localhost:8945/interactive-module/api/internal-query/job
# app.py
import os
get_job_uri = os.environ["GET_JOB_URI"]
POST_RESULT_PATH uri path
- The path used to post a result from the compute module service. Use it to construct a URI when creating a custom client.
- Example value:
/interactive-module/api/internal-query/results
# app.py
import os
post_result_path = os.environ["POST_RESULT_PATH"]
POST_RESULT_URI uri
- The fully qualified URI to post a result to the compute module service. Use it to construct a URI when creating a custom client.
- Example value:
https://localhost:8945/interactive-module/api/internal-query/results
# app.py
import os
post_result_uri = os.environ["POST_RESULT_URI"]
POST_SCHEMA_URI uri
- The fully qualified URI to post schemas to the compute module service. Use it to construct a URI when creating a custom client.
- Example value:
/interactive-module/api/internal-query/schemas
# app.py
import os
post_schema_uri = os.environ["POST_SCHEMA_URI"]
MAX_CONCURRENT_TASKS integer
- The maximum number of tasks that can be sent to a replica at a given time. Configure it on the frontend. Any changes to its value that occur while a replica is running will not be respected.
- Example use case: Setting up an initial thread pool when building a custom client.
- Example value:
1
# app.py
import os
max_concurrent_tasks = os.environ["MAX_CONCURRENT_TASKS"]
SOURCE_CREDENTIALS file path
- Available only if you configured at least one external source. It is a path to a JSON file where the top level keys are all of your configured external source API names, and the values are a map of the corresponding secrets.
- Example value:
/opt/source-credentials/SOURCE_CREDENTIALS
# app.py
import json
import os

with open(os.environ['SOURCE_CREDENTIALS'], 'r') as f:
    credentials = json.load(f)

# Access a specific secret
secret = credentials["<Source API Name>"]["<Secret Name>"]
SOURCE_CONFIGURATIONS_PATH file path
- Available only if you configured at least one external source. It is a path to a JSON file where the top-level keys are all of your configured external source API names, and the values are a map of the corresponding secrets. This file may contain extra metadata about your configured sources.
- Example value:
/opt/source-credentials/SOURCE_CONFIGURATIONS_PATH
# app.py
import json
import os

with open(os.environ['SOURCE_CONFIGURATIONS_PATH'], 'r') as f:
    credentials = json.load(f)

# Access a specific secret
secrets = credentials["secrets"]
url = credentials["httpConnectionConfig"]["url"]
DEFAULT_CA_PATH file path
- The path to a mounted CA PEM file. You must use this certificate when connecting to the compute module service. Only relevant if you are constructing a custom client.
- Example value:
/etc/ssl/rubix-ca/ca.pem
# app.py
import os
default_ca_path = os.environ["DEFAULT_CA_PATH"]
BUILD2_TOKEN file path
- Available only with pipeline execution mode. A file that contains a token scoped to your input and output resources. Use it when calling the API gateway.
- Example value:
/opt/build2-token/BUILD2_TOKEN
# app.py
import os
build_2_token = os.environ["BUILD2_TOKEN"]
COMPUTE_SESSION_ID string
- A unique identifier for the replica the container is running in. Each replica of your compute module will have a different session ID.
- Example value:
ses-7f3a9c2e-4b8d-4e1f-a5c6-9d2e8f4a3b1c
# app.py
import os
session_id = os.environ["COMPUTE_SESSION_ID"]
FOUNDRY_COMPUTE_MODULE_RID rid
- The resource identifier (RID) of the compute module.
- Example value:
ri.foundry.main.deployed-app.3d460200-8861-4e2f-a70c-1be19cd79ae5
# app.py
import os
compute_module_rid = os.environ["FOUNDRY_COMPUTE_MODULE_RID"]
MODULE_AUTH_TOKEN file path
- The path to a file containing an authentication token for communicating with the internal compute module service. This token must be included as a header when making requests to the compute module service endpoints. Only relevant if you are constructing a custom client.
- Example value:
/opt/module-auth-token/MODULE_AUTH_TOKEN
# app.py
import os
with open(os.environ["MODULE_AUTH_TOKEN"], "r") as f:
    module_auth_token = f.read()
FOUNDRY_ONTOLOGY_RID rid
- Available for compute modules installed through Marketplace. The resource identifier (RID) of the ontology from the Marketplace installation project. Use this when initializing the OSDK client to ensure the compute module references the correct target ontology. Review the OSDK integration documentation for more details.
- Example value:
ri.ontology.main.ontology.a1b2c3d4-e5f6-7890-abcd-ef1234567890
# app.py
import os
ontology_rid = os.environ["FOUNDRY_ONTOLOGY_RID"]
中文翻译
容器(Containers)
本页面提供与计算模块(compute modules)配合使用的 Docker 基础知识。如需完整说明,请访问 Docker 文档 ↗。
Docker 入门
要构建和发布镜像(images),首先需要安装 Docker。请按照 Docker 文档 ↗ 中的官方说明进行操作。
要验证 Docker 是否正在运行,可以执行 docker info 命令。如果看到 Cannot connect to the Docker daemon,请访问 故障排除指南 ↗ 进行修复。
什么是 Docker?
Docker 是一种用于打包和部署应用程序的工具。Docker 实现了轻松分发、跨运行时环境的一致性执行以及通过隔离实现的安全性。这是通过一个称为容器化(containerization)的过程实现的,该过程将运行应用程序所需的一切打包,并确保其在任何部署位置都能一致运行。Docker 容器化有两个核心原语:镜像(images)和容器(containers)。
- 镜像(Image): 一个不可变的文件,包含运行应用程序所需的所有代码、依赖项等。换句话说,镜像仅描述应该运行什么;它是创建容器的模板。
- 容器(Container): 镜像的单个运行实例。容器是一个实时的、轻量级的、隔离的环境,您的应用程序在其中实际运行。
创建镜像
在 Docker 中创建镜像涉及将应用程序及其依赖项、库和配置文件打包成一个单一的可移植单元。打包指令在 Dockerfile 中定义。
Dockerfile
Dockerfile 是一个由顺序命令组成的文本文档,用于指示如何配置和运行您的应用程序。以下列表概述了在为计算模块创建镜像时可能需要的最常用命令。有关完整指南,请访问 Dockerfile 参考文档 ↗:
- FROM: 声明基础镜像(base image)。基础镜像是构建镜像配置的基础层。基础镜像可以是最小化的(仅包含操作系统),也可以是更全面的(包含预装软件,如 Python)。
FROM必须是 Dockerfile 中的第一条语句。您还可以添加--platform linux/amd64标志来指定目标平台。 - WORKDIR: 设置工作目录(working directory)。工作目录是镜像中命令运行的基础位置。
- RUN: 在镜像构建期间运行 shell 命令。Shell 命令通常用于安装依赖项、编译代码以及执行文件系统操作。
- COPY: 将文件从您的计算机复制到镜像中。
- USER: 设置容器的用户。该用户必须是非 root 的数字值。
- ENTRYPOINT: 设置容器启动时将运行的默认命令。此命令指定您的容器实际要执行的操作。
- EXPOSE: 记录容器将监听的端口。所有暴露的端口必须在 1024 到 65535 之间,不包括 8945 和 8946。
- ENV: 设置环境变量(environment variables)。这些变量可用于配置和提供运行时信息,供容器在执行期间读取。
计算模块的镜像要求
- 镜像必须以非 root 数字用户身份运行。
- 镜像必须为 linux/amd64 平台构建。
- 您必须使用摘要(digest)或除
latest之外的任何标签(tag)。 - 所有暴露的端口必须在 1024 到 65535 之间,不包括 8945 和 8946。
在计算模块中使用您的镜像
一旦您拥有与计算模块兼容的镜像,可以按照以下步骤将其上传到 Foundry。有关完整说明,请查看我们关于发布工件(Artifact)的文档。
- 创建一个工件(Artifacts)仓库。
- 导航到 Publish 并选择 Docker。
- 按照提供的说明将您的镜像推送到仓库。
构建镜像:示例
我们有一个要部署为计算模块的应用程序,其结构如下:
项目结构
myapplication
├── Dockerfile
├── requirements.txt
└── src
    └── application.py
我们可以使用以下步骤逐行构建 Dockerfile:
- 指定基础镜像。
FROM python:3.12
- 设置当前目录。
WORKDIR /app
- 安装必要的依赖项。
COPY ./requirements.txt /app
RUN pip install --no-cache-dir -r requirements.txt
- 指定容器运行的非 root 数字用户。
RUN adduser --uid 5001 user
USER 5001
- 复制应用程序代码。这与依赖项分开进行,以利用 Docker 镜像层缓存。
COPY ./src/application.py /app
- 指定容器在启动时运行应用程序。
ENTRYPOINT ["python", "application.py"]
您的 Dockerfile 应该类似于这样:
FROM python:3.12
WORKDIR /app
COPY ./requirements.txt /app
RUN pip install --no-cache-dir -r requirements.txt
RUN adduser --uid 5001 user
USER 5001
COPY ./src/application.py /app
ENTRYPOINT ["python", "application.py"]
现在,您可以运行以下命令,从您的 Dockerfile 构建一个名为 myimage、标签为 0.0.0 的镜像:
docker build . -t myimage:0.0.0 --platform linux/amd64
日志(Logs)
可以在容器级别配置日志记录,允许您为每个容器启用或禁用日志记录。这种细粒度的控制有助于优化资源使用,并专注于最相关的日志数据。要访问特定容器的日志记录配置,请在 Containers 部分选择该容器的行。这将打开一个侧面板,您可以在其中调整日志记录设置。
日志格式
SLS 格式
SLS 格式是一种结构化日志格式,提供一致且易于解析的日志。SLS 日志记录旨在支持每个日志条目的附加元数据。
以下是 SLS 格式日志记录的示例:
package myproject;

import com.palantir.interactive.module.api.SafeArg;
import com.palantir.interactive.module.api.UnsafeArg;
import com.palantir.interactive.module.tasks.deployedapps.DeployedAppRuntime;
import org.slf4j.Logger;
import org.slf4j.LoggerFactory;

final class DeployedApp {

    private static final Logger log = LoggerFactory.getLogger(DeployedApp.class);

    public static void main(String[] _args) {
        DeployedAppRuntime.builder()
                .addQueryRunner(DeployedApp::hello, String.class, String.class, "hello")
                .buildAndStart();
    }

    static String hello(String name) {
        // SLS 格式的错误日志
        log.error("This is an SLS error log with unsafe parameter", UnsafeArg.of("name", name));

        // 这不是 SLS 格式。因此,如果选择了 SLS 格式,它不会被记录。
        System.out.println("This message will not be logged iff SLS format");

        // SLS 格式的信息日志
        log.info("This is an SLS info log with safe parameter", SafeArg.of("name", name));

        return "Hello, " + name + "!";
    }

    private DeployedApp() {}
}
请注意,日志记录遵循以下样式和约束:
- 对潜在敏感数据使用
UnsafeArg,对非敏感数据使用SafeArg。 - 标准的
System.out.println()语句不会被 SLS 格式捕获。
以下是 JSON 格式的 SLS 格式日志条目示例:
{
  "type": "service.1",
  "level": "INFO",
  "time": "2024-01-15T12:00:00.000Z",
  "origin": "com.example.MyClass",
  "thread": "main",
  "message": "Processing request",
  "params": {
    "requestId": "abc-123"
  },
  "uid": "unique-log-id",
  "sid": "session-id"
}
Python SDK 日志记录
如果您使用 Python 计算模块 SDK,可以使用内置的日志记录工具。get_logger 函数返回一个配置为 SLS 格式的记录器,set_internal_log_level 控制内部 SDK 日志的详细程度。
import logging
from dataclasses import dataclass
from compute_modules.annotations import function
from compute_modules.logging import get_logger, set_internal_log_level

set_internal_log_level(logging.INFO)
logger = get_logger(__name__)
logger.setLevel(logging.INFO)

@dataclass
class AddPayload:
    x: int
    y: int

@function
def add(context, event: AddPayload) -> int:
    try:
        logger.info("Received add request")
        result = event.x + event.y
        return result
    except Exception as e:
        logger.error("There was an error")
        raise e
以下日志级别可用,从最详细到最不详细列出:
DEBUG:用于故障排除的详细诊断信息。INFO:关于正常操作的一般信息性消息。WARNING:表示发生了意外情况,或可能在不久的将来发生。ERROR:阻止特定操作完成的严重问题。CRITICAL:表示应用程序可能无法继续运行的严重错误。
纯文本格式(Plaintext format)
纯文本格式提供人类可读的日志,没有特定结构。纯文本日志更易于直接阅读,但可能更难以通过编程方式解析。
当配置为纯文本时,输出会被插入到 SLS 日志的 message 字段中。这允许与现有的基于 SLS 的工具兼容,同时保持可读性。
:::callout{theme="neutral"} 使用纯文本日志记录作为默认设置可确保同时捕获纯文本和 SLS 日志,其中 SLS 日志以 JSON 形式出现在 messages 字段中。 :::
容器日志源
容器日志可以从两个主要来源捕获。每个来源都有特定的要求和配置,以确保有效的日志收集。
标准输出
标准输出(stdout)源直接从容器的标准输出流收集日志。要启用此日志记录方法,请确保您的容器满足以下要求:
- 必须在
/bin/sh处有一个 shell 可执行文件 - 必须支持 shell 命令
set和tee
包含标准错误: 可选地在日志中包含标准错误(stderr)。当设置为 true 时,stdout 和 stderr 会被同步并合并到单个流中。
日志文件
日志文件源从容器内的特定文件捕获日志。有两个配置参数:
- 目录路径(Directory path): 日志文件所在的基目录。
- 文件路径模式(File path patterns): 用于匹配要捕获的日志文件的模式。此参数支持常见的通配符以实现灵活的文件匹配。每个模式都应包含指定的目录路径。
示例: 要捕获 /var/log/foo/ 中所有 .log 文件和特定文件 /var/log/bar.txt 的日志,请将 directoryPath 设置为 /var/log,并将 filePathPatterns 设置为 /var/log/foo/*.log 和 /var/log/bar.txt。
:::callout{theme="warning"} 使用日志文件时,指定的目录路径在计算模块启动时必须为空。 :::
环境变量(Environment variables)
Docker 环境变量是动态的、命名的值,可以自定义 Docker 容器和应用程序的行为,而无需更改 Dockerfile 或容器镜像。环境变量可用于多种目的,包括以下内容:
- 配置参数: 设置 Docker 镜像的参数,例如 CPU 集和 CPU 份额。
- 定义行为: 定义应用程序或脚本的行为。
- 存储凭据: 安全地存储敏感信息,如 API 密钥和数据库凭据。
- 创建可重用配置: 使用环境变量和插值创建可重用配置,从而更轻松地管理和部署 Docker 化应用程序。
- 覆盖默认值: 在运行容器时覆盖 Dockerfile 中指定的默认配置值。
示例
我们有两个代码路径,production 和 test,其中 test 可能会返回关于请求的一些额外元数据。您可以创建一个 production 环境变量,您的代码可以读取并使用它来执行不同的路径,而无需更改和重新部署代码。
# app.py
import os

if os.environ["production"] == "true":
    ...
else:
    ...
保留环境变量参考
某些环境变量名称是保留的。您不能覆盖保留的环境变量,因为它们可能包含编写计算模块时的重要信息。请查看下面的保留环境变量列表:
CLIENT_ID string
- 如果存在,这是与此计算模块关联的第三方应用程序的客户端 ID。它在函数执行模式和使用应用程序权限时存在。使用它从您的第三方应用程序服务用户获取 Foundry 范围的令牌。
- 示例值:
038120ac-ac39-4d91-be0e-55afabbb0912
# app.py
import requests
import os
token_response = requests.post("https://{FOUNDRY_URL}/multipass/api/oauth2/token",
    data={
        "grant_type": "client_credentials",
        "client_id": os.environ["CLIENT_ID"],
        "client_secret": os.environ["CLIENT_SECRET"],
        "scope": "compass:edit"
    },
    headers={
        "Content-Type": "application/x-www-form-urlencoded",
    }
)
access_token = token_response.json()["access_token"]
CLIENT_SECRET string
- 如果存在,这是与此计算模块关联的第三方应用程序的客户端密钥。它在函数执行模式和使用应用程序权限时存在。使用它从您的第三方应用程序服务用户获取 Foundry 范围的令牌。
- 示例值:
038120ac-ac39-4d91-be0e-55afabbb0912
# app.py
import requests
import os
token_response = requests.post("https://{FOUNDRY_URL}/multipass/api/oauth2/token",
    data={
        "grant_type": "client_credentials",
        "client_id": os.environ["CLIENT_ID"],
        "client_secret": os.environ["CLIENT_SECRET"],
        "scope": "compass:edit"
    },
    headers={
        "Content-Type": "application/x-www-form-urlencoded",
    }
)
access_token = token_response.json()["access_token"]
RUNTIME_HOST host
- 用于连接到计算模块服务的主机。在创建自定义客户端时使用它来构建 URI。
- 示例值:
localhost
# app.py
import os
runtime_host = os.environ["RUNTIME_HOST"]
RUNTIME_PORT port
- 用于连接到计算模块服务的端口。在创建自定义客户端时使用它来构建 URI。
- 示例值:
8945
# app.py
import os
runtime_port = os.environ["RUNTIME_PORT"]
RUNTIME_API hostname
- 用于连接到计算模块服务的 API 路径。在创建自定义客户端时使用它来构建 URI。
- 示例值:
localhost:8945
# app.py
import os
runtime_api = os.environ["RUNTIME_API"]
GET_JOB_PATH uri path
- 用于从计算模块服务获取作业的路径。在创建自定义客户端时使用它来构建 URI。
- 示例值:
/interactive-module/api/internal-query/job
# app.py
import os
get_job_path = os.environ["GET_JOB_PATH"]
GET_JOB_URI uri
- 用于从计算模块服务获取作业的完全限定 URI。在创建自定义客户端时使用它来构建 URI。
- 示例值:
https://localhost:8945/interactive-module/api/internal-query/job
# app.py
import os
get_job_uri = os.environ["GET_JOB_URI"]
POST_RESULT_PATH uri path
- 用于将结果发布到计算模块服务的路径。在创建自定义客户端时使用它来构建 URI。
- 示例值:
/interactive-module/api/internal-query/results
# app.py
import os
post_result_path = os.environ["POST_RESULT_PATH"]
POST_RESULT_URI uri
- 用于将结果发布到计算模块服务的完全限定 URI。在创建自定义客户端时使用它来构建 URI。
- 示例值:
https://localhost:8945/interactive-module/api/internal-query/results
# app.py
import os
post_result_uri = os.environ["POST_RESULT_URI"]
POST_SCHEMA_URI uri
- 用于将模式发布到计算模块服务的完全限定 URI。在创建自定义客户端时使用它来构建 URI。
- 示例值:
/interactive-module/api/internal-query/schemas
# app.py
import os
post_schema_uri = os.environ["POST_SCHEMA_URI"]
MAX_CONCURRENT_TASKS integer
- 在给定时间可以发送到副本的最大任务数。在前端配置。在副本运行时对其值所做的任何更改将不会被遵守。
- 示例用例: 在构建自定义客户端时设置初始线程池。
- 示例值:
1
# app.py
import os
max_concurrent_tasks = os.environ["MAX_CONCURRENT_TASKS"]
SOURCE_CREDENTIALS file path
- 仅当您配置了至少一个外部源时才可用。它是一个 JSON 文件的路径,其中顶级键是您所有已配置的外部源 API 名称,值是对应密钥的映射。
- 示例值:
/opt/source-credentials/SOURCE_CREDENTIALS
# app.py
import json
import os

with open(os.environ['SOURCE_CREDENTIALS'], 'r') as f:
    credentials = json.load(f)

# 访问特定密钥
secret = credentials["<Source API Name>"]["<Secret Name>"]
SOURCE_CONFIGURATIONS_PATH file path
- 仅当您配置了至少一个外部源时才可用。它是一个 JSON 文件的路径,其中顶级键是您所有已配置的外部源 API 名称,值是对应密钥的映射。此文件可能包含有关您已配置源的额外元数据。
- 示例值:
/opt/source-credentials/SOURCE_CONFIGURATIONS_PATH
# app.py
import json
import os

with open(os.environ['SOURCE_CONFIGURATIONS_PATH'], 'r') as f:
    credentials = json.load(f)

# 访问特定密钥
secrets = credentials["secrets"]
url = credentials["httpConnectionConfig"]["url"]
DEFAULT_CA_PATH file path
- 挂载的 CA PEM 文件的路径。连接到计算模块服务时必须使用此证书。仅在构建自定义客户端时相关。
- 示例值:
/etc/ssl/rubix-ca/ca.pem
# app.py
import os
default_ca_path = os.environ["DEFAULT_CA_PATH"]
BUILD2_TOKEN file path
- 仅在使用管道执行模式时可用。一个包含作用域为您的输入和输出资源的令牌的文件。在调用 API 网关时使用它。
- 示例值:
/opt/build2-token/BUILD2_TOKEN
# app.py
import os
build_2_token = os.environ["BUILD2_TOKEN"]
COMPUTE_SESSION_ID string
- 容器所在副本的唯一标识符。计算模块的每个副本将有不同的会话 ID。
- 示例值:
ses-7f3a9c2e-4b8d-4e1f-a5c6-9d2e8f4a3b1c
# app.py
import os
session_id = os.environ["COMPUTE_SESSION_ID"]
FOUNDRY_COMPUTE_MODULE_RID rid
- 计算模块的资源标识符(RID)。
- 示例值:
ri.foundry.main.deployed-app.3d460200-8861-4e2f-a70c-1be19cd79ae5
# app.py
import os
compute_module_rid = os.environ["FOUNDRY_COMPUTE_MODULE_RID"]
MODULE_AUTH_TOKEN file path
- 包含用于与内部计算模块服务通信的身份验证令牌的文件的路径。在向计算模块服务端点发出请求时,此令牌必须作为标头包含在内。仅在构建自定义客户端时相关。
- 示例值:
/opt/module-auth-token/MODULE_AUTH_TOKEN
# app.py
import os
with open(os.environ["MODULE_AUTH_TOKEN"], "r") as f:
    module_auth_token = f.read()
FOUNDRY_ONTOLOGY_RID rid
- 适用于通过 Marketplace 安装的计算模块。来自 Marketplace 安装项目的本体(ontology)的资源标识符(RID)。在初始化 OSDK 客户端时使用此值,以确保计算模块引用正确的目标本体。有关更多详细信息,请查看 OSDK 集成文档。
- 示例值:
ri.ontology.main.ontology.a1b2c3d4-e5f6-7890-abcd-ef1234567890
# app.py
import os
ontology_rid = os.environ["FOUNDRY_ONTOLOGY_RID"]