Functions(函数 (Functions))
Register functions
If running in function execution mode, you must register the functions in your compute module to make them callable from elsewhere in Foundry. This page explains two different methods for manually registering a compute module function.
:::callout{theme="neutral"} The compute modules SDK makes it easier to register functions by automatically inferring the schema of your function(s). If you are using the compute modules SDK, review the automatic function schema inference section below. :::
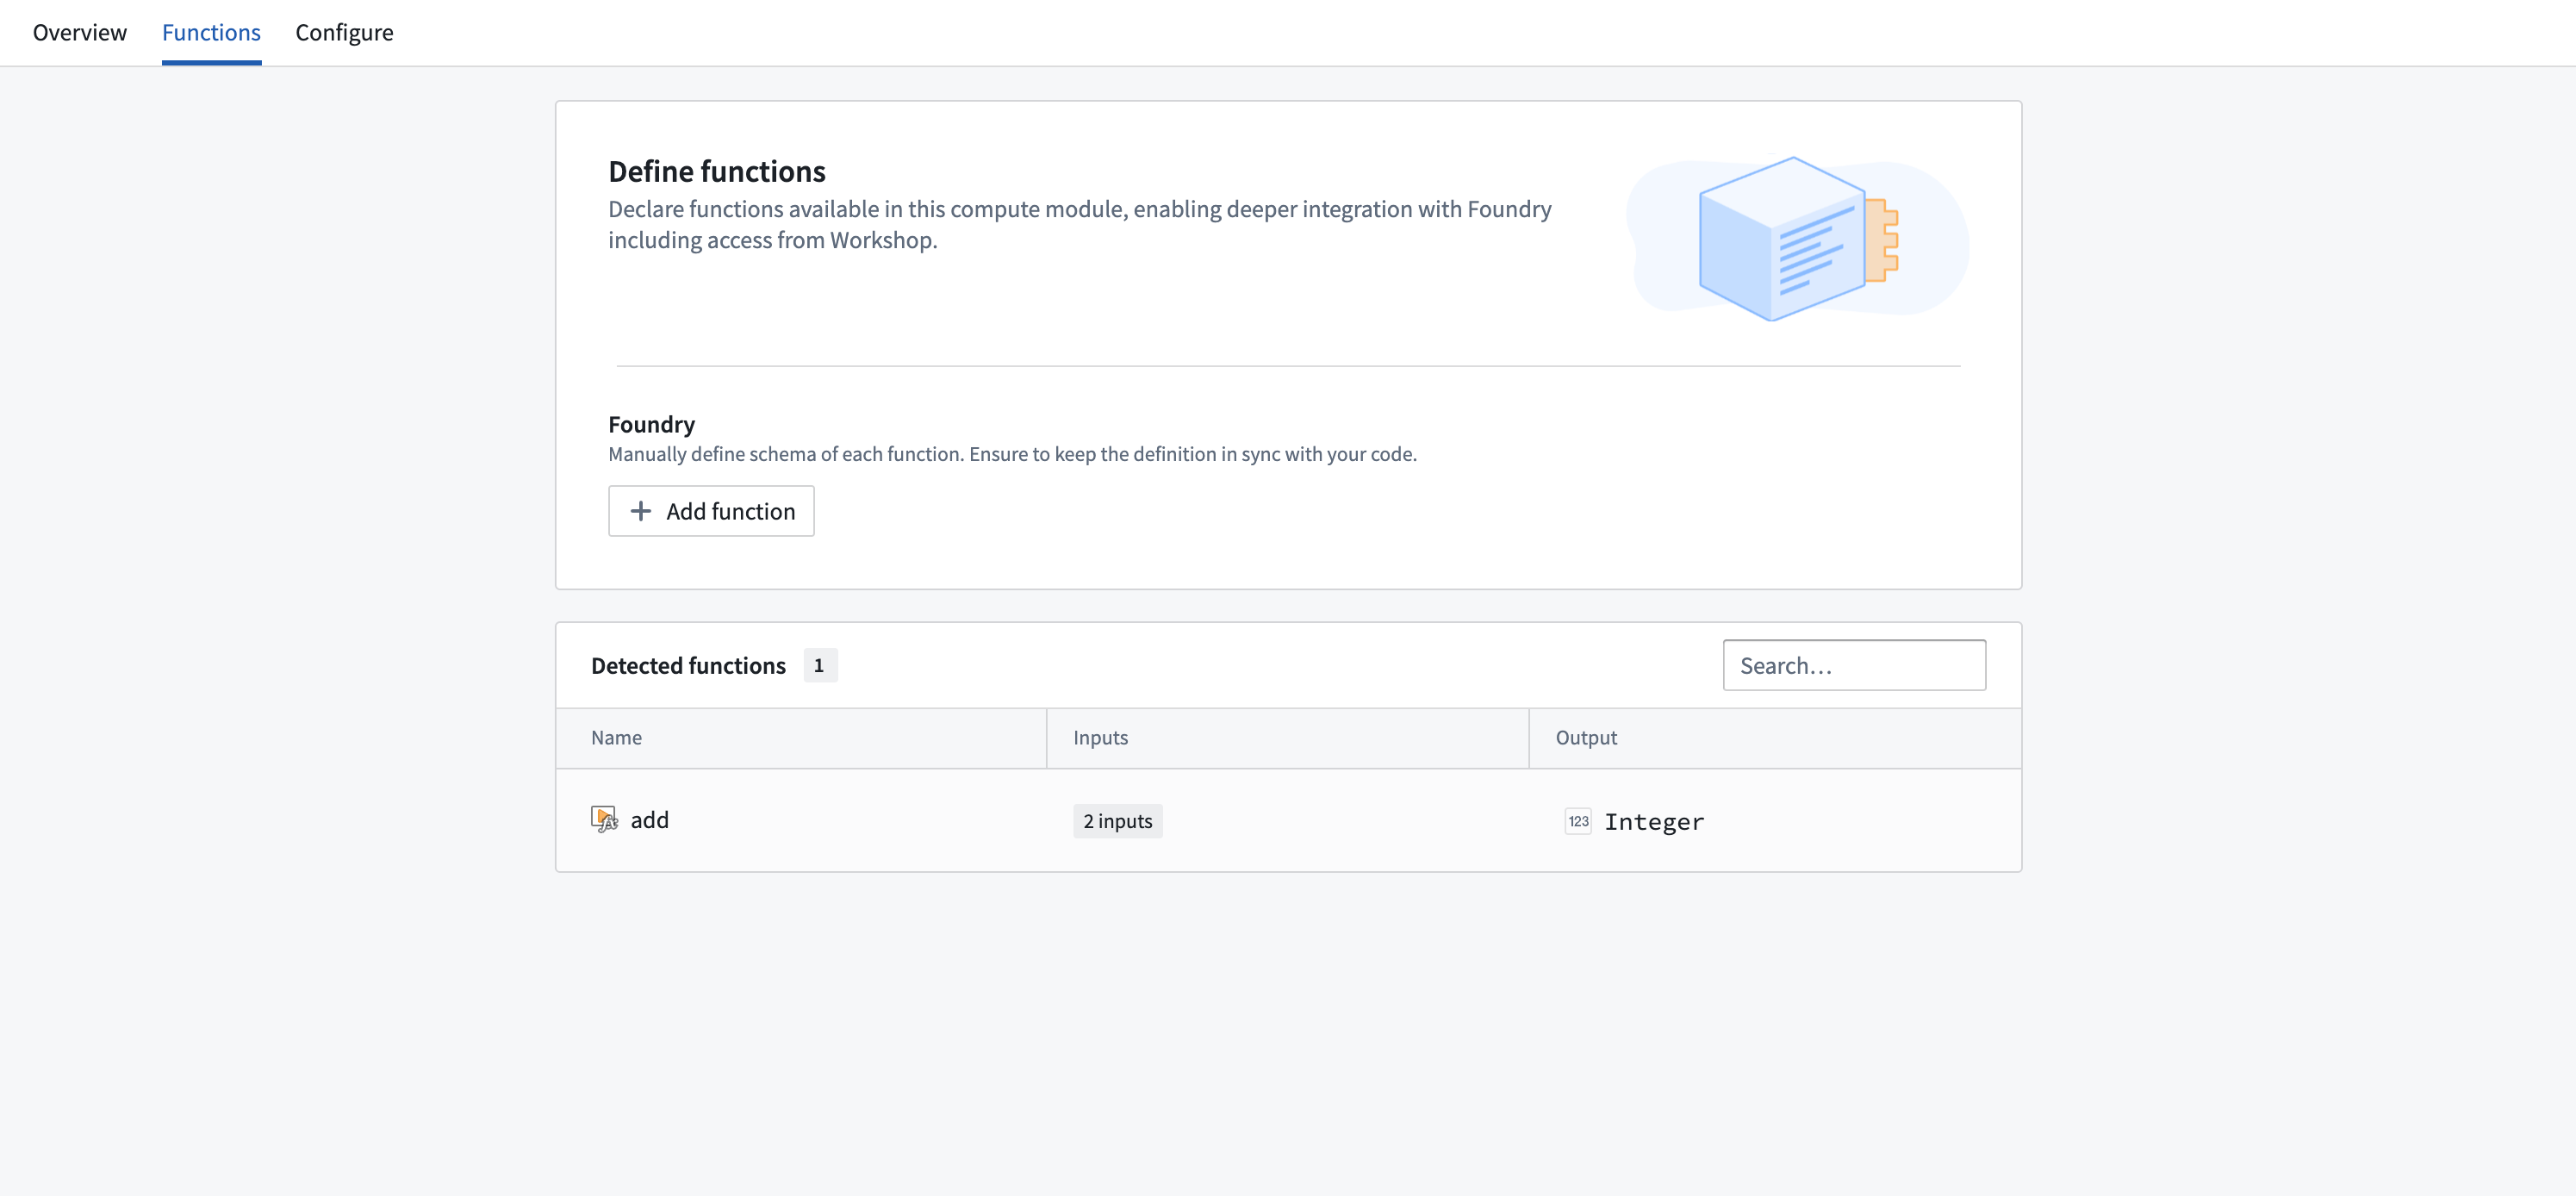
Register a function from the Compute Modules application
You can manually register a function for a compute module from the Functions page. Select Add function to open the Create function panel:
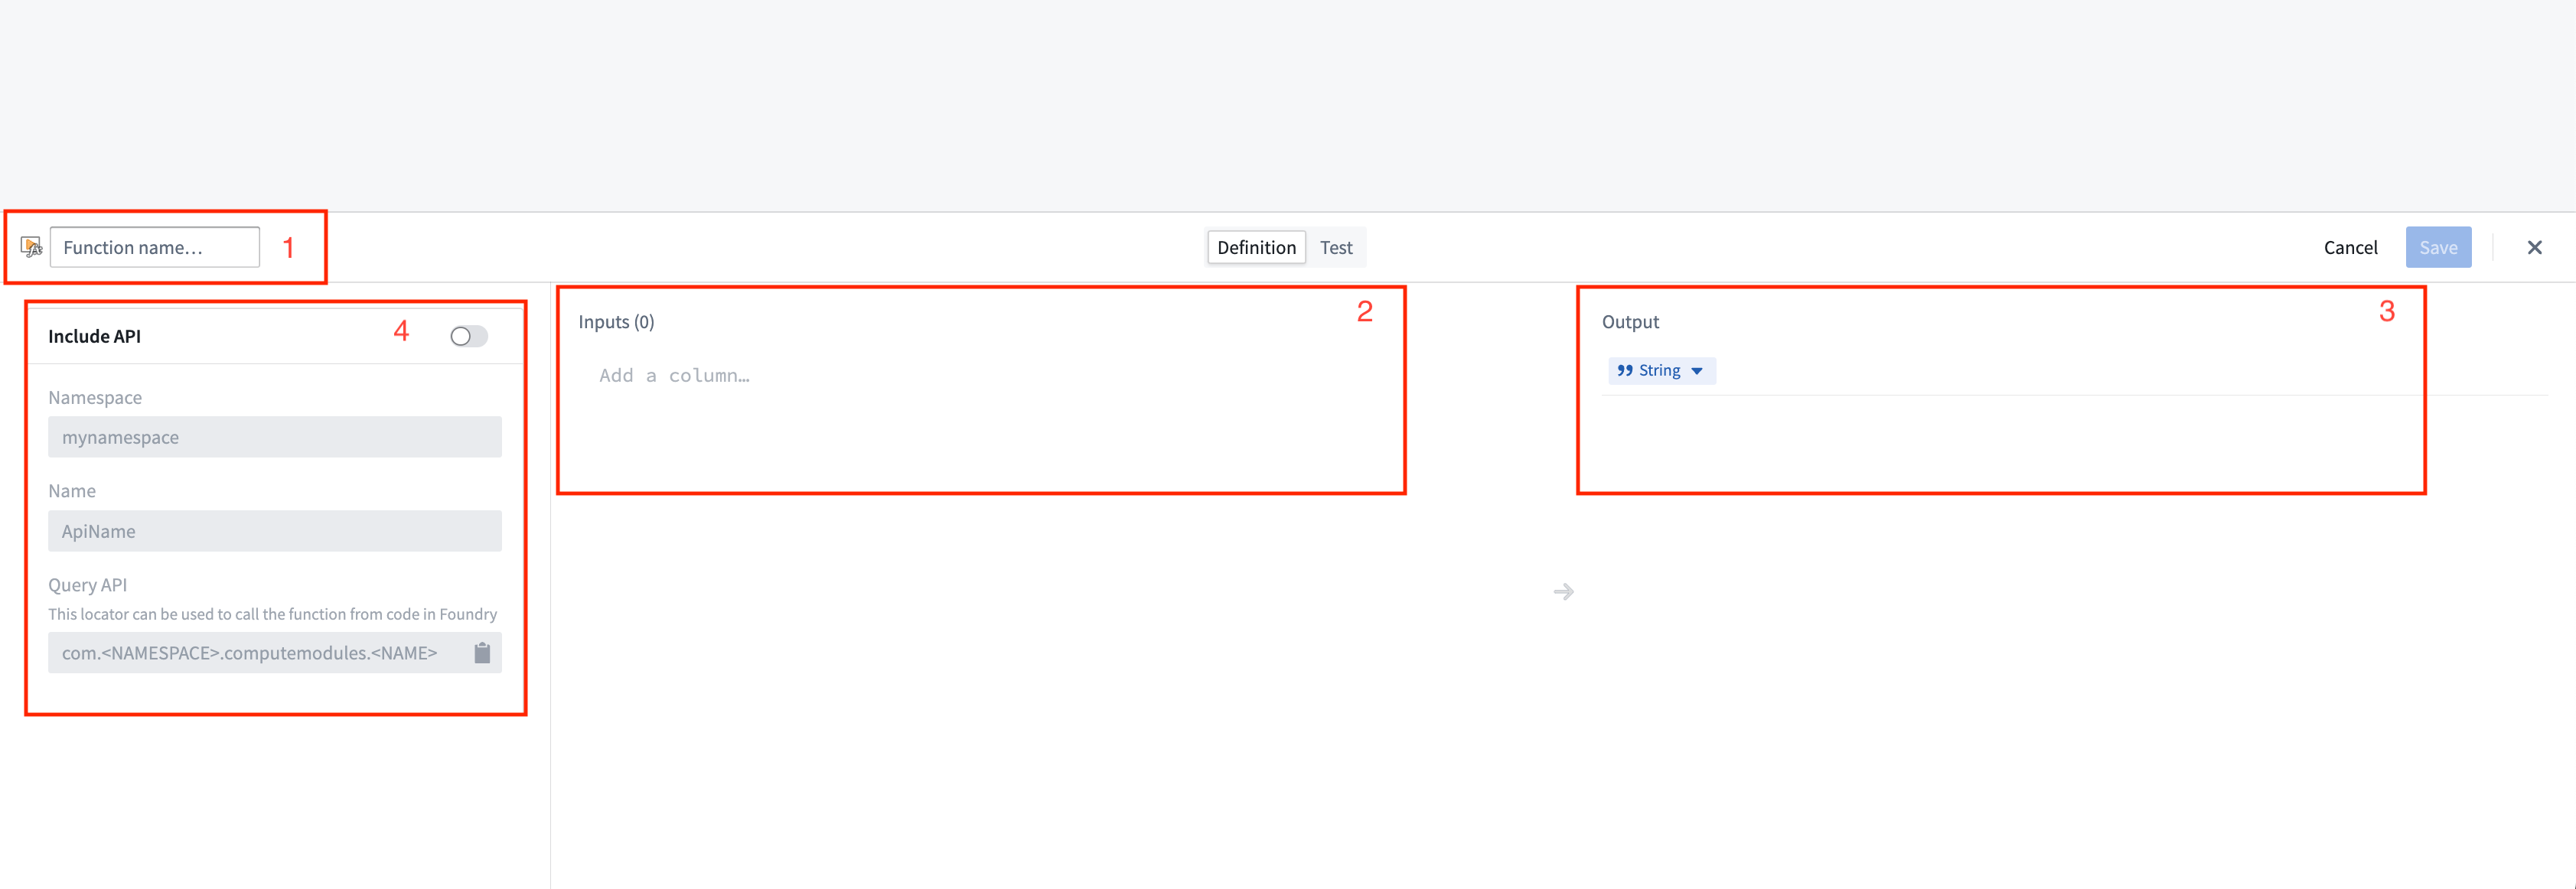
- Function name: The name of the function to be invoked. Typically, this should match the name of the function in your compute module.
- Inputs: The input parameter(s) to be passed as arguments to your compute module function.
Compute module function inputs are packaged into a JSON object; each input that you add corresponds to a property on the input object passed into your function. In the example below, function inputs are on the left, and the JSON object passed to the corresponding function is on the right.

example_function_payload.json
{
    "arg1": "hello",
    "arg2": 2,
    "arg3": "1969-07-20"
}
- Output: The return type of your function.
-
API name: The API name is the function locator that allows you call your function from other code in Foundry, such as through a TypeScript function. The compute module API format follows the structure
com.<namespace>.computemodules.<MyApiName>and must comply to the following naming rules: -
namespace: Must be all lowercase and contain no special characters.
- MyApiName: Must be in camel case and contain no special characters.
:::callout{theme="warning"} Changing the API name will break the consumer code. Only the latest published version of the query is supported. :::
Once you define a function, you can switch to the Test tab to try invoking the function, and/or select Save to save the function and make it callable from Foundry.
:::callout{theme="warning"}
Compute module functions are always registered with version 0.0.0. If you update the function, the function's version will be overwritten by your changes.
:::
Register a function using JSON
You can also manually define your function schema by sending an HTTP POST request from within your compute module. Typically, you will only need to do this if you are creating your own client. For information on the HTTP request, review our POST function schema documentation.
This endpoint accepts a JSON array as the payload, where each element in the array corresponds to the specification of a function in your compute module. Our Python SDK ↗ provides a good reference on how to assemble this JSON payload.
Function type reference
Below is a table showing the mapping between function input/output types and how those types are serialized over HTTP to a compute module:
| Foundry type | Serialized over HTTP as | Notes |
|---|---|---|
| Integer | int | |
| Byte | string | |
| Boolean | boolean | |
| Binary | string | |
| Date | string | |
| Timestamp | int | Milliseconds since epoch |
| Decimal | string | |
| Float | float | |
| Array | array (non-streaming), stream of JSON (streaming) | |
| Map | JSON | Key-value store (for example, Python dict, Java Map) |
| Struct | JSON | Custom object type |
:::callout{theme="neutral"} Review the following SDK guides for more information on how to define types, including Records, dataclasses, TypedDict, and @JsonProperty annotations:
Automatic function schema inference
Compute modules offer a streamlined way to define and register functions, enabling automatic schema inference and integration with Foundry's Compute Module application. This section provides an in-depth look at the automatic registration of functions and advanced usage scenarios, ensuring a smoother development experience.
:::callout{theme="warning"} The imported function schemas will only appear in the Compute Modules interface once your compute module is running and responsive. This means that you must deploy and run your compute module for the functions to be visible and accessible in Foundry. Review our documentation on debugging using replica status for more details. :::
In your compute module, you can define the schema of a function using a JSON structure directly within your code. This approach offers several benefits:
- Centralized schema definition
- Easy maintenance and updates
- Automatic integration with Foundry
By making a simple POST call when your compute module starts up, the module automatically infers the schema from the endpoint call and makes it available as a function in the Computes Modules application. This allows developers to define endpoint schemas once and easily import them into Foundry.
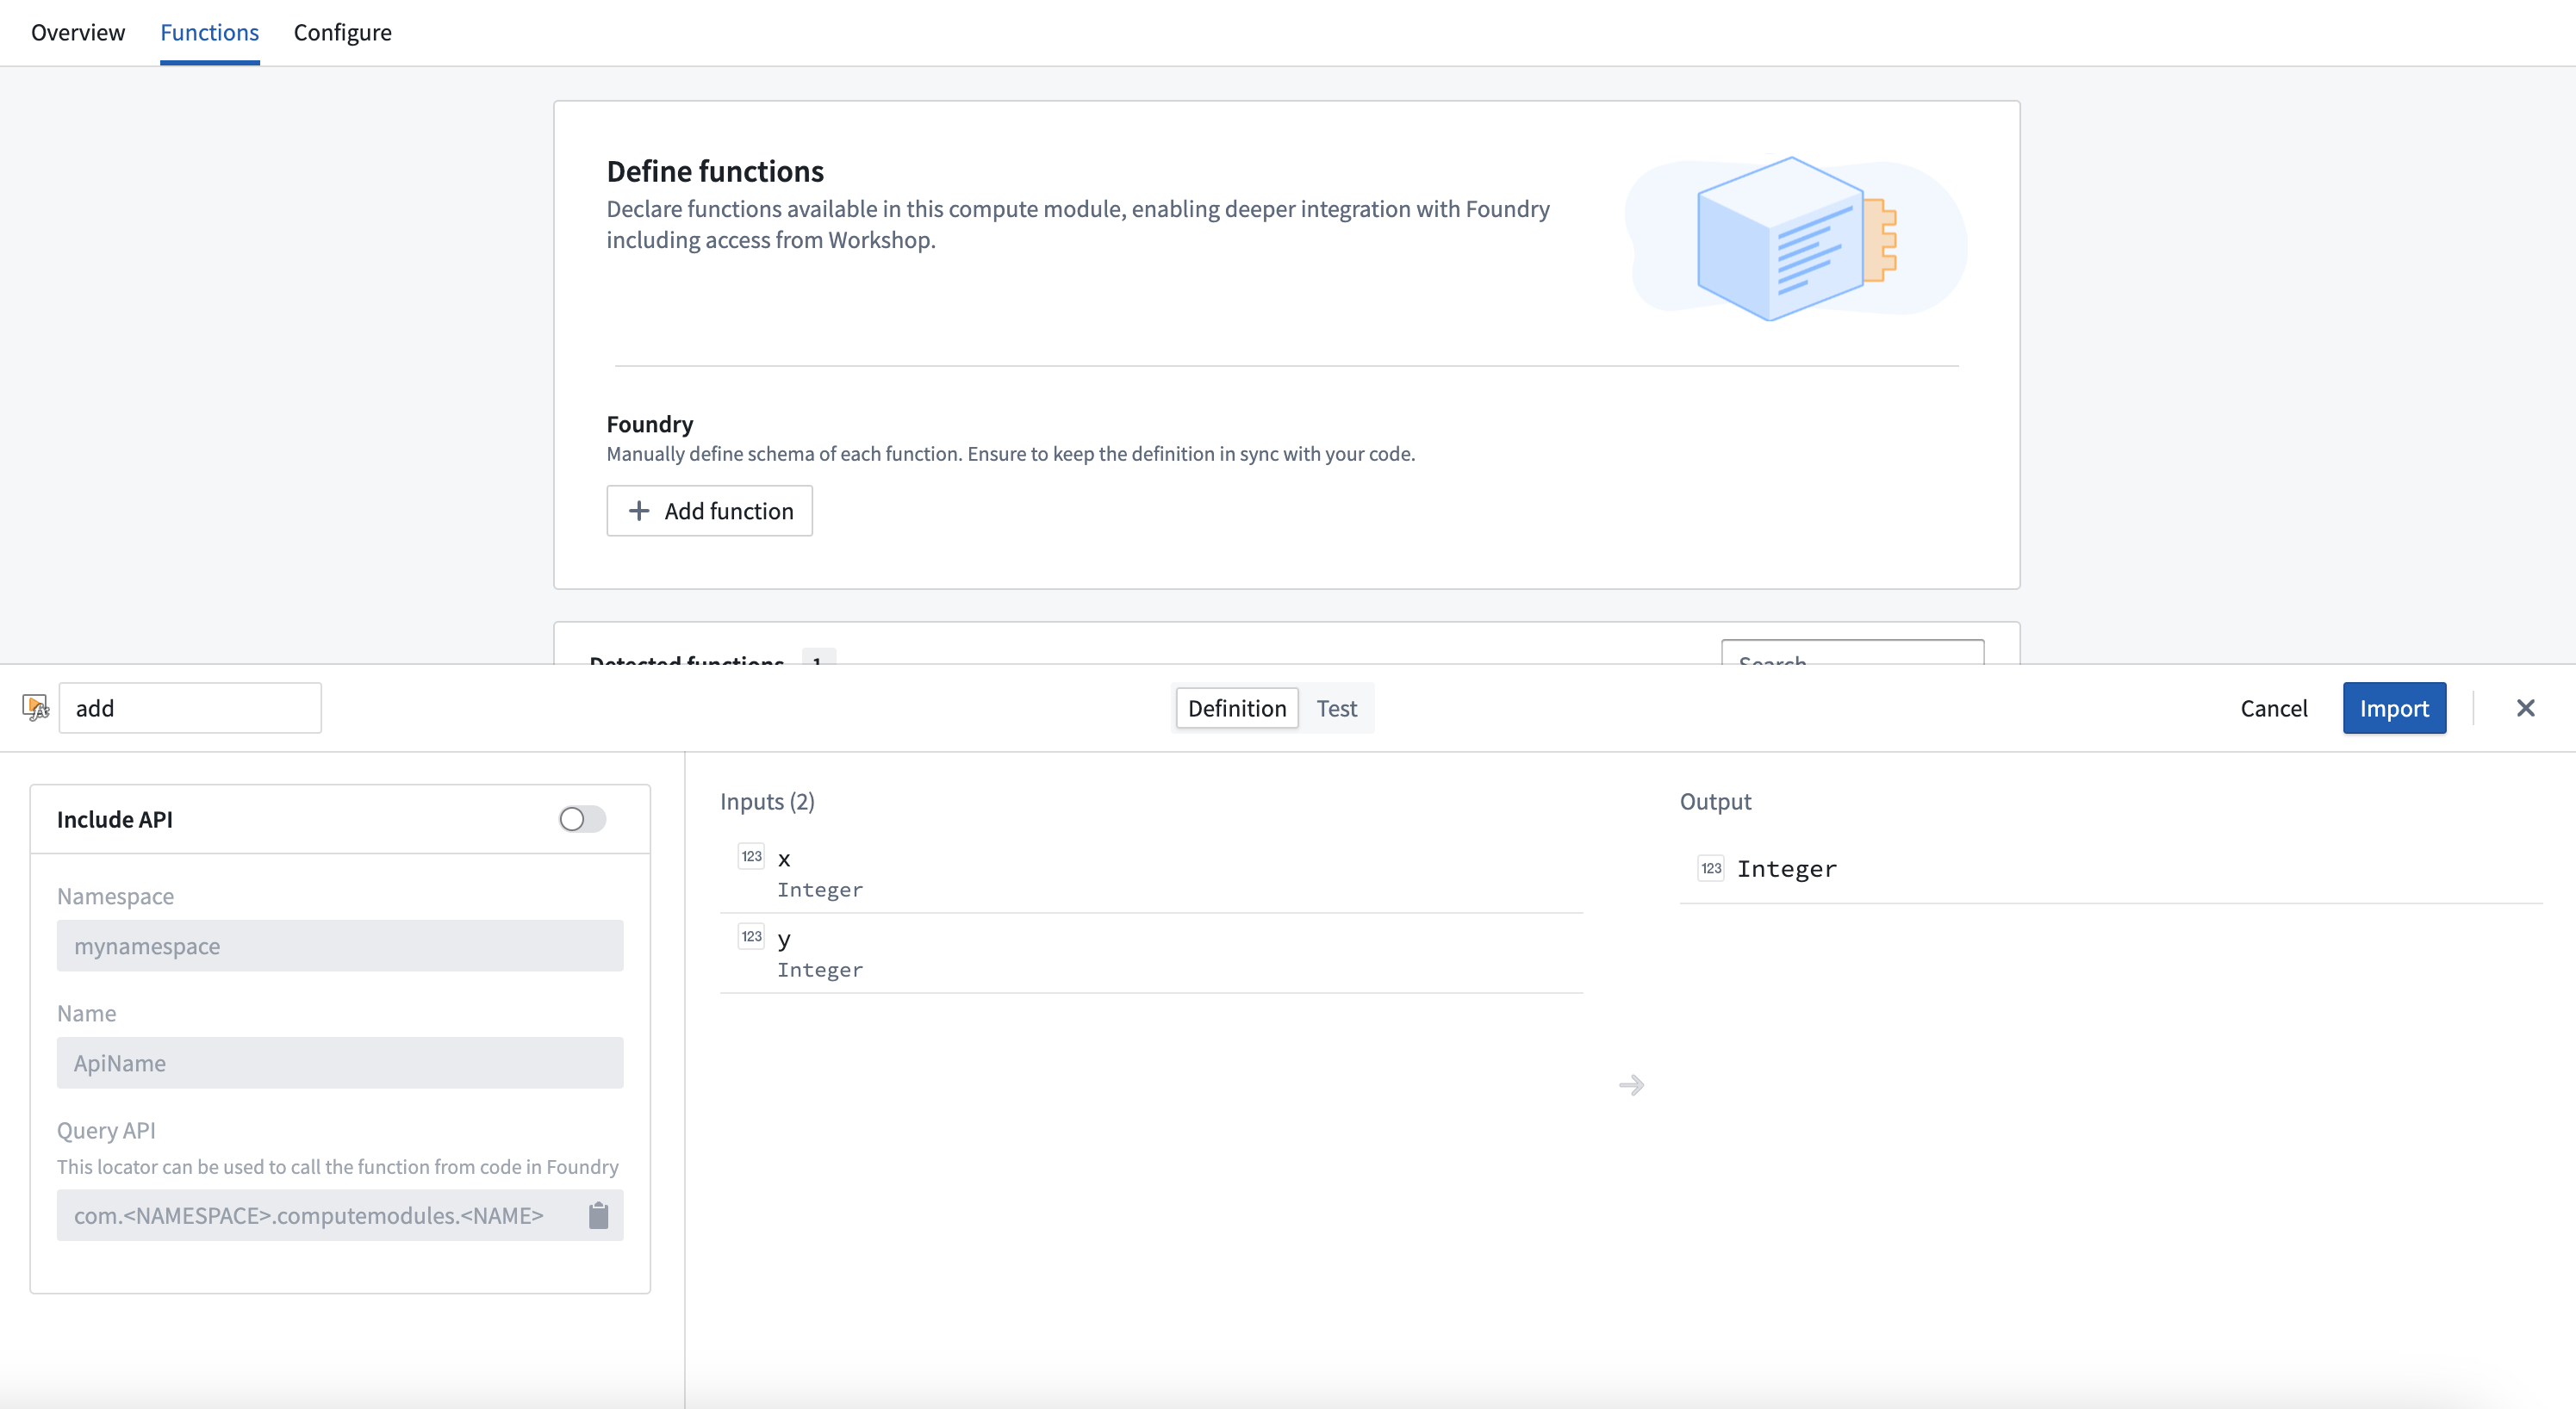
Example: Add function schema
Consider a simple add function, where inputs are x and y (two integers) and the output is a string. The example below shows how to define the JSON schema for this function:
schemas.json
{
    "functionName": "add",
    "inputs": [
        {
            "name": "x",
            "dataType": {
                "integer": {},
                "type": "integer"
            },
            "required": true,
            "constraints": []
        },
        {
            "name": "y",
            "dataType": {
                "integer": {},
                "type": "integer"
            },
            "required": true,
            "constraints": []
        }
    ],
    "output": {
        "single": {
            "dataType": {
                "string": {},
                "type": "string"
            }
        },
        "type": "single"
    }
}
Once you have defined your JSON schema, send an HTTP POST request in your app.py file to register it with Foundry:
if __name__ == "__main__":
    certPath = os.environ['DEFAULT_CA_PATH']
    postSchemaUri = os.environ["POST_SCHEMA_URI"]

    with open('schemas.json', 'r') as file:
        SCHEMAS = json.load(file)

    requests.post(
        postSchemaUri,
        json=SCHEMAS,
        headers={"Module-Auth-Token": moduleAuthToken, "Content-Type": "application/json"},
        verify=certPath
    )
Make sure to handle exceptions and implement proper error logging in a production environment.
Notice that the function adheres to the following constraints:
- The schema definition function must declare the types of all of its inputs and the type of its output, using the supported Python type (see table below).
- The schema definition of each function must declare a
functionNamethat matches the Python function name.
| Python type | Foundry type | Serialized over HTTP as | Notes |
|---|---|---|---|
| int | Integer | int | |
| str | Byte | string | |
| bool | Boolean | boolean | |
| bytes | Binary | string | |
| datetime.datetime | Date | string | |
| datetime.datetime | Timestamp | int | Milliseconds since epoch |
| decimal.Decimal | Decimal | string | |
| float | Float | float | |
| list | Array | array (non-streaming), stream of JSON (streaming) | |
| set | Array | array (non-streaming), stream of JSON (streaming) | |
| dict | Map | JSON | Key-value store (for example, Python dict, Java Map) |
| class/TypedDict | Struct | JSON | Custom object type |
| Iterable | Array | array (non-streaming), stream of JSON (streaming) |
Automatic function discovery with the compute module SDK
The compute module SDK includes functionality for automatic function discovery. It inspects the defined functions and their input/output types, then converts them into FunctionSpecs that can be imported as Foundry Functions without modification.
To ensure this feature works seamlessly, you should understand how type inference works within the SDK and how to correctly define input and output types. Review the following considerations:
- The input class must be a complex type. Foundry Function specifications require the input type of a Function to be a complex type. If your function takes only a single primitive type as input, make sure to wrap that parameter in a complex type to properly infer your function schema.
- Input type definition
✅ TypedDict as input type
# app.py
from typing import TypedDict
from compute_modules.annotations import function

class HelloInput(TypedDict):
    planet: str

@function
def hello(context, event: HelloInput) -> str:
    return "Hello " + event["planet"] + "!"
✅ dataclass as input type
# app.py
from compute_modules.annotations import function
from dataclasses import dataclass
import datetime
import decimal

@dataclass
class TypedInput:
    bytes_value: bytes
    bool_value: bool
    date_value: datetime.date
    decimal_value: decimal.Decimal
    float_value: float
    int_value: int
    str_value: str
    datetime_value: datetime.datetime
    other_date_value: datetime.datetime

@function
def typed_function(context, event: TypedInput) -> str:
    diff = event.other_date_value - event.datetime_value
    return f"The difference between the provided dates is {diff}"
✅ Regular class with both class AND constructor type hints
# app.py
from compute_modules.annotations import function

class GoodExample:
    some_flag: bool
    some_value: int

    def __init__(self, some_flag: bool, some_value: int) -> None:
        self.some_flag = some_flag
        self.some_value = some_value

@function
def typed_function(context, event: GoodExample) -> int:
    return event.some_value
❌ AVOID Python class with no class type hints
# app.py
# This will raise an exception
class BadClassNoTypeHints:
    def __init__(self, arg1: str, arg2: int):
        ...
❌ AVOID Python class with Args in constructor
# app.py
# This will raise an exception
class BadClassArgsInit:
    arg1: str
    arg2: int

    def __init__(self, arg1: str, arg2: int, *args):
        ...
❌ AVOID Python class with Kwargs in constructor
# app.py
# This will raise an exception
class BadClassKwargsInit:
    arg1: str
    arg2: int

    def __init__(self, arg1: str, arg2: int, **kwargs):
        ...
- Streaming output: The compute module python SDK includes support for streaming output if it is any
Iterabletype (exceptdict). To enable result streaming, change@functionto@function(streaming=True). You can review more details in our SDK documentation ↗. To make sure your streaming function is registered correctly, use anyIterabletype as the return type. Then the output will be registered as FoundryArray.
:::callout{theme="warning"}
If you do not set streaming=True, the result will be posted as a single JSON blob of the whole iterable. It may throw if your iterable is not able to be serialized in JSON. If you set streaming=True, the result will be posted as a stream of JSON blobs serialized from each element. Review more in our SDK documentation ↗.
:::
✅ Regular Iterable as output type
# app.py
# The outputs will be registered as Foundry Array
from compute_modules.annotations import function

@function(streaming=True)
def get_string_list(context, event) -> list[str]:
    return [f'string {i}' for i in range(10)]

@function(streaming=True)
def get_string_set(context, event) -> set[str]:
    return {'string 1', 'string 2', 'string 3'}
✅ Generator as output type
# app.py
# Generator is Iterable. The output will be registered as Foundry Array
from compute_modules.annotations import function
import typing

@function(streaming=True)
def string_generator(context, event) -> typing.Iterable[str]:
    for i in range(10):
        yield f'string {i}'
⚠️ Regular Iterable as output type but streaming not enabled
# app.py
# This is valid. The output will be registered as Foundry Array, but the result will not be streamed
from compute_modules.annotations import function

@function
def get_string_list(context, event) -> list[str]:
    return [f'string {i}' for i in range(10)]
❌ Generator as output type but streaming not enabled
# app.py
# Generator is not JSON serializable as a whole object. Cannot be used in a non-streaming function since it serializes the whole object
# The output type will be registered as Foundry Array, but it will throw when executed
from compute_modules.annotations import function
import typing

@function
def string_generator(context, event) -> typing.Iterable[str]:
    for i in range(10):
        yield f'string {i}'
Register the function
Follow the steps below to register your function:
- Ensure your compute module is running.
- Navigate to the Functions tab in the Compute Module application.
- You should be able to view your function in the list of detected functions.
- Select the function you want to register to open a pop-up window.
- In the window, select Import.
Integrate a server
:::callout{theme="warning"} Integrating a server in compute modules is in the experimental phase of development and may not be available on your enrollment. Functionality may change during active development. :::
Typically, compute modules use a client which pulls jobs from the compute modules API. However, you can also use an HTTP server in compute modules without any need for a client, adapter, or SDK.
OpenAPI Specification
The OpenAPI Specification (OAS) ↗ is an open-source framework for enumerating HTTP APIs. You will first need to provide an OpenAPI specification for your server. There are many ways to create an OpenAPI specification for your server; you can do so manually or with an LLM assistant by following the OpenAPI documentation, using a generic OpenAPI generator, or using language-specific libraries.
To work with compute modules, your OpenAPI specification must adhere to all of the following constraints:
- Use OpenAPI Specification version 3.0.0 or higher.
- Include a single server with a URL of the form
http://localhost:port. - Include an
operationIdon each operation, which will be the name of the function in Foundry. - Only use
GET,PUT,POST, andDELETEverbs. - Include the
schemafield on all parameters, and not use any parameters withcookielocations. - Must not use
anyOf,oneOf, orallOfschemas, or schemas with multiple types. - Only include a single response code on all endpoints (since functions in Foundry only support a single output schema), which must be of
application/jsoncontent type.
The following is an example of a Python server using Flask, and its accompanying OpenAPI specification:
from flask import Flask, request, jsonify
import uuid

app = Flask(__name__)

books = {}


@app.route('/books', methods=['POST'])
def add_book():
    data = request.json

    user_id = request.headers.get('User-ID')
    title = data.get('title')
    author = data.get('author')
    published_year = int(data.get('published_year'))

    book_id = str(uuid.uuid4())

    books[book_id] = {
        'title': title,
        'author': author,
        'published_year': published_year,
        'added_by': user_id
    }
    return jsonify(book_id), 200


@app.route('/books/<book_id>', methods=['GET'])
def get_book(book_id):
    return jsonify(books.get(book_id)), 200


if __name__ == '__main__':
    app.run(port=8000)
{
  "openapi": "3.0.0",
  "servers": [
    {
      "url": "http://localhost:8000"
    }
  ],
  "paths": {
    "/books": {
      "post": {
        "operationId": "addBook",
        "requestBody": {
          "content": {
            "application/json": {
              "schema": {
                "type": "object",
                "properties": {
                  "title": {
                    "type": "string"
                  },
                  "author": {
                    "type": "string"
                  },
                  "published_year": {
                    "type": "integer"
                  }
                }
              }
            }
          }
        },
        "parameters": [
          {
            "name": "User-ID",
            "in": "header",
            "schema": {
              "type": "string"
            }
          }
        ],
        "responses": {
          "200": {
            "content": {
              "application/json": {
                "schema": {
                  "type": "string"
                }
              }
            }
          }
        }
      }
    },
    "/books/{book_id}": {
      "get": {
        "operationId": "getBook",
        "parameters": [
          {
            "name": "book_id",
            "in": "path",
            "schema": {
              "type": "string"
            }
          }
        ],
        "responses": {
          "200": {
            "content": {
              "application/json": {
                "schema": {
                  "type": "object",
                  "properties": {
                    "title": {
                      "type": "string"
                    },
                    "author": {
                      "type": "string"
                    },
                    "published_year": {
                      "type": "integer"
                    },
                    "added_by": {
                      "type": "string"
                    }
                  }
                }
              }
            }
          }
        }
      }
    }
  }
}
Using your server
When building your Docker image, use the server.openapi image label with the value as your OpenAPI specification. The following is a Dockerfile for the example above with the server's specification attached:
FROM python:3.12

EXPOSE 8000

RUN pip install flask
COPY src .

USER 5000

LABEL server.openapi='{"openapi":"3.0.0","servers":[{"url":"http://localhost:8000"}],"paths":{"/books":{"post":{"operationId":"addBook","requestBody":{"content":{"application/json":{"schema":{"type":"object","properties":{"title":{"type":"string"},"author":{"type":"string"},"published_year":{"type":"integer"}}}}}},"parameters":[{"name":"User-ID","in":"header","schema":{"type":"string"}}],"responses":{"200":{"content":{"application/json":{"schema":{"type":"string"}}}}}}},"/books/{book_id}":{"get":{"operationId":"getBook","parameters":[{"name":"book_id","in":"path","schema":{"type":"string"}}],"responses":{"200":{"content":{"application/json":{"schema":{"type":"object","properties":{"title":{"type":"string"},"author":{"type":"string"},"published_year":{"type":"integer"},"added_by":{"type":"string"}}}}}}}}}}}'

CMD ["python", "app.py"]
Build, publish, select your image, and save your compute module configuration as normal. Then, navigate to the Functions tab and select Detect from OpenAPI specification. You can then import your functions and view the OpenAPI specification from which they were generated. These functions can be used throughout the Foundry platform.

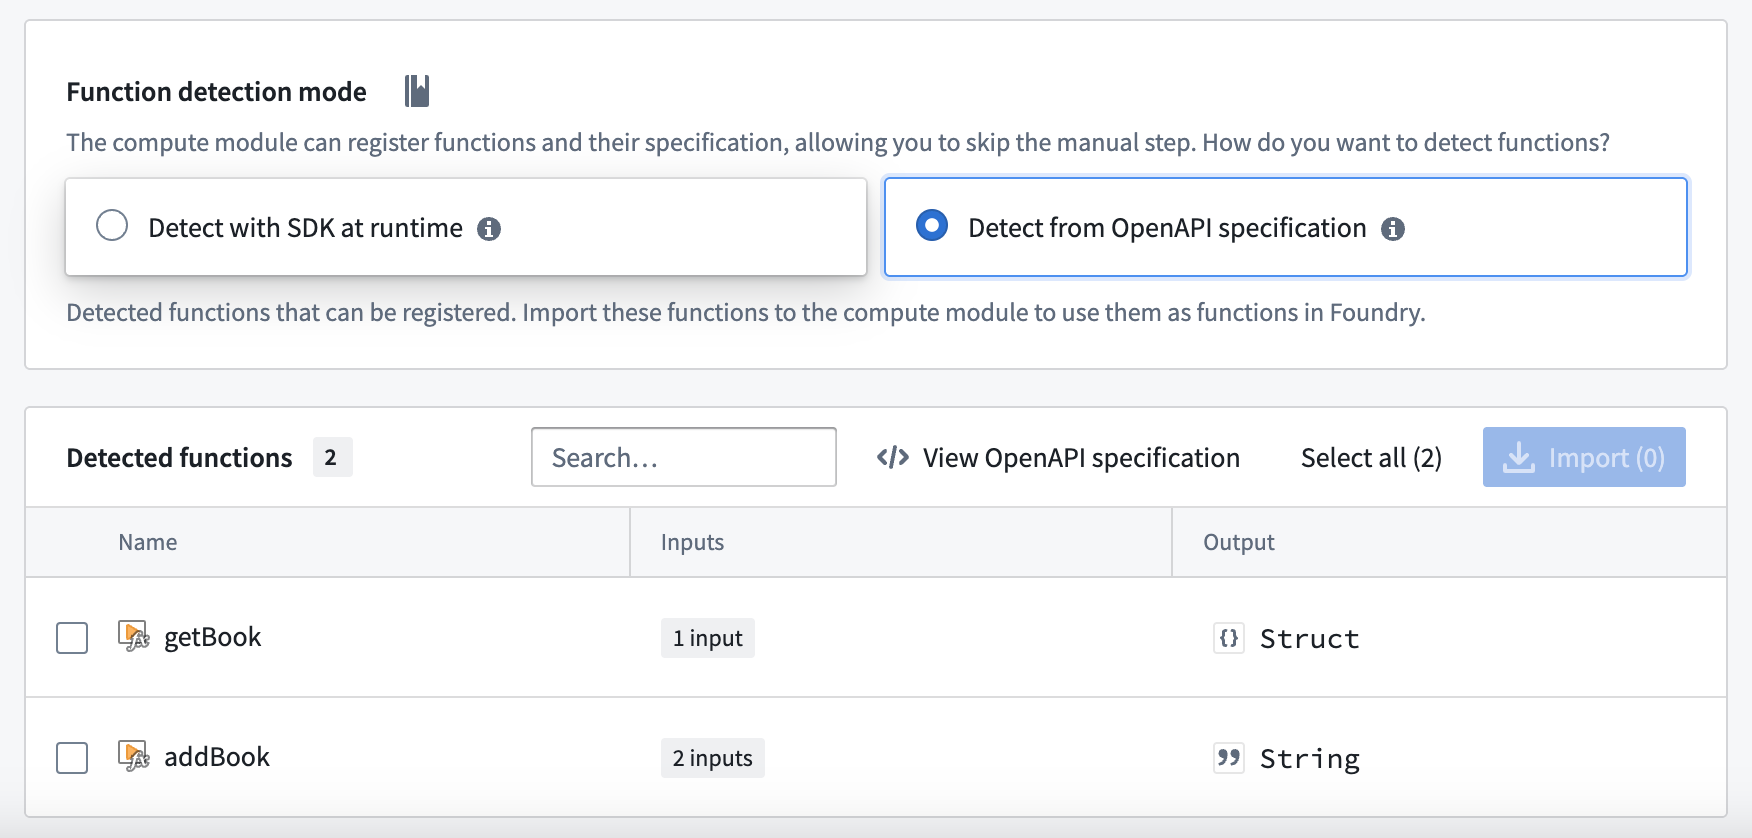
:::callout{theme="warning"} Do not manually modify your function definitions - they must be kept in line with the OpenAPI specification attached to your image. :::
Functions CLI
The Functions CLI is a standalone tool that helps you publish compute module artifacts. It has two core responsibilities:
- Running static inference against your source code to generate function specifications.
- Building and publishing Docker images with the metadata labels required by Foundry.
You can use the Functions CLI in local development workflows or integrate it into CI/CD pipelines to automate the build and publish process for your compute modules.
Access the Functions CLI
To get started with the Functions CLI:
- Download the latest binary for your platform.
- Ensure the binary is executable:
chmod +x functions-cli
You can then invoke the CLI directly from your terminal.
Inference
The Functions CLI can perform static inference against your source code to automatically generate function specifications. This is useful when you want to inspect or verify the function schemas that will be registered in Foundry.
Use the --opt functions flag to run function spec inference. For Python compute modules using the SDK, specify the --plugin python_cm flag.
The following example runs inference against Python source code in the ./src directory:
functions-cli infer --opt functions --plugin python_cm --dir ./src
You can also use a plan file to configure inference:
functions-cli infer --planfile ./infer_plan.yml --dir ./src
The output is a JSON array of function specifications. Each specification includes the function name, input parameters with their data types, and the output type.
File plugin
If you prefer to define function schemas manually rather than relying on automatic inference, you can use the file plugin. This approach lets you specify function schemas in a JSON file with explicit type definitions.
The following example shows a function schema file with a custom type and a function that uses it:
{
  "types": {
    "Person": {
      "type": "object",
      "fields": {
        "name": { "dataType": "string" },
        "age": { "dataType": "integer" }
      }
    }
  },
  "functions": [
    {
      "functionName": "example_function",
      "inputs": [
        { "name": "text", "dataType": "string", "required": true },
        { "name": "items", "dataType": "list<Person>", "required": true },
        { "name": "metadata", "dataType": "optional<dict<string, string>>", "required": false }
      ],
      "outputs": [
        { "dataType": "dict<string, set<Person>>" }
      ]
    }
  ]
}
The file plugin supports the following data types:
| Data type | Description |
|---|---|
string |
Text value |
integer |
Whole number |
boolean |
True or false |
float |
Floating-point number |
binary |
Binary data |
date |
Date value |
decimal |
Arbitrary-precision decimal |
timestamp |
Point in time |
list<T> |
Ordered collection of type T |
set<T> |
Unordered collection of unique values of type T |
dict<K, V> |
Key-value mapping from type K to type V |
optional<T> |
Value of type T that may be absent |
You can nest these types to create complex structures, such as dict<string, set<Person>> or optional<list<integer>>.
Build
The Functions CLI can build and publish Docker images for your compute module. You configure the build using a plan file in YAML or JSON format.
The following example shows a build plan:
name: my-compute-module-image
tag: $(IMAGE_TAG)
registry:
  url: stack-container-registry.palantirfoundry.com
  username: ri.artifacts.main.repository.example-artifact-repo-rid-abc123
auth:
  client_id: $(CLIENT_ID)
  client_secret: $(CLIENT_SECRET)
  host: stack.palantirfoundry.com
kind: python_cm
Run the build with:
functions-cli build -p ./build_plan.yml -d ./src
The auth section of the build plan supports two authentication methods:
- OAuth client: Uses
client_id,client_secret, andhostfields. - Token: Uses a
tokenfield with a Foundry API token.
Tag increment
You can use the -t flag to automatically increment the image tag version instead of specifying a tag manually:
| Flag | Increment |
|---|---|
-t |
Patch version |
-tt |
Minor version |
-ttt |
Major version |
Engine options
By default, the Functions CLI uses Docker to build images. If you do not have a Docker daemon available, you can use the GoCR engine instead.
The following example shows a build plan using the GoCR engine:
name: my-compute-module-image
tag: 0.0.1
registry:
  url: stack-container-registry.palantirfoundry.com
  username: ri.artifacts.main.repository.example-artifact-repo-rid-abc123
auth:
  token: $(FOUNDRY_TOKEN)
engine:
  gocr:
    base_image: python:3.12
    copy_paths:
      - source: ./src
        dest: /app/client
    entrypoint: ["python", "app.py"]
kind: python_cm
The GoCR engine does not require a Docker daemon, which makes it suitable for CI/CD environments where Docker-in-Docker is unavailable or restricted.
Logging
You can increase the verbosity of CLI output for debugging purposes:
| Flag | Level |
|---|---|
-v |
Info |
-vv |
Debug |
Use compute module functions in TypeScript functions
Prerequisites:
- You must register your function in the Compute Module application with an API name.
- You must have the compute module running for live preview to work.
- You must initialize a TypeScript code repository.
Enable resource generation
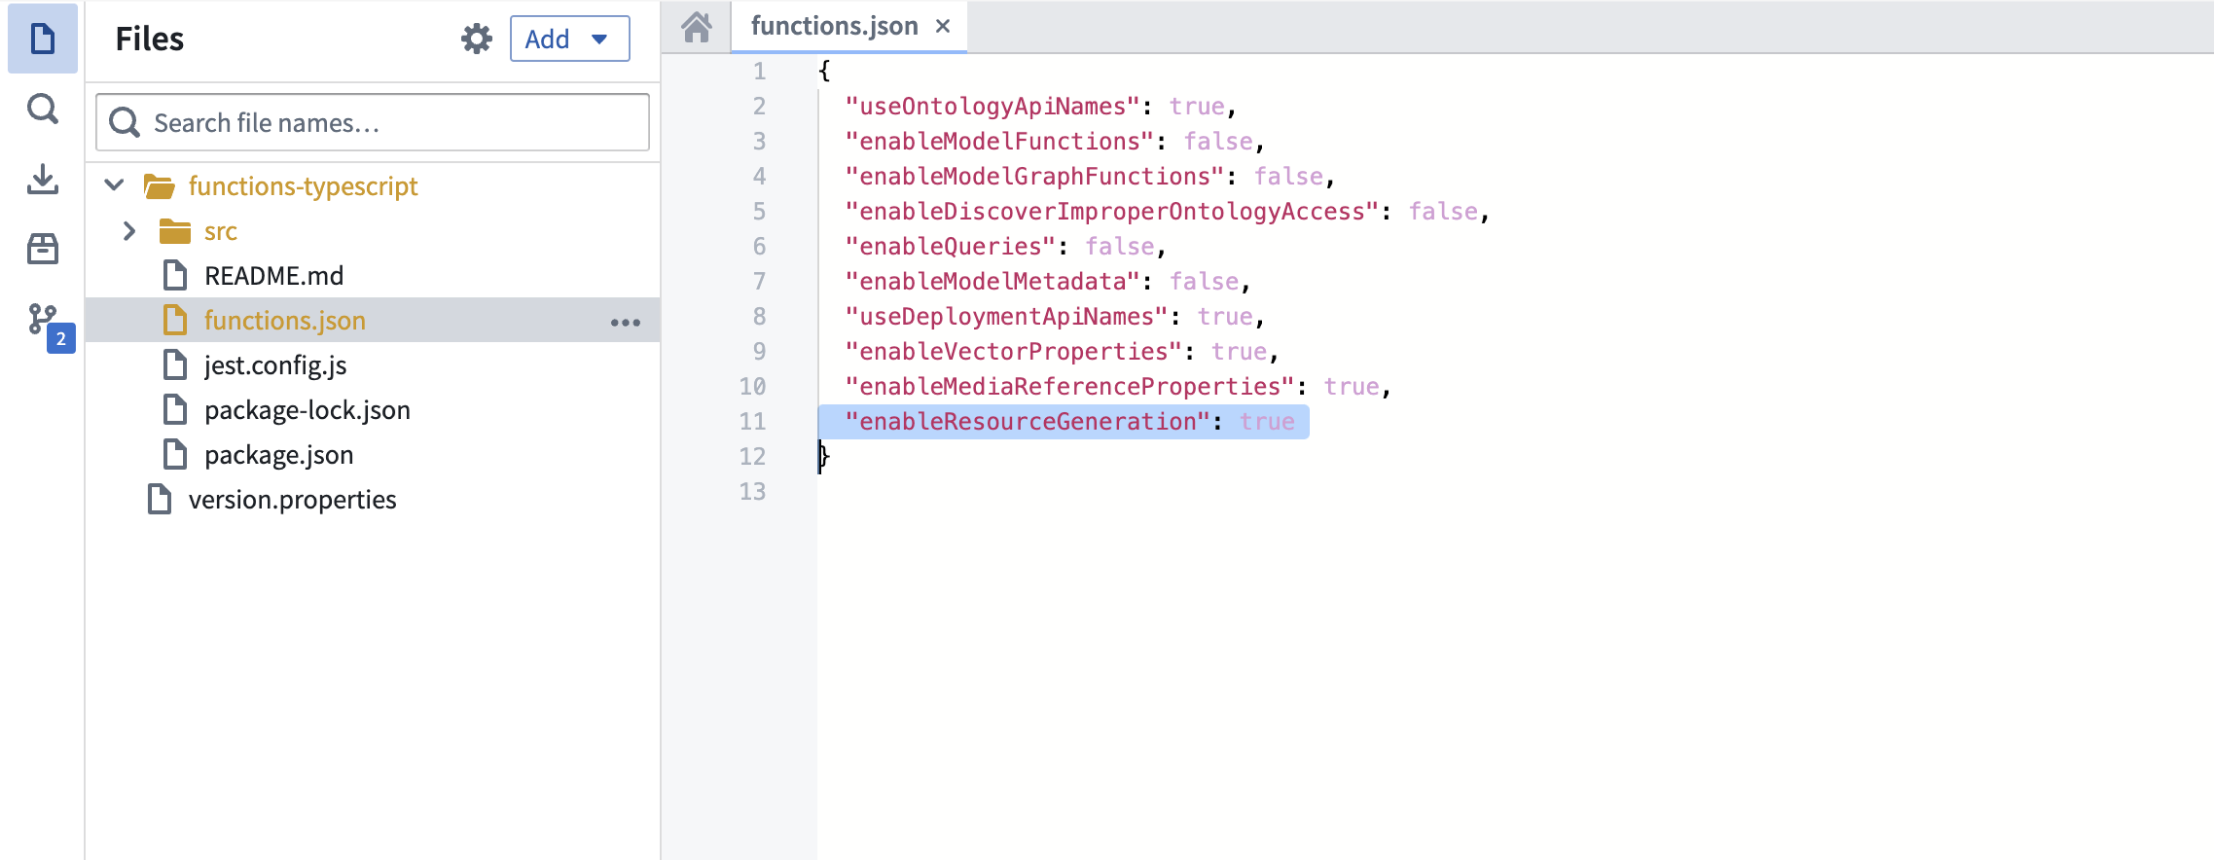
Before you begin, ensure that resource generation is enabled in your Typescript code repository:
- Open your
functions.jsonfile. - Set the
enableResourceGenerationproperty totrue.
Import your compute module function
To import a compute module function in TypeScript, follow the steps below:
- From the left panel of the TypeScript code repository, find and select the Resource imports tab.
- Select Add, then select Query Functions to display a pop-up window to select an Ontology.
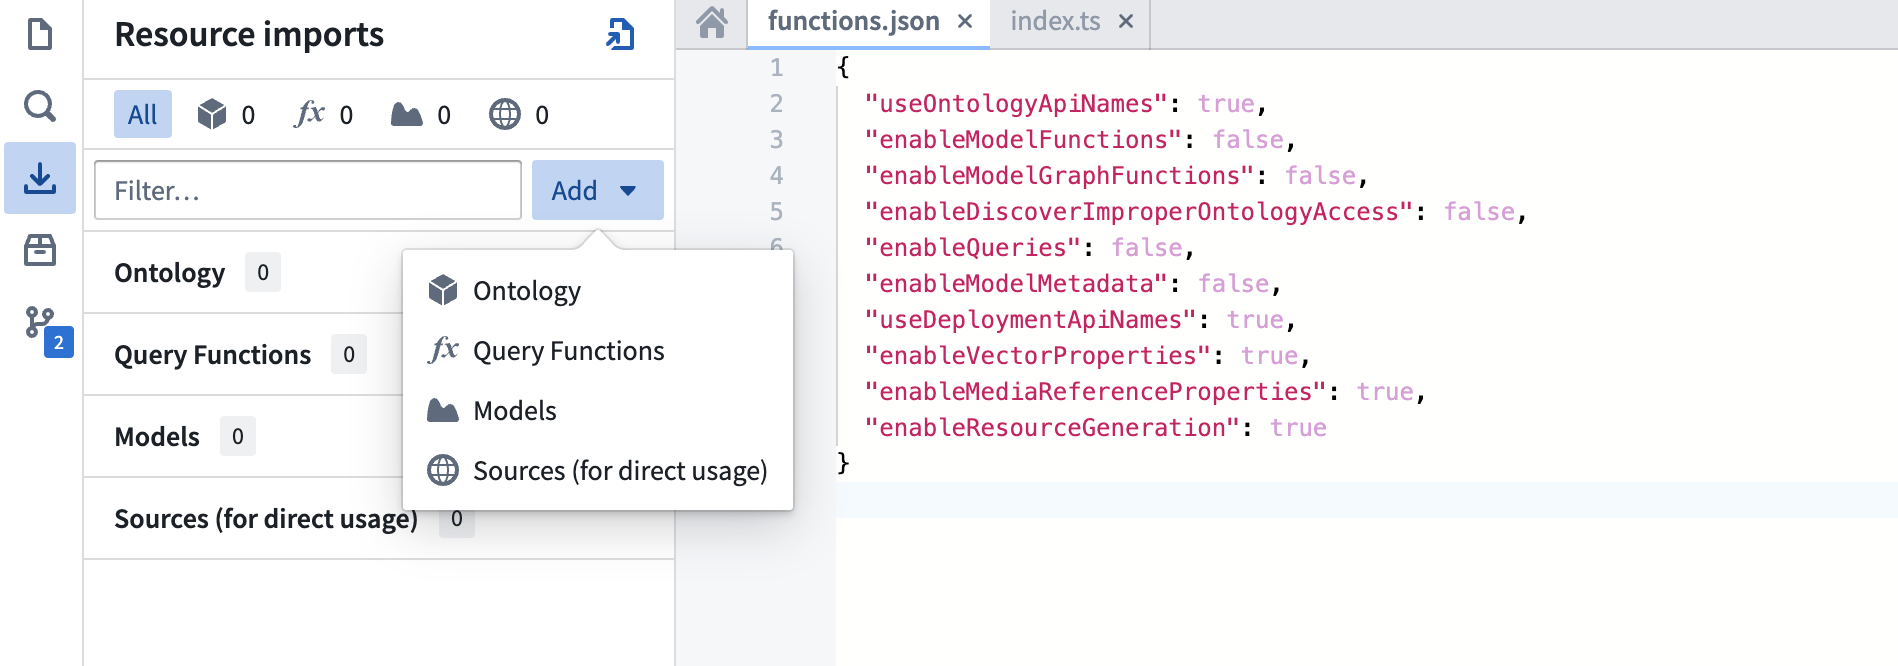
- Although compute modules are not tied to a specific Ontology, you must select one for the import process. Choose any Ontology that suits your use case.
- Search for your compute module function's API name.
- Select the function.
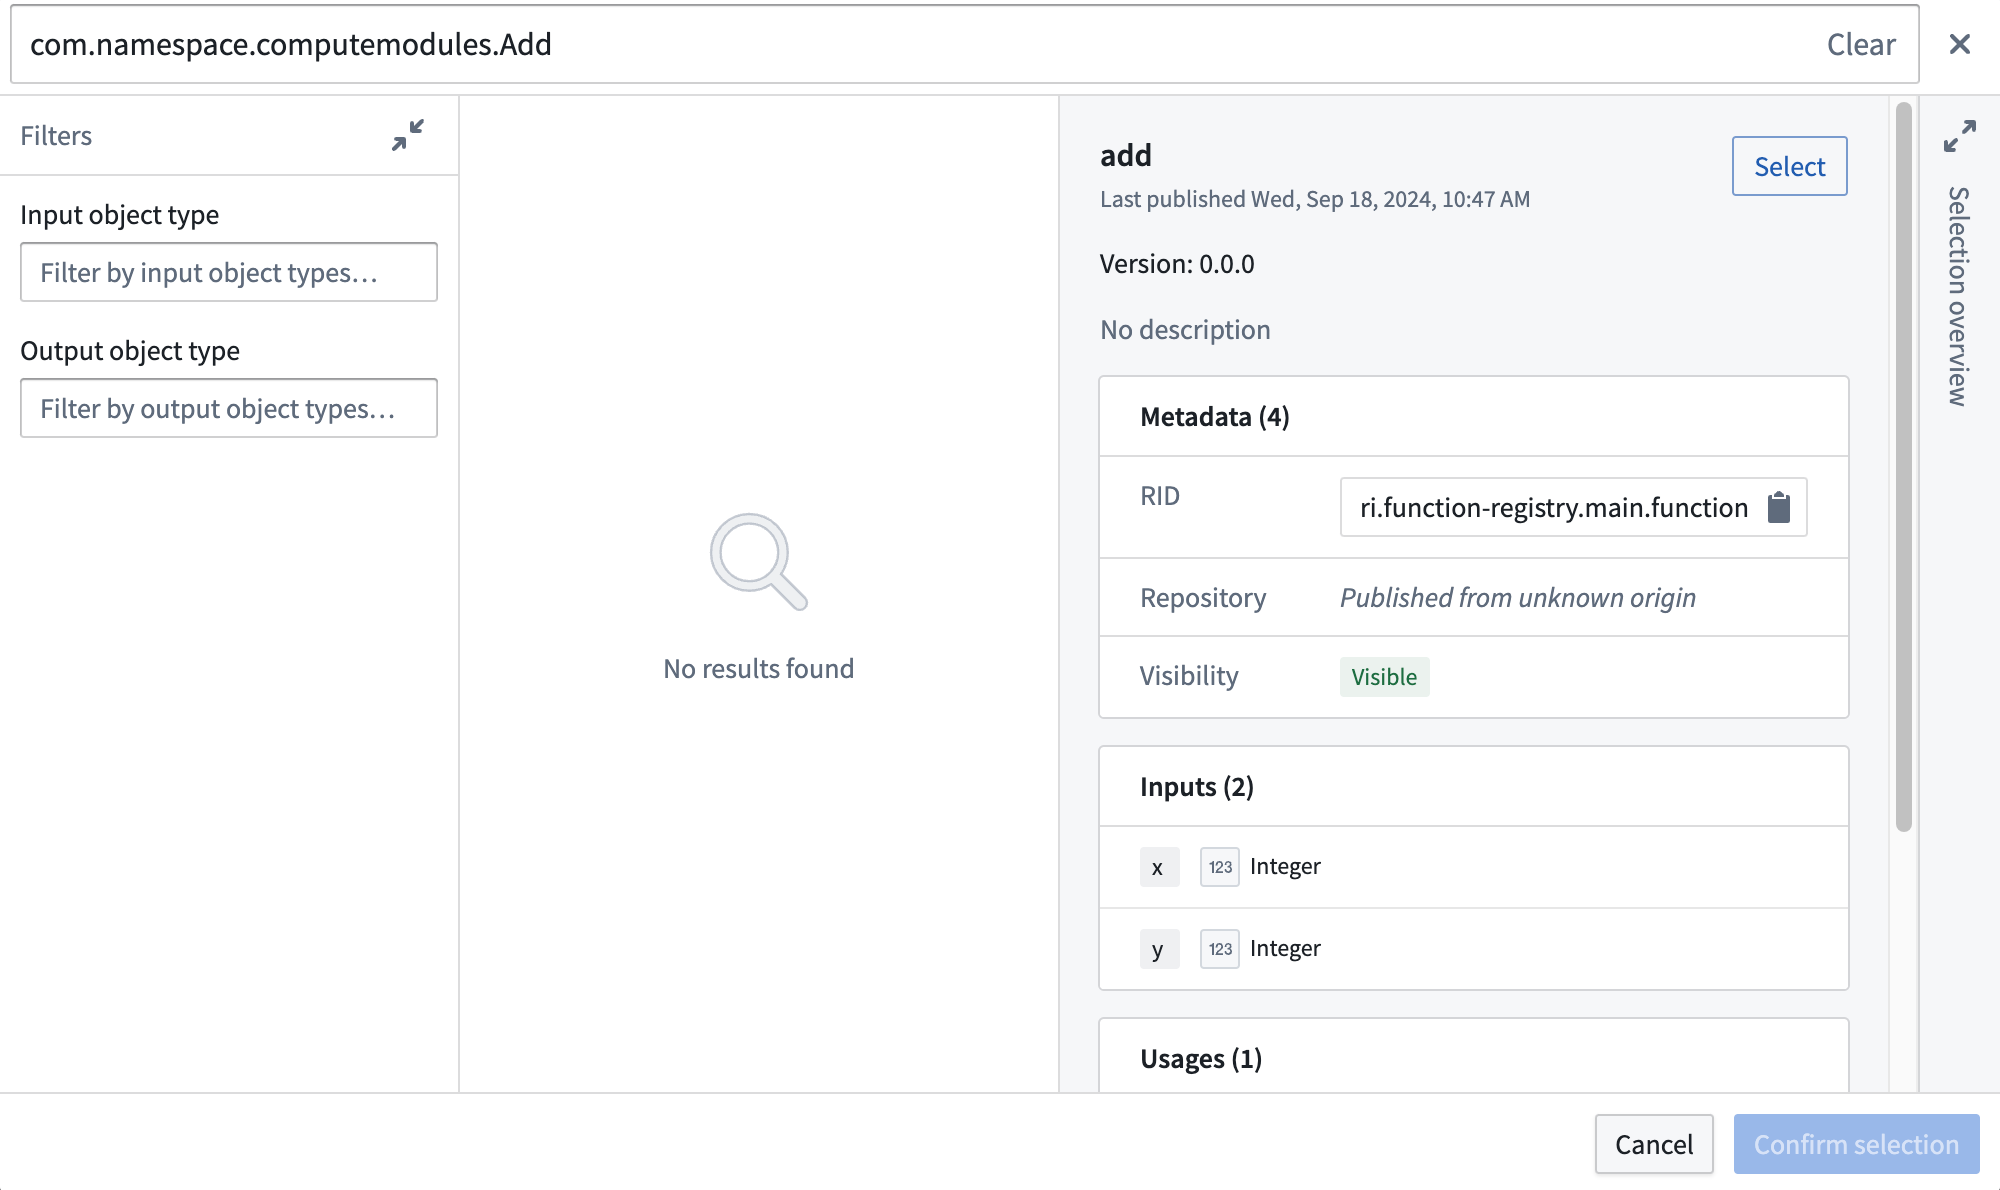
- Choose Confirm selection.
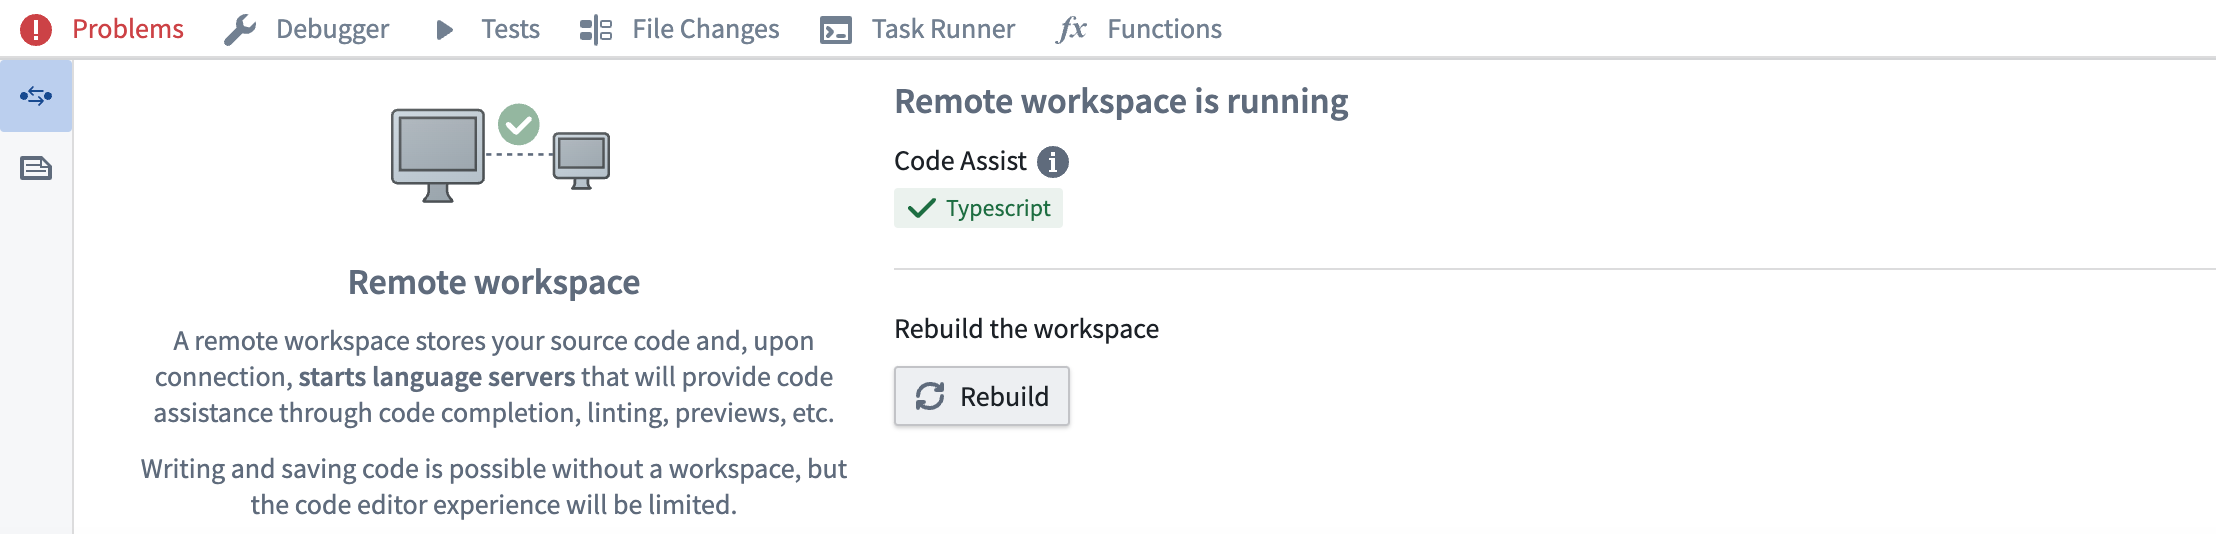
Rebuild your code workspace
Import and use the function
The example below shows how to import and use a compute module function:
// index.ts
import { Function } from "@foundry/functions-api";

// API Name: com.mycustomnamespace.computemodules.Add
import { add } from "@mycustomnamespace/computemodules";

export class MyFunctions {
    @Function()
    public async myFunction(): Promise<string> {
        return await add({ x: 50, y: 50 });
    }
}
Important considerations
- Project location: Ensure the compute module is in the same Project as your TypeScript code for live preview to work correctly.
- Type consistency: TypeScript enforces strict type checking. Ensure the declared return type matches the actual return type of your compute module function. For example, if you declare a
stringreturn type, your registered compute module function must return astring, not astructtype. - Asynchronous operations: Compute module functions are typically asynchronous. Use
async/awaitsyntax for proper handling.
:::callout{theme="warning"}
Since TypeScript functions go through the function-executor, only compute module functions that take less than five minutes will succeed. If the function takes longer than five minutes, it will time out.
:::
中文翻译
函数 (Functions)
注册函数 (Register functions)
如果在函数执行模式下运行,您必须在计算模块 (compute module) 中注册函数,以便在 Foundry 的其他位置调用它们。本页介绍了手动注册计算模块函数的两种不同方法。
:::callout{theme="neutral"} 计算模块 SDK 通过自动推断函数的模式 (schema) 来简化函数注册过程。如果您正在使用计算模块 SDK,请查看下面的自动函数模式推断部分。 :::
从计算模块应用程序注册函数 (Register a function from the Compute Modules application)
您可以从 函数 (Functions) 页面手动注册计算模块的函数。选择 添加函数 (Add function) 以打开 创建函数 (Create function) 面板:
- 函数名称 (Function name): 要调用的函数名称。通常,这应与计算模块中的函数名称匹配。
- 输入 (Inputs): 作为参数传递给计算模块函数的输入参数。
计算模块函数输入被封装到一个 JSON 对象中;您添加的每个输入都对应于传递给函数的输入对象上的一个属性。在下面的示例中,函数输入在左侧,传递给相应函数的 JSON 对象在右侧。
example_function_payload.json
{
    "arg1": "hello",
    "arg2": 2,
    "arg3": "1969-07-20"
}
- 输出 (Output): 函数的返回类型。
-
API 名称 (API name): API 名称是一个函数定位器,允许您从 Foundry 中的其他代码(例如通过 TypeScript 函数)调用您的函数。 计算模块 API 格式遵循结构
com.<namespace>.computemodules.<MyApiName>,并且必须符合以下命名规则: -
namespace: 必须全部小写,且不包含特殊字符。
- MyApiName: 必须使用驼峰命名法 (camel case),且不包含特殊字符。
:::callout{theme="warning"} 更改 API 名称将会破坏调用方代码。仅支持最新发布的查询版本。 :::
定义函数后,您可以切换到 测试 (Test) 选项卡尝试调用该函数,和/或选择 保存 (Save) 来保存函数并使其可从 Foundry 调用。
:::callout{theme="warning"}
计算模块函数始终以版本 0.0.0 注册。如果您更新函数,函数的版本将被您的更改覆盖。
:::
使用 JSON 注册函数 (Register a function using JSON)
您也可以通过从计算模块内部发送 HTTP POST 请求来手动定义函数模式。通常,只有在创建自己的客户端时才需要这样做。有关 HTTP 请求的信息,请查看我们的 POST 函数模式文档。
此端点接受 JSON 数组作为有效负载,数组中的每个元素对应计算模块中一个函数的规范。我们的 Python SDK ↗ 提供了关于如何组装此 JSON 有效负载的良好参考。
函数类型参考 (Function type reference)
下表显示了函数输入/输出类型与这些类型如何通过 HTTP 序列化到计算模块之间的映射关系:
| Foundry 类型 | 通过 HTTP 序列化为 | 备注 |
|---|---|---|
| 整数 (Integer) | int | |
| 字节 (Byte) | string | |
| 布尔值 (Boolean) | boolean | |
| 二进制 (Binary) | string | |
| 日期 (Date) | string | |
| 时间戳 (Timestamp) | int | 自纪元以来的毫秒数 |
| 十进制数 (Decimal) | string | |
| 浮点数 (Float) | float | |
| 数组 (Array) | array (非流式), stream of JSON (流式) | |
| 映射 (Map) | JSON | 键值存储(例如,Python dict,Java Map) |
| 结构体 (Struct) | JSON | 自定义对象类型 |
:::callout{theme="neutral"} 查看以下 SDK 指南,了解有关如何定义类型的更多信息,包括 Records、dataclasses、TypedDict 和 @JsonProperty 注解:
自动函数模式推断 (Automatic function schema inference)
计算模块提供了一种简化的方式来定义和注册函数,支持自动模式推断以及与 Foundry 计算模块应用程序的集成。本节深入介绍函数的自动注册和高级使用场景,以确保更流畅的开发体验。
:::callout{theme="warning"} 导入的函数模式只有在您的计算模块运行并响应后,才会出现在计算模块界面中。这意味着您必须部署并运行计算模块,函数才能在 Foundry 中可见和可访问。查看我们关于使用副本状态进行调试的文档以获取更多详细信息。 :::
在您的计算模块中,您可以直接在代码中使用 JSON 结构定义函数的模式。这种方法有几个好处:
- 集中化的模式定义
- 易于维护和更新
- 与 Foundry 自动集成
通过在计算模块启动时进行简单的 POST 调用,模块会自动从端点调用中推断模式,并将其作为函数在计算模块应用程序中提供。这允许开发人员一次定义端点模式,然后轻松地将其导入 Foundry。
示例:添加函数模式 (Example: Add function schema)
考虑一个简单的 add 函数,其输入是 x 和 y(两个整数),输出是一个字符串。下面的示例展示了如何为此函数定义 JSON 模式:
schemas.json
{
    "functionName": "add",
    "inputs": [
        {
            "name": "x",
            "dataType": {
                "integer": {},
                "type": "integer"
            },
            "required": true,
            "constraints": []
        },
        {
            "name": "y",
            "dataType": {
                "integer": {},
                "type": "integer"
            },
            "required": true,
            "constraints": []
        }
    ],
    "output": {
        "single": {
            "dataType": {
                "string": {},
                "type": "string"
            }
        },
        "type": "single"
    }
}
定义好 JSON 模式后,在您的 app.py 文件中发送一个 HTTP POST 请求以将其注册到 Foundry:
if __name__ == "__main__":
    certPath = os.environ['DEFAULT_CA_PATH']
    postSchemaUri = os.environ["POST_SCHEMA_URI"]

    with open('schemas.json', 'r') as file:
        SCHEMAS = json.load(file)

    requests.post(
        postSchemaUri,
        json=SCHEMAS,
        headers={"Module-Auth-Token": moduleAuthToken, "Content-Type": "application/json"},
        verify=certPath
    )
确保在生产环境中处理异常并实现适当的错误日志记录。
请注意,该函数遵循以下约束:
- 模式定义函数必须使用支持的 Python 类型声明其所有输入的类型及其输出的类型(见下表)。
- 每个函数的模式定义必须声明一个与 Python 函数名称匹配的
functionName。
| Python 类型 | Foundry 类型 | 通过 HTTP 序列化为 | 备注 |
|---|---|---|---|
| int | 整数 (Integer) | int | |
| str | 字节 (Byte) | string | |
| bool | 布尔值 (Boolean) | boolean | |
| bytes | 二进制 (Binary) | string | |
| datetime.datetime | 日期 (Date) | string | |
| datetime.datetime | 时间戳 (Timestamp) | int | 自纪元以来的毫秒数 |
| decimal.Decimal | 十进制数 (Decimal) | string | |
| float | 浮点数 (Float) | float | |
| list | 数组 (Array) | array (非流式), stream of JSON (流式) | |
| set | 数组 (Array) | array (非流式), stream of JSON (流式) | |
| dict | 映射 (Map) | JSON | 键值存储(例如,Python dict,Java Map) |
| class/TypedDict | 结构体 (Struct) | JSON | 自定义对象类型 |
| Iterable | 数组 (Array) | array (非流式), stream of JSON (流式) |
使用计算模块 SDK 自动发现函数 (Automatic function discovery with the compute module SDK)
计算模块 SDK 包含自动发现函数的功能。它会检查已定义的函数及其输入/输出类型,然后将它们转换为 FunctionSpecs,无需修改即可作为 Foundry 函数导入。
为确保此功能无缝运行,您应该了解 SDK 中类型推断的工作原理,以及如何正确定义输入和输出类型。请查看以下注意事项:
- 输入类必须是复杂类型。 Foundry 函数规范要求函数的输入类型是复杂类型。如果您的函数只接受单个原始类型作为输入,请确保将该参数包装在复杂类型中,以便正确推断函数模式。
- 输入类型定义
✅ 使用 TypedDict 作为输入类型
# app.py
from typing import TypedDict
from compute_modules.annotations import function

class HelloInput(TypedDict):
    planet: str

@function
def hello(context, event: HelloInput) -> str:
    return "Hello " + event["planet"] + "!"
✅ 使用 dataclass 作为输入类型
# app.py
from compute_modules.annotations import function
from dataclasses import dataclass
import datetime
import decimal

@dataclass
class TypedInput:
    bytes_value: bytes
    bool_value: bool
    date_value: datetime.date
    decimal_value: decimal.Decimal
    float_value: float
    int_value: int
    str_value: str
    datetime_value: datetime.datetime
    other_date_value: datetime.datetime

@function
def typed_function(context, event: TypedInput) -> str:
    diff = event.other_date_value - event.datetime_value
    return f"The difference between the provided dates is {diff}"
✅ 使用同时包含类类型提示 AND 构造函数类型提示的常规类
# app.py
from compute_modules.annotations import function

class GoodExample:
    some_flag: bool
    some_value: int

    def __init__(self, some_flag: bool, some_value: int) -> None:
        self.some_flag = some_flag
        self.some_value = some_value

@function
def typed_function(context, event: GoodExample) -> int:
    return event.some_value
❌ 避免 使用没有类类型提示的 Python 类
# app.py
# This will raise an exception
class BadClassNoTypeHints:
    def __init__(self, arg1: str, arg2: int):
        ...
❌ 避免 在构造函数中使用 Args 的 Python 类
# app.py
# This will raise an exception
class BadClassArgsInit:
    arg1: str
    arg2: int

    def __init__(self, arg1: str, arg2: int, *args):
        ...
❌ 避免 在构造函数中使用 Kwargs 的 Python 类
# app.py
# This will raise an exception
class BadClassKwargsInit:
    arg1: str
    arg2: int

    def __init__(self, arg1: str, arg2: int, **kwargs):
        ...
- 流式输出 (Streaming output): 如果输出类型是任何
Iterable类型(dict除外),计算模块 Python SDK 支持流式输出。要启用结果流式传输,请将@function更改为@function(streaming=True)。您可以在我们的 SDK 文档 ↗ 中查看更多详细信息。为确保您的流式函数正确注册,请使用任何Iterable类型作为返回类型。然后输出将被注册为 FoundryArray。
:::callout{theme="warning"}
如果您不设置 streaming=True,结果将作为整个可迭代对象的单个 JSON blob 发布。如果您的可迭代对象无法序列化为 JSON,则可能会抛出异常。如果您设置 streaming=True,结果将作为从每个元素序列化的 JSON blob 流发布。在我们的 SDK 文档 ↗ 中查看更多信息。
:::
✅ 使用常规 Iterable 作为输出类型
# app.py
# The outputs will be registered as Foundry Array
from compute_modules.annotations import function

@function(streaming=True)
def get_string_list(context, event) -> list[str]:
    return [f'string {i}' for i in range(10)]

@function(streaming=True)
def get_string_set(context, event) -> set[str]:
    return {'string 1', 'string 2', 'string 3'}
✅ 使用生成器 (Generator) 作为输出类型
# app.py
# Generator is Iterable. The output will be registered as Foundry Array
from compute_modules.annotations import function
import typing

@function(streaming=True)
def string_generator(context, event) -> typing.Iterable[str]:
    for i in range(10):
        yield f'string {i}'
⚠️ 使用常规 Iterable 作为输出类型但未启用流式传输
# app.py
# This is valid. The output will be registered as Foundry Array, but the result will not be streamed
from compute_modules.annotations import function

@function
def get_string_list(context, event) -> list[str]:
    return [f'string {i}' for i in range(10)]
❌ 使用生成器作为输出类型但未启用流式传输
# app.py
# Generator is not JSON serializable as a whole object. Cannot be used in a non-streaming function since it serializes the whole object
# The output type will be registered as Foundry Array, but it will throw when executed
from compute_modules.annotations import function
import typing

@function
def string_generator(context, event) -> typing.Iterable[str]:
    for i in range(10):
        yield f'string {i}'
注册函数 (Register the function)
按照以下步骤注册您的函数:
- 确保您的计算模块正在运行。
- 导航到计算模块应用程序中的 函数 (Functions) 选项卡。
- 您应该能够在检测到的函数列表中看到您的函数。
- 选择要注册的函数以打开一个弹出窗口。
- 在窗口中,选择 导入 (Import)。
集成服务器 (Integrate a server)
:::callout{theme="warning"} 在计算模块中集成服务器处于 实验性 开发阶段,可能在您的注册环境中不可用。功能在活跃开发期间可能会发生变化。 :::
通常,计算模块使用一个从计算模块 API 拉取任务的客户端。但是,您也可以在计算模块中使用 HTTP 服务器,而无需任何客户端、适配器或 SDK。
OpenAPI 规范 (OpenAPI Specification)
OpenAPI 规范 (OAS) ↗ 是一个用于枚举 HTTP API 的开源框架。您首先需要为您的服务器提供一个 OpenAPI 规范。创建服务器 OpenAPI 规范的方法有很多种;您可以按照 OpenAPI 文档手动创建,或使用 LLM 助手,使用通用的 OpenAPI 生成器,或使用特定语言的库。
为了与计算模块一起工作,您的 OpenAPI 规范必须满足以下所有约束:
- 使用 OpenAPI 规范版本 3.0.0 或更高版本。
- 包含一个 URL 格式为
http://localhost:port的单一服务器。 - 在每个操作上包含一个
operationId,它将是 Foundry 中函数的名称。 - 仅使用
GET、PUT、POST和DELETE动词。 - 在所有参数上包含
schema字段,并且不使用任何带有cookie位置的参数。 - 不得使用
anyOf、oneOf或allOf模式,或具有多种类型的模式。 - 在所有端点上仅包含一个响应代码(因为 Foundry 中的函数仅支持单个输出模式),并且该响应代码必须是
application/json内容类型。
以下是一个使用 Flask 的 Python 服务器及其附带的 OpenAPI 规范的示例:
from flask import Flask, request, jsonify
import uuid

app = Flask(__name__)

books = {}


@app.route('/books', methods=['POST'])
def add_book():
    data = request.json

    user_id = request.headers.get('User-ID')
    title = data.get('title')
    author = data.get('author')
    published_year = int(data.get('published_year'))

    book_id = str(uuid.uuid4())

    books[book_id] = {
        'title': title,
        'author': author,
        'published_year': published_year,
        'added_by': user_id
    }
    return jsonify(book_id), 200


@app.route('/books/<book_id>', methods=['GET'])
def get_book(book_id):
    return jsonify(books.get(book_id)), 200


if __name__ == '__main__':
    app.run(port=8000)
{
  "openapi": "3.0.0",
  "servers": [
    {
      "url": "http://localhost:8000"
    }
  ],
  "paths": {
    "/books": {
      "post": {
        "operationId": "addBook",
        "requestBody": {
          "content": {
            "application/json": {
              "schema": {
                "type": "object",
                "properties": {
                  "title": {
                    "type": "string"
                  },
                  "author": {
                    "type": "string"
                  },
                  "published_year": {
                    "type": "integer"
                  }
                }
              }
            }
          }
        },
        "parameters": [
          {
            "name": "User-ID",
            "in": "header",
            "schema": {
              "type": "string"
            }
          }
        ],
        "responses": {
          "200": {
            "content": {
              "application/json": {
                "schema": {
                  "type": "string"
                }
              }
            }
          }
        }
      }
    },
    "/books/{book_id}": {
      "get": {
        "operationId": "getBook",
        "parameters": [
          {
            "name": "book_id",
            "in": "path",
            "schema": {
              "type": "string"
            }
          }
        ],
        "responses": {
          "200": {
            "content": {
              "application/json": {
                "schema": {
                  "type": "object",
                  "properties": {
                    "title": {
                      "type": "string"
                    },
                    "author": {
                      "type": "string"
                    },
                    "published_year": {
                      "type": "integer"
                    },
                    "added_by": {
                      "type": "string"
                    }
                  }
                }
              }
            }
          }
        }
      }
    }
  }
}
使用您的服务器 (Using your server)
构建 Docker 镜像时,使用 server.openapi 镜像标签,其值为您的 OpenAPI 规范。以下是上述示例的 Dockerfile,其中附带了服务器的规范:
FROM python:3.12

EXPOSE 8000

RUN pip install flask
COPY src .

USER 5000

LABEL server.openapi='{"openapi":"3.0.0","servers":[{"url":"http://localhost:8000"}],"paths":{"/books":{"post":{"operationId":"addBook","requestBody":{"content":{"application/json":{"schema":{"type":"object","properties":{"title":{"type":"string"},"author":{"type":"string"},"published_year":{"type":"integer"}}}}}},"parameters":[{"name":"User-ID","in":"header","schema":{"type":"string"}}],"responses":{"200":{"content":{"application/json":{"schema":{"type":"string"}}}}}}},"/books/{book_id}":{"get":{"operationId":"getBook","parameters":[{"name":"book_id","in":"path","schema":{"type":"string"}}],"responses":{"200":{"content":{"application/json":{"schema":{"type":"object","properties":{"title":{"type":"string"},"author":{"type":"string"},"published_year":{"type":"integer"},"added_by":{"type":"string"}}}}}}}}}}}'

CMD ["python", "app.py"]
像往常一样构建、发布、选择您的镜像并保存计算模块配置。然后,导航到 函数 (Functions) 选项卡并选择 从 OpenAPI 规范检测 (Detect from OpenAPI specification)。然后您可以导入您的函数并查看生成它们的 OpenAPI 规范。这些函数可以在整个 Foundry 平台中使用。
:::callout{theme="warning"} 不要手动修改您的函数定义——它们必须与附加到镜像的 OpenAPI 规范保持一致。 :::
函数 CLI (Functions CLI)
函数 CLI 是一个独立的工具,可帮助您发布计算模块工件。它有两个核心职责:
- 对您的源代码运行静态推断以生成函数规范。
- 使用 Foundry 所需的元数据标签构建和发布 Docker 镜像。
您可以在本地开发工作流中使用函数 CLI,或将其集成到 CI/CD 管道中,以自动化计算模块的构建和发布过程。
访问函数 CLI (Access the Functions CLI)
要开始使用函数 CLI:
- 下载适用于您平台的最新二进制文件。
- 确保二进制文件可执行:
chmod +x functions-cli
然后,您可以直接从终端调用 CLI。
推断 (Inference)
函数 CLI 可以对您的源代码执行静态推断,以自动生成函数规范。当您想要检查或验证将在 Foundry 中注册的函数模式时,这非常有用。
使用 --opt functions 标志运行函数规范推断。对于使用 SDK 的 Python 计算模块,请指定 --plugin python_cm 标志。
以下示例对 ./src 目录中的 Python 源代码运行推断:
functions-cli infer --opt functions --plugin python_cm --dir ./src
您也可以使用计划文件 (plan file) 来配置推断:
functions-cli infer --planfile ./infer_plan.yml --dir ./src
输出是一个函数规范的 JSON 数组。每个规范包括函数名称、带有数据类型的输入参数以及输出类型。
文件插件 (File plugin)
如果您更愿意手动定义函数模式,而不是依赖自动推断,您可以使用文件插件。这种方法允许您在一个 JSON 文件中使用显式类型定义来指定函数模式。
以下示例显示了一个函数模式文件,其中包含一个自定义类型和一个使用该自定义类型的函数:
{
  "types": {
    "Person": {
      "type": "object",
      "fields": {
        "name": { "dataType": "string" },
        "age": { "dataType": "integer" }
      }
    }
  },
  "functions": [
    {
      "functionName": "example_function",
      "inputs": [
        { "name": "text", "dataType": "string", "required": true },
        { "name": "items", "dataType": "list<Person>", "required": true },
        { "name": "metadata", "dataType": "optional<dict<string, string>>", "required": false }
      ],
      "outputs": [
        { "dataType": "dict<string, set<Person>>" }
      ]
    }
  ]
}
文件插件支持以下数据类型:
| 数据类型 | 描述 |
|---|---|
string |
文本值 |
integer |
整数 |
boolean |
真或假 |
float |
浮点数 |
binary |
二进制数据 |
date |
日期值 |
decimal |
任意精度十进制数 |
timestamp |
时间点 |
list<T> |
类型 T 的有序集合 |
set<T> |
类型 T 唯一值的无序集合 |
dict<K, V> |
从类型 K 到类型 V 的键值映射 |
optional<T> |
可能缺失的类型 T 的值 |
您可以嵌套这些类型来创建复杂结构,例如 dict<string, set<Person>> 或 optional<list<integer>>。
构建 (Build)
函数 CLI 可以为您的计算模块构建和发布 Docker 镜像。您可以使用 YAML 或 JSON 格式的计划文件来配置构建。
以下示例显示了一个构建计划:
name: my-compute-module-image
tag: $(IMAGE_TAG)
registry:
  url: stack-container-registry.palantirfoundry.com
  username: ri.artifacts.main.repository.example-artifact-repo-rid-abc123
auth:
  client_id: $(CLIENT_ID)
  client_secret: $(CLIENT_SECRET)
  host: stack.palantirfoundry.com
kind: python_cm
使用以下命令运行构建:
functions-cli build -p ./build_plan.yml -d ./src
构建计划中的 auth 部分支持两种认证方法:
- OAuth 客户端 (OAuth client):使用
client_id、client_secret和host字段。 - 令牌 (Token):使用带有 Foundry API 令牌的
token字段。
标签递增 (Tag increment)
您可以使用 -t 标志自动递增镜像标签版本,而不是手动指定标签:
| 标志 | 递增 |
|---|---|
-t |
补丁版本 (Patch version) |
-tt |
次版本 (Minor version) |
-ttt |
主版本 (Major version) |
引擎选项 (Engine options)
默认情况下,函数 CLI 使用 Docker 来构建镜像。如果您没有可用的 Docker 守护进程,您可以改用 GoCR 引擎。
以下示例显示了一个使用 GoCR 引擎的构建计划:
name: my-compute-module-image
tag: 0.0.1
registry:
  url: stack-container-registry.palantirfoundry.com
  username: ri.artifacts.main.repository.example-artifact-repo-rid-abc123
auth:
  token: $(FOUNDRY_TOKEN)
engine:
  gocr:
    base_image: python:3.12
    copy_paths:
      - source: ./src
        dest: /app/client
    entrypoint: ["python", "app.py"]
kind: python_cm
GoCR 引擎不需要 Docker 守护进程,这使其适用于 Docker-in-Docker 不可用或受限的 CI/CD 环境。
日志记录 (Logging)
您可以增加 CLI 输出的详细程度以进行调试:
| 标志 | 级别 |
|---|---|
-v |
信息 (Info) |
-vv |
调试 (Debug) |
在 TypeScript 函数中使用计算模块函数 (Use compute module functions in TypeScript functions)
先决条件:
- 您必须在计算模块应用程序中使用 API 名称注册您的函数。
- 您必须运行计算模块才能使实时预览 (live preview) 正常工作。
- 您必须初始化一个 TypeScript 代码仓库。
启用资源生成 (Enable resource generation)
在开始之前,请确保在您的 TypeScript 代码仓库中启用了资源生成:
- 打开您的
functions.json文件。 - 将
enableResourceGeneration属性设置为true。
导入您的计算模块函数 (Import your compute module function)
要导入 TypeScript 中的计算模块函数,请按照以下步骤操作:
- 从 TypeScript 代码仓库的左侧面板中,找到并选择 资源导入 (Resource imports) 选项卡。
- 选择 添加 (Add),然后选择 查询函数 (Query Functions) 以显示一个弹出窗口来选择本体 (Ontology)。
- 尽管计算模块不绑定到特定的本体,但您必须选择一个本体以进行导入过程。选择任何适合您用例的本体。
- 搜索您的计算模块函数的 API 名称。
- 选择该函数。
- 选择 确认选择 (Confirm selection)。
重建您的代码工作区 (Rebuild your code workspace)
导入并使用该函数 (Import and use the function)
下面的示例展示了如何导入和使用一个计算模块函数:
// index.ts
import { Function } from "@foundry/functions-api";

// API Name: com.mycustomnamespace.computemodules.Add
import { add } from "@mycustomnamespace/computemodules";

export class MyFunctions {
    @Function()
    public async myFunction(): Promise<string> {
        return await add({ x: 50, y: 50 });
    }
}
重要注意事项 (Important considerations)
- 项目位置 (Project location): 确保计算模块与您的 TypeScript 代码位于同一个项目 (Project) 中,以便实时预览正常工作。
- 类型一致性 (Type consistency): TypeScript 强制执行严格的类型检查。确保声明的返回类型与计算模块函数的实际返回类型匹配。例如,如果您声明了一个
string返回类型,那么您注册的计算模块函数必须返回一个string,而不是struct类型。 - 异步操作 (Asynchronous operations): 计算模块函数通常是异步的。使用
async/await语法进行正确处理。
:::callout{theme="warning"}
由于 TypeScript 函数通过 function-executor 运行,因此只有耗时少于五分钟的计算模块函数才能成功执行。如果函数执行时间超过五分钟,将会超时。
:::