OSDK integration(OSDK 集成)
The Ontology SDK (OSDK) can be used within compute modules to interact with Foundry ontology objects. This page covers how to grant the necessary permissions, configure your compute module, and use the OSDK in both local Docker builds and Code Repositories.
Prerequisites
Before using the OSDK in your compute module, you must grant your application service user access to the required Ontology resources and configure your compute module with the appropriate credentials.
Grant access to the application service user
The client ID from Developer Console must have access to the Ontology resources your compute module will use.
- Navigate to the OAuth & restrictions tab in Developer Console, and select Troubleshoot access in the Resource and operation restrictions section.
- In the Security tab of the resource you want to access, search for your client ID and add the user.
- For Ontology objects backed by datasets, you may need to grant access to both the object set and the underlying dataset. Refer to the third-party applications documentation for the latest guidance on configuring access.
Configure your compute module
Your compute module requires network egress and application credentials to use the OSDK.
- Add a source for your Foundry hostname, since egress is disabled by default.
- From the Configure tab of your compute module, select Application permissions. For more information on execution modes, review the execution modes documentation.
- Select Use other app credentials.
- Enter the client ID and client secret from Developer Console, select Apply, and save your configuration.
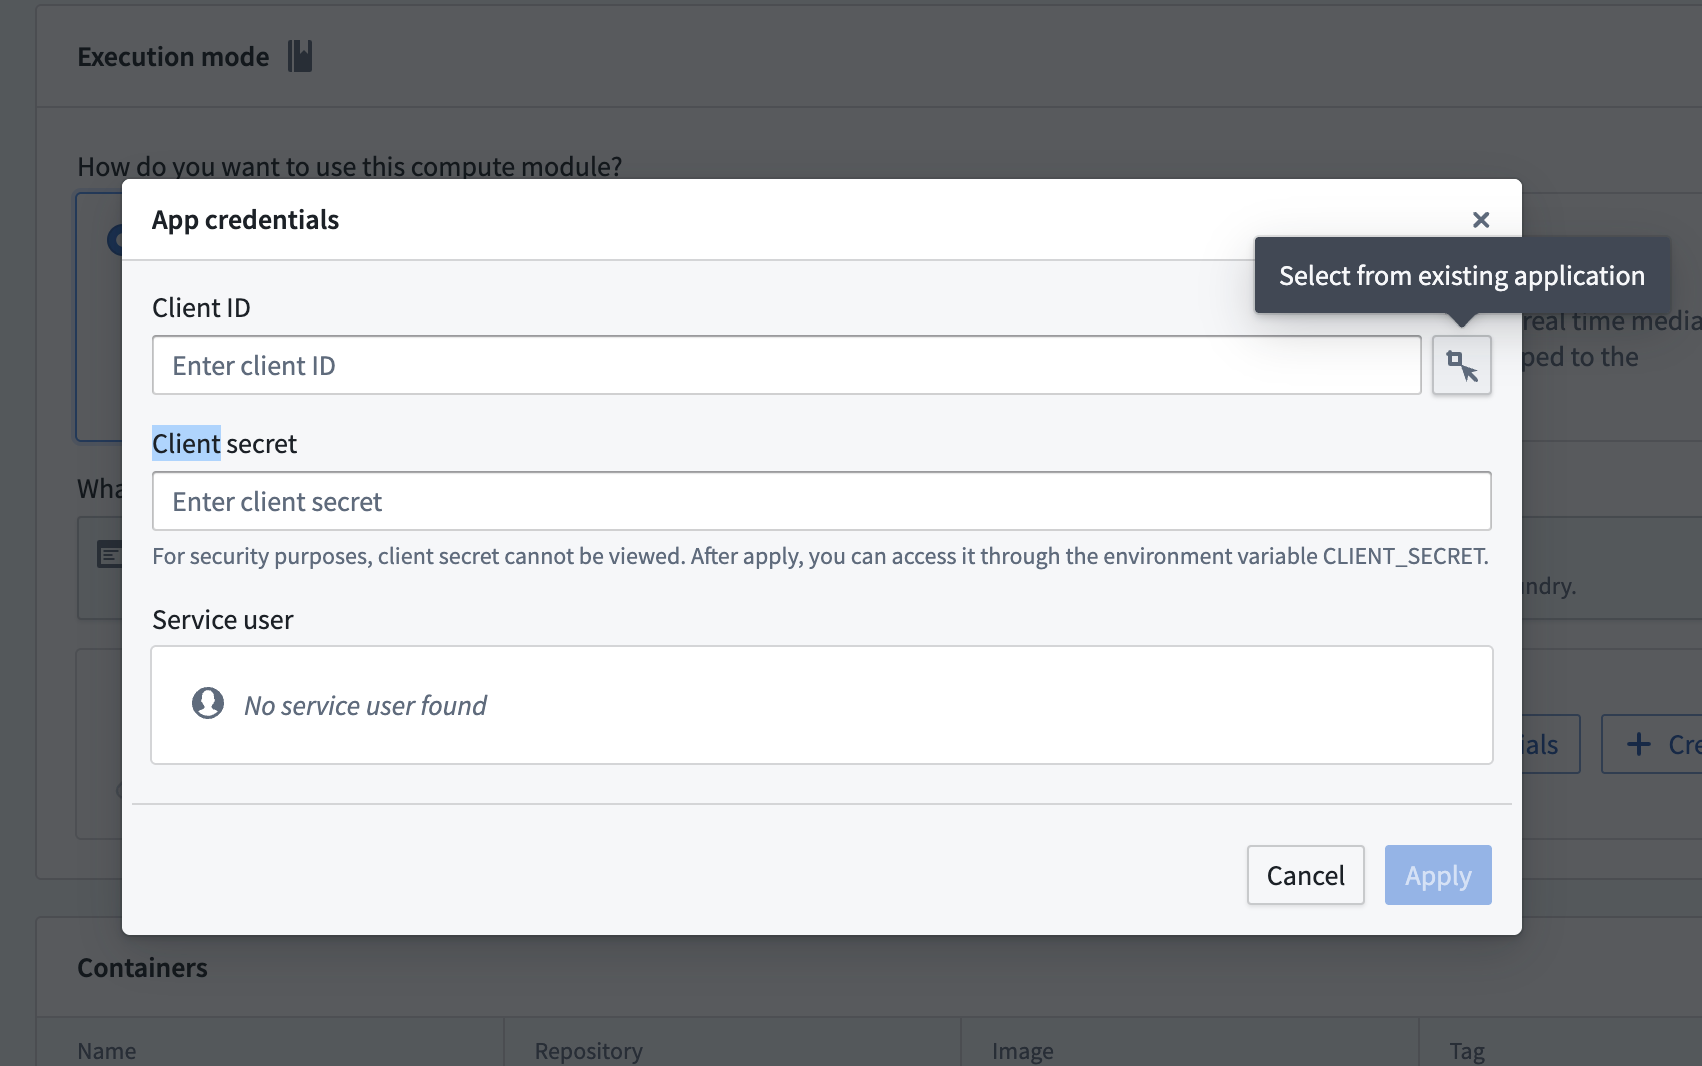
You can access the credentials from your compute module code using the reserved CLIENT_ID and CLIENT_SECRET environment variables:
```python tab="Python" from compute_modules.auth import retrieve_third_party_id_and_creds
client_id, client_secret = retrieve_third_party_id_and_creds()
```java tab="Java"
String clientId = System.getenv("CLIENT_ID");
String clientSecret = System.getenv("CLIENT_SECRET");
Use OSDK with local Docker builds (Python)
This section walks through creating an OSDK-backed compute module using a local Docker build with Python.
Set up your OSDK
- Create an application in Developer Console and generate your OSDK. Select Python as the language, Backend service as the application type, and Application permissions for the permission model.
- Install the OSDK library with pip using the command from Developer Console.
Write your compute module code
The following example demonstrates how to authenticate with the OSDK and query an Ontology object from within a compute module function:
from demo_python_sdk import FoundryClient, ConfidentialClientAuth
import logging
import os
from compute_modules.logging import get_logger, set_internal_log_level
from compute_modules.auth import retrieve_third_party_id_and_creds
from compute_modules.annotations import function

CLIENT_ID, CLIENT_CREDS = retrieve_third_party_id_and_creds()

set_internal_log_level(logging.INFO)
logger = get_logger(__name__)
logger.setLevel(logging.INFO)

foundry_url = os.environ["FOUNDRY_URL"]

@function
def get_object(context, event):
    auth = ConfidentialClientAuth(
        client_id=CLIENT_ID,
        client_secret=CLIENT_CREDS,
        hostname=foundry_url,
        should_refresh=True,
    )
    client = FoundryClient(auth=auth, hostname=foundry_url)
    EmployeeObject = client.ontology.objects.Employee
    logger.info(EmployeeObject.take(1))
    return "Success"
Create your Dockerfile
When building locally, the OSDK library is hosted in a private Foundry Artifact repository. You must use a FOUNDRY_TOKEN secret during the Docker build to authenticate with the repository.
FROM --platform=linux/amd64 python:3.12
COPY requirements.txt .
RUN --mount=type=secret,id=FOUNDRY_TOKEN,env=FOUNDRY_TOKEN \
    pip install -r requirements.txt --upgrade \
    --extra-index-url "https://user:$FOUNDRY_TOKEN@yourenrollment.palantirfoundry.com/artifacts/api/repositories/ri.artifacts.main.repository.REDACTED/contents/release/pypi/simple" \
    --extra-index-url "https://user:$FOUNDRY_TOKEN@yourenrollment.palantirfoundry.com/artifacts/api/repositories/ri.foundry-sdk-asset-bundle.main.artifacts.repository/contents/release/pypi/simple"
COPY src .
USER 5000
ENTRYPOINT ["python", "app.py"]
:::callout{theme="warning"}
Replace yourenrollment.palantirfoundry.com with your actual Foundry enrollment URL, and replace the repository RIDs with the values provided in Developer Console.
:::
Build and push the image
Build the Docker image using the following command, passing the FOUNDRY_TOKEN as a build secret:
docker buildx build --platform=linux/amd64 \
    --secret id=FOUNDRY_TOKEN,env=FOUNDRY_TOKEN \
    -t yourenrollment-container-registry.palantirfoundry.com/hello-world:0.0.1 .
For more information on building and publishing Docker images, review the containers documentation.
Use OSDK with Code Repositories
If you are developing your compute module in Code Repositories, you can add the OSDK as a library dependency instead of installing it locally.
Python
- Create an application in Developer Console and generate your OSDK. Select Python as the language, Backend service as the application type, and Application permissions for the permission model. A Conda SDK will be created.
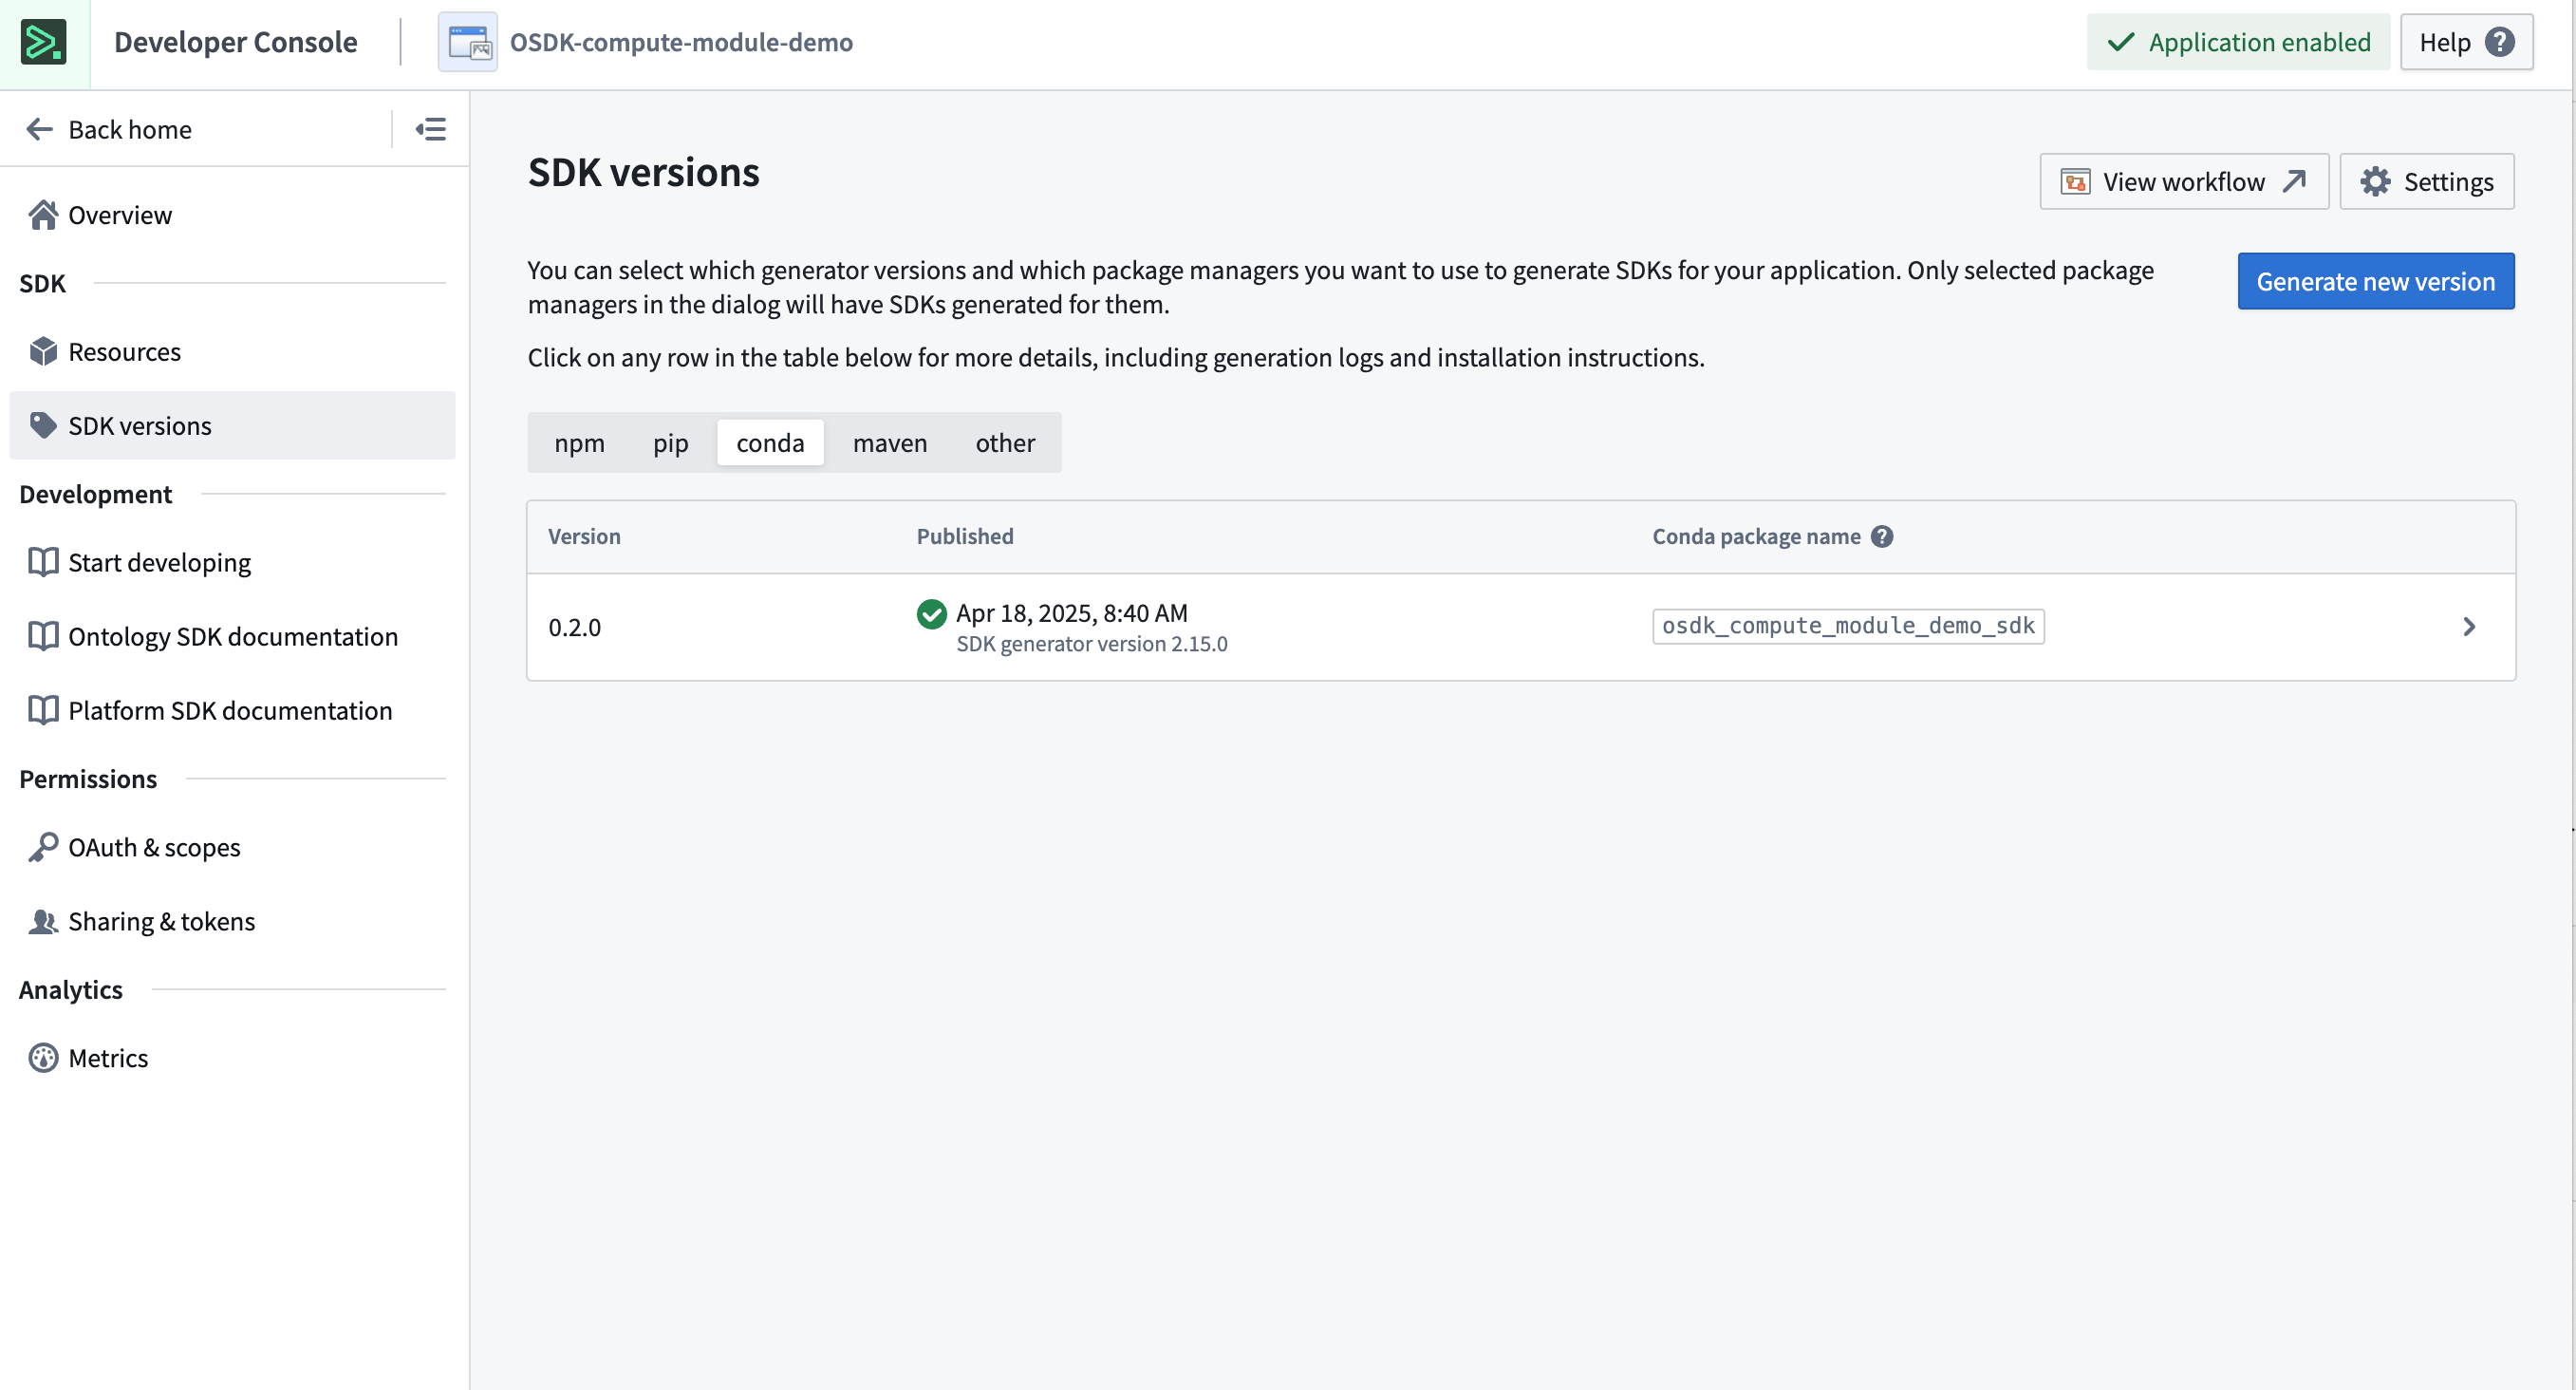
- In your Python Code Repository, open the Libraries panel, search for the Conda SDK generated in the previous step, and add it.
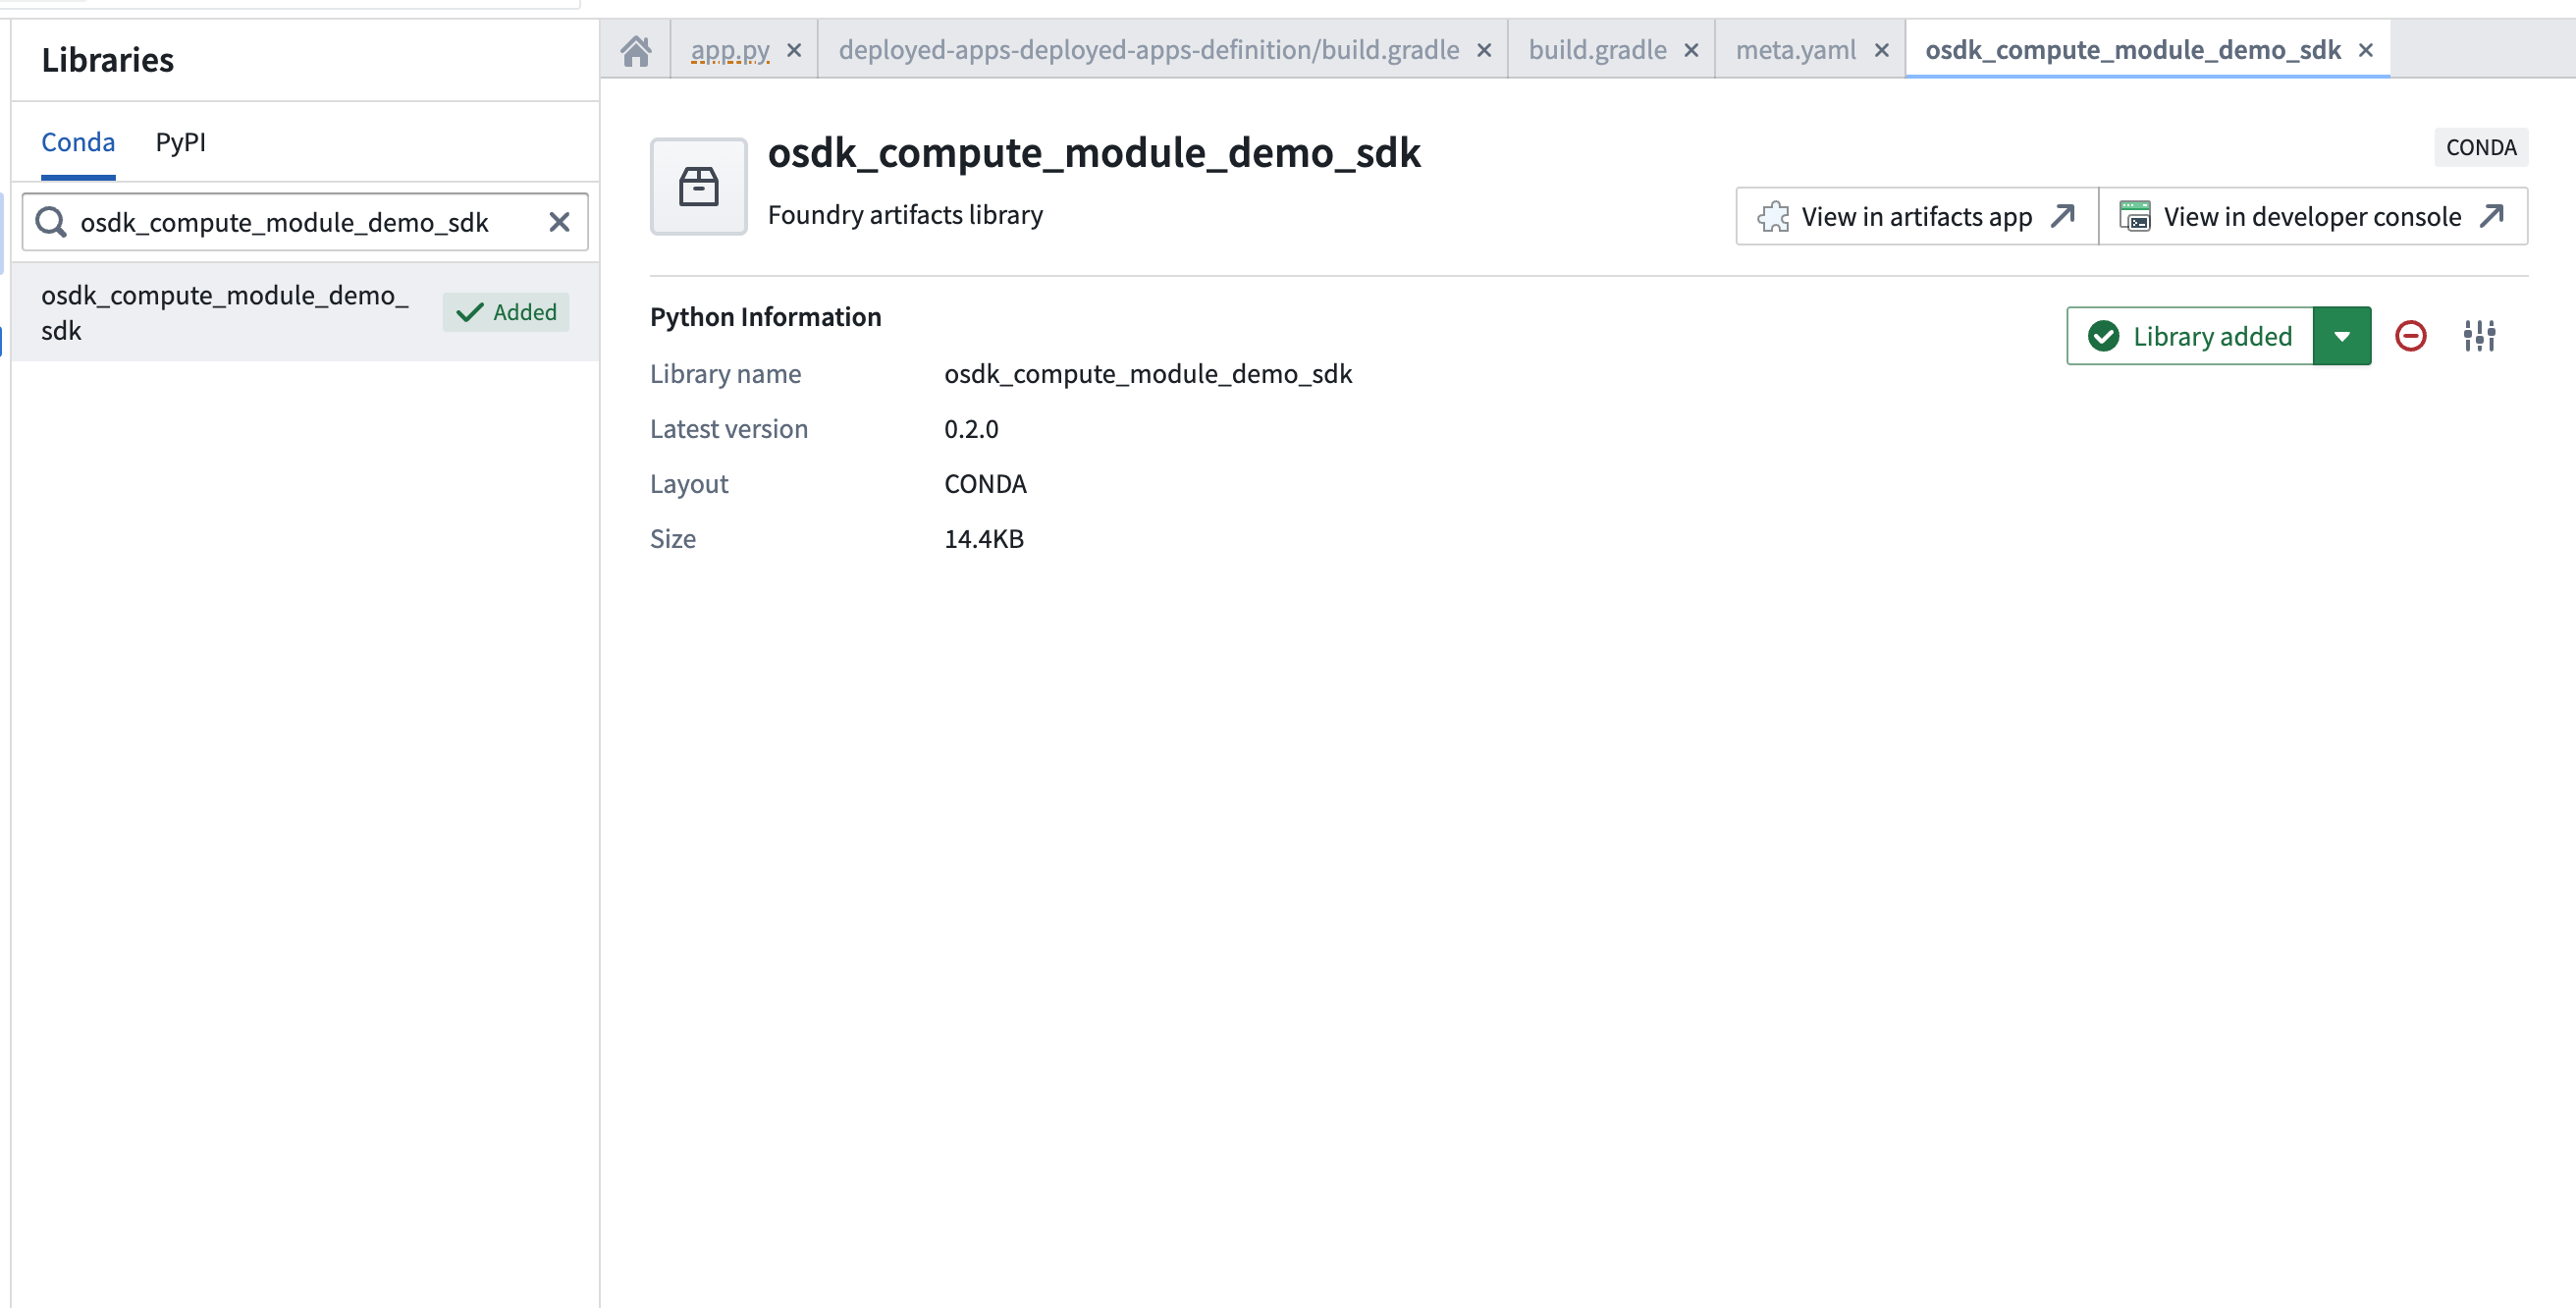
- Use the OSDK in your compute module code:
import os
from osdk_compute_module_demo_sdk import ConfidentialClientAuth, FoundryClient
from compute_modules.auth import retrieve_third_party_id_and_creds
from compute_modules.annotations import function

foundry_url = os.environ["FOUNDRY_URL"]
CLIENT_ID, CLIENT_CREDS = retrieve_third_party_id_and_creds()

@function
def print_object(context, event):
    auth = ConfidentialClientAuth(
        client_id=CLIENT_ID,
        client_secret=CLIENT_CREDS,
        hostname=foundry_url,
        should_refresh=True,
        scopes=[
            "api:ontologies-read",
            "api:ontologies-write",
            "api:mediasets-read",
            "api:mediasets-write",
        ],
    )
    client = FoundryClient(auth=auth, hostname=foundry_url)
    EmployeeObject = client.ontology.objects.Employee
    return str(EmployeeObject.take(1))
Java
- Create an application in Developer Console and generate your OSDK. Select Java as the language, Backend service as the application type, and Application permissions for the permission model. A Maven locator will be provided, such as
com.palantir.foundry:osdk-compute-module-demo-sdk.
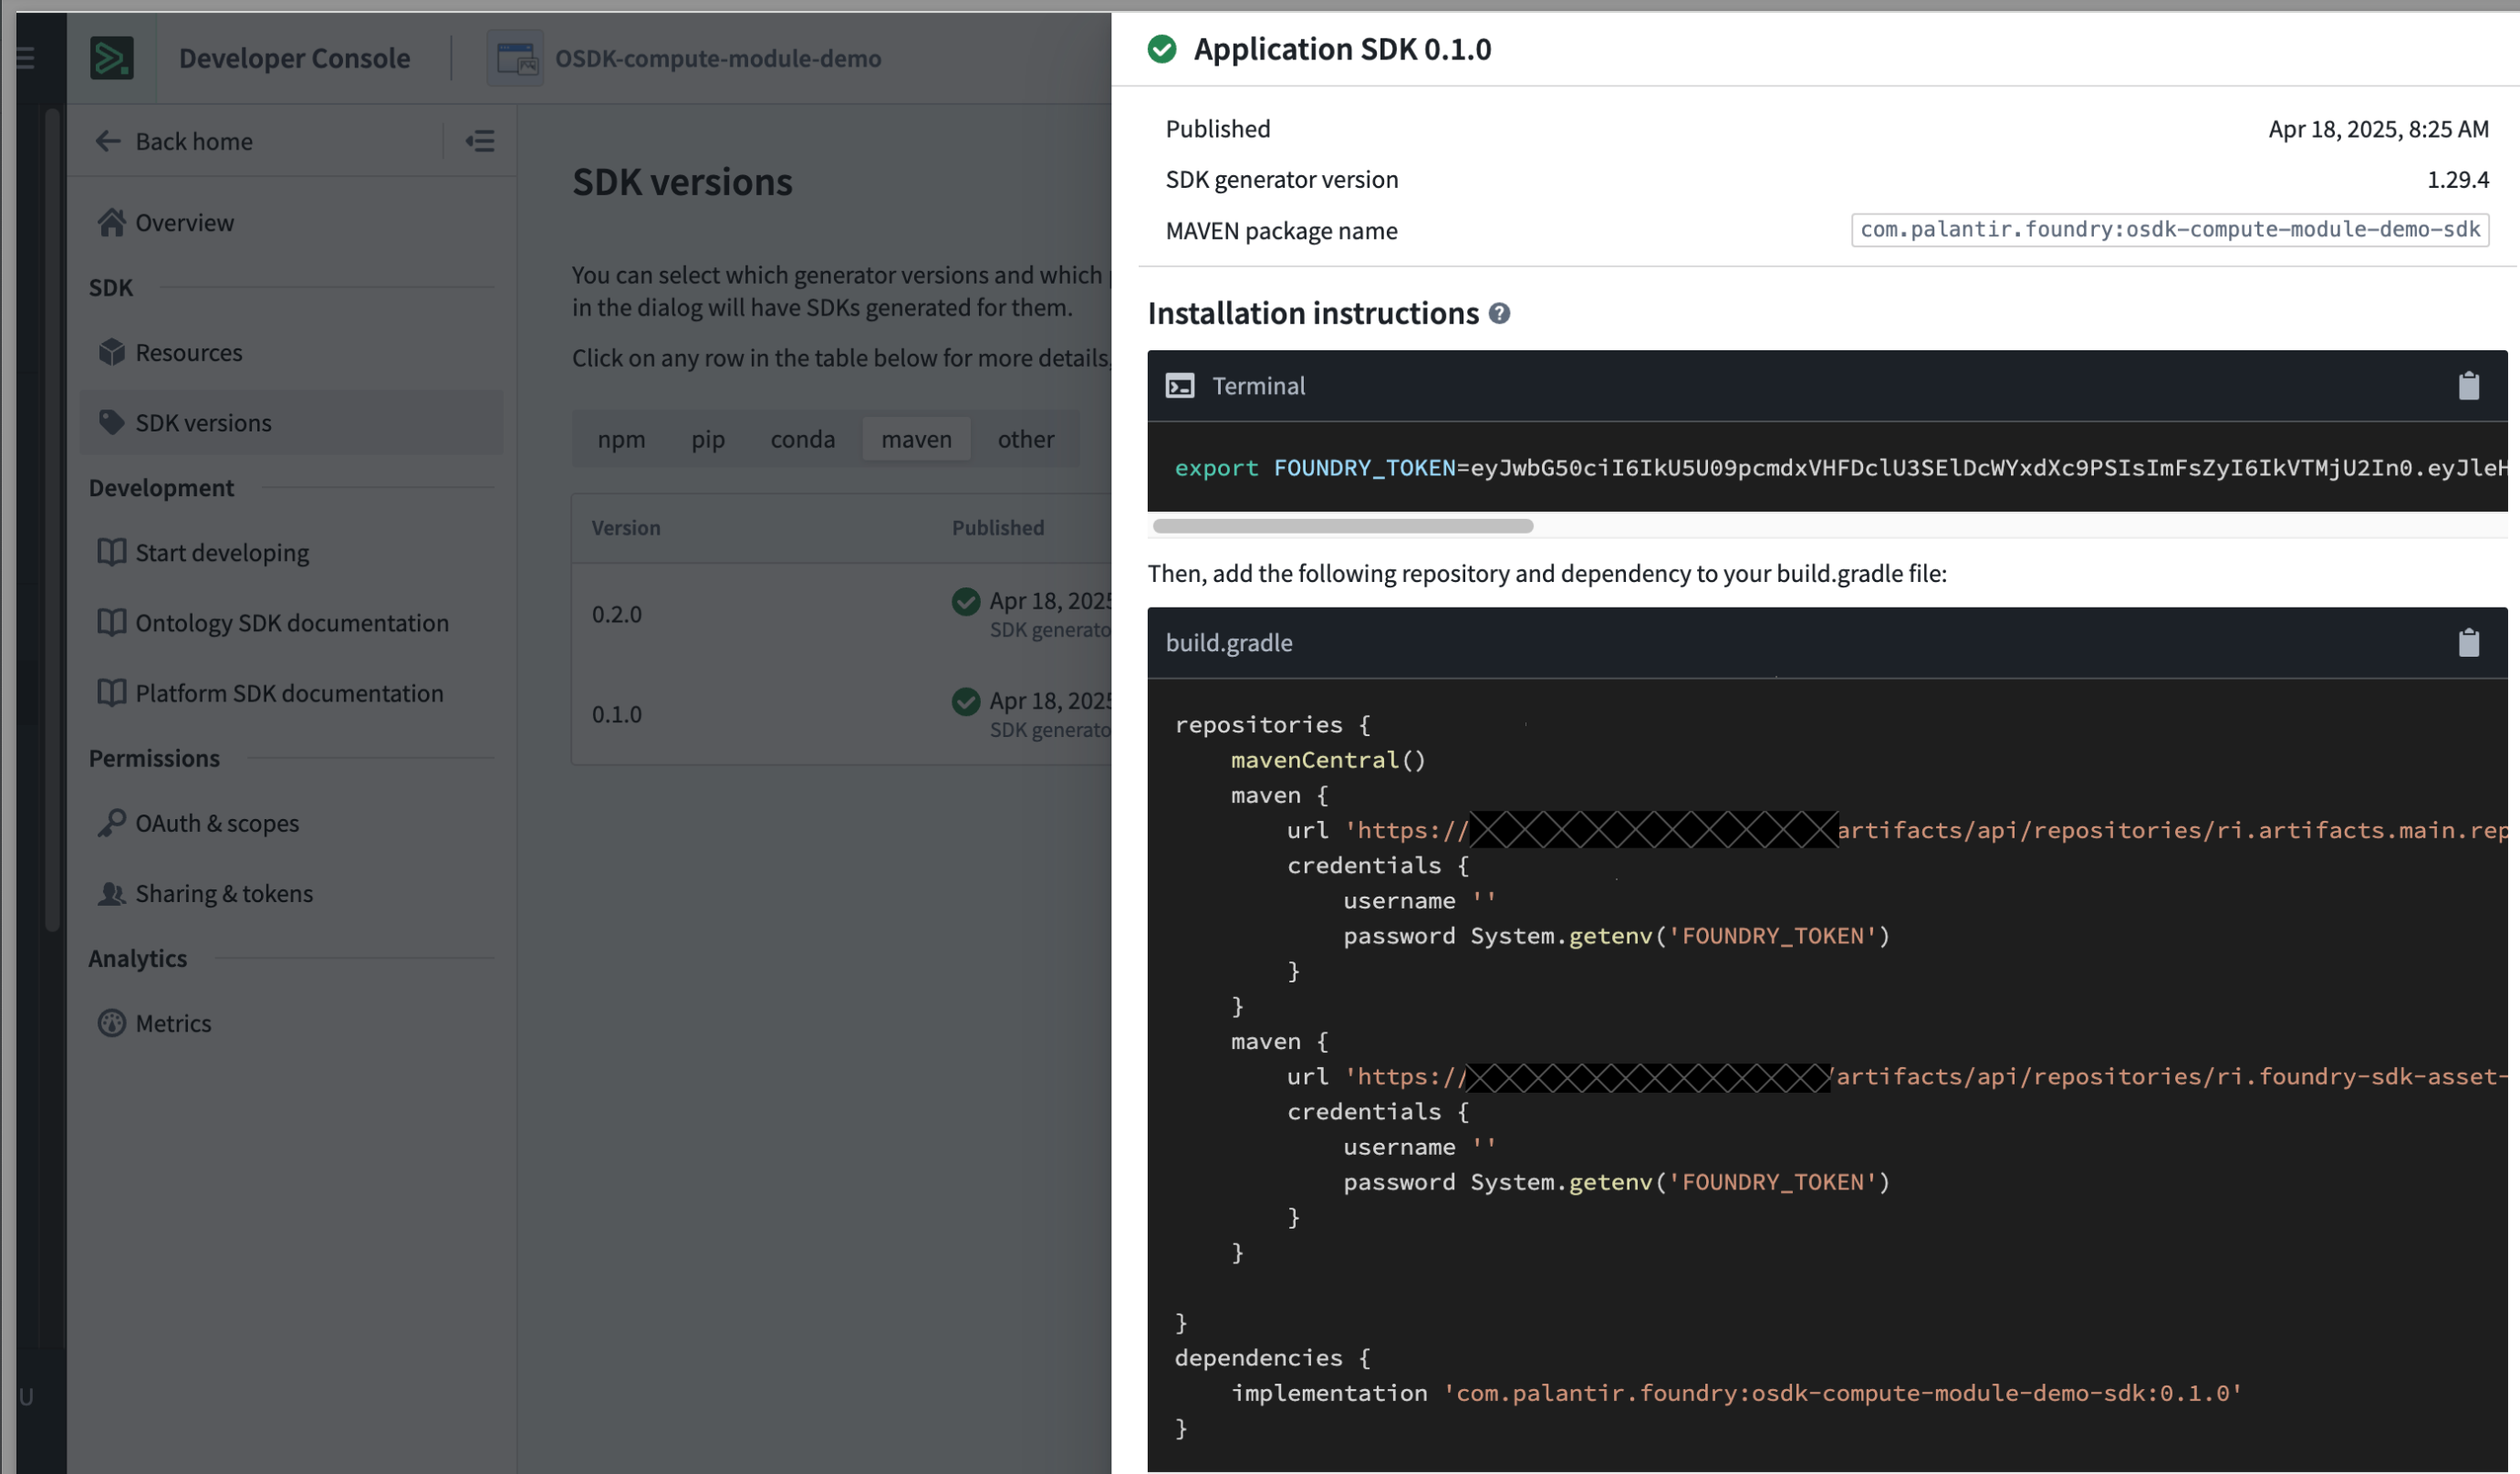
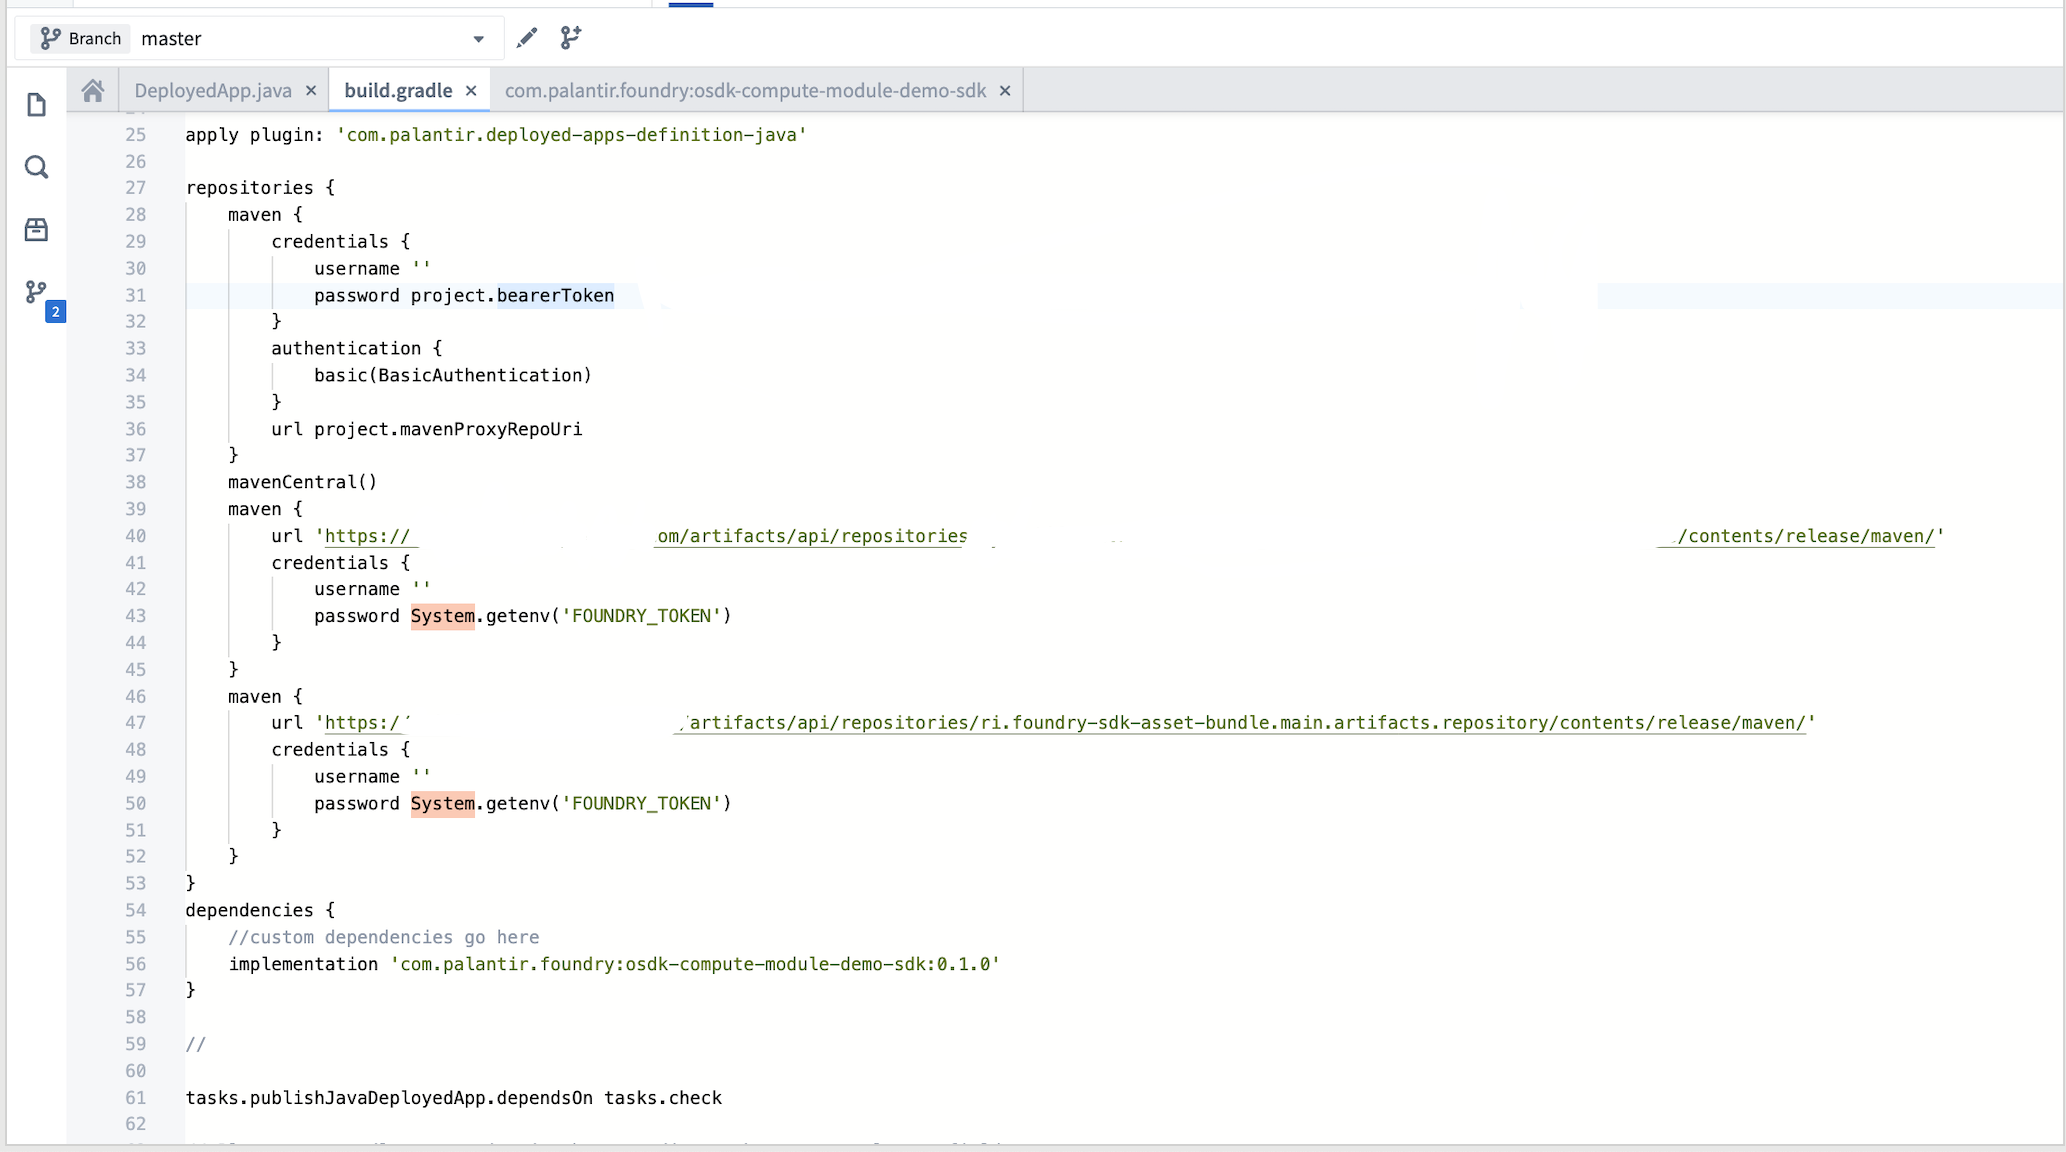
- In your Java Code Repository, open the Libraries panel, search for the Maven SDK generated in the previous step, and add it.
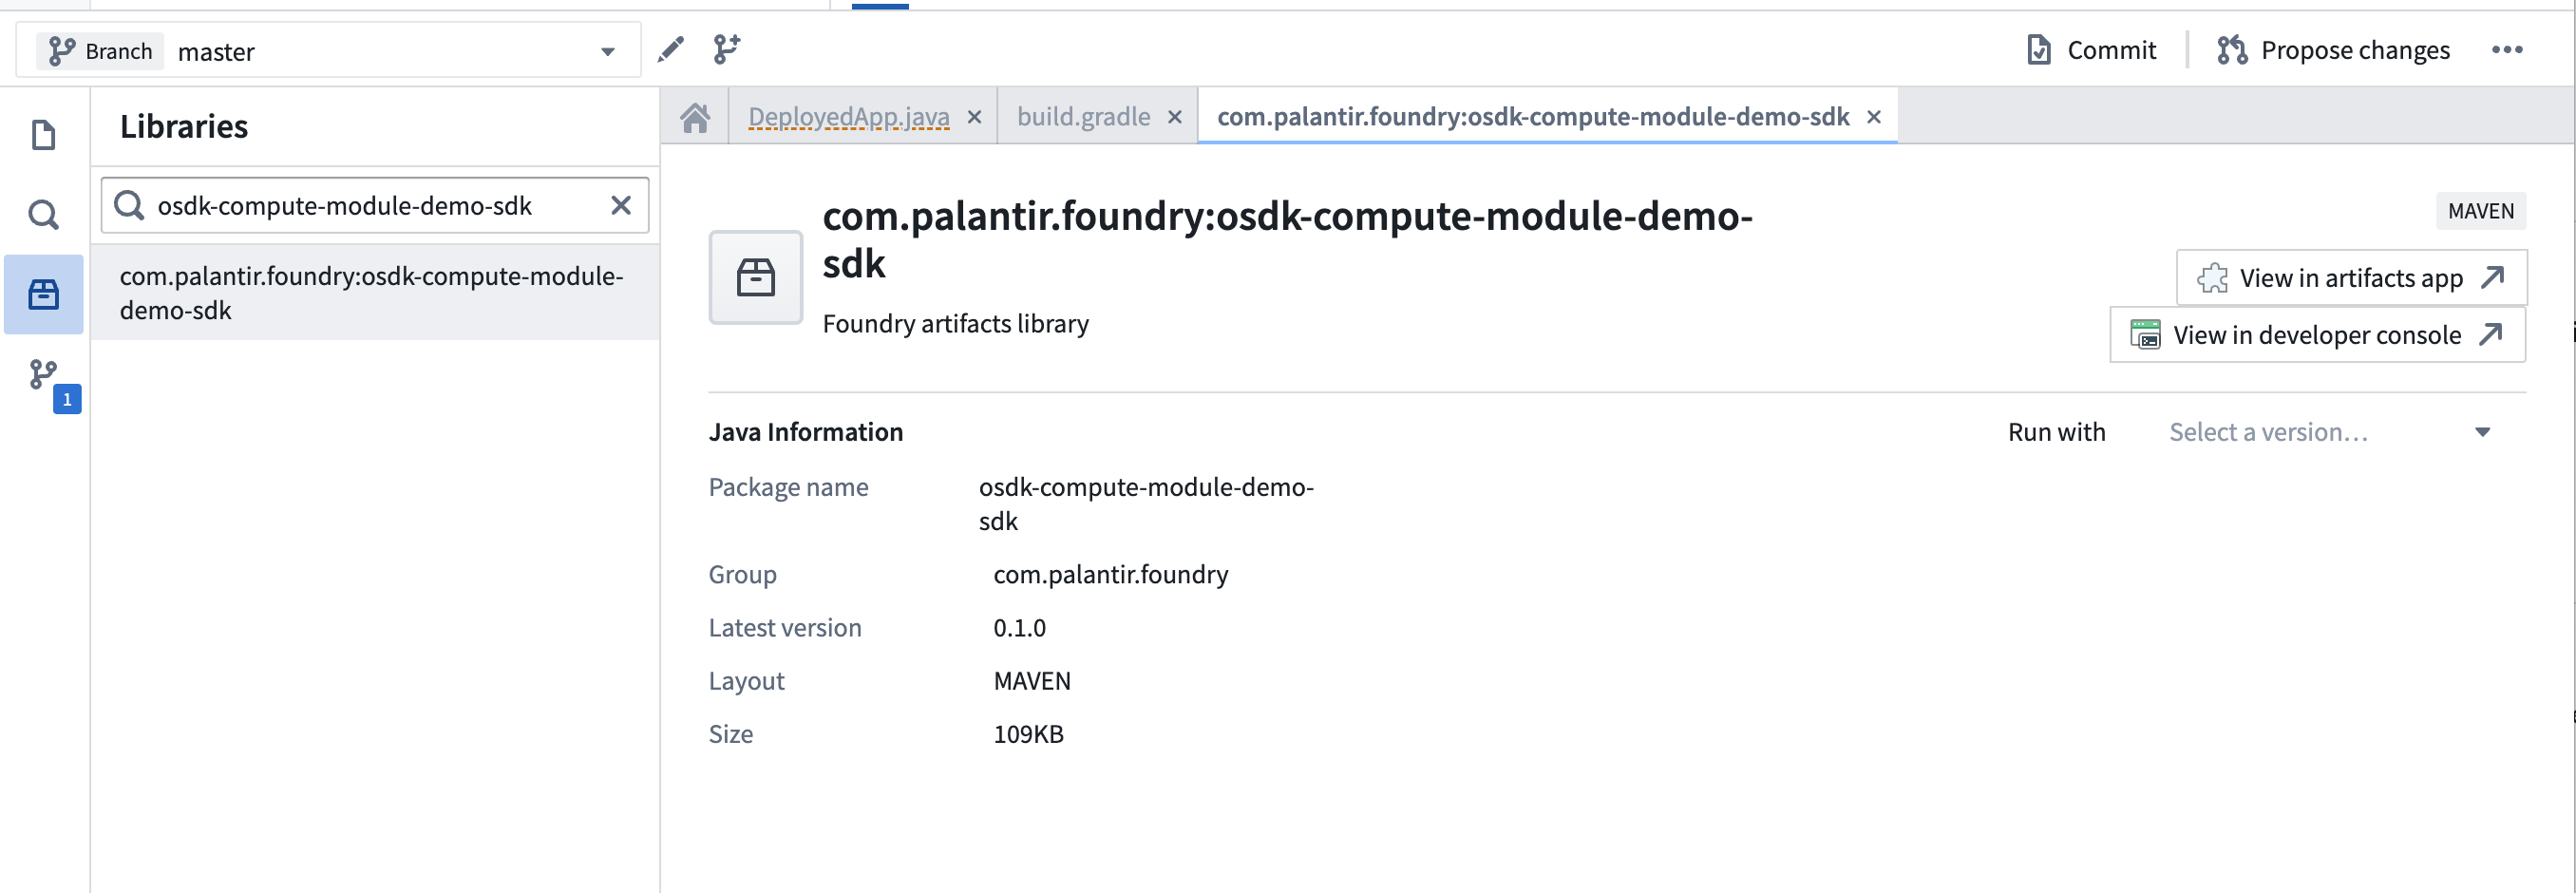
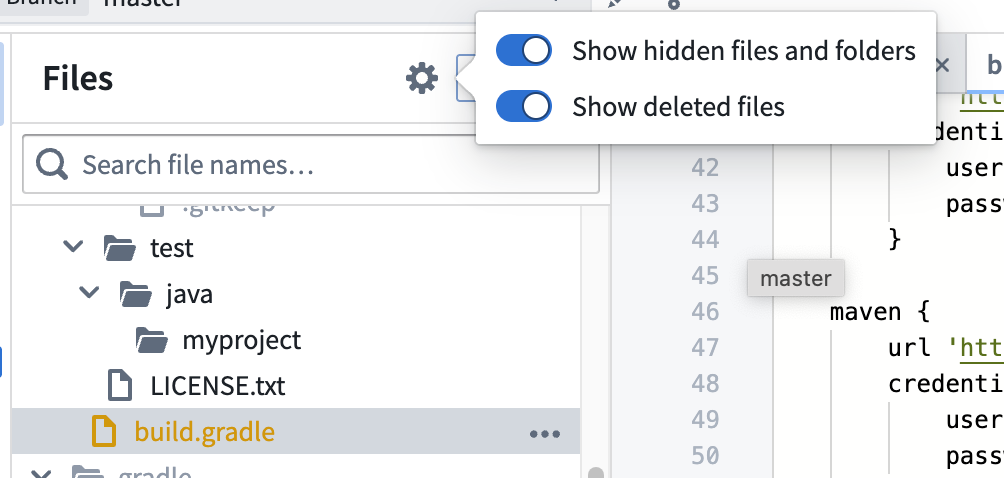
- Toggle hidden files and find the
build.gradlefile in your deployed application definition directory. Add the Maven locators as dependencies.
- Use the OSDK in your compute module code:
import com.palantir.foundry.osdk_compute_module_demo_sdk.FoundryClient;
import com.palantir.foundry.osdk_compute_module_demo_sdk.objects.Employee;
import com.palantir.osdk.api.Auth;
import com.palantir.osdk.api.auth.ConfidentialClientAuth;
import com.palantir.osdk.internal.api.FoundryConnectionConfig;
import java.util.List;

static String return_object() {
    Auth auth = ConfidentialClientAuth.builder()
            .clientId(System.getenv("CLIENT_ID"))
            .clientSecret(System.getenv("CLIENT_SECRET"))
            .build();

    FoundryClient client = FoundryClient.builder()
            .auth(auth)
            .connectionConfig(FoundryConnectionConfig.builder()
                    .foundryUri("https://yourenrollment.palantirfoundry.com")
                    .build())
            .build();

    List<Employee> objects = client.ontology().objects().Employee()
            .fetchStream().toList();
    return objects.get(0).toString();
}
Marketplace-installed compute modules
When a compute module installed through Marketplace uses the OSDK, the ontology RID from the Marketplace installation project is linked to the compute module through the FOUNDRY_ONTOLOGY_RID environment variable. This is the ontology RID of the installation project, not the original source project.
:::callout{theme="warning"} The API names of all Ontology entities must match between the source and target ontologies. If the API names do not match, the OSDK will not be able to resolve the entities in the target ontology. :::
Use the FOUNDRY_ONTOLOGY_RID environment variable when initializing the OSDK client to ensure your compute module references the correct ontology:
```python tab="Python" import os
FOUNDRY_ONTOLOGY_RID = os.environ.get("FOUNDRY_ONTOLOGY_RID") CLIENT = FoundryClient(auth=AUTH, hostname=HOSTNAME, rid=FOUNDRY_ONTOLOGY_RID)
```javascript tab="TypeScript"
const originalOntologyRid: string = "{YOUR_ORIGINAL_ONTOLOGY_RID}";
const ontologyRid: string = process.env.FOUNDRY_ONTOLOGY_RID ?? originalOntologyRid;
const client: Client = createClient(url, ontologyRid, auth);
中文翻译
OSDK 集成
本体论 SDK(OSDK)可在计算模块中使用,用于与 Foundry 本体论对象进行交互。本页介绍如何授予必要权限、配置计算模块,以及在本地 Docker 构建和代码仓库中使用 OSDK。
前提条件
在计算模块中使用 OSDK 之前,必须授予应用程序服务用户对所需本体论资源的访问权限,并使用适当的凭据配置计算模块。
授予应用程序服务用户访问权限
开发者控制台中的客户端 ID 必须具有对计算模块将使用的本体论资源的访问权限。
- 导航至开发者控制台中的 OAuth 与限制选项卡,在资源和操作限制部分选择故障排除访问。
- 在要访问资源的安全选项卡中,搜索您的客户端 ID 并添加该用户。
- 对于由数据集支持的本体论对象,您可能需要同时授予对对象集和底层数据集的访问权限。请参阅第三方应用程序文档获取最新配置指南。
配置计算模块
您的计算模块需要网络出口和应用程序凭据才能使用 OSDK。
- 为您的 Foundry 主机名添加一个源,因为默认情况下出口是禁用的。
- 从计算模块的配置选项卡中,选择应用程序权限。有关执行模式的更多信息,请查阅执行模式文档。
- 选择使用其他应用程序凭据。
- 输入来自开发者控制台的客户端 ID 和客户端密钥,选择应用,然后保存配置。
您可以使用保留的 CLIENT_ID 和 CLIENT_SECRET 环境变量从计算模块代码中访问凭据:
```python tab="Python" from compute_modules.auth import retrieve_third_party_id_and_creds
client_id, client_secret = retrieve_third_party_id_and_creds()
```java tab="Java"
String clientId = System.getenv("CLIENT_ID");
String clientSecret = System.getenv("CLIENT_SECRET");
在本地 Docker 构建中使用 OSDK(Python)
本节介绍如何使用 Python 在本地 Docker 构建中创建基于 OSDK 的计算模块。
设置 OSDK
- 在开发者控制台中创建应用程序并生成 OSDK。选择 Python 作为语言,后端服务作为应用程序类型,应用程序权限作为权限模型。
- 使用开发者控制台中的命令通过 pip 安装 OSDK 库。
编写计算模块代码
以下示例演示了如何在计算模块函数中使用 OSDK 进行身份验证并查询本体论对象:
from demo_python_sdk import FoundryClient, ConfidentialClientAuth
import logging
import os
from compute_modules.logging import get_logger, set_internal_log_level
from compute_modules.auth import retrieve_third_party_id_and_creds
from compute_modules.annotations import function

CLIENT_ID, CLIENT_CREDS = retrieve_third_party_id_and_creds()

set_internal_log_level(logging.INFO)
logger = get_logger(__name__)
logger.setLevel(logging.INFO)

foundry_url = os.environ["FOUNDRY_URL"]

@function
def get_object(context, event):
    auth = ConfidentialClientAuth(
        client_id=CLIENT_ID,
        client_secret=CLIENT_CREDS,
        hostname=foundry_url,
        should_refresh=True,
    )
    client = FoundryClient(auth=auth, hostname=foundry_url)
    EmployeeObject = client.ontology.objects.Employee
    logger.info(EmployeeObject.take(1))
    return "Success"
创建 Dockerfile
在本地构建时,OSDK 库托管在私有 Foundry Artifact 仓库中。您必须在 Docker 构建期间使用 FOUNDRY_TOKEN 密钥来验证仓库。
FROM --platform=linux/amd64 python:3.12
COPY requirements.txt .
RUN --mount=type=secret,id=FOUNDRY_TOKEN,env=FOUNDRY_TOKEN \
    pip install -r requirements.txt --upgrade \
    --extra-index-url "https://user:$FOUNDRY_TOKEN@yourenrollment.palantirfoundry.com/artifacts/api/repositories/ri.artifacts.main.repository.REDACTED/contents/release/pypi/simple" \
    --extra-index-url "https://user:$FOUNDRY_TOKEN@yourenrollment.palantirfoundry.com/artifacts/api/repositories/ri.foundry-sdk-asset-bundle.main.artifacts.repository/contents/release/pypi/simple"
COPY src .
USER 5000
ENTRYPOINT ["python", "app.py"]
:::callout{theme="warning"}
将 yourenrollment.palantirfoundry.com 替换为您的实际 Foundry 注册 URL,并将仓库 RID 替换为开发者控制台中提供的值。
:::
构建并推送镜像
使用以下命令构建 Docker 镜像,并将 FOUNDRY_TOKEN 作为构建密钥传递:
docker buildx build --platform=linux/amd64 \
    --secret id=FOUNDRY_TOKEN,env=FOUNDRY_TOKEN \
    -t yourenrollment-container-registry.palantirfoundry.com/hello-world:0.0.1 .
有关构建和发布 Docker 镜像的更多信息,请查阅容器文档。
在代码仓库中使用 OSDK
如果您在代码仓库中开发计算模块,可以将 OSDK 添加为库依赖项,而不是本地安装。
Python
- 在开发者控制台中创建应用程序并生成 OSDK。选择 Python 作为语言,后端服务作为应用程序类型,应用程序权限作为权限模型。将创建一个 Conda SDK。
- 在您的 Python 代码仓库中,打开库面板,搜索上一步生成的 Conda SDK,然后添加它。
- 在计算模块代码中使用 OSDK:
import os
from osdk_compute_module_demo_sdk import ConfidentialClientAuth, FoundryClient
from compute_modules.auth import retrieve_third_party_id_and_creds
from compute_modules.annotations import function

foundry_url = os.environ["FOUNDRY_URL"]
CLIENT_ID, CLIENT_CREDS = retrieve_third_party_id_and_creds()

@function
def print_object(context, event):
    auth = ConfidentialClientAuth(
        client_id=CLIENT_ID,
        client_secret=CLIENT_CREDS,
        hostname=foundry_url,
        should_refresh=True,
        scopes=[
            "api:ontologies-read",
            "api:ontologies-write",
            "api:mediasets-read",
            "api:mediasets-write",
        ],
    )
    client = FoundryClient(auth=auth, hostname=foundry_url)
    EmployeeObject = client.ontology.objects.Employee
    return str(EmployeeObject.take(1))
Java
- 在开发者控制台中创建应用程序并生成 OSDK。选择 Java 作为语言,后端服务作为应用程序类型,应用程序权限作为权限模型。将提供一个 Maven 定位器,例如
com.palantir.foundry:osdk-compute-module-demo-sdk。
- 在您的 Java 代码仓库中,打开库面板,搜索上一步生成的 Maven SDK,然后添加它。
- 切换隐藏文件,在已部署的应用程序定义目录中找到
build.gradle文件。将 Maven 定位器添加为依赖项。
- 在计算模块代码中使用 OSDK:
import com.palantir.foundry.osdk_compute_module_demo_sdk.FoundryClient;
import com.palantir.foundry.osdk_compute_module_demo_sdk.objects.Employee;
import com.palantir.osdk.api.Auth;
import com.palantir.osdk.api.auth.ConfidentialClientAuth;
import com.palantir.osdk.internal.api.FoundryConnectionConfig;
import java.util.List;

static String return_object() {
    Auth auth = ConfidentialClientAuth.builder()
            .clientId(System.getenv("CLIENT_ID"))
            .clientSecret(System.getenv("CLIENT_SECRET"))
            .build();

    FoundryClient client = FoundryClient.builder()
            .auth(auth)
            .connectionConfig(FoundryConnectionConfig.builder()
                    .foundryUri("https://yourenrollment.palantirfoundry.com")
                    .build())
            .build();

    List<Employee> objects = client.ontology().objects().Employee()
            .fetchStream().toList();
    return objects.get(0).toString();
}
通过 Marketplace 安装的计算模块
当通过 Marketplace 安装的计算模块使用 OSDK 时,Marketplace 安装项目中的本体论 RID 通过 FOUNDRY_ONTOLOGY_RID 环境变量链接到计算模块。这是安装项目的本体论 RID,而非原始源项目。
:::callout{theme="warning"} 所有本体论实体的 API 名称必须在源本体论和目标本体论之间匹配。如果 API 名称不匹配,OSDK 将无法解析目标本体论中的实体。 :::
在初始化 OSDK 客户端时使用 FOUNDRY_ONTOLOGY_RID 环境变量,以确保计算模块引用正确的本体论:
```python tab="Python" import os
FOUNDRY_ONTOLOGY_RID = os.environ.get("FOUNDRY_ONTOLOGY_RID") CLIENT = FoundryClient(auth=AUTH, hostname=HOSTNAME, rid=FOUNDRY_ONTOLOGY_RID)
```javascript tab="TypeScript"
const originalOntologyRid: string = "{YOUR_ORIGINAL_ONTOLOGY_RID}";
const ontologyRid: string = process.env.FOUNDRY_ONTOLOGY_RID ?? originalOntologyRid;
const client: Client = createClient(url, ontologyRid, auth);