Using custom models to create a semantic search workflow(使用自定义模型创建语义搜索工作流)
:::callout{theme="warning"} This tutorial is for those using an embedding model not supplied by Palantir, which is no longer a recommended workflow. See the list of Palantir-provided models and the Palantir-provided model semantic search tutorial. :::
This page illustrates the process of building a notional end-to-end documentation search service that is capable of retrieving relevant docs when given a prompt. The service will use a Foundry modeling objective to embed documents and extract their features into a vector. These documents and embeddings will be stored in an object type with the vector property.
For this example, we begin by setting up a model in Foundry and creating a pipeline to generate embeddings. Then, we will create a new object type and a function to query it through natural language.
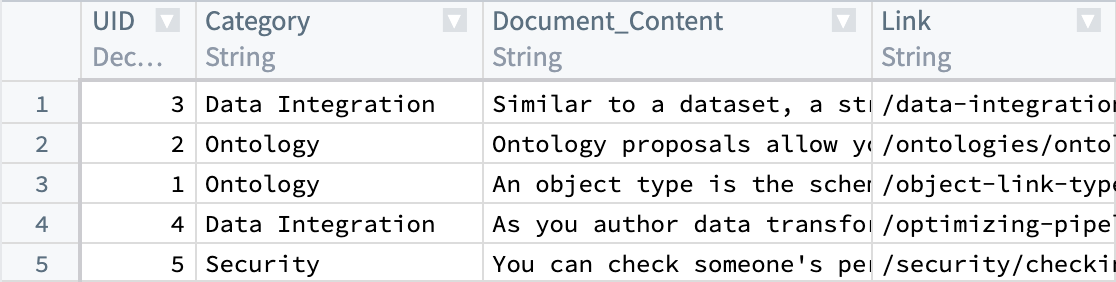
We begin with a dataset that currently has our parsed documents and metadata, such as Document_Content and Link. Next, we will generate embeddings from the Document_Content to enable us to query them via semantic search.
To understand the details of the KNN feature, review KNN Functions on Objects section in the Foundry documentation.
:::callout{theme="success" title="Value substitution"}
Throughout this workflow you can substitute a value of your choosing, as long as it is consistent for each instance. For example, every instance of ObjectApiName is always substituted with Document.
The values you must substitute are:
ObjectApiName: identifier for a unique ObjectType, in our caseDocument. NOTE: The identifier may sometimes appear asobjectApiNamewith the first letter lowercased.ModelApiName: identifier for a function wrapping a ModelOutputDatasetRid: identifier for the output dataset from the embedding transform.InputDatasetRid: identifier for the input dataset for the embedding transform.ModelRid: identifier for the model used for the embedding transform and in the creation of the Live Modeling Deployment :::
1. Create embeddings using models in Foundry
There are a few options for creating embeddings from a model in Foundry. In this example, we will create a transform to interact with an imported open-source model. We will use the all-MiniLM-L6-v2 model, a general purpose text-embedding model that will create vectors of dimension (size) 384. This model can be swapped out with any other existing model that outputs vectors compatible with the Foundry Ontology vector type. To import a new open-source model, review our Hugging Face model documentation.
The code below expects the model to expose an API with a tabular input containing a text string column and a column for tabular outputs containing an embedding list of floats. For more details on defining model APIs, refer to the model adapter API documentation.
import palantir_models as pm


class EmbeddingModelAdapter(pm.ModelAdapter):
    ...

    @classmethod
    def api(cls):
        inputs = {
            "inference_data": pm.Pandas(columns=[("text", str)])
        }
        outputs = {
            "output_data": pm.Pandas(columns=[("text", str), ("embedding", list[float])])
        }
        return inputs, outputs
The transform below runs the data through the model to return an embedding, then casts the embedding value (double arrays) to floats in order to match the type necessary for vector embeddings.
A couple of points to consider:
- Each
StructFieldin theschemavariable relates to a columns that are present in the processed input dataset (InputDatasetRid) plus theembeddingcolumn added by the model. - When working with data at larger scales, the transform might fail if using a Pandas dataframe that is excessively large. In these cases, the transform will have to be performed in Spark.
- Graphics Processing Units (GPUs) can be leveraged to increase the speed at which embeddings are produced by a transform. GPUs can be used by adding the
@configuredecorator to your transform. Contact your Palantir representative if you are interested in enabling this in your environment.
An example transform is shown below:
from transforms.api import configure, transform, Input, Output
from palantir_models.transforms import ModelInput
from pyspark.sql.functions import pandas_udf, PandasUDFType
from pyspark.sql.types import StructType, StructField, IntegerType, StringType, FloatType, ArrayType
import numpy as np


@configure(profile=["DRIVER_GPU_ENABLED"]) # Remove this line if GPUs have not been enabled in your environment
@transform(
    dataset_out=Output("OutputDatasetRid"),
    dataset_in=Input("InputDatasetRid"),
    embedding_model=ModelInput("ModelRid")
)
def compute(ctx, dataset_out, dataset_in, embedding_model):
    # Match input column of model
    spark_df = dataset_in.dataframe().withColumnRenamed("Document_Content", "text")

    def embed_df(df):
        # Create embeddings
        output_df = embedding_model.transform(df).output_data
        # Cast to float array
        output_df["embedding"] = output_df["embedding"].apply(lambda x: np.array(x).astype(float).tolist())
        # drop unnecessary column
        return output_df.drop('inference_device', axis=1)

    # Updated schema
    schema = StructType([
        StructField("UID", IntegerType(), True),
        StructField("Category", StringType(), True),
        StructField("text", StringType(), True),
        StructField("Link", StringType(), True),
        StructField("embedding", ArrayType(FloatType()), True)
    ])

    udf = pandas_udf(embed_df, returnType=schema, functionType=PandasUDFType.GROUPED_MAP)
    output_df = spark_df.groupBy('UID').apply(udf)

    # Write the output DataFrame
    dataset_out.write_dataframe(output_df)
Next, we will need a Live Modeling Deployment to create embeddings off of a user query to be used to search against our existing vectors. The model used in this part should be the same as the one used to generate the initial embeddings in this current step.
2. Create object type
By now, we should have a new dataset with a column containing float vector embeddings generated using the batch modeling deployment from our first and previous step. Next, we will create an object type.
We will name the object type Document, and set the embedding property to be of property type Vector. This requires configuring two values:
- Dimension: this is the length of the array produced in the column
embedding. - Similarity Function: the method by which distance between two
embeddingvalues from different objects will be calculated.

Once this object type is created, we will have a property (embedding) that can be used to semantically search through the Documentation objects.
The value for ObjectApiName will be available after the object type is saved, and can be found on the configuration page for the object type created. More information can be found about this on the Create an object type section of the documentation.
3. Create a Live Modeling Deployment
Now that our objects have embeddings as a property, we need to generate embeddings for user queries with low-latency. These embeddings will be used to find objects with similar embedding values. To do this, create a live model deployment for fast, low-latency access with Functions.
Review the instructions for configuring a live deployment in Modeling Objectives or directly from a model. A Function then needs to be published for that model.
4. Create an embedding with Functions on Models
:::callout{theme="warning" title="Enabling Vector properties for functions"}
Before proceeding, ensure that the entries "enableVectorProperties": true, "enableResourceGeneration": true, and "useDeploymentApiNames": true are all present in the functions.json file in your Functions code repository. If these entries are not present, add them to functions.json and commit the change to proceed. Contact your Palantir representative if you need further assistance.
:::
The final step is to create a function to query this object type. For the search phase, the overall goal is to be able to take some user input, generate a vector using the live modeling deployment created earlier, and then do a KNN search over our object type. A sample function for this use case is shown below, including the file structure they should reside within.
Edits to vector properties can be applied by Actions and Functions.
Further information on how to use a model in a Function can be found in the Functions on models documentation.
File structure
|-- functions-typescript
|   |-- src
|   |   |-- tests
|   |   |   |-- index.ts
|   |   |-- index.ts
|   |   |-- semanticSearch.ts
|   |   |-- service.ts
|   |   |-- tsconfig.json
|   |   |-- types.ts
|   |-- functions.json
|   |-- jest.config.js
|   |-- package-lock.json
|   |-- package.json
|-- version.properties
functions-typescript/src/types.ts
import { Double } from "@foundry/functions-api";

export interface IEmbeddingModel {
    embed: (content: string) => Promise<IEmbeddingResponse>;
}

export interface IEmbeddingResponse {
    text: string
    embedding: Double[]
    inference_device?: string
}

export interface IEmbeddingRequest {
    text: string
}
functions-typescript/src/service.ts
// View the Model in the repository's Resource imports sidebar to know which namespace to import it from
import { ModelApiName } from "@{YOUR_NAMESPACE_HERE}/models";
import { IEmbeddingRequest, IEmbeddingResponse } from "./types";

// service to hit model
export class EmbeddingService {
    public async embed(content: string): Promise<IEmbeddingResponse> {
        const request: IEmbeddingRequest = {
                                "text": content,
                            };
        return await ModelApiName([request])
                                 .then((output: any) => output[0]) as IEmbeddingResponse;
    }
}
functions-typescript/src/semanticSearch.ts
import { Function, Integer, Double } from "@foundry/functions-api";
import { Objects, ObjectApiName } from "@foundry/ontology-api";

import { EmbeddingService } from "./service";
import { IEmbeddingResponse, IEmbeddingModel } from './types';

export class SuggestedDocs {
    embeddingService: IEmbeddingModel = new EmbeddingService;

    @Function()
    public async fetchSuggestedDocuments(userQuery: string, kValue: Integer, category: string): Promise<ObjectApiName[]> {
        const embedding: IEmbeddingResponse = await this.embeddingService.embed(userQuery);
        const vector: Double[] = embedding.embedding;

        return Objects.search()
                      .objectApiName()
                      .filter(obj => obj.category.exactMatch(category))
                      .nearestNeighbors(obj => obj.embedding.near(vector, {kValue: kValue}))
                      .orderByRelevance()
                      .take(kValue);
    }

    /**
     * The following is an alternative to fetchSuggestedDocuments which applies a threshold similarity.
     * Otherwise, kValue number of documents are always returned, no matter how similar.
     * The computation of the distance function depends on the distance function defined for the embedding
     * property. Here we assume it's cosine similarity, which can be computed with a simple vector dot
     * product if the embedding model produces normalized vectors.
     */
    @Function()
    public async fetchSuggestedDocumentsWithThreshold(userQuery: string, kValue: Integer, category: string, thresholdSimilarity: Double): Promise<ObjectApiName[]> {
        const embedding: IEmbeddingResponse = await this.embeddingService.embed(userQuery);
        const vector: Double[] = embedding.embedding;

        return Objects.search()
                      .objectApiName()
                      .filter(obj => obj.category.exactMatch(category))
                      .nearestNeighbors(obj => obj.embedding.near(vector, {kValue: kValue}))
                      .orderByRelevance()
                      .take(kValue)
                      .filter(obj => SuggestedDocs.dotProduct(vector, obj.embedding! as number[]) >= thresholdSimilarity);
    }

    private static dotProduct<K extends number>(arr1: K[], arr2: K[]): number {
        if (arr1.length !== arr2.length) {
            throw EvalError("Two vectors must be of the same dimensions");
        }
        return arr1.map((_, i) => arr1[i] * arr2[i]).reduce((m, n) => m + n);
    }
}
functions-typescript/src/index.ts
export { SuggestedDocs } from "./semanticSearch";
5. Publish the function and use in an example
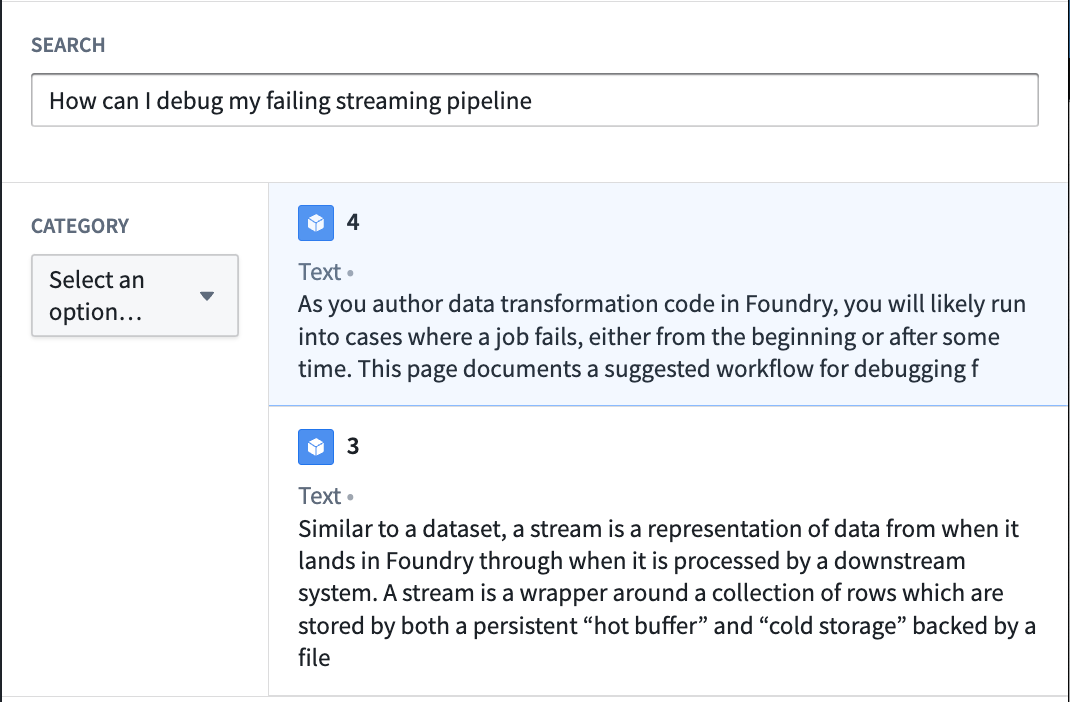
At this point, we have a function that can run semantic search to query objects with natural language. The final step is to publish the function and use it in a workflow. To continue building on the documentation search example, we will create a Workshop application to invoke this function with a text input to return the top two matching documentation articles to a user.
The process to creating a semantic search for the documentation service in the example is as follows:
- Start by creating a Workshop application.
- Add a text input and a string selector. The string selector will be used to choose a documentation category with which to filter. Both the text input and string selector will serve as inputs into the published KNN document fetch function.
- Finally, add an object list widget with an input object set generated from the function and the selected inputs as shown below:

From this point, the inputs will be used to semantically search through documents in the object type and return the two most relevant. This is just one simple use case of vector properties and semantic search. See an example of the resulting Workshop application in the screenshot below:
中文翻译
使用自定义模型创建语义搜索工作流
:::callout{theme="warning"} 本教程适用于使用非 Palantir 提供的嵌入模型(embedding model)的用户,这已不再是推荐的工作流。请参阅 Palantir 提供的模型列表 和 Palantir 提供的模型语义搜索教程。 :::
本页面演示了构建一个概念性的端到端文档搜索服务的过程,该服务能够在收到提示(prompt)时检索相关文档。该服务将使用 Foundry 建模目标(Modeling Objective) 来嵌入文档并将其特征提取为向量(vector)。这些文档和嵌入(embedding)将存储在具有向量属性(vector property)的对象类型(object type)中。
在本示例中,我们首先在 Foundry 中设置一个模型并创建生成嵌入的管道(pipeline)。然后,我们将创建一个新的对象类型和一个通过自然语言查询该对象类型的函数。
我们从包含已解析文档和元数据的数据集开始,例如 Document_Content 和 Link。接下来,我们将从 Document_Content 生成嵌入,以便通过语义搜索(semantic search)进行查询。
要了解 KNN 功能的详细信息,请查阅 Foundry 文档中的 对象上的 KNN 函数 部分。
:::callout{theme="success" title="值替换"}
在整个工作流中,您可以替换为您选择的值,只要每个实例保持一致即可。例如,ObjectApiName 的每个实例始终替换为 Document。
您必须替换的值包括:
ObjectApiName:唯一对象类型(ObjectType)的标识符,在我们的示例中为Document。注意: 该标识符有时可能以小写首字母显示为objectApiName。ModelApiName:包装模型的函数标识符OutputDatasetRid:嵌入转换输出数据集的标识符InputDatasetRid:嵌入转换输入数据集的标识符ModelRid:用于嵌入转换和创建实时建模部署的模型标识符 :::
1. 使用 Foundry 中的模型创建嵌入
在 Foundry 中,有几种从模型创建嵌入的选项。在本示例中,我们将创建一个转换(transform)来与导入的开源模型进行交互。我们将使用 all-MiniLM-L6-v2 模型,这是一个通用文本嵌入模型,将创建维度为 384 的向量。该模型可以替换为任何其他输出向量与 Foundry 本体论 vector 类型兼容的现有模型。要导入新的开源模型,请查阅我们的 Hugging Face 模型文档。
以下代码期望模型暴露一个 API,该 API 具有包含 text 字符串列的表格输入(tabular input)和包含 embedding 浮点数列表的表格输出(tabular output)列。有关定义模型 API 的更多详细信息,请参阅模型适配器 API 文档。
import palantir_models as pm


class EmbeddingModelAdapter(pm.ModelAdapter):
    ...

    @classmethod
    def api(cls):
        inputs = {
            "inference_data": pm.Pandas(columns=[("text", str)])
        }
        outputs = {
            "output_data": pm.Pandas(columns=[("text", str), ("embedding", list[float])])
        }
        return inputs, outputs
下面的转换将数据通过模型运行以返回 embedding,然后将 embedding 值(双精度数组)转换为浮点数,以匹配向量嵌入所需的类型。
需要考虑的几点:
schema变量中的每个StructField对应于处理后的输入数据集 (InputDatasetRid) 中存在的列,加上模型添加的embedding列。- 在处理大规模数据时,如果使用过大的 Pandas 数据框(dataframe),转换可能会失败。在这些情况下,必须在 Spark 中执行转换。
- 可以利用图形处理单元(GPU)来提高转换生成嵌入的速度。可以通过在转换中添加
@configure装饰器来使用 GPU。如果您有兴趣在您的环境中启用此功能,请联系您的 Palantir 代表。
示例如下:
from transforms.api import configure, transform, Input, Output
from palantir_models.transforms import ModelInput
from pyspark.sql.functions import pandas_udf, PandasUDFType
from pyspark.sql.types import StructType, StructField, IntegerType, StringType, FloatType, ArrayType
import numpy as np


@configure(profile=["DRIVER_GPU_ENABLED"]) # 如果您的环境未启用 GPU,请删除此行
@transform(
    dataset_out=Output("OutputDatasetRid"),
    dataset_in=Input("InputDatasetRid"),
    embedding_model=ModelInput("ModelRid")
)
def compute(ctx, dataset_out, dataset_in, embedding_model):
    # 匹配模型的输入列
    spark_df = dataset_in.dataframe().withColumnRenamed("Document_Content", "text")

    def embed_df(df):
        # 创建嵌入
        output_df = embedding_model.transform(df).output_data
        # 转换为浮点数组
        output_df["embedding"] = output_df["embedding"].apply(lambda x: np.array(x).astype(float).tolist())
        # 删除不必要的列
        return output_df.drop('inference_device', axis=1)

    # 更新后的模式
    schema = StructType([
        StructField("UID", IntegerType(), True),
        StructField("Category", StringType(), True),
        StructField("text", StringType(), True),
        StructField("Link", StringType(), True),
        StructField("embedding", ArrayType(FloatType()), True)
    ])

    udf = pandas_udf(embed_df, returnType=schema, functionType=PandasUDFType.GROUPED_MAP)
    output_df = spark_df.groupBy('UID').apply(udf)

    # 写入输出 DataFrame
    dataset_out.write_dataframe(output_df)
接下来,我们需要一个实时建模部署(Live Modeling Deployment)来根据用户查询创建嵌入,用于搜索现有向量。此部分使用的模型应与当前步骤中用于生成初始嵌入的模型相同。
2. 创建对象类型
到目前为止,我们应该有一个新的数据集,其中包含使用第一步中的批处理建模部署(batch modeling deployment)生成的浮点向量嵌入列。接下来,我们将创建一个对象类型。
我们将对象类型命名为 Document,并将 embedding 属性设置为 Vector 属性类型。这需要配置两个值:
- 维度(Dimension): 这是
embedding列中生成的数组长度。 - 相似度函数(Similarity Function): 计算不同对象之间两个
embedding值距离的方法。
创建此对象类型后,我们将拥有一个属性 (embedding),可用于对 Documentation 对象进行语义搜索。
ObjectApiName 的值将在对象类型保存后可用,并且可以在所创建对象类型的配置页面上找到。有关此内容的更多信息,请参阅文档的创建对象类型部分。
3. 创建实时建模部署
现在我们的对象已将嵌入作为属性,我们需要为低延迟的用户查询生成嵌入。这些嵌入将用于查找具有相似嵌入值的对象。为此,请创建一个实时模型部署,以便通过函数(Functions)实现快速、低延迟的访问。
请查阅在建模目标中配置实时部署的说明或直接从模型创建部署的说明。然后需要为该模型发布一个函数。
4. 使用模型上的函数创建嵌入
:::callout{theme="warning" title="为函数启用向量属性"}
在继续之前,请确保 "enableVectorProperties": true、"enableResourceGeneration": true 和 "useDeploymentApiNames": true 这些条目全部存在于函数代码仓库的 functions.json 文件中。如果这些条目不存在,请将它们添加到 functions.json 中并提交更改以继续。如果您需要进一步帮助,请联系您的 Palantir 代表。
:::
最后一步是创建一个查询此对象类型的函数。对于搜索阶段,总体目标是能够获取一些用户输入,使用之前创建的实时建模部署生成向量,然后对我们的对象类型执行 KNN 搜索。 以下是一个适用于此用例的示例函数,包括它们应驻留的文件结构。
可以通过操作(Actions)和函数(Functions)应用对向量属性的编辑。
有关如何在函数中使用模型的更多信息,请参阅模型上的函数文档。
文件结构
|-- functions-typescript
|   |-- src
|   |   |-- tests
|   |   |   |-- index.ts
|   |   |-- index.ts
|   |   |-- semanticSearch.ts
|   |   |-- service.ts
|   |   |-- tsconfig.json
|   |   |-- types.ts
|   |-- functions.json
|   |-- jest.config.js
|   |-- package-lock.json
|   |-- package.json
|-- version.properties
functions-typescript/src/types.ts
import { Double } from "@foundry/functions-api";

export interface IEmbeddingModel {
    embed: (content: string) => Promise<IEmbeddingResponse>;
}

export interface IEmbeddingResponse {
    text: string
    embedding: Double[]
    inference_device?: string
}

export interface IEmbeddingRequest {
    text: string
}
functions-typescript/src/service.ts
// 查看仓库资源导入侧边栏中的模型,以了解从哪个命名空间导入
import { ModelApiName } from "@{YOUR_NAMESPACE_HERE}/models";
import { IEmbeddingRequest, IEmbeddingResponse } from "./types";

// 用于访问模型的服务
export class EmbeddingService {
    public async embed(content: string): Promise<IEmbeddingResponse> {
        const request: IEmbeddingRequest = {
                                "text": content,
                            };
        return await ModelApiName([request])
                                 .then((output: any) => output[0]) as IEmbeddingResponse;
    }
}
functions-typescript/src/semanticSearch.ts
import { Function, Integer, Double } from "@foundry/functions-api";
import { Objects, ObjectApiName } from "@foundry/ontology-api";

import { EmbeddingService } from "./service";
import { IEmbeddingResponse, IEmbeddingModel } from './types';

export class SuggestedDocs {
    embeddingService: IEmbeddingModel = new EmbeddingService;

    @Function()
    public async fetchSuggestedDocuments(userQuery: string, kValue: Integer, category: string): Promise<ObjectApiName[]> {
        const embedding: IEmbeddingResponse = await this.embeddingService.embed(userQuery);
        const vector: Double[] = embedding.embedding;

        return Objects.search()
                      .objectApiName()
                      .filter(obj => obj.category.exactMatch(category))
                      .nearestNeighbors(obj => obj.embedding.near(vector, {kValue: kValue}))
                      .orderByRelevance()
                      .take(kValue);
    }

    /**
     * 以下是 fetchSuggestedDocuments 的替代方案,应用了相似度阈值。
     * 否则,无论相似度如何,始终返回 kValue 数量的文档。
     * 距离函数的计算取决于为嵌入属性定义的距离函数。
     * 这里我们假设是余弦相似度(cosine similarity),如果嵌入模型生成归一化向量,
     * 则可以通过简单的向量点积来计算。
     */
    @Function()
    public async fetchSuggestedDocumentsWithThreshold(userQuery: string, kValue: Integer, category: string, thresholdSimilarity: Double): Promise<ObjectApiName[]> {
        const embedding: IEmbeddingResponse = await this.embeddingService.embed(userQuery);
        const vector: Double[] = embedding.embedding;

        return Objects.search()
                      .objectApiName()
                      .filter(obj => obj.category.exactMatch(category))
                      .nearestNeighbors(obj => obj.embedding.near(vector, {kValue: kValue}))
                      .orderByRelevance()
                      .take(kValue)
                      .filter(obj => SuggestedDocs.dotProduct(vector, obj.embedding! as number[]) >= thresholdSimilarity);
    }

    private static dotProduct<K extends number>(arr1: K[], arr2: K[]): number {
        if (arr1.length !== arr2.length) {
            throw EvalError("两个向量必须具有相同的维度");
        }
        return arr1.map((_, i) => arr1[i] * arr2[i]).reduce((m, n) => m + n);
    }
}
functions-typescript/src/index.ts
export { SuggestedDocs } from "./semanticSearch";
5. 发布函数并在示例中使用
至此,我们有了一个可以运行语义搜索来使用自然语言查询对象的函数。最后一步是发布函数并在工作流中使用它。为了继续构建文档搜索示例,我们将创建一个 Workshop 应用程序,通过文本输入调用此函数,向用户返回最匹配的两篇文档文章。
在示例中为文档服务创建语义搜索的过程如下:
- 首先创建一个 Workshop 应用程序。
- 添加一个文本输入和一个字符串选择器。字符串选择器将用于选择要过滤的文档类别。文本输入和字符串选择器都将作为已发布的 KNN 文档获取函数的输入。
- 最后,添加一个对象列表小部件,其输入对象集由函数生成,并选择如下所示的输入:
至此,输入将用于对对象类型中的文档进行语义搜索,并返回最相关的两个文档。这只是向量属性和语义搜索的一个简单用例。请参阅下方截图中的 Workshop 应用程序示例: