Branching the ontology(本体分支管理(Branching the ontology))
The ontology integrates with Global Branching to enable safe, isolated development of ontology resources. This documentation covers how to work with the ontology on branches, including adding and modifying resources, rebasing and conflict resolution, the review and merge process, and known limitations.
For general information on Global Branching concepts and workflows, refer to the Global Branching documentation.
Definitions
For general definitions of branches, proposals, and rebasing, refer to the Global Branching core concepts. The term below is specific to ontology branching:
- Ontology proposal: When you create a Global Branching proposal on a branch that includes ontology changes, an ontology proposal is automatically created to track the ontology-specific changes. The ontology proposal contains metadata such as reviews, name, and descriptions of the ontology changes being merged into
main.
Adding and modifying resources
To modify the ontology on a branch, you can either create a new branch in Ontology Manager, or access an existing branch using the branch selector.
To create a branch, open the branch selector and choose Create new branch to open a dialog where you can add a title and description for your branch.

If you already have changes to the ontology that you would like to include in a branch, you can select Save to new branch from the save dialog to create a separate branch with those changes. Note that if you make changes to any protected ontology resources, you will be required to save to a new branch.

:::callout{theme="neutral"}
You can only branch from the main ontology, also known as main branch.
:::
While on a branch, a branch taskbar at the bottom of the interface will display your current branch name and additional metadata.
Resource protection
The ontology resource types supported by branch protection include:
- Object types
- Action types
- Link types
- Interface types
- Shared property types
Resource protection is not supported on:
- Type groups
- Rule sets (when modifying a rule set, the protection status of the containing object type will be enforced)
Additionally, ontology resources must be migrated to use project permissions before they can be protected. For more information, review ontology permissions.
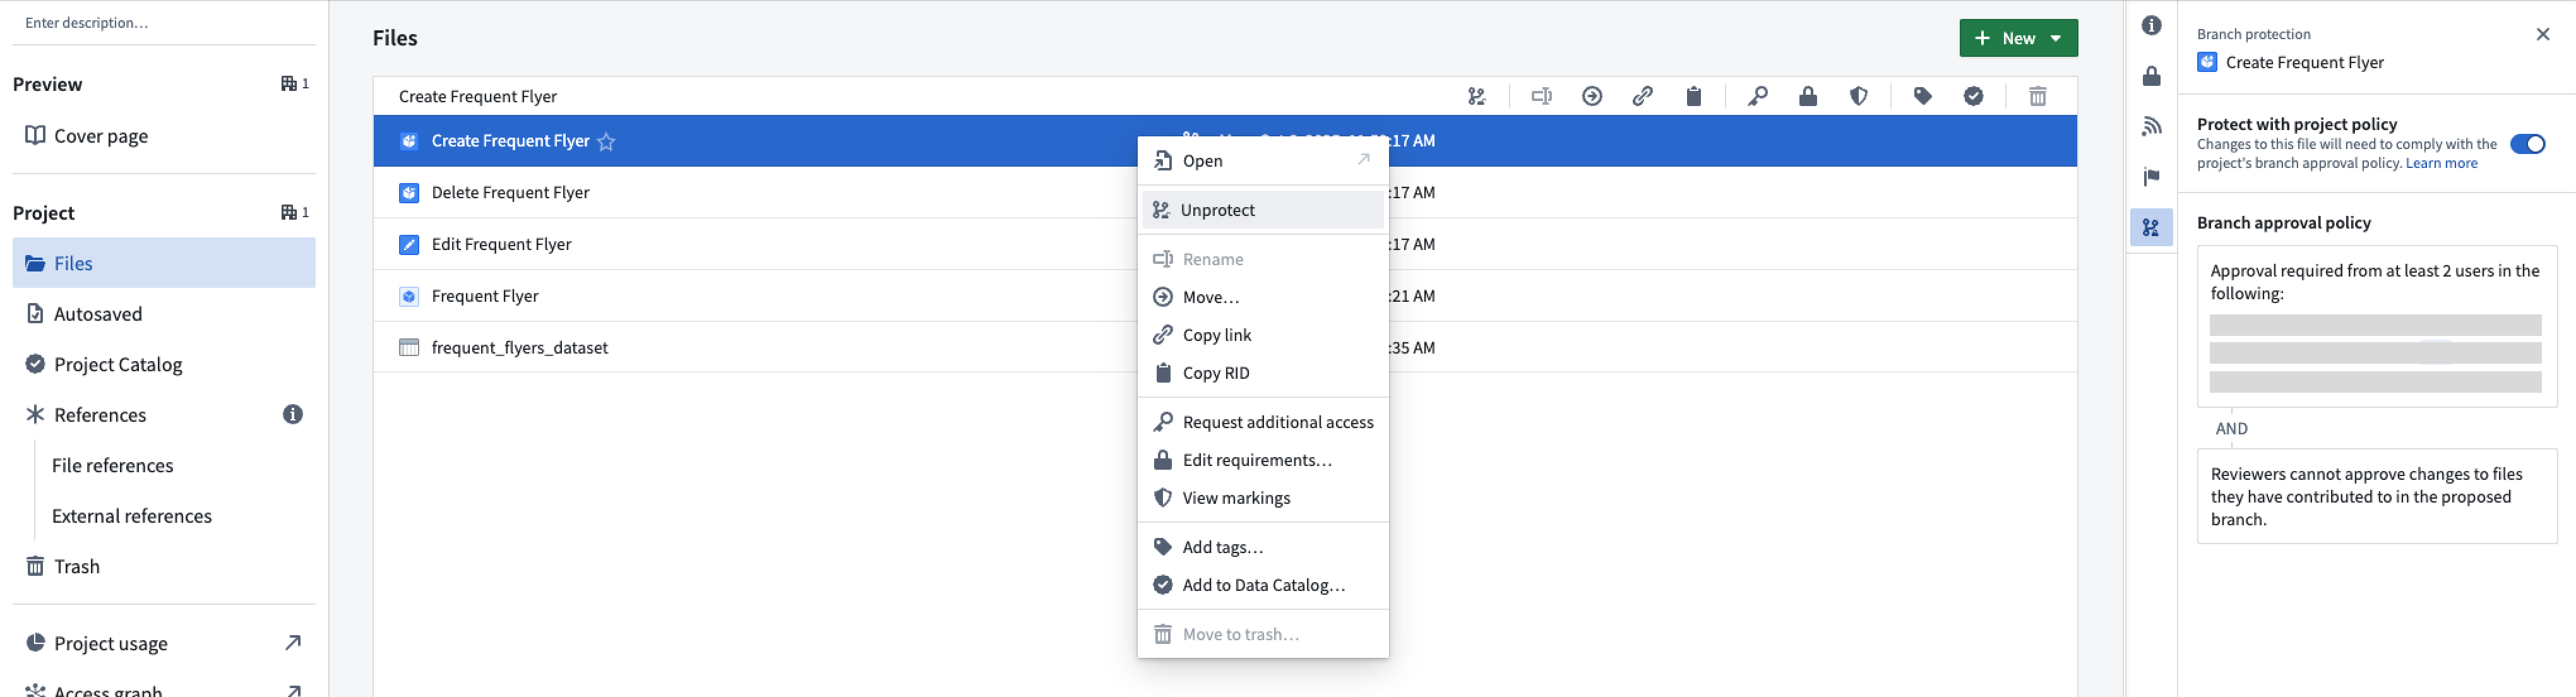
After migrating an ontology resource to use project permissions, you can view and manage its protection status via the parent project's Files tab.
Once protection is enabled, you must make changes on a separate branch and create a proposal to merge them into the main branch.
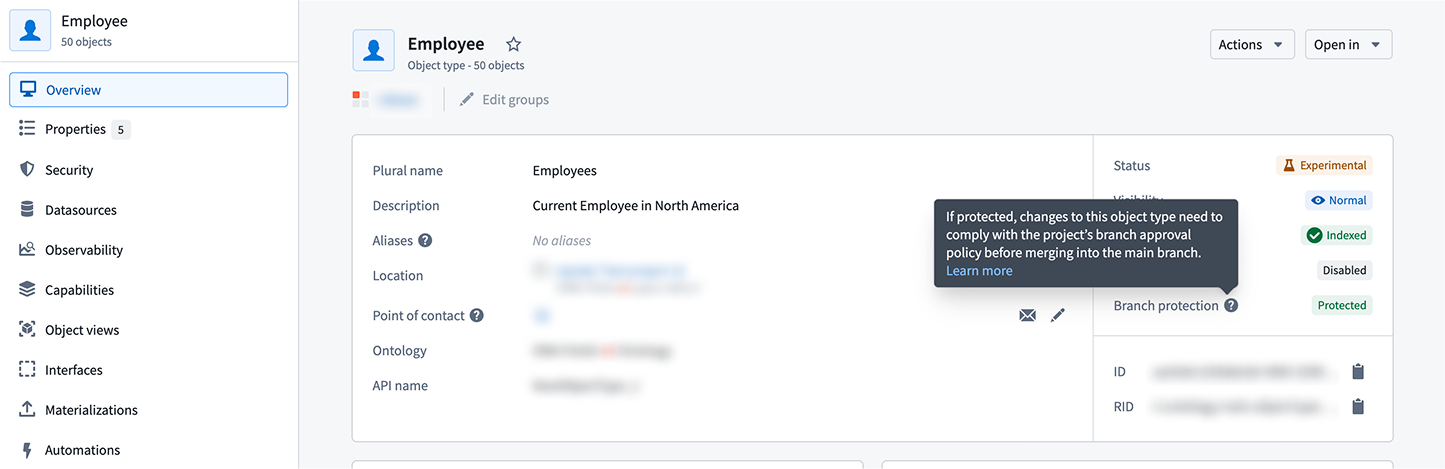
The protection status is also visible in Ontology Manager on the Overview tab:
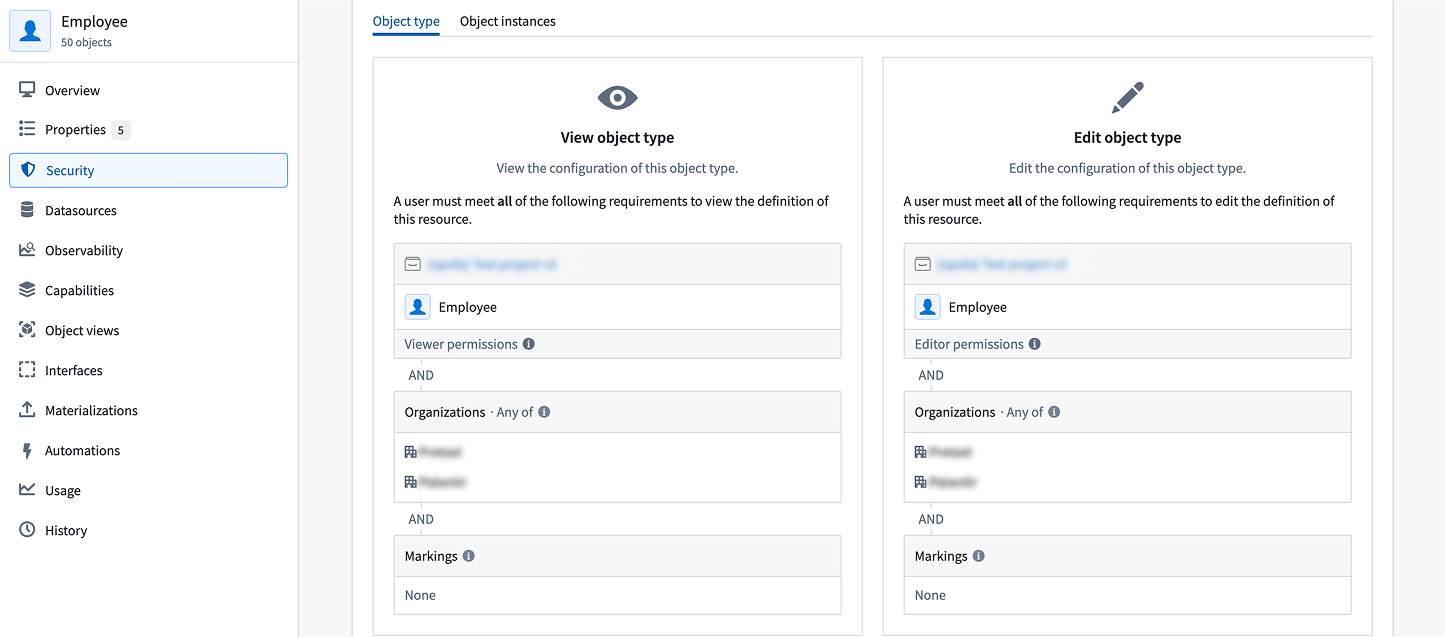
You can also review the applicable policy under the Security tab:
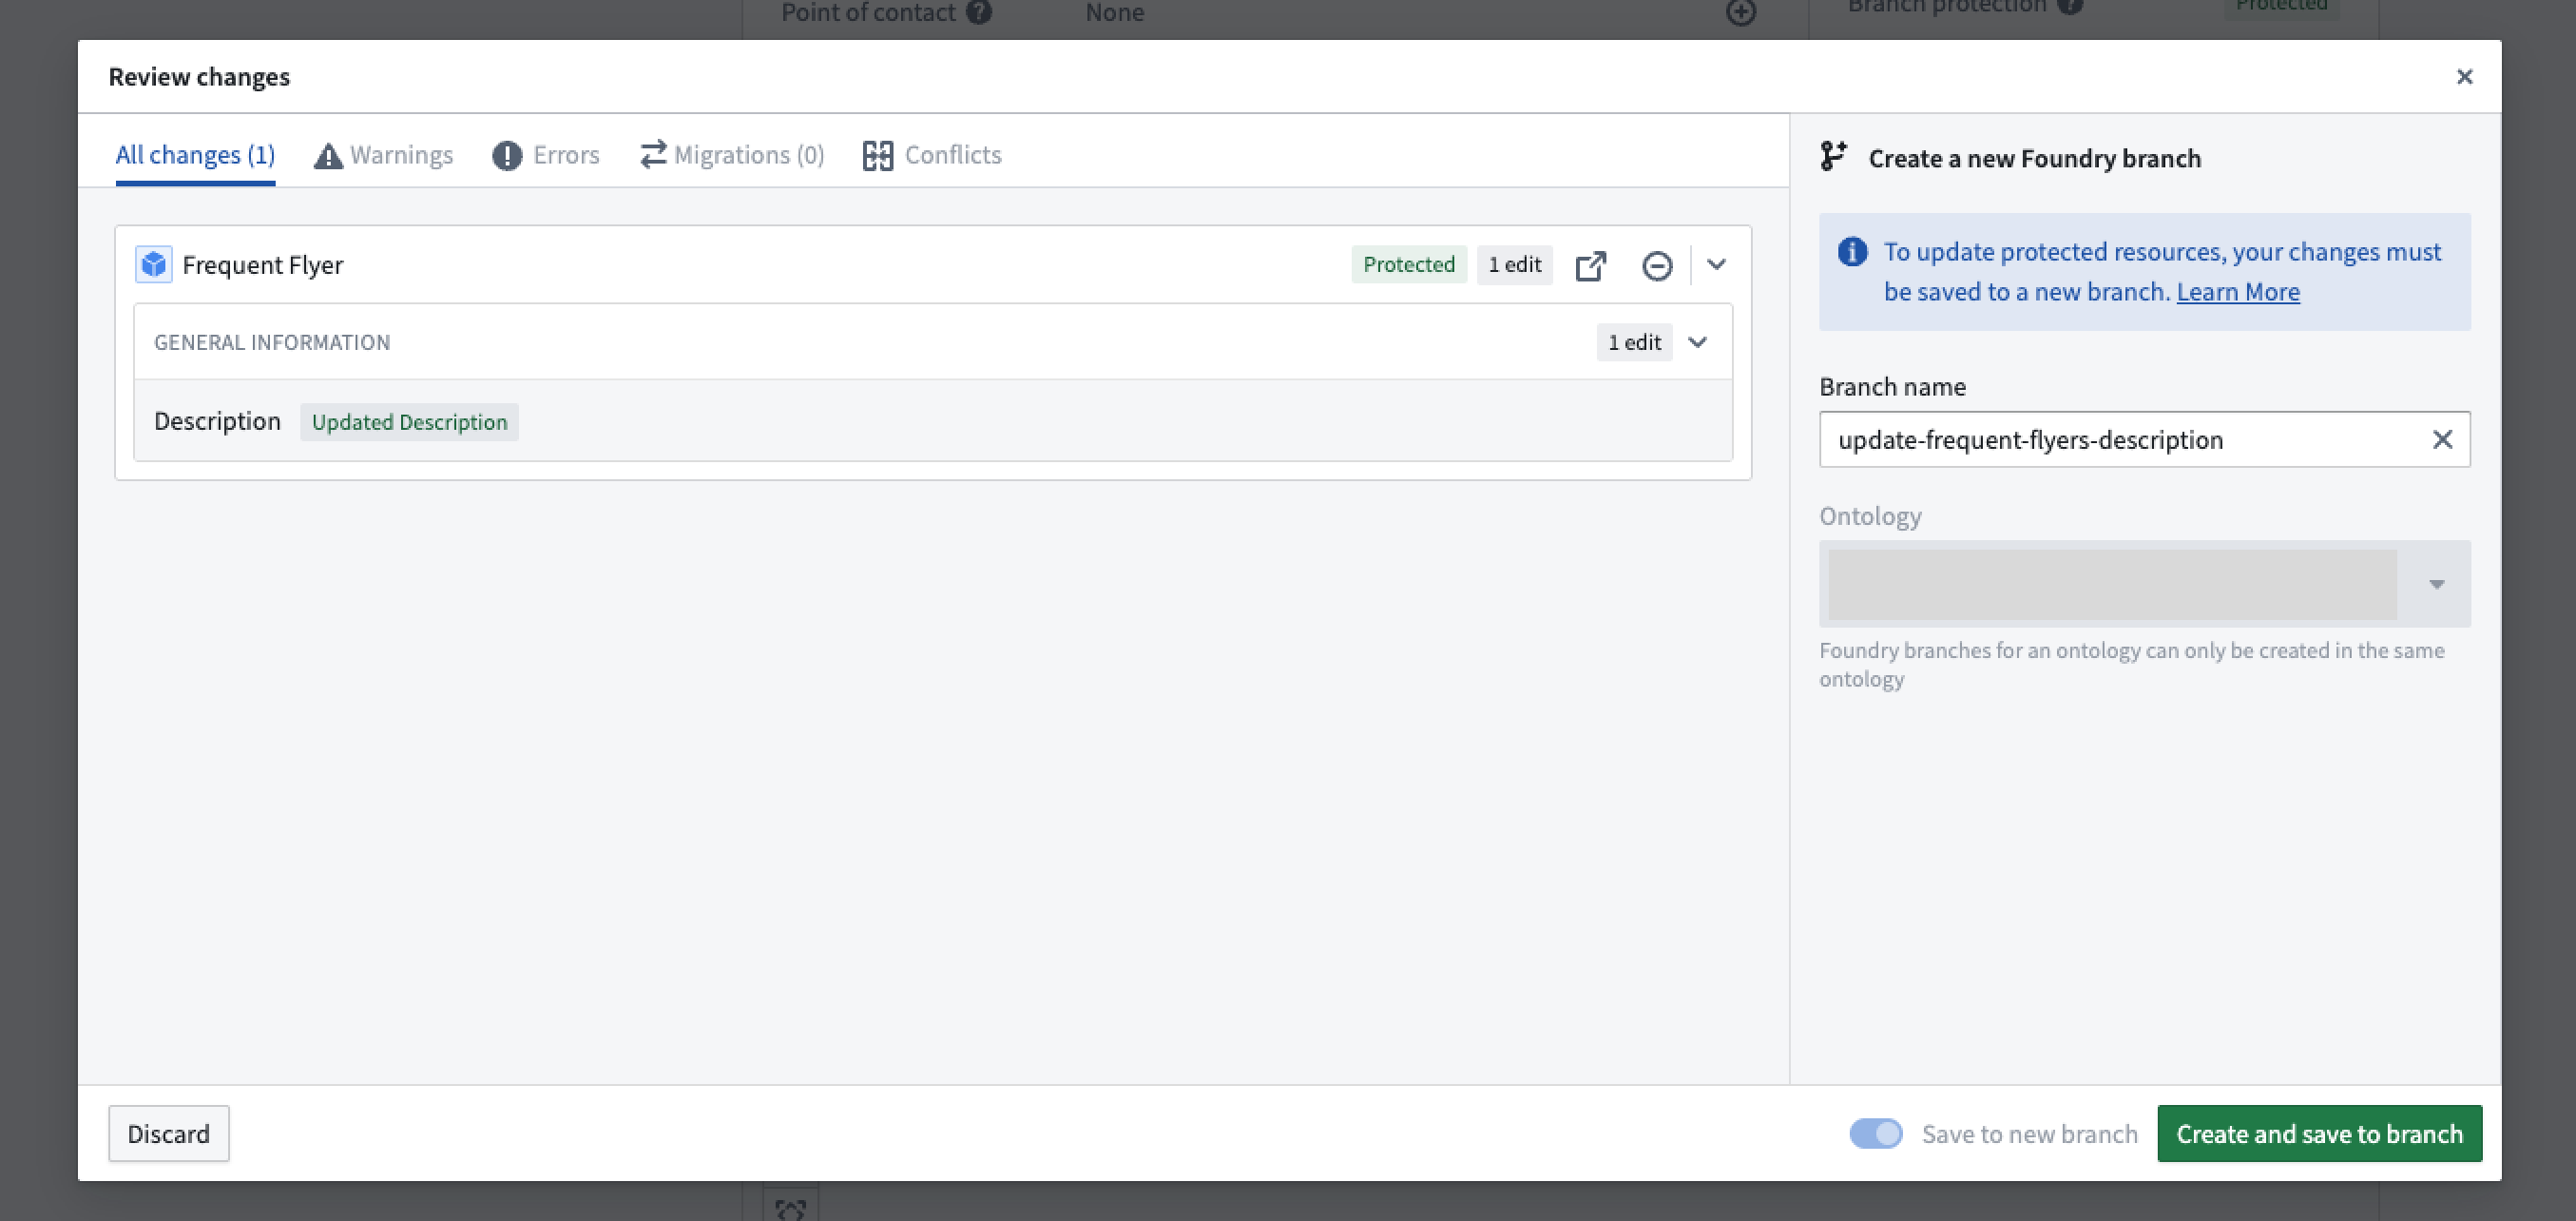
When modifying protected resources, the Save dialog is replaced with Create and save to branch, requiring you to save changes to a new branch.
Rebasing and conflict resolution
While you are introducing changes on your branch, main can also receive new changes from others. Rebasing incorporates the latest changes from main into your current branch to keep your current branch up to date.
:::callout{theme="neutral" title="Automatic rebasing"}
If your global branch does not contain changes to the ontology, rebasing occurs automatically. Once you introduce ontology changes to your branch, including indexing an object type, you will need to manually rebase to keep your branch up to date with main.
:::
Rebase a branch
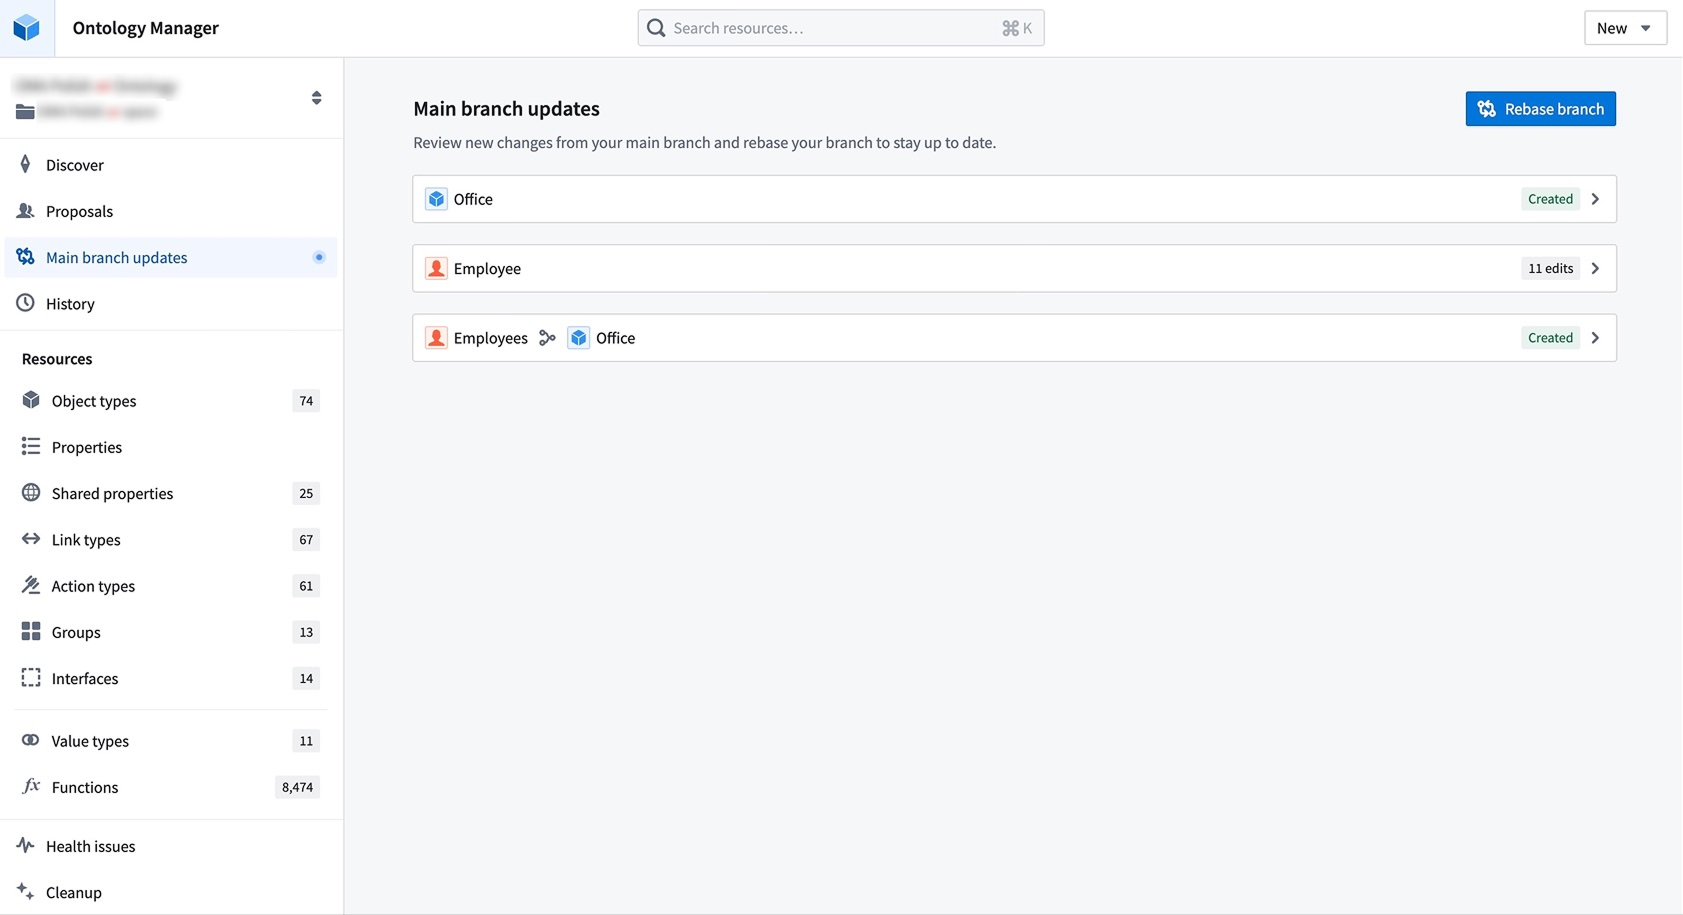
When there are new changes from main, a blue indicator appears on the Main branch updates tab in the sidebar to prompt you to review these changes.

Navigate to the Main branch updates page to view incoming changes since your last rebase — or since branch creation, if this is your first manual rebase. Select Rebase branch to update your branch with the latest version of main.
If there are no conflicts or errors, the rebase will complete automatically, and your branch will be up to date.
Resolve merge conflicts
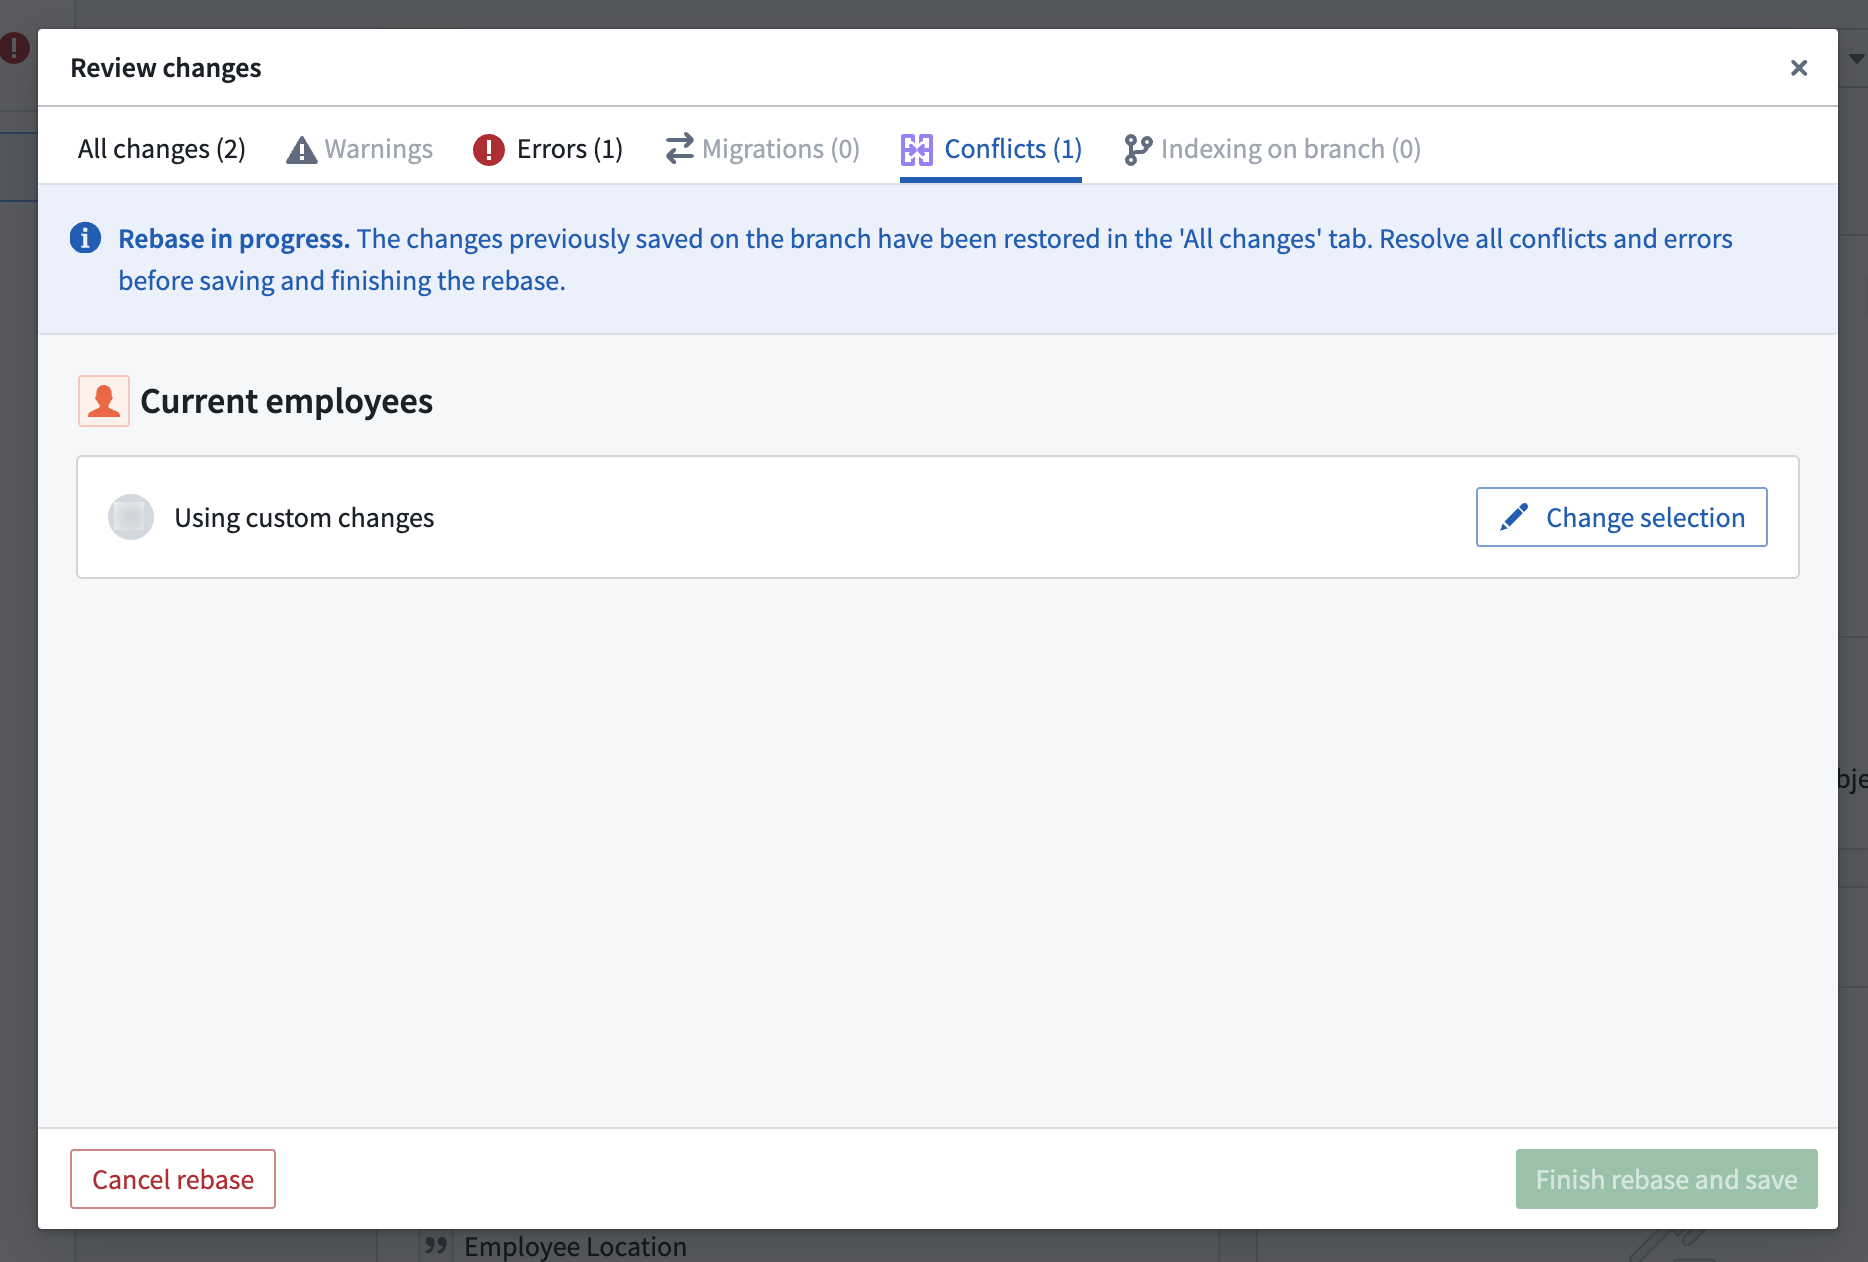
If there are conflicts, your rebase will remain in progress, and you will be redirected to the Conflicts tab to resolve any conflicting changes between your branch and main. If there are only errors, you will be redirected to the Errors tab instead.
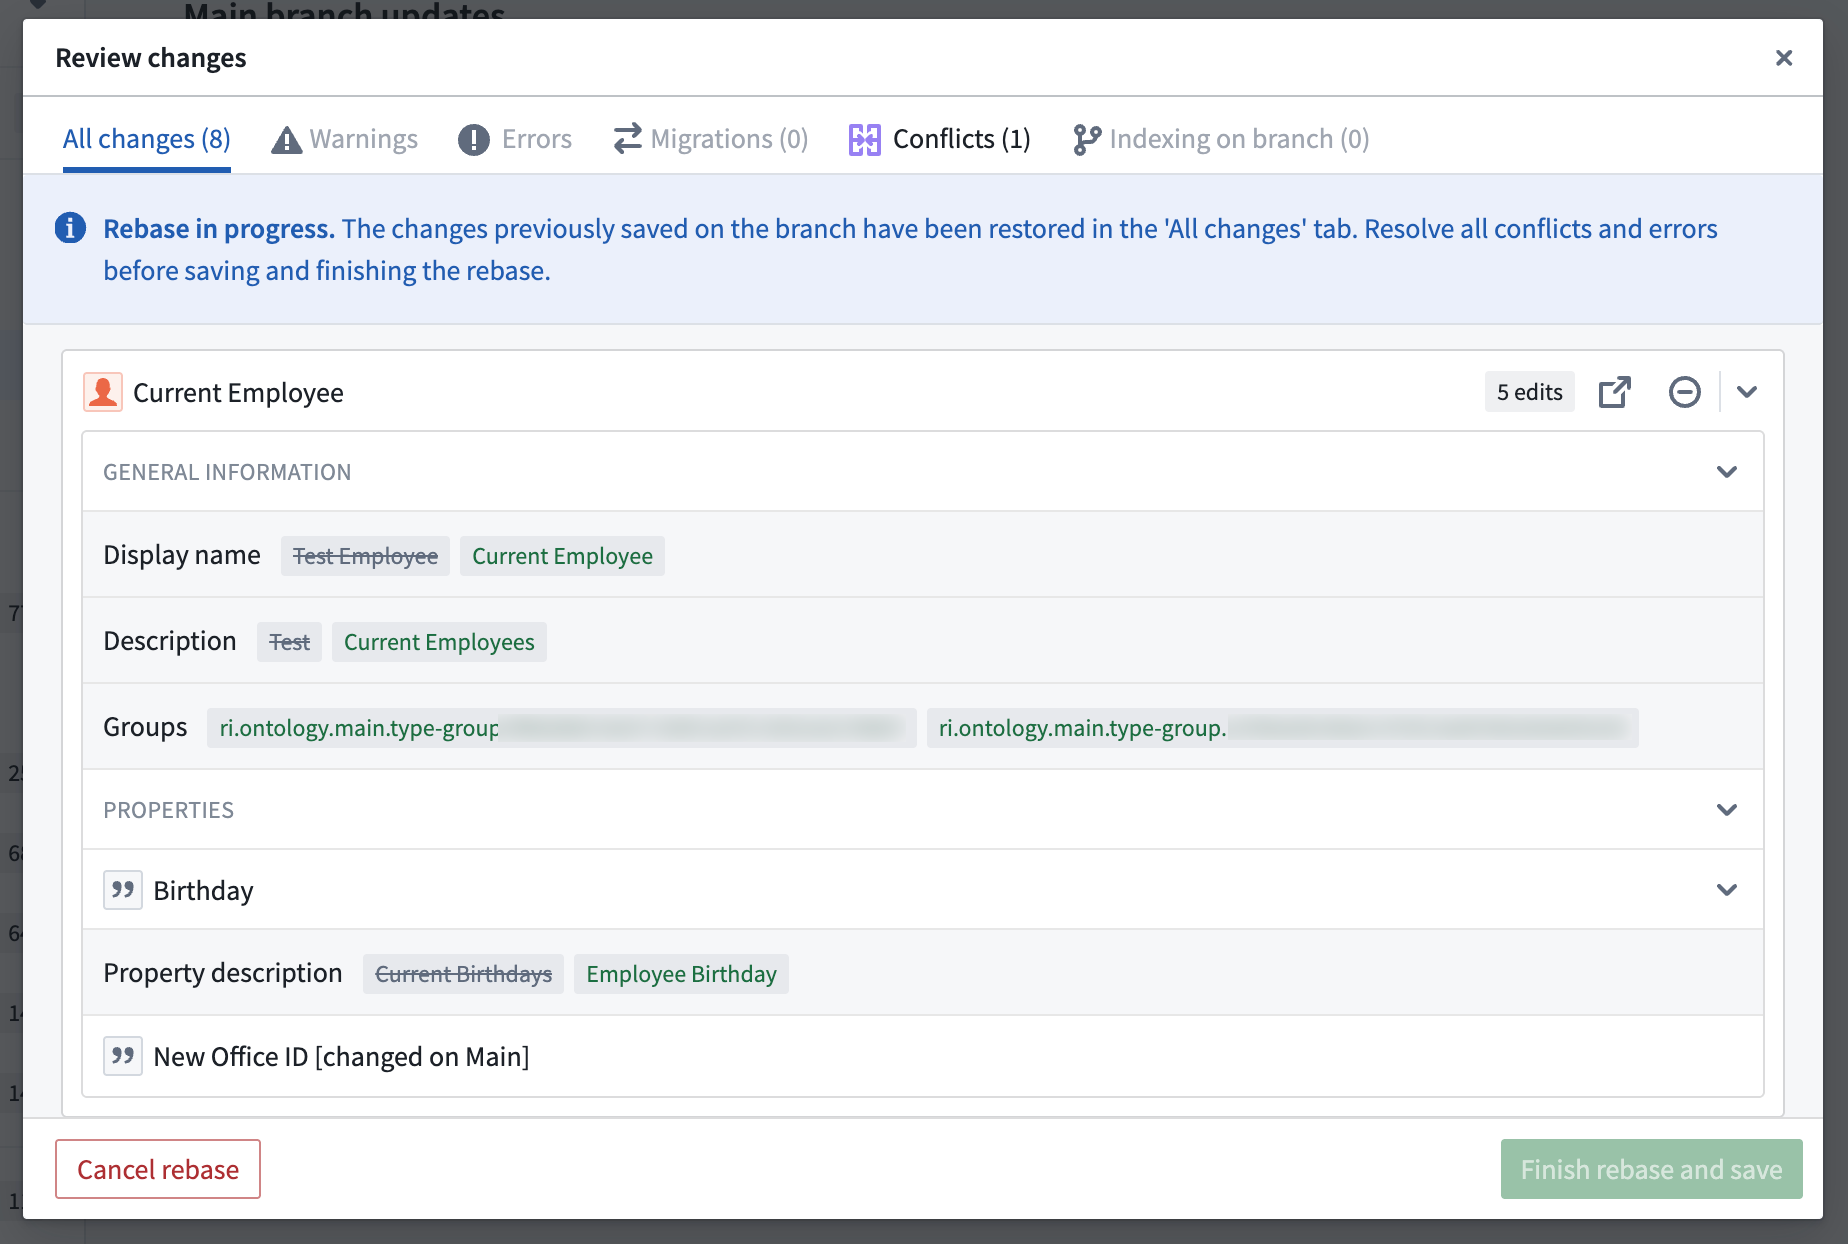
During rebasing, changes from main are loaded onto your branch, while any previously saved changes from your current branch are reloaded back into the working state, which you can see in the All changes tab.
This state allows you to view and access changes from both main and your branch. When an ontology resource has changes from both branches, it will display your branch version by default.
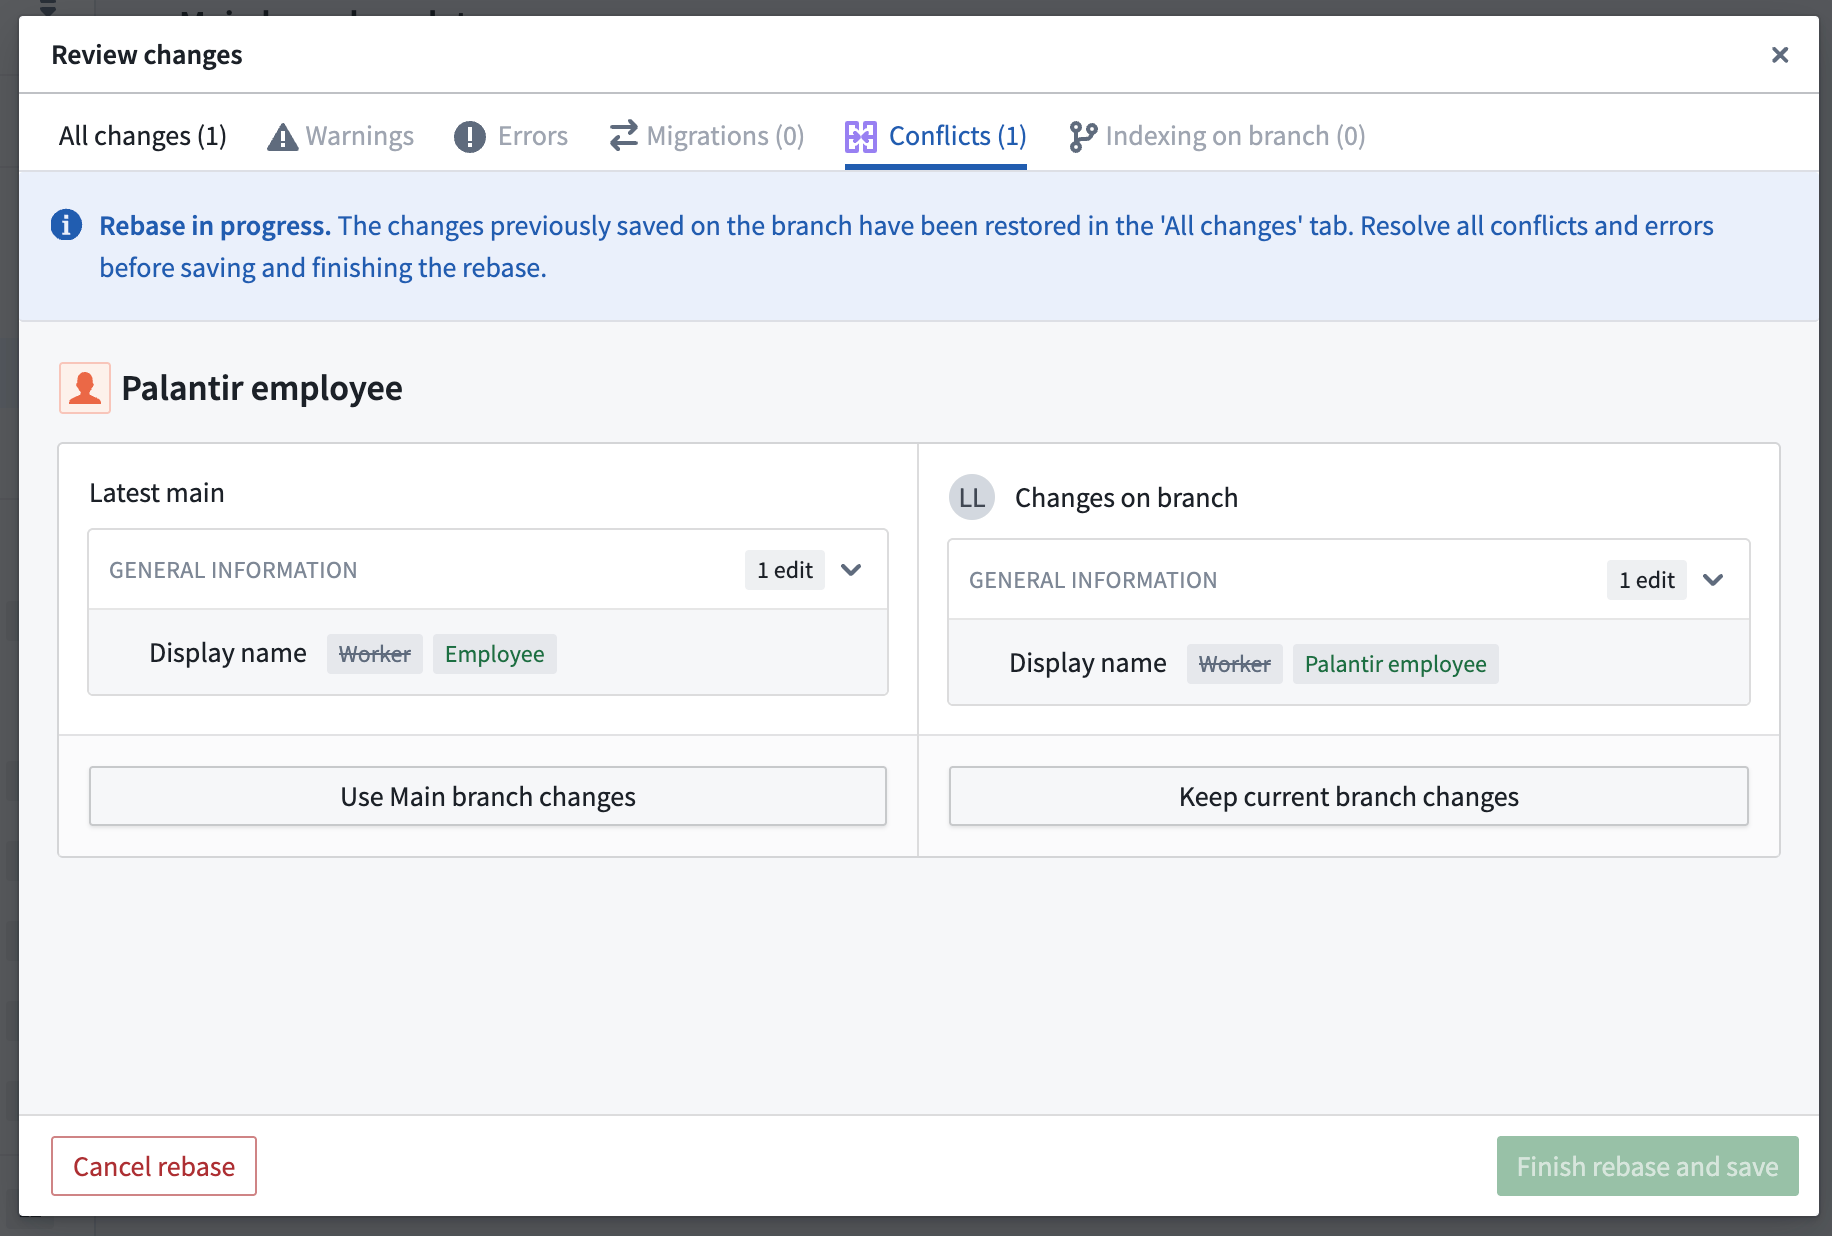
To resolve conflicts, you can choose to Use Main branch changes or Keep current branch changes for each resource. Alternatively, you can navigate directly to that resource and apply custom changes to resolve its conflicts.
In this example, the Palantir employee object type has a conflict in which the display name has been changed on both main branch and your branch. To resolve this conflict, choose which version of this object type to keep.
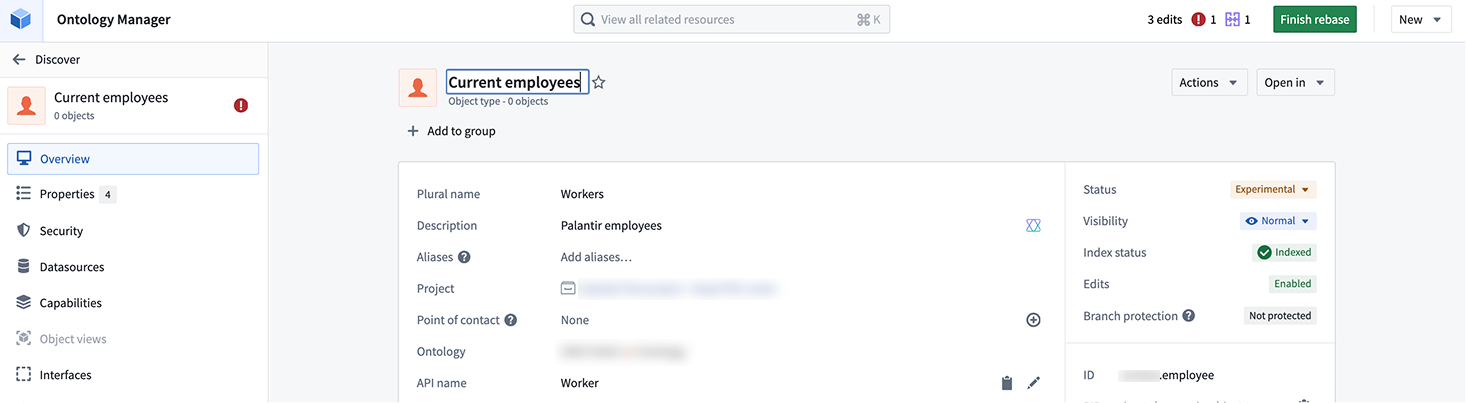
You can also resolve this conflict by making a custom change. In the example, you can navigate to the object type and change its display name from "Palantir employee" to "Current employee". The conflict will now be resolved due to this custom change.
After resolving all conflicts, ensure any errors are addressed before finishing your rebase.
Finish rebase
Once all errors and conflicts have been resolved, you can select Finish rebase and save, and your branch will be up to date.

You can continue working on your branch and rebasing regularly to keep your branch current with the latest version of main branch.

Merge requirements
Prepare your branch for review
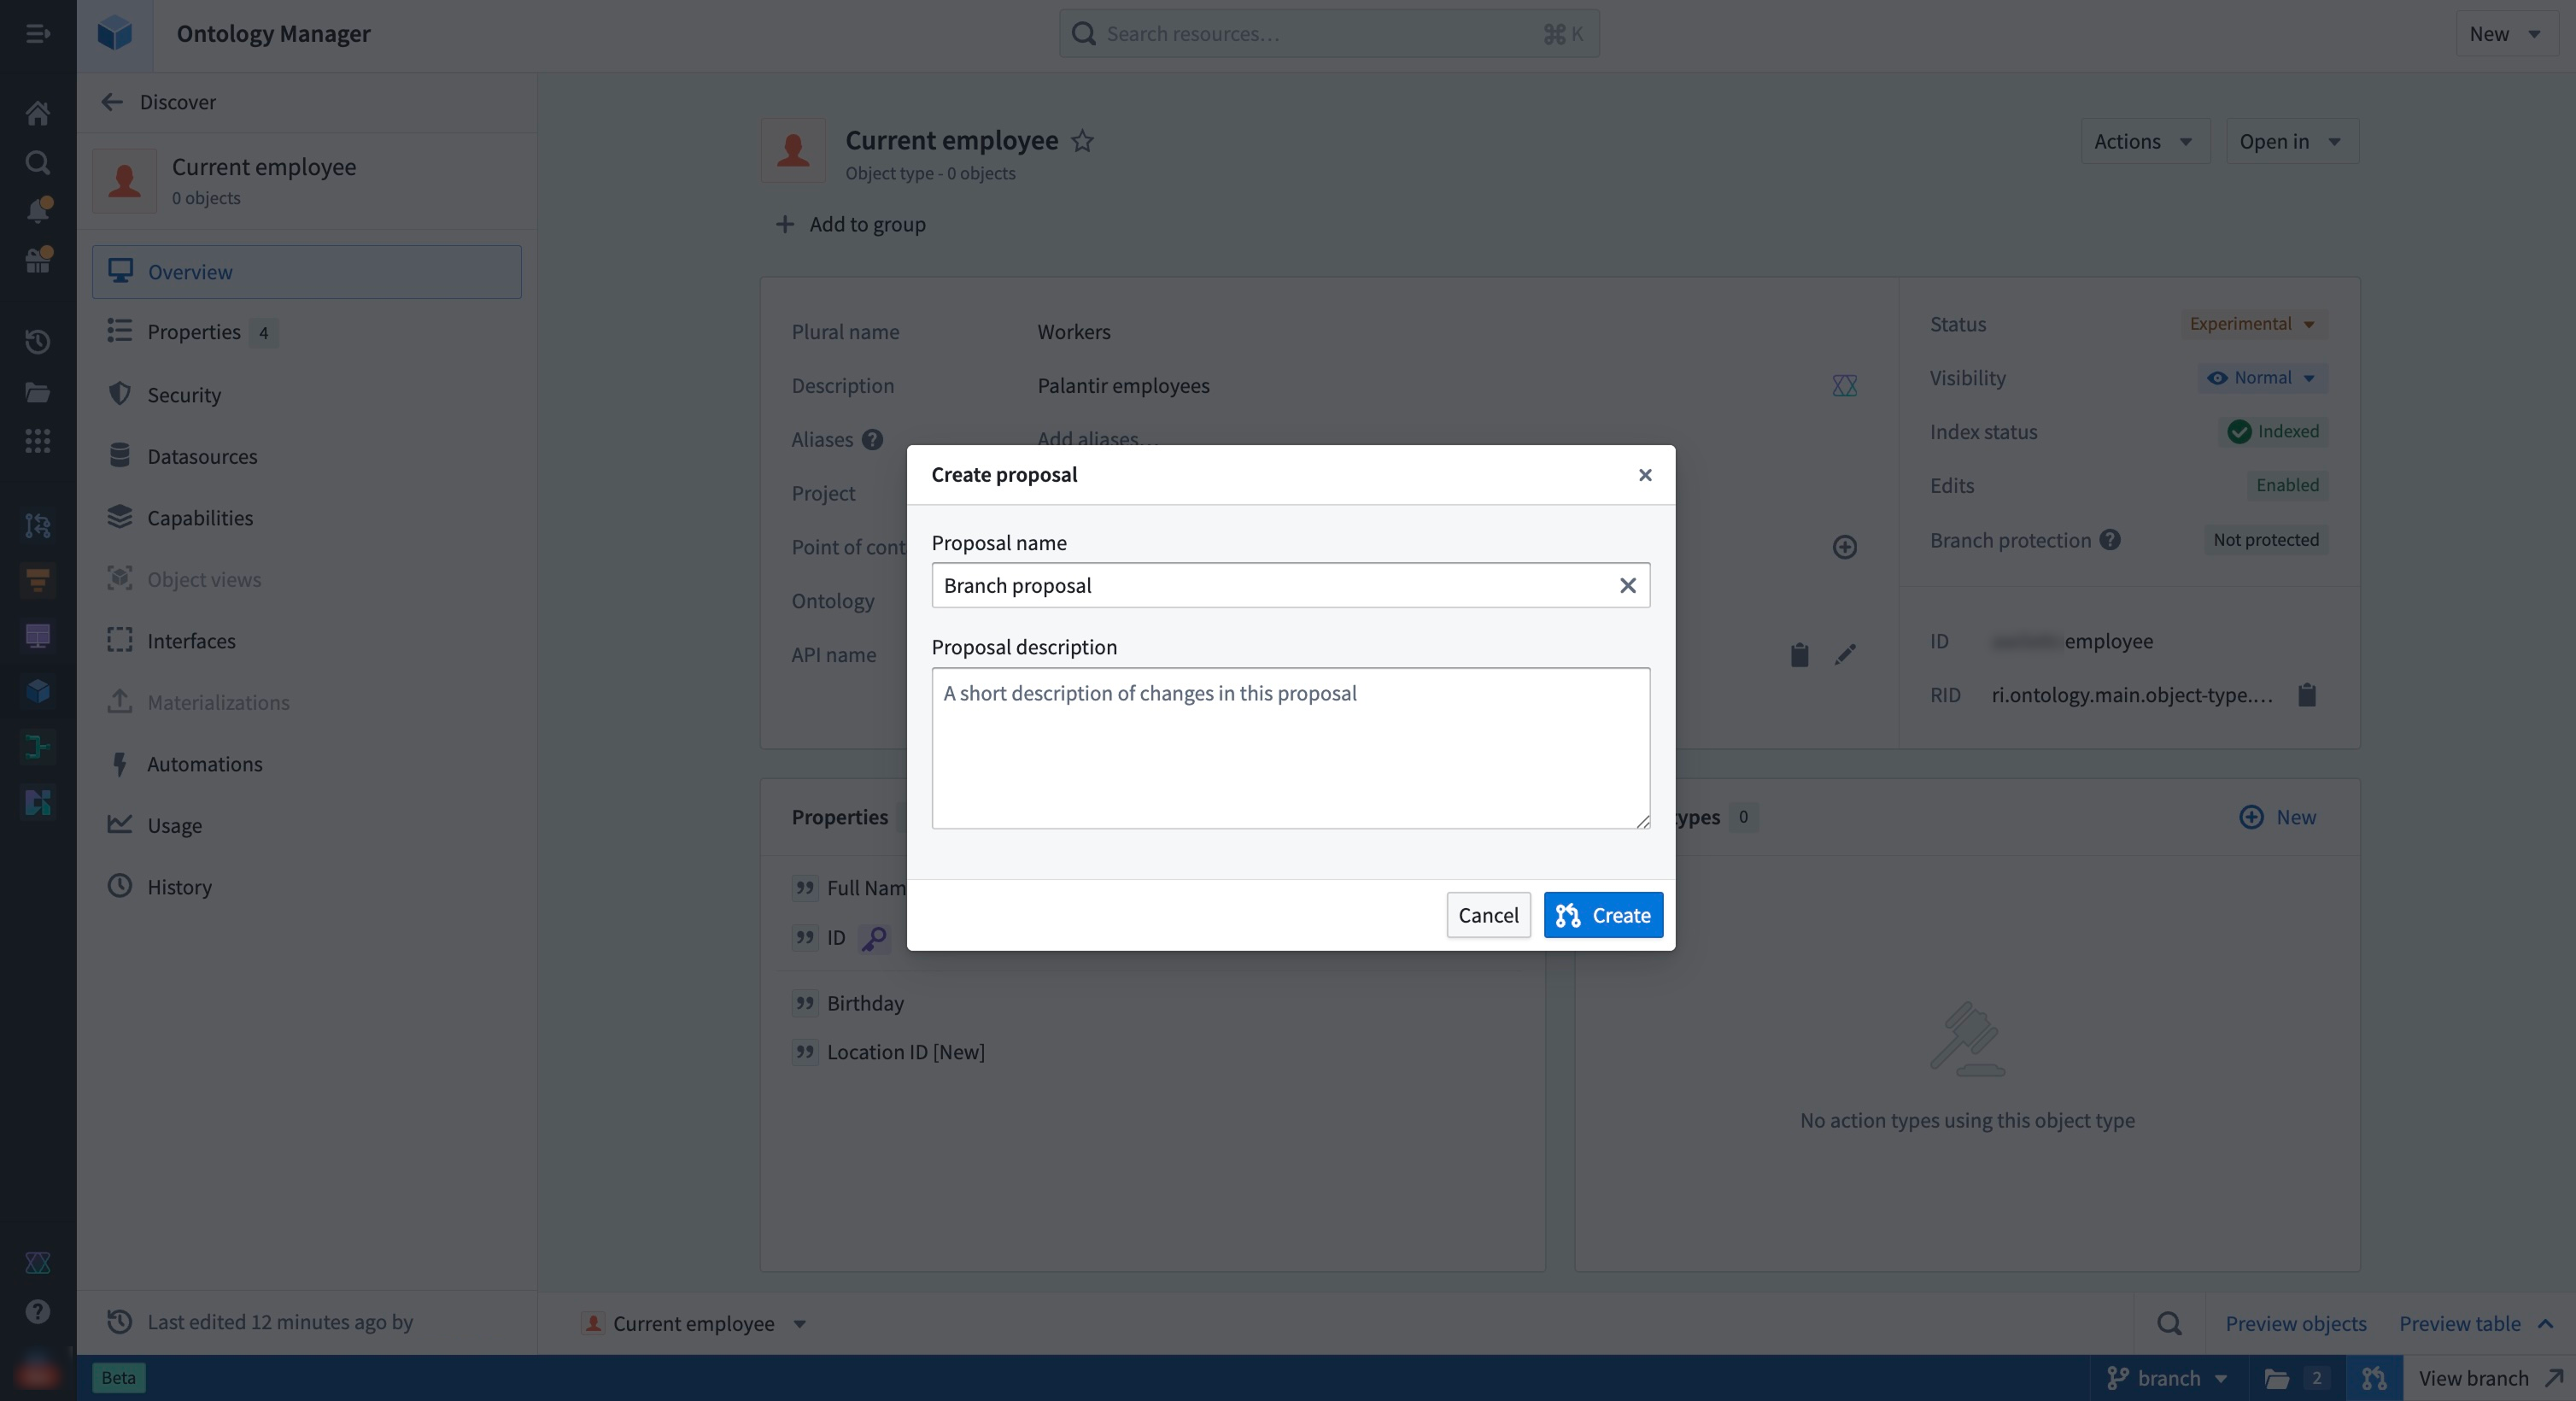
When you are ready to merge your branch into main after making your changes, create a proposal by selecting the Create proposal icon in the branch taskbar. Add a name and description to set up your proposal.

When a proposal is created, merge checks will run to verify whether the resources on a global branch are able to merge into the main branch. Failed checks can include conflicts between your branch and the main branch, which would require you to rebase your branch.

Request a review
You can add reviewers to your proposal through the branch taskbar, the Global Branching proposal page, or the ontology proposal page.
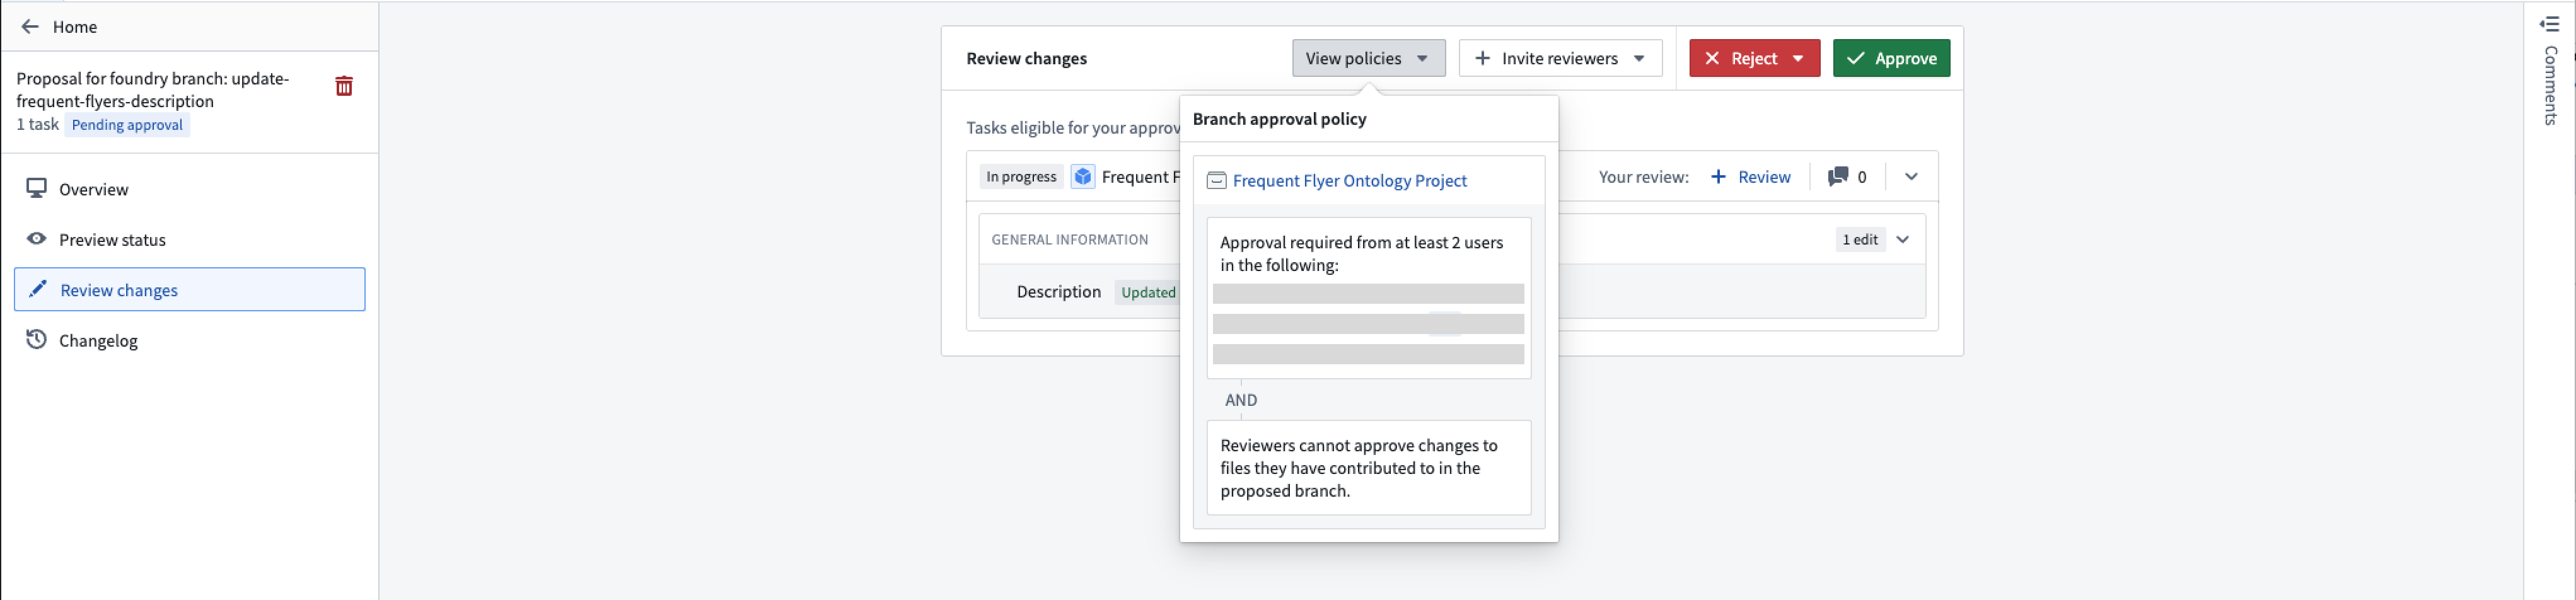
On the ontology proposal page, go to Review changes and select Invite reviewers to add reviewers to your proposal. For ontology resources that have migrated to projects, select View policies to see which reviewers are required to review a resource based on the associated project policies.
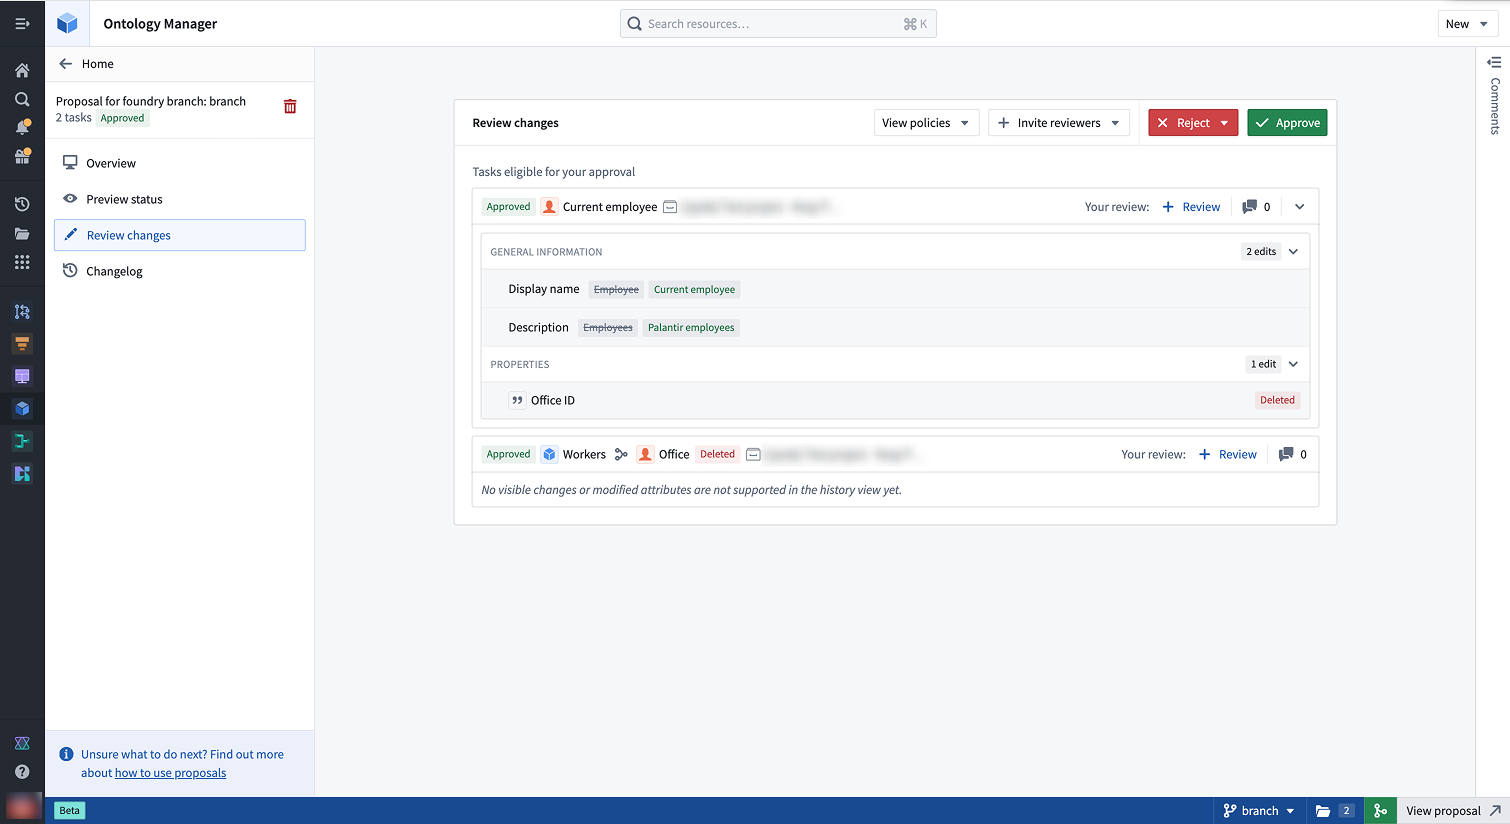
Each ontology resource is considered an individual task. The status tag next to the resource name indicates the overall approval status, while the Your review section on the right allows you to submit a review.
:::callout{theme="neutral"} While ontology entities are treated as separate resources in Global Branching, they are grouped under a single local ontology proposal. This means adding a reviewer to one ontology resource effectively adds that reviewer across all ontology resources. :::
:::callout{theme="info" title="Leaving comments"} You may also leave comments on the various tasks in your proposal to give context about the changes proposed. Access the Comments section of your tasks by selecting the Comments sidebar on the far right. :::
Review the proposal
In the Review changes tab, reviewers may approve or reject individual tasks. Users without permissions may still review the task, for example, to convey their opinions on the change, but this will not affect the approved status of the task.
:::callout{theme="warning" title="Approval rights"} Users with approval rights can approve proposals even if not added as reviewers. Use the reviewers list to track who should review changes, not to restrict approvals. :::
In the ontology proposal, reviewers can view the proposal details and approve or reject changes to all modified resources or to specific ontology resources.
Once the policy requirements are met, approved resources change from In Progress to Approved. You can then merge the proposal if all other checks have passed.
Merge your branch
When you are ready to merge your changes to main, you must merge your Global Branching proposal. This will automatically kick off the merge process for the ontology.

To do so, select the merge icon in the branch taskbar, or navigate to your proposal page in Global Branching and select Merge proposal.
Known limitations
- Datasource deletion: When a conflict occurs on an object type where a backing datasource has been replaced or removed on the
mainbranch, choosing to keep your branch changes will lead to a merge failure. In this case, choose themainbranch changes. - Conditional formatting deletion: When a conflict occurs on a property type where a conditional formatting rule set has been replaced or removed on the
mainbranch, choosing to keep your branch changes will lead to a merge failure. In this case, choose themainbranch changes. - Pipeline Builder object types: Object types created in Pipeline Builder are not modifiable in Ontology Manager on a branch.
- Indexing counts as a modification: Indexing an object type is treated as a modification. If the resource is protected by a project policy, you will need policy approval to merge your branch. To bypass this requirement, remove indexing changes before merging.
- Reviewers apply across all ontology resources: Adding reviewers to one ontology resource adds them to the entire proposal, as ontology changes are grouped together. Only users in a resource's project policy are required to approve that specific resource.
中文翻译
本体分支管理(Branching the ontology)
本体与全局分支管理(Global Branching)集成,支持对本体资源进行安全、隔离的开发。本文档介绍如何在分支上操作本体,包括添加和修改资源、变基(rebasing)与冲突解决、审查与合并流程,以及已知限制。
有关全局分支管理概念和工作流程的通用信息,请参阅全局分支管理文档。
定义
关于分支、提案(proposals)和变基的通用定义,请参阅全局分支管理核心概念。以下术语专用于本体分支:
- 本体提案(Ontology proposal): 当您在包含本体变更的分支上创建全局分支管理提案时,系统会自动创建一个本体提案,用于跟踪本体相关的变更。该提案包含元数据,如审查记录、名称以及将要合并到
main分支的本体变更描述。
添加和修改资源
要修改分支上的本体,您可以在 Ontology Manager 中创建新分支,或使用分支选择器访问现有分支。
要创建分支,请打开分支选择器并选择创建新分支,在弹出的对话框中为分支添加标题和描述。
如果您已有希望包含在分支中的本体变更,可以从保存对话框中选择保存到新分支,从而创建一个包含这些变更的独立分支。请注意,如果您修改了任何受保护的本体资源,则必须保存到新分支。
:::callout{theme="neutral"}
您只能从主本体(即 main 分支)创建分支。
:::
在分支上操作时,界面底部的分支任务栏(branch taskbar)会显示当前分支名称及其他元数据。
资源保护(Resource protection)
支持分支保护的本体资源类型包括:
- 对象类型(Object types)
- 操作类型(Action types)
- 链接类型(Link types)
- 接口类型(Interface types)
- 共享属性类型(Shared property types)
以下资源类型不支持资源保护:
- 类型组(Type groups)
- 规则集(Rule sets)(修改规则集时,将强制执行其所属对象类型的保护状态)
此外,本体资源必须先迁移到项目权限(project permissions)后才能被保护。更多信息请参阅本体权限。
将本体资源迁移到项目权限后,您可以通过父项目的文件选项卡查看和管理其保护状态。
一旦启用保护,您必须在单独的分支上进行修改,并创建提案以将其合并到主分支。
保护状态在 Ontology Manager 的概览选项卡中也可查看:
您还可以在安全选项卡下查看适用的策略:
修改受保护资源时,保存对话框将替换为创建并保存到分支,要求您将更改保存到新分支。
变基与冲突解决
当您在分支上引入变更时,main 分支也可能收到其他人的新变更。变基操作会将 main 分支的最新变更合并到当前分支,使其保持最新状态。
:::callout{theme="neutral" title="自动变基"}
如果您的全局分支不包含本体变更,变基会自动进行。一旦您向分支引入本体变更(包括索引对象类型),您需要手动变基以保持分支与 main 分支同步。
:::
变基分支
当 main 分支有新变更时,侧边栏的主分支更新选项卡上会出现蓝色指示符,提示您审查这些变更。
导航到主分支更新页面,查看自上次变基以来的传入变更——如果是首次手动变基,则查看自分支创建以来的变更。选择变基分支,将分支更新到 main 分支的最新版本。
如果没有冲突或错误,变基将自动完成,您的分支将保持最新状态。
解决合并冲突
如果存在冲突,变基将保持进行中状态,您将被重定向到冲突选项卡,以解决分支与 main 分支之间的冲突变更。如果只有错误,您将被重定向到错误选项卡。
在变基过程中,main 分支的变更会被加载到您的分支上,而当前分支之前保存的变更会重新加载到工作状态中,您可以在所有变更选项卡中查看。
在此状态下,您可以查看和访问来自 main 分支和您分支的变更。当某个本体资源在两个分支上都有变更时,默认显示您分支的版本。
要解决冲突,您可以为每个资源选择使用主分支变更或保留当前分支变更。或者,您可以直接导航到该资源并应用自定义变更来解决冲突。
在此示例中,Palantir employee 对象类型存在冲突,其显示名称在 main 分支和您的分支上都被修改了。要解决此冲突,请选择保留该对象类型的哪个版本。
您也可以通过进行自定义变更来解决此冲突。在示例中,您可以导航到该对象类型,将其显示名称从"Palantir employee"更改为"Current employee"。此自定义变更将解决冲突。
解决所有冲突后,请确保在完成变基前处理所有错误。
完成变基
当所有错误和冲突都已解决后,您可以选择完成变基并保存,您的分支将保持最新状态。
您可以继续在分支上工作,并定期进行变基,以保持分支与 main 分支的最新版本同步。
合并要求
准备分支以供审查
当您完成变更并准备将分支合并到 main 分支时,请点击分支任务栏中的创建提案图标来创建提案。添加名称和描述以设置您的提案。
创建提案后,合并检查将运行,以验证全局分支上的资源是否能够合并到 main 分支。检查失败可能包括分支与 main 分支之间存在冲突,此时您需要变基分支。
请求审查
您可以通过分支任务栏、全局分支管理提案页面或本体提案页面,向提案添加审查者。
在本体提案页面上,转到审查变更并选择邀请审查者,向提案添加审查者。对于已迁移到项目的本体资源,选择查看策略,以查看根据关联项目策略需要审查该资源的审查者。
每个本体资源被视为一个独立任务。资源名称旁的状态标签表示总体审批状态,而右侧的您的审查部分允许您提交审查意见。
:::callout{theme="neutral"} 虽然本体实体在全局分支管理中被视为独立资源,但它们被归入同一个本地本体提案。这意味着,为某个本体资源添加审查者,实际上会将该审查者添加到所有本体资源中。 :::
:::callout{theme="info" title="发表评论"} 您还可以在提案中的各个任务上留下评论,以提供关于提议变更的背景信息。通过选择最右侧的评论侧边栏,可以访问任务的评论部分。 :::
审查提案
在审查变更选项卡中,审查者可以批准或拒绝单个任务。没有权限的用户仍然可以审查任务(例如,表达他们对变更的看法),但这不会影响任务的批准状态。
:::callout{theme="warning" title="审批权限"} 拥有审批权限的用户即使未被添加为审查者,也可以批准提案。请使用审查者列表来跟踪谁应该审查变更,而不是限制审批权限。 :::
在本体提案中,审查者可以查看提案详情,并批准或拒绝所有已修改资源或特定本体资源的变更。
一旦满足策略要求,已批准的资源状态将从进行中变为已批准。如果所有其他检查均已通过,您就可以合并提案。
合并分支
当您准备将变更合并到 main 分支时,必须合并您的全局分支管理提案。这将自动启动本体的合并过程。
为此,请点击分支任务栏中的合并图标,或导航到全局分支管理中的提案页面并选择合并提案。
已知限制
- 数据源删除: 当对象类型发生冲突,且
main分支上的支持数据源已被替换或删除时,选择保留分支变更将导致合并失败。在这种情况下,请选择main分支的变更。 - 条件格式删除: 当属性类型发生冲突,且
main分支上的条件格式规则集已被替换或删除时,选择保留分支变更将导致合并失败。在这种情况下,请选择main分支的变更。 - Pipeline Builder 对象类型: 在 Pipeline Builder 中创建的对象类型无法在分支上的 Ontology Manager 中修改。
- 索引视为修改: 索引对象类型被视为一次修改。如果该资源受项目策略保护,则需要策略批准才能合并分支。要绕过此要求,请在合并前移除索引变更。
- 审查者适用于所有本体资源: 为某个本体资源添加审查者,会将其添加到整个提案中,因为本体变更是分组在一起的。只有资源项目策略中的用户才需要批准该特定资源。