Migrate to project-based permissions(迁移至项目级权限(project-based permissions))
Ontology resources, including object types, action types, link types, interfaces, and shared properties, can be saved within specific projects and automatically inherit permissions from those projects. Object and link instance permissions remain dependent on the backing datasource location. Once migrated permissions to view, edit, and manage ontology resources are managed through Compass, the Palantir platform's filesystem. Project-based permissions replaces the previous ontology roles and datasource-derived permissions models. This is the same permission model used for all other resource types.
You can migrate your existing ontology resources to project-based permissions using our migration tool. This tool suggests the placement of ontology resources into appropriate projects while ensuring they receive the correct permissions.
:::callout{theme="warning"} Once a resource has been migrated to project-based permissions, it cannot be reverted to ontology roles or datasource-derived permissions. :::
To turn on project-permissioning for new ontology resources, ontology owners can navigate to the Ontology configuration tab in Ontology Manager and toggle on Require new ontology resources be saved in a project. Once enabled, users will be prompted to choose a save location when creating new ontology resources.
Limitations
Before starting, be aware of the following limitations:
- This feature is not yet available for Default ontologies. Contact Palantir Support if you are not sure of your ontology type.
- Ontology resource names must conform to Compass conventions. Forward slashes ("/") are not allowed, and duplicate names are not permitted. While aliases allow duplicate names to be rendered, the system removes duplicates by appending "(1)" to ensure unique paths.
- Each ontology resource must have a unique name
- Example:
common/utility-roomis invalid due to the forward slash - An Ontology's resources must be saved in a project within the same space as the ontology itself.
Approaches to migration
Before starting the migration, consider how you want to organize your ontology resources:
-
Save ontology resources alongside datasources or in use case projects: Keeping ontology resources next to their corresponding datasources ensures consistent permissions across resources and instances. This approach lets you grant permissions to the entire use case in one place, ensuring the right users can view, edit, or manage all components together.
-
Save ontology resources in a dedicated project: Create one or more separate projects specifically for ontology resources. Grant broad access to these projects to make ontology resources viewable to everyone who needs them.
-
Hybrid approach: Save core ontology resources into a single project that everyone has permissions to view. Save use case specific resources in use case specific projects. This prevents ontology pickers and search screens becoming cluttered with use case specific ontology resources.
:::callout{theme="neutral"} Ontology resources have separate permissions from object and link instances. This migration affects only ontology resource permissions. Object and link instances permissions remain based on the backing datasource location. :::
How migration changes Marketplace installs
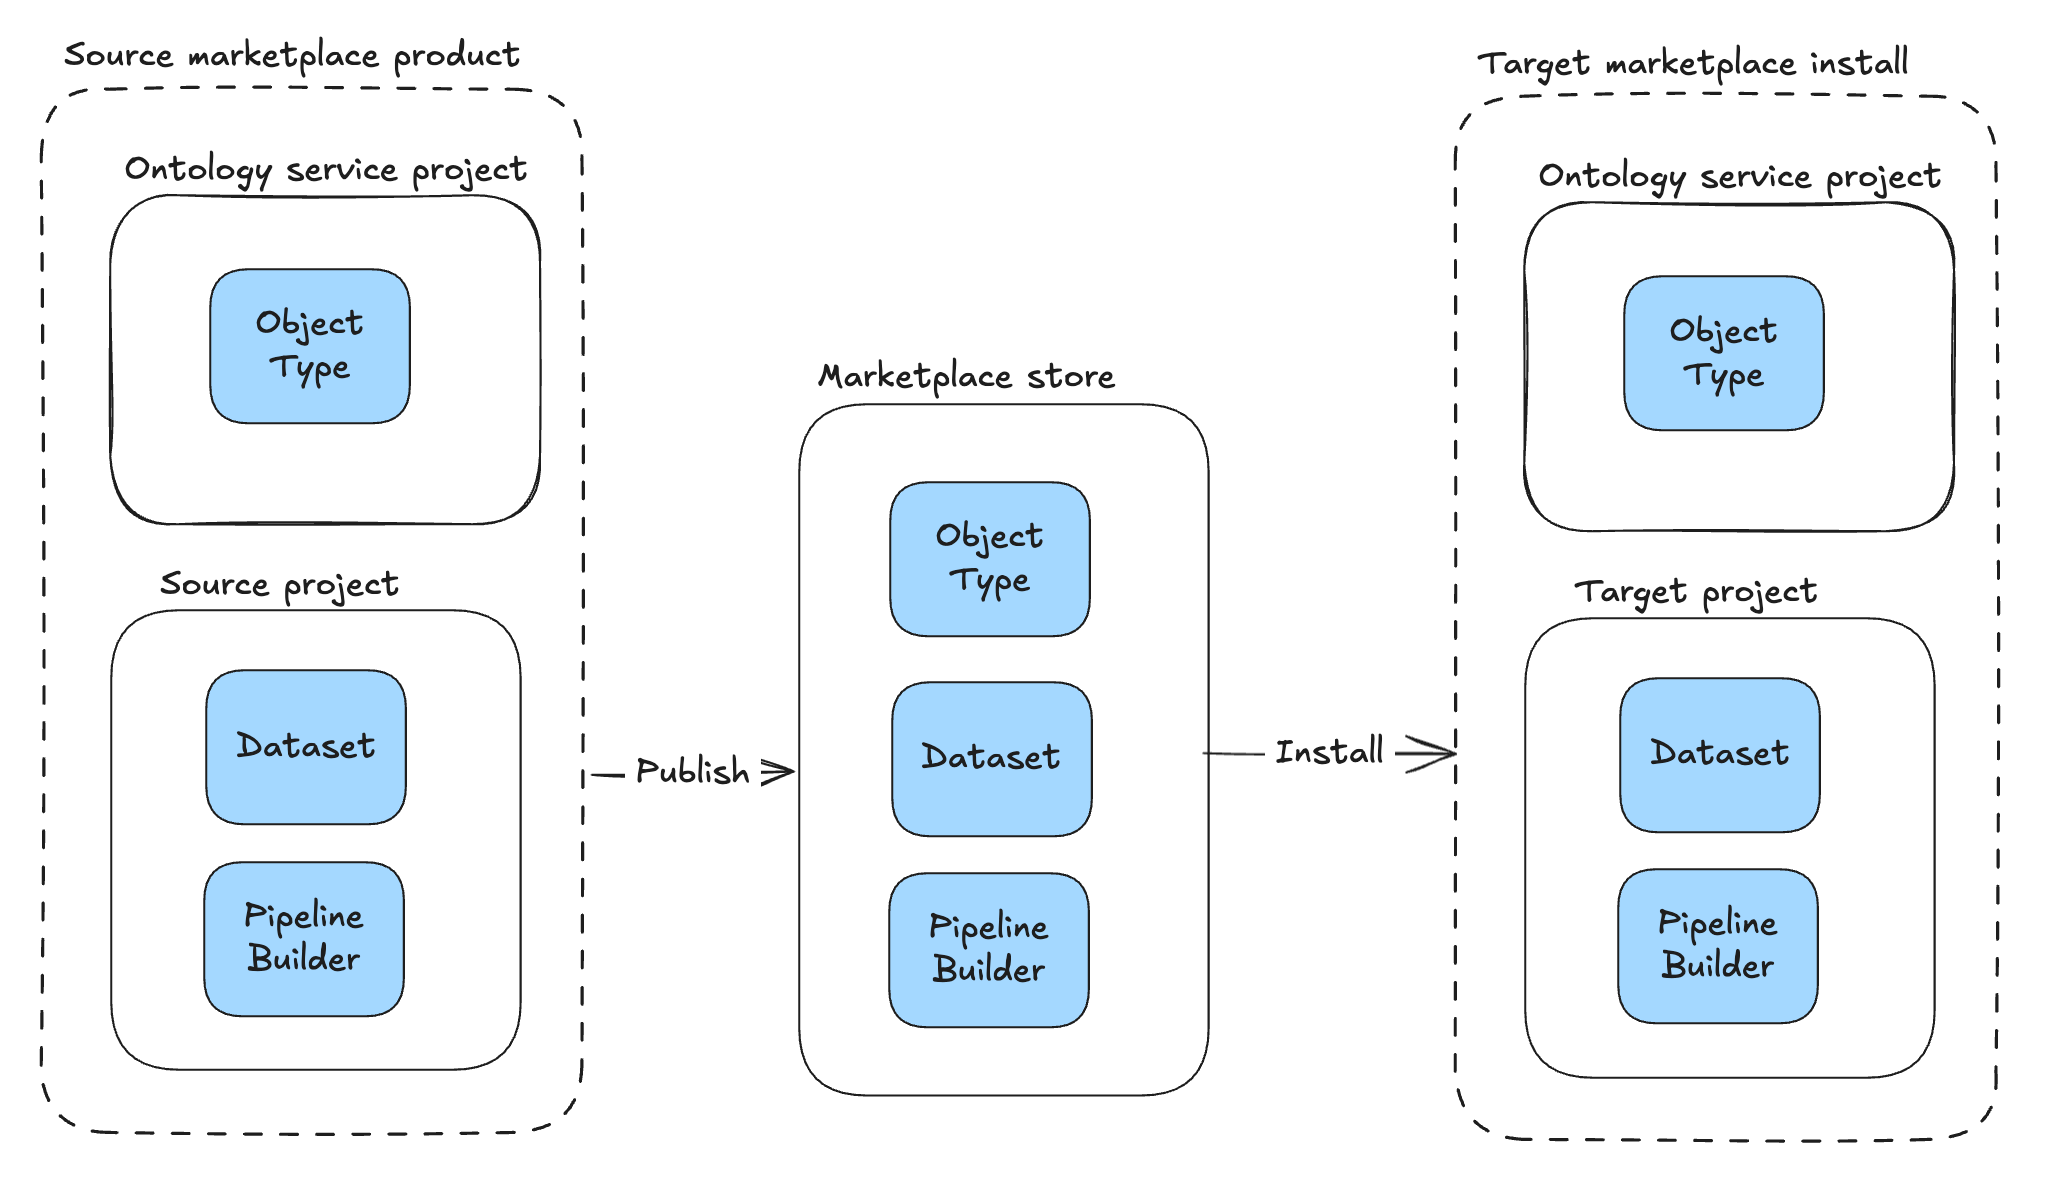
Before you migrate to project permissioning, ontology resources live in the Ontology service project, a system-managed project that holds all ontology resources for an ontology under the legacy permission models. In the Ontology service project, every user has a default Viewer grant on ontology resources, and the resources do not carry file classifications. When you install a Marketplace product, the ontology resources are placed in this Ontology service project, while the non-ontology files are placed in the target project the installing user chooses:
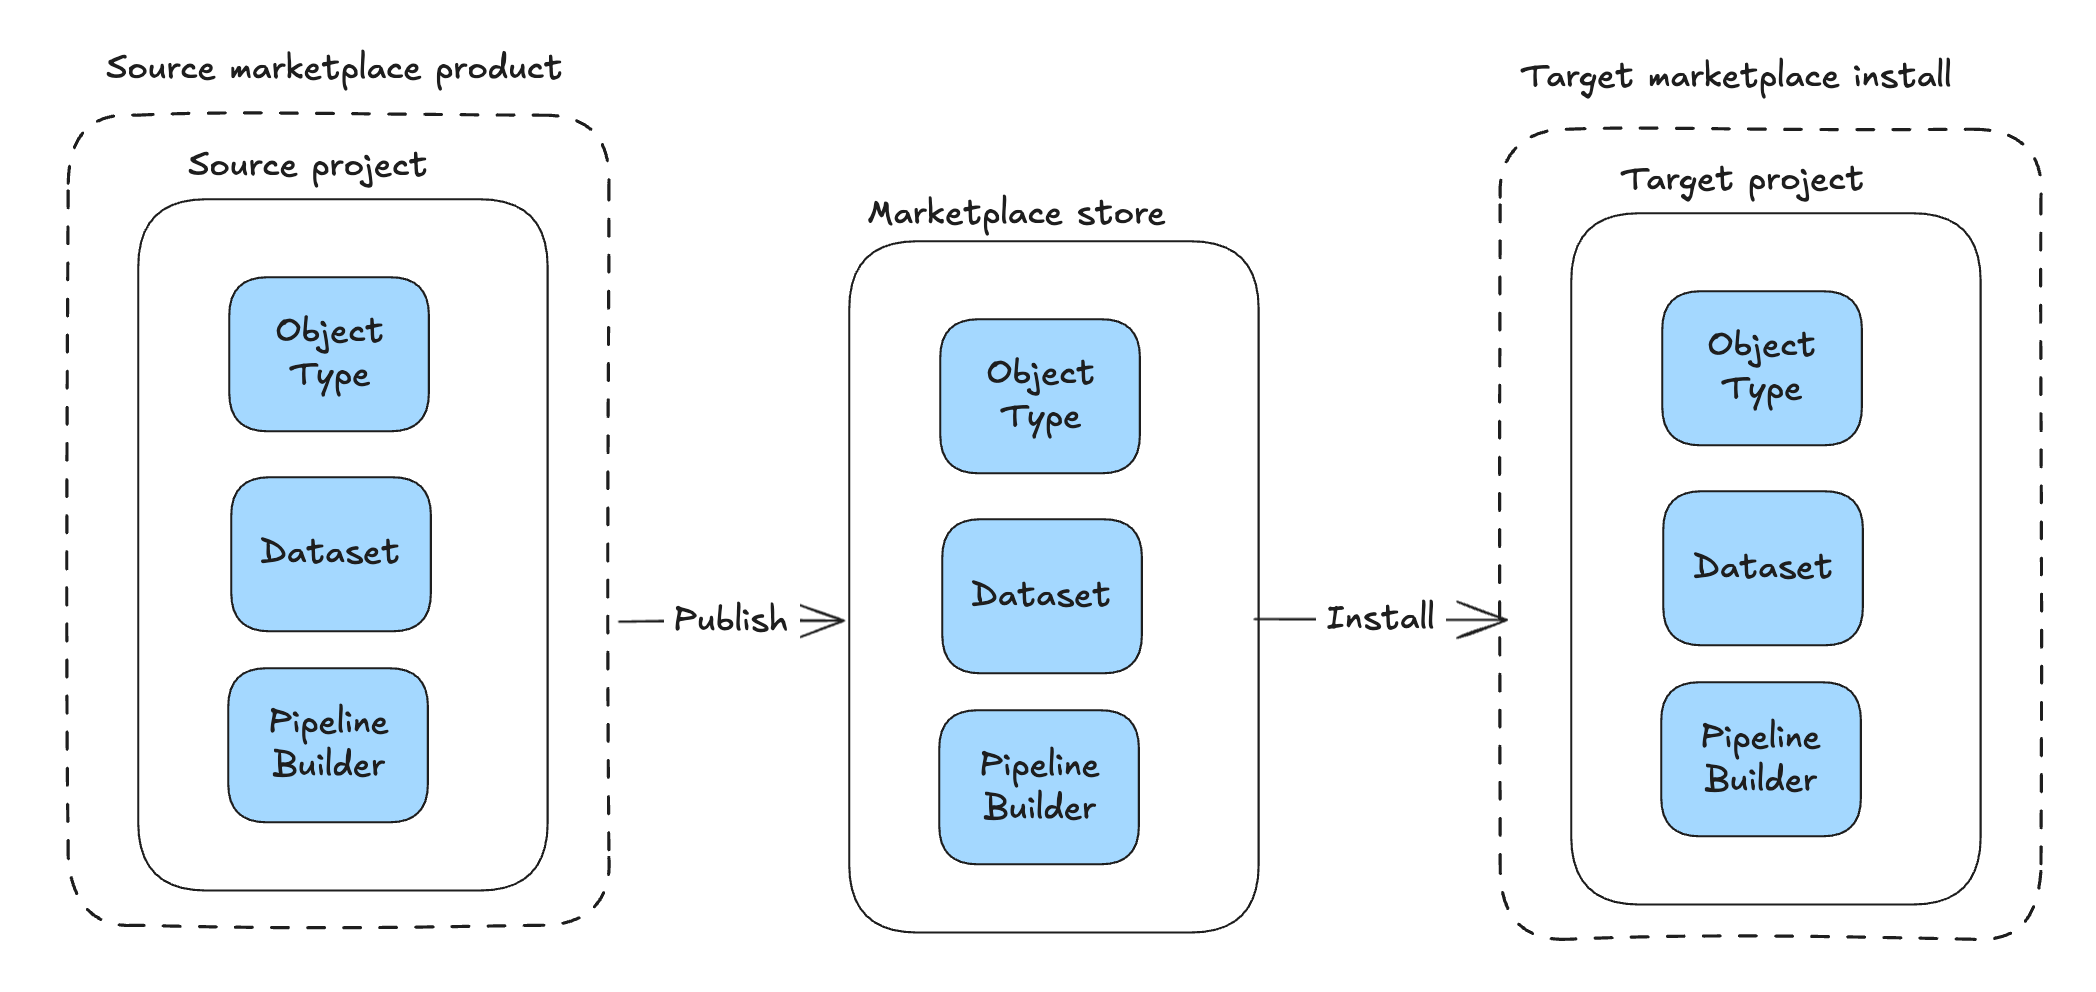
After you migrate to project permissioning, the same product installs the ontology resources directly into the chosen target project alongside the rest of the files, and the project's role grants and classifications apply to them:
The Ontology service project gives every user a default Viewer grant and carries no classifications, so the target project's tighter role grants — along with any mandatory markings or maximum classification it enforces — can narrow the visibility of installed ontology resources compared to before migration. To keep the ontology resources at a different visibility from the other files in the product, split the product into two linked Marketplace products: one containing the ontology resources, installed into a more permissive project, and a second containing the remaining files, installed into a more restricted project.

Use the migration assistant (recommended)
The migration assistant helps you quickly identify suitable projects and locations for your ontology resources.
To access the migration assistant: Select your ontology, navigate to the Ontology configuration page, and select Proceed to migration under the Migrations section.

Strong recommendations for where to move resources are preselected to accelerate your workflow, while weaker suggestions remain unselected for your review. After confirming your selections, proceed with the migration. Before finalizing, you can create necessary imports or cancel the operation.
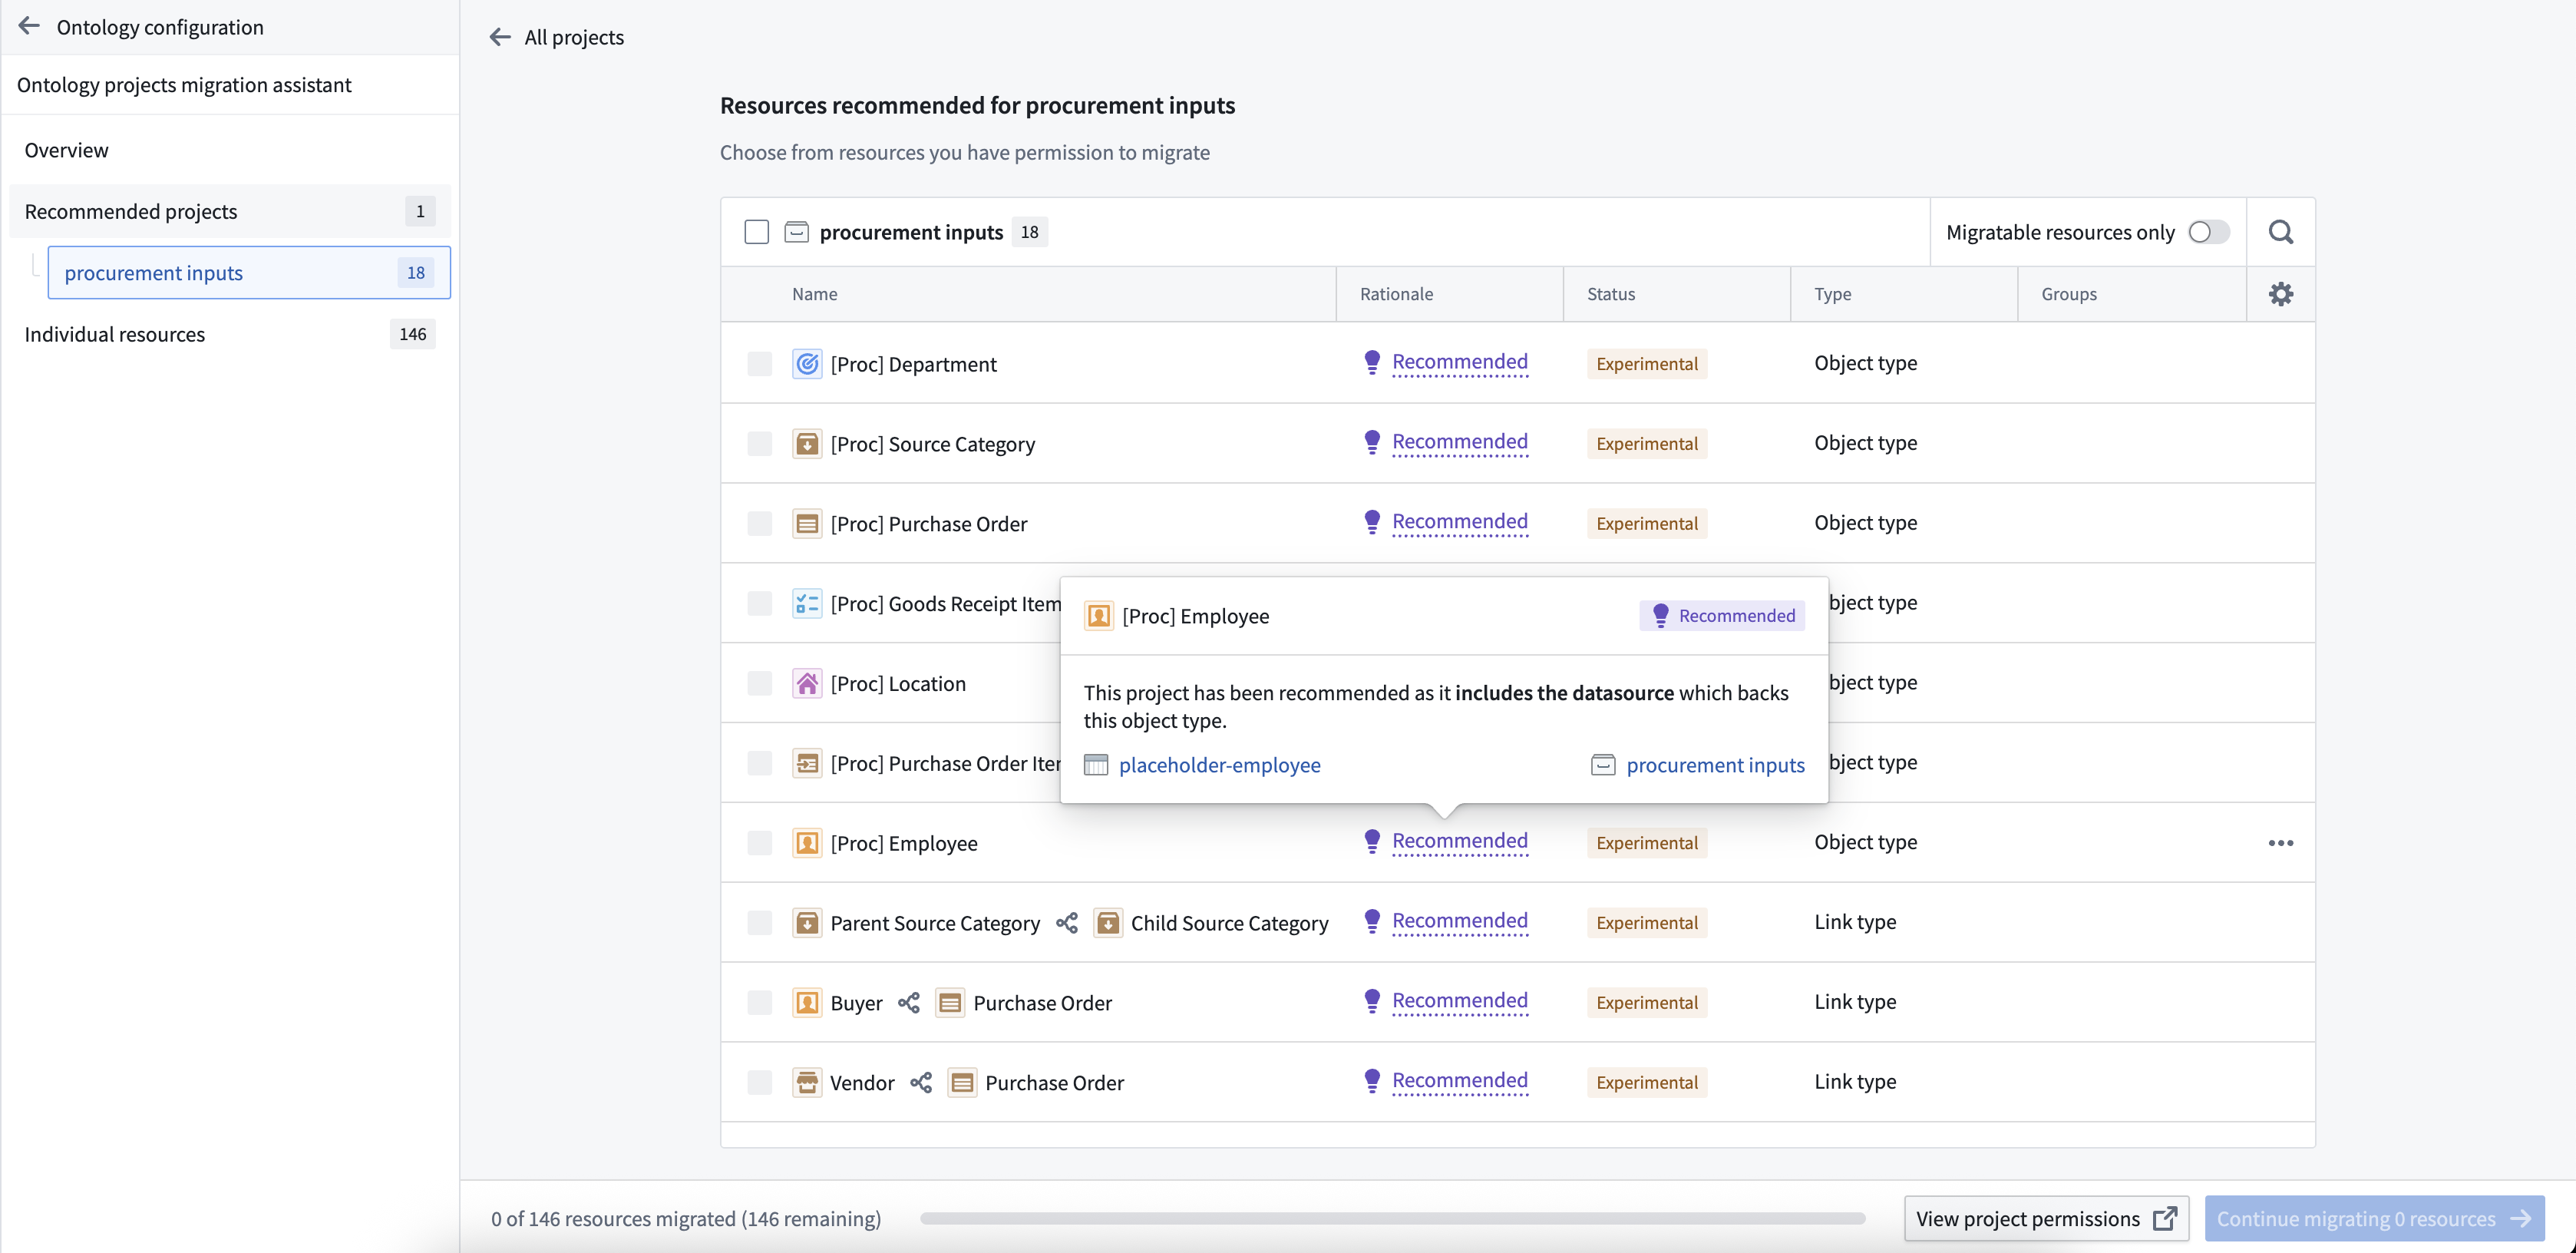
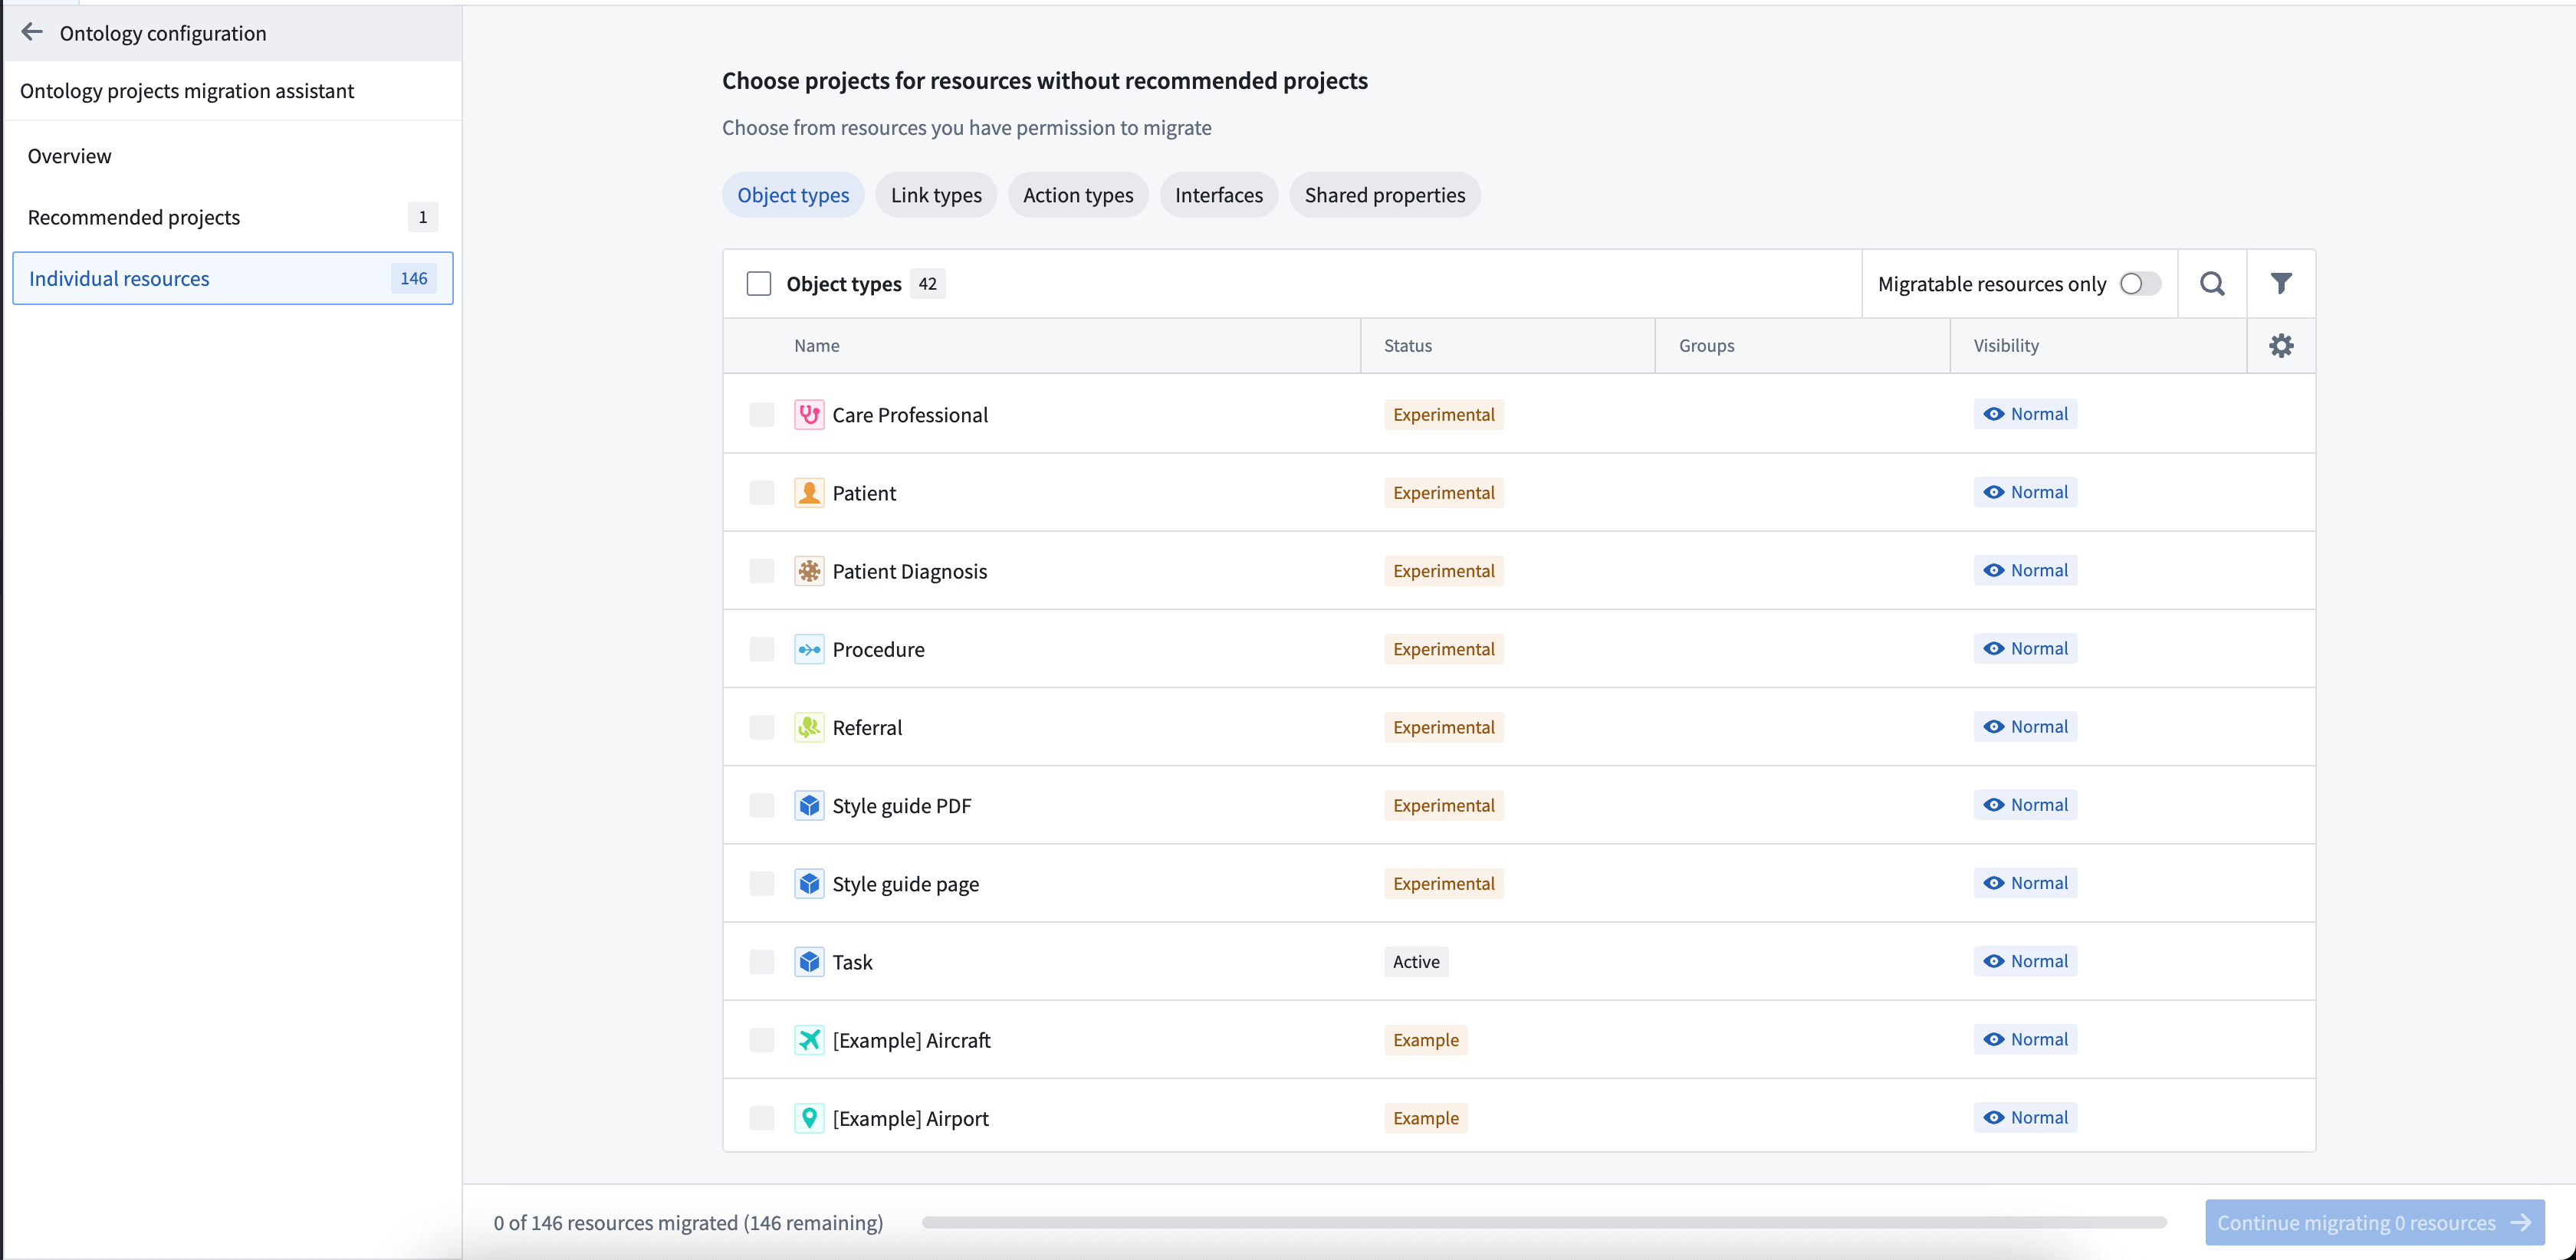
These recommendations help you make faster, more informed decisions about resource placement. If no recommendations are available, you can manually select locations in the Individual resources tab of the migration assistant.
Migrate resources directly
You can also migrate resources without using the assistant, which is useful when you know exactly where resources should go or want to migrate specific resources quickly.
-
Bulk migrate multiple resources: Select your ontology, then choose a resource type from the Resources section in the left sidebar. Select the items to migrate, then use the dropdown menu to select Project permission migration.

-
Migrate an individual resource: Open an ontology resource and use the Actions dropdown menu on the Overview page to select Project permission migration.

中文翻译
迁移至项目级权限(project-based permissions)
本体(Ontology)资源包括对象类型(object type)、操作类型(action type)、链接类型(link type)、接口(interface)和共享属性(shared property),可保存在指定项目中并自动继承项目的权限。对象和链接实例的权限仍然取决于其底层数据源的存储位置。迁移完成后,查看、编辑和管理本体资源的权限将通过Palantir平台的文件系统Compass进行管理。项目级权限将取代此前的本体角色和数据源派生权限模型,这一权限模型与所有其他资源类型使用的权限模型一致。
您可以使用迁移工具将现有本体资源迁移至项目级权限。该工具会为本体资源推荐合适的存放项目,同时确保资源获得正确的权限。
:::callout{theme="warning"} 资源一旦迁移至项目级权限模式,就无法回退到本体角色或数据源派生权限模式。 :::
要为新本体资源开启项目级权限,本体所有者可进入本体管理器(Ontology Manager)的本体配置选项卡,开启要求新本体资源保存在项目中开关。启用后,用户创建新本体资源时会被提示选择保存位置。
限制
开始迁移前,请了解以下限制:
* 该功能目前暂不支持默认本体(Default ontologies)。如果您不确定自己的本体类型,请联系Palantir支持团队。
* 本体资源名称必须符合Compass规范,不允许使用正斜线("/"),也不允许出现重名。虽然别名可以支持渲染重复名称,但系统会通过追加"(1)"的方式去除重名,确保路径唯一。
* 每个本体资源必须拥有唯一名称
* 示例:common/utility-room 因包含正斜线属于无效名称
* 本体的所有资源必须保存在与本体本身处于同一空间(space)下的项目中。
迁移方案
开始迁移前,请考虑您希望如何组织本体资源: * 将本体资源与数据源保存在一起,或存放在业务用例项目中: 让本体资源紧邻其对应的数据源,可确保资源和实例的权限一致。这种方案支持您在同一个位置为整个业务用例分配权限,确保合适的用户可以统一查看、编辑或管理所有组件。 * 将本体资源存放在专用项目中: 创建一个或多个专门存储本体资源的独立项目,为这些项目授予较广的访问权限,让所有有需要的用户都可以查看本体资源。 * 混合方案: 将核心本体资源存入所有用户都有权查看的单一项目,将业务用例专属的资源存入对应业务用例的项目。这种方式可以避免本体选择器和搜索界面被业务用例专属的本体资源占满,导致界面杂乱。
:::callout{theme="neutral"} 本体资源的权限与对象和链接实例的权限相互独立。本次迁移仅影响本体资源权限,对象和链接实例的权限仍然基于其底层数据源的存储位置。 :::
迁移对Marketplace安装的影响
在迁移到项目级权限之前,本体资源都存储在本体服务项目(Ontology service project)中,这是一个系统托管的项目,用于存放旧权限模式下对应本体的所有资源。在本体服务项目中,所有用户默认对本体资源拥有查看者(Viewer)权限,且资源不会附带文件分级。您安装Marketplace产品时,本体资源会被放入这个本体服务项目,而非本体文件则会被放入安装用户选择的目标项目:
迁移到项目级权限之后,安装同一个产品时,本体资源会直接和其他文件一起存入选定的目标项目,适用项目的角色授权和分级规则:
本体服务项目为所有用户提供默认查看者权限,且不附带任何分级规则,因此与迁移前相比,目标项目更严格的角色授权、以及其强制执行的任何强制标记或最高分级要求,可能会缩小已安装本体资源的可见范围。如果希望本体资源的可见性与产品中其他文件不同,可以将产品拆分为两个关联的Marketplace产品:一个包含本体资源,安装到权限更宽松的项目中;另一个包含剩余文件,安装到权限更严格的项目中。
使用迁移助手(推荐)
迁移助手可以帮助您快速为本体资源匹配合适的项目和存储位置。
访问迁移助手的方式: 选中您的本体,进入本体配置页面,在迁移板块下选择开始迁移。
为了加速您的工作流程,系统会预先选中资源迁移位置的强推荐选项,弱推荐选项则不会预选,供您审核确认。确认选择后即可开始迁移。在最终完成前,您可以创建必要的导入,或取消操作。
这些推荐可以帮助您更快、更合理地做出资源放置决策。如果没有可用推荐,您可以在迁移助手的单个资源选项卡中手动选择存储位置。
直接迁移资源
您也可以不使用助手直接迁移资源,这种方式适合您明确知道资源存放位置,或想要快速迁移特定资源的场景。
-
批量迁移多个资源: 选中您的本体,在左侧边栏的资源板块选择一种资源类型,选中要迁移的条目,然后在下拉菜单中选择项目权限迁移。
-
迁移单个资源: 打开对应的本体资源,在概览页面使用操作下拉菜单选择项目权限迁移。