Create a link type(创建链接类型)
We recommend creating and configuring a new link type with the guided helper outlined below. However, if you exit the helper before completing the object creation process, you can manually complete the process by specifying the link type, keys, and API names for the new link type.
Access the link type creation helper
Navigate to Ontology Manager. To access the link type creation helper, choose one of the following methods:
-
Select New from the top right corner, then select Link type.

-
In the left sidebar, select Link types under Resources. Then, select New link type in the top right corner of the Link types page.
-
Navigate to an object type you want to link, then select Create new link type from within the link type graph on the object type’s Overview page.
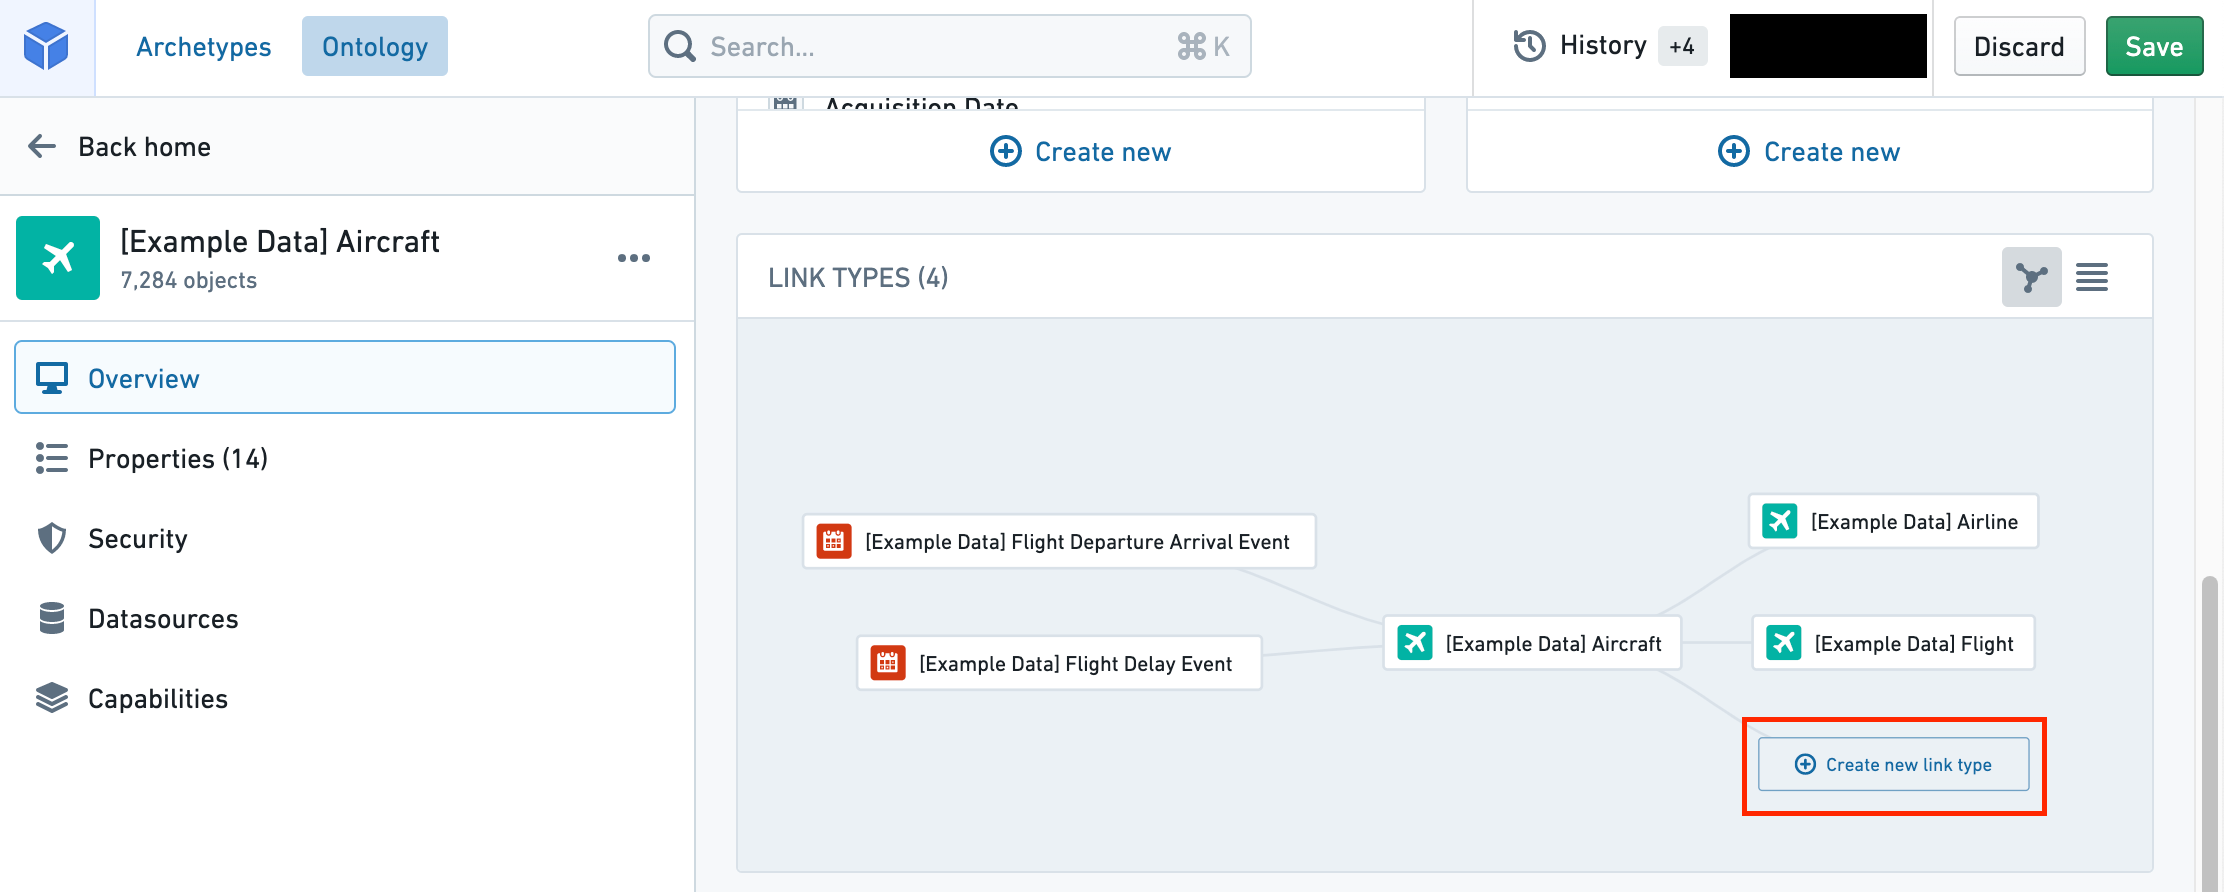
Configure a new link type
The new link type helper will guide you through the following steps:
- Choose the relationship type
- Define link resources
- Foreign key relationship type
- Join table dataset relationship type
- Backing object relationship type
- Define link type names
- Save location
- Save change to ontology
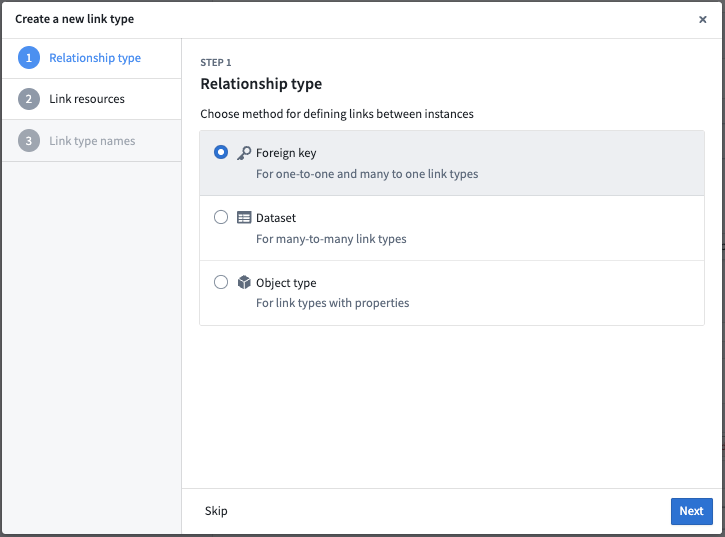
Choose the relationship type
- In the first step of the Create a new link type dialog, select the relationship type for the link.
-
Choose the relationship type for defining links between your two objects:
-
Object type foreign keys: Supports "one-to-one" and "many-to-one" cardinality link types. This option allows you to select properties that represent the foreign key and corresponding primary key for the desired objects. See below for details in defining link resources with a foreign key.
- Join table dataset: For "many-to-many" cardinality link types. This option allows you to use a join table dataset to back the link. See below for details in defining link resources with a dataset.
- Backing object type: Object-backed link types expand on many-to-one cardinality link types, providing first class support for object types as a link type storage solution. See below for details on defining link resources backed by an object. For additional information, refer to the object-backed links section.
In the examples below, assume that there are two object types that are related to each other through a cardinality: an Aircraft object type and a Flight object type. Cardinality types include:
- One-to-one cardinality: This indicates that one
Aircraftshould be linked to a singleFlight. The one-to-one cardinality serves as an indicator of the intended relationship, but the one-to-one cardinality is not enforced. - One-to-many cardinality: This indicates that one
Aircraftcan be linked to manyFlights. - Many-to-one cardinality: This indicates that many
Aircraftcan be linked to oneFlight. -
Many-to-many cardinality: This indicates that one
Aircraftcan be linked to manyFlights, and oneFlightcan be linked to manyAircraft. -
Select Next to proceed to the next step.
Define link resources
Foreign key relationship type
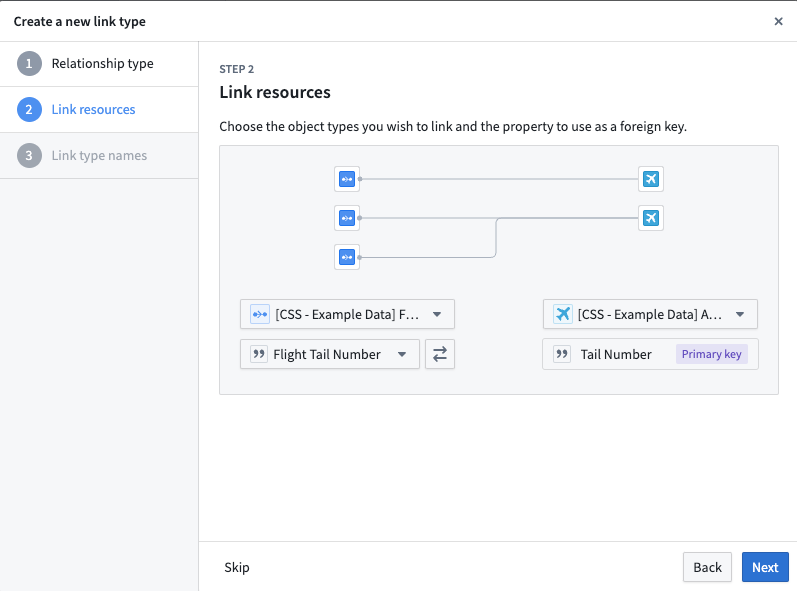
In a one-to-one or many-to-one cardinality link type, you will define the foreign key property and primary key properties for the link. The foreign key property of one object type must refer to the primary key property of the other object type.
For example, the Tail Number property is the primary key on the Aircraft object type. The Flight Tail Number property on the Flight object type is the foreign key. Links will be created between Aircraft and Flight object types when the Tail Number of the Aircraft matches a Flight Tail Number of a Flight.
-
In the Link resources step, choose the object types for your link.
-
Select the primary key object type from the dropdown menu on the right (
Aircraftin our example). -
Select the foreign key object type from the dropdown menu on the left (
Flightin our example). The creation dialog will detect and automatically select a foreign key if the following conditions are met: - The foreign key matches the primary key of the linked object type.
-
The property types of both objects match.
-
Choose the properties that will form the link:
- For the foreign key object type, select the property that will be used as the foreign key for the source object type (
Flight Tail Numberfor theFlightobject types). -
The primary key of the object type is auto-selected since there is only one primary key for each object type (
Tail Numberfor theAircraftobject type). -
Select Next to continue.
Join table dataset relationship type
In a many-to-many cardinality, select a datasource that includes all combinations of links between the primary key of the first object type (Aircraft in our example) and the second object type (Flight in our example).
A many-to-many cardinality, which requires a backing datasource, is required to enable users to edit or write back to the link type.
- In the Link resources step, choose the object types for your link.
- Select the first object type from the dropdown menu on the left (
Flight). - Select the second object type from the dropdown menu on the right (
Aircraft). - Choose the join table dataset. Select a dataset that contains columns matching the primary keys for both selected object types. A column can only be mapped to one primary key.
- It is now possible to automatically generate a join table for new link types. The Generate join table option will create a dataset with the correct schema based on the primary keys of the two object types you have selected. This means that you can get started faster if you have user edit-backed data, or if you want to provide production data later on.
- Select which columns in the link type’s backing datasource map to the primary keys of each of the linked object types.
- Select Next to continue.

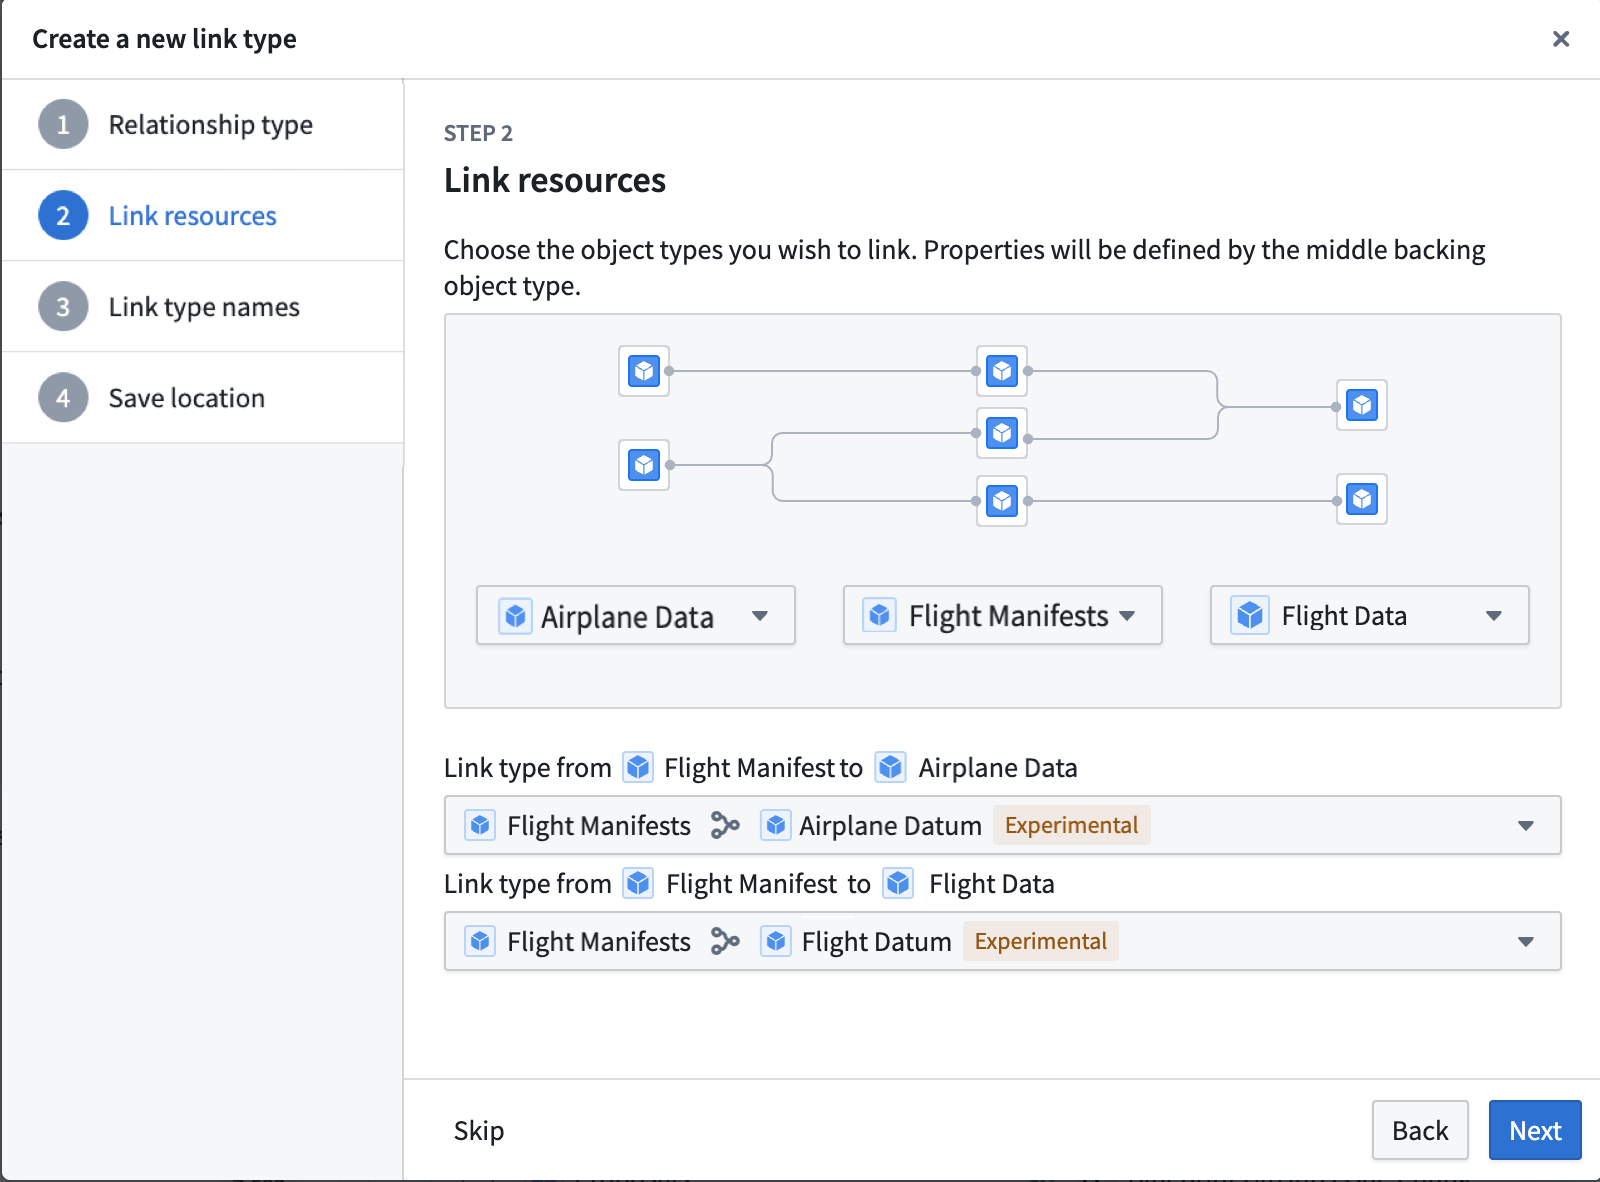
Backing object relationship type
Before creating the object-backed link, ensure that the prerequisite object and links have been created.
- Select the object types created in the prerequisites to represent your desired link type. The objects on the left and right represent the two entities that will be linked together. The object in the middle serves as the intermediary and provides additional metadata about the connection between the two entities, and backs the link.
- If there are multiple links between the objects on the left and right and the intermediary object in the middle, use the dropdown menus to select the desired links between the left and right objects and the intermediary object.
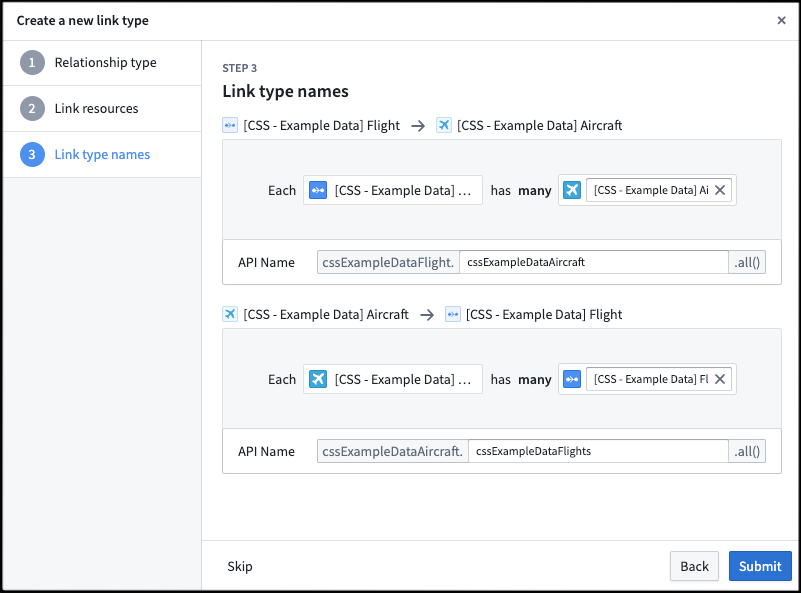
Define link type names
- In the Link type names step, provide the display and API names for your new link type.
- Enter a display name for each side of the link type. A side of the link type represents the link to that object type. In our example, the display name for the
Aircraftobject type describes the link fromFlighttoAircraft. You could choose the display nameAssigned Aircraftsince oneFlighthas oneAssigned Aircraft. - The API name will be automatically generated based on the display name, but you can modify it if needed.
- The API name field is used when referring to a link type programmatically in code. The API name on a side of a link type can be used to return objects of that type. For example, if the API name on the
Aircraftside of the link type isassignedAircraft, then callingFlight.assignedAircraft.get()will return theAircraftobjects linked to thoseFlightobjects. - Link type API names must adhere to the following:
- Begin with a lowercase character and consist of only alphanumeric characters.
- Be unique across all link types associated with the same object type.
- Be between 1 and 100 characters long.
- Be NFKC normalized.
- Not be a reserved keyword.
- Learn more about API names.
- Select Next to proceed.
Save location
In the final step, choose a project to save this link type to. Then, Submit. After completing these steps, your new link type will be created, but not yet saved.

Save change to ontology
Back in Ontology Manager, select Save in the upper right corner to make the change to your ontology.
Object-backed links
Object-backed link types expand on many-to-one cardinality link types, providing first class support for object types as a link type storage solution. Object-backed link types allow for the inclusion of additional metadata on the link and support restricted views.
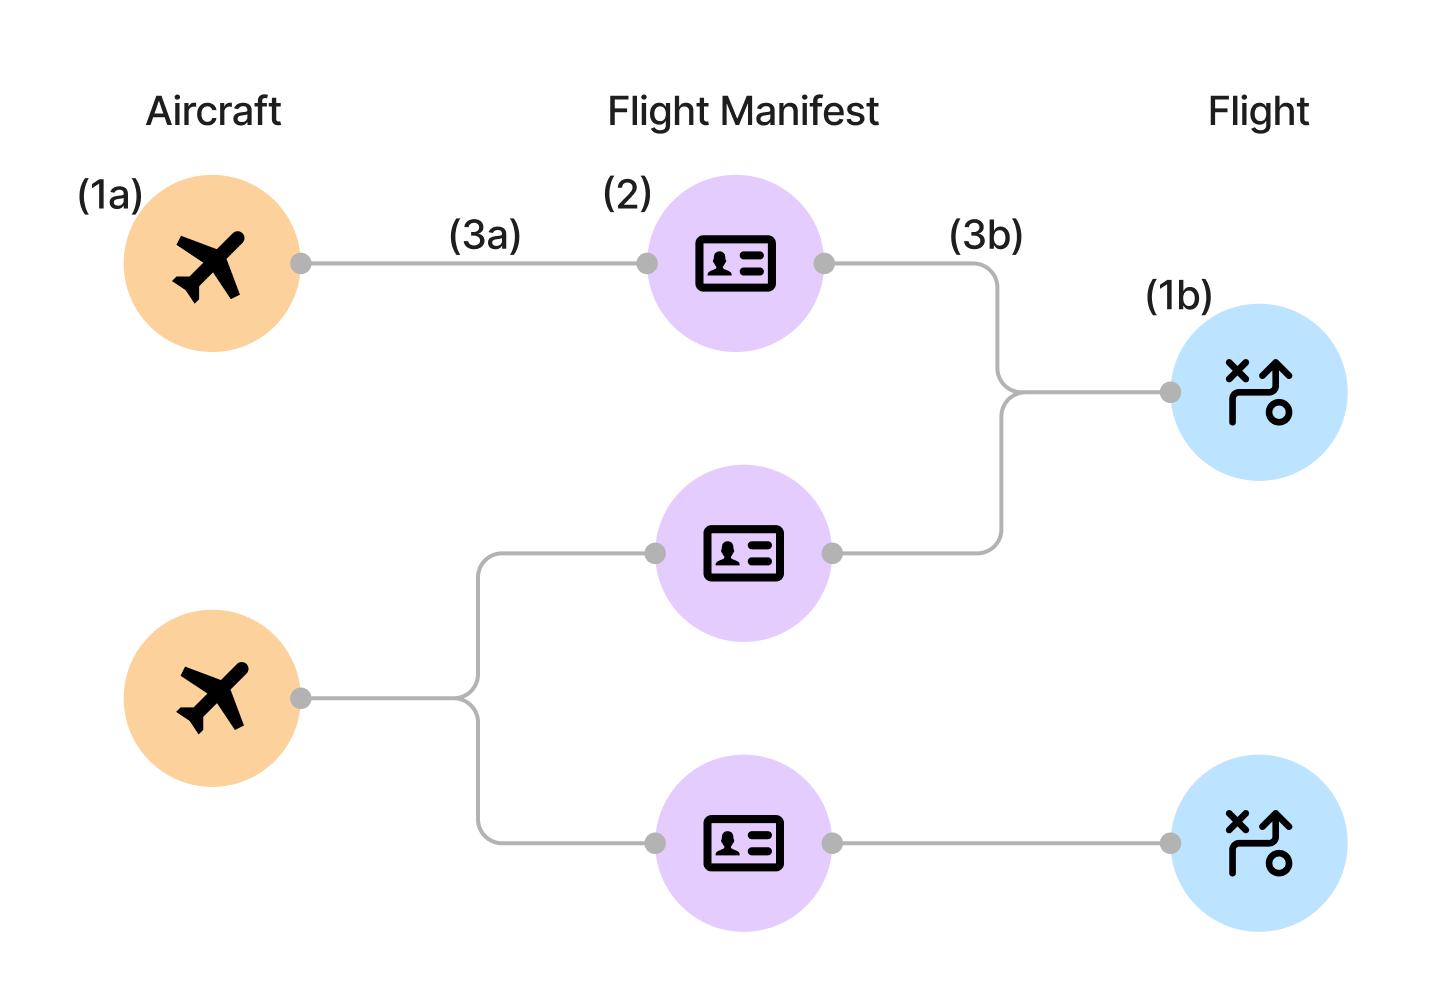
For object-backed links, in addition to the Aircraft and Flight objects, assume an additional object type for the Flight Manifest. With an object-backed link, you can have the Flight Manifest object type that links the Aircraft and Flight objects. Unlike a foreign key or data-set backed link, this Flight Manifest object can contain additional properties such as Pilot and First Mate to provide additional metadata on the link.
Prerequisites for creating an object-backed link type
Before you can create an object-backed link type, you must first do the following:
- Create the object types on either side of the link type. See create an object type for additional details.
- Create the backing object type that links the two object types together.
- Create the many-to-one link types between each side of the link type to the backing object type. See configure a new link type for additional details.
For the Aircraft, Flight, and Flight Manifest example from above, you need to create the following resources:
- Create the object types on either side of the link type.
Aircraftobject typeFlightobject type- Create the backing object type that links the two object types together.
Flight Manifestobject type- Create the many-to-one link type between each side of the link type to the backing object type.
- Link between the
Aircraftobject type and theFlight Manifestobject type - Link between the
Flightobject type and theFlight Manifestobject type
Once these have been created, you can create the object-backed link type.
Convert existing links to object-backed link types
Existing links can be converted to object-backed link types. Before modifying existing links, the prerequisites for object-backed link types must be fulfilled.
To modify the link type of an existing link:
- Open the link in Ontology Manager.
- In the Configuration section, update the join method and select Object type.
- Select the backing object type in the Update link type to object-backed link type dialog.
- Select the link type from the link edges to the backing object in the Update link type to object-backed link type dialog.
- Select the Update to object-backed.
Use object-backed link types
Currently, object-backed link types can be viewed in Object Explorer, Vertex, and Workshop. Select a link to view the link's backing object properties. Note that in Vertex, the link title will display the link's backing object title instead.
Troubleshooting
Error: Phonograph2:DatasetAndBranchAlreadyRegistered
If you receive the error Phonograph2:DatasetAndBranchAlreadyRegistered, the datasource backing the link type you are trying to save is already backing a different link type in the Ontology and cannot be used again.
中文翻译
创建链接类型
我们建议使用下面概述的引导助手来创建和配置新的链接类型。但是,如果您在完成对象创建过程之前退出了助手,您可以通过指定新链接类型的链接类型、键和API名称来手动完成该过程。
访问链接类型创建助手
导航至本体论管理器(Ontology Manager)。要访问链接类型创建助手,请选择以下方法之一:
-
从右上角选择新建,然后选择链接类型。
-
在左侧边栏中,选择资源下的链接类型。然后,在链接类型页面的右上角选择新建链接类型。
-
导航至您想要链接的对象类型,然后在该对象类型的概览页面上的链接类型图中选择创建新链接类型。
配置新链接类型
新链接类型助手将引导您完成以下步骤:
选择关系类型
- 在创建新链接类型对话框的第一步中,选择链接的关系类型。
-
选择用于定义两个对象之间链接的关系类型:
-
对象类型外键: 支持"一对一"和"多对一"基数的链接类型。此选项允许您选择表示所需对象的外键和对应主键的属性。有关使用外键定义链接资源的详细信息,请参见下文。
- 连接表数据集: 适用于"多对多"基数的链接类型。此选项允许您使用连接表数据集来支撑链接。有关使用数据集定义链接资源的详细信息,请参见下文。
- 支撑对象类型: 对象支撑的链接类型扩展了多对一基数的链接类型,为对象类型作为链接类型存储解决方案提供了一流支持。有关定义由对象支撑的链接资源的详细信息,请参见下文。更多信息,请参考对象支撑的链接部分。
在下面的示例中,假设有两个通过基数相互关联的对象类型:一个Aircraft对象类型和一个Flight对象类型。基数类型包括:
- 一对一基数: 表示一个
Aircraft应链接到一个Flight。一对一基数用于指示预期关系,但不强制执行。 - 一对多基数: 表示一个
Aircraft可以链接到多个Flight。 - 多对一基数: 表示多个
Aircraft可以链接到一个Flight。 -
多对多基数: 表示一个
Aircraft可以链接到多个Flight,且一个Flight可以链接到多个Aircraft。 -
选择下一步继续下一步。
定义链接资源
外键关系类型
在一对一或多对一基数的链接类型中,您将定义链接的外键属性和主键属性。一个对象类型的外键属性必须引用另一个对象类型的主键属性。
例如,Tail Number属性是Aircraft对象类型的主键。Flight对象类型上的Flight Tail Number属性是外键。当Aircraft的Tail Number与Flight的Flight Tail Number匹配时,将在Aircraft和Flight对象类型之间创建链接。
-
在链接资源步骤中,为您的链接选择对象类型。
-
从右侧下拉菜单中选择主键对象类型(在我们的示例中为
Aircraft)。 -
从左侧下拉菜单中选择外键对象类型(在我们的示例中为
Flight)。如果满足以下条件,创建对话框将检测并自动选择外键: - 外键与链接对象类型的主键匹配。
-
两个对象的属性类型匹配。
-
选择将构成链接的属性:
- 对于外键对象类型,选择将用作源对象类型外键的属性(
Flight对象类型的Flight Tail Number)。 -
对象类型的主键会自动选择,因为每个对象类型只有一个主键(
Aircraft对象类型的Tail Number)。 -
选择下一步继续。
连接表数据集关系类型
在多对多基数中,选择一个包含第一个对象类型(在我们的示例中为Aircraft)和第二个对象类型(在我们的示例中为Flight)主键之间所有链接组合的数据源。
多对多基数需要一个支撑数据源,这是允许用户编辑或写回链接类型所必需的。
- 在链接资源步骤中,为您的链接选择对象类型。
- 从左侧下拉菜单中选择第一个对象类型(
Flight)。 - 从右侧下拉菜单中选择第二个对象类型(
Aircraft)。 - 选择连接表数据集。选择一个包含与所选两个对象类型主键匹配的列的数据集。一个列只能映射到一个主键。
- 现在可以为新链接类型自动生成连接表。生成连接表选项将根据您选择的两个对象类型的主键创建一个具有正确模式的数据集。这意味着如果您有用户编辑支撑的数据,或者您希望稍后提供生产数据,您可以更快地开始。
- 选择链接类型支撑数据源中哪些列映射到每个链接对象类型的主键。
- 选择下一步继续。
支撑对象关系类型
在创建对象支撑的链接之前,请确保已创建先决条件中的对象和链接。
- 选择在先决条件中创建的对象类型来表示您想要的链接类型。左侧和右侧的对象代表将要链接在一起的两个实体。中间的对象充当中介,提供关于两个实体之间连接的额外元数据,并支撑链接。
- 如果左侧和右侧对象与中间中介对象之间存在多个链接,请使用下拉菜单选择左侧和右侧对象与中介对象之间的所需链接。
定义链接类型名称
- 在链接类型名称步骤中,为新的链接类型提供显示名称和API名称。
- 为链接类型的每一侧输入显示名称。链接类型的一侧表示到该对象类型的链接。在我们的示例中,
Aircraft对象类型的显示名称描述了从Flight到Aircraft的链接。您可以选择显示名称Assigned Aircraft,因为一个Flight有一个Assigned Aircraft。 - API名称将根据显示名称自动生成,但您可以根据需要修改。
- API名称字段用于在代码中以编程方式引用链接类型。链接类型一侧的API名称可用于返回该类型的对象。例如,如果链接类型
Aircraft侧的API名称是assignedAircraft,那么调用Flight.assignedAircraft.get()将返回链接到这些Flight对象的Aircraft对象。 - 链接类型API名称必须遵守以下规则:
- 以小写字符开头,且仅由字母数字字符组成。
- 在与同一对象类型关联的所有链接类型中唯一。
- 长度在1到100个字符之间。
- 经过NFKC规范化。
- 不是保留关键字。
- 了解更多关于API名称的信息。
- 选择下一步继续。
保存位置
在最后一步中,选择一个项目来保存此链接类型。然后,提交。完成这些步骤后,您的新链接类型将被创建,但尚未保存。
保存对本体的更改
返回本体论管理器(Ontology Manager),选择右上角的保存以将更改应用到您的本体。
对象支撑的链接
对象支撑的链接类型扩展了多对一基数的链接类型,为对象类型作为链接类型存储解决方案提供了一流支持。对象支撑的链接类型允许在链接上包含额外的元数据,并支持受限视图。
对于对象支撑的链接,除了Aircraft和Flight对象外,假设还有一个额外的Flight Manifest对象类型。使用对象支撑的链接,您可以拥有链接Aircraft和Flight对象的Flight Manifest对象类型。与外键或数据集支撑的链接不同,此Flight Manifest对象可以包含额外的属性,如Pilot和First Mate,以提供链接上的额外元数据。
创建对象支撑链接类型的先决条件
在创建对象支撑的链接类型之前,您必须首先完成以下操作:
- 创建链接类型两侧的对象类型。有关更多详细信息,请参见创建对象类型。
- 创建将两个对象类型链接在一起的支撑对象类型。
- 创建从链接类型每一侧到支撑对象类型的多对一链接类型。有关更多详细信息,请参见配置新链接类型。
对于上述Aircraft、Flight和Flight Manifest示例,您需要创建以下资源:
- 创建链接类型两侧的对象类型。
Aircraft对象类型Flight对象类型- 创建将两个对象类型链接在一起的支撑对象类型。
Flight Manifest对象类型- 创建从链接类型每一侧到支撑对象类型的多对一链接类型。
Aircraft对象类型与Flight Manifest对象类型之间的链接Flight对象类型与Flight Manifest对象类型之间的链接
一旦这些创建完成,您就可以创建对象支撑的链接类型。
将现有链接转换为对象支撑的链接类型
现有链接可以转换为对象支撑的链接类型。在修改现有链接之前,必须满足对象支撑链接类型的先决条件。
要修改现有链接的链接类型:
- 在本体论管理器(Ontology Manager)中打开链接。
- 在配置部分,更新连接方法并选择对象类型。
- 在将链接类型更新为对象支撑的链接类型对话框中,选择支撑对象类型。
- 在将链接类型更新为对象支撑的链接类型对话框中,选择从链接边缘到支撑对象的链接类型。
- 选择更新为对象支撑。
使用对象支撑的链接类型
目前,对象支撑的链接类型可以在对象浏览器(Object Explorer)、Vertex和Workshop中查看。选择一个链接以查看该链接的支撑对象属性。请注意,在Vertex中,链接标题将显示链接的支撑对象标题。
故障排除
错误:Phonograph2:DatasetAndBranchAlreadyRegistered
如果您收到错误Phonograph2:DatasetAndBranchAlreadyRegistered,则表示支撑您尝试保存的链接类型的数据源已经在本体中支撑了另一个链接类型,无法再次使用。