Create an object type(创建对象类型)
The primary way to create and configure a new object type is with a guided step-by-step helper. The guided helper is the recommended method, but if you exit the helper before completing the object creation process, you can also manually complete the process by specifying the metadata, backing datasource, property mappings, and keys (primary and title) for the new object type.
After creating a new object type, you can change the API name from the assigned default.
This page also contains troubleshooting information on the new object type creation process.
Create a new object type with the helper
- Create a new object type
- Choose a backing datasource
- Object type metadata
- Create properties for the object type
- Configure the primary key and title key
- Generate actions
- Save location
- Save change to ontology
Create a new object type
To create a new object type, select the Create your first object type option from the Ontology Manager homepage or choose New > Create object type located on top right on the same page.

The Create new object type helper will appear.

Choosing a backing datasource
If you have an existing datasource in Foundry containing data to back the object type then you can select it. This will automatically populate the object type's metadata. It will also map every column of the backing datasource to a property, but you can discard added properties in the Properties step.
:::callout{theme="warning" title="Warning"}
A backing datasource for an object type may not contain MapType or StructType columns.
:::
If you do not have an existing datasource containing data for the object type, you can choose to continue without an existing datasource and select a location to generate a dataset for permissions. This option is not available if you are using Object Storage v1. As permissions of the objects of a type are determined by the location of their backing datasources, you will be prompted to choose a location to which you want to save an empty dataset.

Object type metadata
In this step, provide the following information regarding your new object type:
- Icon: Select the default icon to customize the icon and color of the object type; this icon and color will be displayed in user applications when a user views an object of this type.
- Name: The name shown to anyone accessing an object of this type in user applications.
- Plural name: The name shown to anyone accessing multiple objects of this type in user applications.
- Description: Explanatory text for anyone accessing the objects of this type in user applications. For example, users searching in Object Explorer will view the description of the object type in their search results.
- Groups: Choose whether this object type will be part of any groups. This is a mechanism for organizing your ontology, making it easier to filter for the object types you want to work with later.

Create properties for the object type
In the third step of the dialog you can customize which properties the object type will have. If you have chosen an existing Foundry datasource, any columns will be mapped automatically, but can be discarded during this step.
Every object type requires at least one property. This is because object types need a primary key to uniquely identify them. The wizard allows you to add any other desired properties.
Note that property types that require advanced configuration, such as media, cannot be generated as part of the bootstrapping wizard and must be added after you have exited it.

Configure the primary key and title key
As part of the Properties step you need to choose a primary key and title key:
- Title key: The property that acts as a display name for objects of this type.
- For example, selecting the
full nameproperty as the title key of theEmployeeobject type would use the values of that property, such as “Melissa Chang”, “Akriti Patel”, or “Diego Rodriguez” as the display names for each respective notionalEmployeeobject. - Primary key: The property that acts as a unique identifier for each instance of an object type. Each row in the backing datasource must have a different value for this property.
- For example, the value of the
employee IDproperty will be used to identify “Melissa Chang” as a unique employee within the organization.
A list of supported property types can be found in the object type properties documentation.

:::callout{theme="warning"} Be sure to check your backing datasources for duplicates before assigning a primary key. The primary key you select must be unique for every record in the datasource. If your ontology is using Object Storage v2, a duplicate primary key will cause Funnel batch pipeline errors leading to a build failure. If you are using Object Storage v1 (Phonograph), an update will appear as successful; however, the duplicate primary keys can cause unexpected changes to your ontology. :::
:::callout{theme="warning"} Primary keys should be deterministic. If the primary key is non-deterministic and changes on build, edits can be lost and links may disappear. Edits can be lost because ontology edits are associated with the primary key of the object. Links between objects can disappear if builds are not coordinated to update link IDs. To ensure deterministic primary keys, you should define pipeline logic such that the primary key is the function of either a single column or multiple columns. Avoid using numbered row or random key generation, since these can cause primary keys to change between build runs. :::
Generate actions
You can optionally generate a standard set of actions to edit objects of this type and assign a specific user or group that can run them.
Note that you can still make edits to these actions or create new additional actions even if you have finalized the object type and exited the helper.

This step is not available if you are using Object Storage v1.
Save location
In the final step, choose a project to save this object type to. Then, select Create. Selecting Create will only stage your changes and will not save them.

Save change to ontology
Back in Ontology Manager, select Save in the upper right corner to make the change to your ontology.
Create a new object type manually
When creating a new object type with the helper, it is possible to select Create before completing all the steps in the Create a new object type helper instructions above. Selecting Create before the process is complete will exit the helper and bring you to the Overview page.
At this point, the object type is unsaved and cannot be saved until all the steps below have been completed. The steps for completing the creation process manually (outside the Create a new object type helper) are described below:
- Add metadata for a new object type
- Add a backing datasource to a new object type
- Add a new property
- Map a single property to data
- Map all unmapped columns as new properties
- Configure the primary key and title key
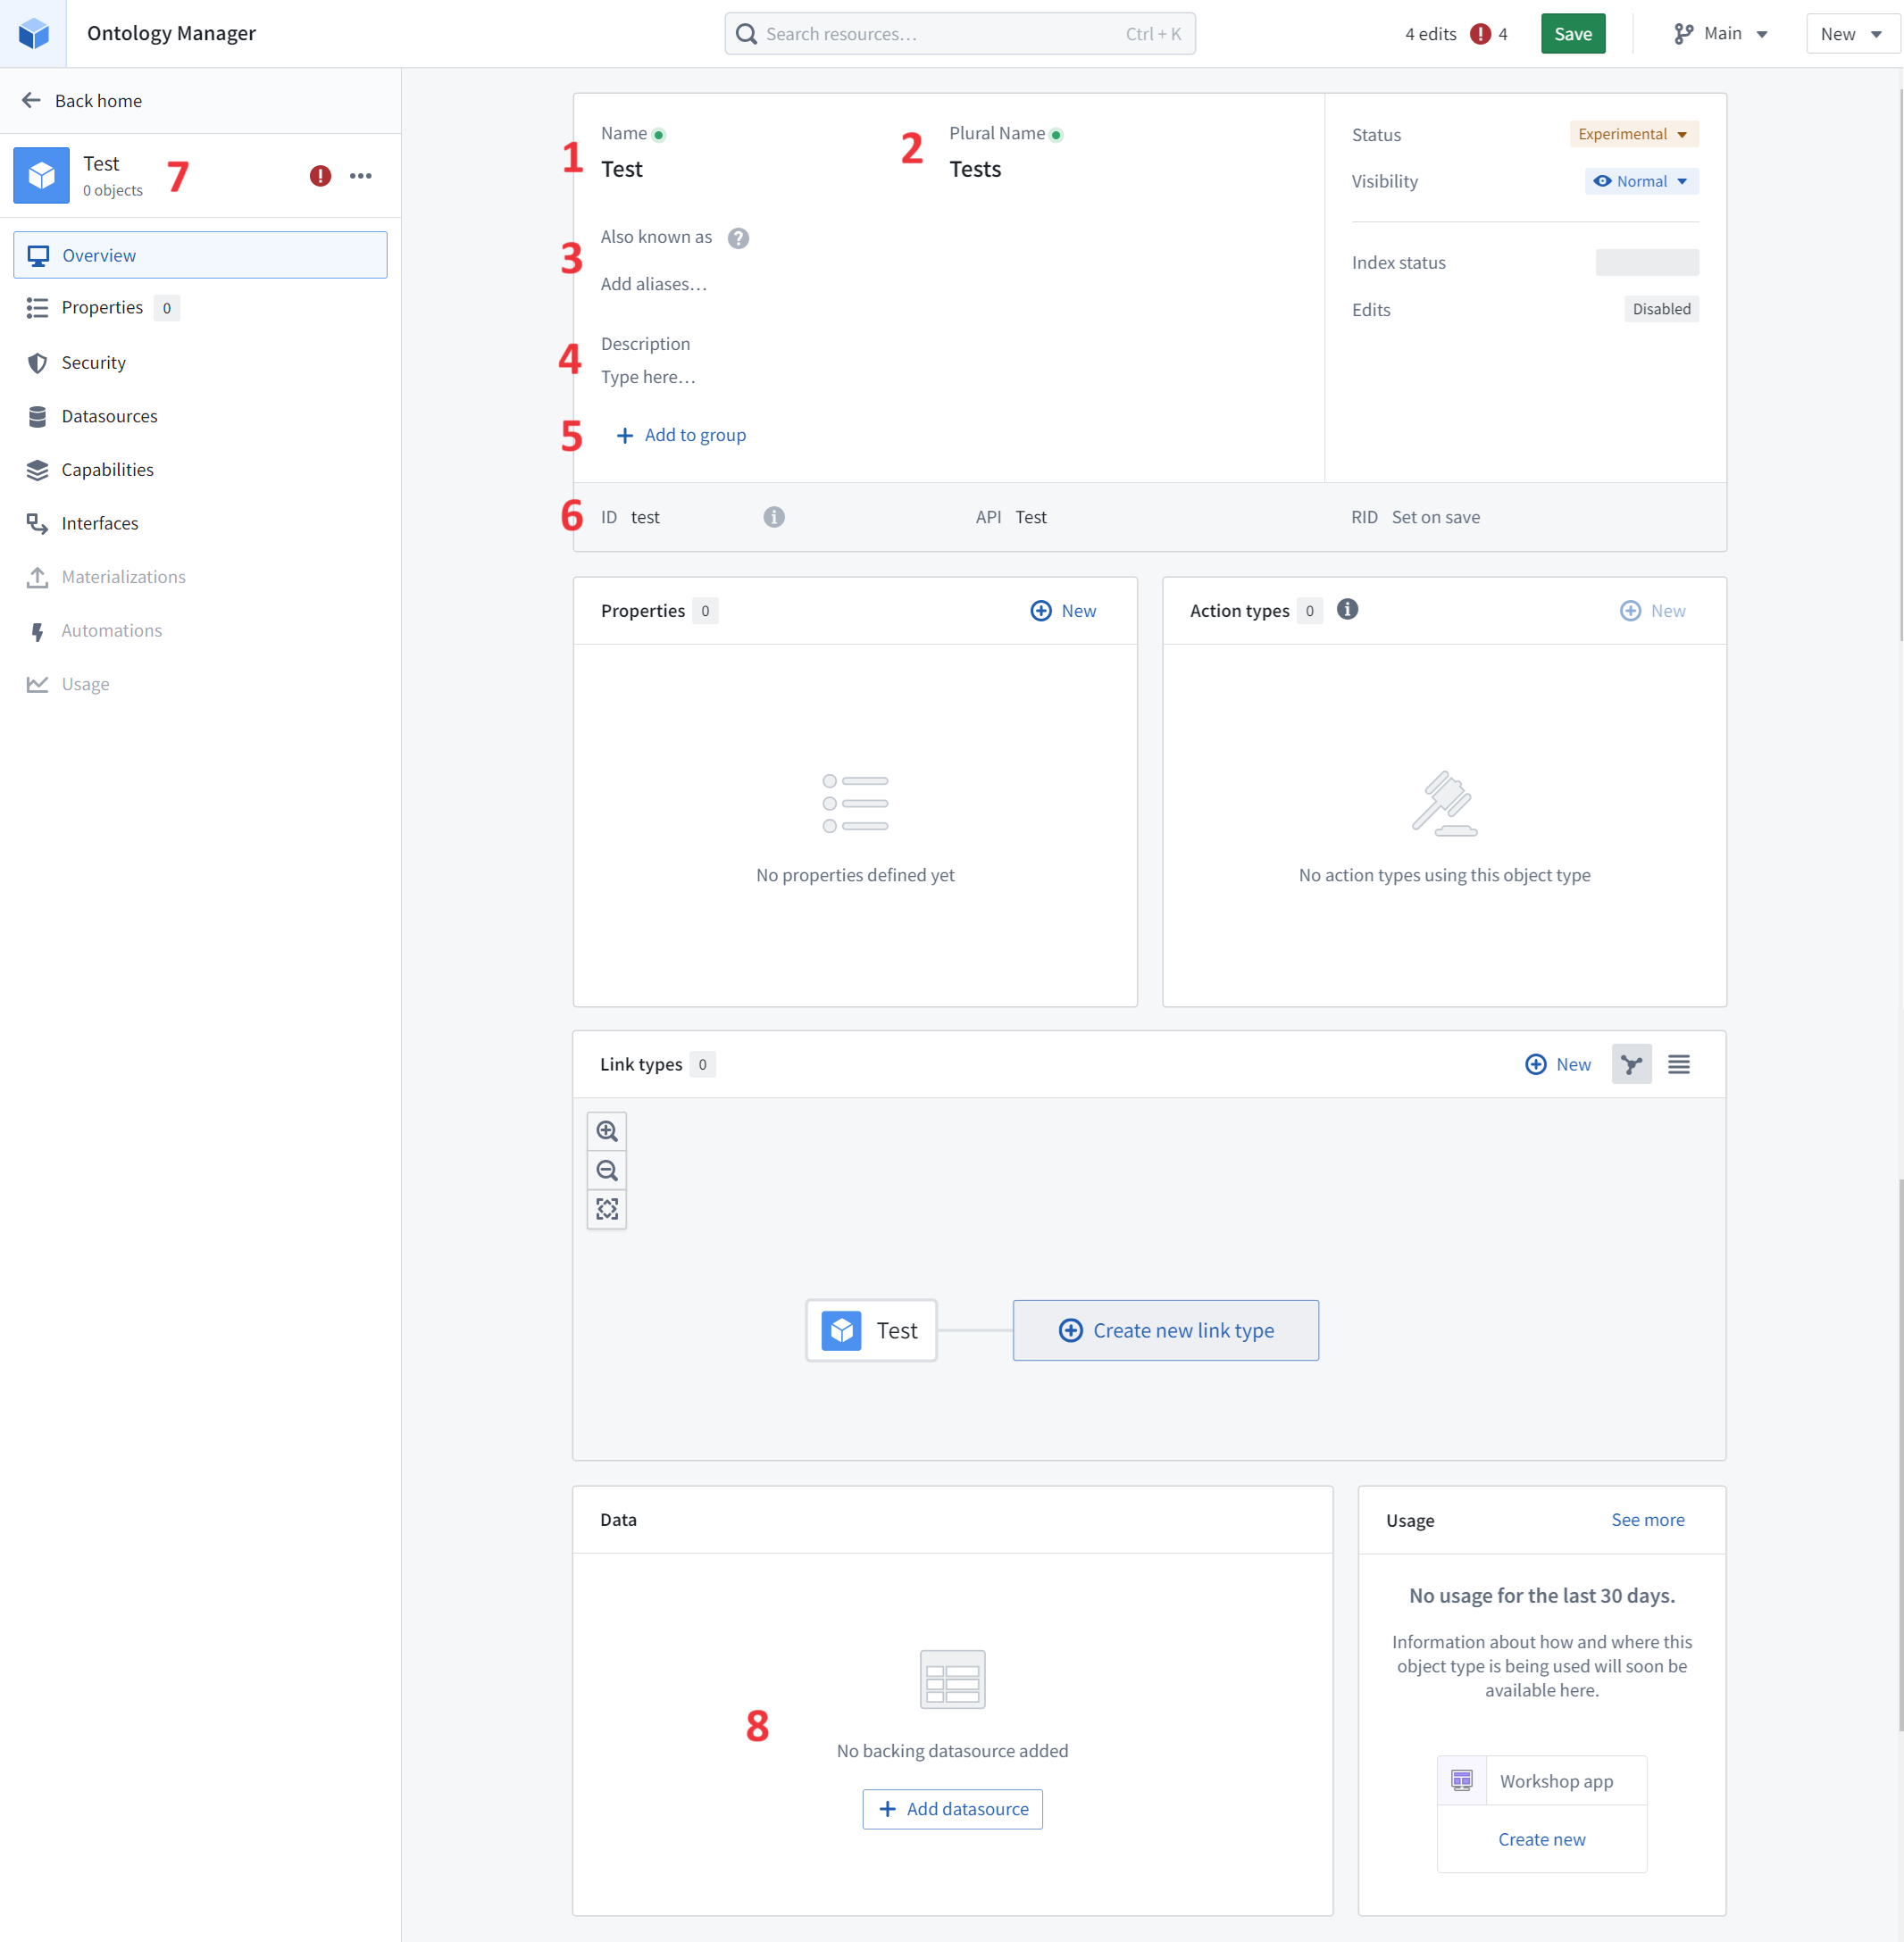
Add metadata for a new object type
On the Overview page’s metadata section, you can edit the object type’s display name, plural display name, description, and ID:
- Display name: The name shown to anyone accessing an object of this type in user applications.
- Plural display name: The name shown to anyone accessing multiple objects of this type in user applications.
- Aliases: Additional terms that will find this object type when users search for them.
- Description: Explanatory text for anyone accessing the objects of this type in user applications. For example, users searching in Object Explorer will view the description of the object type in their search results.
- Groups: One or more labels that help categorize the object type.
- ID: A unique identifier of the object type, primarily used to reference objects of this type when configuring a user application.
- An ID can contain lowercase letters, numbers, and dashes.
- The first character of an ID must be a lowercase letter.
- Once a property’s ID is saved and the property is referenced in user applications, any change to the property ID will break the application.
- Icon: Select the default icon from the object type view’s sidebar to customize the icon and color of the object type; this icon and color will be displayed in user applications when a user views an object of this type.
- Backing datasource: The source of the data used as property values for objects of this type.
Add a group to an object type
Groups are labels that help categorize object types. From the object type metadata widget, you can:
- Add a group from a list of existing groups.
- Create a new group by typing the name of that group.
- Remove a group from your object type.

Groups are searchable in the Ontology Manager's Search bar and Search bar dialog. The table of object types in the Ontology Manager supports displaying and filtering by group. Groups are also displayed on the Object Explorer home page.

:::callout{theme="warning" title="Warning"}
Groups as labels in object type metadata replace the previous method of adding oe_home_page_object_type_group type class to the primary key property; this previous method is no longer available.
:::
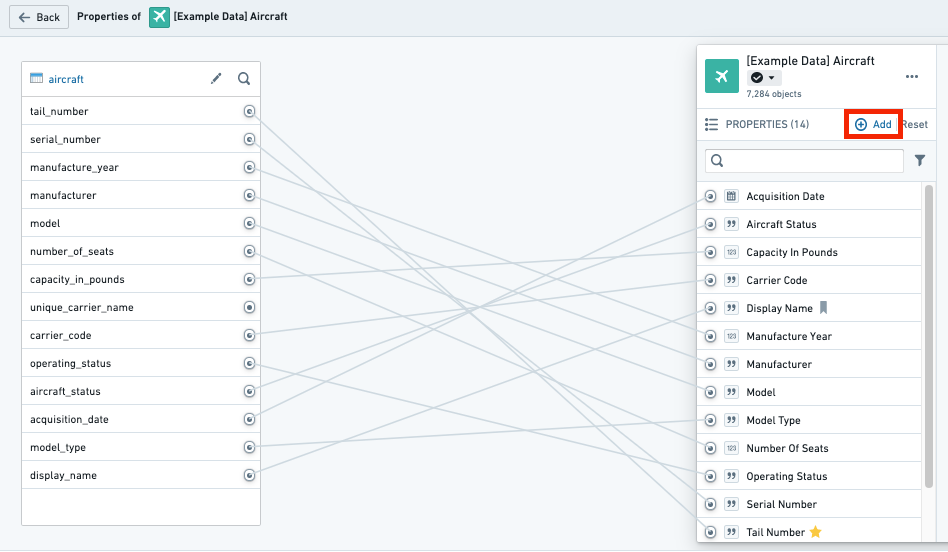
Add a backing datasource to a new object type
In order to populate property values for objects of this type with data, you must add a backing datasource. You can do this by:
- Navigating into the Property editor by selecting Create new from the Properties section of the Overview page, or by selecting the Edit property mapping button from the Properties page of the object type view’s sidebar.
- Then, select the Add a backing datasource button as shown in the image below. This will allow you to select any of the available datasources in Foundry as a backing datasource.
- Note that a single datasource can only be used to back one object type.

Add a new property
From within the property editor, select Add in the Properties pane on the right side of the screen. This will add a new property to the object type.
Map a single property to data
It is possible to map properties to columns in a backing datasource in any of the following ways:
Map a column to a new property
In the datasource pane on the left side of the screen (see image below), you can see all of the columns of the datasource. Hover over the column you want to map and select the Add as a new property button to create a new property mapped to this column. The property ID, display name, and base type will be inferred from the name of the column.
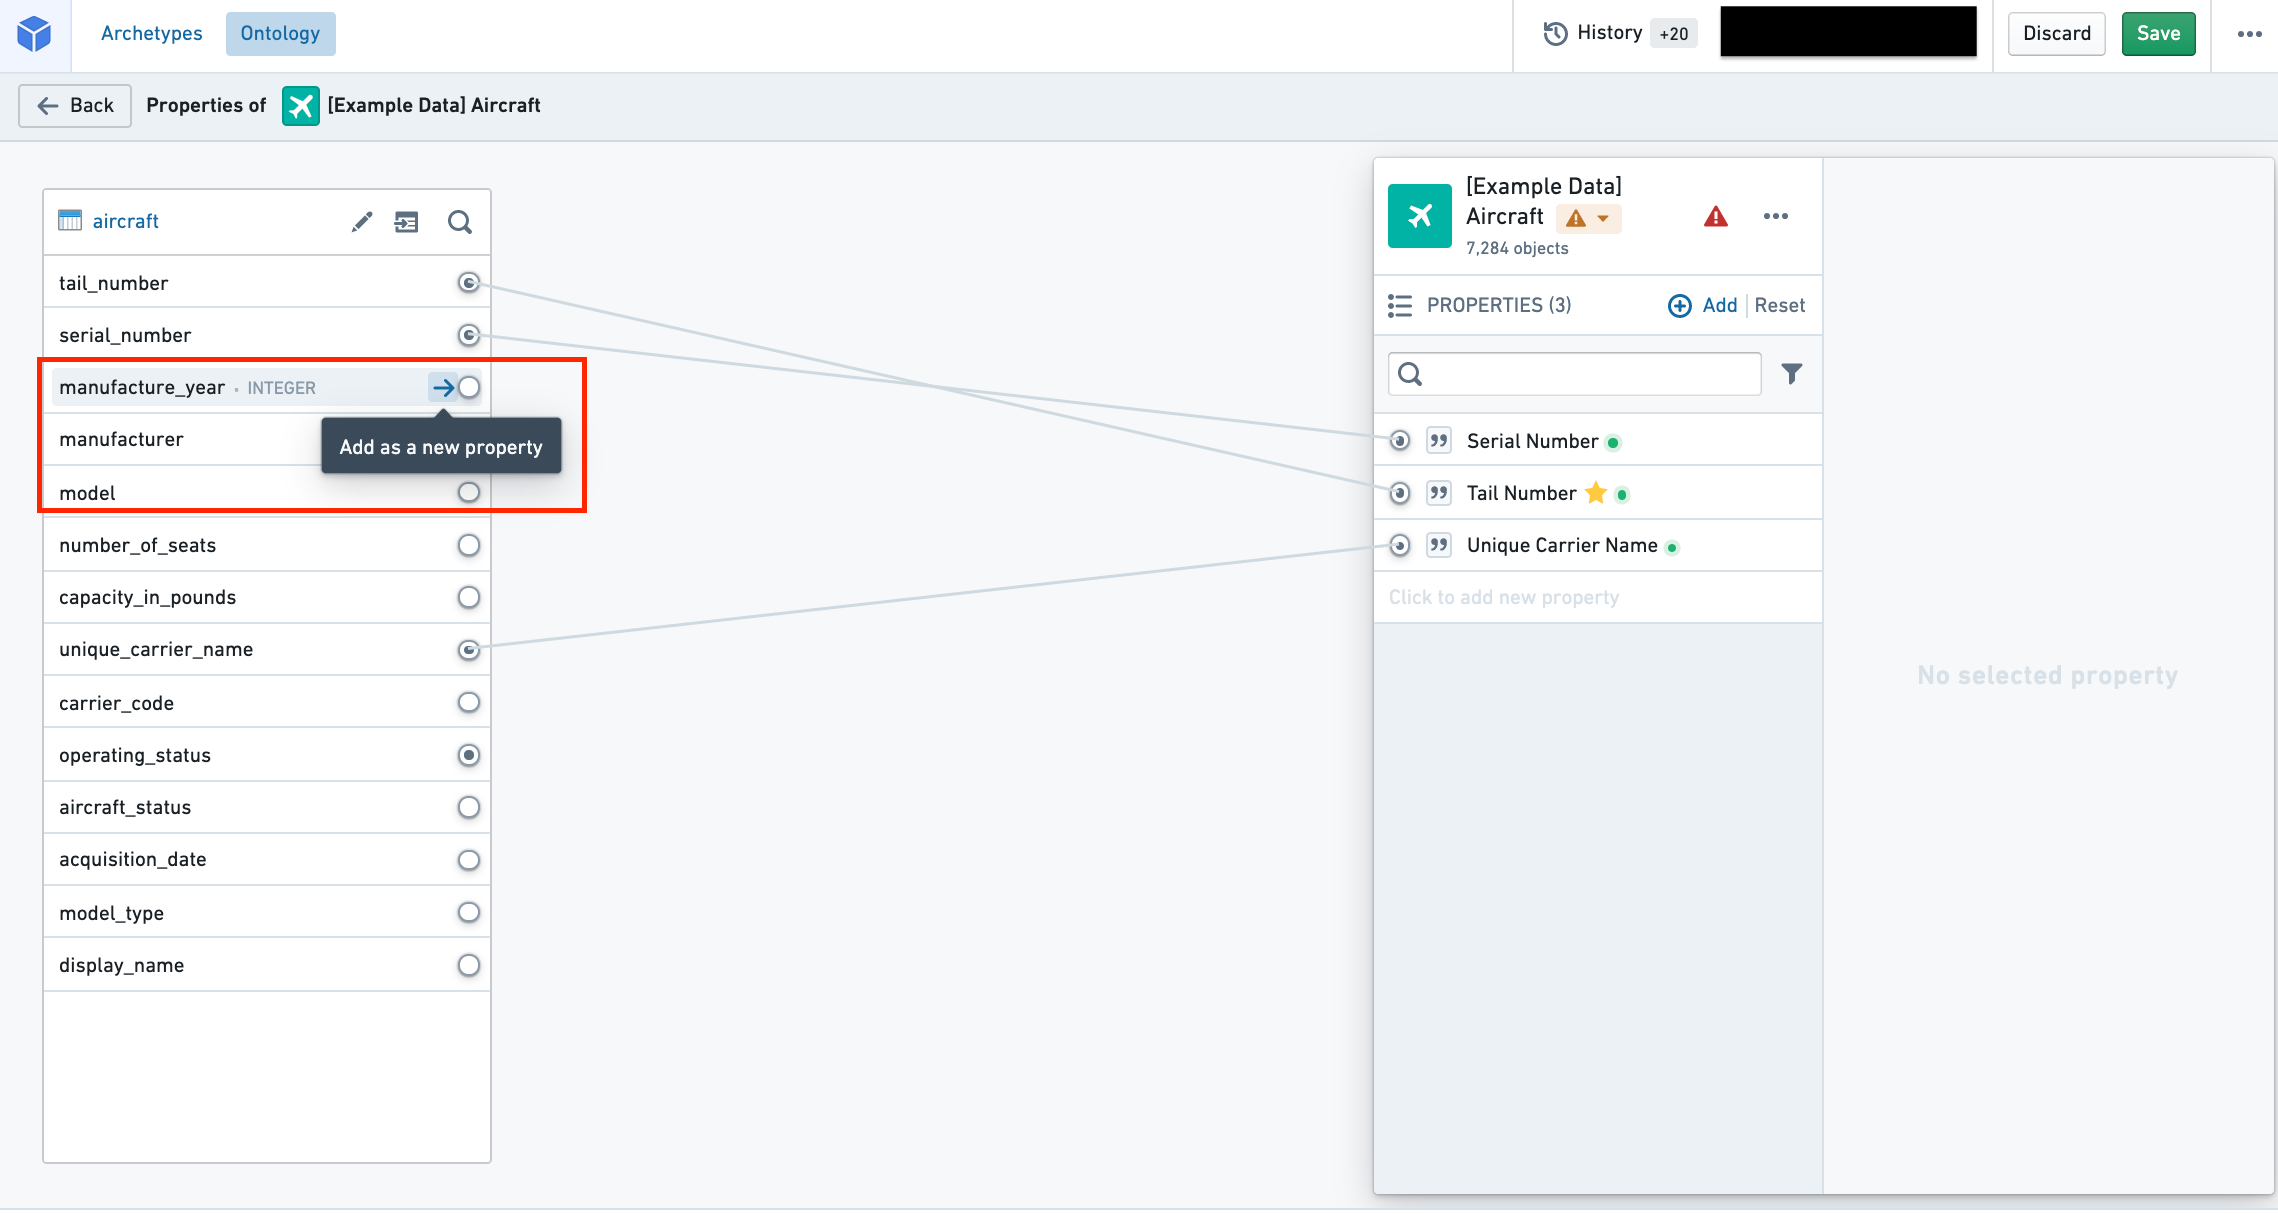
Map a column to an existing property
In the datasource pane on the left side of the screen, you can see all of the columns of the datasource. Hover over an unmapped column and select the Add as a new property button. If a property already exists with a property ID that matches the column name, the column will be mapped to the existing property.
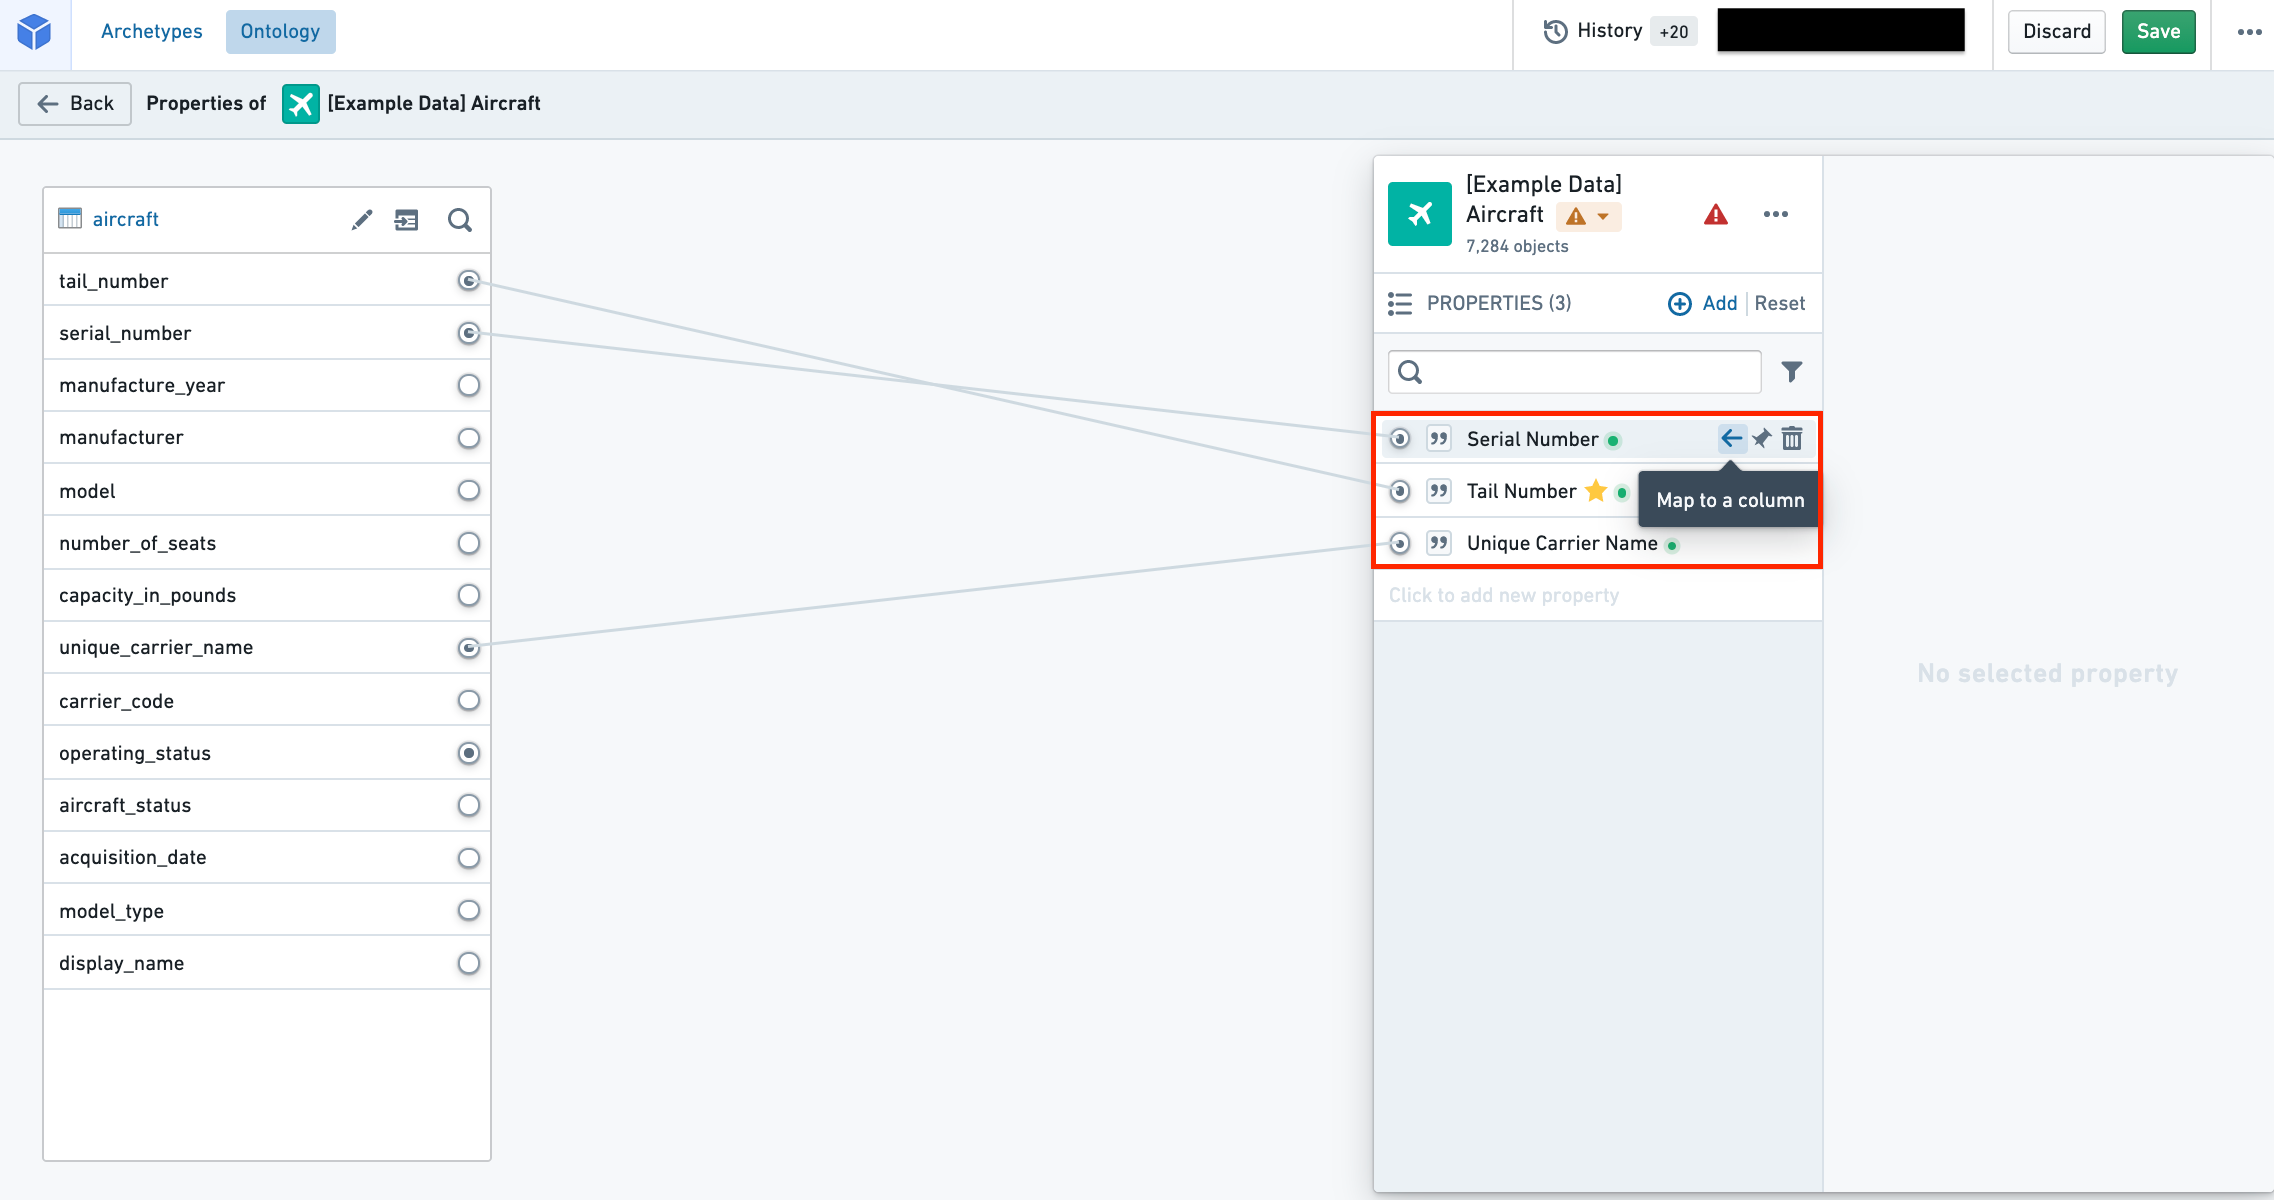
Map a property to a column
In the properties pane on the right side of the screen, hover over the property you want to map to a column and select Map to a column. This will open a dropdown from which you can select the column you want to map to your property.
Map all unmapped columns as new properties
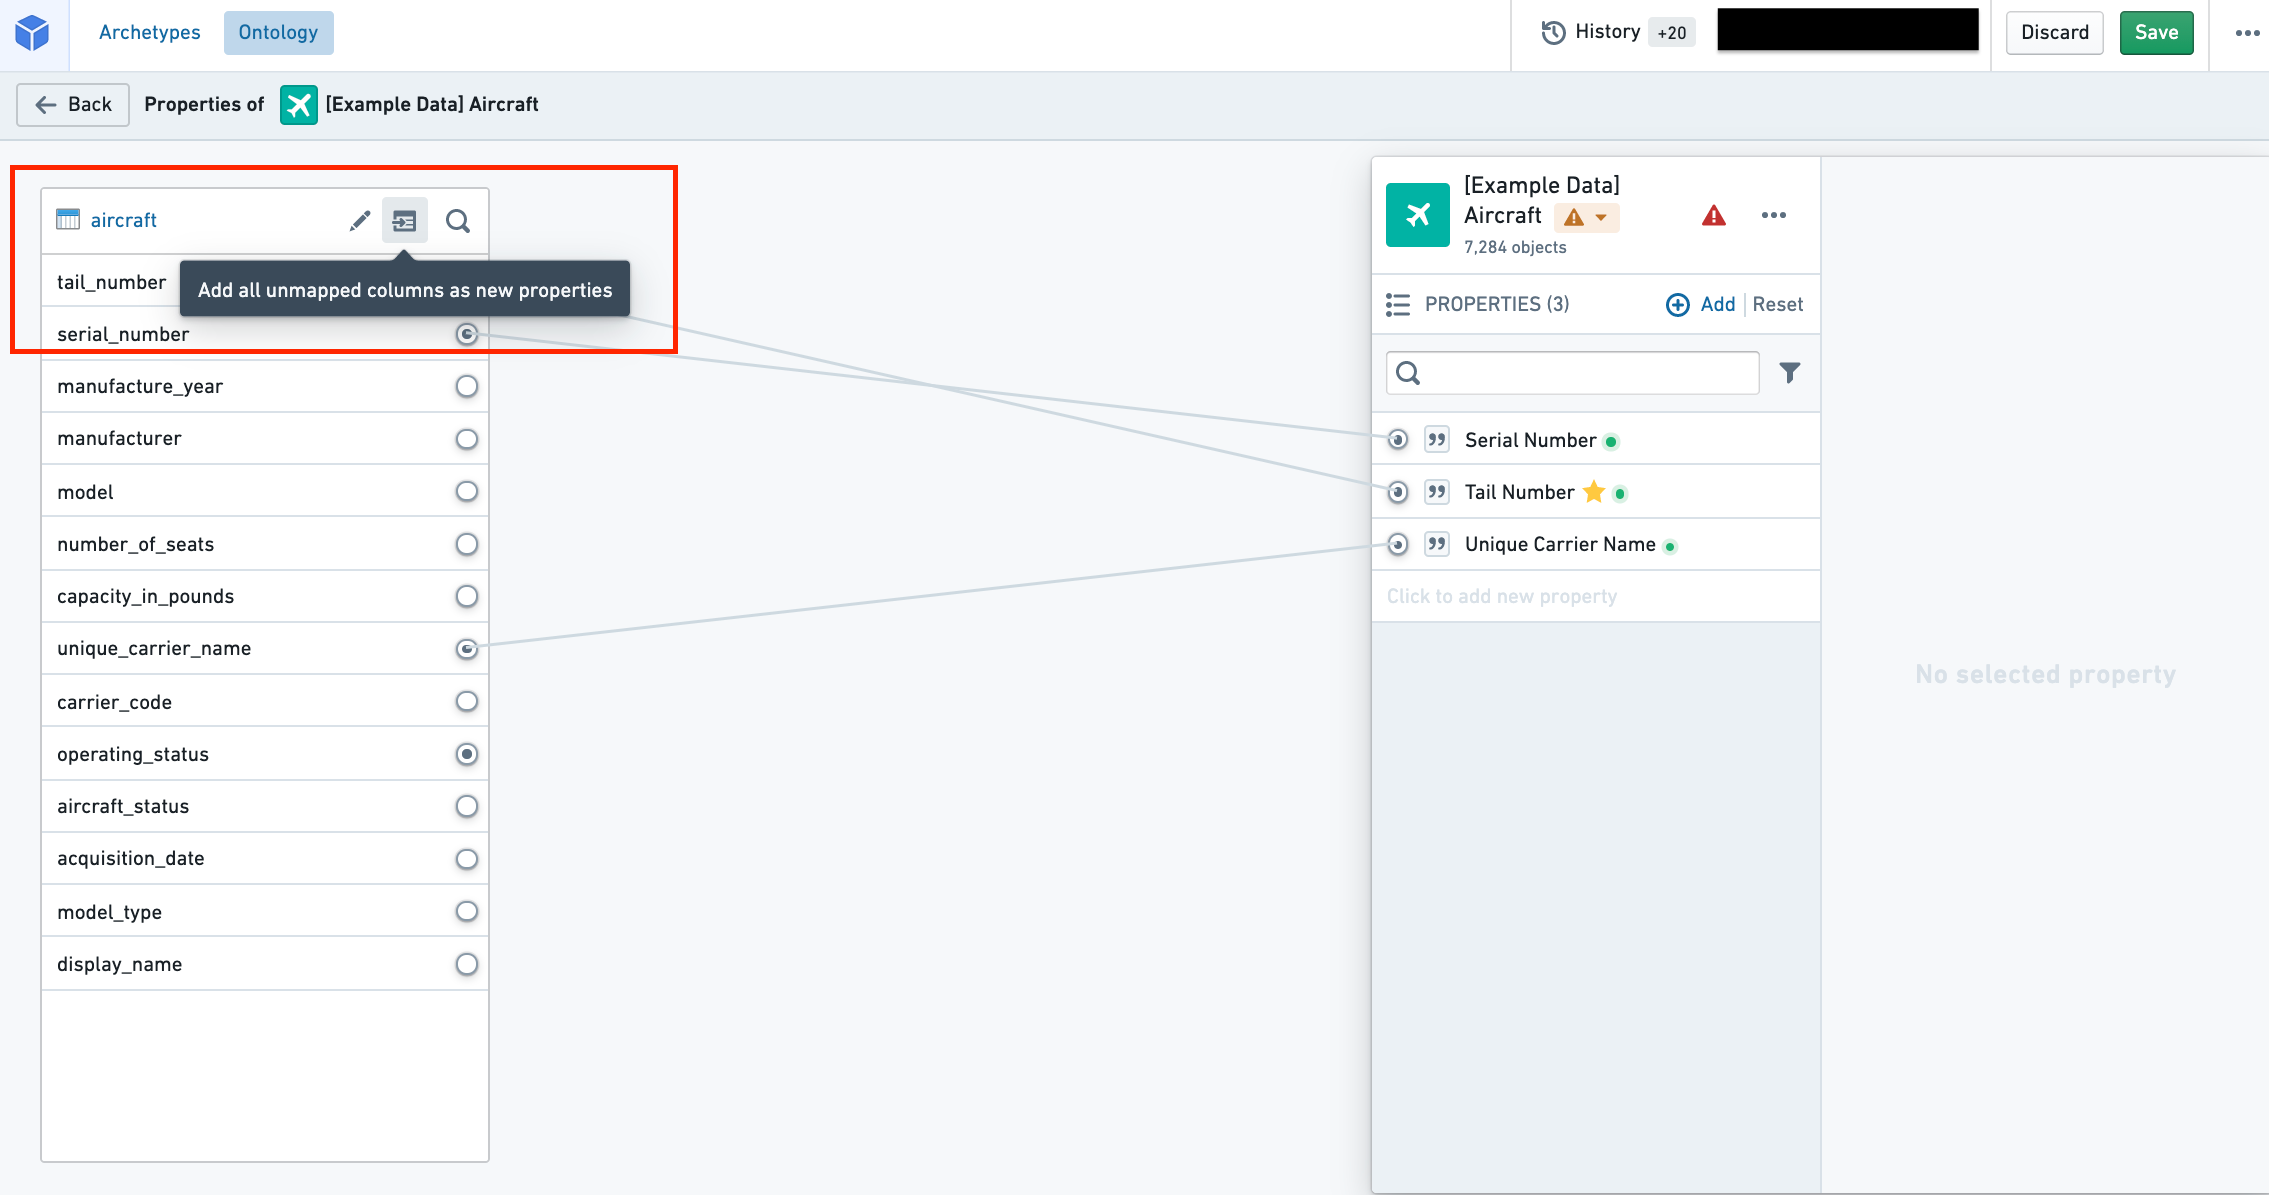
Next to the datasource name in the datasource pane, you will find an Add all unmapped columns as new properties button. Selecting the button will create properties for all the unmapped columns in the datasource. The IDs, display names, and base types of the properties will be inferred from the corresponding columns in the datasource.
- Once a property’s ID is saved and the property is referenced in user applications, any change to the property ID will break the application.
Configure the primary key and title key
Now that you've created your new object type, added a backing datasource, and mapped it to new properties, you still need to configure the primary key and title key before being able to save your object type. You can navigate to the property metadata pane in the property editor (see image below) to set a property as the primary key and title key:

- Primary key: The property that acts as a unique identifier for each instance of an object type. Each row in the backing datasource must have a different value for this property.
- For example, the value of the
employee IDproperty will be used to identify “Melissa Chang“ as a unique (notional) employee within the organization. - To configure the primary key, select the property you want to assign to the primary key in the properties pane of the property editor and check the Primary key option.
- Edits are permanently attached to the primary key value you made them for. Any time you change the primary key of an object type, you will be prompted to delete all existing edits.
- Title key: The property that acts as a display name for objects of this type.
- For example, selecting the
full nameproperty as the title key of theEmployeeobject type will use the values of that property, such as “Melissa Chang”, “Akriti Patel”, or “Diego Rodriguez” as the display names for each respective notionalEmployeeobject. - To configure the title key, select the property you want to assign to the title key in the properties pane of the property editor and check the Title key option. Note that until this point, your changes have been staged but have not yet been saved. To save your new object type to the Ontology, follow the instructions on how to save changes to the Ontology.
:::callout{theme="warning"} Be sure to check your backing datasources for duplicates before assigning a primary key. The primary key you select must be unique for every record in the datasource. If your Ontology is using Object Storage V2, a duplicate primary key will cause Funnel batch pipeline errors leading to a build failure. If you are using Object Storage V1 (also known as Phonograph), an update will appear as successful; however, the duplicate primary keys can cause unexpected changes to your Ontology. :::
Configure API names
An API name is the name used when referring to an object type or a property programmatically in code. All new object types and properties are automatically assigned API names that are inferred from their display names. Learn more about API names.
You can change the automatically assigned API names as follows:
- An object type’s API name can be edited in the object type’s Overview page.
- A property’s API name can be edited in the properties pane of the property editor.
Naming guidelines
Object type API names follow functional coding standards. An object type’s API name must:
- Begin with an uppercase character and consist of only alphanumeric characters.
- Be written in PascalCase (also known as UpperCamelCase, in which the first letter of each word in a compound word is capitalized; for instance, “ThisExampleName”).
- Be unique across all object types.
- Be between 1 and 100 characters long.

A property’s API name must:
- Begin with a lowercase character and consist of only alphanumeric characters.
- Be written in camelCase (in which the first letter of each word after the first word in a compound word is capitalized; for instance, “thisExampleName”).
- Be unique across all properties belonging to the same object type.
- Be between 1 and 100 characters long.

Troubleshooting
Mandatory object type fields
To save a new object type, the following object type fields must not be empty:
- ID
- Display name
- Plural display name
- Backing datasource
- API name
Additionally, the following property fields must not be empty:
- Property ID
- Property display name
- Backing column
- Property API name
- Title key
- Primary key
Valid ID checklist
Object type ID
Object type IDs:
- Can be made up of lowercase letters, numbers, and dashes.
- Should start with a letter.
- Must be unique across all object types.
Property type ID
Property type IDs:
- Can be made up of lowercase or uppercase letters, numbers, dashes, and underscores.
- Should start with a letter.
- Must be unique across all properties that belong to the same object type.
API name
In line with functional coding standards, an object type’s API name must:
- Consist of only alphanumeric characters and underscores.
- Be unique across all object types.
- Be between 1 and 100 characters long.
A property’s API name must:
- Be valid Unicode.
- Be unique across all properties belonging to the same object type.
- Be between 1 and 100 characters long.
Note that there are a number of reserved keywords that cannot be used for API names. They are: ontology, object, property, link, relation, rid, primaryKey, typeId, and ontologyObject.
Errors
Error: Phonograph2:DatasetAndBranchAlreadyRegistered
If you receive the error Phonograph2:DatasetAndBranchAlreadyRegistered, the datasource backing the object type you are trying to save is already backing a different object type in the Ontology and cannot be used again.
中文翻译
创建对象类型
创建和配置新对象类型的主要方式是使用引导式分步助手。引导式助手是推荐的方法,但如果您在完成对象创建过程之前退出了助手,也可以通过指定新对象类型的元数据、后端数据源、属性映射以及键(主键和标题键)来手动完成该过程。
创建新对象类型后,您可以更改 API 名称(从分配的默认值)。
本页还包含有关新对象类型创建过程的故障排除信息。
使用助手创建新对象类型
创建新对象类型
要创建新对象类型,请从 Ontology Manager 主页选择 创建您的第一个对象类型 选项,或选择同一页面右上角的 新建 > 创建对象类型。
将出现 创建新对象类型 助手。
选择后端数据源
如果您在 Foundry 中有包含支持该对象类型数据的现有数据源,则可以选择它。这将自动填充对象类型的元数据。它还会将后端数据源的每一列映射到一个属性,但您可以在 属性 步骤中丢弃添加的属性。
:::callout{theme="warning" title="警告"}
对象类型的后端数据源不能包含 MapType 或 StructType 列。
:::
如果您没有包含该对象类型数据的现有数据源,您可以选择在没有现有数据源的情况下继续,并选择一个位置来生成用于权限的数据集。如果您使用的是 Object Storage v1,则此选项不可用。由于对象类型的权限由其后端数据源的位置决定,系统会提示您选择一个要保存空数据集的位置。
对象类型元数据
在此步骤中,提供有关新对象类型的以下信息:
- 图标: 选择默认图标以自定义对象类型的图标和颜色;当用户在应用程序中查看此类型的对象时,将显示此图标和颜色。
- 名称: 在用户应用程序中访问此类型对象的任何人看到的名称。
- 复数名称: 在用户应用程序中访问此类型多个对象的任何人看到的名称。
- 描述: 为在用户应用程序中访问此类型对象的任何人提供的说明文本。例如,在 Object Explorer 中搜索的用户将在搜索结果中看到对象类型的描述。
- 组: 选择此对象类型是否属于任何组。这是一种组织本体的机制,使以后更容易过滤出您想要处理的对象类型。
为对象类型创建属性
在对话框的第三步中,您可以自定义对象类型将具有哪些属性。如果您选择了现有的 Foundry 数据源,任何列都将自动映射,但可以在这一步中丢弃。
每个对象类型至少需要一个属性。这是因为对象类型需要一个主键来唯一标识它们。向导允许您添加任何其他所需的属性。
请注意,需要高级配置的属性类型(如媒体)无法作为引导向导的一部分生成,必须在退出向导后添加。
配置主键和标题键
作为 属性 步骤的一部分,您需要选择主键和标题键:
- 标题键: 充当此类型对象显示名称的属性。
- 例如,选择
full name属性作为Employee对象类型的标题键,将使用该属性的值,如 "Melissa Chang"、"Akriti Patel" 或 "Diego Rodriguez" 作为每个相应概念性Employee对象的显示名称。 - 主键: 充当对象类型每个实例唯一标识符的属性。后端数据源中的每一行必须具有此属性的不同值。
- 例如,
employee ID属性的值将用于将 "Melissa Chang" 标识为组织内的唯一员工。
支持的属性类型列表可以在对象类型属性文档中找到。
:::callout{theme="warning"} 在分配主键之前,请务必检查后端数据源中是否存在重复项。您选择的主键对于数据源中的每条记录必须是唯一的。如果您的本体使用 Object Storage v2,重复的主键将导致 Funnel 批处理管道错误,从而导致构建失败。如果您使用的是 Object Storage v1 (Phonograph),更新将显示为成功;但是,重复的主键可能会导致本体的意外更改。 :::
:::callout{theme="warning"} 主键应该是确定性的。如果主键是非确定性的并且在构建时发生变化,则编辑可能会丢失,链接可能会消失。编辑可能会丢失,因为本体编辑与对象的主键相关联。如果构建未协调以更新链接 ID,则对象之间的链接可能会消失。为确保确定性主键,您应该定义管道逻辑,使主键成为单个列或多个列的函数。避免使用编号行或随机键生成,因为这些可能导致主键在构建运行之间发生变化。 :::
生成操作
您可以选择生成一组标准操作来编辑此类型的对象,并分配可以运行这些操作的特定用户或组。
请注意,即使您已完成对象类型并退出助手,您仍然可以对这些操作进行编辑或创建新的附加操作。
如果您使用的是 Object Storage v1,则此步骤不可用。
保存位置
在最后一步中,选择一个项目来保存此对象类型。然后,选择 创建。选择 创建 只会暂存您的更改,不会保存 它们。
保存对本体的更改
返回 Ontology Manager,选择右上角的 保存 以对您的本体进行更改。
手动创建新对象类型
使用助手创建新对象类型时,可以在完成上述 创建新对象类型 助手说明中的所有步骤之前选择 创建。在过程完成之前选择 创建 将退出助手并将您带到 概览 页面。
此时,对象类型未保存,并且在完成以下所有步骤之前无法保存。手动完成创建过程的步骤(在 创建新对象类型 助手之外)如下所述:
为新对象类型添加元数据
在 概览 页面的元数据部分,您可以编辑对象类型的显示名称、复数显示名称、描述和 ID:
- 显示名称: 在用户应用程序中访问此类型对象的任何人看到的名称。
- 复数显示名称: 在用户应用程序中访问此类型多个对象的任何人看到的名称。
- 别名: 用户搜索时将找到此对象类型的附加术语。
- 描述: 为在用户应用程序中访问此类型对象的任何人提供的说明文本。例如,在 Object Explorer 中搜索的用户将在搜索结果中看到对象类型的描述。
- 组: 一个或多个有助于对对象类型进行分类的标签。
- ID: 对象类型的唯一标识符,主要用于在配置用户应用程序时引用此类型的对象。
- ID 可以包含小写字母、数字和破折号。
- ID 的第一个字符 必须 是小写字母。
- 一旦属性的 ID 被保存并且该属性在用户应用程序中被引用,任何 对属性 ID 的更改都将破坏应用程序。
- 图标: 从对象类型视图的侧边栏中选择默认图标以自定义对象类型的图标和颜色;当用户在应用程序中查看此类型的对象时,将显示此图标和颜色。
- 后端数据源: 用作此类型对象属性值的数据源。
向对象类型添加组
组 是帮助对对象类型进行分类的标签。从对象类型元数据小部件中,您可以:
- 从现有组列表中添加组。
- 通过键入组名称来创建新组。
- 从对象类型中移除组。
组可在 Ontology Manager 的 搜索 栏和 搜索 栏对话框中搜索。Ontology Manager 中的对象类型表支持按组显示和筛选。组也显示在 Object Explorer 主页上。
:::callout{theme="warning" title="警告"}
对象类型元数据中的组作为标签,取代了之前将 oe_home_page_object_type_group 类型类添加到主键属性的方法;此先前方法不再可用。
:::
为新对象类型添加后端数据源
为了用数据填充此类型对象的属性值,您必须添加后端数据源。您可以通过以下方式执行此操作:
- 导航到属性编辑器,方法是从 概览 页面的 属性 部分选择 创建新属性,或从对象类型视图侧边栏的 属性 页面选择 编辑属性映射 按钮。
- 然后,选择 添加后端数据源 按钮,如下图所示。这将允许您选择 Foundry 中任何可用的数据源作为后端数据源。
- 请注意,单个数据源只能用于支持一个对象类型。
添加新属性
在属性编辑器中,选择屏幕右侧 属性 窗格中的 添加。这将向对象类型添加一个新属性。
将单个属性映射到数据
可以通过以下任何方式将属性映射到后端数据源中的列:
将列映射到新属性
在屏幕左侧的数据源窗格中(见下图),您可以看到数据源的所有列。悬停在要映射的列上,然后选择 添加为新属性 按钮,以创建映射到此列的新属性。属性 ID、显示名称和基本类型将从列名推断出来。
将列映射到现有属性
在屏幕左侧的数据源窗格中,您可以看到数据源的所有列。悬停在未映射的列上,然后选择 添加为新属性 按钮。如果已存在属性 ID 与列名匹配的属性,则该列将映射到现有属性。
将属性映射到列
在屏幕右侧的属性窗格中,悬停在要映射到列的属性上,然后选择 映射到列。这将打开一个下拉菜单,您可以在其中选择要映射到属性的列。
将所有未映射的列添加为新属性
在数据源窗格中数据源名称旁边,您会找到一个 将所有未映射的列添加为新属性 按钮。选择该按钮将为数据源中所有未映射的列创建属性。属性的 ID、显示名称和基本类型将从数据源中的相应列推断出来。
- 一旦属性的 ID 被保存并且该属性在用户应用程序中被引用,任何 对属性 ID 的更改都将破坏应用程序。
配置主键和标题键
现在您已经创建了新对象类型,添加了后端数据源,并将其映射到新属性,您仍然需要配置主键和标题键,然后才能保存对象类型。您可以导航到属性编辑器中的属性元数据窗格(见下图)以将属性设置为主键和标题键:
- 主键: 充当对象类型每个实例唯一标识符的属性。后端数据源中的每一行必须具有此属性的不同值。
- 例如,
employee ID属性的值将用于将 "Melissa Chang" 标识为组织内的唯一(概念性)员工。 - 要配置主键,请在属性编辑器的属性窗格中选择要分配给主键的属性,然后选中 主键 选项。
- 编辑永久附加到您为其进行编辑的主键值。任何时候更改对象类型的主键,系统都会提示您删除所有现有编辑。
- 标题键: 充当此类型对象显示名称的属性。
- 例如,选择
full name属性作为Employee对象类型的标题键,将使用该属性的值,如 "Melissa Chang"、"Akriti Patel" 或 "Diego Rodriguez" 作为每个相应概念性Employee对象的显示名称。 - 要配置标题键,请在属性编辑器的属性窗格中选择要分配给标题键的属性,然后选中 标题键 选项。 请注意,到目前为止,您的更改已暂存但 尚未保存。要将新对象类型保存到本体,请按照如何保存对本体的更改的说明进行操作。
:::callout{theme="warning"} 在分配主键之前,请务必检查后端数据源中是否存在重复项。您选择的主键对于数据源中的每条记录必须是唯一的。如果您的本体使用 Object Storage V2,重复的主键将导致 Funnel 批处理管道错误,从而导致构建失败。如果您使用的是 Object Storage V1(也称为 Phonograph),更新将显示为成功;但是,重复的主键可能会导致本体的意外更改。 :::
配置 API 名称
API 名称是在代码中以编程方式引用对象类型或属性时使用的名称。所有新对象类型和属性都会自动分配从其显示名称推断出的 API 名称。了解有关 API 名称的更多信息。
您可以按如下方式更改自动分配的 API 名称:
- 对象类型的 API 名称可以在对象类型的 概览 页面中编辑。
- 属性的 API 名称可以在属性编辑器的属性窗格中编辑。
命名指南
对象类型 API 名称遵循函数式编码标准。对象类型的 API 名称必须:
- 以大写字符开头,并且仅包含字母数字字符。
- 采用 PascalCase 格式(也称为 UpperCamelCase,其中复合词中每个单词的首字母大写;例如,"ThisExampleName")。
- 在所有对象类型中唯一。
- 长度在 1 到 100 个字符之间。
属性的 API 名称必须:
- 以小写字符开头,并且仅包含字母数字字符。
- 采用 camelCase 格式(其中复合词中第一个单词之后的每个单词的首字母大写;例如,"thisExampleName")。
- 在属于同一对象类型的所有属性中唯一。
- 长度在 1 到 100 个字符之间。
故障排除
必填的对象类型字段
要保存新对象类型,以下对象类型字段不能为空:
- ID
- 显示名称
- 复数显示名称
- 后端数据源
- API 名称
此外,以下属性字段不能为空:
- 属性 ID
- 属性显示名称
- 后端列
- 属性 API 名称
- 标题键
- 主键
有效 ID 检查清单
对象类型 ID
对象类型 ID:
- 可以由小写字母、数字和破折号组成。
- 应以字母开头。
- 必须在所有对象类型中唯一。
属性类型 ID
属性类型 ID:
- 可以由小写或大写字母、数字、破折号和下划线组成。
- 应以字母开头。
- 必须在属于同一对象类型的所有属性中唯一。
API 名称
根据函数式编码标准,对象类型的 API 名称必须:
- 仅包含字母数字字符和下划线。
- 在所有对象类型中唯一。
- 长度在 1 到 100 个字符之间。
属性的 API 名称必须:
- 是有效的 Unicode。
- 在属于同一对象类型的所有属性中唯一。
- 长度在 1 到 100 个字符之间。
请注意,有许多保留关键字不能用作 API 名称。它们是:ontology、object、property、link、relation、rid、primaryKey、typeId 和 ontologyObject。
错误
错误:Phonograph2:DatasetAndBranchAlreadyRegistered
如果您收到错误 Phonograph2:DatasetAndBranchAlreadyRegistered,则支持您尝试保存的对象类型的数据源已经在支持本体中的不同对象类型,并且不能再次使用。