Create Ontology objects from Gaia(从 Gaia 创建 Ontology 对象)
Similar to how you can add data from the Ontology to a Gaia map, you can also create Ontology objects from a shape you draw, a point you drop, or a tactical graphic you configure on a map by tagging the object within an object type which implements the Gaia Geoshape Creatable, Gaia Geopoint Creatable, or the MILSTD 2525C Symbol interface.
:::callout{theme="warning"}
Made available through Palantir's Defense OSDK, the MILSTD 2525C Symbol interface supersedes the Gaia Milsym Creatable interface, which is in the planned deprecation phase of development and will be deprecated by July 2026. Contact Palantir Support with questions about the availability of Defense OSDK interfaces or the deprecation of the Gaia Milsym Creatable interface on your enrollment.
If both interfaces are available on your enrollment, implement the MILSTD 2525C Symbol interface instead of the Gaia Milsym Creatable interface. :::
:::callout{theme="warning"} To create Ontology objects from a Gaia map, your enrollment must use both Foundry and Gotham. :::
The sections below outline the end-to-end process to integrate Gaia shapes, points, and tactical graphics with the Ontology:
- Install all necessary Marketplace products.
- Implement the Gaia Geoshape Creatable interface on a supported object type backed by a restricted view.
- Implement the Gaia Geopoint Creatable interface on a supported object type backed by a restricted view.
- Implement the MILSTD 2525C Symbol interface on a supported object type backed by a restricted view.
- Register your ontology and search for your object types in Gaia.
- Draw a new shape on your map and tag it within your object type.
- Drop a new point on your map and tag it within your object type.
- Configure a tactical graphic from a shape drawn on your map and tag it within your object type.
Install prerequisite Marketplace products
Marketplace is Foundry's storefront for published data products or collections of platform resources made available for user installation. You can access Marketplace through the Search... bar or the Applications portal on your home screen.
Once you launch Marketplace, install the following products:
- Core Property Types from the Core Ontology Store, which contains core shared property types, such as an object's classification and geoshape, that can be used on multiple object types in your ontology.
- Gaia Geoshape Creatable interface from the Gaia App Store, which describes the shape of a geospatial object type to enable consistent modeling of and interaction with other object types of the same shape.
- Gaia Geopoint Creatable interface from the Gaia App Store, which describes the position of a single point object type.
Core Property Types from the Core Ontology Store
:::callout{theme="neutral"} Contact Palantir Support to install the Core Ontology on your Foundry enrollment as a Foundry product if the Core Ontology Store, which contains the Core Property Types product, is not available in Marketplace. :::
Gaia Geoshape Creatable interface from the Gaia App Store
In Foundry, interfaces exist within your ontology to describe an object type's shape as well as its capabilities, enabling consistent modeling and interaction between object types of a common shape. You can implement an interface on multiple object types, and interfaces may extend any number of other interfaces. Once implemented on an object type, the Gaia Geoshape Creatable interface enables you to create objects in your ontology from shapes drawn on a Gaia map.
:::callout{theme="warning"} The Gaia Geoshape Creatable interface supersedes the deprecated Gaia Geocreatable interface. Contact Palantir Support if you are unable to access the Gaia Geoshape Creatable interface in Marketplace. :::
To install the Gaia Geoshape Creatable interface from Marketplace:
- Navigate back to Marketplace and search for the
Gaia App Storein Search stores.... - Choose the
Gaia Geoshape Creatableproduct. - Select the blue Install button on the right side of your screen to launch a draft installation. You can optionally add a descriptive suffix to your installation.
- Identify a Namespace where your installation will save. Marketplace will automatically create a new Project within the chosen Namespace.
- Configure the product's classification and access controls under Permissions. The classification you select under Classification based access control (CBAC) defines the maximum classification for the installation.
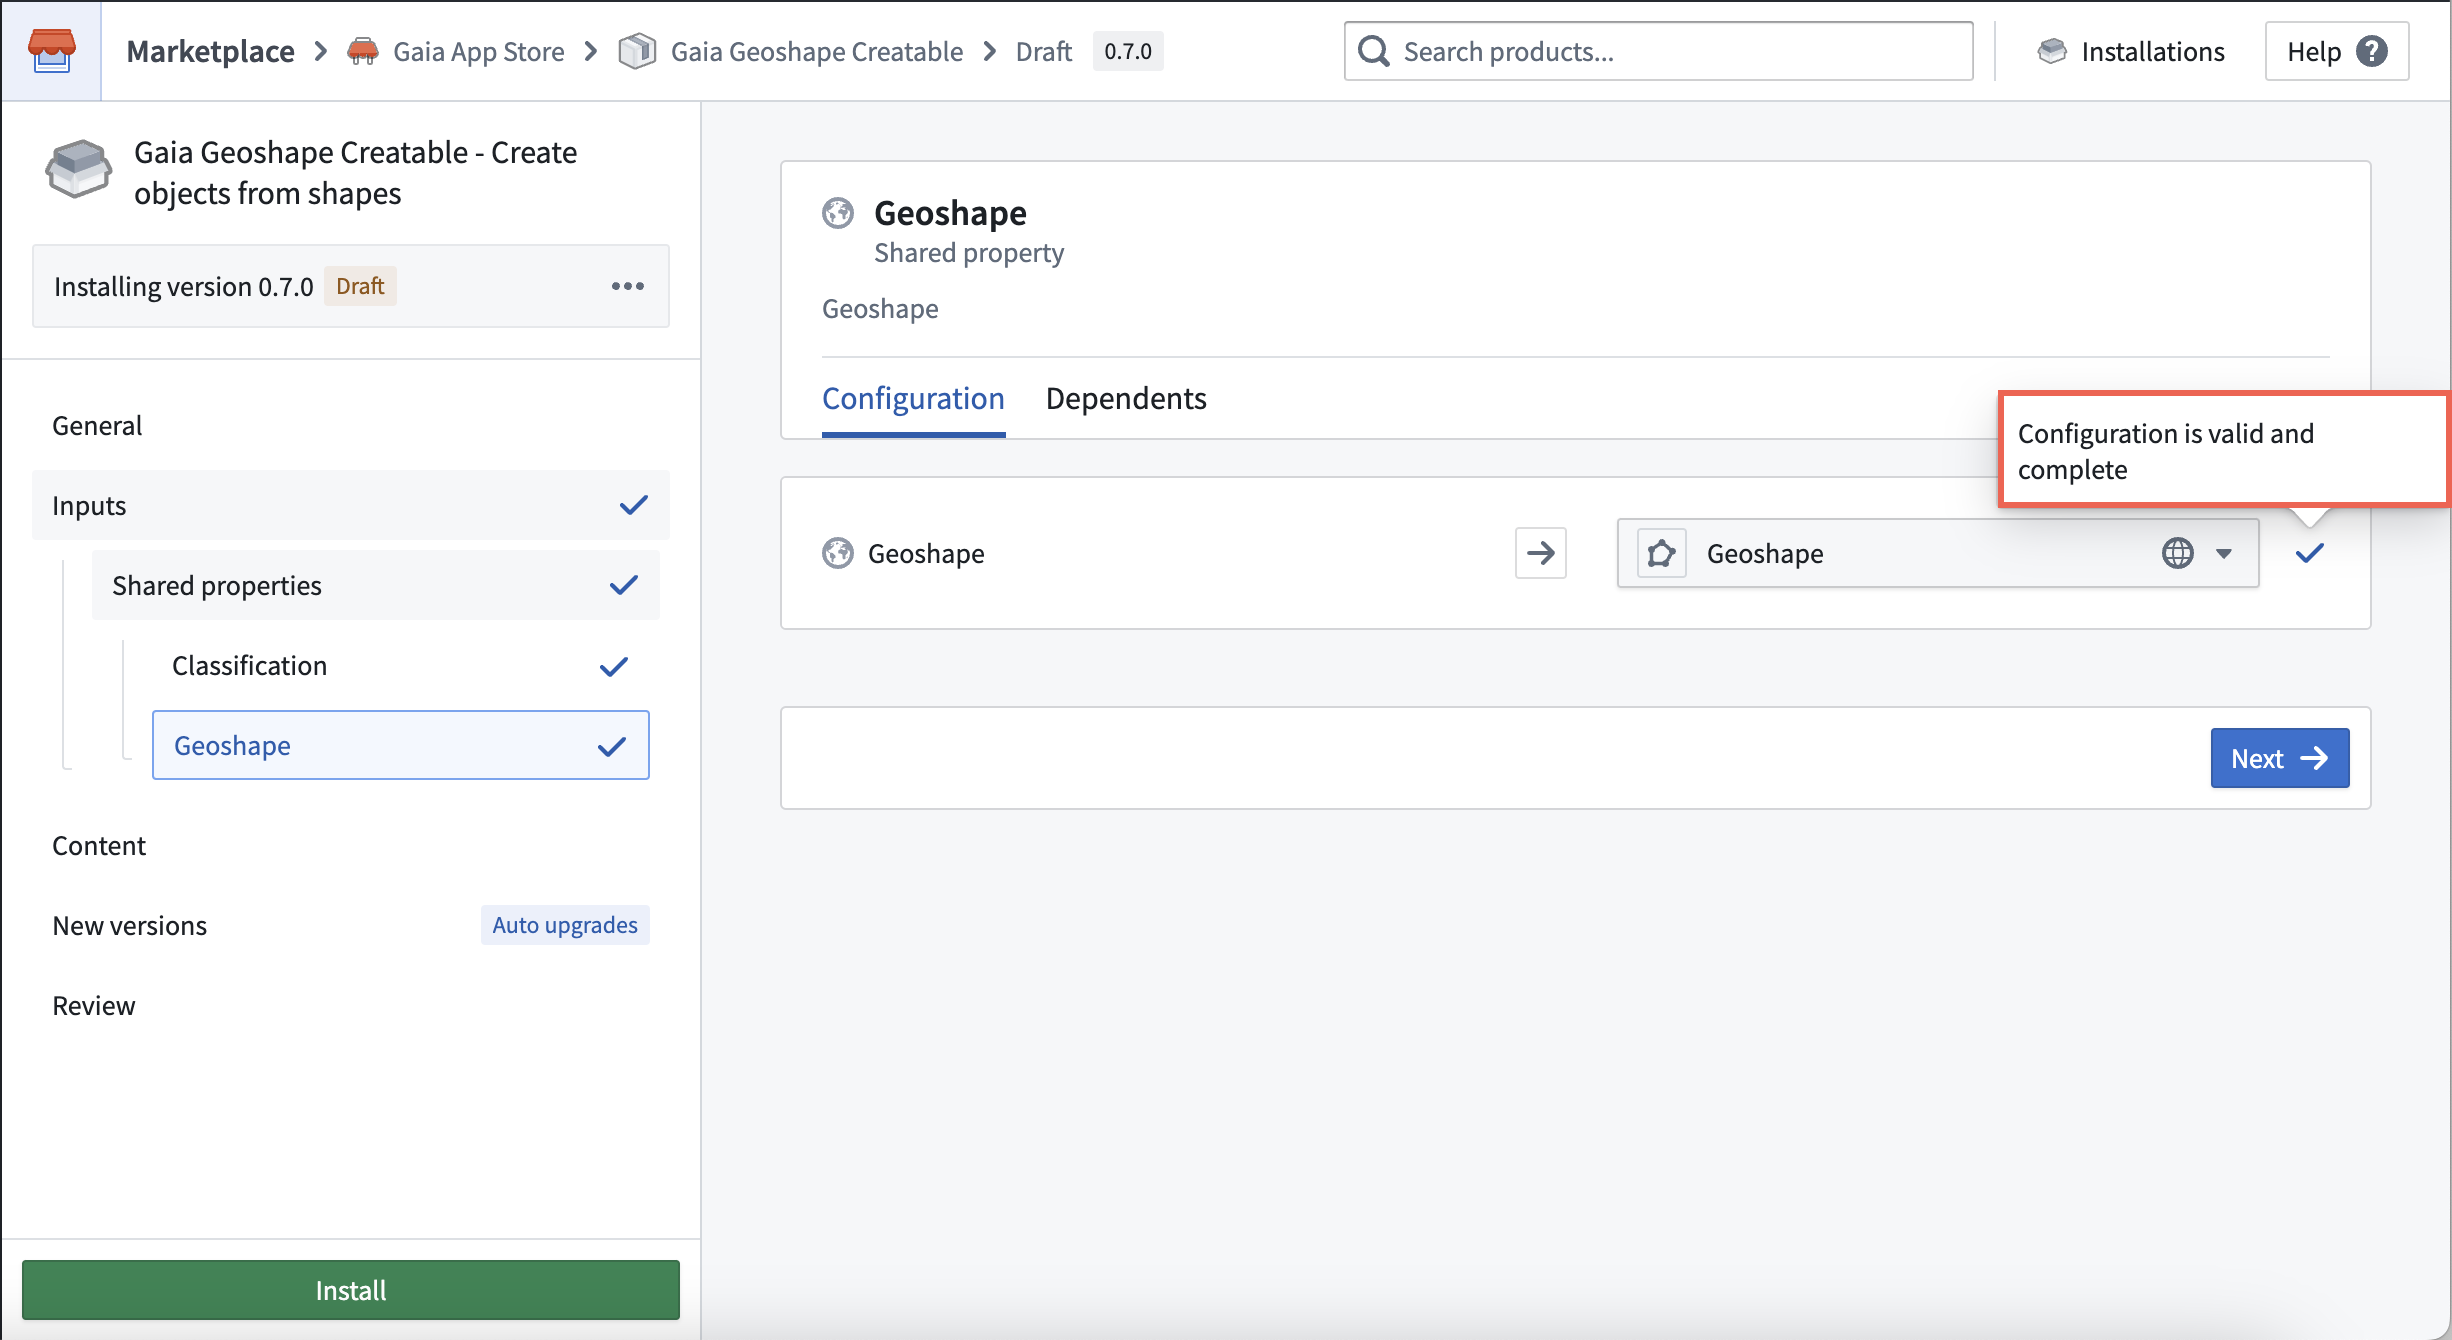
- Select Next to launch the installation window's Inputs page.
- Select the Shared properties tab under Inputs in the left panel to map the
Geoshapeshared property from your ontology to your new interface. - Select Next to launch the installation window's Content page.
- Optionally toggle on Prefix Ontology entities and insert a valid prefix. Note that your prefix may not contain certain special characters, such as parentheses or brackets.
- Choose which Ontology schema migrations to enable on the right side of your screen. You can reference additional schema management information within the existing object edits and materializations documentation.
- Update the automatic configurations in New versions as necessary for your use case before you select Next. Marketplace pre-configures certain products to upgrade automatically.
- Review your interface's configurations and select Install.
Gaia Geopoint Creatable interface from the Gaia App Store
To install the Gaia Geopoint Creatable interface from Marketplace's Gaia App Store, select the Gaia Geopoint Creatable product from the store menu. Marketplace's interface installation workflows are common across different interfaces, so you can follow the same steps outlined in the Geoshape Creatable interface installation instructions above with the following distinctions:
- In the Shared properties section of the Inputs window, map the
Geopointshared property from your ontology to the Gaia Geopoint Creatable interface.
Create an object type that implements the Gaia Geoshape Creatable interface
Gaia can discover object types backed by a dataset or restricted view in your ontology after they implement the Gaia Geoshape Creatable interface. In the following sections, you will:
- Create an object type-backing dataset or restricted view.
- Create an object type and ensure it integrates with Gotham.
- Configure an action type to enable object creation in Gaia.
- Implement the Gaia Geoshape Creatable interface.
Create an object type-backing dataset or restricted view
:::callout{theme="neutral"} You should create a restricted view if you plan to secure objects based on a user's classification or by applying markings to control file access. If your use case does not require the additional object security provided by classification-based access or markings, then you should create a dataset to back to your object type. :::
To create an object type that can integrate with Gaia, you will first need to create a dataset or restricted view that contains, at a minimum, the following columns:
Geoshape, which you will set as astringfor Gaia to automatically populate with your drawn object's shape.Object ID, which you will set as astringfor Foundry to automatically populate with a unique ID for each Gaia shape you create as an object. This will serve as your object type's primary key.Classification, which you will set as anarrayto capture your object's classification. AClassificationcolumn is only required if a restricted view backs your object type.
:::callout{theme="success"}
You can configure additional columns in your dataset or restricted view based on your specific use case, such as Name, Category, or Notes columns set as strings to capture user-entered descriptive information about the object.
:::
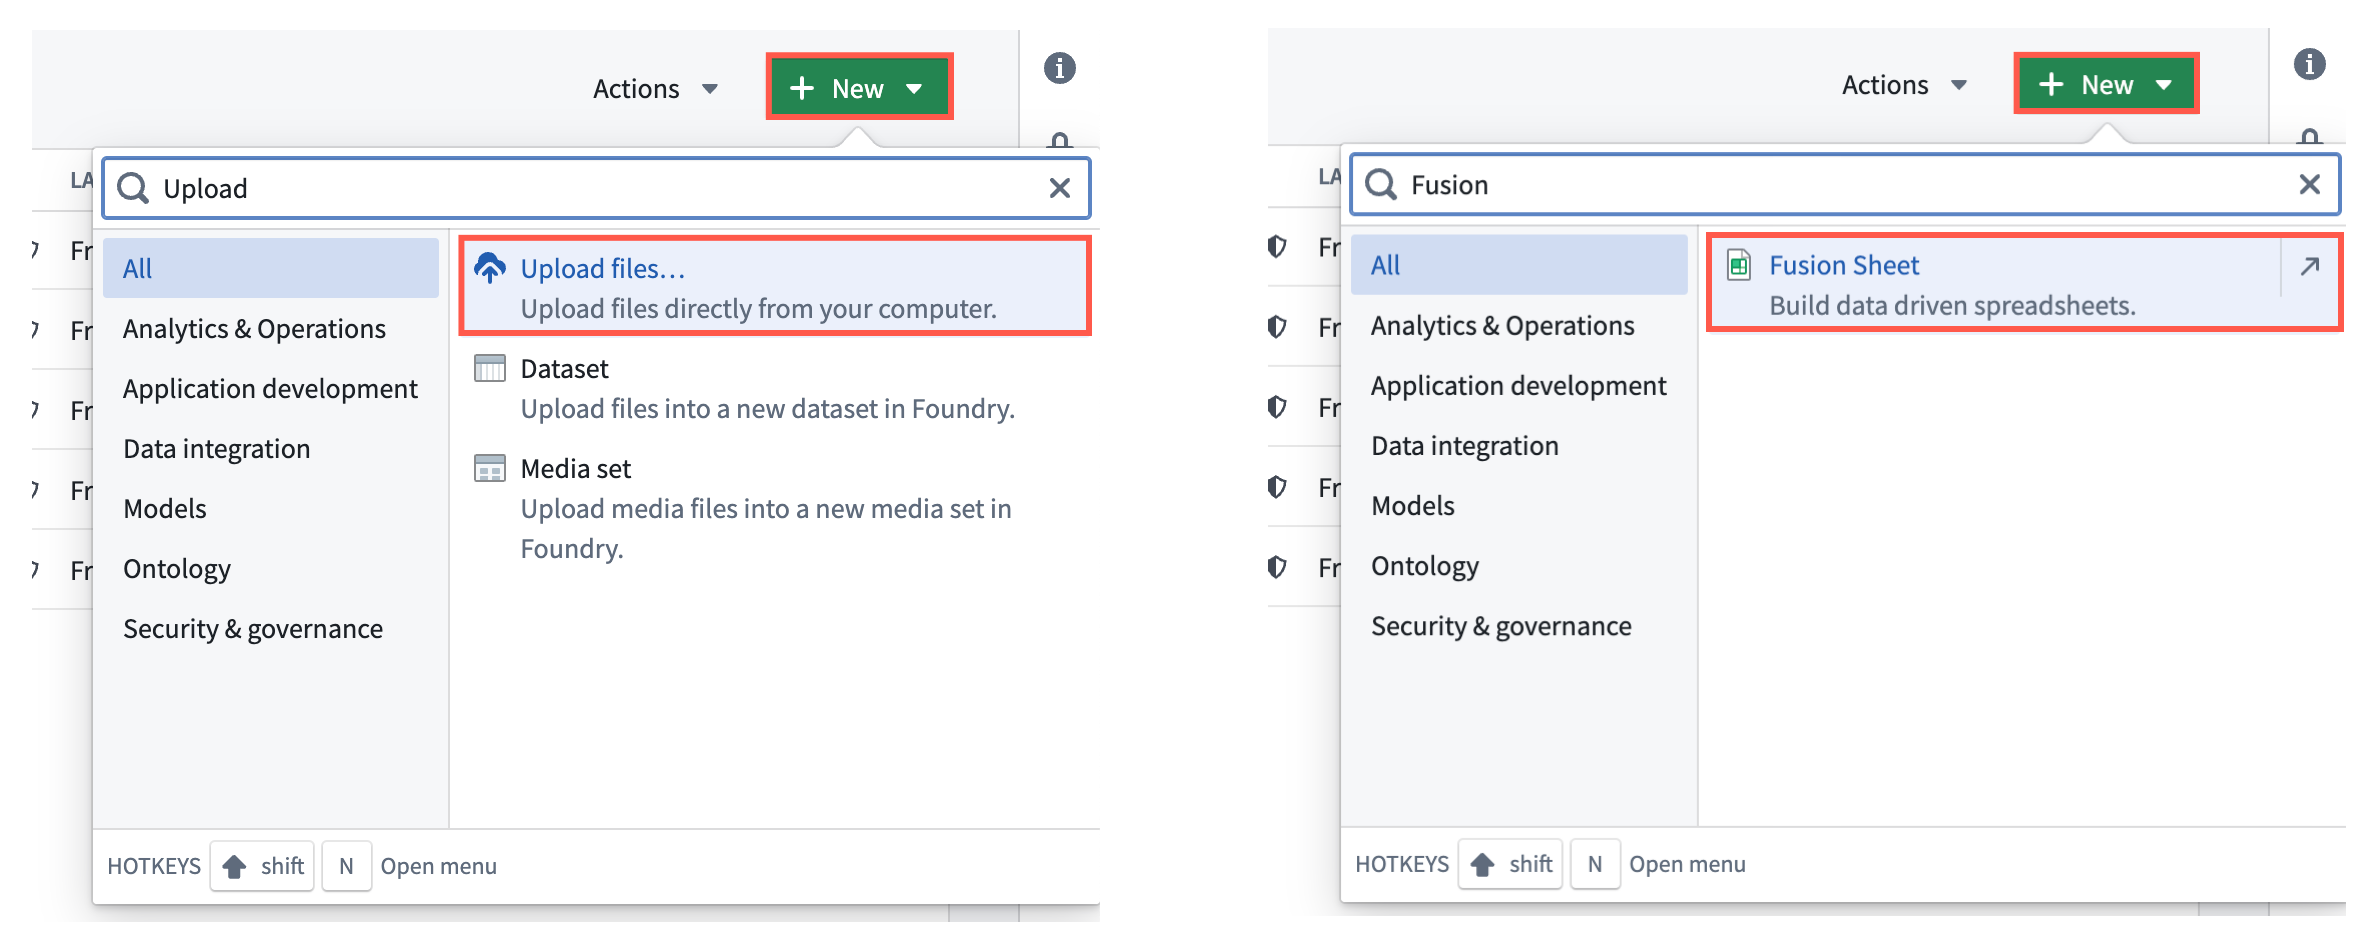
Select the New button in your Project to upload an existing file, such as a .csv, or use Fusion to create a standalone dataset or a dataset that backs your restricted view. If you use a dataset to back your object type, you can skip the restricted view creation instructions below and proceed to create your object type.
:::callout{theme="success"} You can reference additional restricted view creation instructions in Foundry's security and object permissions documentation. :::
Your restricted view should contain a granular policy that restricts user access to the data contained in the view based on their classification access. Compose the granular policy as the first step in the Create '{restricted view}' window.
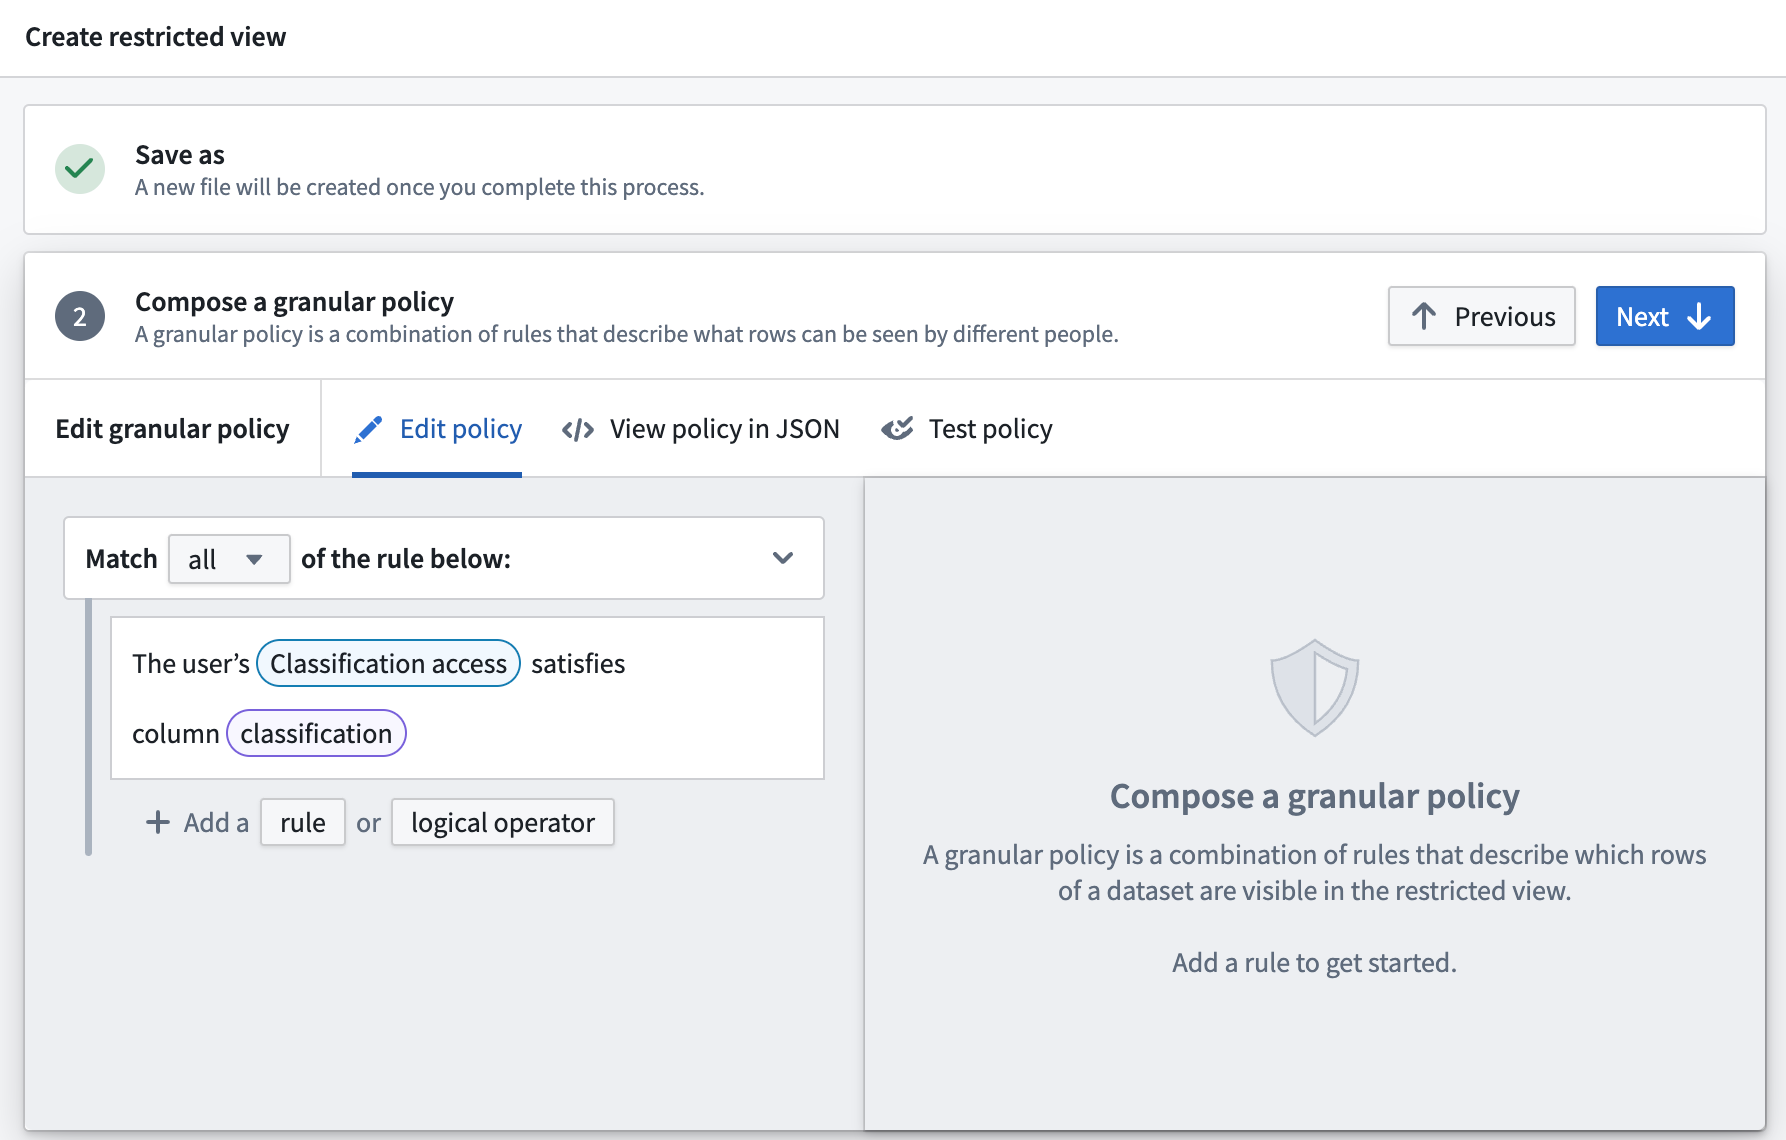
:::callout{theme="warning"} If an object contains a CBAC or mandatory marking property to restrict its access, then Foundry creates objects using the CBAC or mandatory markings it inherits from the Gaia map and will not apply group restrictions defined in the map's security and sharing settings. :::
You can reference an example policy in JSON below.
{
  "condition": {
    "and": {
      "conditions": [
        {
          "markings": {
            "value": {
              "field": {
                "fieldName": "classification"
              },
              "type": "field"
            },
            "filters": [
              {
                "markingTypes": {
                  "markingTypes": [
                    "CBAC"
                  ]
                },
                "type": "markingTypes"
              }
            ]
          },
          "type": "markings"
        }
      ]
    },
    "type": "and"
  }
}
Create an object type and ensure it integrates with Gotham
Once you configure your restricted view, launch Ontology Manager and follow the steps below to create your object type:
- Select New > Object type from the top right of your screen.
- Select Use existing datasource and choose Select datasource to locate and Select your restricted view before choosing Next.
- Name your object type and optionally enter a Description.
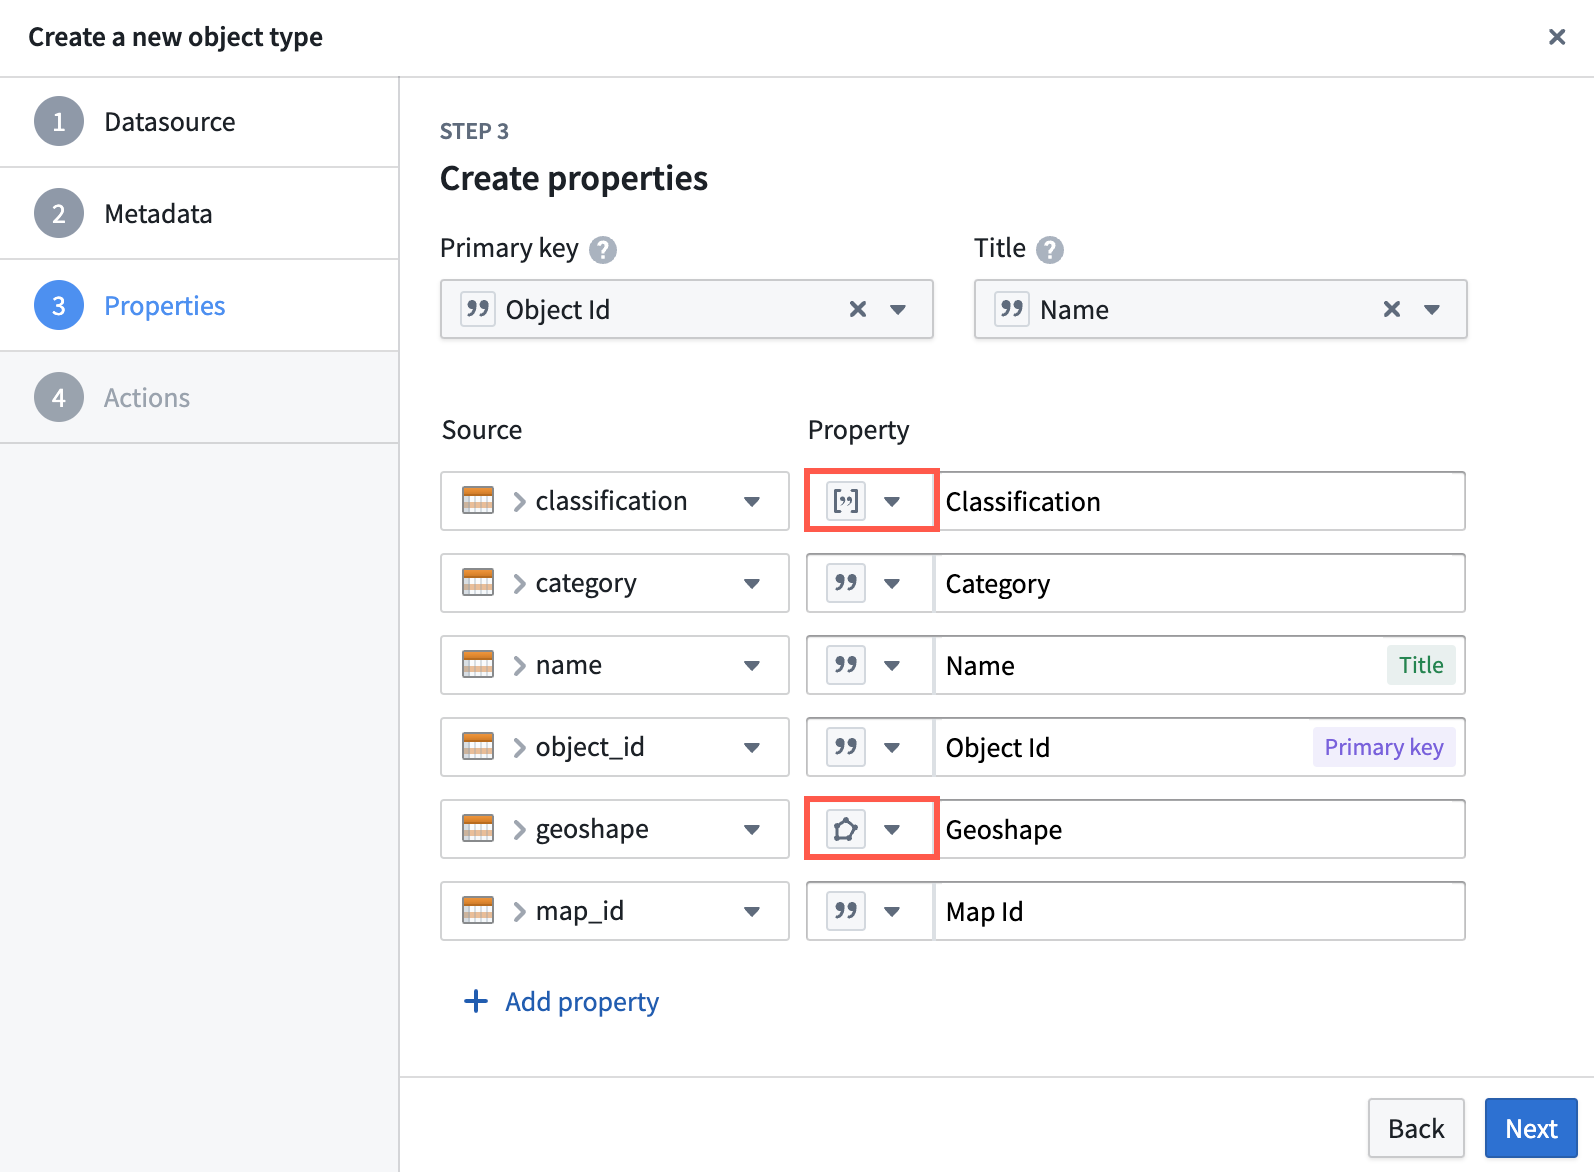
- Set
Object IDas the Primary Key andNameas the Title. - Ensure
Classification's Property is an array of strings andGeoshape's Property is geoshape. You will only need to validate the former if a restricted view backs your object type.
- Select Create, as you will generate and configure action types after object type creation.
With your draft object type viewable in Ontology Manager, you will next select the Classification and Geoshape properties as shared property types in your ontology. Select the Properties panel beneath Overview and follow the steps below to complete the shared property type selection process:
:::callout{theme="success"}
If you are using a dataset to back your object type that does not contain a Classification property, then you should complete steps 1 and 4 below for your Geoshape property.
:::
- Select
Classificationfrom your list of properties to launch the Property editor window on the right side of your screen. - Update the Base type dropdown menus to contain
Mandatory controlandCBAC Marking, respectively. - Configure the property's Max Classification.

:::callout{theme="warning"}
Contact your Palantir Support if you are unable to select Mandatory control as the base type for Classification, as Mandatory control markings are not generally available across all Foundry enrollments.
:::
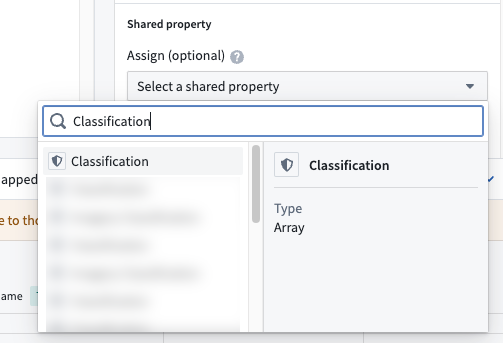
- Scroll to the bottom of the window to the Shared property section and use the dropdown menu to assign
Classificationas a shared property.
Repeat steps 1 and 4 above for your Geoshape property, as you will not need to configure its mandatory control markings or classification.
Select the green Save button at the top of the screen to publish incremental changes to your ontology before proceeding.
If your Foundry enrollment contains Map Rendering Service (MRS), then object types in your ontology with a geospatial property type automatically integrate with Gotham, and you can proceed to create an action type to enable object creation in Gaia. Follow the steps in the Gotham integration documentation to check if your enrollment contains MRS. If your enrollment does not contain MRS, then follow the instructions to integrate data in your ontology with Gotham.
:::callout{theme="neutral"} Contact Palantir Support with questions about MRS installation or functionality. :::
Create and configure an action type to enable object creation in Gaia
Once you create your object type and ensure it integrates with Gotham, navigate back to the Overview window in Ontology Manager. Here, create an action type that enables users to create and edit objects from shapes and configure their properties, such as Name and Category, from Gaia.
:::callout{theme="warning"} Your Foundry enrollment must contain MRS to edit Ontology objects in Gaia, as this capability does not extend to objects added to Gaia through type mapping. Contact Palantir Support with questions about MRS installation or functionality. :::
Follow the steps below to configure your action type:
- Select New from the Action types section of your object type's Overview window to launch the Create a new action type pop-up window.
:::callout{theme="success"} If you are unable to select the New button in Action types, then you can toggle on Allow edits on your object type in the Datasources window. :::
- Select Modify or create object under Object actions before choosing Next.
- Select Auto-generated primary key from the Or create a new object with dropdown menu.
- Select Add property to add all your existing properties to the action type, then choose Next to configure your action type's metadata.
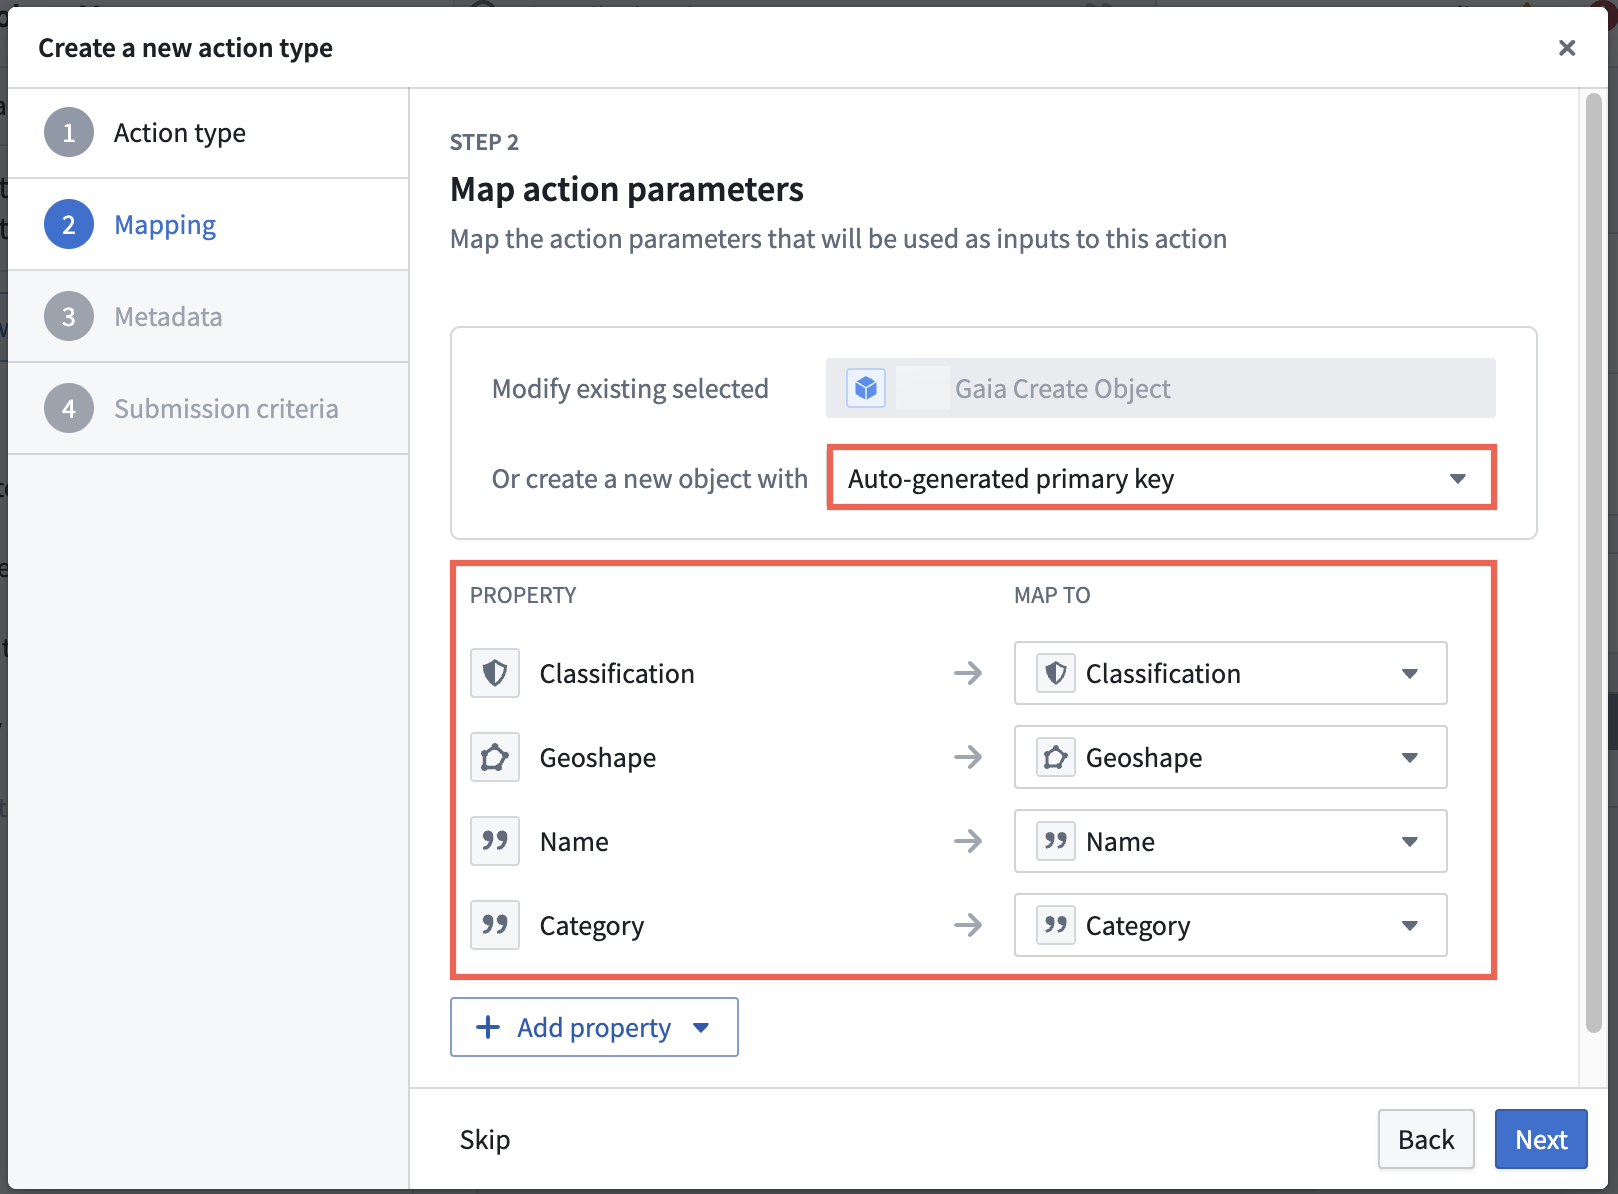
:::callout{theme="neutral"}
You will only need to map a Classification property if a restricted view backs your object type.
:::
- Name your action type, and optionally enter a description and update its default icon.
- Select an Organization, Group, or User who may execute the action, then select Create.
Select the green Save button at the top of the screen to publish incremental changes to your ontology before proceeding.
Next, you will configure your action type's Rules and Parameters by following the steps below:
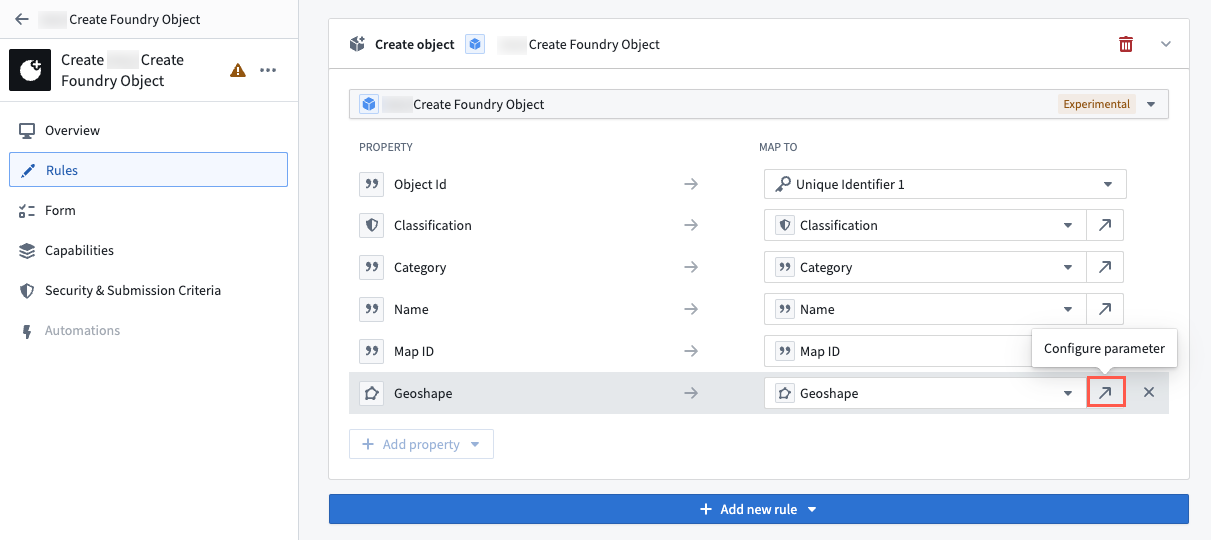
- Select Rules from the left side of the screen.
- Validate the
Geoshapeproperty's configurations by selecting the arrow icon next to Configure parameter. - Ensure the
Geoshapeproperty's type is eitherGeoshapeorStringfrom the Type dropdown menu on the right side of the screen. - Ensure the Disabled option is selected in the General panel so a user cannot manually configure the location of a
Geoshape.
- Select your
Classificationproperty from the Form content panel on the left side of your screen and verify that its Type isMandatory control. You will only need to configure aClassificationproperty if a restricted view backs your object type. - Select Back to Form and remove
Object Idfrom Form content by selecting the X icon on the far right side of the Object Id panel. Foundry will automatically generate a unique ID for each object created from Gaia. - Select the green Save button at the top of your screen to save your action type's configurations to the Ontology.
Implement the Gaia Geoshape Creatable interface
The final step in creating and configuring your object type in Ontology Manager is to implement the Gaia Geoshape Creatable interface that you previously installed from Marketplace. Navigate back to your object type's Overview page and follow the steps below to implement the interface before saving changes to your ontology:
- Navigate to the Interfaces window beneath Object Views on the left side of your screen.
- Select Implement new interface and search for
Gaia Geoshape Creatablebefore choosing Next. - Select Choose an option > Replace existing to map your ontology's
Geoshapeshared property type to the object type implementing the interface. - Select Confirm to close the Implement an interface window and Save the newly configured interface to your ontology.

Create an object type that implements the Gaia Geopoint Creatable interface
To create an object type that implements the Gaia Geopoint Creatable interface, you can follow the same steps outlined in the object type creation instructions for the Gaia Geoshape Creatable interface above with the following distinctions in each section:
- Create an object type-backing restricted view.
- Create a
Geopointinstead ofGeoshapecolumn. - Create an object type and ensure it integrates with Gotham.
- In the object type creation window, ensure
Geopoint's Property is geopoint. - Configure an action type to enable object creation in Gaia.
- Ensure your
Geopointproperty's Type isGeopointin your action type's Parameters window. - Implement the Gaia Geoshape Creatable interface.
- Search for the
Gaia Geopoint Creatableinstead of theGaia Geoshape Creatableinterface. - When mapping your ontology's shared property types, select Replace existing for the
Geopointinstead of theGeoshapeproperty.
Create an object type that implements the MILSTD 2525C Symbol interface
:::callout{theme="warning"} Unlike the Gaia Geoshape Creatable and Gaia Geopoint Creatable interfaces, you must use a restricted view to back an object type that implements the MILSTD 2525C Symbol interface. :::
To create an object type that implements the MILSTD 2525C Symbol interface, you can follow the same steps outlined in the object type creation instructions for the Gaia Geoshape Creatable interface above with the following distinctions in each section:
- Create an object type-backing restricted view.
- You will only need to create
Object ID,Classification, andTitlecolumns. - Create an object type and ensure it integrates with Gotham.
- In the object type creation window, set
Object IDas the Primary key andTitleas the Title.
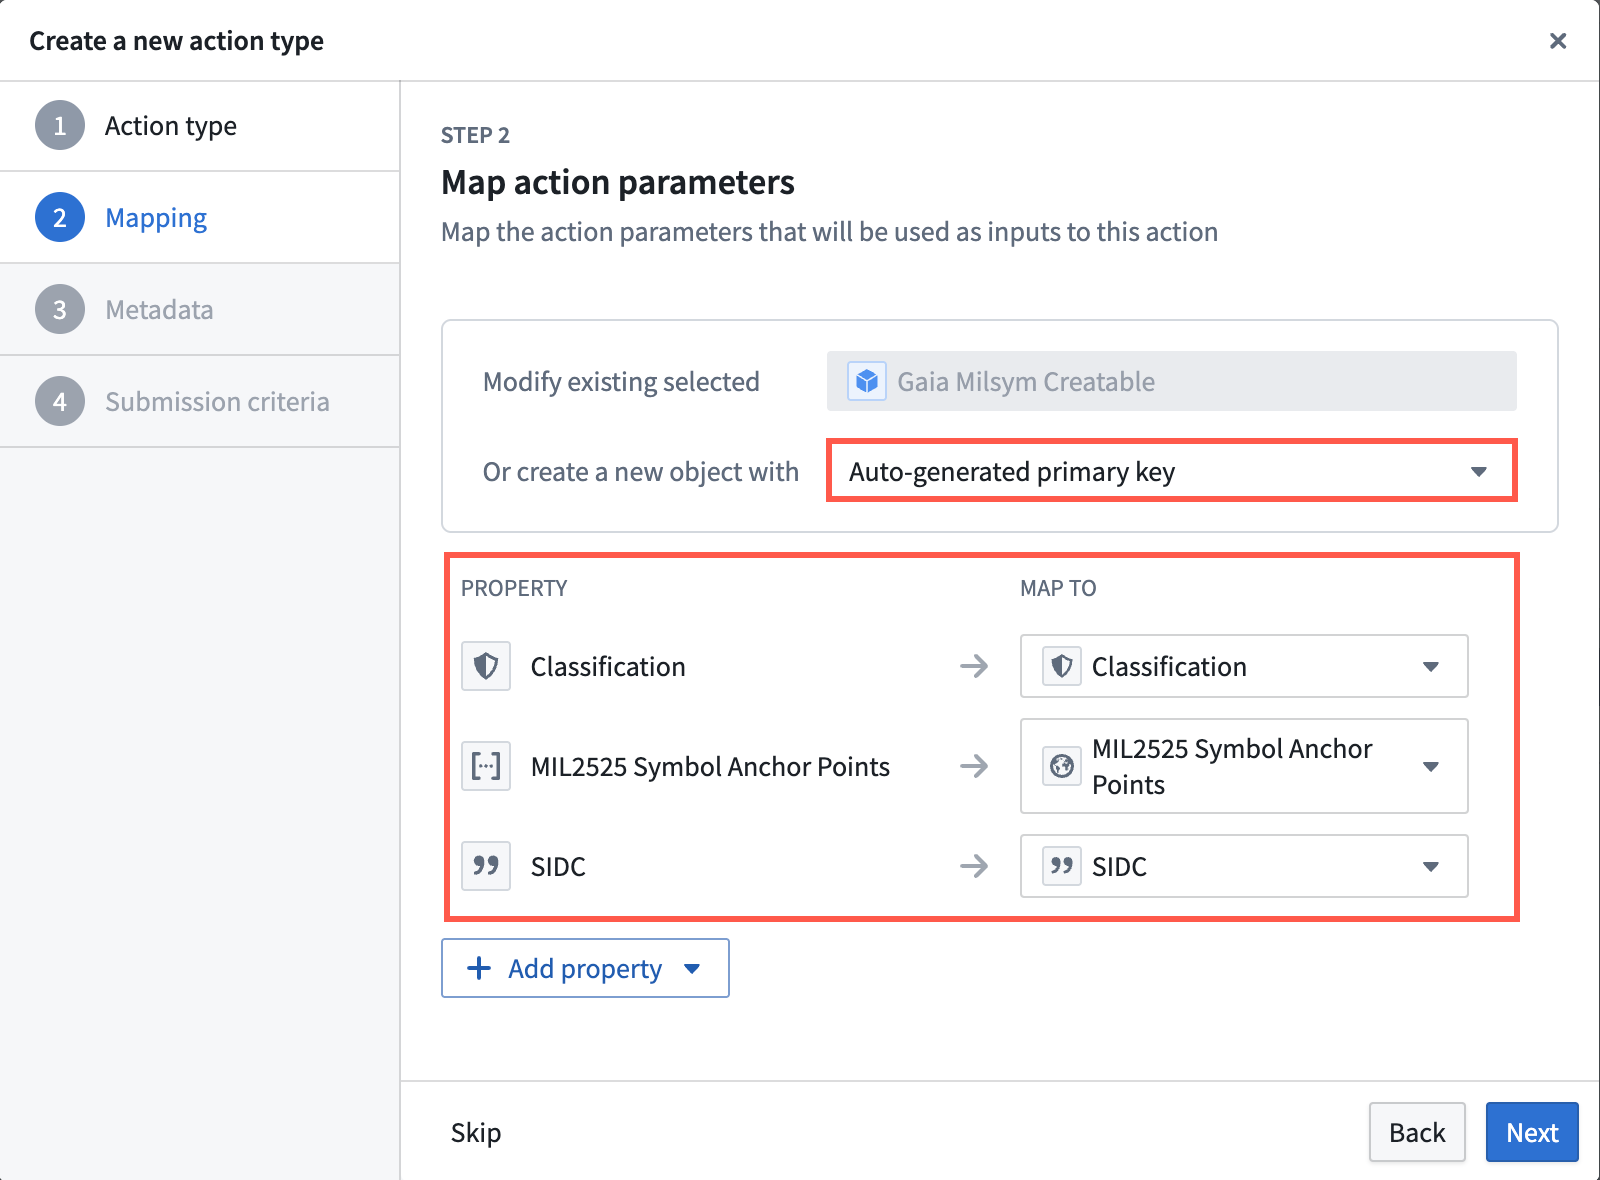
When configuring an action type to enable object creation, ensure you map at least the Classification, Symbol Anchor Points, and SIDC properties in the Create a new action type window before you select Next.
Select the green Save button at the top of the screen to publish incremental changes to your ontology before proceeding.
Next, you will configure your action type's Rules and Parameters by following the steps below:
- Select Rules from the left side of the screen.
- Select the arrow icon to the right of your
Classificationproperty to Configure parameter.
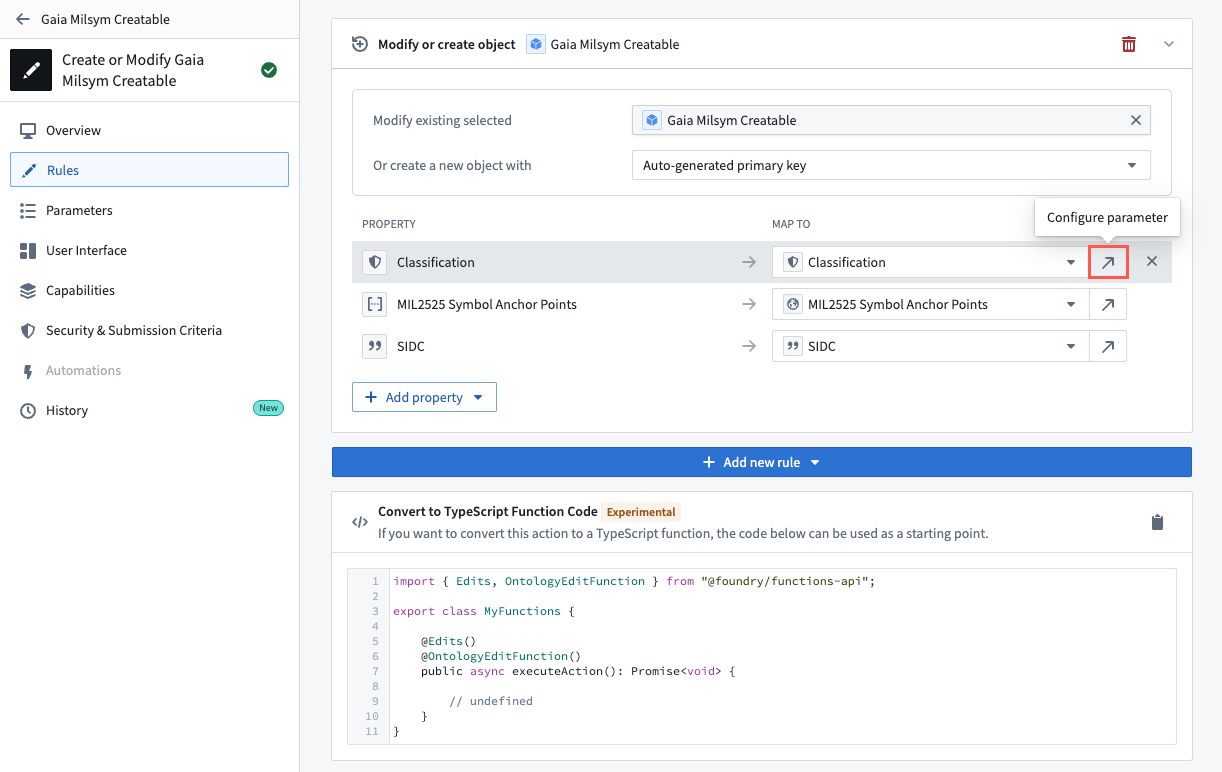
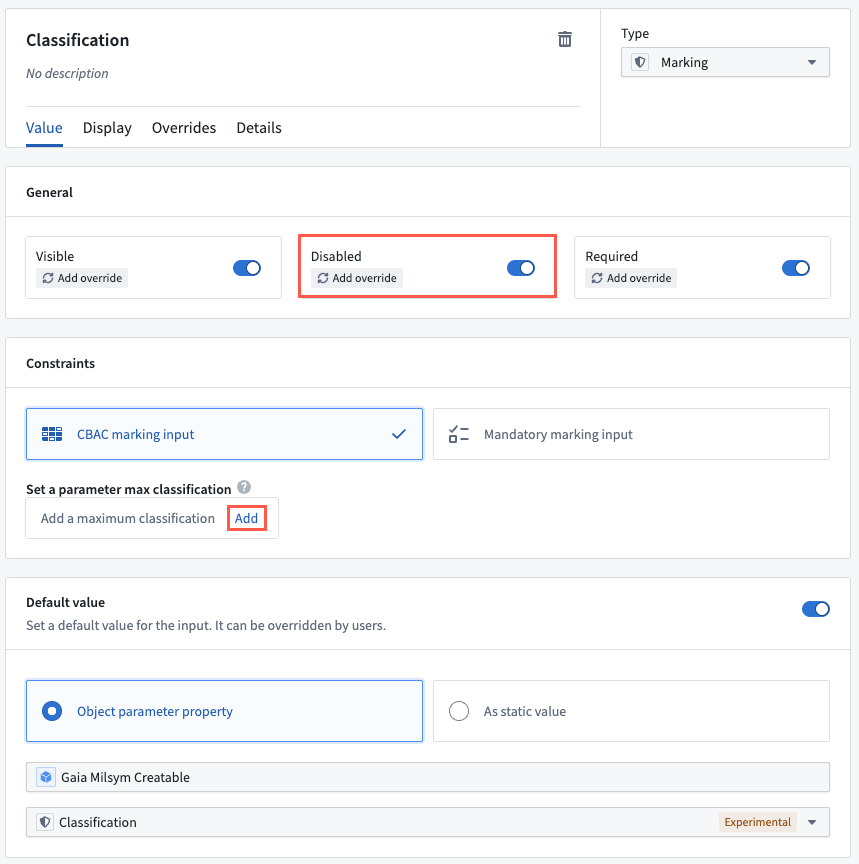
- Toggle on Disabled in the General section to ensure the object created inherits its classification markings from your Gaia map.
- Select Add under Set a parameter max classification to ensure the action type's maximum classification matches the object type's maximum classification.
- Select the green Save button at the top of the screen to publish the action type to your ontology.
:::callout{theme="warning"}
Since the use of struct properties in actions is not currently supported, you will not be able to configure the Speed Modifier (Z) or Altitude/Depth Modifier (X) properties as action type parameters.
:::
- Implement the Gaia Geoshape Creatable interface.
- Search for the
MILSTD 2525C Symbolinstead of theGaia Geoshape Creatableinterface. - When mapping your ontology's shared property types, select Replace existing for your
Classificationproperty and Create edit-only property for the others.
Register your ontology and its types
Now, you have object types that implement the Gaia Geoshape Creatable, Gaia Geopoint Creatable, and MILSTD 2525C Symbol interfaces and contain accompanying action types that enable a user to configure objects they create from shapes drawn, points dropped, and tactical graphics configured on a Gaia map. Next, you will register your ontology, object types, and action types either in Gaia's admin application or Control Panel extension, depending on your enrollment.
:::callout{theme="neutral"}
To access Gaia's admin application, you must be a platform administrator. To access Gaia's Control Panel extension, you must be granted the Organization administrator role.
Contact Palantir Support with questions about access to the admin application or Control Panel extension if you are unable to access either.
:::
To register your ontology, object types, and action types, launch Gaia's admin application or Control Panel extension and follow the steps below:
- Locate the Ontology Config (admin application)/Ontology (Control Panel extension) panel and verify your ontology's configuration. If your ontology is not configured, select the toggle on the left side of the panel to set Ontology Config/Ontology to
overridden(admin application)/Override(Control Panel extension). - Enter your ontology's RID and API name into the Ontology RID and API Name text boxes.
:::callout{theme="success"} To locate and copy your ontology's RID and API name, navigate to Ontology Manager and choose Ontology configuration from the bottom of its left panel to launch the Ontology metadata window. :::
- Locate the Foundry Object Creation Config panel and select Show (admin application)/Override (Control Panel extension).
- Select Add at the bottom of your enrollment's existing object and action type list.
- Copy and paste the RIDs for all three object types and their supporting action types into three separate Object type rid and Action type rid text boxes, respectively.
- Select Preview and save in the top right ribbon (admin application)/Save for {Organization} in the bottom right corner (Control Panel extension).

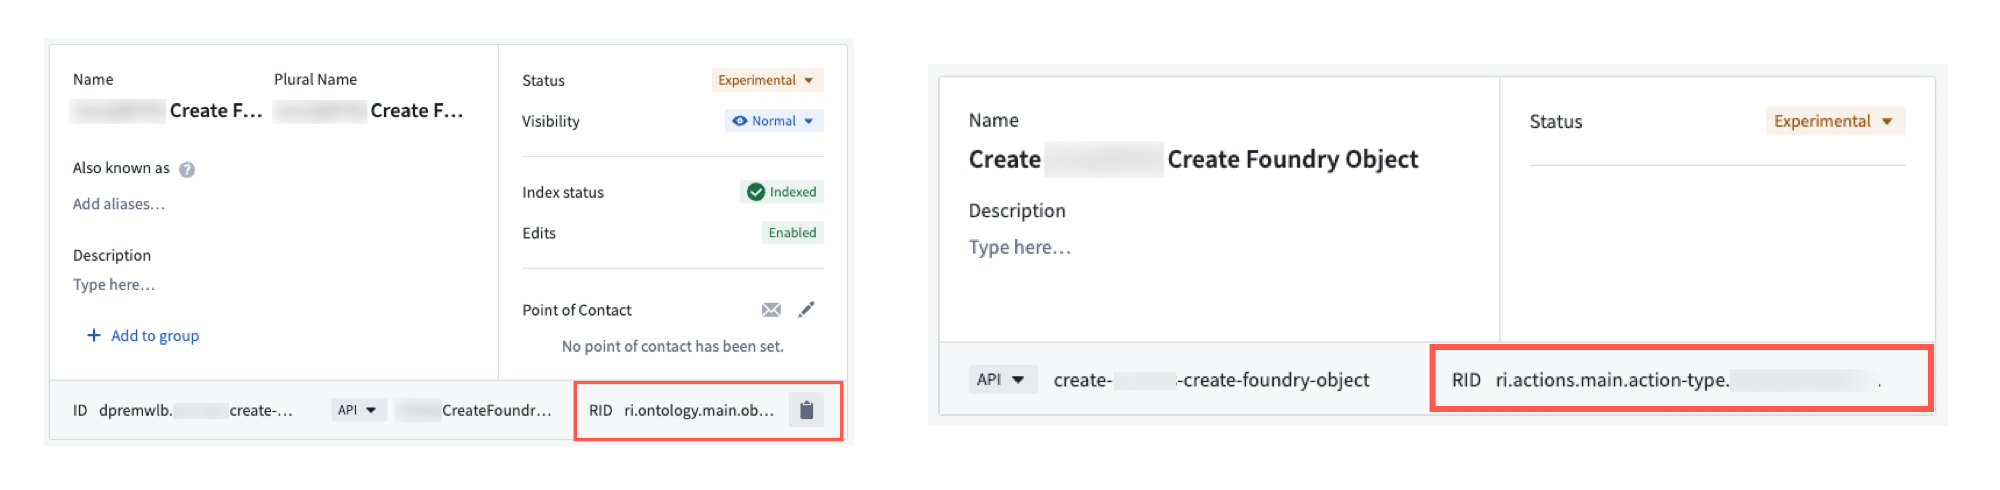
You can access your object type's RID from the Overview window in Ontology Manager. Select the clipboard icon to copy the RID. Additionally, you can access your action type's RID by selecting Create {object type name} in the Action types section of the Overview window. The action type's RID can also be copied through the clipboard icon.
Next, you will launch Gotham's Gaia application to create objects from shapes you draw, points you drop, and tactical graphics you configure on a map using its Add to map menu.
Draw a new shape on your Gaia map and tag it to an object type
:::callout{theme="warning" title="Current limitations around the International Date Line"}
While you can create map annotations that cross the 180th meridian, or antimeridian, on a Gaia map, you cannot draw shapes tagged as Foundry objects that do so.
Contact Palantir Support with questions about annotation creation, rendering, or Gaia's additional documentation present in Gotham.
:::
With your Gaia map open, select the object icon from the menu in the top left region of your map to switch from Draw annotation to Create object mode.
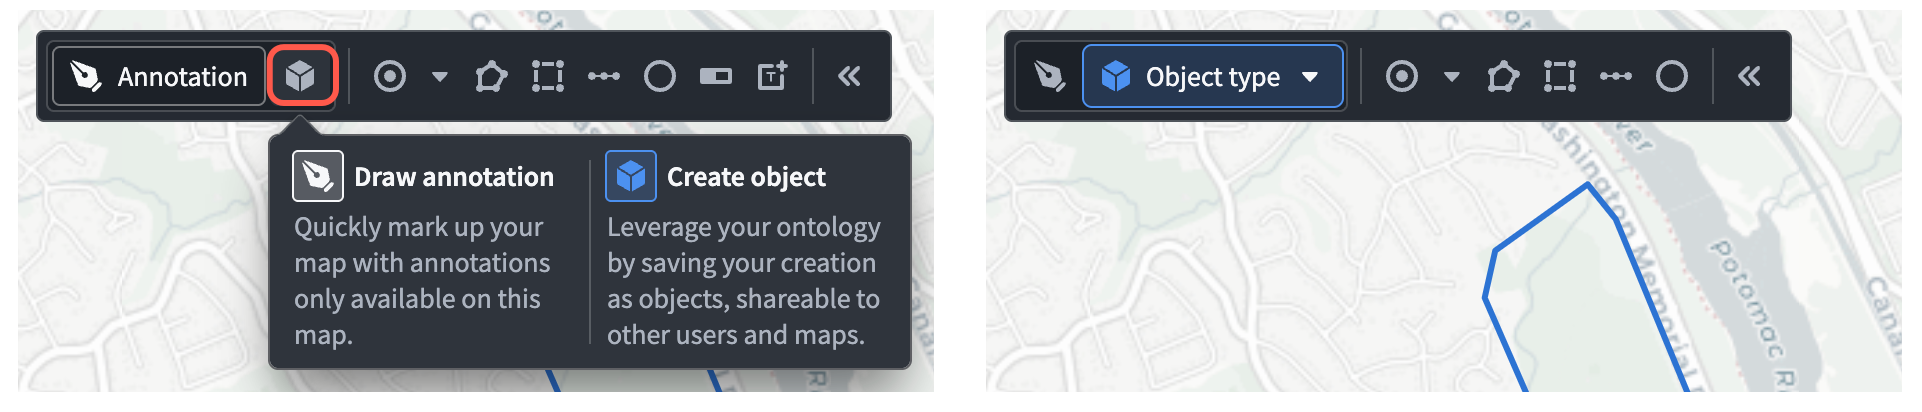
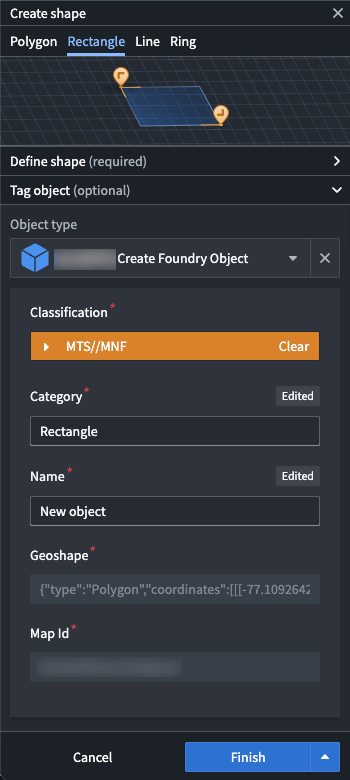
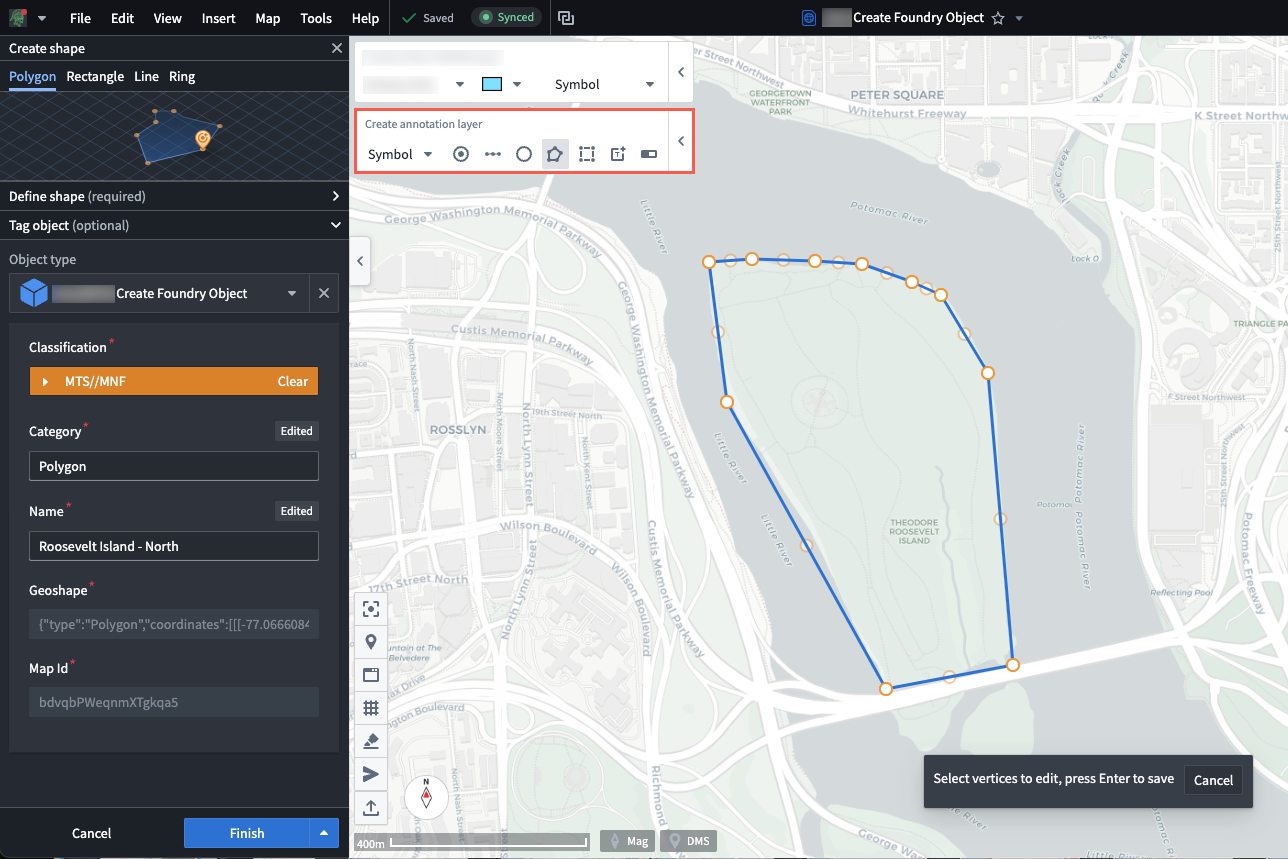
Next, select a shape to draw from the right side of the same menu. When you finish drawing your shape, the Create shape window will appear in Gaia's left panel. Follow the steps below to configure your shape and save it to your ontology as an object:
- Search for and select your object from the Object type dropdown menu. If you selected an object type from the tool bar's dropdown menu on your map canvas, then Gaia will automatically populate the Create shape's dropdown menu with that value.
- Complete the required fields in the action form, such as
CategoryandName, for your object before you select Finish.
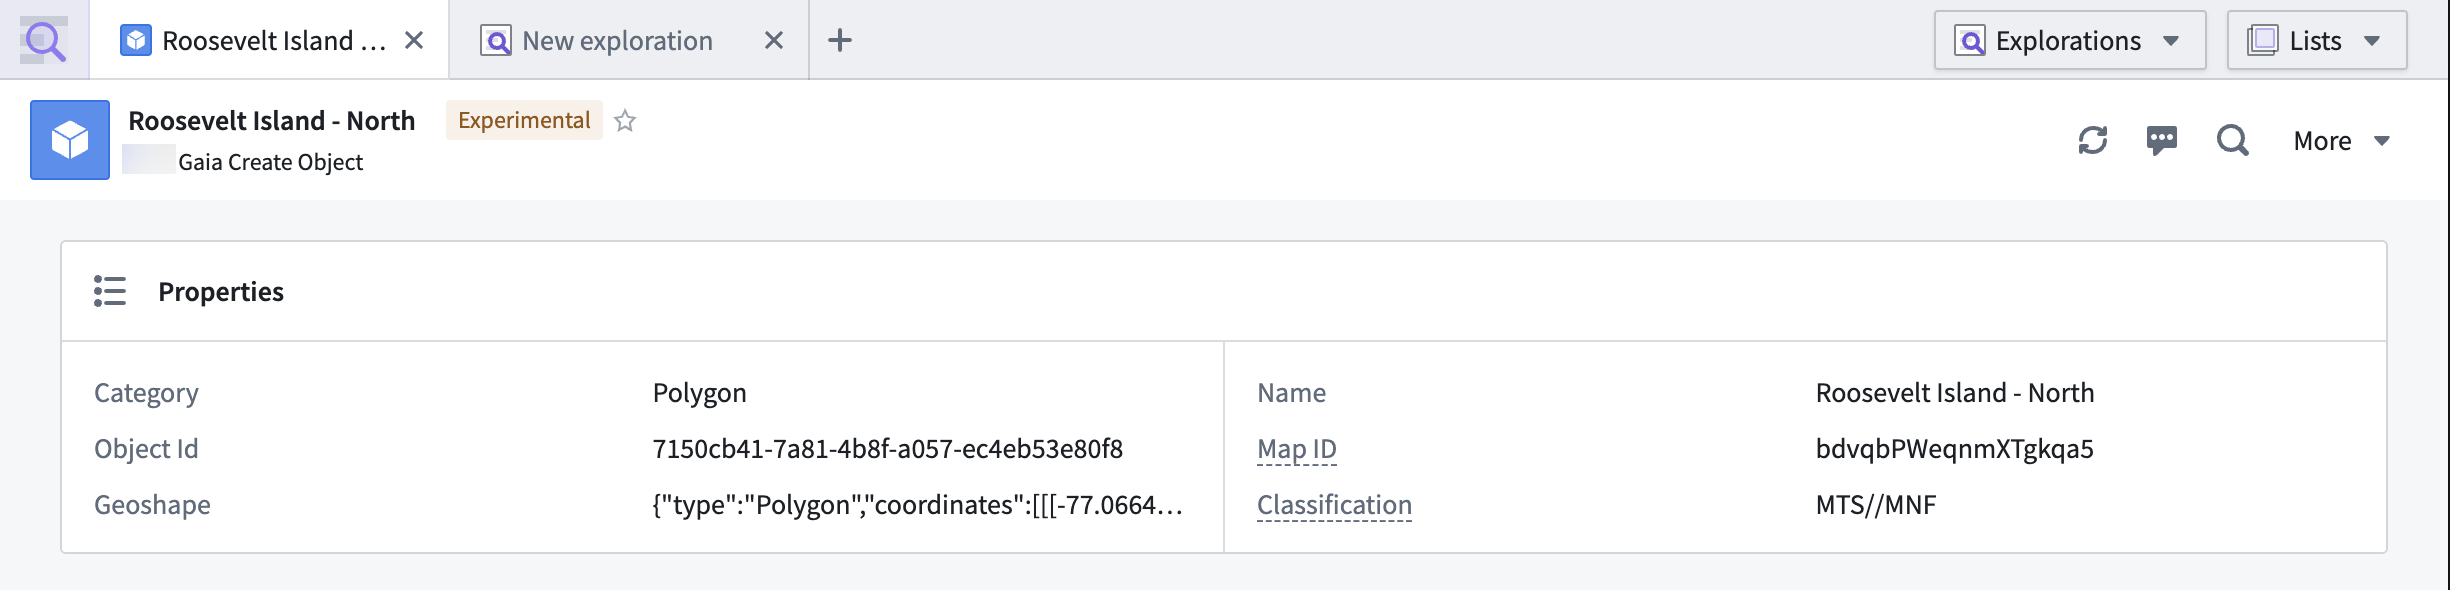
Once you save your shape as an object, it will render as one of the Layers in Gaia's left panel. You can select the object's name to launch the Selection panel on the right side of your screen, where you can view its properties and customize its appearance.
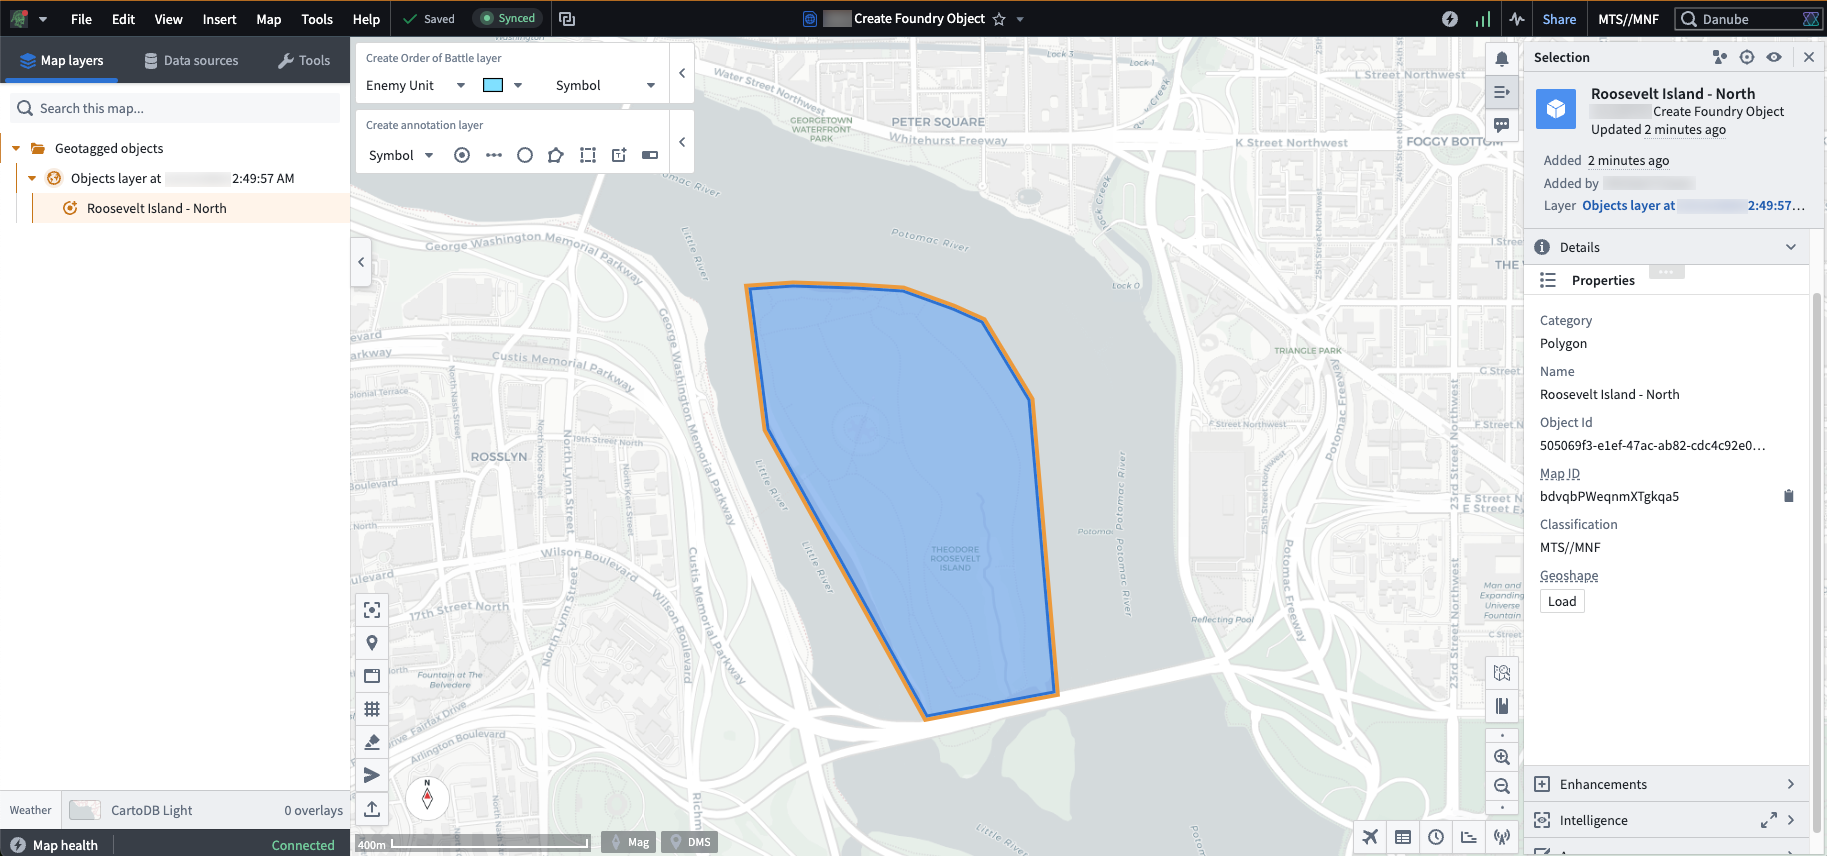
You can also view your object in Foundry's Object Explorer.
Edit an existing shape object
To edit an existing shape object, hover your cursor over the object in the left panel and choose Edit selection to launch the Edit shape window, which you can also access by double-clicking the object on your map.
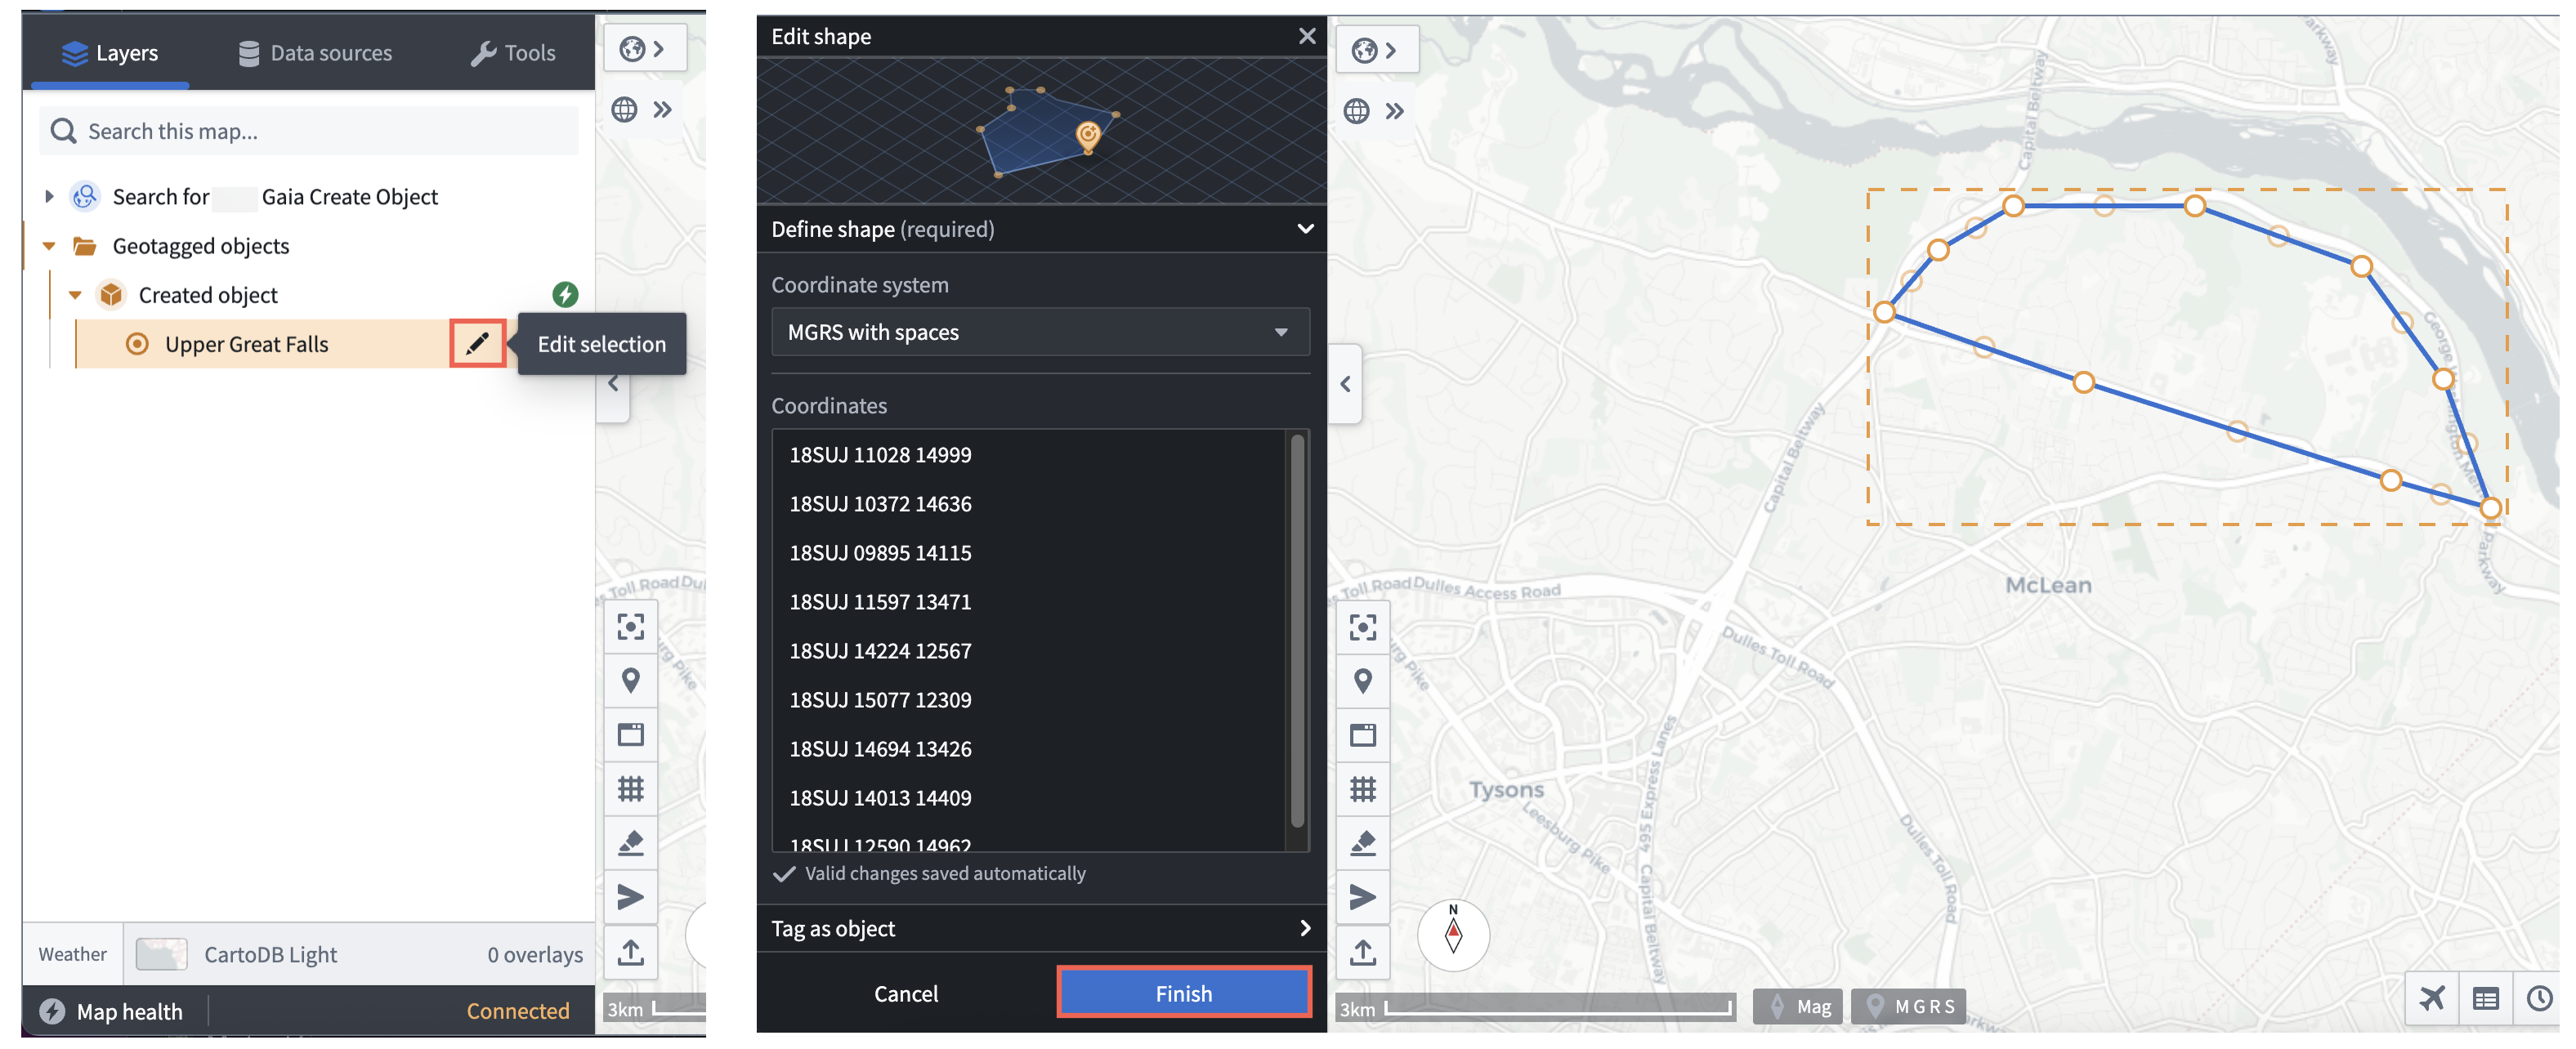
Select and drag any vertex to adjust the shape, or select a point within the shape's boundary to drag the shape to another location on your map. When you are finished making changes, choose Finish at the bottom of the Edit shape window.
Drop a new point on your Gaia map and tag it to an object type
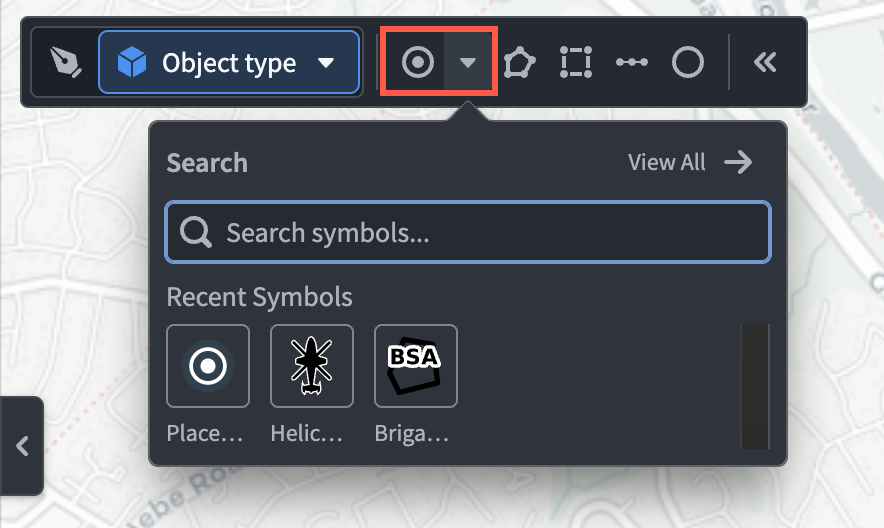
With your Gaia map open, select the down arrow to render the symbol Search menu, where you can choose an available symbol to drop anywhere on your map. If you select one of the available Tactical Graphics symbols, then you will only be able to create an object within an object type that implements the MILSTD 2525C Symbol interface. Gaia will automatically populate the Coordinates input box based on your map's coordinate system preference.
:::callout{theme="success"} Select File > Preferences > Coordinate system from Gaia's top ribbon to update the default coordinate system. :::
The Create symbol window will appear in Gaia's left panel, where you can search for and select your object type that implements the Gaia Geopoint Creatable interface. Next, optionally adjust the Bearing (mag) of your geopoint before entering a Title for your object. Choose Finish to save the dropped symbol to your ontology as an object.
Once you save your geopoint as an object, you can interact with the new map layer and view the object in Foundry's Object Explorer in the same manner you can for a shape drawn on your map.
Edit an existing geopoint object
You can edit an existing geopoint object in the same manner you can for a shape drawn on your map.
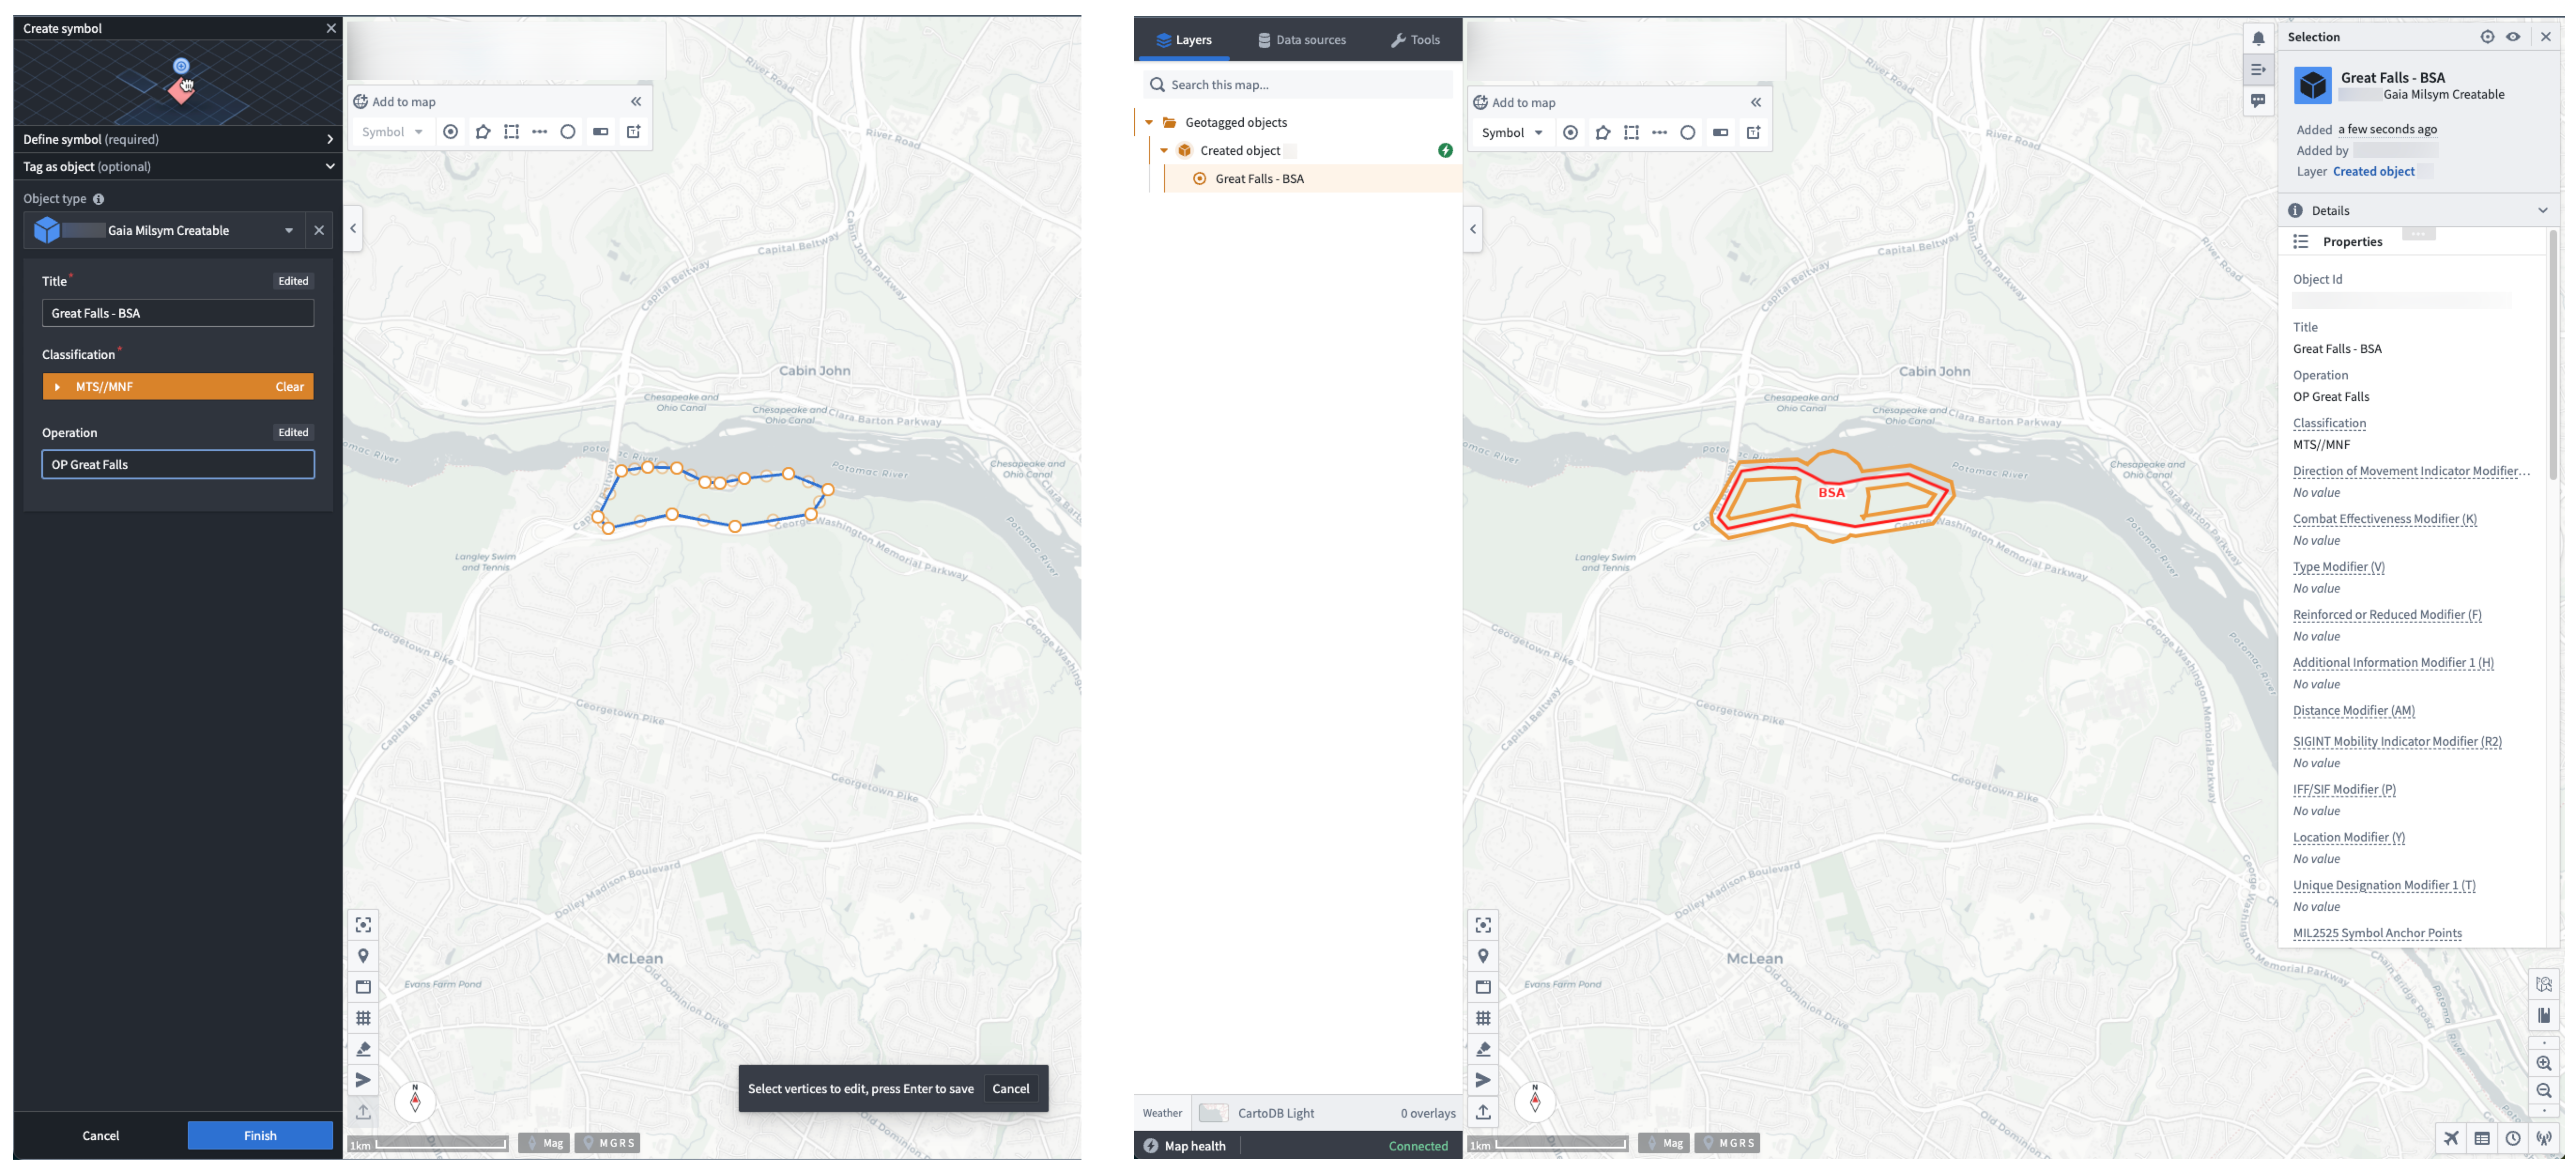
Configure a tactical graphic on your Gaia map and tag it to an object type
:::callout{theme="warning"} Your Foundry enrollment must contain MRS to tag a tactical graphic to an object type. Contact Palantir Support with questions about MRS installation or functionality. :::
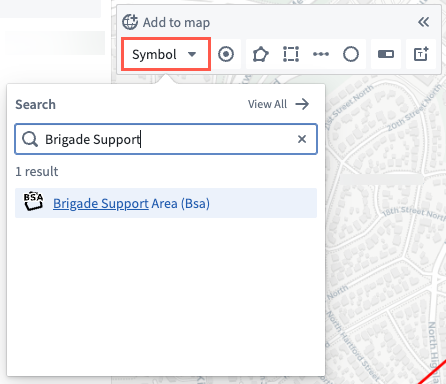
Similar to adding a new geopoint to tag as an object, select the down arrow to render the symbol Search menu, where you can choose an available tactical graphic to drop anywhere on your map. Type the name of your desired tactical graphic in the Search symbols... input box, such as Brigade Support Area.
The Create symbol window will appear in Gaia's left panel, and you can follow the same shape creation instructions above to add your tactical graphic to the map and tag it to an object type.
Edit an existing tactical graphic object
You can edit an existing tactical graphic object by following the shape object editing instructions above.
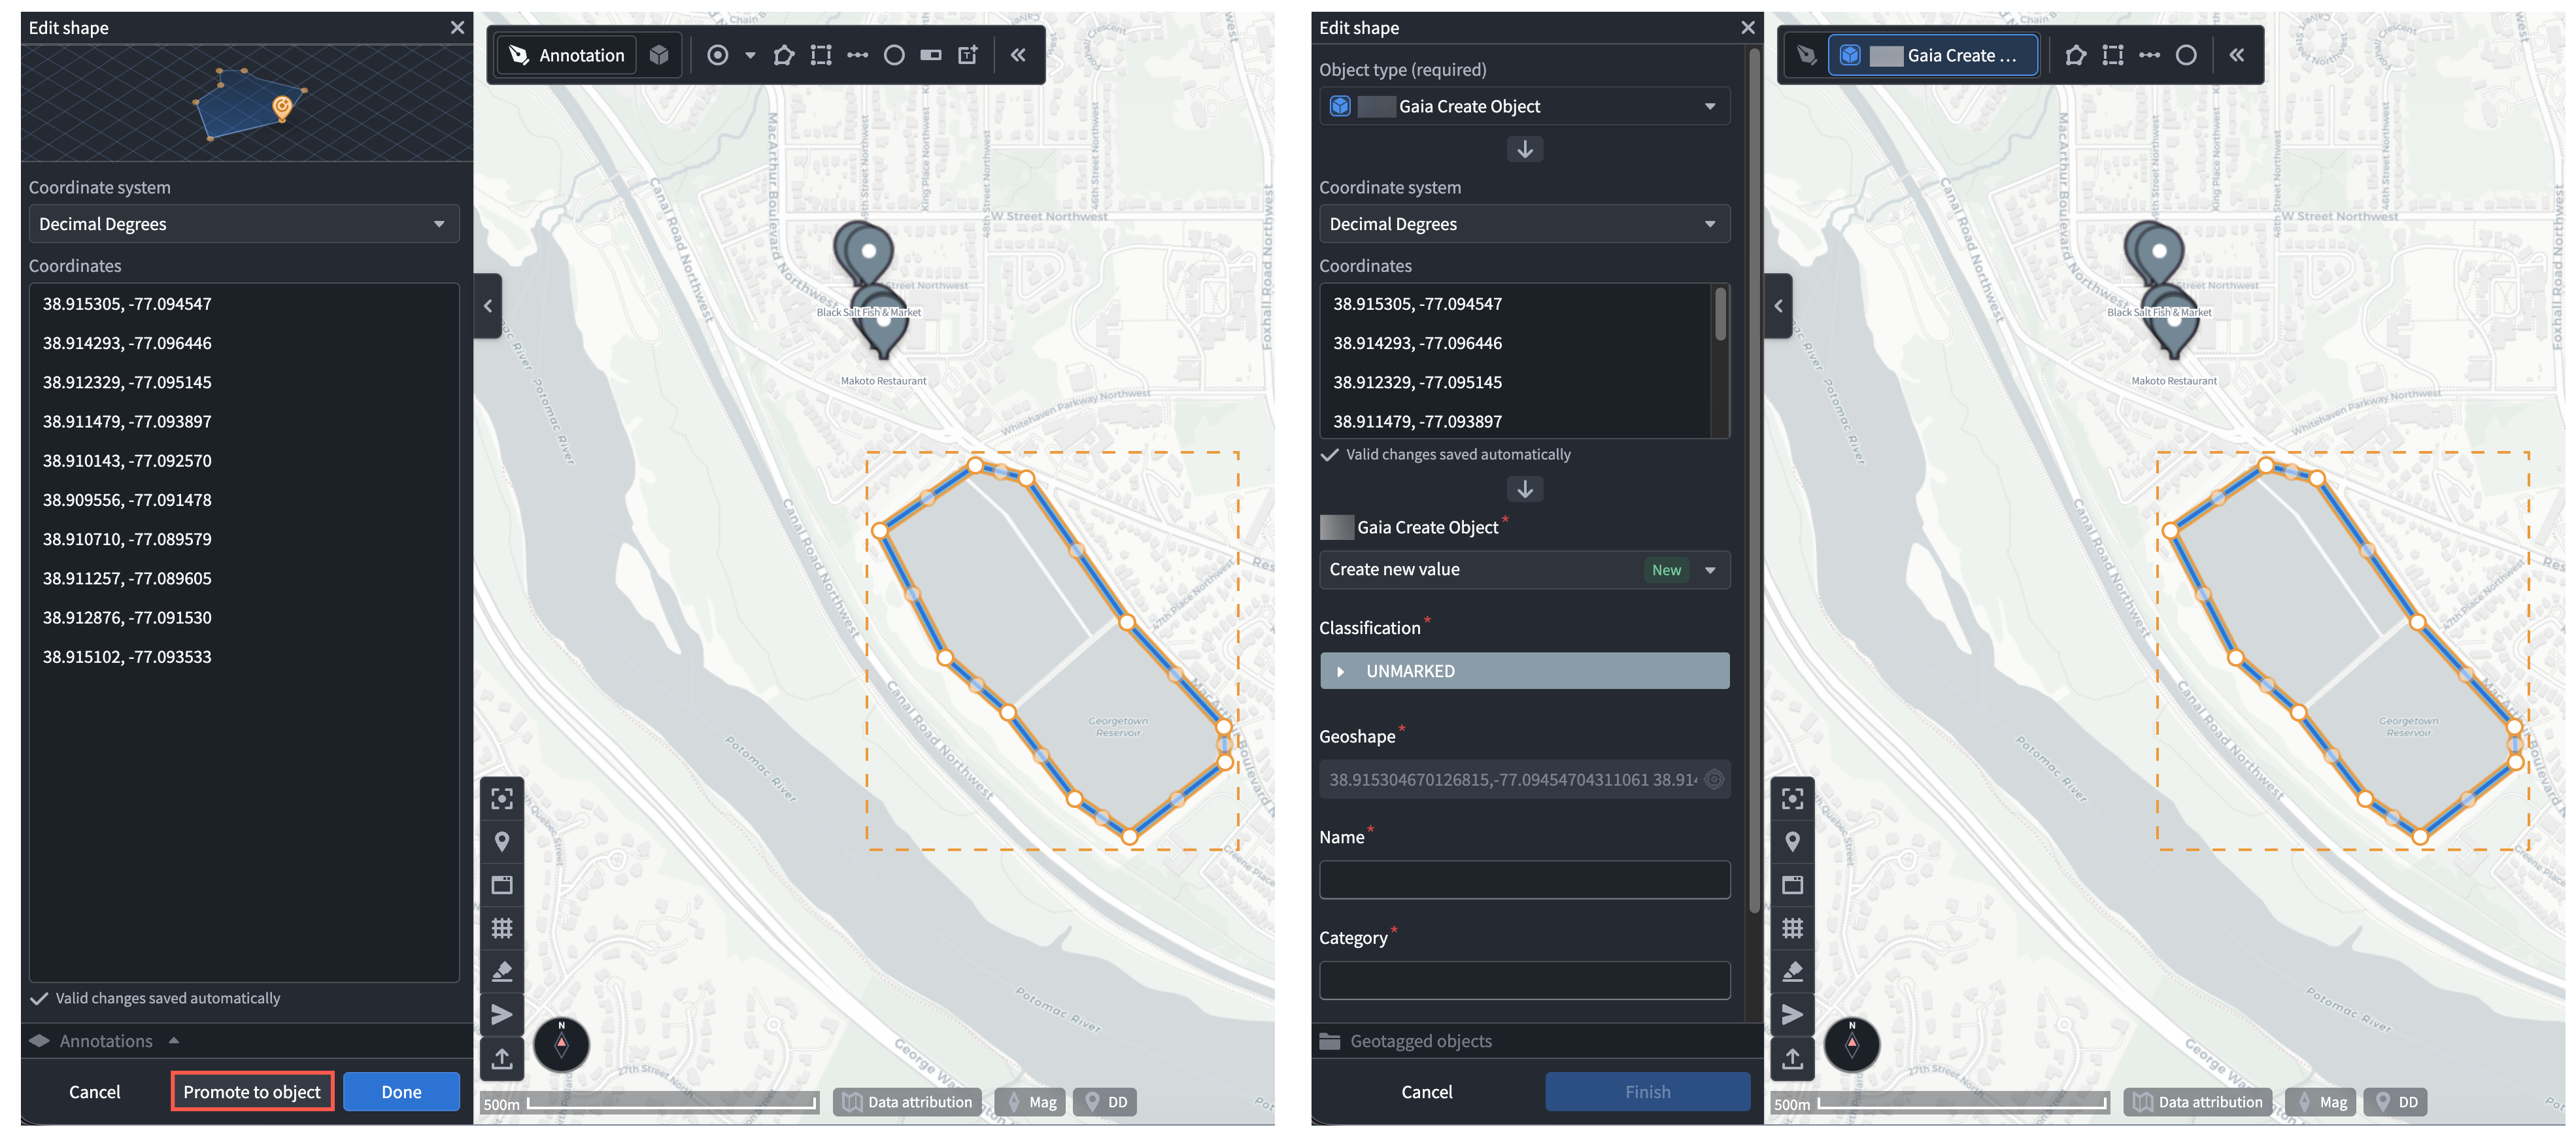
Promote an annotation to an object
In Gaia, an annotation is a shape, point, or symbol that is local to your current map. You can promote annotations on your map to objects in your ontology for use on other maps created by other users who can access their object type.
To tag an existing annotation as an object, double-click the annotation on your map or hover your cursor over the annotation's pencil icon in the Layers tab of the left panel to launch the shape, point, or symbol edit window. Next, select Promote to object, choose your object type from the Object type dropdown menu, and complete the action form in the shape, point, or symbol edit window.
To learn more about the various methods you can use to add data from your ontology to Gotham, review the existing geospatial data integration documentation.
中文翻译
从 Gaia 创建 Ontology 对象
与将 Ontology 数据添加到 Gaia 地图类似,您也可以从在地图上绘制的形状、放置的点或配置的战术图形中创建 Ontology 对象,方法是在实现了 Gaia Geoshape Creatable(Gaia 几何形状可创建)、Gaia Geopoint Creatable(Gaia 几何点可创建)或 MILSTD 2525C Symbol(MILSTD 2525C 符号)接口的对象类型中标记该对象。
:::callout{theme="warning"}
通过 Palantir 的 Defense OSDK 提供的 MILSTD 2525C Symbol 接口将取代 Gaia Milsym Creatable 接口。后者目前处于计划弃用阶段,并将于 2026 年 7 月正式弃用。如有关于 Defense OSDK 接口可用性或您的实例上 Gaia Milsym Creatable 接口弃用的问题,请联系 Palantir 支持团队。
如果您的实例上同时存在这两个接口,请实现 MILSTD 2525C Symbol 接口,而非 Gaia Milsym Creatable 接口。 :::
:::callout{theme="warning"} 要从 Gaia 地图创建 Ontology 对象,您的实例必须同时使用 Foundry 和 Gotham。 :::
以下各节概述了将 Gaia 形状、点和战术图形与 Ontology 集成的端到端流程:
- 安装所有必需的 Marketplace 产品。
- 在由受限视图支持的对象类型上实现 Gaia Geoshape Creatable 接口。
- 在由受限视图支持的对象类型上实现 Gaia Geopoint Creatable 接口。
- 在由受限视图支持的对象类型上实现 MILSTD 2525C Symbol 接口。
- 注册您的 ontology 并在 Gaia 中搜索您的对象类型。
- 在地图上绘制新形状并将其标记到您的对象类型中。
- 在地图上放置新点并将其标记到您的对象类型中。
- 根据在地图上绘制的形状配置战术图形并将其标记到您的对象类型中。
安装必需的 Marketplace 产品
Marketplace 是 Foundry 的商店,用于发布可供用户安装的数据产品或平台资源集合。您可以通过主屏幕上的搜索...栏或应用程序门户访问 Marketplace。
启动 Marketplace 后,安装以下产品:
- 来自 Core Ontology Store 的 Core Property Types,其中包含核心共享属性类型(例如对象的分类和几何形状),可用于您的 ontology 中的多个对象类型。
- 来自 Gaia App Store 的 Gaia Geoshape Creatable 接口,该接口描述地理空间对象类型的形状,以实现对相同形状的其他对象类型的一致建模和交互。
- 来自 Gaia App Store 的 Gaia Geopoint Creatable 接口,该接口描述单个点对象类型的位置。
来自 Core Ontology Store 的 Core Property Types
:::callout{theme="neutral"} 如果包含 Core Property Types 产品的 Core Ontology Store 在 Marketplace 中不可用,请联系 Palantir 支持团队,将 Core Ontology 作为 Foundry 产品安装到您的 Foundry 实例上。 :::
来自 Gaia App Store 的 Gaia Geoshape Creatable 接口
在 Foundry 中,接口存在于您的 ontology 中,用于描述对象类型的形状及其能力,从而实现对具有共同形状的对象类型之间的一致建模和交互。您可以在多个对象类型上实现一个接口,并且接口可以扩展任意数量的其他接口。一旦在对象类型上实现,Gaia Geoshape Creatable 接口将使您能够根据在 Gaia 地图上绘制的形状在您的 ontology 中创建对象。
:::callout{theme="warning"} Gaia Geoshape Creatable 接口取代了已弃用的 Gaia Geocreatable 接口。如果您无法在 Marketplace 中访问 Gaia Geoshape Creatable 接口,请联系 Palantir 支持团队。 :::
要从 Marketplace 安装 Gaia Geoshape Creatable 接口:
- 导航回 Marketplace,并在搜索商店...中搜索
Gaia App Store。 - 选择
Gaia Geoshape Creatable产品。 - 选择屏幕右侧的蓝色安装按钮以启动草稿安装。您可以选择为安装添加描述性后缀。
- 确定一个命名空间,您的安装将保存在其中。Marketplace 将在所选命名空间内自动创建一个新的项目。
- 在权限下配置产品的分类和访问控制。您在基于分类的访问控制 (CBAC) 下选择的分类定义了安装的最大分类。
- 选择下一步以启动安装窗口的输入页面。
- 选择左侧面板中输入下的共享属性选项卡,将 ontology 中的
Geoshape共享属性映射到您的新接口。 - 选择下一步以启动安装窗口的内容页面。
- (可选)打开为 Ontology 实体添加前缀并插入有效前缀。请注意,您的前缀不能包含某些特殊字符,例如括号或方括号。
- 在屏幕右侧选择要启用的Ontology 模式迁移。您可以在现有的对象编辑和物化文档中参考其他模式管理信息。
- 在您选择下一步之前,根据需要为您的用例更新新版本中的自动配置。Marketplace 会预先配置某些产品以自动升级。
- 查看您接口的配置并选择安装。
来自 Gaia App Store 的 Gaia Geopoint Creatable 接口
要从 Marketplace 的 Gaia App Store 安装 Gaia Geopoint Creatable 接口,请从商店菜单中选择 Gaia Geopoint Creatable 产品。Marketplace 的接口安装工作流在不同接口之间是通用的,因此您可以遵循上面 Geoshape Creatable 接口安装说明中概述的相同步骤,但有以下区别:
- 在输入窗口的共享属性部分,将 ontology 中的
Geopoint共享属性映射到 Gaia Geopoint Creatable 接口。
创建实现 Gaia Geoshape Creatable 接口的对象类型
在对象类型实现 Gaia Geoshape Creatable 接口后,Gaia 可以发现由 ontology 中的数据集或受限视图支持的对象类型。在以下各节中,您将:
创建对象类型的支持数据集或受限视图
:::callout{theme="neutral"} 如果您计划根据用户的分类或通过应用标记来控制文件访问以保护对象,则应创建受限视图。如果您的用例不需要基于分类的访问或标记提供的额外对象安全性,则应创建数据集来支持您的对象类型。 :::
要创建可以与 Gaia 集成的对象类型,您首先需要创建一个数据集或受限视图,该数据集或视图至少包含以下列:
Geoshape,您将其设置为string,以便 Gaia 自动填充您绘制对象的形状。Object ID,您将其设置为string,以便 Foundry 为您作为对象创建的每个 Gaia 形状自动填充唯一 ID。这将作为您对象类型的主键。Classification,您将其设置为array以捕获您对象的分类。仅当受限视图支持您的对象类型时才需要Classification列。
:::callout{theme="success"}
您可以根据您的具体用例在数据集或受限视图中配置其他列,例如设置为 string 的 Name、Category 或 Notes 列,以捕获用户输入的关于对象的描述性信息。
:::
选择项目中的新建按钮以上传现有文件(例如 .csv),或使用 Fusion 创建独立数据集或支持受限视图的数据集。如果您使用数据集来支持您的对象类型,则可以跳过下面的受限视图创建说明,直接进入创建您的对象类型。
:::callout{theme="success"} 您可以在 Foundry 的安全和对象权限文档中参考其他受限视图创建说明。 :::
您的受限视图应包含一个细粒度策略,该策略根据用户的分类访问权限限制其对视图中包含的数据的访问。在创建 '{restricted view}' 窗口中,将细粒度策略编写为第一步。
:::callout{theme="warning"} 如果对象包含 CBAC 或强制标记属性以限制其访问,则 Foundry 使用其从 Gaia 地图继承的 CBAC 或强制标记来创建对象,并且不会应用地图安全性和共享设置中定义的组限制。 :::
您可以在下面参考 JSON 格式的示例策略。
{
  "condition": {
    "and": {
      "conditions": [
        {
          "markings": {
            "value": {
              "field": {
                "fieldName": "classification"
              },
              "type": "field"
            },
            "filters": [
              {
                "markingTypes": {
                  "markingTypes": [
                    "CBAC"
                  ]
                },
                "type": "markingTypes"
              }
            ]
          },
          "type": "markings"
        }
      ]
    },
    "type": "and"
  }
}
创建对象类型并确保其与 Gotham 集成
配置好受限视图后,启动 Ontology Manager 并按照以下步骤创建您的对象类型:
- 从屏幕右上角选择新建 > 对象类型。
- 选择使用现有数据源,然后选择选择数据源以找到并选择您的受限视图,然后选择下一步。
- 命名您的对象类型,并可选择输入描述。
- 将
Object ID设置为主键,将Name设置为标题。 - 确保
Classification的属性是字符串数组,Geoshape的属性是几何形状。仅当受限视图支持您的对象类型时,您才需要验证前者。
- 选择创建,因为您将在创建对象类型之后生成和配置操作类型。
在 Ontology Manager 中查看您的草稿对象类型后,您接下来需要选择 Classification 和 Geoshape 属性作为 ontology 中的共享属性类型。选择概述下方的属性面板,并按照以下步骤完成共享属性类型的选择过程:
:::callout{theme="success"}
如果您使用不包含 Classification 属性的数据集来支持您的对象类型,则您应该为 Geoshape 属性完成下面的步骤 1 和 4。
:::
- 从属性列表中选择
Classification,以在屏幕右侧启动属性编辑器窗口。 - 将基础类型下拉菜单分别更新为
Mandatory control和CBAC Marking。 - 配置属性的最大分类。
:::callout{theme="warning"}
如果您无法为 Classification 选择 Mandatory control 作为基础类型,请联系您的 Palantir 支持团队,因为 Mandatory control 标记并非在所有 Foundry 实例上都普遍可用。
:::
- 滚动到窗口底部的共享属性部分,并使用下拉菜单将
Classification分配为共享属性。
为您的 Geoshape 属性重复上述步骤 1 和 4,因为您不需要配置其强制控制标记或分类。
在继续之前,选择屏幕顶部的绿色保存按钮以将增量更改发布到您的 ontology。
如果您的 Foundry 实例包含地图渲染服务 (MRS),则您的 ontology 中具有地理空间属性类型的对象类型会自动与 Gotham 集成,您可以继续创建操作类型以支持在 Gaia 中创建对象。按照 Gotham 集成文档中的步骤检查您的实例是否包含 MRS。如果您的实例不包含 MRS,则按照说明将 ontology 中的数据与 Gotham 集成。
:::callout{theme="neutral"} 如有关于 MRS 安装或功能的问题,请联系 Palantir 支持团队。 :::
创建并配置操作类型以支持在 Gaia 中创建对象
创建对象类型并确保其与 Gotham 集成后,导航回 Ontology Manager 中的概述窗口。在此处,创建一个操作类型,使用户能够从形状创建和编辑对象,并从 Gaia 配置其属性,例如 Name 和 Category。
:::callout{theme="warning"} 您的 Foundry 实例必须包含 MRS 才能在 Gaia 中编辑 Ontology 对象,因为此功能不适用于通过类型映射添加到 Gaia 的对象。如有关于 MRS 安装或功能的问题,请联系 Palantir 支持团队。 :::
按照以下步骤配置您的操作类型:
- 从对象类型的概述窗口的操作类型部分选择新建,以启动创建新操作类型弹出窗口。
:::callout{theme="success"} 如果您无法在操作类型中选择新建按钮,则可以在数据源窗口中为您的对象类型打开允许编辑。 :::
- 在对象操作下选择修改或创建对象,然后选择下一步。
- 从或使用以下方式创建新对象下拉菜单中选择自动生成主键。
- 选择添加属性以将所有现有属性添加到操作类型,然后选择下一步以配置操作类型的元数据。
:::callout{theme="neutral"}
仅当受限视图支持您的对象类型时,您才需要映射 Classification 属性。
:::
- 命名您的操作类型,并可选择输入描述和更新其默认图标。
- 选择可以执行操作的组织、组或用户,然后选择创建。
在继续之前,选择屏幕顶部的绿色保存按钮以将增量更改发布到您的 ontology。
接下来,您将按照以下步骤配置操作类型的规则和参数:
- 从屏幕左侧选择规则。
- 通过选择配置参数旁边的箭头图标来验证
Geoshape属性的配置。 - 确保
Geoshape属性的类型在屏幕右侧的类型下拉菜单中为Geoshape或String。 - 确保在常规面板中选择了禁用选项,以便用户无法手动配置
Geoshape的位置。
- 从屏幕左侧的表单内容面板中选择您的
Classification属性,并验证其类型是否为Mandatory control。仅当受限视图支持您的对象类型时,您才需要配置Classification属性。 - 选择返回表单,并通过选择 Object Id 面板最右侧的 X 图标从表单内容中移除
Object Id。Foundry 将为从 Gaia 创建的每个对象自动生成唯一 ID。 - 选择屏幕顶部的绿色保存按钮,将操作类型的配置保存到 Ontology。
实现 Gaia Geoshape Creatable 接口
在 Ontology Manager 中创建和配置对象类型的最后一步是实现您之前从 Marketplace 安装的 Gaia Geoshape Creatable 接口。导航回对象类型的概述页面,并按照以下步骤实现该接口,然后将更改保存到您的 ontology:
- 导航到屏幕左侧对象视图下方的接口窗口。
- 选择实现新接口并搜索
Gaia Geoshape Creatable,然后选择下一步。 - 选择选择一个选项 > 替换现有,将 ontology 的
Geoshape共享属性类型映射到实现该接口的对象类型。 - 选择确认以关闭实现接口窗口,并将新配置的接口保存到您的 ontology。
创建实现 Gaia Geopoint Creatable 接口的对象类型
要创建实现 Gaia Geopoint Creatable 接口的对象类型,您可以遵循上面 Gaia Geoshape Creatable 接口的对象类型创建说明中概述的相同步骤,但每个部分有以下区别:
- 创建对象类型的支持数据集或受限视图。
- 创建
Geopoint列而不是Geoshape列。 - 创建对象类型并确保其与 Gotham 集成。
- 在对象类型创建窗口中,确保
Geopoint的属性是几何点。 - 创建并配置操作类型以支持在 Gaia 中创建对象。
- 确保在操作类型的参数窗口中,您的
Geopoint属性的类型是Geopoint。 - 实现 Gaia Geoshape Creatable 接口。
- 搜索
Gaia Geopoint Creatable接口,而不是Gaia Geoshape Creatable接口。 - 在映射 ontology 的共享属性类型时,为
Geopoint属性选择替换现有,而不是Geoshape属性。
创建实现 MILSTD 2525C Symbol 接口的对象类型
:::callout{theme="warning"} 与 Gaia Geoshape Creatable 和 Gaia Geopoint Creatable 接口不同,您必须使用受限视图来支持实现 MILSTD 2525C Symbol 接口的对象类型。 :::
要创建实现 MILSTD 2525C Symbol 接口的对象类型,您可以遵循上面 Gaia Geoshape Creatable 接口的对象类型创建说明中概述的相同步骤,但每个部分有以下区别:
- 创建对象类型的支持数据集或受限视图。
- 您仅需要创建
Object ID、Classification和Title列。 - 创建对象类型并确保其与 Gotham 集成。
- 在对象类型创建窗口中,将
Object ID设置为主键,将Title设置为标题。
在配置操作类型以支持对象创建时,请确保在创建新操作类型窗口中至少映射 Classification、Symbol Anchor Points 和 SIDC 属性,然后再选择下一步。
在继续之前,选择屏幕顶部的绿色保存按钮以将增量更改发布到您的 ontology。
接下来,您将按照以下步骤配置操作类型的规则和参数:
- 从屏幕左侧选择规则。
- 选择
Classification属性右侧的箭头图标以配置参数。
- 在常规部分打开禁用,以确保创建的对象从您的 Gaia 地图继承其分类标记。
- 选择设置参数最大分类下的添加,以确保操作类型的最大分类与对象类型的最大分类匹配。
- 选择屏幕顶部的绿色保存按钮,将操作类型发布到您的 ontology。
:::callout{theme="warning"}
由于当前不支持在操作中使用结构属性,您将无法将 Speed Modifier (Z) 或 Altitude/Depth Modifier (X) 属性配置为操作类型参数。
:::
- 实现 Gaia Geoshape Creatable 接口。
- 搜索
MILSTD 2525C Symbol接口,而不是Gaia Geoshape Creatable接口。 - 在映射 ontology 的共享属性类型时,为您的
Classification属性选择替换现有,为其他属性选择创建仅编辑属性。
注册您的 Ontology 及其类型
现在,您已经拥有了实现 Gaia Geoshape Creatable、Gaia Geopoint Creatable 和 MILSTD 2525C Symbol 接口的对象类型,并附带了相应的操作类型,使用户能够配置他们从在 Gaia 地图上绘制的形状、放置的点和配置的战术图形中创建的对象。接下来,您将根据您的实例,在 Gaia 的管理应用程序或 Control Panel 扩展中注册您的 ontology、对象类型和操作类型。
:::callout{theme="neutral"}
要访问 Gaia 的管理应用程序,您必须是平台管理员。要访问 Gaia 的 Control Panel 扩展,您必须被授予组织管理员角色。
如果您无法访问管理应用程序或 Control Panel 扩展,请联系 Palantir 支持团队。
:::
要注册您的 ontology、对象类型和操作类型,请启动 Gaia 的管理应用程序或 Control Panel 扩展,并按照以下步骤操作:
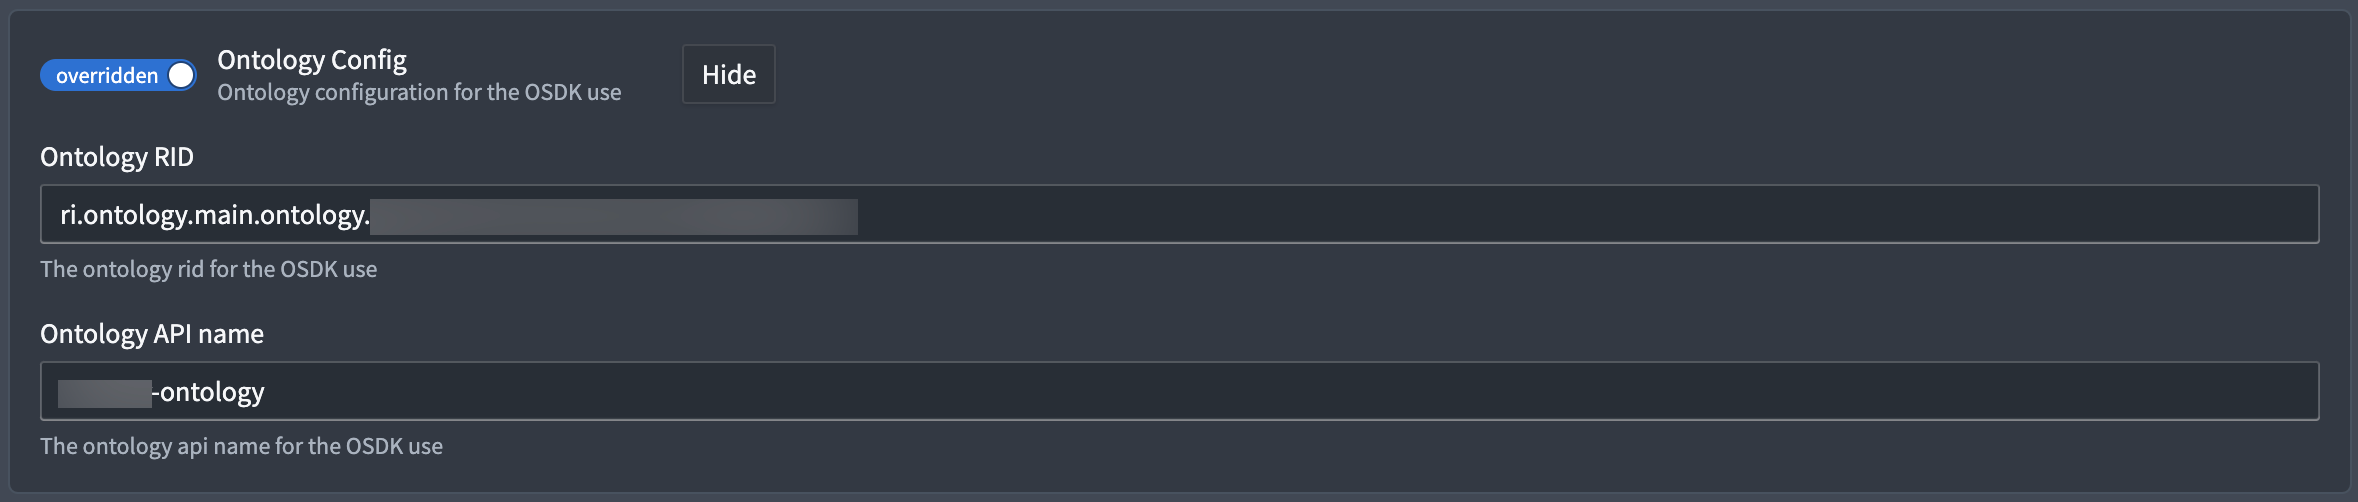
- 找到 Ontology Config(管理应用程序)/ Ontology(Control Panel 扩展)面板,并验证您的 ontology 配置。如果您的 ontology 未配置,请选择面板左侧的切换开关,将 Ontology Config/Ontology 设置为
overridden(管理应用程序)/Override(Control Panel 扩展)。 - 在 Ontology RID 和 API Name 文本框中输入您的 ontology 的 RID 和 API 名称。
:::callout{theme="success"} 要查找并复制您的 ontology 的 RID 和 API 名称,请导航到 Ontology Manager,并从其左侧面板底部选择 Ontology configuration 以启动 Ontology metadata 窗口。 :::
- 找到 Foundry Object Creation Config 面板,并选择 Show(管理应用程序)/ Override(Control Panel 扩展)。
- 在您实例的现有对象和操作类型列表底部选择添加。
- 将所有三个对象类型及其支持操作类型的 RID 分别复制并粘贴到三个独立的 Object type rid 和 Action type rid 文本框中。
- 选择右上角功能区中的预览并保存(管理应用程序)/ 右下角的为 {Organization} 保存(Control Panel 扩展)。
您可以从 Ontology Manager 的概述窗口访问您的对象类型的 RID。选择剪贴板图标以复制 RID。此外,您可以通过在概述窗口的操作类型部分选择创建 {object type name} 来访问您的操作类型的 RID。操作类型的 RID 也可以通过剪贴板图标复制。
接下来,您将启动 Gotham 的 Gaia 应用程序,使用其添加到地图菜单,从您在地图上绘制的形状、放置的点和配置的战术图形中创建对象。
在 Gaia 地图上绘制新形状并将其标记到对象类型
:::callout{theme="warning" title="当前关于国际日期变更线的限制"}
虽然您可以在 Gaia 地图上创建跨越 180 度经线(即反子午线)的地图注释,但您不能绘制标记为 Foundry 对象的形状来这样做。
如有关于注释创建、渲染或 Gotham 中提供的其他 Gaia 文档的问题,请联系 Palantir 支持团队。
:::
打开您的 Gaia 地图后,选择地图左上角区域菜单中的对象图标,以从绘制注释模式切换到创建对象模式。
接下来,从同一菜单的右侧选择要绘制的形状。完成形状绘制后,创建形状窗口将出现在 Gaia 的左侧面板中。按照以下步骤配置您的形状并将其作为对象保存到您的 ontology:
- 从对象类型下拉菜单中搜索并选择您的对象。如果您从地图画布上的工具栏下拉菜单中选择了对象类型,则 Gaia 将自动使用该值填充创建形状的下拉菜单。
- 在操作表单中填写必填字段,例如
Category和Name,然后选择完成。
将形状保存为对象后,它将作为图层之一呈现在 Gaia 的左侧面板中。您可以选择对象的名称以启动屏幕右侧的选择面板,您可以在其中查看其属性并自定义其外观。
您也可以在 Foundry 的 Object Explorer 中查看您的对象。
编辑现有形状对象
要编辑现有形状对象,请将光标悬停在左侧面板中的对象上,然后选择编辑选择以启动编辑形状窗口,您也可以通过双击地图上的对象来访问该窗口。
选择并拖动任何顶点以调整形状,或选择形状边界内的点以将形状拖动到地图上的另一个位置。完成更改后,选择编辑形状窗口底部的完成。
在 Gaia 地图上放置新点并将其标记到对象类型
打开您的 Gaia 地图后,选择向下箭头以显示符号搜索菜单,您可以在其中选择可用的符号放置在地图上的任何位置。如果您选择可用的战术图形符号之一,则您只能在实现了 MILSTD 2525C Symbol 接口的对象类型内创建对象。Gaia 将根据您地图的坐标系偏好自动填充坐标输入框。
:::callout{theme="success"} 从 Gaia 的顶部功能区选择文件 > 偏好设置 > 坐标系以更新默认坐标系。 :::
创建符号窗口将出现在 Gaia 的左侧面板中,您可以在其中搜索并选择实现了 Gaia Geopoint Creatable 接口的对象类型。接下来,可选地调整几何点的方位角 (磁偏角),然后为您的对象输入标题。选择完成以将放置的符号作为对象保存到您的 ontology。
将几何点保存为对象后,您可以与新的地图图层进行交互,并像处理在地图上绘制的形状一样,在 Foundry 的 Object Explorer 中查看该对象。
编辑现有几何点对象
您可以像处理在地图上绘制的形状一样编辑现有的几何点对象。
在 Gaia 地图上配置战术图形并将其标记到对象类型
:::callout{theme="warning"} 您的 Foundry 实例必须包含 MRS 才能将战术图形标记到对象类型。如有关于 MRS 安装或功能的问题,请联系 Palantir 支持团队。 :::
与添加新的几何点以标记为对象类似,选择向下箭头以显示符号搜索菜单,您可以在其中选择可用的战术图形放置在地图上的任何位置。在搜索符号...输入框中输入您想要的战术图形的名称,例如 Brigade Support Area。
创建符号窗口将出现在 Gaia 的左侧面板中,您可以按照上面相同的形状创建说明将战术图形添加到地图并将其标记到对象类型。
编辑现有战术图形对象
您可以按照上面的形状对象编辑说明来编辑现有的战术图形对象。
将注释提升为对象
在 Gaia 中,注释是当前地图本地的形状、点或符号。您可以将地图上的注释提升为 ontology 中的对象,以供其他可以访问其对象类型的用户创建的其他地图使用。
要将现有注释标记为对象,请双击地图上的注释,或将光标悬停在左侧面板图层选项卡中注释的铅笔图标上,以启动形状、点或符号编辑窗口。接下来,选择提升为对象,从对象类型下拉菜单中选择您的对象类型,并在形状、点或符号编辑窗口中完成操作表单。
要了解有关可用于将数据从您的 ontology 添加到 Gotham 的各种方法的更多信息,请查看现有的地理空间数据集成文档。