Getting started(入门指南)
In this guide, we will create a simple action type for changing the priority on a ticket.
We will configure submission criteria to make sure that the priority is P0, P1 or P2, and that the ticket status is Open.
Prerequisites
For this guide, we will use a Demo Ticket object type, which has four properties:
Ticket IDTitlePriorityStatus
We also have two demo objects available:
| Ticket ID | Title | Status | Priority |
|---|---|---|---|
| PDS-123 | Demo Ticket One | Open | P2 |
| PDS-124 | Demo Ticket Two | Closed | P1 |
You can recreate these in your Ontology if desired, but it is not essential.
Note that for a user to be able to take an action defined in an action type configuration, additional configuration is required. If running Object Storage V2, the user must enable edits with a toggle. If running Object Storage V1 (Phonograph), a writeback dataset must be created. Note that Object Storage V1 is in a planned deprecation phase of development; migrate to Object Storage V2.
Create a new action type
We start by creating a new action type for changing the ticket's priority. In the Ontology Manager, select Action type on the left sidebar, then choose New Action type at the top right of the view.
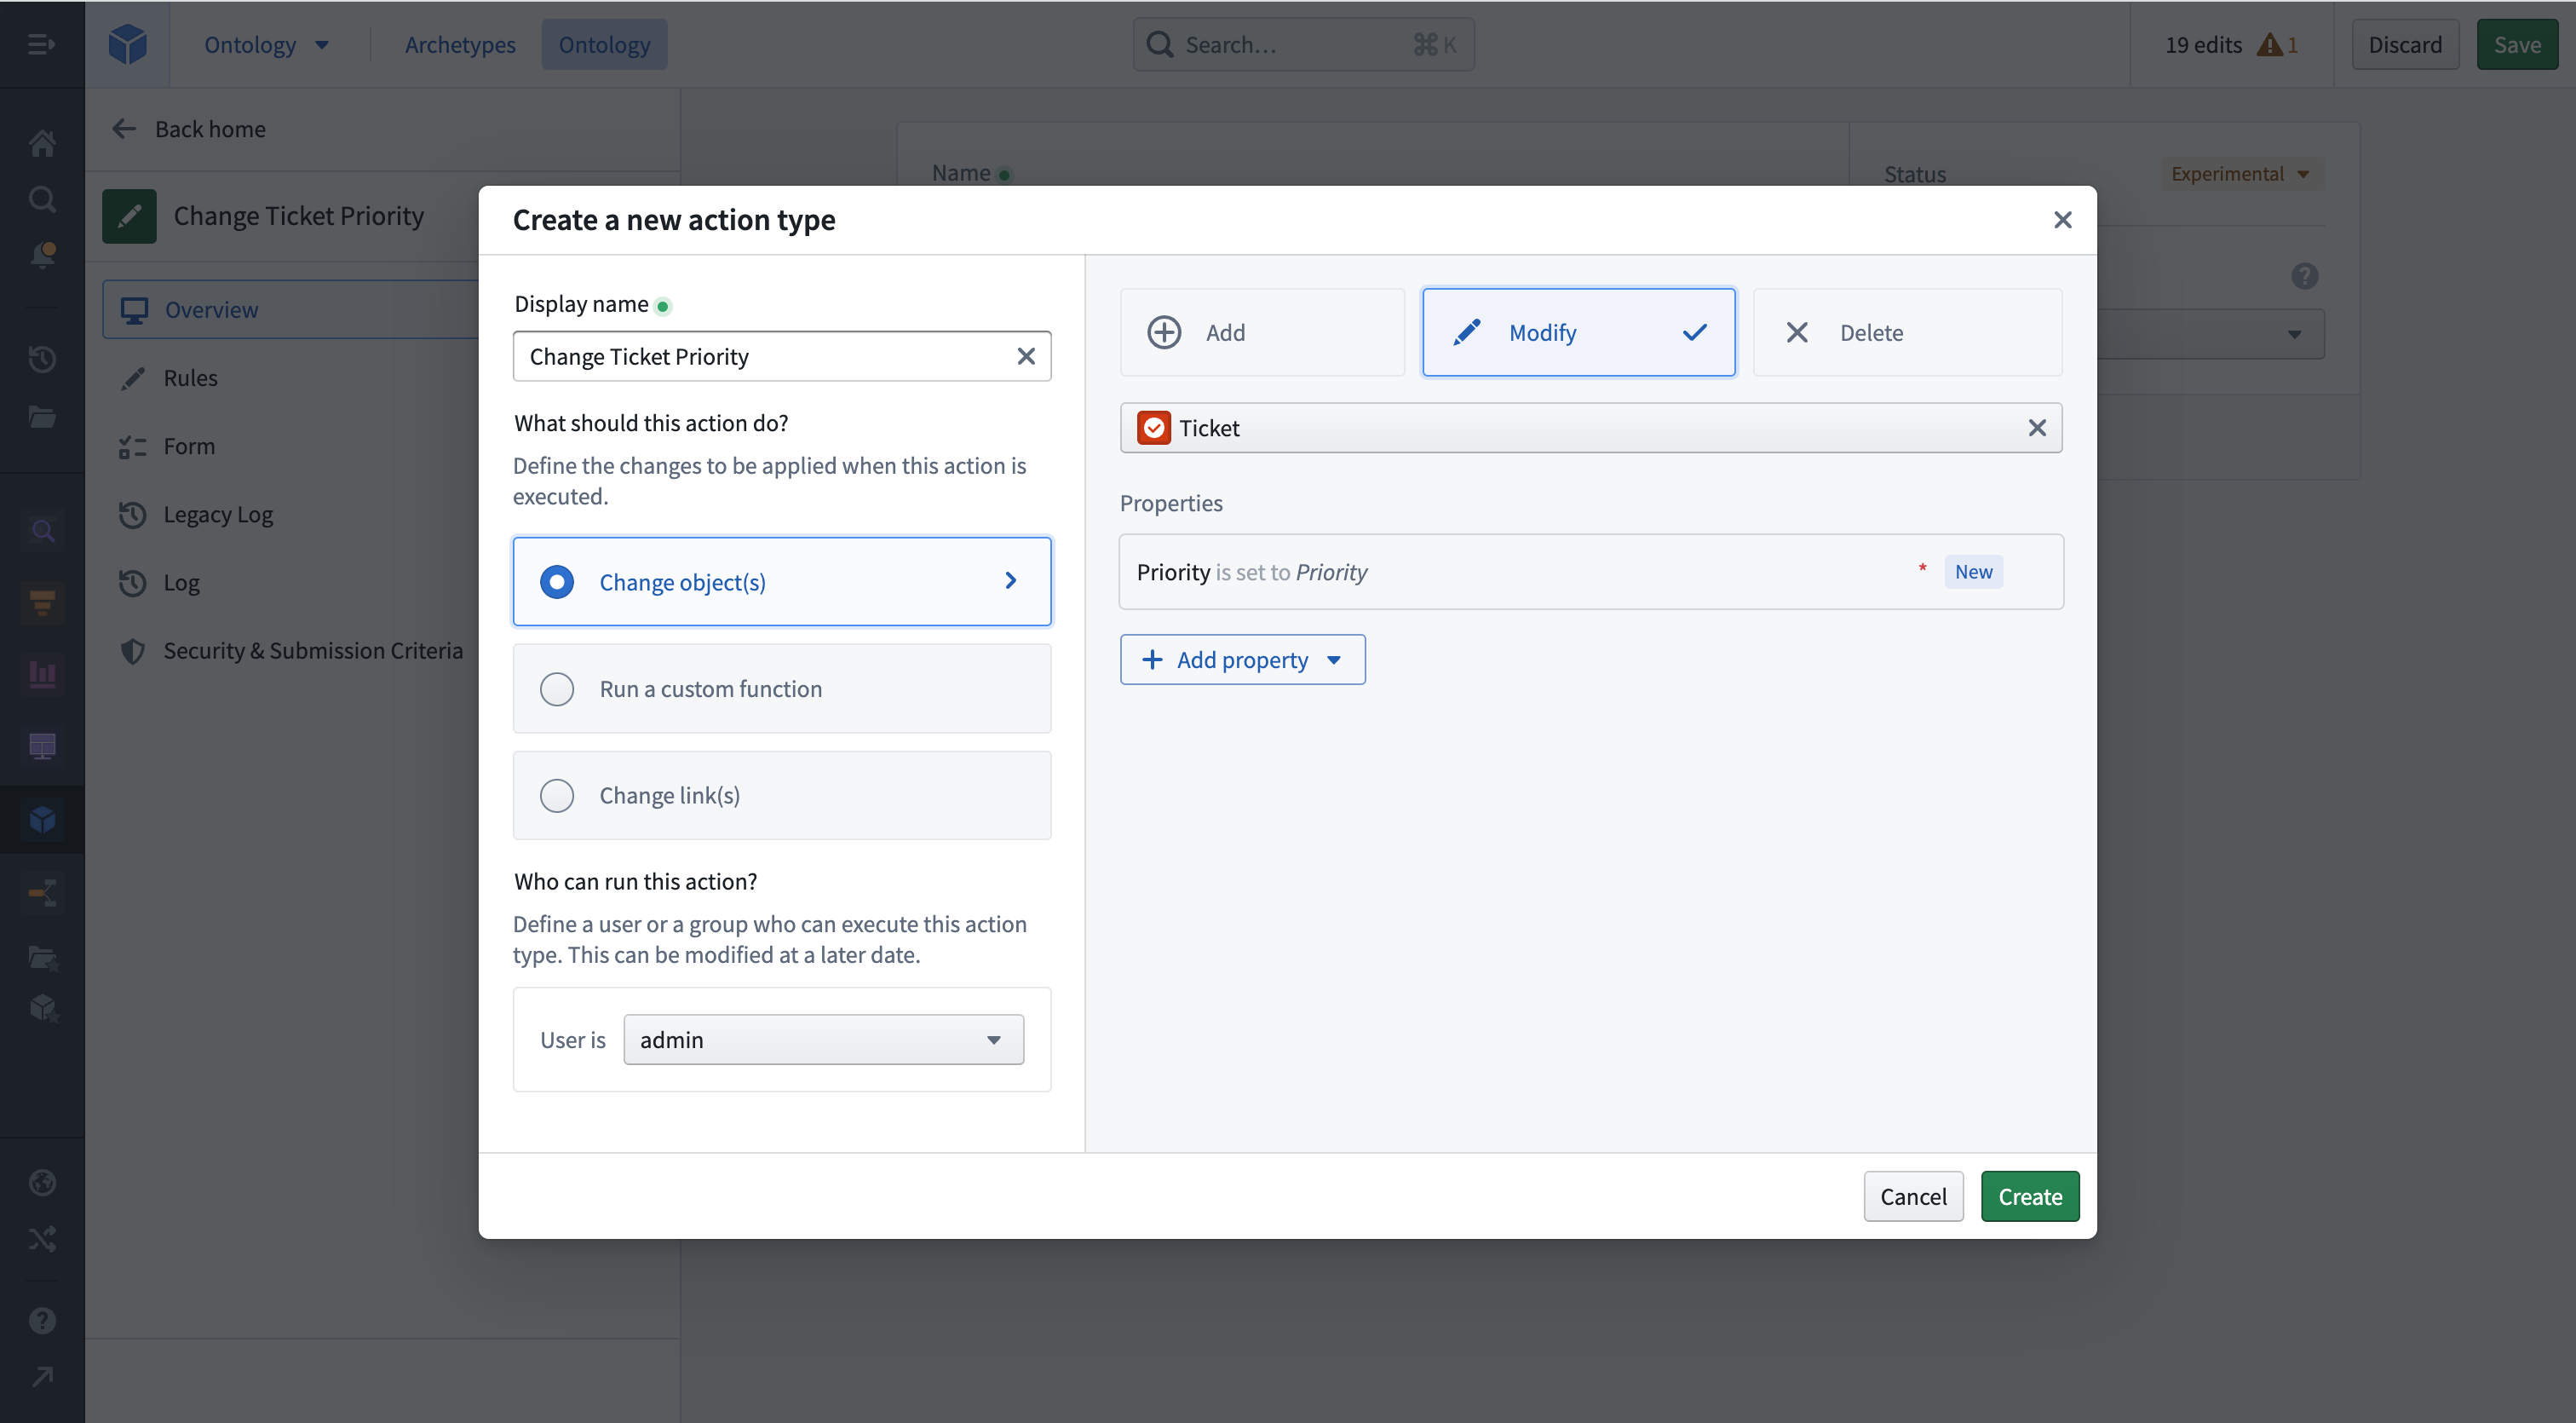
The creation wizard allows you to configure the most important features of an action type. Enter a Display name for your action type. Next, select the Change object(s) option and set it to Modify. From the following dropdown, select the Demo Ticket object type and add the Priority property by selecting Add property. Finally, select Create in the bottom right.
You can now see the full detailed view of your action type. You can make additional adjustments, like adding a Description in the Overview tab or adding additional properties to modify in the Rules tab.
Edit parameters
Select the Forms tab to get an overview of the parameters. The Ticket and Priority parameter have already been created based by the Rule.
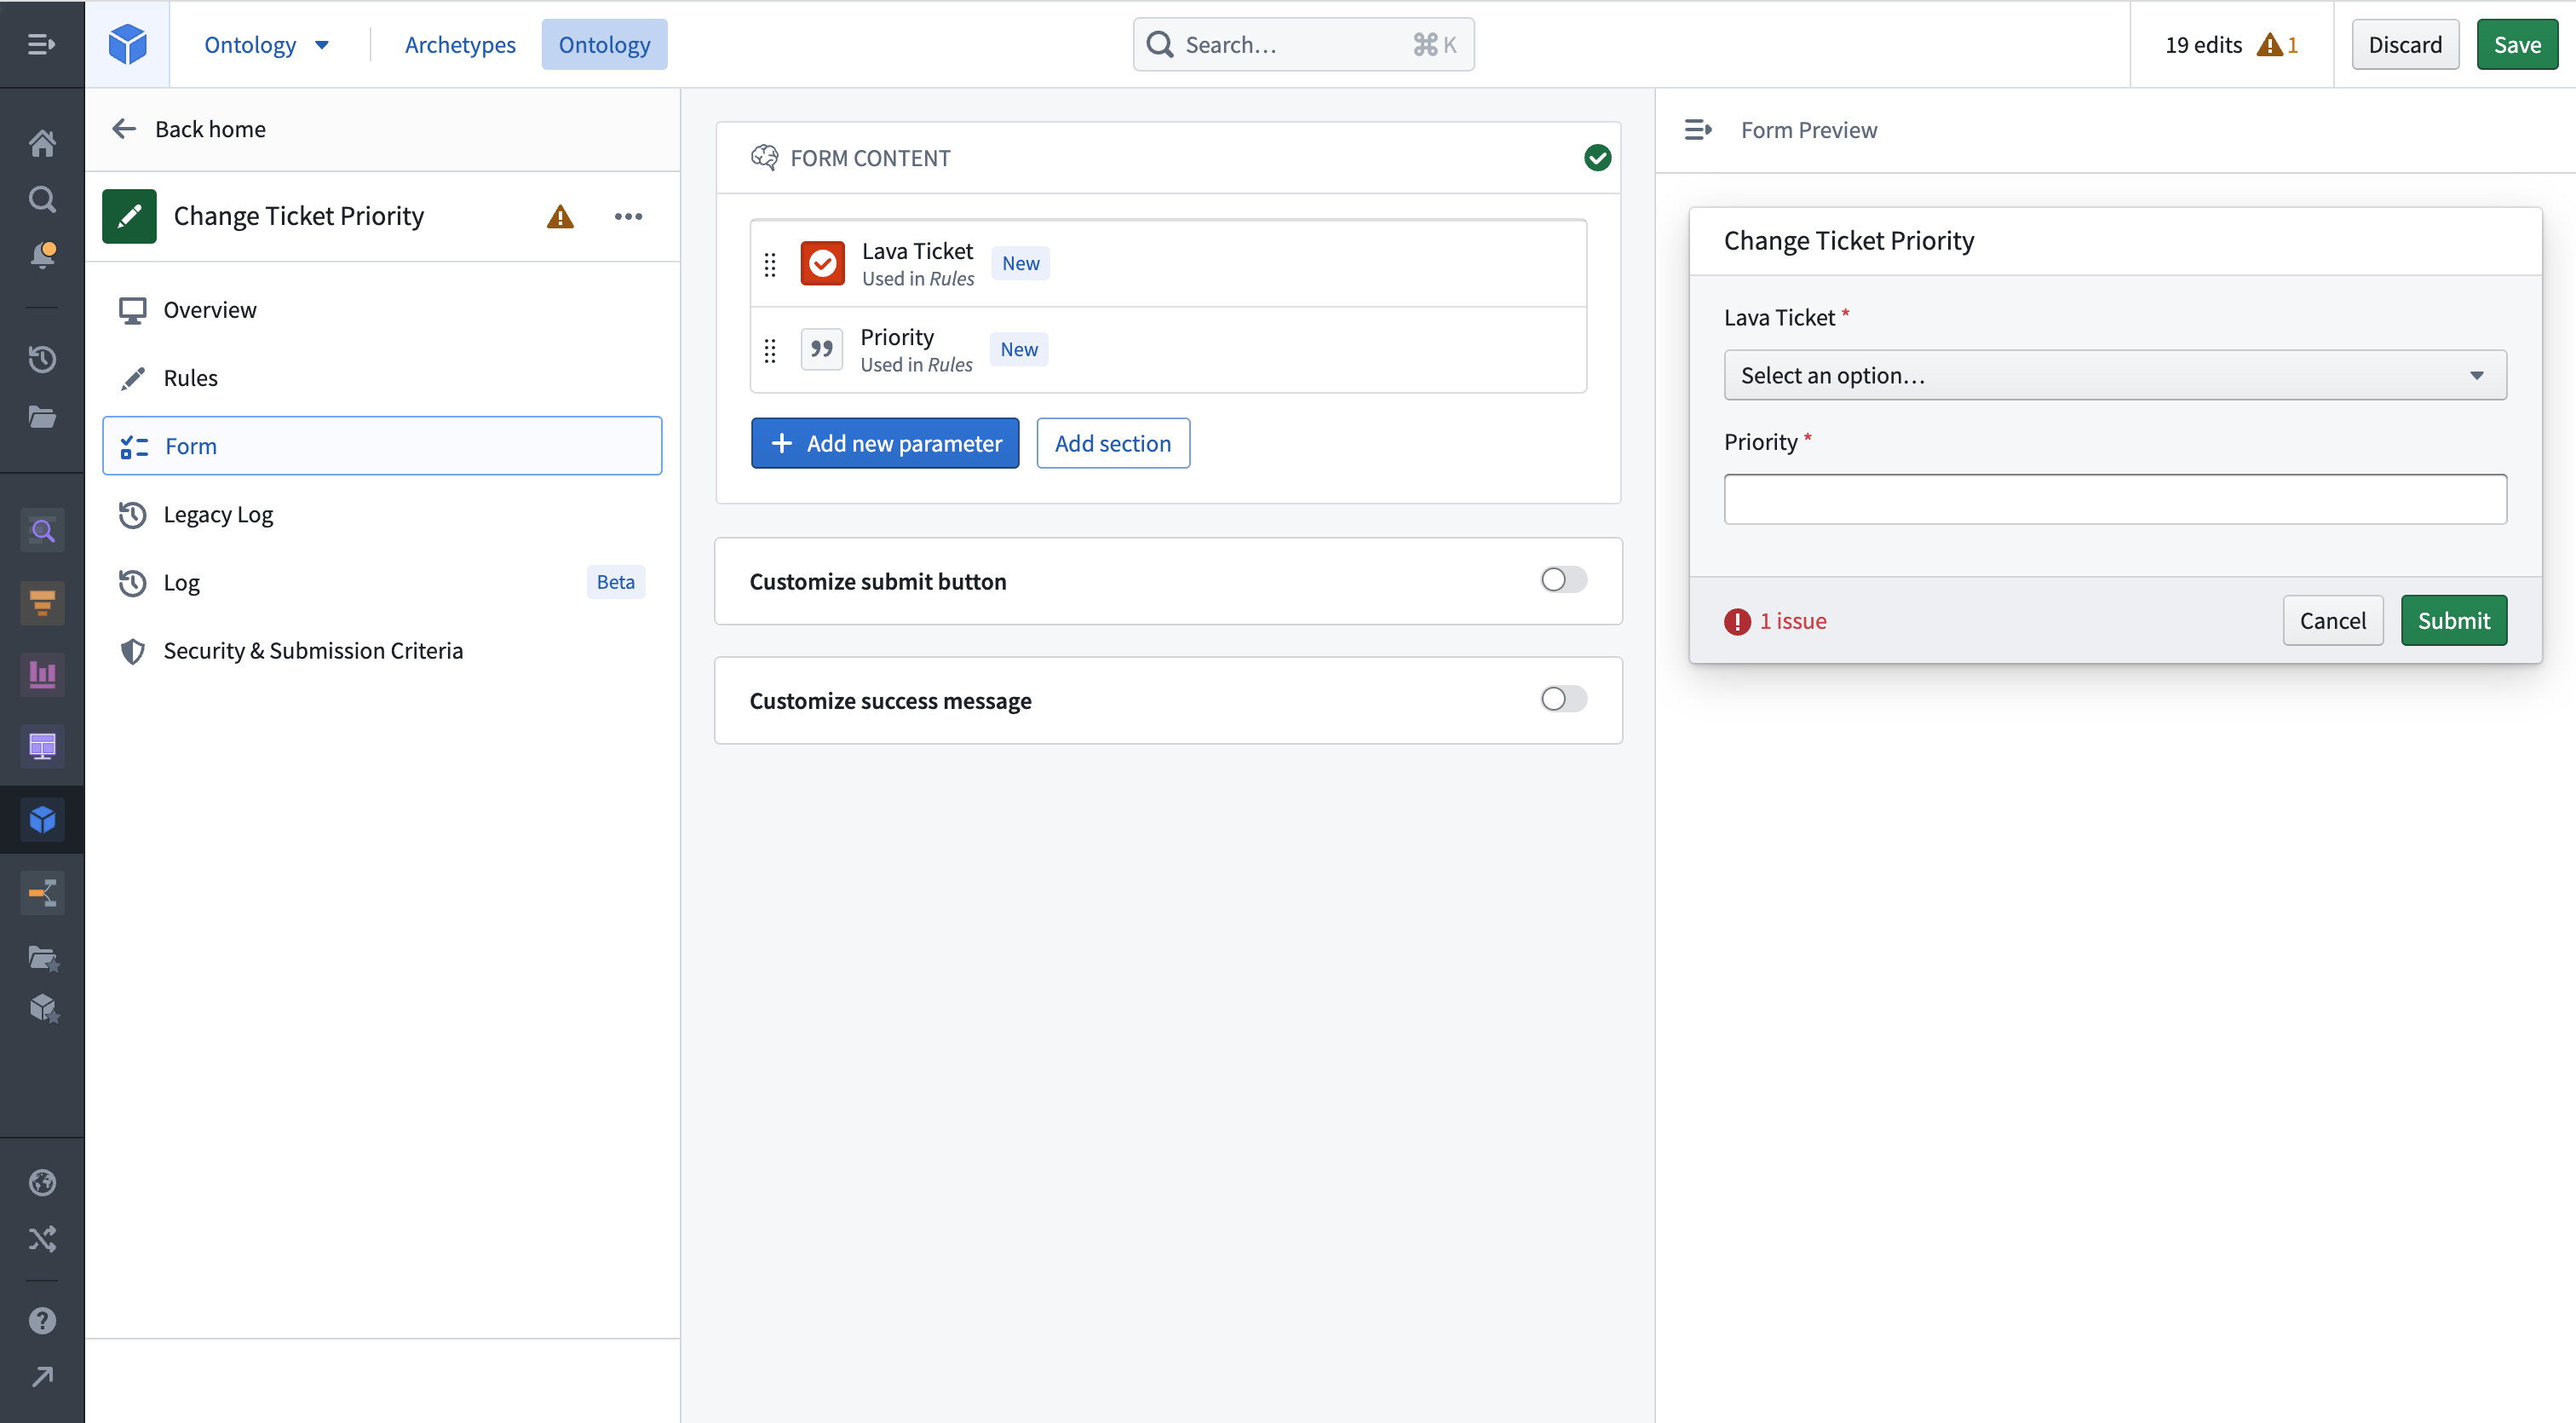
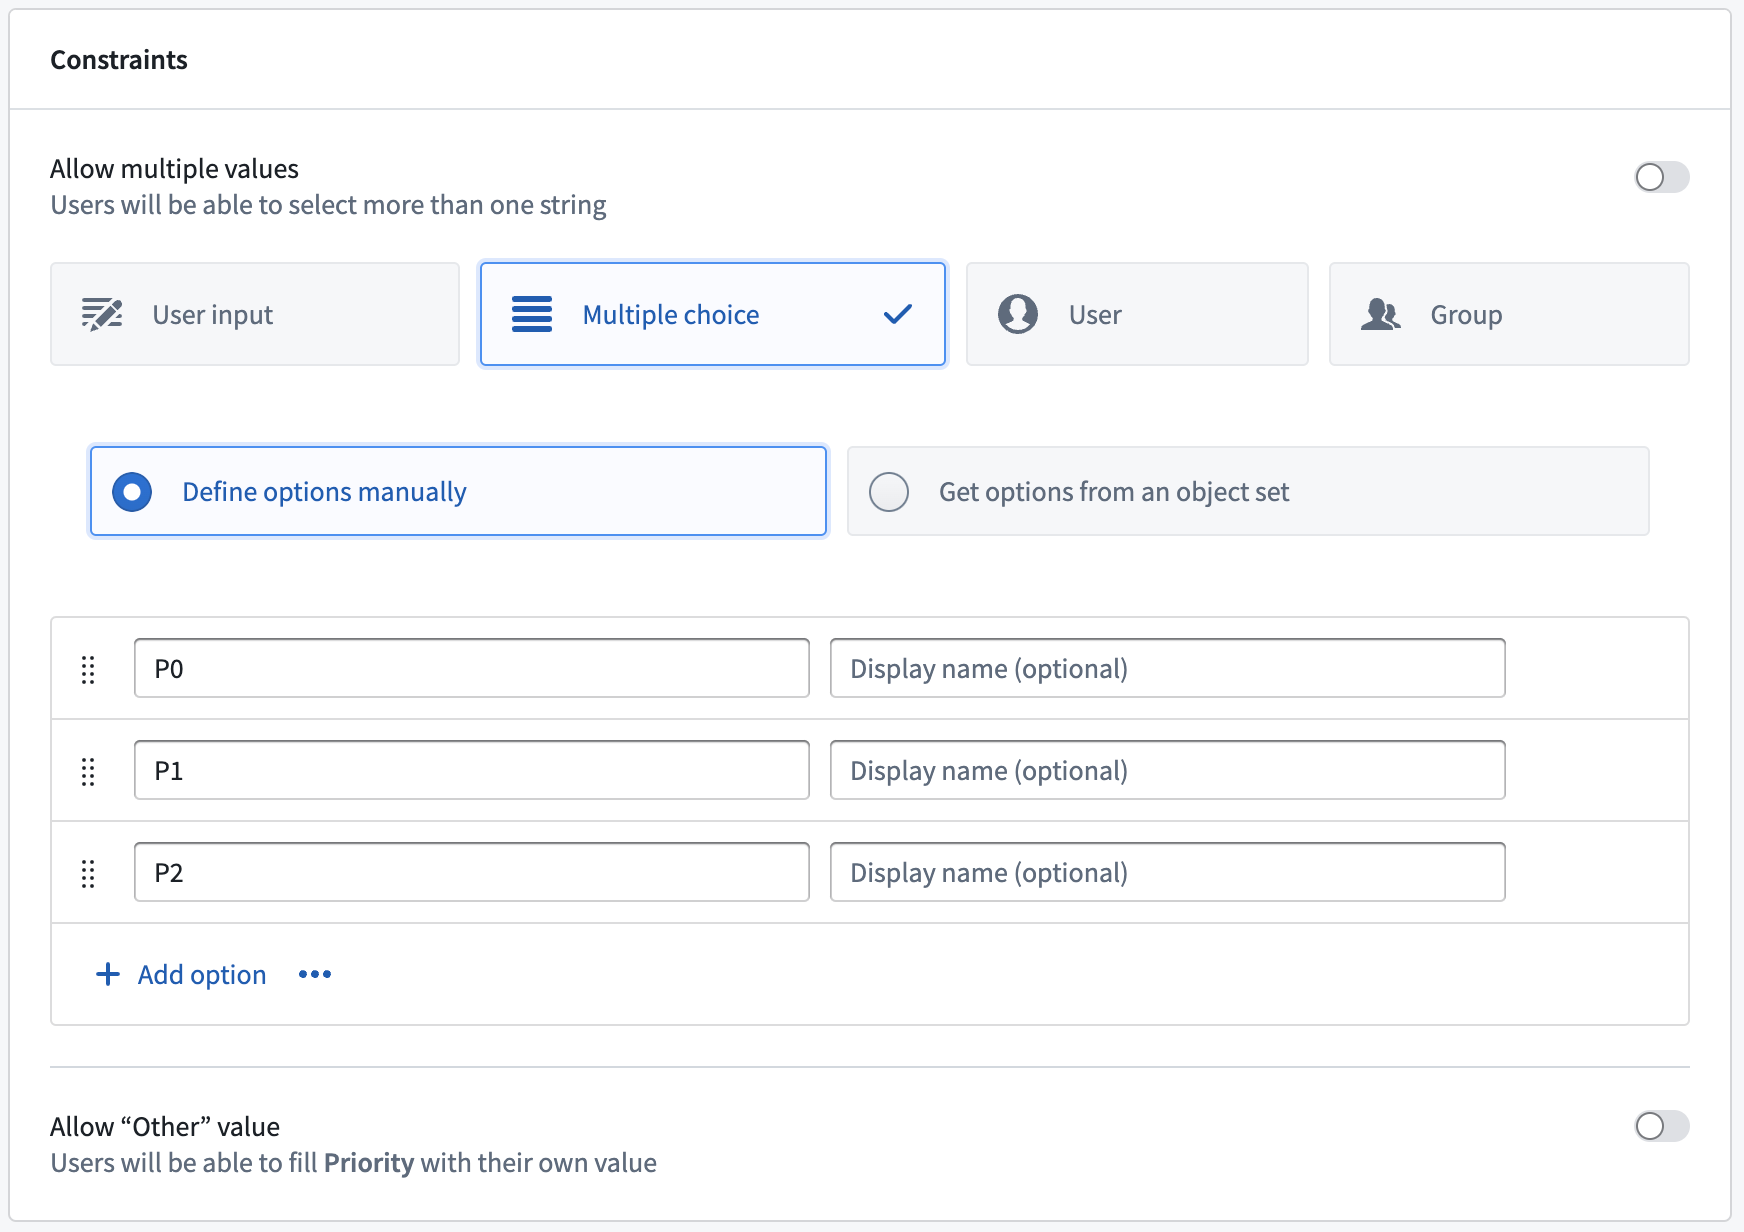
Select the Priority parameter to limit the values it can take on. Change the constraints from User input to Multiple choice. This will allow you to pick what values can be chosen for this parameter. Add P0, P1 and P2 as options. If you applied your action to an object now, you could change the priority of a ticket to P0, P1, or P2. You will now add submission criteria that will restrict you to only changing the priority for open tickets.
Add submission criteria
Open the submission criteria section in the Security & Submission Criteria tab from the sidebar. Create a new condition by selecting Condition in the Execution section. Using the Parameter condition template, set a condition on the Ticket Status object parameter's Ticket property. Using the is operator, you can then do an exact string comparison between the ticket status and the specific value Open.
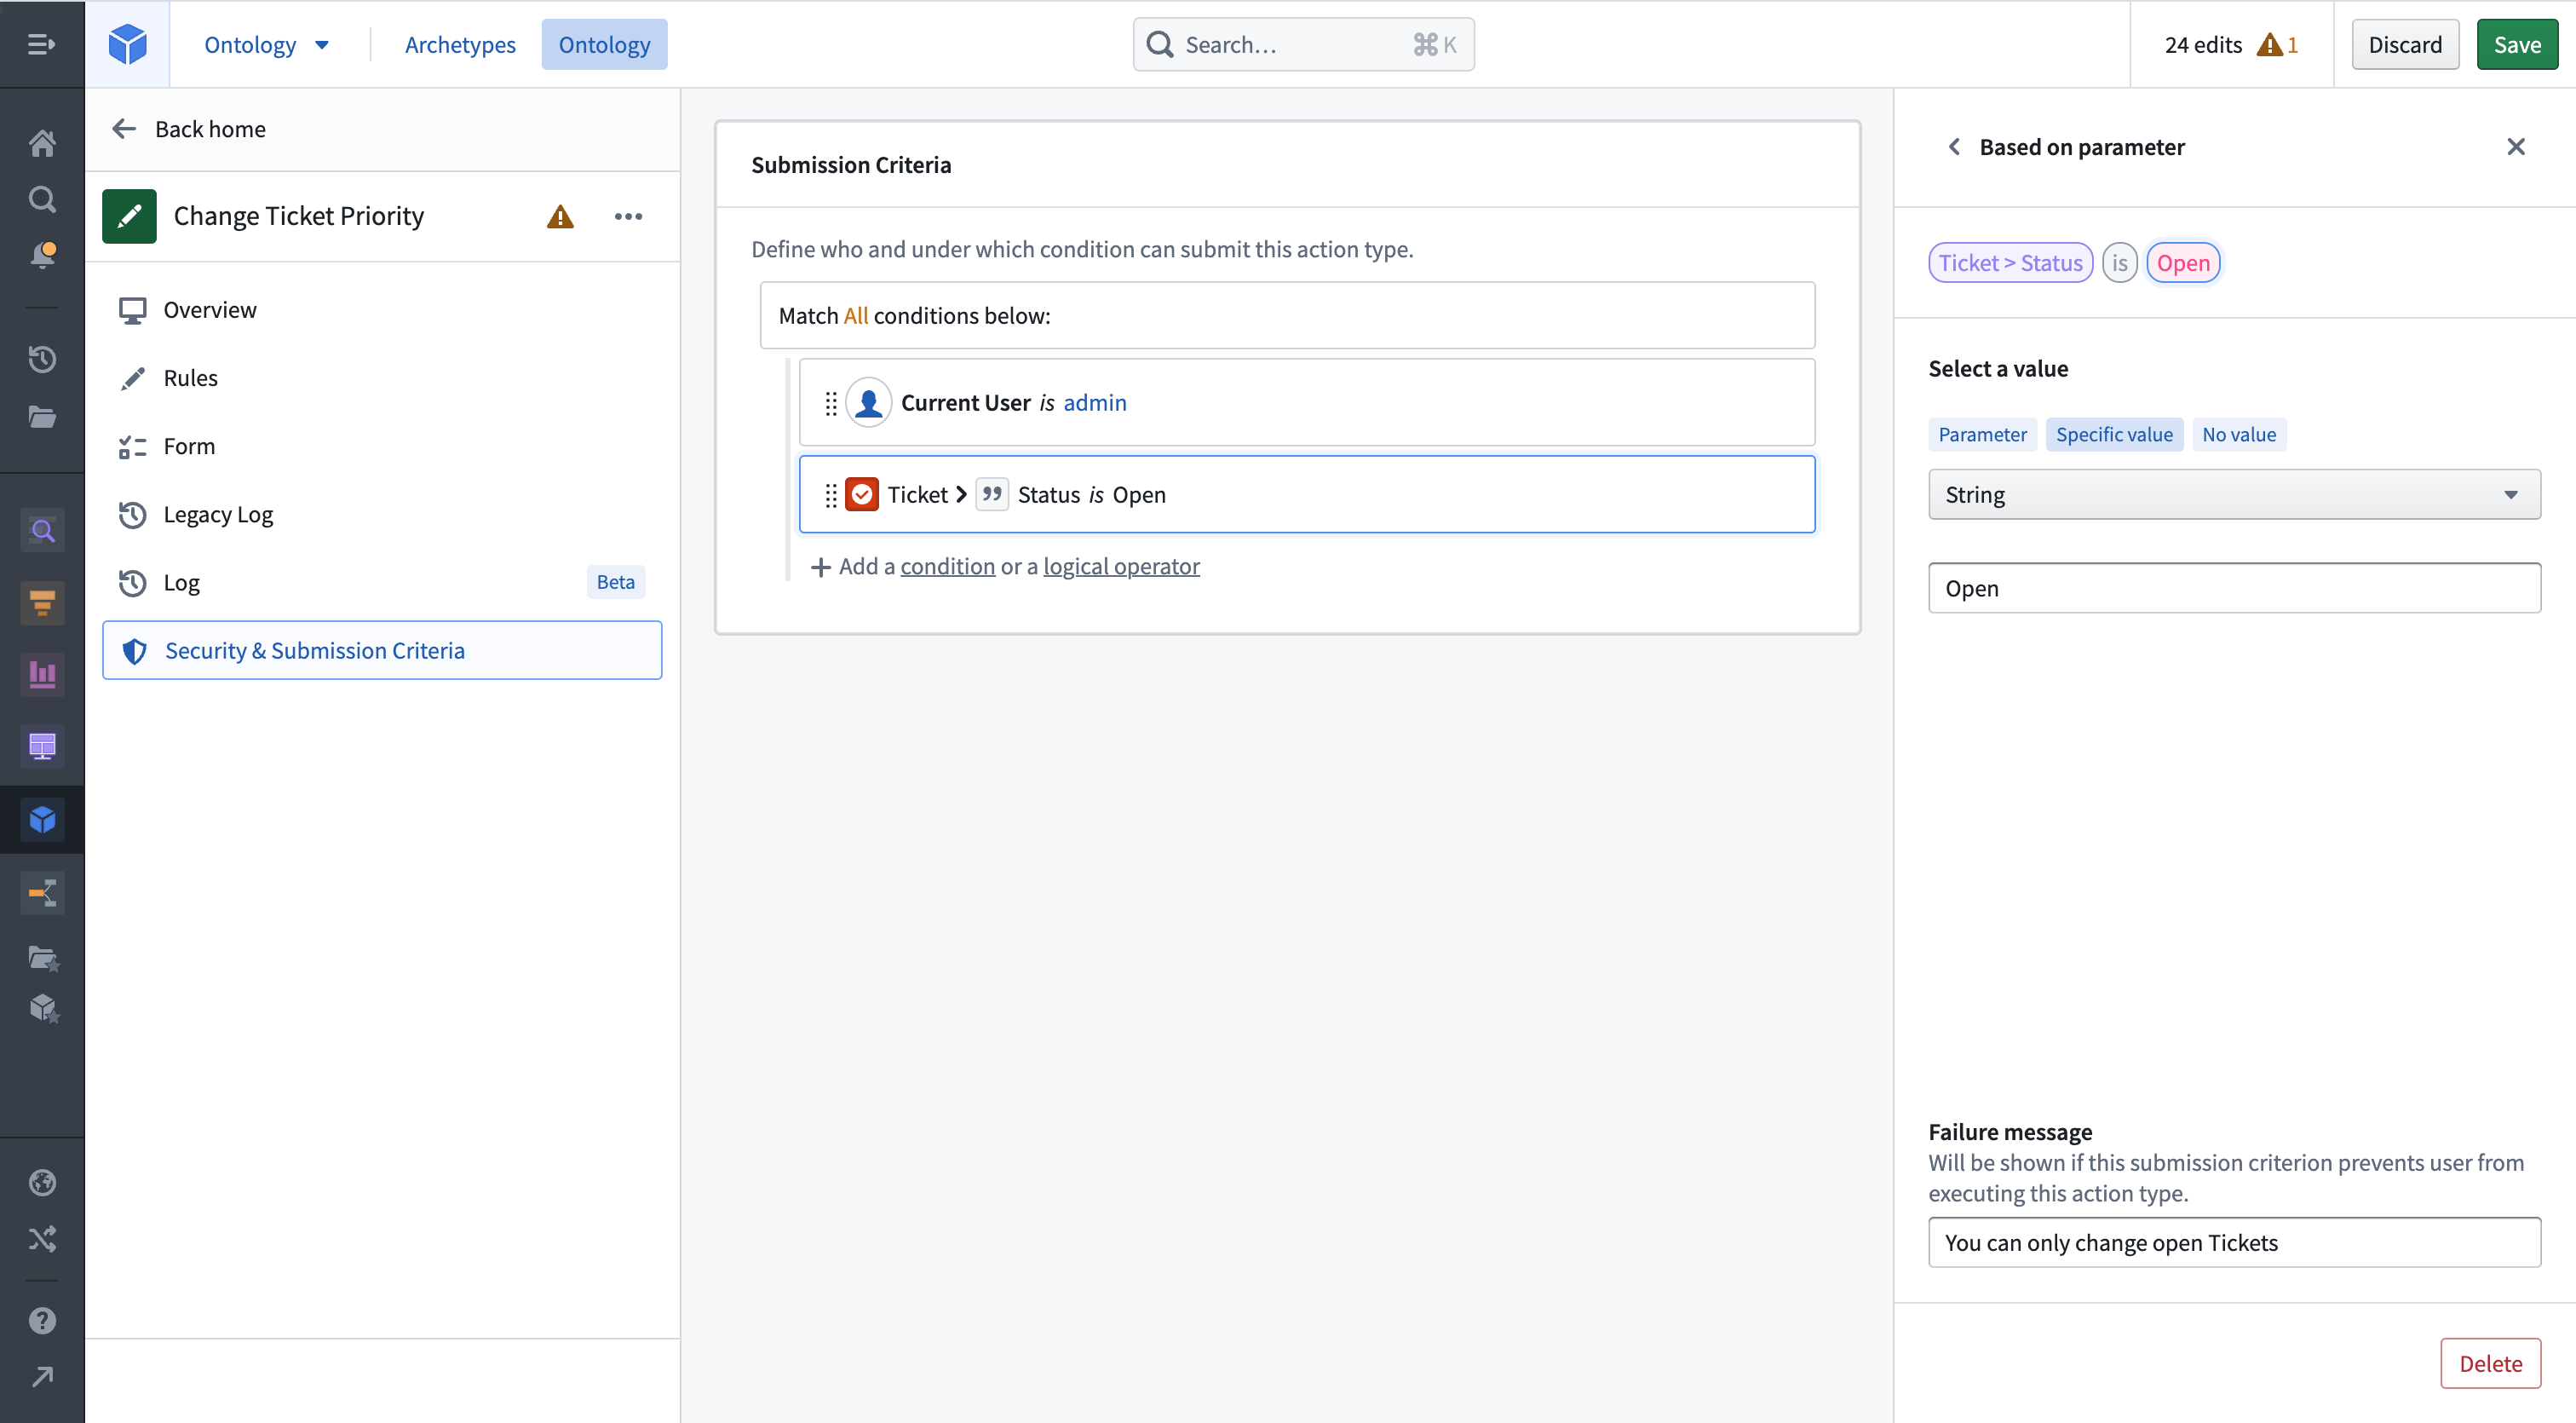
Add a failure message so users can see why an action has failed. Your action definition is now complete, and you can configure it to show up next to the Object View in Object Explorer.
Add the action to an Object View
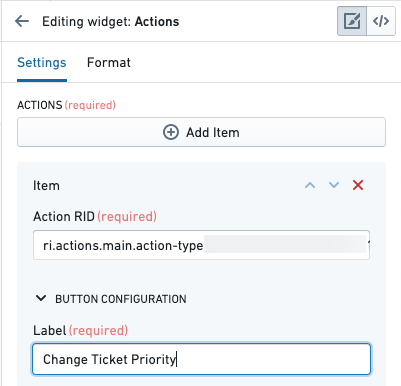
Go to Demo Ticket One and edit its Object View. Add a new widget to the top, and choose the Actions widget. In the sidebar, select Add Item. Copy and paste the action RID from the Ontology Manager and paste it into the Action RID field. Name the label "Change Ticket Priority".
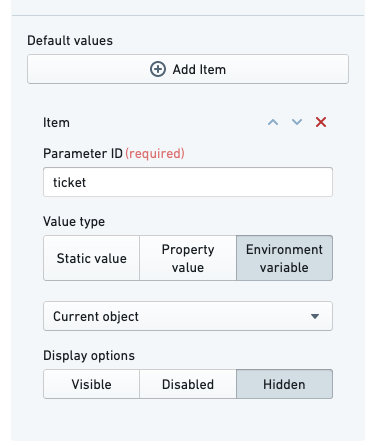
By default, the action form will show every parameter as a field in the action form, including the Ticket parameter. Additionally, an action does not know that it should fill the current object in for the Ticket parameter. We will configure the action form to hide the ticket field (so the user cannot change the status of a different ticket), and set its value to the current object.
Under Default value, select Add Item. Type the parameter ID for the Ticket parameter—in this tutorial, we set it to ticket. Change the value type to Environment variable and select Current object. Finally, change the display option to Hidden.
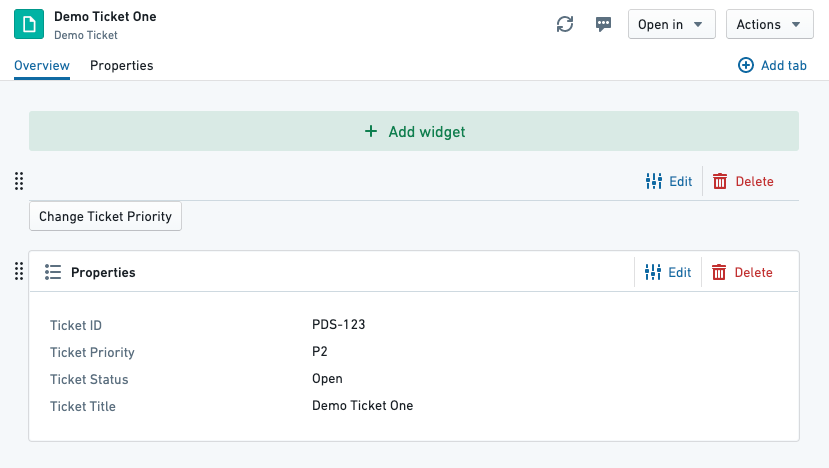
You will now see the action button on the preview page:
You can now save and publish the Object View.
Apply the action
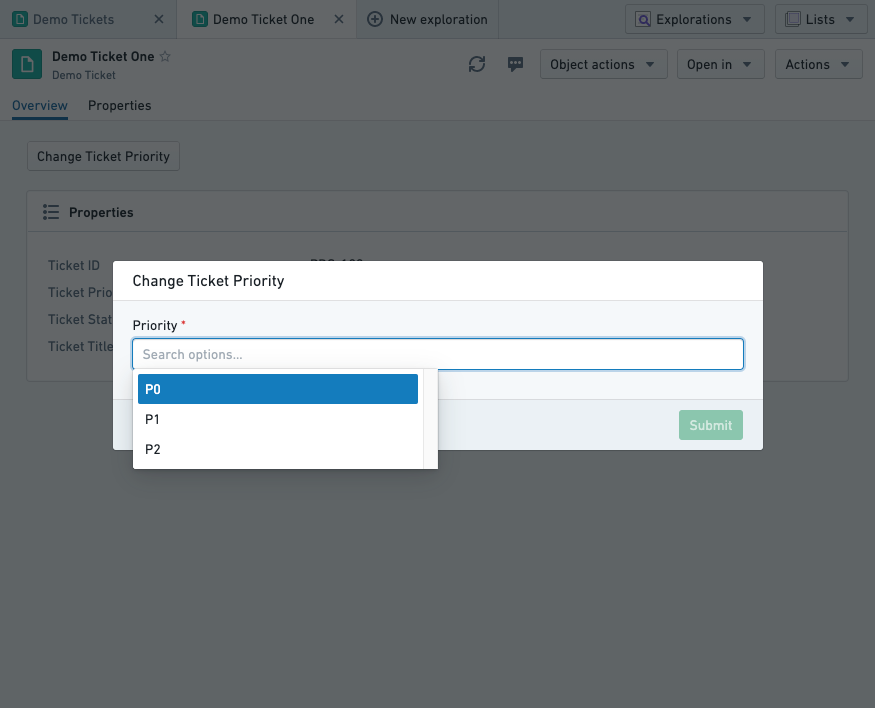
Visit an open ticket and select the Change Ticket Priority button we configured. You should see the action form appear over the view. Clicking into the Priority field will show the single selected submission criterion we configured on the parameter:
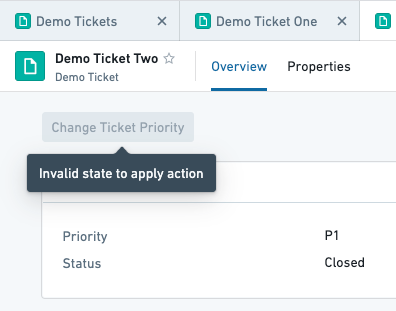
Pick a priority and select submit. The form will disappear and the object view will update with the new priority. Our submission criteria said that it should not be possible to run this action on a closed ticket—if we open Demo Ticket Two, which is closed, we see the following:
Resolve conflicting user edits (actions) and datasource updates
Object instances in the Foundry Ontology can be created and modified by both input datasources and user edits/actions. When a single object instance (that is, a row or object with a specific primary key value) receives data from both the input datasource and user edits, these received values must be transparently resolved with a conflict resolution strategy.
There are two strategies for resolving conflicts:
- Strategy 1: Apply user edits (default)
- Strategy 2: Apply most recent value (may not be available on your enrollment)
Learn more about how to resolve conflicting user edits and datasource updates.
Next steps
- Learn more about action permissions.
- Create a function-backed action.
- Use an action elsewhere in the platform.
- Resolve conflicting user edits (actions) and datasource updates
中文翻译
入门指南
在本指南中,我们将创建一个简单的操作类型(action type),用于更改工单的优先级。
我们将配置提交条件(submission criteria),确保优先级为 P0、P1 或 P2,并且工单状态为 Open。
前提条件
本指南将使用一个 Demo Ticket 对象类型(object type),该类型包含四个属性(property):
Ticket ID(工单ID)Title(标题)Priority(优先级)Status(状态)
我们还有两个可用的演示对象:
| Ticket ID | Title | Status | Priority |
|---|---|---|---|
| PDS-123 | Demo Ticket One | Open | P2 |
| PDS-124 | Demo Ticket Two | Closed | P1 |
如有需要,您可以在本体(Ontology)中重新创建这些对象,但这不是必需的。
请注意,用户要能够执行操作类型配置中定义的操作,需要额外的配置。如果运行的是 Object Storage V2,用户必须通过开关启用编辑功能。如果运行的是 Object Storage V1 (Phonograph),则必须创建一个回写数据集(writeback dataset)。请注意,Object Storage V1 正处于计划弃用阶段;请迁移到 Object Storage V2。
创建新的操作类型
首先,我们创建一个用于更改工单优先级的新操作类型。在本体管理器(Ontology Manager)中,选择左侧边栏的 Action type(操作类型),然后选择视图右上角的 New Action type(新建操作类型)。
创建向导允许您配置操作类型最重要的功能。为您的操作类型输入一个显示名称(Display name)。接下来,选择 Change object(s)(更改对象)选项,并将其设置为 Modify(修改)。从下拉菜单中选择 Demo Ticket 对象类型,然后通过选择 Add property(添加属性)来添加 Priority 属性。最后,选择右下角的 Create(创建)。
现在您可以看到操作类型的完整详细视图。您可以进行其他调整,例如在 Overview(概览)选项卡中添加描述(Description),或在 Rules(规则)选项卡中添加要修改的其他属性。
编辑参数
选择 Forms(表单)选项卡以查看参数概览。Ticket 和 Priority 参数已根据规则创建。
选择 Priority 参数以限制其可接受的值。将约束条件从 User input(用户输入)更改为 Multiple choice(多项选择)。这样您就可以选择该参数可以使用的值。添加 P0、P1 和 P2 作为选项。如果现在将操作应用于对象,您可以将工单的优先级更改为 P0、P1 或 P2。接下来,您将添加提交条件,以限制仅能更改处于开放状态的工单的优先级。
添加提交条件
从侧边栏打开 Security & Submission Criteria(安全与提交条件)选项卡中的提交条件部分。在 Execution(执行)部分选择 Condition(条件)来创建新条件。使用 Parameter(参数)条件模板,对 Ticket Status 对象参数的 Ticket 属性设置条件。使用 is 运算符,您可以对工单状态与特定值 Open 进行精确的字符串比较。
添加一条失败消息,以便用户了解操作失败的原因。您的操作定义现已完成,您可以对其进行配置,使其显示在对象资源管理器(Object Explorer)的对象视图(Object View)旁边。
将操作添加到对象视图
转到 Demo Ticket One 并编辑其对象视图。在顶部添加一个新小部件,然后选择 Actions(操作)小部件。在侧边栏中,选择 Add Item(添加项目)。从本体管理器复制操作 RID,并将其粘贴到 Action RID 字段中。将标签命名为 "Change Ticket Priority"(更改工单优先级)。
默认情况下,操作表单会显示每个参数作为表单中的一个字段,包括 Ticket 参数。此外,操作不知道应该为 Ticket 参数填充当前对象。我们将配置操作表单,隐藏工单字段(这样用户就无法更改其他工单的状态),并将其值设置为当前对象。
在 Default value(默认值)下,选择 Add Item(添加项目)。输入 Ticket 参数的参数 ID——在本教程中,我们将其设置为 ticket。将值类型更改为 Environment variable(环境变量),然后选择 Current object(当前对象)。最后,将显示选项更改为 Hidden(隐藏)。
现在您将在预览页面上看到操作按钮:
您现在可以保存并发布对象视图。
应用操作
访问一个处于开放状态的工单,然后选择我们配置的 Change Ticket Priority(更改工单优先级)按钮。您应该会看到操作表单出现在视图上方。点击 Priority(优先级)字段将显示我们在参数上配置的单个选定提交条件:
选择一个优先级,然后选择提交。表单将消失,对象视图将更新为新的优先级。我们的提交条件规定,不应允许对已关闭的工单执行此操作——如果我们打开已关闭的 Demo Ticket Two,会看到以下内容:
解决冲突的用户编辑(操作)和数据源更新
Foundry 本体中的对象实例可以通过输入数据源(input datasource)和用户编辑/操作来创建和修改。当单个对象实例(即具有特定主键值的行或对象)同时从输入数据源和用户编辑接收数据时,必须使用冲突解决策略(conflict resolution strategy)透明地解决这些接收到的值。
有两种解决冲突的策略:
- 策略 1:应用用户编辑(默认)
- 策略 2:应用最新值(您的注册环境可能不支持)