Set up a notification(设置通知)
This tutorial demonstrates how to set up an action with a notification.
We will be using an action which updates the Priority property of an Alert object, and also notifies the Assignee (a Foundry user) which is stored as a property on that Alert object. If you want to follow along, you'll need to have the following already set up:
- An object with the correct properties and configured to be editable via actions
- An action which takes in one of your objects as well as a parameter containing the new priority and updates the priority property on the specified object. If you previously followed the tutorial on getting started with actions, you should already have this set up.
If you are new to managing objects, you can read about how to set up an object type.
Prerequisites
Complete the Getting Started tutorial
This tutorial assumes you already completed the Getting Started tutorial for actions.
Add the assignee property to your object type
For this tutorial, you will need to have a property on the Alert object that is called Case Managers and contains the Foundry user ID for the currently assigned user. Typically, if you are using actions to construct your workflow, you will be able to capture and store user IDs with the user selector components in your application. These will show up as full usernames wherever they are displayed in Foundry.
Add a notification
First, navigate to your action that updates the ticket priority. Under the Rules section select Add new rule, followed by Notification. This will open the configuration dialog for adding a notification.

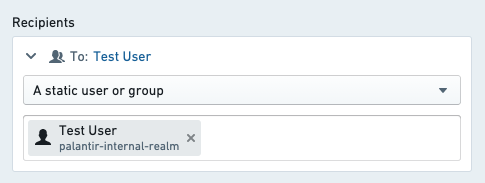
Configure recipients
For this example, you will send the notification to the assignee, which is stored as a property of the Alert object being edited. To do this, use the option "Recipient(s) from property of object parameter" in the Recipients dropdown. Select the Alert object that is available as a parameter to the action, then select the Case managers property when prompted.
You should see the selected object parameter and property displayed in the Recipients section of the configuration. Keep in mind that the recipient must always be a Foundry user ID. If this property contains something else such as string email addresses, no notifications will be sent.
:::callout{theme="neutral"} For testing, you may initially want to configure the action with hardcoded recipient(s) that can be used to validate the logic and notification content is configured as expected. :::
Learn more about other recipient configuration options.
Configure notification content
Next, you will configure the content of the notification by customizing the notification to address the recipient by name and including the old and new priority of the Alert object in the content. An example notification configuration is available below.
First, select "Template" from the content options. This is the most straightforward way to configure the content and does not require writing any code.
For the subject line, enter your desired message. To add a parameter reference, add a forward slash / and select the desired parameter from the dropdown list. If your selection is an object parameter, you will be asked to select which property you want to reference.
For the body, enter text that addresses the recipient by name, identifies the user who made a change, and reports the previous and updated status.
As with the object reference in the subject, you can select the "Recipient", "Current User", and any parameter options from the dropdown list in order to generate the correct reference to those user attributes.
Learn how to generate notification content with more complex requirements.
Configure a link
Finally, you will add a link to the Object View of the specified Alert in Object Explorer. Select "Object View" and then select your ticket object parameter from the dropdown. Then, add a label for the link button that reads View Ticket.
Now you are ready to save your entire notification configuration:

Learn more about other types of links that can be configured.
Send a test notification
To verify, create a test alert with yourself as the assignee. In order to run the action, you will then need to expose the action in Object Explorer or via a button in a Workshop module as described in the actions documentation.
Once you've made a test change, you should receive both an in-platform push notification and an email notification to the email account specified on your Foundry user profile. Previews for both in-platform and email notifications are displayed within the notification configuration view.
If you did not receive an email, it may be because you have email and/or in-platform notifications disabled. You can verify this in Notifications under User Settings.
Next steps
- Explore other optional features, such as custom content for when the recipient chooses to receive notifications via email.
- Configure complex logic for recipients or content using functions.
中文翻译
设置通知
本教程演示如何配置包含通知的操作。
我们将使用一个操作来更新Alert对象的Priority属性,同时通知存储在该Alert对象属性中的Assignee(即受让人,一个Foundry用户)。如果你想跟着操作,需要先完成以下设置:
- 一个具有正确属性且已配置为可通过操作编辑的对象
- 一个操作,该操作接收你的一个对象以及包含新优先级值的参数,并更新指定对象的优先级属性。如果你之前已经按照操作入门教程操作过,应该已经完成了此设置。
如果你不熟悉对象管理,可以阅读如何设置对象类型。
前提条件
完成入门教程
本教程假设你已经完成了操作的入门教程。
为对象类型添加受让人属性
在本教程中,你需要在Alert对象上添加一个名为Case Managers的属性,该属性包含当前分配用户的Foundry用户ID。通常,如果你使用操作来构建工作流,可以通过应用程序中的用户选择器组件来捕获和存储用户ID。这些ID在Foundry中显示时会以完整用户名形式呈现。
添加通知
首先,导航到更新工单优先级的操作。在规则部分选择添加新规则,然后选择通知。这将打开添加通知的配置对话框。
配置收件人
在本示例中,你将向受让人发送通知,该受让人存储为正在编辑的Alert对象的属性。为此,请在收件人下拉菜单中选择"来自对象参数的属性中的收件人"。选择作为操作参数可用的Alert对象,然后在提示时选择Case managers属性。
你应该会在配置的收件人部分看到所选的对象参数和属性。请注意,收件人必须始终是Foundry用户ID。如果此属性包含其他内容(如字符串形式的电子邮件地址),则不会发送任何通知。
:::callout{theme="neutral"} 为了测试,你可以先使用硬编码的收件人来配置操作,以便验证逻辑和通知内容是否符合预期。 :::
配置通知内容
接下来,你将通过自定义通知内容来配置通知,包括按名称称呼收件人,并在内容中包含Alert对象的旧优先级和新优先级。下面提供了一个示例通知配置。
首先,从内容选项中选择"模板"。这是配置内容最直接的方式,无需编写任何代码。
对于主题行,输入你希望显示的消息。要添加参数引用,请键入正斜杠/,然后从下拉列表中选择所需的参数。如果你的选择是对象参数,系统会要求你选择要引用的属性。
对于正文,输入文本,按名称称呼收件人,标识进行更改的用户,并报告之前和更新后的状态。
与主题中的对象引用类似,你可以从下拉列表中选择"收件人"、"当前用户"以及任何参数选项,以生成对这些用户属性的正确引用。
配置链接
最后,你将在对象资源管理器中为指定的Alert添加一个指向对象视图的链接。选择"对象视图",然后从下拉菜单中选择你的工单对象参数。然后,为链接按钮添加一个标签,显示为查看工单。
现在,你可以保存整个通知配置了:
发送测试通知
为了验证,创建一个测试警报,并将自己设为受让人。要运行该操作,你需要按照操作文档中的说明,在对象资源管理器中或通过Workshop模块中的按钮公开该操作。
完成测试更改后,你应该会收到平台内的推送通知,以及发送到Foundry用户配置文件指定邮箱的电子邮件通知。平台内和电子邮件通知的预览都会显示在通知配置视图中。
如果你没有收到电子邮件,可能是因为你已禁用电子邮件和/或平台内通知。你可以在用户设置下的通知中检查此设置。