Use Actions in Workshop(在Workshop中使用动作(Actions))
Actions in Foundry allow users to edit, create, delete, and link object data based on defined rule sets (known as action types). For example, an Action might allow a user to do one or more of the following:
- Create a new
Flightobject and fill in itsFlight Number,Time of Departure,Origin, andDestinationproperties. - Modify an existing
Flightobject to change theDestinationproperty. - Link a specific
Flightobject to a specificPassengerobject. - Delete a
Flightobject that was created by mistake.
By creating a user-friendly wrapper for complex object data edits, Actions enables application creators to use meaningful and secure building blocks for user writeback to object data. These building blocks can then be:
- Used in multiple applications (such as Workshop or Object Views) to support business process workflows.
- A Form component is automatically generated based on the Action definition, so writeback to object data and the user interface associated with it are not defined separately. The core interactions of Workshop and Actions are detailed below.
- Granularly permissioned to support different writeback permissions for different users and conditions.
- For example, an analyst may be allowed to start a new investigation, but the ability to close investigations may be restricted to members of the manager user group.
Define an Action in the Ontology Manager
:::callout
To create, configure, or edit an action, a given Palantir Foundry user must belong to the actions-admins group.
:::
:::callout For full details on defining actions, see the actions documentation. The documentation below provides a brief notional example of action configuration focused on using actions within Workshop. :::
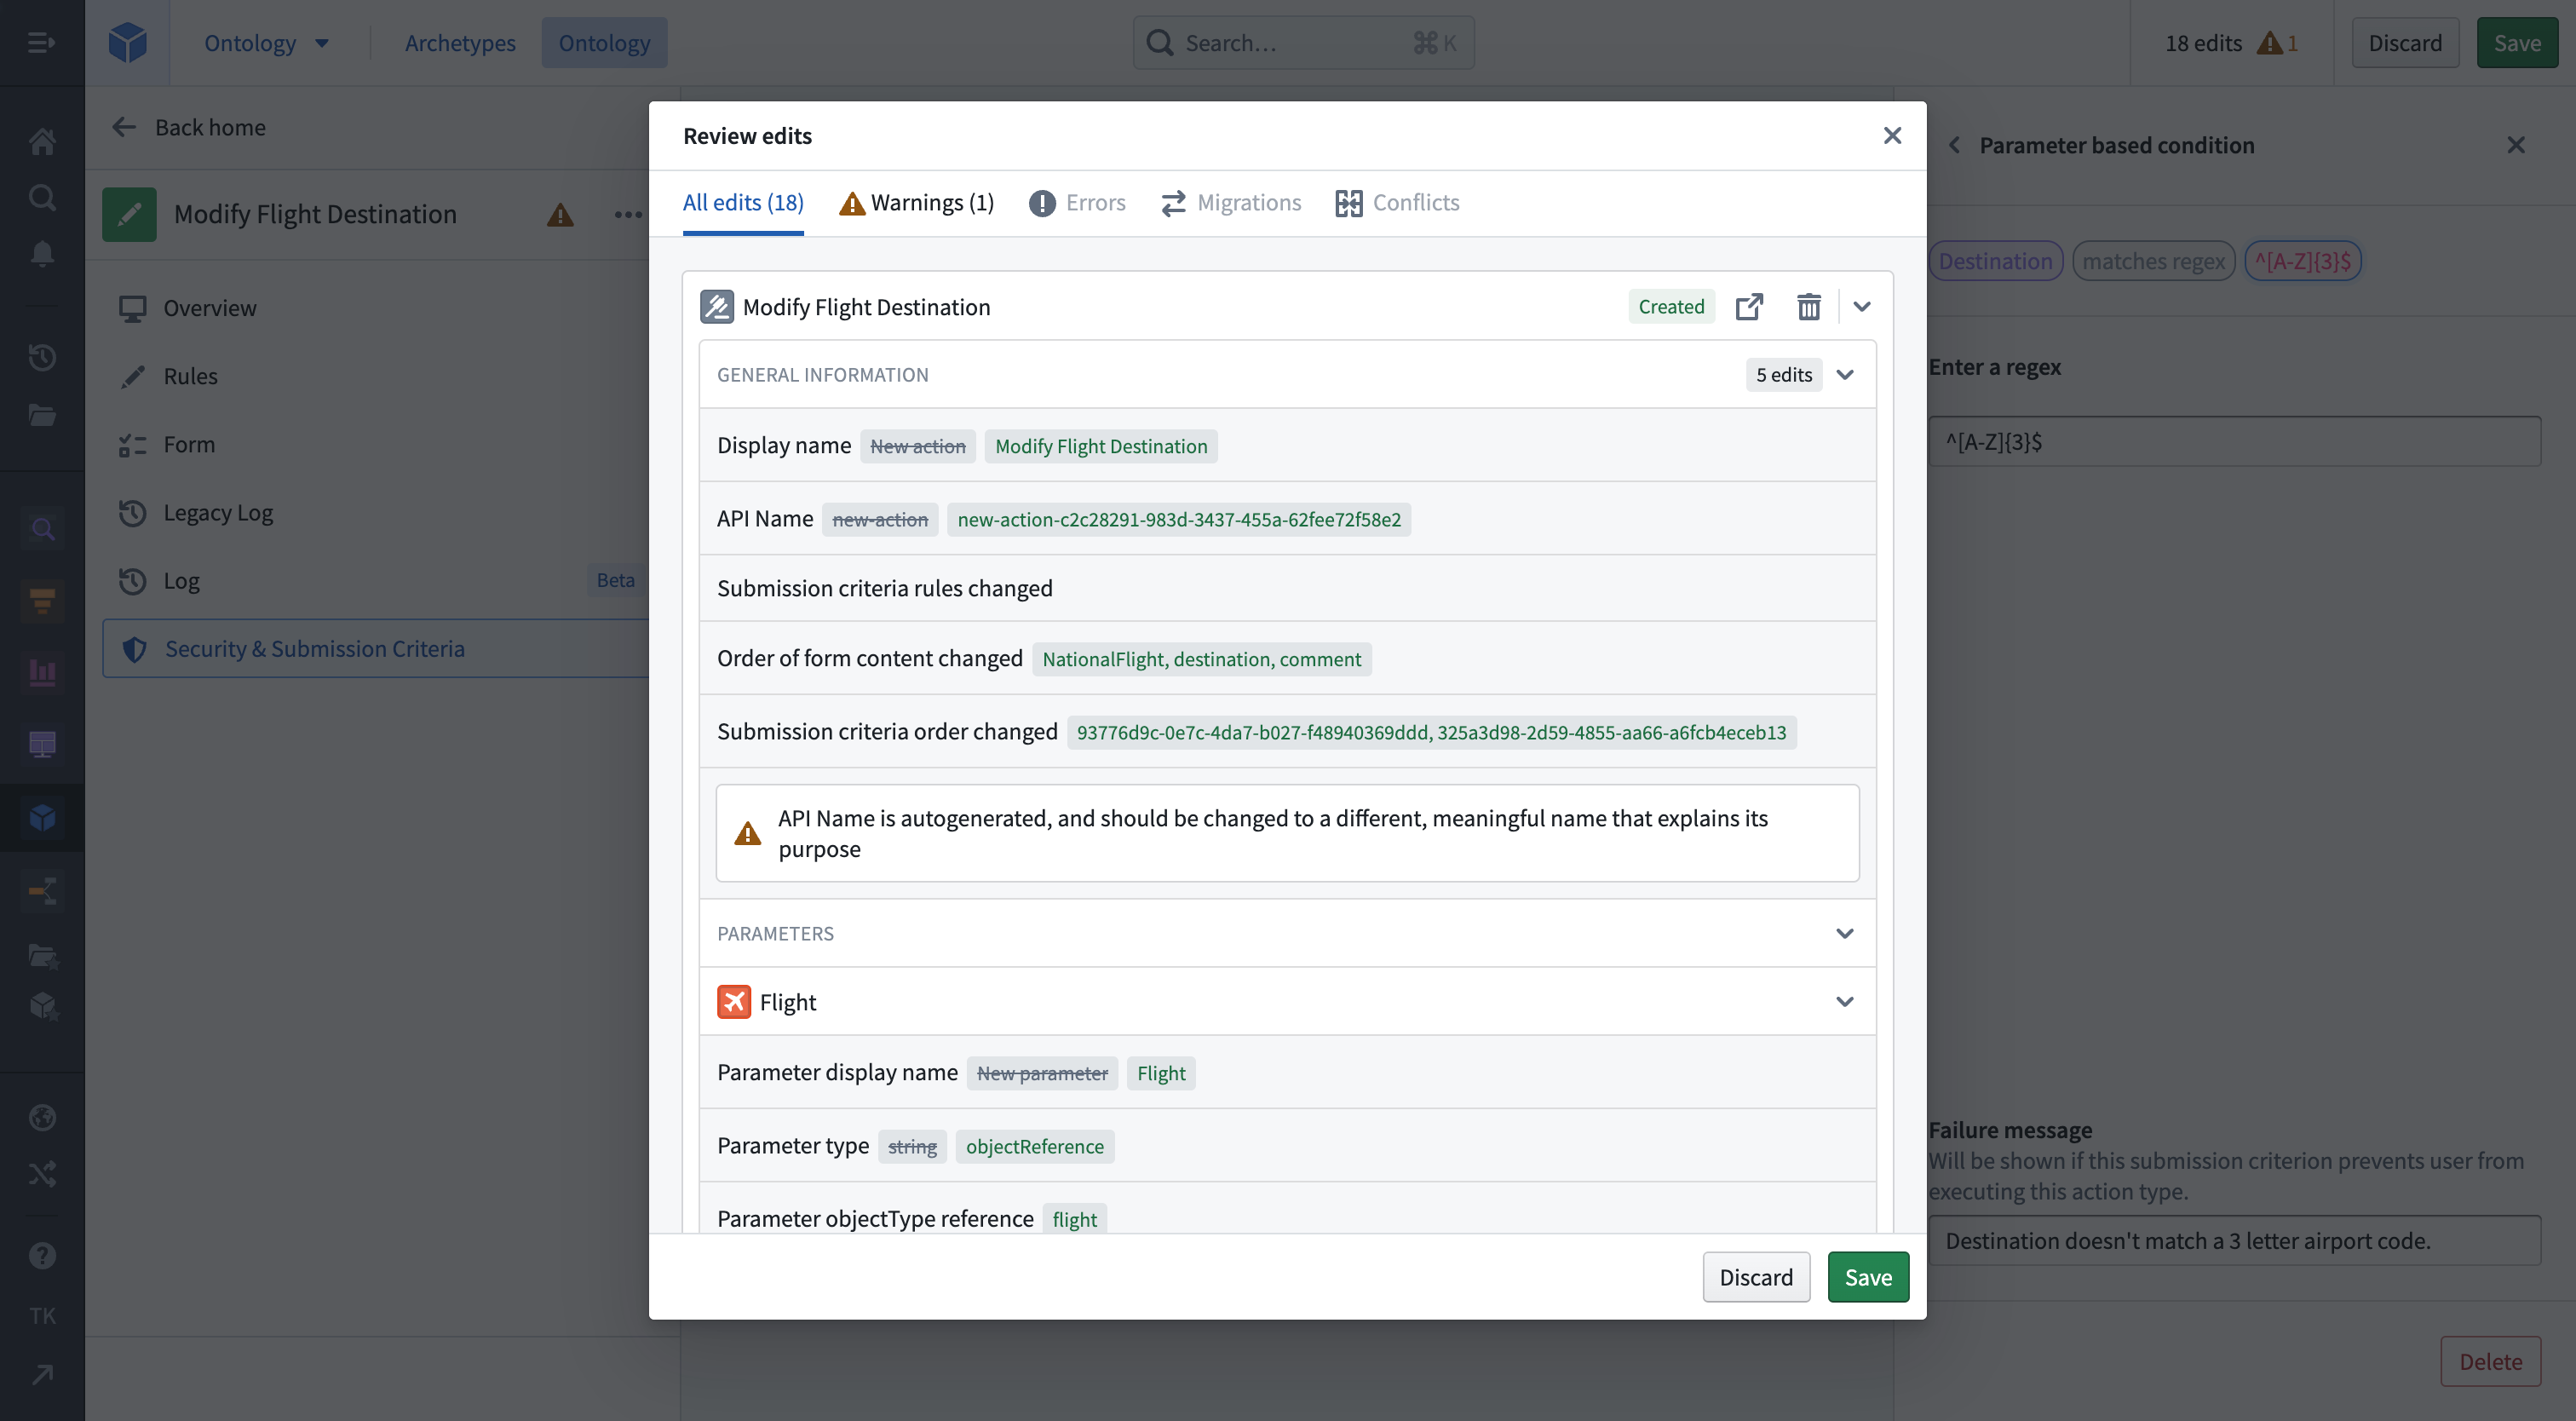
Actions administrators can create, configure, and edit action types in the Ontology manager. To access, select Ontology manager from the Apps sidebar. The Action types tab (seen in the screenshot below) provides a list of existing action types, which can be selected to be viewed and edited. The New action type button allows you to define a new action type from scratch. Alternatively, you can also create action types right from the object type which it should be based on. Navigate to the object type and select Create new in the action types box.
:::callout{theme="neutral"} Note that this example is illustrative and you may not be able to complete every step as written. Since your Foundry Ontology is customized to your needs and data, you may not have access to the ontology objects required to complete the tutorial. :::
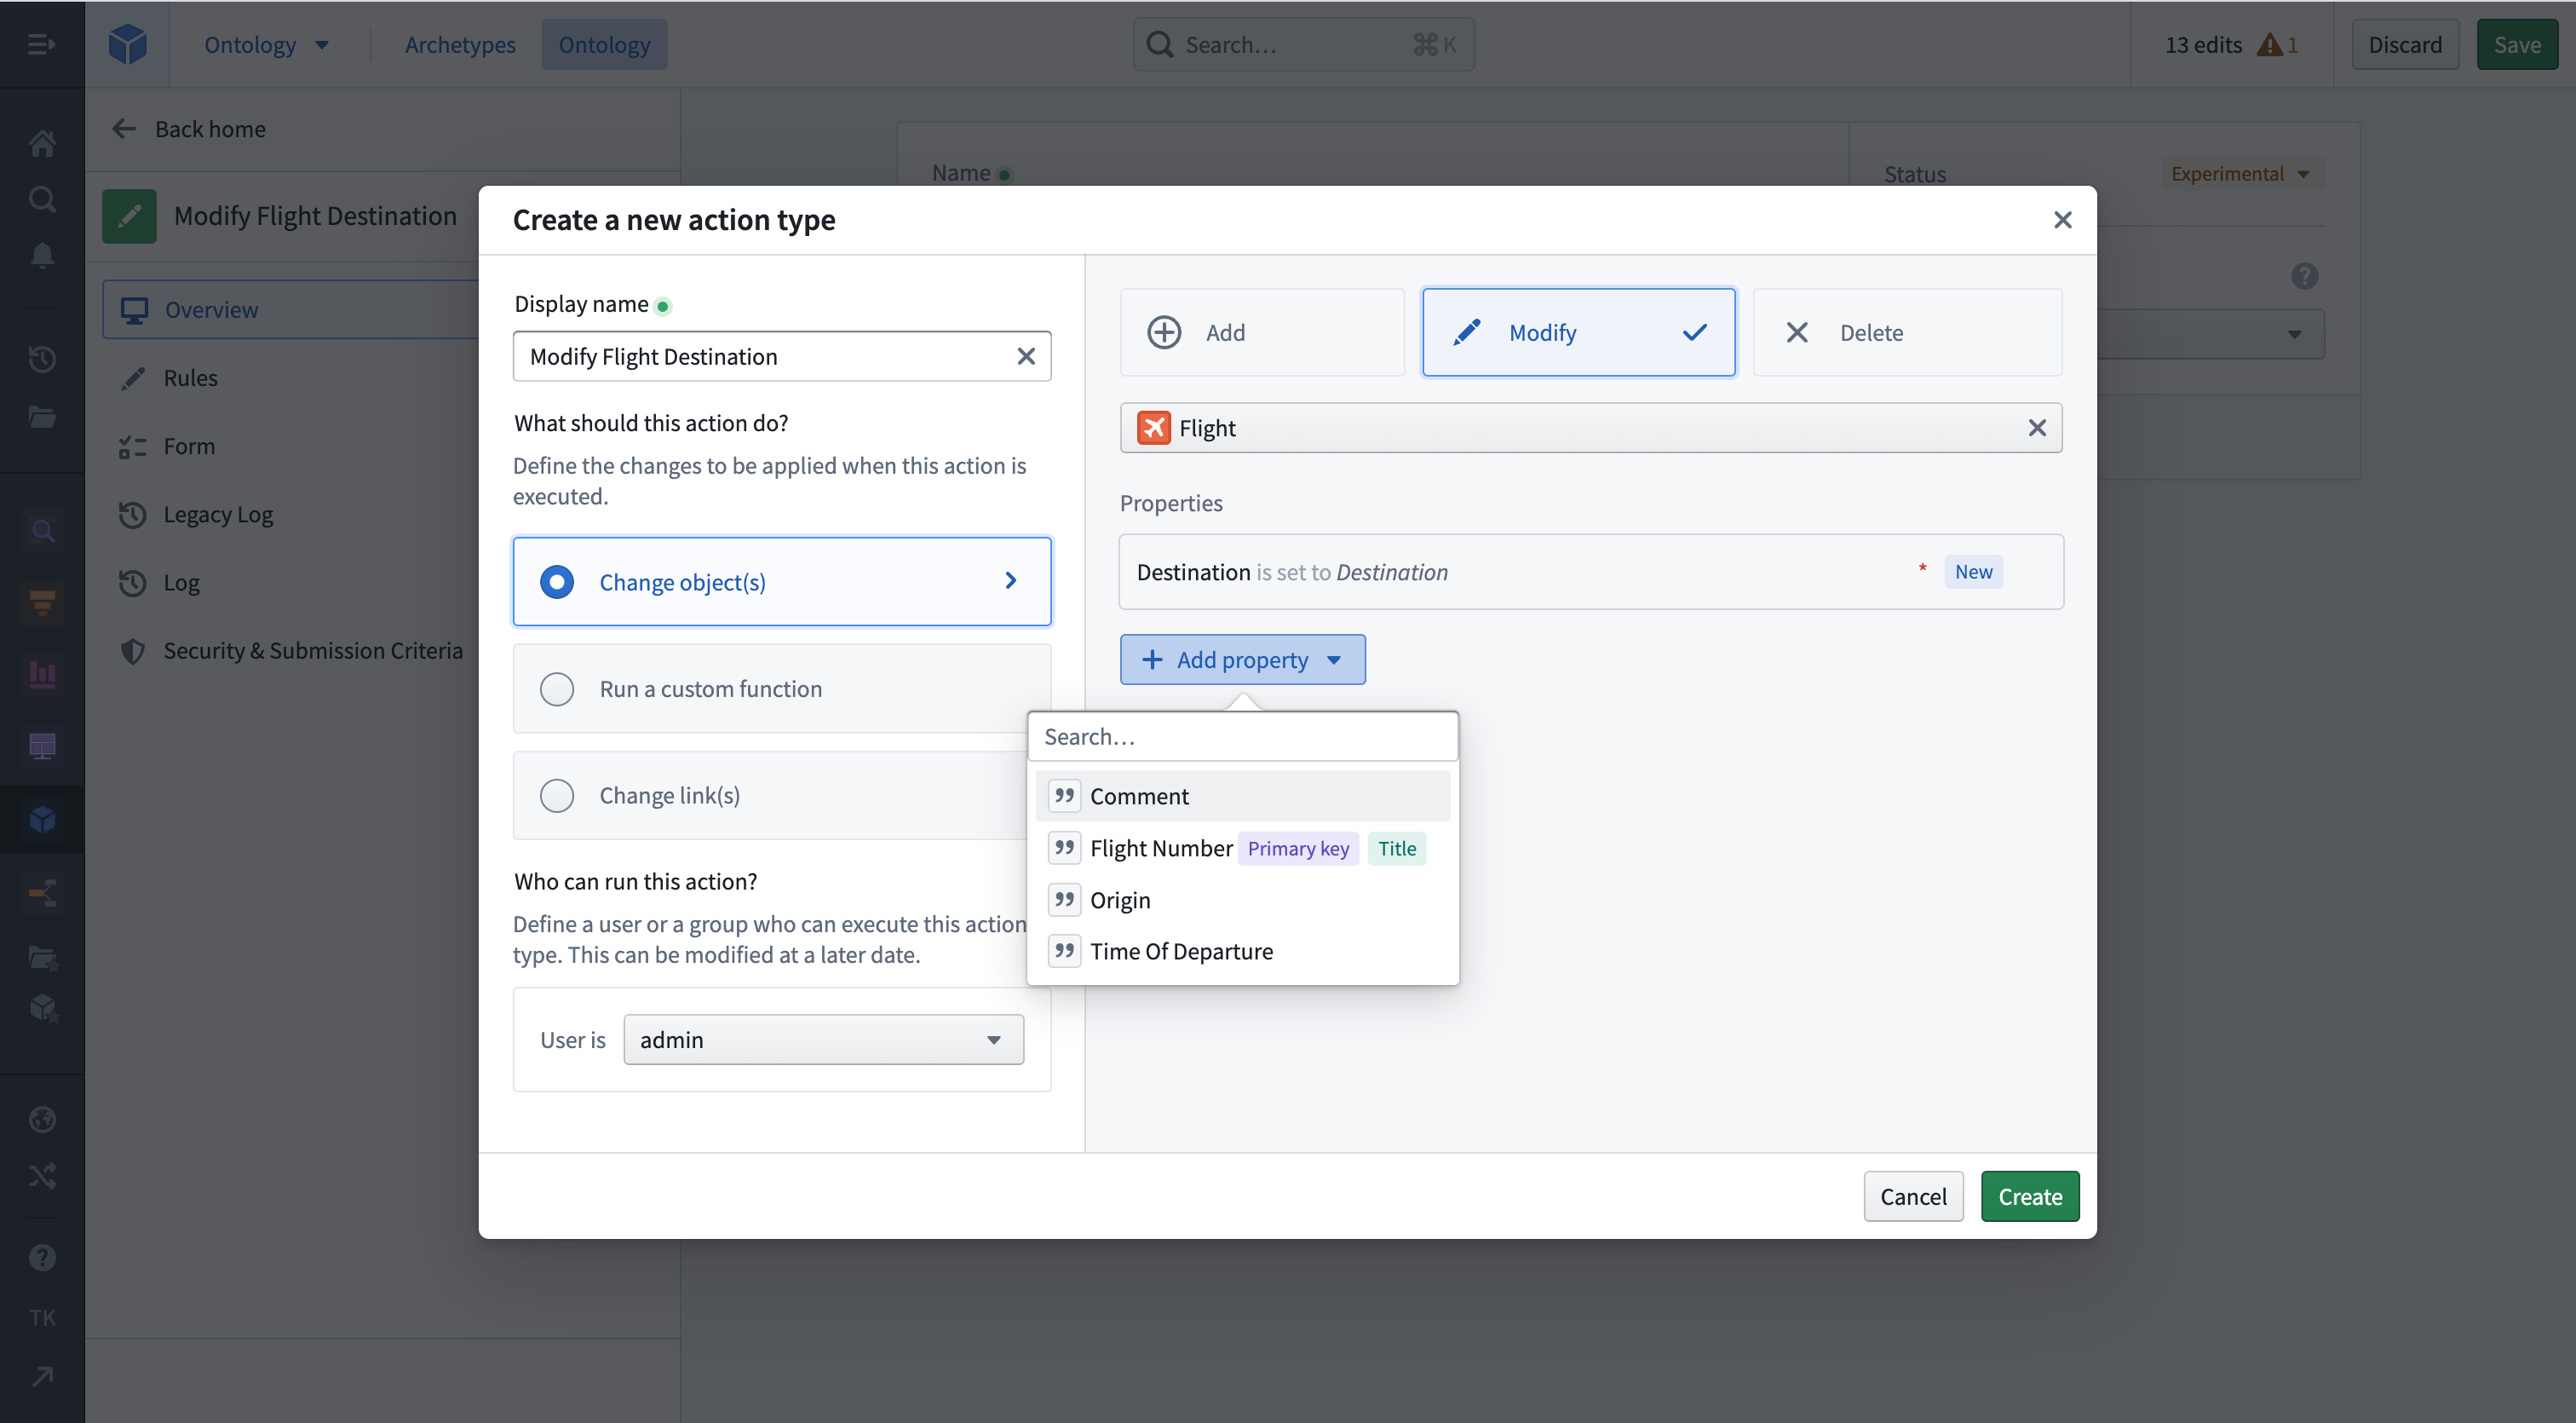
Select the Create new button on the object type to begin. In this example, we’ll be defining a “Modify Flight Destination” action that will allow users to modify the Destination property on an existing Flight object.
The creation wizard walks you through the most important steps to bootstrap your new action type. Enter a Display name and select Modify under the Change object(s) option to configure your action type. From the object dropdown, select your previously created Flight object and then select the Comment and Destination properties which this action type should modify.
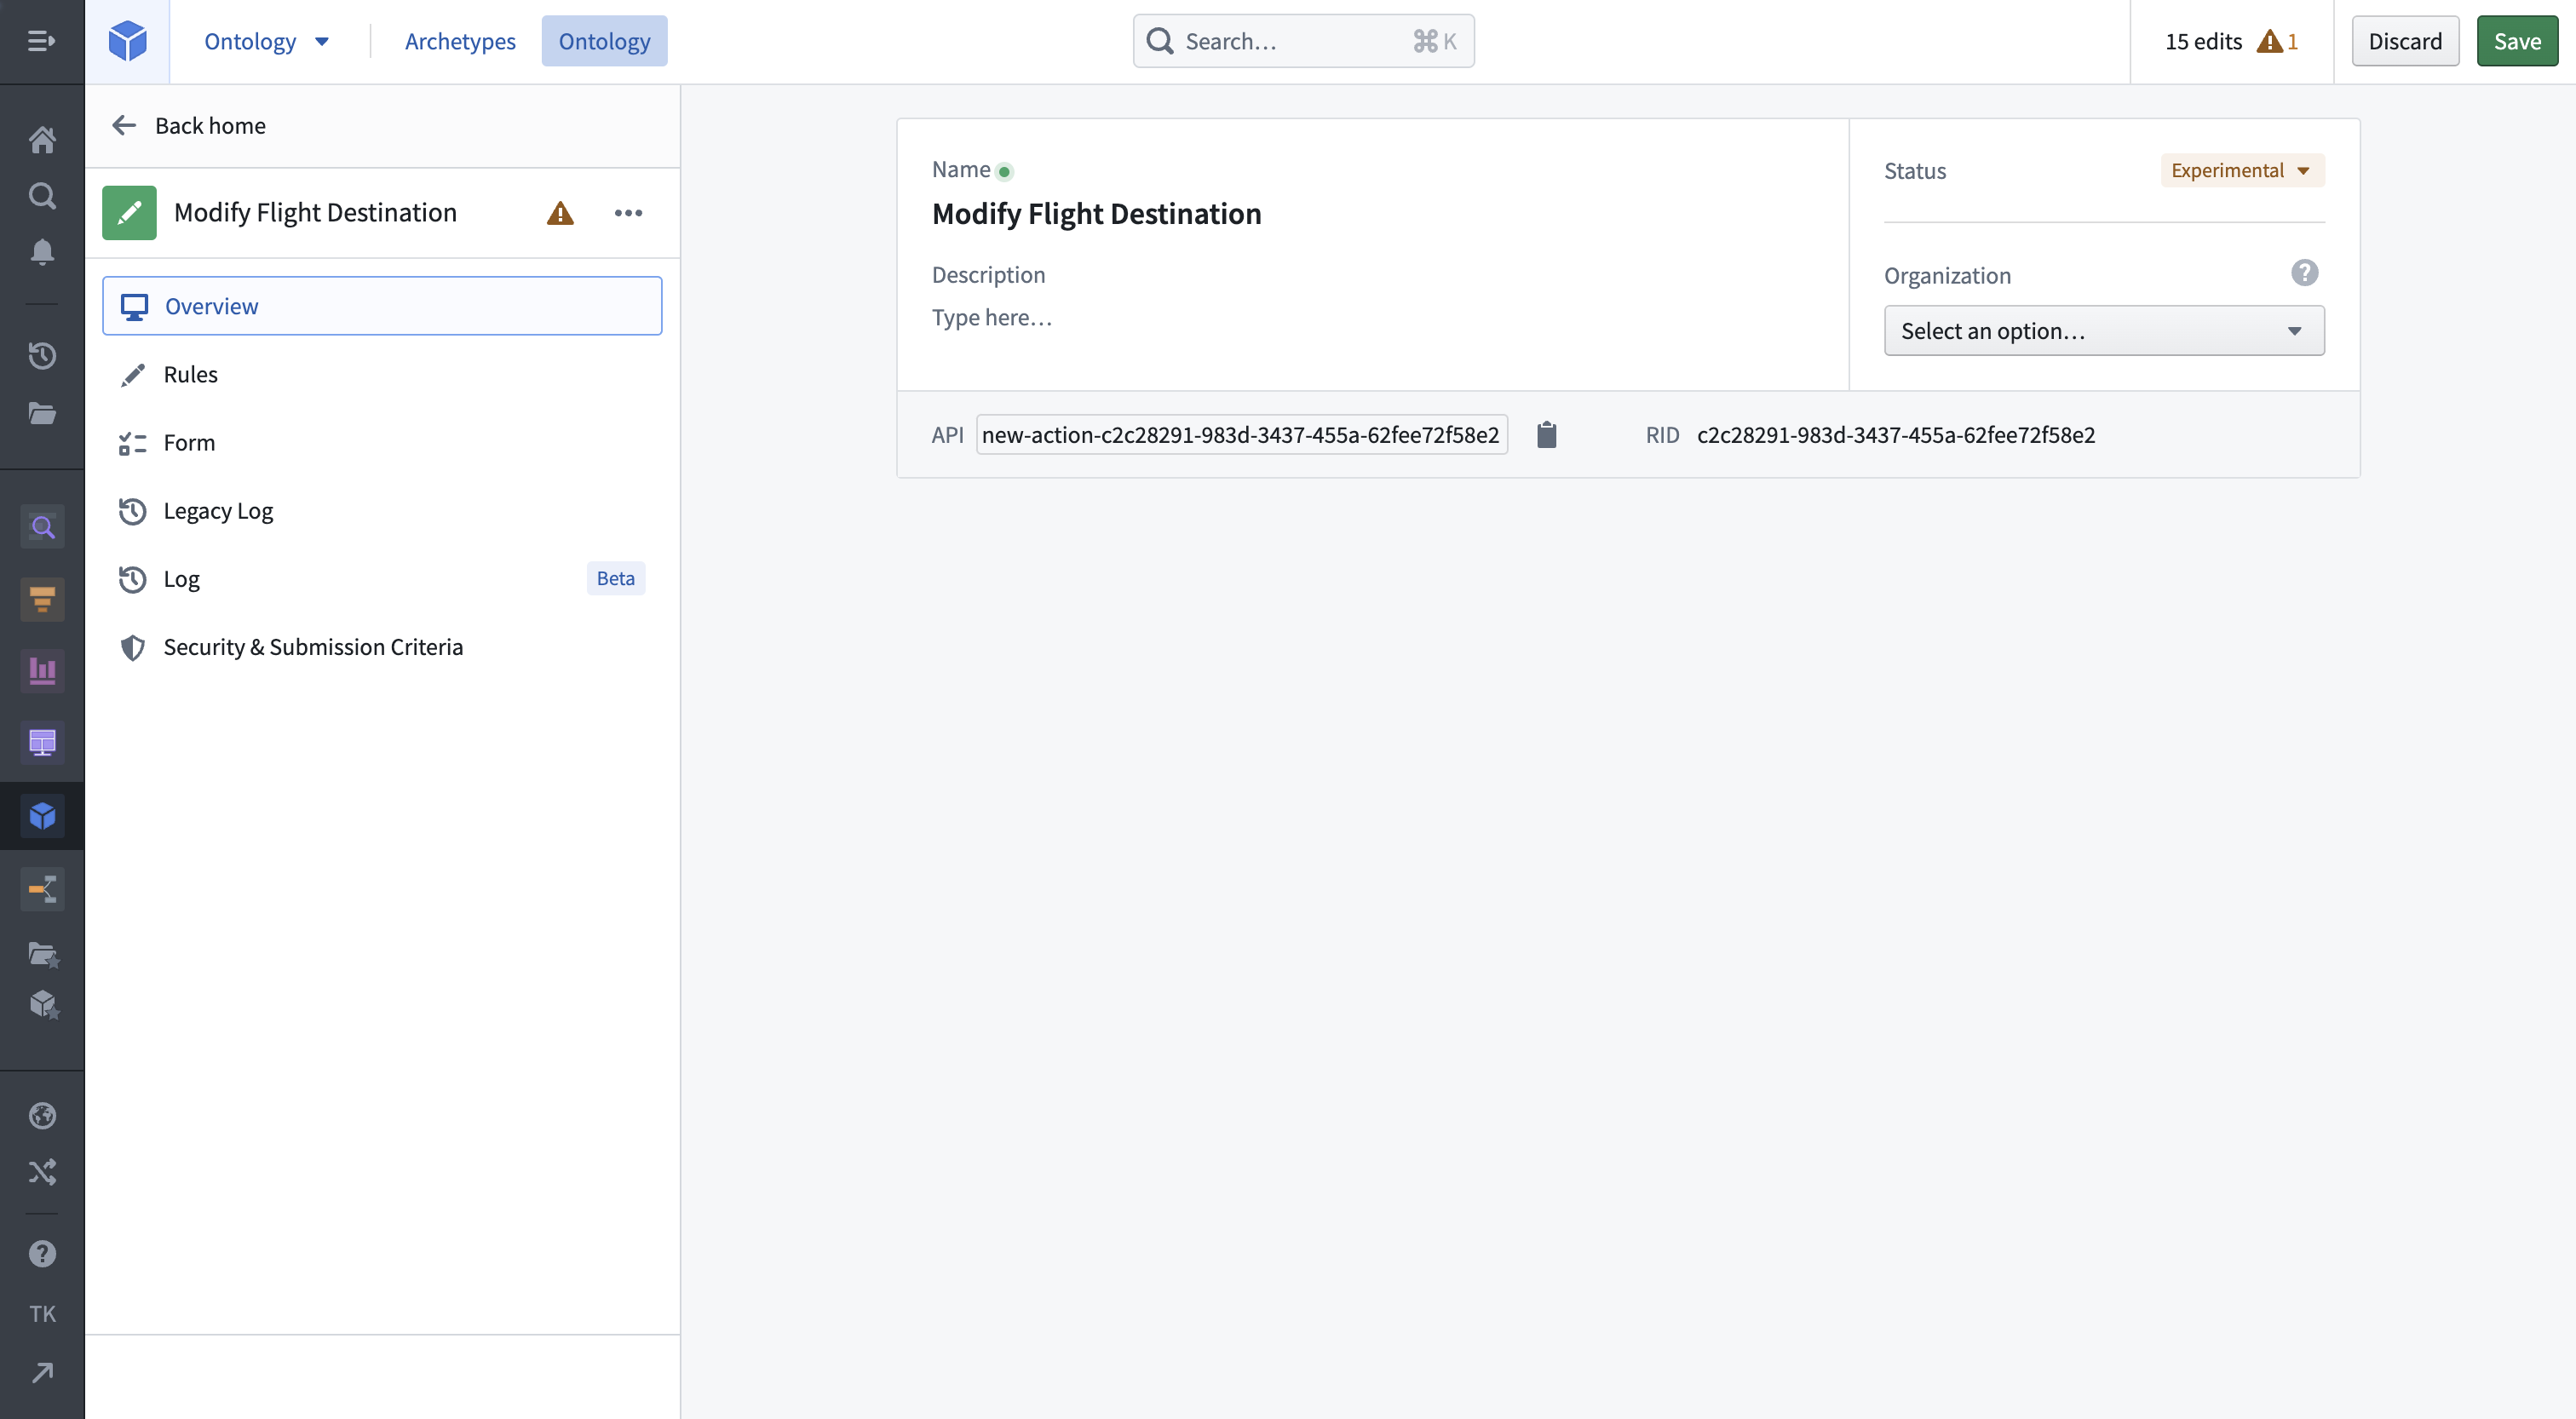
The first tab of an action type definition is called Overview and allows you to define the API Name (a unique ID), the user-facing Display Name, the user-facing Description, and Status of the action. Some of these fields will already be filled based on the previous step. Fill the missing fields with values such as those seen below. The API name cannot be edited after saving, so it is important to take care when choosing an API name.
Next, select the Rules tab of this action type definition. This is where you’ll configure the core of your action type: its Rules or outputs / execution. After selecting the object type and the kind of changes you want this action type to perform, you can see the Rule configured as a modification rule as well as the added properties. You can add additional properties from the dropdown if needed.
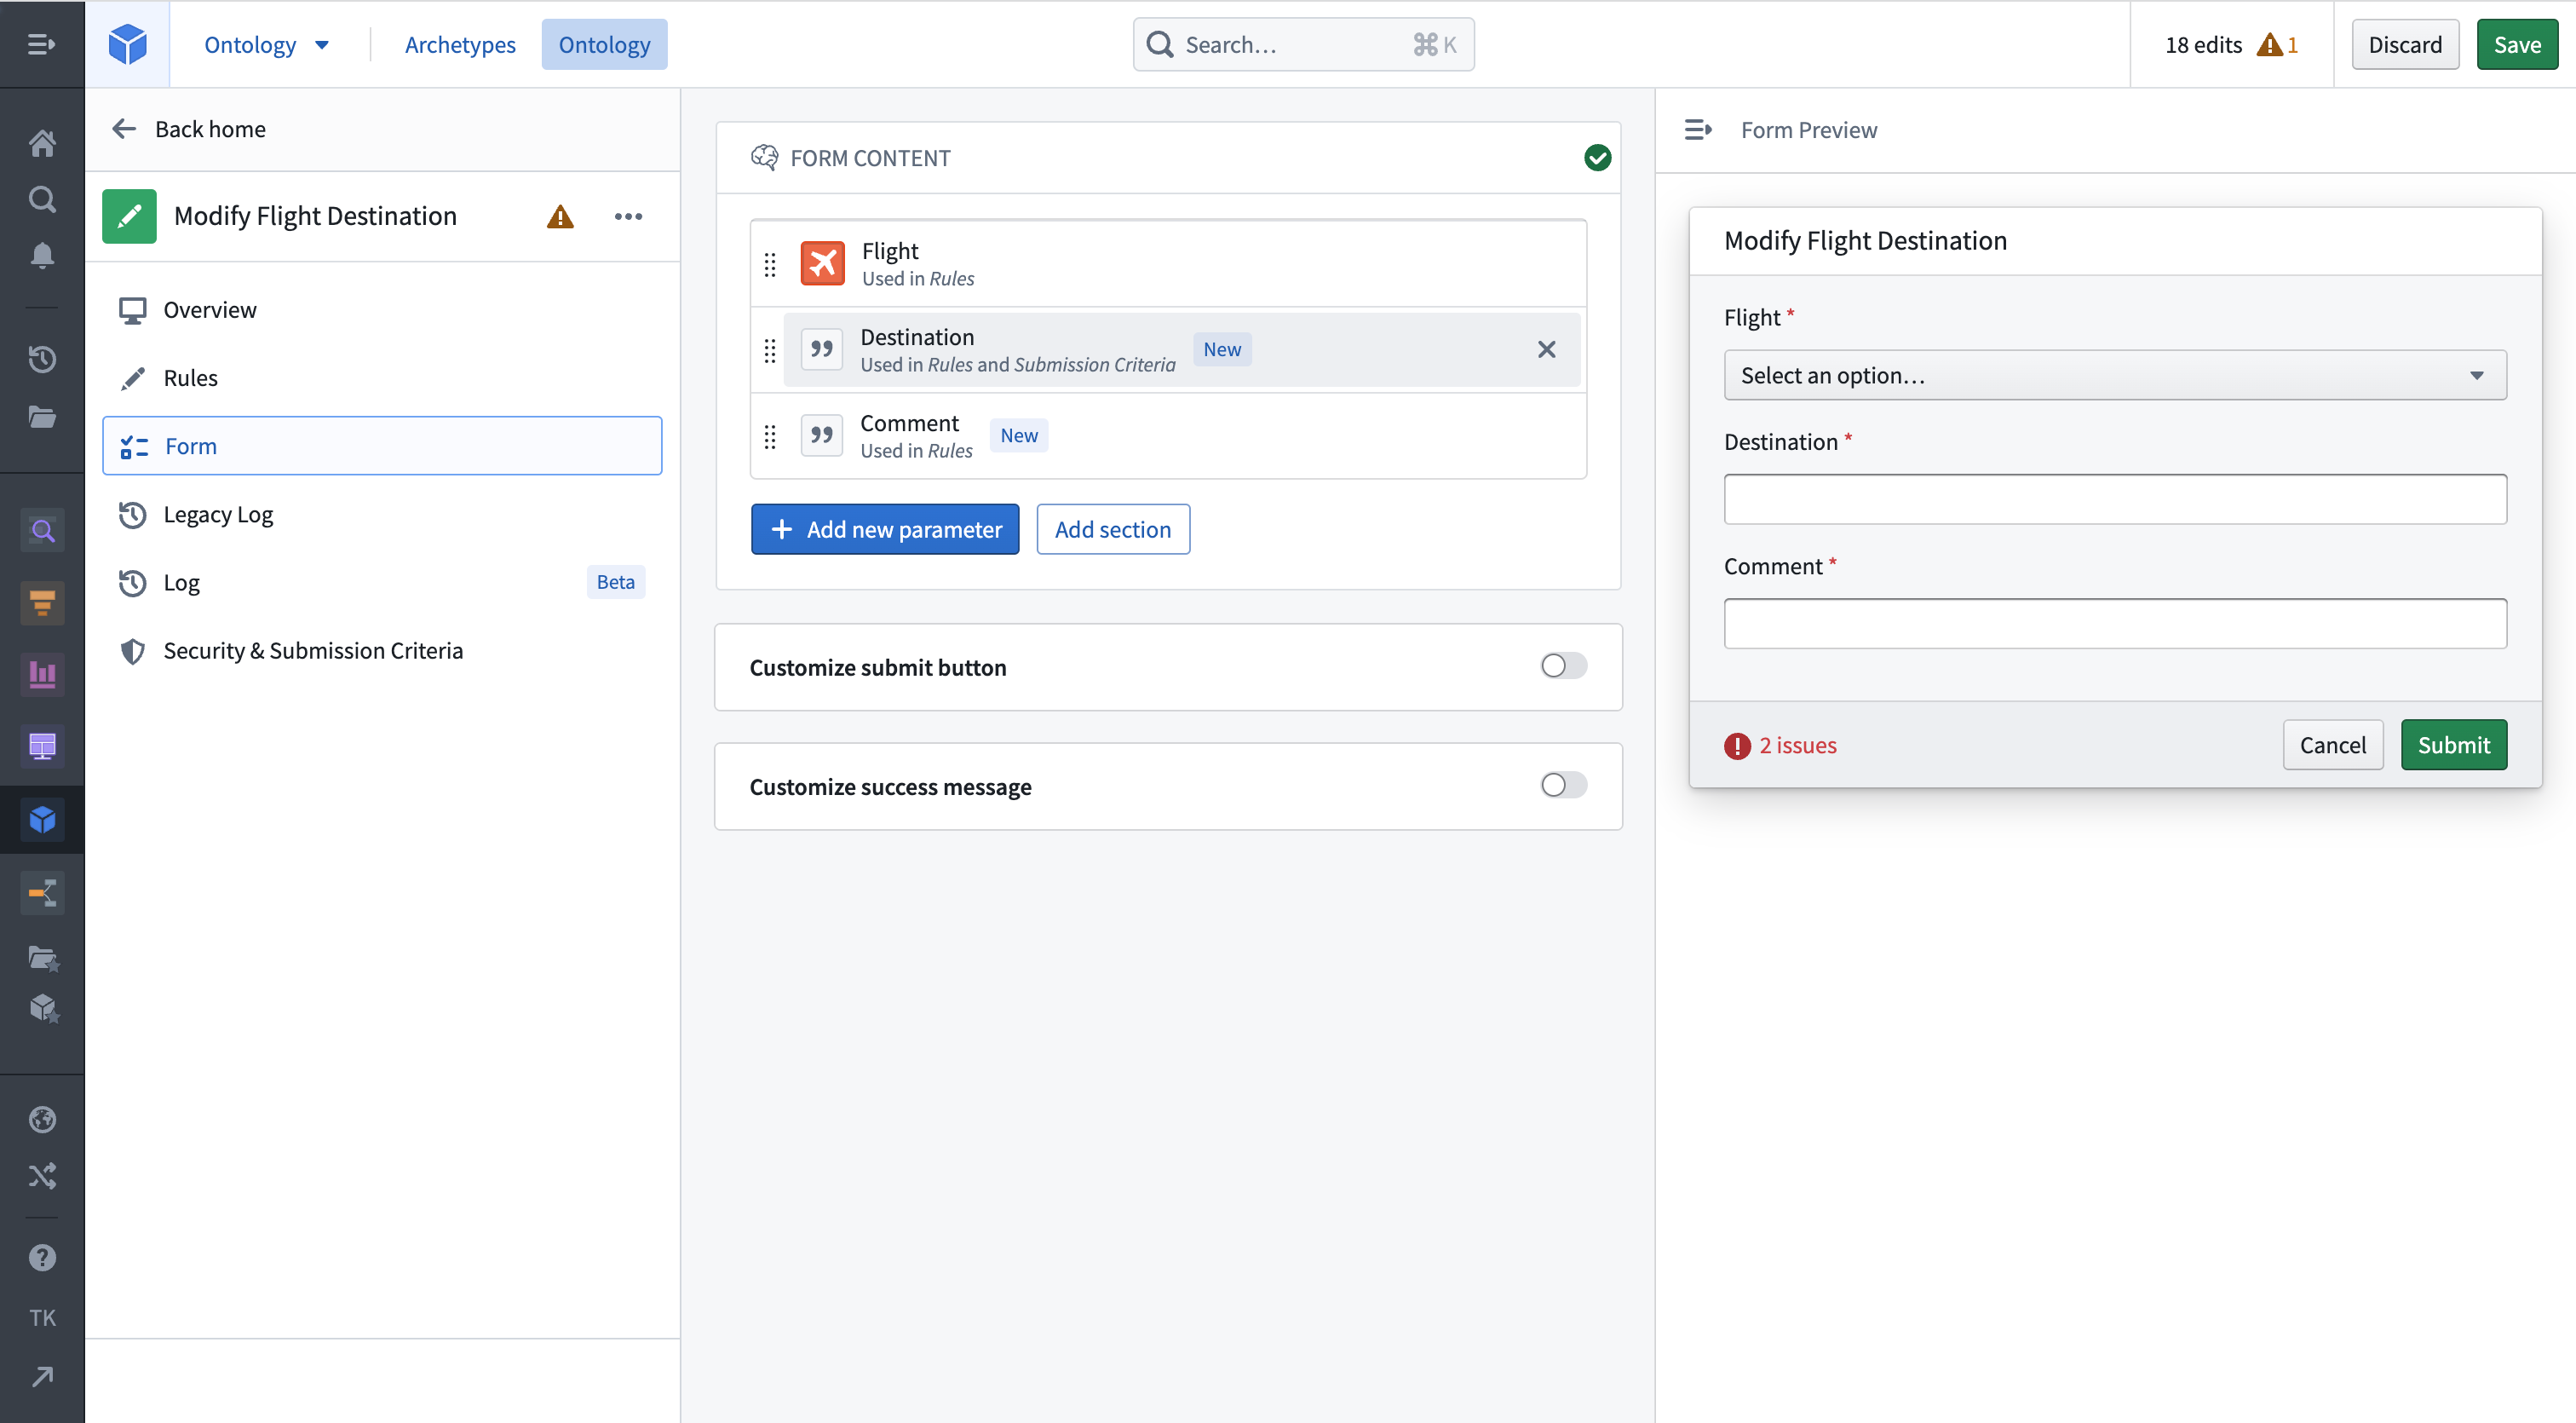
The Form tab lists the Parameters or inputs of your action type. The parameters have already been added automatically by the Rules section.
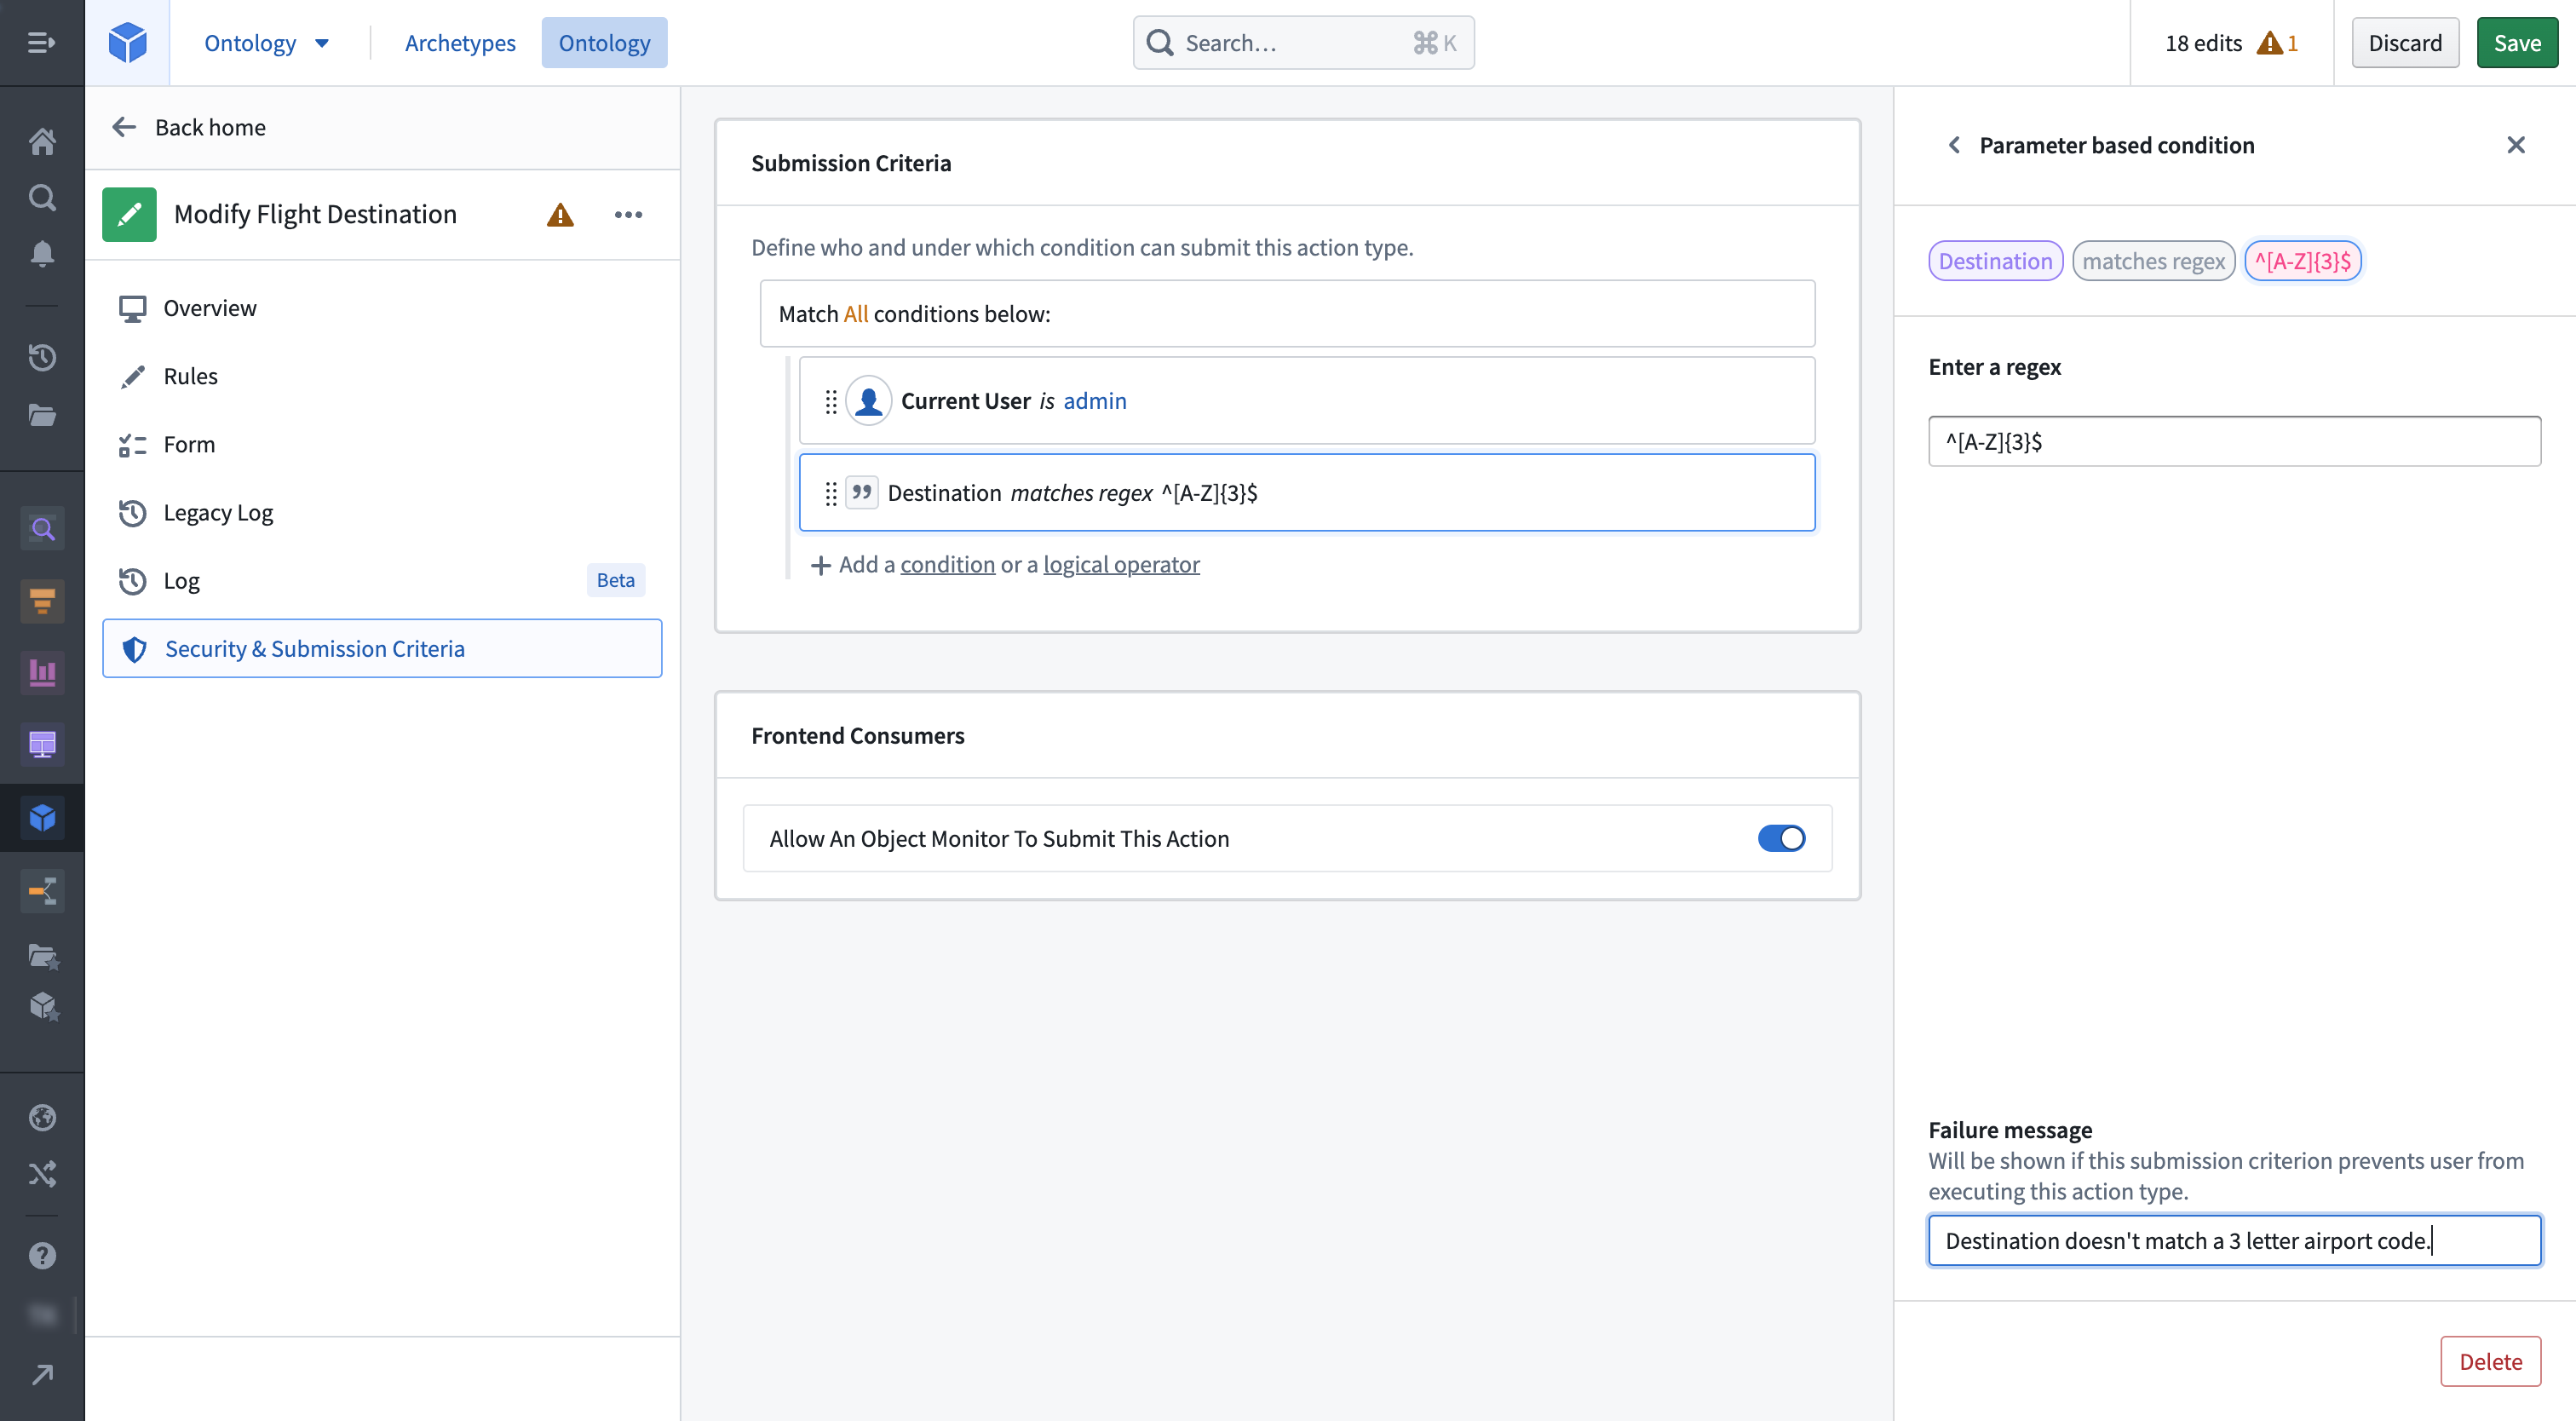
Next, let’s configure some basic Submission Criteria for our action type. In this example, we want to confirm that the user has entered a valid three-character airport code (like EWR) for their modified destination. Navigate to the Security & Submission Criteria tab and select Add a condition in the Submission Criteria section. Use the Parameter condition template in this example to compare the Destination property with a regular expression like ^[A-Z]{3}$; this lets us confirm that the value entered for our destination parameter is exactly three characters. To give the user more information about why a submission is potentially failing on a condition, add an error message at the bottom of the sidebar.
To test the new action type, navigate back to the Form tab and use the preview of the form on the right side of your screen to test your action type. You can enter different values and select the Submit button. This only tests whether an action would be submittable and does not actually submit an action.
You have now finished configuring your first action type and need to save it on our Ontology. To do so, select the Save button at the top right of the screen, review the list of modifications that appear in a modal, and then select Save again twice to confirm.
Your first action type is now saved, and we can head to Workshop to build a module that will allow users to execute this action type.
Use an Action within Workshop
:::callout{theme="success" title="Tip"} The below section assumes familiarity with building Workshop modules. See this page for a tutorial covering these topics. :::
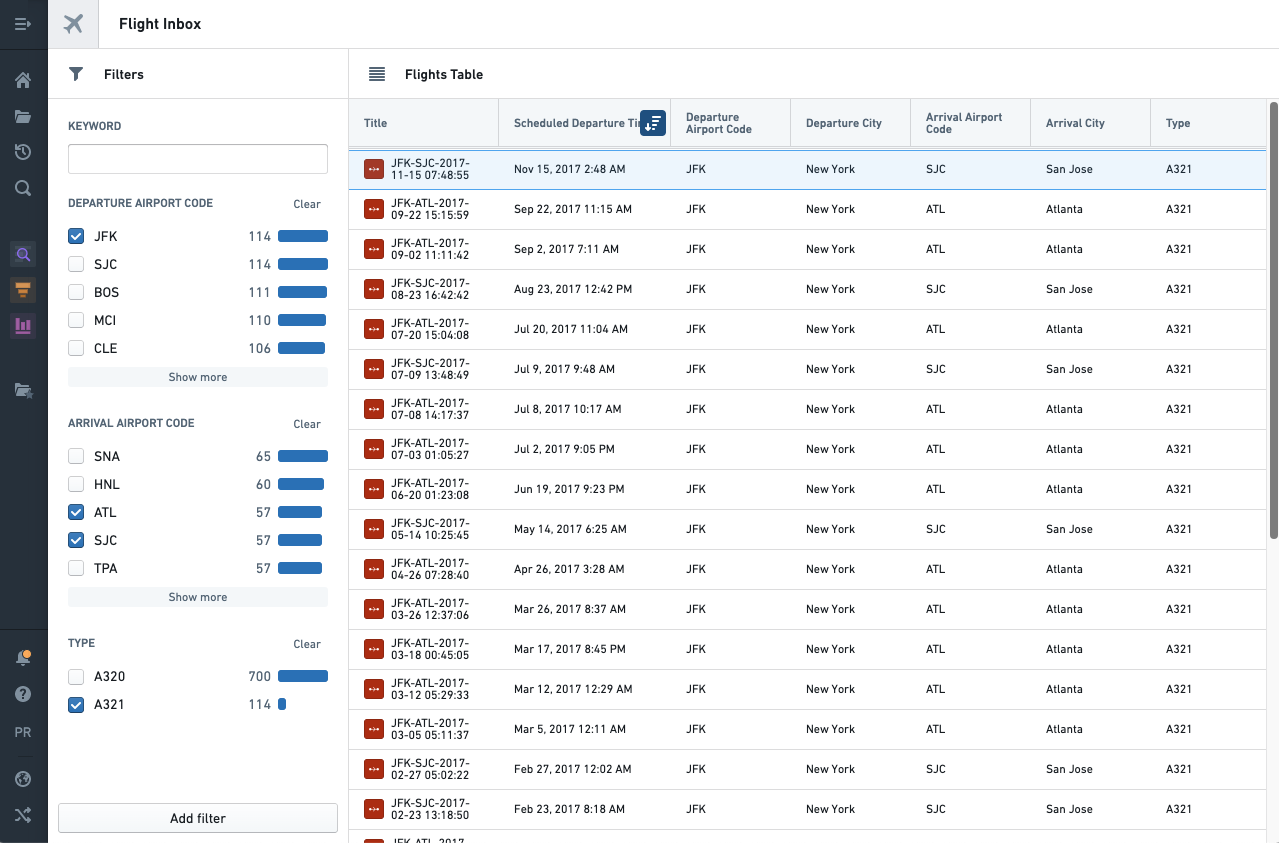
Within Workshop, actions can be exposed to users through a number of different widgets, including Button Groups and the Create Action panel. The example below begins with a Flight Inbox module and describes how to trigger actions via a Button Group from within this Workshop module.
Button Groups
The Button Group widget in Workshop allows a module builder to add one or more buttons to their module. For this example, we focus on how Button Groups can be used to expose an action in Workshop.
Configuring an action in a Button Group
After a Button Group is added to your Workshop module, single-clicking on the Button Group within your on-screen module will open the widget's configuration panel in the right-hand side of your screen. The core configuration options can be found in the Widget setup tab and are divided into three sections — Layout, Style, and Buttons. The Layout and Style sections control advanced display options, but this example focuses on the Buttons section, where a module builder can configure basic display options and determine how actions are applied when a button is selected.
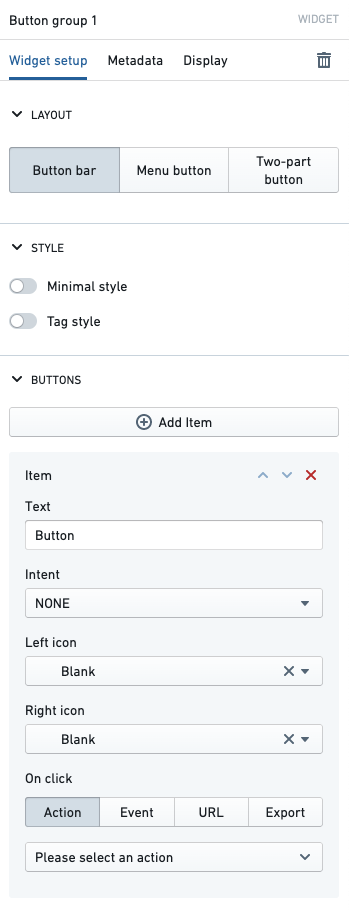
Within the Buttons section of the above, you can adjust the Text, Color, Left icon, and Right icon options to control the display of the button. As an example, let's configure these four options for the "Modify Destination" action we intend to trigger from the button.
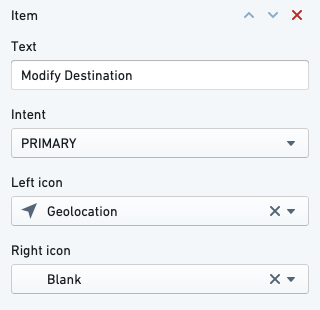
This above configuration will produce a button that looks like the below. Accurately labeling a button with appropriate text, color, and an icon will help users understand what will happen when they select it. You can choose a preset color (primary, success, warning, danger) or specify a custom color, including via a hex code.

Now that our button is labelled, we proceed to the On click section to connect our intended action. To do so, select the Select an action... dropdown and then filter to and select the "Modify Destination" action. Doing so will cause the below to appear, which contains all three of the action parameters that we defined when creating the "Modify Destination" action above.
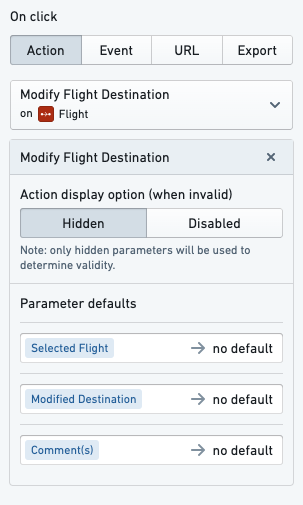
The Parameter defaults allows the user to optionally set default values for the action parameters. As a reminder, each parameter corresponds to an input in the action type Definition (an object list, object reference, integer, string, and so on). For each parameter the user has two options:
- Set a default value equal to a variable in the Workshop module
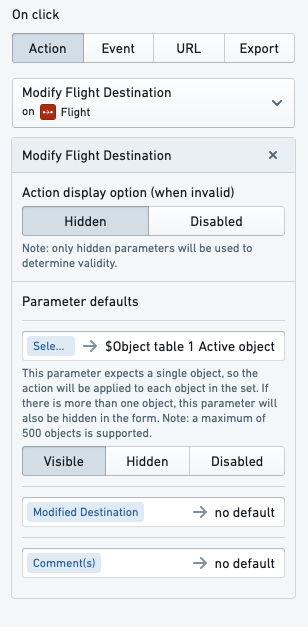
- To do this we can select the Selected Flight parameter's "no default" value and set this instead to be the "Active object" variable output by our object table of flights. Once this is set, additional options will appear to set the parameter to be Visible (default value can be further modified by a user in the actions form), Hidden (the parameter is entirely hidden from the user in the actions form), or Disabled (parameter appears as read-only to the user in the actions form). In this example, let's keep the default option of Visible.
- Leave no default
- Parameters with no default will initially appear as empty fields in the actions form, and the values will be input by the user.
- In this example, we leave Modified Destination and Comment(s) fields without defaults.
Applying an action from a Button Group
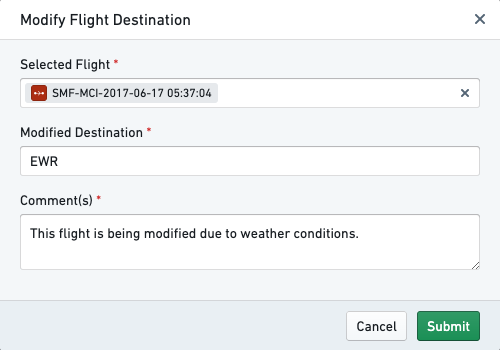
After configuring the action in the Button Group, when a user selects the Modify Destination button in the Workshop module they will see an actions form appear. The default values of a field are based on the above configuration; the Selected Flight field is auto-populated based on the module variable, while the Modified Destination and Comment fields are left empty for user input.
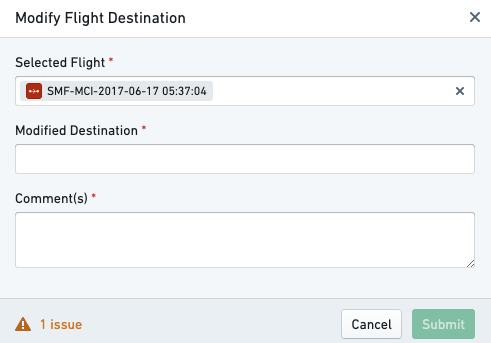
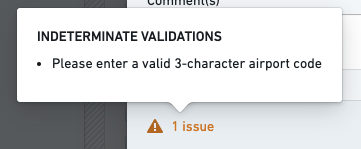
In the form above, 1 issue is flagged at the bottom left of the actions form. By hovering over the 1 issue text, the user can see that the issue is that the Modified Destination field is not currently a valid three-character airport code.
When the actions form is filled out and all parameters pass validation, the action can be submitted (the submit button will be available).
After selecting submit, a user will see a green toast appear on top of the module, indicating that the action was successfully completed and the selected Flight object was updated to reflect the changes entered.

Trigger actions from the Media Uploader widget
Actions can also be triggered when users upload files via the Media Uploader widget. This is useful for workflows that depend on newly uploaded media, such as processing, enrichment, or linking workflows.
When configuring the Media Uploader to trigger an action on upload, you can reference the uploaded file in the action's parameter configuration using the special file identifier value:
- For uploads to datasets, the file identifier is the uploaded filename.
- For uploads to Compass folders, the file identifier is the uploaded file's RID.
- For uploads to media sets, the file identifier is the uploaded file's media reference.
If multi-file upload is enabled, the configured action triggers once for each uploaded file, with the file identifier corresponding to the specific file being processed.
For setup details including button configuration, upload destination, allowed file extensions, dynamic destinations, and multi-file options, see the Media Uploader widget documentation.
中文翻译
在Workshop中使用动作(Actions)
Foundry中的动作(Actions)允许用户基于定义好的规则集(称为动作类型(action types))编辑、创建、删除和关联对象数据。例如,一个动作可以支持用户执行以下一项或多项操作:
- 创建新的
Flight对象,填写Flight Number、Time of Departure、Origin和Destination属性。 - 修改现有
Flight对象的Destination属性。 - 将指定
Flight对象与指定Passenger对象建立关联。 - 删除误创建的
Flight对象。
通过为复杂的对象数据编辑封装出用户友好的操作层,动作(Actions)让应用构建者可以使用有实际业务意义且安全的构建块,实现用户对对象数据的回写。这些构建块可用于以下场景:
- 在多个应用(例如Workshop或对象视图(Object Views))中使用,支撑业务流程工作流。
- 系统会基于动作定义自动生成表单(Form)组件,因此对象数据回写逻辑和对应的用户界面无需分别定义。Workshop与动作(Actions)的核心交互如下文详述。
- 可进行细粒度的权限控制,为不同用户和场景配置不同的回写权限。
- 例如,分析师可能有权限发起新的调查,但关闭调查的权限可能仅对经理用户组(manager user group)的成员开放。
在本体管理器(Ontology Manager)中定义动作(Actions)
:::callout
要创建、配置或编辑动作,Palantir Foundry用户必须属于actions-admins用户组。
:::
:::callout 如需了解定义动作的完整说明,请参阅动作文档。下文仅提供动作配置的简要示例,重点讲解如何在Workshop中使用动作。 :::
动作管理员可以在本体管理器(Ontology Manager)中创建、配置和编辑动作类型。要访问本体管理器,请从应用侧边栏选择Ontology manager。Action types标签页(如下图截图所示)会列出所有现有动作类型,点击即可查看和编辑。点击New action type按钮即可从零开始定义新的动作类型。你也可以直接基于对应的对象类型创建动作类型:导航到目标对象类型页面,在动作类型板块选择Create new即可。
:::callout{theme="neutral"} 请注意本示例仅作演示,你可能无法按步骤完全复现。由于你的Foundry本体(Ontology)是根据你的需求和数据自定义的,你可能没有访问本教程所需的本体对象的权限。 :::
点击对象类型页面的Create new按钮开始创建。在本示例中,我们将定义一个“修改航班目的地”动作,允许用户修改现有Flight对象的Destination属性。
创建向导会引导你完成新动作类型启动的核心步骤。输入Display name,在Change object(s)选项下选择Modify来配置动作类型。在对象下拉菜单中,选择你之前创建的Flight对象,然后选择该动作类型需要修改的Comment和Destination属性。
动作类型定义的第一个标签页名为Overview,你可以在这里定义动作的API名称(API Name)(唯一ID)、面向用户的Display Name、面向用户的Description和Status。部分字段会根据上一步的操作自动填充。请参考下方示例填充缺失字段。注意API名称保存后无法编辑,因此选择API名称时请务必谨慎。
接下来,选择该动作类型定义的规则(Rules)标签页。这里是配置动作类型核心逻辑的地方:你可以设置动作的规则(Rules)即输出/执行逻辑。选择对象类型和你希望该动作类型执行的变更类型后,你可以看到已配置的修改规则以及添加的属性。如果需要,你可以从下拉菜单中添加更多属性。
表单(Form)标签页列出了动作类型的参数(Parameters)即输入项。这些参数已经由规则(Rules)板块自动添加完成。
接下来,我们为动作类型配置一些基础的提交条件(Submission Criteria)。在本示例中,我们需要确认用户为修改后的目的地输入了有效的3字符机场代码(例如EWR)。导航到Security & Submission Criteria标签页,在Submission Criteria板块选择Add a condition。本示例使用Parameter条件模板,将Destination属性与^[A-Z]{3}$正则表达式进行匹配,以此确认目的地参数的输入值恰好是3个大写英文字符。为了让用户清晰了解提交失败的原因,请在侧边栏底部添加错误提示信息。
要测试新的动作类型,导航回Form标签页,使用屏幕右侧的表单预览测试动作类型。你可以输入不同的值,点击Submit按钮。该操作仅测试动作是否可提交,不会真正提交动作。
现在你已经完成了第一个动作类型的配置,需要将其保存到本体(Ontology)中。点击屏幕右上角的Save按钮,查看弹窗中显示的修改列表,然后再点击两次Save确认操作。
你的第一个动作类型已经保存完成,接下来我们可以前往Workshop构建一个模块,让用户可以执行该动作类型。
在Workshop中使用动作(Actions)
:::callout{theme="success" title="提示"} 下文假设你已经掌握了构建Workshop模块的基础知识。你可以参阅此页面的教程了解相关内容。 :::
在Workshop中,你可以通过多种不同的组件将动作开放给用户,包括按钮组(Button Groups)和创建动作面板(Create Action panel)。以下示例从航班收件箱(Flight Inbox)模块开始,讲解如何在该Workshop模块中通过按钮组触发动作。
按钮组(Button Groups)
Workshop中的按钮组(Button Group)组件允许模块构建者向模块中添加一个或多个按钮。在本示例中,我们重点介绍如何使用按钮组在Workshop中开放动作。
在按钮组中配置动作
将按钮组添加到你的Workshop模块后,单击屏幕模块中的按钮组,即可在屏幕右侧打开组件配置面板。核心配置选项位于组件设置(Widget setup)标签页,分为三个板块——Layout、Style和Buttons。Layout和Style板块用于控制高级展示选项,本示例重点介绍Buttons板块,模块构建者可以在这里配置基础展示选项,定义点击按钮时触发的动作逻辑。
在上述的Buttons板块中,你可以调整Text、Color、Left icon和Right icon选项来控制按钮的展示效果。我们以之前创建的要通过按钮触发的“修改目的地”动作为例,配置这四个选项。
上述配置会生成如下所示的按钮。使用合适的文本、颜色和图标为按钮准确标注,可以帮助用户了解点击按钮后的执行效果。你可以选择预设颜色(primary、success、warning、danger),也可以指定自定义颜色,包括使用十六进制颜色码。
按钮标注完成后,我们进入点击事件(On click)板块,绑定我们要触发的动作。点击Select an action...下拉菜单,筛选并选择“修改目的地”动作。选择后会显示如下内容,包含我们之前创建“修改目的地”动作时定义的所有三个动作参数。
参数默认值(Parameter defaults)支持用户为动作参数选择性设置默认值。请注意,每个参数对应动作类型定义中的一个输入项(对象列表、对象引用、整数、字符串等)。每个参数有两种配置选项:
- 将默认值设置为Workshop模块中的一个变量
- 要实现该配置,你可以点击“所选航班”参数的“no default”选项,将其设置为航班对象表输出的“Active object”变量。设置完成后,会出现更多选项,可将参数设置为Visible(用户可以在动作表单中进一步修改默认值,为默认选项)、Hidden(用户在动作表单中完全看不到该参数)或Disabled(用户在动作表单中看到的该参数为只读状态)。本示例中我们保留默认的Visible选项。
- 不设置默认值
- 未设置默认值的参数在动作表单中初始为空字段,需要用户输入值。
- 本示例中,我们不为“修改后的目的地”和“评论”字段设置默认值。
通过按钮组触发动作
在按钮组中完成动作配置后,用户点击Workshop模块中的修改目的地按钮时,会弹出动作表单。字段的默认值基于上述配置生成:Selected Flight字段会根据模块变量自动填充,而Modified Destination和Comment字段为空,等待用户输入。
在上述表单中,动作表单左下角会标记1 issue。将鼠标悬停在1 issue文本上,用户可以看到问题是Modified Destination字段当前不是有效的3字符机场代码。
动作表单填写完成且所有参数通过校验后,即可提交动作(提交按钮会变为可点击状态)。
点击提交后,用户会看到模块顶部弹出绿色提示消息,说明动作已成功执行,所选Flight对象已根据输入的变更完成更新。
通过媒体上传器(Media Uploader)组件触发动作
用户通过媒体上传器(Media Uploader)组件上传文件时也可以触发动作。这适用于依赖新上传媒体的工作流,例如处理、数据丰富或关联工作流。
配置媒体上传器在上传时触发动作时,你可以使用特殊的文件标识符值,在动作的参数配置中引用上传的文件: * 上传到数据集时,文件标识符为上传的文件名。 * 上传到Compass文件夹时,文件标识符为上传文件的资源标识符(RID)。 * 上传到媒体集(media sets)时,文件标识符为上传文件的媒体引用(media reference)。
如果启用了多文件上传,配置的动作会为每个上传的文件触发一次,文件标识符对应当前正在处理的特定文件。