Branching Workshop modules(分支化 Workshop 模块)
Workshop integrates with Global Branching so you can develop modules and their configurations safely and in isolation. This page covers how to work with Workshop modules on branches, including adding resources to a branch, resource protection and approvals, and rebasing and conflict resolution.
For general information on Global Branching concepts and workflows, refer to the Global Branching documentation.
Adding Workshop modules to a branch
To add a Workshop module to a branch, use the branch selector to switch to that branch, open the module, then save any changes. The module is now a resource on the branch.
If your Workshop module contains non-Workshop elements for which Global Branching is not available, such as Quiver dashboards, these elements will not be modifiable on a branch.
Resource protection
When on the main branch, protected Workshop modules show a Save to new branch option instead of Save and publish, requiring all changes to be made on a branch rather than directly to main.
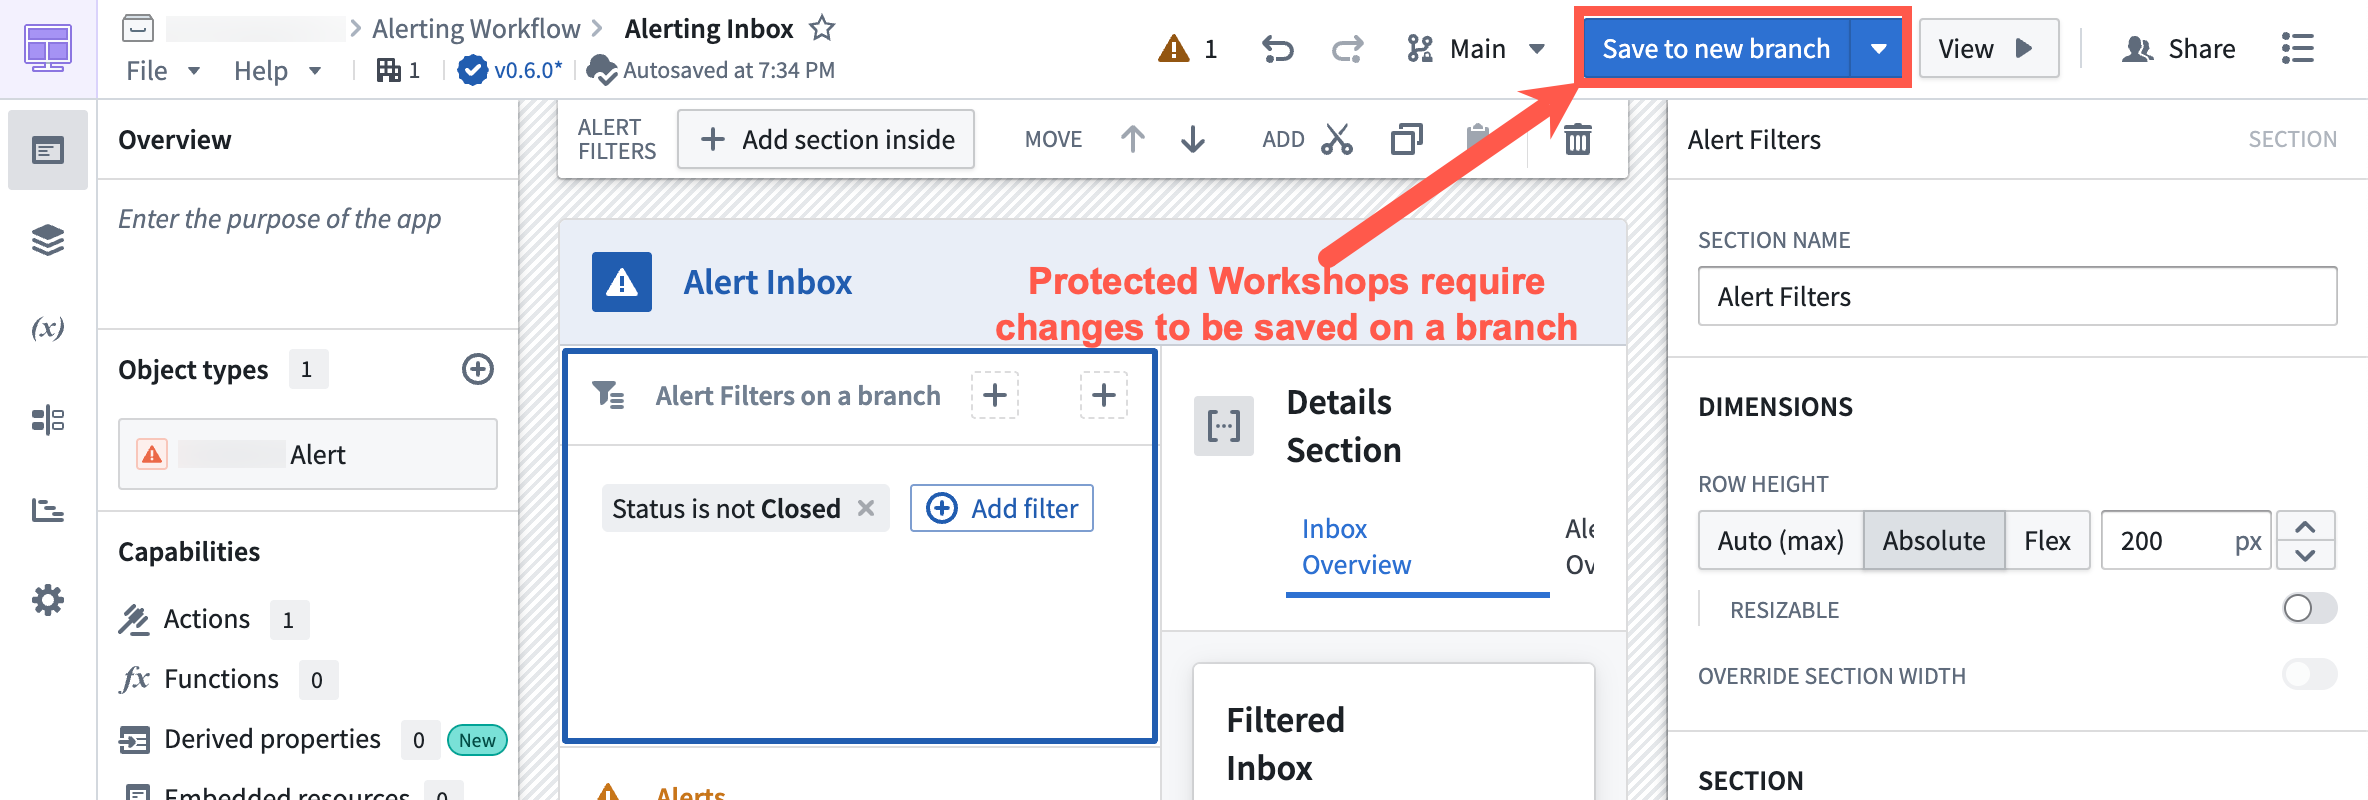
Select Save to new branch to open the new-branch dialog. Name the branch and select an ontology for it.
When you are ready to merge your changes to main, create a proposal.
Merge requirements
Approval process
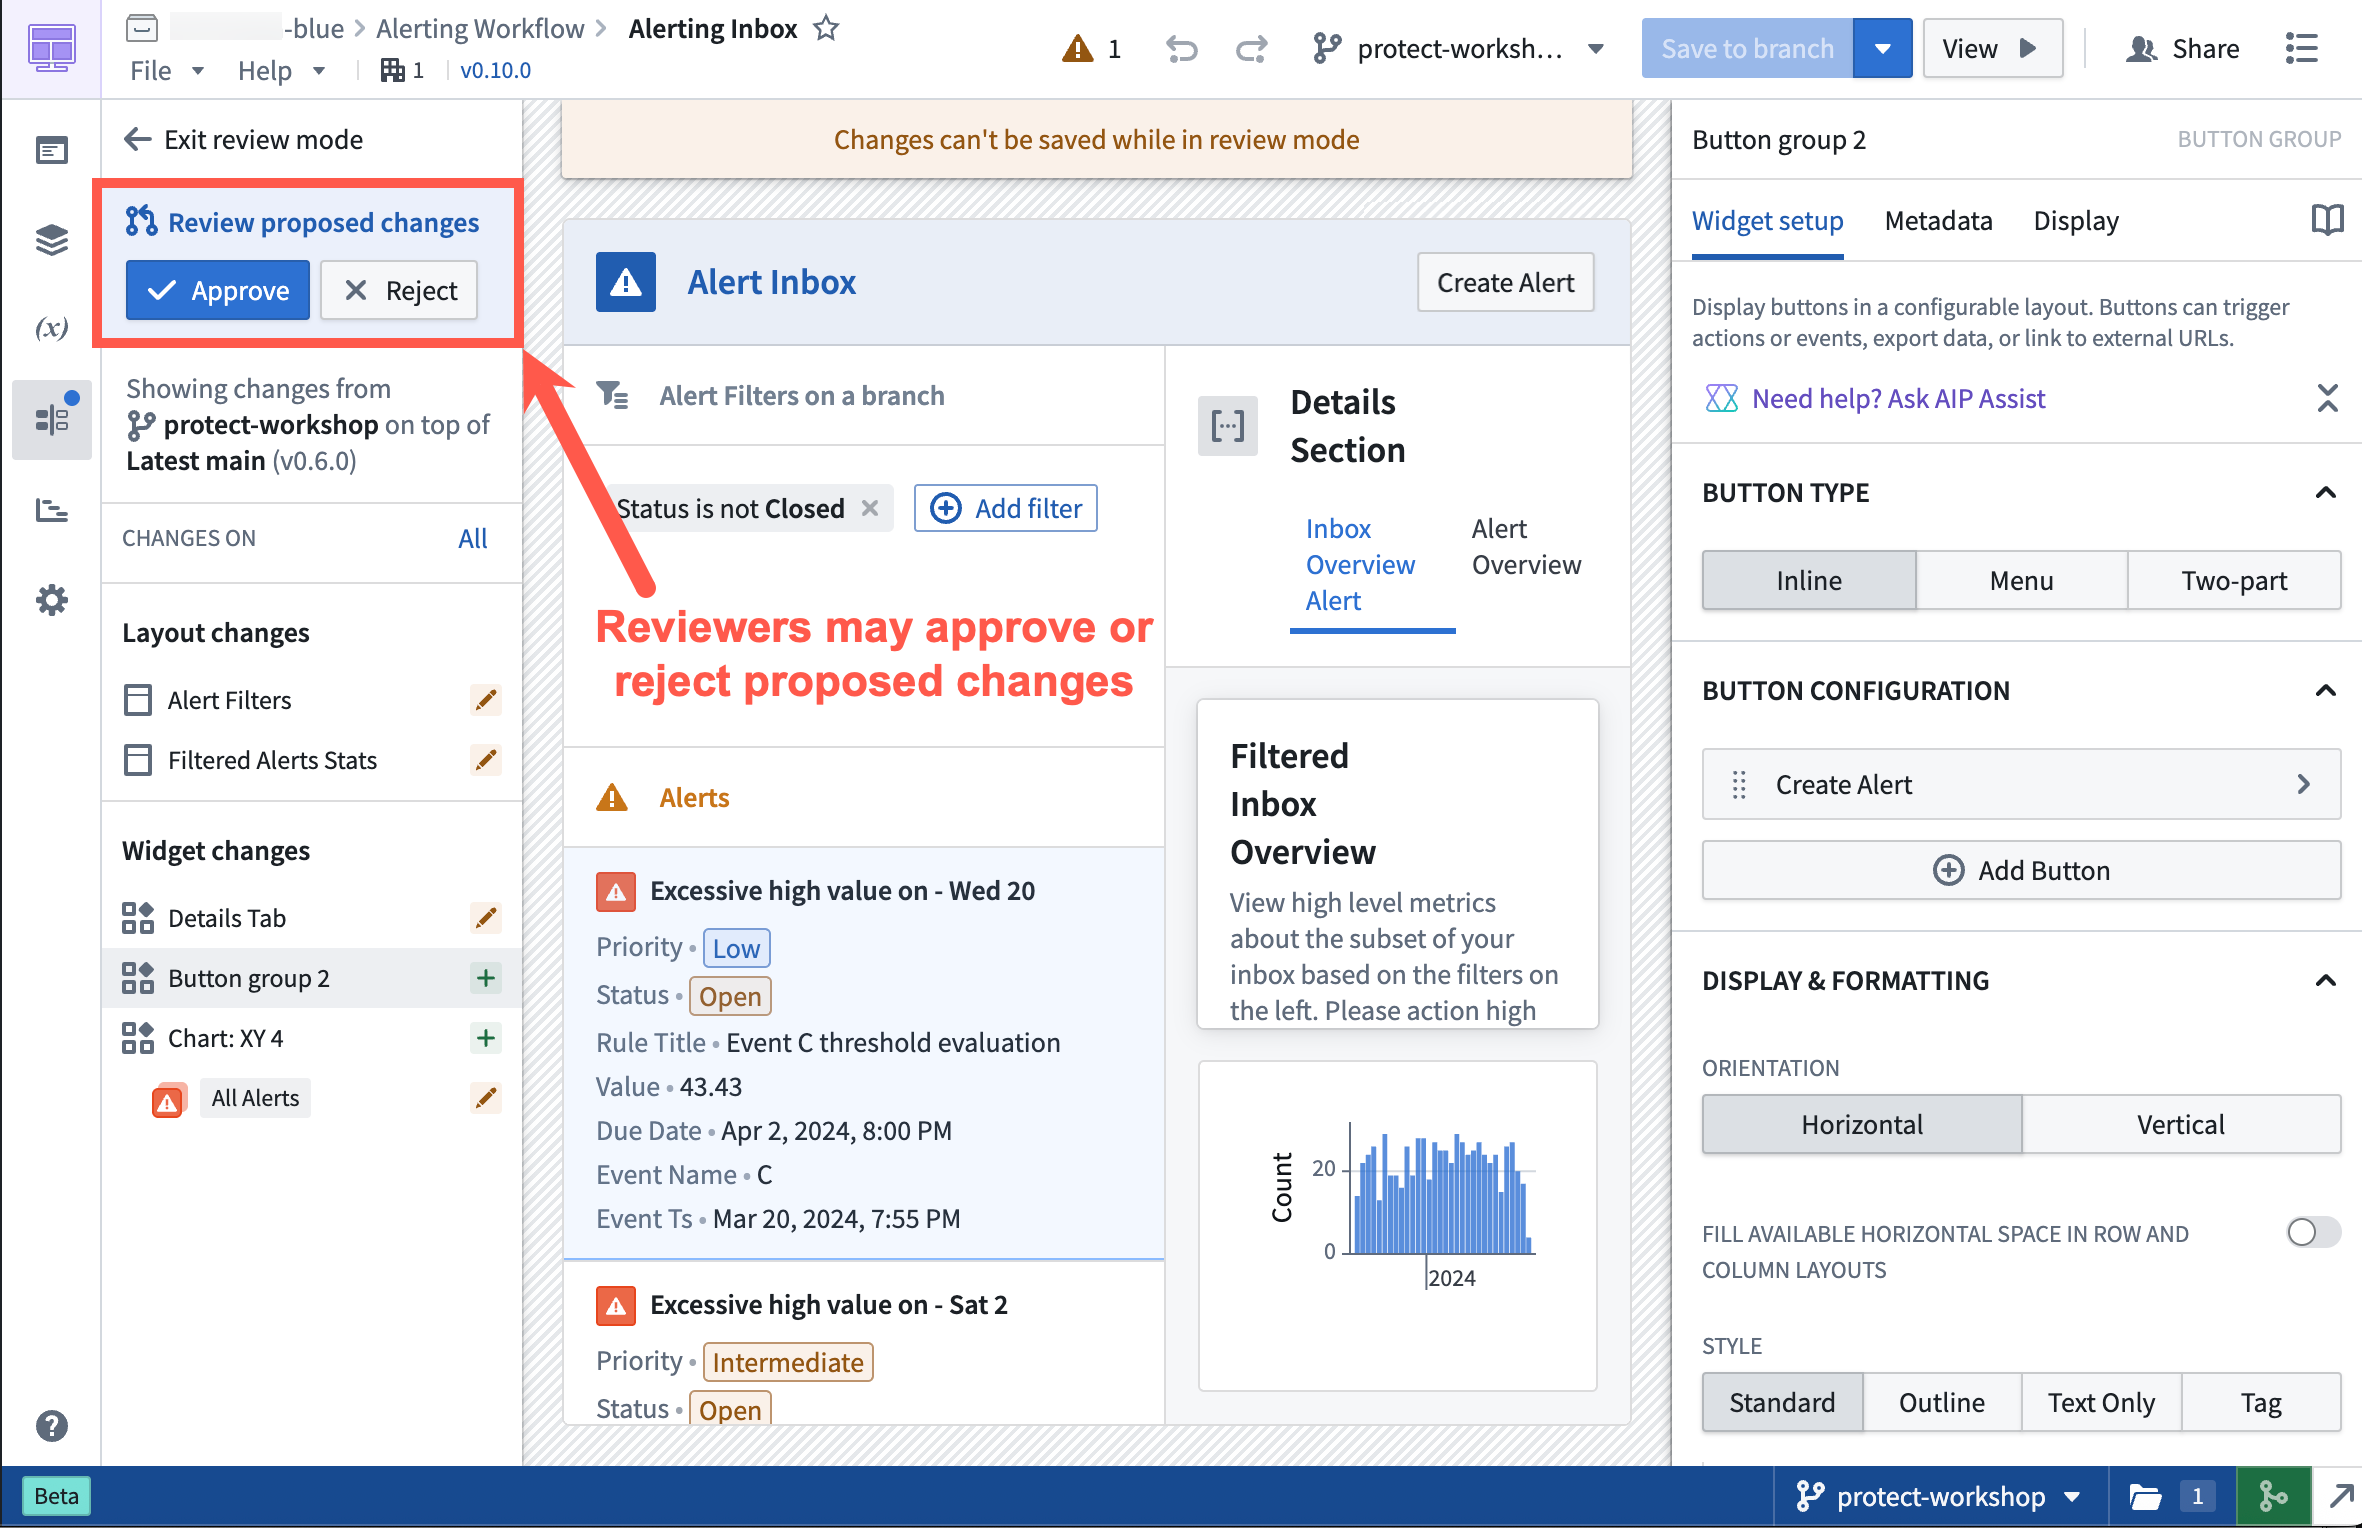
After a proposal is created, assigned reviewers are notified to review the changes. Navigating to the branched version of the Workshop module directs reviewers to the Changelog tab in Workshop.
Within the Changelog tab, reviewers can see the changes made to the module. Reviewers can then approve or reject the change by selecting the appropriate Approve or Reject button on the left panel in the Review proposed changes section.
Rebasing and conflict resolution
Workshop rebasing enables multiple builders to edit a single module at the same time without needing to worry about overriding each other's changes.
Before you merge Workshop changes on a branch into main, you must rebase if a change occurred on main after the module was saved on a branch.
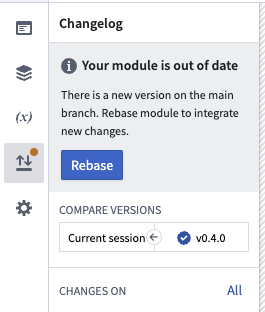
The rebasing user interface uses the Changelog panel to depict the changes made in the module.
Start the rebase
If a rebase is required before merging, the Changelog panel displays a visual notification dot. Select the panel to show an option that begins the rebase.
:::callout{theme="warning" title="Save before rebasing"} Unsaved Workshop edits are not preserved through a rebase. Save your changes to the branch before starting the rebase; any in-progress edits that have not been saved will be lost. :::
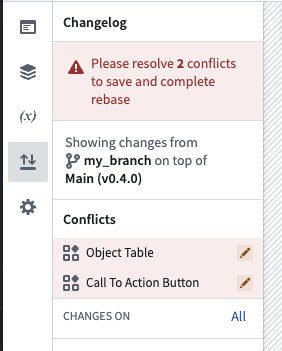
Rebasing applies the changes made on the branch to the latest main version of the module. Resolve any merge conflicts manually to proceed.
Resolve a merge conflict
A change is marked as a merge conflict when it is edited on both main and the branch.
Workshop auto-merges changes that do not overlap. A change is only flagged as a merge conflict when the same widget, variable, section, or layout position was edited on both main and your branch; for those, you must pick a version manually as described below.
Common examples of merge conflicts include:
- A widget or variable was modified on both
mainand your branch. - A section was deleted on
mainand edited on the branch. - A widget was moved from location
AtoBonmainand fromAtoCon your branch.
To resolve a merge conflict, switch between three states to test how each option affects the module in real time:
- Main: The modification as it appears on
main. - Branch: The modification as it appears on the branch.
- Modification: Edits you make to the component during the rebase, useful for combining changes from
mainwith your branch.
Finish rebase
When you are satisfied with how your module looks and have resolved any merge conflicts, save the module to finish rebasing.
After this is complete, you can safely merge your Workshop changes from your branch into main.
Example
In the example below, a merge conflict occurs in the object table widget during a rebase. main adds a new column, Departure airport code, while the current working branch adds a column, Action required.
Main:

Branch:

To keep both columns, first select main, then manually add the Action required column to resolve the conflict.

中文翻译
分支化 Workshop 模块
Workshop 与全局分支化(Global Branching)集成,使您能够安全且隔离地开发模块及其配置。本页介绍如何在分支上使用 Workshop 模块,包括向分支添加资源、资源保护与审批、以及变基与冲突解决。
有关全局分支化概念和工作流程的通用信息,请参阅全局分支化文档。
将 Workshop 模块添加到分支
要将 Workshop 模块添加到分支,请使用分支选择器切换到该分支,打开模块,然后保存任何更改。该模块现在成为该分支上的一个资源。
如果您的 Workshop 模块包含不支持全局分支化的非 Workshop 元素(例如 Quiver 仪表板),则这些元素将无法在分支上修改。
资源保护
在 main 分支上,受保护的 Workshop 模块会显示保存到新分支选项,而非保存并发布,要求所有更改在分支上进行,而不是直接修改 main。
选择保存到新分支以打开新建分支对话框。为分支命名并为其选择一个本体论(Ontology)。
当您准备好将更改合并到 main 时,请创建提案。
合并要求
审批流程
创建提案后,指定的审阅者会收到通知以审查更改。导航到分支版本的 Workshop 模块会将审阅者引导至 Workshop 中的变更日志选项卡。
在变更日志选项卡中,审阅者可以查看对模块所做的更改。审阅者可以通过在审阅提议的更改部分左侧面板中选择相应的批准或拒绝按钮来批准或拒绝更改。
变基与冲突解决
Workshop 变基功能允许多个构建者同时编辑同一模块,而无需担心覆盖彼此的更改。
在将分支上的 Workshop 更改合并到 main 之前,如果模块保存到分支后 main 上发生了更改,则必须进行变基。
变基用户界面使用变更日志面板来展示模块中所做的更改。
开始变基
如果在合并前需要变基,变更日志面板会显示一个可视化的通知点。选择该面板以显示开始变基的选项。
:::callout{theme="warning" title="变基前请保存"} 未保存的 Workshop 编辑内容在变基过程中不会保留。请在开始变基前将更改保存到分支;任何未保存的进行中编辑都将丢失。 :::
变基会将分支上所做的更改应用到最新的 main 版本模块。手动解决任何合并冲突以继续。
解决合并冲突
当某个更改同时在 main 和分支上被编辑时,该更改会被标记为合并冲突。
Workshop 会自动合并不重叠的更改。仅当同一小部件、变量、部分或布局位置同时在 main 和您的分支上被编辑时,该更改才会被标记为合并冲突;对于这些情况,您必须按照下文描述手动选择一个版本。
合并冲突的常见示例包括:
- 小部件或变量同时在
main和您的分支上被修改。 - 某个部分在
main上被删除,同时在分支上被编辑。 - 小部件在
main上从位置A移动到B,而在您的分支上从A移动到C。
要解决合并冲突,请在三种状态之间切换,以实时测试每个选项对模块的影响:
- Main: 更改在
main上的呈现方式。 - Branch: 更改在分支上的呈现方式。
- Modification: 您在变基过程中对组件进行的编辑,用于合并来自
main和您分支的更改。
完成变基
当您对模块的外观满意并解决了所有合并冲突后,保存模块以完成变基。
完成后,您可以安全地将 Workshop 更改从分支合并到 main。
示例
在以下示例中,变基过程中对象表格小部件发生了合并冲突。main 添加了一个新列 Departure airport code,而当前工作分支添加了一个列 Action required。
Main:
Branch:
要保留两列,请先选择 main,然后手动添加 Action required 列以解决冲突。