Events(事件(Events))
Events within Workshop modules enable you to trigger specific behavior whenever a user takes a given action. Events can be triggered from many widgets, including the Button Group, Object Table on row selection, String Dropdown on selection or deselection, and Tabs widgets. Learn more in our event-triggering and navigational widgets documentation. A full list of available events is documented below, but available event types may vary by widget.
Event execution order
Events in Workshop execute sequentially based on their configuration order. However, events do not wait for the downstream computations of previous events to complete before executing.
Key behavior
When a Set variable value event triggers:
- The source variable value is copied to the target variable value immediately.
- The target variable value will be up-to-date when the next configured event executes.
- Downstream variables that depend on the target variable will not be up-to-date before the next configured event executes.
This behavior is similar for other event types that update variable values.
Limitations
Workshop does not support forcing events to wait for all downstream updates to complete before proceeding to the next event.
If your workflow requires complete propagation of downstream updates between events, separate the events into multiple user-triggered events. This allows downstream computations to complete before the next event is triggered.
Types of events
Layers
Layers events trigger changes in the on-screen display state of overlays (drawers and modals) in a Workshop module.
Open/Close {overlay name}
For each overlay in the module, the following two events are available:
- Open: Open the overlay specified in the event name.
- Close: Close the overlay specified in the event name.
Layout
Layout events trigger changes in the on-screen display within a Workshop module, such as switching the selected page, expanding or collapsing a given section, and switching the active tab in a Tabs layout.
Switch to {page name}
For each page in the module, an event is available to switch to the chosen page when the event is triggered. If the module is using a string variable for the Variable-Based Page Selection option, the value of this variable will not be updated as a result of a Switch to Page event. If you wish to keep this variable value in sync with the selected page, you can use a Set Variable Value event instead.
Expand/Collapse/Toggle {section name}
For each collapsible section in the module, the following three events are available:
- Expand: Expand the section specified in the event name.
- Collapse: Collapse the section specified in the event name.
- Toggle: Expand the section specified in the event name if it is currently collapsed, or collapse the specified section if it is currently expanded.
If the specified section has a Boolean variable backing the collapse state, the value of this variable will not be updated as a result of one of these events. If you wish to keep this variable value in sync with the collapse state of the section, you can use a Set Variable Value event instead.
Example
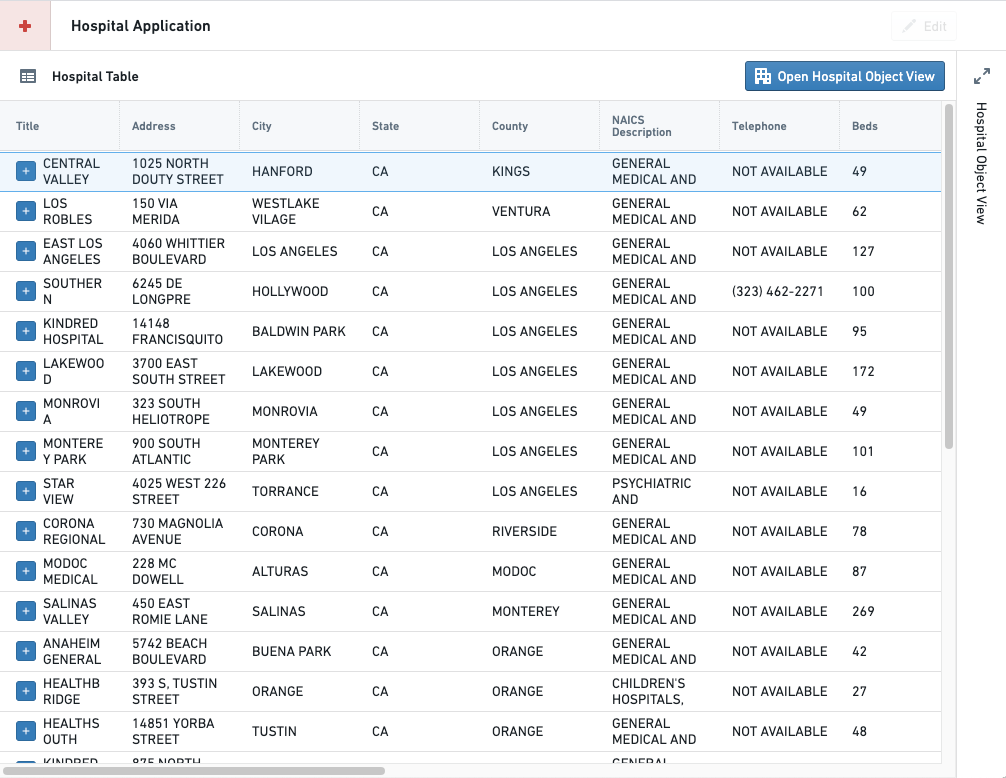
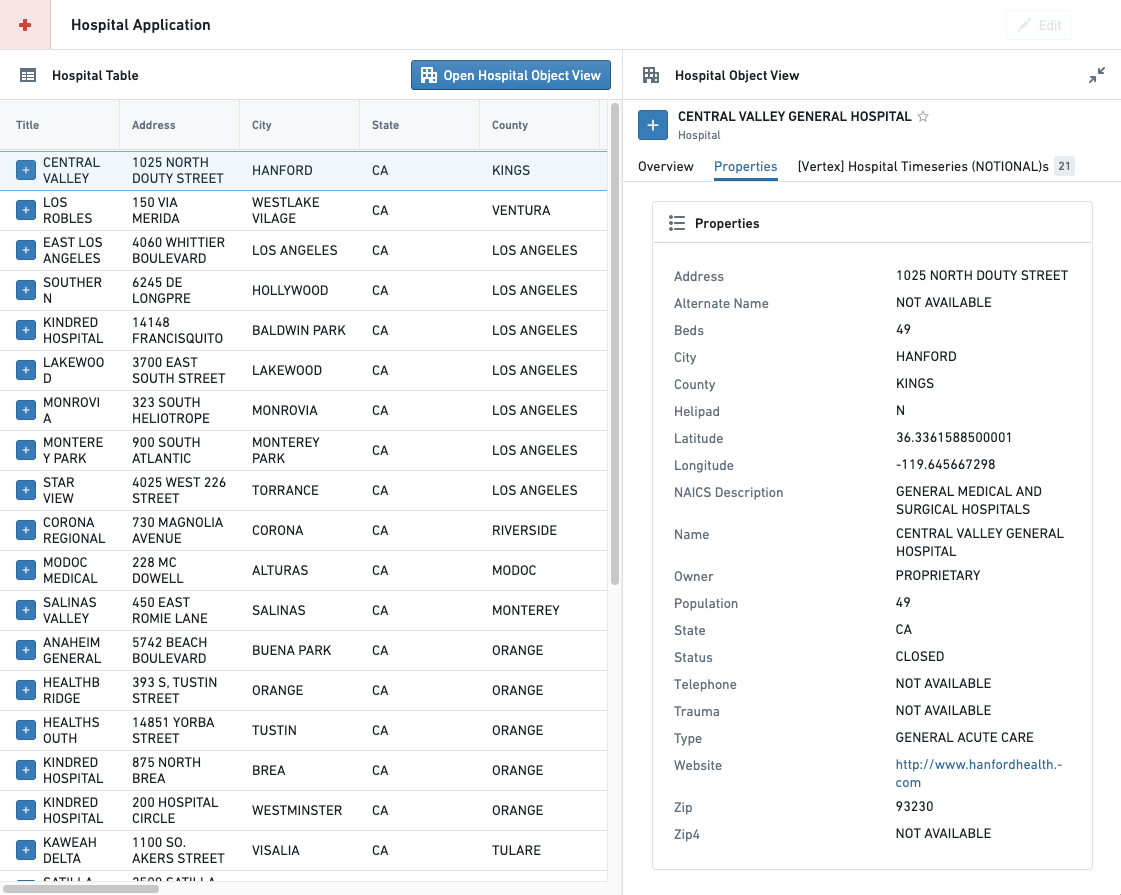
As an example, an application builder has configured the following module displaying hospital data. The module contains an object table and an initially-collapsed object view that the builder would like to expand when the Open Hospital Object View button is selected.
At the bottom of a button's configuration pane for the Button Group widget, the application builder can choose to trigger a Layout event whenever the button is selected by choosing the Event option from the On click dropdown menu, then using the Add event button that appears to choose the desired Layout event.

Once the button and event is configured, the section containing the object view will expand whenever a user selects the Open Hospital Object View button in this module, as shown below:
Switch to {tab name}
For each Tab section in the module, a Switch to {tab name} event will be added for each tab in the section. Unlike the Switch to {page name}, and section collapse state events, events that change the selected tab will also update the value of the string variable configured for Variable-Based Tab Selection if a variable is configured.
Variables
Variable events provide application builders with ways to change variable values within a Workshop module.
Reset {variable name} value
Reset {variable name} value events will set the value of the chosen variable to its default value, which is the value configured in the variable definition. This option is offered for static variables.
Recompute {variable name}
Recompute {variable name} events will cause the chosen variable's value to be recomputed based on its input values and variable definition. This option is offered for non-static variable types, and is particularly useful for managing recomputes for variables without Automatic recompute behavior.
Set variable value
The Set variable value event will assign the current value of the chosen source variable to the value of the chosen target variable.
Configuration options
- Source variable: This is the variable value that will be copied immediately when the Set variable value event is triggered, without waiting for potential recomputation of its input variables from other events that are started at the same time.
- Target variable: This variable value will be overwritten with the Source variable's value
Stream LLM response into variable
The Stream LLM response into variable event enables displaying the response of an LLM in real time within a Workshop module.
Configuration options
- Target variable: The string variable to stream the response into.
- Prompt: The prompt to send to the LLM. This can be a string variable or a function that returns a string.
- Model: The language model to use. Three OpenAI models are supported: GPT-3, GPT-4, and GPT-4 32K.
- Temperature: The temperature to use with the model, a number between
0and1. Higher values, like0.8, will make the output more random, while lower values, like0.2, will make the output more focused and deterministic. - Variable update delay: How frequently the variable will update, in milliseconds.
The screenshot below, which can be found within the event configuration, shows an example configuration with the supplied parameters described above.

AIP Assist
The Send to AIP Assist event offers a way to send a prompt as static text or as a string variable to AIP Assist and automatically run the query. When this event is triggered, the AIP Assist sidebar will automatically open if it is not already open. To further customize the user experience, builders can also provide a default chatbot, an LLM-powered assistant that is equipped with enterprise-specific knowledge, to answer queries about custom operational topics. AIP Assist chatbots use custom content as their search context, and can be configured in Chatbot Studio (formerly known as Agent Studio) [Beta].
A default AIP Assist chatbot can be selected during event configuration, allowing builders to choose the appropriate chatbot for the given context. Chatbots can be given access to custom content, such as documentation about the application being used or other operational processes to provide targeted assistance at relevant times. Selecting a chatbot is optional, and users can also select a dedicated chatbot in the AIP Assist sidebar. By selecting a default chatbot, builders can be sure that the correct chatbot for the task has been chosen without relying on end-users for manual selection. Prompts sent in the event can be static text or dynamic variables, allowing builders to tailor the user experience as they see fit based on the prompt and the receiving agent.
Configuration
The Send to AIP Assist event can be added using the Button Group widget. The following is a walkthrough of Send to AIP Assist event creation using a Button Group widget. This widget will open the AIP Assist sidebar and send a configured prompt when selected.
-
Add a Button Group widget by selecting + Add widget and selecting Button group from the list of widgets.
-
Configure the button's name, icon, and description as desired under the Button Configuration section.

-
In the On Click section of the button configuration panel, select Event from the drop down.
-
Select +Add event and choose Send to AIP Assist from the list of options.

-
Configure the event by choosing whether the prompt should be Static text or a computed Variable.
- Static: For this option, simply input the prompt text. This text will be sent to AIP Assist as a prompt when the button is selected. For example: “What threshold does the Inventory Management Application use to determine when to create a ‘Low Inventory Alert’?"
-
Variable: For this option, you must configure a string type variable to be used for the
Send to AIP Assistevent and select it using the Select a variable dropdown. -
(Optional) Select the agent that will be used by default when the event is triggered. This functionality enables builders to select the appropriate AIP Assist Agent for the given context. Note that this step can have a significant impact on user experience, as users can also select a dedicated agent in the AIP Assist sidebar, but selecting a default during configuration ensures that the correct agent for the task has been chosen without relying on end-users for manual selection. This option may give users access to an agent with access to custom content.
For more information on AIP Assist Agent configuration, refer to the AIP Assist Agent documentation.
Variable configuration
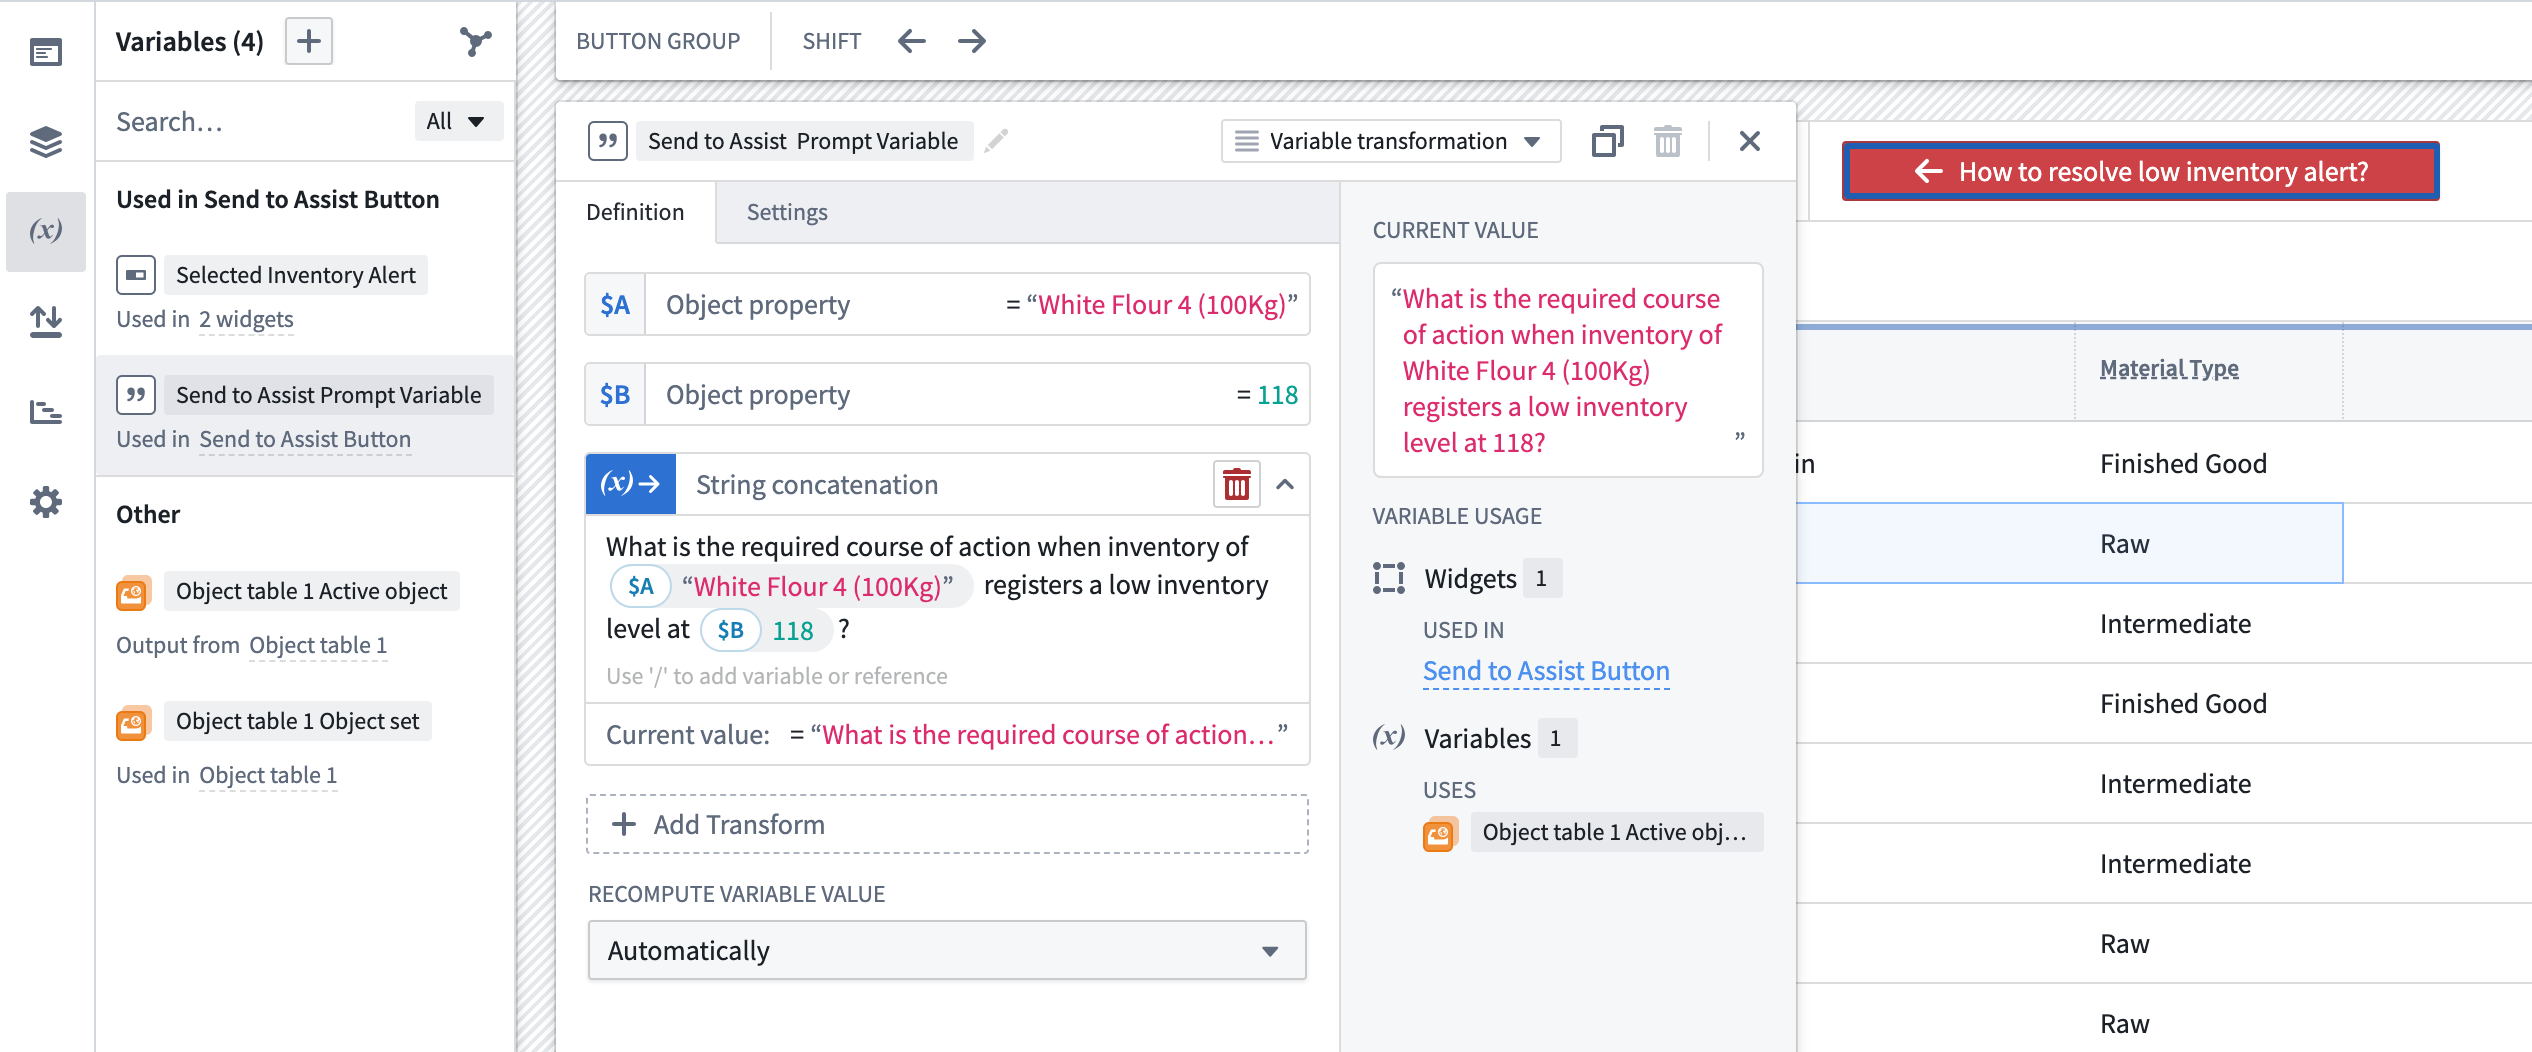
When configuring a variable for the Send to AIP Assist event, ensure that your variable value is up to date before using it. There are a number of possible variable configurations, but it is worth noting that the String → Variable Transformation type enables the configuration of complex, dynamic prompts based on the active state of the Workshop application. The following is a sample configuration for a series of connected variables that programmatically change based on Workshop's active state. In this example, the selected Inventory Material object from the active object table is String concatenation Variable Transform, combined with free text to form a prompt that can be sent to AIP Assist.
Applications
The following events provide a way to open other Foundry resources in a new browser tab. If the Workshop module is in a Carbon workspace, using these events will open the target resource in a new Carbon tab.
- Open Workshop module: This event will allow an application builder to select a Workshop module and map variables from the current module to module interface variables from the selected module.
- Open Quiver analysis:
- Open Object view:
- Open Object Explorer:
- Open Notepad document (read-only):
- Open Vertex exploration:
Data staleness
The Refresh data in module event allows all data in the module to be reloaded when this event is triggered.
Module appearance
The Toggle between light and dark mode event allows the theme of the module to be changed by the user when this event is triggered.
中文翻译
事件(Events)
Workshop模块中的事件(Events)使您能够在用户执行特定操作时触发相应的行为。事件可以从多个小部件(Widgets)触发,包括按钮组(Button Group)、对象表(Object Table)(行选择时)、字符串下拉框(String Dropdown)(选择或取消选择时)以及标签页(Tabs)小部件。更多信息请参阅我们的事件触发与导航小部件文档。下文列出了所有可用事件的完整列表,但具体可用的事件类型可能因小部件而异。
事件执行顺序(Event execution order)
Workshop中的事件按照其配置顺序依次执行。然而,事件不会等待前一个事件的下游计算完成后再执行。
关键行为(Key behavior)
当设置变量值(Set variable value)事件触发时:
- 源变量值会立即复制到目标变量值。
- 目标变量值将在下一个配置的事件执行时保持最新状态。
- 依赖于目标变量的下游变量在下一个配置的事件执行之前不会更新。
此行为对于其他更新变量值的事件类型也类似。
限制(Limitations)
Workshop不支持强制事件等待所有下游更新完成后再执行下一个事件。
如果您的工作流需要在事件之间完全传播下游更新,请将事件拆分为多个用户触发的事件。这样可以在下一个事件触发之前完成下游计算。
事件类型(Types of events)
图层(Layers)
图层事件(Layers events)触发Workshop模块中覆盖层(overlays)(抽屉和模态框)的屏幕显示状态变化。
打开/关闭 {覆盖层名称}
对于模块中的每个覆盖层,提供以下两个事件:
- 打开(Open): 打开事件名称中指定的覆盖层。
- 关闭(Close): 关闭事件名称中指定的覆盖层。
布局(Layout)
布局事件(Layout events)触发Workshop模块内的屏幕显示变化,例如切换所选页面、展开或折叠指定部分、以及切换标签页(Tabs)布局中的活动标签页。
切换到 {页面名称}
对于模块中的每个页面,都有一个事件可在触发时切换到所选页面。如果模块使用字符串变量进行基于变量的页面选择(Variable-Based Page Selection),则该变量的值不会因"切换到页面"事件而更新。如果您希望保持此变量值与所选页面同步,可以使用设置变量值(Set Variable Value)事件。
展开/折叠/切换 {部分名称}
对于模块中的每个可折叠部分,提供以下三个事件:
- 展开(Expand): 展开事件名称中指定的部分。
- 折叠(Collapse): 折叠事件名称中指定的部分。
- 切换(Toggle): 如果指定部分当前处于折叠状态则展开,如果当前处于展开状态则折叠。
如果指定部分有布尔变量支持折叠状态,则该变量的值不会因这些事件而更新。如果您希望保持此变量值与部分的折叠状态同步,可以使用设置变量值(Set Variable Value)事件。
示例(Example)
例如,一个应用构建者配置了以下显示医院数据的模块。该模块包含一个对象表和一个初始折叠的对象视图,构建者希望在点击打开医院对象视图(Open Hospital Object View)按钮时展开该视图。
在按钮组小部件的按钮配置面板底部,应用构建者可以通过从点击时(On click)下拉菜单中选择事件(Event)选项,然后使用出现的添加事件(Add event)按钮选择所需的布局事件,从而在按钮被选中时触发布局事件。
配置好按钮和事件后,当用户在该模块中选择打开医院对象视图(Open Hospital Object View)按钮时,包含对象视图的部分将展开,如下所示:
切换到 {标签页名称}
对于模块中的每个标签页(Tab)部分,该部分中的每个标签页都会添加一个切换到 {标签页名称}事件。与切换到 {页面名称}和部分折叠状态事件不同,更改所选标签页的事件也会更新为基于变量的标签页选择(Variable-Based Tab Selection)配置的字符串变量的值(如果已配置变量)。
变量(Variables)
变量(Variable)事件为应用构建者提供了在Workshop模块内更改变量值的方法。
重置 {变量名称} 值
重置 {变量名称} 值事件会将所选变量的值设置为其默认值,即在变量定义中配置的值。此选项适用于静态变量。
重新计算 {变量名称}
重新计算 {变量名称}事件会根据其输入值和变量定义重新计算所选变量的值。此选项适用于非静态变量类型,对于管理没有自动(Automatic)重新计算行为的变量的重新计算特别有用。
设置变量值(Set variable value)
设置变量值(Set variable value)事件会将所选源变量的当前值赋给所选目标变量的值。
配置选项(Configuration options)
- 源变量(Source variable): 这是当设置变量值(Set variable value)事件触发时立即复制的变量值,无需等待其输入变量可能因同时启动的其他事件而重新计算。
- 目标变量(Target variable): 此变量值将被源变量(Source variable)的值覆盖。
将LLM响应流式传输到变量(Stream LLM response into variable)
将LLM响应流式传输到变量(Stream LLM response into variable)事件支持在Workshop模块内实时显示LLM的响应。
配置选项(Configuration options)
- 目标变量(Target variable): 用于流式传输响应的字符串变量。
- 提示词(Prompt): 发送给LLM的提示词。可以是字符串变量或返回字符串的函数。
- 模型(Model): 要使用的语言模型。支持三种OpenAI模型:GPT-3、GPT-4和GPT-4 32K。
- 温度(Temperature): 与模型一起使用的温度,取值范围为
0到1。较高的值(如0.8)会使输出更加随机,而较低的值(如0.2)会使输出更加集中和确定。 - 变量更新延迟(Variable update delay): 变量更新的频率,以毫秒为单位。
下面的截图(可在事件配置中找到)显示了上述参数的示例配置。
AIP辅助(AIP Assist)
发送到AIP辅助(Send to AIP Assist)事件提供了一种将提示词作为静态文本或字符串变量发送到AIP辅助并自动运行查询的方式。当此事件触发时,AIP辅助侧边栏将自动打开(如果尚未打开)。为了进一步定制用户体验,构建者还可以提供默认的聊天机器人(Chatbot),这是一个由LLM驱动的助手,配备企业特定知识,用于回答关于自定义操作主题的查询。AIP辅助聊天机器人使用自定义内容作为其搜索上下文,可以在聊天机器人工作室(Chatbot Studio)(原代理工作室(Agent Studio))[Beta]中进行配置。
在事件配置期间可以选择默认的AIP辅助聊天机器人,使构建者能够为给定上下文选择合适的聊天机器人。聊天机器人可以被授予访问自定义内容的权限,例如关于正在使用的应用程序或其他操作流程的文档,以便在相关时间提供有针对性的帮助。选择聊天机器人是可选的,用户也可以在AIP辅助侧边栏中选择专用的聊天机器人。通过选择默认聊天机器人,构建者可以确保为任务选择了正确的聊天机器人,而无需依赖最终用户进行手动选择。事件中发送的提示词可以是静态文本或动态变量,使构建者能够根据提示词和接收代理灵活定制用户体验。
配置(Configuration)
发送到AIP辅助(Send to AIP Assist)事件可以使用按钮组小部件(Button Group widget)添加。以下是使用按钮组小部件创建发送到AIP辅助(Send to AIP Assist)事件的逐步说明。该小部件在被选中时将打开AIP辅助侧边栏并发送配置的提示词。
-
通过选择+ 添加小部件(+ Add widget)并从小部件列表中选择按钮组(Button group)来添加按钮组小部件。
-
在按钮配置(Button Configuration)部分下,根据需要配置按钮的名称、图标和描述。
-
在按钮配置面板的点击时(On Click)部分,从下拉菜单中选择事件(Event)。
-
选择+添加事件(+Add event)并从选项列表中选择发送到AIP辅助(Send to AIP Assist)。
-
通过选择提示词应为静态(Static)文本还是计算的变量(Variable)来配置事件。
- 静态(Static): 对于此选项,只需输入提示词文本。当按钮被选中时,此文本将作为提示词发送到AIP辅助。例如:"库存管理应用程序使用什么阈值来确定何时创建'低库存警报'?"
-
变量(Variable): 对于此选项,您必须配置一个字符串类型变量用于
发送到AIP辅助(Send to AIP Assist)事件,并使用选择变量(Select a variable)下拉菜单选择它。 -
(可选)选择事件触发时将默认使用的代理(Agent)。此功能使构建者能够为给定上下文选择合适的AIP辅助代理。请注意,此步骤可能对用户体验产生重大影响,因为用户也可以在AIP辅助侧边栏中选择专用代理,但在配置期间选择默认代理可确保为任务选择了正确的代理,而无需依赖最终用户进行手动选择。此选项可能授予用户访问具有自定义内容权限的代理的权限。
有关AIP辅助代理配置的更多信息,请参阅AIP辅助代理文档。
变量配置(Variable configuration)
在为发送到AIP辅助(Send to AIP Assist)事件配置变量时,请确保在使用前变量值是最新的。有多种可能的变量配置,但值得注意的是,字符串 → 变量转换(String → Variable Transformation)类型支持基于Workshop应用程序的活动状态配置复杂的动态提示词。以下是一系列连接变量的示例配置,这些变量根据Workshop的活动状态以编程方式更改。在此示例中,从活动对象表中选择的库存物料(Inventory Material)对象是字符串连接变量转换(String concatenation Variable Transform),与自由文本结合形成可发送到AIP辅助的提示词。
应用程序(Applications)
以下事件提供了在新浏览器标签页中打开其他Foundry资源的方式。如果Workshop模块在Carbon工作区中,使用这些事件将在新的Carbon标签页中打开目标资源。
- 打开Workshop模块(Open Workshop module): 此事件允许应用构建者选择一个Workshop模块,并将当前模块的变量映射到所选模块的模块接口变量(module interface variables)。
- 打开Quiver分析(Open Quiver analysis):
- 打开对象视图(Open Object view):
- 打开对象浏览器(Open Object Explorer):
- 打开记事本文档(只读)(Open Notepad document (read-only)):
- 打开Vertex探索(Open Vertex exploration):
数据过时(Data staleness)
刷新模块中的数据(Refresh data in module)事件允许在触发此事件时重新加载模块中的所有数据。
模块外观(Module appearance)
在亮色和暗色模式之间切换(Toggle between light and dark mode)事件允许用户在触发此事件时更改模块的主题。