Use Functions in Workshop(在 Workshop 中使用函数(Functions))
Within a Workshop module, functions can be used in a variety of ways. Function-backed actions enable modules to trigger complex sets of object edits and writeback. Widgets such as Metric Cards can display the output of functions in-module to help guide user decisions.
Function-backed actions in Workshop
When defining a new action type in the Ontology Manager, a function can be used as part of the rules logic of the action type. This is generally helpful to enable more complex writeback in an action type than the built-in options of Add Object, Delete Object, Modify Object, Add Link, or Delete Link. Learn more about how to define a function-backed action type.
Once a function-backed action type is defined, it can be used in Workshop like any other action type. Learn more about how to expose an action type in Workshop.
Function-backed variables in Workshop
Functions can also be used in Workshop to populate the value of a variable in your module. The following example walks you through how to create a numeric variable and populate it with the output of a function that calculates the number of flights an aircraft has to a given airport.
:::callout{theme="neutral"} Note that this example is illustrative and you may not be able to complete every step as written. Since your Foundry ontology is custom to your organization, you may not have access to the ontology objects required to complete the tutorial. :::
First, take a look at the function that we will be calling from within our Workshop module. As seen below, the function is called flightsForAircraftToDestination. It accepts an ExampleAircraft object and a string representing the destination airport’s three-letter airport code as inputs, and then returns the count of flights that aircraft has to the target airport.
@Function()
public flightsForAircraftToDestination(aircraft: ExampleAircraft, destinationAirportCode: string): Integer {
    return aircraft.flights.all()
    .filter(flight => flight.destinationAirport === destinationAirportCode)
    .length
}
Next, begin the process of wiring up this function in your Workshop module. The aim is to pass in the function inputs from the module and then display the function output within a widget.
Start by creating a new numeric variable from the Variables menu at the top left of the screen. Use the + option next to the Variables title to create a new variable, select Numeric, and then select Function as seen below.

Next, find and select the function to use for this variable. Use the function picker to search for your function. Note that the function must be tagged with a release version to appear in this list. Learn more about function versioning.

After selecting your desired function, configure its inputs. In the example below, the aircraft input is populated by the currently selected aircraft object in the module, and the destinationAirportCode input is populated by a variable that captures the selected flight’s destination airport elsewhere in the application. Make sure to name your variable and place it in a variable folder for easier discovery.

:::callout{theme="warning"} Function-backed variables cache their results. If an identical input is provided to a function, the result in Workshop will be from a cache and not from a new computation. If you require the value to be recomputed, use a set variable value event in Workshop. You can also configure the recompute behavior of the variable to control when it recomputes. :::
:::callout{theme="warning" title="OAuth-backed functions"} Functions that call a source configured with an OAuth 2.0 outbound application cannot trigger the interactive authorization prompt when used directly in Workshop, including as function-backed variables or to populate widget content. If the user has not already authorized the outbound application, the function will fail. To use OAuth-backed sources from Workshop, wrap the function in a function-backed action instead, which can display the authorization prompt as part of action execution. :::
To display the output of this function to a user, use the Metric Card widget described below.
Metric Card with functions
The Metric Card widget gives builders a way to display key information in their module. It can be helpful for the statistic displayed here to be generated by a function. Within the Metric Card configuration, set a given metric to populate from the function-backed numeric variable that you defined in the steps above.
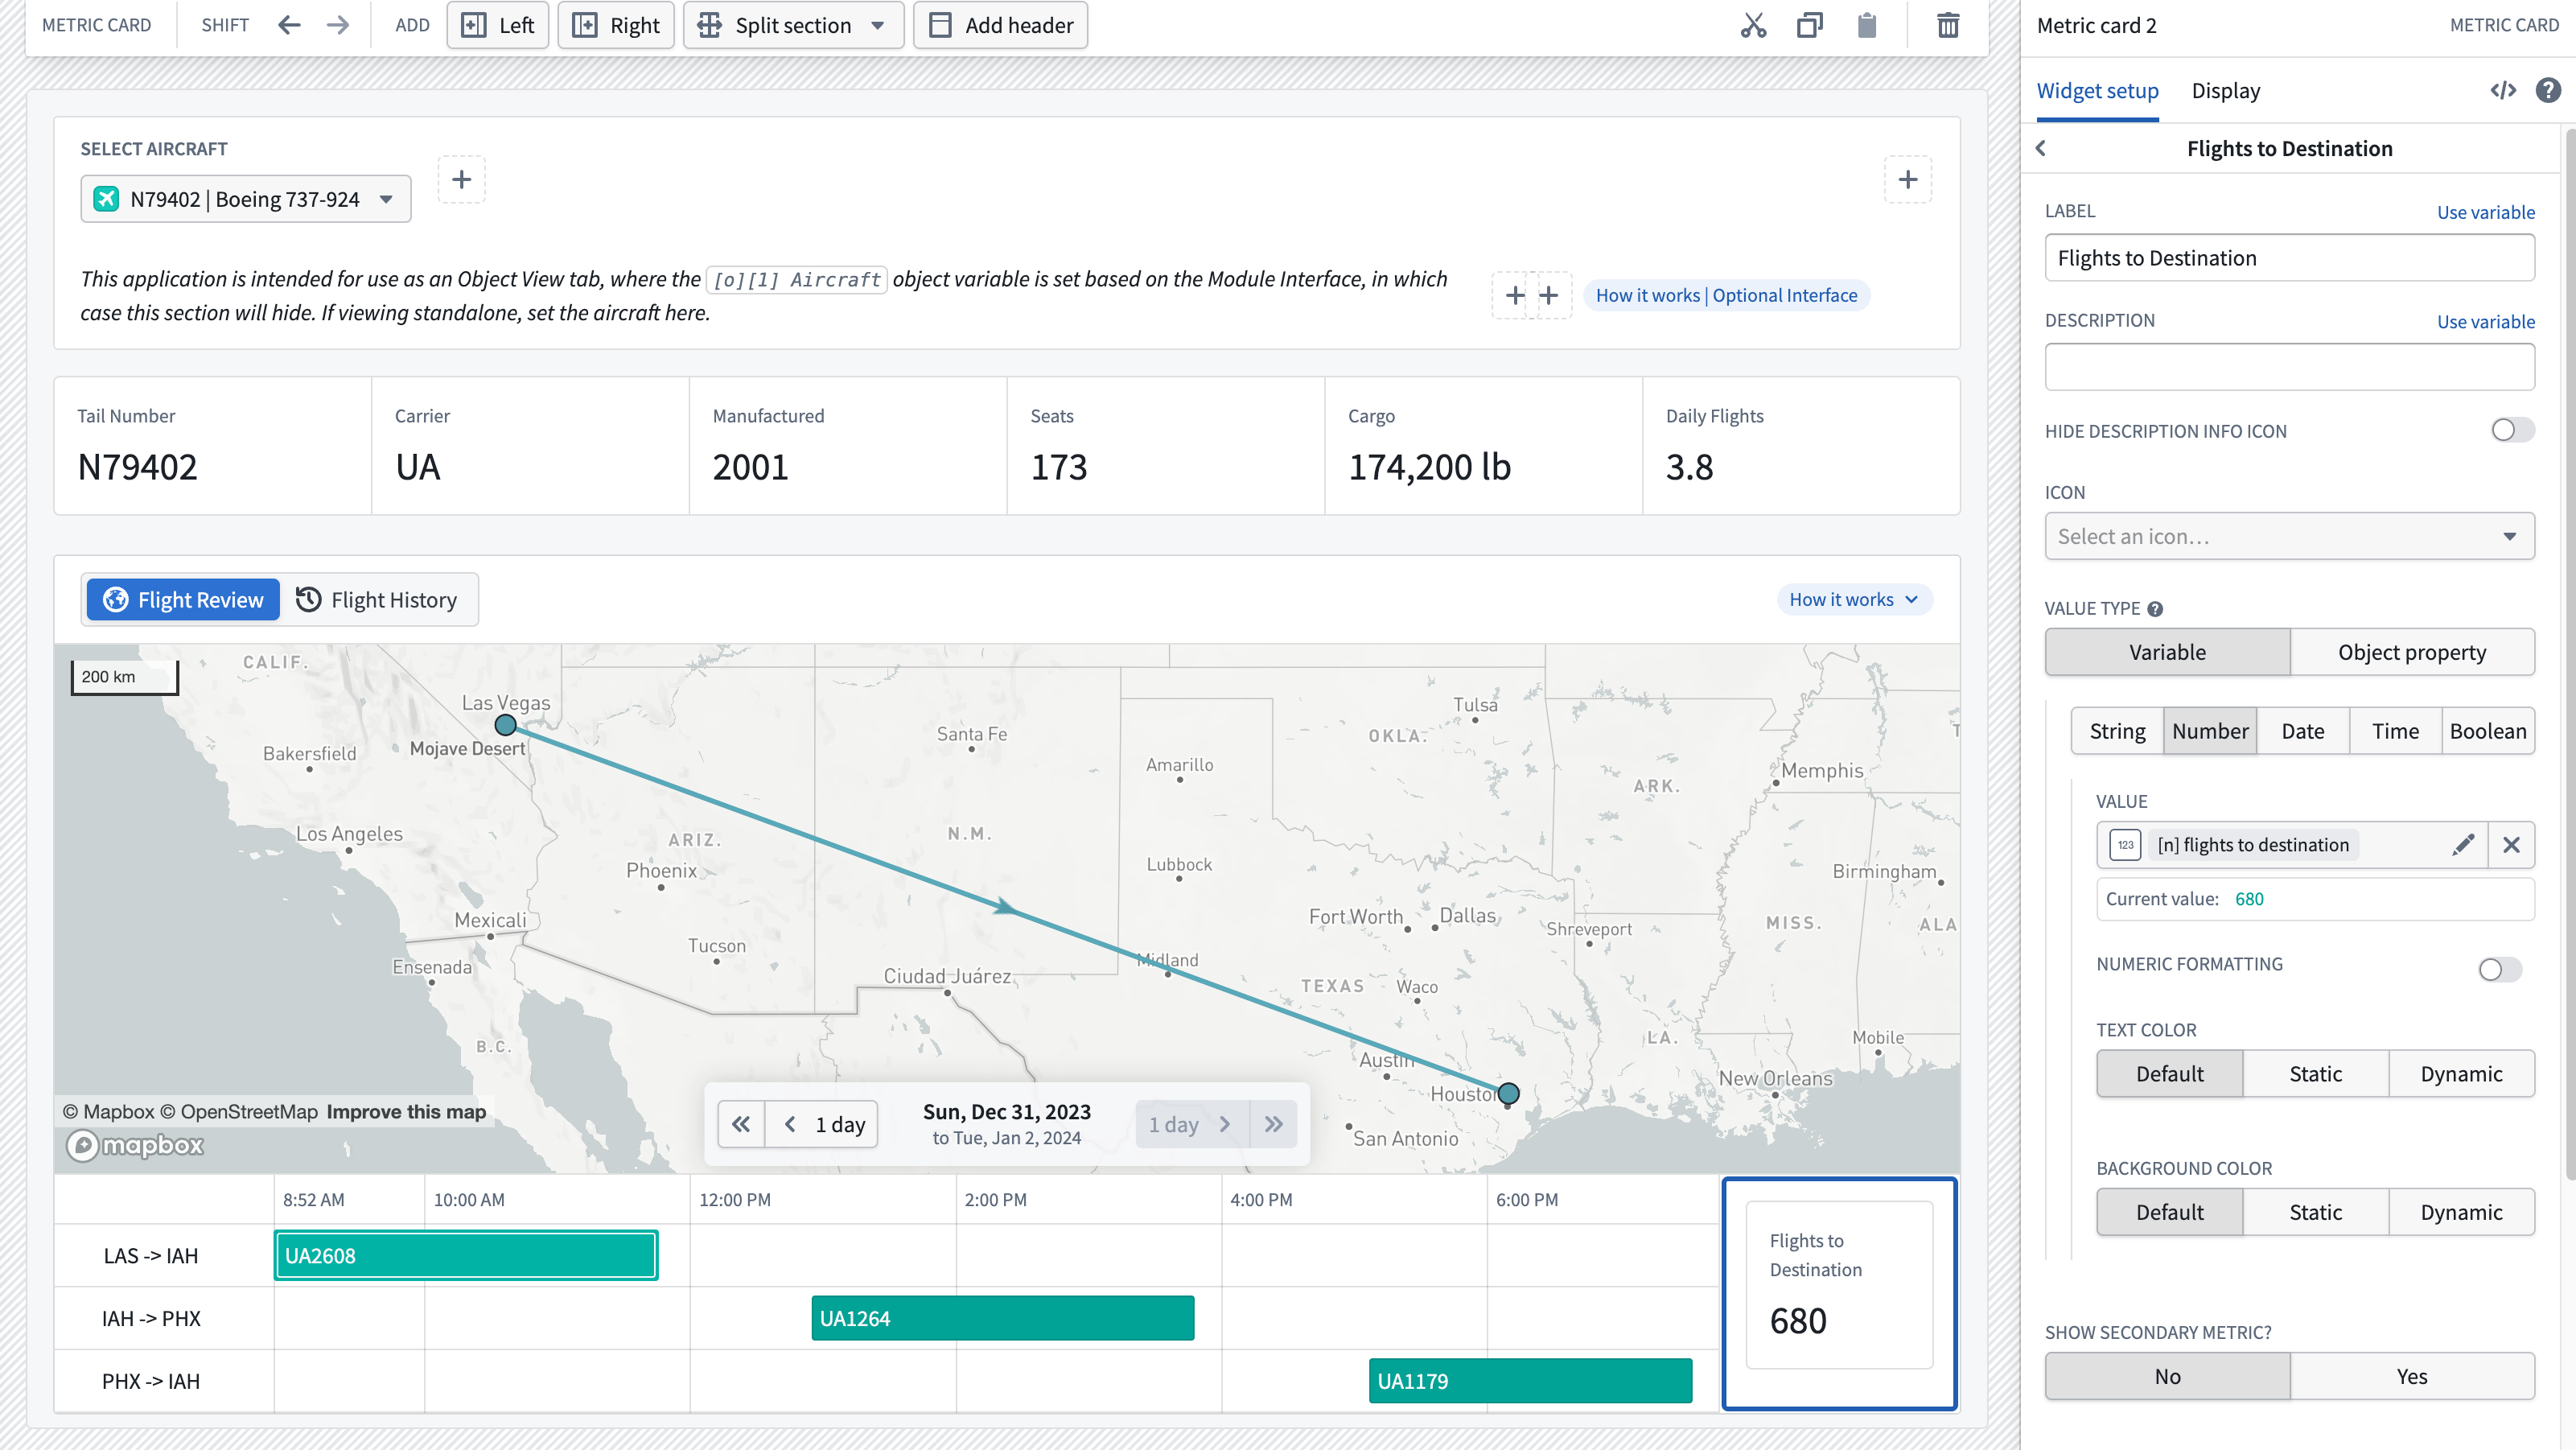
The screenshot below shows the resulting module with our function-backed Metric Card on the right. As a user changes their selection on the Gantt chart on the left to different flights, the Metric Card dynamically updates to display the total number of flights for the selected aircraft to the destination airport. In this case, there are 680 total flights for this aircraft to Houston (IAH).
中文翻译
在 Workshop 中使用函数(Functions)
在 Workshop 模块中,函数可以通过多种方式使用。函数支持的操作(Function-backed actions)使模块能够触发复杂的对象编辑和回写操作。诸如指标卡片(Metric Cards)之类的小部件可以在模块内显示函数的输出,从而帮助用户做出决策。
Workshop 中的函数支持操作
在 Ontology Manager 中定义新的操作类型时,可以将函数用作该操作类型规则逻辑的一部分。这通常有助于在操作类型中实现比内置选项(如添加对象、删除对象、修改对象、添加链接或删除链接)更复杂的回写操作。了解如何定义函数支持的操作类型。
一旦定义了函数支持的操作类型,它就可以像其他操作类型一样在 Workshop 中使用。了解如何在 Workshop 中公开操作类型。
Workshop 中的函数支持变量(Function-backed variables)
函数还可以在 Workshop 中用于填充模块中变量的值。以下示例将引导您创建一个数值变量,并用一个函数的输出来填充它,该函数计算某架飞机飞往指定机场的航班数量。
:::callout{theme="neutral"} 请注意,此示例仅用于说明,您可能无法完全按照所述步骤操作。由于您的 Foundry 本体是针对您的组织定制的,您可能无法访问完成教程所需的本体对象。 :::
首先,查看我们将在 Workshop 模块中调用的函数。如下所示,该函数名为 flightsForAircraftToDestination。它接受一个 ExampleAircraft 对象和一个表示目的地机场三字码的字符串作为输入,然后返回该飞机飞往目标机场的航班数量。
@Function()
public flightsForAircraftToDestination(aircraft: ExampleAircraft, destinationAirportCode: string): Integer {
    return aircraft.flights.all()
    .filter(flight => flight.destinationAirport === destinationAirportCode)
    .length
}
接下来,开始在 Workshop 模块中配置此函数。目标是将模块中的函数输入传递进去,然后在小部件中显示函数输出。
首先,从屏幕左上角的 变量(Variables) 菜单创建一个新的数值变量。使用 变量 标题旁边的 + 选项创建新变量,选择 数值(Numeric),然后选择 函数(Function),如下所示。
接下来,查找并选择要用于此变量的函数。使用函数选择器搜索您的函数。请注意,函数必须标记有发布版本才能出现在此列表中。了解更多关于函数版本管理的信息。
选择所需函数后,配置其输入。在下面的示例中,aircraft 输入由模块中当前选定的飞机对象填充,而 destinationAirportCode 输入则由一个变量填充,该变量在应用程序的其他位置捕获所选航班的目的地机场。请确保为变量命名,并将其放入变量文件夹中,以便更容易发现。
:::callout{theme="warning"} 函数支持的变量会缓存其结果。如果向函数提供相同的输入,Workshop 中的结果将来自缓存,而不是重新计算。如果您需要重新计算该值,请在 Workshop 中使用设置变量值事件。您还可以配置变量的重新计算行为,以控制其重新计算的时机。 :::
:::callout{theme="warning" title="OAuth 支持的函数(OAuth-backed functions)"} 调用配置了 OAuth 2.0 出站应用程序的源的函数,在 Workshop 中直接使用时(包括作为函数支持的变量或填充小部件内容)无法触发交互式授权提示。如果用户尚未授权该出站应用程序,函数将执行失败。要在 Workshop 中使用 OAuth 支持的源,请将函数包装在函数支持的操作中,该操作可以在执行操作时显示授权提示。 :::
要为用户显示此函数的输出,请使用下面描述的指标卡片小部件。
带函数的指标卡片(Metric Card)
指标卡片小部件为构建者提供了一种在模块中显示关键信息的方式。此处显示的统计数据由函数生成会很有帮助。在指标卡片配置中,将给定的指标设置为从上述步骤中定义的函数支持的数值变量中填充。
下面的截图显示了最终的模块,右侧是我们的函数支持的指标卡片。当用户在左侧的甘特图上选择不同的航班时,指标卡片会动态更新,显示所选飞机飞往目的地机场的总航班数。在此示例中,这架飞机飞往休斯顿(IAH)的总航班数为 680 次。