Getting started(入门指南)
:::callout{theme="neutral"} Note that this tutorial is intended as an illustrative example. Since the Foundry Ontology is customized to your needs and data, you may not have access to the same ontology resources to complete the tutorial as written. :::
This tutorial is intended for new Workshop builders and walks through the configuration of a simple Workshop module. Concepts covered below will include creating a new module, configuring widgets like the Object Table, Filter List, and Object View, and enabling writeback through an Action-backed Button Group widget.
In this example storyline, our aim is to build a “Flight Alert Inbox” that surfaces potential flight delays and cancellations and presents a user with options to easily understand and take action on these alerts. Our target user is an airline supervisor who needs to track these alerts in real time, prioritize which alerts require response next, and resolve alerts quickly.
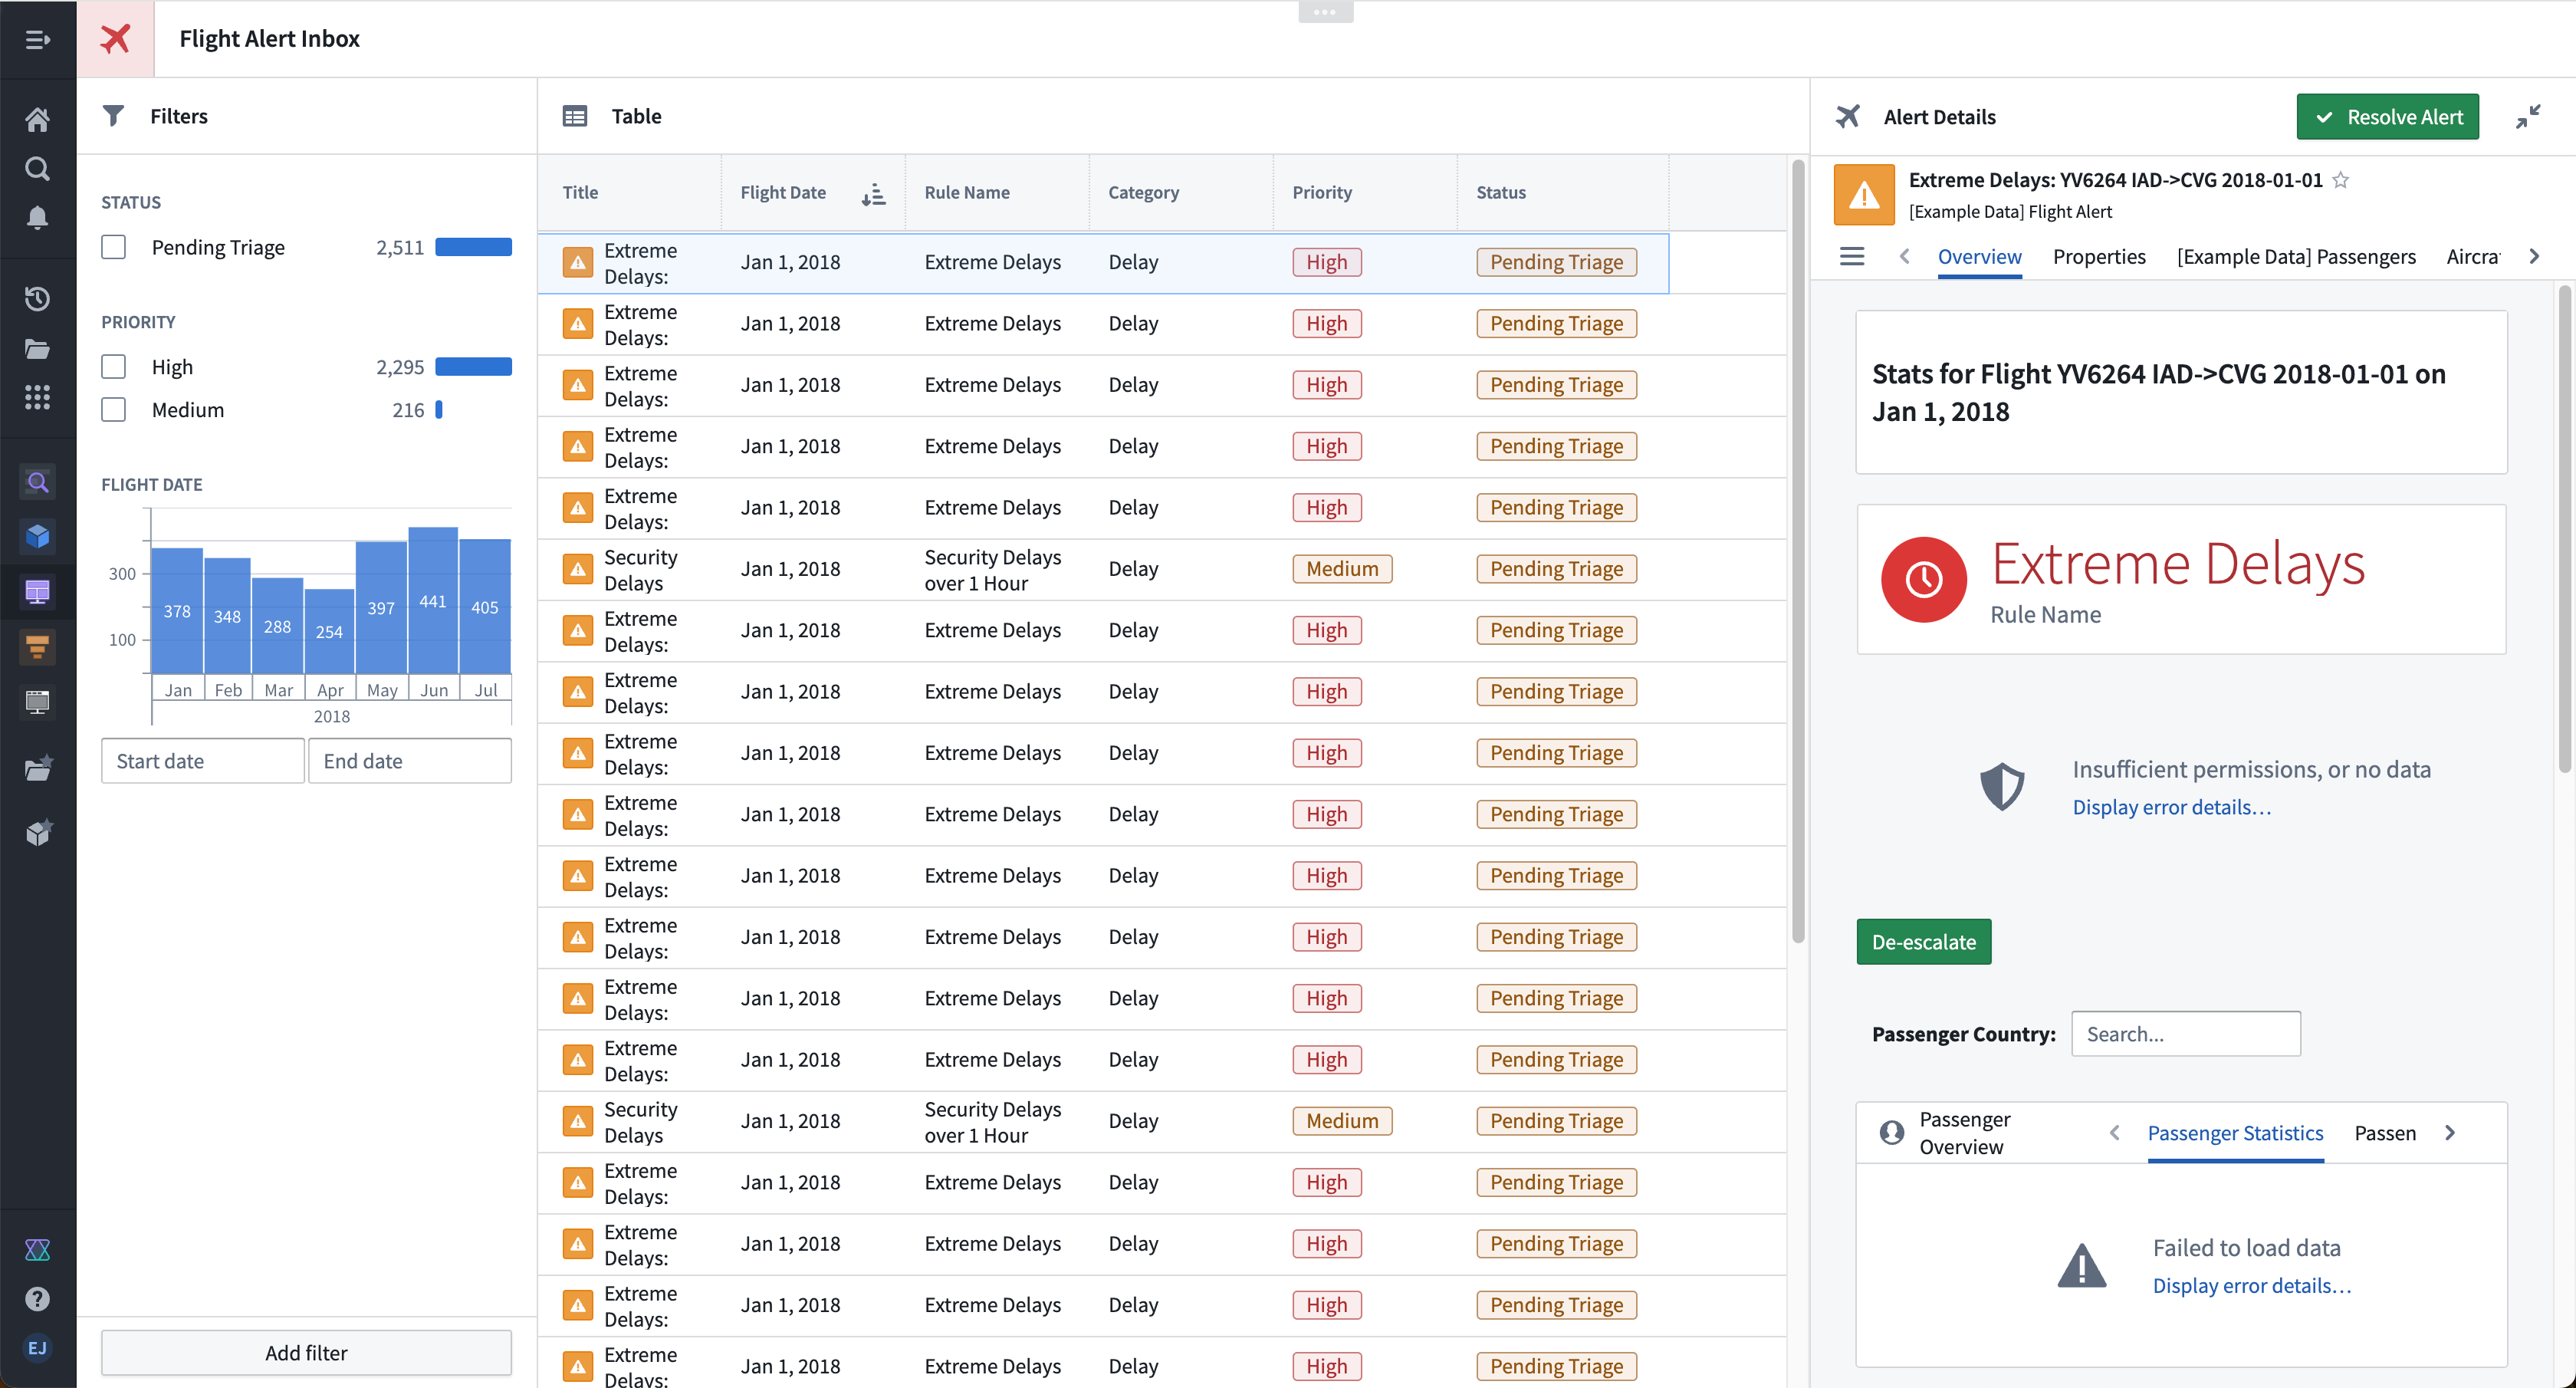
The image below shows the end result of this tutorial:
:::callout{theme="success" title="Palantir Learning portal"} Get started and build your first application with the course on learn.palantir.com ↗. :::
Part I: Initial setup
- To create a new module, open Projects & Files from the left workspace navigation panel, then find your desired Project or folder. Once there, select New > Workshop module in the top right to create a new module within the current Project or folder. The new module will inherit the permission of the Project or folder in which it is created.
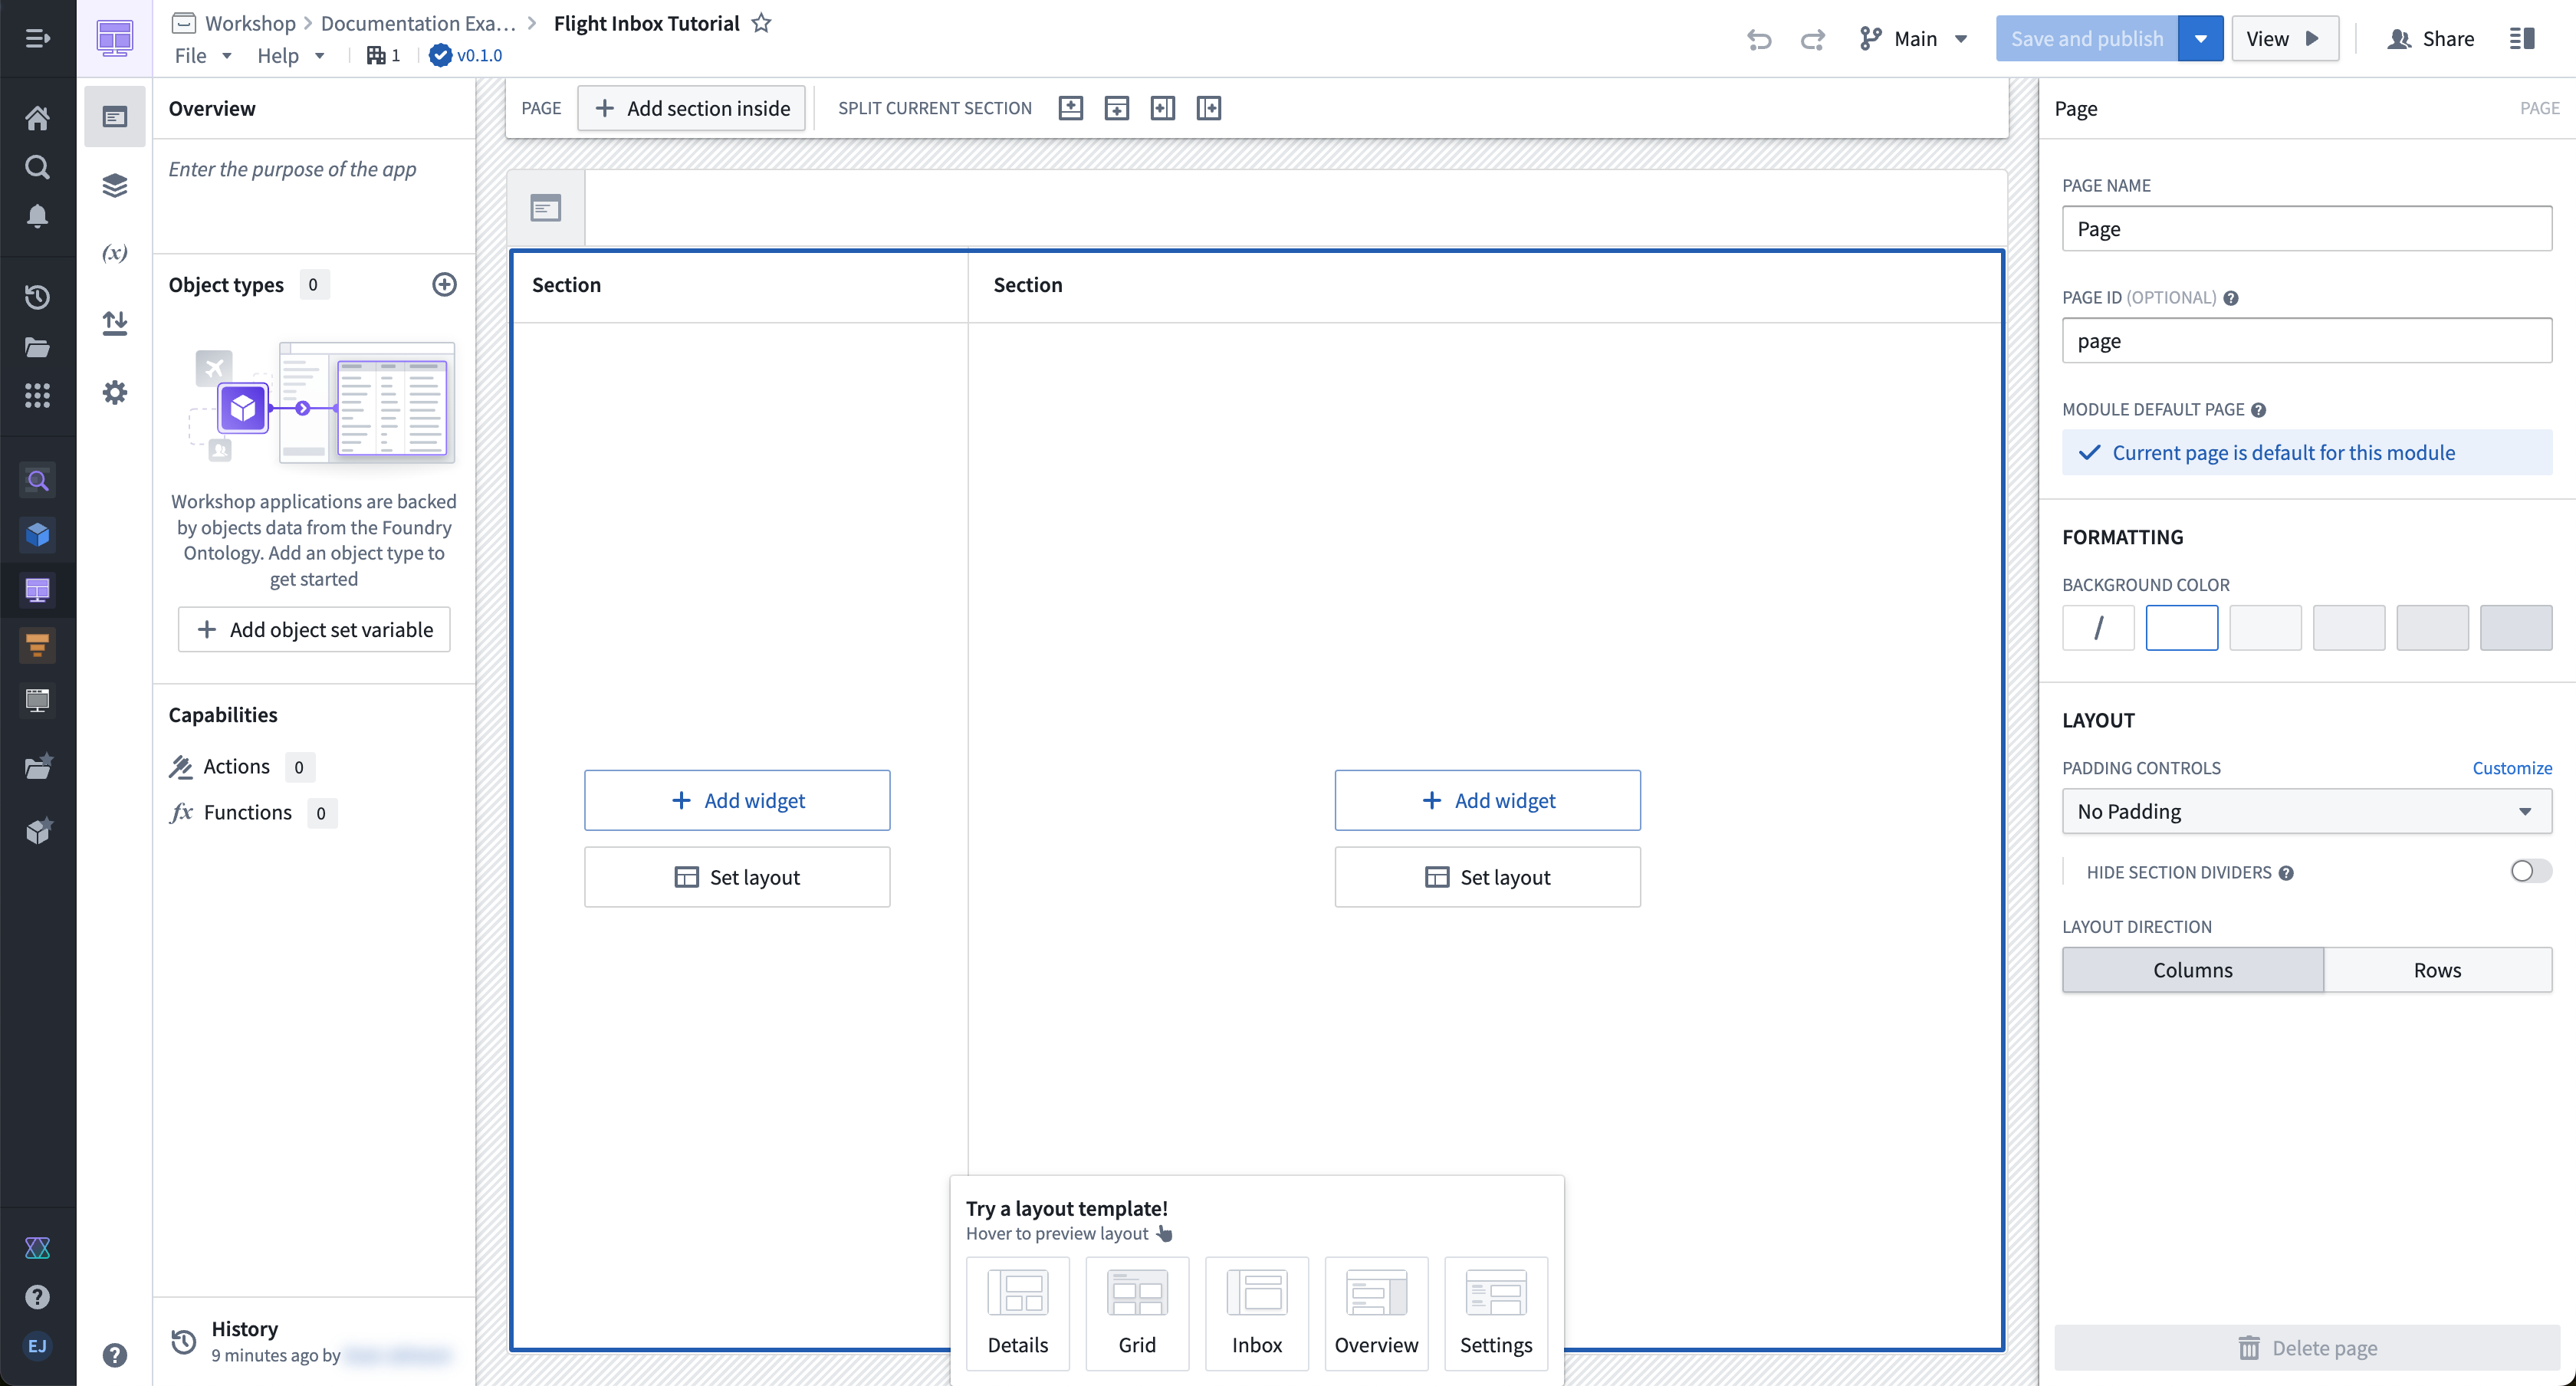
- The module resource name will appear in the top left; by default, the name will have the format “New module (2022-04-08 15:16:23)”. We can select this default to enter a more descriptive and memorable resource name. In this case, we will name the module “Flight Inbox Tutorial.” After this change, our screen should resemble the following:
Part II: Configure your initial view
Let’s add and configure an Object Table widget for the Flight Alert objects:
- On the right side of your module layout, select Add widget, then select the Object table widget from the widget selector that appears.
- In the configuration panel for the Object table 1 widget, use the Object set dropdown menu to define the data that will be displayed in this widget. In the dropdown menu, select + New object set variable, and in the variable definition popover that appears, choose the Starting object set dropdown menu and select [Example Data] Flight Alert. If you cannot find [Example Data] Flight Alert, contact Palantir Support.
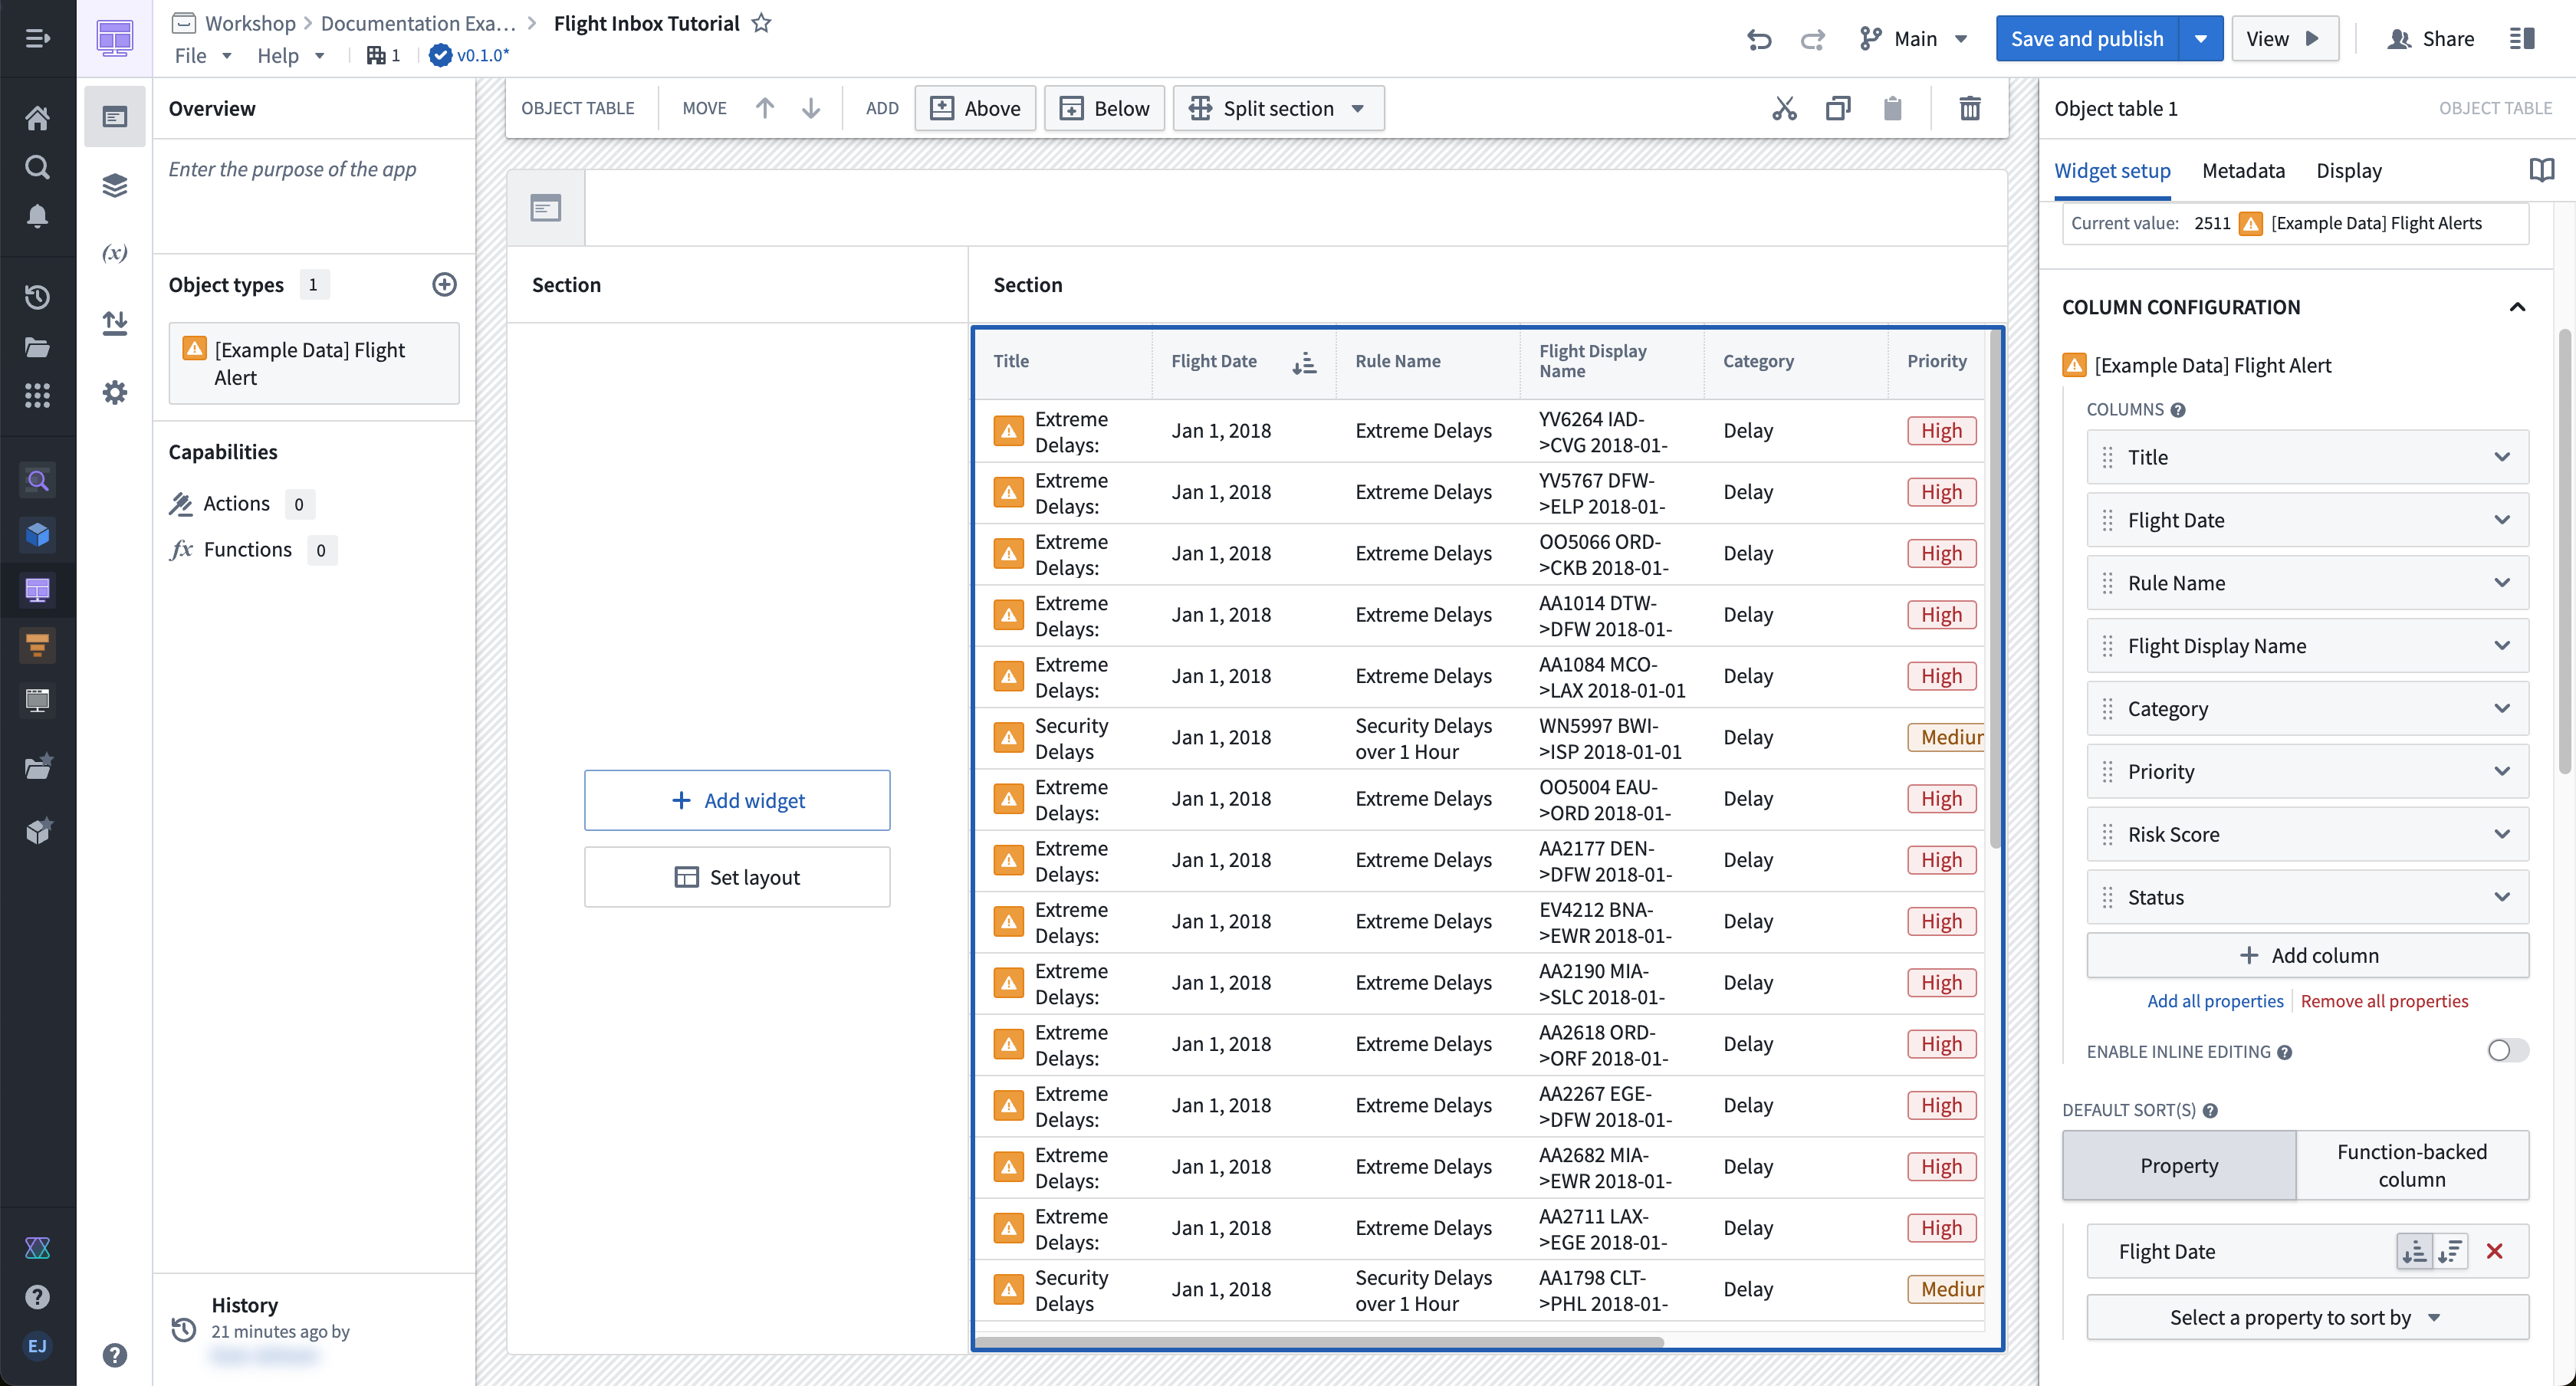
- Return to the main configuration panel for the Object table 1 widget, and look for the Column Configuration section to select Add all properties. This will populate the Object Table widget with a column for each property of the [Example Data] Flight Alert object type. You can also configure specific columns with the + Add column button if desired.
- Under Columns, adjust the column order as you like and remove any undesired properties. For example, drag the Flight Date column to the top of the list so it displays as the first column after the object title in the object table.
- Scroll down in the configuration panel to the Default sort(s) section, and select the Flight Date property to sort by.
Part III: Configure filtering
To configure filtering, first add and configure a Filter List widget for Flight Alert objects:
-
On the left side of your module layout, select Add widget, then choose the Filter list widget from the selector that appears.
-
In the configuration panel for the Filter list 1 widget, select the Object set dropdown menu to define the data that will be displayed. Again, select + New object set variable, and in the variable definition popover that appears, choose the Starting object set dropdown menu then [Example Data] Flight Alert. You must define a new object set variable to back the Filter List widget so that the filter does not limit the base object set that backs the widget.
-
Return to the main configuration panel for the Filter list 1 widget, and look for the Filters Configuration section to use the + Add filter button to add filters for the following properties: Status, Priority, and Flight Date.
-
In the Filter List configuration, set Layout configuration to vertical to display filters in a stacked list. For a more compact experience, you can instead choose Pills, which displays filters as interactive pills that open a popover for configuration.
-
At the bottom of this configuration panel, switch on the toggle to Allow users to add and remove filters.
Next, modify the Object Table widget to accept the filter criteria output from our Filter List widget:
- Select the Object Table widget to show its configuration panel on the right side of the screen.
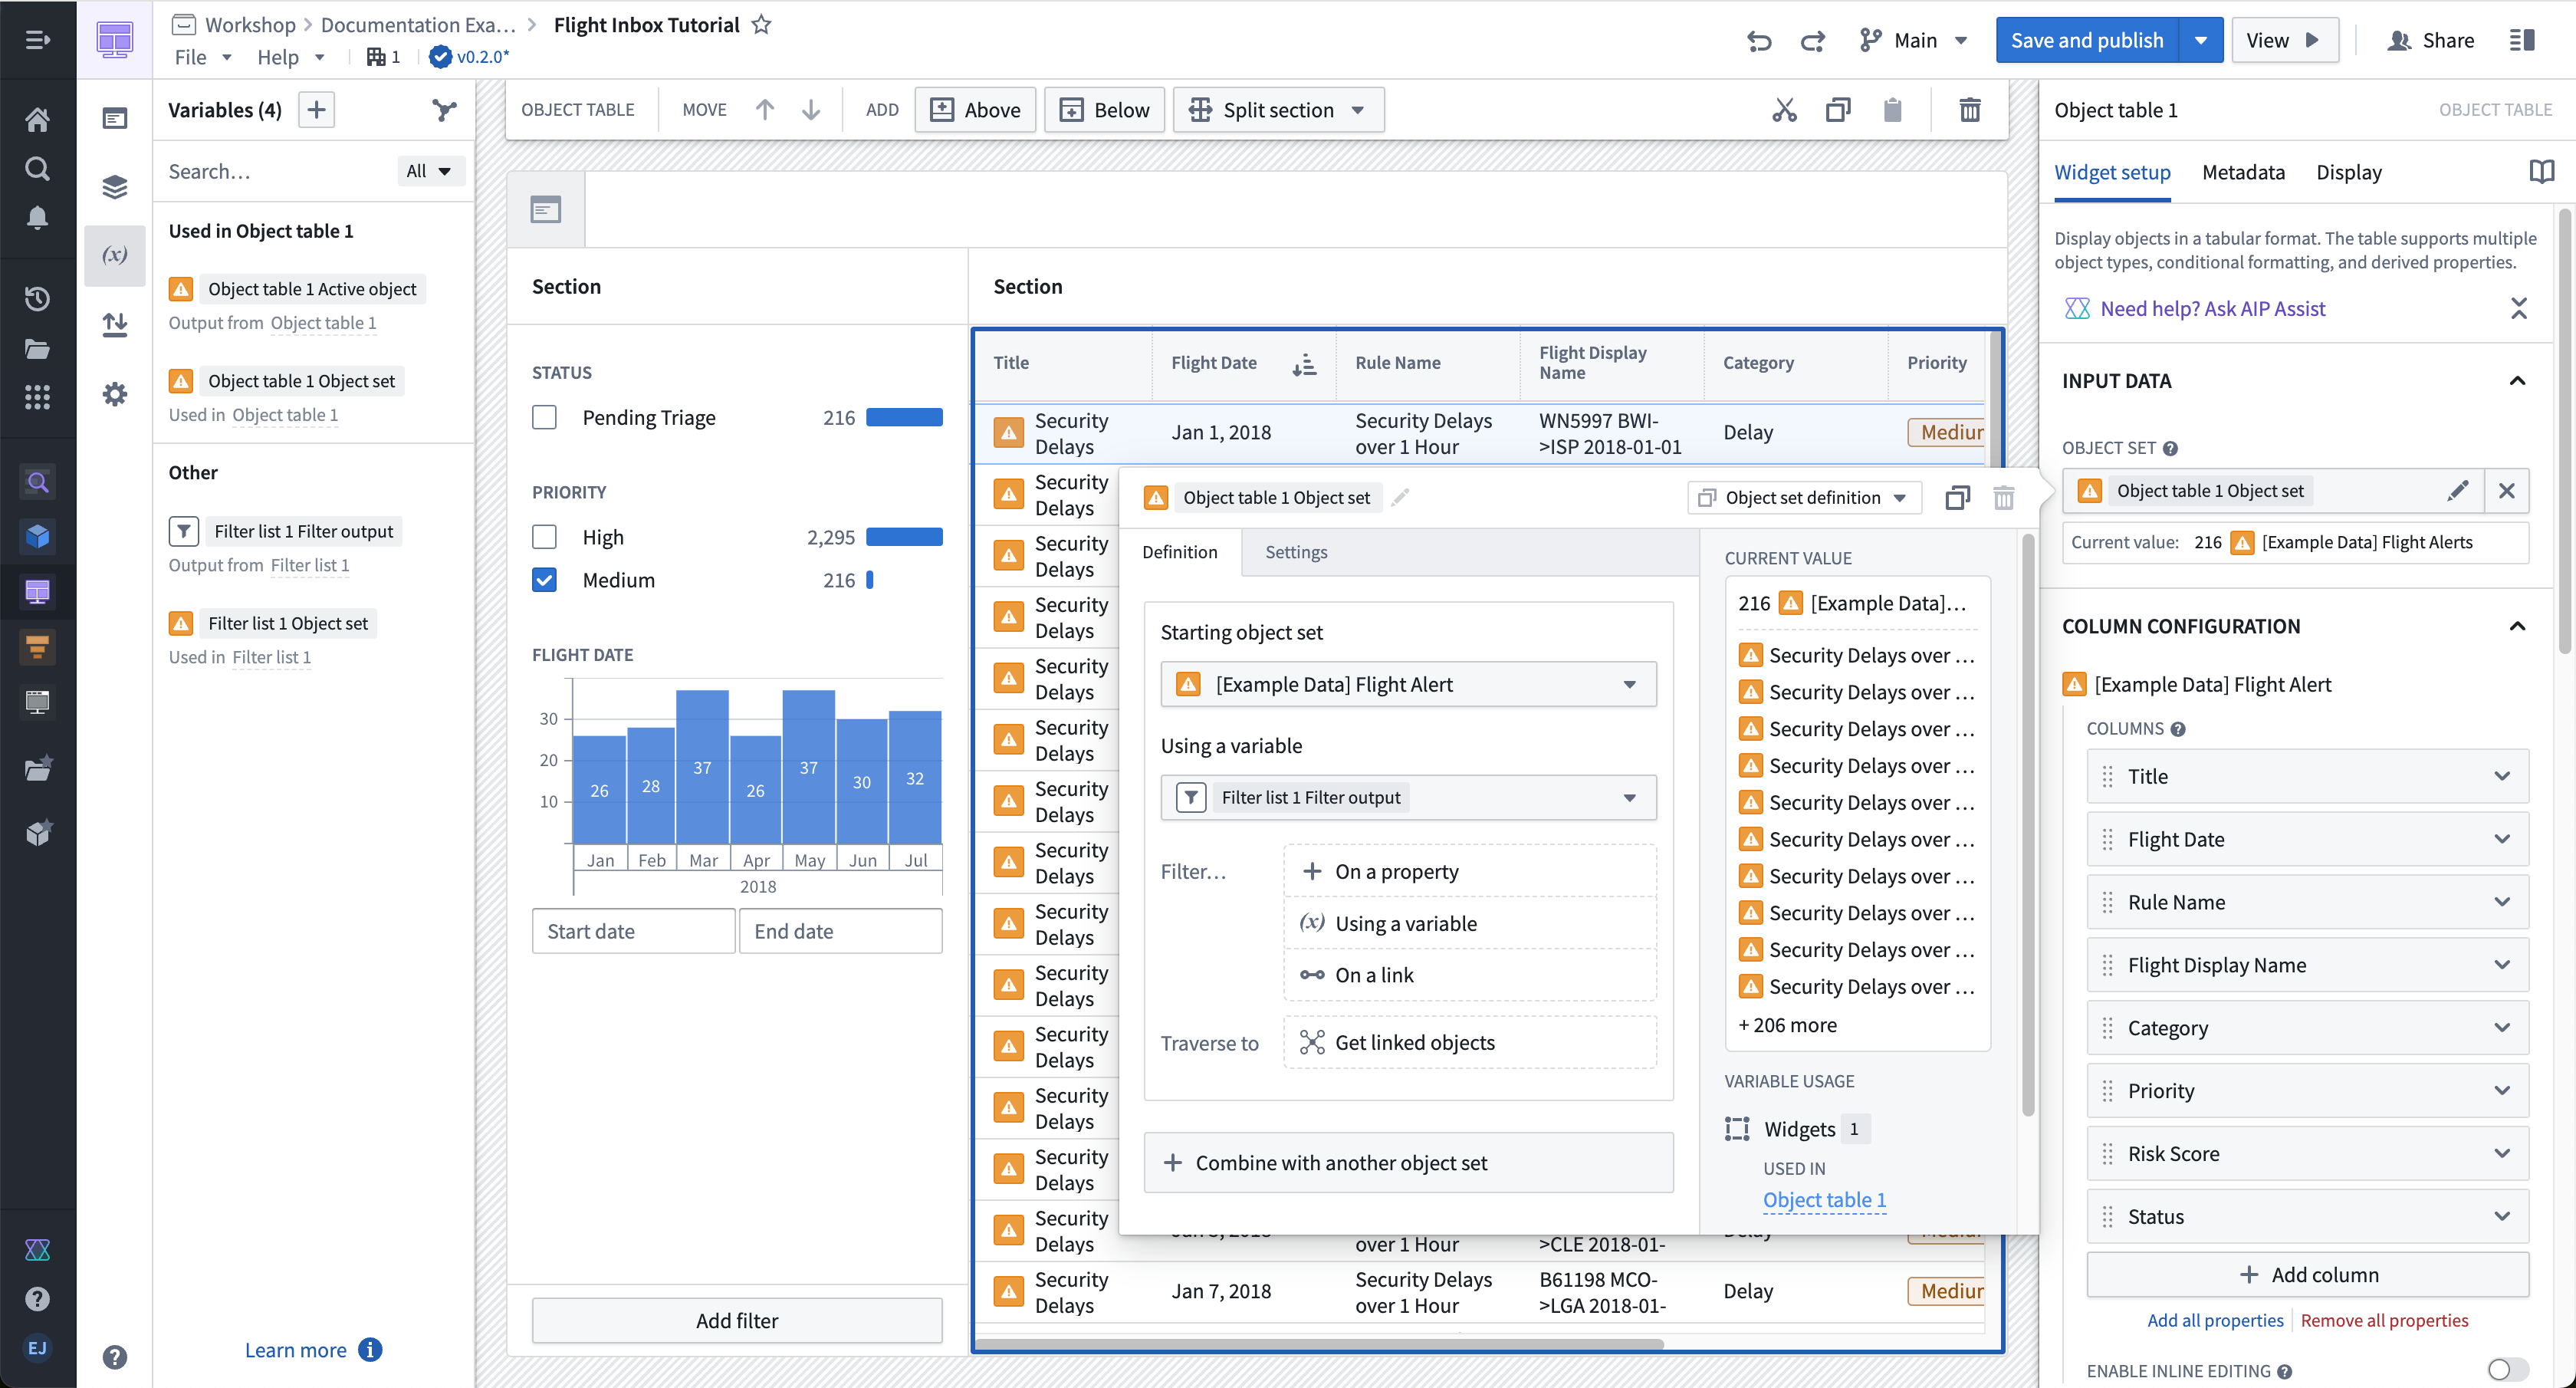
- Within the configuration panel, select Object set. In the variable definition popover that appears, choose the Filter... — Using a variable option and select the Filter list 1 Filter output variable.
- Test that filtering works by toggling on a filter in the panel (for example, by filtering to Alert Type of Priority: Medium). You should notice the filter applied to your Object Table.
:::callout{theme="neutral"} The Filter list 1 Filter output is an object set filter variable. You can set default filters and, if needed, enable filter value extraction to reuse selected values elsewhere in your module. For more information, see the documentation on object set filter variables. :::
Part IV: Configure a collapsible panel for the Object View
Let’s add and configure an Object View widget for the active object in the Object Table widget.
-
Select the section surrounding the object title on the right side of the screen and note the Section toolbar that appears at the top of your module. Choose the Add — Right option to add a new section to the right of the Object Table widget.
-
Select the new section that appeared. Within the Section configuration panel on the right, toggle on the options for Section Header and Collapsible. Also, set the column width to an Absolute pixel size of
500. -
Next, select + Add widget within this section, then select the Object View widget from the selector that appears.
-
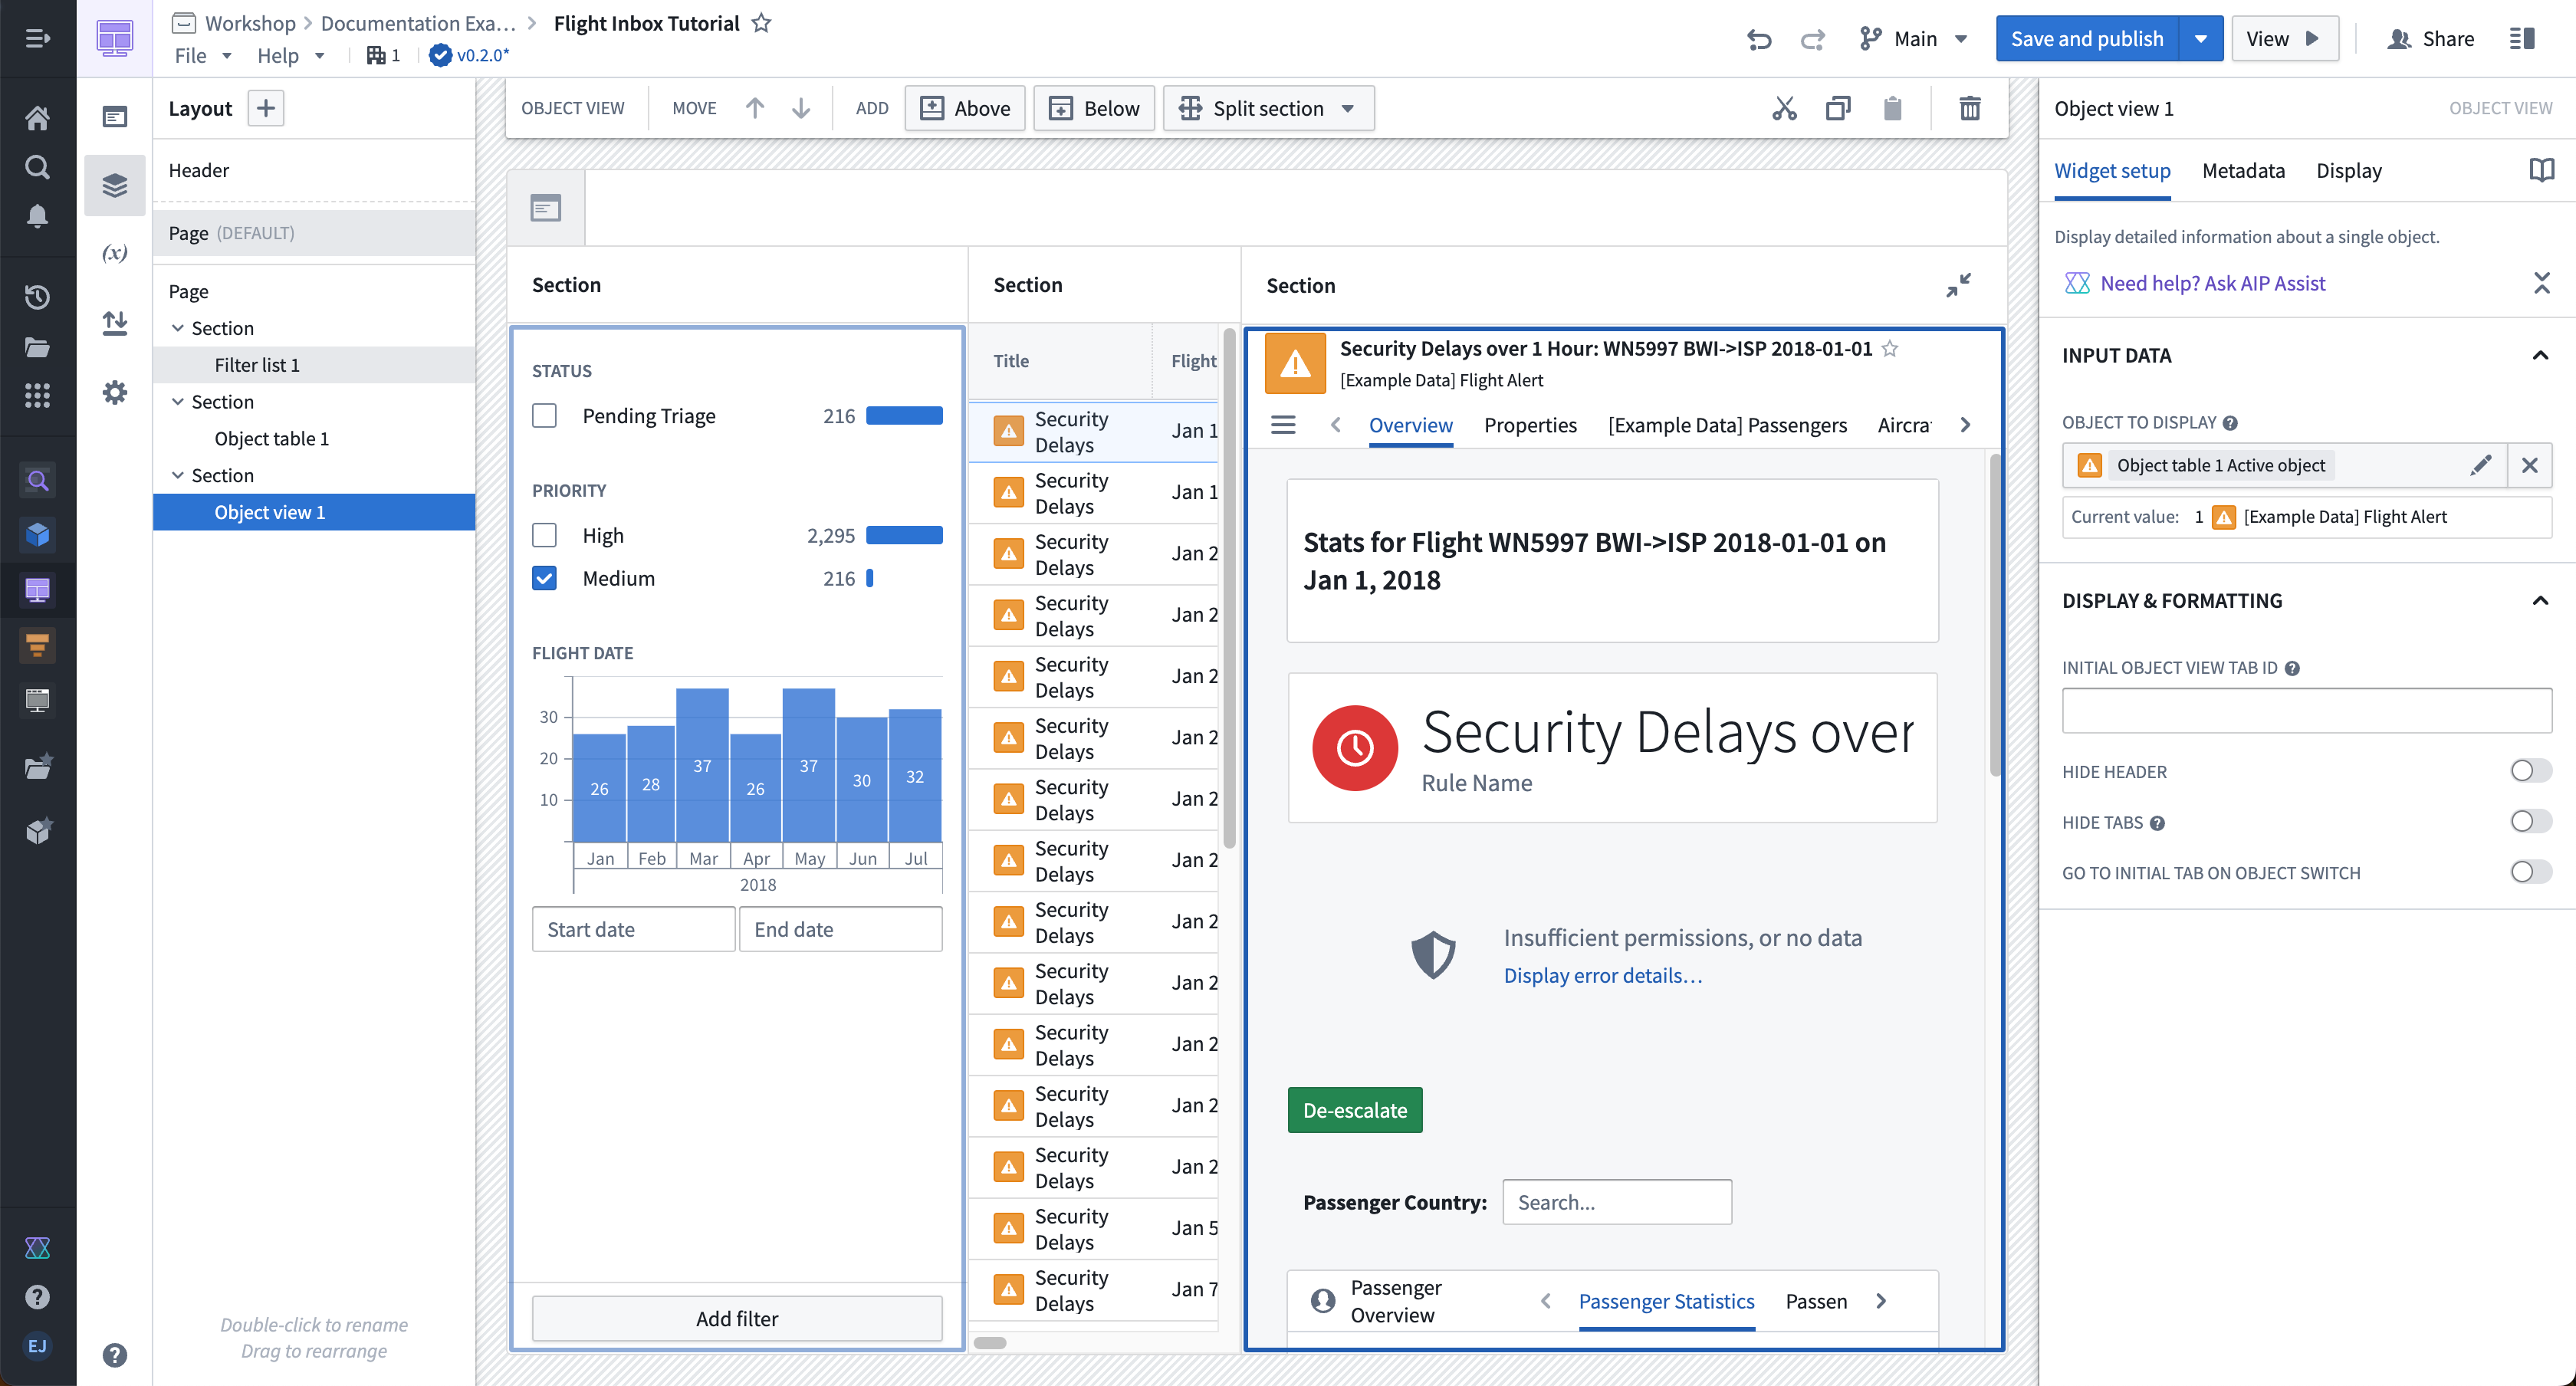
In the configuration panel, open the Object to display option and choose the Object Table 1 Active Object variable that is an output from the Object Table widget.
-
In the Object View Display & formatting settings, set Form factor to full. Since the section already has a header configured, you can optionally toggle Hide header to avoid displaying both the section header and the widget header. If you choose the Panel form factor instead, set Panel behavior to Object instance so the panel displays the active object from the Object Table.
Part V: Enable writeback with Actions
:::callout{theme="neutral"} The below section assumes that the [Example Data] De-escalate Flight Alert action type has already been created. For details on how to create a new action type, see the documentation on how to use Actions in Workshop. :::
Now, let's add and configure a Resolve Alert button to allow users to write back to the Flight Alert data when they resolve an issue.
- Select the section header above the newly configured Object View header. Choose the plus sign (+) on the right, then select the Button Group widget from the selector that appears.
- Next, configure the title and styling of the button. Under the Button Configuration header, select the first button, named Button 1 by default. Within the button configuration, change Text to
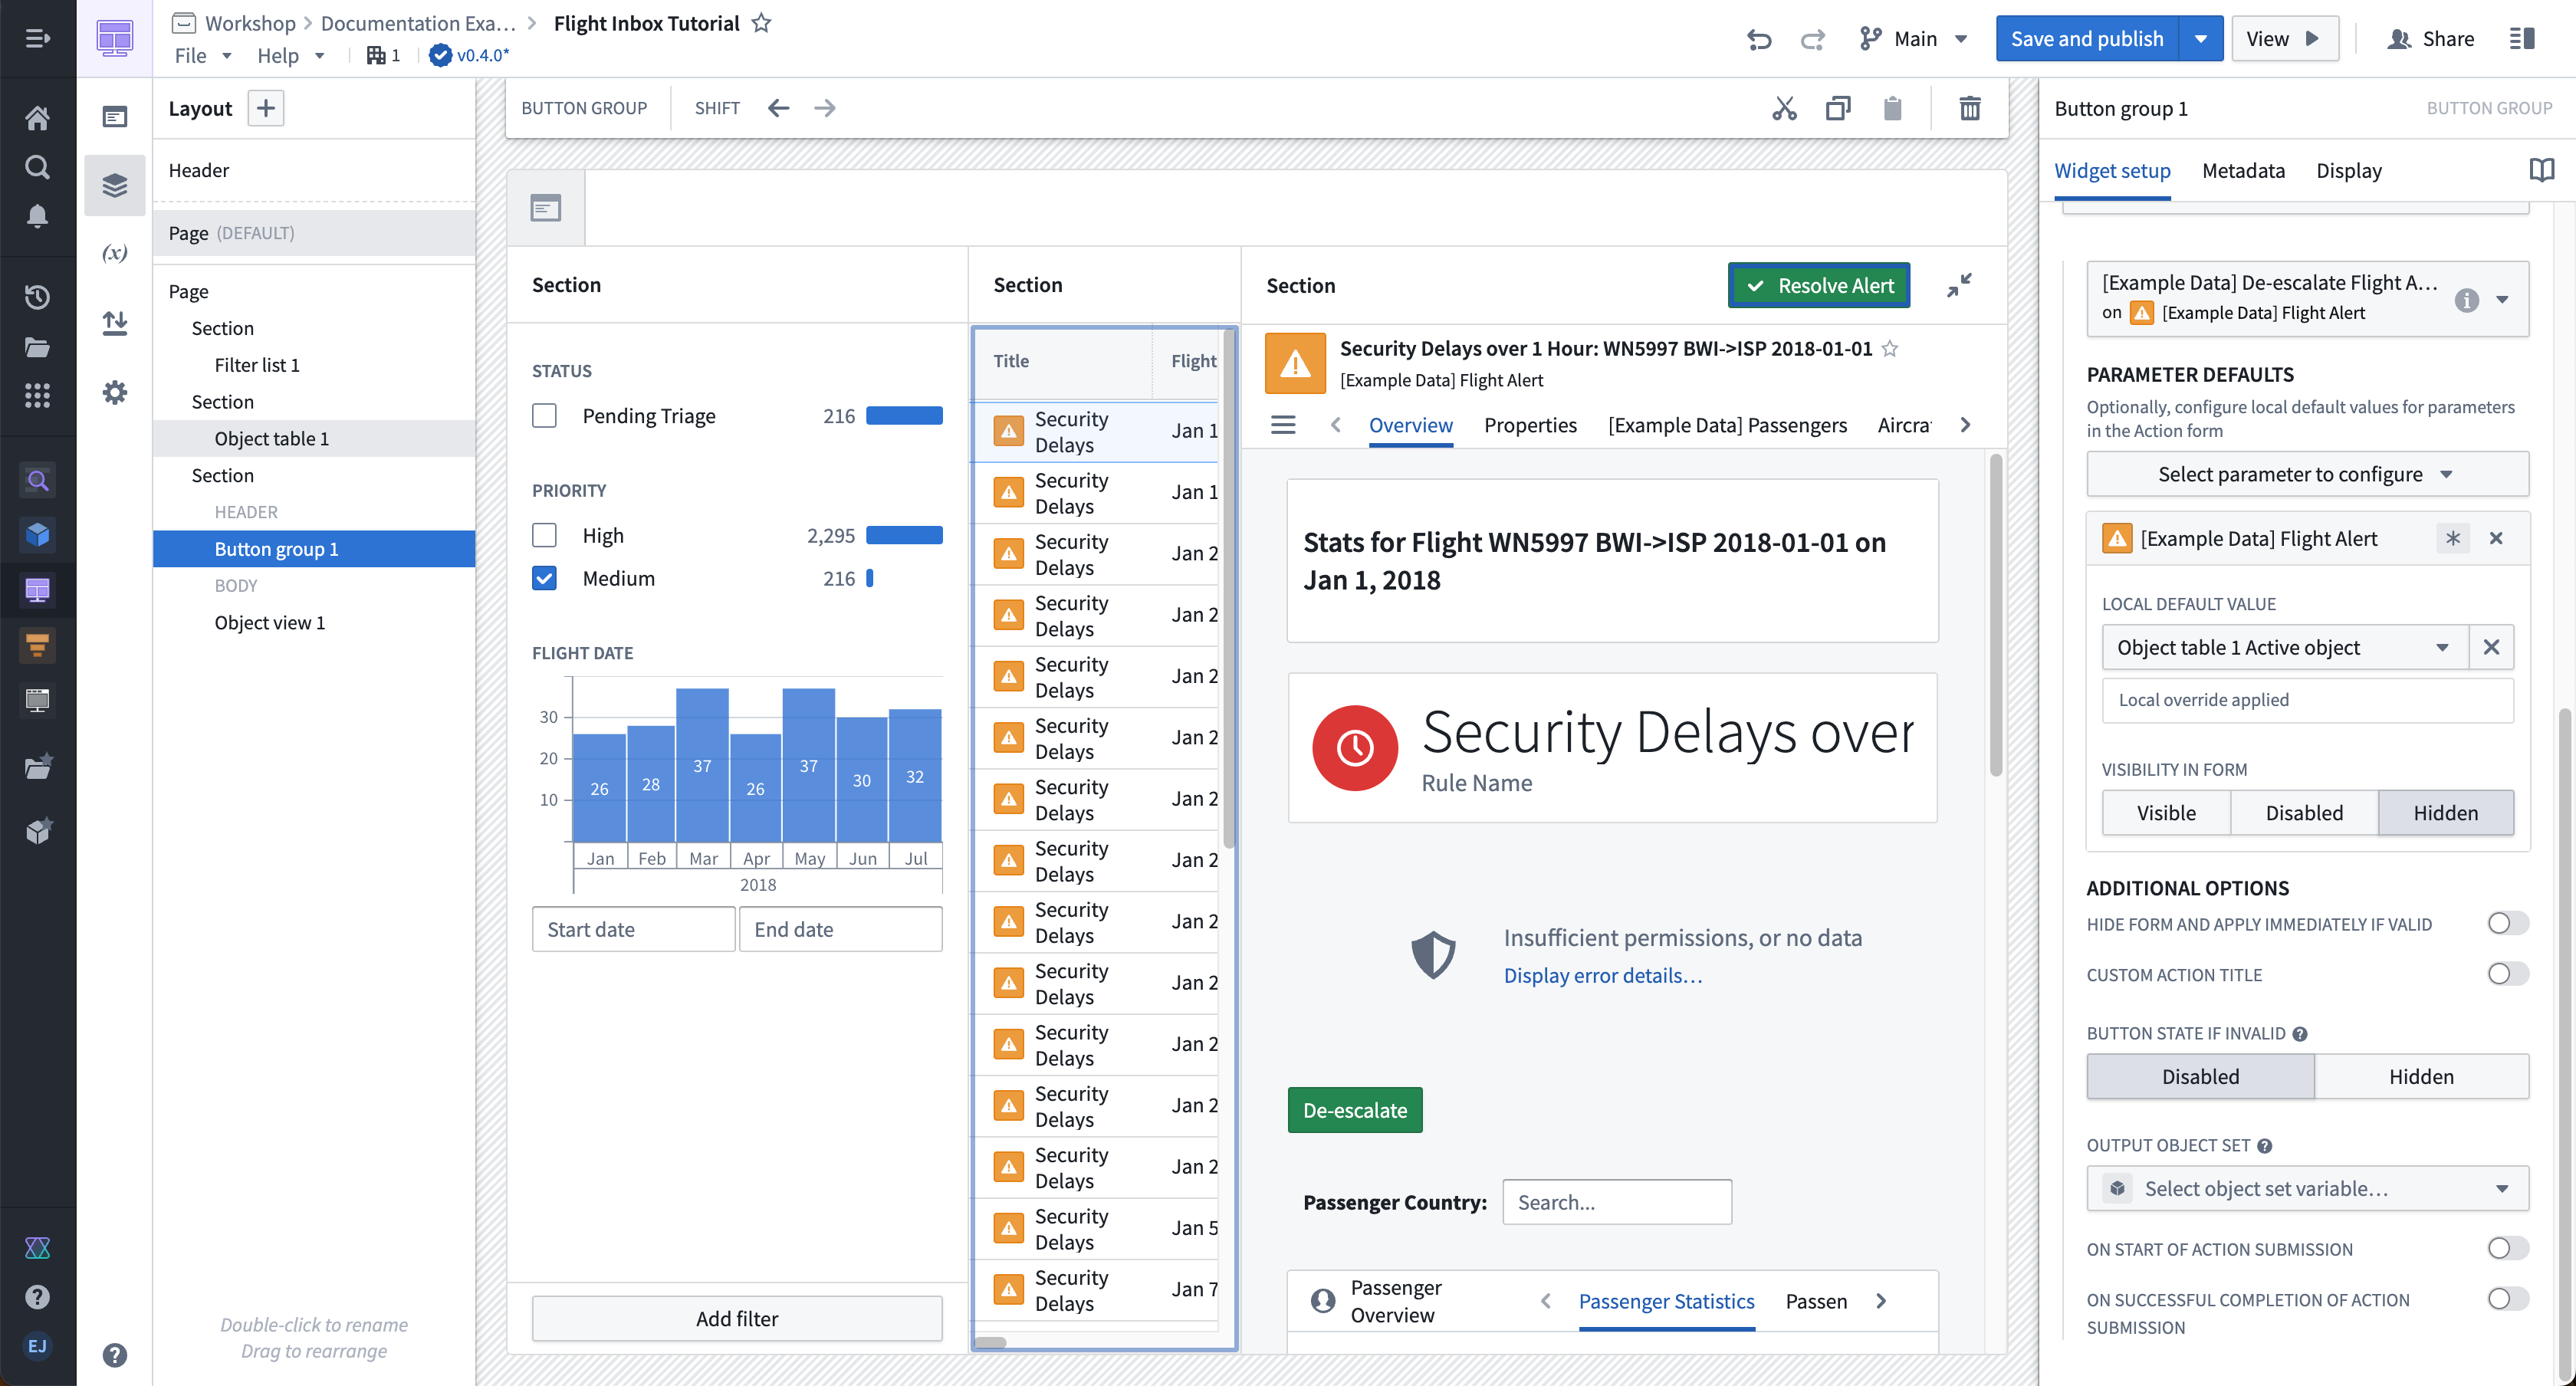
Resolve Alert, change Intent toSuccess, and change Left icon toSmall tick. - We then configure the action type we want to trigger when the button is selected by a user. In the same Item block, change the On click setting to Action, and use the Select an action... dropdown menu to choose the
[Example Data] De-escalate Flight AlertAction. In the Parameter Defaults section that appears, we can configure the default input parameters for this Action. For the [Example Data] Flight Alert parameter, choose the Object table 1 Action object variable that we also use to back the Object View widget. Leave the Comment variable without a default so that a user can manually enter how they resolved this flight alert. - Under the [Example Data] Flight Alert parameter configuration, select Hidden for the Visibility in form value. This will prevent the
Alertobject from appearing in the form that is shown to the user after interacting with theResolve Alertbutton.
Part VI: Polish your inbox and add headers
We can now configure the overall header of our module.
- Select the currently unconfigured header at the top of our module. In the configuration panel that appears on the right, change the Icon to an Airplane with a color of Red 3. In the same configuration panel, set the Title input to
Flight Alert Inbox. - Finally, configure the section headers. To configure the section headers of our filter, object table, and object view sections, select the header of each. Then, use the configuration panel on the right to configure the Title under the Section configuration (such as “Filters”) and choose a Blueprint icon (such as “filter”) to display in each section header. Your end result should look like the inbox seen below and at the top of this tutorial.
中文翻译
入门指南
:::callout{theme="neutral"} 请注意,本教程仅作为示例说明。由于 Foundry 本体论(Ontology)是根据您的需求和数据进行定制的,您可能无法访问完成本教程所需的相同本体论(Ontology)资源。 :::
本教程面向 Workshop 的新手构建者,将引导您完成一个简单 Workshop 模块的配置。以下涵盖的概念包括创建新模块、配置对象表(Object Table)、筛选列表(Filter List)和对象视图(Object View)等小部件,以及通过基于操作(Action)的按钮组(Button Group)小部件启用回写功能。
在本示例场景中,我们的目标是构建一个"航班预警收件箱",用于显示潜在的航班延误和取消信息,并为用户提供易于理解和处理这些预警的选项。我们的目标用户是需要实时跟踪这些预警、确定哪些预警需要优先处理并快速解决预警的航空公司主管。
下图显示了本教程的最终结果:
:::callout{theme="success" title="Palantir 学习门户"} 通过 learn.palantir.com ↗ 上的课程开始学习并构建您的第一个应用程序。 :::
第一部分:初始设置
- 要创建新模块,请从左侧工作区导航面板中打开项目与文件(Projects & Files),然后找到您想要的项目或文件夹。进入后,选择右上角的新建 > Workshop 模块(New > Workshop module),在当前项目或文件夹中创建新模块。新模块将继承其创建所在项目或文件夹的权限。
- 模块资源名称将出现在左上角;默认情况下,名称格式为"新模块 (2022-04-08 15:16:23)"。我们可以选择此默认名称,输入更具描述性和易记性的资源名称。在本例中,我们将模块命名为"航班收件箱教程(Flight Inbox Tutorial)"。更改后,屏幕应类似于下图:
第二部分:配置初始视图
让我们为航班预警(Flight Alert)对象添加并配置一个对象表(Object Table)小部件:
- 在模块布局的右侧,选择添加小部件(Add widget),然后从出现的小部件选择器中选择对象表(Object table)小部件。
- 在对象表 1(Object table 1)小部件的配置面板中,使用对象集(Object set)下拉菜单定义将在此小部件中显示的数据。在下拉菜单中,选择+ 新建对象集变量(+ New object set variable),在出现的变量定义弹出框中,选择起始对象集(Starting object set)下拉菜单,然后选择[示例数据] 航班预警([Example Data] Flight Alert)。如果找不到[示例数据] 航班预警([Example Data] Flight Alert),请联系 Palantir 支持。
- 返回对象表 1(Object table 1)小部件的主配置面板,找到列配置(Column Configuration)部分,选择添加所有属性(Add all properties)。这将为[示例数据] 航班预警([Example Data] Flight Alert)对象类型的每个属性在对象表小部件中添加一列。如果需要,您也可以使用+ 添加列(+ Add column)按钮配置特定列。
- 在列(Columns)下,根据需要调整列顺序并删除任何不需要的属性。例如,将航班日期(Flight Date)列拖到列表顶部,使其在对象表中显示为对象标题后的第一列。
- 在配置面板中向下滚动到默认排序(Default sort(s))部分,选择航班日期(Flight Date)属性进行排序。
第三部分:配置筛选
要配置筛选,首先为航班预警(Flight Alert)对象添加并配置一个筛选列表(Filter List)小部件:
- 在模块布局的左侧,选择添加小部件(Add widget),然后从出现的选择器中选择筛选列表(Filter list)小部件。
- 在筛选列表 1(Filter list 1)小部件的配置面板中,选择对象集(Object set)下拉菜单以定义要显示的数据。再次选择+ 新建对象集变量(+ New object set variable),在出现的变量定义弹出框中,选择起始对象集(Starting object set)下拉菜单,然后选择[示例数据] 航班预警([Example Data] Flight Alert)。您必须定义一个新的对象集变量来支持筛选列表小部件,以便筛选不会限制支持该小部件的基础对象集。
- 返回筛选列表 1(Filter list 1)小部件的主配置面板,找到筛选配置(Filters Configuration)部分,使用+ 添加筛选(+ Add filter)按钮为以下属性添加筛选:状态(Status)、优先级(Priority)和航班日期(Flight Date)。
- 在筛选列表配置中,将布局配置(Layout configuration)设置为垂直(vertical),以堆叠列表形式显示筛选。如需更紧凑的体验,您可以选择药丸(Pills),它将筛选显示为交互式药丸,点击可打开弹出框进行配置。
- 在此配置面板底部,打开允许用户添加和删除筛选(Allow users to add and remove filters)的开关。
接下来,修改对象表(Object Table)小部件以接受来自筛选列表小部件的筛选条件输出:
- 选择对象表小部件以在屏幕右侧显示其配置面板。
- 在配置面板中,选择对象集(Object set)。在出现的变量定义弹出框中,选择筛选... — 使用变量(Filter... — Using a variable)选项,然后选择筛选列表 1 筛选输出(Filter list 1 Filter output)变量。
- 通过在面板中打开一个筛选来测试筛选功能是否正常工作(例如,筛选预警类型为优先级:中(Priority: Medium))。您应该会注意到筛选已应用到您的对象表中。
:::callout{theme="neutral"} 筛选列表 1 筛选输出(Filter list 1 Filter output)是一个对象集筛选变量。您可以设置默认筛选,并在需要时启用筛选值提取,以便在模块的其他位置重用所选值。有关更多信息,请参阅对象集筛选变量文档。 :::
第四部分:为对象视图配置可折叠面板
让我们为对象表小部件中的活动对象添加并配置一个对象视图(Object View)小部件。
- 选择屏幕右侧对象标题周围的区域,注意模块顶部出现的部分工具栏(Section toolbar)。选择添加 — 右侧(Add — Right)选项,在对象表小部件的右侧添加一个新部分。
- 选择出现的新部分。在右侧的部分配置面板(Section configuration panel)中,打开部分标题(Section Header)和可折叠(Collapsible)的选项。同时,将列宽设置为绝对(Absolute)像素值
500。 - 接下来,在此部分中选择+ 添加小部件(+ Add widget),然后从出现的选择器中选择对象视图(Object View)小部件。
- 在配置面板中,打开要显示的对象(Object to display)选项,选择对象表 1 活动对象(Object Table 1 Active Object)变量,该变量是对象表小部件的输出。
- 在对象视图的显示与格式(Display & formatting)设置中,将形态(Form factor)设置为完整(full)。由于部分已配置了标题,您可以选择打开隐藏标题(Hide header),以避免同时显示部分标题和小部件标题。如果选择面板(Panel)形态,请将面板行为(Panel behavior)设置为对象实例(Object instance),以便面板显示对象表中的活动对象。
第五部分:使用操作(Actions)启用回写
:::callout{theme="neutral"} 以下部分假设[示例数据] 降级航班预警([Example Data] De-escalate Flight Alert)操作类型(Action type)已创建。有关如何创建新操作类型(Action type)的详细信息,请参阅如何在 Workshop 中使用操作(Actions)的文档。 :::
现在,让我们添加并配置一个"解决预警(Resolve Alert)"按钮,允许用户在解决问题时将数据回写到航班预警数据中。
- 选择新配置的对象视图标题上方的部分标题。选择右侧的加号(+),然后从出现的选择器中选择按钮组(Button Group)小部件。
- 接下来,配置按钮的标题和样式。在按钮配置(Button Configuration)标题下,选择第一个按钮,默认名称为按钮 1(Button 1)。在按钮配置中,将文本(Text)更改为
解决预警(Resolve Alert),将意图(Intent)更改为成功(Success),将左侧图标(Left icon)更改为小勾号(Small tick)。 - 然后,我们配置用户选择按钮时要触发的操作类型(Action type)。在同一个项目(Item)块中,将点击时(On click)设置更改为操作(Action),并使用选择操作...(Select an action...)下拉菜单选择
[示例数据] 降级航班预警([Example Data] De-escalate Flight Alert)操作(Action)。在出现的参数默认值(Parameter Defaults)部分,我们可以配置此操作(Action)的默认输入参数。对于[示例数据] 航班预警([Example Data] Flight Alert)参数,选择我们用于支持对象视图小部件的对象表 1 操作对象(Object table 1 Action object)变量。将评论(Comment)变量留空,不设置默认值,以便用户可以手动输入他们如何解决此航班预警。 - 在[示例数据] 航班预警([Example Data] Flight Alert)参数配置下,将表单中的可见性(Visibility in form)值选择为隐藏(Hidden)。这将防止
预警(Alert)对象出现在用户与解决预警(Resolve Alert)按钮交互后显示的表单中。
第六部分:完善收件箱并添加标题
现在我们可以配置模块的整体标题了。
- 选择模块顶部当前未配置的标题。在右侧出现的配置面板中,将图标(Icon)更改为飞机(Airplane),颜色选择红色 3(Red 3)。在同一配置面板中,将标题(Title)输入设置为
航班预警收件箱(Flight Alert Inbox)。 - 最后,配置各部分标题。要配置筛选、对象表和对象视图部分的标题,请选择每个部分的标题。然后,使用右侧的配置面板在部分(Section)配置下设置标题(Title)(例如"筛选(Filters)"),并选择 Blueprint 图标(例如"筛选(filter)")显示在每个部分标题中。您的最终结果应类似于下方以及本教程顶部所示的收件箱。