Object Table(对象表格(Object Table))
The Object Table widget is used to display object data in a tabular format. Module builders configuring an Object Table widget can use features including:
- Displaying data on one or multiple object types.
- Choosing which columns are displayed, including time series columns using time series properties, and derived columns generated on-the-fly via a Function.
- Sorting via one or multiple columns.
- Setting column size and row height.
- Displaying conditional formatting and numerical formatting options configured in the Ontology Manager.
- Allowing single- or multi-selection within the table.
- Inline editing to enable cell-level writeback within the table.
- Triggering Workshop Events upon row selection within the table.
- Adding custom row actions in the right-click menu.
The below screenshot shows an example of a configured Object Table displaying Flight Alert data:

Configuration options
:::callout{theme="neutral"}
If your object has a property that stores a URL to an image, you can add the type class hubble:icon to display the image instead of the icon that was selected when setting up the object type. This feature allows you to show pictograms or images to show alongside your data.
:::
For the Object Table widget, the core configuration options are the following:
- Input data
-
Object set: This is the input variable to the Object Table widget and determines the data that will be displayed within the Object Table. This allows a module builder to define a new object set variable or reuse an existing object set variable created elsewhere in this Workshop module.
-
Column configuration
-
Columns: This section determines the columns that will be displayed within the Object Table. This configuration option is revealed in more detail to show the property types seen within the initial object set, once that object set is populated. In addition, special column types allow module builders to display linked objects, parameterized URL links, time series data, and derived columns generated on-the-fly with a function. Users in View mode can also choose to configure the columns shown to them. By selecting Configure columns from the arrow next to a column header, viewers can choose the columns and the order to display them in the Object Table. Review the time series properties section below for more information on time series data, and the function-backed columns section for more information on how to configure derived columns.
:::callout{theme="neutral"} The displayed column name is a text field that defaults to the object type's property name when added. If the object type's property name is later updated in the Ontology, the displayed column name in the Object Table will not automatically change. :::
-
Unsupported property types: Certain large properties (for example, Geoshape and Vector) are not loaded by default to preserve performance. In View mode, users can select the "..." overflow on a cell to load an unsupported property's value on demand. In the widget editor, unsupported properties are marked with a warning icon and tooltip to indicate potential performance impact.
-
Enable inline editing: When enabled, this toggle allows configuration of cell-level edits within the Object Table. See the Inline Edits (cell-level writeback) section below for more information on how to configure this advanced feature.
-
Default sort(s): This setting allows one or more default sorts to be applied to the table. Module builders can sort on both visible property types shown within the table or hidden property types not displayed. If no sort is applied, the data is not sorted. We recommend specifying a sort where necessary.
-
Right-click menu
- Enable export to CSV: When enabled, this toggle allows a user to export object table data to CSV format from a row's right-click menu. This feature supports exporting function-backed columns and linked object properties and is capable of exporting up to 10,000 rows at a time.
- Enable export to Excel: When enabled, this toggle allows a user to export object table data to Excel format from a row's right-click menu. Note that this feature supports exporting up to 200,000 rows at a time.
-
Customize right-click menu: This option enables module builders to configure a row's right-click menu with custom actions. See the custom right-click menu section below for more information on how to configure this feature.
-
Selection
- Active object: This is the first of two output variables in the Object Table and outputs an object set of the currently active / highlighted object. This object set can then be used in downstream widgets within the current module.
- Disable active object auto-selection: By default, the first row in the table is automatically set as the active object at load time. Disabling this setting prevents this and results in an empty active object at load time. Note that auto-selection only triggers when the widget is visible; if the Object Table is within a collapsed section, auto-selection will not occur until the section is expanded and the widget becomes visible.
- Enable multi-select: When enabled, this toggle allows multiple objects to be checked / selected in the table and output via the Selected objects object set variable.
- Selected objects: This is the second of two output variables in the Object Table and outputs an object set of the currently checked / selected objects. This object set can then be used in downstream widgets within the current module. Note: this output variable will only be in use and populated if the Enable multi-select toggle is set to true.
-
On active object selection: This option enables module builders to configure Workshop events to trigger when a row is selected in the table (for example, causing a drawer with a more detailed object view to appear).
-
Display & formatting
- Number of lines to display per row: This number controls the height of each table row.
- Enable value wrapping: When enabled, allows text content to wrap within cells. This option supports wrapping for struct properties and arrays of struct properties. When content is too long to display fully, struct values show ellipsis truncation with hover tooltips displaying the complete value.
- Number of frozen columns: This number determines the number of frozen columns that are anchored to the left of the table and will remain visible when a user scrolls to the right.
- Empty state message: Configure what is displayed by the widget if the object set backing the widget is empty. By Default, the widget will display a generic table icon alongside a "No objects found" message. To customize the display icon and message, select the Custom option.
- Custom "No value" display: When enabled, override what is displayed in the table when there is no value for a cell. By default, "No value" will be displayed.
- Combine multiple object types: This setting only affects tables displaying multiple object types. When disabled, each object type will be displayed within its own tab. When enabled, all object types will be displayed within a single table and, across object types, property types that share both display names and IDs will be combined into a single column. Note that this option is not available when Enable inline editing is set to true.
- Variable-backed column visibility: When enabled, allows control over which columns are visible using a string array variable containing the API names of visible columns. This array variable also controls the order that columns appear in. If the string array is empty, all configured columns will be shown in the table.
- Fit columns horizontally: When enabled, columns will auto-resize to fill the current width of the table.
- Enable narrow headers: When enabled, table headers will narrow from 50 pixels to 30 pixels.
- Conditional formatting colors entire cell: When enabled, conditional formatting will color an entire cell. Note: conditional formatting is configured within the Ontology Manager for normal property types and from within the Object Table widget configuration panel for function-backed properties.
- Hide column configuration: When enabled, hides the Configure columns option present in view mode from the table's header menu.
-
Show security markings: When enabled, property security markings render as a condensed gray pill with an expanded window view on selection.
-
Scenarios
- Scenario to load data from: Select the Scenario to load data for the Object Table. This input also affects what objects appear and their respective order in the Object Table.
- Compare against Scenarios: Enable this toggle to select the Scenario array variable to compare data from. This will compare the data in the table to values from the Scenarios in the array by displaying the values side-by-side in columns which have modifications.
- See the Scenarios documentation for more information.
Save user column configuration
To save a user's column configuration, take the following steps to use a string array variable with state saving:
- Ensure that state saving is enabled.
- Enable Variable-backed column visibility with a new static string array variable (the array variable can be empty). This will store which columns are visible, as well as their order.
- Add an external ID for the string array variable in the Settings panel and ensure it is enabled for use with state saving.
Function-backed columns
:::callout{theme="neutral"} The tutorial below references a Flight Alert object type that may not be available in your Foundry environment. Use the below as a guide and then follow along by using a comparable object type from your Foundry instance. To learn more about Functions, see the dedicated Functions documentation. :::
Summary
To create a function that returns one or more function-backed columns, you will need to meet the following specifications:
- The function’s input parameters must include an
ObjectSet<ObjectType>parameter (and can optionally include other input parameters). ThisObjectSet<ObjectType>parameter will enable the objects displayed in the table to be passed into the function to then generate the desired derived column. Note that anObjectType[]parameter will also work here, but this less performant option is not recommended. -
The function's return type must be a map from the object type to a value or custom type, enabling the function to return a mapping of object to value or custom type that may include one or more fields:
-
In TypeScript v1, use
FunctionsMap<ObjectType, CustomType>. - In TypeScript v2, use
Record<ObjectSpecifier<ObjectType>, CustomType>. - In Python, use
dict[ObjectType, CustomType].
Learn more about custom types.
Once a function that meets the above criteria is configured and published, you can successfully configure a function-backed property column within the Object Table configuration. See below for a more detailed tutorial.
Features of function-backed properties
The Object Table widget supports the display of function-backed properties which are calculated on-the-fly via Functions. This offers module builders considerable flexibility to display columns that could, for example:
- Calculate the sum, difference, or other mathematical operation between two or more other properties.
- Showcase the output of a statistical model that updates based on data entry elsewhere in the Workshop module.
- Display properties from linked objects
- Change what is displayed based on user input elsewhere in the Workshop module.
Configure a single function-backed property
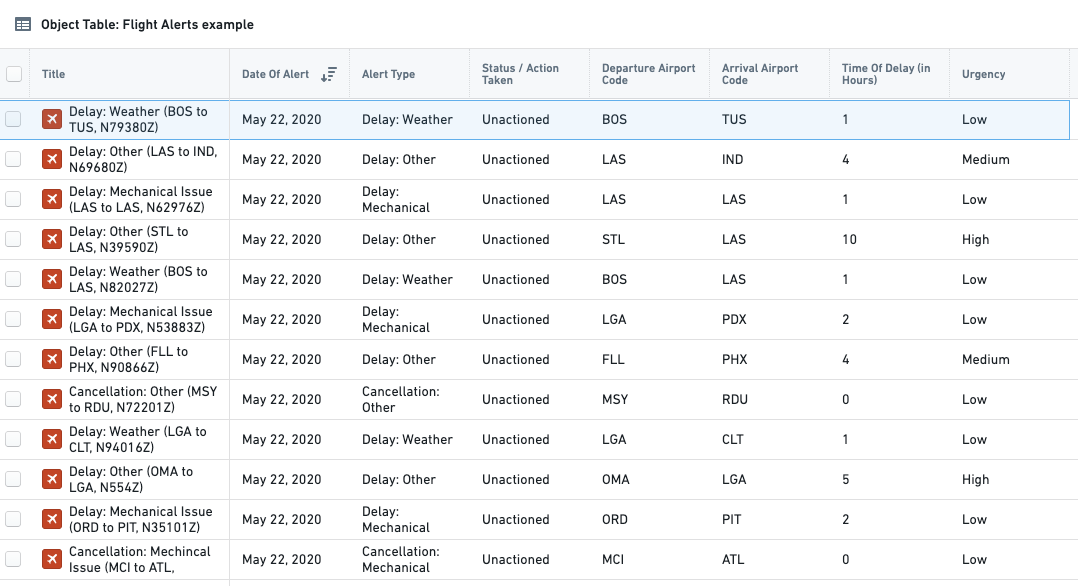
This example uses a function-backed property to help users view and work with the priority of a Flight Alert ticket. Here, the goal is to examine an existing property called Time of Delay (in Hours) and, from this property, generate a new, function-backed column called Urgency. The derived Urgency column marks long delays (over 4 hours) as "High" urgency, moderate delays (between 2 and 4 hours) as "Medium" urgency, and shorter delays (of less than 2 hours) as "Low" urgency. This Urgency derived property should make it easier for users to quickly scan the Object Table and determine which alerts to action first.
To configure this function-backed property, the first step is to configure a function that takes in the expected input (for example, an object set of Flight Alert objects) and returns the expected map output required by the Object Table for a function-backed property (for example, a map of Flight Alert objects to urgency strings). In this example, the logic to calculate urgency is hardcoded into the function itself, as seen below:
```typescript tab="TypeScript v1" import { Function, FunctionsMap } from "@foundry/functions-api"; import { FlightAlertWorkshopTutorial, ObjectSet } from "@foundry/ontology-api";
export class MyFunctions {
@Function()
public flightAlertCalculateUrgency(flightAlerts: ObjectSet```typescript tab="TypeScript v2"
import { ObjectSet, ObjectSpecifier } from "@osdk/client";
import { FlightAlertWorkshopTutorial } from "@ontology/sdk";
async function flightAlertCalculateUrgency(
flightAlerts: ObjectSet<FlightAlertWorkshopTutorial>
): Promise<Record<ObjectSpecifier<FlightAlertWorkshopTutorial>, string>> {
const map: Record<ObjectSpecifier<FlightAlertWorkshopTutorial>, string> = {};
for await(const flightAlert of flightAlerts.asyncIter({"$select": ["timeOfDelayHours"]})) {
const hoursDelayed = flightAlert.timeOfDelayHours;
if (hoursDelayed! > 4) {
map[flightAlert.$objectSpecifier] = "High";
} else if (hoursDelayed! > 2) {
map[flightAlert.$objectSpecifier] = "Medium";
} else {
map[flightAlert.$objectSpecifier] = "Low";
}
}
return map;
}
export default flightAlertCalculateUrgency;
```python tab="Python" from functions.api import function from ontology_sdk.ontology.objects import FlightAlertWorkshopTutorial from ontology_sdk.ontology.object_sets import FlightAlertWorkshopTutorialObjectSet
@function def flight_alert_calculate_urgency( flight_alerts: FlightAlertWorkshopTutorialObjectSet, ) -> dict[FlightAlertWorkshopTutorial, str]: result = {} for flight_alert in flight_alerts.iterate(): hours_delayed = flight_alert.time_of_delay_hours if hours_delayed is not None and hours_delayed > 4: result[flight_alert] = "High" elif hours_delayed is not None and hours_delayed > 2: result[flight_alert] = "Medium" else: result[flight_alert] = "Low" return result
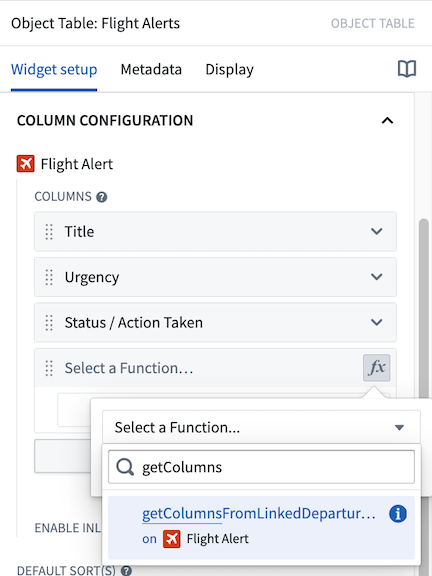
Once this function has been published, configure the `Urgency` derived property to be displayed in this Workshop module. First, within the Object Table's configuration panel in the Workshop module, select the **Add column** button and the option to add a **Function-backed property.**
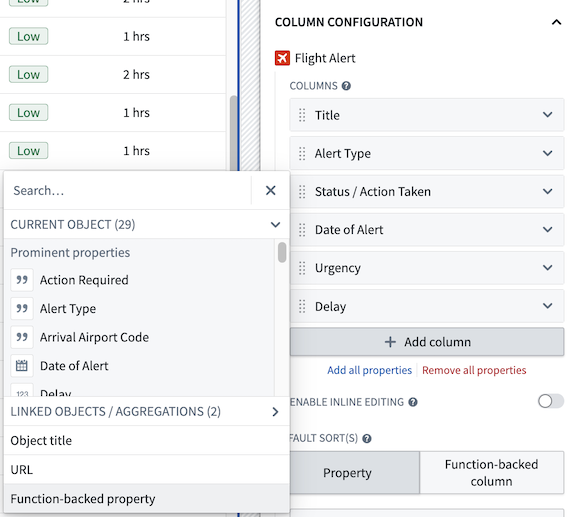
Within the **Function-Backed Property** option that appears in the Columns list, select the "fx" Functions icon and then choose the desired function. In this example, we select the **flightAlertCalculateUrgency** function.
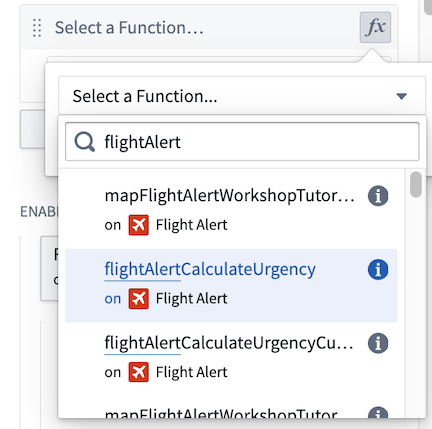
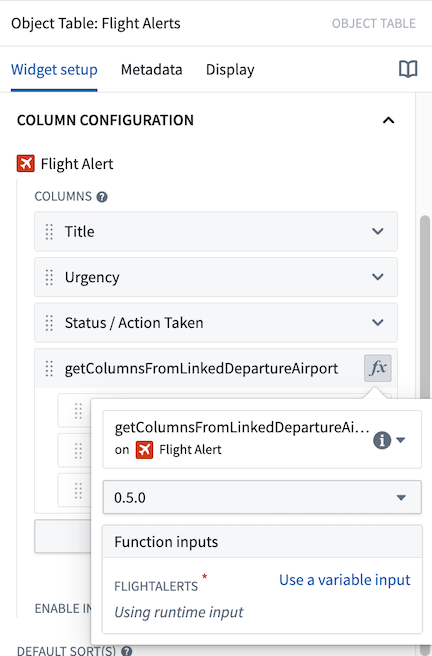
Next, confirm the function version and then configure the necessary inputs for the function. Let's choose **Use a runtime input** to pass only the objects currently displayed in the Object Table and thus optimize the performance of our function. Alternatively, you have the option to pass in an object set variable (that is, the same object set that backs the Object Table).
:::callout{theme="neutral"}
The **Use a runtime input** option will dynamically pass only the objects currently displayed in the Object Table (rather than an entire object set) into a derived column function and provide faster performance. The additional **Use a variable input** option allows passing in an entire object set variable instead (such as the input object set variable that backs the Object Table), but may result in slower performance.
:::

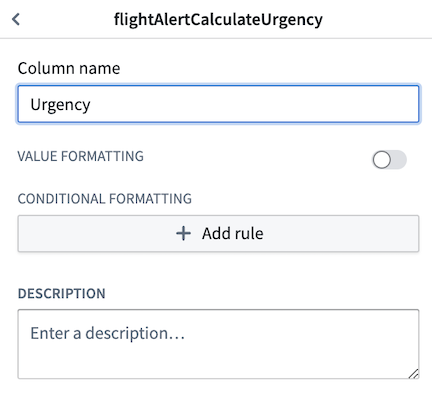
Lastly, select the **Function-backed property** column cell to rename this column to something more descriptive like "Urgency".
The end result will be the following Object Table that calculates the new derived Urgency column on-the-fly and displays this valuable additional information to users.
### Configure multiple function-backed properties
Next, let's walk through a more advanced example to create a single function that produces multiple function-backed properties by using a custom return type. [Learn more about custom types.](https://palantir.com/docs/foundry/functions/types-reference/#structcustom-type) There are several advantages to using a single function to return multiple function-backed properties, including increased performance and clearer organization of the related derived properties code.
In this example, use a function that takes in an `ObjectSet<FlightAlerts>`, traverses a `Departure Airport` link to retrieve a linked `Airport` object, and then returns three properties from that linked `Airport` object. This will enrich the data displayed in the Object Table to include relevant information from a linked object type.
To achieve this goal, first define a custom type to use within this function. This could look like the following:
```typescript tab="TypeScript v1"
interface LinkedDepartureAirportProperties {
airport: string;
city: string;
country: string;
}
```typescript tab="TypeScript v2" interface LinkedDepartureAirportProperties { airport: string; city: string; country: string; }
```python tab="Python"
from dataclasses import dataclass

@dataclass
class LinkedDepartureAirportProperties:
    airport: str
    city: str
    country: str
Then, use this custom type to write a function that returns three function-backed columns for Airport, City, and Country:
```typescript tab="TypeScript v1" import { Function, FunctionsMap } from "@foundry/functions-api"; import { AirportObject, FlightAlertWorkshopTutorial, ObjectSet } from "@foundry/ontology-api";
export class MyFunctions {
@Function()
public getColumnsFromLinkedDepartureAirport(flightAlerts: ObjectSet
    const map = new FunctionsMap<FlightAlertWorkshopTutorial, LinkedDepartureAirportProperties>();
    flightAlerts.all().forEach(alert => {
        // Get airport for this alert
        const airport = iataToAirport[alert.departureAirportCode!];
        // Skip if airport not found
        if (!airport) {
            return;
        }

        map.set(alert, {
            airport: airport.airport!,
            city: airport.city!,
            country: airport.country!,
        });
    });

    return map;
}
}
typescript tab="TypeScript v2"
import { ObjectSet, ObjectSpecifier, Osdk } from "@osdk/client";
import { AirportObject, FlightAlertWorkshopTutorial } from "@ontology/sdk";
async function getColumnsFromLinkedDepartureAirport(
flightAlerts: ObjectSet
```python tab="Python" from functions.api import function from ontology_sdk.ontology.objects import AirportObject, FlightAlertWorkshopTutorial from ontology_sdk.ontology.object_sets import FlightAlertWorkshopTutorialObjectSet
@function def get_columns_from_linked_departure_airport( flight_alerts: FlightAlertWorkshopTutorialObjectSet, ) -> dict[FlightAlertWorkshopTutorial, LinkedDepartureAirportProperties]: # Fetch all linked airports and store in dictionary, keyed by iata iata_to_airport: dict[str, AirportObject] = {} for airport in flight_alerts.search_around_departure_airport().iterate(): iata_to_airport[airport.iata] = airport
result: dict[FlightAlertWorkshopTutorial, LinkedDepartureAirportProperties] = {}
for alert in flight_alerts.iterate():
    # Get airport for this alert
    airport = iata_to_airport.get(alert.departure_airport_code)
    # Skip if airport not found
    if airport is None:
        continue

    result[alert] = LinkedDepartureAirportProperties(
        airport=airport.airport,
        city=airport.city,
        country=airport.country,
    )

return result
``
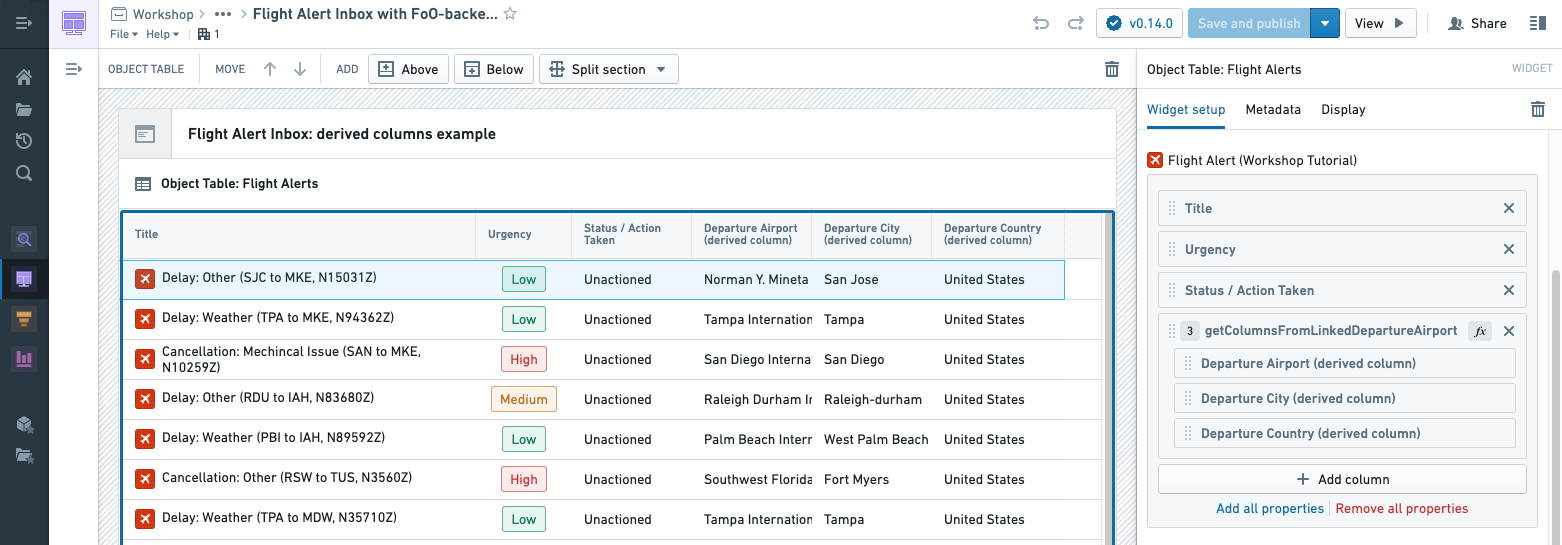
Once the above function is [published](https://palantir.com/docs/foundry/functions/getting-started/#publish-your-functions), it can be used to add derived columns within **Workshop**. Add a newFunction-backed propertycolumn to your Object Table widget that containsFlight Alertobjects as you did in the above section.
In the new column that appears in the column list, select the **fx** icon to choose the function that will back the derived column(s). In this example, select thegetColumnsFromLinkedDepartureAirportfunction defined earlier in this tutorial.
Next, configure the input parameters to the selected function. In this example, the function takes a single input parameter, an object set of Flight Alert objects calledflightAlerts. Let's choose the **Use a runtime input** option to pass the function the objects currently displayed in the Object Table.
:::callout{theme="neutral"}
The **Use a runtime input** option will dynamically pass only the objects currently displayed in the Object Table (rather than an entire object set) into the derived column function and thus provide faster performance. The additional **Use a variable input** option allows passing in an entire object set variable instead (such as the input object set variable that backs the Object Table), but may result in slower performance.
:::
Once the above step is complete, the function should run successfully and display the three expected columns in the **Object Table:**Departure Airport,Departure City, andDeparture Country`. We can either stop here or edit the column display names or column order to improve how the columns are presented in the application.
Time series properties
Time series properties, including data generated by time series transforms, can be viewed alongside regular properties in the Object Table. A time series property is an object property that stores a history of timestamped values. See Time series properties in Workshop for more information.
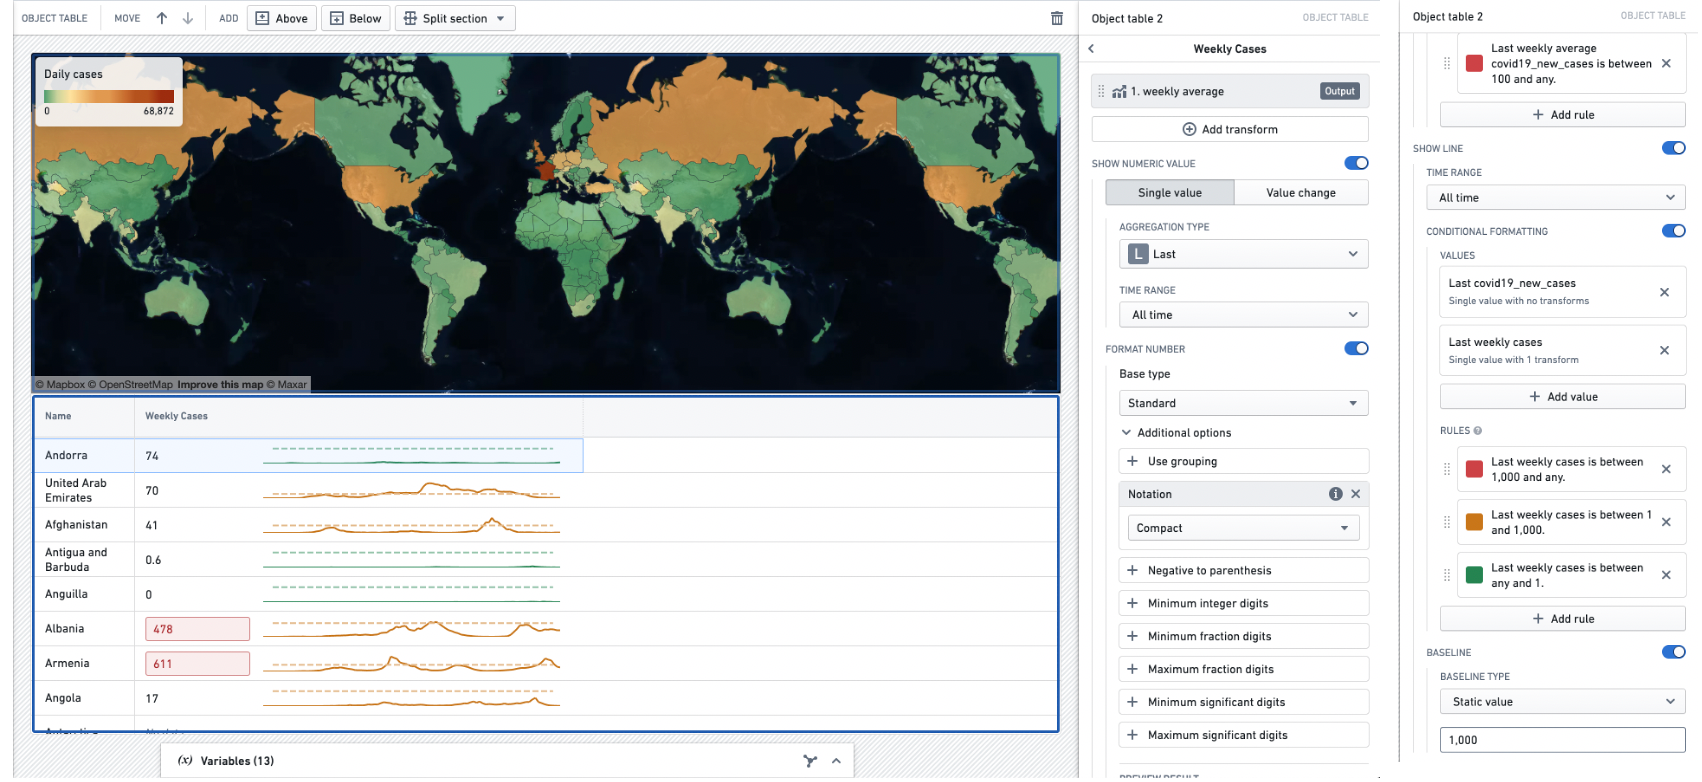
In the example below, the Country object has a conventional string property Name, which stores the name of the country, and a time series property New Cases, which stores a daily history of new COVID-19 cases observed in the country. The object table displays these two properties in the first two columns on the left, along with three time series derived from the New Cases property using time series transforms: Case Acceleration, Weekly Cases, and Total Cases. Each time series column displays the most recent observation in the time series on the left, and a sparkline visualizing the history of the time series on the right.
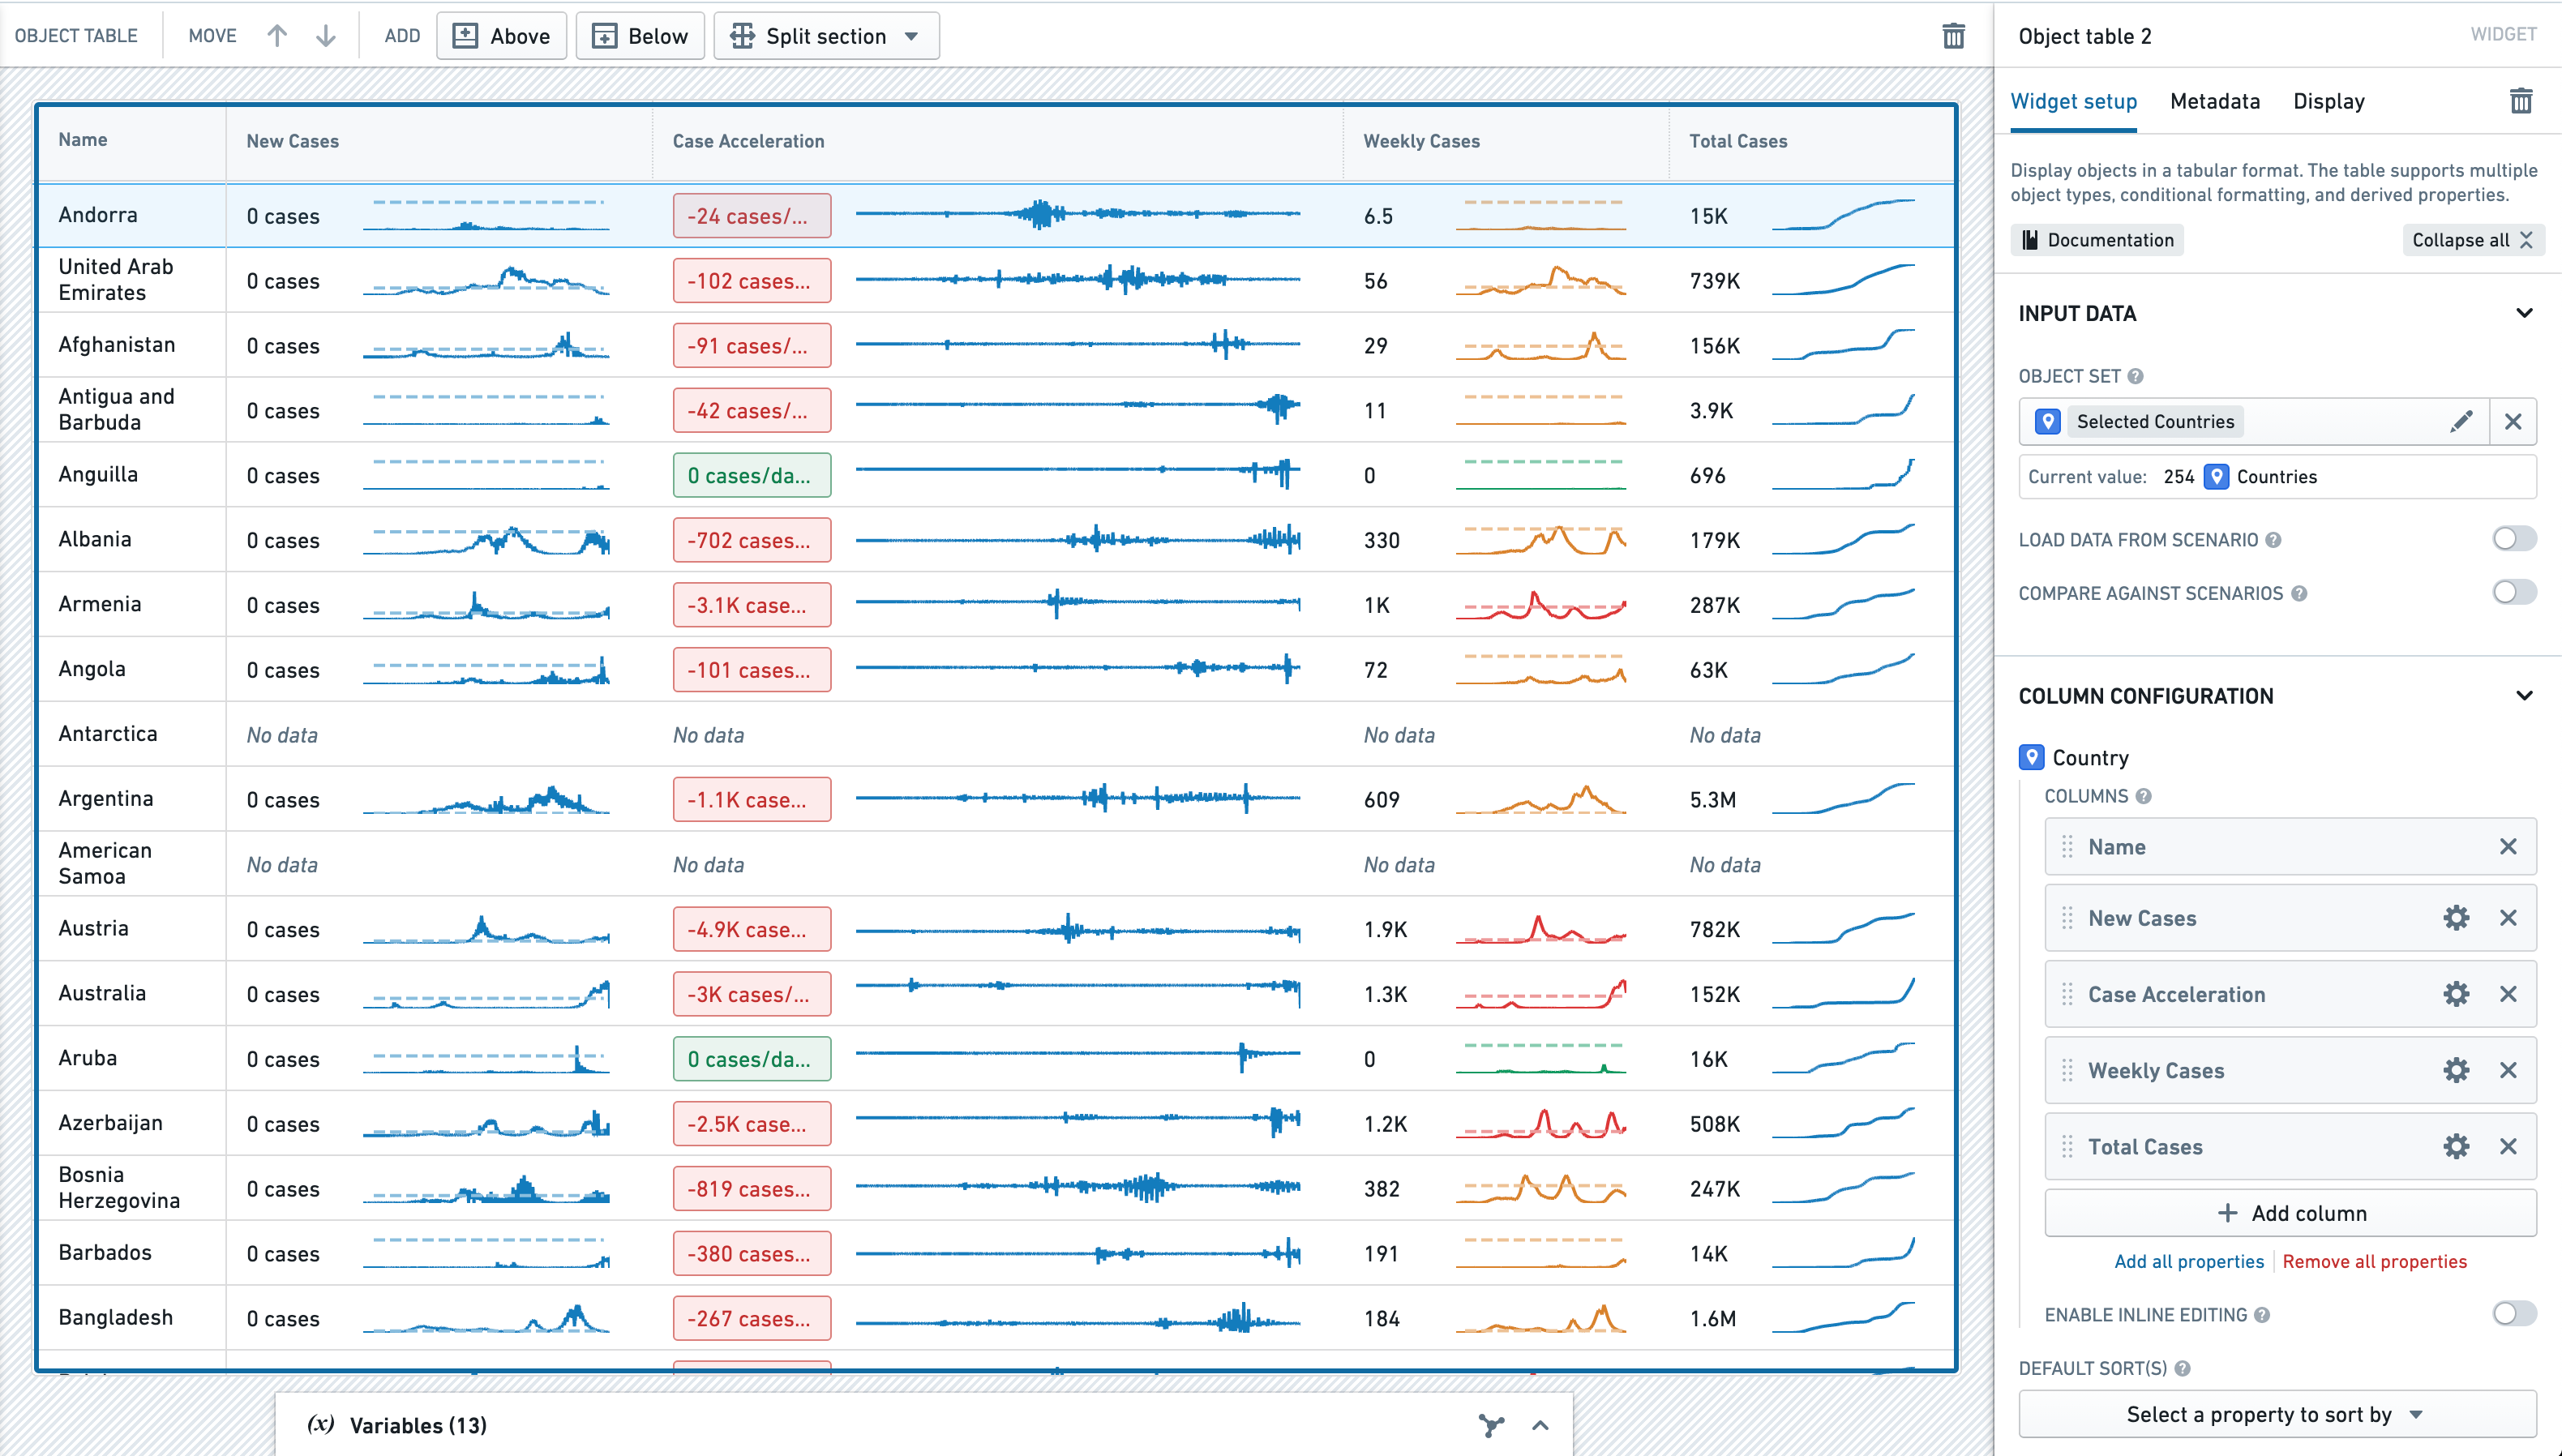 To illustrate how to configure a time series property column in the Object Table, we will walk through the set up of the
 Weekly Cases column. The panels on the right side of the screen are the upper and lower parts of the configuration of the Weekly Cases column. These are placed together on the same screen as the column itself, to give a holistic reference for the configuration and result.
Time series transforms
First, we need to generate a time series of the weekly COVID-19 caseload using a time series transform. A time series transform performs a mathematical operation on input time series data to yield a new output time series. See Time series properties in Workshop for more information on time series transforms.
Here, we can use an aggregate transform to create the time series we need. The Add transform button opens a transform configuration, which we can set up to generate the time series we need.
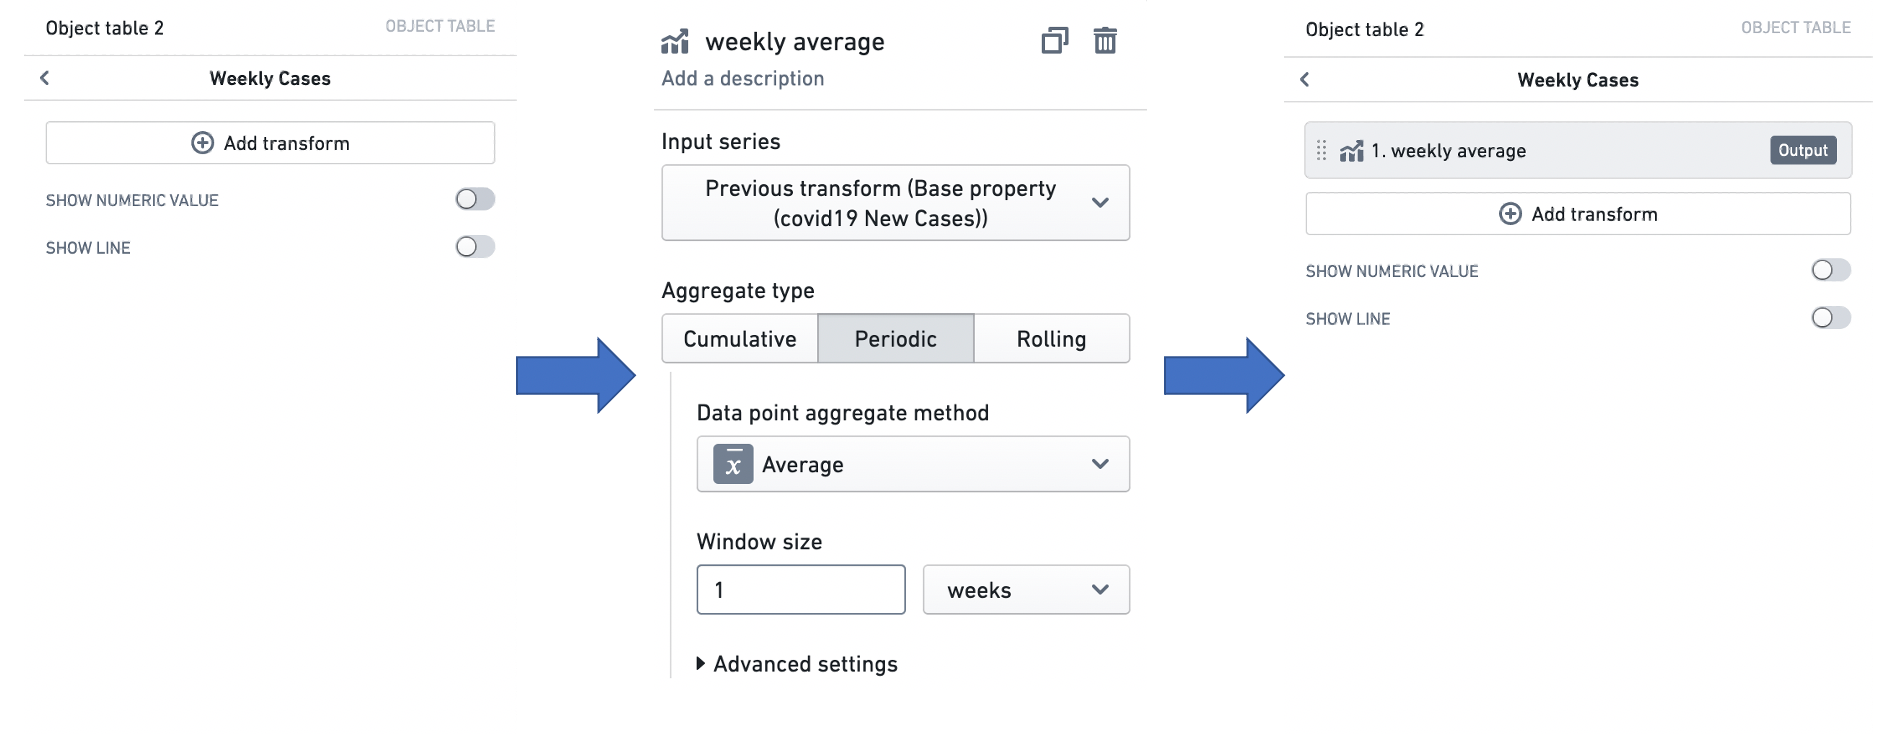
Time series summarizers
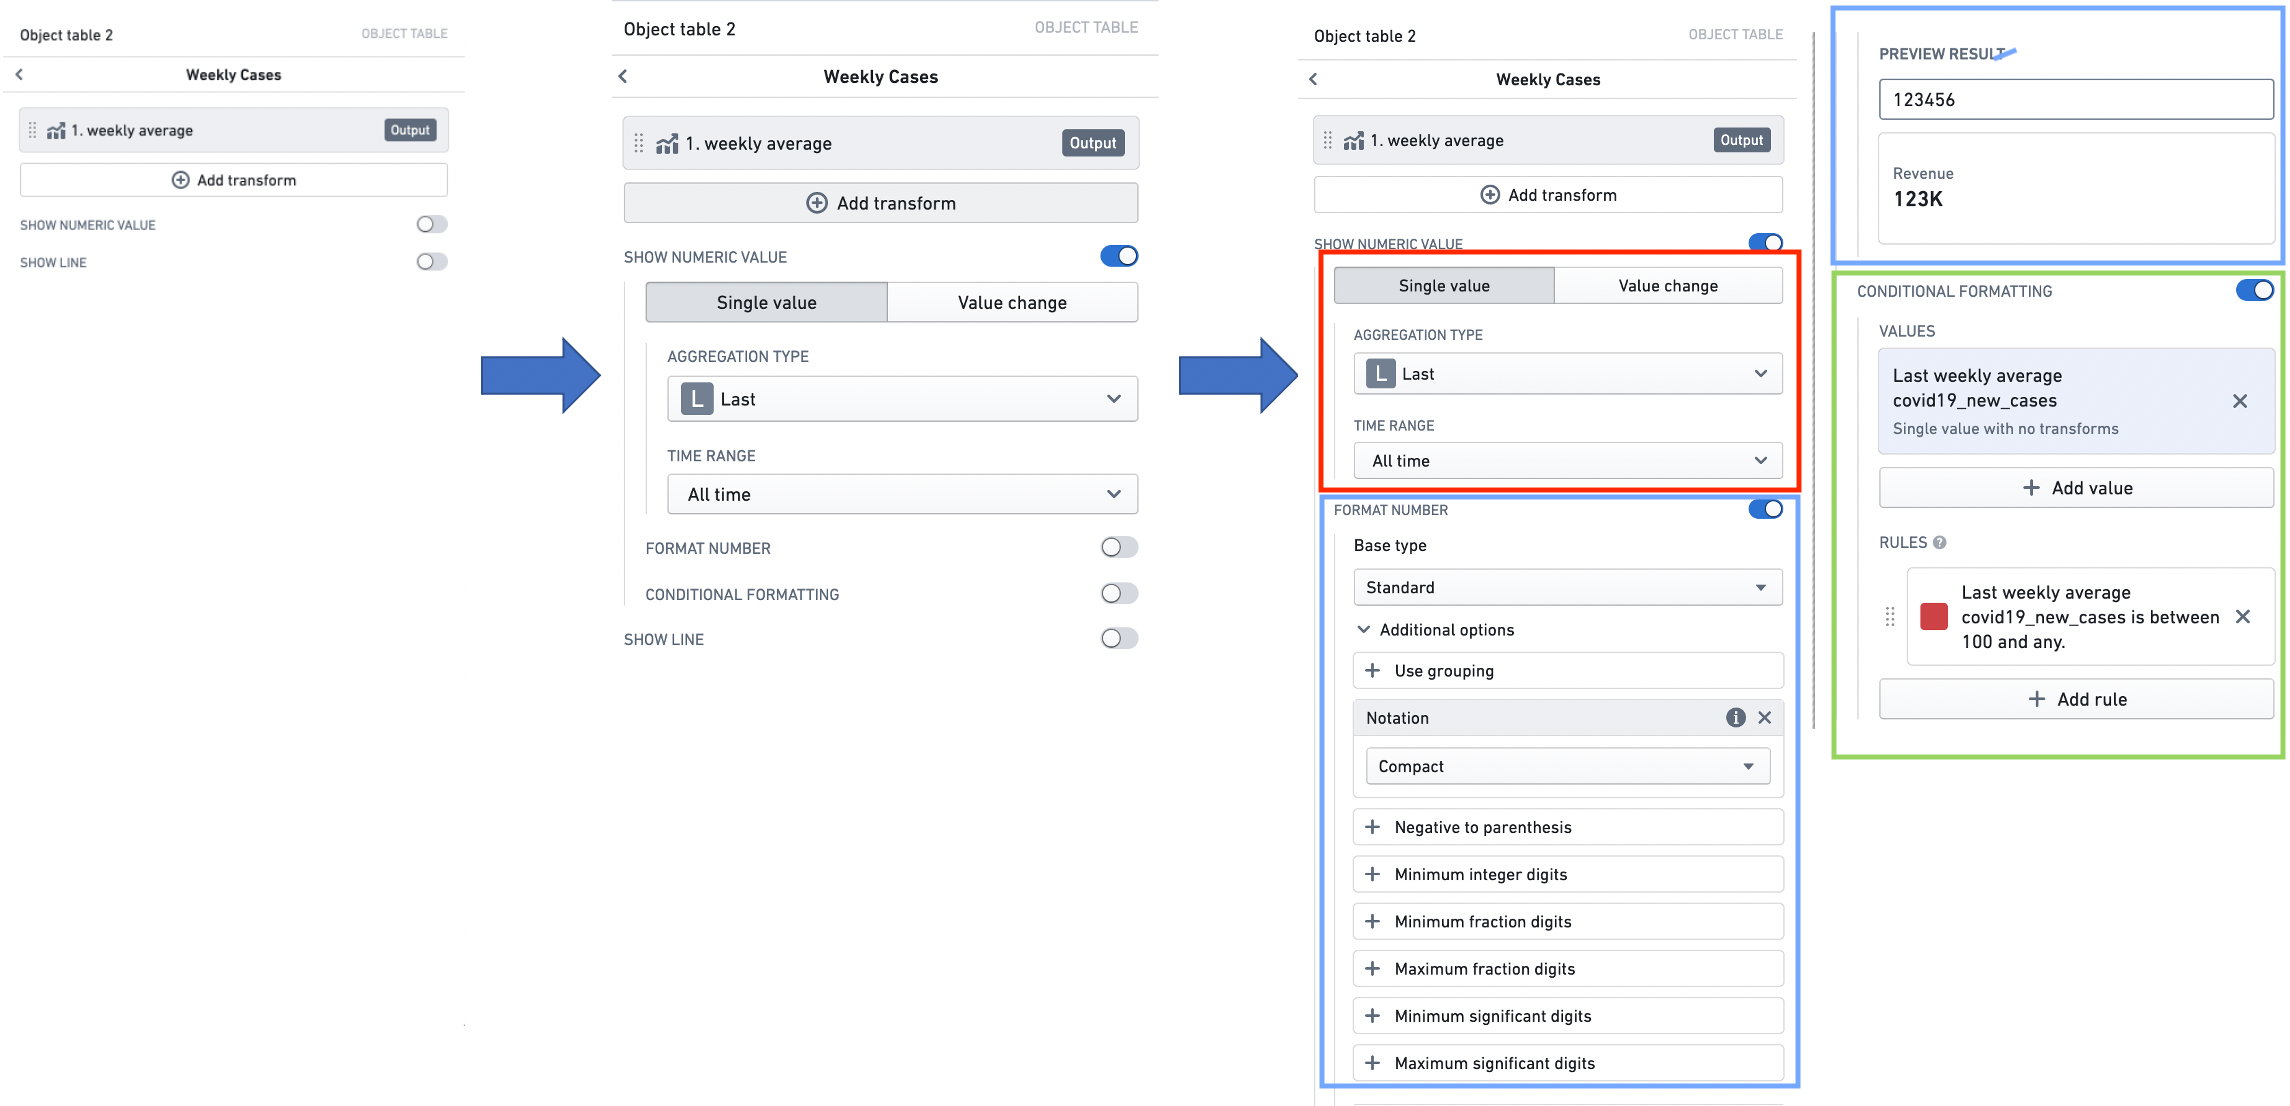
Next, we can use a time series summarizer (the red box) to generate the numeric value that is displayed in the column. A time series summarizer configures a summary statistic for time series data - that is, a value that reflects the state of the time series. Here, we use a single value summarizer to generate the value we want to display, which will be the last weekly average case count. See Time series properties in Workshop for more information on time series summarizers.
We can then configure value formatting (the blue box), under the Format Number header, and conditional formatting (the green box), under the Conditional Formatting header, to style the display of this value. Value formatting controls how the figures in the value are displayed, while conditional formatting changes the display color using a value-based rule system. In this case, we want to use compact notation, and to display the value in red if the weekly average COVID-19 case count is more than 100. See Formatting in Workshop for more information on value and conditional formatting.
Sparklines
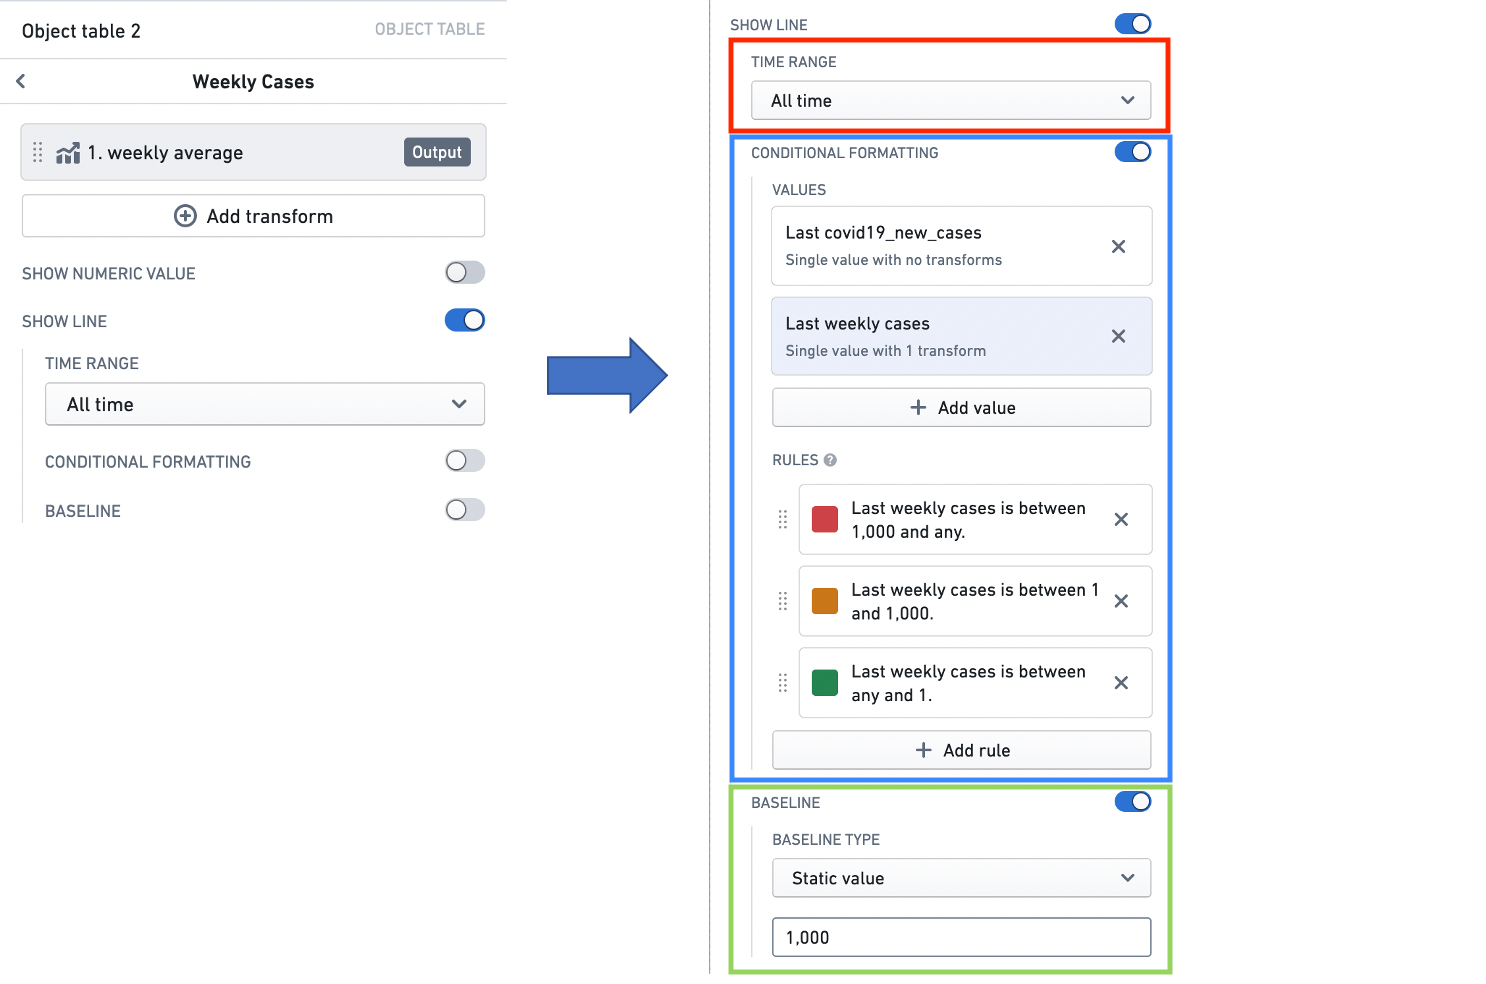
Finally, we can configure the sparkline visualization that will display the history of our weekly average cases time series.
The time range selector (the red box) lets us specify the time window we want to visualize the time series for. See Time series properties in Workshop for more information on time ranges.
We can also add conditional formatting (the blue box), under the Conditional Formatting header, to change the color of the sparkline using a value-based rule system. See Formatting in Workshop for more information on conditional formatting.
Last, we can configure a baseline (the green box) to aid with interpretation of the sparkline. See Time series properties in Workshop for more information on configuring baselines.
Inline edits (cell-level writeback)
:::callout{theme="neutral"} Editing options for inline edits are defined via an action configured in the Ontology. For more information on actions, see the actions tutorial. For further inline edit considerations, see the actions inline edits documentation. :::
Summary
Enabling inline editing allows module users to modify cell-level data displayed within the Object Table and then save these edits to objects data. Editing options are defined via an action configured in the Ontology that must meet the following criteria to be compatible with inline edits: * The action should either use a single "Modify object" rule or be function-backed. * All modified properties within the action must be defined "from parameter" (not "as static value" or "from property of object parameter"). * Property parameters must be of single, primitive types (for example, boolean, integer, or string, not an object reference or array). * Parameters' visibility options should not be set to "hidden" (as each parameter will be tied to a visible column with the table). Additional notes: * If a parameter has defined enumerated values from which a user can select, those options will be respected and displayed within an in-cell dropdown when a user modifies that parameter. * If a parameter or action has validation criteria (for example, that a given number parameter must be between 1 and 10), these validation criteria will be enforced. * A parameter's display options will not be respected during inline editing (such as text input vs. text area). * For an easier configuration experience, action parameter IDs should match the property IDs displayed within the table. This will allow an automatic mapping of action parameters to table columns. * For consistent display, Multipass user parameters should be map to columns / property types using Multipass value formatting within the ontology. For more information on value formatting, see the Ontology documentation.
Configure and use inline edits
When configuring the Object Table widget, the toggle to Enable inline editing will appear within the Column configuration section below the Columns list. Setting this toggle to true will Enable inline editing and prompt you to select the action you already configured within the Ontology to modify the displayed object type. In the example below, inline editing is enabled through the Flight Alert: Inline Editing action. Beneath the action picker, the action parameters are mapped to the table columns through the displayed dropdown menus. You can also pass variables as action parameters that will get passed into the action automatically without the user needing to edit the field in the table.
 After the above is configured, users can enter into editing mode with the Edit table button visible in the table footer. You can edit this button text with the Custom button text input field. You can also choose to have the table always be in inline editing mode by toggling on the Enable edit mode by default option. Once in edit mode, users can edit any modifiable column mapped to an action parameter, as seen below. Users can stage edits for up to 20 rows at a time for function-backed actions and up to 200 rows at a time for actions that are not function-backed. Any staged edits can be undone with the
 ![]() Undo button (as seen in the left-most column of the table in the screenshot below).
Undo button (as seen in the left-most column of the table in the screenshot below).
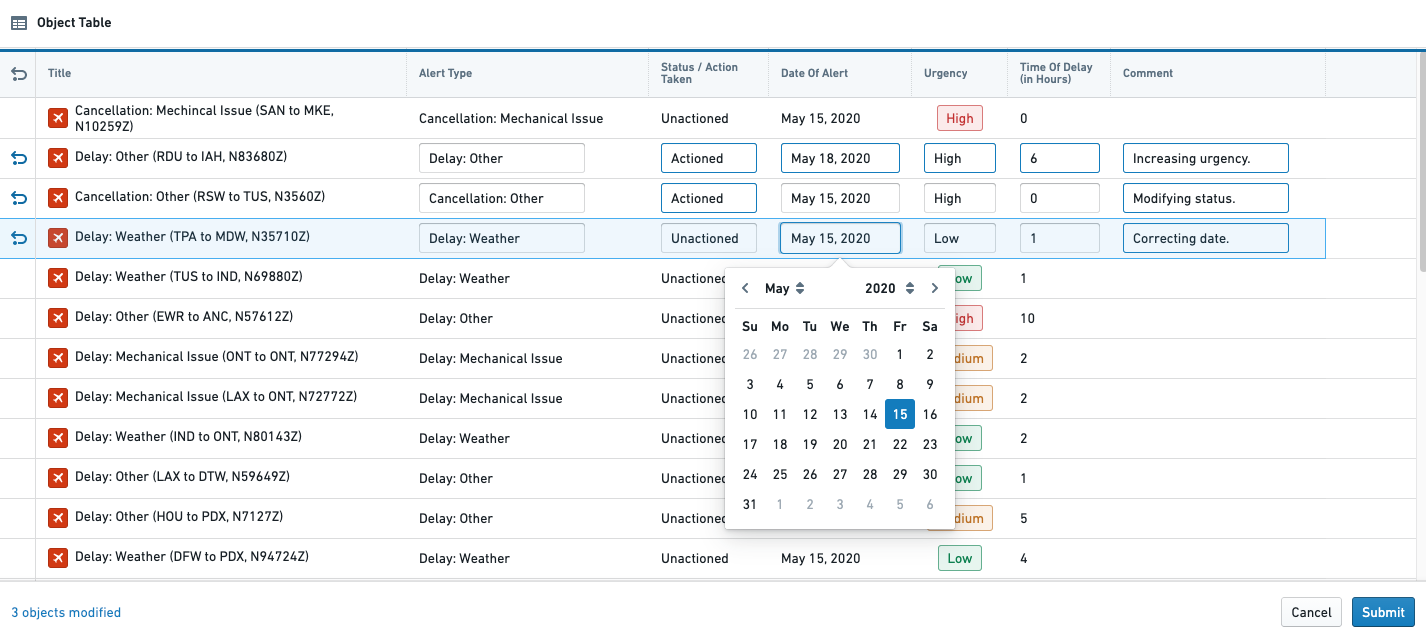 Once you make your edits and are ready to submit your changes, you can press the Submit button in the bottom right corner of the table. A confirmation dialog will appear where you will again press Submit to submit your changes. If you prefer to use a one-click submit option and would like to disable this confirmation dialog, you can enable the One-click submit toggle.
Custom right-click menu
Summary
Adding custom row actions to the right-click menu allows users to run actions or events on an object that is right-clicked from the object table.
Configure and use inline edits
To add custom row actions to the right-click menu, enable the Customize right-click menu toggle within the Right-click menu section. Setting this toggle to true will prompt you to create a right-clicked object which outputs the currently right-clicked object in the table. You can then add custom items to the menu by selecting Add item.
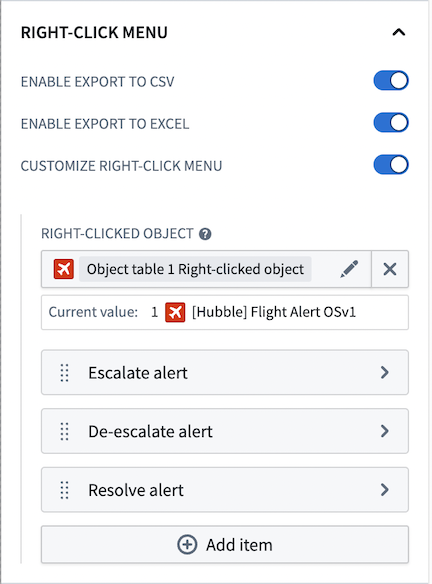 When you select Add item, a new menu will appear (as shown in the screenshot below) where you can customize how your menu item will be displayed within the right-click menu. You can also assign an action to your menu item by selecting an option from the On click dropdown menu. This allows you to choose whether your menu item triggers an action or an event. Additionally, you can use the right-clicked object you set up earlier within the action or event.
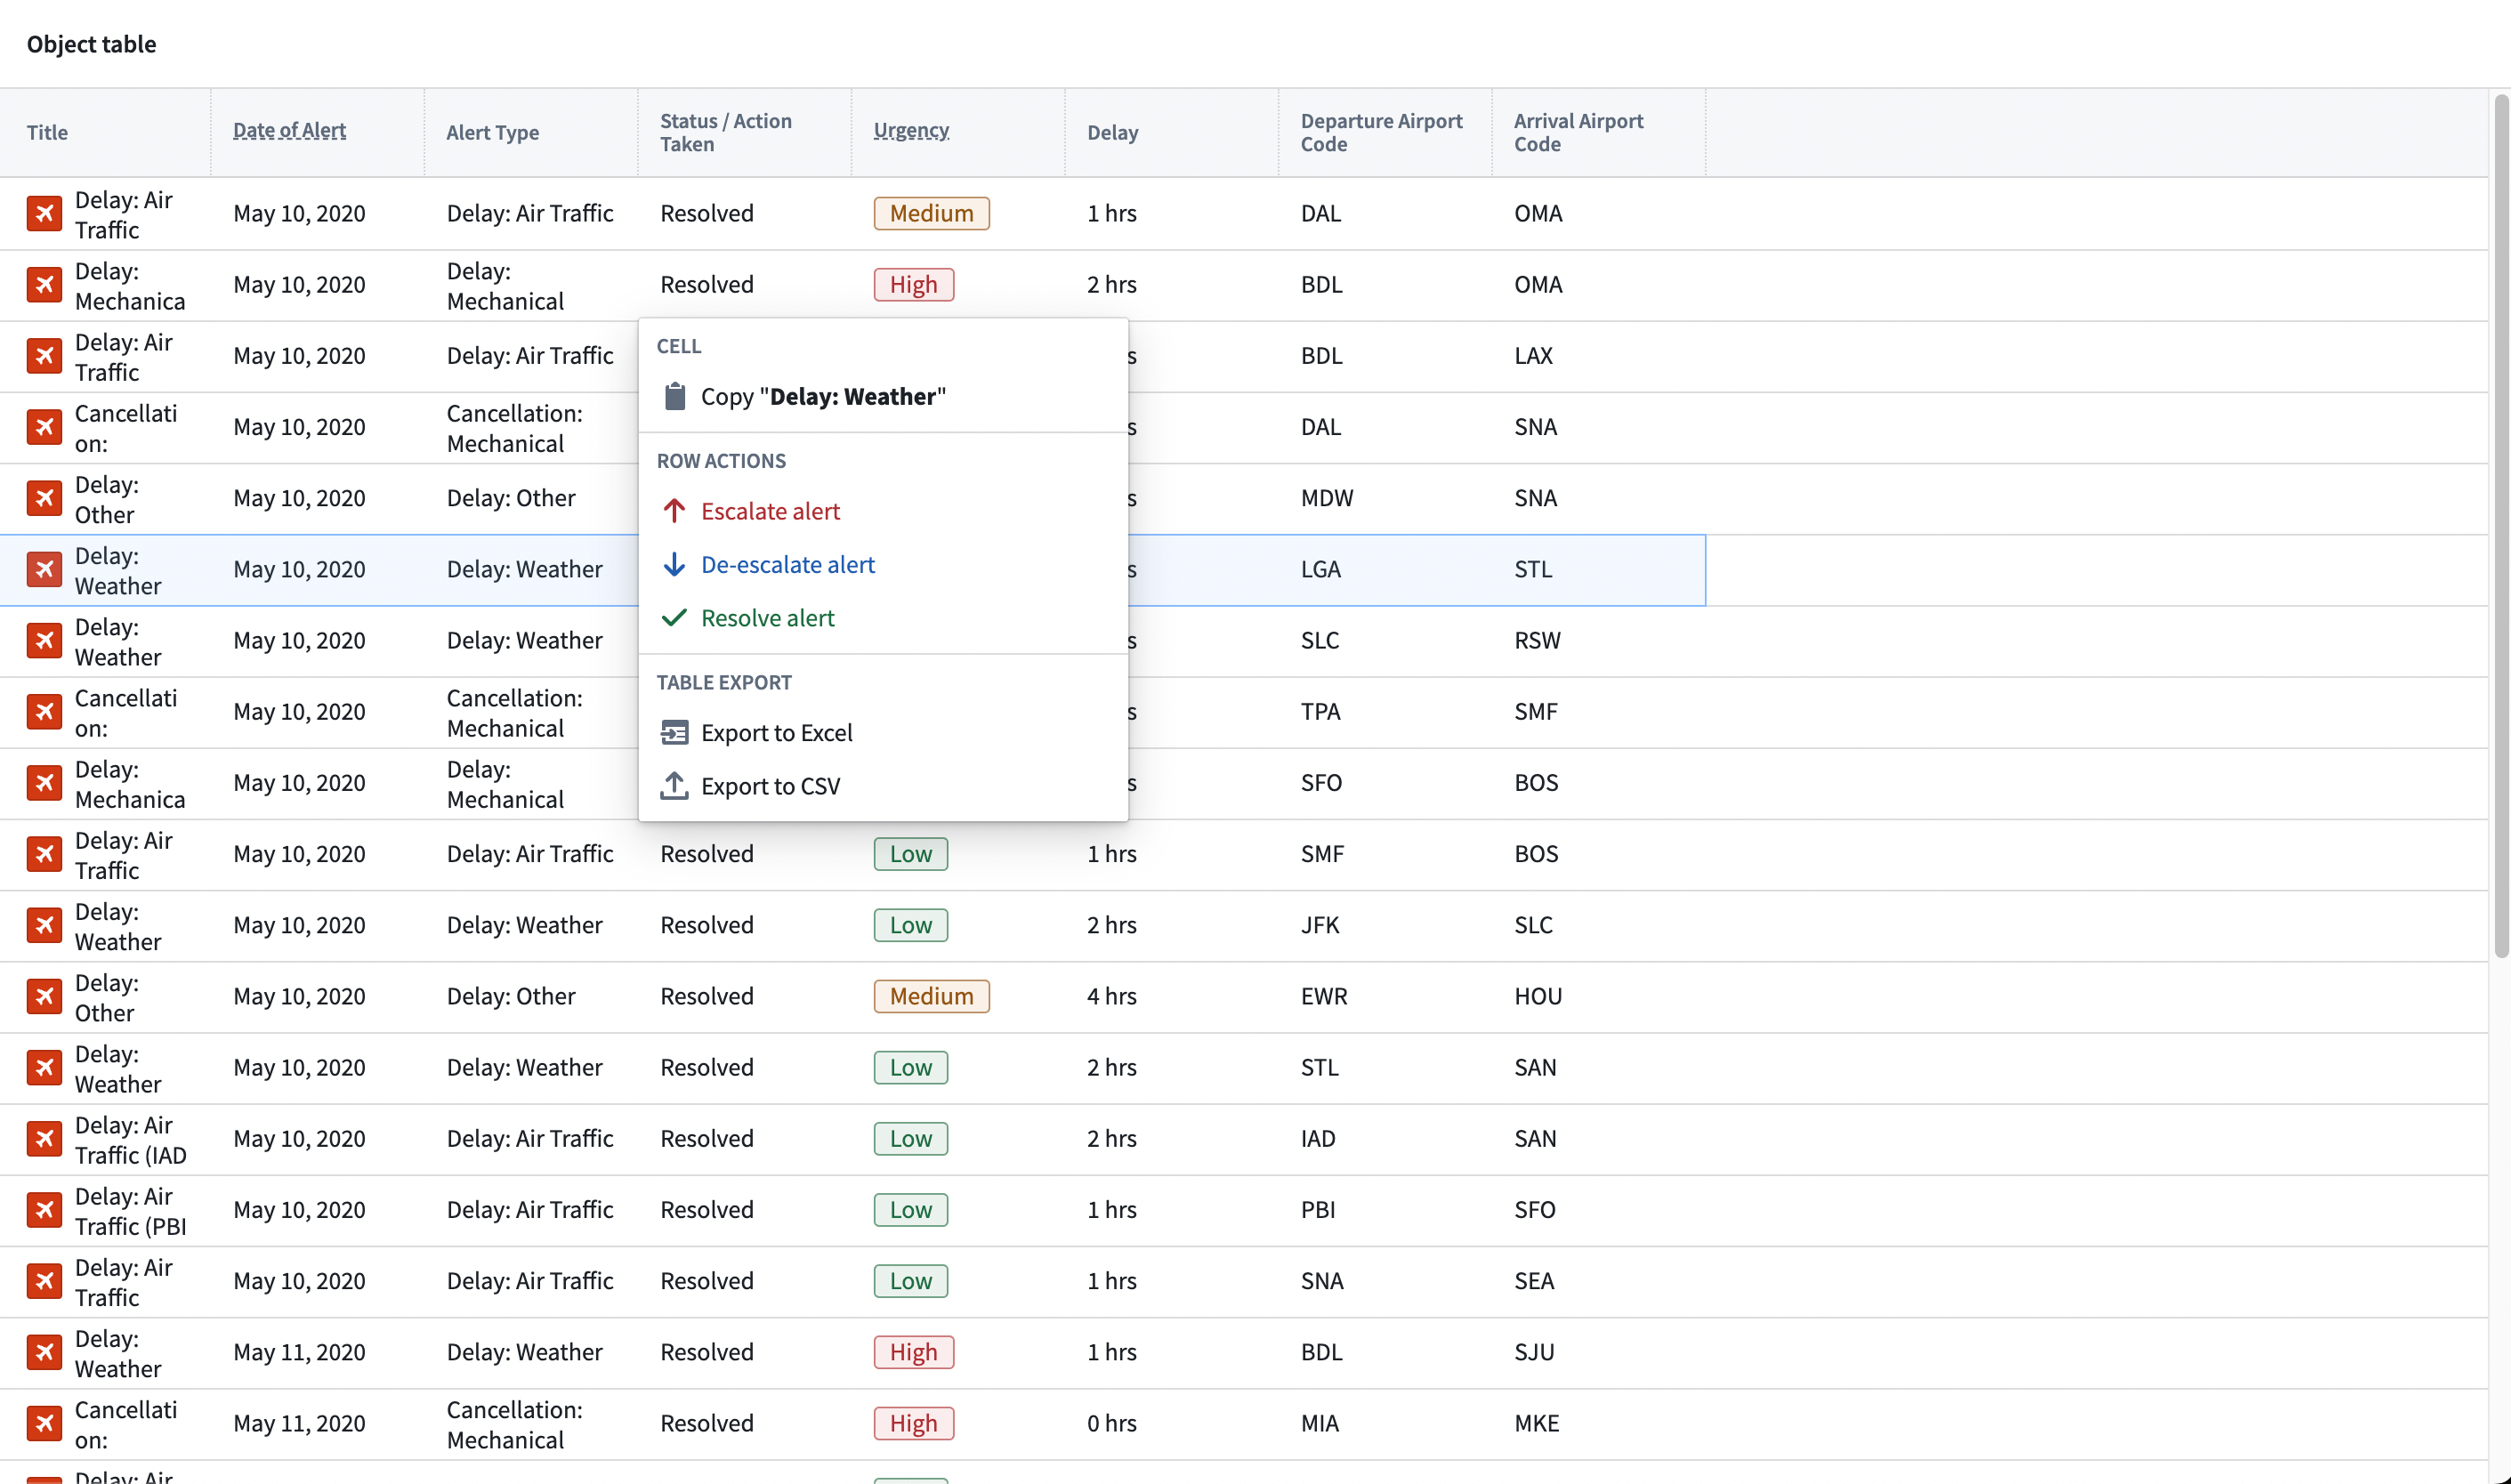
 Once configured, you will see your changes when you right-click on a row in your Object Table.
中文翻译
对象表格(Object Table)
对象表格(Object Table) 组件用于以表格格式显示对象数据。配置对象表格组件的模块构建者可以使用以下功能:
* 在一种或多种对象类型上显示数据。
* 选择要显示的列,包括使用时间序列属性的时间序列列,以及通过函数(Function)即时生成的派生列。
* 通过单列或多列进行排序。
* 设置列宽和行高。
* 显示在本体管理器(Ontology Manager)中配置的条件格式和数字格式选项。
* 允许在表格内进行单选或多选。
* 内联编辑(Inline editing),支持在表格内进行单元格级别的写回。
* 在表格中选择行时触发工作坊事件(Workshop Events)。
* 在右键菜单中添加自定义行操作。
以下截图显示了配置好的对象表格展示航班警报数据的示例:
配置选项
:::callout{theme="neutral"}
如果您的对象具有存储图片URL的属性,您可以添加类型类 hubble:icon 来显示图片,而不是在设置对象类型时选择的图标。此功能允许您显示象形图或图片以与数据一起展示。
:::
对于对象表格组件,核心配置选项如下:
* 输入数据(Input data)
* 对象集(Object set): 这是对象表格组件的输入变量,决定了对象表格中显示的数据。这允许模块构建者定义一个新的对象集变量,或重用在此工作坊模块中其他地方创建的现有对象集变量。
* 列配置(Column configuration)
* 列(Columns): 此部分决定对象表格中显示的列。一旦对象集被填充,此配置选项会展开以显示初始对象集中可见的属性类型。此外,特殊列类型允许模块构建者显示链接对象、参数化URL链接、时间序列数据以及通过函数即时生成的派生列。处于查看(View)模式的用户也可以选择配置他们看到的列。通过选择列标题旁边的箭头并选择配置列(Configure columns),查看者可以选择要在对象表格中显示的列及其顺序。有关时间序列数据的更多信息,请参阅下面的时间序列属性部分;有关如何配置派生列的更多信息,请参阅函数支持的列部分。
:::callout{theme="neutral"}
显示的列名是一个文本字段,默认使用添加时对象类型的属性名称。
如果对象类型的属性名称稍后在本体(Ontology)中更新,对象表格中显示的列名不会自动更改。
:::
* 不支持的属性类型(Unsupported property types): 某些大型属性(例如,地理形状(Geoshape)和向量(Vector))默认不加载以保持性能。在查看模式下,用户可以选择单元格上的"..."溢出菜单,按需加载不支持的属性值。在组件编辑器中,不支持的属性会标有警告图标和工具提示,以指示潜在的性能影响。
* 启用内联编辑(Enable inline editing): 启用后,此开关允许在对象表格内进行单元格级别的编辑。有关如何配置此高级功能的更多信息,请参阅下面的内联编辑(单元格级写回)部分。
* 默认排序(Default sort(s)): 此设置允许对表格应用一个或多个默认排序。模块构建者可以对表格中显示的可见属性类型或未显示的隐藏属性类型进行排序。如果未应用排序,则数据不会排序。我们建议在必要时指定排序。
* 右键菜单(Right-click menu)
* 启用导出为CSV(Enable export to CSV): 启用后,此开关允许用户从行的右键菜单中将对象表格数据导出为CSV格式。此功能支持导出函数支持的列和链接对象属性,并且一次最多可导出10,000行。
* 启用导出为Excel(Enable export to Excel): 启用后,此开关允许用户从行的右键菜单中将对象表格数据导出为Excel格式。请注意,此功能一次最多可导出200,000行。
* 自定义右键菜单(Customize right-click menu): 此选项使模块构建者能够使用自定义操作配置行的右键菜单。有关如何配置此功能的更多信息,请参阅下面的自定义右键菜单部分。
* 选择(Selection)
* 活动对象(Active object): 这是对象表格中两个输出变量中的第一个,输出当前活动/高亮对象的对象集。然后可以在当前模块中的下游组件中使用此对象集。
* 禁用活动对象自动选择(Disable active object auto-selection): 默认情况下,表格中的第一行在加载时自动设置为活动对象。禁用此设置可防止此行为,并在加载时产生空的活动对象。请注意,自动选择仅在组件可见时触发;如果对象表格位于折叠部分内,则在展开该部分且组件变为可见之前,不会发生自动选择。
* 启用多选(Enable multi-select): 启用后,此开关允许在表格中勾选/选择多个对象,并通过已选对象(Selected objects)对象集变量输出。
* 已选对象(Selected objects): 这是对象表格中两个输出变量中的第二个,输出当前已勾选/选择对象的对象集。然后可以在当前模块中的下游组件中使用此对象集。注意:仅当启用多选(Enable multi-select)开关设置为true时,此输出变量才会被使用和填充。
* 活动对象选择时(On active object selection): 此选项使模块构建者能够配置在表格中选择行时触发的工作坊事件(例如,导致出现一个包含更详细对象视图的抽屉)。
* 显示与格式(Display & formatting)
* 每行显示的行数(Number of lines to display per row): 此数字控制每个表格行的高度。
* 启用值换行(Enable value wrapping): 启用后,允许文本内容在单元格内换行。此选项支持结构体属性(struct properties)和结构体数组(array of struct properties)的换行。当内容过长无法完全显示时,结构体值会显示省略号截断,并带有悬停工具提示显示完整值。
* 冻结列数(Number of frozen columns): 此数字确定锚定在表格左侧的冻结列数,当用户向右滚动时这些列将保持可见。
* 空状态消息(Empty state message): 配置当支持组件的对象集为空时组件显示的内容。默认(Default)情况下,组件将显示一个通用表格图标以及"未找到对象(No objects found)"消息。要自定义显示图标和消息,请选择自定义(Custom)选项。
* 自定义"无值"显示(Custom "No value" display): 启用后,覆盖单元格无值时表格中显示的内容。默认情况下,将显示"无值(No value)"。
* 合并多种对象类型(Combine multiple object types): 此设置仅影响显示多种对象类型的表格。禁用时,每种对象类型将显示在其自己的选项卡中。启用时,所有对象类型将显示在单个表格中,并且跨对象类型,共享显示名称和ID的属性类型将合并到单个列中。请注意,当启用内联编辑(Enable inline editing)设置为true时,此选项不可用。
* 变量支持的列可见性(Variable-backed column visibility): 启用后,允许使用包含可见列API名称的字符串数组变量来控制哪些列可见。此数组变量还控制列出现的顺序。如果字符串数组为空,则所有配置的列都将显示在表格中。
* 水平填充列(Fit columns horizontally): 启用后,列将自动调整大小以填充表格的当前宽度。
* 启用窄标题(Enable narrow headers): 启用后,表格标题将从50像素缩小到30像素。
* 条件格式为整个单元格着色(Conditional formatting colors entire cell): 启用后,条件格式将为整个单元格着色。注意:条件格式是在本体管理器(Ontology Manager)中为普通属性类型配置的,并在对象表格组件配置面板中为函数支持的属性配置。
* 隐藏列配置(Hide column configuration): 启用后,从表格的标题菜单中隐藏查看模式下存在的配置列(Configure columns)选项。
* 显示安全标记(Show security markings): 启用后,属性安全标记将呈现为紧凑的灰色药丸形状,并在选择时展开窗口视图。
* 场景(Scenarios)
* 要加载数据的场景(Scenario to load data from): 选择要为对象表格加载数据的场景。此输入还会影响对象表格中出现的对象及其各自的顺序。
* 与场景比较(Compare against Scenarios): 启用此开关以选择要比较数据的场景数组变量。这将通过在有修改的列中并排显示值,将表格中的数据与数组中的场景值进行比较。
* 有关更多信息,请参阅场景文档。
保存用户列配置
要保存用户的列配置,请按照以下步骤使用带有状态保存的字符串数组变量: 1. 确保已启用状态保存。 2. 使用一个新的静态字符串数组变量启用变量支持的列可见性(Variable-backed column visibility)(数组变量可以为空)。这将存储哪些列可见以及它们的顺序。 3. 在设置(Settings)面板中为字符串数组变量添加外部ID,并确保其已启用用于状态保存。
函数支持的列(Function-backed columns)
:::callout{theme="neutral"} 以下教程引用的航班警报对象类型在您的Foundry环境中可能不可用。请将以下内容作为指南,然后使用Foundry实例中类似的对象类型进行操作。要了解有关函数的更多信息,请参阅专门的函数文档。 :::
概述
要创建一个返回一个或多个函数支持的列的函数,您需要满足以下规范:
1. 函数的输入参数必须包含一个 ObjectSet<ObjectType> 参数(并且可以选择包含其他输入参数)。此 ObjectSet<ObjectType> 参数将使表格中显示的对象能够传递到函数中,以生成所需的派生列。请注意,ObjectType[] 参数也可以在此处使用,但不推荐使用这种性能较差的选项。
2. 函数的返回类型必须是从对象类型到值或自定义类型的映射,使函数能够返回对象到值或自定义类型(可能包含一个或多个字段)的映射:
* 在 TypeScript v1 中,使用 FunctionsMap<ObjectType, CustomType>。
* 在 TypeScript v2 中,使用 Record<ObjectSpecifier<ObjectType>, CustomType>。
* 在 Python 中,使用 dict[ObjectType, CustomType]。
了解更多关于自定义类型的信息。
一旦配置并发布了满足上述条件的函数,您就可以在对象表格配置中成功配置函数支持的属性列。有关更详细的教程,请参阅下方。
函数支持的属性的功能
对象表格组件支持显示通过函数即时计算的函数支持的属性。这为模块构建者提供了相当大的灵活性,可以显示例如以下列: * 计算两个或多个其他属性之间的和、差或其他数学运算。 * 展示基于工作坊模块中其他地方的数据输入而更新的统计模型的输出。 * 显示链接对象的属性。 * 根据工作坊模块中其他地方的用户输入更改显示内容。
配置单个函数支持的属性
此示例使用函数支持的属性来帮助用户查看和处理航班警报(Flight Alert)工单的优先级。这里的目标是检查一个名为延误时间(小时)(Time of Delay)的现有属性,并从此属性生成一个名为紧急程度(Urgency)的新函数支持列。派生的紧急程度(Urgency)列将长时间延误(超过4小时)标记为"高(High)"紧急程度,中度延误(2到4小时之间)标记为"中(Medium)"紧急程度,较短延误(少于2小时)标记为"低(Low)"紧急程度。此派生的紧急程度(Urgency)属性应使用户更容易快速扫描对象表格并确定首先处理哪些警报。
要配置此函数支持的属性,第一步是配置一个函数,该函数接受预期的输入(例如,航班警报(Flight Alert)对象的对象集)并返回对象表格为函数支持的属性所需的预期映射输出(例如,航班警报(Flight Alert)对象到紧急程度字符串的映射)。在此示例中,计算紧急程度的逻辑被硬编码到函数本身中,如下所示:
typescript tab="TypeScript v1"
import { Function, FunctionsMap } from "@foundry/functions-api";
import { FlightAlertWorkshopTutorial, ObjectSet } from "@foundry/ontology-api";

export class MyFunctions {
    @Function()
    public flightAlertCalculateUrgency(flightAlerts: ObjectSet<FlightAlertWorkshopTutorial>):
    FunctionsMap<FlightAlertWorkshopTutorial, string>{
        const map = new FunctionsMap<FlightAlertWorkshopTutorial, string>();
        flightAlerts.all().forEach(flightAlert => {
            var hoursDelayed = flightAlert.timeOfDelayHours
            if (hoursDelayed! > 4) {
                map.set(flightAlert, "High")
            }
            else if (hoursDelayed! > 2) {
                map.set(flightAlert, "Medium")
            }
            else {
                map.set(flightAlert, "Low")
            }
        });
        return map;
    }
}
```typescript tab="TypeScript v2" import { ObjectSet, ObjectSpecifier } from "@osdk/client"; import { FlightAlertWorkshopTutorial } from "@ontology/sdk";
async function flightAlertCalculateUrgency(
flightAlerts: ObjectSet
export default flightAlertCalculateUrgency;
```python tab="Python"
from functions.api import function
from ontology_sdk.ontology.objects import FlightAlertWorkshopTutorial
from ontology_sdk.ontology.object_sets import FlightAlertWorkshopTutorialObjectSet

@function
def flight_alert_calculate_urgency(
    flight_alerts: FlightAlertWorkshopTutorialObjectSet,
) -> dict[FlightAlertWorkshopTutorial, str]:
    result = {}
    for flight_alert in flight_alerts.iterate():
        hours_delayed = flight_alert.time_of_delay_hours
        if hours_delayed is not None and hours_delayed > 4:
            result[flight_alert] = "High"
        elif hours_delayed is not None and hours_delayed > 2:
            result[flight_alert] = "Medium"
        else:
            result[flight_alert] = "Low"
    return result
一旦此函数发布,配置紧急程度(Urgency)派生属性以在此工作坊模块中显示。首先,在工作坊模块的对象表格配置面板中,选择添加列(Add column)按钮以及添加函数支持的属性(Function-backed property)的选项。

在列列表中出现的函数支持的属性(Function-Backed Property)选项中,选择"fx"函数图标,然后选择所需的函数。在此示例中,我们选择flightAlertCalculateUrgency函数。

接下来,确认函数版本,然后配置函数所需的输入。让我们选择使用运行时输入(Use a runtime input),仅传递当前在对象表格中显示的对象,从而优化我们函数的性能。或者,您可以选择传入一个对象集变量(即支持对象表格的同一对象集)。
:::callout{theme="neutral"} 使用运行时输入(Use a runtime input)选项将动态地仅传递当前在对象表格中显示的对象(而不是整个对象集)到派生列函数中,并提供更快的性能。额外的使用变量输入(Use a variable input)选项允许传入整个对象集变量(例如支持对象表格的输入对象集变量),但可能导致性能较慢。 :::

最后,选择函数支持的属性(Function-backed property)列单元格,将此列重命名为更具描述性的名称,如"紧急程度(Urgency)"。

最终结果将是以下对象表格,它即时计算新的派生紧急程度列,并向用户显示此有价值的附加信息。

配置多个函数支持的属性
接下来,让我们通过一个更高级的示例来创建一个使用自定义返回类型生成多个函数支持的属性的单个函数。了解更多关于自定义类型的信息。 使用单个函数返回多个函数支持的属性有几个优点,包括提高性能和更清晰地组织相关的派生属性代码。
在此示例中,使用一个函数,该函数接受一个 ObjectSet<FlightAlerts>,遍历一个出发机场(Departure Airport)链接以检索链接的机场(Airport)对象,然后从该链接的机场(Airport)对象返回三个属性。这将丰富对象表格中显示的数据,以包含来自链接对象类型的相关信息。
为了实现此目标,首先定义一个在此函数中使用的自定义类型。可能如下所示:
```typescript tab="TypeScript v1" interface LinkedDepartureAirportProperties { airport: string; city: string; country: string; }
```typescript tab="TypeScript v2"
interface LinkedDepartureAirportProperties {
    airport: string;
    city: string;
    country: string;
}
```python tab="Python" from dataclasses import dataclass
@dataclass class LinkedDepartureAirportProperties: airport: str city: str country: str
然后,使用此自定义类型编写一个函数,返回`机场(Airport)`、`城市(City)`和`国家(Country)`三个函数支持的列:

```typescript tab="TypeScript v1"
import { Function, FunctionsMap } from "@foundry/functions-api";
import { AirportObject, FlightAlertWorkshopTutorial, ObjectSet } from "@foundry/ontology-api";

export class MyFunctions {
    @Function()
    public getColumnsFromLinkedDepartureAirport(flightAlerts: ObjectSet<FlightAlertWorkshopTutorial>):
    FunctionsMap<FlightAlertWorkshopTutorial, LinkedDepartureAirportProperties> {
        // Fetch all linked airports and store in dictionary, keyed by iata
        const iataToAirport: { [iata: string]: AirportObject } = {};
        flightAlerts.searchAroundDepartureAirport().all().forEach(airport => {
            iataToAirport[airport.iata!] = airport;
        });

        const map = new FunctionsMap<FlightAlertWorkshopTutorial, LinkedDepartureAirportProperties>();
        flightAlerts.all().forEach(alert => {
            // Get airport for this alert
            const airport = iataToAirport[alert.departureAirportCode!];
            // Skip if airport not found
            if (!airport) {
                return;
            }

            map.set(alert, {
                airport: airport.airport!,
                city: airport.city!,
                country: airport.country!,
            });
        });

        return map;
    }
}
```typescript tab="TypeScript v2" import { ObjectSet, ObjectSpecifier, Osdk } from "@osdk/client"; import { AirportObject, FlightAlertWorkshopTutorial } from "@ontology/sdk";
async function getColumnsFromLinkedDepartureAirport(
flightAlerts: ObjectSet
const map: Record<ObjectSpecifier<FlightAlertWorkshopTutorial>, LinkedDepartureAirportProperties> = {};
for await(const alert of flightAlerts.asyncIter({"$select": ["departureAirportCode"]})) {
    // Get airport for this alert
    const airport = iataToAirport[alert.departureAirportCode!];
    // Skip if airport not found
    if (!airport) {
        continue;
    }

    map[alert.$objectSpecifier] = {
        airport: airport.airport!,
        city: airport.city!,
        country: airport.country!,
    };
}

return map;
}
export default getColumnsFromLinkedDepartureAirport;
```python tab="Python"
from functions.api import function
from ontology_sdk.ontology.objects import AirportObject, FlightAlertWorkshopTutorial
from ontology_sdk.ontology.object_sets import FlightAlertWorkshopTutorialObjectSet

@function
def get_columns_from_linked_departure_airport(
    flight_alerts: FlightAlertWorkshopTutorialObjectSet,
) -> dict[FlightAlertWorkshopTutorial, LinkedDepartureAirportProperties]:
    # Fetch all linked airports and store in dictionary, keyed by iata
    iata_to_airport: dict[str, AirportObject] = {}
    for airport in flight_alerts.search_around_departure_airport().iterate():
        iata_to_airport[airport.iata] = airport

    result: dict[FlightAlertWorkshopTutorial, LinkedDepartureAirportProperties] = {}
    for alert in flight_alerts.iterate():
        # Get airport for this alert
        airport = iata_to_airport.get(alert.departure_airport_code)
        # Skip if airport not found
        if airport is None:
            continue

        result[alert] = LinkedDepartureAirportProperties(
            airport=airport.airport,
            city=airport.city,
            country=airport.country,
        )

    return result
一旦上述函数发布,就可以在工作坊(Workshop)中使用它来添加派生列。按照上述部分中的操作,向包含航班警报(Flight Alert)对象的对象表格组件添加一个新的函数支持的属性(Function-backed property)列。
在列列表中出现的新列中,选择fx图标以选择支持派生列的函数。在此示例中,选择本教程前面定义的getColumnsFromLinkedDepartureAirport函数。

接下来,配置所选函数的输入参数。在此示例中,该函数接受一个输入参数,即名为flightAlerts的航班警报对象的对象集。让我们选择使用运行时输入(Use a runtime input)选项,将当前在对象表格中显示的对象传递给函数。
:::callout{theme="neutral"} 使用运行时输入(Use a runtime input)选项将动态地仅传递当前在对象表格中显示的对象(而不是整个对象集)到派生列函数中,从而提供更快的性能。额外的使用变量输入(Use a variable input)选项允许传入整个对象集变量(例如支持对象表格的输入对象集变量),但可能导致性能较慢。 :::

完成上述步骤后,函数应成功运行,并在对象表格(Object Table)中显示预期的三列:出发机场(Departure Airport)、出发城市(Departure City)和出发国家(Departure Country)。我们可以在此停止,或者编辑列显示名称或列顺序,以改善列在应用程序中的呈现方式。
时间序列属性(Time series properties)
时间序列属性(Time series properties),包括由时间序列转换(time series transforms)生成的数据,可以在对象表格中与常规属性一起查看。时间序列属性是一种对象属性,用于存储带时间戳值的历史记录。有关更多信息,请参阅工作坊中的时间序列属性。
在下面的示例中,国家(Country)对象具有一个常规字符串属性名称(Name),用于存储国家名称,以及一个时间序列属性新增病例(New Cases),用于存储该国每日新增COVID-19病例的历史记录。对象表格在前两列中显示这两个属性,以及使用时间序列转换从新增病例(New Cases)属性派生的三个时间序列:病例加速度(Case Acceleration)、每周病例(Weekly Cases)和总病例(Total Cases)。每个时间序列列在左侧显示时间序列中的最新观测值,在右侧显示可视化时间序列历史的迷你图。
为了说明如何在对象表格中配置时间序列属性列,我们将逐步设置每周病例(Weekly Cases)列。屏幕右侧的面板是每周病例(Weekly Cases)列配置的上下部分。它们与列本身放在同一屏幕上,以提供配置和结果的整体参考。
时间序列转换(Time series transforms)
首先,我们需要使用时间序列转换(time series transform)生成每周COVID-19病例数的时间序列。时间序列转换对输入时间序列数据执行数学运算,以生成新的输出时间序列。有关时间序列转换的更多信息,请参阅工作坊中的时间序列属性。
在这里,我们可以使用聚合转换来创建我们所需的时间序列。添加转换(Add transform)按钮打开一个转换配置,我们可以设置它以生成所需的时间序列。
时间序列汇总器(Time series summarizers)
接下来,我们可以使用时间序列汇总器(time series summarizer)(红色框)来生成列中显示的数值。时间序列汇总器为时间序列数据配置一个汇总统计量——即反映时间序列状态的值。在这里,我们使用单值汇总器来生成我们想要显示的值,这将是最后一个每周平均病例数。有关时间序列汇总器的更多信息,请参阅工作坊中的时间序列属性。
然后,我们可以在格式化数字(Format Number)标题下配置值格式(value formatting)(蓝色框),在条件格式(Conditional Formatting)标题下配置条件格式(conditional formatting)(绿色框),以设置此值的显示样式。值格式控制值的数字显示方式,而条件格式使用基于值的规则系统更改显示颜色。在这种情况下,我们想要使用紧凑表示法,并且如果每周平均COVID-19病例数超过100,则以红色显示该值。有关值和条件格式的更多信息,请参阅工作坊中的格式设置。
迷你图(Sparklines)
最后,我们可以配置将显示每周平均病例时间序列历史的迷你图可视化。
时间范围(time range)选择器(红色框)允许我们指定要可视化时间序列的时间窗口。有关时间范围的更多信息,请参阅工作坊中的时间序列属性。
我们还可以在条件格式(Conditional Formatting)标题下添加条件格式(conditional formatting)(蓝色框),以使用基于值的规则系统更改迷你图的颜色。有关条件格式的更多信息,请参阅工作坊中的格式设置。
最后,我们可以配置一个基线(baseline)(绿色框)以帮助解释迷你图。有关配置基线的更多信息,请参阅工作坊中的时间序列属性。
内联编辑(单元格级写回)(Inline edits (cell-level writeback))
:::callout{theme="neutral"} 内联编辑的编辑选项是通过在本体(Ontology)中配置的操作(action)定义的。有关操作的更多信息,请参阅操作教程。有关内联编辑的更多注意事项,请参阅操作内联编辑文档。 :::
概述
启用内联编辑允许模块用户修改对象表格中显示的单元格级数据,然后将这些编辑保存到对象数据中。编辑选项是通过在本体(Ontology)中配置的操作定义的,该操作必须满足以下条件才能与内联编辑兼容:
- 该操作应使用单个"修改对象(Modify object)"规则或由函数支持。
- 操作中的所有修改属性必须定义为"来自参数(from parameter)"(而不是"作为静态值(as static value)"或"来自对象参数的属性(from property of object parameter)")。
- 属性参数必须是单一的原始类型(例如,布尔值、整数或字符串,而不是对象引用或数组)。
- 参数的可见性选项不应设置为"隐藏(hidden)"(因为每个参数将与表格中的可见列相关联)。
其他注意事项:
- 如果参数具有用户可从中选择的枚举值,则在用户修改该参数时,这些选项将被尊重并显示在单元格内下拉菜单中。
- 如果参数或操作具有验证条件(例如,给定的数字参数必须在1到10之间),则将强制执行这些验证条件。
- 内联编辑期间不会尊重参数的显示选项(例如文本输入与文本区域)。
- 为了获得更轻松的配置体验,操作参数ID应与表格中显示的属性ID匹配。这将允许操作参数自动映射到表格列。
- 为了显示一致,Multipass用户参数应映射到使用本体中Multipass值格式的列/属性类型。有关值格式的更多信息,请参阅本体文档。
配置和使用内联编辑
配置对象表格组件时,启用内联编辑(Enable inline editing)开关将出现在列配置(Column configuration)部分的列(Columns)列表下方。将此开关设置为true将启用内联编辑(Enable inline editing),并提示您选择已在本体中配置的用于修改显示对象类型的操作。在下面的示例中,通过航班警报:内联编辑(Flight Alert: Inline Editing)操作启用了内联编辑。在操作选择器下方,操作参数通过显示的下拉菜单映射到表格列。您还可以将变量作为操作参数传递,这些参数将自动传递到操作中,而无需用户编辑表格中的字段。
完成上述配置后,用户可以通过表格页脚中可见的编辑表格(Edit table)按钮进入编辑模式。您可以使用自定义按钮文本(Custom button text)输入字段编辑此按钮文本。您还可以通过启用默认启用编辑模式(Enable edit mode by default)选项,使表格始终处于内联编辑模式。进入编辑模式后,用户可以编辑任何映射到操作参数的可修改列,如下所示。对于函数支持的操作,用户可以一次暂存最多20行的编辑;对于非函数支持的操作,最多可暂存200行。任何暂存的编辑都可以使用![]() 撤销(Undo)按钮(如下面截图中表格最左侧列所示)撤消。
撤销(Undo)按钮(如下面截图中表格最左侧列所示)撤消。
完成编辑并准备提交更改后,您可以按下表格右下角的提交(Submit)按钮。将出现一个确认对话框,您需要再次按提交(Submit)以提交更改。如果您希望使用一键提交选项并希望禁用此确认对话框,可以启用一键提交(One-click submit)开关。
自定义右键菜单(Custom right-click menu)
概述
向右键菜单添加自定义行操作允许用户对从对象表格中右键单击的对象运行操作或事件。
配置和使用内联编辑
要向右键菜单添加自定义行操作,请在右键菜单(Right-click menu)部分启用自定义右键菜单(Customize right-click menu)开关。将此开关设置为true将提示您创建一个右键单击对象,该对象输出表格中当前右键单击的对象。然后,您可以通过选择添加项目(Add item)向菜单添加自定义项目。
当您选择添加项目(Add item)时,将出现一个新菜单(如下面截图所示),您可以在其中自定义菜单项在右键菜单中的显示方式。您还可以通过从点击时(On click)下拉菜单中选择一个选项来为菜单项分配一个操作。这允许您选择菜单项是触发操作还是事件。此外,您可以在操作或事件中使用之前设置的右键单击对象。
配置完成后,当您在对象表格中右键单击一行时,您将看到您的更改。